

Page 1
Gerber Solara ion
UV Ink Jet Printer
Owner’s Guide
V ™
4/29/10 Rev G
Page 2
Solara ionV Print Modes
User Selectable Print Modes Print
Throughput
(4' x 8' sheet)
Performance (2 Pass, Bidirectional) 181 ft2 / hr 11 min - Performance (2 Pass, Unidirectional) 125 ft2 / hr 15 min 36 ft2 / hr 53 min
Production (4 Pass, Bidirectional) 107 ft2 / hr 18 min - Production (4 Pass, Unidirectional) 70 ft2 / hr 27 min 18 ft2 /hr 107 min
High Quality (8 Pass, Bidirectional) 55 ft2 / hr 35 min - Ultra-High Quality (8 Pass, Unidirectional) 33 ft2 / hr 58 min 9.5 ft2 / hr 202 min
Approximate
Print Time
(4' x 8' sheet)
360 x 360 720 x 720
Print
Throughput
(4' x 8' sheet)
Approximate
(4' x 8' sheet)
Print Time
Warranty
Please see Product Specifications for required operating environment and consult your
Owner’s Guide for required preventative maintenance procedures.
Additional Documentation
Further documents, and updates to current documentation, will be available with each
new firmware release. For the most up-to-date literature, contact your Gerber Service
representative or check the eService Document Library which can be accessed from the
Support section of the Gerber web site: www.gspinc.com.
4/29/10 Rev G
Page 3

Copyright Notice
COPYRIGHT 2010 Gerber Scientific International, Inc. All Rights Reserved.
This document may not be reproduced by any means, in whole or in part, without written
permission of the copyright owner.
This document is furnished to support the Gerber Solara ion
of the furnishing of the information contained in this document, the party to whom it is given
assumes its custody and control and agrees to the following:
The information herein contained is given in confidence, and any part thereof shall not be
copied or reproduced without written consent of Gerber Scientific International, Inc.
This document or the contents herein under no circumstances shall be used in the manufacture
or reproduction of the article shown and the delivery of this document shall not constitute any
right or license to do so.
Information in this document is subject to change without notice.
Printed in USA
Gerber Solara ion, GerberCAT, Cold Fire Cure Technology, FastFacts, ImageRIP, OMEGA, Support First,
and Matched Technology System are trademarks and GSP is a registered trademark of Gerber Scientific
Products. Onyx and PosterShop are registered trademarks and ProductionHouse is a trademark of Onyx
Graphics. X-ACTO is a registered trademark of Hunt Corporation. Anticon is a registered trademark of
Milliken & Company. Firefox is a registered trademark of Mozilla. Microsoft, Internet Explorer,
Windows, and Windows XP are registered trademarks of Microsoft in the USA and other countries.
Wasatch SoftRIP is a registered trademark of Wasatch Computer Technology. SignLab is a trademark of
CADlink Technology Corporation. Flexi and PhotoPrint are trademarks of SA International, Inc.
V
Ink Jet Printer. In consideration
4/29/10 Rev G
Page 4

FCC Compliance
Warning: Changes or modifications to this unit not expressly approved by the party responsible
for compliance could void the user’s authority to operate the equipment.
Note: This equipment has been tested and found to comply with the limits for a Class A digital
device, pursuant to Part 15 of the FCC rules. These limits are designed to provide reasonable
protection against harmful interference when the equipment is operated in a commercial
environment. This equipment generates, uses, and can radiate radio frequency energy and, if
not installed and used in accordance with the instruction manual, may cause harmful
interference to radio communications. Operation of this equipment in a residential area is likely
to cause harmful interference in which case the user will be required to correct the interference
at their own expense.
This Class A digital apparatus complies with Canadian ICES-003.
Cet appareil numérique de la classe A est conforme à la norme NMB-003 du Canada.
4/29/10 Rev G
Page 5

Contents
Quick Print Checklist................................................................................................................ 10
Chapter 1: Introduction........................................................................................................... 11
In this manual.........................................................................................................................................12
Conventions used in this booklet ........................................................................................................12
Safety information .................................................................................................................................13
Electrical...............................................................................................................................................13
Ink handling and disposal.................................................................................................................13
Printer ventilation...............................................................................................................................14
Personal precautions ..........................................................................................................................14
UV lamp precautions .........................................................................................................................14
Technical support ..................................................................................................................................14
Additional sources of information ...................................................................................................14
Chapter 2: Product Overview ................................................................................................. 15
General requirements............................................................................................................................15
Size and weight...................................................................................................................................15
Ambient conditions ............................................................................................................................16
Power requirements ...........................................................................................................................16
Printer orientation...............................................................................................................................17
Locating the serial number................................................................................................................17
Computer and software requirements.............................................................................................18
UV bulb technology...............................................................................................................................18
UV ink technology.................................................................................................................................19
Storing inks and materials....................................................................................................................19
UV ink storage.....................................................................................................................................19
Material storage ..................................................................................................................................20
Gerber Solara ion control panel ...........................................................................................................20
Main control panel..............................................................................................................................21
Auxiliary keypad................................................................................................................................21
Control Panel keys..............................................................................................................................22
Power-up functions ............................................................................................................................24
Exploring the printer's menu system..................................................................................................24
Status..........................................................................................................................................25
Setup..........................................................................................................................................25
Calibration ................................................................................................................................25
Maintenance..............................................................................................................................26
The Gerber Solara ion web pages ........................................................................................................27
Starting and stopping the printer ........................................................................................................27
Firmware startup and internal diagnostics.....................................................................................28
Automatic ink level check .................................................................................................................28
Automatic printhead cleaning check ...............................................................................................28
Sleep/Idle mode .................................................................................................................................28
Emergency Stop ..................................................................................................................................29
4/29/10 Rev G
Page 6

Chapter 3: Setting up the Gerber Solara ion...................................................................... 31
Networking your Gerber Solara ion printer ......................................................................................31
Setting fixed (static) network addresses..........................................................................................31
Setting the IP Address and Subnet Mask of your computer.........................................................33
Checking network connections............................................................................................................37
Viewing the current network settings.................................................................................................37
Chapter 4: Loading Inks and Materials ............................................................................... 39
Loading the inks.....................................................................................................................................39
Checking the ink level........................................................................................................................40
Replacing ink pouches when ink remains in the reservoir...........................................................40
Replacing an ink pouch when the reservoir is empty ...................................................................42
Loading the material .............................................................................................................................42
Printer/graphic orientation...............................................................................................................44
Choosing a material type...................................................................................................................45
Normalizing material.........................................................................................................................46
Cleaning material................................................................................................................................46
Using material hold-down devices for roll material......................................................................48
Loading roll material in the Roll-to-Roll configuration....................................................................49
Using the material roller....................................................................................................................50
Loading roll material into the printer..............................................................................................51
Using the winding unit......................................................................................................................52
Removing material from the winding unit and printer ................................................................54
Loading rigid material ..........................................................................................................................55
Uniform Print Gap & Elimination of Gap Between Prints............................................................56
Understanding printing margins.........................................................................................................59
Chapter 5: Printing Jobs on the Gerber Solara ion........................................................... 61
Using RIP software and profiles..........................................................................................................61
Print mode options ................................................................................................................................61
Printer operations ..................................................................................................................................62
UV lamp automatic shut-off or Continuous mode ........................................................................62
Lamp Delay mode ..............................................................................................................................62
Lamp Spec mode.................................................................................................................................63
Large Field mode ................................................................................................................................64
Step Blending mode ...........................................................................................................................64
X Gantry Adjustment .........................................................................................................................65
UV lamp warm-up..............................................................................................................................66
Sleep/Idle mode .................................................................................................................................66
Automatic spitting to clear the nozzles ...........................................................................................66
Cleaning the printheads.....................................................................................................................67
Pausing a job due to data starvation................................................................................................67
Choosing a print mode for Roll-to-Roll printing...............................................................................67
Single mode .........................................................................................................................................67
Continuous mode ...............................................................................................................................67
Viewing job information at the printer...............................................................................................68
Printing a single Roll-to-Roll or Flat Bed job......................................................................................69
Media feed adjustment on a Roll-to-Roll job ..................................................................................71
Printing a full bleed Flat Bed job .........................................................................................................72
Printing double-sided, full-bleed......................................................................................................73
Printing multiple Roll-to-Roll jobs in Continuous mode .................................................................75
Canceling a job .......................................................................................................................................77
4/29/10 Rev G
Page 7

Chapter 6: Routine Printer Maintenance ............................................................................ 78
Required routine maintenance supplies.............................................................................................78
Gerber Solara ion
V
Regular Preventive Maintenance........................................................................79
Daily maintenance.................................................................................................................................82
Tips for Clean Heads procedure.......................................................................................................82
1) What is the purpose of the Clean Heads procedure?................................................................82
2) How hard do I press the Anticon-covered swab against the surface of the printhead nozzle plate?
...............................................................................................................................................................82
3) How can I be sure my clean was effective?.................................................................................82
4) Why do I lose nozzles? ..................................................................................................................82
Clean Heads Procedure......................................................................................................................84
End of Day Clean................................................................................................................................86
Cleaning the sliding UV shield and side plates..............................................................................88
Cleaning individual color printheads..............................................................................................91
Emptying and cleaning the waste ink tray......................................................................................93
40 Hour Maintenance............................................................................................................................95
Periodic Maintenance Process to correct angled nozzles on the Gerber Solara ion......................95
Materials needed.................................................................................................................................95
Process overview ................................................................................................................................95
Cleaning the flat bed ..........................................................................................................................97
Cleaning the roll-to-roll platen..........................................................................................................97
Cleaning the head access door..........................................................................................................97
Cleaning the ink drawers...................................................................................................................98
Cleaning the Maintenance Shelf Mat ...............................................................................................98
Cleaning the outside of the Gerber Solara ion................................................................................98
Monthly maintenance ...........................................................................................................................99
Six month maintenance.......................................................................................................................100
Cleaning the table rails.....................................................................................................................100
Cleaning the Roll-to-Roll grit wheels.............................................................................................100
Cleaning the Roll-to-Roll rubber drive wheels.............................................................................101
Yearly maintenance .............................................................................................................................101
Replacing the light shields (flaps) ..................................................................................................101
Purging ink lines to remove air..........................................................................................................102
Clearing the ink lines...........................................................................................................................106
Filling the ink lines ..............................................................................................................................109
Preparing a printer that will not be used for up to two weeks......................................................113
Steps for preparing the Solara ion for two weeks of idle time ...................................................113
Steps for restarting the Solara ion after two weeks of idle time.................................................113
Shutting down the printer for more than two weeks .....................................................................114
Steps for shutting down the Solara ion..........................................................................................114
Steps for restarting the Solara ion...................................................................................................114
Steps for shutting down your Solara ion.......................................................................................114
Steps for restarting your Solara ion................................................................................................123
Chapter 7: Gerber Solara ion Web Pages.......................................................................... 124
Accessing the Gerber Solara ion web pages.....................................................................................124
Home page............................................................................................................................................125
System Status page ..............................................................................................................................125
System Status page ..............................................................................................................................126
System Settings page...........................................................................................................................127
Changing the printer name .............................................................................................................127
Changing the System Log Level.....................................................................................................127
4/29/10 Rev G
Page 8

Choosing the numeric units ............................................................................................................128
Choosing the language.....................................................................................................................128
Setting the Lamp Delay mode.........................................................................................................128
Setting the Lamp Spec Mode...........................................................................................................128
Setting Large Field mode.................................................................................................................128
Setting Step Blending mode ............................................................................................................128
Network Settings .................................................................................................................................129
Using Static Settings.........................................................................................................................129
Other settings ....................................................................................................................................130
Job Status page .....................................................................................................................................130
Diagnostics page ..................................................................................................................................131
Restoring Factory Default Settings.................................................................................................132
Version Information .........................................................................................................................133
View System Log ..............................................................................................................................134
View Satellite Log.............................................................................................................................135
Sensors................................................................................................................................................136
Configuration Info page...................................................................................................................138
USB Test page....................................................................................................................................138
Statistics..............................................................................................................................................140
Error History page............................................................................................................................141
Calibration web page ..........................................................................................................................142
X Gantry Adjustment .......................................................................................................................143
Y Carriage Steps/Inch—Y Encoder Calibration...........................................................................144
Calibrating the location of a printed image (Print Pos Offset Front and Side) ........................146
Calibrating the printhead park position........................................................................................147
Calibrating Image Quality...............................................................................................................149
Update page..........................................................................................................................................156
Loading firmware upgrades............................................................................................................156
Starting the printer in Bootloader mode........................................................................................160
Downloading new color profiles....................................................................................................161
Contacts web page...............................................................................................................................161
Chapter 8: Troubleshooting.................................................................................................. 163
RIP software issues..............................................................................................................................163
Determining the category of problems .............................................................................................163
Printer issues ........................................................................................................................................164
Printer will not turn on ....................................................................................................................164
Printer is stuck on “Gerber” screen at power-up .........................................................................164
Printer is stuck on “Check the Shelf” screen.................................................................................164
Printer is stuck on “Warming” screen ...........................................................................................164
Job will not print ...............................................................................................................................164
Winder does not roll up the material.............................................................................................165
Material jams when printing...........................................................................................................165
Quality of printed output ...................................................................................................................167
Missing nozzles.................................................................................................................................167
Banding in the flat bed prints..........................................................................................................167
Banding in roll-to-roll prints ...........................................................................................................167
Missing or angled nozzles...............................................................................................................168
The print is blurred...........................................................................................................................169
Smearing or fading in the print.......................................................................................................169
Objects are printing in the wrong place.........................................................................................170
Color balance is different between software and print ...............................................................170
Overlap on a roll-to-roll job.............................................................................................................170
4/29/10 Rev G
Page 9

Small text quality is poor.................................................................................................................170
Ink not curing....................................................................................................................................171
The ink forms small puddles on the print.....................................................................................171
Ink mist at front left corner of material..........................................................................................171
Image easily scratches off the material ..........................................................................................171
Entire print smudges when touched..............................................................................................171
First few inches (50-100cm) of the job is not curing.....................................................................172
One side of the print is not curing well .........................................................................................172
Job data errors ......................................................................................................................................173
Data errors and interruptions during printing.............................................................................173
Incorrect data is printing .................................................................................................................173
Objects are printing in the wrong place.........................................................................................173
Prints are not the correct size ..........................................................................................................174
Left edge of job is inconsistently located.......................................................................................174
Printer does not always start in same location .............................................................................174
The printer pauses between passes................................................................................................174
Messages ...............................................................................................................................................174
Error Messages.....................................................................................................................................178
Running the control panel screen test...............................................................................................180
Printer Menu Tree – Rev G Version .................................................................................... 182
Index .......................................................................................................................................... 184
4/29/10 Rev G
Page 10

Quick Print Checklist
After you have setup your Gerber Solara ion for the first time, use this checklist
to help guide you through the steps required for getting the machine ready for printing.
Refer to the page numbers provided next to each step for more information.
1 Check the Ink Level by pressing the Ink Level button on the control
panel.
(Replace ink pouches if necessary)
2 Clean the heads. (Repeat every 4 hours of printing and after 2 hours of idle
time, and at start and end of each day.)
3 Prep the material.
(Normalize and clean for best results)
4 Select material type if equipped with the Roll-to-Roll option. (Roll-to-
Roll (Single or Continuous) or Flat)
5 Load the material.
(Roll-to-Roll or Flat)
6 Adjust the UV shield for flat material or adjust the material hold-
downs for roll-to-roll material.
Using your selected RIP software
7 Open, adjust, and arrange your image(s).
8 Select the appropriate material profile and page size.
9 Select the print quality.
(2 pass, 4 pass, or 8 pass)
10 Send the job to the printer.
11 View job information to confirm that the correct material is loaded.
12 Press Run Job to begin printing your job.
13 UV Lamp warm-up.
(If lamps are not to proper temperature.)
14 Job will begin printing.
p. 40
p. 84
p. 46
p. 45
p. 42
p. 49 or 55
p. 61
p. 61
p. 61
p. 69
p. 68
p. 69
p. 18
p. 69
4/29/10 Rev G
Page 11

11
Chapter 1: Introduction
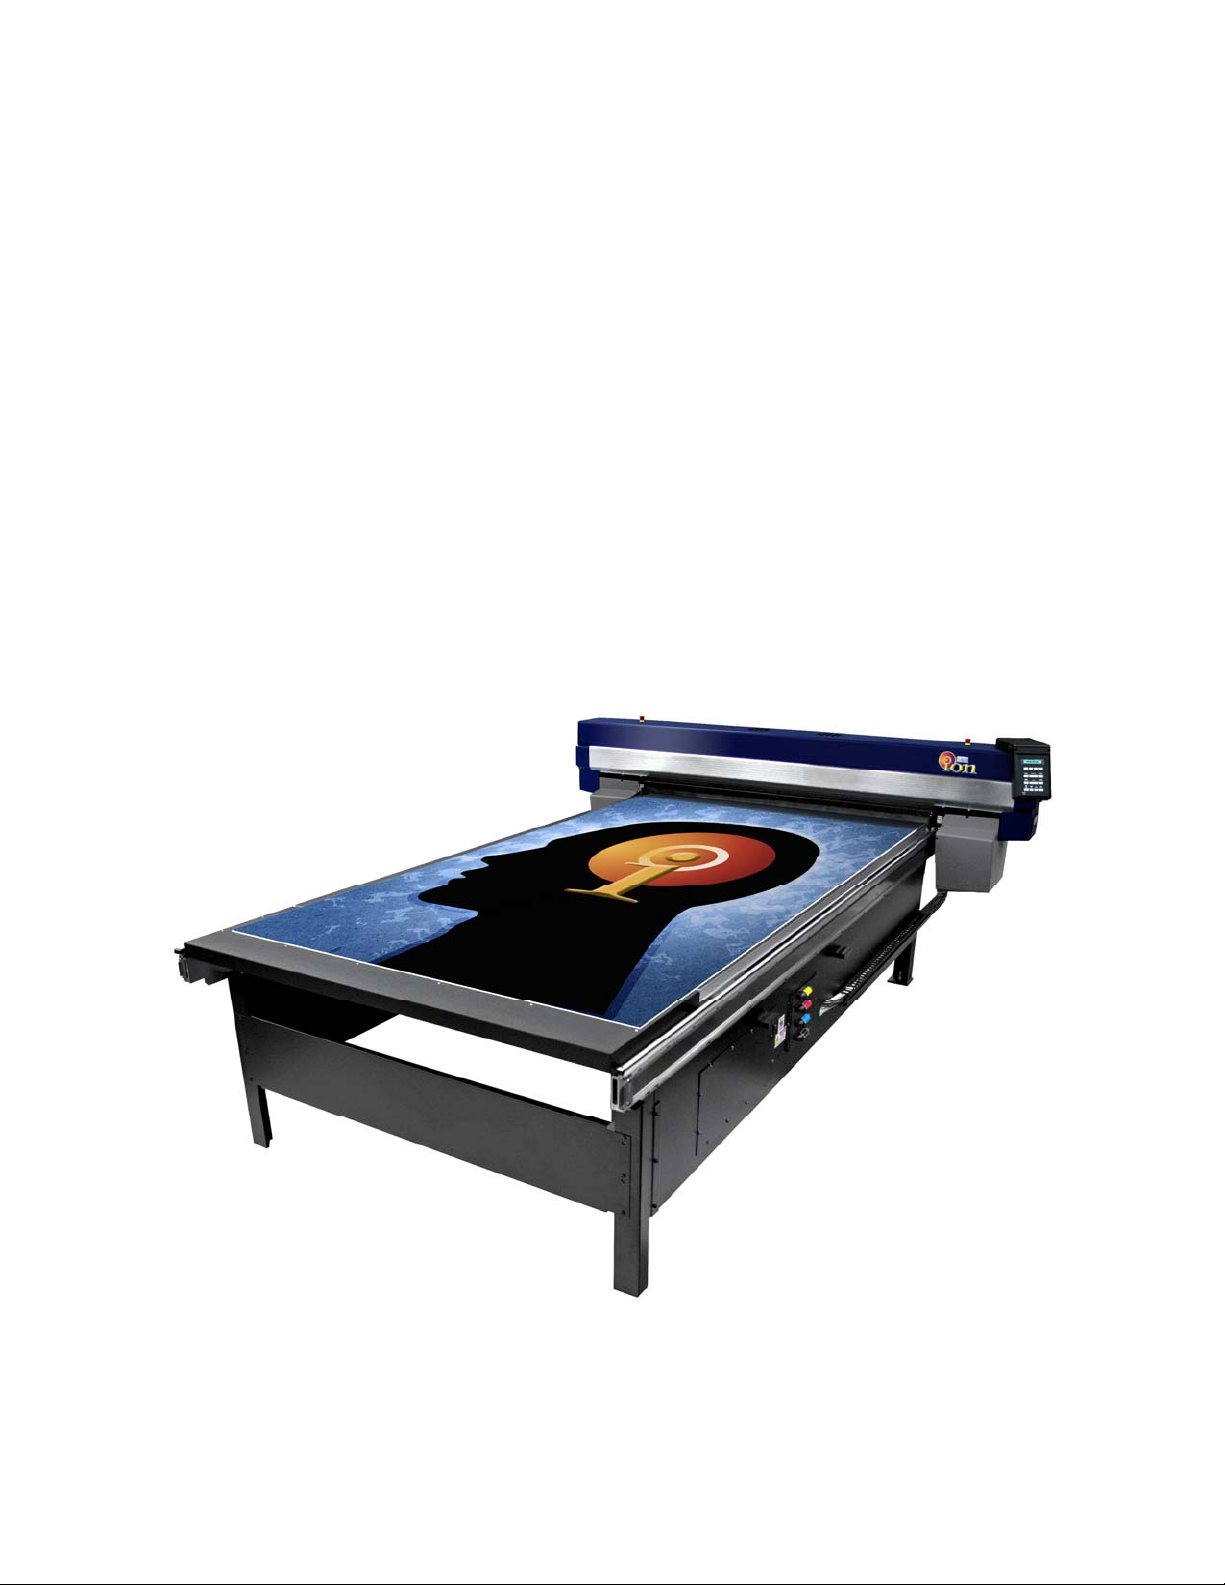
Thank you for purchasing the Gerber Solara ionV™, an outdoor-durable, UV-cured ink jet
printer. The Gerber Solara ion’s versatile printing methods allow shops to meet diverse
customer needs. The printer has a generous flatbed which accommodates large jobs with ease. It
can print on rigid materials such as foam board, corrugated plastic, polycarbonate, expanded
PVC, aluminum, or MDO, as well as flexible materials such as banner, vinyl, and backlit. In
addition, you have the option of printing full-bleed.
If you have chosen to add a roll-to-roll option, the printer can accommodate flexible materials
such as banner, vinyl, and backlit. In addition the roll-to-roll option expands the length of the
flatbed to 120" (3m/304.8cm).
The Gerber Solara ion
variety of materials which meet the following standards:
produces all kinds of durable, outdoor or indoor graphics on a wide
Maximum rigid or roll material width is 64" (1.6m/162.6cm).
Maximum rigid material thickness is 1" (25.4mm).
Maximum rigid material length for the roll-to-roll configuration is 120" (3m/304.8cm).
Maximum rigid material length for the flatbed-only configuration is 100"
(2.5m/254cm).
Maximum rolled material thickness is 0.030" (0.76mm).
Minimum rolled material width is 24" (61cm).
Minimum sheet size is 12" x 12" (30.5cm x 30.5cm).
The Gerber Solara ion printheads use multiple-drop technology to provide vivid colors and an
expanded color gamut. The printer has several print modes to maximize throughput or quality.
The printing rate varies based on the selected print mode and the chosen material profile (as
determined by the RIP software).
Gerber’s exclusive GerberCAT™ ultraviolet ink set includes four colors - Cyan, Magenta,
Yellow, and Black, which achieve an outstanding color gamut and brilliant hues. The cationic
inks are cured using Gerber's proprietary Cold Fire Cure™ technology. This low energy, low
temperature cure creates a mechanical bond between the ink and the substrate, providing better
abrasion resistance and eliminating adhesion loss which can occur with vinyl graphics. The
low-temperature cure also greatly expands the range of materials that can be printed by the
Gerber Solara ion. Heat sensitive plastic, vinyl, fabric, and paper-based materials can be printed
using Gerber's Cold Fire Cure and GerberCAT inks without concern over ink adhesion or
material damage.
The Gerber Solara ion inkjet printer is part of Gerber’s Matched Technology System™ which
provides users with a complete, integrated solution from start-to-finish.
4/29/10 Rev G
Page 12

CHAPTER 1
Introduction
12
In this manual
The following chapters introduce you to the Gerber Solara ion, describe the printing process,
and show you how to maintain your printer for maximum quality output.
Chapter 1: Introduction provides details on how to use this manual and important customer
service and safety information.
Chapter 2: Product Overview provides details of the general product features and requirements
and describes the control panel and menu structure as well as the startup sequence.
Chapter 3: Setting up the Gerber Solara ion directs you in setting up the Gerber Solara ion to
run on a network and other user-controlled options.
Chapter 4: Loading Inks and Materials directs you in loading the Gerber Solara ion ink and
installing materials.
Chapter 5: Printing Jobs on the Gerber Solara ion describes how to print on either flexible or
rigid material with RIP software.
Chapter 6: Routine Printer Maintenance details cleaning and purging of printheads as well as
the daily, weekly and monthly maintenance routines.
Chapter 7: Gerber Solara ion Web Pages describes the onboard web interface program that can
be used to check on the printer's current status and ink status, to view or change system and
network settings, view message logs, assist in diagnostics, and to install new firmware.
Chapter 8: Troubleshooting highlights potential printing problems and provides possible
solutions. The Messages section list common messages that may display on your control panel
screen and their meaning.
Menu Tree provides a visual layout of the Gerber Solara ion printer's menu.
Preventive Maintenance chart is a handy reference for the routine preventive maintenance tasks
and scheduled service procedures.
Conventions used in this booklet
The following conventions are used in this booklet:
WARNING: A warning statement contains information which, if not followed,
could result in electrical shock hazard.
CAUTION: A caution statement contains information which, if not followed, could
result in personal injury or equipment damage.
NOTE: A note contains important information that affects the successful completion of a task.
TIP: A tip contains a suggestion to make your task easier or to remind you of something that
may appear elsewhere in the booklet.
4/29/10 Rev G
Page 13

CHAPTER 1
Introduction
Safety information
Electrical
WARNING: Observe these safety precautions to avoid possible electrical shock
hazard when using the Gerber Solara ion.
Use the correct power cord; do not use a damaged power cord.
Use an outlet with a ground terminal or electric shock can occur.
Turn printer off and unplug it from the power source before servicing.
Unplug any communications cables before servicing.
Never open covers affixed by screws unless directed by Gerber service personnel.
Doing so may result in electric shock or damage to the printer.
Remove any electrostatic charge from your clothing or body by touching a metal part
of the printer before servicing. Electronic components (such as memory) may
malfunction if exposed to electrostatic charge.
13
Industrial rubber mats are required under and around the printer if it is installed on
carpeting.
Ink handling and disposal
CAUTION: Observe these general safety precautions when operating the Gerber
Solara ion
CAUTION: Use impervious gloves to protect your hands. Nitrile gloves of no less
than 8 mils have proven impervious for one hour of exposure. Gloves should be
disposed of after one hour of exposure time. Wear goggles to protect your eyes.
Dispose of used swabs, wipes, and gloves according to local laws and regulations.
Do not use inks other than GerberCAT inks. Using other inks will void the warranty
and will damage the printer.
Consult the Gerber CAT ink MSDS for proper handling, disposal, and safety
recommendations. Also consult local laws and regulations.
Do not open ink pouches. Ink could get on your skin or in your eyes.
When handling ink pouches and waste ink, be careful that the ink does not get on your
skin by wearing impervious nitrile gloves. If it does, wash your skin with mild soap
and water for 15 minutes. Seek medical attention if symptoms occur.
Ink Jet Printer.
If your clothing comes in contact with uncured ink, remove any contaminated clothing
and wash them separately with soap and water.
If ink gets in your eyes, immediately rinse your eyes with copious amounts of water
for at least 15 minutes and seek medical attention immediately.
Dispose empty ink pouches, waste ink, wipes, used swabs and gloves according to
local laws and regulations.
4/29/10 Rev G
Page 14

CHAPTER 1
Introduction
Printer ventilation
CAUTION: Observe these general safety precautions when operating the Gerber
Solara ion
Do not obstruct printer exhaust fans.
Ink Jet Printer.
Personal precautions
CAUTION: Observe these general safety precautions when operating the Gerber
Solara ion
There are two emergency stop switches located on either end of the gantry. Press
either switch to immediately shut down the UV lamps and abort printing.
Be careful when reaching into the printer to open the maintenance shelf, or swab the
printhead. The UV lamp assemblies and interior surfaces of the printer may be hot.
Be careful not to pinch fingers in drawers, pinch wheels, and material feed system.
Use caution when lifting heavy rolls or pieces of material.
Ink Jet Printer.
14
UV lamp precautions
UV WARNING
Exposure to UV light can be dangerous to eyes and skin and should be avoided.
Never operate the Gerber Solara ion with any of the covers removed.
Never operate the printer with the rubber light shields (flaps) missing or damaged.
Contact Gerber if any of the rubber light shields (flaps) need to be replaced.
Technical support
If you have questions regarding using, maintaining, or troubleshooting the Gerber Solara ion
please contact your Gerber distributor or Gerber Service.
Additional sources of information
Gerber FastFacts provides answers to technical and service questions. FastFacts are available
on the Gerber web site: www.gspinc.com under “Support.”
phone: 800-828-5406 / 860-643-1515, ext. 8602
fax: 860-871-3862
e-mail: gspservice@gspinc.com
www.gspinc.com
Electronic versions of this manual and other documentation are available from the eService
Document Library which can be accessed from the Gerber web site: www.gspinc.com under
“Support.” You must sign up for a free customer account to access the eService location.
4/29/10 Rev G
Page 15

15
Chapter 2: Product Overview
General requirements
The following sections provide an overview of Gerber Solara ion size, weight, and
recommended operating conditions.
Size and weight
You must have enough room to maneuver the packed Gerber Solara ion to its final location
where you can unpack and assemble it.
CAUTION: The Gerber Solara ion is packaged in several crate assemblies that vary
based on the printer’s configuration. The customer is responsible for providing
appropriate equipment (fork lift or palette jack with extended forks) for unloading
and moving the system into place. If a loading dock is not available, you must have
a forklift capable of unloading the system from the back of the delivery truck. The
fork lift must be able to lift 1,100 lbs. (499kg) and needs extended forks which are at
least 8 feet (2.5m). If this equipment is not available or the system requires
movement to an upper floor, riggers or special equipment will be required. This is
the responsibility of the customer.
Crate # Flatbed-only Configuration Crated Size Crated Weight
1 140" long x 35.25" wide x 78" high (356cm cm x 89cm x 198cm) 1,043 lbs. (473kg)
2 119" long x 35.25" wide x 52" high (302cm x 89cm x 132cm ) 850 lbs. (386kg)
Flatbed-only Configuration Uncrated Size Uncrated Weight
147" long x 104" wide x 52" high (373cm x 264cm x 132cm) ~1,000 lbs. (454kg)
Crate # Roll-to-Roll Configuration Crated Size Crated Weight
1 140" long x 35.25" wide x 78" high (356cm cm x 89cm x 198cm) 1,100 lbs. (499kg)
2 119" long x 35.25" wide x 52" high (302cm x 89cm x 132cm ) 850 lbs. (386kg)
3 75.5" long x 35.25" wide x 32" high (192cm x 89cm x 81cm) 280 lbs. (127kg)
Roll-to-Roll Configuration Uncrated Size Uncrated Weight
148" long x 104" wide x 52" high (376cm x 264cm x 132cm) ~1,000 lbs. (454kg)
4/29/10 Rev G
Page 16

CHAPTER 2
Product Overview
16
Ambient conditions
The Gerber Solara ion 12 month product warranty requires the printer to be maintained in a
specific environment. If the system is operating outside of the environmental specifications, it
may result in system errors and/or shutdown. During the colder months of the year, especially
in dryer climates, be cognizant of the required environmental conditions (40% humidity
minimum/65F (18.5C) minimum). The operating environment must meet the following
conditions:
Temperature: 65F to 75F (18.5C to 24C)
Humidity: 40% - 60%, non-condensing
Ventilation: no special ventilation required
Avoid using printer near open windows, outside doors, or heating/cooling systems
Protect printer and ink pouches from moisture, dust, drafts, and direct sunlight
Noise level when operating vacuum table: ~77-78 Db
Note: Installations in which the Gerber Solara ion will be placed on carpeting require the use of
commercial or industrial rubber mats under and around the printer. This is to guard against
excessive static electricity potentially interrupting system operation.
Note: If you turn down the heat at night to a lower temperature than the specified operating
temperature, allow time for the printer and its internal components to warm to the proper
temperature before printing. Depending on the environment it may take several hours for the
dense metal components and ink in the system to warm to the specified operating temperature.
Power requirements
Gerber recommends that you leave the Gerber Solara ion powered on at all times. Do not turn
the printer off, even for extended periods of down time. If the printer will not be in use for
longer than two weeks, you must follow the special procedures described in “Shutting down
the printer to more than two weeks” on page 114.
Domestic: Dedicated 230/240 VAC circuit at 50-60Hz, single phase,
20 Amps continuous. Measured at the Solara ion: 230 VAC +/- 10%.
The Gerber Solara ion power cord comes with a NEMA 6-20P
plug and requires the matching NEMA 6-20R receptacle.
International: Dedicated 230/240 VAC circuit at 50-60Hz, single phase,
15 Amps continuous. Measured at the Solara ion: 230 VAC +/- 10%.
The Gerber Solara ion comes with a European CEE 7/7 plug and
requires the matching CEE 7 receptacle. These connectors can be
changed to meet local standards.
4/29/10 Rev G
Page 17

CHAPTER 2
Product Overview
17
CAUTION: 208V lines, while seemingly within the specification range, are not
as robust as 230 V lines and are also subject to +/- 10% current fluctuations. These
below specification fluctuations of 208V lines do not to provide the Gerber Solara
ion with adequate power to consistently cure ink. You must provide a 230 V line.
WARNING: Make sure to connect the power cable only after all of the steps of the
installation procedure have been completed.
Printer orientation
Make note of the orientation of the printer. The end with the maintenance shelf is considered
the front of the printer and the control panel end of the gantry is the left side. Also note that the
right and left sides of the graphic file sent from the RIP software are reversed.
Maintenance shelf
Orientation of
graphic sent
from RIP
software
Control panel
Ethernet
connections
under table
Power switch
Roll-to-Roll (if
so equipped)
Locating the serial number
The printer serial number is located on the gantry. Slew the gantry all the way to the front
(maintenance shelf end) of the printer and look underneath and through the gantry track.
4/29/10 Rev G
Page 18

CHAPTER 2
Product Overview
18
Computer and software requirements
The customer’s computer must have compatible RIP software installed to send print jobs to the
Gerber Solara ion. If the computer is not configured properly, if it does not have a network card,
or if the proper data cable is not used, you can run a test print on the Gerber Solara ion but you
cannot send jobs from the computer.
Gerber-authorized RIP software has been approved to work with the Gerber Solara ion and
GerberCAT inks and qualified materials. Following is a list of approved software at the time of
this document’s printing. Consult the GSP web site www.gspinc.com
Onyx® ProductionHouse™ Gerber Edition, Onyx® PosterShop™ Gerber Edition,
ImageRIP™ Plus by Onyx, or Gerber Solara ion Onyx Driver (necessary for existing
Onyx RIP owners version 6.5 or higher to ensure compatibility with the printer)
ErgoSoft
SAi Flexi™ or PhotoPrint™
CADlink SignLab™
Wasatch SoftRIP®
for an up-to-date listing.
UV bulb technology
UV WARNING
Exposure to UV light can be dangerous to eyes and skin and should be avoided.
Never operate the Gerber Solara ion with any of the covers removed.
Never operate the printer with the rubber light shields (flaps) missing or damaged.
Contact Gerber if any of the rubber light shields (flaps) need to be replaced.
The Gerber Solara ion uses Cold Fire Cure UV technology to instantly and safely cure inks
using low energy and low heat. The UV lamps run the full length of the gantry (approximately
65"/165cm) and provide a very specific wavelength of UV light which cures the GerberCAT
inks. The lamps are enclosed to ensure that the user is protected from exposure to UV radiation.
The UV bulbs require a short warm-up cycle before printing if they are not at operating
temperature. When the lamps reach their operating temperature, the cooling fans automatically
turn on to maintain the proper temperature. Gerber Solara ion UV lamps do not require a cool
down cycle before re-striking.
4/29/10 Rev G
 Loading...