

Page 1
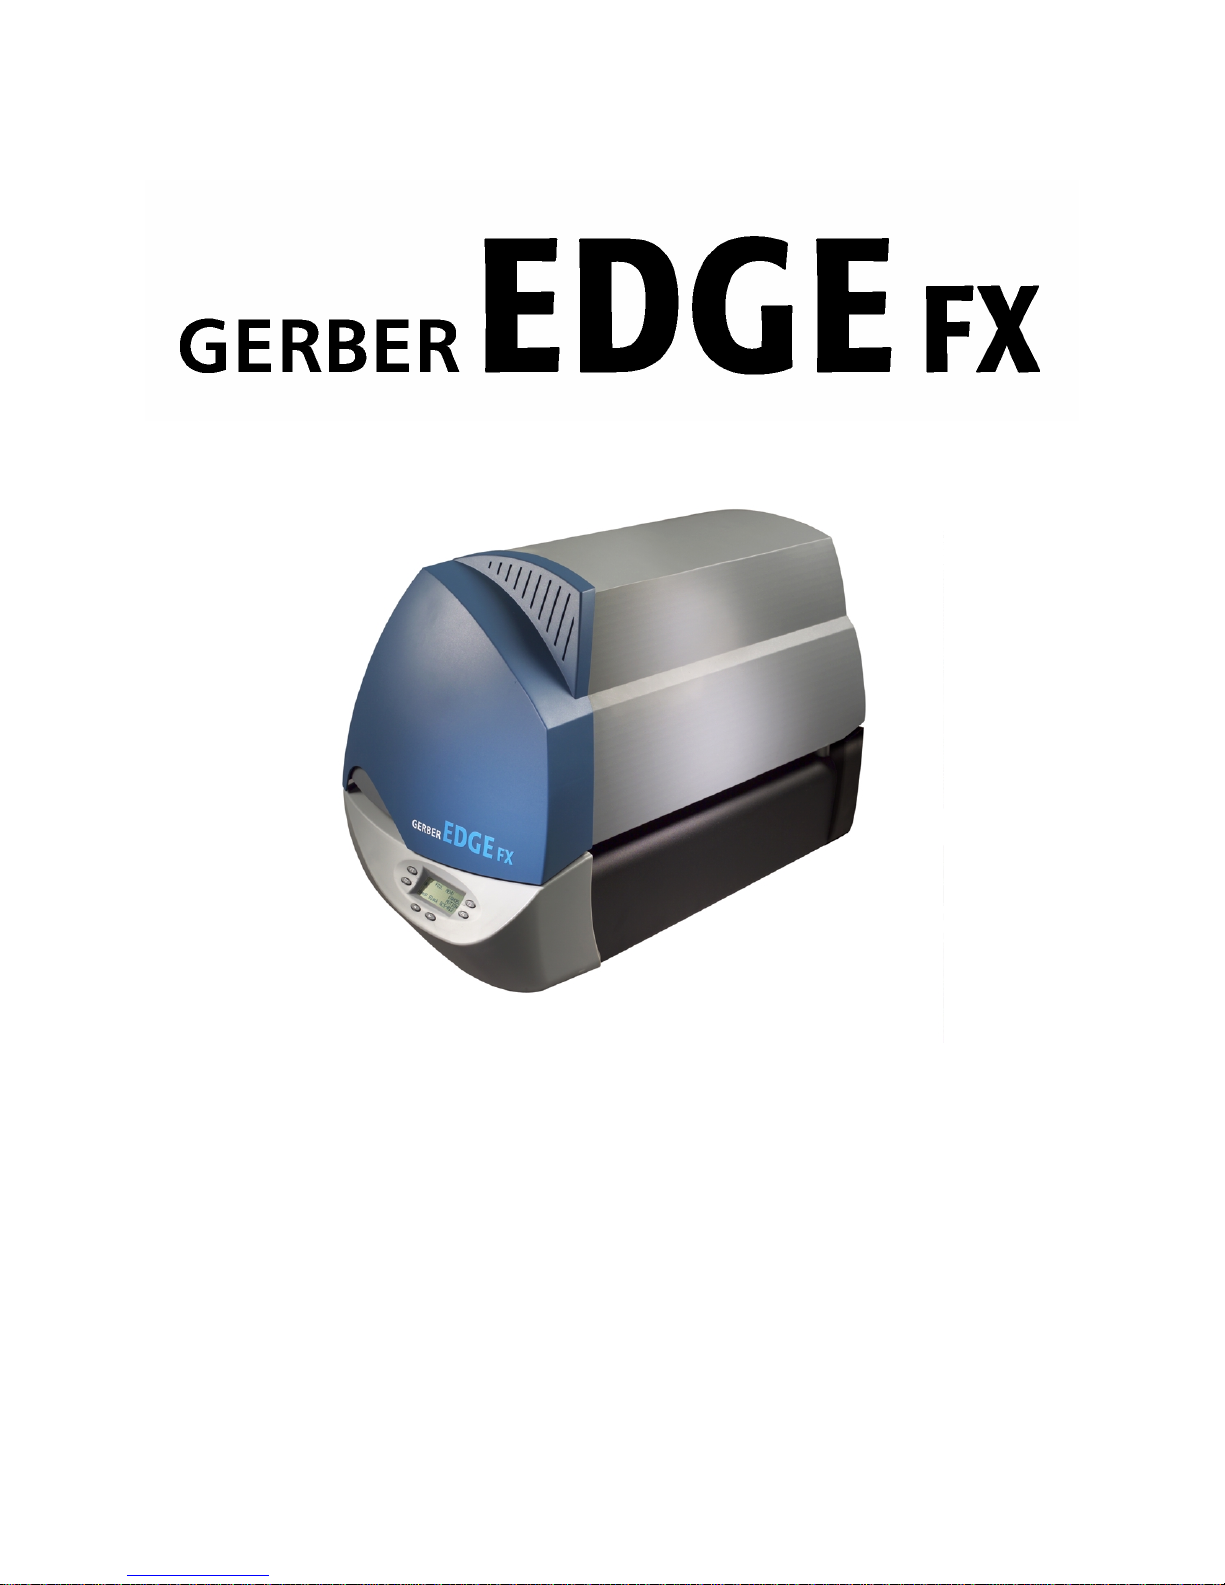
and Installation Guide
Unpacking/Packing
Page 2

Copyright Notice
COPYRIGHT© 2004 Gerber Scientific International. All rights reserved.
This document may not be reproduced by any means, in whole or in part, without written
permission of the copyright owner.
This document is furnished to support the GERBER EDGE FX printer. In consideration of the
furnishing of the information contained in this document, the party to whom it is given assumes
its custody and control and agrees to the following:
1 The information herein contained is given in confidence, and any part thereof shall not be
copied or reproduced without written consent of Gerber Scientific International.
2 This document or the contents herein under no circumstances shall be used in the
manufacture or reproduction of the article shown and the delivery of this document shall not
constitute any right or license to do so.
GERBER EDGE and GSP are registered trademarks and GERBER EDGE FX, EDGE READY,
FastFacts, Support First, and OMEGA are trademarks of Gerber Scientific Products. 3M is a
registered trademark of 3M Corporation.
Page 3

FCC Compliance
Warning: Changes or modifications to this unit not expressly approved by the party responsible
for compliance could void the user’s authority to operate the equipment.
Note: This equipment has been tested and found to comply with the limits for a Class A digital
device, pursuant to Part 15 of the FCC rules. These limits are designed to provide reasonable
protection against harmful interference when the equipment is operated in a commercial
environment. This equipment generates, uses, and can radiate radio frequency energy and, if
not installed and used in accordance with the instruction manual, may cause harmful
interference to radio communications. Operation of this equipment in a residential area is likely
to cause harmful interference in which case the user will be required to correct the interference
at his own expense.
This Class A digital apparatus complies with Canadian ICES-003.
Cet appareil numérique de la classe A est conforme à la norme NMB-003 du Canada.
Page 4

Contents
Chapter 1: Introduct ion.........................................................................................................1
In this manual....................................................................................................................................1
Conventions...................................................................................................................................... 1
Customer support............................................................................................................................. 2
Additional sources of information................................................................................................ 2
Chapter 2 : Unpack ing the GERBER EDGE FX..................................................................... 3
Preparing for installation..................................................................................................................3
Software requirements...................................................................................................................3
Environmental requirements......................................................................................................... 3
GERBEREDGE FX power requirements...................................................................................... 3
Networking requirements............................................................................................................. 3
GERBEREDGE FX sizeand weight.............................................................................................. 4
GERBEREDGE FX space requirements........................................................................................ 4
Storage of materials and foils........................................................................................................ 5
Unpacking the GERBEREDGE FX printer...................................................................................... 6
Contents of the GERBER EDGE FX shipping box........................................................................ 6
Connecting GERBEREDGE FX........................................................................................................ 9
Chapter 3: Conn ec ting the GER BER EDGE FX to t he Computer.................................... 11
Directconnectionto the computer with a crossover cable........................................................ 11
Network connection to a networkhubor switchusing static addresses................................. 12
Network connection to a network router equipped with DHCP.............................................. 13
Usingdirect connection.................................................................................................................. 14
Settingthe network address of the GERBEREDGE FX from the printer keypad ................... 15
Settingthe IP Addressand Network Mask of your computer for direct connection.............. 18
Using network connection with staticaddresses.......................................................................... 22
Setting the IP Address and Network Mask of your computer for connection to a larger
(or existing) network.................................................................................................................... 23
UsingDHCP to assignnetwork addresses.................................................................................... 27
Checking networkconnections ..................................................................................................... .29
Installing Gerber OMEGA 2.1 or higher........................................................................................ 29
Installing the GERBER EDGE FX in OMEGA software................................................................ 30
Chapter 4 : Packin g the GERBER EDGE F X........................................................................33
Packing the GERBER EDGE FX printer......................................................................................... 33
Page 5
1
Chapter 1:
Introduction
In this manual
This manual provides instructions on unpacking and connecting the GERBER EDGE FX™
printer. It also describes repacking procedures that you may need if you wish to ship the
equipment to a new location. Chapters are organized as follows:
Chapter1: Introduction: provides information on how this manual is organized and how to get
help if you need it.
Chapter2: Unpacking the GERBER EDGE FX: gives environmental and physical requirements,
verifies contents of the boxes, and details unpacking and connecting the printer.
Chapter3: Connecting the GERBER EDGE FX to the computer: details how to connect the
GERBER EDGE FX to your computer through a network interface or through a direct
connection.
Chapter4: Packingthe GERBER EDGEFX: describes the repacking procedure in the event that
you need to ship the printer to another location.
Conventions
The following conventions are used in this addendum:
Tip: A tip contains valuable information that could make the task faster or easier.
Note: A n ote contains important information that could affect the successful completion of a
task.
CAUTION: A caution statement contains information which, if not observed, could
result in equipment damage.
WARNING: A warning statement contains information which, if not observed,
could result in personal injury.
Page 6

Chapter 1
2
Introduction
Customer support
If you have questions on unpacking, packing, or installing the GERBER EDGE FX please contact
your Gerber distributor or GSP Technical Support.
phone: 800-828-5406 / 860-644-6971 (Technical Support)
!
"
Additional sources of information
♦ Gerber FastFacts provides answers to technical and service questions. The telephone
fax: 860-648-8376
e-mail: gspservice@gspinc.com (hardware) or
gsptech@gspinc.com (software)
www.gspinc.com
number is 860-648-8040. FastFacts are also available on the web site under “Support.”
♦ If you are a Support First member, use your toll-free assistance number (for more
information about Support First, call 860-644-6971).
Page 7
3
Chapter 2:
Unpacking the GERBER EDGE FX
Preparing for installation
Before unpacking and installing the GERBER EDGE FX, review these software, location, and
environmental requirements.
Software requirements
The GERBER EDGE FX is compatible with Gerber OMEGA™ 2.1 or higher. In addition to the
computer requirements required for network connection, OMEGA software has additional
system requirements regarding computer speed, memory, hard disk space, etc. Please refer to
the OMEGA software literature for current specifications.
Environmental requirements
The GERBER EDGE FX should be installed in a room that is relatively clean and dust-free. The
recommended working environment is as follows:
♦ Operating temperature: 50º to 95º F / 10º to 35º C
♦ Recommended temperature for assured printing accuracy: 68º to 78º F / 20º to 26º C
♦ Operating humidity: 20 to 90% relative humidity, non-condensing (maximum range;
actual range varies by material)
♦ Storage temperature: 14º to 100º F / -26º to 60º C
GERBER EDGE FX power requirements
The GERBER EDGE FX printer requires the following power: 100-240 V AC, 10 Amp, 47-63 Hz
WARNING: All power cables used must meet power requirements.
WARNING: Double pole neutral fusing.
Terminal for connection of protective earthing conductor.
Networking requirements
The GERBER EDGE FX is a network device which has a 10/100 Mbps auto-switch network
interface that can communicate with your computer's 10/100 Mbps network card. (A network
interface board is in most new computers or is readily available for your computer at local
computer stores.) Data needs to be supplied above a minimum rate to prevent printing
anomalies. A GERBER EDGE FX connected directly to a computer via a crossover cable should
Page 8
CHAPTER 2
4
Unpacking the GERBER EDGE FX
function properly using a 10 Mbps (only) interface. When connected to a larger network, you
will obtain more reliable communication when communicating via the 100 Mbps interface. The
10 Mbps interface is not recommended for larger network situations.
There are three ways to connect the GERBER EDGE FX to your computer:
♦ Direct connection to the computer with a crossover cable and static addresses
♦ Network connection to a network hub or switch using static addresses
♦ Network connection to a network router equipped with DHCP
Tip: If your computer is not on a network you can create your own network with a separately
purchased network switch and connect one or more devices to your computer. Your computer
must have a 10/100 Mbps (or auto-switching) network interface board and you will need to
obtain a 10/100 Mpbs Ethernet switch with several ports. Use straight-through Category 5
Ethernet cables with RJ4 5 con n ec tors (or crosso v er cables if the swit c h is aut o - s ens in g ) : o n e
cable to connect the GERBER EDGE FX and the switch and one to connect the computer and
the switch . Th e E t hernet switch, net w or k inter face board , and additional cables are read ily
available at local computer s tores.
See “Chapter 3: Connecting the GERBER EDGE FX to the computer” on page 11.
GERBER EDGE FX size and weight
GERBER EDGE FX Printer
Boxed
Size
Boxed
Weight
38.5" long x 21" wide x 24" high
978 mm x 533 mm x 610 mm
95 lbs
43 kg
Unboxed
Size
Unboxed
Weight
28" long x 16 wide x 19" high
711mm x 406 mm x 483 mm
84 lbs
38 kg
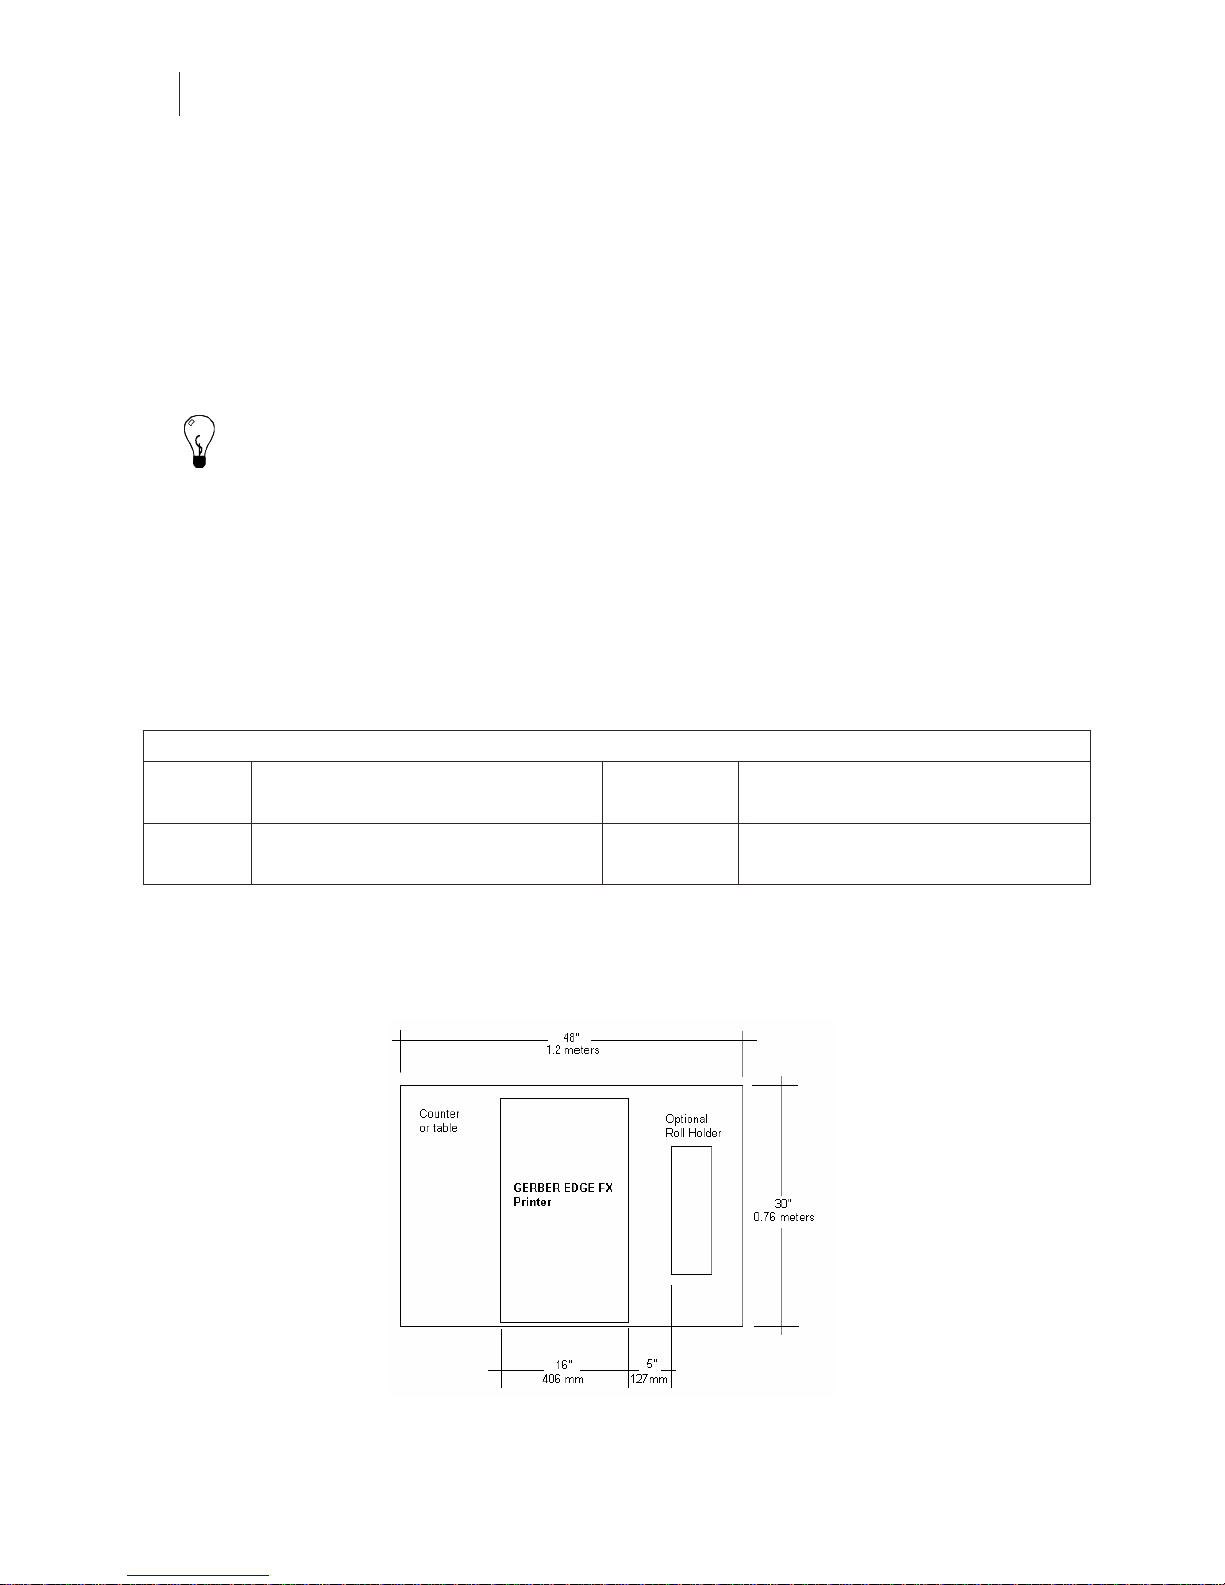
GERBER EDGE FX space requirements
The GERBER EDGE FX is designed to be placed on a table or counter that is at least
30 inches/762 mm deep. See the following illustration for minimum space requirements.
Approximate Space Requirements for GERBER EDGE FX (Measurements are estimates)
Page 9
5
Storage of materials and foils
Plan additional space to store EDGE READY™ materials and GerberColor EDGE FX Foil Inserts
and assembled GERBER EDGE FX Foil Cartridges. Foils must be protected from direct sunlight.
Storing materials
When not in use, the material should be stored in the original plastic bag to protect it from dust
and dirt. Save the original box for long-term storage of material rolls. Never store the material
lying down or loaded in the GERBER EDGE FX, which can leave impressions on the material.
Storin g the foil
Foil Inserts and Cartridge Assemblies must be stored between 40º and 90º F (4º to 32º C), in a
dry environment that is protected from direct sunlight.
Assembled Foil Cartridges should be stored in the original cardboard sleeve.
Foil is especially susceptible to static electricity which can attract dust and dirt. When the Foil
Insert is not installed in the Foil Caddy store it in the original Blister Package. The Foil ID Card
that is used in the Foil Caddy should also be returned to the slot in the Blister Package when
stored. The Blister Packages can be stacked to maximize storage space.
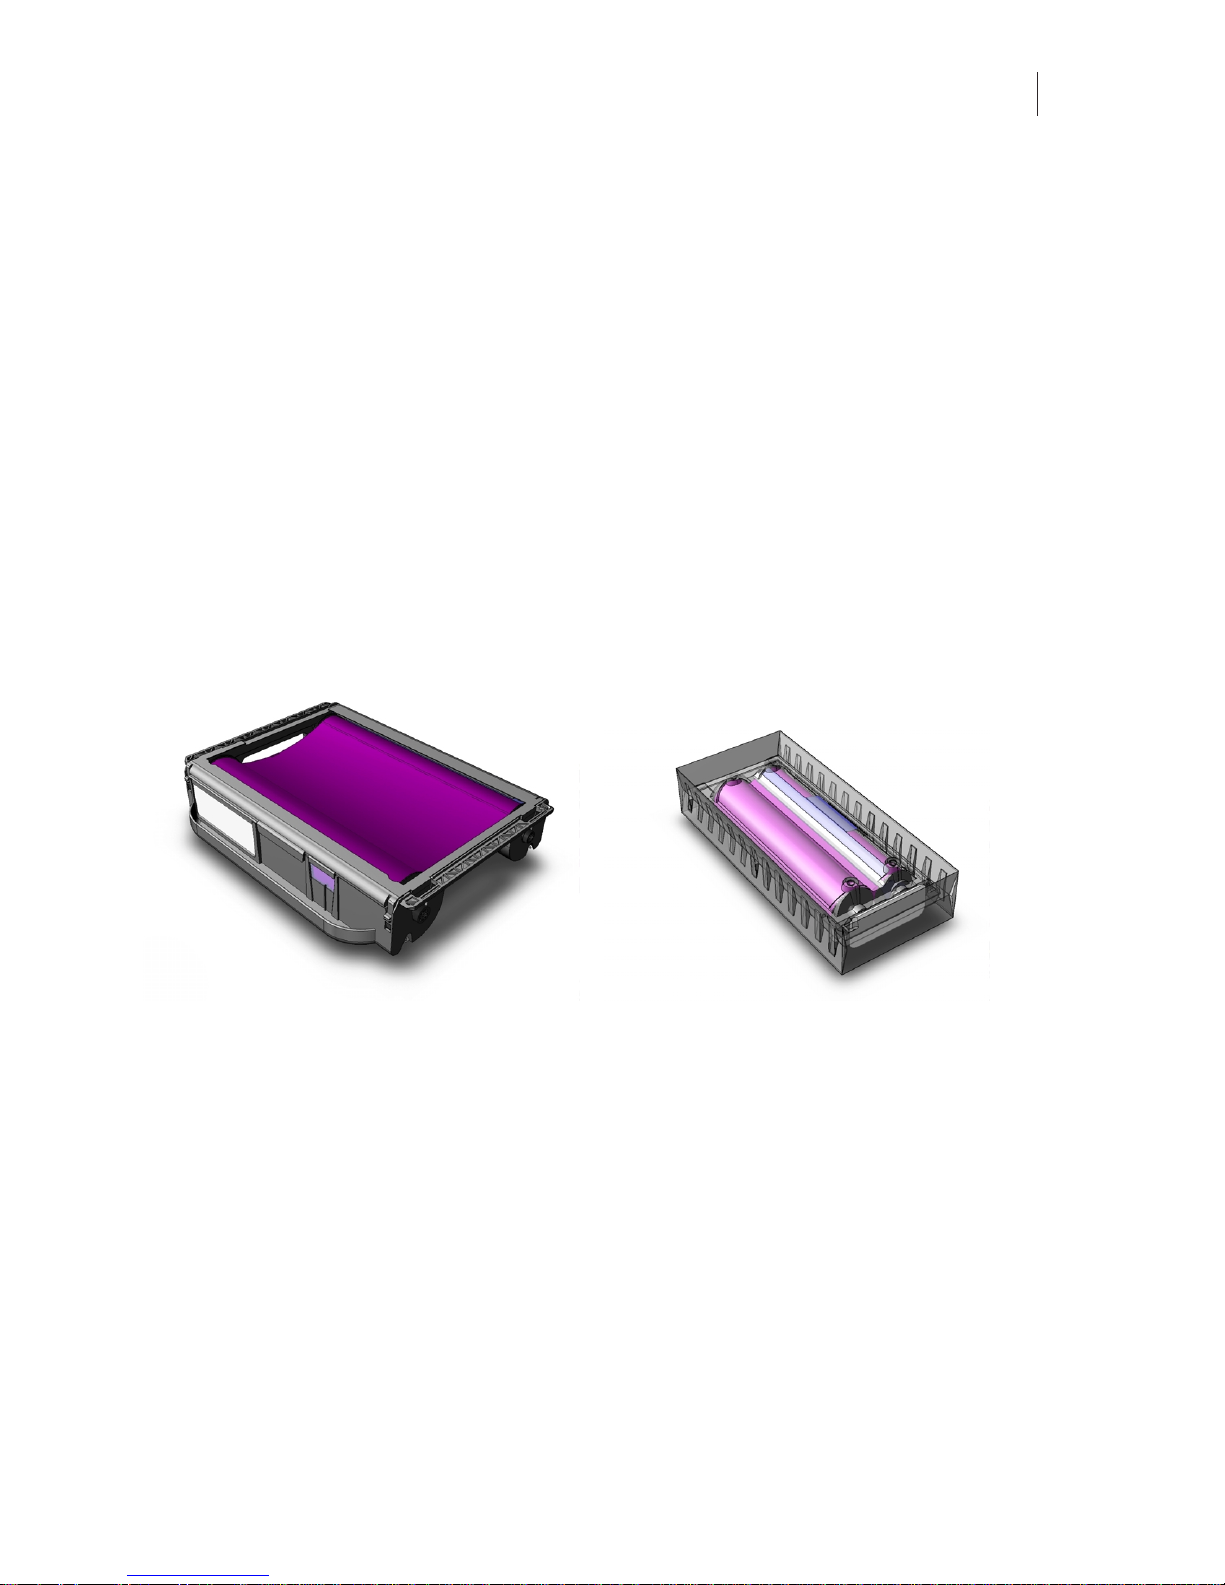
Assembled GERBER EDGE FX Foil Cartridge Foil Blister Package
Page 10

CHAPTER 2
6
Unpacking the GERBER EDGE FX
Unpacking the GERBER EDGE FX printer
The GERBER EDGE FX is shipped from the factory in reusable p ackaging materials. Save these
packaging materials for future use in case you need to ship the GERBER EDGE FX. This
document also includes detailed repacking instructions. Save this important document along
with the packaging materials for future reference.
CAUTION: Failure to repackage the printer with specified packaging materials may
result in damage to the unit during shipping. Always repack the printer as
described in this document. Gerber is not liable for shipping damage due to
improperly packed units. If you do not have the proper packaging materials, call
Gerber Service at 800-828-5406.
Contents of the GERBER EDGE FX shipping box
The GERBER EDGE FX is shipped in a single box which contains the printer, product
documentation, and an accessories box. The contents are as follows:
♦ GERBER EDGE FX printer unit
♦ GERBER EDGE FX Unpacking/Packing and Installation Guide
♦ GERBER EDGE FX Getting Started Guide
♦ Warranty Registration Card
♦ Documentation CD with GERBER EDGE FX Owner’s Guide
♦ Accessories box
♦ GERBER EDGE FX power cable (14.5 feet/ cm)
♦ GERBER EDGE FX CAT 5 cross-over Ethernet cable
♦ Thermal print head cleaning kit
♦ Two 10 amp fuses
♦ Foil squeegee (replacement)
♦ Material squeegees (replacements – qty. 2)
♦ 3M® Scotchcal 220 Series white film (10 yard roll)
♦ GERBER EDGE FX Foil Caddy
♦ GerberColor EDGE FX Foil (Spot Raspberry 15 meter roll)
Page 11
7
To unpack the GERBER E DG E FX
WARNING: The GERBER EDGE FX weighs 84 pounds and requires two people to
lift it.
1 Carefully open the shipping carton.
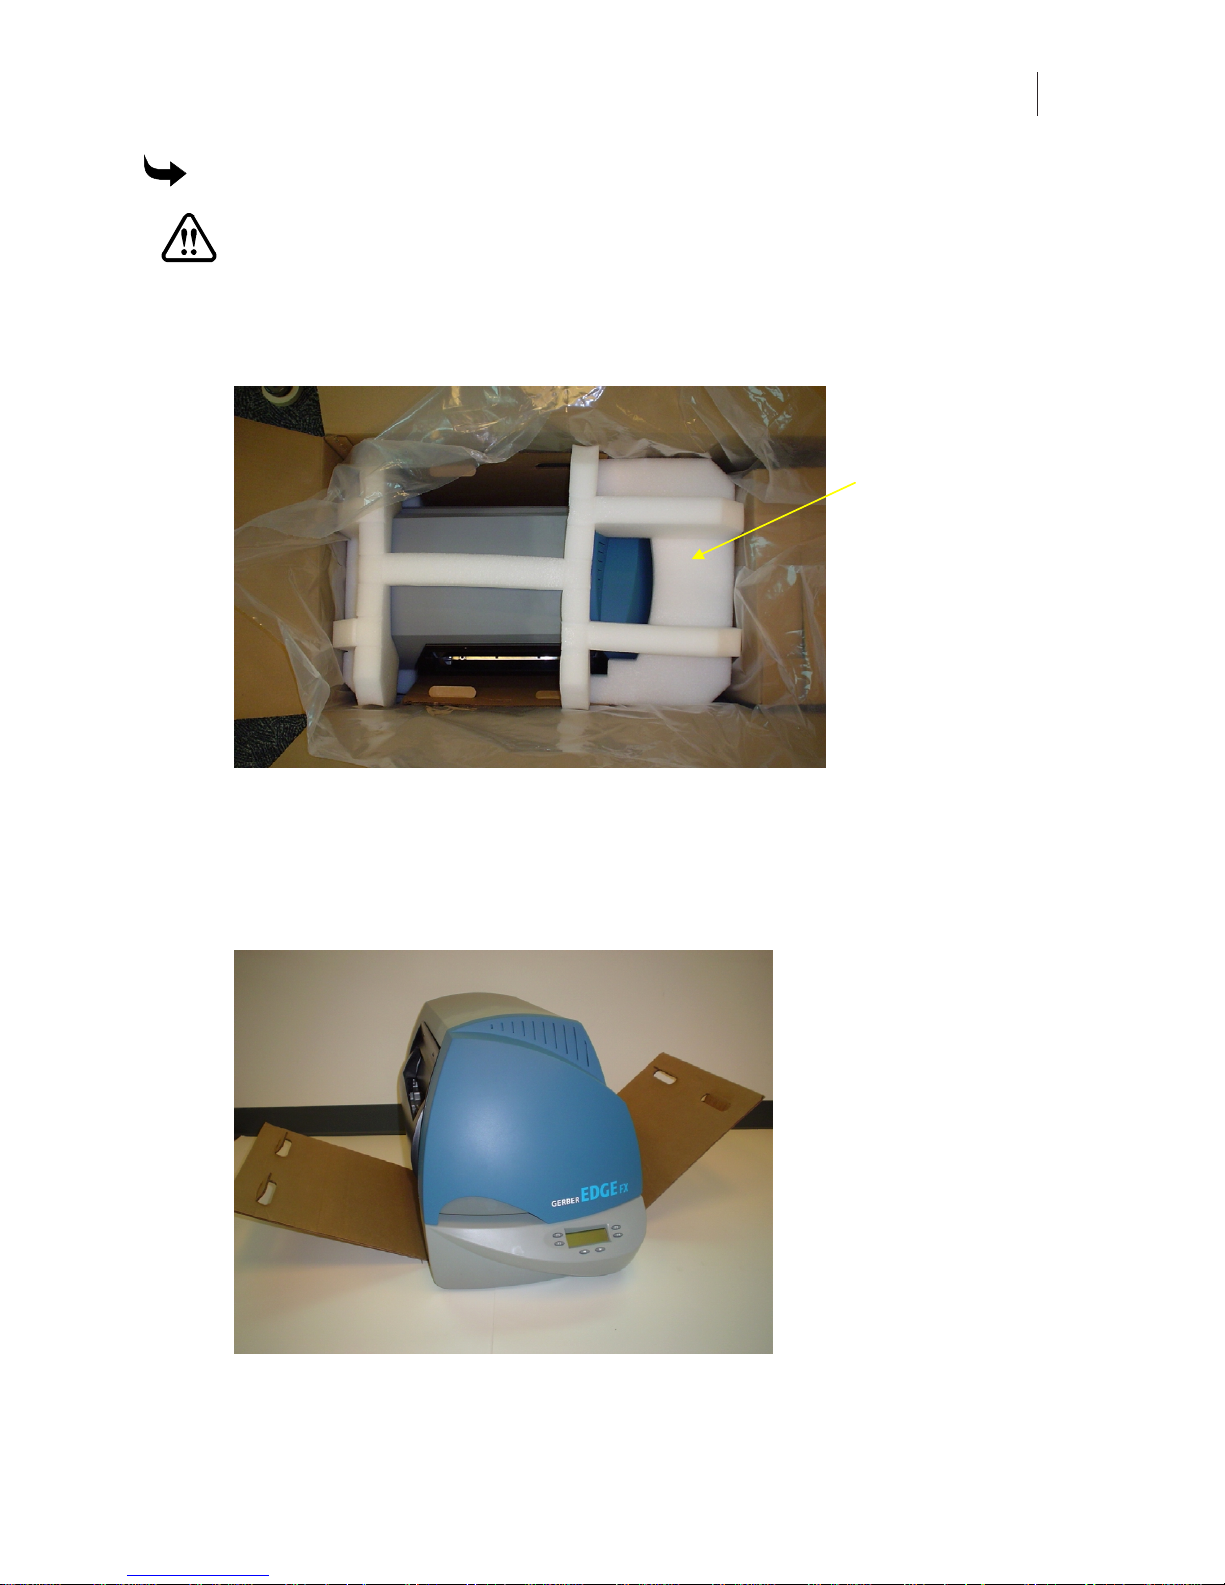
2 Open the plastic bag and remove the protective foam from the top of the unit. Save the
foam packaging materials.
Protective foam
packaging
3 Using the contents list on page 6, verify that the contents of the carton and the
accessories box are present and not damaged.
4 Remove and unpack the accessory box. Set aside its contents for lateruse.
5 Using two people, one on each side of the printer, carefully lift the GERBER EDGE FX
printer from the box using the cardboard sling and set it on a table.
Protective foam
packaging
6 Lift the GERBER EDGE FX off of the cardboard sling and save the sling for future use.
Page 12
CHAPTER 2
8
Unpacking the GERBER EDGE FX
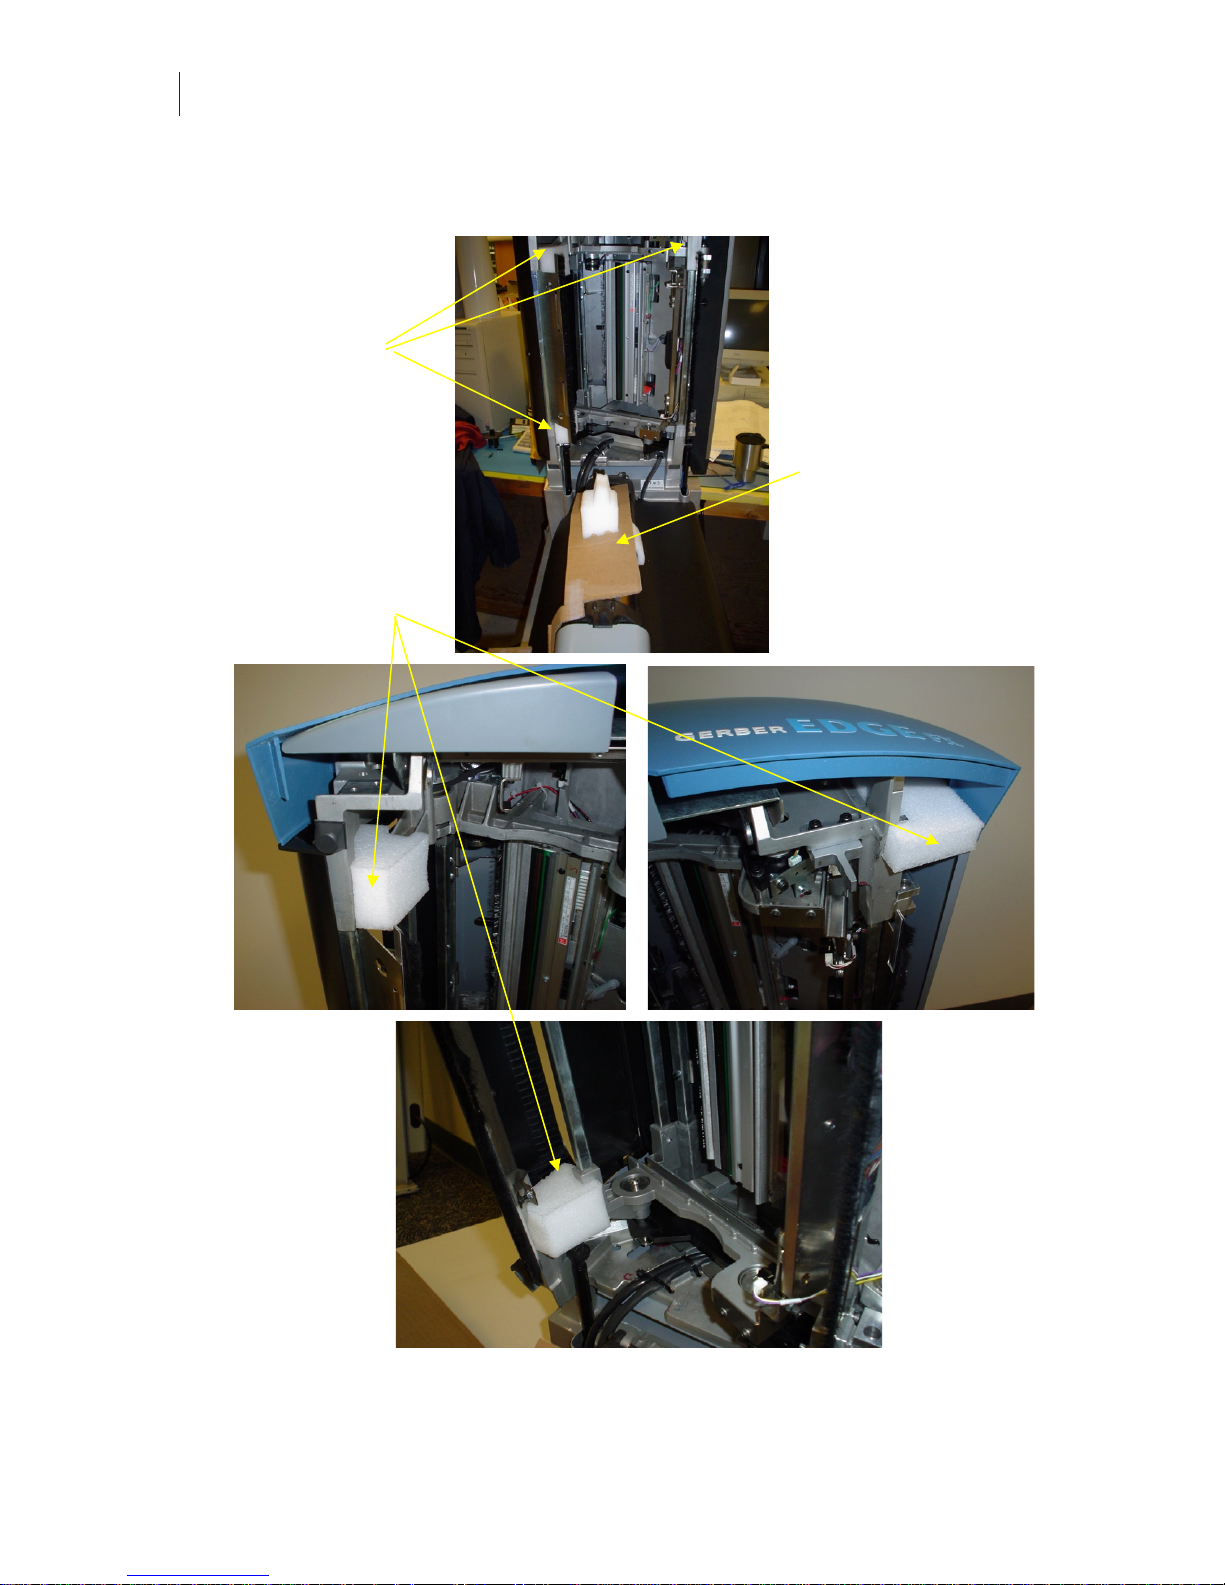
7 Open the printer cover and remove the three foam blocks and foam and cardboard
assembly that cushions the print head during shipping. Save all foam blocks and the
cardboard assembly with the original packaging.
Foam cushions
Cardboard and foam
protective packaging
Foam cushions
8 Store all packaging materials and the empty accessories box in the original shipping
carton and save for future use.
Page 13

9
Connecting GERBER EDGE FX
See the following illustration of the GERBER EDGE FX back panel.
Fuse carrier
plate
Power switch
Power cord
receptacle
GERBER EDG E F X back panel
Future use
RJ45 Jack
After connecting the computer to the GERBER EDGE FX, plug the power cord into the
receptacle at the back of the printer and then into a 110 V power outlet. Turn on the power
switch located at the back of the printer. During the power up cycle the GERBER EDGE
displays:
F1 Gerber EDGE FX F3
F2 Release: X.X.XX F4
Before printing the GERBER EDGE FX warms the Thermal Print Head (TPH) and displays a
Warming ******** message on the bottom line of the display. When the TPH reaches operating
temperature the display changes to:
MAIN MENU
F1 OFFLINE CANCEL F3
F2 Mode: Single SYSTEM F4
Page 14

Page 15

11
Chapter 3:
Connecting the GERBER EDGE FX to the Computer
The GERBER EDGE FX is a network device which has a 10/100 Mbps auto-switch network
interface that can communicate with your computer's 10/100 Mbps network card. (A network
interface board is in most new computers or is readily available for your computer at local
computer stores.) Data needs to be supplied above a minimum rate to prevent printing
anomalies. An EDGE FX connected directly to a computer via a crossover cable should function
properly using a 10 Mbps (only) interface. When connected to a larger network, you will obtain
more reliable communication when communicating via the 100 Mbps interface. The 10 Mbps
interface is not recommended for larger network situations.
In addition to the GERBER EDGE FX computer requirements required for network connectivity,
Gerber OMEGA™ software has additional system requirements regarding computer speed,
memory,harddiskspace,etc.PleaserefertotheOMEGAsoftwareliteratureforcurrent
specifications.
The following illustrations depict three ways to connect the GERBER EDGE FX to your
computer:
♦ Direct connection to the computer with a crossover cable using static addresses
♦ Network connection to a network hub or switch using static addresses
♦ Network connection to a network router equipped with DHCP
Direct connection to the computer with a crossover cable
When the GERBER EDGE FX ships its default network setting is a static network address
designed for direct connection to a computer using a crossover cable. See the following
illustration. See “Using direct connection” on page 14 for more detailed instructions.
Page 16

CHAPTER 3
12
Connecting the GERBER E DGE FX to the Computer
Direct Connection
• Connect computer an d G E R BER EDGE FX with
crossover cable.
• GERBER E DG E F X uses default static network
address (no need to cha nge settings. )
• Computer uses default Automat ic Pr ivate IP
Addressing (no need to assign ne twor k addre sses).
• Install OME G A 2.1 or highe r .
• Install GERBER EDGE FX in OMEGA using the
Browse but ton in GSPTray.
• Turn on GERB E R E DG E FX before turning o n
computer.
• TIP: Assign static address to com puter if boot times
are excessive.
GERBER
EDGE FX
Default static IP address
Crossover c able
Computer
with OMEGA
2.1 or higher
Default automati c I P address
Network connection to a network hub or switch using static addresses
Some locations may connect the EDGE FX to a new or existing network that uses static network
addresses. Two typical scenarios are shown in the following illustrations: a new network or an
existing network. See “Using network connection with static addresses” on page 22 for more
detailed instructions.
Page 17

13
Existing Network using Static IP Addresses
Network c ables
Network hub,
switch, or
server
• Contact network adm inistrator to
obtain compatible IP address f or
GERBER EDGE FX.
• Connect GE R BER EDGE FX to
network hub/switch with straightthrough C ate gory 5 RJ45 E thernet
cables (or crossover cables if hub is
auto-sensing).
• Use GERBER EDGE FX keypad to
assign a stat ic I P address pr ovided
by network administrator.
• Existing com puters and equipment
retain static addresses (no n e ed to
change).
• Install OME G A 2.1 or highe r .
• Install GERB E R EDGE FX in O ME GA
using the Br owse button in GSPTray.
GERBER
EDGE FX
Assign compatible
static I P address
Existing
computer
with OMEGA
2.1 or higher
Existing s tatic
IP address
Other
computer or
equipment
Existing s tatic
IP address
Other
computer or
equipment
Existing s tatic
IP address
New netw or k
hub, switch, or
server w ithout
DHCP
• Connect new computer and GERBER
EDGE FX to ne twork hub/switch with
straight-through Category 5 RJ45 Ethernet
cables (or crossover cables if hub is a utosensing).
• GERBER EDGE FX uses default static
network address (no ne e d to change
settings.)
• New compu te r(s) uses default Aut om atic
Private IP Ad dr essing (no ne ed to assign
network addresses ).
• Install OME G A 2.1 or highe r .
• Install GERBE R EDGE FX in O ME G A using
the Browse button in G S PTray.
• TIP: Assign sta ti c addre ss to com puters i f
boot times are excessive.
New Network Connection using Static IP Addresses
Network c ables
GERBER
EDGE FX
Default static
IP address
New
computer
with OMEGA
2.1 or higher
Default
automatic IP
Other new
computer
Default
automatic IP
Other new
computer
Default
automatic IP
Network connection to a network router equipped with DHCP
Some locations may activate DHCP (dynamic host configuration protocol) on the GERBER
EDGE FX and allowing a network equipped with a DHCP server to automatically assign
addresses. Two typical scenarios are shown in the following illustrations: a new network with
Page 18

CHAPTER 3
14
Connecting the GERBER E DGE FX to the Computer
DHCP cable/DSL router or an existing DHCP network. See “Using DHCP to assign network
addresses” on page 27 for more detailed instructions.
New Network with a DHCP Cable/DSL Rout e r
Network c ables
Cable/DSL
router with
DHCP
• Connect GE RBER EDGE FX and
computer(s) to cable/DSL router with
straight-through Category 5, R J45
Ethernet cables (or crosso ve r cables if
router is a uto-sensing).
• Activate DHCP on the GERBER EDGE FX
keypad.
• Cable/DS L r outer with DHCP
automa tically assig n s I P addresses for all
equipment.
• Install OME G A 2.1 or highe r .
• Install GERBE R EDGE FX in O ME G A using
the Browse button in G S PTray.
GERBER
EDGE FX
Activate DHC P
DHCP assig ns
IP address
Computer
with OMEGA
2.1 or higher
DHCP assig ns
IP address
Other
computer or
equipment
DHCP assig ns
IP address
Other
computer or
equipment
DHCP assig ns
IP address
DHCP Network
Network c ables
Network r outer
or server wit h
DHCP
• Connect GERBER EDGE FX to DHCP
router/se r ver with straight-thr ough
Category 5, R J 45 Ethernet cables (or
crossover cables if router/se r ver is
auto-sensing).
• Activate DHCP on the GERBER EDGE
FX keypad.
• DHCP automatically assigns IP
addresses f or all equipment.
• Install OME G A 2.1 or highe r .
• Install GERB E R EDGE FX in O ME GA
using the Br owse button in GSPTray.
GERBER
EDGE FX
Activate DHC P
DHCP assig ns
IP address
Computer
with OMEGA
2.1 or higher
DHCP assig ns
IP address
Other
computer or
equipment
DHCP assig ns
IP address
Other
computer or
equipment
DHCP assig ns
IP address
Using direct connect ion
A new computer defaults to DHCP (dynamic host configuration protocol) for network
addressing. When the computer initializes it first searches for a DHCP server. If it fails to find a
DHCP server, the computer automatically selects a network address using Windows Automatic
IP Addressing. The range of IP addresses in Automatic Private IP Addressing are as follows:
♦ 169.254.000.000 to 169.254.255.255
The default network address of the GERBER EDGE FX falls with in the range of Automatic
Private IP Addressing:
Page 19

15
♦ GERBER EDGE FX IP Address: 169.254.128.129
♦ Subnet Mask for GERBER EDGE FX: 255.255.0.0
A new (unconfigured) computer connected directly to the printer via a crossover cable should
be able to communicate without altering the network address of either piece of equipment.
To directly connect the GERBER ED GE FX t o t he computer
1 Connect one end of the supplied (red) Category 5 crossover cable to the RJ45 jack on
the back of the GERBER EDGE FX and the other end into the network interface board
RJ45 jack on the computer.
2 When connecting directly to a computer that has not been configured for networking,
the default IP Address and Network Mask of the GERBER EDGE FX should be correct
and will not need to be changed.
3 If the computer is running under Windows default networking scheme, the
computer's network address will be assigned by Windows Automatic Private IP
Addressing and should not need to be changed.
If the computer has been previously configured for networking, you may need to set
your computer's network address or GERBER EDGE FX network address to be
compatible with each other. See “Setting the network address of the GERBER EDGE
FX from the printer keypad” on page 15 or “Setting the IP Address and Network Mask
of your computer for direct connection” on page 18 for detailed instructions.
4 Install the GERBER EDGE FX using GSPTray. The software should automatically find
the printer on the network. See “Installing the GERBER EDGE FX in OMEGA
software” on page 30.
5 If you have trouble finding or communicating with the GERBER EDGE FX, check if the
network jack LEDs light when the cable is connected. You can also check connectivity
between the computer and printer as described in “Checking network connections” on
page 29.
Tip: If you have connected the computer directly to the GERBER EDGE FX using the Windows
default network addressing scheme, a nd the computer initialization time seems to be
excessive, you can assign a sta t ic IP add r ess. Follow the procedure “Setting th e IP Add r ess
and Network Mask of your computer for direct connection” on page 18.
Note: Turn on and allow the GERBER EDGE FX to initialize before starting the computer
that is connected via the crossover cable. Some c omputers ignore Ethernet connections if they
are not live when the computer is initialized.
Setting the network address of the GERBER EDGE FX from the printer
keypad
The default address for the GERBER EDGE FX was chosen to work with a crossover cable and
Windows Automatic Private IP Addressing. For computers that have not been configured for
networking, the default address should be acceptable. For existing networks, the defaults may
not apply. Contact your network administrator or IT professional for assistance in assigning the
correct address.
Page 20

CHAPTER 3
16
Connecting the GERBER E DGE FX to the Computer
This procedure uses the following default network address:
♦ GERBER EDGE FX IP Address: 169.254.128.129
♦ GERBER EDGE FX Subnet Mask: 255.255.0.0
If necessary, replace the network address in this procedure with the proper address obtained
from your network administrator or IT professional.
To set the network address of the GERBER EDGE FX from the pr i nt er keypad
1 From the MAIN MENU use F1 to toggle to OFFLINE.
MAIN MENU
F1 OFFLINE CANCEL F3
F2 Mode: Single SYSTEM F4
2 Press F4, SYSTEM to display the SYSYEM MENU.
SYSTEM MENU
F1 NETWORK CANCEL F3
F2 DIAG MOTION F4
3 Press F1, NETWORK to display the NETWORK MENU.
NETWORK MENU
F1 TCP/IP CANCEL F3
F2 ETHERNET F4
Page 21

17
4 Press F1, TCP/IP to display the TCP/IP MENU where you can change the IP Address
of the GERBER EDGE FX.
TCP/IP MENU
F1 IP ADDR. CANCEL F3
F2 SUBNET MASK DHCP F4
5 Press F1, IP ADDR. to open the IP ADDRESS MENU where you change the IP address.
––– designates which octet (three digit section of the address ranging from 000 to
The
255) is available to be changed. Use F4, NEXT to move the active designation to the
octet that you wish to update.
IP ADDRESS MENU
F1 SAVE CANCEL F3
F2 ––– NEXT F4
169 . 254 . 128 . 129
6 Use the Left or Right Slew keys to change the value of the octet. Press F4, NEXT to
move the active designation to the next octet and change that value. Continue until the
entireIPAddressisupdated.
Note: This procedure uses the default IP address of the GERBER EDGE FX as an example.
Your IP address for the printer may be different.
7 Press F1, SAVE to set the displayed IP Address. The display changes to:
after re boot.
Continue with step 8. The address will be active after cycling the printer
IP Address us ed
power at the end of the procedure.
8 Press F3, CANCEL to leave the IP Address Menu and return to the SYSTEM MENU.
9 Press F1, NETWORK to display the NETWORK MENU.
NETWORK MENU
F1 TCP/IP CANCEL F3
F2 ETHERNET F4
10 Press F1, TCP/IP to display the TCP/IP MENU where you can change the Subnet
Mask of the GERBER EDGE FX.
TCP/IP MENU
F1 IP ADDR. CANCEL F3
F2 SUBNET MASK DHCP F4
Page 22

CHAPTER 3
18
Connecting the GERBER EDGE FX to the Computer
11 Press F2, SUBNET MASK to open the SUBNET MASK MENU where you can change
the Subnet mask of the printer. The
––– designates which octet is available to be
changed. Use F4, NEXT to move the active designation to the octet you wish to update.
SUBNET MASK MENU
F1 SAVE CANCEL F3
F2 ––– NEXT F4
255 . 255 . 000 . 000
12 Use the Left or Right Slew keys to change the value of the octet. Press F4, NEXT to
move the active designation to the next octet and change that value. Continue until the
entire Subnet Mask is updated.
13 Press F1, SAVE to set the displayedSubnet Mask. The display changes to:
used after reboot.
Subnet Mask
14 Press F3, CANCEL to exit the menu and return to the MAIN MENU.
15 Cycle the power to the GERBER EDGE FX. The network address will be active after
cycling the printer power.
Setting the IP Address a nd Network Mask of your computer for direct
connection
If you need to change the network address of you computer that is directly connected to the
GERBER EDGE FX, follow the procedure for your Windows operating system (Windows 98 SE,
Windows XP, or Windows 2000). These procedures use the following address for the computer:
♦ Computer IP address: 169.254.128.130
♦ Computer Network Mask: 255.255.0.0
To set the IP Address and Network Mas k f or W indows 98 SE
1 Click Start > Settings > Control Panel.
2 Double-click the Network icon.
3 Click the Configuration tab.
4 Click TCP/IP.
Page 23

19
5 Click Properties to open the TCP/IP Properties dialog box.
Note: Depending on your setup, your computer's IP address may vary.
6 On the IP Address tab, click Specify an IP Address:
7 Enter 169.254.128.130 for the IP Address.
8 Enter 255.255.000.000 for Network Mask.
9 Do not enter a Gateway address; it is not required for direct connection.
10 Click OK to close the TCP/IP Properties dialog box.
11 Click OK to close the Network dialog box.
Page 24

CHAPTER 3
20
Connecting the GERBER EDGE FX to the Computer
To set the IP Address and Network Ma sk f or W indow s XP
1 Click Start > Control Panel.
2 Click Network and Internet Connections.
3 Click the Network Connections icon.
4 Right click the Local Area Connections icon and choose Properties to open the Local
Area Connections Properties dialog box.
5 Click Internet Protocol (TCP/IP) in the list.
6 Click Properties to open the Internet Protocol (TCP/IP) Properties dialog box.
Note: Depending on your setup, your computer's IP address may vary.
7 Click Use the following IP address:
8 Enter 169.254.128.130 for IP Address.
Page 25

21
9 Enter 255.255.000.000 for Network Mask.
10 Do not enter a Default Gateway; it is not required for direct connection. Leave the
fields blank.
11 Click OK to save the settings and exit the Internet Protocol (TCP/IP) Properties dialog
box.
12 Click OK to close the Local Area Connections Properties dialog box.
To set the IP Address and Network Mas k f or W indows 2000
1 Click Start > Settings > Control Panel.
2 Double-click the Network and Dial up Connections icon.
3 Right-click the Local Area Connection icon and choose Properties from the context
menu to display the Local Area Connection Properties dialog box.
4 Click Internet Protocol (TCP/IP) in the list.
5 Click Properties to open the Internet Protocol (TCP/IP) Properties dialog box.
Page 26

CHAPTER 3
22
Connecting the GERBER EDGE FX to the Computer
Note: Depending on your setup, your computer's IP address may vary.
6 Click Use the following IP address:
7 Enter 169.254.128.130 for IP Address.
8 Enter 255.255.000.000 for Network Mask.
9 Do not enter a Default Gateway; it is not required for direct connection. Leave the
fields blank.
10 Click OK to save the settings and exit the Internet Protocol (TCP/IP) Properties dialog
box.
11 Click OK to exit the Local Area Connection Properties dialog box.
Using network connection with static addresses
The GERBER EDGE FX is a network device which has a 10/100 Mbps auto-switch network
interface board that can communicate with computer's 10/100 Mbps network card. Data needs
to be supplied above the minimum rate to prevent printing anomalies. You will obtain more
reliable communication when communicating via the 100 Mbps interface.
Gerber supplies a crossover Ethernet cable with RJ45 connectors to use with direct connection to
the computer. Modern hubs or switches which are auto-sensing work equally well with
crossover or straight-through cables. When connecting to a network hub or switch that is not
auto-sensing you will need to obtain a straight-through Category 5 (or better) Ethernet cable
from a local computer store.
Tip: If your computer is not on a network you can create your own network with a separately
purchased network switch and connect one or more devices to your computer. Your computer
must have a 10/100 Mbps (or auto-switching) network interface board and you will need to
obtain a 10/100 Mpbs Ethernet switch with several ports. Use straight-through Category 5
Ethernet cables with RJ4 5 con n ec tors (or crosso v er cables if the swit c h is aut o - s ens in g ) : o n e
cable to connect the GERBER EDGE FX and the switch and one to connect the computer and
the switc h. Th e E t h er n et sw it c h, n etwork interface bo ard, and add i ti o nal cables are read ily
available at local computer s tores.
To connect the GERBER EDGE FX to the computer on a network using a static addr ess
1 If not already connected, connect the computer to your Ethernet hub or switch using
the appropriate RJ45 cable. Modern hubs or switches which are auto-sensing work
equally well with crossover or straight-through cables. Straight-through Category 5
Ethernet cables are readily available at local computer stores.
2 Connect the GERBER EDGE FX to your Ethernet hub or switch using the appropriate
network cable. Install one end of the cable into the RJ45 receptacle on the back of the
GERBER EDGE FX and the other end in the hub or switch.
3 Assign the correct IP Address and Network Mask to the GERBER EDGE FX via the
printer's control panel. See “To set the network address of the GERBER EDGE FX from
the printer keypad” on page 15. The default IP Address is 169.254.128.129 and the
Page 27

23
default Network Mask is 255.255.0.0. Contact your network administrator or IT
professional for assistance in assigning the correct address.
4 If necessary, configure your computer's IP Address and Network Mask as described in
“Setting the IP Address and Network Mask of your computer for network connection”
on page 23.
5 Install the GERBER EDGE FX using GSPTray. See “Installing the GERBER EDGE FX in
OMEGA software” on page 30.
6 If you are having trouble finding or communicating with the GERBER EDGE FX,
check network connectivity of the computer and printer as described in “Checking
network connections” on page 29.
Setting the IP Address and Network Mask of your computer for
connection to a larger (or existing) network
For a computer on an existing network, the IP Address and Network Mask (and Gateway if
required) should already be assigned and should not need to be changed. When setting up a
new computer or a new network you may need to assign the IP Address and Network Mask of
the computer as describe in the following procedures.
CAUTION: Use care when entering addresses for the equipment. Entering an
incorrect address could damage the network. In a large existing network, obtain the
correct address for the computer and the GERBER EDGE FX from the network
administrator or IT professional.
This procedure describes the process of setting the computer network address using the
following address as an example:
♦ Computer IP address: 169.254.128.130
♦ Computer Network Mask: 255.255.000.000
♦ Computer Gateway: 000.000.000.000
To set the IP Address and Network Mas k f or W indows 98
1 Click Start > Settings > Control Panel.
2 Double-click the Network icon.
3 Click the Configuration tab.
4 Click TCP/IP.
Page 28

CHAPTER 3
24
Connecting the GERBER EDGE FX to the Computer
5 Click Properties to open the TCP/IP Properties dialog box.
Note: Depending on your network and other equipment currently residing on the network,
your computer's IP address may vary. If necessary, replace the network address in this
procedure with the proper address obtained from your network administrator or IT
professional.
6 On the IP Address tab, click Specify an IP Address:
7 Enter 169.254.128.130 for the IP Address.
8 Enter 255.255.000.000 for Network Mask.
9 Do not enter a Gateway address unless directed by your network administrator.
10 Click OK to close the TCP/IP Properties dialog box.
11 Click OK to close the Network dialog box.
Page 29

25
To set the IP Address and Network Ma sk f or W indow s XP
1 Click Start > Control Panel.
2 Click Network and Internet Connections.
3 Click the Network Connections icon.
4 Right click the Local Area Connections icon and choose Properties to open the Local
Area Connections Properties dialog box.
5 Click Internet Protocol (TCP/IP) in the list.
6 Click Properties to open the Internet Protocol (TCP/IP) Properties dialog box.
Note: Depending on your network and other equipment currently residing on the network,
your computer's IP address may vary. If necessary, replace the network address in this
procedure with the proper address obtained from your network administrator or IT
professional.
7 Click Use the following IP address:
8 Enter 169.254.128.130 for IP Address.
Page 30

CHAPTER 3
26
Connecting the GERBER EDGE FX to the Computer
9 Enter 255.255.000.000 for Network Mask.
10 Do not enter a Gateway address unless directed by your network administrator. Leave
the fields blank.
11 Click OK to save the settings and exit the Internet Protocol (TCP/IP) Properties dialog
box.
12 Click OK to close the Local Area Connections Properties dialog box.
To set the IP Address and Network Mas k f or W indows 2000
1 Click Start > Settings > Control Panel.
2 Double-click the Network and Dial up Connections icon.
3 Right-click the Local Area Connection icon and choose Properties from the context
menu.
4 Click Internet Protocol (TCP/IP) in the list.
5 Click Properties to open the Internet Protocol (TCP/IP) Properties dialog box.
Page 31

27
Note: Depending on your network and other equipment currently residing on the network,
your computer's IP address may vary. If necessary, replace the network address in this
procedure with the proper address obtained from your network administrator or IT
professional.
6 Click Use the following IP address:
7 Enter 169.254.128.130 for IP Address.
8 Enter 255.255.000.000 for Network Mask.
9 Do not enter a Gateway address unless directed by your network administrator. Leave
the fields blank.
10 Click OK to save the settings and exit the Internet Protocol (TCP/IP) Properties dialog
box.
11 Click OK to exit the Local Area Connection Properties dialog box.
Using DHCP to assig n network addresses
If your network is equipped with a DHCP (dynamic host configuration protocol) server you can
have it automatically assign the IP Addresses to the computer and other devices on the network
including the GERBER EDGE FX. When you turn on the equipment it will automatically load
the proper TCP/IP settings provided by the server. The DHCP server automatically allocates an
unused IP Address from the IP Address pool.
By default DHCP is disabled on the GERBER EDGE FX to allow you to assign a static network
address. You can activate DHCP from the GERBER EDGE FX control panel, or from the web
interface (if network connectivity has already been established). See “Modifying Network
Settings” for instructions on using the web interface.
Note: If you KNOW that you are on a n etwork that uses a DHCP server then proceed with
this procedure. If you are unsure, contact your network administrator or IT professional.
To activate DHCP from the GERBER EDGE FX control panel
1 From the MAIN MENU use F1 to toggle to OFFLINE.
MAIN MENU
F1 OFFLINE CANCEL F3
F2 Mode: Single SYSTEM F4
2 Press F4, SYSTEM to display the SYSYEM MENU.
SYSTEM MENU
F1 NETWORK CANCEL F3
F2 DIAG MOTION F4
Page 32

CHAPTER 3
28
Connecting the GERBER EDGE FX to the Computer
3 Press F1, NETWORK to display the NETWORK MENU.
NETWORK MENU
F1 TCP/IP CANCEL F3
F2 ETHERNET F4
4 Press F1, TCP/IP to open the TCP/IP MENU.
TCP/IP MENU
F1 IP ADDRESS CANCEL F3
F2 SUBNET MASK DHCP F4
5 Press F4, DHCP to open the DHCP menu.
DHCP MENU
F1 ENABLE CANCEL F3
F2 DISABLE F4
Currently Disabled.
6 Press F1, Enable to activate DHCP. The new setting will be in effect after cycling the
power to the printer. The system displays the following message:
F1 DHCP enabled after F3
F2 reboot. F4
7 Cycle the printer power to change the DHCP setting.
Note: If you have enabled DHCP and the server successfully assigns an IP address, you will no
longer be able to assign a static network address in the IP Address menu. If you return to the
IP Address menu the --- symbol that designates the ability to change the address no longer
appears. The lack of the --- symbol indicates that DHCP is enabled. You can disable DHCP if
you later need to u se a static IP address.
Page 33

29
Checking network connect ions
You can check the network connections to be sure that the computer and GERBER EDGE FX can
communicate.
Tip: When a live network cable is plugged into the computer, the RJ45 jack LEDs will light.
To check network connections
1 In Windows 98 click Start > Programs > MS-DOS to open the MS-DOS window. In
Windows XP click Start > Programs > Accessories > Command Prompt to open the
Command Prompt window. The display shows
your hard drive.
2 Type ping followed by the IP address of the GERBER EDGE FX and press enter. Do not
type any leading zeros that may be in the address. For example, to test a GERBER
EDGE FX connected directly to a computer you would type:
ping 169.254.128.129
3 If the network connection is working you will see a reply from the GERBER EDGE
FX's network address. If there is a problem with the network connection you will see
the message:
Request timed out or Destination host unreacha ble. Check that the network
cables are properly attached and that you have entered the correct IP Address,
NetworkMaskandGateway.
C:\WINDOWS where C is the letter of
Network connection c onf ir med Network connection timed out
Installing Gerber OMEGA 2.1 or higher
You must have Gerber OMEGA 2.1 or higher software installed on the computer that
communicates with the GERBER EDGE FX. Follow OMEGA installation instructions included
with the software.
Page 34

CHAPTER 3
30
Connecting the GERBER EDGE FX to the Computer
Installing the GERBER EDGE FX in OMEGA software
The GERBER EDGE FX printer is compatible with OMEGA 2.1 or higher. Install the GERBER
EDGE FX using the Network tab of the Add or Delete Gerber Vinyl Printer dialog box in
GSPTray.
To install the GERBER EDGE FX using GSPTray
1 Right-click the GSPTray icon to open the GSPTray menu.
2 Click Install Vinyl Printer to open the Add or Delete Gerber Vinyl Printer(s) dialog
box.
3 ClicktheNetworktab.
4 If the GERBER EDGE FX is visible on the network it is shown in the Devices Found
drop down list. Choose the printer to install from the list.
OR
Click the Browse button to navigate to the printer location.
OR
Type the IP number of your GERBER EDGE FX in the IP Address box. Refer to your
network administrator and “Connecting the GERBER EDGE FX to your computer” for
information on obtaining this address.
Tip: When the GERBER EDGE FX is located on the network it displays in the Devices Found
box. The firs t 12-dig it nu mber is t h e pr in t er' s M A C addres s (00 - 3 0 -2D -C 2-5 0 - 0 0 in the abo v e
example), fo llowed by th e IP address (169.2 54 .128.129 in the above example). The MAC addr ess
is unique to that printer and cannot be changed.
5 Click Add and the Add – Name Device dialog box displays. Accept the default name
or enter a unique name for the GERBER EDGE FX.
Page 35

31
6 Click OK to return to the Network tab. The name of the newly installed GERBER
EDGE FX printer appears in the Installed Vinyl Printer(s) section of the Add or Delete
Vinyl printer(s) dialog box.
7 To install or modify which profiles display in OMEGA, click the Profile Manager
button to open the Gerber Device Profile Manager dialog box. Select the devices from
the list to display the associated profiles (EDGE, EDGE 2, EDGE FX, Elan, Jetster, or
MAXX, or Solara). Deselect the devices to h ide the profiles that are unnecessary. You
can also use the Profile Manager to uninstall and reinstall profiles. For complete help
on this topic, press F1 while in the Device Manager dialog box.
8 Click OK to return to the Add or Delete Gerber Vinyl Printer(s) dialog box.
9 Click the Device Home page button if you wish to open the web interface of the
GERBER EDGE FX. Once open, you may wish to make a shortcuton your desktop for
easy access.
10 Click Close.
Page 36

Page 37

33
Chapter 4:
Packing the GERBER EDGE FX
The GERBER EDGE FX printer is shipped from the factory in reusable packaging materials. Use
these original packaging materials when you need to ship the GERBER EDGE FX.
CAUTION: Failure to repackage the printer with the specified packaging materials
may result in damage to the unit during shipping. Always repack the printer as
described in this document. Gerber is not liable for shipping damage due to
improperly packed units. If you do not have the proper packaging materials, call
Gerber Service at 800-828-5406.
Packing the GERBER EDGE FX printer
Gather the original box and packaging materials. Remove any loaded material and the foil
cartridge from the printer.
WARNING: The GERBER EDGE FX weighs 84 pounds/38 kg and requires two
people to lift it.
To repack the GERBER EDGE FX printer
1 Turn off the power and unplug the GERBER EDGE FX from the power source.
2 Disconnect the network cable, and power cable from the back of the printer. Store the
network cable and power cable in the accessories box.
3 Open the cover of the printer and reinstall the three foam blocks that protect the print
head during shipment. Press the blocks firmly (compressing the foam slightly) to
position them correctly as shown in the following photos.
Page 38

CHAPTER 4
34
Packing the GERBER EDGE FX
4 Install the cardboard and foam assembly over the platen as shown in the following
photo. Tape the cardboard to the front cover with masking tape. Close the cover
securely.
Position the cardboar d and foam pro tective pack aging
over the pla te n and tape i n position as shown
5 Install the original plastic bag in the shipping carton.
6 Insert the bottom piece of protective foam in the base of the shipping carton as shown
in the following photo. (Curved end facing the accessories box.)
Page 39

35
Accessories box
Foam base – curved
portion faces
accessories box.
7 Put the cardboard sling on a flat surface and place the printer on top of it.
Cardboard sling
8 Using two people, lift the printer using the cardboard sling (one on each side of the
printer) and place the printer in the carton on top of the protective foam. Curved front
face of the printer fits into the curved portion of the protective foam base.
9 Install the protective foam on top of the printer.
Page 40

CHAPTER 4
36
Packing the GERBER EDGE FX
10 Close the plastic bag and secure with tape.
Protective foam
11 Storetheaccessoriesinthebox.
12 Close the shipping carton and secure with tape.
Page 41

P77560A Rev A
83 Gerber Road
South Windsor, CT 060 74-9864 USA
www.gspinc.com
 Loading...