


GR36P

1
®
THE LEAN MEAN FAT REDUCING GRILLING MACHINE
®
Please Read and Save this Use and Care Book
Por favor lea este instructivo antes de usar el producto
Veuillez lire et conserver ce guide d’entretien et d’utilisation
For online customer service
and to register your product, go to
www.prodprotect.com/applica
Also view the details for our
latest sweepstakes!
Customer Care Line:
USA/Canada
1-800-231-9786
Accessories/Parts (USA / Canada)
Accesorios/Partes (EE.UU / Canadá)
Accessoires/Pièces (É.-U./Canada)
1-800-738-0245
Models
Modelos
Modèles
❑GR36P
❑GR36PCAN

2
3
IMPORTANT SAFEGUARDS
When using electrical appliances, basic safety precautions should always be
followed, including the following:
❑Read all instructions.
❑Do not touch hot surfaces. Use handles or knobs.
❑To protect against electrical shock do not immerse cord, plugs or appliance in
water or other liquid.
❑Close supervision is necessary when any appliance is used by or near
children.
❑Unplug from outlet when not in use and before cleaning. Allow to cool before
putting on or taking off parts, and before cleaning the appliance.
❑Do not operate any appliance with a damaged cord or plug, or after the
appliance malfunctions or has been damaged in any manner. Return
appliance to the nearest authorized service facility for examination, repair
or adjustment. Or, call the appropriate toll-free number on the cover of this
manual.
❑The use of accessory attachments not recommended by the appliance
manufacturer may cause injuries.
❑Do not use outdoors.
❑Do not let cord hang over edge of table or counter, or touch hot surfaces.
❑Do not place on or near a hot gas or electric burner, or in a heated oven.
❑Extreme caution must be used when moving an appliance containing hot oil or
other hot liquids.
❑To disconnect, remove plug from wall outlet.
❑Do not use this appliance for other than intended use.
❑The appliance is only to be operated in the closed position.
SAVE THESE INSTRUCTIONS.
This product is for household use only.
POLARIZED PLUG (FOR US MODELS ONLY))
This appliance has a polarized plug (one blade is wider than the other). To reduce
the risk of electric shock, this plug is intended to fit into a polarized outlet only
one way. If the plug does not fit fully into the outlet, reverse the plug. If it still
does not fit, contact a qualified electrician. Do not attempt to modify the plug in
any way.
GROUNDED PLUG (FOR CANADIAN MODELS ONLY)
As a safety feature, this product is equipped with a grounded plug, which will
only fit into a three-prong outlet. Do not attempt to defeat this safety feature.
Improper connection of the grounding conductor may result in the risk of electric
shock. Consult a qualified electrician if you are in doubt as to whether the outlet
is properly grounded.
TAMPER-RESISTANT SCREW
Warning: This appliance is equipped with a tamper-resistant screw to prevent
removal of the outer cover. To reduce the risk of fire or electric shock, do not
attempt to remove the outer cover. There are no user-serviceable parts inside.
Repair should be done only by authorized service personnel.
ELECTRICAL CORD
a) A short power-supply cord (or detachable power-supply cord) is to be
provided to reduce the risk resulting from becoming entangled in or tripping
over a longer cord.
b) Longer detachable power-supply cords or extension cords are available and
may be used if care is exercised in their use.
c) If a long detachable power-supply cord or extension cord is used,
1) The marked electrical rating of the detachable power-supply cord or
extension cord should be at least as great as the electrical rating of the
appliance,
2) If the appliance is of the grounded type, the extension cord should be a
grounding-type 3-wire cord, and
3) The longer cord should be arranged so that it will not drape over the
countertop or tabletop where it can be pulled on by children or tripped over.
Note: If the power supply cord is damaged, it should be replaced by qualified
personnel; in Latin America, by an authorized service center.
4
5
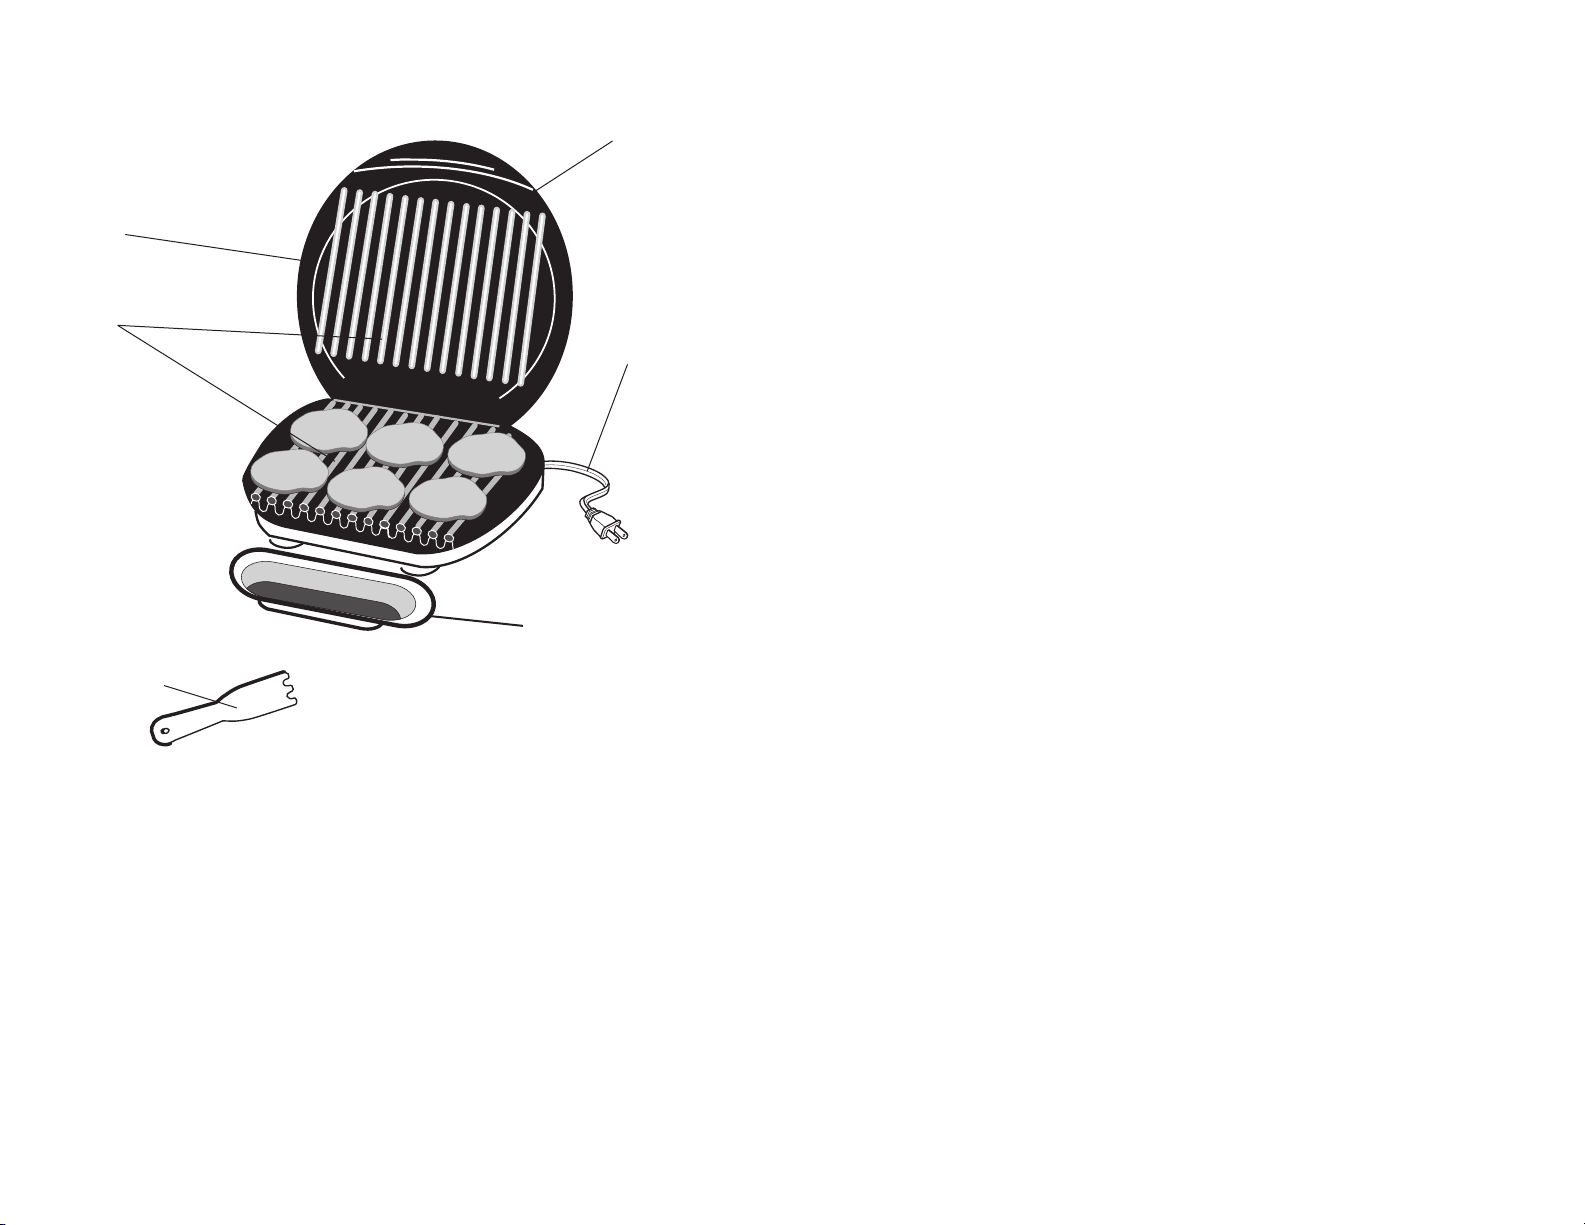
Product may vary slightly from what is illustrated.
1.
Grill cover (lid)
2. Grill plates
† 3. Drip tray (Part # 21274)
† 4. Spatula (Part # 20147)
5. Preheat indicator light (not shown)
6. Power cord
Note: † indicates consumer replaceable/removable parts
How to Use
This product is for household use only.
GETTING STARTED
• Remove all packing material and any stickers.
• Remove and save literature.
• Please go to www.prodprotect.com/applica to register your warranty.
• Wash removable parts and/or accessories as instructed in CARE AND
CLEANING section of this manual.
• Wipe grill plates with a damp cloth or sponge to remove any dust. Wipe dry
with a soft cloth or paper towels.
• Select location where grill will be used, leaving enough space between
the back of the grill and wall to allow heat to flow without damage to cabinets
and walls.
DRIP TRAY
Place the drip tray under the front sloped section of the grill.
PREHEATING THE GRILL
1. Close cover on grill.
2. Unwind cord and plug into an outlet.
3. The preheat indicator light comes on to indicate the grill is heating.
4. When the selected temperature is reached, the preheat indicator light will
go out.
Note: The preheat indicator light will turn on and off during cooking to indicate
your desired temperature is being maintained.
GRILLING
1. Using a pot holder, carefully open the preheated grill.
2. Before first use, if desired, lightly oil grill plates.
Note: Aerosol cooking spray should not be used on nonstick surface. Chemicals
that allow spray to come out of can build up on surface of grill plates and reduce
their efficiency.
3. Carefully place foods to be cooked on lower grilling plate. This grill
accommodates up to 8 servings.
Note: Do not overload grill.
4. Close the cover and allow food to cook for the selected time. If desired, use
a kitchen timer.
Note: Note: Use suggested cooking times found in the GRILLING CHART on
pages 6, 7 and 8.
Important: Do not leave the appliance unattended during use.

6
7
5. Light pressure can be used on the handle to press and heat food to your liking.
Important: Do not use heavy pressure on the lid of the grill at any time.
6. After selected time, the food should be done. If you would prefer longer
cooking, simply follow the steps beginning at step 4.
7. Once cooking is complete, carefully open the grill cover using a pot holder.
8. Remove cooked food using plastic spatula provided.
Note: Always use silicone, heatproof plastic or wood utensils to avoid scratching
nonstick surface of grill plates. Never use metal spatulas skewers, tongs, forks or
knives.
Important: Heat continues to be ON until grill is unplugged.
9. Allow drip tray to cool before removing it from under grill. Wash and dry drip
tray after each use.
SUGGESTED GRILLING CHART
The following are meant to be used as a guideline only. The times reflect a full
grill of food. Cooking time will depend upon thickness and cut being used. Use a
cooking thermometer as a test for doneness. If the food needs longer cooking,
check periodically to avoid overcooking the food.
FOOD COOKING TIME COMMENTS
MEAT
Hamburger (5 oz.) Fresh
Frozen 4 – 6 minutes
5 – 6 minutes
¾-inch thick
Cooked to medium (160ºF)
Flank steak (¾ lb.)
Skirt steak (½ lb.)
6 – 8 minutes
4 – 6 minutes
¾-inch thick
Cooked to medium rare
(145ºF)
Cooked to medium (160ºF)
NY strip steak (shell
steak) (6 oz.)
6 – 8 minutes ¾-inch thick
Cooked to medium rare
(145ºF)
Beef tenderloin (5 oz.) 4 – 6 minutes ¾-inch thick
Cooked to medium rare
(145ºF)
Beef kabobs 5 – 7 minutes Cooked to medium (160ºF)
Pork loin chops, bone-
less
4 – 6 minutes ¾-inch thick
Cooked to 160ºF
Pork loin chops, bone in 4 – 6 minutes ½ -inch thick
Cooked to 160ºF
FOOD COOKING TIME COMMENTS
MEAT
Sausage, link or patty 4 – 6 minutes Cooked to 160°F
Hot dogs 4 – 5 minutes Cooked to 168°F
Bacon 6 – 8 minutes
Smoked pork loin
chops, boneless
4 – 6 minutes Cooked to 160ºF
Lamb chops, loin 5 – 7 minutes ¾-inch thick
Cooked to medium (160ºF)
POULTRY
Chicken breast, bone-
less and skinless (8 oz.)
11 – 13 minutes Cooked to 170ºF
Chicken tenderloins 4
to 6 pieces
4 – 6 minutes Cooked to 170ºF
Turkey tenderloin (½ lb.) 9 – 11 minutes Cooked to 170ºF
Turkey burgers (5 oz.) 4 – 6 minutes Cooked to 170ºF
FISH
Tilapia fillets (6 oz., ea.) 5 – 7 minutes Cooked to 145ºF
Trout fillet 6 oz. 4 – 6 minutes Cooked to 145ºF
Salmon fillet (8 oz.
1piece)
5 – 7 minutes Cooked to 145ºF
Salmon steak (6 – 8 oz.) 7 – 9 minutes Cooked to 145ºF
Tuna steak (6 oz.) 4 – 6 minutes Cooked to 145ºF
Shrimp 3 – 4 minutes Cooked to 145ºF

8
9
Please note: To be sure your food is fully cooked the USDA recommends the
following guidelines. Use a kitchen timer. Using a meat thermometer, test for
doneness by inserting the meat thermometer into the center of the food being
cooked and make sure the thermometer is not touching the bone or grill plates.
GRILLING TIPS
• To prevent heat loss and for even cooking, do not open the lid frequently.
• For best results, do not overload the grill.
• When first cooking a particular food, check for doneness several minutes
before suggested time; if necessary adjust time.
• When cooking several pieces of food, try to have them similar in size and
thickness.
• Remember that since grill is cooking from both sides, cooking time will typically
be shorter than expected. Watch carefully to avoid overcooking.
• For added flavor, add dry seasonings or marinate foods before grilling.
FOOD TO BE COOKED MEDIUM WELL DONE OR
FULLY COOKED
Chicken Breast 170ºF 77ºC
Chicken Thigh 180ºF 82ºC
Beef / Lamb/Veal 160ºF 71ºC 170ºF 77ºC
Pork 160ºF 71ºC
Reheated cooked meats and
poultry
165ºF 74°C
GRILLING FRUITS AND VEGETABLES
The following are meant to be used as a guideline only. The times reflect a full grill
of food. Cooking time will depend upon thickness of food. Use a fork inserted into
the center of the food to test for doneness. (Be careful not to touch the grilling
plate.) If the food needs longer cooking, check periodically to avoid overcooking
the food.
FOOD TO BE COOKED MEDIUM WELL DONE OR
FULLY COOKED
Chicken Breast 170ºF 77ºC
Chicken Thigh 180ºF 82ºC
Beef / Lamb/Veal 160ºF 71ºC 170ºF 77ºC
Pork 160ºF 71ºC
Reheated cooked meats
and poultry
165ºF 74°C
Important: Use only silicone, heatproof plastic or wood utensils when cooking
on the grill. Silicone utensils are especially good because they do not discolor
or melt with the high temperature.
Care and Cleaning
This product contains no user serviceable parts. Refer service to qualified service
personnel
CLEANING
Caution: To avoid accidental burns, allow grill to cool thoroughly before
cleaning.
1. Before cleaning, unplug grill from wall outlet and allow to cool.
Important: Heat continues to be ON until grill is unplugged.
2. Place drip tray under front of grill. Use plastic spatula to scrape off any excess
fat and food particles left on the grill plates; runoff will drip into the drip tray.
3. Use a warm, soapy sponge to wipe plates clean, then rinse sponge and wipe
again to remove any soapy residue. Dry thoroughly with an absorbent paper
towel.
4. To remove stubborn buildup, use a nylon or nonmetallic scrubbing pad to clean
the grill plates.
Important: Do not use metallic scrubbing pads, steel wool or any abrasive
cleaners to clean any part of your grill; use only nylon or nonmetallic scrubbing
pads.
5. Empty drip tray and wash in warm, soapy water; dry thoroughly with a paper
towel.
6. To clean the grill cover, wipe with a warm, wet sponge and dry with a soft,
dry cloth.
Important: Do not immerse body of grill in water or any other liquid.
7. Any servicing requiring disassembly other than the above cleaning must be
preformed by a qualified electrician.
Caution: Make sure to hold grill cover by the handle while cleaning to prevent
accidental closing and injury.
STORAGE
Always make sure grill is clean and dry before storing.

10
11
TROUBLESHOOTING
PROBLEM POSSIBLE CAUSE SOLUTION
Finish on grill plates has
cut marks.
Metal utensils have
been used.
Always use silicone,
heatproof plastic or
wood utensils to avoid
scratching nonstick
surface of grill plates.
Never use metal spatulas
skewers, tongs, forks or
knives.
The indicator light turns
on and off.
The heating elements
are cycling.
This is normal. The light
comes on when the grill
is plugged in and off
once the set temperature
is reached. However,
it will cycle on and off
to indicate the correct
temperature is being
maintained.
Grill marks on food are
very light.
Grill was not fully
preheated before use.
Always preheat grill at
least 5 minutes before
cooking any foods.
There is food buildup on
grill plates.
Grill not properly
cleaned after use.
Use nylon scrubbing pad
and hot, soapy water to
clean grill plates. Do not
use steel wool scrubbing
pads or abrasive cleaners
to clean grill.
Food is dry and burnt. Food is overcooked. Because grill is cooking
from both sides, food is
cooked much faster than
in a skillet or under a
broiler. Use cooking chart
as a guide and check food
at lowest time stated on
chart.
Grill does not turn on. Grill is not plugged in. Check to be sure
appliance is plugged into
working outlet.
INSTRUCCIONES IMPORTANTES
DE SEGURIDAD
Cuando se usan aparatos eléctricos, siempre se deben respetar las siguientes
medidas básicas de seguridad:
❑Por favor lea todas las instrucciones.
❑No toque las superficies calientes. Use las asas o las perillas.
❑A fin de protegerse contra un choque eléctrico y lesiones a las personas, no
sumerja el cable, los enchufes ni el aparato en agua ni en ningún otro líquido.
❑Todo aparato eléctrico usado en la presencia de los niños o por ellos mismos
requiere la supervisión de un adulto.
❑Desconecte el aparato del tomacorriente cuando no esté en uso y antes de
limpiarlo. Espere que el aparato se enfríe antes de instalarle o retirarle piezas
y antes de limpiarlo.
❑No use ningún aparato eléctrico que tenga el cable o el enchufe averiado,
que presente un problema de funcionamiento o que esté dañado. Acuda a un
centro de servicio autorizado para que lo examinen, reparen o ajusten o llame
gratis al número correspondiente en la cubierta de este manual.
❑El uso de accesorios no recomendados por el fabricante del aparato puede
ocasionar incendio, choque eléctrico o lesiones a las personas.
❑No use este aparato a la intemperie.
❑No permita que el cable cuelgue del borde de la mesa o del mostrador ni que
entre en contacto con superficies calientes.
❑No coloque el aparato sobre ni cerca de las hornillas de gas o eléctricas ni
adentro de un horno caliente.
❑Tome mucha precaución al mover de un lugar a otro un aparato que contenga
aceite u otros líquidos calientes.
❑Para desconectar, retire el enchufe del tomacorriente.
❑Este aparato se debe usar únicamente con el fin previsto.
❑Este aparato solo debe dejarse funcionar en posición cerrada.
CONSERVE ESTAS INSTRUCCIONES.
Este aparato eléctrico es para uso doméstico únicamente.
 Loading...