

Page 1
Page 2

Page 3

1
GB
CONTENTS
VIDEO CAMERA DESCRIPTION ............................................................ 2
GETTING S TA R T E D ............................................................................... 3
Insert battery ................................................................................................................... 3
Charge .............................................................................................................................. 3
Insert micro-SD card ......................................................................................................3
USING YOUR G-EYE .............................................................................. 4
Power ON / OFF ............................................................................................................... 4
Record a video ................................................................................................................ 5
Take a photo ....................................................................................................................5
Camera functions overview ........................................................................................... 5
Default settings ............................................................................................................... 6
CAMERA SETTINGS .............................................................................. 7
Video settings .................................................................................................................7
Photo settings ................................................................................................................. 8
General settings ..............................................................................................................9
LASER POINTER ................................................................................. 11
TRANSFER FILES ON COMPUTER ...................................................... 12
DISPLAY VIDEOS / PHOTOS ON TV/HDTV .......................................... 12
ERROR MESSAGES ............................................................................. 12
TECHNICAL FEATURES ...................................................................... 13
PRECAUTIONS FOR USE ..................................................................... 13
WARRANTY, LEGAL WORDING ........................................................... 14
Limited liability .............................................................................................................. 14
warranty ......................................................................................................................... 14
Legal wording ................................................................................................................ 14
Page 4
2
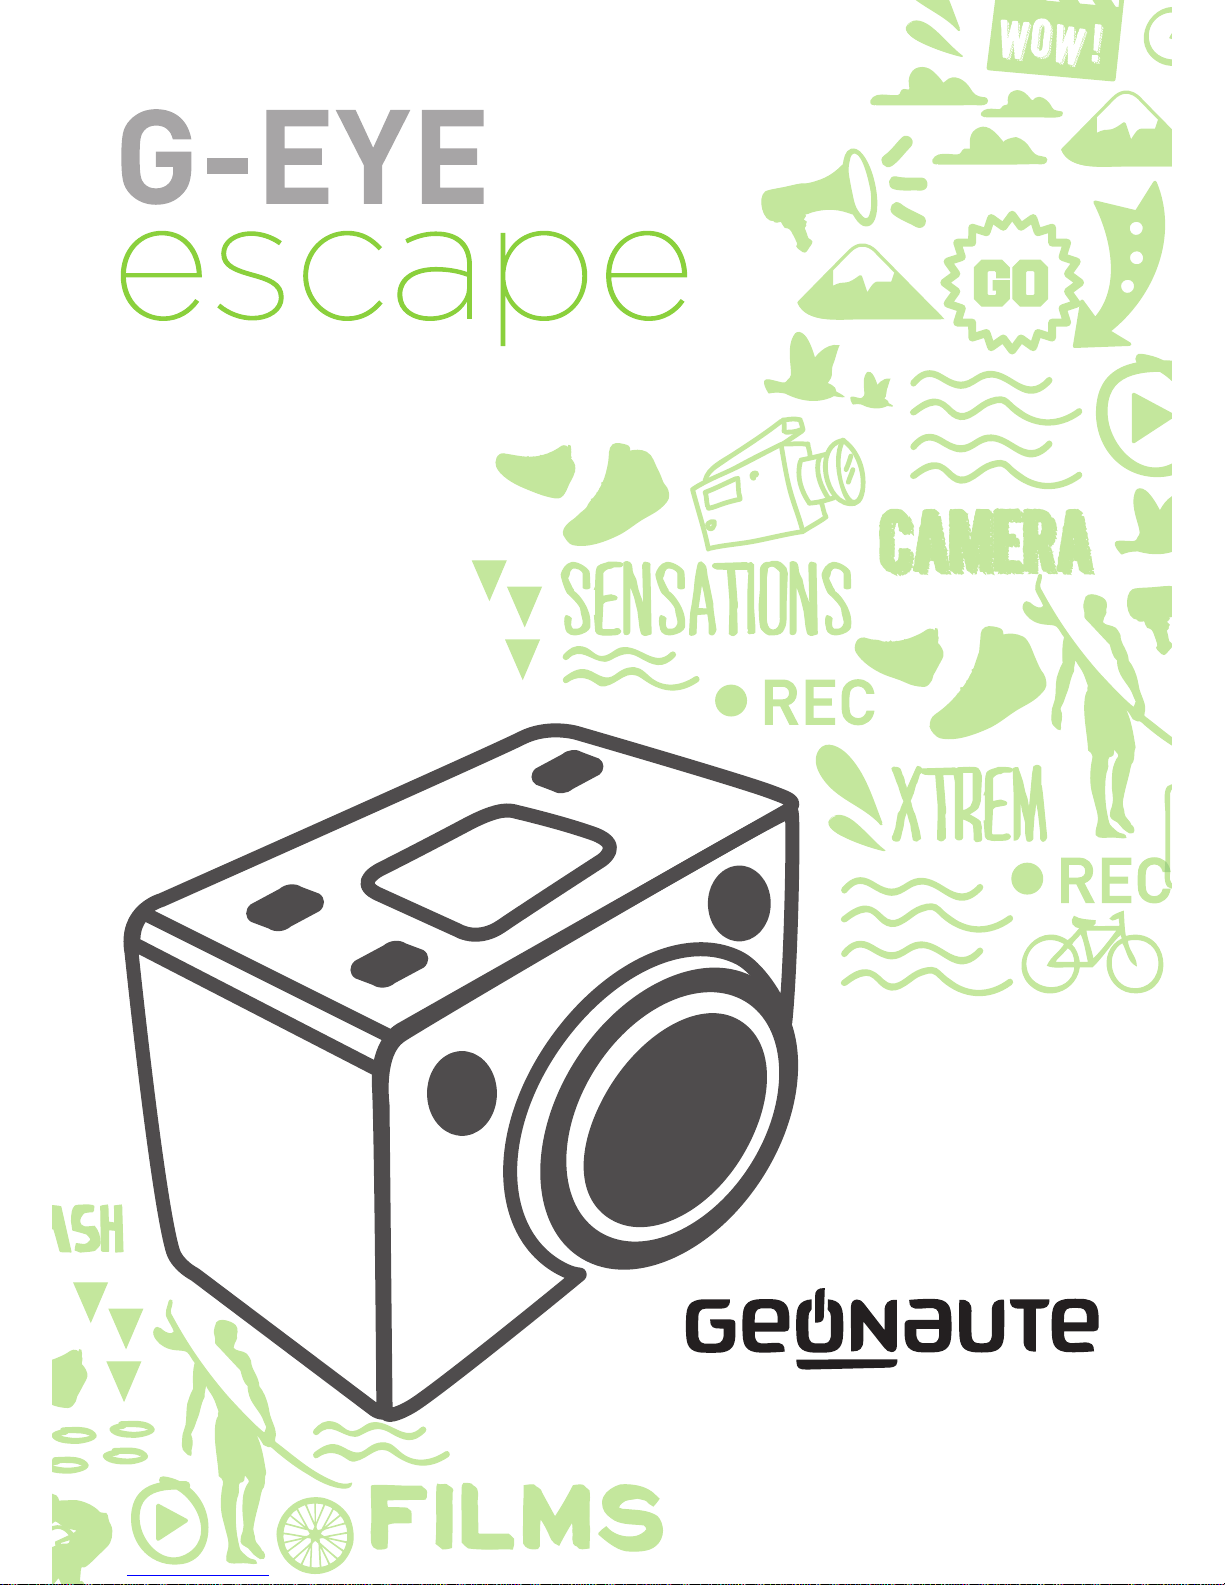
VIDEO CAMERA DESCRIPTION
Record button
Photo button
LCD screen
Video recording /
photo capture red
indicator
Laser
Slot for μSD card
Power / Charge red
indicator
Video recording /
Data transfer green
indicator
Microphone
Speakers
Micro-HDMI
connector
Micro-USB
connector
AV-Out connector
Screw to fasten the video
camera ("Kodak" standard)
Power / Stop
button
Power indicator
Audio recording
indicator
Video recording
Photo capture
Duration of recording
underway
Battery level
Active USB connection
Remaining memory
available
LCD SCREEN
Page 5
3
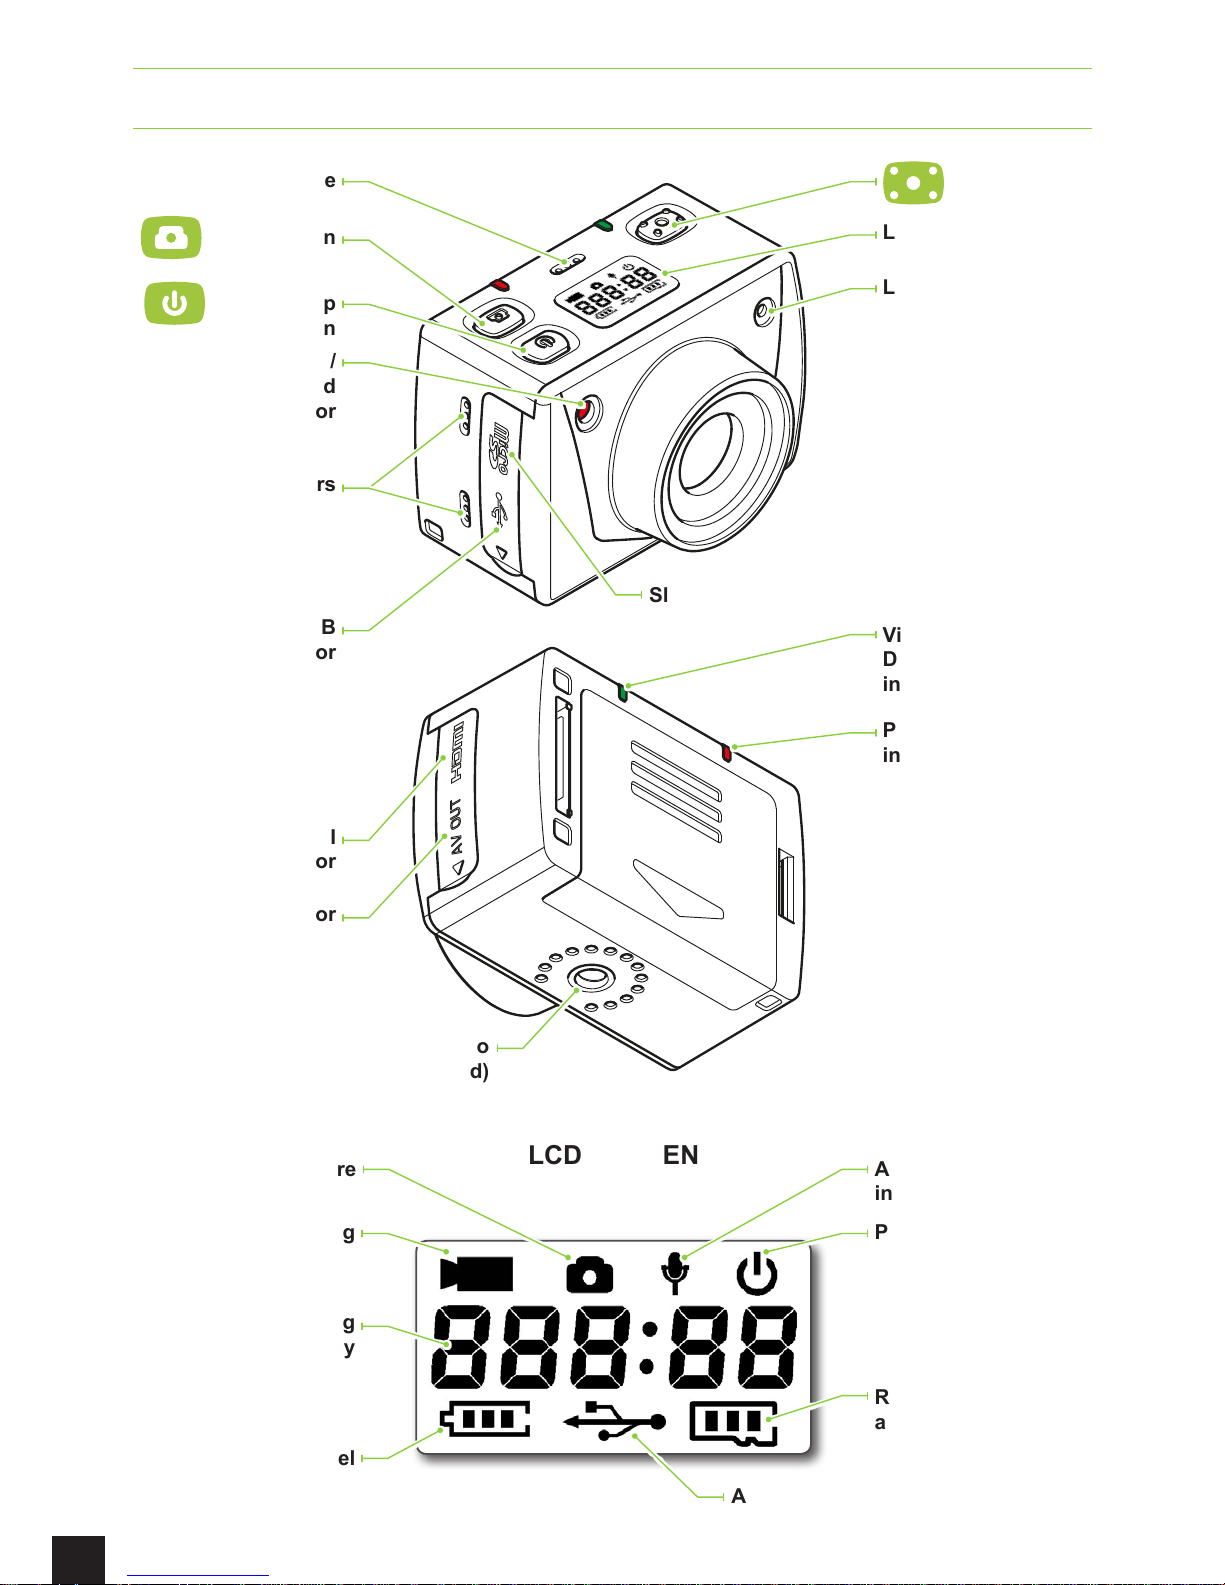
GETTING STARTED
INSERT BATTERY
1
1
2
check that the battery is inserted in the right direction. Do not force it : it could damage
the camera and make it unusable.
CHARGE
4h
12
6
39
Fast Charging : When device is connected to computer, to have a more efcient charging process, you
can make a long press on "power" button to shut down the camera. Then, the green LED will be powered
off, and the red LED will be blinking during charging and stable when charge is completed. The charging
time will be around 3 hours in that case. (Warning : data transfer is not possible during this charging mode).
INSERT MICRO-SD CARD
Compatible Cards Micro-SD cards of 2GB to 32GB (Class 10 recommended)
Page 6

4
USING YOUR G-EYE
POWER ON / OFF
POWER ON
3 s
STANDBY
After 5 minutes without being used, the camera turns automatically to the standby mode.
To record a video, p. 5
To take a photo, p. 5
POWER OFF
3 s
Page 7

5
RECORD A VIDEO
START
STOP
TAKE A PHOTO
CAMERA FUNCTIONS OVERVIEW
CAMERAS MODES
Burst mode
Page 8
Self timer
Page 8
Time lapse
Page 9
Page 8

6
CAMERA SETTINGS
Video
Resolution
Page 7
Video bitrate
Page 7
Laser
Page 7
Video recording mode
Page 7
Photo
Resolution
Page 8
General
Key beep
Page 10
Date and time display
Page 10
Continuous recording
Page 10
Automatic sleep mode
Page 10
TV standard
Page 10
Frame rate
Page 10
Date and time
Page 10
OTHER FUNCTIONS
Laser pointer
Page 7
Format memory
Page 10
Return to default settings
Page 10
DEFAULT SETTINGS
Video ( )
Resolution 1920 x 1080 @ 30 fps
Video bitrate High video bitrate
Laser Off
Video recording mode Video + audio
Photo ( )
Single/triple shot mode Single
Timer Off
Time-laps Off
Resolution 2592 x 1944 / 5 megapixel
General ( )
Beep On
Date and Time display Off
Continuous recording Off
Automatic sleep mode After 5 min
TV standard PAL
Frame rate 50 Hz
Language English
Return to default settings, see p. 10.
Page 9

7
CAMERA SETTINGS
VIDEO SETTINGS
ACCESS TO VIDEO SETTINGS
3 s
1
Navigate in the settings menu
2
Enter in the setting
3
Scroll between the setting choices
4
Conrm the setting selection and return to upper menu
VIDEO SETTINGS LIST
SETTING SETTING CHOICES DETAILS
Resolution
1920 x 1080
30 fps, 16:9
1280 x 720
60fps, 16:9
1280 x 720
30fps, 16:9
Video bitrate
High video bitrate
High video bitrate will provide a higher
denition of colours, but will use two times
more memory space than in Low bitrate
setting.
Low video bitrate
Laser
Disabled
Enabled
Automatic
The laser is automatically activated when
you record a video, and stops when you
stop recording.
Video recording
mode
Video and audio
Audio only
is displayed.
Return to upper menu
Page 10

8
PHOTO SETTINGS
ACCESS TO PHOTO SETTINGS
3 s
1
Navigate in the settings menu
2
Enter in the setting
3
Scroll between the setting choices
4
Conrm the setting selection and return to upper menu
PHOTO SETTINGS LIST
SETTING SETTING CHOICES DETAILS
Resolution
8MP, 4:3 3200 x 2400
5 M P, 4:3 2592 x 1944
3M P, 4:3 2048 x 1536
Shot mode
Single-shot mode
In Burst Mode, the cameras takes
3 photos / second.
Burst mode
Self-timer
Disabled
When this function is activated, photos
are taken after 5 s or 10 s delay.
After 5 s
After 10 s
Page 11

9
SETTING SETTING CHOICES DETAILS
Time lapse
Disabled
When this function is activated, the
camera captures a series of photos at
2, 3, 5, 10, 20 or 30 seconds intervals.
2 seconds intervals
3 seconds intervals
5 seconds intervals
10 seconds intervals
20 seconds intervals
30 seconds intervals
Return to upper menu
GENERAL SETTINGS
ACCESS TO GENERAL SETTINGS
x2
3 s
1
Navigate in the settings menu
2
Enter in the setting
3
Scroll between the setting choices
4
Conrm the setting selection and return to upper menu
Page 12

10
GENERAL SETTINGS LIST
SETTING SETTING CHOICES DETAILS
Beep
Enabled
Enable/Disable beeps on camera keys.
Disabled
Automatic sleep
mode
Disabled
When this function is activated, the camera
turns to standby mode after 2, 5 or 10 minutes.
After 2 mn
After 5 mn
After 10 mn
Date and time
display
Enabled
Enable/Disable overlay of date and time on
video recording.
Disabled
Continuous
recording
Enabled
When this function is activated, if the memory is
full, the camera will delete the oldest video le
to free memory space and continue recording.
Deletion of les is repeated each time it's
needed.
Disabled
Format memory
Conrm
This function is used to erase all les saved on
micro-SD card.
Cancel
Delete les
Conrm
This function is used to delete selected les
starting with the last saved le.
Cancel
Reset
Conrm
To return to default settings.
Cancel
TV standard
PAL
NTSC
Frame rate
50 Hz
60 Hz
Date & Time
Year
For each setting:
Increase the value
Decrease the value
Validate
Month
Day
Time
Minute
Return to upper menu
Page 13

11
LASER POINTER
Laser pointer enables easy framing. It can be used with the optional waterproof cover.
ACTIVATE THE LASER POINTER
3 s
DEACTIVATE THE LASER POINTER
3 s
Page 14

12
TRANSFER FILES ON COMPUTER
Next, recover les the same as you do with a USB key.
SYSTEM REQUIREMENTS
PC MAC
Windows XP, Vista, 7, 8 OS > 10
DISPLAY VIDEOS / PHOTOS ON TV/HDTV
To see your videos and photos on a large screen, plug your G-EYE directly on a TV/HDTV with a
HDMI/ micro HDMI, or with an AV-out cable (optional accessories). Refer to your TV instructions
for use.
ERROR MESSAGES
MESSAGE DESCRIPTION ACTION
No micro-SD card inside the
camera:
• Impossible to start recording/capture.
• Possible to go to «Settings» menu.
Insert a micro-SD card in your camera,
see p. 3
Micro-SD card is full:
• Impossible to start recording/capture.
• Possible to go to «Settings» menu.
Transfer videos and photos on your
computer, see p. 12.
Delete les, see p. 10.
Low level of battery:
• First, only the battery icon is
blinking.
• The message is displayed 2 s before
the camera turns OFF.
Charge the battery, see p. 3.
Page 15

13
TECHNICAL FEATURES
Battery standby Video continuous recording approximately 2 hours
Recharge time ~ 3.5 hours. Max < 4 hours
Battery type Li-ion, 3.7V, 1000 mAh
Video resolution 1080p, 30fps, 16:9, viewing angle = 110°
720p, 60fps, 16:9, viewing angle = 135°
720p, 30fps, 16:9, viewing angle = 135°
Photo resolution 8MP, 5MP, 3MP
Connectors Micro-USB, Micro-HDMI, AV-out, 32 pins for extensions
Connection to computer USB 2.0 « Full-Speed », card reader Micro-SD
Micro-SD card compatible
(sold separately)
Micro-SD of 2 GB to 32 GB
Operational temperature -10°C < … < 45°C
Video format MP4
Photo format JPG
PRECAUTIONS FOR USE
-10°C
-50°F
45°C
113°F
• Handle the device with care - do not drop it or subject it to strong impacts.
• This product is not waterproof, do not subject it to sprays of water or immerse it.
• For increased safety, avoid using the buttons during action. Loss of concentration can be
dangerous
• Do not take the product apart, as this may lead to damage as well as cancellation of the
warranty.
• Using the product in a very cold environment (temperature below -10°C) may lead to a
reduction in battery capacity, and therefore reduction of battery lifetime.
• If you plan not to use the product over a long period of time (over 1 month), make sure the
battery is removed.
Page 16

14
WARRANTY, LEGAL WORDING
LIMITED LIABILITY
• GEONAUTE is not responsible for accidents or injuries caused by handling or using the
product during high risk sports.
• In particular, GEONAUTE insists on informing the user of possible loss of concentration linked
to using the product in dangerous conditions.
• The user is warned that he assumes all legal liability for the taking, sharing, and publication of
images recorded with the product.
WARRANTY
• GEONAUTE guarantees the initial buyer of this product that it is exempt of defaults related
to the materials or fabrication and does so for a period of 2 years (inclusive) from the date of
purchase.
• Please keep your receipt as proof of purchase.
• The warranty does not cover damage caused due to improper use, non-compliance with safety
precautions, accidents, or the incorrect maintenance or commercial use of the device.
• This warranty does not cover damage resulting from repairs carried out by persons not
authorised by GEONAUTE.
• The guarantees contained herein explicitly replace all other guarantees including the
implicit guarantee of merchantability and/or suitability for use. GEONAUTE can, under no
circumstances, be held responsible for any damage, direct or indirect, of a general or specic
nature, caused by or related to use of these instructions or the product they describe.
• During the warranty period, the item will either be repaired free of charge by an authorised
repair service or replaced free of charge (depending on the distributor).
• The warranty does not cover the battery, or camera if it t is cracked, broken or presents visible
dents.
LEGAL WORDING
CE COMPLIANCE
OXYLANE hereby declares that the G-EYE ESCAPE device complies with essential
requirements and with other relevant stipulations of the 1999/5/CE directive.
The CE compliance declaration is available at the following web link:
https://www.geonaute.com/en/ec-declaration-conformity
RECYCLING
This product and the batteries it contains may not be thrown away with
household waste. They are subject to a specic type of sorting. Take the
batteries and unusuable electronic product to an authorised collection area
for recycling. This treatment of your electronic waste will protect the
environment and your health.
CONTACT US
Contact us on www.geonaute.com.
 Loading...