

Page 1

Page 2
Page 3

Congratulations on your purchase of the CW600.T heart rate monitor.
assionate and regular participants of an endurance sport,
P
the CW600.T will allow you to optimize the effectiveness of your
training. With its target range indicator, its passing alarm and
EN
its automatic summary, you can target the desired
physiological impact for each type of session.
The design and comfort of this product have both been carefully
studied to suit all body types.
Limited guarantee
DECATHLON guarantees the initial purchaser that this CW600.T heart rate monitor
is free from any faults linked to the material or manufacture of the charger pack for
a period of 2 years from the date of purchase.
of purchase.
This guarantee does not cover damage resulting from improper use, failure to
•
respect the terms of use or accidents, neither does it cover damage resulting from
improper maintenance or use of the item for business purposes.
This guarantee does not cover damage resulting from repairs carried out by
•
parties not authorized by DECATHLON.
The guarantees contained here replace all other guarantees including the
•
implicit guarantee of fair and trade quality and/or adaptation to use. DECATHLON
cannot under any circumstances be held responsible for any damage, whether
direct or indirect, general or specific, caused by or linked to these directions for use
and the products they relate to.
During the guarantee period, the item can either be repaired free of charge by a
•
repair service authorized by DECATHLON or replaced for free (depending on distributor).
The guarantee does not cover receptor and sensor cells or cracked or broken
•
watch faces where signs of a blow are evident.
The guarantee does not cover the elastic strap of the belt, which is a wearing part.
•
Please retain your receipt as proof
Guidelines governing use
Normal conditions of use : This heart rate monitor consists of a watch
and a chest belt.
The watch is designed to be worn on the wrist or on its bicycle support during the
practice of various light sports in a temperate climate. It indicates time and date
and measures intervals of time manually with its stopwatch function.
The pectoral belt must be placed on the chest. If it is positioned correctly,
it transmits information on your heart rate to the watch. If placed in the reception
cone, the watch then displays your heart rate and sounds an alarm if you exceed
the "target zone" that you are able to program yourself.
The purpose of this information is the planning and optimization of your shape-up
program or training.
Restrictions on use / guidelines governing use
Waterproof design: This watch is waterproof to 5 atmospheres. It can therefore
•
be use in humid conditions, in heavy rain, in the shower and for swimming.
However, avoid diving and wearing the watch at a depth of below 5 meters. Do not
move the buttons underwater.
The chest belt is only "water-resistant". It is therefore impermeable to sweat and
•
can be used in the rain or under damp clothing. It must not be worn in the shower,
however, and must not be used while swimming.
Treat the watch with care; do not drop it or bang it.
•
Do not dismantle the watch. This will render the guarantee invalid and could cause
•
damage and loss of waterproofing.
17
Page 4
ead guidelines carefully before use. Retain these guidelines for as long
Please r
•
as you have the watch.
Do not manipulate the buttons under water, and do not go beyond the depth
•
indicated by the following table with the watch.
Do not subject the watch to extremes of temperature. If the watch is subjected to
•
direct sunlight for a long period, the display may darken temporarily, but will go back to
normal once the temperature has dropped again.
Clean the watch and the belt with a soft, damp cloth only. Do not use detergents
•
since they may damage the materials of your watch. Only the elastic of the belt
may be machine washed (30°).
CAUTION!!!
This device is designed for use in sports and leisure activities. This is not a medical
monitoring device. The information provided by this device or this booklet are
for information only and must not be used for monitoring a pathology except after
consultation with and the agreement of your physician.
Even athletes in good health must take into account that the determination of
your maximum heart rate and your personal training zone is a vital element in the
scheduling of effective, risk-free training.
The advice of your physician or health professional is recommended for
determining your maximum heart rate, your upper and lower cardiac limits and the
frequency and duration of exercise adjusted for your age, physical condition and
targeted results.
Finally, because of possible disturbances generated by the radio transmission
system, we do not recommend that persons who wear pacemakers use a heart
rate monitor utilizing this technology, like the CW600.T
Not taking these precautions may entail serious risk.
Wearing the chest belt.
The chest belt acts as a sensor
and emitter. It measures
the differences in potential
created on the surface
of the skin by the beating
of your heart. Then it sends
this information to the watch by radio signal.
The quality and precision of the measurements depends on correct positioning,
but also the comfort during practice.
As indicated in drawing 1, the sensors are the surfaces of black rubber on both
sides of the central part.
Measurement sensors
18
Page 5
Installation procedure
et the sensors with water or a water-based conducting gel to ensure
1 W
ood contact.
g
2 Introduce one rib of the elastic into one of the holes on the belt
provided for this purpose.
3 Attach the belt around the chest, then position
the belt just below the pectoral muscles with
one of the sensors under the heart and the
other under the right pectoral.
4 Adjust the length of the elastic so that it holds
firmly but is still comfortable. The belt must not move
around if you jump or move your arms.
5 Check the positioning of the belt by bringing it
to 50 cm from the watch. The heart rate
should flash on the display. If it does
not flash normally:
- reduce the distance between the belt
and the watch
- adjust the position of the belt and wet
the sensors well
- check that the batteries are good, especially
in the belt
- go to cardio mode (procedure in paragraphs 6 and 7)
and press
S1 to test the connection
Sensors
Sensors
ATTENTION :
Avoid positioning the sensors in areas that are too hairy.
In cold and dry climates, the belt may need several minutes to function correctly.
This is normal because sensors need a film of sweat to ensure contact with the
skin.
When it first begins measuring, the watch may indicate very elevated values for
about for about 20 seconds. This is because the algorithm is initializing.
The display will stabilize at correct values after this interval of time.
Take precautions when fixing the elastic strap in the hole of the belt provided for
this purpose. Maintain the ergot by placing your finger behind the belt.
Navigation system
The CW600.T has 4 functioning modes: the hour, cardio, stopwatch and alarm
modes. You go from one to the other by pressing S3.
Note: By pressing S3 for 3 seconds in any mode, you will return directly to the Time
mode.
Explanation of each mode
TIME PULS CHRONO ALRM
Time mode Cardio mode Chrono mode Alarm mode
S3
S3 S3
S3
19
Page 6

1 - Time mode (TIME):
S4
S3
S1 : activation / deactivation of chimes S4 :
S2 : date display
S3 : Go to cardio mode S5 : Electroluminescence
TU
17:24
24
S5
for 3 seconds)
S1
❤
S2
settings mode (press and hold
Setting of the time, date and 12/24h mode :
In the time mode (TIME), press S4 for 3 seconds.
•
Press S1 to increase the hour (keep the button pressed down to make
•
the numerals scroll by more quickly).
Press S2 to decrease it.
•
When the hours number is set, press S3 each time to set, in the same fashion:
•
-> minutes "min" (press
-> seconds "sec" (press
-> the year "yr" (press
from 2000 to 2039),
-> the month "mth" (press
-> the day "day" (press
-> 12/24h display (press
versa.)
S4 to quit settings mode (The day of the week is automatically calculated
Press
depending on the date selected.)
Note :
If no button is pressed for 2 or 3 seconds in the settings mode, the watch will
automatically return to normal time mode.
S1 or S2 to make the numerals scroll by)),
S1 or S2 to make the numerals scroll by)
S1 or S2 to make the numerals scroll by, to set for any year
S1 or S2 to make the numerals scroll by),
S1 or S2 to make the numerals scroll by),
S1 or S2 to go from 12h mode to 24h mode and vice
2- Cardio mode (PULS) :
S4 S1
BPM
60
S3
S1 : Increase value (settings mode) S4 : Setting parameters
S2 : Decrease value (settings mode) S5 : Electroluminescence
S3 : Go to stopwatch mode
20
-
S2
S5
Page 7

Setting parameters :
1013
mBar
60
22:01
ACC
70
M
ALTI
12:30
03
1013
T1
WE
4
P
mBar
60
22:01
ACC
70
M
ALTI
12:30
03
1013
T1
WE
4
P
mBar
60
22:01
ACC
70
M
ALTI
ore anything else, you must enter your personal parameters so that the device
Bef
ovide you with the most personally accurate measurements possible..
can pr
ou have entered the heart rate monitor mode (PULS) by pressing successively
After y
on the S3 b
Press for 3 seconds on S4, and the letters "zone Hr" will be displayed and the "on" light
will flash at the bottom of the screen.
Set the parameter flashing by pressing S1 (increase) or S2 (decrease). Hold the
button down for rapid scrolling.
After selecting the correct value, press S3 to go to the settings mode for the
following parameter.
The parameters that need to be set are the following :
•
•
•
•
•
•
•
•
It is imperative that you check that this data is entered correctly before use in order
to ensure the reliable functioning of the heart rate monitor.
If the target zone function is deactivated
alarm when you exceed the target zone and no display of the time spent in the
target zone in the reporting function of the stopwatch mode (see stopwatch mode).
If the
and the data erased.
To start using :
See paragraph "Wearing the chest belt" for positioning the belt.
Once everything is installed, bring the watch to within less than 50 cm of the belt
and then press
The heart on the display begins to flash and a value is displayed.
Disregard the values indicated before the device stabilizes (about 20 seconds). This is
the time necessary for the calculation algorithm to provide smooth, reliable numbers
The pectoral belt does not have an encoded emitter; interference is to be expected
if you are located too close (about 1 meter) to other heart monitor wearers..
If the radio connection between the watch and the belt is interrupted for more than
1 minute, " --- " will be displayed on the middle line. To reactivate the connection,
press
utton as indicated in paragraph 6.
Activation of the target zone (Zone Hr): possible values On, Off
Sex: man (Male), woman (Female)
Metric system or English system (unit): KG(kilograms) or LB(pounds)
Your weight (wt) in the units previously selected: from 20 to 300
Your age (age) (from 1 to 99 years)
The upper limit of the target zone (HI) (in beats per minute (BPM)
The lower limit of the target zone (LO)
Alarm for when the target zone is exceeded (zone ALM): possible values On/Off
ATTENTION :
(zone Hr = OFF), there will be no sounding
UNIT parameter or the weight is changed, the stopwatch will be reset to 0
ATTENTION :
ATTENTION :
S4.
S1 to test the connection..
.
.
21
Page 8

1013
60
22:01
ACC
70
M
ALTI
12:30
03
1013
T1
WE
4
P
mBar
60
22:01
ACC
70
M
ALTI
Fig. a
Fig. b
BPM
❤
165
HI
In the "cardio" function, if the heart rate displayed is higher than the upper limit of
the target zone, the display indicates this with the following symbol (fig a.). If it is
lower than the lower limit, the symbol displayed is the one in figure b.
If the passing alarm is activated (ON), the watch will emit 1 beep every 6 seconds
if your heart rate is LOWER than the Target Zone.
ATTENTION :
In the settings mode, if no buttons are pressed for 2 to 3 minutes, the watch will return
automatically to cardio mode.
In the cardio mode, if no cardio signal is being received and if the buttons are not
pressed for 2 to 3 minutes, the watch will return automatically to time mode.
4 - Stopwatch mode (CHRONO)
S1 :
start stopwatch, intermediate time
S2 : Stop stopwatch S5 : Electroluminescence
S3 : Go to stopwatch mode
S4 S1
S3
BPM
72
15
05
S5
BPM
103
❤
S2
S4 : Reset to 0
❤
HI
ATTENTION :
The following explanations as well as the diagrams on the screen assume that the user
is wearing the chest belt and is using the heart rate monitor function in parallel. If a
heart rate signal is received correctly by the watch, the symbol
bottom line. If this is not the case, the display of the heart rate on the upper line remains
at - and no alarm will be triggered.
The stopwatch displays the minutes and seconds on the line in the middle and the
1/100 seconds on the upper line up to 59'59'', then the hours and minutes on the
middle line and the seconds on the upper line.
On the bottom line, the watch displays the current heart rate of the user.
22
"heart" will flash in the
Page 9

ATTENTION :
12:30
03
1013
T1
WE
4
P
mBar
60
22:01
ACC
70
M
ALTI
No measure of heart rate when the electroluminescence function is activated or
the alarm sounds.
The stopwatch function
In stopwatch mode (CHRONO) :
Press S1 to start the stopwatch.
S2 to stop the stopwatch.
Press
Press
S4 when the stopwatch has stopped to reset it to 0.
Intermediate time
In stopwatch mode :
Press S1 to start the stopwatch.
S1 to measure the intermediate time (the letters CHR flash to indicate that
Press
the stopwatch is running). The intermediate time is displayed for about 10 seconds,
and then the display returns to the current stopwatch value (attention, the values
cannot be saved in memory).
S1 to measure the following intermediate time.
Press
S2 to stop the stopwatch (CHR stops it from flashing).
Press
"Training report" function :
If the "zone Hr" function is activated (On)after stopping the stopwatch, the watch
displays a training report. The following information is displayed sequentially, each
for 5 seconds. (You can also press
- Overall time
- Average heart rate
- Time spent in heart rate zone
- Calories burnt
ATTENTION :
If the watch does not detect any cardiac signal when it enters the stopwatch mode,
only the duration of the stop watch measurement is displayed when the stopwatch
is stopped.
5 - Alarm mode (ALRM)
S4 S1
S3
S2 to scroll the information) :
A
07:00
ON
S2
S5
S1 : Activation / deactivation of the alarm S4 : Enter / leave settings mode
S2 : Activation / deactivation of the alarm S5 : Electroluminescence
S3 : Go to time mode
Set the alarm
In the Alarm Mode (ALRM), press S4 for 3 seconds until the numeral for the hours
flashes.
Press
scroll the numerals rapidly.
Once the correct value is indicated, press
that is flashing.
S1 or S2 or increase or decrease the numeral for the hours. Hold down to
S3 to set the numeral for the minutes
23
Page 10

Set the minutes with S1 or S2.
Once the correct hour is indicated, press
vation of the day alarm
Acti
Alarm Mode, press
In the
m is activated, a graphic flashes at the bottom of the screen (see drawing,
alar
agraph 1).
par
Note
The alarm sounds each day at the programmed hour for 20 seconds. Stop the
buzzer by pressing any button.
If the hour is set in 24h mode, there is no display of A (AM) or P (PM).
S1 or S2 to acti
S4 to exit the settings mode.
vate/deactivate the alarm. When the
Spécifications
Principle functions :
Hour (12/24h display)
•
Date
•
Retroillumination
•
Target zone with passing alarm
•
Stopwatch to 1/100 of a second (up to 1h. precision 1 second afterwards)
•
Waterproof design of watch: 5 ATM
•
Waterproof design of belt: 1ATM
•
Temperature: from -10°C (14°F) to +50°C (122°F)
•
Batteries :
•
- Watch: CR2032 (not to be changed by the user)
- Belt: CR2032
Approximate useful life of the batteries with normal use
-
(5 hours of use per week):1 year.
ATTENTION :
The use of background lighting consumes a great deal of energy (2000 times more
than the normal functioning of the watch). If this function is used frequently,
the useful life of the batteries may be reduced dramatically and it will be necessary
to change the batteries after several hours of use.
Target zone: can be set at 40 to 240 beats per minute.
•
Radio transmission: amplitude modulation on carrier wave of 5 kHz.
•
Made in China.
•
24
Page 11

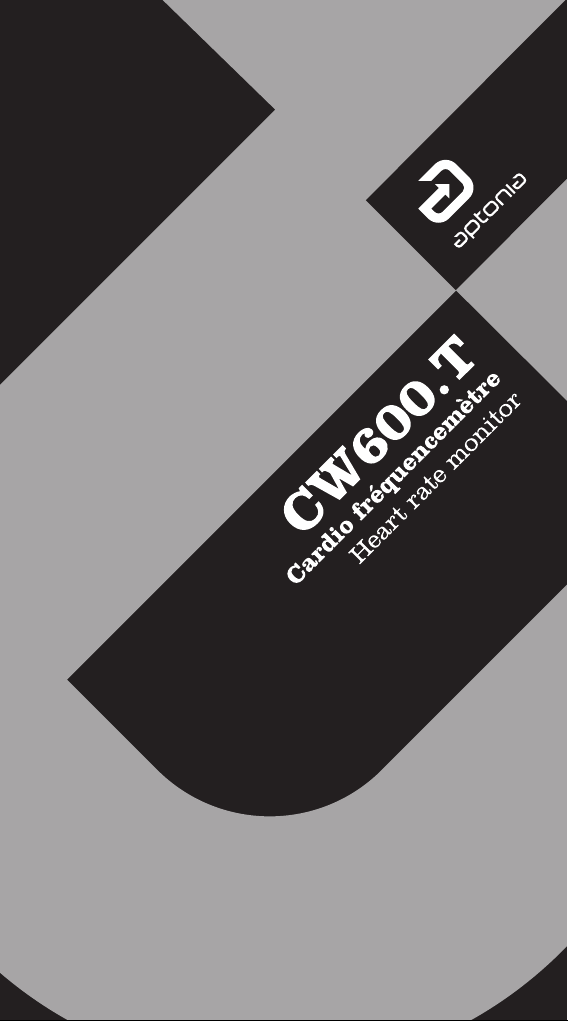
Batteries : The battery used in the chest belt is a CR 2032.
he battery used in the watch is a CR 2032.
T
Watch :
ut rather have the job done by a specialized DECATHLON repair shop. If you change
b
the ba
and guar
Please check the availability of the battery with your dealer before replacing it.
e recommend that you not change the watch batteries yourself,
W
ttery yourself, you may damage the seal and lose both the water tightness
antee on the product
.
Pectoral belt : If the hear t rate indications become inconsistent, or if the
heart monitor light on the watch does not flash when it is close to the belt, it may
be necessary to change the battery in the chest belt.
You can easily change the belt battery yourself, without the aid of any particular tool
Changing procedure :
1 unscrew with the aid of a coin, then remove the cover of the battery compartment.
2 remove the old battery by tapping on the opposite side of the belt.
3 replace the used battery with a lithium 3V type CR2032 battery without touching
it on its 2 terminals (it may discharge), with the +terminal (printed surface) up.
4 carefully replace the cover, then screw it down again by a quarter turn to the
"CLOSED" position
If there is a problem, contact your retailer.
Battery
Contacts
.
25
Page 12

Problem
1 – Heart rate is not
displayed.
Cause
1.1 – The electrodes are not moistened enough.
1.2 – The belt is incorrectly positioned.
1.3 – Belt battery low or flat.
2 – Watch display is faint
or illegible.
3 – Heart rate displayed
races or is unrealistically
high.
4 – Rate displayed at the
start of a session is
inconsistent.
5 –
Product is malfunctioning.
6 – Device beeps when
the heart rate function
is used.
If you do not find a solution to your problem in this troubleshooting table,
please contact DECATHLON after-sales service.
2.1 – HRM watch battery is low.
3.1 – The device is capturing interference.
3.2 – You are receiving another runner's heart
rate data.
3.3 – Belt is rubbing.
3.4 – Poor conduction in dry and cold weather.
4.1 – Algorithm is initialising.
5.1 – Buttons do not activate the right functions,
or device appears to malfunction.
6.1 – Target zone alarm is incorrectly set.
26
Page 13

Operation / Procedure
Moisten the electrodes using conducting aqueous gel or water.
Check the positioning of the belt around your chest: it should be positioned
as shown in the instruction leaflet.
Bring the HRM watch and the belt closer together, check the above points,
and then check transmission. If there is no transmission, change the belt
battery as shown in the instruction leaflet.
Please visit a DECATHLON workshop to have your HRM battery changed.
You may be in an area with a strong magnet field, a high voltage power line,
radio communication equipment, etc.
If this is the case, move away from this area.
The belt does not have a coded transmitter. You will receive interference
when less than 1 metre from other HRM users.
Check that the belt is tightened and that the electrodes are moistened.
Rubbing of the belt sends a signal different to that of a heart rate.
During cold and dry weather, the product may give incorrect information for a
few minutes. This is normal, as a film of perspiration is necessary for good
contact between the electrodes and your skin.
For around ten seconds, the displayed value may be inconsistent with your
real heart rate. This is because the algorithm is initialising.
Hold down buttons S1, S2, S3 and S4 together for 1 second to RESET the device.
Now set the device as shown in the instruction leaflet.
The target zone alarm is probably active and you are outside of the zone.
See the instruction leaflet for details of how to set or deactivate the target
zone alarm.
27
Page 14

Principles of training
For reasons of effectiveness and safety, it is indispensable for you to know certain
physiological parameters required for training. The advice that we provide here is
intended for healthy, active persons who do not present any pathology. We strongly
advise you to obtain the advice of your physician in order to establish your most
ecise training zone.
pr
ATTENTION :
Know your limits and do not exceed them !!!
To optimize the benefits of your physical preparation, you must first know your
maximum heart rate
La FCmax peut s’estimer en fonction du calcul suivant :
FCmax = 220- votre âge.
During a shape-up program, several training zones will give specific results
corresponding to different objectives. Depending on the intensity of the exercise,
the percentage of the energy coming from the combustion of sugar and that
coming from the combustion of fats changes.
Fats Sugars % FC max
(FCmax) expressed in beats per minute (bpm).
50% - 60%
60% - 70%
70% - 80%
80% - 90%
Moderate activity (walking, hiking…)
Weight control (cardio training, running, in-line skating)
Aerobic zone (endurance training, 10km)
Speed training (400m)
Ex : A 30-year-old athlete training for aerobic endurance in order to increase
his resistance to effort and improve his time in the 10,000 meter run. The most
effective training zone for his objective will be 80 to 90% of his maximum heart rate.
The lower and upper limits of the target zone are calculated by multiplying your
FCmax by the limit percentages of the selected training zone. This equation also
measures your resting heart rate (FC rest), which you can simply measure with
your heart rate monitor early in the morning when you wake up.
Limit of the target zone = FC rest+ intensity %*
(FC max -FC rest)
FCmax=220-30=190 bpm
FC rest = 60 bpm
The upper limit of the target zone is
FC rest + 90%*(Fcmax-FC rest) = 60 + 90%*(190-60) =177 bpm
The lower limit of the target zone is
FC rest + 80%*(Fcmax-FC rest) = 60 + 80%*(190-60) =164 bpm
28
Page 15

Contact
As we strive to continually improve the products we develop, we are interested in
your feedback regarding the quality, the functionality and the usage of our products.
In France, please call the customer service center at:
•
0810 08 08 08 (local call r
For any other country, please leave a message under the relevant heading on our
•
website:
www.decathlon.com
We promise to answer you promptly.
ate)
29
 Loading...