

Page 1

Chrono 900 FR-EN-ZH.qxd 8/06/05 10:08 Page 66
Page 2
1918
00:00’ :00’’00
00:00’ :00’’00
[000]
RECALL
SLOW
FAST
AVG
LAP
STOP
PACER
SPLIT
00:00’ :00’’
00
STW
FULLSPEED TIMEDIST Mi /Hr Km /Hr BPM
ke
Congratulations on your purchase of the Trt’L 900 stopwatch! This
device offers very good measuring precision as well as great ease
of use and a series of high-perfor mance functions. The Trt’L 900
will accompan
y you for a long time during your athletic activities,
when monitoring training or very simply for any measurement of time.
Limited guarantee
DÉCATHLON guarantees the initial purchaser of this stopwatch that it is free from any
faults linked to the materials or manufacture for a period of two years from the date of
purchase.
Please retain your receipt as proof of purchase.
•
This guarantee does not cover damage resulting from improper use, failure to respect the
terms of use or accidents, neither does it cover damage resulting from improper maintenance
or use of the item for business purposes..
•
This guarantee does not cover damage resulting from repairs carried out by parties not
authorized by DÉCATHLON.
•
The guarantees contained here replace all other guarantees including the implicit
guarantee of fair and trade quality and/or adaptation to use. DÉCATHLON cannot under
any circumstances be held responsible for any damage, be it direct or indirect, general or
specific, caused by or linked to these directions for use or the products they relate to.
•
During the guarantee period, the item will either be repaired free of charge by an
authorized repair service or replaced for free (depending on distributor).
•
The guarantee does not cover batteries or cracked or broken watch faces where signs
of a blow are evident.
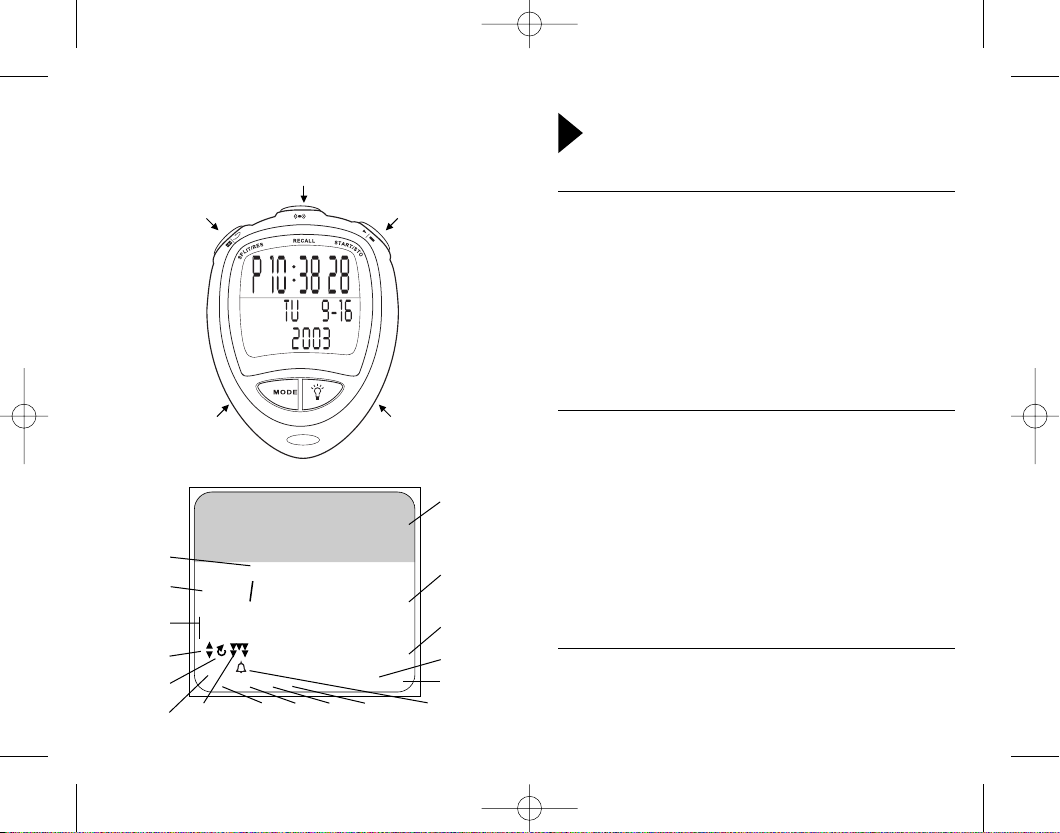
Characteristics and functions
•
5 Buttons :
SPLIT/RESET, RECALL, START/STOP, MODE, ÉCLAIRAGE
•
3 display lines
•
measuring precision to 1/100 of a second up to 10 hours
•
Replaceable batteries
(CR2032).
•
Case is waterproof to water spray. May be used for water sports or in the rain.
Functions
•
Stopwatch for up to 99 hours and 59 minutes
•
Time (h, min, s in 12 hour and 24 hour display)
•
Date (day, month, year), automatic calculation of the day of the week
•
999 intermediate times (LAP)
•
299 memories that can be consulted during functioning, calculation of the fastest and
slowest LAP, value of the average LAP
•
3 countdown systems (timer) that can be set from 1s to 99h59min59s by steps of 1 s
and decrementation to 1/100s
•
Pacer (pacer) that can be set for from 05 to 240 beeps per minute
•
Calculation of speed in km/h and m/h (conversion possible)
•
Measurement of average frequency over 2 to 30 cycles
Normal conditions of use
This stopwatch has been designed to measure intervals of time in order to optimize
athletic training or for measuring performance. It is not intended for calibrating technical or
safety devices (especially braking systems). It is no longer designed for arbitrating
competition or to be used for any commercial purpose.
EN
SPLIT/RESET
MODE
START/STOP
LIGHT
Main data, e.g.
time, stopwatch
time
Secondary
data, e.g. LAP,
date
Memory
full
indicator
Training
countdown timer
indicator
Beep
indicator
Down’n’Up
countdown
indicator
Split countdown
timer indicator
Memory : slowest
lap, fastest lap,
average lap time
Lap,
split timer
Secondary data,
e.g. SPLIT,
year
Speed units
Frequency units
Stopwatch
operating light
RECALL
Speed
mode
indicator
Time
mode
indicator
Distance
indicator
Alarm
indicator
Chrono 900 FR-EN-ZH.qxd 8/06/05 10:08 Page 18
Page 3
2120
Restrictions on use / guidelines governing use :
•
If you do not respect the following precautions, you risk losing the
Décathlon
guarantee.
•
Waterproof design: The stopwatch is classified as "water resistant". It can therefore be used
in humid conditions and is w
ater-resistant in rain or water spray. But it is not waterproof in
cases of immersion, nor is it designed to be used under water.
•
Care and maintenance : To preserve the Décathlon guarantee, any operation or repair must
be exclusively entrusted to a Décathlon electronics shop. If one is not available, no dysfunction
can be claimed in the context of the Decathlon guarantee, with the exception of hidden defects.
•
When changing the battery, replace the seal and check for water-tightness.
•
If condensation appears or water infiltrates, check the device immediately. Water may
attack the electronic elements inside the casing.
•
Avoid submitting the device to hard shocks like those received when falling onto a hard
surface.
•
Do not expose the stopwatch to extreme temperatures.
•
Clean only with a slightly damp, soft cloth, and do not use detergents or soap, which may
cause the materials to deteriorate.
•
Keep the device away from any strong electrical field or area of static electricity.
Operating problems:
If you encounter a problem with the read-out please check the batteries first.
Recycling:
The ‘crossed out dustbin’ sign means that this product and its batteries cannot
be thrown out with domestic waste. They should be treated apar t. When you
have finished with them, drop them at an authorised collection point so they
can be recycled. This gesture will go towards protecting the environment and
your health.
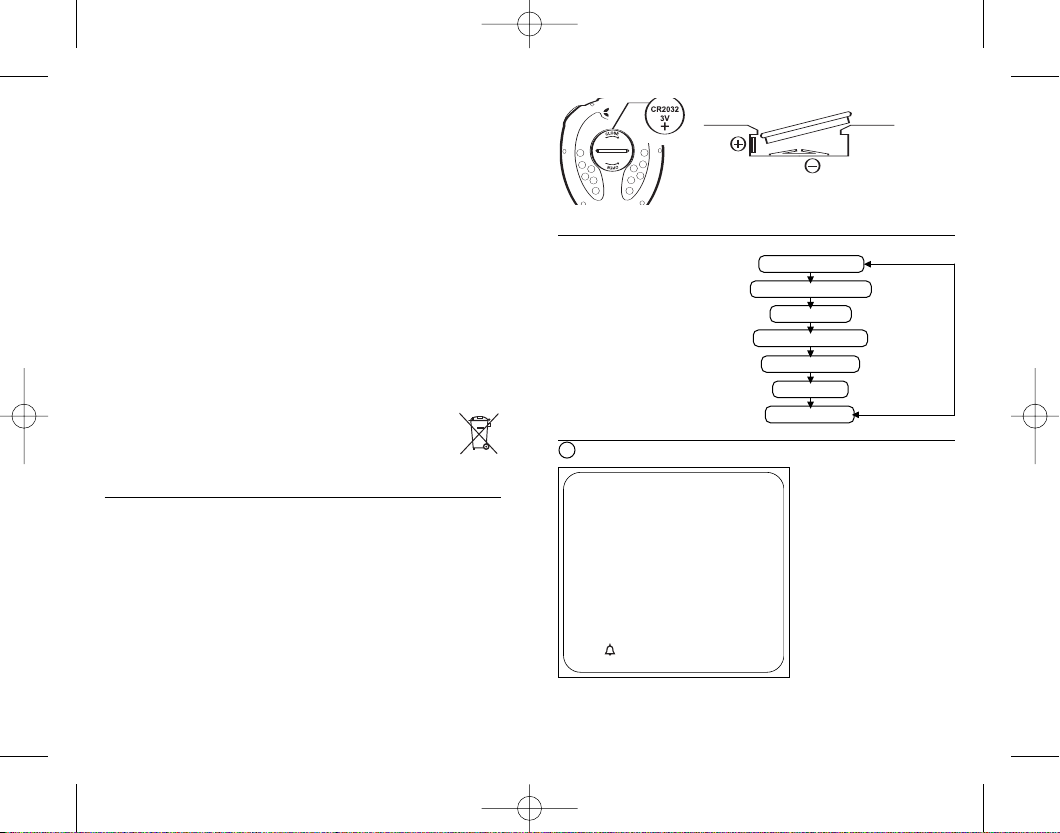
First use
The setting of the time
, the date
, the
TIMER and the PACER are explained in the sections
dedicated to the different modes
Initialization : In case of problems with the display or a significant dysfunction,
press the 4 buttons simultaneously (START/STOP, MODE, RECALL, SPLIT/RESET)
to reinitialize the stopwatch (RESET).
batteries : The stopwatch uses a CR2032 type battery
Replacing the battery is done by unscrewing the back cover a quarter turn, using a coin,
for example.
Inserting the battery is done according to the following diagram. Make sure the polarities
are correctly placed. Remember to protect the environment and dispose of your batteries
or y
our used product in a place where the
y can be recycled.
Scrolling through the different modes
By pressing repeatedly on the
MODE button, you can access the
different functioning modes as shown
in the following diagram.You must make
the screen corresponding to the desired
function appear in order to use or set it
1 Time/Date Mode (Time)
2 Daily Alarm Mode
3 Pacer mode (Pacer)
4 Countdown Mode (Timer)
5 Stopwatch mode
6 Speed Calculation Mode
7 Frequency calculation mode
Modes
1 Time/Date Mode (Time)
START/STOP :
activate/deactivate the beeping sound
RECALL :
to enter the setting mode
SPLIT/RESET :
to go to 12/24h mode
MODE :
go to the following mode
2
Daily Alarm Mode
3
Pacer mode
5
Stopwatch mode
4
Countdown Mode
6
Speed Mode
7
Frequency Mode
SU:12:07’’00
2004’’00
AM:12’ :30’’
43
FULLSPEED TIME
ke
1
Time/Date Mode
Chrono 900 FR-EN-ZH.qxd 8/06/05 10:08 Page 20
Page 4

2322
2 Daily Alarm Mode
START/STOP :
activate/deactivate the alarm
RECALL :
to enter the setting mode
SPLIT/RESET :
inactive
MODE :
go to the following mode
•
Display :
- Top line: Time
- Middle line: ALARM
- Bottom line: Wake-up time
•
The indication for the daily alarm will appear if the function has been selected (see
corresponding chapter).
The word
ALARM will appear for several seconds once you are in this mode, then remain
displa
yed on the middle line.
•
On the top line
, y
ou will read the time displayed according to the setting made in the
preceding chapter, in 12h or 24h mode.
On the bottom line, you will read the alarm time in the same format as that of the time, set
in the time date mode.
•
Press the ST
AR
T/ST
OP
b
utton to alter
nate betw
een activ
ating and deactivating the
alarm.
•
Set the alarm
Press longer (2s) on the RECALL button. The word SET and the number for the alarm
hours will flash to indicate that y
ou have entered the setting mode.
•
Press the SPLIT/RESET button repeatedly to change the parameter to set following the
sequence …hour-minutes-…
When one of the elements flashes
, press the START/STOPbutton to make the numbers
scroll until you reach the desired value.
Press RECALL again to leave the setting mode.
•
When the alar
m goes off
, it sounds f
or 20 seconds.
Press on any button to stop the sounding.
•
Display :
- Top line: Time
- Middle line: Day, week and date
- Bottom line: Year
•
T
he screen will display the word TIME at the lower left of the screen.
The symbol for the daily alarm will appear if the function is selected (see corresponding
chapter). The sound that signals activation of the buttons is also present in the lower left of
the screen if activated (press
START/STOP to activate or deactivate).
•
A brief display on the central line (TIME) indicates that you have arrived in this
mode.
•
START/STOP: beeping sound (activation/deactivation)
•
SOn the top line, you will read the time in Anglo-Saxon mode (0-12 hours AM/PM) or in
European mode (0-24 hours). Going from one to the other is done by pressing the
SPLIT/RESET button.
On the middle line
, you will read the date in the format day week-day of the month-month
or week-month-day of the month respectively, depending on whether the European mode
(
EU) or Anglo-Saxon mode (US) has been activated (see settings chapter).
The current year will appear on the lower line.The day of the week is automatically
calculated based on the year and the date.
•
Setting the time and date.
Press for a longer time (2s) on the RECALL button. The word SET and the number
of seconds will flash to indicate that you have entered the setting mode.
•
Press the
SPLIT/RESET
button repeatedly to change the parameter to set, following
sequence …seconds-hour-minutes-year-month-day-display in European or Anglo-Saxon
mode (date in the format DD/MM or MM//YY)…
When the elements flash, press the
ST
AR
T/STOP
b
utton to reset the seconds to 0 or scroll
through the numbers of the parameter to the desired value. Hold the button down to set
more rapidly.
Press RECALL again to leave the setting mode.
ALARM’’00
PM:02’ :00’’00
AM:07’ :06’’
39
Chrono 900 FR-EN-ZH.qxd 8/06/05 10:08 Page 22
Page 5

2524
3 Pacer mode (PACER)
START/STOP :
start / stop the timer
RECALL :
decrease the pacer value
SPLIT/RESET :
to increase the frequency of the pacer
MODE :
go to the following mode
•
Display:
- Top line: displays the stopwatch if it is active. Empty if not.
- Middle line :
PACER
- Bottom line : pacer frequency
•
The screen displays the word PACER in the middle of the screen in this mode
•
The letters BPM (beats per minute) are found in the lower right of the screen.
•
The alar
m symbol appears if it is selected (see corresponding mode).
•
The word PACER will flash at the bottom left of the screen if it is activated.
•
On the bottom line, you will read the pacer value set, from 01 to 240 pulsations per
minute (possible values: 1, 2, 3, 4, 5, 10, 15, 20, 30, 40, 50, 60, 80, 100, 110, 120, 130,
140, 150, 160, 180, 200, 220, 240)
•
Setting the rhythm value.
Press the SPLIT/RESET b
utton to scroll through the pacer v
alues incrementally.
Press
RECALL to scroll downwards.
•
Press the ST
ART/STOPbutton to start or stop the pacer. When the pacer is activated,
the word PACER will flash.
4 Countdown Mode (TIMER)
START/STOP :
start/stop the timer
RECALL :
to enter the setting mode
SPLIT/RESET :
to set the values
MODE :
go to the following mode
•
Display :
- Top line : the current value of the countdown.
- Middle line: TR, number of the countdown and repetition counter.
- Bottom line: starting value of the countdown.
•
On the top line, you will read the current countdown value (format - hour : minutes :
seconds : hundredths of seconds).
•
On the lower line, you will read the value of the countdown setting (format - hour :
minutes : seconds).
•
In the middle
, to the left of the screen, the indication of the repetition counter f
or the
countdown will appear, to three digits.
•
On the lower left of the screen will appear a pictogram indicating the type of countdown
that is active. This pictogram will flash (in all the modes) when the countdown is activated.
•
A "STOP" pictog
r
am is displayed when the countdown has stopped.
3 possible countdown modes:
•
Do
wn and Up:the countdo
wn begins at the starting value, goes down to 0, beeps, and
then starts the stopwatch at the beep.
•
Repeated timer
: repeated countdown.The countdown begins at the starting value, goes
do
wn to 0, beeps, and then begins again at the starting value while counting the number
of countdowns with the repetition counter.
•
Training timer
: countdown for training.You can set up to 9 different, successive count-
do
wns. You will also set the number of repetitions of the sequence thus formed. You may
go from one to the other by pressing for a longer time on the
SLIP/RESET
button..
04:00TR1’’00
00:30’ :00’’00
[001]
STOP
00:26’ :06’’
83
PACER’’00
180’’00
BPM
PACER
Chrono 900 FR-EN-ZH.qxd 8/06/05 10:08 Page 24
Page 6

2726
Down and up timer
(symbole )
•
Use
The ST
ART/STOPbutton starts or stops the countdown
When the countdown has stopped, press the SPLIT/RESET button to reinitialize it at its set
value.
When the count arrives at 0, a 5 second buzz is emitted.
Beginning with 0, the timer increases the time like a stopwatch.
A press on the
START/STOP
button will stop the counting.
A press on
SPLIT/RESET
rwill reset the repetition counter to 0 and reinitialize the count-
down at its starting value.
•
Setting the starting value of the countdown
Press for a longer time (2s) on the RECALL button.The indication of the set value will flash
to indicate that you have entered the setting mode..
Press repeatedly on the
SPLIT/RESET button to change the parameter to set following the
sequence …hour-minutes-seconds…
When one of the elements flashes, press the START/STOP button to make the numbers
scroll until you reach the desired value.
Press RECALL again to leave the setting mode.
Repeated timer
(symbole )
•
Use
The START/STOP button starts or stops the countdown.
When the countdown has stopped, press the SPLIT/RESET button to reinitialize it at its set
value.
When the count arrives at 0, a 5 second buzz is emitted.
The repetition counter (between the square brackets) goes up by 1 unit.
Then the countdown begins with its initial value and counts down the same interval of time
again. And so forth…
A press on the
START/STOP button will stop the counting.
A press on SPLIT/RESET will reset the repetition counter to 0 and reinitialize the countdo
wn at its star
ting value.
•
Setting the starting value of the countdown
Press for a longer time (2s) on the RECALL button.The indication of the set value will flash
to indicate that you have entered the setting mode.
Press repeatedly on the
SPLIT/RESET button to change the parameter to set following the
sequence …hour-min
utes-seconds…
When one of the elements flashes, press the START/STOP button to make the numbers
scroll until you reach the desired value.
Press RECALL again to lea
ve the setting mode.
Training timer
(symbole )
•
This type of countdo
wn is designed f
or programming a training session composed of
blocks of different intensity and lengths that are strung together, the sequence being
repeated a certain number of predetermined times.
•
Bef
ore star
ting the tr
aining session, it is theref
ore necessar
y to program the session.
T
o simplify the procedure
, here is an e
xample to f
ollo
w :
You must complete a training session alternating 3 blocks of 45 seconds of fast running
and 15 seconds of w
alking.
•
Initial setting for the training sequence
Press for a longer time (2s) on the RECALL button to enter the setting mode.
The indication of the symbol for countdown 1 (T1) will flash, and the word SET will be
displayed and also flash.
Press the SPLIT/RESET button repeatedly to change the parameter to be set following the
sequence …number of the timer-hour-minutes-seconds…
When one of the elements flashes, press the START/STOP button to make the numbers
scroll until you reach the desired value.
When T1 flashes, press SPLIT/RESET for a longer time to go to the setting of the number
of repetitions of the sequence.The number between the square brackets will flash and indicate the number of repetitions of the GLOBAL sequence. This number can be
changed for the whole series when setting each timer.
When
T1 flashes, press START/STOP to go to the settings mode for the following timers.
The starting values set for each timer will be displayed on the bottom line.
Press RECALL again to leave the setting mode
The number of repetitions of the total sequence will be displayed to the right of the
repetition counter: ex, in our case [000]/03.
•
Use
Using the RECALL button (brief press), scroll through the different countdowns until you
come to the one that indicates the interval of time for the first block (in our case T1).
This step enables you to check that the device is correctly programmed.
The START/STOP button starts or stops the session
The countdowns are strung together in numerical order (T1-T2-T3…) until a countdown
programmed at a null value, then begins again with T1.The repetition counter counts up.
If the first countdown is not T1, the repetition counter increases by 1 just before beginning
again with the countdown from the beginning (ex: 3 countdowns, T1, T2, T3 have been
programmed. The first of the session is T3. The counter is therefore increased after having
completed T3, then T1, then T2, and just before beginning T3 again).
•
Buzzers :
To differentiate auditorily between the types of buzzing for countdowns and for the
progression of the session, the final beeps have been differentiated:
End of a countdown: 3 beeps in close succession.
End of a repetition: 2*3 beeps in close succession
End of the session: 4*3 beeps in close succession
F
or the preceding e
xample :
Star
t !
Timer 1 : 45s. 3 beeps in close succession
Timer 2 : 15s. 2*3 beeps in close succession
Counter = 1/3
Timer 1 : 45s. 3 beeps in close succession
Timer 2 : 15s. 2*3 beeps in close succession
Counter = 2/3
Timer 1 : 45s. 3 beeps in close succession
Timer 2 :
15s
.
4*3 beeps in close succession
Counter = 3/3
End of the session.
A press on the
START/STOP button will stop the counting.
A press on SPLIT/RESET will reset the repetition counter to 0 and reinitialize the
countdown at its starting value.
Chrono 900 FR-EN-ZH.qxd 8/06/05 10:08 Page 26
Page 7

2928
5 Stopwatch mode
START/STOP :
start/stop the stopwatch
RECALL :
recall of intermediate times recorded
SPLIT/RESET :
to record an intermediate time
MODE :
go to the following mode
•
Display :
- Top line: the current value of the stopwatch
- Middle line : LAP, the time around
- Bottom line : SPLIT, the intermediate time
•
In this mode, the screen will display the letters STW in the middle of the screen when
the stopw
atch is functioning. When the stopwatch is stopped, the word STOP will appear
on the left of the screen.
•
The stopwatch enables you to measure intermediate times (SPLIT, the time passed
since the start up to the given point) and laps (LAP, the time passed since the last
partial time measurement up to the given point).
It enables you to measure up to 999 intermediate times and to store the first 299
measurements in memory.
•
On the top line, you will read the current stopwatch value (Format - hour :minutes : seconds
: 1/100s).The maximum value is 99 h 59min 59s 99
•
On the middle line
, you will read the lap time value
(LAP) (F
ormat - hour : minutes :
seconds, hundredths of seconds).
On the top left of the screen, the three-digit indication of the intermediate time counter will
appear.
•
On the bottom line you will read the value for the intermediate times (SPLIT).
•
To re-initialize the stopwatch
When the stopwatch has stopped, press the SPLIT/RESET button for 3s to reset to 0.
The stopwatch is started/stopped by pressing the START/STOP button. You can accumulate
several time measurements by pressing
START/STOP again between each measurement.
When the stopwatch is going, by pressing repeatedly on the SPLIT/LAP button, you can
display intermediate times and lap times on the corresponding lines. With each press, the
intermediate time counter goes up by one.
Once the number 299 is reached, the counter will flash to signal that the memory is full.
Display of the word
FULL
When the stopwatch has stopped (START/STOP), the last lap is put into memory.
•
Using the memory.
When using the stopwatch, the first 299 intermediate times and lap times are memorized.
They can be recalled, whether the stopwatch is in action or not, by pressing the RECALL
button. The order of reading is different depending on whether the stopwatch is
functioning or not.
If the stopwatch is functioning:
By pressing RECALL repeatedly, scroll through the values already put into memory in the
following order :
-
The f
astest lap time
(F
AST)
-
The slo
w
est lap time
(SL
O
W)
- The average lap time of the X measurements recorded
(AVG)
-
The last lap time
(x)
-
The ne
xt to last lap time
(x-1)
…
- the 1st lap time
(1)
If the stopwatch is not functioning:
By pressing RECALL repeatedly
, scroll through the values already put into memory in the
following order :
-
The f
astest lap time
(F
AST)
- The slowest lap time (SLOW)
-
The a
v
erage lap time of the
X measurements recorded (A
V
G)
-
The FIRST lap time
(1)
- The SECOND lap time (2)
…
- the next to last lap time (x-1)
- the last lap time (x)
00:00’ :09’’12
00:00’ :19’’05
[003]
LAP
SPLIT
00:00’ :19’’
05
STW
DÉPART 400 m 800 m 1200 m 1500 m
ST
AR
T
LAP 1 LAP 2 LAP 3 LAP 4
SPLIT1
SPLIT 2
SPLIT 3
END : SPLIT 4
Chrono 900 FR-EN-ZH.qxd 8/06/05 10:08 Page 28
Page 8

3130
ATTENTION :When the stopwatch has stopped, you can only leave the memory
recall mode after scrolling through all the intermediate times or pressing once on the
MODE button. Appuyez 3s sur
SPLIT/RESET
pour effacer tous les enregistrements.
ATTENTION :When the speed calculation (SPEED
, see corresponding mode) is
in progress, the stopwatch function cannot be used.
6 Speed Calculation Mode (SPEED)
START/STOP :
Start / Stop the count
(remember: you cannot start if the distance is set at 0)
SPLIT/RESET :
if the stopwatch is functioning: time elapsed
if the stopwatch has stopped: reset to zero
RECALL :
if the data ha
v
e been stored in memor
y:
enables you to enter the memory
recall mode
if the time has been reset to zero, hold the button down now
f
or 2 seconds: enables you to enter the distance setting mode.
MODE :
go to the following mode
•
When you are using this mode, the value for the distance cannot be zero. (Initial Mode)
•
Display :
- The counter is found on the middle line to the left of the screen
- The lower line indicates the fixed distance (initial = 0.000), then the speed when
functioning
- The middle line indicates the lap time
The DIST KM icon or Mi is displayed
- The top line indicates the time elapsed
•
Distance Setting Mode
Reset the time to z
ero, and then hold
RECALL do
wn for 2 seconds to enter the setting mode)
The "DIST" icon will be displayed and indicates that the distance setting mode has been
activated.
The KM icon will flash for selection, as well as SET UNIT (ret unit)!
Enter the setting "KM" -kilometer, or "M" - mile
The maximum value that can be set is 999,999
1. Press START/STOP: set "KM" or "MI"
2. Press SPLIT/RESET: select the following field for setting.The number will flash.
3. Press
START/STOP to make the numerals scroll by.
4. Proceed thus for all the distance numbers.The point between the numerals represents
the decimal point. Ex: 1.435 km or 1.435 miles.
5. 1.When you have finished with all the settings, press
RECALL to exit the settings mode.
•
Functioning of the Speed Mode
Preset the distance to be measured.
The stopwatch is started/stopped by pressing the START/STOP button. You can accumulate
several time measurements by pressing START/STOP again between each measurement.
At each press on STOP, the speed in Km/h or Mi/h (according to the setting) will be displayed
on the bottom line.
When the stopwatch is going, by pressing repeatedly on the SPLIT/LAP button,
you can display and record lap times and average speed for the lap times. With each
press, the intermediate time counter goes up by one.
Once the number 299 is reached, the counter will flash to signal that the memory is full.
When the stopwatch has stopped
(START/STOP), the last lap is put into memory.
ATTENTION : Since the maxim
um speed displa
y is 999,999, if the calculated
speed is larger than this value, "ERROR" will be displayed on the top line, and the value
of the speed will not be recorded in the memory.
•
Memor
y R
ecall in Speed Mode
The memor
y can be recalled whether the speed mode is functioning or whether it is
stopped.
When the stopwatch is stopped
When the stopwatch is functioning
With each press of the
« RECALL »
button
Speed / fastest lap, speed / slowest lap,
then speed / average lap, after which the
times lapsed are recalled, beginning with
the first
Speed / fastest lap, speed / slowest lap,
then speed / average lap, after which the
times lapsed are recalled, beginning with
the last
00:00’ :00’’00
0,161’’00
[000]
LAP
STOP
00:00’ :00’’
00
FULLSPEED TIMEDIST Km
Chrono 900 FR-EN-ZH.qxd 8/06/05 10:08 Page 30
Page 9

3332
ATTENTION : You can convert the speed measurement from km/h to m/h
(miles per hour) by pressing SPLIT/RESET briefly when the stopwatch is stopped.
Holding the button down for a longer time triggers the stopwatch to reset to 0
(the distance measured is then displa
yed on the bottom line).
The distance can also be converted to miles or kilometers by briefly pressing
SPLIT/RESET when the stopwatch is stopped.
ATTENTION : If the stopwatch is functioning or if the intermediate times have
been memorized, the
SPEED mode is not available.
On the other hand, if the speeds have been memorized or if the speed mode is active, the
stopwatch mode is not available.
7 Frequency calculation mode (STROKE)
START/STOP :
begin / stop the measurement of the movement
SPLIT/RESET :
- if the STROKE mode is functioning – no function
- if the STROKE mode has been stopped – resets the STROKE display to 2400
RECALL :
entry into setting mode
MODE :
go to the following mode
•
The " STROKE " function is a counter of the frequency of an action with a certain rhythm
(the movements in rowing or swimming, strides in running).The time lapsed x beats (parameter that can be set) is measured, and the stopwatch displays the average frequency in
beats per minute over this period.
•
Setting the number of beats by which the frequency is calculated
Press RECALL for 3s.The message SET will flash as well as the current value of the
number of beats on the bottom line.
Scroll through the values (from 2 to 30) by pressing START/STOP.
Press RECALL to store this value in memory.
•
Measurement of a frequency
Suppose that the value X has been set during the preceding step (display in the counter
between the square brackets)
Begin the measurement by pressing START/STOP and stop the measurement by
pressing START/STOP once the xthmovement has been completed.
The n
umber of movements (strides) per minute is displayed on the bottom line while the
measured time is indicated on the top line.
ATTENTION : Be sure to take into account the INTERVALS of time between the
impacts and not the impacts themselves. Ex : impact.....impact.....impact.....impact =
3 str
ides and not 4
Note :
1.
If you press the START and STOP buttons too quickly (in less than 1/8 of a second
(0.125 sec)), the screen will display "
ERROR". This indicates that the value has passed
by too quickly to indicate it.
2.
If y
ou press the START
and STOPb
uttons after too long a time, the screen will display
"
ERROR". This indicates that the period of time is too long and that the STROKE mode
is useless for analysis.
Contact
As w
e strive to continually improve the products we develop, we are interested in your
feedback regarding the quality, the functionality and the usage of our products.
•
In France, please call the customer service center at:
0810 08 08 08 (local call rate)
•
For any other country, please leave a message under the relevant heading on
our website:
www.decathlon.com
We promise to answer you promptly.
STROKE’’00
00:00’ :00’’00
[005]
00:00’ :00’’
00
BPM
Chrono 900 FR-EN-ZH.qxd 8/06/05 10:08 Page 32
 Loading...