

Page 1

USER GUIDE
GeoExplorer
®
3000 series
Version 1.00
Revision B
May 2012
F
Page 2

Trimble Navigation Limited
10355 Westmoor Drive
Suite #100
Westminster, CO 80021
USA
www.trimble.com
Legal Notices
Copyright and Trademarks
© 2011-2012, Trimble Navigation Limited. All rights reserved.
Trimble, the Globe & Triangle logo, GeoExplorer, and GPS Pathfinder are
trademarks of Trimble Navigation Limited, registered in the United
States and in other countries. EVEREST, GeoBeacon, GeoXH, GeoXM,
GeoXT, GPS Analyst, GPScorrect, H-Star, TerraSync, TrimPix, VRS, and
Zephyr are trademarks of Trimble Navigation Limited.
Microsoft, ActiveSync, Excel, Outlook, PowerPoint, Windows, Windows
Live, Windows Media, Windows Mobile, Windows Vista, and the
Windows Start logo are either registered trademarks or trademarks of
Microsoft Corporation in the United States and/or other countries.
The Bluetooth word mark and logos are owned by the Bluetooth SIG,
Inc. and any use of such marks by Trimble Navigation Limited is under
license.
All other trademarks are the property of their respective owners.
Release Notice
This is the May 2012 release (Revision B) of the GeoExplorer 3000 Series
User Guide. The GeoExplorer 3000 series handheld’s operating system is
based on the Microsoft Windows Mobile version 6 Classic operating
system (5.2.1433).
Limited Warranty Terms and Conditions
Product Limited Warranty
Subject to the terms and conditions set forth herein, Trimble Navigation
Limited (“Trimble”) warrants that for a period of (1) year from date of
purchase this Trimble product (the “Product”) will substantially
conform to Trimble's publicly available specifications for the Product
and that the hardware and any storage media components of the
Product will be substantially free from defects in materials and
workmanship.
Product Software
Product software, whether built into hardware circuitry as firmware,
provided as a standalone computer software product, embedded in flash
memory, or stored on magnetic or other media, is licensed solely for use
with or as an integral part of the Product and is not sold. The terms of
the end user license agreement, as included below, govern the use of the
Product Software, including any differing limited warranty terms,
exclusions and limitations, which shall control over the terms and
conditions set forth in the limited Product warranty.
Warranty Remedies
If the Trimble Product fails during the warranty period for reasons
covered by this limited warranty and you notify Trimble of such failure
during the warranty period, Trimble will repair OR replace the
nonconforming Product with new, equivalent to new, or reconditioned
parts or Product, OR refund the Product purchase price paid by you, at
Trimble’s option, upon your return of the Product in accordance with
Trimble's product return procedures then in effect.
How to Obtain Warranty Service
To obtain warranty service for the Product, please contact your Trimble
dealer. Alternatively, you may contact Trimble to request warranty
service at +1-408-481-6940 (24 hours a day) or e-mail your request to
[email protected]. Please be prepared to provide:
– your name, address, and telephone numbers;
– proof of purchase;
– a copy of this Trimble warranty
– a description of the nonconforming Product including the model
number; and
– an explanation of the problem.
The customer service representative may need additional information
from you depending on the nature of the problem.
Warranty Exclusions and Disclaimer
This Product limited warranty shall only apply in the event and to the
extent that (i) the Product is properly and correctly installed, configured,
interfaced, maintained, stored, and operated in accordance with
Trimble's applicable operator's manual and specifications, and; (ii) the
Product is not modified or misused. This Product limited warranty shall
not apply to, and Trimble shall not be responsible for, defects or
performance problems resulting from (i) the combination or utilization
of the Product with hardware or software products, information, data,
systems, interfaces, or devices not made, supplied, or specified by
Trimble; (ii) the operation of the Product under any specification other
than, or in addition to, Trimble's standard specifications for its products;
(iii) the unauthorized installation, modification, or use of the Product;
(iv) damage caused by: accident, lightning or other electrical discharge,
fresh or salt water immersion or spray (outside of Product
specifications); or exposure to environmental conditions for which the
Product is not intended; (v) normal wear and tear on consumable parts
(e.g., batteries); or (vi) cosmetic damage. Trimble does not warrant or
guarantee the results obtained through the use of the Product or
Software, or that software components will operate error free.
NOTICE REGARDING PRODUCTS EQUIPPED WITH TECHNOLOGY
CAPABLE OF TRACKING SATELLITE SI GNALS FROM SATELLITE BASED
AUGMENTATION SYSTEM S (SBAS) (WAAS/EGNOS, AND MSAS),
OMNISTAR, GPS, MODERNIZED GPS OR GLONASS SATELLITES, OR
FROM IALA BEACON SOURCES: TRIMBLE IS NOT RESPONSI BLE FOR
THE OPERATION OR FAILURE OF OPERATION OF ANY SATELLITE
BASED POSITIONING SYSTEM OR THE AVAI LABILITY OF ANY
SATELLITE BASED POSITIONING SIGNALS.
THE FOREGOING LIMITED WARRANTY TERMS STATE TRIMBL E’S ENTIRE
LIABILITY, AND YOUR EXCLUSIVE REMEDIES, REL ATING TO THE TRIMBLE
PRODUCT. EXCEPT AS OTHERWISE EXPRESSLY PROVIDED HEREIN, THE
PRODUCT, AND ACCOMPANYING DOCUMENTATION AND MATERIALS
ARE PROVIDED “AS-IS” AND WITHOUT EXPRESS OR IMPLIED WARRANTY
OF ANY KIND, BY EITHER TRIMBLE OR ANYONE WHO HAS BEEN
INVOLVED IN ITS CREATION, PRODUCTION, INSTALLATION, OR
DISTRIBUTION , INCLUDING, BUT NOT LIMITED TO, THE IMPLIED
WARRANTIES OF MERCHANTABILITY AND FITNESS FOR A PARTICULAR
PURPOSE, TITLE, AND NONINFRINGEMENT. THE ST ATED EXPRESS
WARRANTIES ARE IN LIEU OF ALL OBLIGATIONS OR LIABILITIES ON THE
PART OF TRIMBLE ARISING OUT OF, OR IN CONNECTION WITH, ANY
PRODUCT. BECAUSE SOME STATES AND JURISDICTIONS DO NOT ALLOW
LIMITATIONS ON DURATION OR THE EXCLUSION OF AN IMPLIED
WARRANTY, THE ABOVE LIMITATION MAY NOT APPLY TO YOU.
Limitation of Liability
TRIMBLE'S ENTIRE LIABILITY UNDER ANY PROVISION HEREIN SHALL BE
LIMITED TO THE AMOUNT PAID BY YOU FOR THE PRODUCT. TO THE
MAXIMUM EXTENT PERMITTED BY APPLICABLE LAW, IN NO EVENT
SHALL TRIMBLE OR ITS SUPPLIERS BE LIABLE FOR ANY INDIRECT,
SPECIAL , INCIDENTAL, OR CONSEQUENTIAL DAMAGE WHATSOEVER
UNDER ANY CIRCUMSTANCE OR LEGAL THEORY RELATI NG IN ANYWAY
TO THE PRODUCTS, SOFTWARE AND ACCOMPANYING DOCUMENTATION
AND MATERIALS, (INCLUDING, WITHOUT LIMITATION, DAMAGES FOR
LOSS OF BUSINESS PROFITS, BUSINESS INTERRUPTION, LOSS OF DATA, OR
ANY OTHER PECUNIARY LOSS), REGARDL ESS OF WHETHER TRIMBLE HAS
BEEN ADVISED OF THE POSSIBILITY OF ANY SUCH LOSS AND REGARDLESS
OF THE COURSE OF DEALING WHICH DEVELOPS OR HAS DEVELOPED
BETWEEN YOU AND TRIMBLE. BECAUSE SOME STATES AND
JURISDICTIONS DO NOT ALLOW THE EXCLUSION OR LIMITATION OF
LIABILITY FOR CONSEQUENTIAL OR INCIDENTAL DAMAGES, THE ABOVE
LIMITATION MAY NOT APPLY TO YOU.
PLEASE NOTE: THE ABOVE TRIMBLE LIMITED WARRANTY PROVISIONS
WILL NOT APPLY TO PRODUCTS PURCHASED IN THOSE
JURISDICTIONS (E.G., MEMBER STATES OF THE EUROPEAN ECONOMIC
AREA) IN WHICH PRODUCT WARRANTIES ARE THE RESPON SIBILITY
OF THE LOCAL DEALER FROM WHOM THE PRODUCTS ARE ACQUIRED.
IN SUCH A CASE, PLEASE CONTACT YOUR TRIMBLE DEALER FOR
APPLICABLE WARRANTY INFORMATION.
Notice to Australian Purchasers
The Australian Consumer Law
Our goods come with guarantees that cannot be excluded under the
Australian Consumer Law. You are entitled to a replacement or refund
for a major failure and for compensation for any other reasonably
foreseeable loss or damage. You are also entitled to have the goods
repaired or replaced if the goods fail to be of acceptable quality and the
failure does not amount to a major failure.
Trimble's warranty, as set out in the user manual accompanying this
statement, or as described in the warranty card accompanying the
Product you purchased, is in addition to any mandatory rights and
remedies that you may have under the Australian Consumer Law.
Official Language
THE OFFICIAL LANGUAGE OF THESE TERMS AND CONDITIONS IS
ENGLISH. IN THE EVENT OF A CONFLICT BETWEEN ENGLISH AND OTHER
LANGUAGE VERSIONS, THE ENGLISH LANGUAGE SHALL CONTROL.
End User License Agreement for Product Software
IMPORTANT, READ CAREFULLY. THIS END USER LICENSE
AGREEMENT (“EULA”) IS A LEGAL AGREEMENT BETWEEN YOU
AND Trimble Navigation Limited (“Trimble”) and applies to the
computer software provided with the Trimble product purchased by you
(whether built into hardware circuitry as firmware, embedded in flash
memory or a PCMCIA card, or stored on magnetic or other media), or
2 GeoExplorer 3000 Series User Guide
Page 3

provided as a stand-alone computer software product, and includes any
accompanying written materials such as a user's guide or product
manual, as well as any "online" or electronic documentation ("Software"
or “Product Software”). This EULA will also apply to any Software error
corrections, updates and upgrades subsequently furnished by Trimble,
unless such are accompanied by different license terms and conditions,
which will govern their use. You have acquired a Trimble Product
("Device") that includes Software, some of which was licensed by
Trimble from Microsoft Corporation or its affiliates (collectively
"Microsoft"). The Software licensed from Microsoft, as well as associated
updates, supplements, internet-based services and support services,
media, printed materials, and "online" or electronic documentation
("Microsoft Software"), are protected under this EULA. The Software is
also protected by copyright laws and international copyright treaties, as
well as other intellectual property laws and treaties. The Software is
licensed, not sold.
BY USING THE SOFTWARE, INCLUDING USE ON THIS DEVICE, YOU
ACCEPT THESE TERMS. IF YOU DO NOT ACCEPT THEM, DO NOT
USE THE DEVICE OR SOFT WARE. INSTEAD CONTACT TRIMBLE FOR
A REFUND OR CREDIT. As described below, using some features also
operates as your consent to the transmission of certain standard
computer information for Internet-based services.
WAR NI NG : If the Software contains voice operated technologies, then
operating this Software requires user attention. Diverting attention away
from the road while driving can possibly cause an accident or other
serious consequence. Even occasional, short diversions of attention can
be dangerous if your attention is diverted away from your driving task at
a critical time. Trimble and Microsoft make no representations,
warranties or other determinations that ANY use of this Software is
legal, safe, or in any manner recommended or intended while driving or
otherwise operating a motor vehicle.
This EULA does not grant you any rights with respect to the
Windows Mobile Device Center, Microsoft ActiveSync or Microsoft
Outlook 2007 Trial which are subject to the licenses accompanying
those items.
1 SOFTWARE PRODUCT LICENSE
1.1 License Grant. Subject to the terms and conditions of this EULA,
Trimble grants you a non-exclusive right to use one copy of the Software
in a machine-readable form only as installed on the Device. Such use is
limited to use with the Device for which it was intended, as set forth in
the product documentation. The Device Software is licensed with the
Device as a single integrated product. The Device Software installed in
read only memory (“ROM”) of the Device may only be use d as part of the
Device into which it was embedded. You may use the installation
Software from a computer solely to download the Software to one
Device. In no event shall the installation Software be used to download
the Software onto more than one Device. A license for the Software may
not be shared or used concurrently on different computers or Devices.
1.2 Scope of License. This EULA only gives you some rights to use the
Software. Trimble and Microsoft reserve all other rights. Unless
applicable law gives you more rights despite this limitation, you may use
the Software only as expressly permitted in this EULA. In doing so, you
must comply with any technical limitations in the Software that allow
you to use it only in certain ways. Except as expressly provided in this
EULA, rights to access the Software on this Device do not give you any
right to implement Microsoft patents or other Microsoft intellectual
property in software or devices that access this device. You may use
remote access technologies in the software such as Remote Desktop
Mobile to access the Software remotely from a computer or server. You
are responsible for obtaining any licenses required for use of the
protocols to access other software.
1.3 Proof of License
disc or other media, a genuine Certificate of Authenticity label with a
genuine copy of the Software identifies licensed software. To be valid,
this label must be affixed to the Device, or included on or in the software
packaging. If you receive the label separately, it is not valid. You should
keep the label on the device or packaging to prove that you are licensed
to use the Software. To identify genuine Microsoft Software, see
http://www.howtotell.com.
1.4 Connectivity Software
Mobile Device Center or Microsoft ActiveSync software. If it is included,
then you may install and use it in accordance with the license terms that
are provided with it. If no license terms are provided, then you may
install and use only one (1) copy of the Software on a single computer.
1.5 Digital Certificates. The Software uses digital certificates in X.509
format. These digital certificates are used for authentication.
1.6 Phone Functionality. If the Device Software includes phone
functionality, all or certain portions of the Device Software may be
inoperable if you do not have and maintain a service account with a
wireless telecommunication carrier (“Mobile Operator”), or if the Mobile
Operator’s network is not operating or configured to operate with the
Device.
. If you acquired the Software on the Device, or on a
. Your Device package may include Windows
1.7 Upgrade Software. In the event that any upgrades to the Software,
including Microsoft Software, are provided under this EULA, then the
following shall apply: you may follow the applicable instructions
accompanying this Software and install one (1) copy of the Software on
one (1) Device presently containing a licensed copy of a predecessor
version of the Software (unless this EULA indicates that this Software
copy has been licensed for installation on multiple Devices). NO
REPRESENTATION OR WARRANTY IS MADE BY TRIMBLE OR
MICROSOFT WITH RESPECT TO THE COMPATIBILITY OF THIS
SOFTWARE WITH ANY DEVICE OR ANY OTHER EXISTING
SOFTWARE OR DATA OF ANY KIND CONTAINED ON SUCH DEVICES,
AND NEITHER TRIMBLE OR MICROSOFT SHALL BE RESPONSIBLE
IN ANY REGARD WITH RESPECT TO ANY LOSS, CORRUPTION,
MODIFICATION OR INACCESSIBILITY OF ANY DATA,
APPLICATIONS OR OTHER SOFTWARE RESULTING FROM THE
INSTALLATION OF THE SOFTWARE ON ANY DEVICE.
1.8 Internet-Based Services Components. Microsoft provides Internetbased services with the software. Microsoft may change or cancel them
at any time. The Microsoft Software features described below connect to
Microsoft or service provider computer systems over the Internet. In
some cases, you will not receive a separate notice when they connect.
You may switch off some of these features or not use them. For more
information about these features, visit
http://go.microsoft.com/fwlink/?LinkId=81931. By using these
features, you consent to the transmission of this information.
Microsoft does not use the information to identify or contact you. You
may not use these services in any way that could harm them or impair
anyone else’s use of them. You may not use the services to try to gain
unauthorized access to any service, data, account or network by any
means.
1.9 Device Information
which send to the appropriate systems device information, such as your
Internet protocol address, the type of operating system, browser and
name and version of the Software you are using, and the language code
of the Device where you installed the Software. Microsoft uses this
information to make the Internet-based services available to you. a)
Update Features: Windows Mobile Update feature provides you the
ability to obtain and install Software updates on your Device if updates
are available. You may choose not to use this feature. Trimble and/or
your Mobile Operator may not support this feature or an update for your
device. b) Security Updates/Digital Rights Management. Content
owners use Windows Media digital rights management technology
(WMDRM) to protect their intellectual property, including copyrights.
This software and third party software use WMDRM to play and copy
WMDRM-protected content. If the software fails to protect the content,
content owners may ask Microsoft to revoke the software's ability to use
WMDRM to play or copy protected content. Revocation does not affect
other content. When you download licenses for protected content, you
agree that Microsoft may include a revocation list with the licenses.
Content owners may require you to upgrade WMDRM to access their
content. Microsoft software that includes WMDRM will ask for your
consent prior to the upgrade. If you decline an upgrade, you will not be
able to access content that requires the upgrade.
1.10 Additional Software/Services. The Device Software may permit
Trimble, Microsoft, their affiliates and/or their designated agent to
provide or make available to you Software updates, supplements, add-on
components, or Internet-based services components of the Software
after the date you obtain your initial copy of the Software
(“Supplemental Components”).
1.10.1 If Trimble provides or makes available to you Supplemental
Components and no other end user license agreement terms are
provided along with the Supplemental Components, then the terms
of this EULA shall apply.
1.10.2 If Microsoft, its affiliates and/or its designated agent makes
available Supplemental Components, and no other end user license
agreement terms are provided, then the terms of this EULA shall
apply, except that the Microsoft entity or affiliate entity providing
the Supplemental Component(s) shall be the licensor of the
Supplemental Component(s).
1.10.3 Trimble, Microsoft and each of their affiliates and/or their
designated agents reserve the right to discontinue any Internetbased services provided to you or made available to you through
the use of the Device Software.
1.11 Links to Third Party Sites
party websites, those links are provided to you only as a convenience,
and the inclusion of any link does not imply an endorsement of the third
party website by Microsoft or Trimble.
1.12 Other Rights and Limitations. (1) The Software contains valuable
trade secrets proprietary to Trimble and its suppliers. To the extent
permitted by relevant law, you shall not, nor allow any third party to
copy, decompile, disassemble or otherwise reverse engineer the
Software, or attempt to do so, provided, however, that to the extent any
applicable mandatory laws (such as, for example, national laws
implementing EC Directive 91/250 on the Legal Protection of Computer
. The following features use Internet protocols,
. If the Software provides links to third
GeoExplorer 3000 Series User Guide 3
Page 4

Programs) give you the right to perform any of the aforementioned
activities without Trimble's consent in order to gain certain information
about the Software for purposes specified in the respective statutes (i.e.,
interoperability), you hereby agree that, before exercising any such
rights, you shall first request such information from Trimble in writing
detailing the purpose for which you need the information. Only if and
after Trimble, at its sole discretion, partly or completely denies your
request, may you exercise such statutory rights. (2) This Software is
licensed as a single product. You may not separate its component parts
for use on more than one computer nor make more copies of the
software than specified in this EULA. (3) You may not rent, lease, or lend
the Software. (4) No service bureau work, multiple-user license or timesharing arrangement is permitted. For purposes of this EULA “service
bureau work” shall be deemed to include, without limitation, use of the
Software to process or to generate output data for the benefit of, or for
purposes of rendering services to any third party over the Internet or
other communications network. (5) You may make one backup copy of
the Software. You may use it only to reinstall the Software on the Device.
(6) You may transfer the Software only with the Device, the Certificate of
Authenticity label, and these license terms directly to a third party.
Before the transfer, that party must agree that these license terms apply
to the transfer and use of the Software. You may not retain any copies of
the Software including the backup copy. (7) The Software is subject to
United States export laws and regulations. You must comply with all
domestic and international expor t laws and regulations that apply to the
Software. These laws include restrictions on destinations, end users, and
end use. For additional information see
http://www.microsoft.com/exporting. (8) Without prejudice as to any
other rights, Trimble may terminate this EULA without notice if you fail
to comply with the terms and conditions of this EULA. In such event,
you must destroy all copies of the Software and all of its component
parts. (9) If the Microsoft Software includes speech recognition
component(s), you should understand that speech recognition is an
inherently statistical process and that recognition errors are inherent in
the process. Neither Trimble, Microsoft, nor any of their suppliers shall
be liable for any damages arising out of errors in the speech recognition
process. (10) You may not publish the Software for others to copy. (11)
You may not use the Software for commercial software hosting services.
1.13 Notice Regarding the MPEG-4 Visual Standard. The Software may
include MPEG-4 visual decoding technology. This technology is a format
for data compression of video information. MPEG LA, L.L.C. requires
this notice: USE OF THIS PRODUCT IN ANY MANNER THAT
COMPLIES WITH THE MPEG-4 VISUAL STANDARD IS PROHIBITED,
EXCEPT FOR USE DIRECTLY RELATED TO (A) DATA OR
INFORMATION (i) GENERATED BY AND OBTAINED WITHOUT
CHARGE FROM A CONSUMER NOT THEREBY ENGAGED IN A
BUSINESS ENTERPRISE, AND (ii) FOR PERSONAL USE ONLY; AND (B)
OTHER USES SPECIFICALLY AND SEPARATELY LICENSED BY MPEG
LA, L.L.C. If you have questions about the MPEG-4 visual standard,
please contact MPEG LA, L.L.C., 250 Steele Street, Suite 300, Denver, CO
80206; www.mpegla.com.
1.14 If the Device Software is provided by Trimble separate from the
Device on media such as a ROM chip, CD ROM disk(s) or via web
download or other means, and is labeled “For Upgrade Purposes Only”
you may install one (1) copy of such Device Software onto the Device as
a replacement copy for the existing Device Software and use it
accordance with this EULA, including any additional end user license
agreement terms accompanying the upgrade Device Software.
1.15 If any software component(s) is provided by Trimble separate from
the Device on CD ROM disc(s) or via web download or other means, and
labeled “For Upgrade Purposes Only,” you may (i) install and use one (1)
copy of such component(s) on the computer(s) you use to exchange data
with the Device as a replacement copy for the existing Companion CD
com pone nt(s).
1.16 Copyright
but not limited to any images, photographs, animations, video, audio,
music, text and “applets,” incorporated into the Software), the
accompanying printed materials, and any copies of the Software are
owned by Trimble, or Microsoft (including Microsoft Corporation), and
their respective suppliers. You may not copy the printed materials
accompanying the Software. All title and intellectual property rights in
and to the content which may be accessed through use of the Software is
the property of the respective content owner and may be protected by
applicable copyright or other intellectual property laws and treaties.
This EULA grants you no rights to use such content. You shall not
remove, cover or alter any of Trimble’s patent, copyright or trademark
notices placed upon, embedded in or displayed by the Software or on its
packaging and related materials. All rights not specifically granted in
this EULA are reserved by Trimble, Microsoft, and their respective
suppliers.
1.17 U.S. Government Restricted Rights. The Software is provided with
“RESTRICTED RIGHTS”. Use, duplication, or disclosure by the United
States Government is subject to restrictions as set forth in this EULA,
. All title and copyrights in and to the Software (including
and as provided in DFARS 227.7202-1(a) and 227.7202-3(a) (1995),
DFARS 252.227-7013(c)(1)(ii) (OCT 1988), FAR 12.212(a) (1995), FAR
52.227-19, or FAR 52.227-14(ALT III), as applicable.
1.18 Microsoft has contractually obligated Trimble to include the
following terms in this EULA:
Product Support
provided by Microsoft or its affiliates or subsidiaries. For product
support, please refer to the Trimble support number provided in the
documentation for the Device.
Not fault tolerant. The Software is not fault tolerant. Trimble
installed the Software on the Device and is responsible for how it
operates on the Device.
Restricted user. The Microsoft Software was designed for systems
that do not require fail-safe performance. You may not use the
Microsoft Software in any device or system in which a malfunction
of the Microsoft Software would result in foreseeable risk of injury
or death to any person. This includes operation of nuclear facilities,
aircraft navigation or communication systems and air traffic
control.
No warranties for the software. Microsoft gives no express
warranties, guarantees or conditions regarding the Microsoft
Software. Any warranties you receive regarding the Device or the
Software do not originate from, and are not binding on, Microsoft or
its affiliates. When allowed by your local laws, Trimble and
Microsoft exclude implied warranties of merchantability, fitness for
a particular purpose and non-infringement.
LIABILITY LIMITATIONS
affiliates only direct damages up to fifty U.S. Dollars (U.S. $50.00), or
equivalent in local currency. You cannot recover any other damages,
including consequential, lost profits, special, indirect or incidental
damages. This limitation applies to:
– Anything related to the Software, services, content
(including code) on third party internet sites, or third party
. The Product support for the Software is not
. You can recover from Microsoft and its
programs, and
– claims for breach of contract, breach of warranty, guarantee
or condition, strict liability, negligence, or other tort to the
extent permitted by applicable law.
It also applies even if Microsoft should have been aware of the
possibility of the damages. The above limitation may not apply to
you because your country may not allow the exclusion or limitation
of incidental, consequential or other damages.
2 LIMITED WARRANTY FOR TRIMBLE PRODUCT SOFTWARE.
2.1 Limited Warranty. Trimble warrants that the Software, exclusive of
the Microsoft Software, will perform substantially in accordance with
the accompanying written materials for a period of twelve (12) months
from the date of purchase. This limited warranty gives you specific legal
rights; you may have others, which vary from state/jurisdiction to
state/jurisdiction. The above limited warranty does not apply to Fixes,
Minor Updates, or Major Upgrades of the Software after expiration of the
twelve (12) month limited warranty period, all of which are provided “AS
IS” and without warranty unless otherwise specified in writing by
Trimble. Because the Software is inherently complex and may not be
completely free of nonconformities, defects or errors, you are advised to
verify your work. Trimble does not warrant that the Software will
operate error free or uninterrupted, will meet your needs or
expectations, or that all nonconformities can or will be corrected.
2.2 Software Fixes. During the limited warranty period described in
section 2.1 above, you will be entitled to receive such Fixes to the
Product Software that Trimble releases and makes commercially
available and for which it does not charge separately, subject to the
procedures for delivery to purchasers of Trimble products generally. If
you have purchased the Product from an authorized Trimble dealer
rather than from Trimble directly, Trimble may, at its option, forward the
software Fix to the Trimble dealer for final distribution to you. Minor
Updates, Major Upgrades, new products, or substantially new software
releases, as identified by Trimble, are expressly excluded from this
update process and limited warranty. Receipt of Software Fixes or other
enhancements shall not serve to extend the limited warranty period.
For purposes of this warranty the following definitions shall apply: (1)
"Fix(es)" means an error correction or other update created to fix a
previous software version that does not substantially conform to its
Trimble specifications; (2) "Minor Update" occurs when enhancements
are made to current features in a software program; and (3) "Major
Upgrade" occurs when significant new features are added to software, or
when a new product containing new features replaces the further
development of a current product line. Trimble reserves the right to
determine, in its sole discretion, what constitutes a Fix, Minor Update,
or Major Upgrade.
2.3 Customer Remedies. Trimble’s and its suppliers’ entire liability, and
your sole remedy, with respect to the Software shall be either, at
Trimble’s option, (a) repair or replacement of the Software, or (b) return
of the license fee paid for any Software that does not meet Trimble’s
4 GeoExplorer 3000 Series User Guide
Page 5

limited warranty. This limited warranty is void if failure of the Software
has resulted from (1) accident, misuse, abuse, or misapplication; (2)
alteration or modification of the Software without Trimble’s
authorization; (3) interaction with software or hardware not supplied or
supported by Trimble; (4) your improper, inadequate or unauthorized
installation, maintenance or storage; or (5) if you violate the terms of
this EULA. Any replacement Software will be warranted for the
remainder of the original warranty period or thirty (30) days, whichever
is longer.
2.4 NO OTHER WARRANTIES. TO THE MAXIMUM EXTENT
PERMITTED BY APPLICABLE LAW, TRIMBLE AND ITS SUPPLIERS
DISCLAIM ALL OTHER WARRANTIES, TERMS AND CONDITIONS,
EITHER EXPRESS OR IMPLIED, BY STATUTE, COMMON LAW OR
OTHERWISE, INCLUDING BUT NOT LIMITED TO, IMPLIED
WARRANTIES, TERMS AND CONDITIONS OF MERCHANTABILITY
AND FITNESS FOR A PARTICULAR PURPOSE, TITLE, AND
NONINFRINGEMENT WITH REGARD TO THE SOFTWARE, ITS
SATISFACTORY QUALITY AND THE PROVISION OF OR FAILURE TO
PROVIDE SUPPORT SERVICES. TO THE EXTENT ALLOWED BY
APPLICABLE LAW, IMPLIED WARRANTIES, TERMS AND
CONDITIONS ON THE SOFTWARE ARE LIMITED TO NINETY (90)
DAYS. Y0U MAY HAVE OTHER LEGAL RIGHTS WHICH VARY FROM
STATE/JURISDICTION TO STATE/JURISDICTION.
NO WARRANTIES FOR THE MICROSOFT SOFTWARE. THE
MICROSOFT SOFTWARE is provided “AS IS” and with all faults, AND
TRIMBLE PROVIDES NO WARRANTY WITH RESPECT THERETO.
THE ENTIRE RISK AS TO SATISFACTORY QUALITY, PERFORMANCE,
ACCURACY AND EFFORT (INCLUDING LACK OF NEGLIGENCE) FOR
THE MICROSOFT SOFTWARE IS WITH YOU. ALSO, THERE IS NO
WARRANTY AGAINST INTERFERENCE WITH YOUR ENJOYMENT OF
THE MICROSOFT SOFTWARE OR AGAINST INFRINGEMENT.
2.5 PLEASE NOTE: THE FOREGOING TRIMBLE LIMITED WARRANTY
PROVISIONS MAY NOT APPLY TO SOFTWARE PRODUCT LICENSES
PURCHASED IN THOSE JURISDICTIONS (SUCH AS COUNTRIES OF THE
EUROPEAN UNION) IN WHICH PRODUCT WARRANTIES ARE O BTAINED
FROM THE LOCAL DISTRIBUTOR. IN SUCH CASES, PLEASE CONTACT
YOUR TRIM BLE DEALER FOR APPL ICABLE WARRANTY INF ORMATION.
3 TRIMBLE LIMITATION OF LIABILITY.
3.1 LIMITATION OF LIABILITY. TO THE MAXIMUM EXTENT
PERMITTED BY APPLICABLE LAW, IN NO EVENT SHALL TRIMBLE
OR ITS SUPPLIERS BE LIABLE FOR ANY SPECIAL, INCIDENTAL,
INDIRECT, CONSEQUENTIAL OR PUNITIVE DAMAGES HOWEVER
CAUSED AND REGARDLESS OF THE THEORY OF LIABILITY
(INCLUDING, WITHOUT LIMITATION, DAMAGES FOR LOSS OF
BUSINESS PROFITS, BUSINESS INTERRUPTION, LOSS OF BUSINESS
INFORMATION, OR ANY OTHER PECUNIARY LOSS) ARISING OUT OF
THE USE OR INABILITY TO USE THE SOFTWARE, OR THE
PROVISION OF OR FAILURE TO PROVIDE SUPPORT SERVICES, EVEN
IF TRIMBLE HAS BEEN ADVISED OF THE POSSIBILITY OF SUCH
DAMAGES AND NOTWITHSTANDING ANY FAILURE OF ESSENTIAL
PURPOSE OF ANY EXCLUSIVE REMEDY PROVIDED IN THIS EULA.
IN NO EVENT SHALL THE TOTAL CUMULATIVE LIABILITY OF
TRIMBLE AND ITS SUPPLIERS IN CONNECTION WITH THIS EULA
OR THE SOFTWARE, WHETHER BASED ON CONTRACT, WARRANTY,
TORT (INCLUDING NEGLIGENCE), STRICT LIABILITY OR
OTHERWISE, EXCEED THE ACTUAL AMOUNT PAID TO TRIMBLE
FOR THE SOFTWARE LICENSE GIVING RISE TO THE CLAIM.
BECAUSE SOME STATES AND JURISDICTIONS DO NOT ALLOW THE
EXCLUSION OR LIMITATION OF LIABILITY FOR CONSEQUENTIAL
OR INCIDENTAL DAMAGES, THE ABOVE LIMITATION MAY NOT
APPLY TO YOU.
4 GENERAL.
4.1 This EULA shall be governed by the laws of the State of California
and applicable United States Federal law without reference to “conflict of
laws” principles or provisions. The United Nations Convention on
Contracts for the International Sale of Goods will not apply to this
EULA. Jurisdiction and venue of any dispute or court action arising from
or related to this EULA or the Software shall lie exclusively in or be
transferred to the courts the County of Santa Clara, California, and/or
the United States District Court for the Northern District of California.
You hereby consent and agree not to contest, such jurisdiction, venue
and governing law.
4.2 Section 4.1 notwithstanding, if you acquired this product in Canada,
this EULA is governed by the laws of the Province of Ontario, Canada. In
such case each of the parties to this EULA irrevocably attorns to the
jurisdiction of the courts of the Province of Ontario and further agrees to
commence any litigation that may arise under this EULA in the courts
located in the Judicial District of York, Province of Ontario. If you
acquired this product in the European Union, this EULA is governed by
the laws of The Netherlands, excluding its rules governing conflicts of
laws and excluding the United Nations Convention on the International
Sale of Goods. In such case each of the parties to this EULA irrevocably
attorns to the jurisdiction of the courts of The Netherlands and further
agrees to commence any litigation that may arise under this EULA in the
courts of The Hague, The Netherlands.
4.3 Trimble reserves all rights not expressly granted by this EULA.
4.4 Official Language. The official language of this EULA and of any
documents relating thereto is English. For purposes of interpretation, or
in the event of a conflict between English and versions of this EULA or
related documents in any other language, the English language version
shall be controlling.
Registration
To receive information regarding updates and new products, please
contact your local dealer or visit the Trimble website at
www.trimble.com/register. Upon registration you may select the
newsletter, upgrade, or new product information you desire.
Notices
Class B statement- Notice to users This equipment has been tested and
found to comply with the limits for a Class B digital device pursuant to
Part 15 of the FCC Rules. Operation is subject to the following two
conditions: (1) this device may not cause harmful interference, and (2)
this device must ac cept any interference received, including inter ference
that may cause undesired operation.
This equipment generates uses and can radiate radio frequency energy
and, if not installed and used in accordance with the instructions may
cause harmful interference to radio communication.
However, there is no guarantee that interference will not occur in a
particular installation. If this equipment does cause harmful
interference to radio or television reception, which can be determined
by turning the equipment off and on, the user is encouraged to try to
correct the interference by one or more of the following measures:
– Reorient or relocate the receiving antenna.
– Increase the separation between the equipment and the receiver.
– Connect the equipment into an outlet on a circuit different from that
to which the receiver is connected.
– Consult the dealer or an experienced radio/TV technician for help.
Changes and modifications not expressly approved by the manufacturer
or registrant of this equipment can void your authority to operate this
equipment under Federal Communications Commission rules.
The radio devices used by this equipment are classified under 47 CFR
§15.247 as spread spectrum transmitter equipment. In accordance with
OET Bulletin 65 supplement C Edition 1-01, the device operates at low
power levels where there is a high likelihood of compliance with the RF
exposure standards, is categorically excluded from routine
environmental evaluation as set forth in CFR 47 section 2.1093. The
radiated output power of this equipme nt produces a calculated SAR that
is significantly below the FCC radio frequency exposure limits.
The external antenna connector provided in this device is for GPS
antennas only.
Accessories
The following accessories have been approved for use with this device:
P/N 70970-00 GeoExplorer 2008 Series Support Module
P/N 70970-01 GeoExplorer 3000 Series Support Module and
P/N 70980-00 GeoExplorer 2008 Series Power/Serial Clip.
Canada
This Class B digital apparatus complies with Canadian ICES-003.
This digital apparatus does not exceed the Class B limits for radio noise
emissions from digital apparatus as set out in the radio interference
regulations of the Canadian Department of Communications.
Cet appareil numérique de la classe B est conforme à la norme NNB-003
du Canada.
Le présent appareil numérique n'émet pas de bruits radioélectriques
dépassant les limites applicables aux appareils numériques de Classe B
prescrites dans le règlement sur le brouillage radioélectrique édicté par
le Ministère des Communications du Canada.
Europe
This product has been tested and
found to comply with all
requirements for CE Marking and
sale within the European Economic
Area (EEA). It is classified and marked as being Class 2 Radio Equipment
under 2000/299/EC, as Bluetooth and wireless LAN approvals are
country specific. Please consult your local distributor for more
information.
The Trimble GeoExplorer 3000 series has Bluetooth and wireless LAN
approval in most EU countries and satisfies the requirements for Radio
and Telecommunication Terminal Equipment specified by European
GeoExplorer 3000 Series User Guide 5
Page 6

Council Directive 1999/5/EC. These requirements provide reasonable
protection against harmful inter ference when the equipment is operated
appropriately in a residential or commercial environment.
Australia and New Zealand
This product conforms with the regulatory requirements of the
Australian Communications Authority (ACA) EMC and
Radiocommunications framework, thus satisfying the
requirements for C-Tick Marking and sale within Australia and
New Zealand.
Taiwan – Battery Recycling Requirements
The product contains an internal Lithium-ion battery.
Taiwanese regulations require that waste batteries are recycled.
廢電池請回收
Notice to Our European Union Customers
For product recycling instructions and more information, please go to
www.trimble.com/ev.shtml.
Recycling in Europe: To recycle Trimble WEEE (Waste Electrical
and Electronic Equipment, products that run on electrical
power.), Call +31 497 53 24 30, and ask for the "WEEE Associate".
Or, mail a request for recycling instructions to:
Trimble Europe BV
c/o Menlo Worldwide Logistics
Meerheide 45
5521 DZ Eersel, NL
Korean Communications Commission (KCC)
This product conforms with the regulatory requirements of the Korean
Communications Commission (KCC), thus satisfying the requirements
for KCC Marking and sale within Korea
방송통신위원
이 제품은 한국 방송통신위원회(KCC)의 규제요건에 부합하므로
KCC 마크 표시 및 한국내 판매 요건을 충족합니다
1. 인증받은자의 상호: Trimble Navigation Ltd.
2. 모델명 :GeoXT / GeoXH
3. 제조사 : Flextronics
4. 송신주파수 :B/T 2402~2480 MHz, WLAN : 2412~2472 MHz
5. 수신주파수 :B/T 2402~2480 MHz, WLAN : 2412~2472 MHz
6. 출력 : B/T 0.02 mW, WLAN 10mW
7. 사용자 안내문구
기종별 사 용 자 안 내 문
B급 기기
( 가정용 방송통
신기기 )
8. 당해무선설비기기는 운용중 전파혼신 가능성이 있으므로 인명안
전과 관련된 서비스는 할수 없음.
이 기기는 가정용 (B 급 ) 으로 전자파 적합등
록을 한 기기로서 주로 가정에서 사용하는 것
을 목적으로 하며 , 모든 지역에서
사용할 수 있습니다
6 GeoExplorer 3000 Series User Guide
Page 7

Safety Information
Radio use
The Trimble® GeoExplorer® 3000 series handheld contains a Bluetooth® radio and a
wireless LAN radio. In some situations, you may be required to turn off the radios. For
example, aviation authority regulations restrict the use of radios on board aircraft.
To prevent the handheld from emitting radio signals, do one of the following:
• To turn off the handheld, press the Power button.
• To turn off the Bluetooth and wireless LAN radios only:
a. Tap the Wireless Connectivity icon ( or ) in the title bar of the To da y
screen and then tap Wireless Manager.
b. Tap
All to turn off both radios. The status fields below the Wi-Fi and
Bluetooth buttons change to Off.
Deactivating the integrated radios
The GeoExplorer 3000 Series User Guide handheld is shipped with wireless LAN and
Bluetooth wireless technology activated. To use the wireless LAN or Bluetooth radio,
you need to turn it on (see Turning on and turning off the integrated radios, page 78).
Note – You may need to deactivate the wireless LAN and/or Bluetooth radio in the
handheld if the country in which you are working does not approve the use of wireless LAN
and/or Bluetooth wireless technology. If you are unsure about whether the GeoExplorer
3000 series handheld’s radios are approved for use in your country, check with your
Trimble reseller.
Use the Radio Activation Manager software to deactivate the integrated wireless LAN
and/or Bluetooth radio, or to reactivate the radios if they have been deactivated. The
Radio Activation Manager software runs on an office computer.
The latest copy of the software is available for download from the Trimble website. Go
to www.trimble.com/geoxh3000.shtml, www.trimble.com/geoxm3000.shtml, or
www.trimble.com/geoxt3000.shtml, click Support, click Downloads, and then click
Radio Activation Manager.
GeoExplorer 3000 Series User Guide 7
Page 8

Safety Information
Exposure to radio frequency radiation (Bluetooth and WLAN
transmitters)
This device is approved as a portable device with respect to Radio Frequency (RF)
exposure compliance. The radiated output power of the internal wireless radio
transmitters is less than 10 milliWatt, which results in exposure levels far below the
FCC radio frequency exposure limits, even when operated in close proximity to the
body. The internal wireless radios operate within guidelines found in international
radio frequency safety standards and recommendations, which reflect the consensus
of the international scientific community. Trimble therefore believes the internal
wireless radios are safe for use by users. The level of electromagnetic energy emitted is
hundreds of times lower than the electromagnetic energy emitted by wireless devices
such as mobile phones. However, the use of wireless radios may be restricted in some
situations or environments, such as on aircraft. If you are unsure of restrictions, you are
encouraged to ask for authorization before turning on the wireless radios.
AC adaptor safety
To charge the handheld’s battery, use the international adaptor kit provided with the
GeoExplorer 3000 series handheld (see Powering the handheld, page 24).
C
WARNING – To use AC adaptors safely:
– Use only the AC adaptor intended for the GeoExplorer 3000 series handheld. Using any
other AC adaptor can damage the handheld and may void your warranty. Do not use
the AC adaptor with any other product.
– Make certain that the input voltage on the adaptor matches the voltage and frequency
in your location.
– Make certain that the adaptor has prongs compatible with your outlets.
– Do not use the AC adaptor in wet outdoor areas; it is designed for indoor use only.
– Unplug the AC adaptor from power when not in use.
– Do not short the output connector.
– Be aware that there are no user-serviceable parts in this product.
– If the AC adaptor becomes damaged, replace it with a new Trimble AC adaptor.
8 GeoExplorer 3000 Series User Guide
Page 9

Electrostatic discharge
Safety Information
C
WARNING – Static electricity can harm electronic components inside your handheld. To
prevent static damage:
– Discharge static electricity from your body before you touch any of the electronic
components inside your device, such as a memory module. You can do so by touching an
unpainted metal surface.
The GeoExplorer 3000 series is designed for outdoor conditions; however
under conditions of low humidity extremely high voltage discharge events
are possible. Users are advised that the risk of causing discharge to
sensitive electronics can be minimised by avoiding finger contact to the
recessed connectors at the back of the unit.
Should such an event occur, the screen may be temporarily affected and become
difficult to read. Under such circumstances, applying the suspend resume key will
restore the unit to the original display, and there will be no accompanying loss of data
or functionality.
Battery safety
The internal rechargeable Lithium-ion battery is supplied partially charged. Charge the
battery completely before using it for the first time (see Powering the handheld,
page 24). If the battery has been stored for longer than six months, charge it before use.
C
WARNING – The GeoExplorer 3000 series handheld is powered by an internal rechargable
Lithium-ion battery. Charge and use the battery only in strict accordance with the
instructions provided.
To prevent injury or damage:
– Never attempt to remove, replace, or repair the battery yourself.
– Do not damage the battery.
– Do not store or leave the handheld near a heat source such as a fireplace or other
heat-generating appliance, or otherwise expose it to temperatures in excess of 70 °C
(158 °F) such as on a vehicle dashboard. When heated to excessive temperatures, battery
cells could explode or vent, posing a risk of fire.
– Do not use the handheld if the battery appears to be leaking.
– If the battery requires attention, send the handheld to your local Trimble Service Center.
– Discharge the handheld before disposing of the battery. When disposing of the battery,
be sure to do so in an environmentally sensitive manner. Adhere to any local and
national regulations concerning battery disposal or recycling.
GeoExplorer 3000 Series User Guide 9
Page 10

Safety Information
Storage card use
The GeoExplorer 3000 series handheld provides a storage card slot, providing an
alternative storage location to the storage memory in the handheld.
C
C
WARNING – Static electricity can harm electronic components inside your handheld. To
prevent static damage:
– Discharge static electricity from your body before you touch any of the electronic
components inside your device, such as a memory module. You can do so by touching an
unpainted metal surface.
WARNING – The presence of any dust or moisture in the storage card slot may adversely
affect the device and void your Trimble warranty. To prevent dust or moisture entering
the storage card slot:
– Make certain that the storage card slot door is attached correctly when you are using
the handheld outdoors.
– When inserting or removing a storage card, place the handheld on a dust-free indoor
surface.
10 GeoExplorer 3000 Series User Guide
Page 11

Contents
Safety Information . . . . . . . . . . . . . . . . . . . . . . . . . . . . . . . . 7
Radio use . . . . . . . . . . . . . . . . . . . . . . . . . . . . . . . . . . . . . . . . . . . . . . . . . . . . . . . 7
Deactivating the integrated radios . . . . . . . . . . . . . . . . . . . . . . . . . . . . . . . . . . . 7
Exposure to radio frequency radiation (Bluetooth and WLAN transmitters). . . . . . . . . . . . . 8
AC adaptor safety . . . . . . . . . . . . . . . . . . . . . . . . . . . . . . . . . . . . . . . . . . . . . . . . . . 8
Electrostatic discharge. . . . . . . . . . . . . . . . . . . . . . . . . . . . . . . . . . . . . . . . . . . . . . . 9
Battery safety. . . . . . . . . . . . . . . . . . . . . . . . . . . . . . . . . . . . . . . . . . . . . . . . . . . . . 9
Storage card use . . . . . . . . . . . . . . . . . . . . . . . . . . . . . . . . . . . . . . . . . . . . . . . . . . 10
1 Introduction . . . . . . . . . . . . . . . . . . . . . . . . . . . . . . . . . . . 15
About the GeoExplorer 3000 series handheld . . . . . . . . . . . . . . . . . . . . . . . . . . . . . . . 16
Supported GPS field software . . . . . . . . . . . . . . . . . . . . . . . . . . . . . . . . . . . . . 16
What’s in the box? . . . . . . . . . . . . . . . . . . . . . . . . . . . . . . . . . . . . . . . . . . . . . . . . 17
Accessories . . . . . . . . . . . . . . . . . . . . . . . . . . . . . . . . . . . . . . . . . . . . . . . . . . . . . 18
Use and care of the handheld . . . . . . . . . . . . . . . . . . . . . . . . . . . . . . . . . . . . . . . . . 18
Storing the handheld . . . . . . . . . . . . . . . . . . . . . . . . . . . . . . . . . . . . . . . . . . 19
Technical assistance . . . . . . . . . . . . . . . . . . . . . . . . . . . . . . . . . . . . . . . . . . . . . . . 19
Technical support . . . . . . . . . . . . . . . . . . . . . . . . . . . . . . . . . . . . . . . . . . . . 19
Additional help . . . . . . . . . . . . . . . . . . . . . . . . . . . . . . . . . . . . . . . . . . . . . . 19
Windows error reporting . . . . . . . . . . . . . . . . . . . . . . . . . . . . . . . . . . . . . . . . 19
2 Getting Started. . . . . . . . . . . . . . . . . . . . . . . . . . . . . . . . . . 21
Parts of the GeoExplorer 3000 series handheld . . . . . . . . . . . . . . . . . . . . . . . . . . . . . . 22
Keypad buttons . . . . . . . . . . . . . . . . . . . . . . . . . . . . . . . . . . . . . . . . . . . . . . . . . . 23
Powering the handheld . . . . . . . . . . . . . . . . . . . . . . . . . . . . . . . . . . . . . . . . . . . . . 24
AC adaptor safety. . . . . . . . . . . . . . . . . . . . . . . . . . . . . . . . . . . . . . . . . . . . . 24
Battery safety . . . . . . . . . . . . . . . . . . . . . . . . . . . . . . . . . . . . . . . . . . . . . . . 24
Charging the battery. . . . . . . . . . . . . . . . . . . . . . . . . . . . . . . . . . . . . . . . . . . 25
Checking the level of battery power . . . . . . . . . . . . . . . . . . . . . . . . . . . . . . . . . 26
Conserving power . . . . . . . . . . . . . . . . . . . . . . . . . . . . . . . . . . . . . . . . . . . . 27
Turning on and turning off the handheld . . . . . . . . . . . . . . . . . . . . . . . . . . . . . . . . . . 27
Suspend mode. . . . . . . . . . . . . . . . . . . . . . . . . . . . . . . . . . . . . . . . . . . . . . . 28
Resetting the handheld . . . . . . . . . . . . . . . . . . . . . . . . . . . . . . . . . . . . . . . . . . . . . 29
Performing a soft reset . . . . . . . . . . . . . . . . . . . . . . . . . . . . . . . . . . . . . . . . . 29
Performing a hard reset . . . . . . . . . . . . . . . . . . . . . . . . . . . . . . . . . . . . . . . . . 29
Resetting to factory default settings . . . . . . . . . . . . . . . . . . . . . . . . . . . . . . . . . 30
Storing data . . . . . . . . . . . . . . . . . . . . . . . . . . . . . . . . . . . . . . . . . . . . . . . . . . . . 30
Storage cards . . . . . . . . . . . . . . . . . . . . . . . . . . . . . . . . . . . . . . . . . . . . . . . 31
Fitting the handstrap. . . . . . . . . . . . . . . . . . . . . . . . . . . . . . . . . . . . . . . . . . . . . . . 33
GeoExplorer 3000 Series User Guide 11
Page 12

3 Using the Windows Mobile Operating System . . . . . . . . . . . . . . . . 35
Parts of the screen . . . . . . . . . . . . . . . . . . . . . . . . . . . . . . . . . . . . . . . . . . . . . . . . 36
Accessing help . . . . . . . . . . . . . . . . . . . . . . . . . . . . . . . . . . . . . . . . . . . . . . . . . . . 36
Status indicators . . . . . . . . . . . . . . . . . . . . . . . . . . . . . . . . . . . . . . . . . . . . . . . . . 37
Pre-installed programs. . . . . . . . . . . . . . . . . . . . . . . . . . . . . . . . . . . . . . . . . . . . . . 37
Using the stylus . . . . . . . . . . . . . . . . . . . . . . . . . . . . . . . . . . . . . . . . . . . . . . . . . . 38
Removing and replacing the stylus . . . . . . . . . . . . . . . . . . . . . . . . . . . . . . . . . . 38
Interacting with the handheld. . . . . . . . . . . . . . . . . . . . . . . . . . . . . . . . . . . . . 39
Tethering the stylus to the handheld. . . . . . . . . . . . . . . . . . . . . . . . . . . . . . . . . 39
Entering information. . . . . . . . . . . . . . . . . . . . . . . . . . . . . . . . . . . . . . . . . . . . . . . 40
Making a recording. . . . . . . . . . . . . . . . . . . . . . . . . . . . . . . . . . . . . . . . . . . . 42
Personalizing the handheld. . . . . . . . . . . . . . . . . . . . . . . . . . . . . . . . . . . . . . . . . . . 43
Buttons . . . . . . . . . . . . . . . . . . . . . . . . . . . . . . . . . . . . . . . . . . . . . . . . . . . 43
Today . . . . . . . . . . . . . . . . . . . . . . . . . . . . . . . . . . . . . . . . . . . . . . . . . . . . 44
Device lock . . . . . . . . . . . . . . . . . . . . . . . . . . . . . . . . . . . . . . . . . . . . . . . . . 45
Power . . . . . . . . . . . . . . . . . . . . . . . . . . . . . . . . . . . . . . . . . . . . . . . . . . . . 45
Sounds and notifications . . . . . . . . . . . . . . . . . . . . . . . . . . . . . . . . . . . . . . . . 46
Screen . . . . . . . . . . . . . . . . . . . . . . . . . . . . . . . . . . . . . . . . . . . . . . . . . . . . 47
Backlight . . . . . . . . . . . . . . . . . . . . . . . . . . . . . . . . . . . . . . . . . . . . . . . . . . 48
Messaging. . . . . . . . . . . . . . . . . . . . . . . . . . . . . . . . . . . . . . . . . . . . . . . . . . . . . . 49
Synchronizing e-mail messages . . . . . . . . . . . . . . . . . . . . . . . . . . . . . . . . . . . . 49
Connecting directly to an e-mail server . . . . . . . . . . . . . . . . . . . . . . . . . . . . . . . 50
4 Connecting to an Office Computer. . . . . . . . . . . . . . . . . . . . . . . 53
Connection management software . . . . . . . . . . . . . . . . . . . . . . . . . . . . . . . . . . . . . . 54
Installing the Windows Mobile Device Center . . . . . . . . . . . . . . . . . . . . . . . . . . 54
Installing ActiveSync technology . . . . . . . . . . . . . . . . . . . . . . . . . . . . . . . . . . . 55
Connecting the handheld to a computer . . . . . . . . . . . . . . . . . . . . . . . . . . . . . . . . . . 55
Managing the connection using the Windows Mobile Device Center . . . . . . . . . . . . . . . . 56
Managing the connection using ActiveSync technology. . . . . . . . . . . . . . . . . . . . . . . . . 57
Installing software onto the handheld . . . . . . . . . . . . . . . . . . . . . . . . . . . . . . . . . . . . 59
5 Using the GPS Receiver . . . . . . . . . . . . . . . . . . . . . . . . . . . . . 61
Supported GPS field software . . . . . . . . . . . . . . . . . . . . . . . . . . . . . . . . . . . . . . . . . 62
TerraSync software . . . . . . . . . . . . . . . . . . . . . . . . . . . . . . . . . . . . . . . . . . . . 62
ESRI ArcPad software and the Trimble GPScorrect extension. . . . . . . . . . . . . . . . . 62
GPS Controller software . . . . . . . . . . . . . . . . . . . . . . . . . . . . . . . . . . . . . . . . 62
Other GPS field applications . . . . . . . . . . . . . . . . . . . . . . . . . . . . . . . . . . . . . . 63
TrimPix technology . . . . . . . . . . . . . . . . . . . . . . . . . . . . . . . . . . . . . . . . . . . 63
Configuring the GPS field software to connect to the receiver . . . . . . . . . . . . . . . . . . . . . 63
GPS COM ports . . . . . . . . . . . . . . . . . . . . . . . . . . . . . . . . . . . . . . . . . . . . . . 63
Connecting to the COM port . . . . . . . . . . . . . . . . . . . . . . . . . . . . . . . . . . . . . 64
Using the GPS field software . . . . . . . . . . . . . . . . . . . . . . . . . . . . . . . . . . . . . . . . . . 64
Starting the GPS field software . . . . . . . . . . . . . . . . . . . . . . . . . . . . . . . . . . . . 65
12 GeoExplorer 3000 Series User Guide
Page 13

Viewing available GPS satellites . . . . . . . . . . . . . . . . . . . . . . . . . . . . . . . . . . . 65
Resetting the GPS receiver . . . . . . . . . . . . . . . . . . . . . . . . . . . . . . . . . . . . . . . 65
Ensuring the accuracy of your GPS data. . . . . . . . . . . . . . . . . . . . . . . . . . . . . . . . . . . 65
Using accuracy-based logging . . . . . . . . . . . . . . . . . . . . . . . . . . . . . . . . . . . . . 67
Connecting to a real-time differential correction source . . . . . . . . . . . . . . . . . . . . 68
Connecting to an external antenna . . . . . . . . . . . . . . . . . . . . . . . . . . . . . . . . . 71
Logging carrier data . . . . . . . . . . . . . . . . . . . . . . . . . . . . . . . . . . . . . . . . . . . 72
Planning a data collection session . . . . . . . . . . . . . . . . . . . . . . . . . . . . . . . . . . 73
Differential GPS explained . . . . . . . . . . . . . . . . . . . . . . . . . . . . . . . . . . . . . . . . . . . 73
Real-time DGPS . . . . . . . . . . . . . . . . . . . . . . . . . . . . . . . . . . . . . . . . . . . . . . 73
Postprocessed DGPS. . . . . . . . . . . . . . . . . . . . . . . . . . . . . . . . . . . . . . . . . . . 74
Postprocessed real-time DGPS . . . . . . . . . . . . . . . . . . . . . . . . . . . . . . . . . . . . 74
Outputting GPS data to external equipment . . . . . . . . . . . . . . . . . . . . . . . . . . . . . . . . 75
6 Getting Connected . . . . . . . . . . . . . . . . . . . . . . . . . . . . . . . . 77
General wireless connection information . . . . . . . . . . . . . . . . . . . . . . . . . . . . . . . . . . 78
Deactivating the integrated radios . . . . . . . . . . . . . . . . . . . . . . . . . . . . . . . . . . 78
Turning on and turning off the integrated radios . . . . . . . . . . . . . . . . . . . . . . . . . 78
Options for connecting wirelessly to other devices and networks . . . . . . . . . . . . . . . . . . 81
Connecting to a wireless LAN access point . . . . . . . . . . . . . . . . . . . . . . . . . . . . 82
Connecting to a Bluetooth-enabled device . . . . . . . . . . . . . . . . . . . . . . . . . . . . 84
Connecting to a Bluetooth-enabled phone for Internet access or real-time corrections
(including VRS networks) . . . . . . . . . . . . . . . . . . . . . . . . . . . . . . . . . . . 88
Connecting to a Bluetooth-enabled serial device . . . . . . . . . . . . . . . . . . . . . . . . . 94
Connecting to an office computer to use ActiveSync technology . . . . . . . . . . . . . . 97
Outputting GPS data to other devices using Bluetooth wireless technology . . . . . . . .100
Enabling other devices to transfer files using Bluetooth wireless technology . . . . . . .101
Beaming files to or from another device . . . . . . . . . . . . . . . . . . . . . . . . . . . . . .102
Accessing a corporate network through your Internet connection. . . . . . . . . . . . . . 103
Bluetooth wireless connections explained . . . . . . . . . . . . . . . . . . . . . . . . . . . . . . . . .105
Connecting to a Bluetooth device as a client . . . . . . . . . . . . . . . . . . . . . . . . . . . 105
Providing Bluetooth services as a host . . . . . . . . . . . . . . . . . . . . . . . . . . . . . . .107
Connecting to other devices using the serial clip . . . . . . . . . . . . . . . . . . . . . . . . . . . . .109
Attaching the serial clip. . . . . . . . . . . . . . . . . . . . . . . . . . . . . . . . . . . . . . . . .109
Connecting to external devices . . . . . . . . . . . . . . . . . . . . . . . . . . . . . . . . . . . . 110
Connecting to an external power source with the serial clip. . . . . . . . . . . . . . . . . .111
7 Troubleshooting . . . . . . . . . . . . . . . . . . . . . . . . . . . . . . . . 113
Power issues . . . . . . . . . . . . . . . . . . . . . . . . . . . . . . . . . . . . . . . . . . . . . . . . . . . .114
Backlight issues . . . . . . . . . . . . . . . . . . . . . . . . . . . . . . . . . . . . . . . . . . . . . . . . . .114
Touch screen issues . . . . . . . . . . . . . . . . . . . . . . . . . . . . . . . . . . . . . . . . . . . . . . .115
Keypad issues . . . . . . . . . . . . . . . . . . . . . . . . . . . . . . . . . . . . . . . . . . . . . . . . . . . 115
Storage card issues . . . . . . . . . . . . . . . . . . . . . . . . . . . . . . . . . . . . . . . . . . . . . . . 116
Connection issues. . . . . . . . . . . . . . . . . . . . . . . . . . . . . . . . . . . . . . . . . . . . . . . . .116
ActiveSync technology . . . . . . . . . . . . . . . . . . . . . . . . . . . . . . . . . . . . . . . . 116
GeoExplorer 3000 Series User Guide 13
Page 14

Windows Mobile Device Center . . . . . . . . . . . . . . . . . . . . . . . . . . . . . . . . . .117
Network connections . . . . . . . . . . . . . . . . . . . . . . . . . . . . . . . . . . . . . . . . .117
Bluetooth wireless technology . . . . . . . . . . . . . . . . . . . . . . . . . . . . . . . . . . . .118
Wireless LAN connections . . . . . . . . . . . . . . . . . . . . . . . . . . . . . . . . . . . . .119
Serial clip issues . . . . . . . . . . . . . . . . . . . . . . . . . . . . . . . . . . . . . . . . . . . . .120
GPS receiver issues . . . . . . . . . . . . . . . . . . . . . . . . . . . . . . . . . . . . . . . . . . . . . . .121
Real-time DGPS issues . . . . . . . . . . . . . . . . . . . . . . . . . . . . . . . . . . . . . . . . . . . .123
Recommended GPS settings for maximum precision . . . . . . . . . . . . . . . . . . . . . . . . . .124
14 GeoExplorer 3000 Series User Guide
Page 15

CHAPTER
1
Introduction 1
In this chapter:
About the GeoExplorer 3000
series handheld
What’s in the box?
Accessories
Use and care of the handheld
Technical assistance
The GeoExplorer 3000 Series User Guide describes
®
how to set up and use the Trimble
®
GeoExplorer
information in this guide supplements the
information in the GeoExplorer 3000 Series Quick
Start Guide, which you received with the
handheld.
This guide describes how to:
• use the Microsoft
version 6 operating system.
• use the handheld’s integrated GPS receiver.
• synchronize information between a
computer and the handheld.
• exchange information between the
handheld and other devices.
• connect to the Internet or to a computer
network.
Even if you have used other Global Positioning
System (GPS) products before, Trimble
recommends that you spend some time reading
this guide to learn about the special features of
the product. If you are not familiar with GPS, go
to the Trimble website (www.trimble.com) for an
interactive look at Trimble and GPS.
3000 series handheld. The
®
Windows Mobile®
GeoExplorer 3000 Series User Guide 15
Page 16
1 Introduction
About the GeoExplorer 3000 series handheld
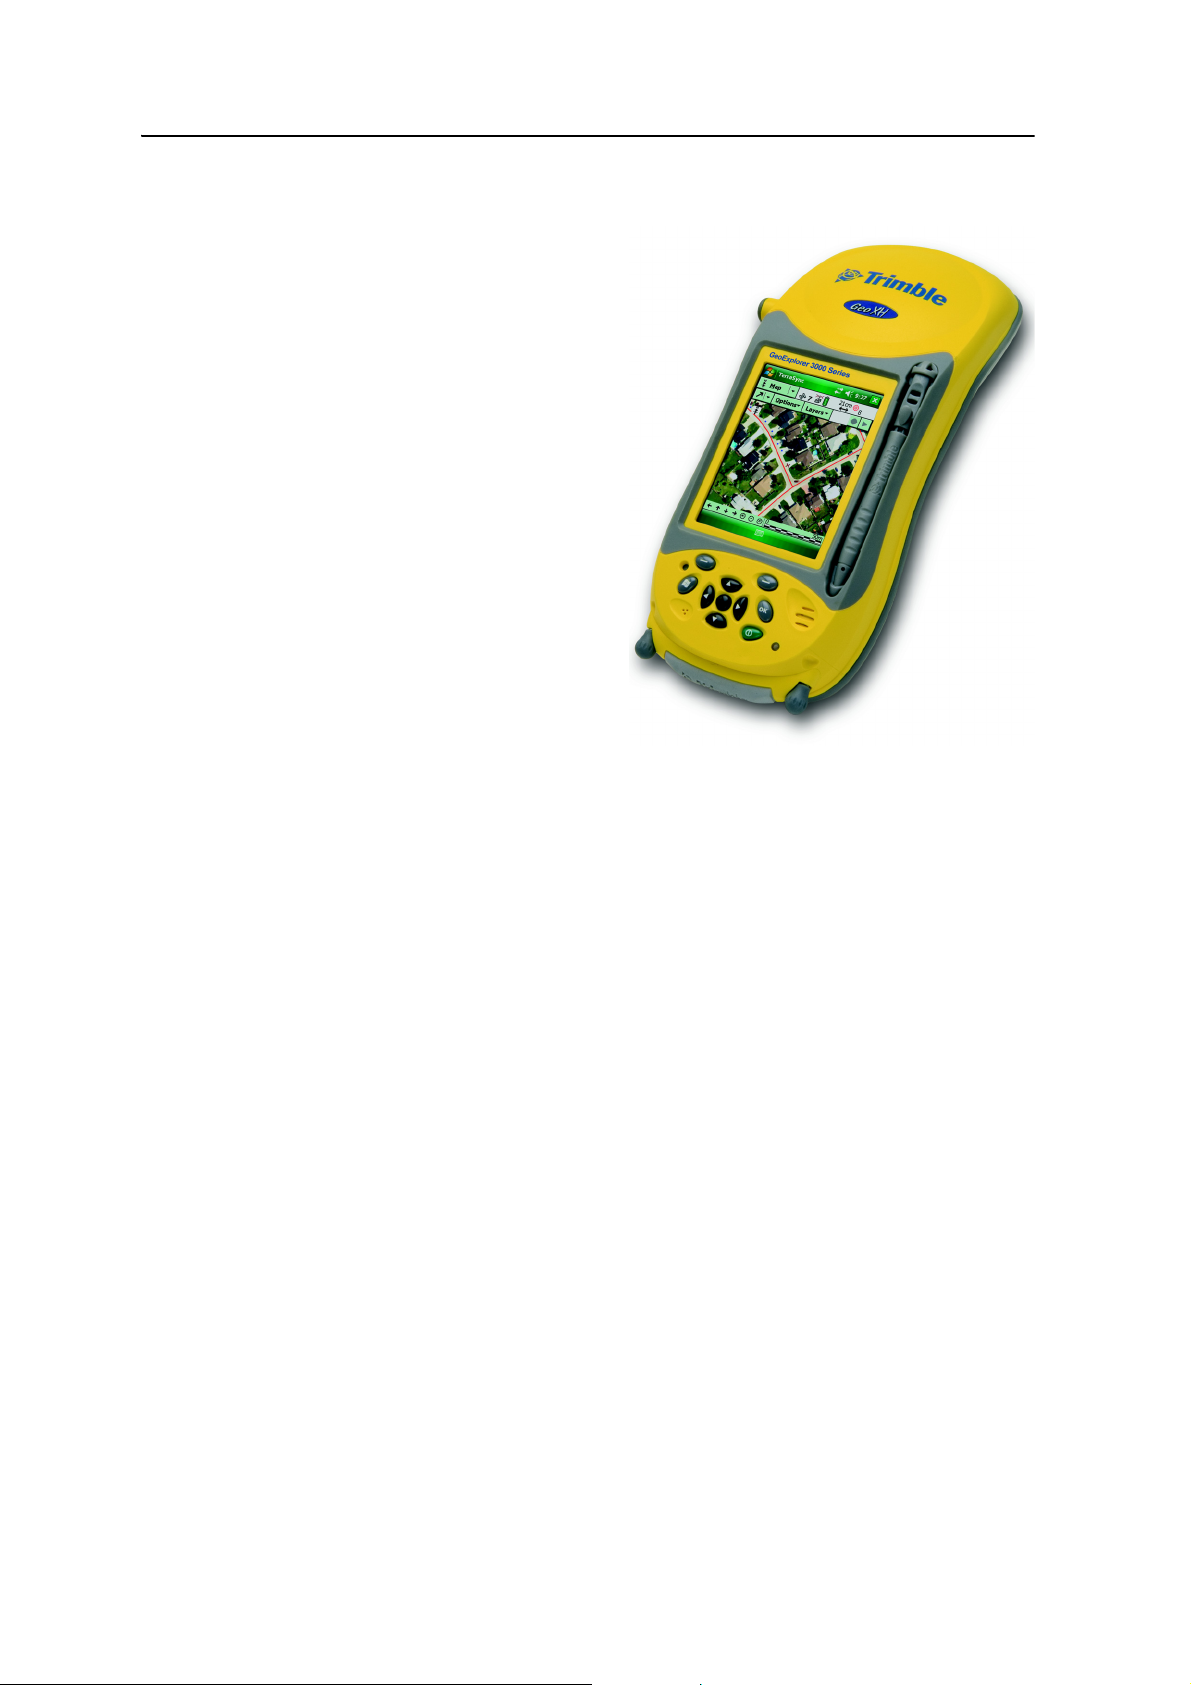
The GeoExplorer 3000 series includes
™
the GeoXH
handhelds. These handhelds combine
a Trimble GPS receiver with a field
computer powered by Microsoft
Windows Mobile version 6 operating
system.
The GeoExplorer 3000 series handheld
has built-in Bluetooth
technology for cable-free connection
to other devices, and wireless LAN
(Local Area Network) connectivity for
connections to networks.
The GeoXM handheld provides
reliable accuracy within 1 to 3 meters.
The GeoXT handheld uses
EVEREST
technology to provide submeter
accuracy. The GeoXH handheld uses
both EVEREST and H-Star
technology to provide subfoot (30 cm) accuracy, either in real time or after
postprocessing. For more information, see Chapter 5, Using the GPS Receiver.
, GeoXM™ and GeoXT™
®
wireless
™
multipath rejection
™
Supported GPS field software
To collect GPS data with the GeoExplorer 3000 series handheld, you must install GPS
field software onto the handheld. You can use the handheld with the following GPS
field software:
• Trimble TerraSync
options and for productive GIS data collection and maintenance.
• The Trimble GPScorrect
real-time differential correction options and for productive GIS data collection
and maintenance.
• The Trimble GPS Pathfinder
integrating GPS data and adding value to an existing mapping and GIS field
software application.
• Trimble GPS Controller software, for configuring real-time differential
correction options and NMEA output settings.
• Other GPS field software that accepts NMEA messages.
Note – Real-time subfoot capability is only available if you are using the TerraSync
software. the GPScorrect extension, or an application based on the GPS Pathfinder Tools
SDK.
™
software, for configuring real-time differential correction
™
extension for ESRI ArcPad software, for configuring
®
Tools Software Development Kit (SDK), for
16 GeoExplorer 3000 Series User Guide
Page 17
For more information, see Chapter 5, Using the GPS Receiver.
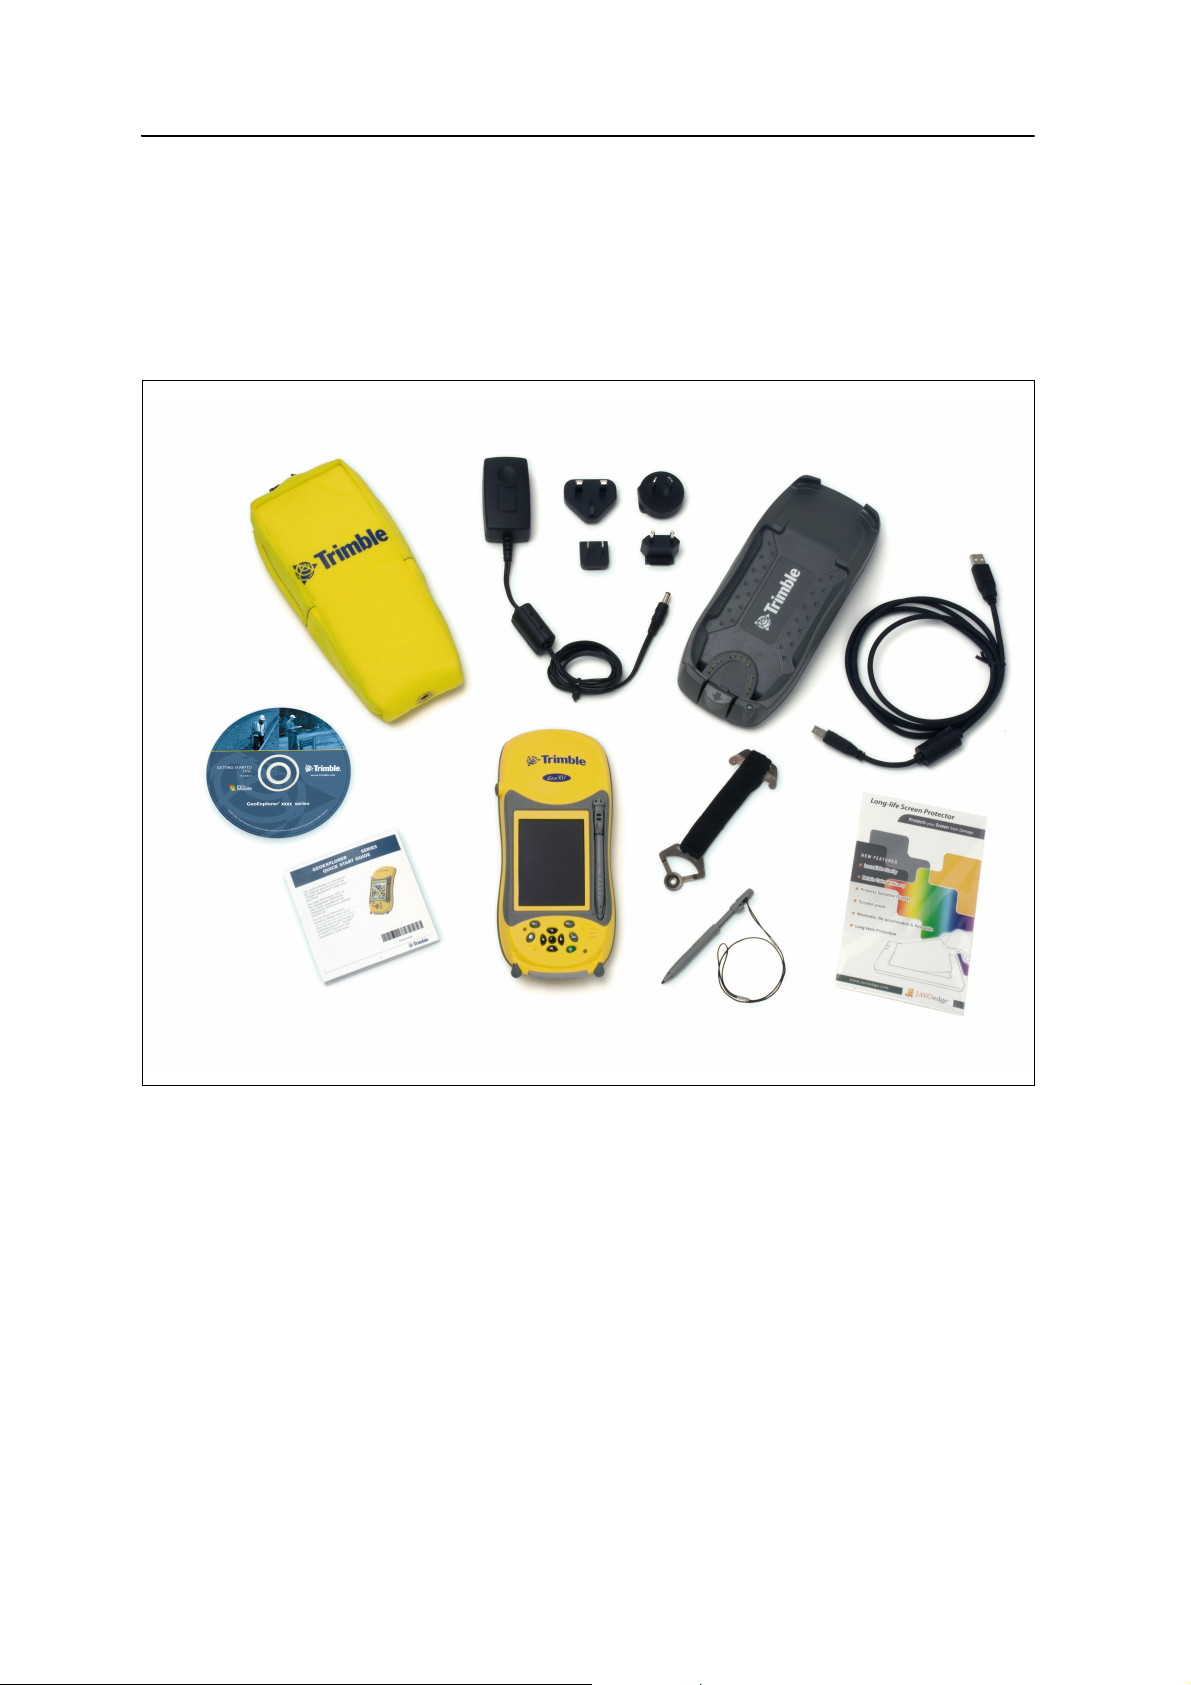
GeoExplorer 3000
Pouch
Quick Start Guide
series handheld
AC power adaptor and
Companion CD
USB data cable
Stylus (x2)
Support module
international adaptor kit
Screen protectors
Handstrap kit
and tether
What’s in the box?
When you unpack the GeoExplorer 3000 series handheld, check that you have received
all the components, as shown below.
Introduction 1
Figure 1.1 Items included with the GeoExplorer 3000 series handheld
Inspect all contents for visible damage (scratches, dents) and if any components
appear damaged, notify the shipping carrier. Keep the shipping and packaging material
for the carrier’s inspection.
GeoExplorer 3000 Series User Guide 17
Page 18

1 Introduction
Accessories
The following optional accessories are available:
• Power/serial clip
• Null modem cable
• Vehicle power adaptor
• External power kit
• Hard carry case
• Range pole
• Range pole bracket
• Hurricane antenna kit
• Zephyr
1
Requires power / serial clip (sold separately)
2
Compatible with GeoXH/XM/XT handhelds for improved yield. Also improves accuracy for the GeoXM and
GeoXT handhelds only.
3
Compatible with the GeoXH handheld for improved accuracy.
™
antenna kit
1
1
2
3
For more information, go to www.trimble.com/geoxh3000.shtml,
www.trimble.com/geoxm3000.shtml, or www.trimble.com/geoxt3000.shtml.
Use and care of the handheld
• External patch antennas
• Pole-mountable ground plane
• Baseball cap with antenna sleeve
• Backpack kit
• Screen protectors (2 pack)
• Stylus kit
• GeoBeacon
™
receiver (receives
differential corrections from a beacon
network)
To protect the GeoExplorer 3000 series handheld when not in use, Trimble
recommends storing the handheld in the pouch provided.
When using the handheld:
• To protect the touch screen from pressure and abrasive objects, Trimble
recommends that you apply one of the screen protectors provided with the
GeoExplorer 3000 series handheld.
• Protect the touch screen by using the stylus provided, and avoid using excessive
pressure and sharp or abrasive objects.
• Keep the outer surface free of dirt and dust.
• Ensure that protective covers and doors are appropriately fitted to the external
antenna port and storage card areas, so that they are kept free from dirt, dust,
fluid ingress & electrostatic discharge (see Storage cards, page 31).
• Protect the handheld from extreme temperatures. For example, do not leave the
handheld on the dashboard of a vehicle.
To clean the handheld, wipe it with a clean dry cloth. Do not immerse the handheld in
water.
18 GeoExplorer 3000 Series User Guide
Page 19

Storing the handheld
If you are not going to use the handheld for three months or more, Trimble
recommends that you do not leave the handheld in Suspend mode (see page 28).
Instead, partially charge the battery and then turn off the handheld.
To prepare the GeoExplorer 3000 series handheld for storage:
1. Transfer any data that you need to an office computer.
2. Charge the battery to approximately 30% and then remove the handheld from
the support module.
Introduction 1
3. Press the
the
Power key for one second until the Power menu appears and then tap
Shutdown button.
4. Store the handheld at room temperature.
To use the GeoExplorer 3000 series handheld after storage:
1. Press the
Power key to turn on the handheld.
2. Recharge the internal battery using the support module (see Charging the
battery, page 25).
Technical assistance
Technical support
Go to the GeoExplorer 3000 series handheld product page
(www.trimble.com/geoxh3000.shtml, www.trimble.com/geoxm3000.shtml, or
www.trimble.com/geoxt3000.shtml) and then click Support for the latest support
information including:
• support notes detailing support issues
• documentation
• the latest files available for download
Additional help
If you still cannot find the information that you need, contact your Trimble reseller.
Windows error reporting
If for any reason a Microsoft Windows Error Reporting dialog appears, indicating that
the handheld or Trimble GPS field software has encountered a problem and needs to
close, you are prompted to send an error report to Microsoft.
Trimble recommends that you click
used to obtain additional information.
Send and then click any subsequent links that are
GeoExplorer 3000 Series User Guide 19
Page 20

1 Introduction
Trimble can access the report that is sent to Microsoft and use it to improve the
GeoExplorer 3000 series handheld.
20 GeoExplorer 3000 Series User Guide
Page 21

CHAPTER
2
Getting Started 2
In this chapter:
Parts of the GeoExplorer 3000
series handheld
Keypad buttons
Powering the handheld
Turning on and turning off the
handheld
Resetting the handheld
Storing data
Fitting the handstrap
This chapter describes the main features of the
GeoExplorer 3000 series handheld, and provides
the information you need to get up and running
with the handheld.
GeoExplorer 3000 Series User Guide 21
Page 22

2 Getting Started
Windows Mobile
powered handheld
Application keys
Start menu key
Navigation keys and Enter key
Microphone
Touch screen
Stylus (pull out)
Speaker
Power status LED
Power key
External antenna
connector
Integrated GPS
receiver
Thumb screws for
storage card slot
door
Reset button
OK key
Storage card slot
door
Parts of the GeoExplorer 3000 series handheld
The following pages show the main parts of the handheld.
Figure 2.1 Parts of the GeoExplorer 3000 series handheld
22 GeoExplorer 3000 Series User Guide
Page 23
Keypad buttons
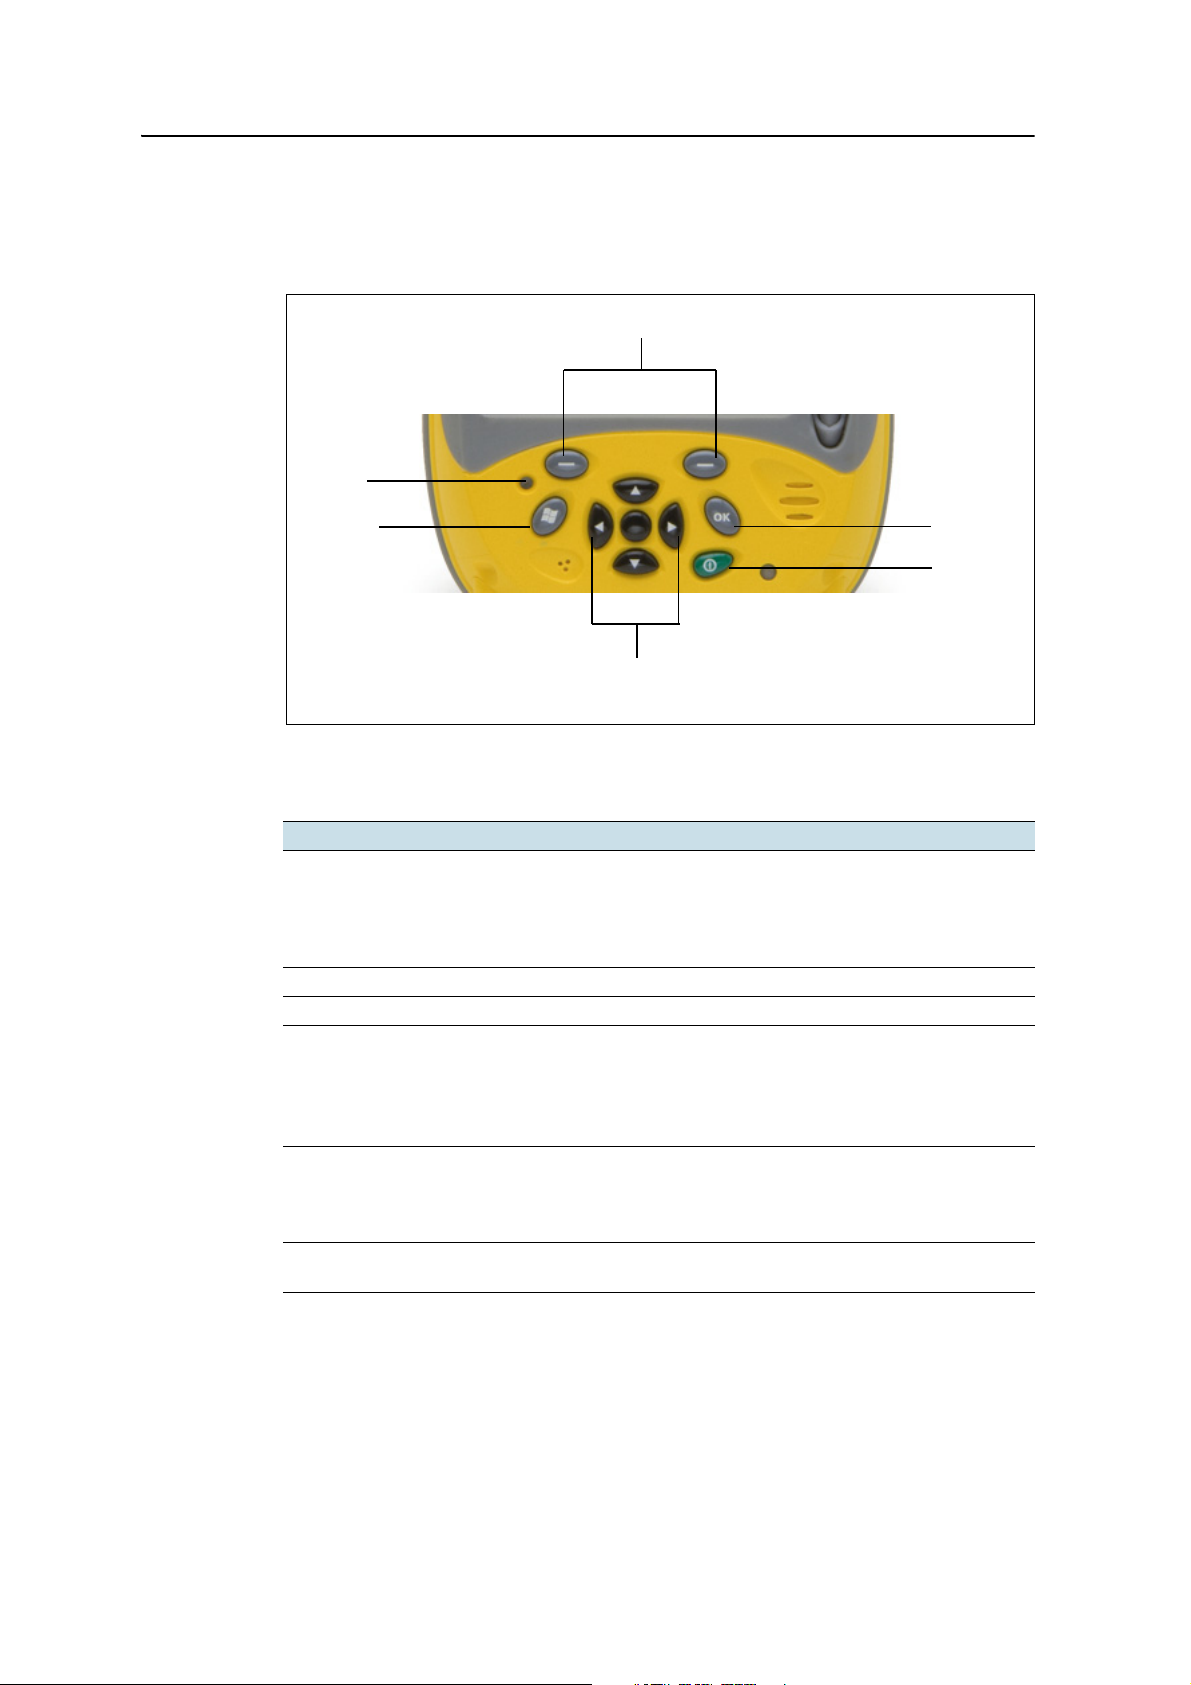
Application keys
Navigation keys and Enter key
Start key
OK key
Reset button
Power key
The GeoExplorer 3000 series handheld provides ten keys and a Reset button for fast,
easy access to common actions.
Getting Started 2
Figure 2.2 GeoExplorer 3000 series handheld keypad buttons
The function of each key is described below:
Key Description
Power Press briefly (less than one second) to turn on or to turn off the handheld
(put it into Suspend mode).
To access other power options, press and hold for one second until the
Power menu appears (see Turning on and turning off the handheld,
page 27).
Start Press to display the Windows Mobile Start menu.
OK Press to select OK or to close an application.
Navigation keys Use these keys to navigate around the screen, scroll through menus, or to
tab through options on windows and forms. Use the:
• arrow keys to move up, down, left, and right.
• action key (the center key) to perform an application-specific action,
which is usually Enter.
Application keys By default these keys perform the same action as the left and right
softkeys in the menu bar.
Alternatively, program these keys to perform a selected action. To
program the keys, use the Buttons control (see Buttons, page 43).
Reset button Use to reset the handheld (see Resetting the handheld, page 29). To
activate this button, use the nib of the stylus.
B
Tip – To lock the screen and handheld keys without turning off the handheld, use the
device lock option (see Device lock, page 45).
GeoExplorer 3000 Series User Guide 23
Page 24

2 Getting Started
Powering the handheld
The GeoExplorer 3000 series handheld contains an internal rechargeable Lithium-ion
battery.
Note – Charge the battery completely before using the handheld for the first time. If the
battery has been stored for longer than six months, charge it before use. Trimble
recommends charging the battery for eight hours to recharge it fully.
When fully charged, the handheld battery provides enough power for a full working
day (eight hours) using the internal GPS antenna and with the backlight on at the
default settings.
Note – Cold temperatures, or using Bluetooth wireless technology or wireless LAN
connectivity consumes additional battery power and so shortens battery life between
charges.
AC adaptor safety
C
WARNING – To use AC adaptors safely:
– Use only the AC adaptor intended for the GeoExplorer 3000 series handheld. Using any
other AC adaptor can damage the handheld and may void your warranty. Do not use
the AC adaptor with any other product.
– Make certain that the input voltage on the adaptor matches the voltage and frequency
in your location.
– Make certain that the adaptor has prongs compatible with your outlets.
– Do not use the AC adaptor in wet outdoor areas; it is designed for indoor use only.
– Unplug the AC adaptor from power when not in use.
– Do not short the output connector.
– Be aware that there are no user-serviceable parts in this product.
– If the AC adaptor becomes damaged, replace it with a new Trimble AC adaptor.
Battery safety
C
WARNING – The GeoExplorer 3000 series handheld is powered by an internal rechargable
Lithium-ion battery. Charge and use the battery only in strict accordance with the
instructions provided.
To prevent injury or damage:
– Never attempt to remove, replace, or repair the battery yourself.
– Do not damage the battery.
– Do not store or leave the handheld near a heat source such as a fireplace or other
heat-generating appliance, or otherwise expose it to temperatures in excess of 70 °C
(158 °F) such as on a vehicle dashboard. When heated to excessive temperatures, battery
cells could explode or vent, posing a risk of fire.
– Do not use the handheld if the battery appears to be leaking.
– If the battery requires attention, send the handheld to your local Trimble Service Center.
– Discharge the handheld before disposing of the battery. When disposing of the battery,
be sure to do so in an environmentally sensitive manner. Adhere to any local and
national regulations concerning battery disposal or recycling.
24 GeoExplorer 3000 Series User Guide
Page 25
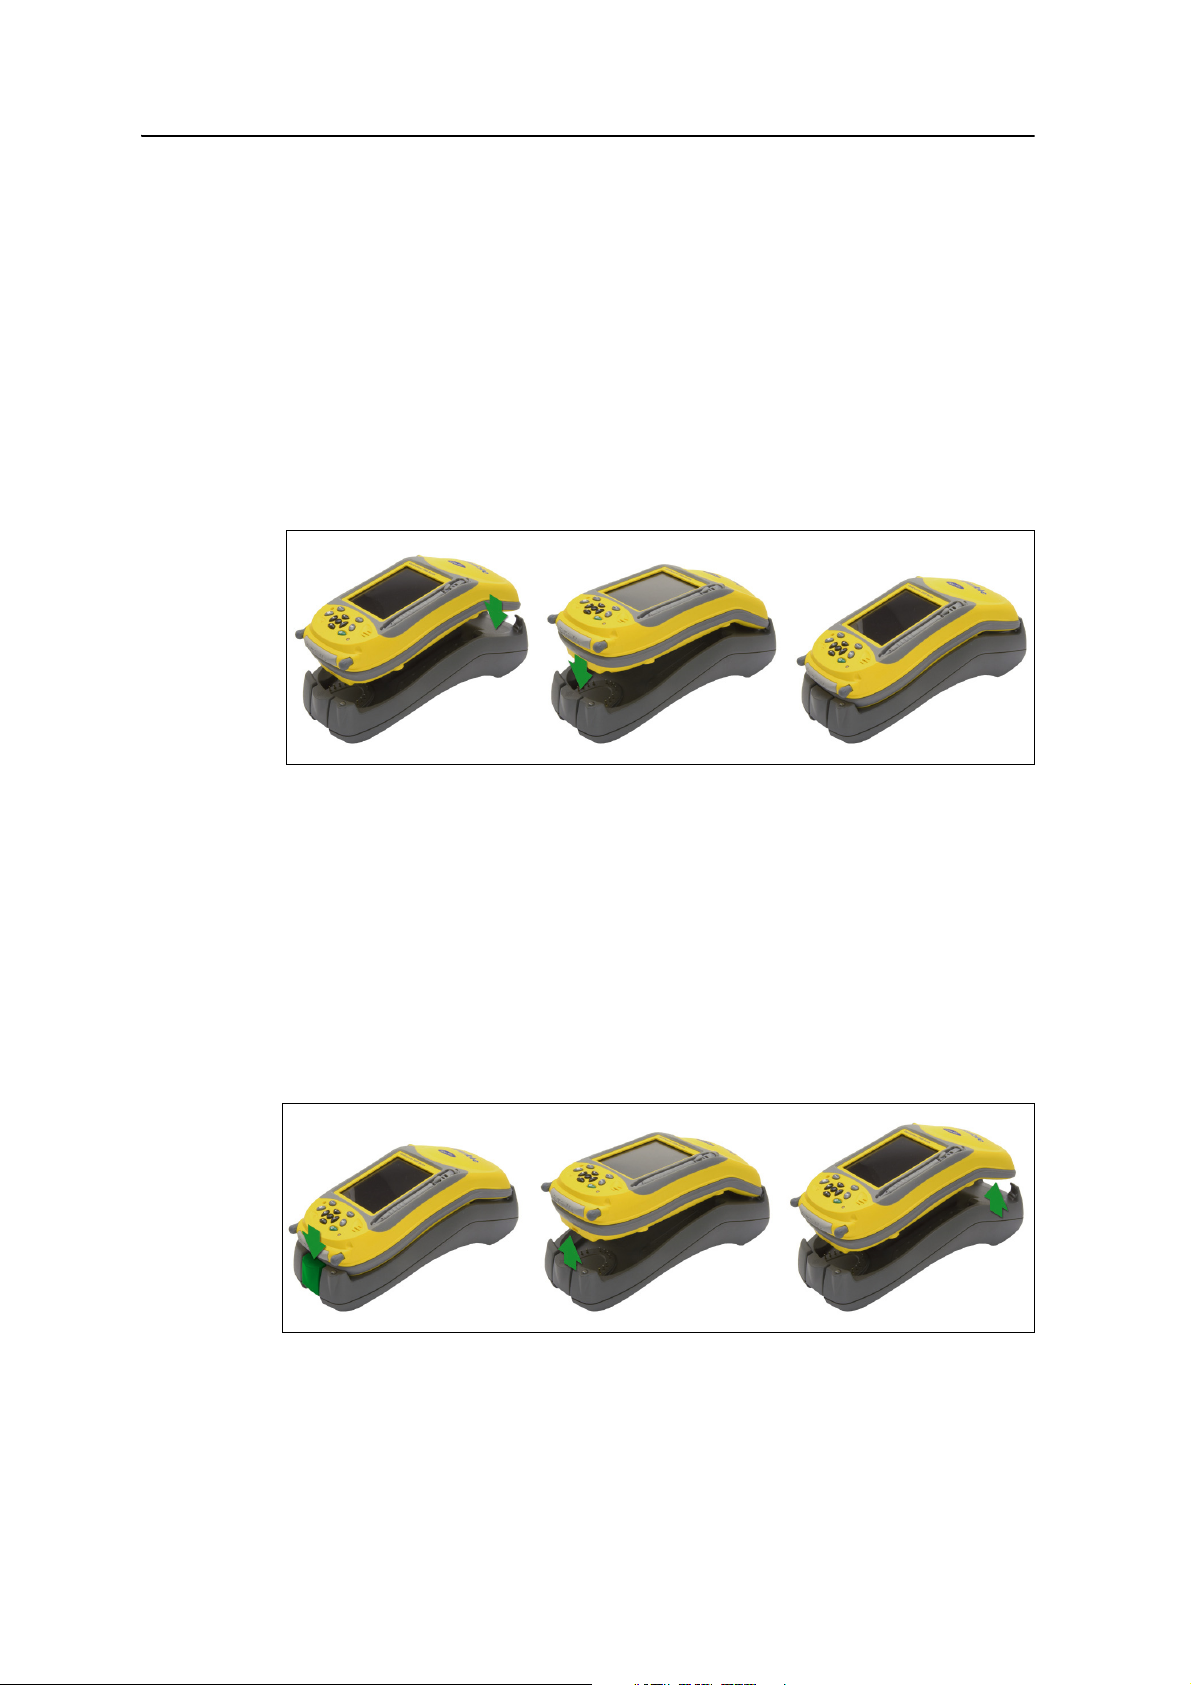
Getting Started 2
Charging the battery
Charge the battery using the support module provided with the GeoExplorer 3000
series handheld. If you have the optional serial clip, you can also use it to charge the
handheld. For more information, see Connecting to an external power source with the
serial clip, page 111.
To charge the battery using the support module:
1. Connect one end of the AC adaptor cable to the support module and the other
to an AC power outlet. An international adaptor kit is provided with the
handheld.
2. Turn off the handheld or put the handheld in Suspend mode (see page 27) and
then place the handheld in the support module as shown below:
Note – Trimble recommends that you charge the handheld at or below normal room
temperature (0 to 30 °C).
3. Leave the battery to charge. It may take up to eight hours for the handheld to
charge completely.
When the handheld is charging, the Power LED on the handheld is solid orange.
If the Power LED changes to flashing orange, a battery charging fault has
occured. For more information, see page 26.
When fully charged, the Power LED is green.
To remove the handheld from the support module, press the release button on the
support module and then lift the bottom of the handheld upward, as shown below:
GeoExplorer 3000 Series User Guide 25
Page 26
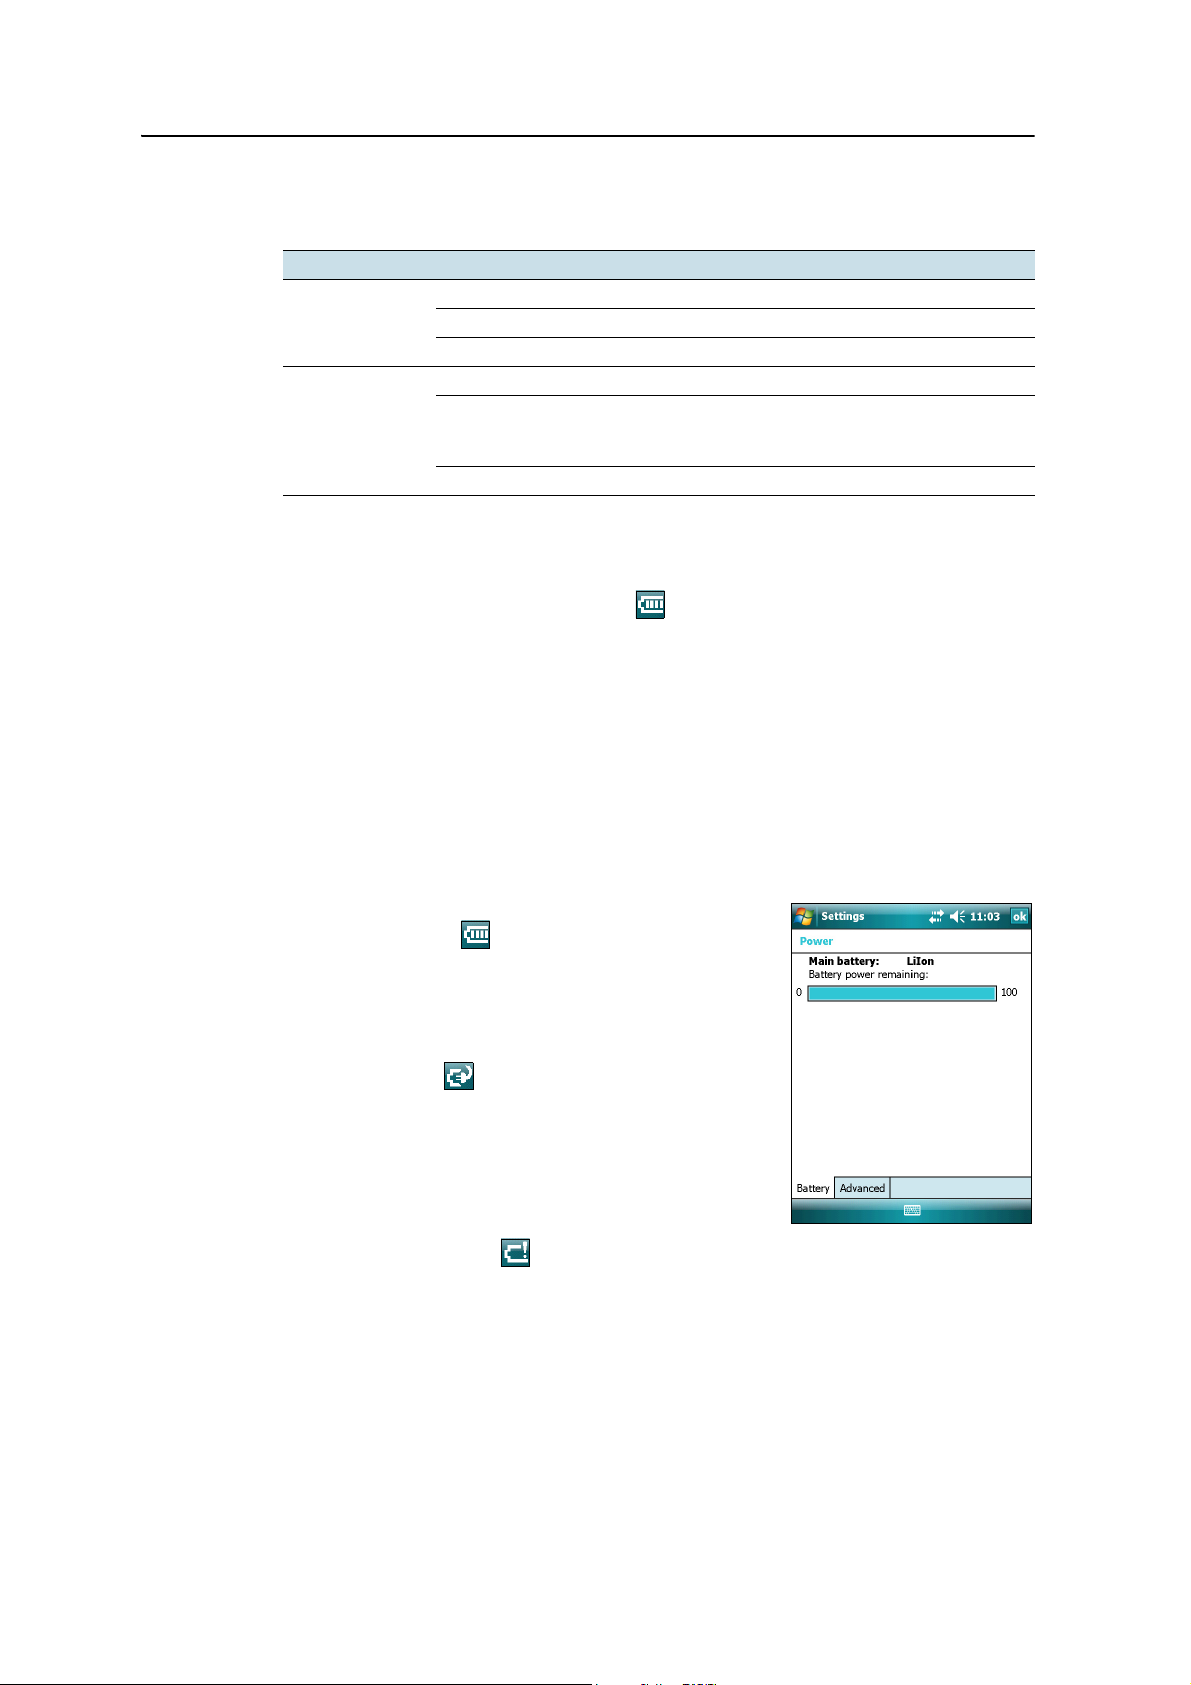
2 Getting Started
The Power LED beside the Power key on the handheld indicates the battery power or
charging status, as shown below:
Power source LED state Handheld/battery state
Battery power Off Off (in Suspend mode or turned off).
Off On and battery level is good.
Flashing red On and battery is low (less than 15%).
External power Solid orange Charging.
Flashing
orange
Solid green Charging is complete.
Charging fault - for example, there is a problem with the
battery, or the temperature of the battery has exceeded
the acceptable temperature range.
Note – During normal charging, the battery may become hotter than the maximum
temperature allowed (40 °C or 104 °F). If this happens, charging is automatically
suspended until the battery cools and then charging automatically restarts. During this
time the battery icon in the title bar shows , to indicate that the handheld is running on
external power. It may take about one hour for the battery to cool.
Avoid keeping the battery at full charge at high temperatures. For more information,
see Storing the handheld, page 19.
Note – The life of the battery can be significantly shortened if power is constantly supplied
to the handheld. To avoid this issue, connect the handheld to an external power source
only when the battery requries charging. Once fully charged, disconnect the external power
source and allow the battery to discharge through normal use.
Checking the level of battery power
To check the level of battery power remaining at any time,
tap the battery icon in the title bar of the To da y
screen. The Power control appears, displaying the Battery
tab.
When the handheld battery is recharging from an
external power source, the battery icon in the To d ay
screen changes to . You can still tap the icon to view
the level of battery power.
Low battery indicators
When the battery level reaches:
• 20%, the battery icon in the title bar of the Today
screen changes to .
• 15%, the Power LED on the handheld flashes red and the Main battery low
message appears on the handheld.
• 5%, the Main battery very low message appears on the handheld.
Trimble recommends that you recharge the battery when any of these indicators
appear.
26 GeoExplorer 3000 Series User Guide
Page 27

Getting Started 2
Conserving power
Although the handheld battery can operate for a full day without recharging, Trimble
recommends that you do the following to reduce power consumption:
• Set the handheld to automatically turn off when idle. For more information, see
Suspend mode, page 28.
• Set the backlight to automatically turn off when the handheld is idle for a
specified time. For more information, see Backlight, page 48.
• Reduce the brightness setting for the backlight. For more information, see
Backlight, page 48.
• Turn off the integrated Bluetooth or wireless LAN radios whenever you are not
using them. For more information, see Bluetooth wireless connections
explained, page 105 and Connecting to a wireless LAN access point, page 82.
• Disconnect from the integrated GPS receiver when GPS data is not required,
using the application’s Disconnect or Deactivate GPS command. When you
disconnect from GPS, the integrated GPS receiver switches off and stops
drawing power.
Note – Do not disconnect from GPS if you will be reconnecting within about five minutes. A
GPS application can take up to 30 seconds to reactivate the integrated GPS receiver, so
disconnecting to save power can cost time.
Turning on and turning off the handheld
If the screen on the handheld is blank, the handheld is in Suspend mode (see page 28)
or has been shut down. To turn on the handheld, press the
one second).
To turn off the handheld and put the handheld into Suspend mode, press the
key briefly (less than one second).
To completely shut down the handheld, press the
Power menu appears and then tap the
shut down, and the handheld is completely turned off.
Shutdown button. All running applications are
Power key briefly (less than
Power
Power key for one second until the
GeoExplorer 3000 Series User Guide 27
Page 28
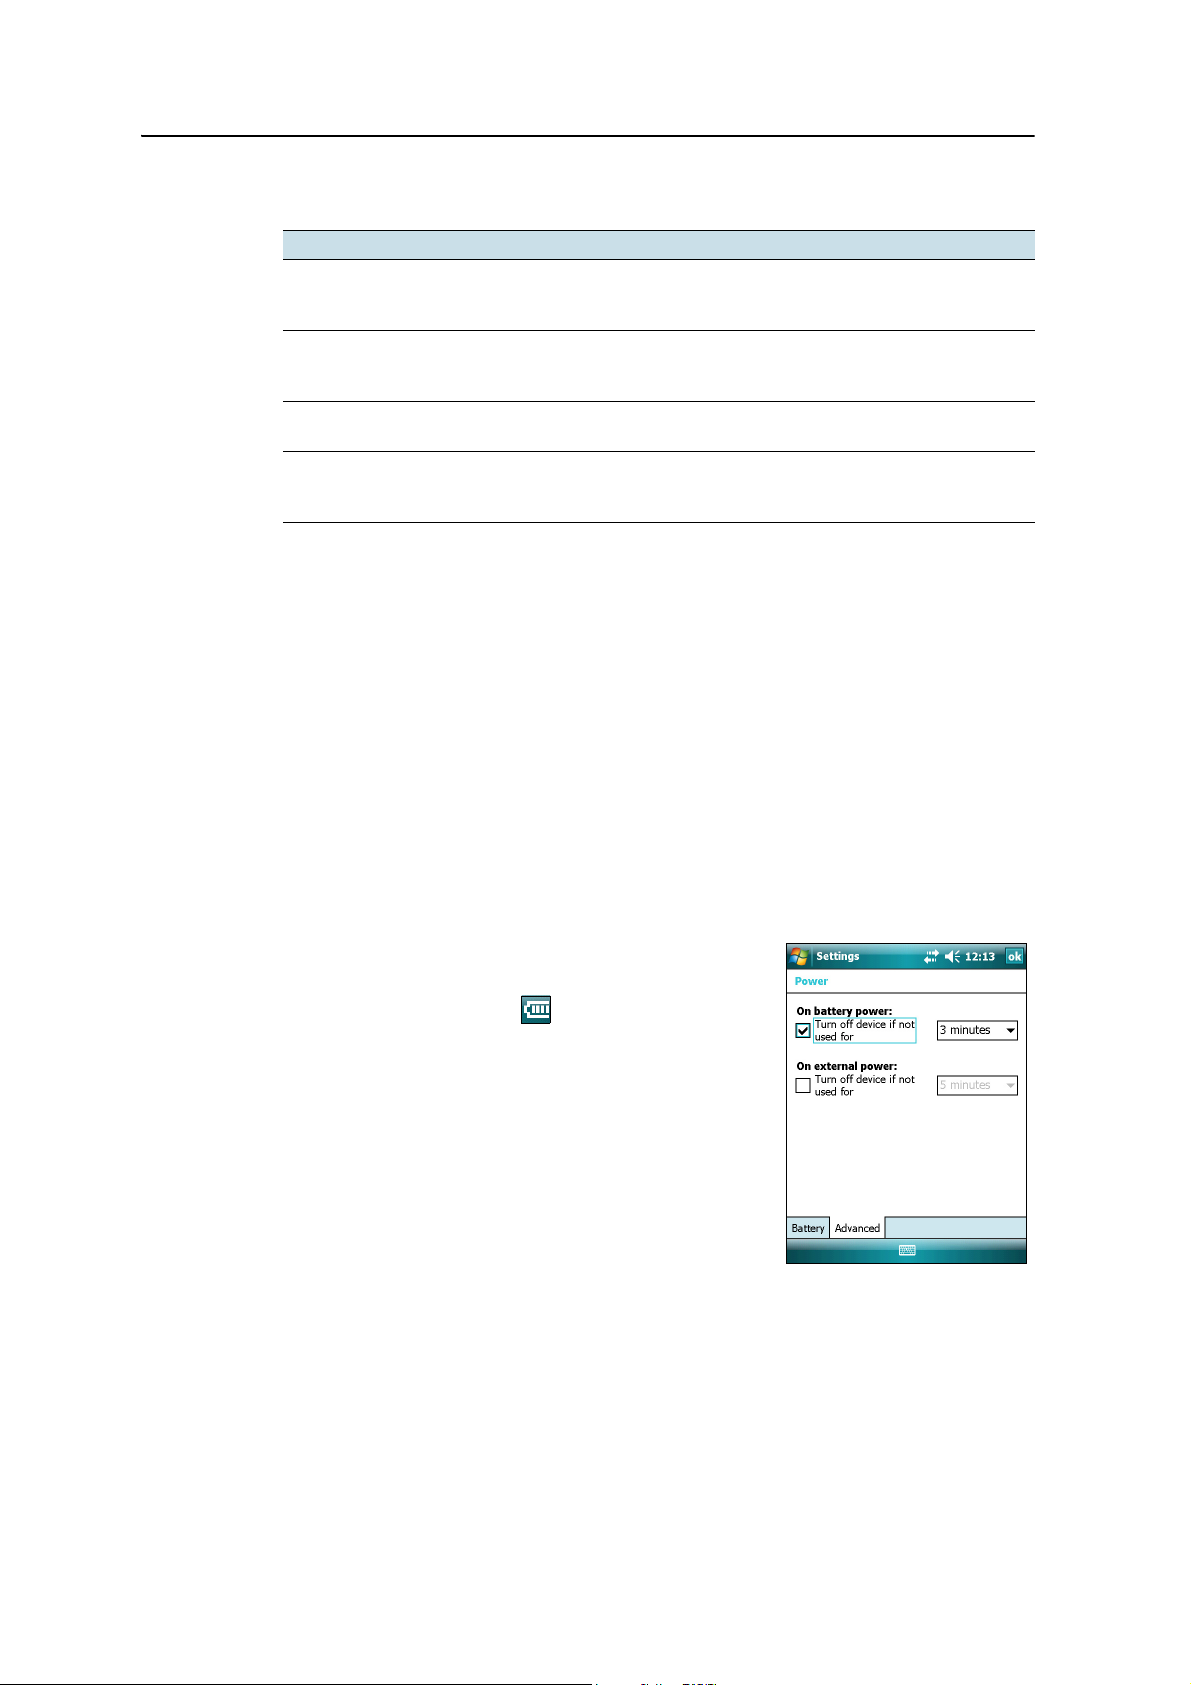
2 Getting Started
Suspend mode
The options available from the Power menu are as follows:
Button Description
Align Screen Starts the screen alignment sequence. If at any time the touch screen
does not respond correctly to stylus taps, start the screen alignment
sequence and follow the on-screen instructions.
Suspend Puts the handheld into Suspend mode. This is a low-power mode. The
handheld and the integrated receiver are turned off and you can not
operate the handheld.
Shutdown Puts the handheld into Shutdown mode. Applications are shut down and
the handheld is completely turned off.
Soft Reset Restarts the handheld. If the handheld stops responding to the stylus, or
if it does not respond when you press any of the keypad buttons, try a
soft reset. For more information, see Resetting the handheld, page 29.
When you press the Power key to turn off the handheld, the handheld goes into
Suspend mode. This is a low-power mode that maintains the main memory contents
and keeps applications running but does not allow you to operate any of the
handheld’s functions. The handheld appears to be turned off. The integrated GPS
receiver is turned off and any application using GPS is disconnected.
To turn on the handheld when it is in Suspend mode, press the
Power key. The
handheld is immediately ready for operation. There may be a delay of up to 30 seconds
while the integrated GPS receiver automatically reactivates.
You can configure the handheld to automatically enter Suspend mode when it has
been idle for a specified time. By default, the handheld is set to enter Suspend mode if
it is not used for three minutes.
To change the time before the handheld enters Suspend
mode:
1. Tap the battery icon in the title bar of the
To da y screen. The Power control appears.
2. Tap the Advanced tab.
3. From the On battery power option, select the Turn
off device if not used for check box and then select
the idle time from the drop-down list.
4. Tap
OK.
28 GeoExplorer 3000 Series User Guide
Page 29
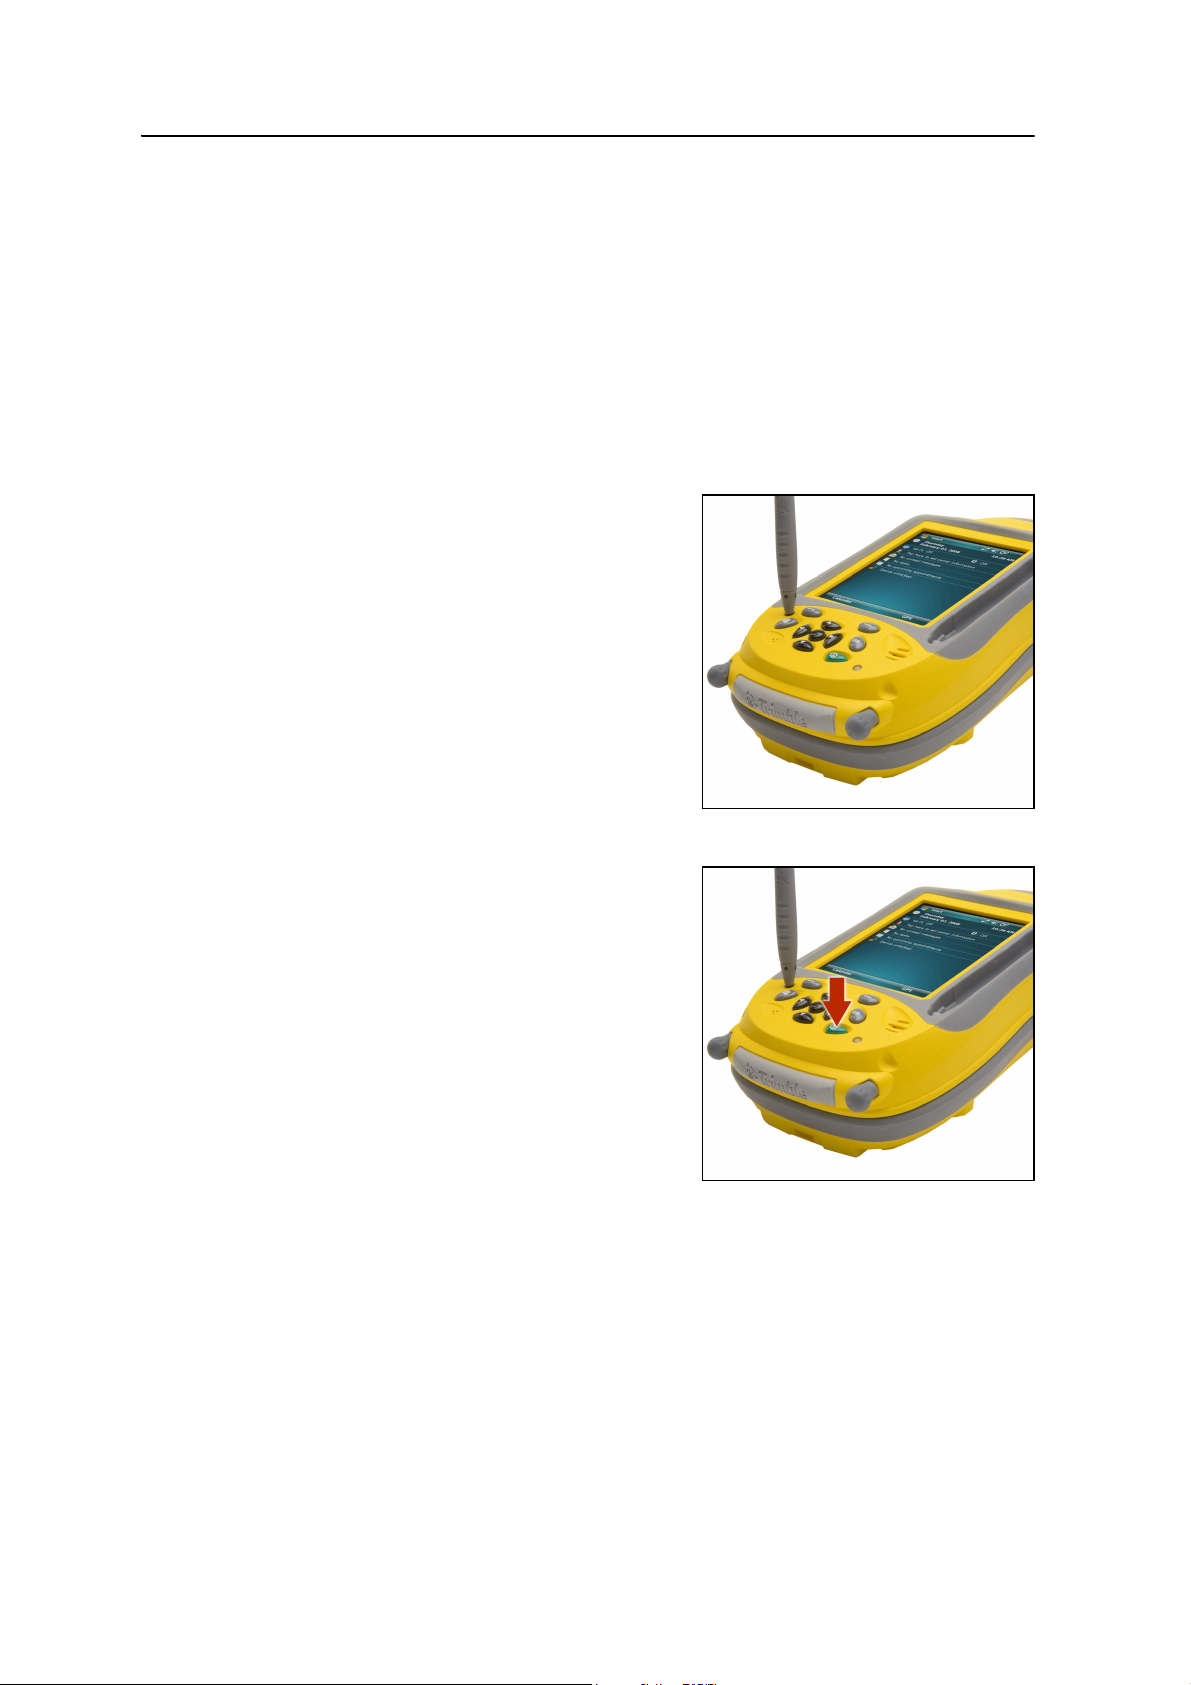
Resetting the handheld
If the screen on the handheld is blank, the handheld has turned off. Press the Power
button to turn on the handheld.
If the handheld stops responding to the stylus, or if it does not respond when you press
any of the keypad buttons, you may need to reset it. First, try a soft reset. If the
handheld does not respond, perform a hard reset.
You can also reset the handheld to its factory default settings.
Performing a soft reset
A soft reset is similar to restarting a computer.
A soft reset saves data and closes all open
applications and then restarts the handheld.
All data and settings are retained after a soft
reset.
To perform a soft reset, use the tip of the stylus
to lightly press the
Reset button.
Getting Started 2
Alternatively, press the
Power key for one
second until the Power menu appears and then
tap the
Soft Reset button.
Performing a hard reset
A hard reset retains settings and data that you
have previously saved on the handheld.
However, any unsaved data may be lost.
Note – Perform a hard reset only if a soft reset
does not resolve the problem.
To perform a hard reset, press and hold the
Power button as you use the tip of the stylus to
lightly press the
Reset button.
GeoExplorer 3000 Series User Guide 29
Page 30
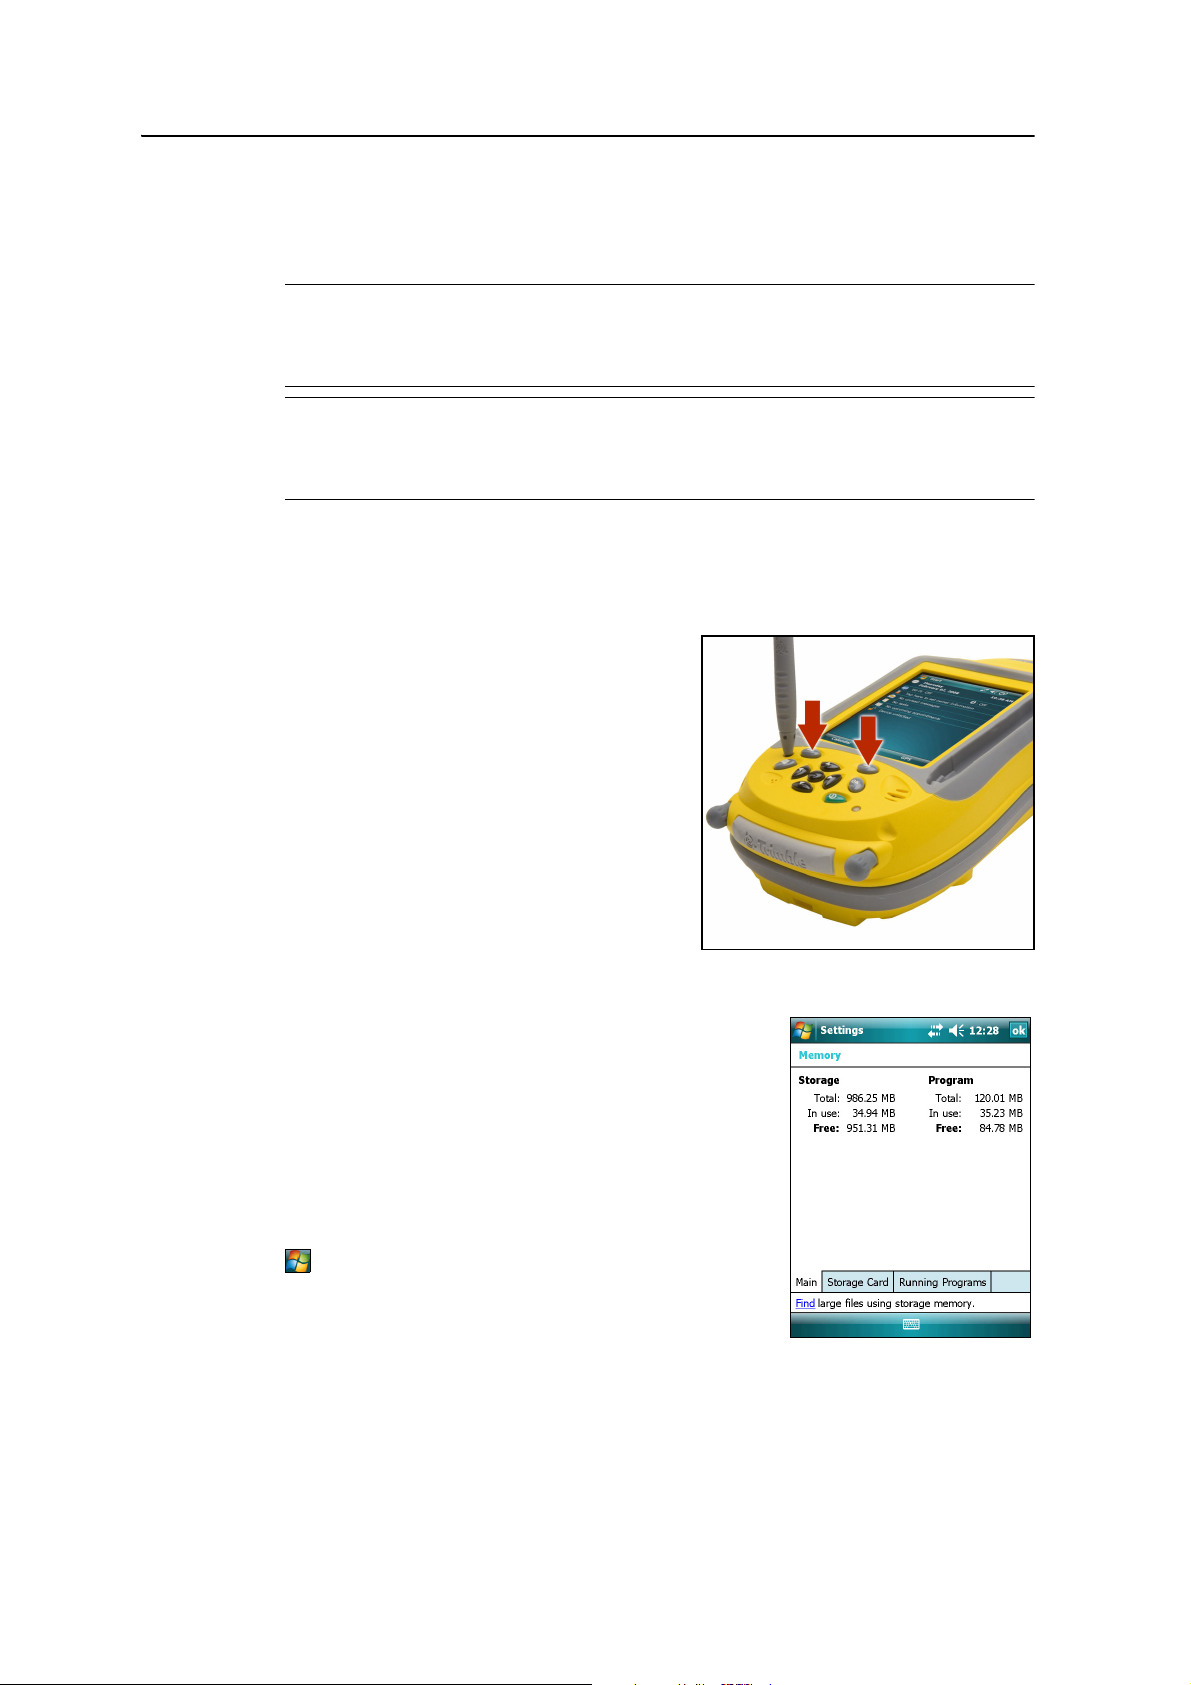
2 Getting Started
Resetting to factory default settings
Reset the handheld to factory default settings to restore the handheld to it’s original
state, or only if a soft reset and then a hard reset does not resolve the problem.
C
C
B
CAUTION – Resetting the handheld to factory default settings erases all data, installed
applications, and settings stored in the handheld, except for any data or applications that
were pre-installed on the handheld or are stored on a storage card. It does not change the
language of the operating system used on the handheld.
CAUTION – If you have encrypted files on a storage card and you reset the handheld to
factory default settings, the encryption key on the handheld is deleted. This means that
any files you have encrypted on a storage card are permanently locked and unreadable by
any device. For more information, see Encrypting files on storage cards, page 32.
Tip – To quickly and easily restore data deleted by performing a factory reset, synchronize
the handheld with a computer before you reset the handheld to the factory default
settings. Once the handheld is reset then resynchronize the handheld with the computer.
To reset the handheld to the factory default settings:
1. Press and hold the two application
buttons on the handheld.
2. While holding the buttons, use the tip of
the stylus to lightly press the
button.
3. Keep holding the two application
buttons until the handheld restarts.
4. Follow the on-screen instruction to
continue the factory reset.
Reset
Storing data
The handheld has two types of memory:
• Storage memory is similar to the hard disk in a
computer, and is used for storing programs and
data.
• Program memory is similar to the RAM in a
computer, and is used for running programs. You
cannot use it to save data.
To check the storage capacity on the handheld, tap
/ Settings / System / Memory. The Storage and
Program columns show the current memory available,
and the memory that is already in use.
Pre-installed documents and program files are not
affected by power loss or resetting. However, you can still lose data if you accidentally
delete or overwrite it.
30 GeoExplorer 3000 Series User Guide
Page 31

Getting Started 2
C
CAUTION – The Windows Mobile 6 operating system does not include a Recycle Bin.
When you delete files from the handheld, they are deleted permanently.
Trimble recommends that you regularly copy important data to an office computer.
For more information, see Connecting to an Office Computer, page 53.
Storage cards
As an alternative to internal storage, you can save data to a removable card. Use either
an SD or SDHC (high capacity SD) card to securely transfer data to and from another
device that supports SD or SDHC cards.
Note – The GeoExplorer 3000 series handheld does not support SDIO (SD input/output)
cards.
C
C
WARNING – The presence of any dust or moisture in the storage card slot may adversely
affect the device and void your Trimble warranty. To prevent dust or moisture entering
the storage card slot:
– Make certain that the storage card slot door is attached correctly when you are using
the handheld outdoors.
– When inserting or removing a storage card, place the handheld on a dust-free indoor
surface.
WARNING – Static electricity can harm electronic components inside the handheld. To
prevent static damage:
– Discharge static electricity from your body before you touch any of the electronic
components inside your device, such as a memory module. You can do so by touching an
unpainted metal surface.
To insert an SD or SDHC card:
1. Place the handheld on a dust-free indoor surface.
2. Use the thumb screws on the base of the handheld to remove the storage card
slot door.
3. Insert the storage card into the storage card slot with the swipes facing down.
Gently press the card until you hear a click, and the card is locked into place.
4. Reattach the storage card slot door to the handheld and then tighten the thumb
screws.
When you select the Save As option in an application, the storage card appears
in the list of available storage locations.
Note – Do not store required data or applications to a storage card if the card will be
removed. Data saved to a storage card is available only when the card is inserted in the
handheld.
To remove the storage card from the storage card slot, gently press the card in and then
let go. The card pops out.
GeoExplorer 3000 Series User Guide 31
Page 32

2 Getting Started
Encrypting files on storage cards
To prevent sensitive data on an SD or SDHC card from being used if the card is lost or
stolen, files can be encrypted as they are placed on the card.
When encryption is enabled, an encryption key is stored on the handheld. Files are
encrypted as they are copied or written to the storage card. Files already saved on
storage cards before enabling encryption are not automatically encrypted.
Note – Because the encryption key is stored on the handheld, encrypted files are only
readable on the handheld on which they are initially encrypted. It is not possible to read
encrypted files on the storage card with any other device, including another GeoExplorer
3000 series handheld or an office computer.
C
CAUTION – If you reset the handheld to the factory default settings, the encryption key is
deleted and the handheld is no longer able to read any encrypted files on a storage card.
This means that any files you have encrypted are permanently locked and unreadable by
any device. To avoid being unable to read previously encrypted files, Trimble recommends
that you use another device, such as an office computer, as the primary location for
storing important data and to control the encryption of important files.
To enable encryption of files as they are written to a storage card:
1. Tap / Settings / System / Encryption.
2. Select the Encrypt files placed on storage cards check-box.
Note – Encrypted files appear as ordinary files on the handheld they were encrypted on. If
the storage card is inserted in another device, the files appear with a .menc file extension
and cannot be opened.
To disable encryption, clear the Encrypt files placed on storage cards check-box.
Note – Disabling encryption does not remove encryption from any existing files on the
storage card, but ensures that new files placed onto the storage card are not encrypted.
To encrypt files that are already stored on a storage card:
1. Copy the files to the handheld’s internal storage or to an office computer.
2. Ensure encryption is enabled on the handheld.
3. Copy the files back to the storage card. The files are encrypted as they are
written to the storage card.
To remove encryption from files so they can be read by other devices:
1. Insert the storage card in the handheld and then connect the handheld to an
office computer using ActiveSync technology.
2. Copy the encrypted files from the storage card to the office computer.
3. To use the decrypted files on the handheld, copy the files from the office
computer to the handheld’s internal storage.
4. To store the decrypted files on a storage card, ensure encryption is not enabled
on the handheld and then copy the decrypted files from the office computer to
the storage card.
32 GeoExplorer 3000 Series User Guide
Page 33
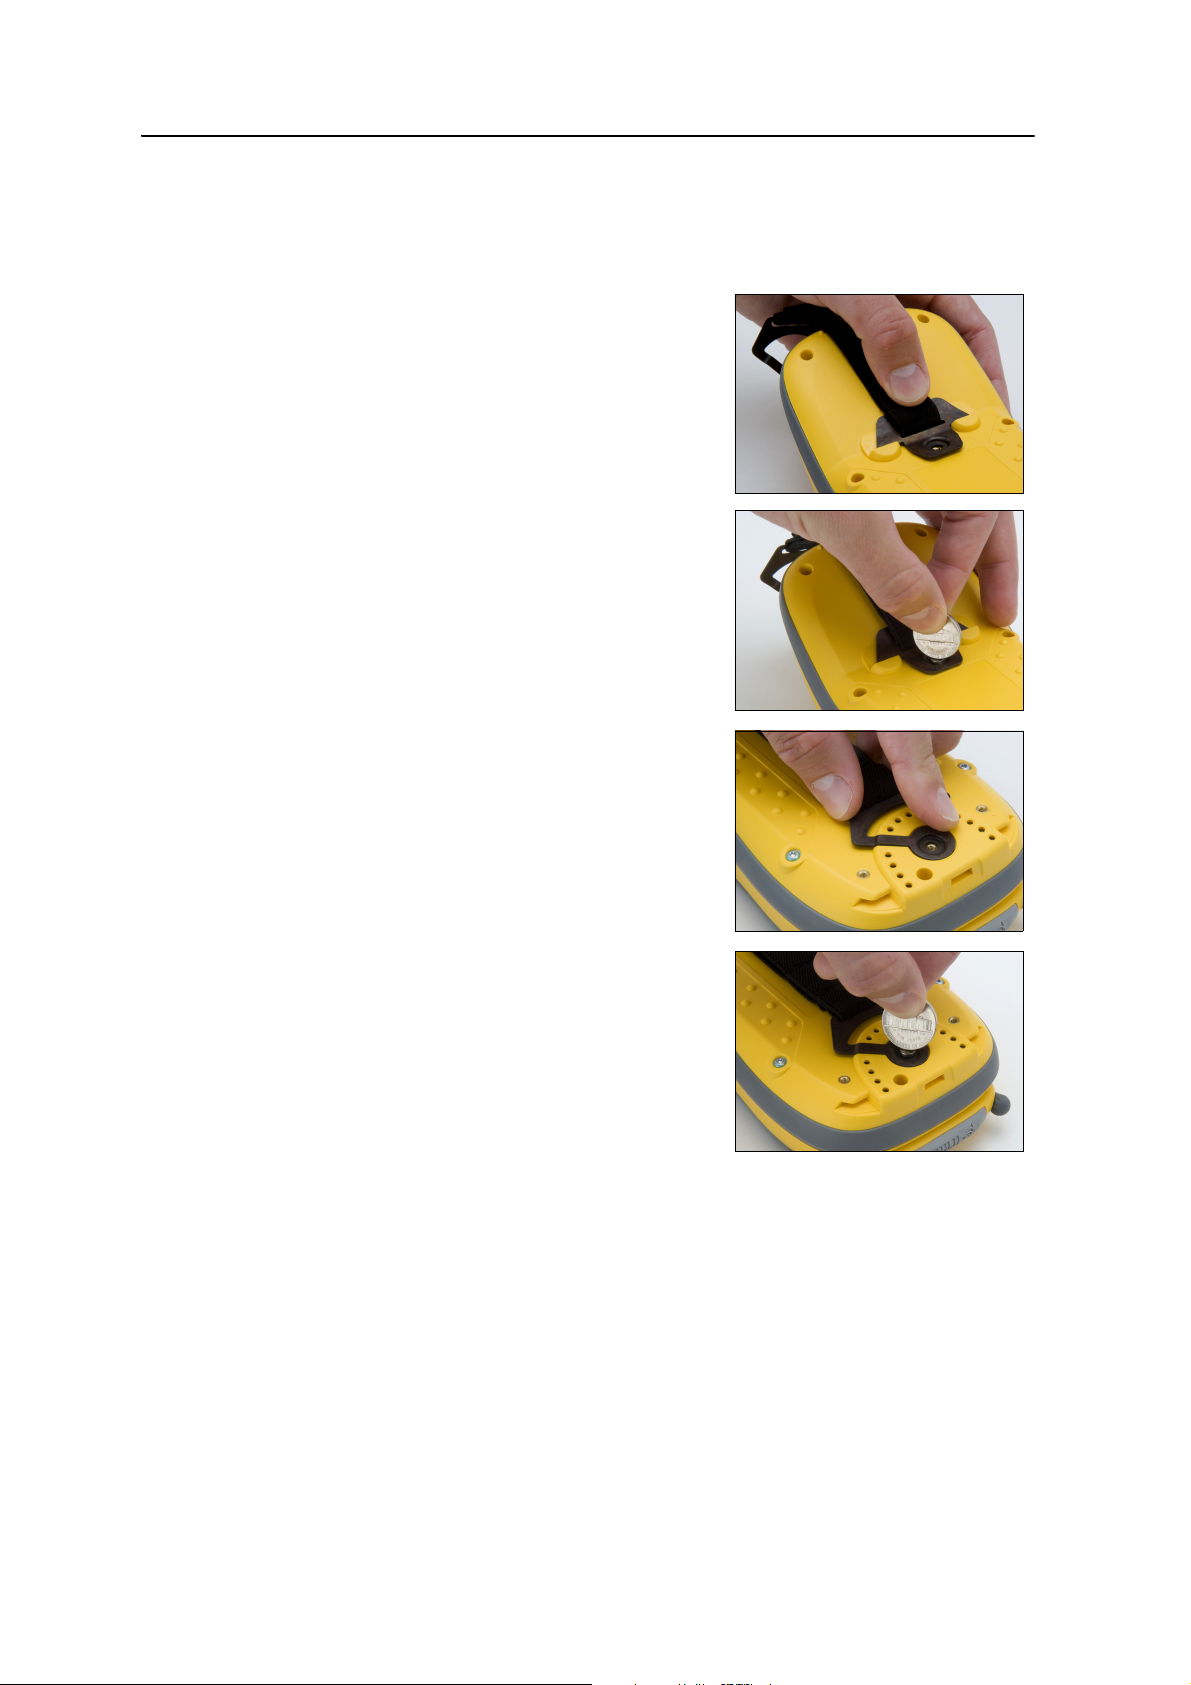
Fitting the handstrap
The handstrap and screws are provided in the box with the handheld. To fit the
handstrap:
1. Align the straight bracket with the slots
below the Microsoft Windows Mobile logo.
Insert the bracket by pressing it down and
into the slots.
2. Insert the first screw and then use a coin or
screwdriver to tighten the screw.
Getting Started 2
3. Align the curved bracket with the slots
above the communication swipes at the
base of the handheld. Insert the bracket by
pressing it down and into the slots.
4. Insert the second screw and then use a coin
or screwdriver to tighten the screw.
GeoExplorer 3000 Series User Guide 33
Page 34

2 Getting Started
34 GeoExplorer 3000 Series User Guide
Page 35

CHAPTER
3
Using the Windows Mobile Operating System
In this chapter:
Parts of the screen
Using the stylus
Status indicators
Pre-installed programs
Accessing help
Entering information
Personalizing the handheld
Messaging
3
The GeoExplorer 3000 series handheld is
powered by the Windows Mobile 6 Classic
operating system.
This chapter describes the main features of the
Windows Mobile operating system.
GeoExplorer 3000 Series User Guide 35
Page 36
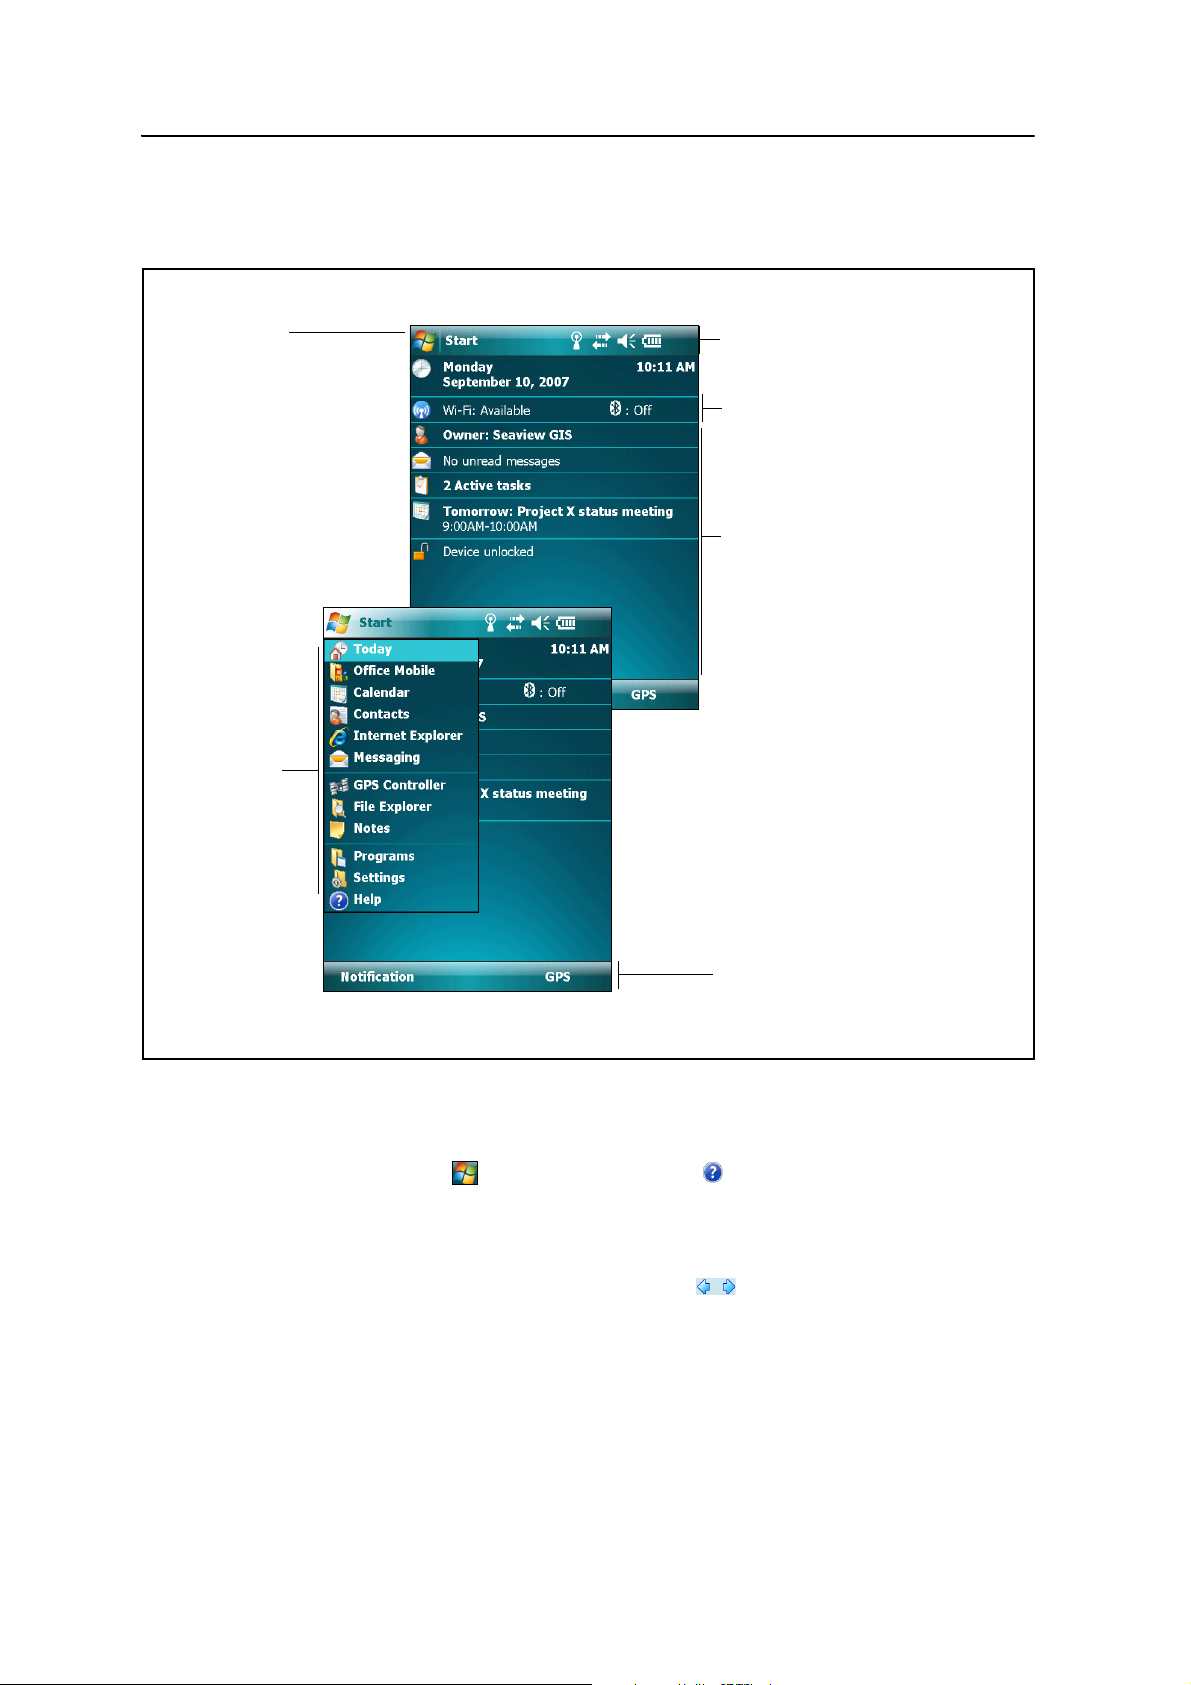
3 Using the Windows Mobile Operating System
Start menu
Tap any item on
the menu to
open it.
Start button
Tap to open the Start menu,
where you can access
programs and system
controls.
Title bar
Contains status icons for important
system functions.
Menu bar
Contains softkeys providing
access to applications, menus,
and notifications.
Today screen
Summarizes your
appointments, tasks, notes, and
e-mails for the day. Tap any
item to open it.
Wireless LAN and Bluetooth
icons
Show status of integrated radios.
Tap either icon to access the
Wireless Manager.
Parts of the screen
The main parts of the screen are shown below.
Accessing help
36 GeoExplorer 3000 Series User Guide
To access help, tap / Help or, if available, tap in the application window. If there
is an application running, context-sensitive help for the current screen appears. To
view the main Help Contents page, tap the Contents softkey in the menu bar.
Help files installed on the handheld work in the same way as a Web page. Tap
hyperlinks to navigate around the help and use to retrace your steps. Tap View /
Contents to return to the Contents page for the application, and tap View / All Installed
Help to return to the main Contents page.
Page 37
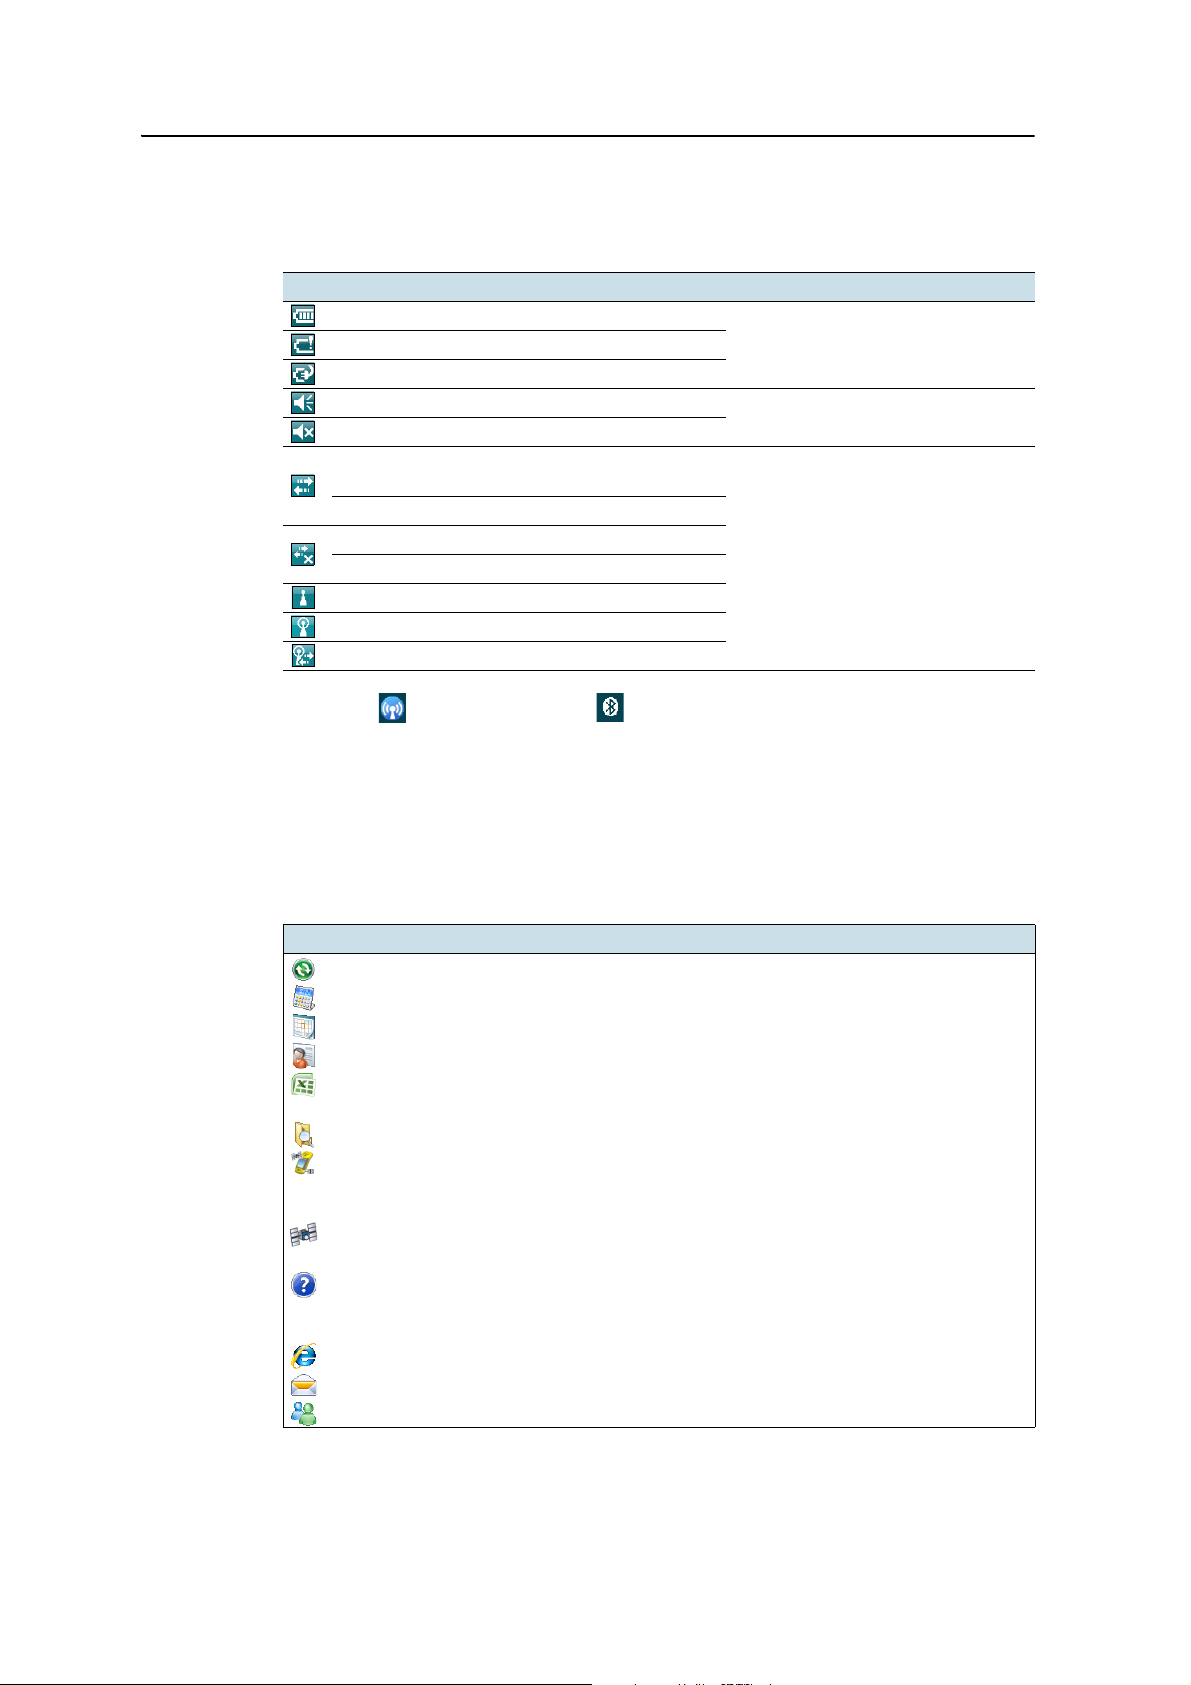
Status indicators
Status indicators that appear in the title bar at the top of the screen are as follows:
Icon Tap icon to...
Battery level
Battery charging/using external power
Speaker is on
Speaker is off
Connected to ActiveSync or the Windows
Mobile Device Center (WMDC) on a computer
Connected to a Bluetooth-enabled phone
Disconnected from ActiveSync or WMDC
Disconnected from a Bluetooth-enabled phone
Wireless LAN radio is on
A wireless LAN is detected
Sending or receiving wireless signals
Using the Windows Mobile Operating System 3
check battery levelLow battery (20% or less remaining)
change volume
configure the connection or access
the Wireless Manager
The Wi-Fi and Bluetooth icons on the To d ay screen show the status of each
radio. Tap the icon to access the Wireless Manager and turn on or turn off the radio.
Pre-installed programs
Programs that are pre-installed on the GeoExplorer 3000 series handheld are as
follows:
Program Function
ActiveSync Synchronize information between the handheld and a computer.
Calculator Perform basic arithmetic functions.
Calendar Keep track of appointments and arrange meetings.
Contacts Keep track of your friends and colleagues.
Excel Mobile From the Start menu, tap Office Mobile and then tap Excel Mobile.
File Explorer View and manage files.
GPS Connector Located in Settings / Connections, it allows you to configure
GPS Controller Configure and view status information for the integrated GPS
Help View help. If there is an application running, context-sensitive
Internet Explorer Browse the World Wide Web.
Messaging Write, send, and receive e-mail messages.
Messenger Send instant messages using Windows Live
Use Excel Mobile to create and edit Excel spreadsheets.
communications between the handheld’s integrated GPS receiver
and external devices.
receiver.
help for the current screen appears. To view the main Help
Contents page, tap the
Contents softkey in the menu bar
™
Messenger.
GeoExplorer 3000 Series User Guide 37
Page 38
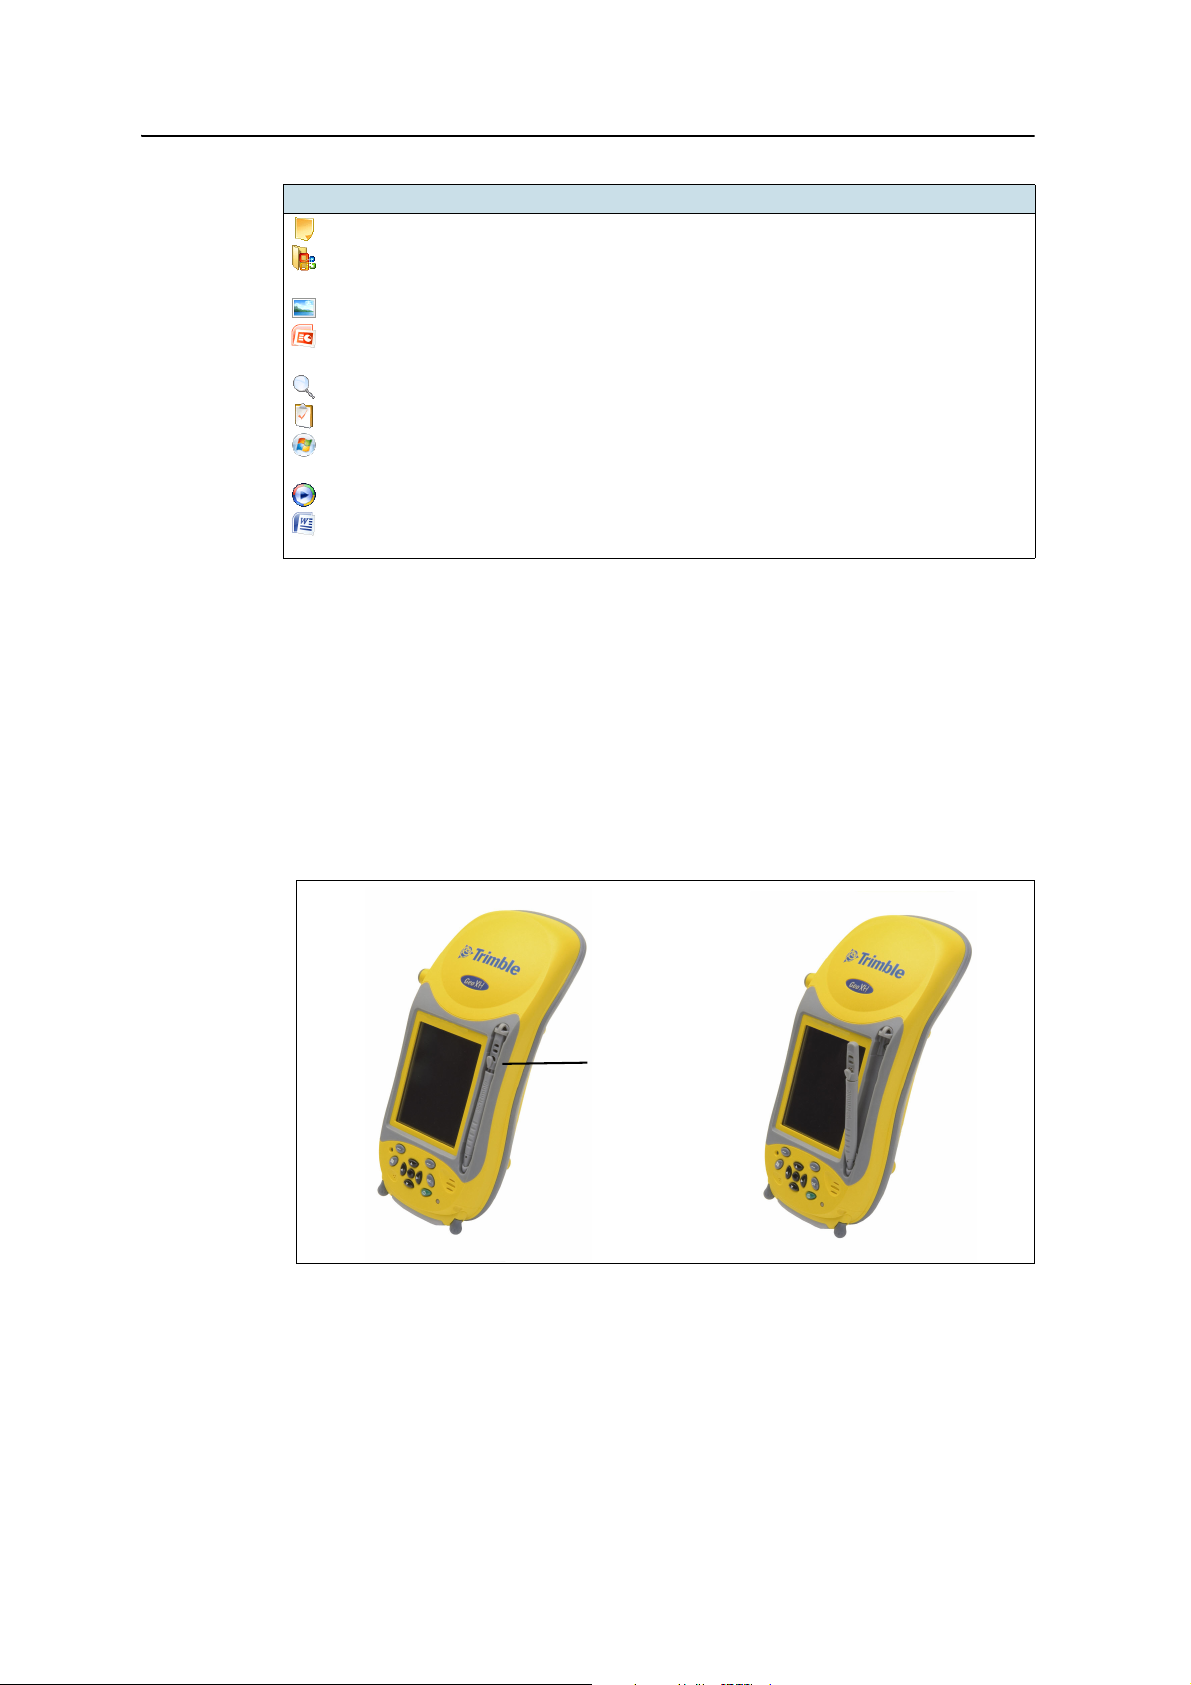
3 Using the Windows Mobile Operating System
stylus spring
Program Function
Notes Create handwritten, typed, or recorded notes.
Office Mobile Provides access to these Office Mobile applications: Excel Mobile,
Pictures and Videos Take, view, and edit pictures, or record and launch video clips.
PowerPoint Mobile From the Start menu, tap Office Mobile and then tap PowerPoint
Search Search for a file or item stored on the handheld.
Tasks Keep track of your tasks.
Windows Live Access Windows Live services, including e-mail, instant messenger
Windows Media Play Windows Media
Word Mobile From the Start menu, tap Office Mobile and then tap Word
For more information about using any of this software, refer to the Help for the
software. See Accessing help, page 36.
PowerPoint Mobile, and Word Mobile.
Mobile. Use PowerPoint
and Internet search.
Mobile. Use Word Mobile to create and edit Word documents.
®
Mobile to view slide show presentations.
®
or MP3 audio and video files.
Using the stylus
Removing and replacing the stylus
To remove the stylus from its holder on the front of the handheld, press the spring on
the stylus downwards and then lift the stylus forward, as shown.
To insert the stylus into its holder on the front of the handheld, insert the tip of the
stylus into the lower retainer with the Trimble logo on the stylus facing out. Then press
the spring on the stylus downwards and insert the top of the stylus below the top
retainer.
38 GeoExplorer 3000 Series User Guide
Page 39
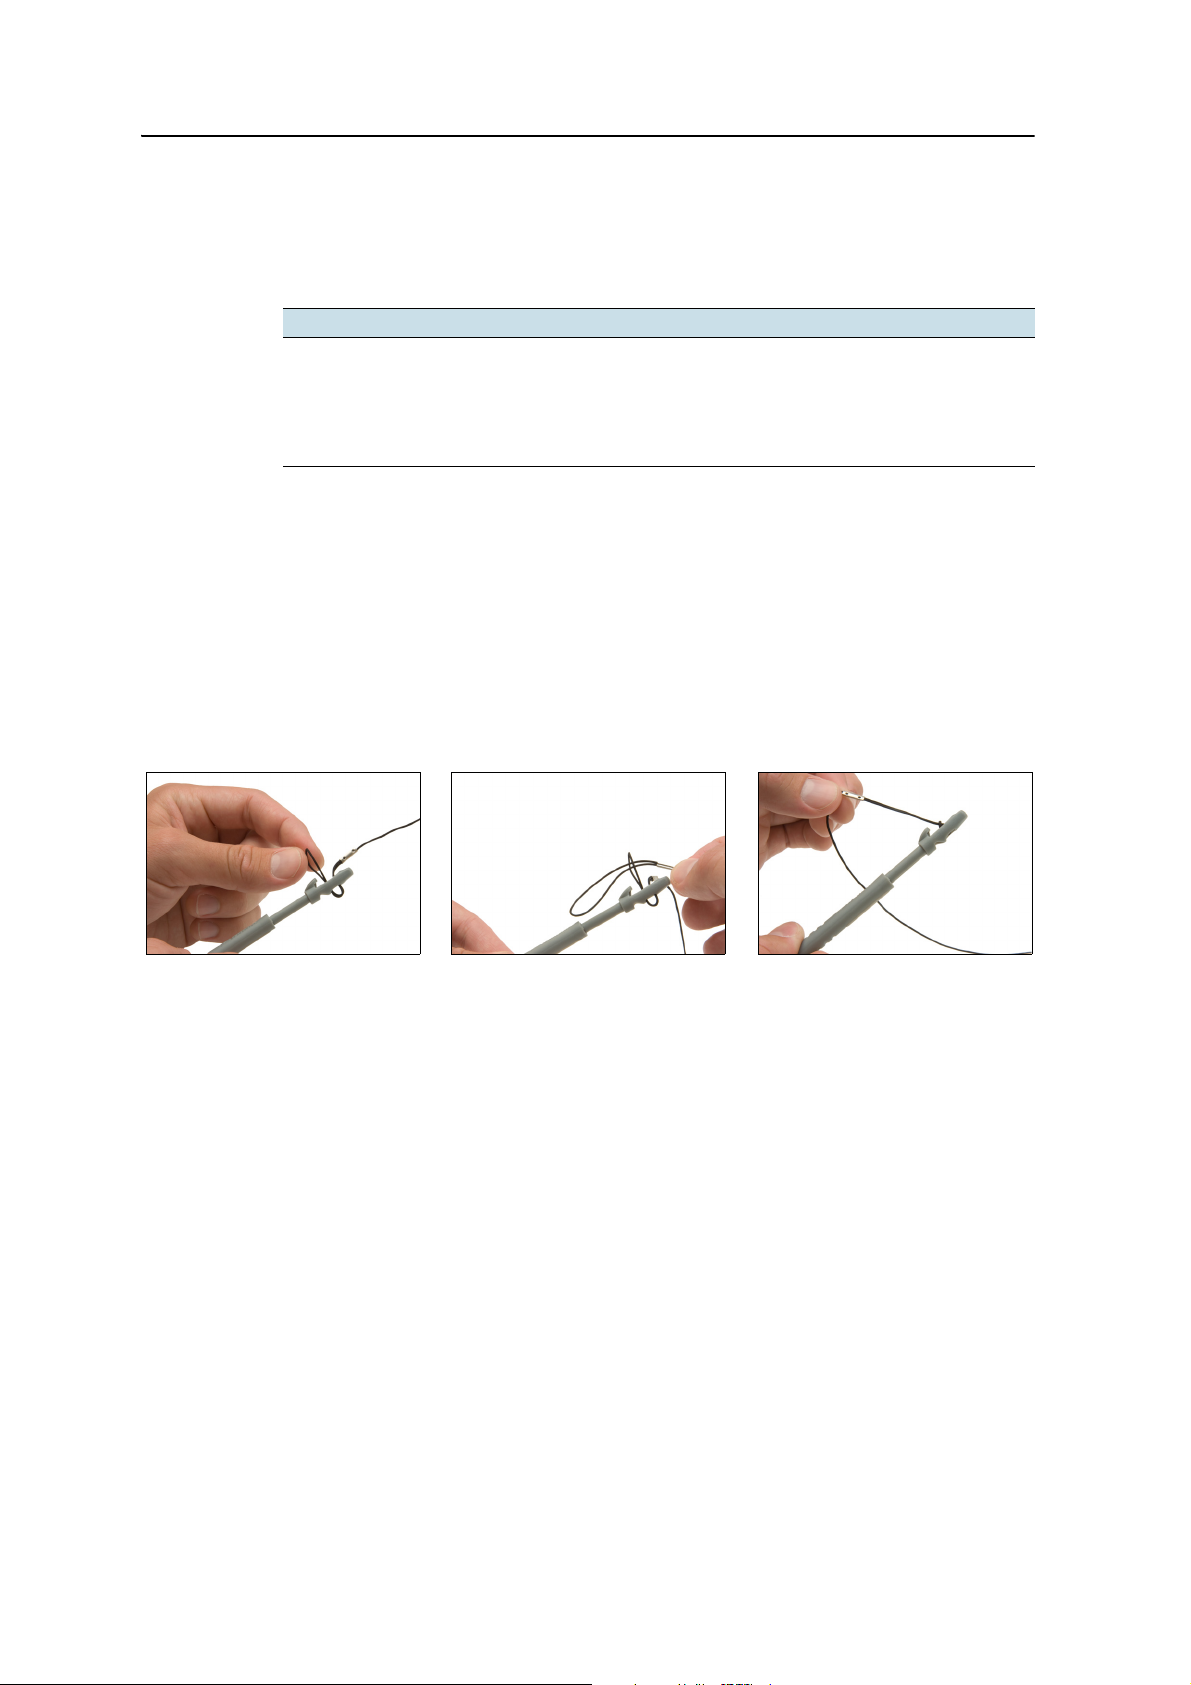
Using the Windows Mobile Operating System 3
Interacting with the handheld
To interact with the handheld, use the stylus to tap on the touch screen.
Actions you can perform with the stylus are as follows:
Action Definition
Tap Touch the screen once with the stylus to open items and select options.
Tap and hold Tap and hold the stylus on an item to see a list of actions available for that
item. On the pop-up menu that appears, tap the action you want to perform.
Drag Hold the stylus on the screen and drag across the screen to select text and
images. Drag in a list to select multiple items.
If at any time the touch screen does not respond correctly to stylus taps, realign it. For
more information, see Screen, page 47.
Tethering the stylus to the handheld
To attach a tether to the stylus:
1. Hold the stylus with the Trimble logo facing upwards and insert the end of the
tether down through one of the two holes in the top of the stylus and then back
up through the other hole.
2. Insert the other end of the tether through the loop and pull until the knot in the
tether is tight.
3. Attach the tethered stylus to the handheld as described below.
To attach a tethered stylus to the handheld, feed the end of the tether through the top
of the stylus retainer on the handheld and then feed the end of the stylus through the
loop until the knot in the tether is tight.
GeoExplorer 3000 Series User Guide 39
Page 40
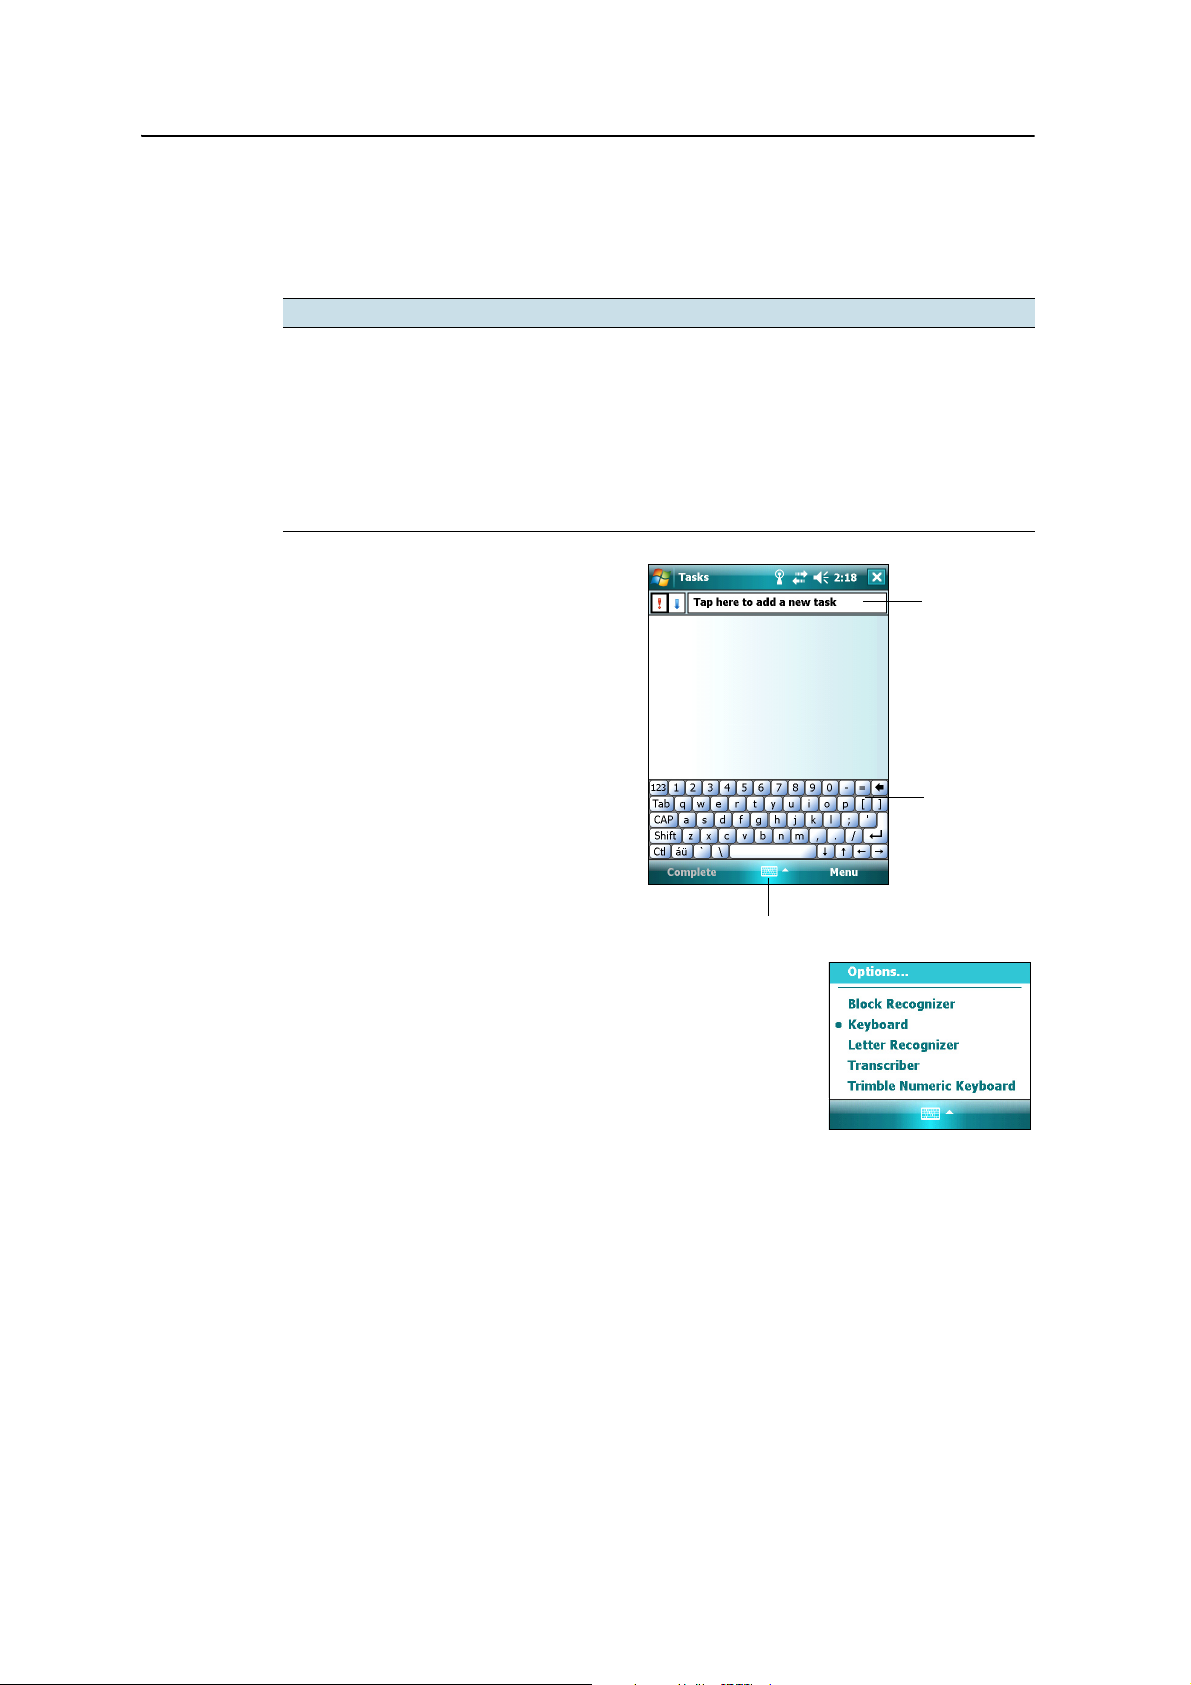
3 Using the Windows Mobile Operating System
Textbox
Input Panel button
Keyboard
input panel
Entering information
Depending on the program you are using, you can enter information in several ways, as
described below:
Input method Description
Synchronizing Use Microsoft connection management software to exchange
Typing Use the Keyboard input panel to enter typed text by tapping keys on
Writing Use the stylus like a pen to write directly on the screen.
Recording Create a stand-alone recording or embed a recording into a note.
Selecting an input panel
Use an input panel to type or to write
on the screen.
The Input Panel button automatically
appears in the menu bar of any
application.
information between the handheld and an office computer.
For more information, see Chapter 4, Connecting to an Office
Computer.
the on-screen keyboard.
To display the currently selected input
panel, tap a text box in the application,
or tap the Input Panel button.
To select an input panel, tap the Input
Selector arrow next to the Input Panel
button and then tap the input panel
you want to use:
• To use the on-screen keyboard,
tap Keyboard.
• To write directly onto the screen and have the
handwritten words and symbols converted into typed
characters, tap Letter Recognizer or another input
panel that supports writing on the screen.
• To configure options for the selected input panel, tap
Options.
40 GeoExplorer 3000 Series User Guide
Page 41

Using the Windows Mobile Operating System 3
Using the on-screen keyboard
To enter characters, use the stylus to tap the keys on the keyboard. When you finish
entering text in a field, tap to accept the text you have entered and then move to
the next field.
To enter special characters, tap to display keyboards containing numbers and
symbols. To switch back to the main keyboard, tap again.
To hide the keyboard, tap the keyboard icon again.
B
B
Tip – To make the keys larger, tap the Input Selector arrow and then tap Options. In the
Input method list, select Keyboard and then tap Large Keys.
Writing directly on screen
When you select Letter Recognizer, you can write individual letters, numbers, and
punctuation in the Letter Recognizer input panel and have them converted into typed
text.
Tip – For help with writing characters with Letter Recognizer, tap the question mark near
the writing area.
When you select Transcriber, you can write anywhere on the screen using the stylus.
The Microsoft Transcriber software converts your handwriting to text. You can use it
to enter notes in a text editor such as Notes.
Transcriber has a number of tools and modes that allow you to customize how it
works. These tools and modes are controlled from the Transcriber keyboard.
For more information, refer to the Transcriber Help.
GeoExplorer 3000 Series User Guide 41
Page 42
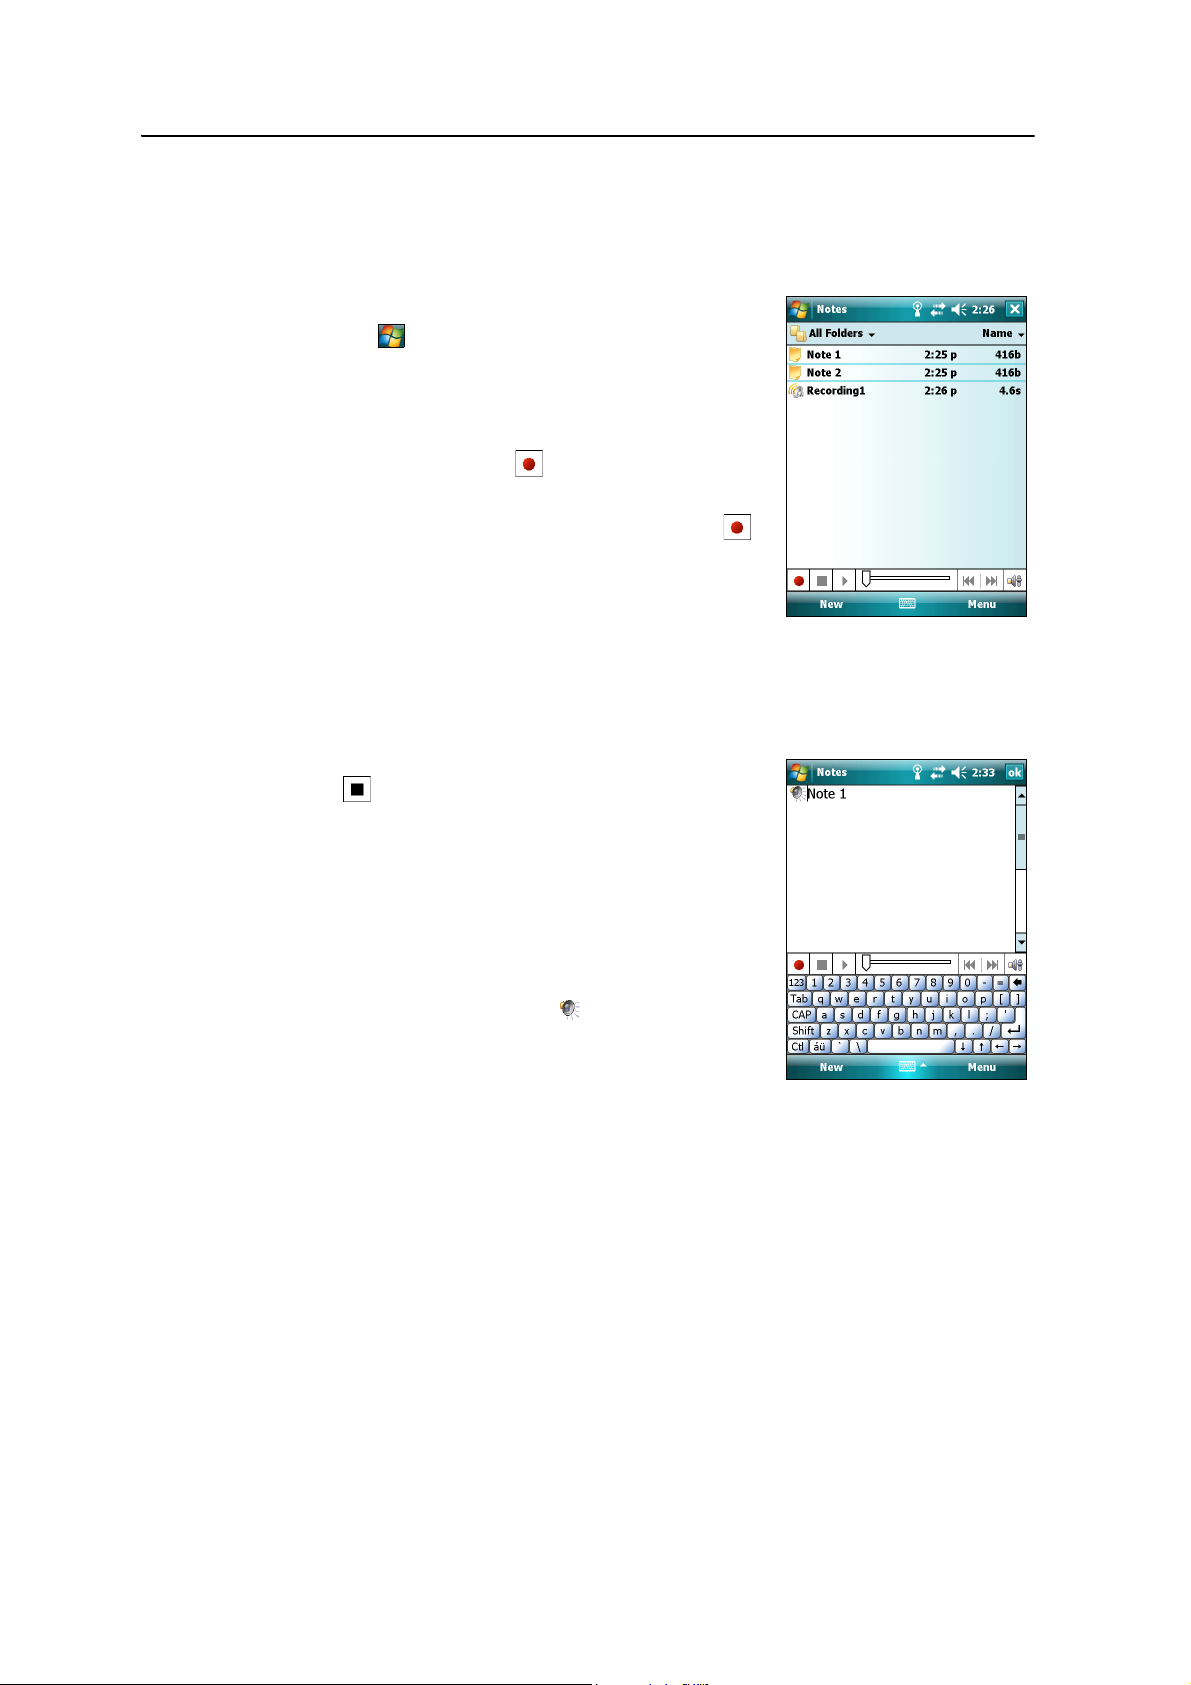
3 Using the Windows Mobile Operating System
Making a recording
You can create a stand-alone voice note or you can add a recording to a note. Then you
can work with voice notes in the same way that you work with notes.
To make a recording:
1. Tap / Programs / Notes.
2. Do one of the following:
– To create a stand-alone recording, in the
screen displaying the list of notes, tap the
Record button to begin recording.
– To add a recording to a note, create or open
a note and then tap the Record button
to begin recording.
B
Tip – If you do not see the Recording toolbar, tap Menu /
View Recording Toolbar.
Note – The GeoExplorer 3000 series handheld’s microphone is on the front of the
handheld, in the keypad area. The microphone will capture voice notes when you are
holding the handheld in front of you. In noisy environments, you may need to move the
handheld closer to you or to the source of the sounds you want to record.
3. When you finish recording, tap the Stop button
.
If you are creating a stand-alone recording, an
icon appears in the note list.
If you are recording in an open note, an icon
appears in the note. Tap
OK to return to the note
list.
To play a recording, tap the recording in the note list or
open the note and then tap the icon in the note.
42 GeoExplorer 3000 Series User Guide
Page 43
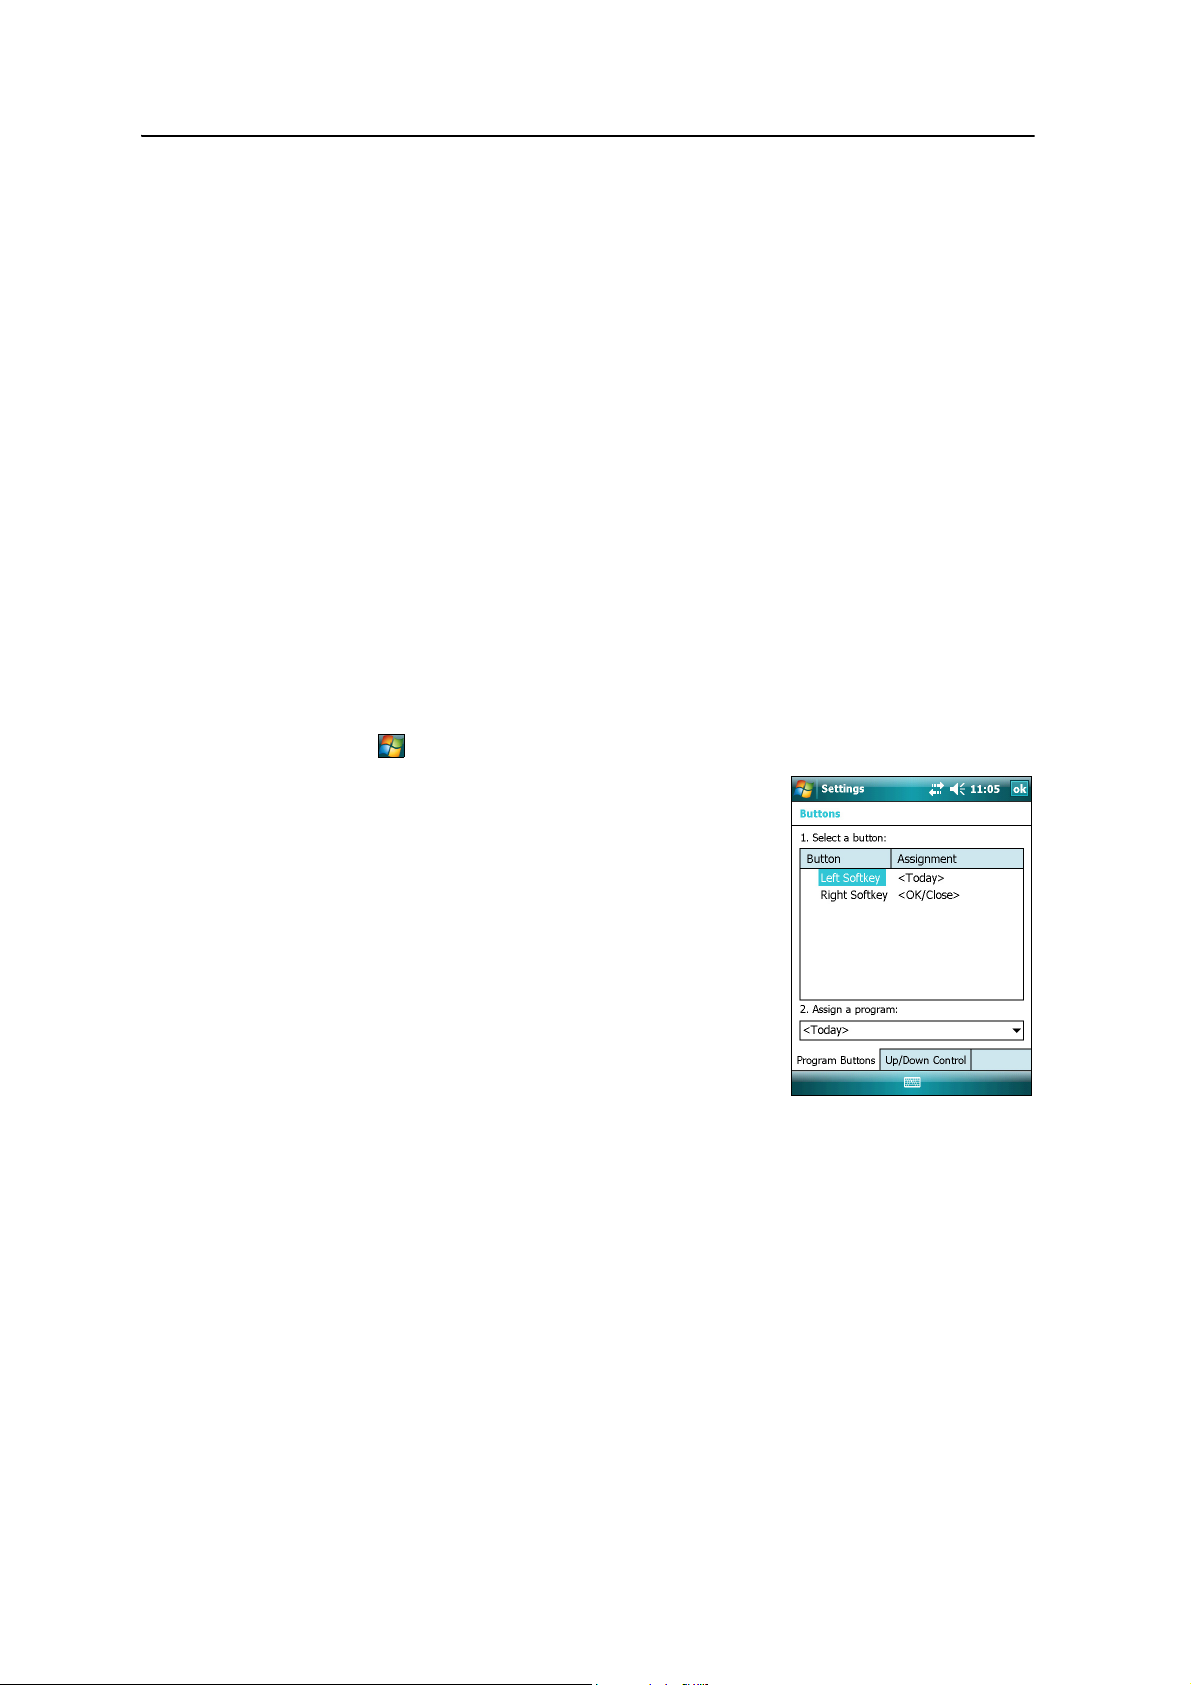
Personalizing the handheld
Use the controls in the Settings area to customize the handheld. The following
examples describe controls that are available.
Buttons
Use the Buttons control to assign the action you want to be performed when you press
the left or right application key.
By default, these keys perform the same action as the left and right softkeys in the
menu bar. Alternatively, program these keys to perform a selected action.
Application buttons can be programmed to perform one of the following types of
actions:
• Run a selected application, for example Messaging or Calendar.
• Act as a software button, for example an OK/Close button or a scroll button.
• View a selected screen, or part of a screen, for example return to the Tod a y
screen or launch the Context menu or Input panel.
Using the Windows Mobile Operating System 3
To open the Buttons control:
• Tap / Settings / Personal / Buttons.
To specify an action for the button:
1. Tap the Program Buttons tab.
2. Tap a button in the list to select it.
3. From the Assign a program drop-down list, select
the action you want to occur when you press the
button or tap the softkey.
4. Tap
OK.
GeoExplorer 3000 Series User Guide 43
Page 44
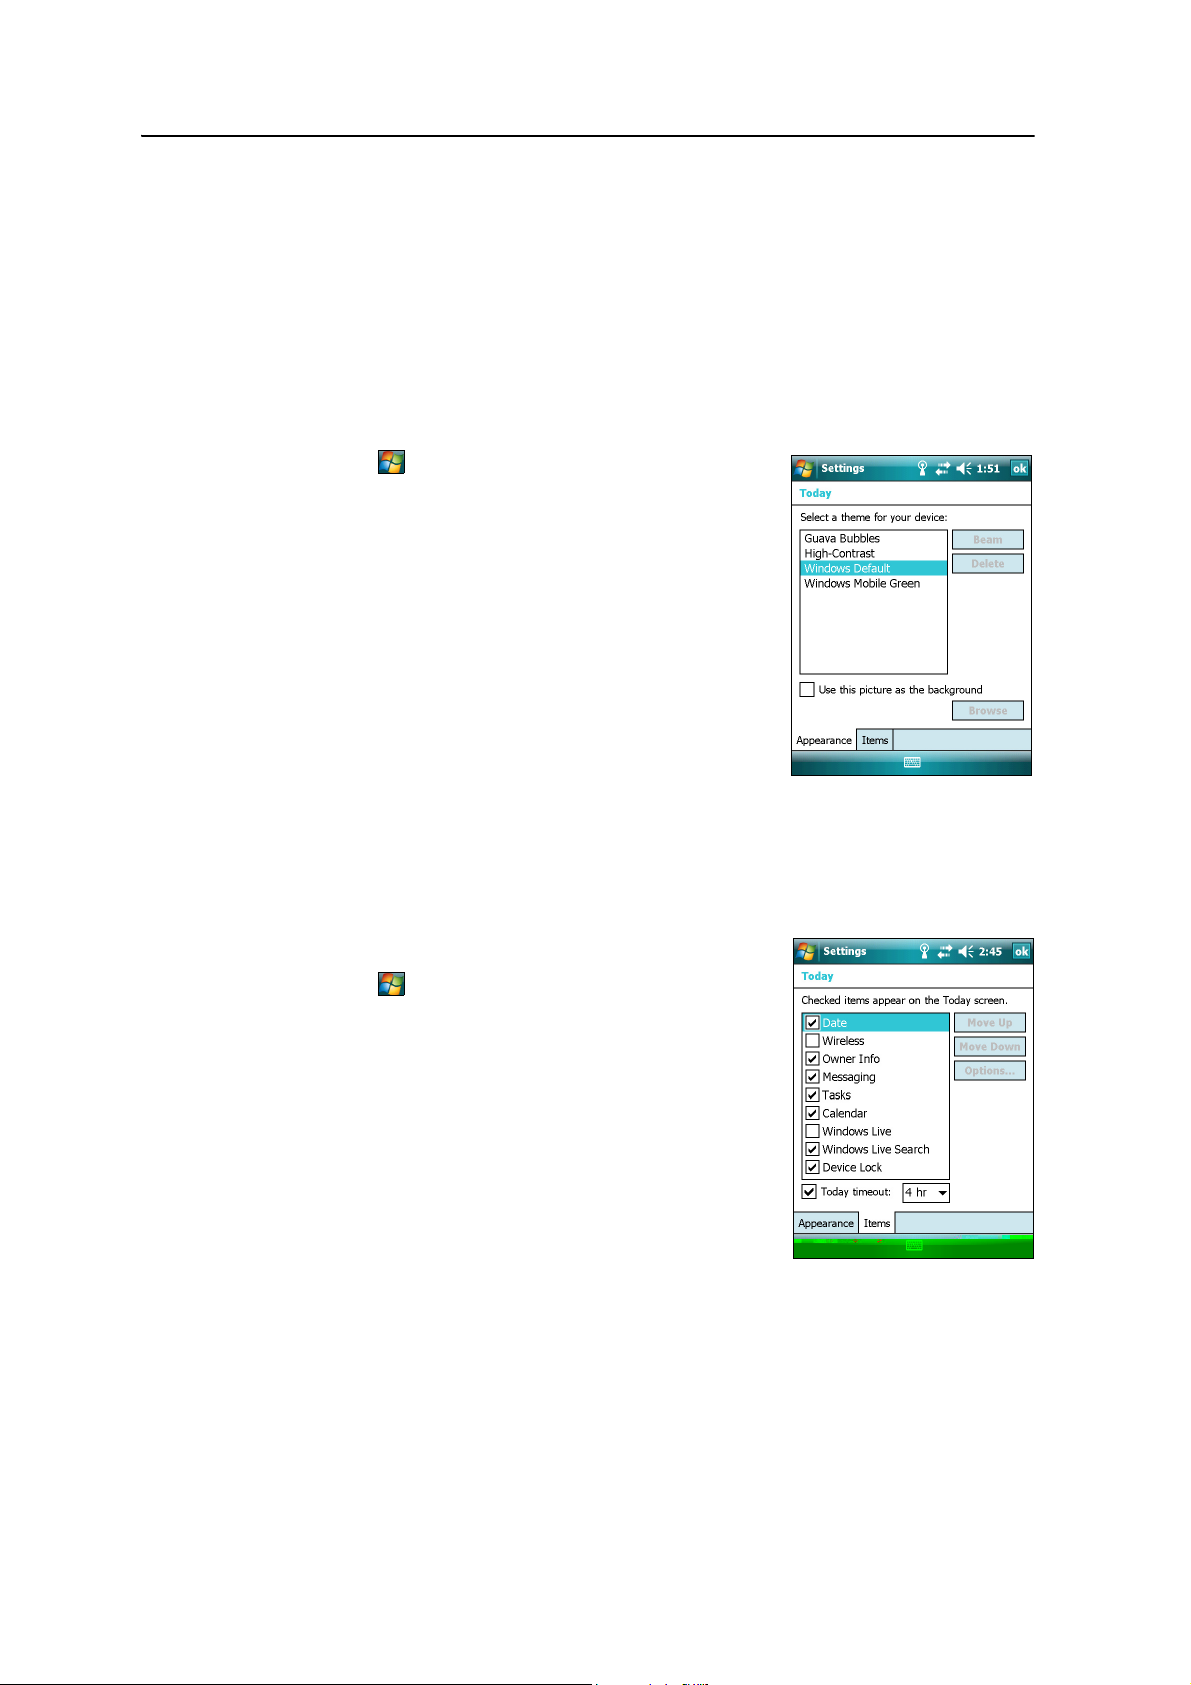
3 Using the Windows Mobile Operating System
Today
Use the Today control to change the display theme that controls the appearance of the
To da y screen, and to customize which items appear on the To da y screen.
Appearance
You can use a theme to customize the background picture on the To da y screen, the
color of the title and menu bars, menus, and messages.
To change the display theme:
1. Tap / Settings / Personal / Tod a y.
2. Tap the Appearance tab.
3. Do one of the following:
– To use a predefined theme, select it from the
list.
– To select the picture that you want to display
in the To da y screen background, select the Use
this picture as the background check box. Then
tap
Browse to search for a file on the
handheld.
4. Tap
OK.
Items
You can choose the items that appear on the Today screen, and the order that they
appear in.
To change the items that appear on the To da y screen:
1. Tap / Settings / Personal / Tod a y.
2. Tap the Items tab.
3. Select or clear the check boxes to show or hide the
To da y screen items.
4. Use the
Move Up and Move Down buttons to
change where the selected item appears on the
To da y screen.
5. Tap
OK.
44 GeoExplorer 3000 Series User Guide
Page 45
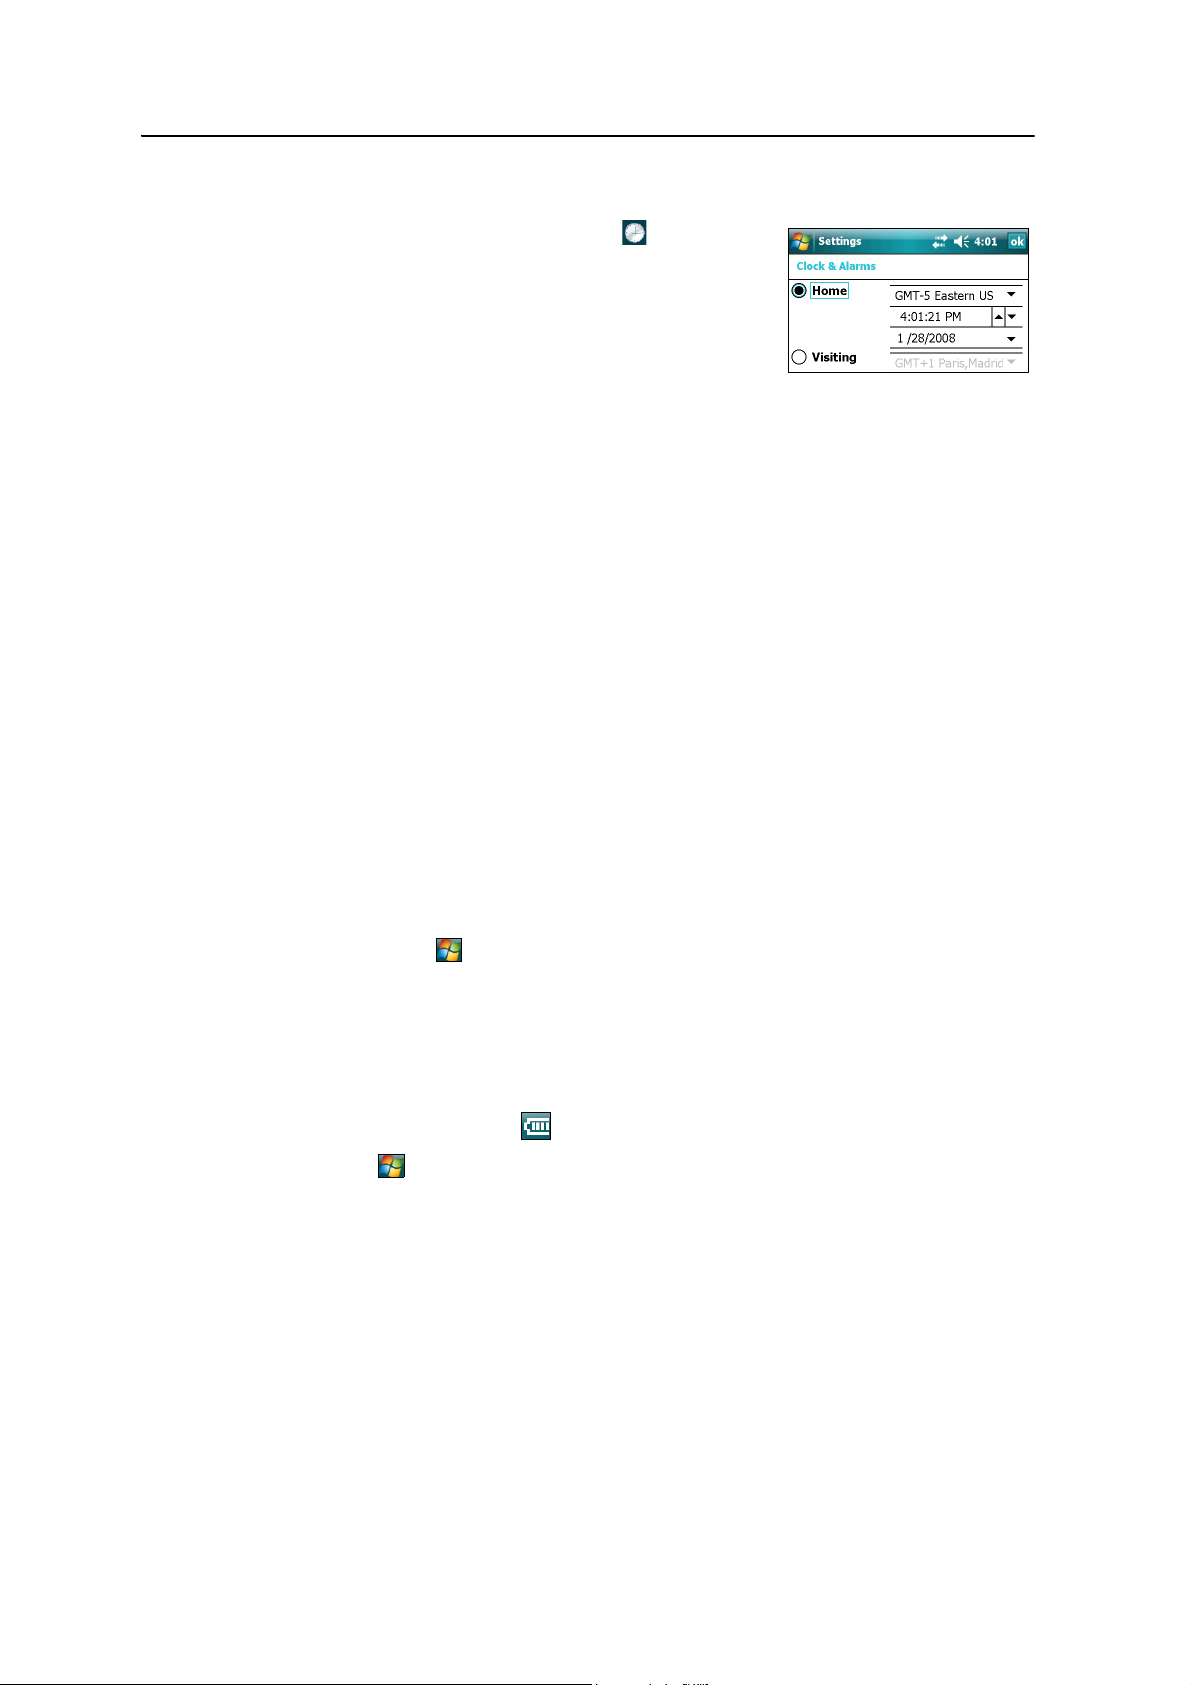
Using the Windows Mobile Operating System 3
Set the time zone
In the Tod a y screen, tap the clock icon . The Clock
Settings screen appears. Tap the Time tab, select the Home
option and then select the correct time zone.
Device lock
Use the Device Lock option on the To day screen to lock the screen and keypad while
the handheld remains turned on.
To lock the device, tap Device unlocked in the Today screen. The To da y screen shows
Device locked, and Unlock appears in the left corner of the menu bar.
Once the handheld is locked, the screen and most of the keys do not respond until the
handheld is unlocked. The exceptions are the
always respond when pressed.
Communication with external devices such as a GPS receiver, or external sensors used
by GPS field software, is not interrupted by locking the handheld. This means that you
can keep using the GPS field software when the handheld is locked. For example, you
could lock the device so that you can safely transport it between features, while
keeping the software connected to the GPS receiver so that you can continue recording
GPS positions.
Power key and the Reset button, which
To unlock the device, tap the Unlock notification in the left corner of the Tod ay screen
menu bar and then tap
Unlock.
You can help to keep your data secure by requiring a password each time the handheld
is turned on. Tap / Settings / Personal / Lock to set a password or to change
password settings.
Power
To open the Power control, do one of the following:
• Tap the battery icon in the title bar of the Tod ay screen.
• Tap / Settings / System / Power.
Tap the Battery tab to check the battery level (see Checking the level of battery power,
page 26).
Tap the Advanced tab to set the time before the handheld turns off when idle (see
Suspend mode, page 28).
GeoExplorer 3000 Series User Guide 45
Page 46
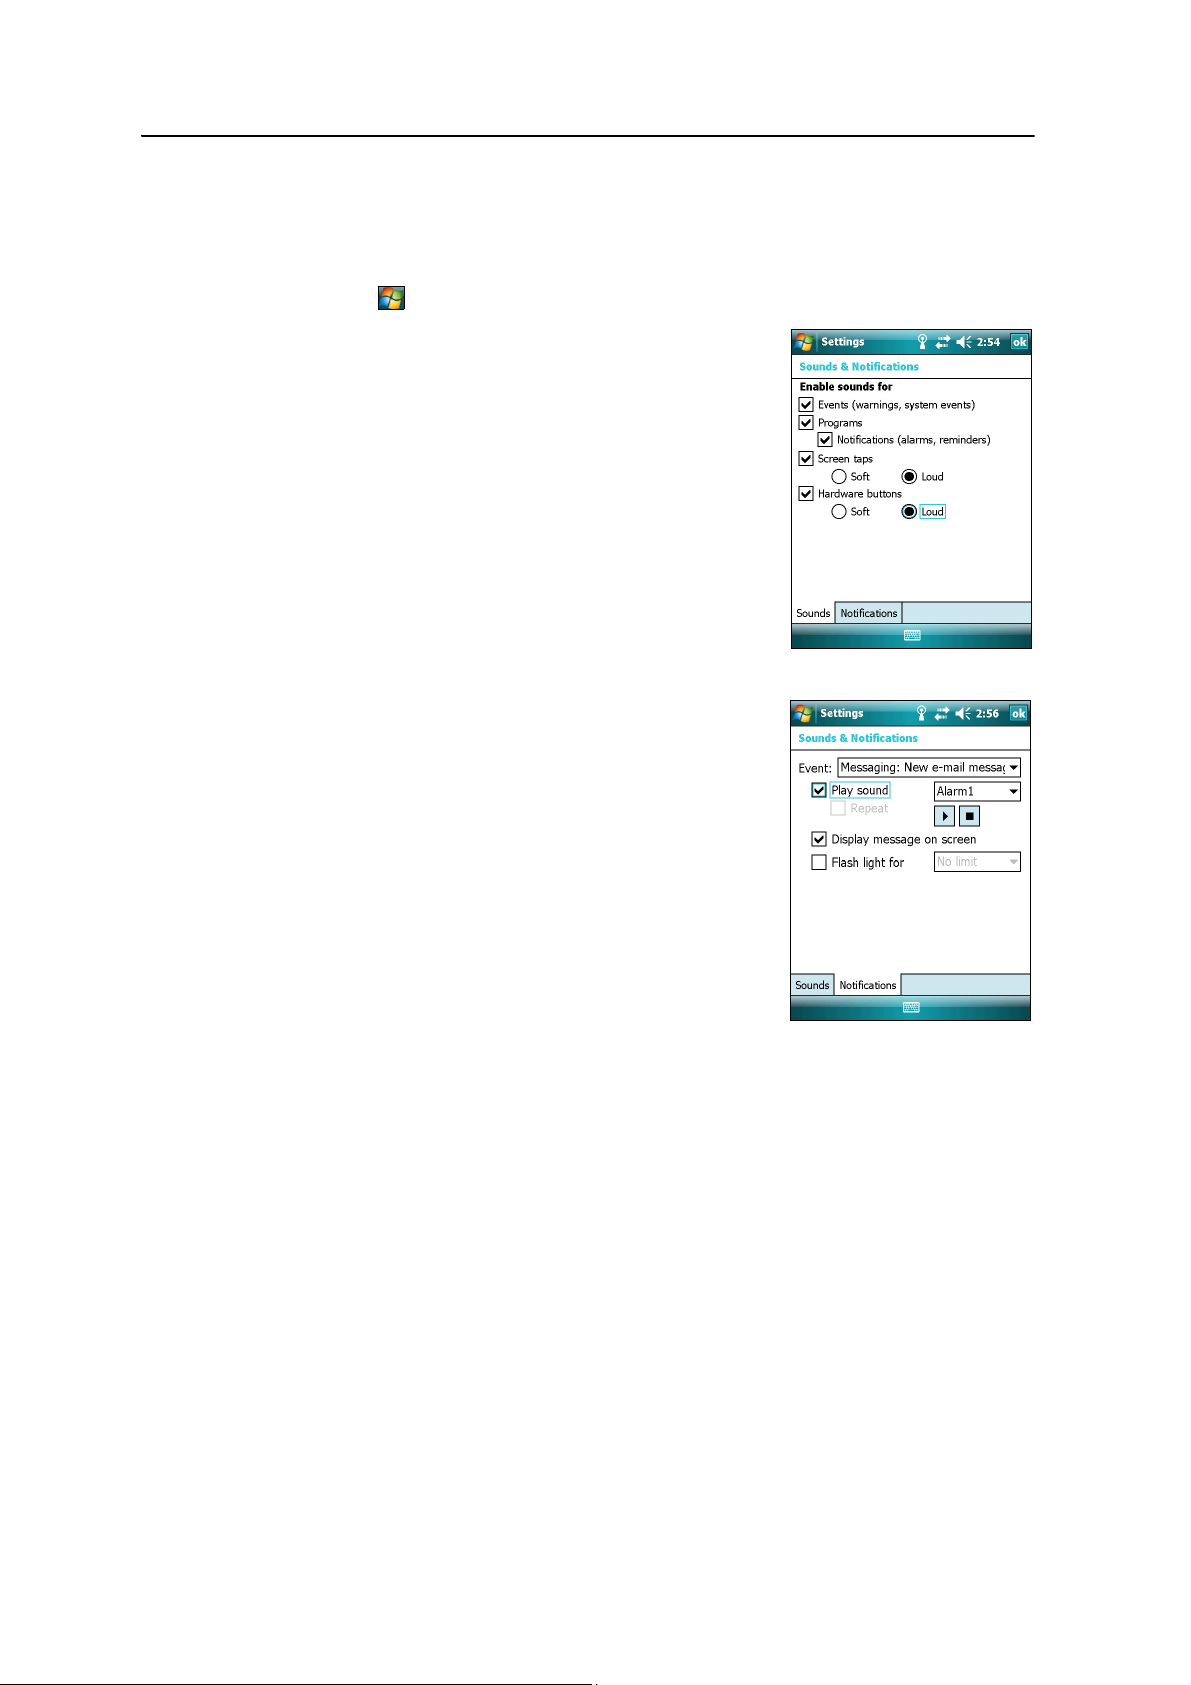
3 Using the Windows Mobile Operating System
Sounds and notifications
Use the Sounds & Notifications control to set preferences for the speaker volume and
system sounds. To open the Sounds & Notifications control:
• Tap / Settings / Personal / Sounds & Notifications.
To turn on or turn off sounds:
1. Tap the Sounds tab.
2. Select or clear the check boxes to enable or disable
categories of sounds.
3. If you select the Screen taps or Hardware buttons
check boxes, select the Soft or Loud option to
control the volume of the sounds.
4. Tap OK.
You can use predefined schemes to customize sounds, or
you can create your own sound schemes.
To specify a sound scheme:
1. Tap the Notifications tab.
2. From the Event drop-down list, select an event.
3. Select the type of notification you want to receive
for that event.
4. Tap
OK.
46 GeoExplorer 3000 Series User Guide
Page 47
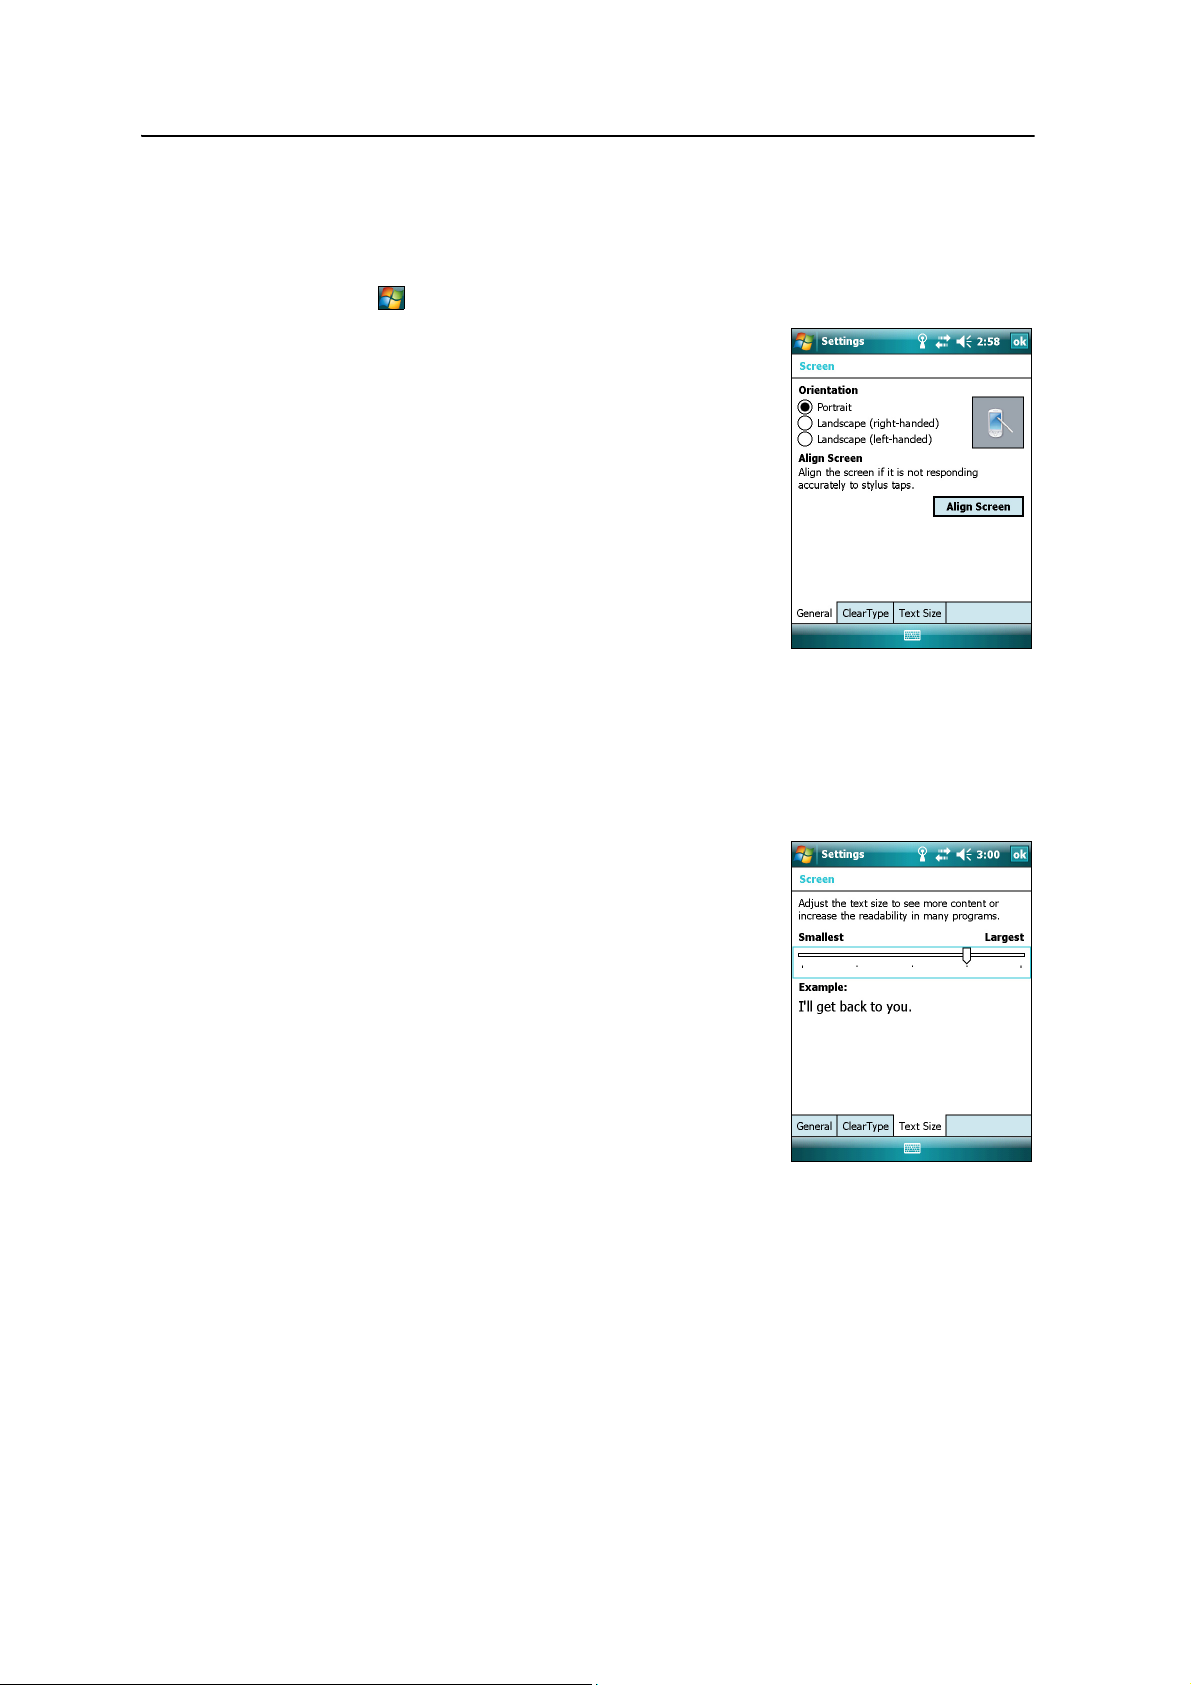
Using the Windows Mobile Operating System 3
Screen
Use the Screen control to align the touch screen or to change the appearance of text on
the screen. To open the Screen control:
• Tap / Settings / System / Screen.
To change the screen settings:
1. Tap the General tab.
2. To change the orientation of the screen, select an
option in the Orientation group.
3. To start the alignment sequence for the touch
screen, tap
Align Screen.
4. Tap
OK.
Note – To align the screen at any time, press and hold the
Power button for 1 second until the Power menu appears
and then tap
Align Screen.
Using ClearType font smoothing can make text easier to
read on the screen.
To enable ClearType:
1. Tap the ClearType tab and then select the Enable ClearType check box.
2. Tap
OK.
To change the size of text on screen:
1. Tap the Text Size tab.
2. Tap and drag the slider control to the left to make
text smaller, or to the right to make text larger.
The example text below the slider shows how the
text will appear on screen.
3. Tap
OK.
GeoExplorer 3000 Series User Guide 47
Page 48
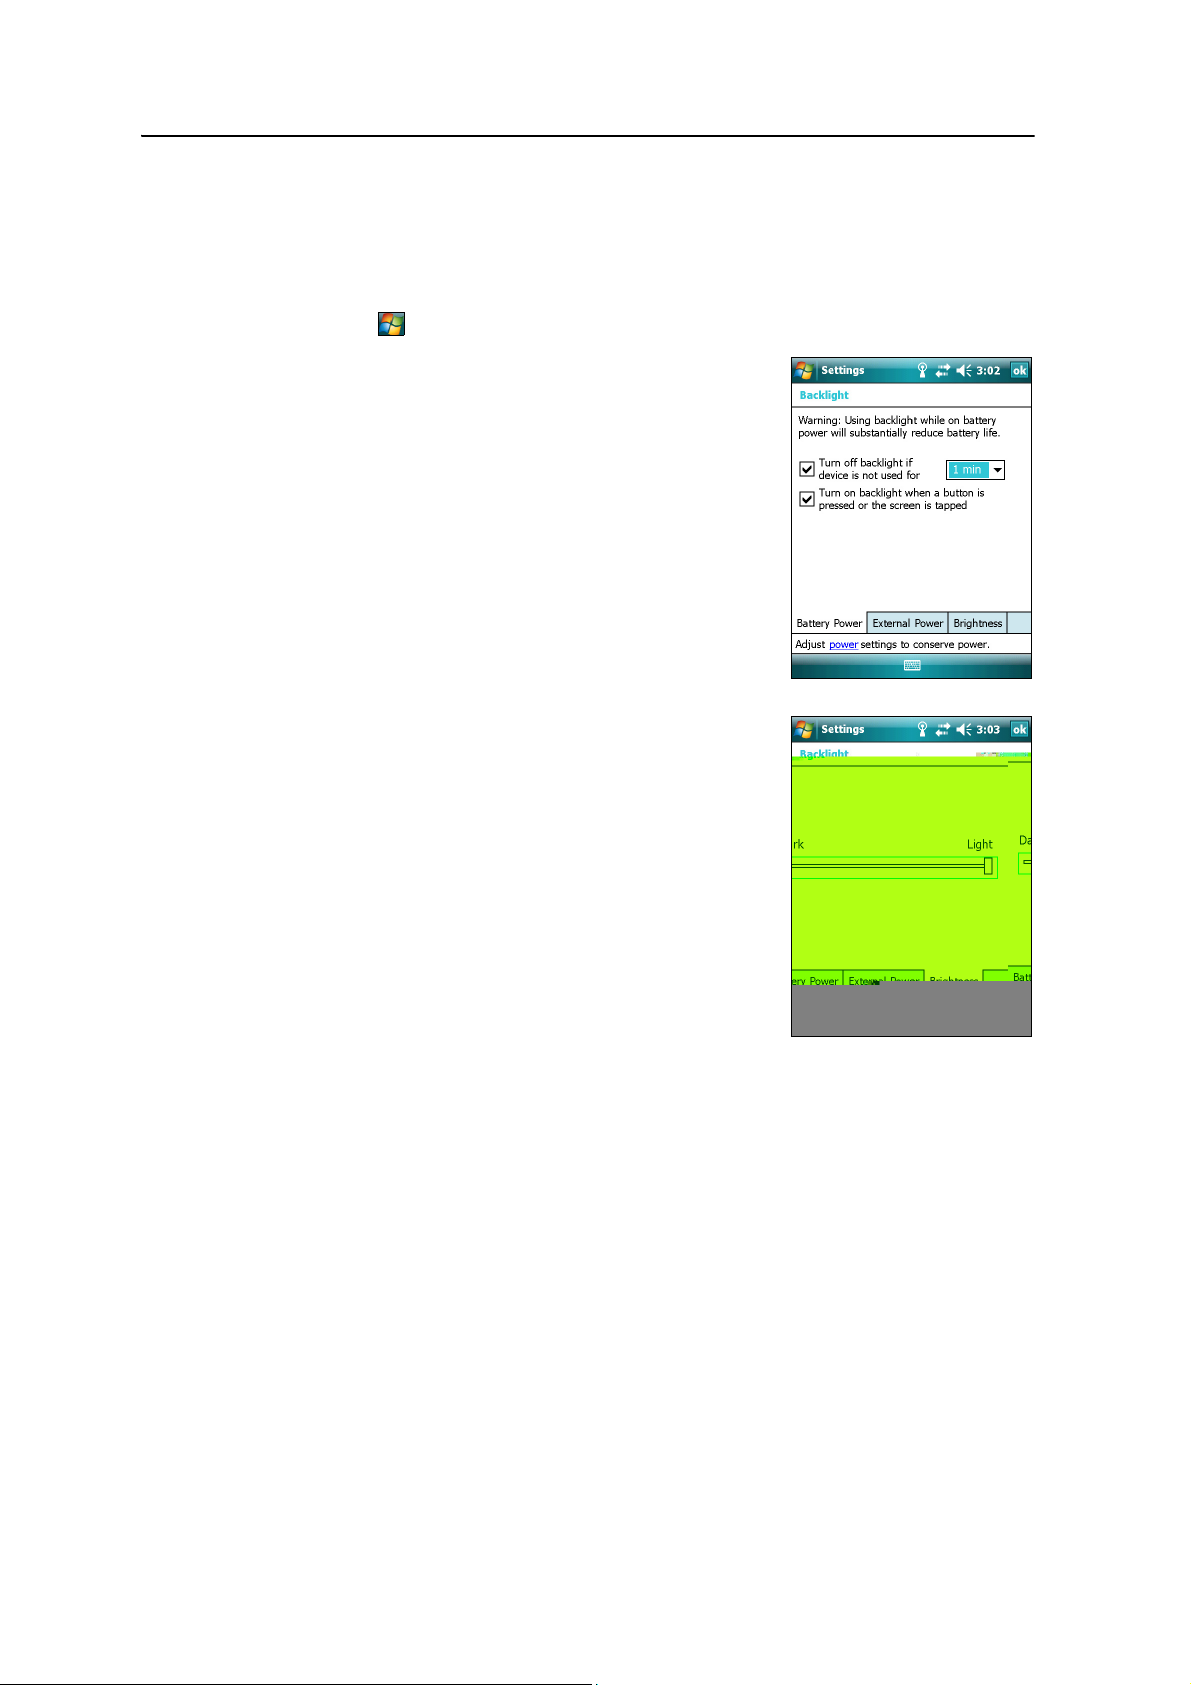
3 Using the Windows Mobile Operating System
Backlight
The backlight makes the screen easier to read in low light, but uses extra power. Use
the Backlight control to configure power-saving settings for the backlight. To open the
Backlight control:
• Tap / Settings / System / Backlight.
To set the backlight to automatically turn off:
1. To automatically turn off the backlight when the
handheld is idle and is using battery power, tap the
Battery Power tab. Select the Turn off backlight
check box and then select a time from the
drop-down list.
2. To automatically turn off the backlight when the
handheld is idle and is using external power, tap
the External Power tab. Select the Turn off backlight
check box and then select a time from the
drop-down list.
3. Tap
OK.
To change the brightness:
1. Tap the Brightness tab.
2. Tap and drag the slider control to the left to make
the backlight darker, or to the right to make the
backlight brighter.
3. Tap
OK.
48 GeoExplorer 3000 Series User Guide
Page 49

Messaging
Use Messaging to send and receive receive e-mail messages using the GeoExplorer
3000 series handheld. Messaging is the equivalent of your e-mail Inbox.
To use e-mail, you can do one of the following:
• Synchronize e-mail messages with Microsoft Exchange or Microsoft Outlook
on an office computer.
• Send and receive e-mail messages by connecting directly to an e-mail server
through an ISP or a network.
Synchronizing e-mail messages
You can synchronize e-mail messages on the handheld and the computer.
Using the Windows Mobile Operating System 3
®
C
CAUTION – When you delete a message on the handheld, it is deleted from the office
computer the next time you synchronize the devices.
To synchronize e-mail, you must enable Inbox synchronization in the ActiveSync
software. For more information, refer to the ActiveSync Help on the office computer.
During synchronization:
• Messages are copied from the mail folders of Exchange or Outlook on the office
computer to the Messaging folder on the handheld. By default, you will receive
messages from the past 3 days only, the first 100 lines of each message, and file
attachments of less than 100 KB in size.
• E-mail messages in the Outbox folder on the handheld are transferred to
Exchange or Outlook, and then sent from those programs.
• E-mail messages in subfolders in other e-mail folders in Outlook are
synchronized only if they were selected for synchronization in the ActiveSync
software.
To send and receive e-mail for a synchronized Exchange or Outlook account, connect
the handheld to the office computer. Synchronization automatically begins, and the
handheld sends and receives e-mail.
GeoExplorer 3000 Series User Guide 49
Page 50
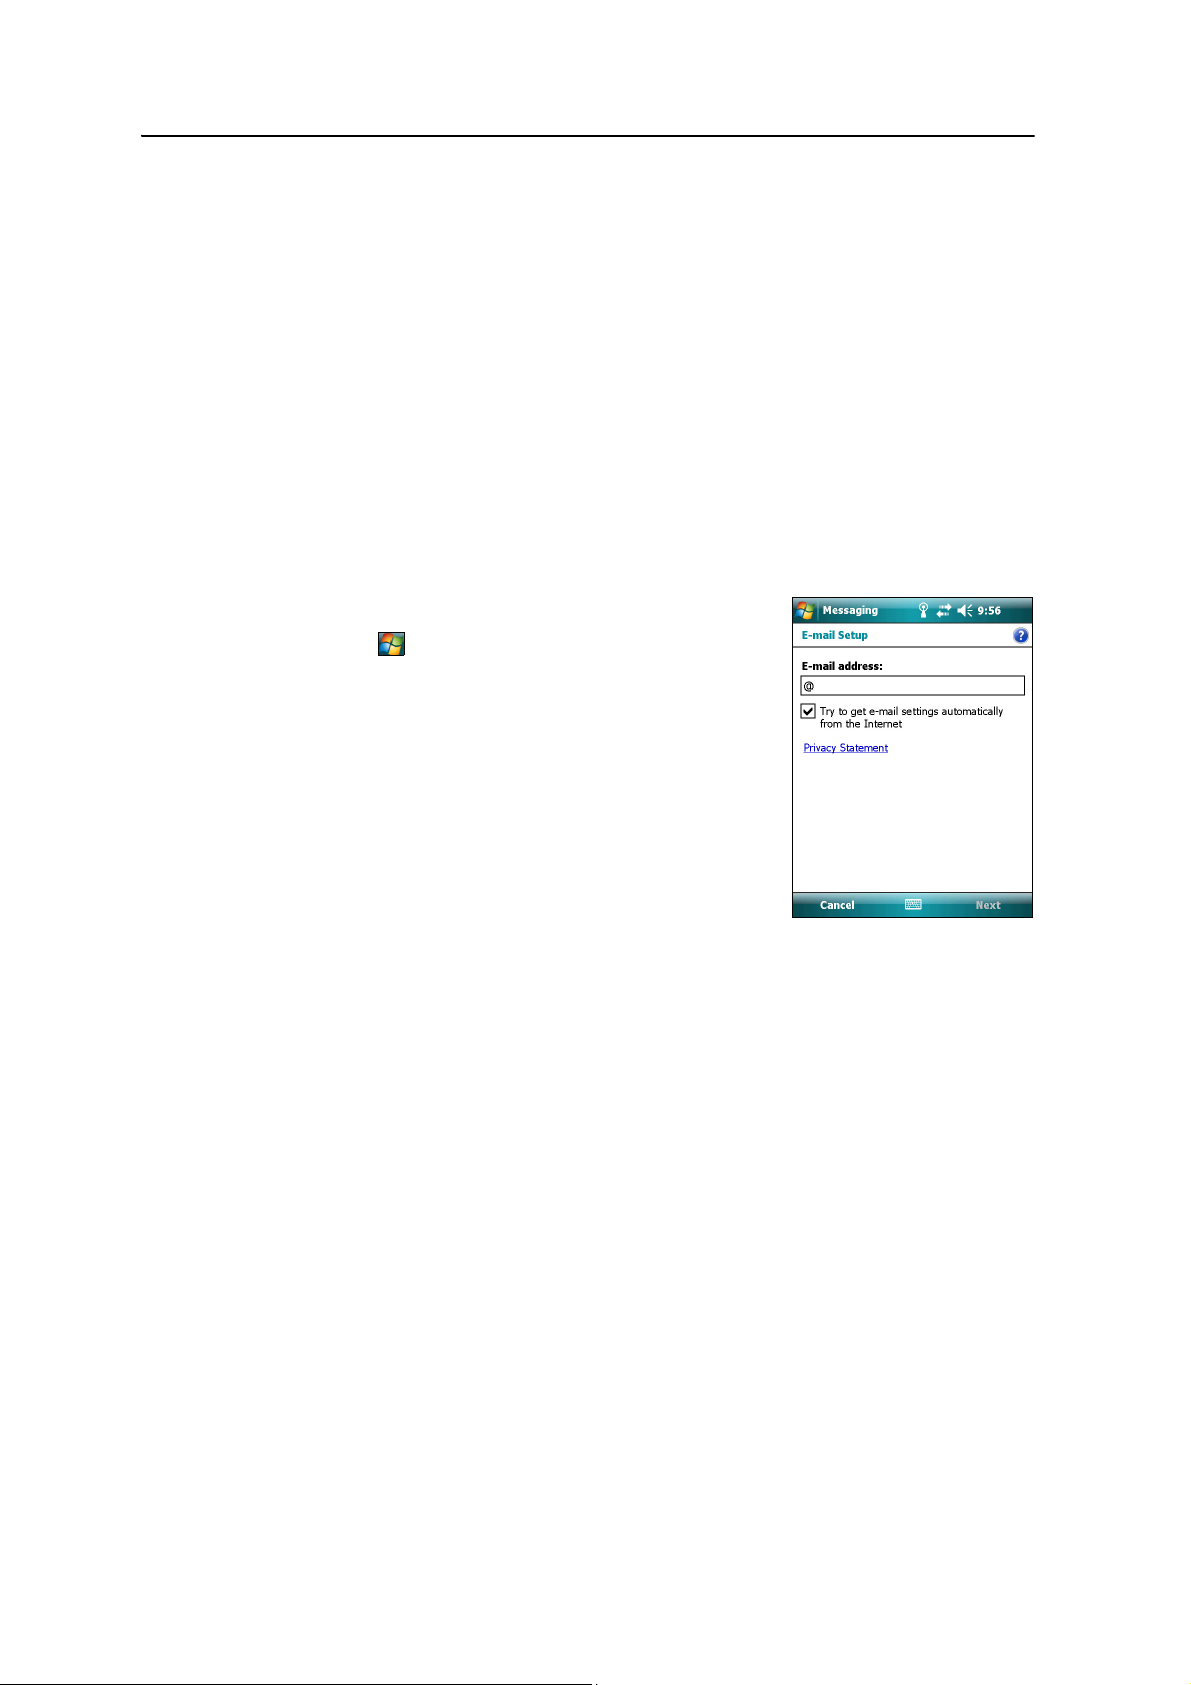
3 Using the Windows Mobile Operating System
Connecting directly to an e-mail server
In addition to synchronizing e-mail messages with an office computer, you can send
and receive e-mail messages by connecting to an e-mail server.
Before you can send and receive e-mail, you must create an e-mail account in the
Messaging software.
Note – You must set up an Internet connection on the handheld before you can set up and
use your e-mail account. For more information, see Connecting to a wireless LAN access
point, page 82 or Connecting to a Bluetooth-enabled phone for Internet access or real-time
corrections (including VRS networks), page 88.
If you need to connect to different mailboxes, set up and name a different service for
each connection.
Note – The Messaging software supports only the POP3 and IMAP4 protocols for incoming
mail, and SMTP for outgoing mail.
To set up a mail service:
1. Tap / Messaging.
2. Tap New E-mail Account.
B
3. Enter the e-mail address for your account.
4. To automatically get connection settings for your
e-mail account from the Internet, select the check
box.
5. Tap
Next.
6. Follow the steps in the Setup wizard. If the
connection settings are not automatically
downloaded from the Internet, you must enter them using the connection
details supplied by your ISP or network administrator.
Note – You cannot change the account name later.
7. Tap
8. Tap
Tip – To receive TerraSync data files by e-mail, edit the settings for the e-mail account you
have set up. To do this, tap Menu and then select Options. In the Accounts tab, tap the
e-mail account you want to use to receive TerraSync files. The E-mail Setup wizard
appears. Tap Next until you reach the last page of the wizard. From the Message
download limit drop-down list, select Entire message.
Finish.
OK to download mail immediately.
When you connect the handheld to the e-mail server, new messages are downloaded
to the Messaging folder, messages in the Outbox folder are sent, and messages that
have been deleted on the e-mail server are removed from the Messaging folder.
Messages received directly from an e-mail server are linked to the e-mail server rather
than an office computer. When you delete a message on the handheld, it is also deleted
from the e-mail server the next time you connect the handheld to the e-mail server.
50 GeoExplorer 3000 Series User Guide
Page 51

Using the Windows Mobile Operating System 3
You can work online or offline. When working online, you read and respond to
messages while connected to the e-mail server. Messages are sent as soon as you tap
Send, which saves space on the handheld.
When working offline, you can disconnect from the e-mail server after you download
new message headers or partial messages and then decide which messages to
download completely. The next time you connect, Messaging downloads the complete
messages you have marked for retrieval and sends any messages that you have written.
GeoExplorer 3000 Series User Guide 51
Page 52

3 Using the Windows Mobile Operating System
52 GeoExplorer 3000 Series User Guide
Page 53

CHAPTER
4
Connecting to an Office Computer 4
In this chapter:
Connection management
software
Connecting the handheld to a
computer
Managing the connection using
the Windows Mobile Device
Center
Managing the connection using
ActiveSync technology
Installing software onto the
handheld
Connect the GeoExplorer 3000 series handheld
to an office computer to transfer information,
settings, and files from one device to the other, or
to install software onto the handheld.
You can connect the handheld to a computer
using the USB cable or a Bluetooth wireless link.
To protect your data, Trimble recommends that
you regularly copy important data to an office
computer.
GeoExplorer 3000 Series User Guide 53
Page 54

4 Connecting to an Office Computer
Connection management software
To install software onto a Windows Mobile powered device, or to copy files between
the handheld and a computer, you must connect the device to an office computer. If
the computer is running:
• the Windows Vista
to manage the connection.
• the Windows
manage the connection.
Note – You must install the Windows Mobile Device Center or ActiveSync technology onto
the computer before you connect the handheld.
This connection management software also enables you to synchronize office
applications on an office computer with the handheld.
®
operating system, use the Windows Mobile Device Center
®
XP or 2000 operating system, use ActiveSync technology to
C
C
CAUTION – The available space on the handheld is small compared to an office computer.
To avoid accidentally synchronizing the handheld with a large amount of data on the
office computer, Trimble recommends that you either connect to the handheld without
forming a partnership, or that you limit the information types and amount of data that
is synchronized.
CAUTION – Synchronizing data is designed to keep the same data on both the office
computer and the handheld. Exercise care when resynchronizing applications after
deleting data from one computer, as resynchronizing will delete the same information
from the other computer.
For more information see one of the following:
• Managing the connection using the Windows Mobile Device Center, page 56
• Managing the connection using ActiveSync technology, page 57.
Installing the Windows Mobile Device Center
The Windows Vista operating system includes a basic connectivity driver for Windows
Mobile powered devices. This driver allows you to transfer files from the handheld to
an office computer.
To install software onto a Windows Mobile powered device, you must install Windows
Mobile Device Center 6 onto an office computer.
A copy of the Windows Mobile Device Center is provided on the GeoExplorer 3000
Series Getting Started Disc. Alternatively, go to
www.microsoft.com/windowsmobile/devicecenter.mspx to download the latest
version from the Microsoft website.
54 GeoExplorer 3000 Series User Guide
Page 55
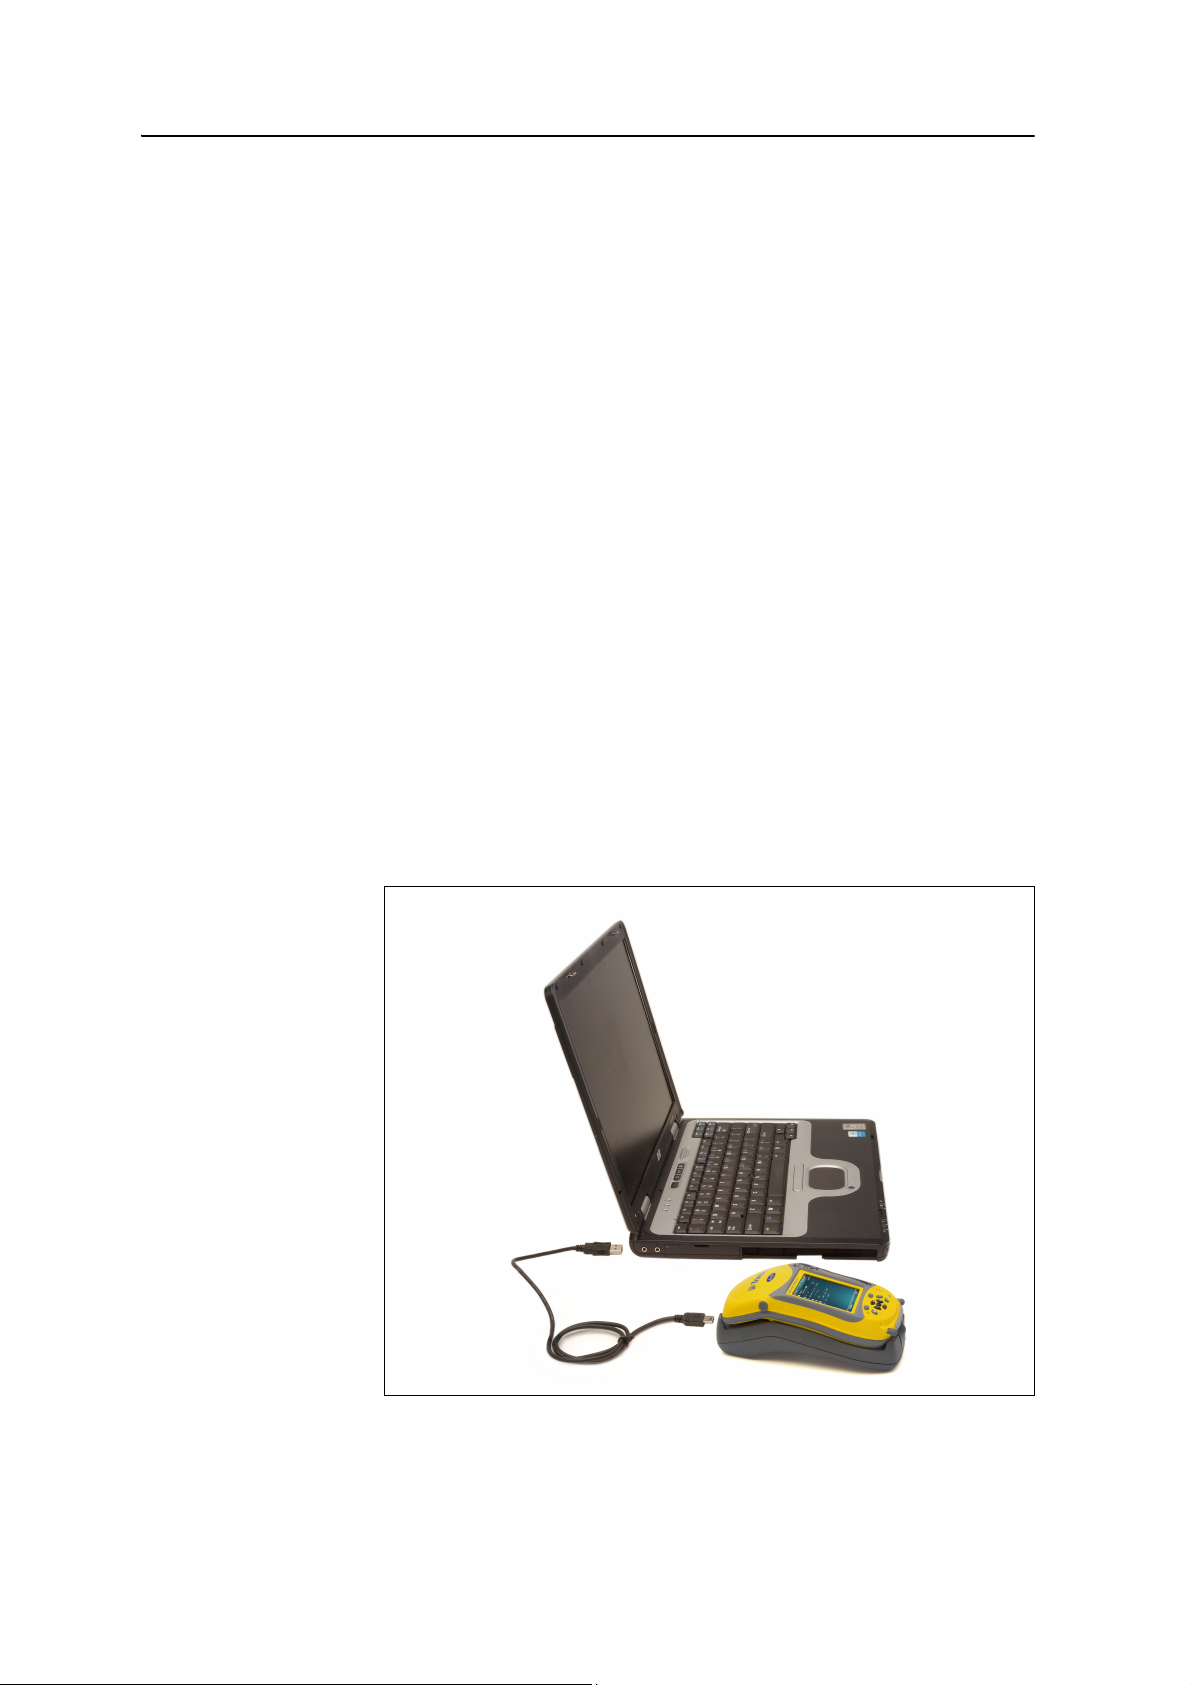
Installing ActiveSync technology
A copy of ActiveSync technology is provided on the GeoExplorer 3000 Series Getting
Started Disc. Alternatively, go to
www.microsoft.com/windowsmobile/activesync/default.mspx to download the latest
version from the Microsoft website.
Connecting the handheld to a computer
To connect the GeoExplorer 3000 series handheld to a computer:
1. Make sure that the handheld and the computer are switched on.
2. Make sure you have installed the appropriate connection management software
onto the computer (see Connection management software, page 54).
3. To form a connection, do one of the following:
– Use the handheld's integrated Bluetooth radio to establish a wireless serial
link to a Bluetooth-enabled computer. For more information, see
Connecting to an office computer to use ActiveSync technology, page 97.
Connecting to an Office Computer 4
– Use a USB connection:
a. Connect the USB data cable to the USB port on the support module.
b. Connect the other end of the USB data cable to a USB port on the
computer.
c. Place the handheld in the support module. For information about how
to do this, see Getting Started, page 21.
GeoExplorer 3000 Series User Guide 55
Page 56
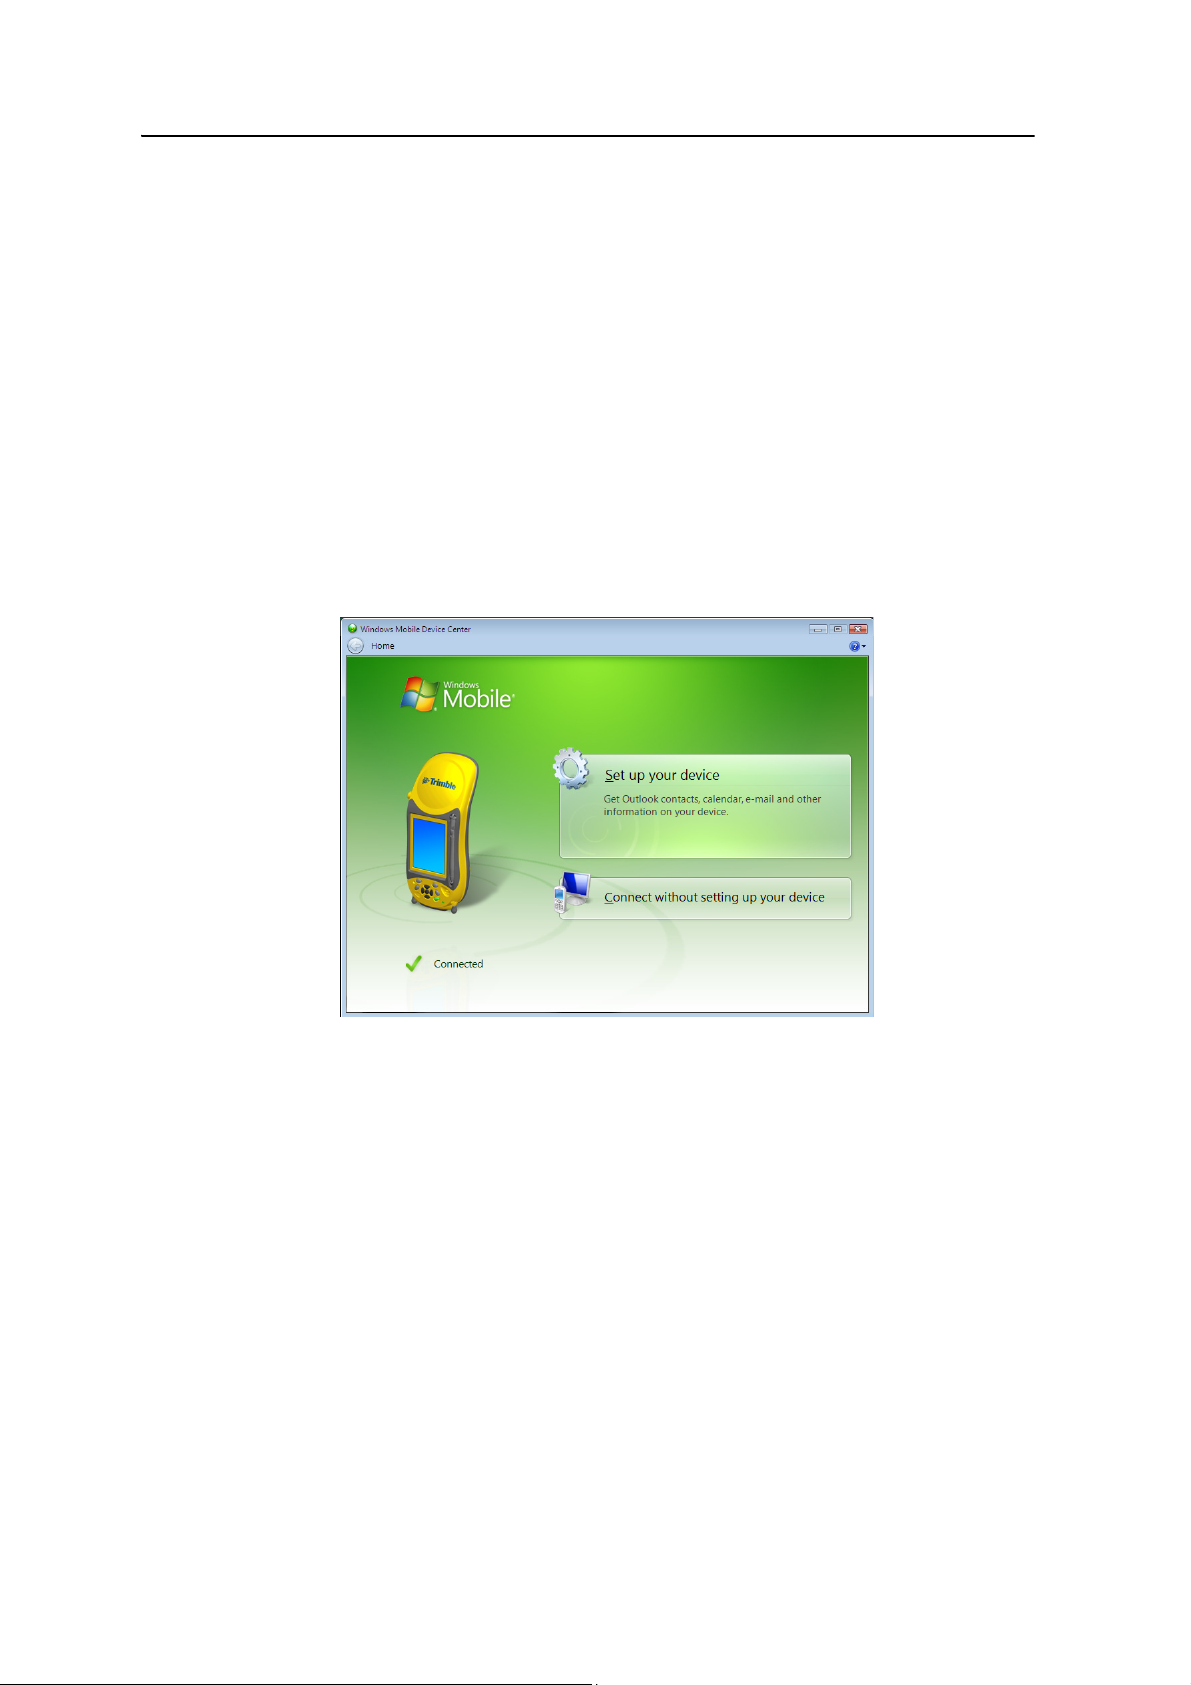
4 Connecting to an Office Computer
When the handheld and the computer are connected, you can manage the
connection through a window that appears on the office computer. See one of
the following:
– Managing the connection using the Windows Mobile Device Center,
page 56
– Managing the connection using ActiveSync technology, page 57
Managing the connection using the Windows Mobile Device Center
1. Connect the handheld to the computer (see page 55).
2. If the Autoplay window appears, close the window.
3. The Windows Mobile Device Center window displays the message
Connected:
Note – If the connection is not made automatically, check that the connection is enabled in
the Windows Mobile Device Center software and on the handheld. For more information,
see Troubleshooting, page 113.
4. Do one of the following:
– To synchronize files and data between the handheld and a computer, click
Set up your device and then follow the instructions on screen.
– To transfer data between the handheld and the computer without
synchronizing the devices, click Connect without setting up your device.
5. To transfer files between the computer and the handheld, click File
Management. A Windows Explorer-type window appears, displaying files stored
on the handheld. Copy and paste files to other locations on the computer, or
from the computer to the handheld.
56 GeoExplorer 3000 Series User Guide
Page 57
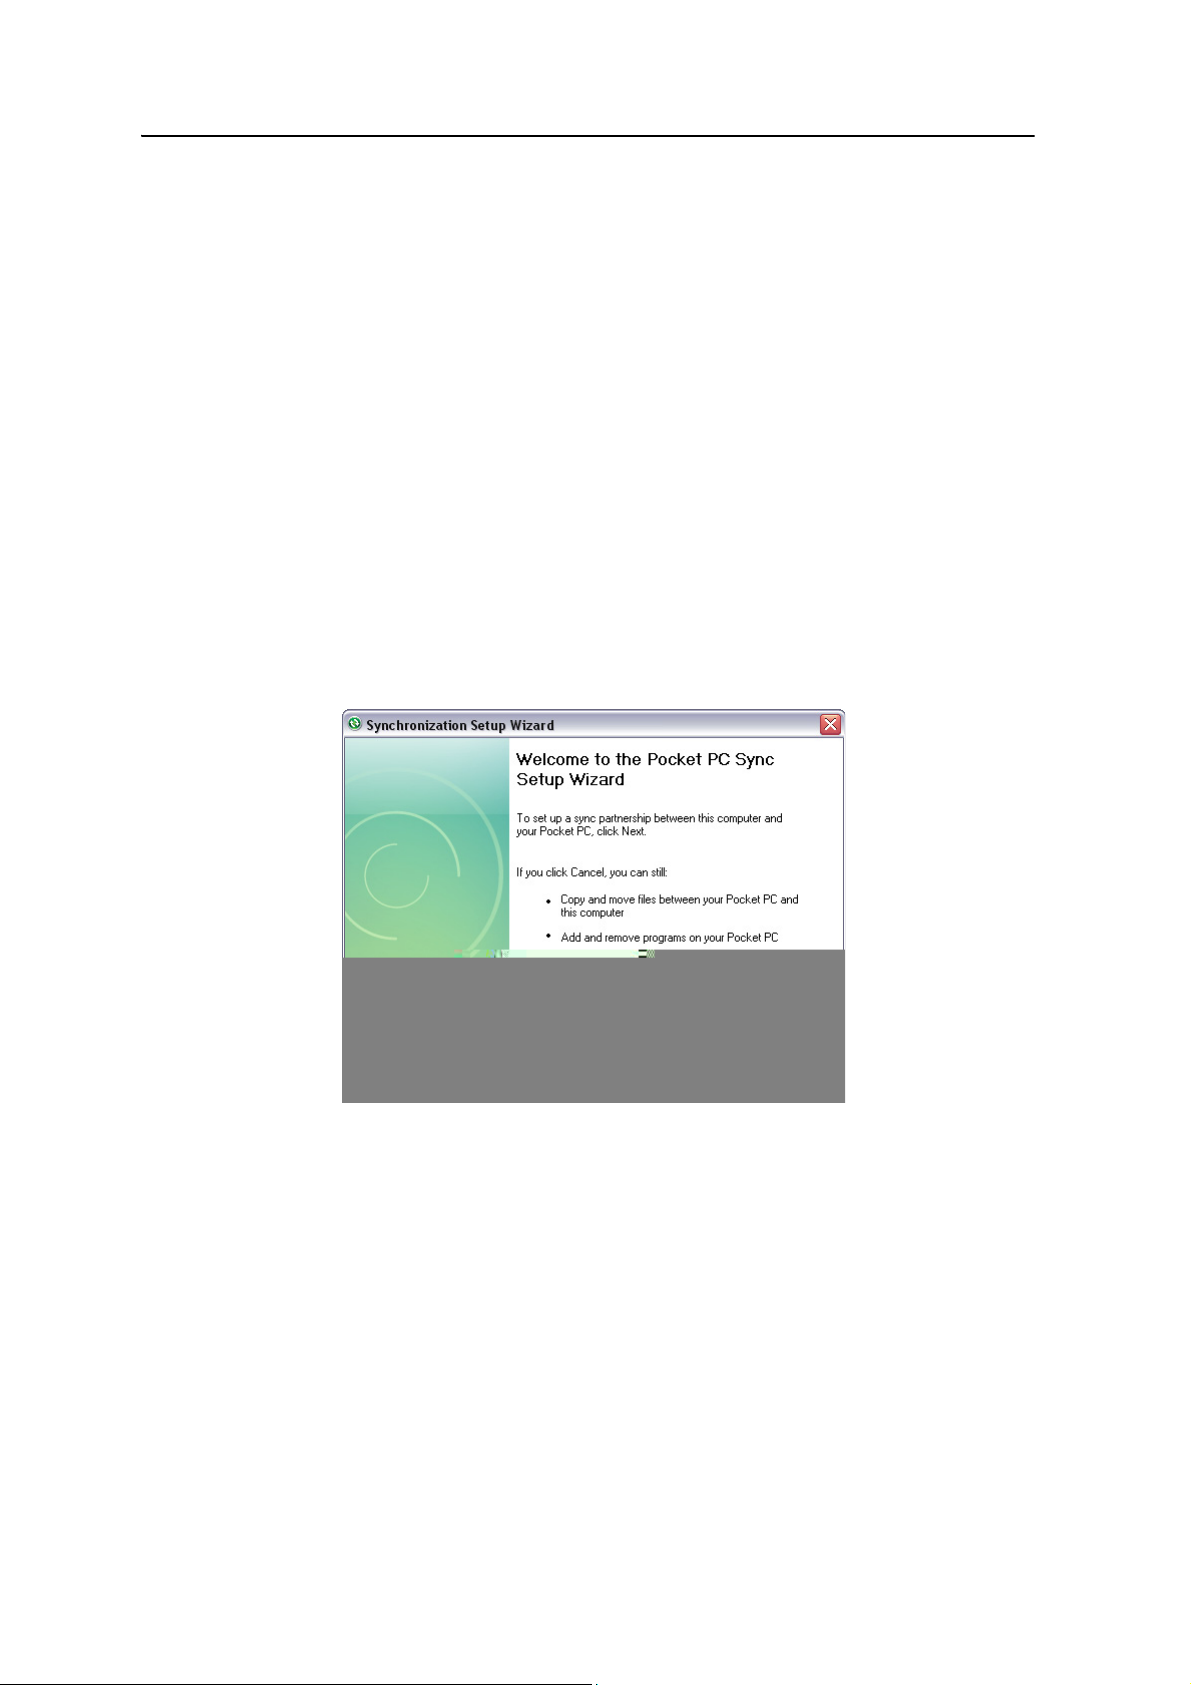
Connecting to an Office Computer 4
6. To install software onto the handheld, see Installing software onto the handheld,
page 59.
7. To uninstall software from the handheld, click Programs and Services and then
click Add/Remove Programs.
B
B
Tip – If the Add/Remove Programs option does not appear below Programs and Services,
click More. The Add/Remove Programs option appears.
For more information, refer to the Windows Mobile Device Center Help.
Tip – If the GPS Pathfinder Office software is installed on the office computer, you can
configure the Connection Manager utility in the GPS Pathfinder Office software to
automatically detect when you connect a GeoExplorer 3000 series handheld to the
computer. This enables you to automatically transfer data from the TerraSync software,
differentially correct the data, and then export it to a GIS. For more information, refer to
the GPS Pathfinder Office Software Help.
Managing the connection using ActiveSync technology
1. Connect the handheld to the computer (see page 55). The Synchronization Setup
Wizard appears:
Note – If the connection is not made automatically, check that the connection is enabled in
the ActiveSync software and on the handheld. For more information, see Troubleshooting,
page 113.
2. Do one of the following:
– To synchronize files and data between the handheld and a computer, click
Next and then follow the instructions in the Synchronization Setup Wizard.
– To transfer data between the handheld and the computer without
synchronizing the devices, click
Cancel to close the wizard.
GeoExplorer 3000 Series User Guide 57
Page 58
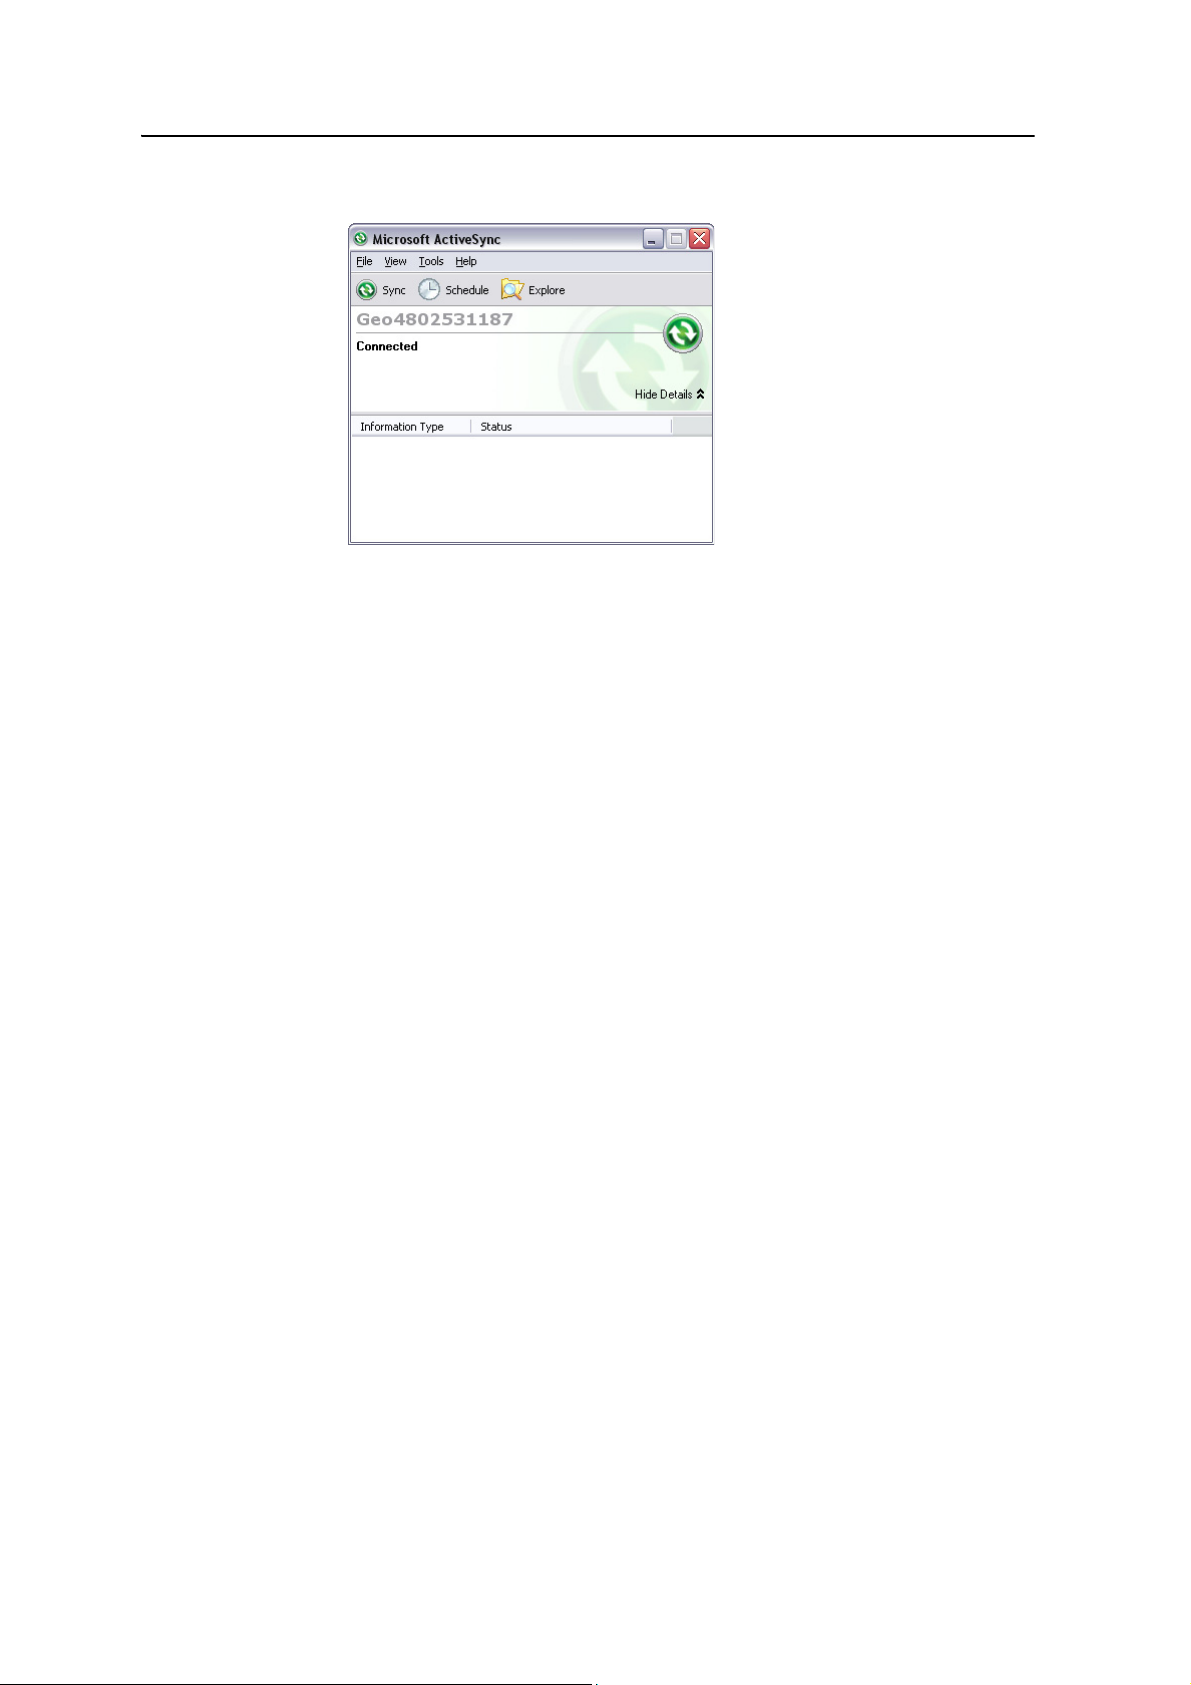
4 Connecting to an Office Computer
3. The Microsoft ActiveSync window displays the message Connected:
B
4. To transfer files between the computer and the handheld, click
Explore. A
Windows Explorer-type window appears, displaying files stored on the
handheld. Copy and paste files to other locations on the computer, or from the
computer to the handheld.
5. To install software onto the handheld, see Installing software onto the handheld,
page 59.
6. To uninstall software from the handheld, select Add/Remove Programs from the
To ol s menu. Clear the check box beside the program you want to remove and
then click
OK.
For more information, refer to the ActiveSync Help.
Tip – If the GPS Pathfinder Office software is installed on the office computer, you can
configure the Connection Manager utility in the GPS Pathfinder Office software to
automatically detect when you connect a GeoExplorer 3000 series handheld to the
computer. This enables you to automatically transfer data from the TerraSync software,
differentially correct the data, and then export it to a GIS. For more information, refer to
the GPS Pathfinder Office Software Help.
58 GeoExplorer 3000 Series User Guide
Page 59

Installing software onto the handheld
Before you begin, refer to the installation instructions provided with the software.
Some software installations are specifically designed to run on a Windows Mobile
powered device. To install software that has a Windows Mobile installation setup:
1. Connect the handheld to a computer (see page 55).
2. Copy the installation files to a folder on the handheld.
3. Browse to the folder on the handheld. Tap and hold the installation setup file
and then select Run.
4. If prompted after installation, perform a soft reset of the handheld (see page 29).
To install software that is provided on a CD, or as an installation setup that runs on an
office computer:
1. Connect the handheld to a computer (see page 55).
2. If the software is provided on a CD, insert the software CD into the office
computer.
3. Run the installation setup.
Connecting to an Office Computer 4
4. If prompted, select the install option for a Windows Mobile powered device.
Once the software is installed on the computer, it is automatically transferred to
the handheld.
Note – If a storage card is inserted in the handheld, the card appears as an installation
location option. Trimble recommends that you install software to the handheld’s internal
storage, not to a storage card. If you install software to a card and then remove the card
from the handheld, the software will not be available for use.
5. If prompted after installation, perform a soft reset of the handheld (see page 29).
GeoExplorer 3000 Series User Guide 59
Page 60

4 Connecting to an Office Computer
60 GeoExplorer 3000 Series User Guide
Page 61

CHAPTER
5
Using the GPS Receiver 5
In this chapter:
Supported GPS field software
Configuring the GPS field
software to connect to the
receiver
Using the GPS field software
Ensuring the accuracy of your GPS
data
Differential GPS explained
Outputting GPS data to external
equipment
The GeoExplorer 3000 series handheld includes
an integrated GPS receiver that enables you to
collect GPS data for incorporating into a GIS or
for managing assets.
The Global Positioning System (GPS) is a
satellite-based positioning system consisting of a
constellation of operational NAVSTAR satellites
that orbit the earth every 12 hours. This system
provides worldwide, all-weather, 24-hour time
and position information.
Note – To receive signals from GPS satellites, the
handheld must have a clear view of the sky. GPS
positions may not always be available, particularly
in or near buildings, in vehicles, or under tree
canopy.
GeoExplorer 3000 Series User Guide 61
Page 62

5 Using the GPS Receiver
Supported GPS field software
You can use the GeoExplorer 3000 series handheld with any of the software products
described below.
TerraSync software
You can install version 3.21 or later of the TerraSync software on a GeoExplorer 3000
series handheld. Use the software to collect and maintain GIS and GPS data.
To install the TerraSync software, either insert the TerraSync Software CD in the
CD-ROM drive of a computer and use the menus provided, or run the downloaded
setup file. To obtain an installation code for installation, you must register your copy of
the software online. Detailed installation instructions are provided in the Ter raSy nc
Software Getting Started Guide.
ESRI ArcPad software and the Trimble GPScorrect extension
You can install version 7.1.0 or later of the ESRI ArcPad software on a GeoExplorer 3000
series handheld. Use the software to collect and maintain GIS and GPS data. Detailed
installation instructions for ESRI ArcPad software are provided in the ArcPad
documentation.
To be able to differentially correct ArcPad GPS data, install version 2.41 or later of the
Trimble GPScorrect extension for ESRI ArcPad software on a GeoExplorer 3000 series
handheld.
You m ust install th e ArcPad softwa re before you install the GPScorrect extension.
Note – Make sure your version of the GPScorrect extension is compatible with the version
of ArcPad software you are using. For more information, go to
www.trimble.com/gpscorrect_ts.asp, click Support Notes and then search for the Mapping
and GIS Product Compatibility List Support Note.
To install the GPScorrect extension, either insert the Trimble GPScorrect Extension for
ESRI ArcPad Software CD in the CD-ROM drive of a computer and use the menus
provided, or run the downloaded setup file. Detailed installation instructions are
provided in the Trimble GPScorrect Extension Getting Started Guide.
GPS Controller software
The GPS Controller software is pre-installed on the GeoExplorer 3000 series handheld.
Use the software to configure and monitor the status of the internal GPS receiver.
62 GeoExplorer 3000 Series User Guide
Page 63

Using the GPS Receiver 5
Other GPS field applications
You can use the GeoExplorer 3000 series handheld with a custom application
developed using version 2.31 or later of the Trimble GPS Pathfinder Tools Software
Development Kit (SDK).
You can also use the GeoExplorer 3000 series handheld with any GPS field software
that accepts NMEA messages.
TrimPix technology
You can install version 1.20 or later of the TrimPix™ technology on a GeoExplorer 3000
series handheld. Use TrimPix technology to quickly and easily add high quality digital
photographs to your GIS data collection workflow.
Note – To use TrimPix technology, you must have a compatible high resolution
WiFi-capable Nikon digital camera.
For more information, go to www.trimble.com/mgis_trimpix.shtml.
Configuring the GPS field software to connect to the receiver
The first time you use GPS field software on the handheld, you may need to specify
which GPS COM port to connect to.
GPS COM ports
The integrated GPS receiver has three COM ports for communicating with software on
the handheld and with external devices. Two ports are for outputting GPS data, and
one port is for receiving real-time corrections into the receiver.
To use GPS, open the appropriate GPS COM port. The type of communication used for
each port is described below:
Port Function Description
COM2 NMEA Outputs NMEA-0183 messages. NMEA is a standard GPS
communication protocol used by many GPS applications.
The handheld outputs the following NMEA messages: GGA, GLL, GSA,
GSV, RMC, VTG, ZDA. All messages are output at a one-second interval.
COM3 TSIP Outputs and receives TSIP messages. TSIP (Trimble Standard Interface
Protocol) is used by Trimble GPS applications, and is also supported by
some other GPS applications.
COM4 Real-time
corrections
Receives real-time correction messages. If you are using an external
correction source connected to COM1 or a Bluetooth port, the
corrections must be redirected to COM4. For more information, see
Using real-time corrections from an external correction source,
page 69.
Note – COM1 is a standard serial port that connects to external devices. For more
information, see Connecting to other devices using the serial clip, page 109.
GeoExplorer 3000 Series User Guide 63
Page 64
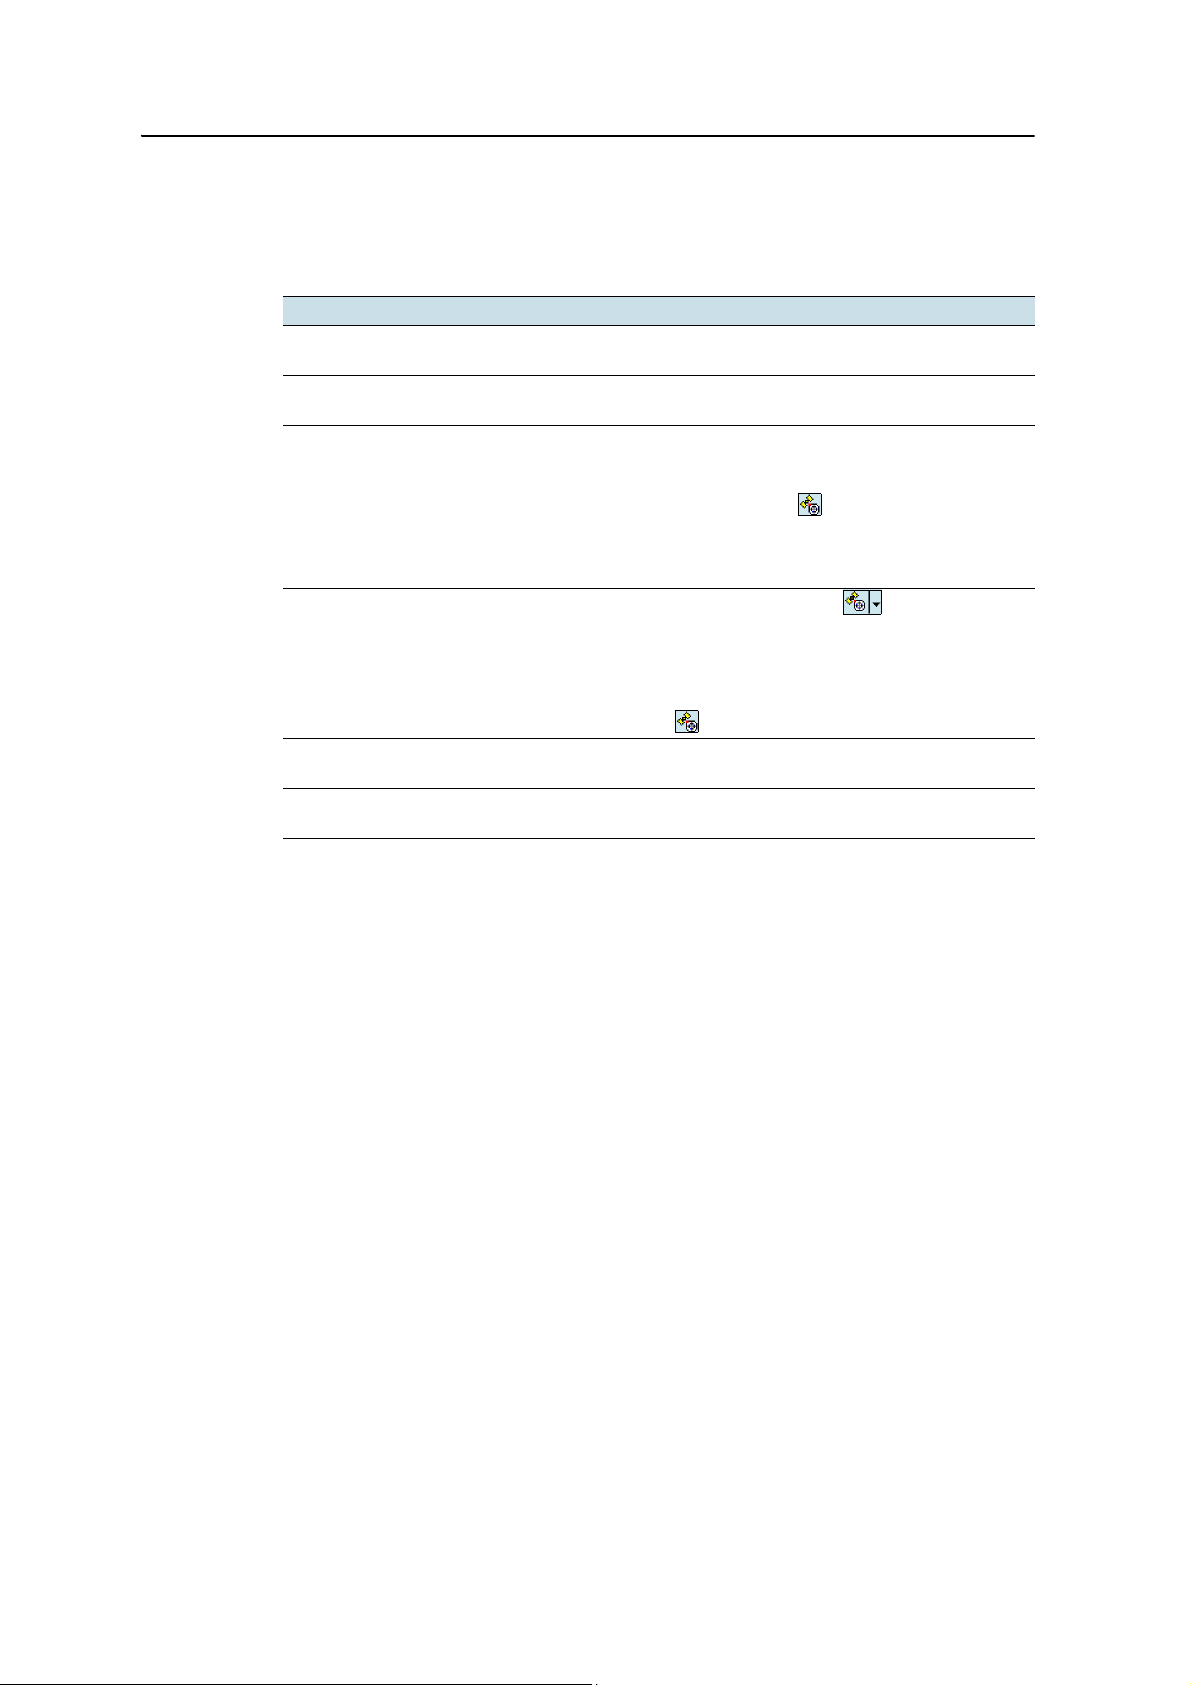
5 Using the GPS Receiver
Connecting to the COM port
Details of how to configure different types of GPS field software to connect to the GPS
COM port are as follows:
GPS field software Configuration details
GPS Controller Run GPS Controller. The software automatically activates the
TerraSync Run Terrasync. The software automatically activates the integrated
ArcPad with the
GPScorrect extension
ArcPad 7 without the
GPScorrect extension
NMEA application Configure the software to connect to GPS on COM2 and then use the
TSIP application Configure the software to connect to GPS on COM3 and then use the
integrated GPS receiver on COM3.
GPS receiver on COM3.
When the Trimble GPScorrect extension is installed, the extension
automatically configures the ArcPad software to use the integrated
GPS receiver on COM3 using the Trimble GPScorrect protocol.
To connect to GPS, tap the
To configure a real-time DGPS source, or to view status information,
run the GPScorrect extension. To do this, tap the
in the Trimble toolbar.
1. In ArcPad, tap the
GPS Preferences from the drop-down menu. Tap the GPS tab.
2. In the Protocol field, select NMEA 0183.
3. In the Port field, select COM2.
4. Tap
5. Tap the
Connect or Activate GPS command.
Connect or Activate GPS command.
OK.
GPS button and then tap Yes.
GPS button and then tap Yes.
GPScorrect button
GPS drop-down menu and then select
Using the GPS field software
The GPS Controller software is pre-installed on all GeoExplorer 3000 series handhelds
and enables you to check the current GPS status, or to configure the integrated GPS
receiver.
Depending on the GPS field software you have installed, the default GPS field software
will be GPS Controller, TerraSync, or the Trimble GPScorrect extension for ESRI
ArcPad software.
Note – GPS Controller duplicates the status and setup features of TerraSync software and
the Trimble GPScorrect extension for ESRI ArcPad software. If one of these applications is
installed, it runs instead of GPS Controller when you tap the GPS softkey in the menu bar
of the Today screen. For more information about these applications, refer to the
documentation for the application.
Depending on the GPS field software you have installed, you can use the software to
configure settings such as GPS, real-time correction, and antenna settings. You may
also be able to use the software to connect to a real-time correction source, configure
logging settings, and collect features. For more information, refer to the rest of this
chapter and the documentation for the GPS field software.
64 GeoExplorer 3000 Series User Guide
Page 65
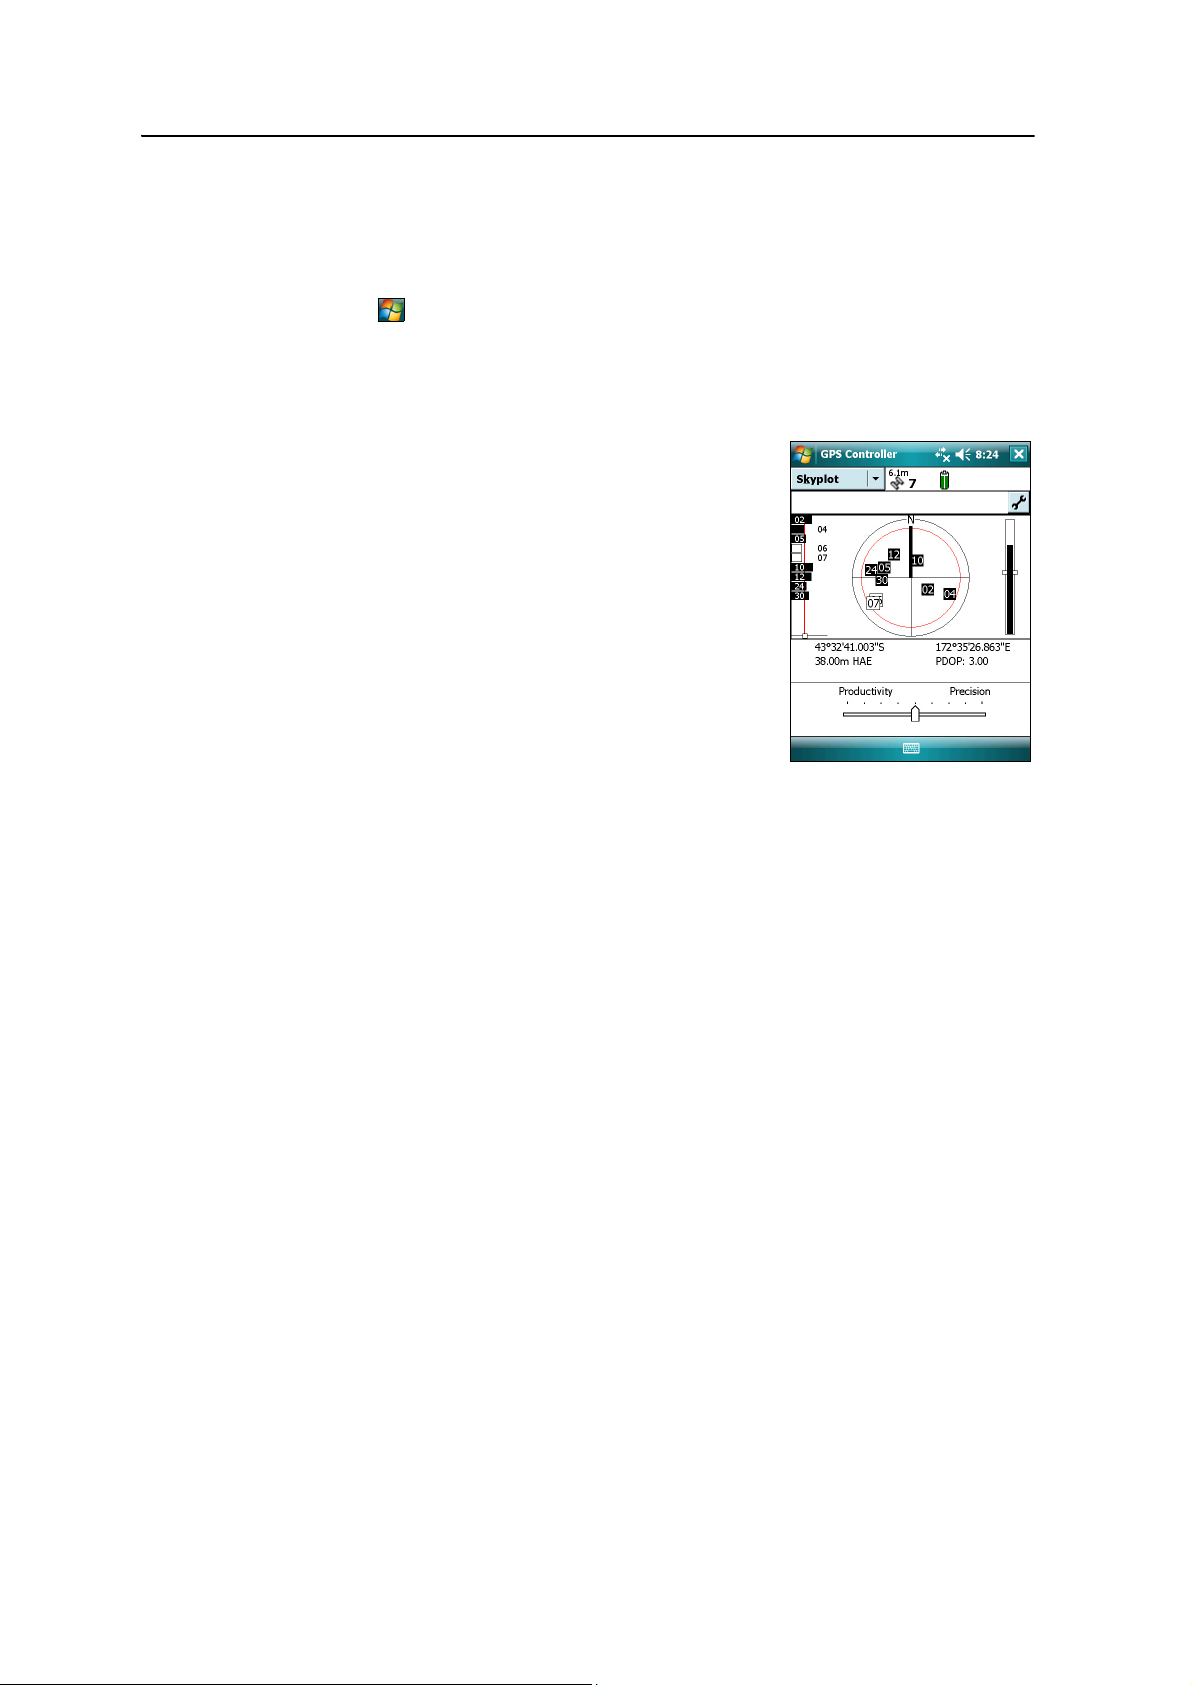
Using the GPS Receiver 5
Starting the GPS field software
Do one of the following:
• From the Tod a y screen, tap the GPS softkey in the menu bar.
• Tap / Programs and then select the GPS field software, for example GPS
Controller.
When you first open any Trimble GPS field software, the Skyplot section is displayed.
Viewing available GPS satellites
Use the graphical Skyplot section or the Satellite Info
section in the Trimble GPS field software to view
detailed GPS information, and to adjust the quality and
yield of the GPS positions you are receiving.
Note – To receive signals from GPS satellites, the handheld
must have a clear view of the sky. GPS positions may not
always be available, particularly in or near buildings, in
vehicles, or under tree canopy.
Resetting the GPS receiver
Trimble GPS field applications all have options to reset the receiver to:
• delete the almanac
• delete information stored on the last known position
• restart the receiver
• reset the GPS receiver to factory default settings
Ensuring the accuracy of your GPS data
GeoExplorer 3000 series handhelds are high performance GPS receivers that calculate
very accurate GPS positions.
To correct errors in the collected data and to further improve the accuracy of the GPS
positions, use differential GPS. Differential GPS (DGPS) requires one or more
additional receivers, called base stations or reference stations, which are located at
known points. Data collected at the base stations is used to determine GPS
measurement errors and compute corrections to these errors. These corrections are
then applied to data collected in the field either in real time or during postprocessing.
For more information, see Differential GPS explained, page 73.
GeoExplorer 3000 Series User Guide 65
Page 66

5 Using the GPS Receiver
The three different models in the GeoExplorer 3000 series offer three levels of DGPS
accuracy:
• The GeoXM handheld provides reliable accuracy to within 1 to 3 meters with
• The GeoXT handheld uses EVEREST multipath rejection technology to provide
• The GeoXH handheld uses EVEREST multipath rejection technology as well as
Note – To achieve subfoot accuracy with a GeoXH handheld, data must be collected using
Trimble field software (TerraSync software, the GPScorrect extension for ESRI ArcPad
software, or a custom application developed using the GPS Pathfinder Tools Software
Development Kit).
real-time or postprocessed differential correction.
submeter accuracy with real-time or postprocessed differential correction.
H-Star technology to provide subfoot (30 cm) accuracy using the internal
antenna, and 10 cm to 30 cm accuracy using the optional Zephyr antenna, with
real-time or postprocessed differential correction.
For more information, refer to the datasheet for your model of handheld.
Where the DGPS infrastructure does not meet subfoot accuracy requirements
( for example, the base station provides L1 corrections only, or is at a distance
greater than recommended), the GeoXH handheld typically achieves submeter
accuracy.
The list below identifies the most important settings and techniques that you can use
in the field to improve the accuracy of your data:
Note – This list assumes that you are using Trimble GPS field software, and lists items in
order of most important to less important.
1. If you are using TerraSync software to collect data, use accuracy-based logging.
For more information, see page 67.
2. Use real-time differential corrections. If you are using a GeoXH handheld and
have access to dual-frequency corrections from a VRS network, use the
corrections from the VRS network. For more information, see page 68.
3. Configure the GPS settings for the receiver to increase the precision of your data,
and to minimize the effect of atmospheric interference and poor satellite
geometry. For more information, see page 70.
4. Connect to an external antenna, if you have one. For more information,
see page 71.
5. If you are using a GeoXT handheld, configure the data collection software to log
carrier data. If you are using a GeoXH handheld, the data collection software
logs H-Star data, by default. For more information, see page 72.
6. Plan GPS data collection around the times of the day when satellite geometry is
best. For more information, see page 73.
66 GeoExplorer 3000 Series User Guide
Page 67
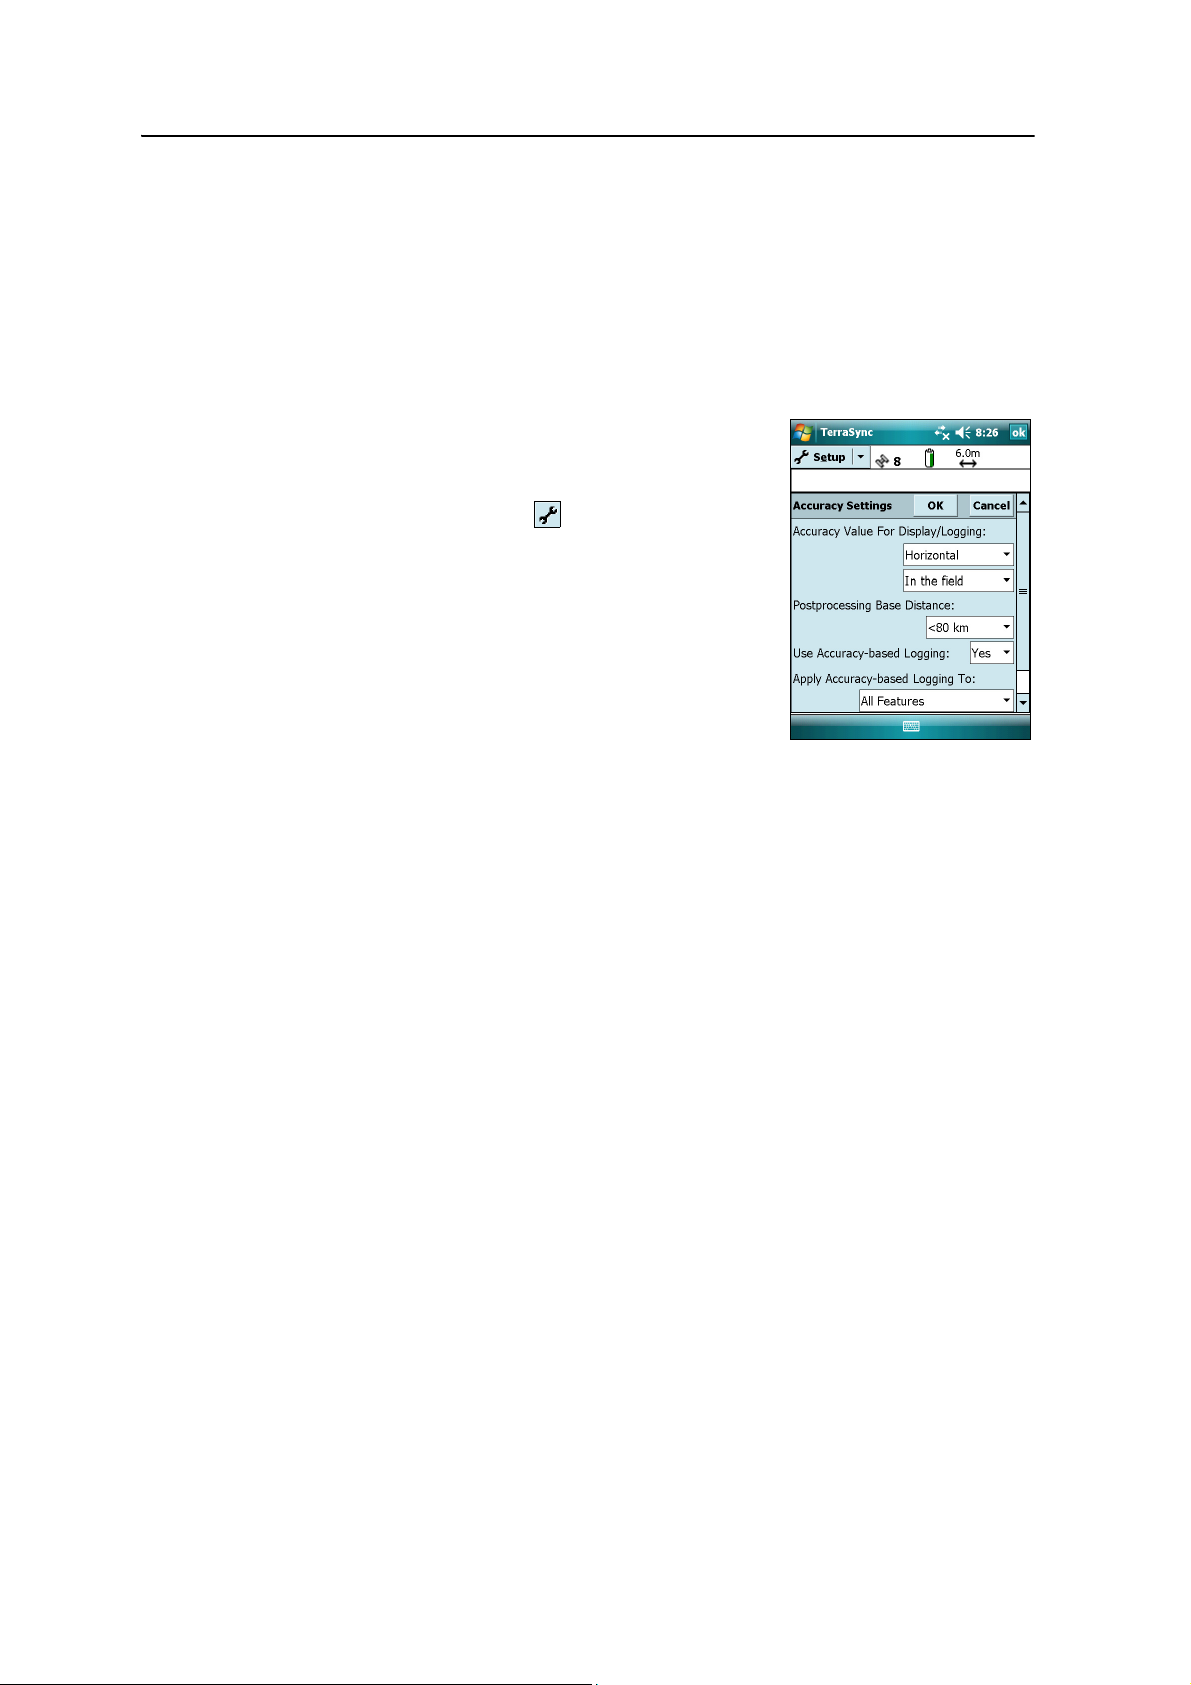
Using the GPS Receiver 5
Using accuracy-based logging
If you are using the TerraSync software, use accuracy-based logging to ensure that only
GPS positions that meet the specified estimated accuracy are logged. GPS positions
that do not meet your accuracy requirements are not logged.
Note – Accuracy estimates for streaming (dynamic) GPS positions may not be as good as
those for static GPS positions.
To configure accuracy-based logging in the TerraSync software:
1. In the Setup section of the TerraSync software, tap
Logging Settings. The Logging Settings form
appears.
2. Tap the
Setup button below the Accuracy
Settings field. The Accuracy Settings form appears.
3. In the Accuracy Value For Display/Logging fields,
select the parameters that will be used to
determine the estimated accuracy:
– Select whether to use the horizontal or
vertical accuracy of the current GPS position.
– Select In the field to use the current
estimated accuracy (recommended if you are
using a real-time correction source), or select Postprocessed to use the
predicted estimated accuracy that will be achieved after the field data has
been postprocessed.
4. If you selected Postprocessed, select the estimated distance to the base station
that will be used for postprocessing from the Postprocessing Base Distance field.
If you will use more than one base station (during H-Star processing), specify
the estimated distance to the closest base station.
5. Set the Use Accuracy-based Logging field to Yes . The settings fields for
accuracy-based logging appear.
6. In the Apply Accuracy-based Logging To field, select the feature types that you
want to log only if the GPS positions meet your required accuracy.
7. In the Required Accuracy field, select the estimated accuracy that is required
before GPS positions are logged.
8. Tap
OK.
Note – Accuracy settings do not affect GPS positions that are used for navigation. GPS
positions are still calculated by the GPS receiver and are available for navigation.
GeoExplorer 3000 Series User Guide 67
Page 68

5 Using the GPS Receiver
Connecting to a real-time differential correction source
Use a real-time differential GPS (DGPS) source to give you better accuracy as you
collect data. For more information about how real-time differential GPS works, see
Differential GPS explained, page 73.
Using real-time corrections from an Internet source
DGPS corrections are often broadcast over the Internet. For example, corrections
generated by a VRS network are commonly broadcast over an Internet server. A VRS
network uses data from several base stations to provide rover receivers with
corrections that are generally more accurate than corrections from a single base
station. Alternatively, you can connect to a server that provides DGPS corrections from
a single base station.
For information on how to connect to the Internet and receive real-time corrections
from an Internet server, see Connecting to a Bluetooth-enabled phone for Internet
access or real-time corrections (including VRS networks), page 88.
Using SBAS corrections
The GeoExplorer 3000 series handheld has an integrated receiver that uses Satellite
Based Augmentation Systems (SBAS) correction messages to improve the accuracy
and integrity of GPS data.
The default SBAS tracking mode is Auto. In Auto mode, the receiver tracks or locks
onto the most powerful satellite signal. The GPS receiver can track two SBAS satellites
at the same time in Auto or Custom mode. It uses corrections from only one SBAS
satellite at a time, but tracking two satellites can improve the availability of SBAS
real-time corrections. For example, if you are working in environments where obstacles
may block the direct line of sight to the SBAS satellite, there is less chance of signal loss
if you are tracking more than one SBAS satellite.
Note – To turn off multiple SBAS satellite tracking, select Custom mode and then deselect
all other SBAS satellites except for the satellite you want to track.
The receiver tracks SBAS satellites according to your geographical location:
• Wide Area Augmentation System (WAAS) satellites are tracked in the
Continental United States including Alaska, and parts of Canada and Mexico.
• European Geostationary Navigation Overlay Service (EGNOS) satellites are
tracked in Europe.
• MTSAT Satellite-based Augmentation System (MSAS) satellites are tracked in
Japan.
You can configure the receiver to use particular SBAS satellites in the Integrated SBAS
Settings form of the Trimble GPS field software. Select the Custom option in the
Tracking Mode field and then enable or disable tracking for any specific satellite.
Note – If you have other Trimble GPS field software installed, configure real-time
correction settings in that application instead of the GPS Controller software.
68 GeoExplorer 3000 Series User Guide
Page 69
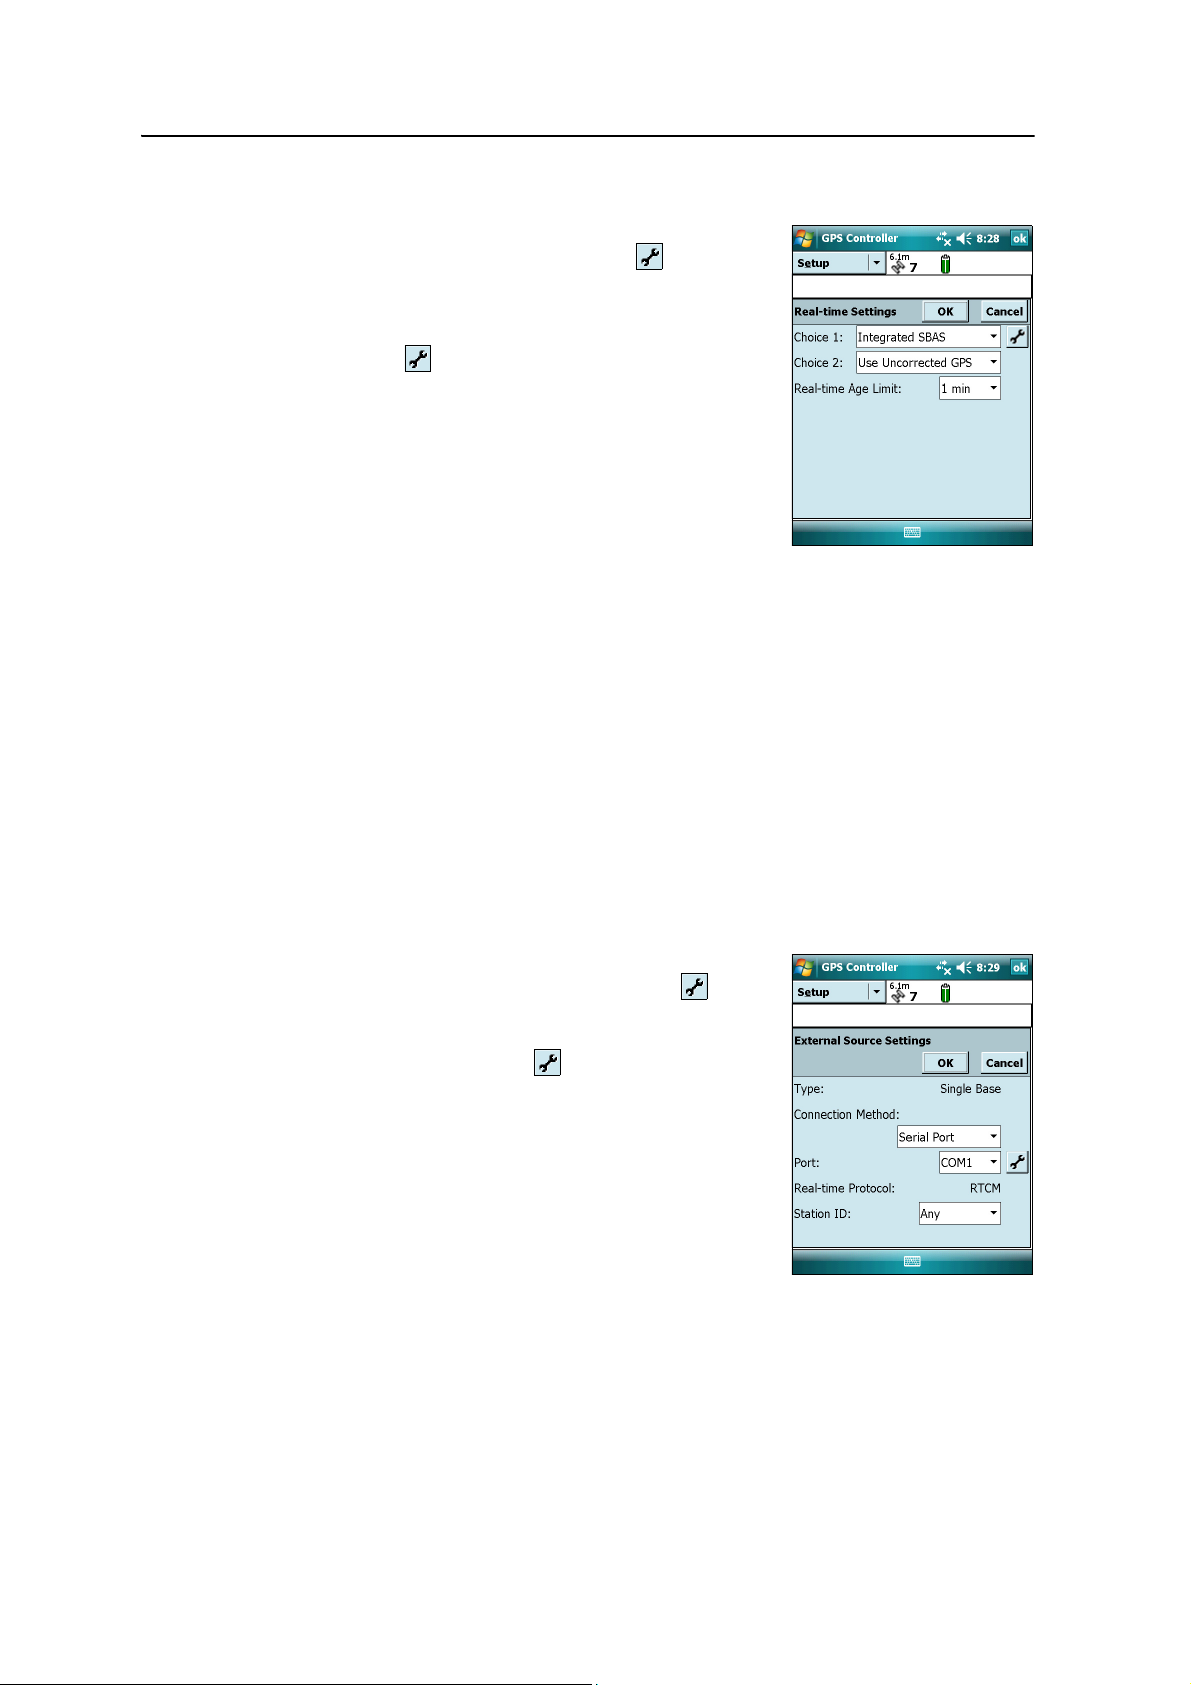
To use SBAS correction s :
1. In the GPS field software, open the Real-time
section and tap the
Setup button .
2. In the Choice 1 field, select Integrated SBAS.
Using the GPS Receiver 5
3. To select particular satellites, tap the
Setup
button next to the Choice 1 field. Select
Custom tracking mode and then enable or disable
tracking of particular satellites. Tap
OK to return
to the Real-time Settings screen.
4. In the Choice 2 field, specify whether to use
uncorrected positions, or to stop using GPS
positions, if corrections are not available.
5. Tap
OK.
Using real-time corrections from an external correction source
You can improve the accuracy of your data by using real-time corrections from an
external correction source, such as a GeoBeacon receiver or a DGPS radio. Connect the
external correction source to a Bluetooth port (see page 86) or to the optional serial
clip (see page 109). Use the GPS field software to set up and monitor the real-time input
source that you want to use.
The integrated GPS receiver communicates only through its GPS COM ports (COM2,
COM3, and COM4). Trimble GPS field software, such as TerraSync and GPS Controller,
automatically redirects input from an external correction source connected to COM1
or to a Bluetooth port to the real-time GPS COM port (COM4).
To set up an external correction source in the Trimble GPS field software:
1. In the GPS field software, open the Real-time
section and then tap the
Setup button .
2. In the Choice 1 field, select External Source.
3. Tap the
Setup button next to the Choice 1
field.
4. In the Connection Method field, select Serial Port.
5. In the Port field, select the COM port to use. If you
are using:
– the serial clip, select COM 1.
– a Bluetooth wireless connection, select the
COM port you configured for the Bluetooth
connection in the COM Ports tab of the Bluetooth manager.
6. Tap
OK.
GeoExplorer 3000 Series User Guide 69
Page 70

5 Using the GPS Receiver
To set up an external correction source for use with non-Trimble GPS field software:
1. In the Trimble GPS Controller software, configure the GPS receiver to use
2. In the GPS Connector software, manually redirect the real-time correction
3. Configure your data collection software to monitor and use real-time
Note – To receive real-time corrections, the GPS Connector software must remain running
on the handheld.
Configuring GPS settings
Note – This section describes the GPS Settings form in the GPS Controller software and the
Trimble GPScorrect extension.
Use the GPS Settings form in the Trimble GPS field software to configure the GPS
quality settings you require. The lower the GPS quality settings, the more productive
you are likely to be, as the GPS receiver will track more satellites and be better able to
calculate a GPS position. The stricter the GPS quality settings, the more precise the
GPS positions that are calculated.
real-time corrections on COM4. For more information, see the steps above.
source to COM4 by tapping Setup then select the real-time source from the drop
down list.
corrections as required.
Note – If you are using the TerraSync software version 3.21 or later, Trimble recommends
that you use accuracy-based logging (see page 67) to control the quality of the GPS
positions logged. Use the default GPS quality settings and let the TerraSync software
manage the logging of positions based on your required accuracy.
By default, the handheld is configured to receive satellite signals in most conditions.
To open the GPS Settings form, do one of the following:
• Ta p GPS Settings in the Setup section.
• Tap in the Skyplot, Satellite Info, or Plan section.
70 GeoExplorer 3000 Series User Guide
Page 71
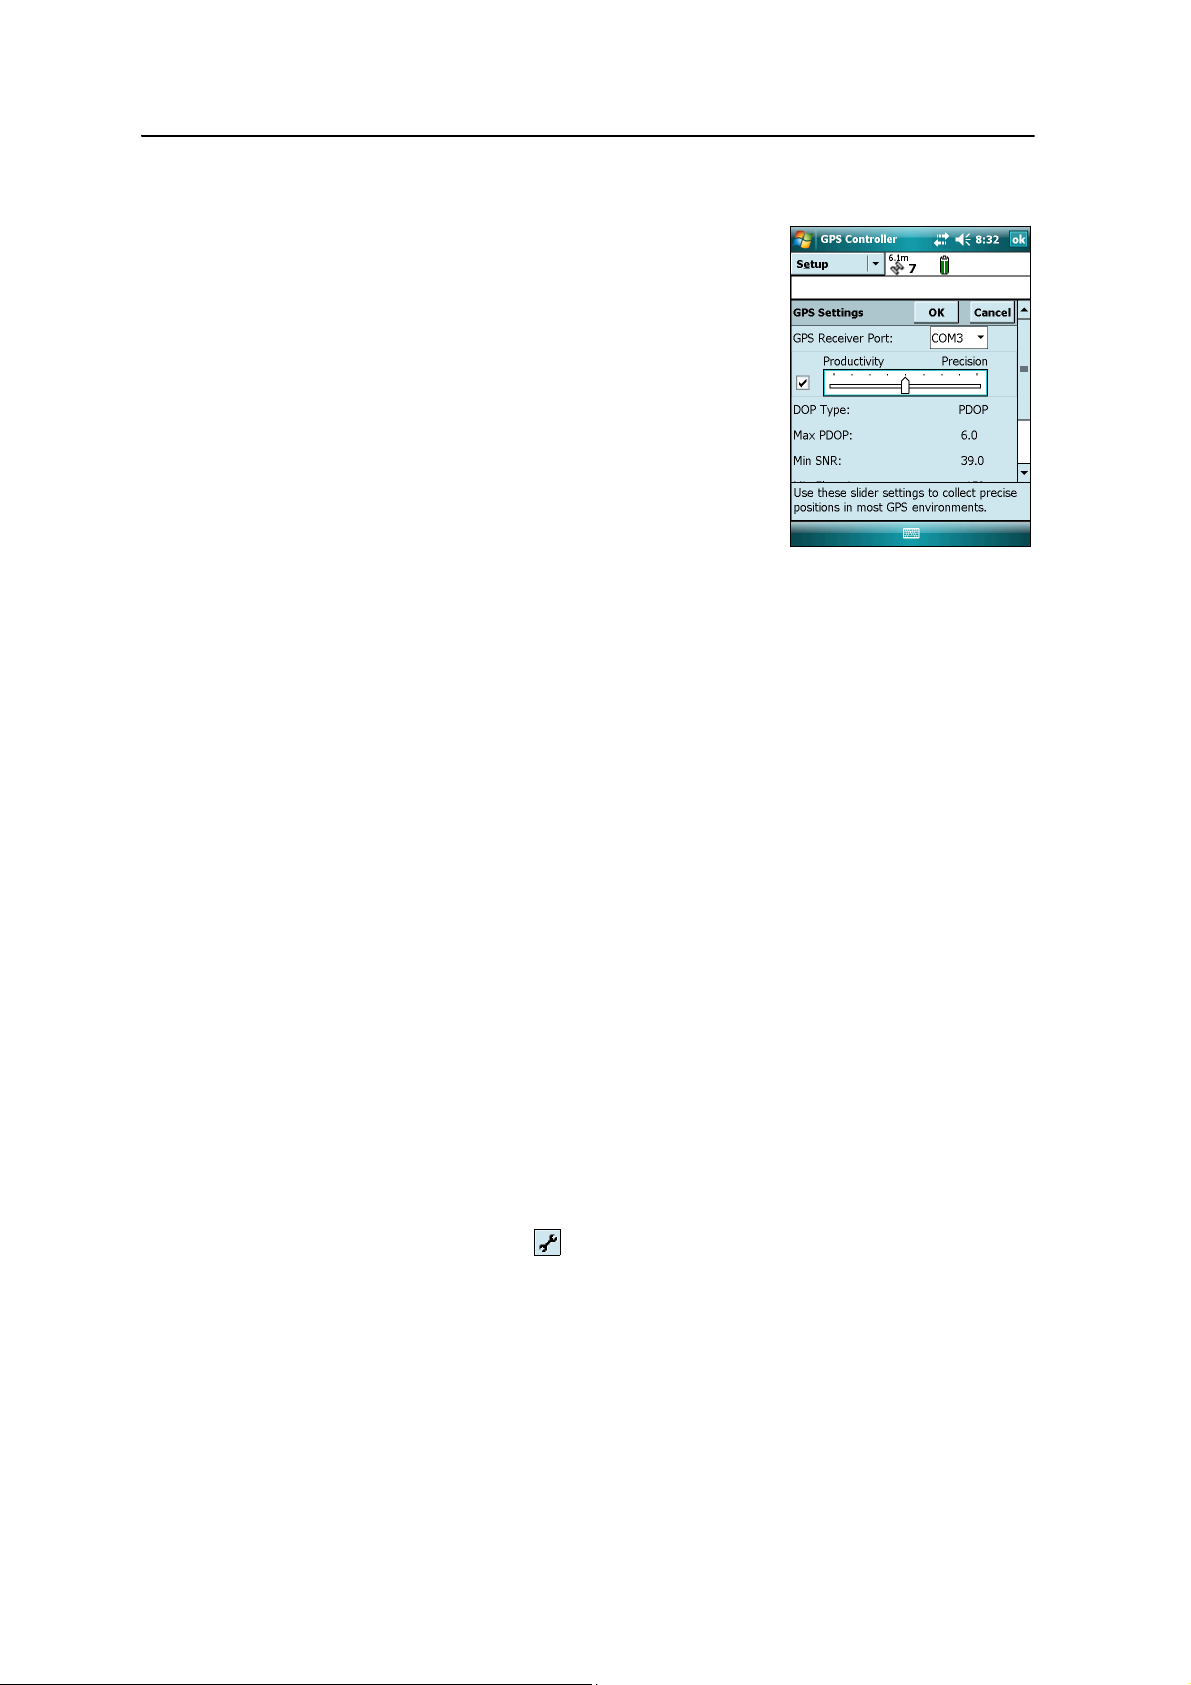
Using the GPS Receiver 5
Selecting predefined settings using the GPS slider
Use the GPS slider to select predefined GPS quality
settings.
Select the slider check box. The slider control appears on
the GPS slider, and some fields in the form become
read-only. The values in these fields change as the slider
control position changes.
Drag the slider control to the left to decrease the GPS
quality requirements and to include more satellites when
calculating GPS positions. Drag it to the right to improve
the GPS quality and exclude satellites that do not meet
the precision requirements from GPS position
calculations.
Selecting custom GPS settings
To select custom GPS quality settings, clear the slider check box. The slider control
disappears from the GPS slider, and the remaining fields change to editable numeric
fields. To specify the required GPS quality settings, enter values in these fields. For
more information about each field, see Recommended GPS settings for maximum
precision, page 124.
Connecting to an external antenna
The GeoExplorer 3000 series handheld has an internal antenna, which is suitable for
use in most conditions.
If you have a GeoXM or a GeoXT handheld, you can also connect a Hurricane or an
external patch antenna for when you work in a vehicle. For improved yield under
canopy, you can use a Hurricane antenna, or a patch antenna with a ground plane.
If you have a GeoXH handheld, you can connect an external Zephyr antenna for
improved accuracy when you collect data for postprocessing using H-Star technology.
Configure antenna settings in the GPS field software, once you have connected the
external antenna to the handheld.
To configure antenna settings in the TerraSync software:
1. In the Setup section of the TerraSync software, tap
Logging Settings form appears.
2. Tap the
Setup button next to the Antenna Height field. The Antenna Settings
form appears.
Logging Settings. The
GeoExplorer 3000 Series User Guide 71
Page 72
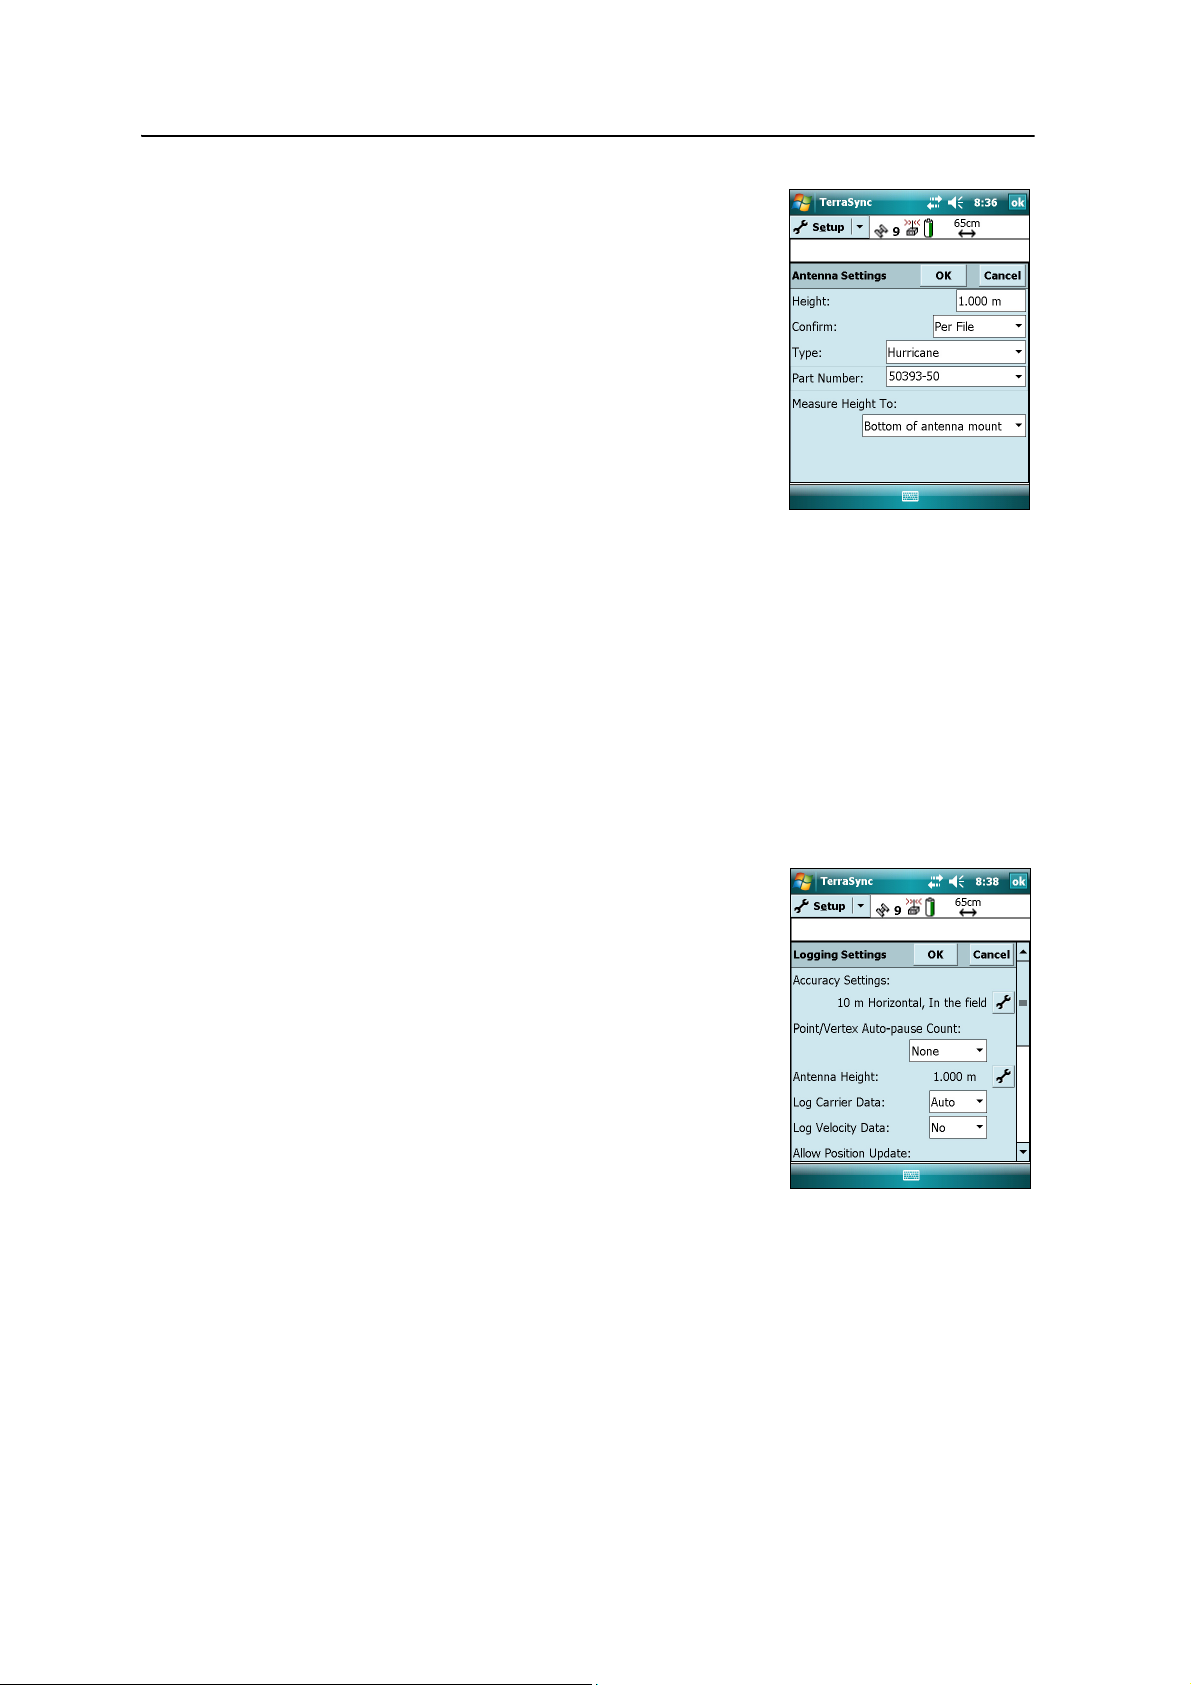
5 Using the GPS Receiver
3. In the Height field, specify the height of the GPS
4. In the Confirm field, select how often the software
5. In the Type field, select the type of antenna that is
6. In the Measure Height To field, select the point on
antenna that is connected to the GPS position.
will ask you to confirm the configured antenna
height during data collection.
connected. The number in the Part Number field is
automatically updated when you select the
antenna type.
the antenna that you have measured the height to.
7. Tap
OK to return to the Logging Settings form.
Logging carrier data
When you log carrier data, the GPS receiver logs additional data as well as GPS
position records. The additional data is used during postprocessing to improve the
accuracy of the GPS positions.
If you are using a GeoXH handheld, H-Star carrier data is logged by default. If you are
using a GeoXT handheld, carrier data is not logged by default. If you want higher levels
of accuracy and are willing to log data for 10 minutes or more while maintaining
continuous lock on at least four satellites, you can configure the GPS field software to
log carrier data.
To configure carrier data logging in the TerraSync
software:
1. In the Setup section of the TerraSync software, tap
Logging Settings. The Logging Settings form
appears.
2. In the Log Carrier Data field, select the data logging
option for the type of handheld you are using:
– If you are using a GeoXT, select Ye s.
– If you are using a GeoXH, make sure Auto is
selected.
3. Tap
72 GeoExplorer 3000 Series User Guide
OK.
Page 73
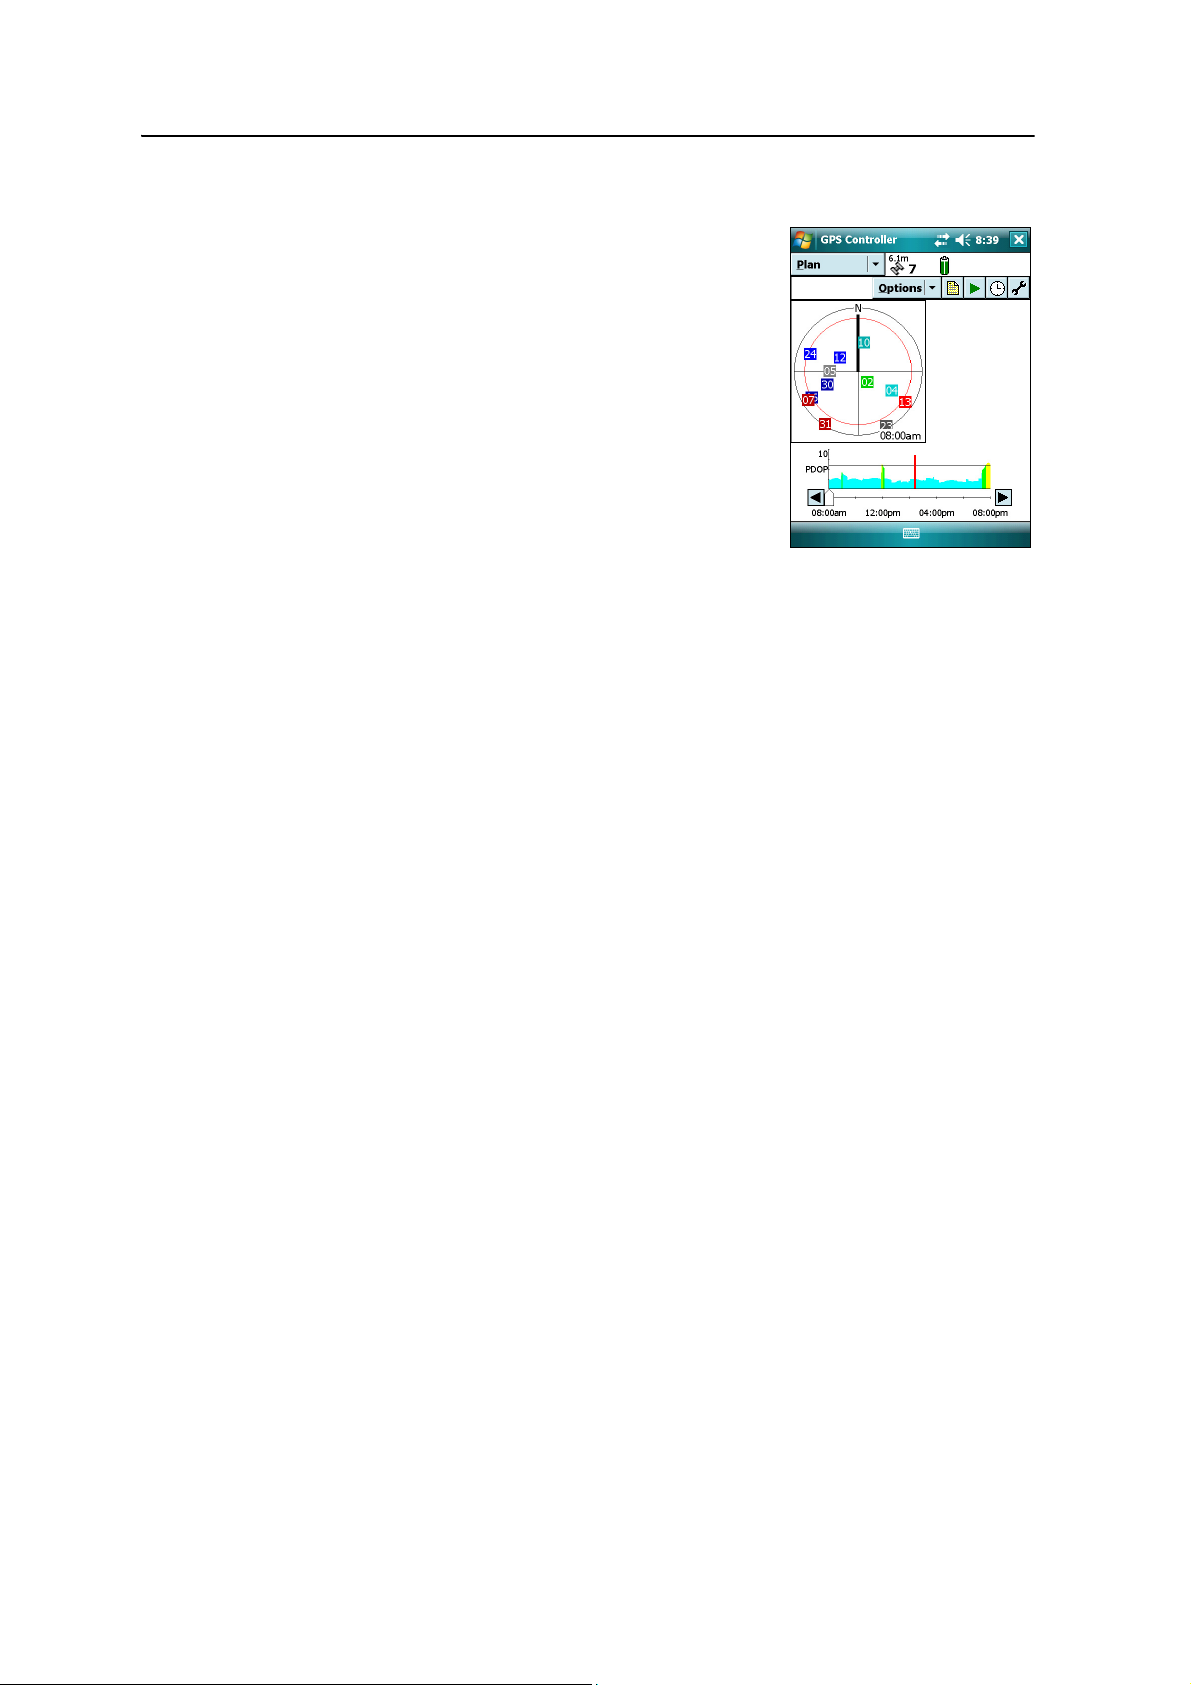
Planning a data collection session
To maximize productivity, plan GPS data collection
around the times of the day when satellite geometry is
best. The GPS Controller software includes a Plan
section with an animated skyplot and DOP (satellite
geometry) graph for your position for the next 12 hours.
In the Plan section, you can check the planning skyplot
as you play a session, then use the timeline to zoom in
on times when geometry is poor. As you adjust GPS
settings, the Plan section is updated, so you can see the
effect of different quality control settings.
Note – If you have other Trimble GPS field software
installed, use the planning feature in that application
instead of the GPS Controller software.
Differential GPS explained
Use differential GPS to correct errors in your collected data. Differential GPS (DGPS)
requires one or more additional receivers, called base stations or reference stations,
which are located at known points. Data collected at the base stations is used to
determine GPS measurement errors and compute corrections to these errors. An
unlimited number of mobile GPS receivers, called rovers, collect GPS data at unknown
locations within the vicinity of the base station. Errors common at both the base
station and the rover receiver are corrected with DGPS either in real time or during
postprocessing.
Using the GPS Receiver 5
Real-time DGPS
In real-time DGPS, the base station calculates and broadcasts the error for each
satellite as each measurement is received, enabling you to apply corrections while in
the field and collect accurate GPS data. DGPS corrections are available from a variety
of public and commercial sources. They can be generated and broadcast in real-time
by privately or self-owned GPS base stations, or by a wide range of government
agencies.
Real-time DGPS sources include external beacon and radio sources, as well as Satellite
Based Augmentation Systems (SBAS) such as WAAS in the US and EGNOS in Europe,
and VRS networks. SBAS and VRS networks use multiple base stations to calculate the
DGPS corrections that are then delivered to the user from a Geostationary satellite
(SBAS) or from a radio or cellular phone (VRS networks).
Factors that affect real-time DGPS accuracy include how often the corrections are
updated, how far you are from the base station, and whether the coordinate system
used by the correction source matches the coordinate system used by the GPS receiver.
GeoExplorer 3000 Series User Guide 73
Page 74

5 Using the GPS Receiver
Postprocessed DGPS
In postprocessed DGPS, the collected GPS data is transferred to an office computer,
and measurements from the base station are downloaded. You can postprocess GPS
data collected with Trimble GPS field software using:
• the GPS Pathfinder Office software version 4.10 (with the latest updates) or
• the Trimble GPS Analyst extension for ESRI ArcGIS software version 2.10 (with
Typically, postprocessed DGPS uses only one base station. However, when
differentially correcting data collected with GeoXH receivers using H-Star technology,
you can select multiple base stations to correct the file against for improved accuracy.
Factors that affect the accuracy of postprocessed DGPS include the type of receiver
and antenna used at the base station, the distance between the base station and the
location where the rover data was collected, the accuracy of the base station position,
and the logging interval at the base station.
For more information, refer to the documentation provided with the postprocessing
software.
later.
the latest updates) or later.
Postprocessed real-time DGPS
If you collected data with subfoot accuracy in real time, you do not need to
postprocess the data.
However, if your data files contain autonomous (uncorrected) positions as well as
real-time corrected positions, Trimble recommends that you postprocess the data.
During postprocessing, you can choose whether to correct only autonomous positions,
or all positions.
If you collected data with submeter accuracy in real time, Trimble recommends that
you postprocess the data, as postprocessed data is often more accurate than data
corrected in real time.
For more information about GPS and DGPS, go to www.trimble.com/gps and review
the All About GPS tutorial.
74 GeoExplorer 3000 Series User Guide
Page 75
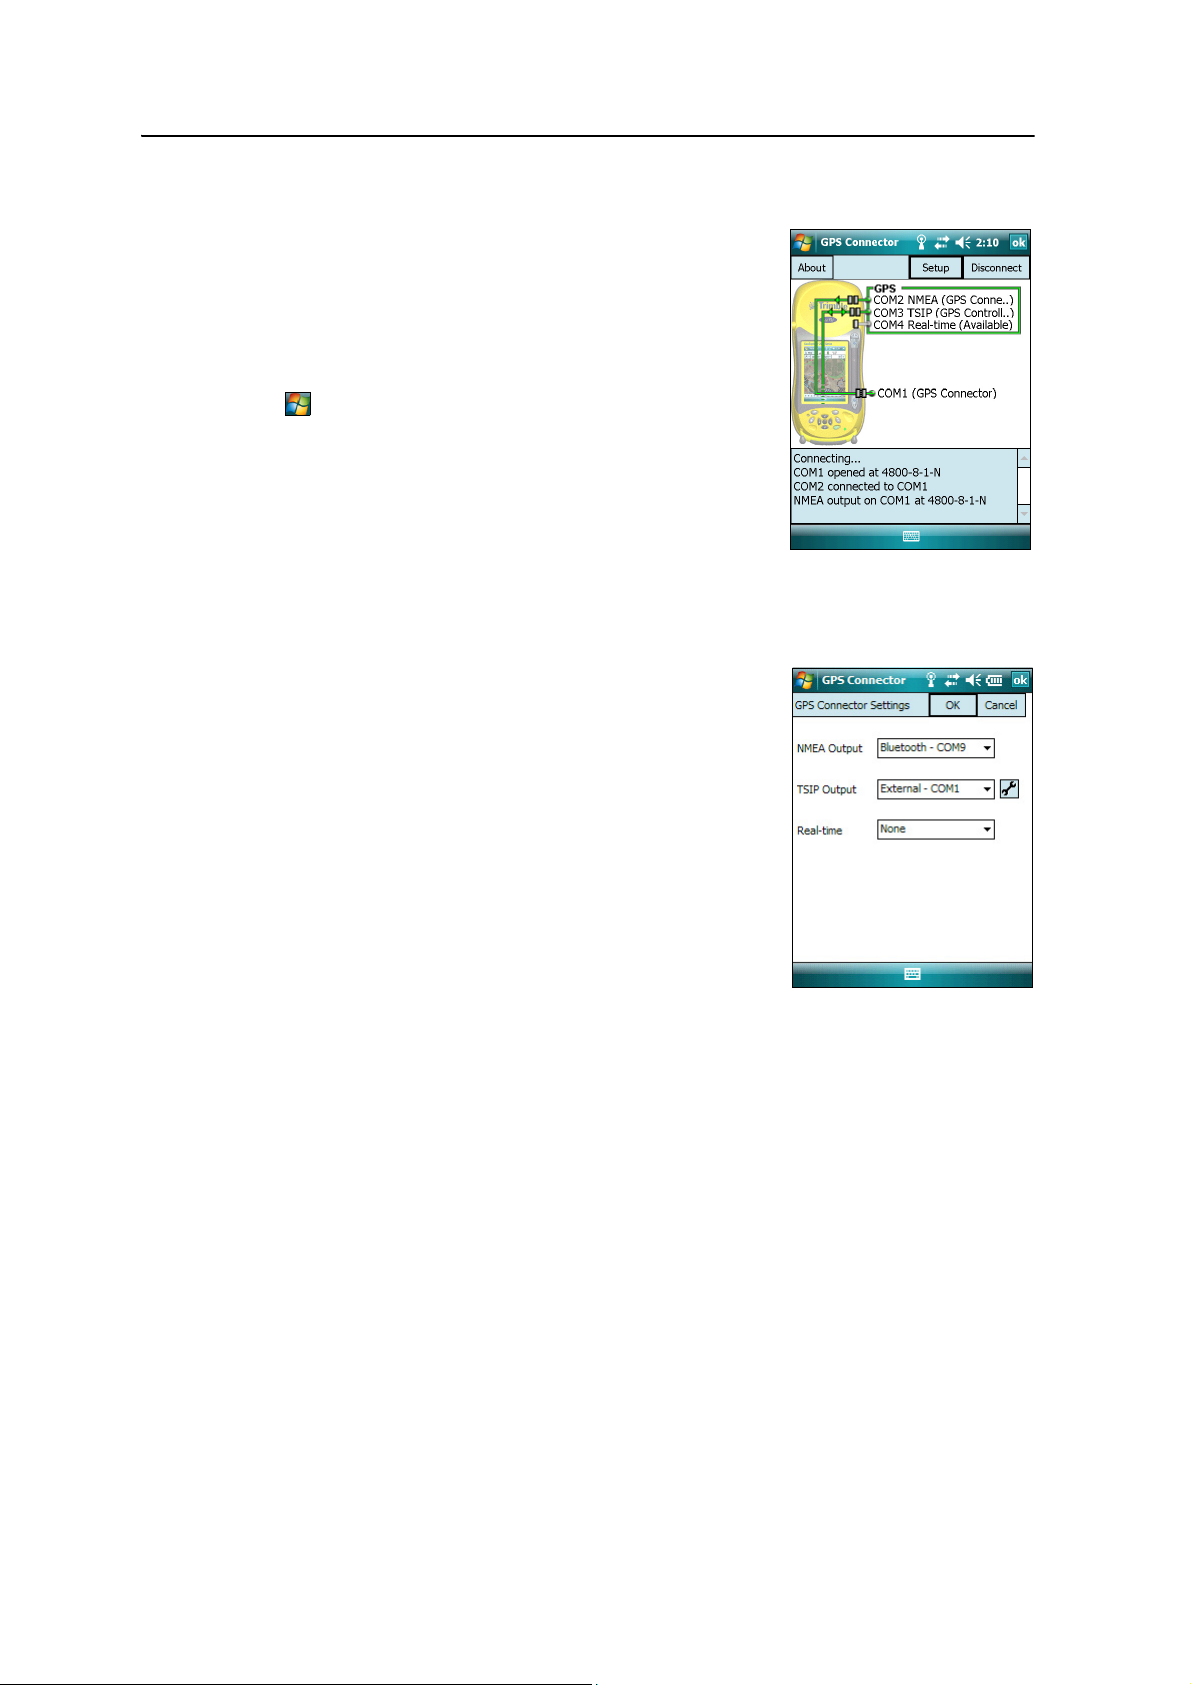
Outputting GPS data to external equipment
The GPS Connector software is pre-installed on the
GeoExplorer 3000 series handheld. Use the software to
specify how the integrated GPS receiver communicates
with equipment that is connected to one of the
handheld’s external communications ports.
To open GPS Connector, tap
/ Settings / Connections / GPS Connector.
The GPS Connector software lets you connect the GPS
COM ports to COM1 or Bluetooth ports and configure
port settings such as the baud rate. GPS Connector
software has a graphical display that shows all active
connections, and a text display that shows connection
messages.
Use the GPS Connector software to output NMEA or TSIP messages from the
integrated GPS receiver to another device, such as an external data collector.
Note – If you are using a Bluetooth port, ensure that the
Bluetooth radio is on and the handheld is visible to other
devices. Use the GPS Connector software to configure
NMEA or TSIP output to Bluetooth - COM9, which is the
pre-defined Bluetooth Host Serial Port. For more
information, see Providing Bluetooth services as a host,
page 107.
Using the GPS Receiver 5
The connections that you create in the GPS Connector
software are active only while the software is running.
Connections created by the GPS Connector software are
labeled GPS Connector in the status screen and end when
you exit the software.
For more information, refer to the GPS Connector Help.
GeoExplorer 3000 Series User Guide 75
Page 76

5 Using the GPS Receiver
76 GeoExplorer 3000 Series User Guide
Page 77

CHAPTER
6
Getting Connected 6
In this chapter:
General wireless connection
information
Options for connecting wirelessly
to other devices and networks
Bluetooth wireless connections
explained
Connecting to other devices using
the serial clip
The GeoExplorer 3000 series handheld includes
an integrated wireless LAN radio and an
integrated Bluetooth radio, and provides a
number of options for connecting to networks
and other devices.
This chapter describes how to enable the radios,
and the main connectivity options available.
Use the table on page 81 to identify the wireless
connection type you want to make and then
follow the steps provided to connect to that
device.
You can use the handheld’s integrated wireless
LAN radio to connect to the Internet or a
corporate network using a wireless LAN (Local
Area Network) connection.
Alternatively, you can use Bluetooth wireless
technology to connect to the Internet using a
cellular phone and then receive real-time
corrections from a VRS network or download
background map data. You can also connect
directly to other Bluetooth-enabled devices such
as a GeoBeacon receiver, a laser rangefinder, or a
barcode scanner.
You can also use the optional serial clip to
connect to external devices using a cabled serial
connection.
GeoExplorer 3000 Series User Guide 77
Page 78

6 Getting Connected
General wireless connection information
The GeoExplorer 3000 series handheld has an integrated wireless LAN radio compliant
with IEEE 802.11 b/g and an integrated Bluetooth radio. The handheld is shipped with
the wireless LAN and Bluetooth wireless technology activated. To use the wireless LAN
or Bluetooth radio,you need to turn it on (see Turning on and turning off the integrated
radios below).
Note – You may need to deactivate the wireless LAN and/or Bluetooth radio in the
handheld (see below) if the country in which you are working does not approve the use of
wireless LAN and/or Bluetooth wireless technology.
Deactivating the integrated radios
Note – If you are unsure about whether the GeoExplorer 3000 series handheld’s radios are
approved for use in your country, check with your Trimble reseller.
Use the Radio Activation Manager software to deactivate the integrated wireless LAN
and/or Bluetooth radio, or to reactivate the radios if they have been deactivated. The
Radio Activation Manager software runs on an office computer.
The latest copy of the software is available for download from the Trimble website. Go
to www.trimble.com/geoxh3000.shtml, www.trimble.com/geoxm3000.shtml, or
www.trimble.com/geoxt3000.shtml, click Support, click Downloads, click GeoExplorer
3000 Series and then click Radio Activation Manager.
Turning on and turning off the integrated radios
You can use the Wireless Manager application to turn on and turn off the GeoExplorer
3000 series handheld's wireless LAN radio and/or Bluetooth radio (see Using the
Wireless Manager, page 79).
You can also turn on or turn off the Bluetooth radio from within the Bluetooth
application (see Turning on and turning off the Bluetooth radio from within the
Bluetooth application, page 80).
To make the GeoExplorer 3000 series handheld visible to other Bluetooth-enabled
devices and enable them to connect, see Making the handheld visible (discoverable) to
other Bluetooth devices, page 80.
78 GeoExplorer 3000 Series User Guide
Page 79
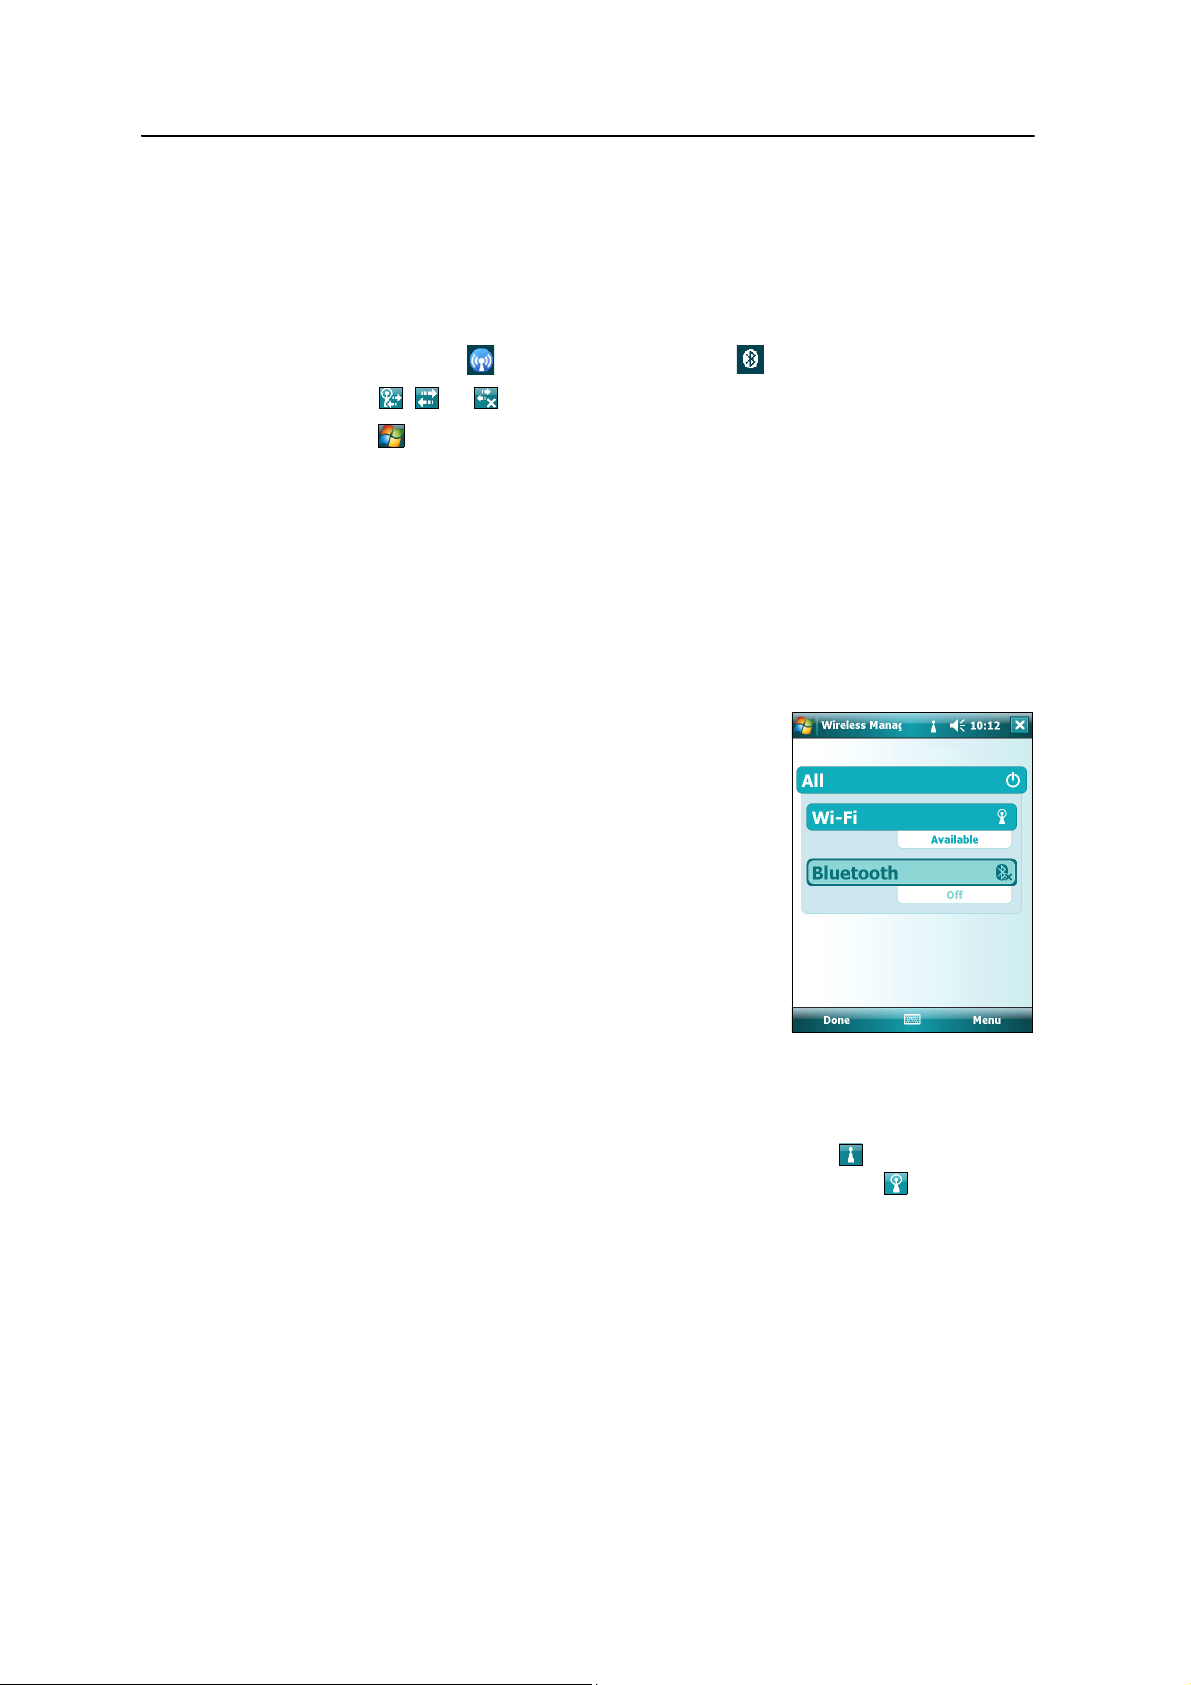
Getting Connected 6
Using the Wireless Manager
You can use the Wireless Manager application to turn on and turn off the GeoExplorer
3000 series handheld's wireless LAN radio and/or Bluetooth radio. You can turn on
and turn off both radios at the same time, or control each radio individually.
To open the Wireless Manager, do one of the following:
• Tap the Wi-Fi icon or the Bluetooth icon in the Tod ay screen.
• Tap , , or in the title bar and then tap Wireless Manager.
• Tap / Settings / Connections / Wireless Manager.
Turn on the wireless LAN radio and/or Bluetooth radio to be able to connect to other
devices or networks.
Turn off the wireless LAN radio and/or Bluetooth radio to prevent the handheld from
sending or receiving wireless signals.
B
Tip – To conserve power, turn off the wireless LAN radio and/or the Bluetooth radio when
not in use.
To turn on or turn off the radios using the Wireless Manager
1. Open the Wireless Manager (see above).
2. Do one of the following:
– Ta p All at the top of the screen to turn on
both radios, or to turn off both radios if they
are already on.
– Ta p Wi-Fi or Bluetooth to turn on the radio
that you want to use, or to turn off the radio
if it is already on.
The status fields below the
Bluetooth button change from Off when the
Wi-Fi button and the
radios are turned on and show the current state of
the radio. The Wi-Fi status field shows Connecting
or Available, and the Bluetooth status field shows On or Visible.
3. Tap
Done to exit the Wireless Manager.
After you turn on the wireless LAN radio, the wireless LAN icon appears in the title
bar to indicate that the wireless LAN radio is enabled. A second icon appears if a
wireless LAN network is detected, and a Notification for the detected network may
appear in the left softkey.
GeoExplorer 3000 Series User Guide 79
Page 80
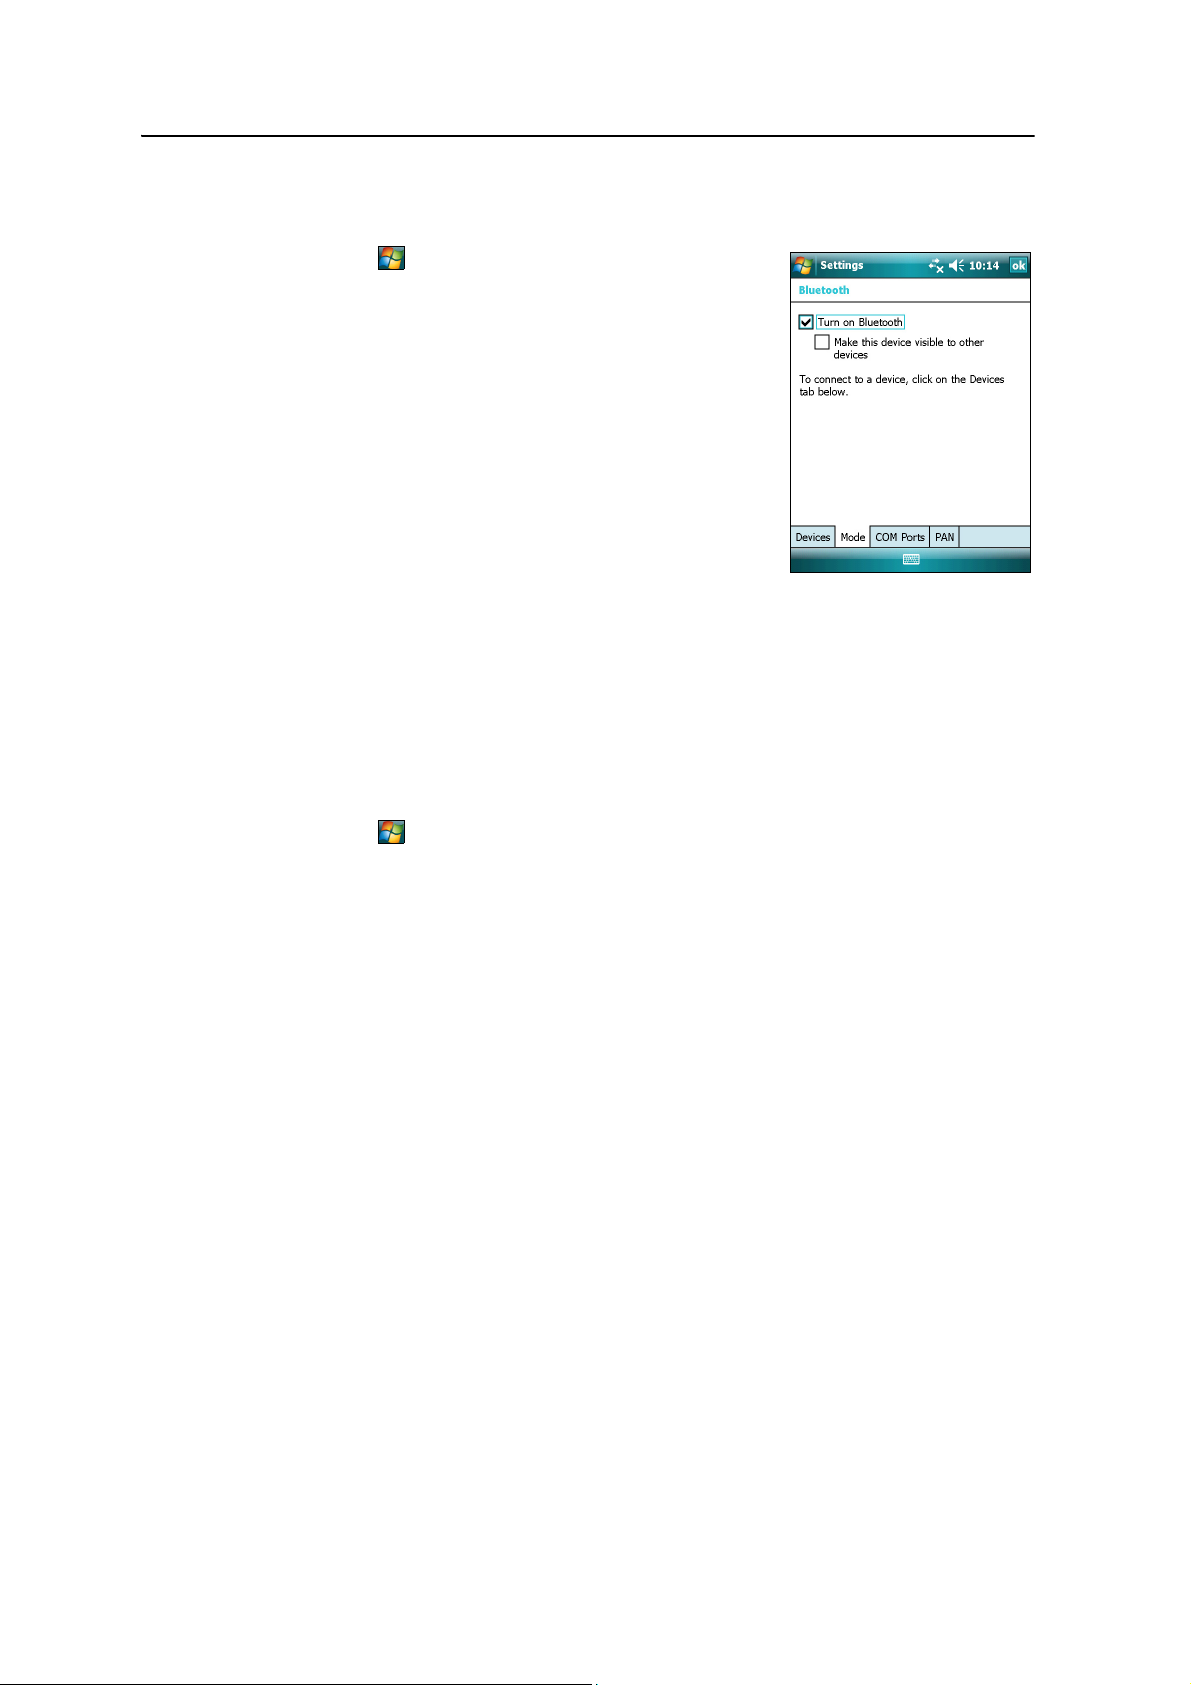
6 Getting Connected
Turning on and turning off the Bluetooth radio from within the Bluetooth
application
1. Tap / Settings / Connections / Bluetooth.
2. Tap the Mode tab.
3. Select the Turn on Bluetooth check box to turn on
the radio, or clear this check box to turn off the
radio.
4. Tap
OK.
Note – If the integrated Bluetooth radio is deactivated, the
message
Problem with Bluetooth hardware may appear
when you try to turn on the Bluetooth radio or discover
devices.
Making the handheld visible (discoverable) to other Bluetooth devices
To allow other Bluetooth-enabled devices to connect to the GeoExplorer 3000 series
handheld, or if the handheld will not connect to or pair with another device you are
attempting to connect to, you must make the handheld visible (this is sometimes
referred to as “discoverable”).
To make th e handheld visible to other devices:
1. Tap / Settings / Connections / Bluetooth.
2. Tap the Mode tab.
3. Select the Turn on Bluetooth check box, if it is not already selected. This enables
the integrated Bluetooth radio.
4. Select the Make this device visible to other devices check box.
5. Tap
80 GeoExplorer 3000 Series User Guide
OK.
Page 81

Getting Connected 6
Options for connecting wirelessly to other devices and networks
The GeoExplorer 3000 series handheld has an integrated wireless LAN radio and an
integrated Bluetooth radio that you can use to connect to other devices and networks.
When you are within range of an available wireless LAN access point, you can use a
wireless LAN connection to connect to the Internet (at broadband speeds) or a
corporate network to:
• browse the Internet or an Intranet
• send and receive e-mail and instant messages
• access files on the network
Access points are also known as “hotspots”. Wireless LAN is often referred to as Wi-Fi.
You can use Bluetooth wireless technology to connect to other Bluetooth-enabled
devices that are within range (typically within 5 m to 10 m of the handheld). You can
connect to:
• Bluetooth-enabled devices such as cellular phones to access the Internet and
receive data ( for example, to obtain real-time corrections from a VRS network)
• computers and other handheld devices to exchange files
• other devices such as a GeoBeacon receiver, laser rangefinder or barcode
scanner
The following table lists devices you can connect to using the handheld, and where to
find detailed information on how to achieve these connections.
Connection method To .. . See...
Wireless LAN Connect to a wireless LAN access point page 82
Bluetooth wireless
technology
Wireless LAN or
Bluetooth wireless
technology
Connect to another Bluetooth-enabled device (paired and non-paired
connections)
Connect to a Bluetooth-enabled phone for Internet access or real-time
corrections (including VRS networks)
Connect to a Bluetooth-enabled serial device page 94
Connect to an office computer to use ActiveSync technology page 97
Output GPS data to other devices using Bluetooth wireless technology page 100
Enable other devices to transfer files using Bluetooth wireless
technology
Beam files to or from another device page 102
Access a corporate network through your Internet connection page 103
page 84
page 88
page 101
Note – For information on connecting to external devices using the optional serial clip, see
Connecting to other devices using the serial clip, page 109.
GeoExplorer 3000 Series User Guide 81
Page 82
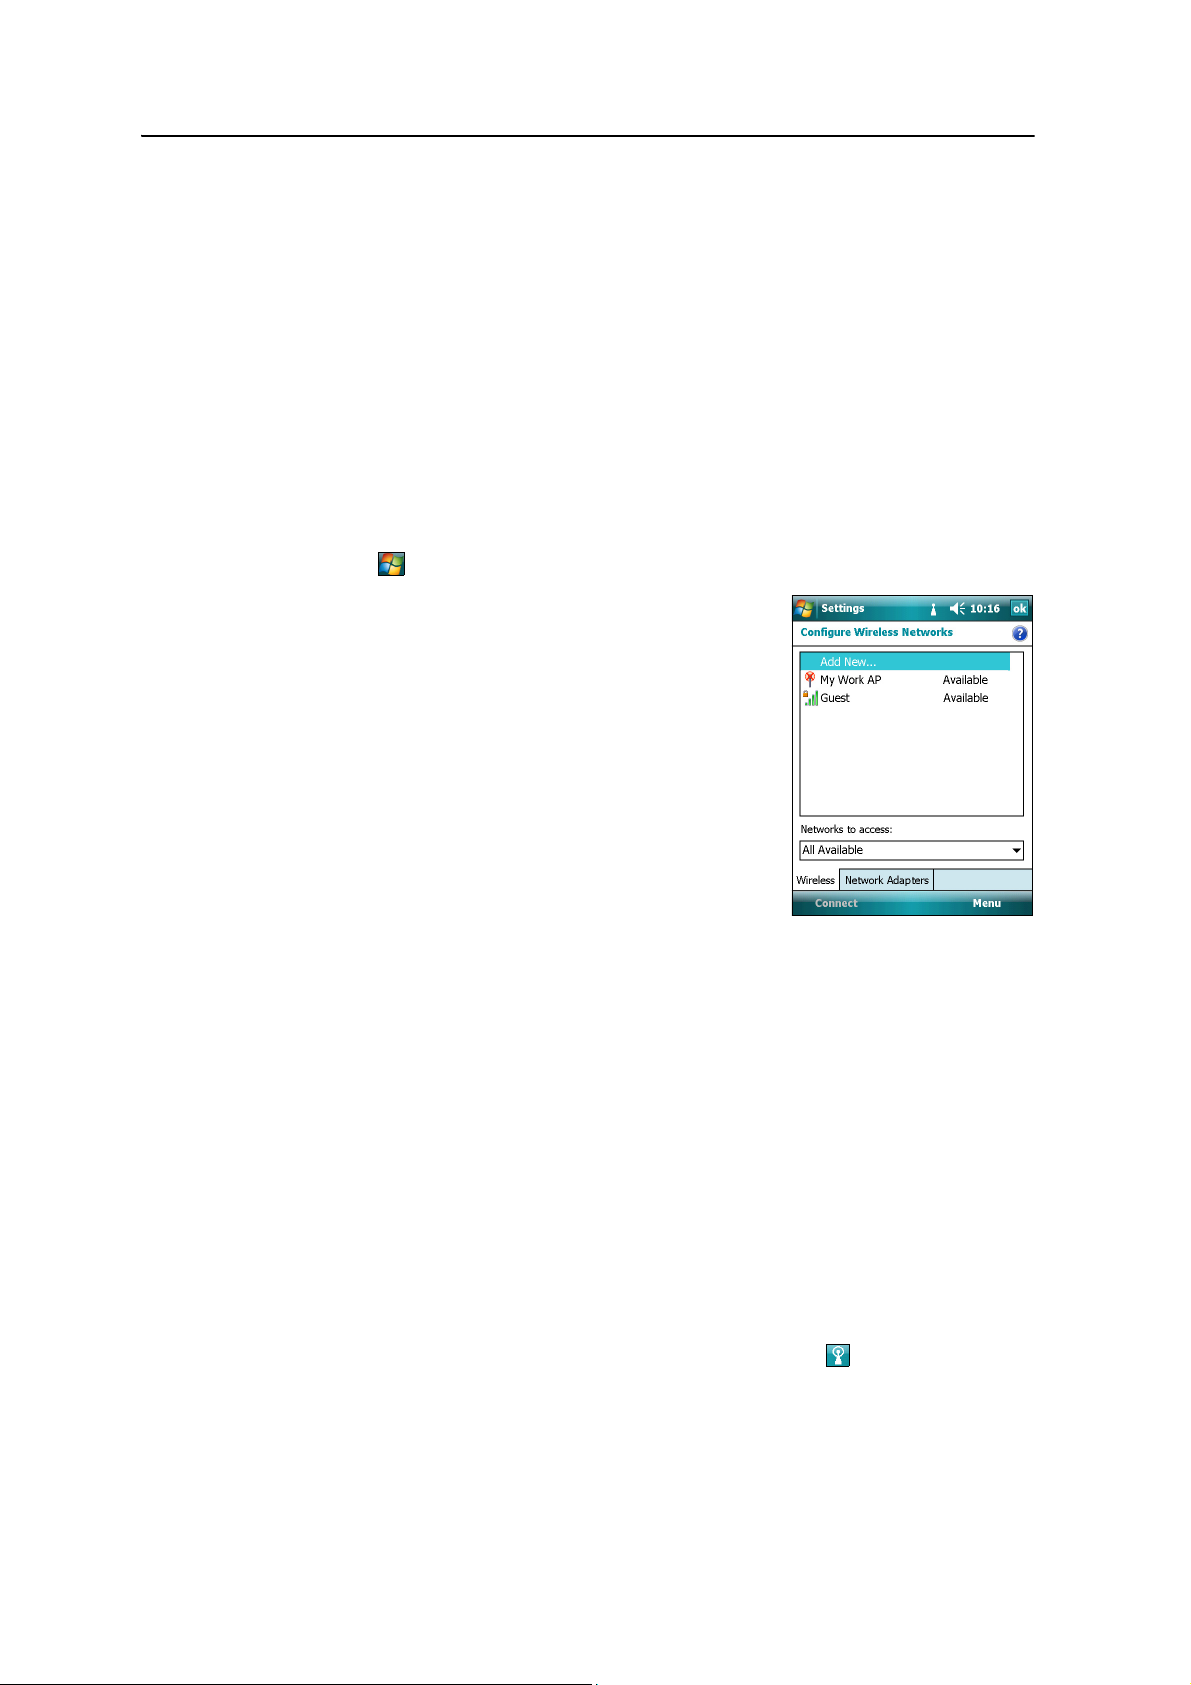
6 Getting Connected
Connecting to a wireless LAN access point
To connect to a wireless LAN access point, you must:
Note – If you have installed a personal certificate on the handheld, you do not need to set
up the wireless connection manually as described in Step 1. To connect to the network or
access point go to Step 2: Connecting to the network or access point.
Step 1: Setting up the wireless LAN connection
1. Set up the wireless LAN connection
2. Connect to the wireless LAN network or access point.
1. Make sure that the GeoExplorer 3000 series handheld’s wireless LAN radio is
enabled (see page 78).
2. Tap / Settings / Connections / Network Cards.
3. Select the Wireless tab.
Any networks that you have already configured
are displayed in the list of preferred networks.
4. To add a new network, tap Add New. To change
the settings for an existing network, tap the
network.
5. Enter the name of the network and other
connection details and then tap
Next.
6. To use authentication, select the authentication
method from the Authentication list.
7. To use data encryption, select an encryption
method from the Data encryption list.
8. To automatically use a network key, select the check box for The key is
automatically provided. Otherwise, enter the network key.
9. Tap
Next.
10. For increased security, select the Use IEEE 802.1x network access control check
box and then configure additional authentication information.
11. Tap
Finish.
Step 2: Connecting to the network or access point
1. Remove the handheld from the support module, as the handheld prioritizes a
USB connection over a wireless LAN connection.
2. Bring the handheld within range of the network or access point.
When a wireless LAN is detected, the access point icon
animated, and a notification message appears on the left softkey.
82 GeoExplorer 3000 Series User Guide
on the title bar is
Page 83

Getting Connected 6
If the access point icon or the notification does not appear, use the Wireless
Manager to turn off and then turn back on the wireless LAN radio. When the
wireless LAN radio is turned on, any networks or access points within range are
detected and the icon and notification appear.
B
3. Tap the access point icon on the title bar or tap
Notification on the left softkey.
A popup message shows the available networks.
4. Select the network you want to connect to and then tap
5. Select The Internet (or work via a VPN) or Work and then tap
OK on the left softkey.
Connect on the left
softkey.
6. If a Network Log On screen appears, enter your user name, password, and
domain information and then tap
OK on the left softkey.
When the handheld is connected to the network or access point, the wireless
LAN connected icon appears in the title bar.
7. Start using the program you want to use, for example Windows Explorer Mobile
or Internet Explorer.
Note – To disconnect from the network or an access point at any time, turn off the
handheld’s wireless radio. To do this, tap the wireless LAN connected icon in the title
bar, select Wireless Manager and then tap the
Tip – To delete a wireless LAN connection, tap and hold the connection in the
Wireless tab of the Network Cards screen and then select Delete.
Wi-Fi button.
GeoExplorer 3000 Series User Guide 83
Page 84

6 Getting Connected
Connecting to a Bluetooth-enabled device
To use another Bluetooth-enabled device with the GeoExplorer 3000 series handheld,
you must form a Bluetooth connection between the two devices, during which you
select the type of service to use for the connection. This defines how the devices will
communicate with each other.
After forming the Bluetooth connection between the devices you may need to
configure settings for the connection such as the COM port for the field software to
use, or the number for the phone to dial. You must then connect to the other device
using the appropriate software application.
To connect the GeoExplorer 3000 series handheld to another Bluetooth-enabled
device, you can use either a paired connection or a non-paired connection.
Note – If you are connecting to a phone, skip this section and go to Connecting to a
Bluetooth-enabled phone for Internet access or real-time corrections (including VRS
networks) on page 88, where the pairing step is described as part of the procedure for
connecting to a phone.
Trimble recommends using a paired connection, if pairing is supported by the other
device, as a paired connection creates a more secure connection and makes
reconnecting to the device easier. For more information, see Pairing with a Bluetooth-
enabled device below.
Some devices, such as a Trimble GeoBeacon receiver, do not support paired
connections. Use a non-paired connection if the device does not have a keyboard, and
if you know that the device does not automatically exchange a pre-programmed
passkey during pairing. For more information, see Setting up a connection to a non-
paired device, page 86.
To connect the GeoExplorer 3000 handheld to the other device, do one of the following:
• Pair with a Bluetooth-enabled device (see below)
• Set up a connection to a non-paired device (see page 86)
Pairing with a Bluetooth-enabled device
Pairing the handheld with another Bluetooth-enabled device creates a permanent
security bond between the devices, which helps to exchange information securely
between the devices. The paired relationship is established when two devices create
and exchange a link key. Once the relationship is established, the handheld and the
other Bluetooth device only need to have their Bluetooth radios turned on to exchange
information; they do not need to be visible to other devices.
To pair with a Bluetooth device:
1. Make sure that the handheld and the Bluetooth device you want to pair with are
within five meters of each other, and that the Bluetooth radio in each device is
turned on.
2. On the GeoExplorer 3000 series handheld, tap
Bluetooth.
84 GeoExplorer 3000 Series User Guide
/ Settings / Connections /
Page 85
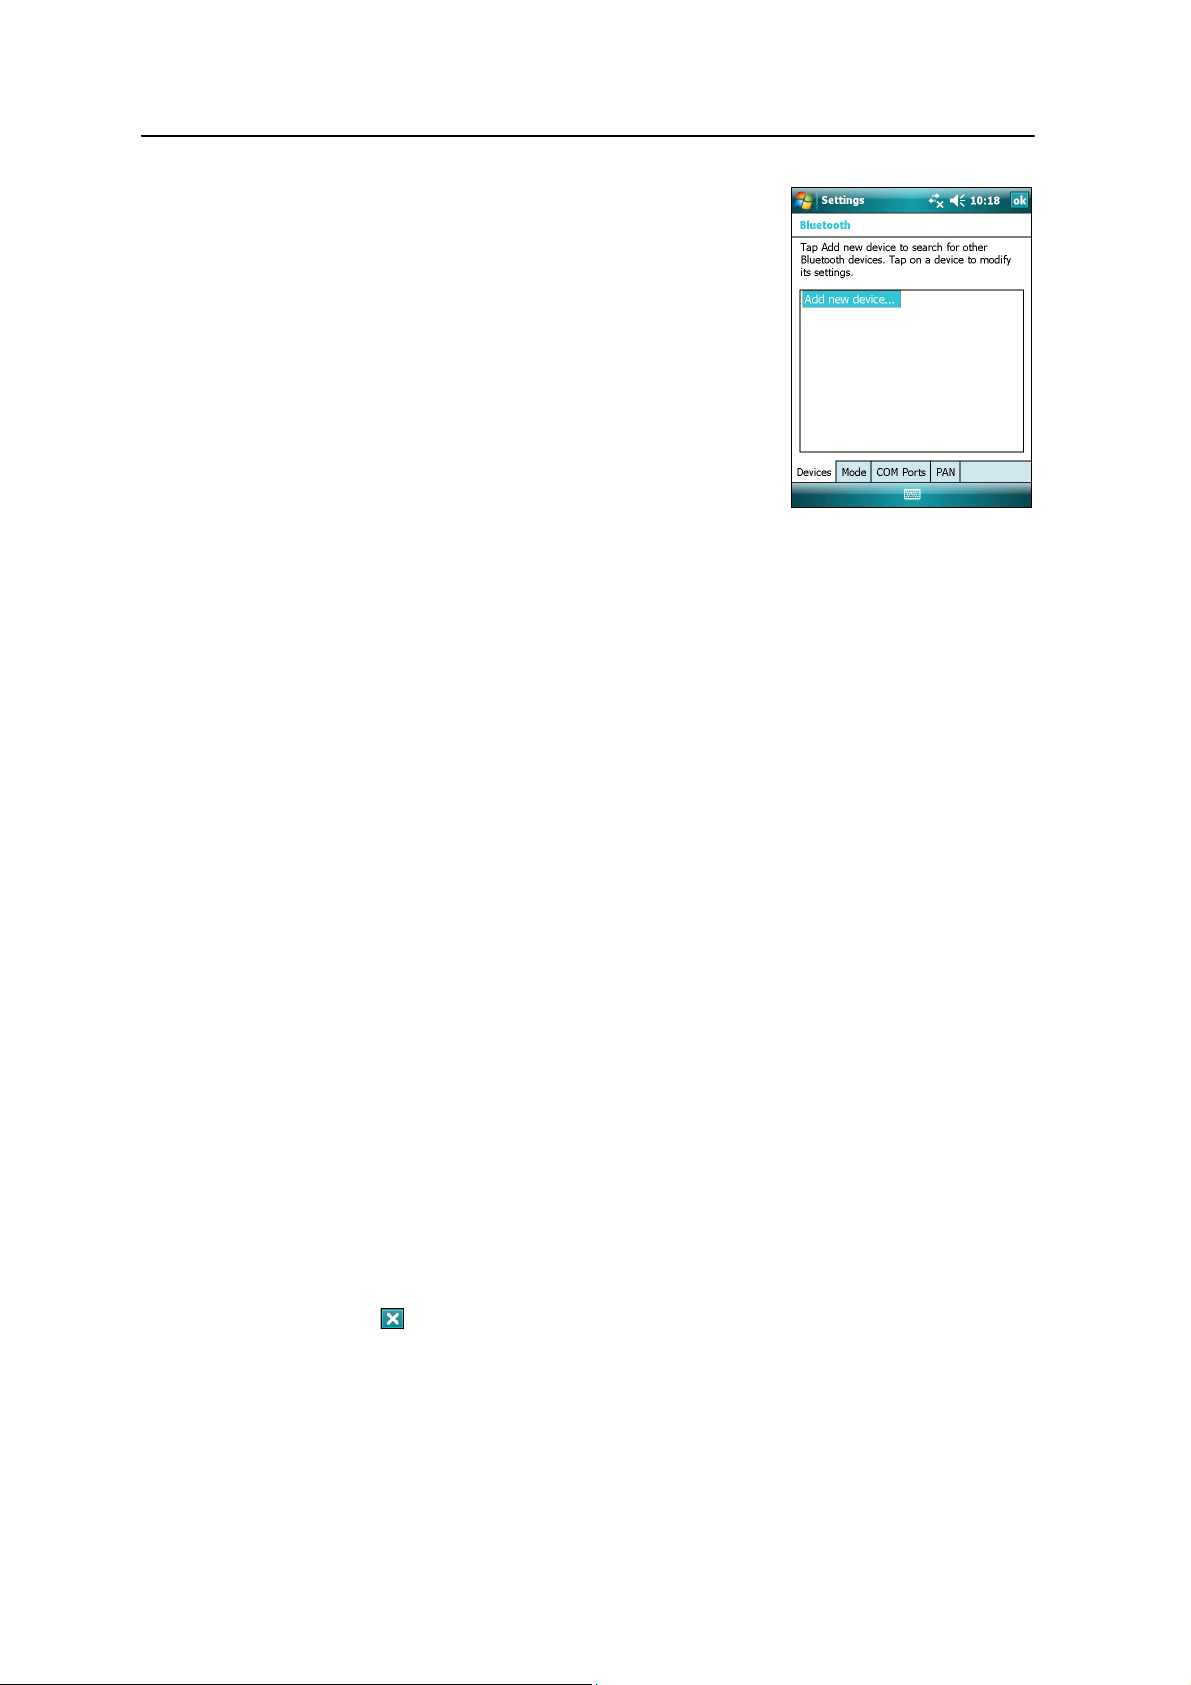
Getting Connected 6
3. In the Devices tab, tap Add new device. The
handheld searches for other Bluetooth devices
and displays them in the list.
If the device you are trying to connect is not
displayed in the list, ensure that the device is on
and within range and then tap
Refresh to search
for devices again.
4. Tap the name of the device you want to pair with
and then tap
Next on the right softkey.
5. In the Passcode field, enter a passcode of between
1 and 16 characters. If you are connecting to:
– a device with a keypad, enter a passcode of
your choice.
– a device without a keypad, but you know that the device has a
pre-programmed passcode that will be exchanged, enter that passcode on
the GeoExplorer handheld.
Note – Trimble recommends that you enter only numbers, as some devices do not support
passcodes that include letters.
6. Tap
Next on the right softkey.
7. When prompted, enter the same passcode on the other device.
On the handheld, the Partnership Settings screen appears.
8. If required, change the name of the device in the Display Name field.
9. Select the service(s) you want to use with this device. For example, if you are
connecting to:
– a Bluetooth-enabled phone to connect to the Internet and receive real-time
corrections or download background maps, select Dialup Networking
(DUN).
– a serial device, such as a GeoBeacon receiver or a laser rangefinder, select
Serial Port.
– a computer to access ActiveSync technology, select ActiveSync.
Note – For more information on the types of devices that the GeoExplorer 3000 series
handheld can connect to, and the supported Bluetooth services, see Connecting to a
Bluetooth device as a client, page 105.
10. Tap
11. Tap
Finish on the right softkey.
OK in the top right corner of the screen to close the Bluetooth application.
12. Tap in the top right corner to close the Settings screen.
GeoExplorer 3000 Series User Guide 85
Page 86
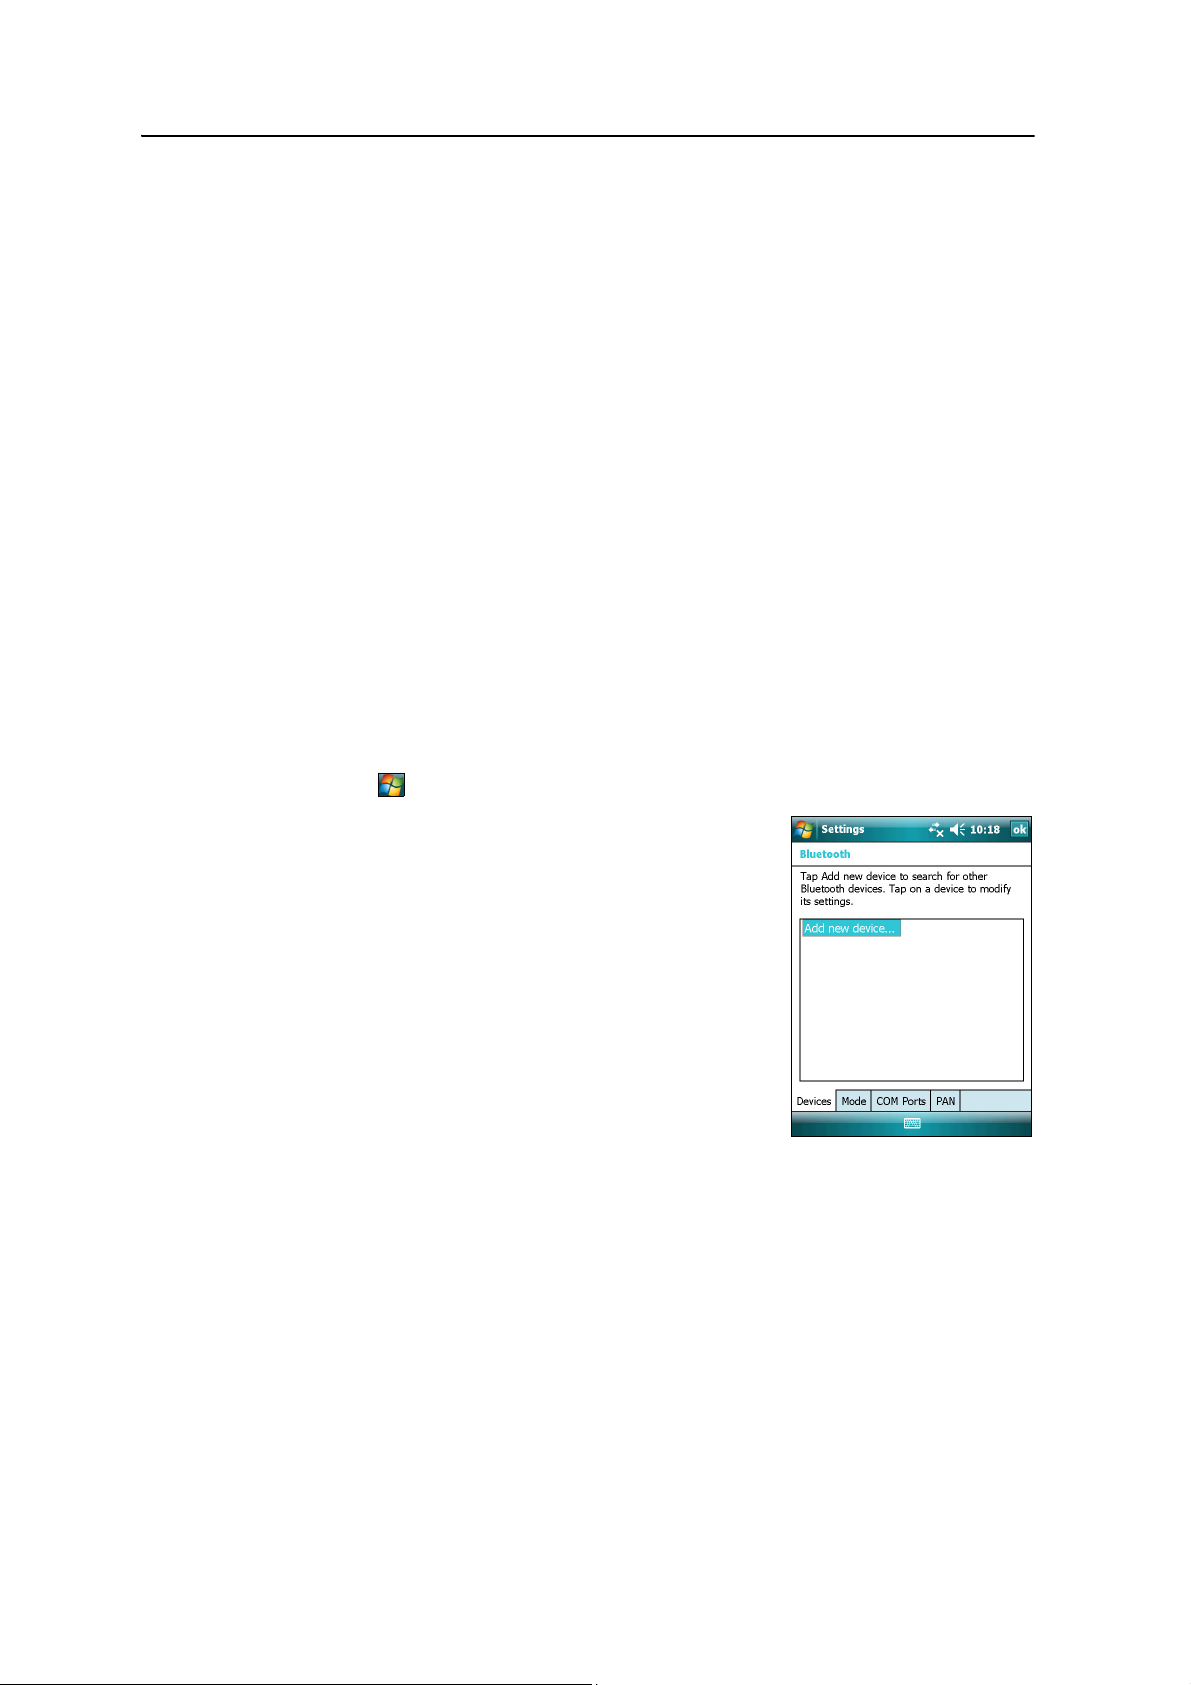
6 Getting Connected
You have now created a partnership between the GeoExplorer 3000 handheld and the
other Bluetooth-enabled device so that they can communicate. To start using the
connection, you must complete the configuration steps for that type of connection and
then connect to the device. For more information, see:
• Connecting to a Bluetooth-enabled phone for Internet access or real-time
corrections (including VRS networks), page 88
• Connecting to a Bluetooth-enabled serial device, page 94
• Connecting to an office computer to use ActiveSync technology, page 97
B
Tip – You only need to pair the handheld with a device before you connect to the device
for the first time.
Setting up a connection to a non-paired device
Setting up a connection to a non-paired device enables you to connect to a device that
does not allow you to enter a passcode on the device, or that does not automatically
exchange a pre-programmed passkey during pairing.
To set up a non-paired connection to a Bluetooth-enabled device:
1. Make sure that the handheld and the Bluetooth device you want to connect to
are within five meters of each other, and that the Bluetooth radio in each device
is turned on.
2. Tap
/ Settings / Connections / Bluetooth.
3. In the Devices tab, tap Add new device. The
handheld searches for other Bluetooth devices
and displays them in the list.
4. Tap the name of the device you want to connect
to and then tap
Next on the right softkey.
The Enter Passcode screen appears.
5. Tap
Next without entering a passcode.
6. If prompted to add the device to your device list,
tap
No.
The Partnership Settings screen appears.
7. If required, change the name of the device in the
Display Name field.
8. Select the service(s) you want to use with this device. For example, if you are
connecting to:
– a Bluetooth-enabled phone to connect to the Internet and receive real-time
corrections or download background maps, select Dialup Networking
(DUN).
– a serial device, such as a GeoBeacon receiver or a laser rangefinder, select
Serial Port.
86 GeoExplorer 3000 Series User Guide
Page 87

Getting Connected 6
– a computer to access ActiveSync, select ActiveSync.
Note – For more information on the types of devices that the GeoExplorer 3000 series
handheld can connect to, and the supported Bluetooth services, see Connecting to a
Bluetooth device as a client, page 105.
9. Tap
10. Tap
Finish on the right softkey.
OK in the top right corner of the screen to close the Bluetooth application.
11. Tap in the top right corner to close the Settings screen.
You have now created a partnership between the GeoExplorer 3000 handheld and the
other Bluetooth-enabled device so that they can communicate. To start using the
connection, you must complete the configuration steps for that type of connection and
then connect to the device. For more information, see:
• Connecting to a Bluetooth-enabled phone for Internet access or real-time
corrections (including VRS networks), page 88
• Connecting to a Bluetooth-enabled serial device, page 94
• Connecting to an office computer to use ActiveSync technology, page 97
GeoExplorer 3000 Series User Guide 87
Page 88

6 Getting Connected
Connecting to a Bluetooth-enabled phone for Internet access or real-time corrections (including VRS networks)
Use the GeoExplorer series handheld’s Bluetooth radio to connect to a
Bluetooth-enabled cellular phone and then connect to the Internet. Use this type of
connection to access a VRS network or other correction source from the Internet, a
background map server, or for Internet and email access.
Note – Some cellular phones support the Bluetooth PAN (Personal Area Networking)
service as well as the Bluetooth DUN (Dialup Networking) service. Because DUN
connections are more common, this section assumes you are making a dialup network
connection with the Bluetooth-enabled phone.
To connect to a Bluetooth-enabled phone using a Bluetooth DUN (Dialup Networking)
connection, you must:
1. Connect the GeoExplorer 3000 series handheld to a Bluetooth-enabled phone
and then configure the connection to the dialup network.
2. Connect to the Internet using the dialup network.
3. Configure the software to use the connection. For example, you must configure
the GPS field software to use real-time corrections or map data received from
the Internet source, or you must set up the Messaging application to send and
receive email using the connection.
Note – Before you begin the steps below, Trimble recommends that you confirm that the
phone can access the Internet directly. If necessary, contact the cellular phone provider
and confirm whether you must enter a user name, password, and domain details when
connecting an external device to the phone using Bluetooth dialup networking.
Step 1: Connecting the handheld to the phone and configuring the
connection to the dialup network
1. Make sure that the handheld and the Bluetooth device you want to connect to
are within five meters of each other, and that the Bluetooth radio in each device
is turned on. For more information, see Turning on and turning off the
integrated radios, page 78.
2. On the handheld, tap / Settings / Connections / Connections.
3. Below My ISP, tap Add a new modem connection.
88 GeoExplorer 3000 Series User Guide
Page 89
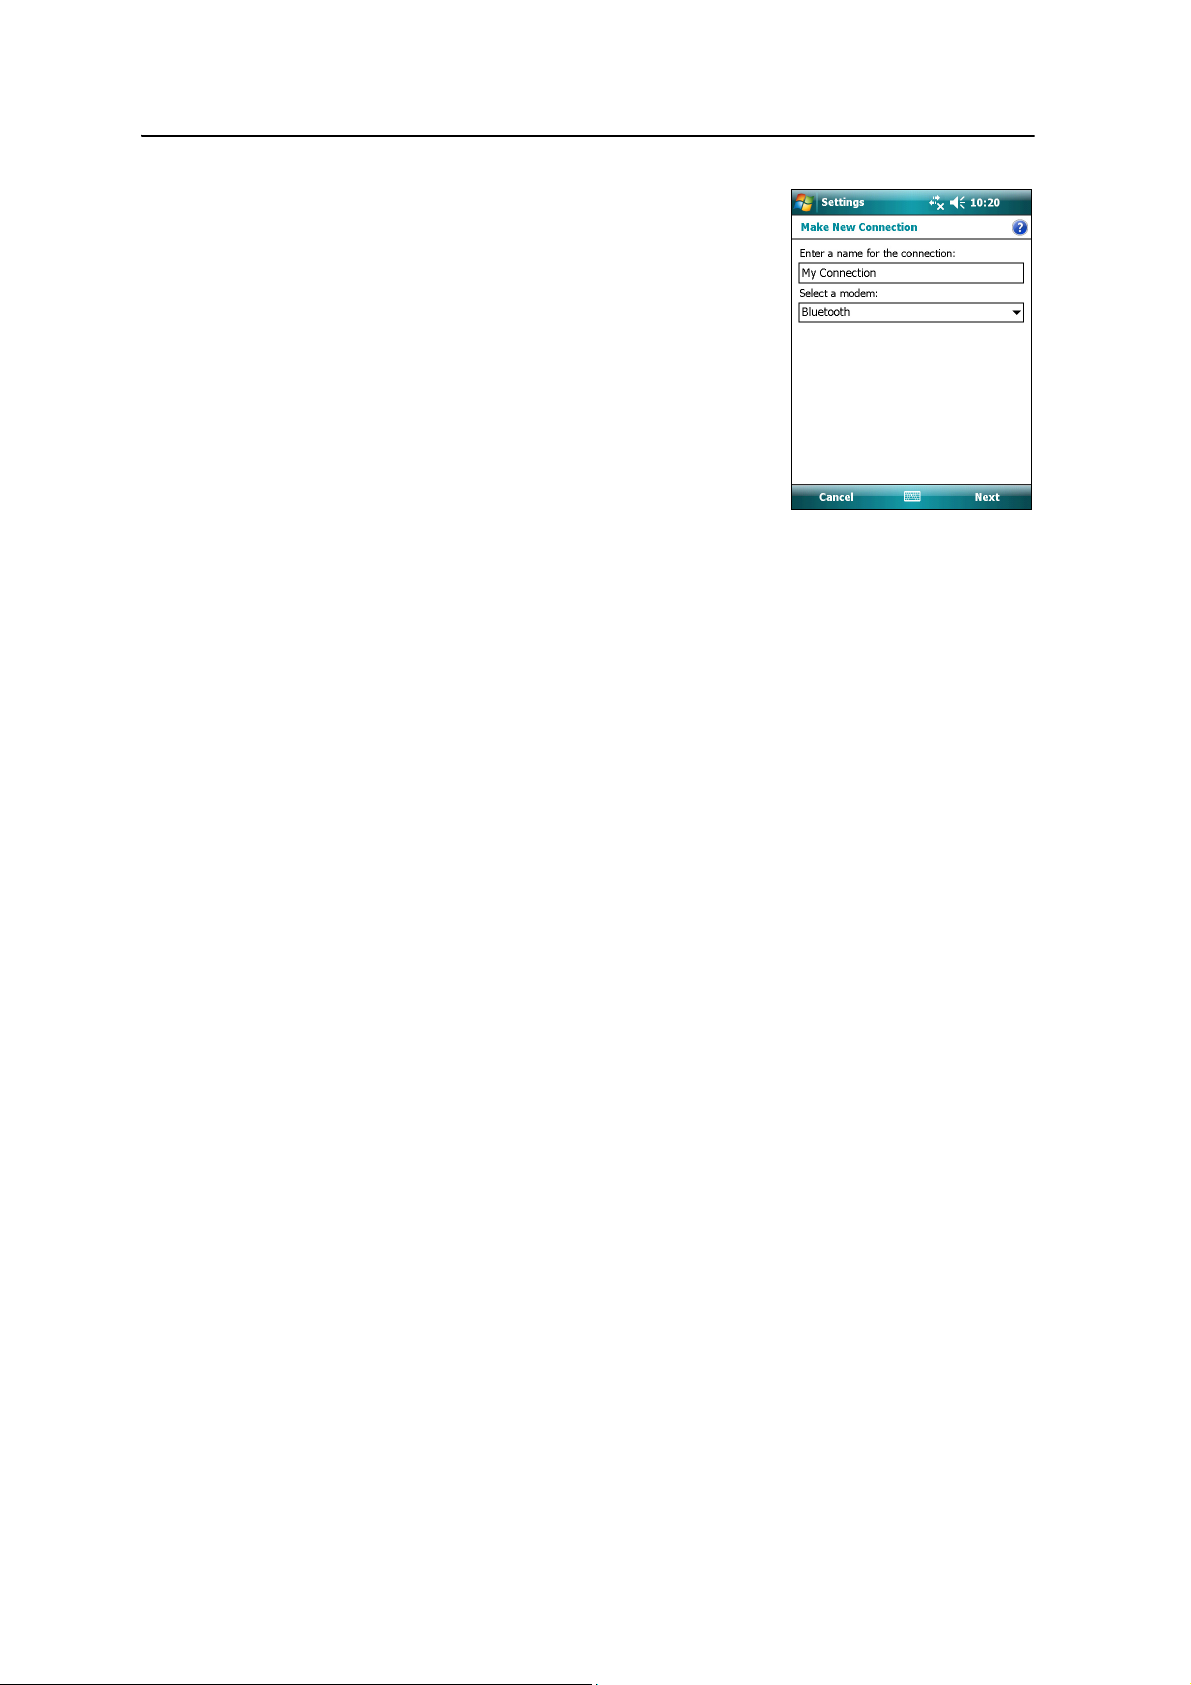
4. Enter the name for the connection. For example,
enter the name of the phone or the VRS network
that you will connect to.
5. From the Select a Modem dropdown list, select
Bluetooth and then tap
Next on the right softkey.
6. If the phone you want to connect to is:
– listed, go to Step 7 below.
– not listed:
a. Tap Add new device. The handheld
searches for other Bluetooth devices and
displays them in the list.
If the handheld’s integrated Bluetooth radio is turned off, it is now
automatically turned on.
b. From the list of available devices, select the device you want to connect
to and then tap
Next on the right softkey.
c. To pair with the phone, enter a passcode of your choice that you will
easily remember onto the handheld and then tap
softkey.
Getting Connected 6
Next on the right
d. When prompted by the phone, enter the same password and then
accept the connection.
e. On the GeoExplorer 3000 series handheld, in the Partnership Settings
screen, make sure that Dialup Networking (DUN) is selected and then
tap
Finish on the right softkey.
You have now created a partnership between the GeoExplorer 3000 series
handheld and the phone so that they can communicate.
7. From the My Connections list, select the phone that you want to configure the
connection to.
8. Enter the GPRS access number for the Internet.
Two of the common GPRS access numbers for cellular phones on GSM
networks are *99***1# and *99#. If these access numbers do not work, contact
the cellular phone provider to obtain the appropriate number to use.
Note – You do not need to set up dialling rules or change the Internet connection settings
on the phone. The connection settings you enter on the handheld are passed to the phone
to use for this connection.
9. Tap
Next on the right softkey.
GeoExplorer 3000 Series User Guide 89
Page 90

6 Getting Connected
10. Unless the phone provider confirmed that you must enter user name, password,
and domain settings to access the Internet, tap
Finish on the right softkey
without entering any information in this screen.
Otherwise:
a. Enter the required information.
b. If the phone provider has told you that you need to change the baud rate or
other settings for the connection, tap
and then tap
OK in the top right corner of the screen.
Advanced, configure these settings
c. Tap
Finish on the right softkey.
You are returned to the Connections screen.
You have now configured the dialup networking connection.
Step 2: Connecting to the Internet using the dialup network
1. On the handheld, go to the Connections screen, if it is not already open (tap /
Settings / Connections / Connections).
2. Below My ISP, tap Manage existing connections.
3. Tap and hold the connection you want to use and then select Connect.
4. Unless the phone provider confirmed that you must enter user name, password,
and domain settings to access the Internet, tap
OK on the left softkey without
entering any information in this screen. Otherwise, enter the required
information and then tap
OK on the left softkey.
5. If the phone prompts for confirmation to connect to the Internet, accept the
connection.
The phone dials the configured GPRS access number and then connects to the
Internet.
A Connectivity notification appears on the handheld as the connection is being
made.
After the connection is made you are returned to the My ISP screen.
To confirm that the GeoExplorer series handheld is connected to the phone, or
to check the status of the connection at any time, tap the Connectivity icon
in the title bar. The notification shows the name of the current connection, and
the time elapsed since the connection was made. To hide the notification, tap
Hide.
Note – If you have an active wireless LAN connection, the connectivity icon appears as
instead.
6. Tap
7. Tap
OK in the top right corner of the screen to close the My ISP screen.
OK in the top right corner to close the Connections screen.
8. Tap in the top right corner to close the Settings screen.
90 GeoExplorer 3000 Series User Guide
Page 91
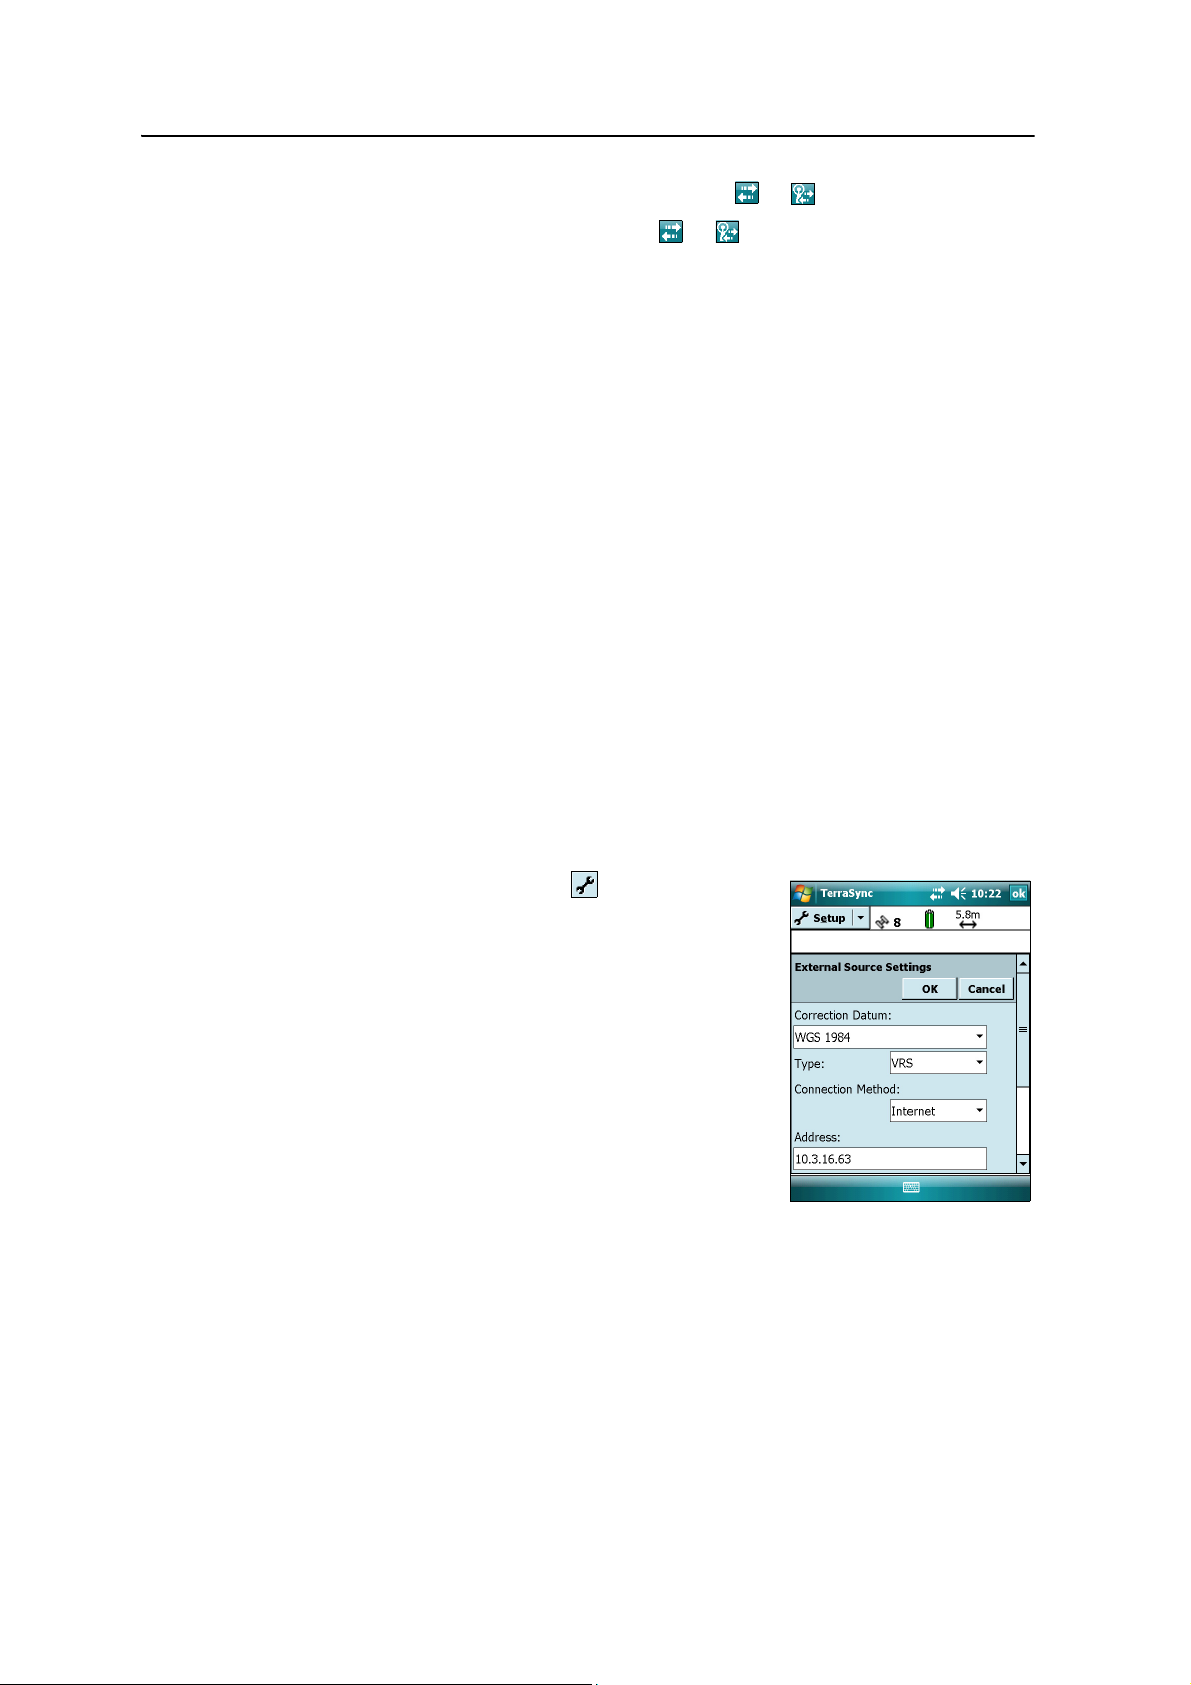
Getting Connected 6
To check the connection status at any time, tap the or icon in the title bar.
To end the connection at any time, tap the or icon in the title bar and then tap
Disconnect.
To connect to a corporate network or Intranet, see page 103.
To send and receive email messages, see Messaging, page 49.
Step 3: Configuring the GPS field software to use data received from the
Internet source
Now that you have connected the GeoExplorer 3000 series handheld to the Internet
using a Bluetooth-enabled cellular phone, you must configure the software to use the
connection to receive data.
To use real-time corrections in Trimble field software, see Using real-time corrections
from the Internet below.
To use background map data in the TerraSync software, see Downloading background
map files from an Internet map server, page 93.
Using real-time corrections from the Internet
1. Start the Trimble GPS field software and then open the Setup section.
2. Tap
Real-time Settings. The Real-time Settings form appears.
3. From the Choice 1 field, select External Source.
4. Configure the external source:
a. Tap the Setup button beside the Choice 1
field. The External Source Settings form
appears.
b. From the Correction Datum field, select the
same datum as the VRS network coordinate
system.
c. From the Type field, select:
– VRS if the real-time correction source is a
VRS network.
– Single Base if the real-time correction
source is a single base station that
broadcasts its corrections over the
Internet.
d. From the Connection Method field, select Internet.
GeoExplorer 3000 Series User Guide 91
Page 92

6 Getting Connected
Typically, the IP address or URL of a VRS network has the format
10.3.123.456:1234, where the digits before the colon (:) are the address, and
the digits after the colon (:) are the port number.
e. In the Address field, enter the IP address or URL of the VRS network or the
server that is supplying the corrections from the VRS network.
f. In the Port field, enter the port number that you will use to connect to the
server.
g. If you are connecting to a VRS network through a broadcast server, tap the
Setup button beside the Source field. The GPS field software attempts to
establish a connection to the broadcast server. If the connection is
successful, the Select Server form appears. Select the server that you want
to use and then tap
OK to return to the External Source Settings form.
h. If you selected a VRS network that requires authentication, the Name and
Password fields appear. Enter the user name and password that you
obtained from the service provider.
i. From the Connection Control field, select:
– Auto if you want the GPS field software to automatically establish and
end connections to the VRS network as necessary.
B
– Manual if you want to connect or disconnect only when you tap Ext
in the Setup screen.
OK to confirm the settings and return to the Real-time Settings form.
j. Tap
5. Tap
Source
OK to confirm the real-time settings and return to the main screen of the
Setup section.
If you selected Auto in the Connection Control field, the
Ext Source button is
depressed and the software attempts to connect to the server.
6. If you selected Manual in the Connection Control field, tap the
Ext Source
button that appears below the Status bar in the Setup section to connect the
Trimble GPS field software to the Internet correction source.
Tip – To disconnect or reconnect to the server at any time, tap Ext Source. To view the
status of the real-time correction source, open the Status section, select the Real-time
subsection and then select External from the Summary list button.
92 GeoExplorer 3000 Series User Guide
Page 93
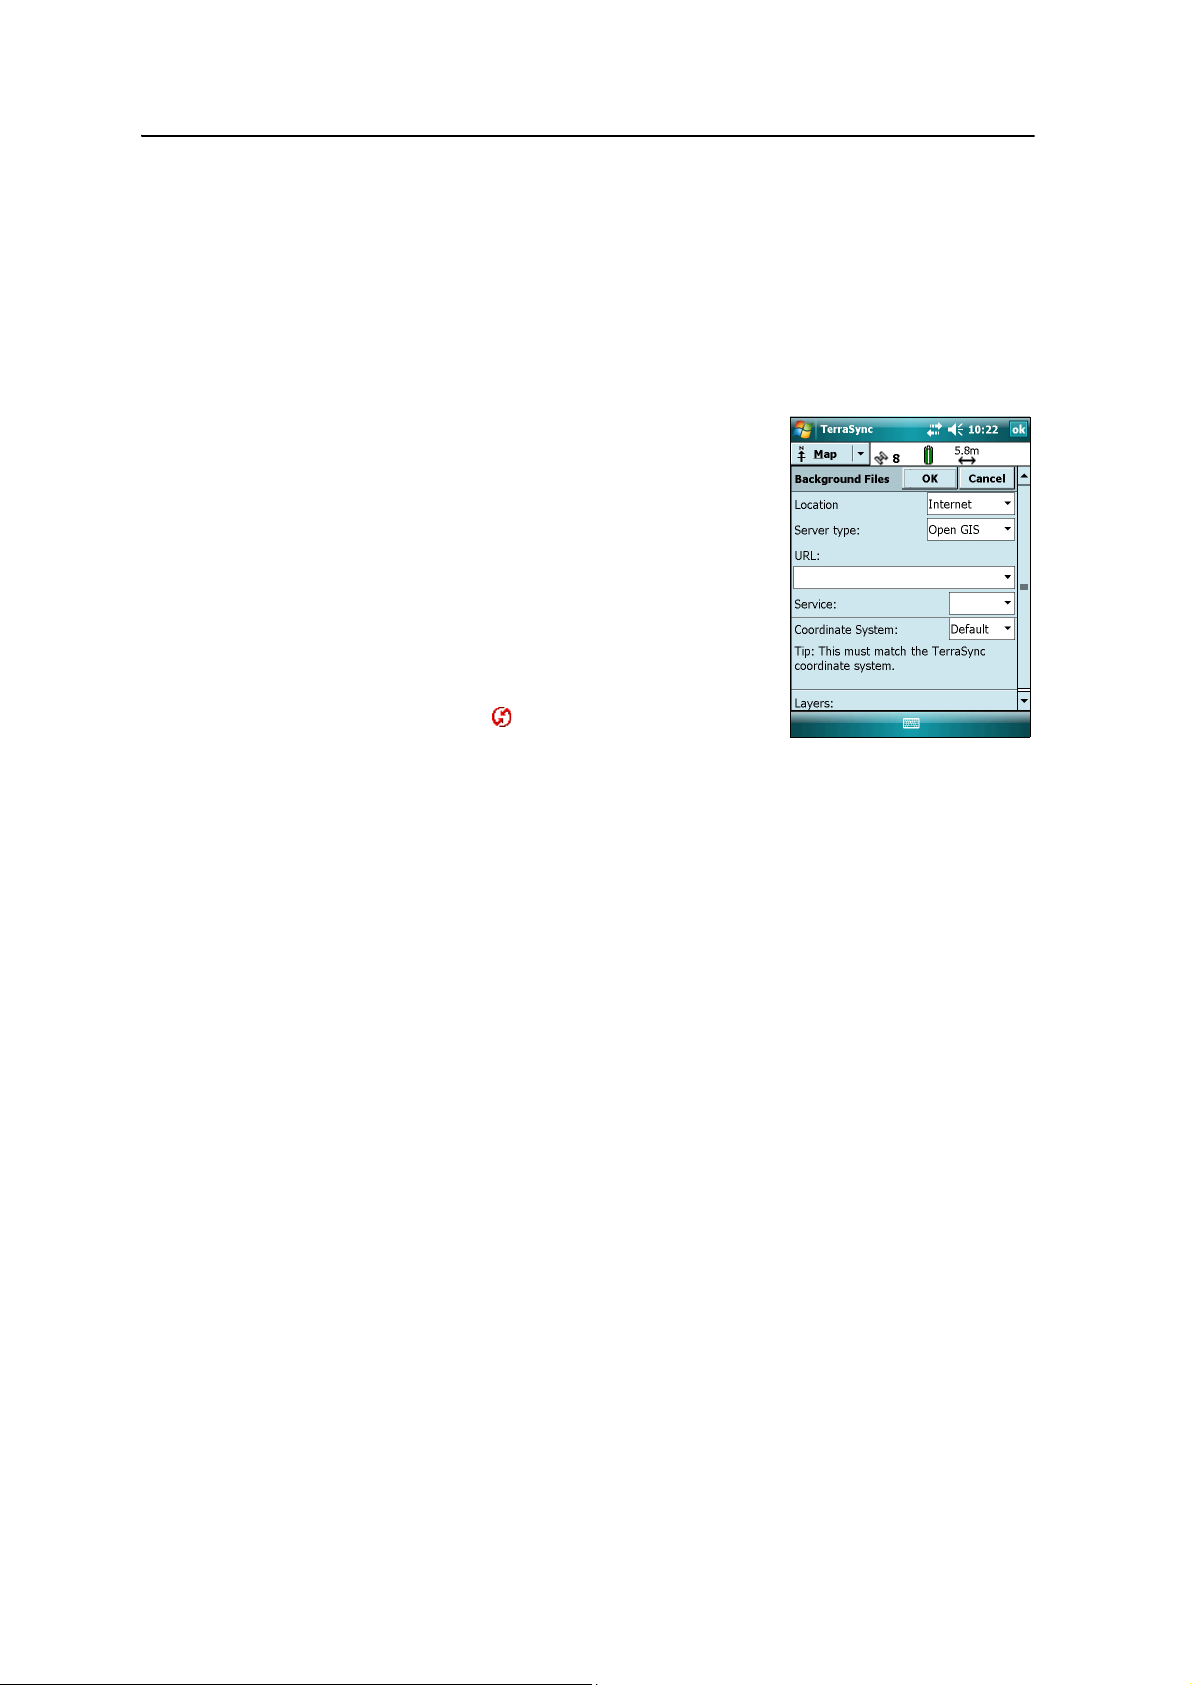
Getting Connected 6
Downloading background map files from an Internet map server
1. Make sure that the coordinate system selected in the TerraSync software
matches the coordinate system of the map server.
2. In the Map section of the TerraSync software,
pan or zoom to make sure that the
area for which you want a background image is displayed on the map.
If the map server covers the area you are in, it will provide a background image
that matches the current map extents.
3. Tap
Layers and then select Background files. The
Background Files form appears.
4. In the Location field select Internet and then use
the fields that appear to specify the Map Server
type, the URL of the server, the service, and the
layers from that service that you want to
download.
5. Tap
OK to close the Background File form and
download the selected background map.
This may take some time. When a download is in
progress, an icon appears in the top left corner
of the map. Once the background file is
downloaded, the hourglass icon appears until the
downloaded image is rendered and becomes
visible.
If you pan or zoom beyond the extents of the downloaded image, new images are
downloaded automatically and displayed in the background of the map.
To stop automatic downloading of background files, either clear the address of the
map server from the URL field, or set the Location field to Default and then clear the
check box next to any files.
Reconnecting to the Internet
To reconnect to the Internet at any time after setting up the connection, repeat the
steps listed under Step 2: Connecting to the Internet using the dialup network on
page 90.
If you selected Auto in the Connection Control field of the Trimble GPS field software,
the software automatically connects to the Internet source that is providing real-time
differential corrections.
To manually reconnect the Trimble GPS field software to the Internet source that is
providing real-time differential corrections, open the software and then tap the
Source
button that appears below the status bar in the Setup section.
GeoExplorer 3000 Series User Guide 93
Ext
Page 94
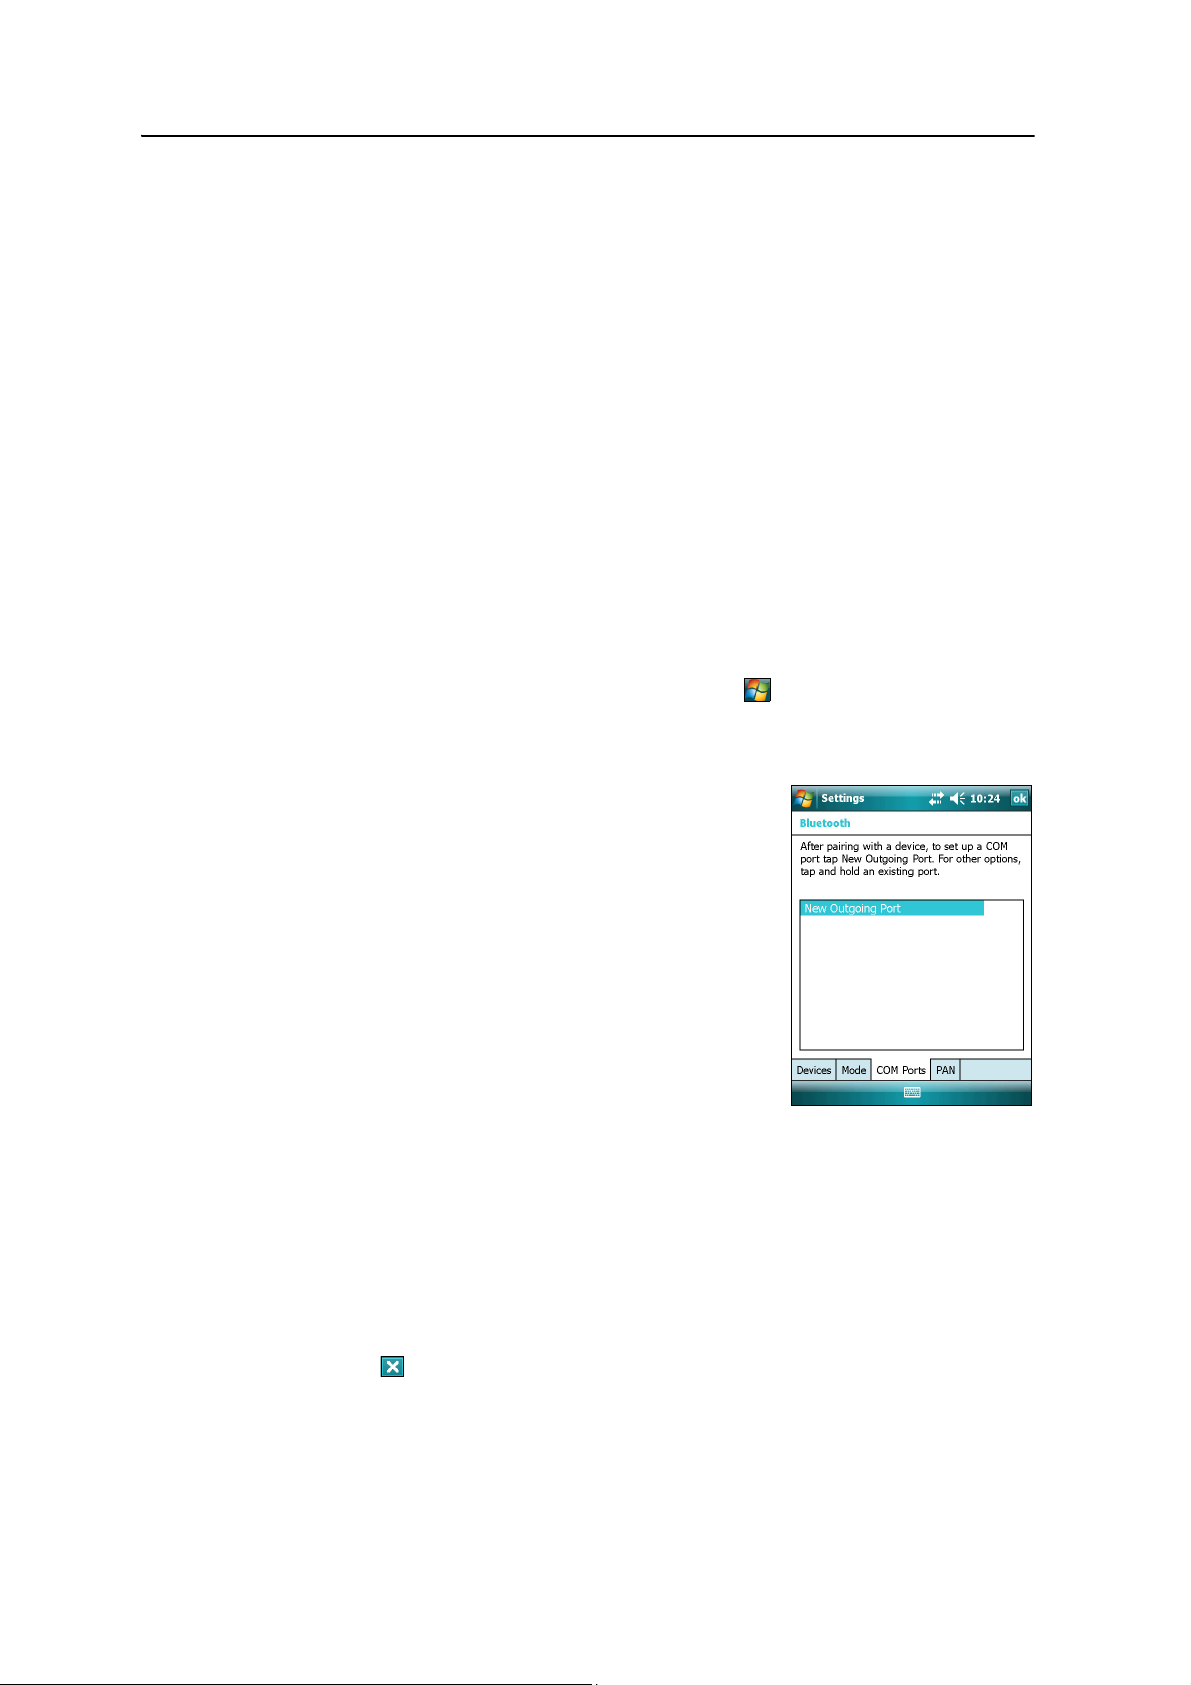
6 Getting Connected
Connecting to a Bluetooth-enabled serial device
Use Bluetooth wireless technology to receive data from a Bluetooth-enabled serial
device, such as a GeoBeacon receiver or a laser rangefinder.
To connect to a Bluetooth-enabled serial device, you must:
Step 1: Connecting to the Bluetooth-enabled serial device
Connect the handheld to the Bluetooth-enabled device, selecting the Serial Port
service if it is not already selected (see Connecting to a Bluetooth-enabled device,
page 84).
Step 2: Configuring the COM port to use on the handheld
1. Connect to the Bluetooth-enabled serial device.
2. Configure the COM port on the handheld to use for the connection.
3. If necessary, configure the GPS field software to use data received from the serial
device.
1. On the GeoExplorer 3000 series handheld, tap
/ Settings /
Connections / Bluetooth.
2. Tap the COM Ports tab.
3. Tap New Outgoing Port.
4. Select the device you want to set up the
connection to and then tap
Next on the right
softkey.
5. Select the COM port on the GeoExplorer
handheld to use for the connection.
The GeoExplorer 3000 series handheld has three
COM ports (COM5, COM6, and COM7) available
for connections out to Bluetooth-enabled serial
devices.
6. Do one of the following:
– To communicate with any device, for example if you have formed this
connection without pairing to a device, clear the Secure Connection check
box.
– To communicate only with devices with which the handheld has a
Bluetooth partnership, select the Secure Connection check box.
7. Tap
8. Tap
Finish on the right softkey.
OK in the top right corner to close the Bluetooth application.
9. Tap in the top right corner to close the Settings screen.
94 GeoExplorer 3000 Series User Guide
Page 95
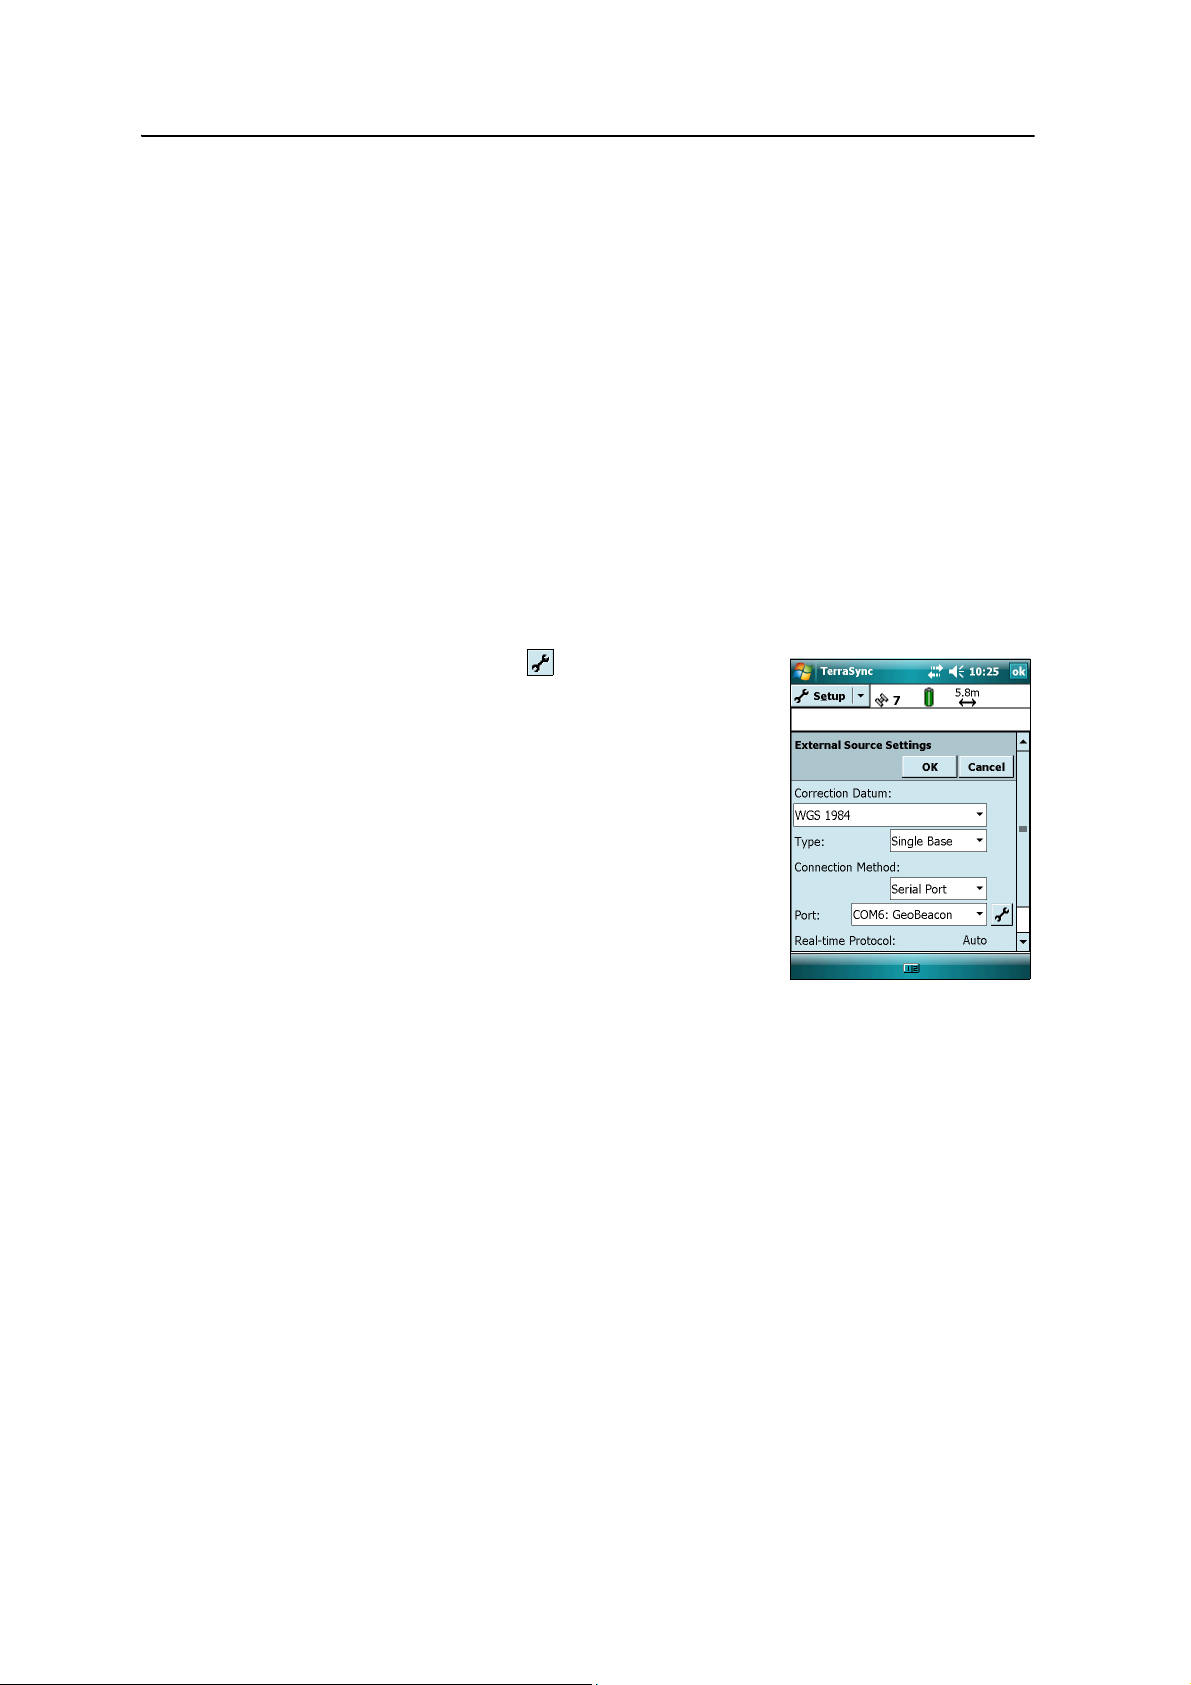
Getting Connected 6
Step 3: Configuring the GPS field software to use data from the serial
device
Once you configure the connection between the GeoExplorer 3000 series handheld
and the Bluetooth-enabled serial device, you must configure the software to use the
connection to receive data.
To use real-time corrections in Trimble field software, see Using real-time corrections
from an external serial device below.
To use an Bluetooth-enabled external sensor such as a laser rangefinder or a barcode
scanner in TerraSync software, see Using data from an external source in the TerraSync
software, page 96.
Using real-time corrections from an external serial device
1. Start the Trimble GPS field software and then open the Setup section.
2. Tap
Real-time Settings. The Real-time Settings form appears.
3. From the Choice 1 field, select External Source.
4. Tap the Setup button beside the Choice 1 field.
The External Source Settings form appears.
5. From the Correction Datum field, select the datum
used by the correction source to calculate
corrections.
Trimble recommends that you select NAD 1983
(Conus) CORS96 if you are using a US Coast
Guard beacon service, or WGS84 for any other
beacon service.
6. From the Type field, select Single Base.
7. From the Connection Method field, select Serial
Port.
8. From the Port field, select the name of the COM port that you selected in the
Bluetooth application when you set up the connection to the serial device.
9. Tap
OK to confirm the external source settings and return to the Real-time
Settings form.
10. Tap
OK to confirm the real-time settings and return to the main screen of the
Setup section.
The real-time correction source is now set up for use. The TerraSync software
automatically connects to the correction source when you run the software, and
automatically disconnects from the source when you close the software.
To manually disconnect from the correction source at any time, go to the Real-time
Settings form and from the Choice 2 field select Use Uncorrected GPS.
To view the status of the real-time correction source, open the Status section, select
the Real-time subsection and then select External from the
Summary list button.
GeoExplorer 3000 Series User Guide 95
Page 96
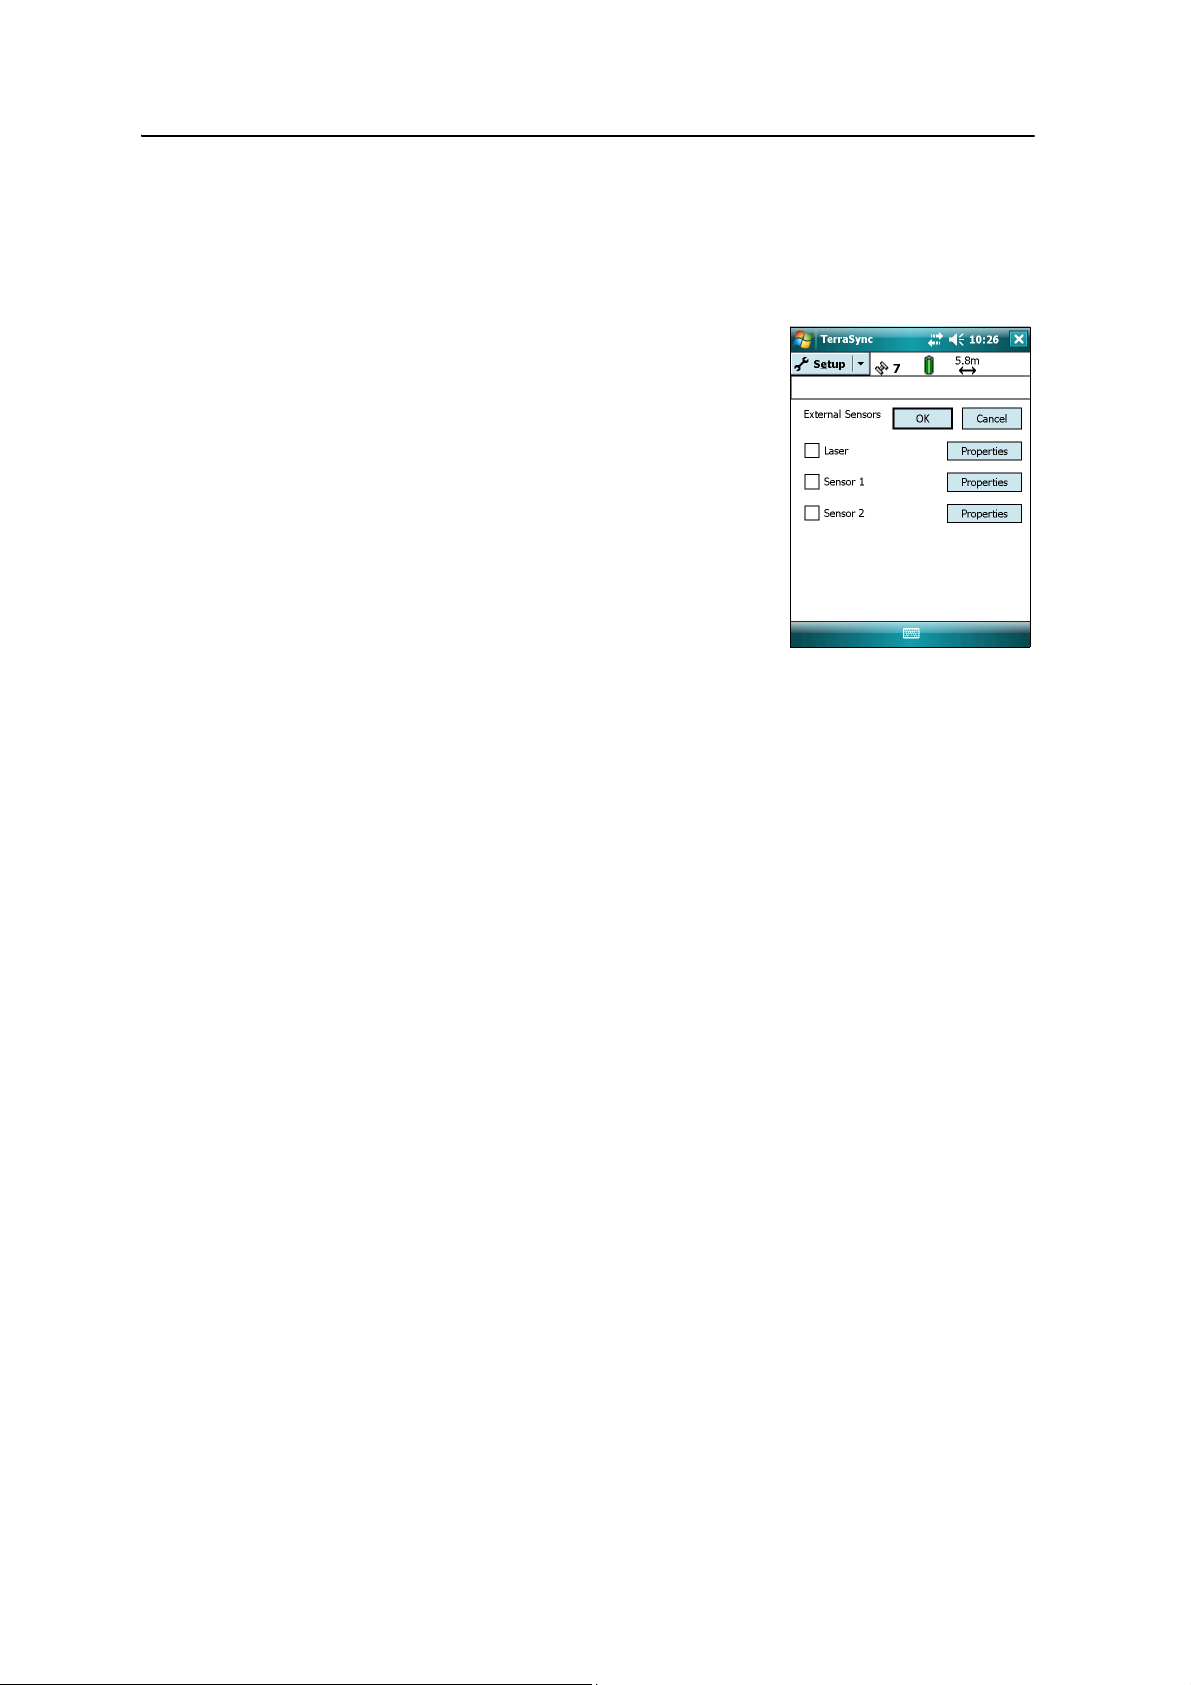
6 Getting Connected
Using data from an external source in the TerraSync software
To configure the TerraSync software to use data from an external source, for example, a
laser rangefinder or barcode scanner:
1. Start the TerraSync software and then open a data file.
2. In the Setup section, tap
External Sensors. The
External Sensors form appears.
3. If you are connecting to:
– a laser rangefinder, select the Laser check
box and then tap the
Properties button
beside the Laser check box. The Laser
Properties form appears.
– a barcode scanner or other external sensor,
select the Sensor 1 or Sensor 2 check box and
then tap the
Properties button beside the
appropriate check box. The Sensor Properties
form appears.
4. If you are connecting to a barcode scanner or other external sensor, enter a
name for the connection in the Name field.
5. From the Port drop-down list, select the name of the COM port that you selected
in the Bluetooth application when you set up the connection to the device.
6. Tap
7. Tap
OK to confirm the sensor settings and return to the External Sensors form.
OK to confirm the settings and return to the main screen of the Setup
section.
8. The external sensor is now setup for use and can be used to add data as
attributes into an open file in TerraSync. The device is automatically connected
and disconnected when data files in TerraSync are opened and closed.
To check the status of the connection, select the Comms subsection in the
Status section of the GPS field software .
96 GeoExplorer 3000 Series User Guide
Page 97
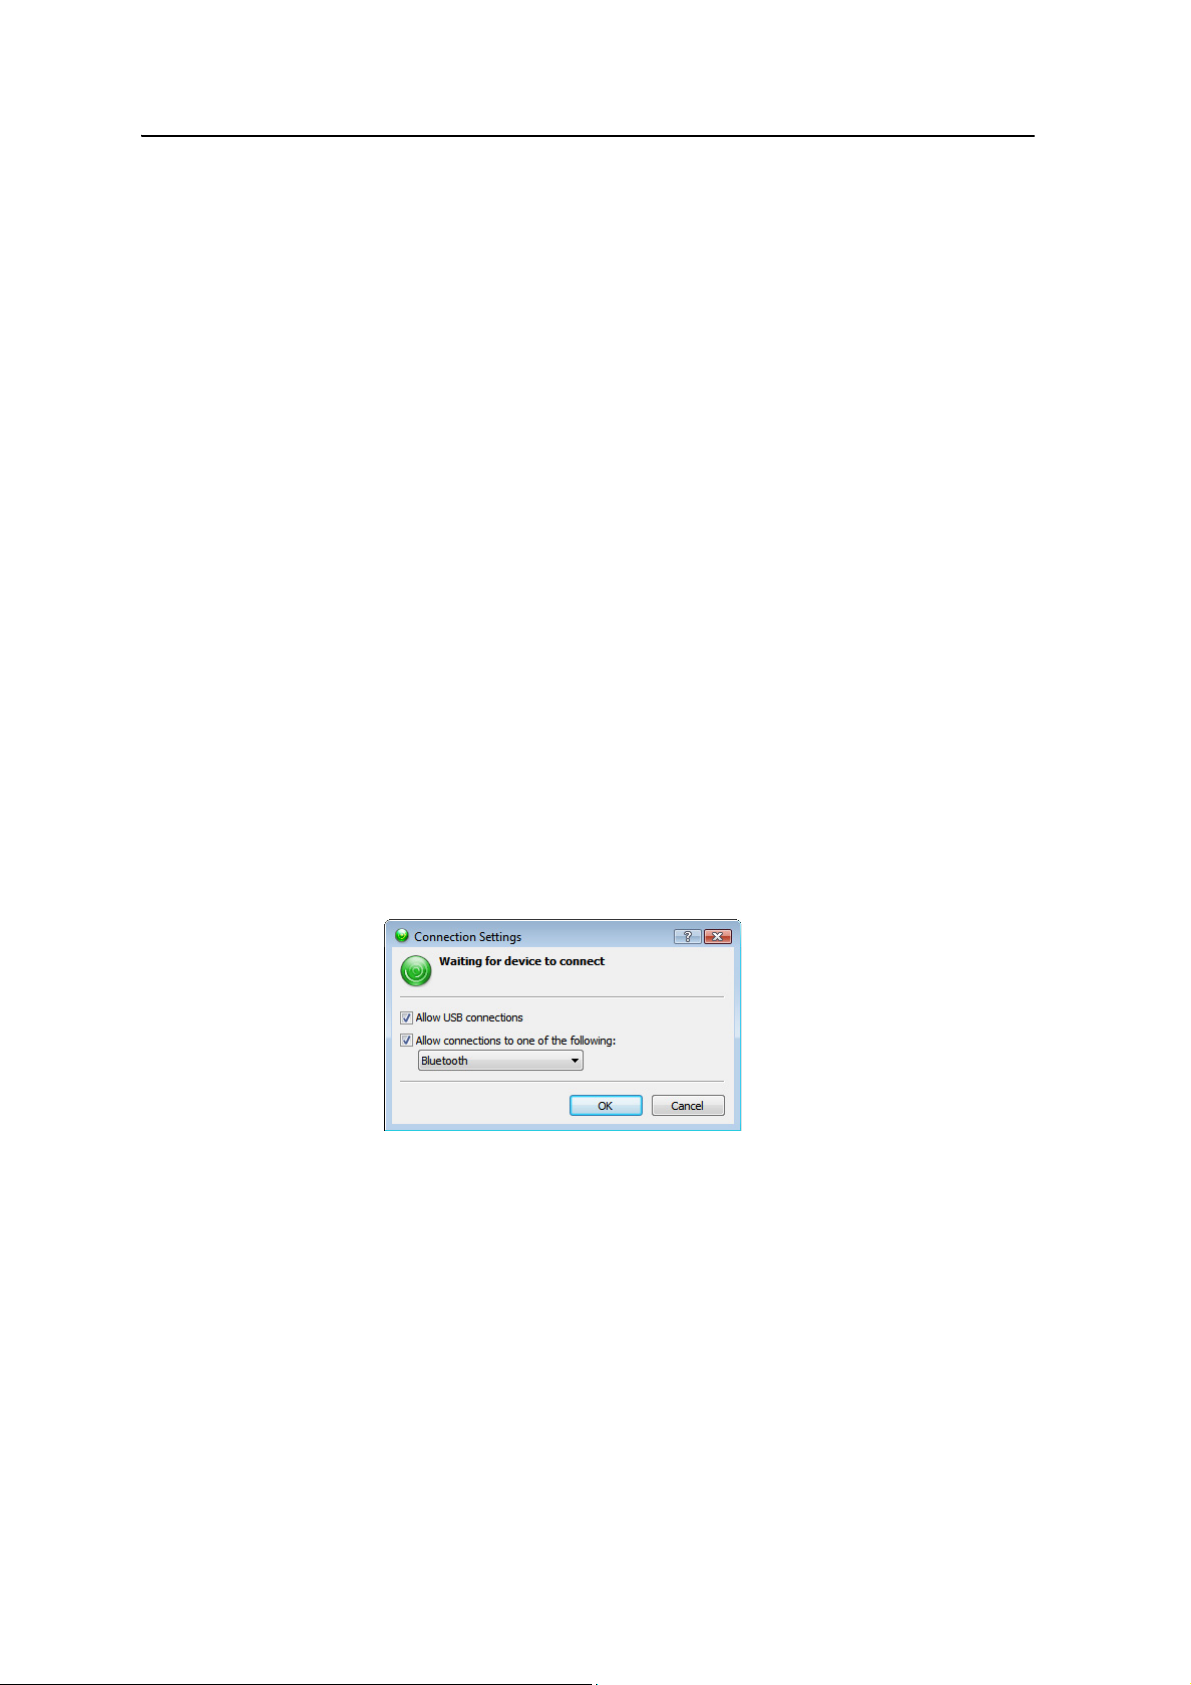
Getting Connected 6
Connecting to an office computer to use ActiveSync technology
Instead of using a USB or serial cable to physically connect to an office computer, you
can use Bluetooth wireless technology to connect to ActiveSync technology or the
Windows Mobile Device Center on a Bluetooth-enabled office computer.
Note – Not all Bluetooth devices and Bluetooth management software support ActiveSync
connections. Check with the manufacturer of the office computer for compatibility.
Note – The exact steps required may vary depending on the office computer.
To connect to a office computer to use ActiveSync with a Bluetooth connection, you
must:
1. Set up the connection to the computer.
2. Connect to ActiveSync using Bluetooth wireless technology.
Step 1: Setting up the connection to the computer
1. From the Bluetooth user interface on the office computer, make sure that the
computer allows itself to be discovered by other Bluetooth devices.
2. Configure the ActiveSync software on the office computer to connect to the
correct Bluetooth port. The steps required depend on the operating system
installed on the office computer. If the office computer is using:
• the Windows Vista operating system:
a. From the Start menu on the office computer, select Control Panel /
Hardware and Sound / Windows Mobile Device Center.
The Connection Settings dialog appears:
b. Select the Allow connections to one of the following check box.
c. From the list, select Bluetooth and then click
• the Windows XP or 2000 operating system:
OK.
a. From the Bluetooth user interface on the office computer, identify the
virtual COM port of the of the host Bluetooth Serial Port or Local Service
and ensure that this is enabled. In this example, the virtual COM port is
COM5.
b. Start the ActiveSync software on the office computer.
GeoExplorer 3000 Series User Guide 97
Page 98
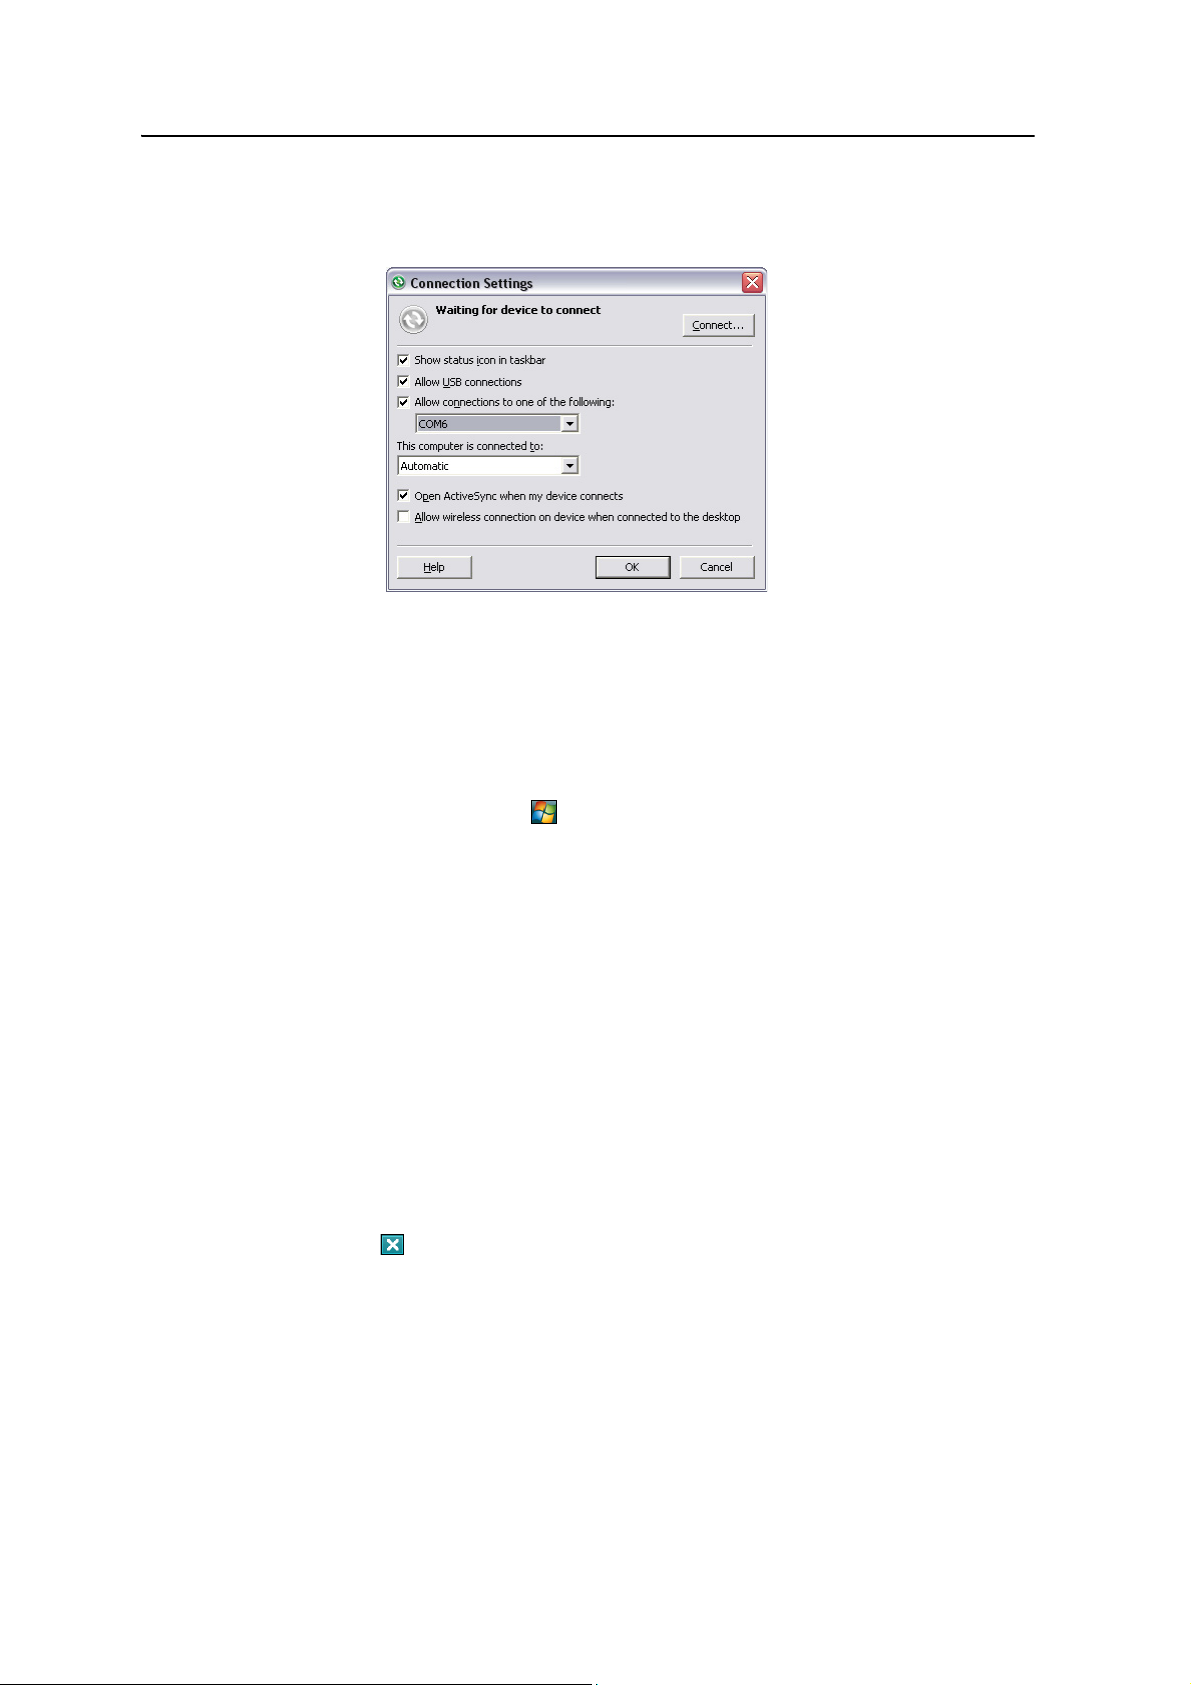
6 Getting Connected
c. Select File / Connection Settings.
The Connection Settings dialog appears:
d. Select the Allow connections to one of the following check box.
e. From the list, select the COM port that you selected in Step a and then click
OK.
Note – Before you try to form a Bluetooth connection from the GeoExplorer 3000 series
handheld to the office computer, you must correctly configure the Bluetooth host serial port
and ActiveSync technology on the office computer.
3. On the handheld, tap
/ Settings / Connections / Bluetooth.
4. In the Devices tab, tap Add new device. The handheld searches for other
Bluetooth devices and displays them in the list.
5. Tap the name of the computer you want to connect to and then tap
Next on the
right softkey.
6. When prompted, enter a passcode of your choice that you will easily remember
on the handheld.
7. Enter the same passcode on the office computer.
8. On the handheld, select the ActiveSync check box in the list of services provided
by the computer and then tap
Finish on the right softkey.
You have now created a partnership between the GeoExplorer 3000 series
handheld and the office computer so that they can communicate.
9. Tap
OK in the top right corner to close the Bluetooth application.
10. Tap in the top right corner to close the Settings screen.
To connect to ActiveSync, see Step 2 on the following page.
98 GeoExplorer 3000 Series User Guide
Page 99

Getting Connected 6
Step 2: Connecting to ActiveSync using Bluetooth wireless technology
1. On the GeoExplorer 3000 series handheld, tap
2. Tap
Menu and then select Connect via Bluetooth.
/ Programs / ActiveSync.
On the GeoExplorer handheld, a message box shows the status of the
connection as it is made.
3. When the connection to the office computer is successful, you are returned to
the ActiveSync application on the handheld.
4. Tap to close.
The connectivity icon in the status bar shows , or if WLAN is connected.
To check the status of the ActiveSync connection, tap the connectivity icon in
the title bar.
To disc o n n ect, t a p / Programs / ActiveSync on the handheld and then select
Menu / Disconnect.
GeoExplorer 3000 Series User Guide 99
Page 100
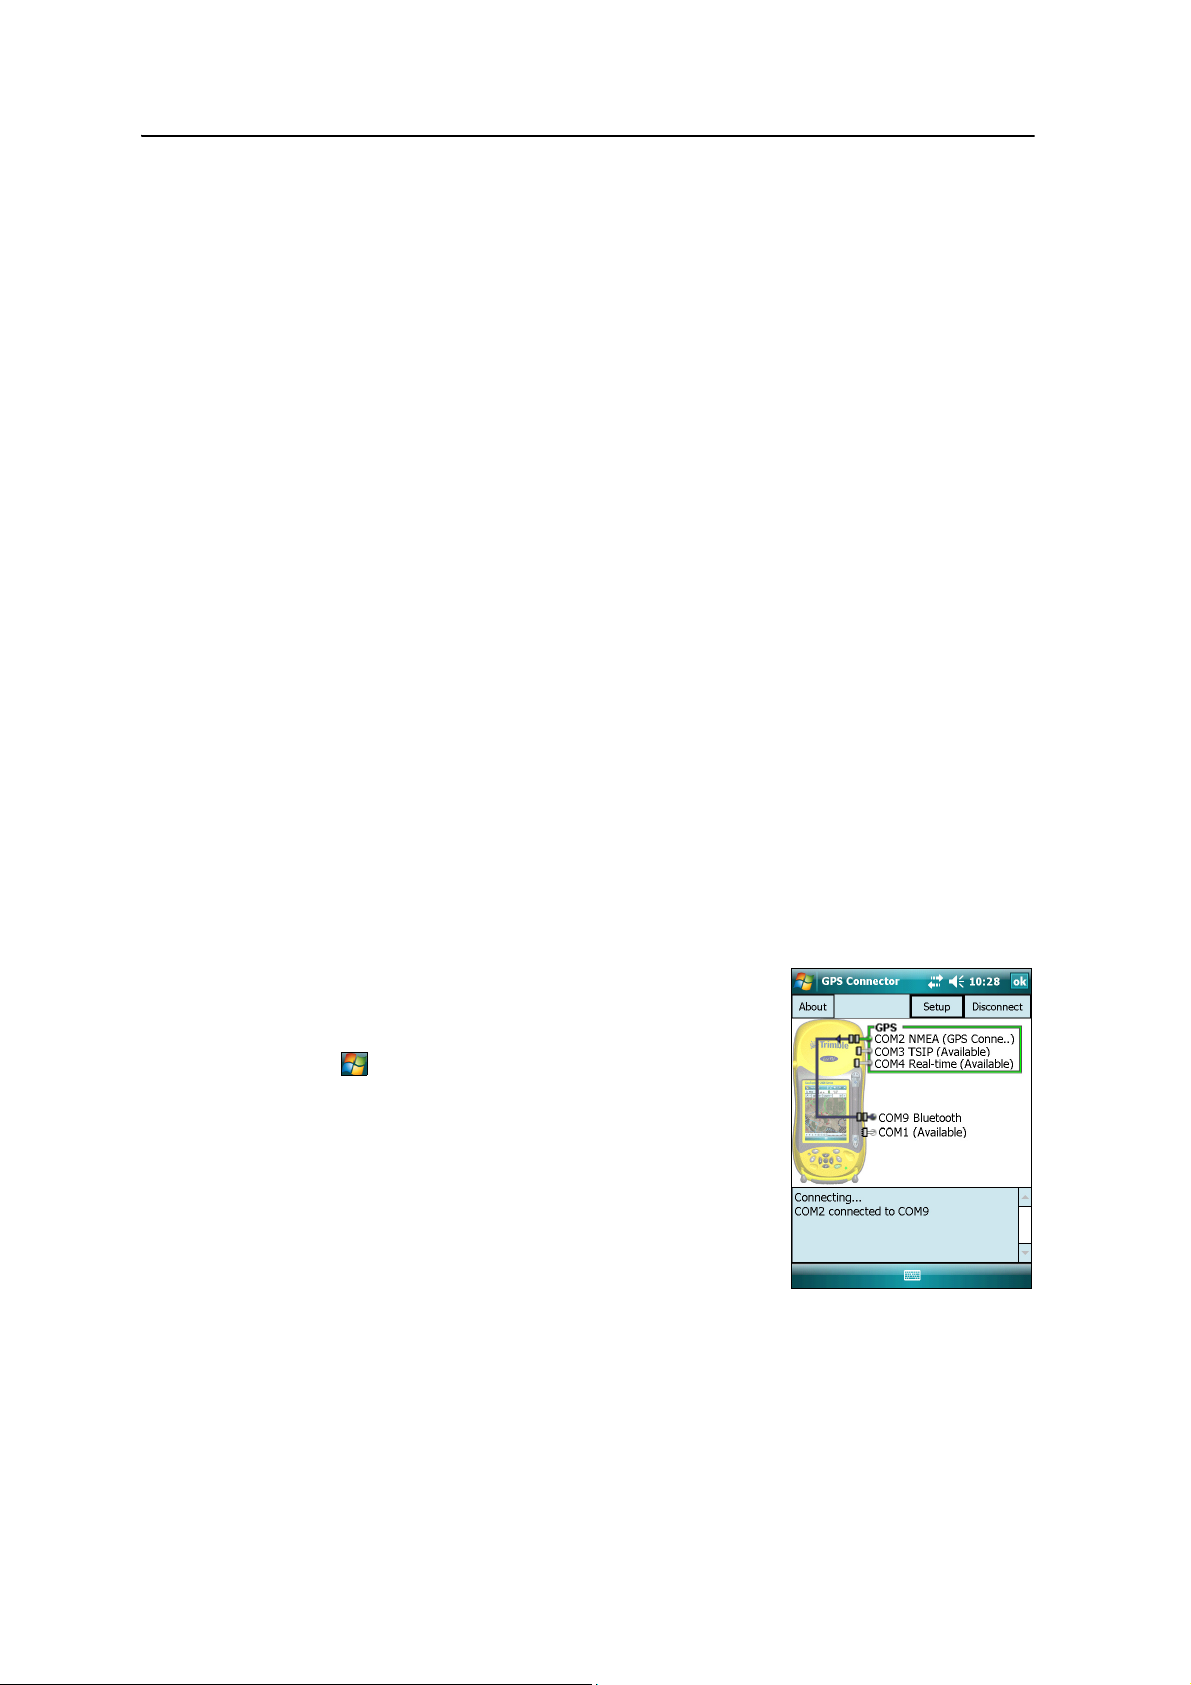
6 Getting Connected
Outputting GPS data to other devices using Bluetooth wireless technology
To provide GPS positions from the GeoExplorer 3000 series handheld to another
device using a Bluetooth wireless connection, you must:
Step 1: Connecting the other device to the GeoExplorer series handheld
1. Connect the other device to the GeoExplorer 3000 series handheld.
2. Configure the handheld to output data to the other device.
3. Configure the other device to receive data from the handheld.
1. Turn on the GeoExplorer 3000 series handheld’s Bluetooth radio and make the
handheld visible to other devices (see page 80).
2. On the other device, turn on the Bluetooth radio.
3. Use the Bluetooth management software on the other device to scan for other
Bluetooth devices and then set up a serial port connection to the GeoExplorer
3000 series handheld.
4. If prompted to enter a passcode on the other device, enter a passcode of your
choice that you will easily remember.
5. When prompted on the GeoExplorer 3000 series handheld, accept the
connection to the other device.
6. Enter the same passcode on the GeoExplorer 3000 series handheld that you
entered on the other device and then tap
Next on the right softkey on the
handheld.
7. On the handheld, tap
Finish on the right softkey.
Step 2: Configuring the handheld to output data
to the other device
1. On the GeoExplorer 3000 series handheld, tap
/ Settings / Connections / GPS Connector to
open the GPS Connector software.
2. Use the GPS Connector software to output NMEA
or TSIP messages to COM9. This is the
GeoExplorer 3000 series handheld's Host
Bluetooth serial port.
3. Use the Trimble GPS field software to ensure
NMEA output is set to on, to configure the NMEA
output settings (output rate and messages), and
to configure the GPS settings.
100 GeoExplorer 3000 Series User Guide
 Loading...