

Page 1

Gentran:Server® for Windows
User’s Guide
Version 5.1
®
4232-510-USER15-0000
Page 2

Copyright Notice
Gentran:Server for Windows
© Copyright 1995–2005
Sterling Commerce, Inc.
ALL RIGHTS RESERVED
Sterling Commerce Software
Trade Secret Notice
THE GENTRAN:SERVER FOR WINDOWS SOFTWARE ("STERLING COMMERCE SOFTWARE") IS THE CONFIDENTIAL AND
TRADE SECRET PROPERTY OF STERLING COMMERCE, INC., ITS AFFILIATED COMPANIES OR ITS OR THEIR LICENSORS,
AND IS PROVIDED UNDER THE TERMS OF A LICENSE AGREEMENT. NO DUPLICATION OR DISCLOSURE WITHOUT PRIOR
WRITTEN PERMISSION. RESTRICTED RIGHTS.
This documentation, the Sterling Commerce Software it describes, and the information and know-how they contain constitute the
proprietary, confidential and valuable trade secret information of Sterling Commerce, Inc., its affiliated companies or its or their
licensors, and may not be used for any unauthorized purpose, or disclosed to others without the prior written permission of the
applicable Sterling Commerce entity. This documentation and the Sterling Commerce Software that it describes have been provided
pursuant to a license agreement that contains prohibitions against and/or restrictions on their copying, modification and use.
Duplication, in whole or in part, if and when permitted, shall bear this notice and the Sterling Commerce, Inc. copyright notice.
As and when provided to any governmental entity, government contractor or subcontractor subject to the FARs, this documentation is
provided with RESTRICTED RIGHTS under Title 48 CFR 52.227-19. Further, as and when provided to any governmental entity,
government contractor or subcontractor subject to DFARs, this documentation and the Sterling Commerce Software it describes are
provided pursuant to the customary Sterling Commerce license, as described in Title 48 CFR 227-7202 with respect to commercial
software and commercial software documentation.
These terms of use shall be governed by the laws of the State of Ohio, USA, without regard to its conflict of laws provisions. If you are
accessing the Sterling Commerce Software under an executed agreement, then nothing in these terms and conditions supersedes or
modifies the executed agreement.
Product names mentioned herein may be trademarks and/or registered trademarks of their respective companies. Gentran and
Gentran:Server are registered trademarks of Sterling Commerce, Inc.
Third Party Software:
Portions of the Sterling Commerce Software may include products, or may be distributed on the same storage media with products,
("Third Party Software") offered by third parties ("Third Party Licensors").
Warranty Disclaimer
This documentation and the Sterling Commerce Software which it describes are licensed either "AS IS" or with a limited warranty, as
set forth in the Sterling Commerce license agreement. Other than any limited warranties provided, NO OTHER WARRANTY IS
EXPRESSED AND NONE SHALL BE IMPLIED, INCLUDING THE WARRANTIES OF MERCHANTABILITY AND FITNESS FOR
USE OR FOR A PARTICULAR PURPOSE. The applicable Sterling Commerce entity reserves the right to revise this publication from
time to time and to make changes in the content hereof without the obligation to notify any person or entity of such revisions or
changes.
The Third Party Software is provided 'AS IS' WITHOUT ANY WARRANTY AND ANY EXPRESSED OR IMPLIED WARRANTIES,
INCLUDING BUT NOT LIMITED TO, THE IMPLIED WARRANTIES OF MERCHANTABILITY, AND FITNESS FOR A PARTICULAR
PURPOSE ARE DISCLAIMED. FURTHER, IF YOU ARE LOCATED OR ACCESSING THIS SOFTWARE IN THE UNITED STATES,
ANY EXPRESS OR IMPLIED WARRANTY REGARDING TITLE OR NON-INFRINGEMENT ARE DISCLAIMED.
4600 Lakehurst Court Dublin, OH 43016-2000 * 614/793-7000
© Copyright 1995–2005—Sterling Commerce, Inc.
Sterling Commerce, Inc.
Page 3

Preface About this Guide
◗ Introduction . . . . . . . . . . . . . . . . . . . . . . . . . . . . . . . . . . . . . . . . . . . . . . . . . . . . . . . . . .viii
◗ What’s in this Manual . . . . . . . . . . . . . . . . . . . . . . . . . . . . . . . . . . . . . . . . . . . . . . . . . . . ix
◗ Getting Support . . . . . . . . . . . . . . . . . . . . . . . . . . . . . . . . . . . . . . . . . . . . . . . . . . . . . . . .xi
Chapter 1 Getting Started
◗ Introducing Gentran:Server for Windows . . . . . . . . . . . . . . . . . . . . . . . . . . . . . . . . . . . 1-2
◗ Navigating in Gentran:Server . . . . . . . . . . . . . . . . . . . . . . . . . . . . . . . . . . . . . . . . . . . . 1-6
◗ Gentran:Server Data Translation Process . . . . . . . . . . . . . . . . . . . . . . . . . . . . . . . . . . . 1-9
◗ Changing your Password . . . . . . . . . . . . . . . . . . . . . . . . . . . . . . . . . . . . . . . . . . . . . . . 1-14
Chapter 2 Using Translation Objects
Table of Contents
◗ Overview . . . . . . . . . . . . . . . . . . . . . . . . . . . . . . . . . . . . . . . . . . . . . . . . . . . . . . . . . . . .2-2
◗ EDI Translation Object Browser . . . . . . . . . . . . . . . . . . . . . . . . . . . . . . . . . . . . . . . . . . 2-3
◗ Register Translation Object Dialog Box . . . . . . . . . . . . . . . . . . . . . . . . . . . . . . . . . . . . 2-6
◗ Registering New Translation Objects . . . . . . . . . . . . . . . . . . . . . . . . . . . . . . . . . . . . . . 2-7
◗ Deleting Translation Objects . . . . . . . . . . . . . . . . . . . . . . . . . . . . . . . . . . . . . . . . . . . . . 2-8
Chapter 3 Using Partners
◗ Introduction . . . . . . . . . . . . . . . . . . . . . . . . . . . . . . . . . . . . . . . . . . . . . . . . . . . . . . . . . .3-3
Using Partner Profiles . . . . . . . . . . . . . . . . . . . . . . . . . . . . . . . . . . . . . . . . . . . . . .3-4
◗ Overview . . . . . . . . . . . . . . . . . . . . . . . . . . . . . . . . . . . . . . . . . . . . . . . . . . . . . . . . . . . .3-4
◗ Partner Editor Dialog Box . . . . . . . . . . . . . . . . . . . . . . . . . . . . . . . . . . . . . . . . . . . . . . . 3-6
◗ Partner Definition (New/Edit) Dialog Box . . . . . . . . . . . . . . . . . . . . . . . . . . . . . . . . . . 3-8
◗ Inbound Relationship Dialog Box . . . . . . . . . . . . . . . . . . . . . . . . . . . . . . . . . . . . . . . . 3-10
◗ Inbound Translation Object Dialog Box . . . . . . . . . . . . . . . . . . . . . . . . . . . . . . . . . . . 3-15
◗ Inbound Group Select Dialog Box . . . . . . . . . . . . . . . . . . . . . . . . . . . . . . . . . . . . . . . 3-23
◗ Inbound Group Entry Dialog Box . . . . . . . . . . . . . . . . . . . . . . . . . . . . . . . . . . . . . . . . 3-25
◗ Inbound Interchange Select Dialog Box . . . . . . . . . . . . . . . . . . . . . . . . . . . . . . . . . . . 3-29
◗ Inbound Interchange Entry Dialog Box . . . . . . . . . . . . . . . . . . . . . . . . . . . . . . . . . . . . 3-31
◗ Outbound Relationship Dialog Box . . . . . . . . . . . . . . . . . . . . . . . . . . . . . . . . . . . . . . . 3-35
◗ Outbound Translation Object Dialog Box . . . . . . . . . . . . . . . . . . . . . . . . . . . . . . . . . . 3-40
Gentran:Server for Windows User’s Guide Gentran:Server for Windows – November 2005
Page 4

ii
◗ Outbound Group Select Dialog Box . . . . . . . . . . . . . . . . . . . . . . . . . . . . . . . . . . . . . . 3-44
◗ Outbound Group Entry Dialog Box . . . . . . . . . . . . . . . . . . . . . . . . . . . . . . . . . . . . . . 3-45
◗ Outbound Interchange Select Dialog Box . . . . . . . . . . . . . . . . . . . . . . . . . . . . . . . . . . 3-50
◗ Outbound Interchange Entry Dialog Box . . . . . . . . . . . . . . . . . . . . . . . . . . . . . . . . . . 3-52
◗ Creating a Partner Definition . . . . . . . . . . . . . . . . . . . . . . . . . . . . . . . . . . . . . . . . . . . . 3-56
◗ Creating an Inbound Relationship . . . . . . . . . . . . . . . . . . . . . . . . . . . . . . . . . . . . . . . . 3-58
◗ Creating an Outbound Relationship . . . . . . . . . . . . . . . . . . . . . . . . . . . . . . . . . . . . . . 3-66
◗ Editing and Deleting Partner Definitions . . . . . . . . . . . . . . . . . . . . . . . . . . . . . . . . . . 3-76
Routing Partner Profiles . . . . . . . . . . . . . . . . . . . . . . . . . . . . . . . . . . . . . . . . . . . 3-78
◗ Import File Select Dialog Box . . . . . . . . . . . . . . . . . . . . . . . . . . . . . . . . . . . . . . . . . . . 3-78
◗ Export File Build Dialog Box . . . . . . . . . . . . . . . . . . . . . . . . . . . . . . . . . . . . . . . . . . . 3-79
◗ Partner Copy Dialog Box . . . . . . . . . . . . . . . . . . . . . . . . . . . . . . . . . . . . . . . . . . . . . . 3-81
◗ Importing Partner Profiles . . . . . . . . . . . . . . . . . . . . . . . . . . . . . . . . . . . . . . . . . . . . . . 3-85
◗ Exporting Partner Profiles . . . . . . . . . . . . . . . . . . . . . . . . . . . . . . . . . . . . . . . . . . . . . . 3-87
◗ Copying Partner Profiles . . . . . . . . . . . . . . . . . . . . . . . . . . . . . . . . . . . . . . . . . . . . . . . 3-88
Using Partner Tables . . . . . . . . . . . . . . . . . . . . . . . . . . . . . . . . . . . . . . . . . . . . . . 3-92
◗ Overview . . . . . . . . . . . . . . . . . . . . . . . . . . . . . . . . . . . . . . . . . . . . . . . . . . . . . . . . . . . 3-92
◗ Partner Tables Dialog Box . . . . . . . . . . . . . . . . . . . . . . . . . . . . . . . . . . . . . . . . . . . . . 3-93
◗ New Table Dialog Box . . . . . . . . . . . . . . . . . . . . . . . . . . . . . . . . . . . . . . . . . . . . . . . . 3-94
◗ CrossRef Select Dialog Box . . . . . . . . . . . . . . . . . . . . . . . . . . . . . . . . . . . . . . . . . . . . 3-95
◗ CrossRef Entry Dialog Box . . . . . . . . . . . . . . . . . . . . . . . . . . . . . . . . . . . . . . . . . . . . . 3-96
◗ Lookup Select Dialog Box . . . . . . . . . . . . . . . . . . . . . . . . . . . . . . . . . . . . . . . . . . . . . 3-97
◗ Lookup Entry Dialog Box . . . . . . . . . . . . . . . . . . . . . . . . . . . . . . . . . . . . . . . . . . . . . . 3-98
◗ Table Export File Build Dialog Box . . . . . . . . . . . . . . . . . . . . . . . . . . . . . . . . . . . . . . 3-99
◗ Table Import File Select Dialog Box . . . . . . . . . . . . . . . . . . . . . . . . . . . . . . . . . . . . . 3-101
◗ Creating Partner Tables . . . . . . . . . . . . . . . . . . . . . . . . . . . . . . . . . . . . . . . . . . . . . . . 3-103
◗ Editing Partner Tables . . . . . . . . . . . . . . . . . . . . . . . . . . . . . . . . . . . . . . . . . . . . . . . . 3-105
◗ Deleting Entries in a Partner Table . . . . . . . . . . . . . . . . . . . . . . . . . . . . . . . . . . . . . . 3-106
◗ Deleting Partner Tables . . . . . . . . . . . . . . . . . . . . . . . . . . . . . . . . . . . . . . . . . . . . . . . 3-107
◗ Exporting Partner Tables . . . . . . . . . . . . . . . . . . . . . . . . . . . . . . . . . . . . . . . . . . . . . . 3-108
◗ Importing Partner Tables . . . . . . . . . . . . . . . . . . . . . . . . . . . . . . . . . . . . . . . . . . . . . . 3-111
Using Partner Locations . . . . . . . . . . . . . . . . . . . . . . . . . . . . . . . . . . . . . . . . . . 3-113
◗ Overview . . . . . . . . . . . . . . . . . . . . . . . . . . . . . . . . . . . . . . . . . . . . . . . . . . . . . . . . . . 3-113
◗ Location Select Dialog Box . . . . . . . . . . . . . . . . . . . . . . . . . . . . . . . . . . . . . . . . . . . . 3-114
◗ Location Entry Dialog Box . . . . . . . . . . . . . . . . . . . . . . . . . . . . . . . . . . . . . . . . . . . . 3-115
◗ Creating Partner Locations . . . . . . . . . . . . . . . . . . . . . . . . . . . . . . . . . . . . . . . . . . . . 3-117
◗ Editing Partner Locations . . . . . . . . . . . . . . . . . . . . . . . . . . . . . . . . . . . . . . . . . . . . . 3-118
◗ Delete Partner Locations . . . . . . . . . . . . . . . . . . . . . . . . . . . . . . . . . . . . . . . . . . . . . . 3-119
Gentran:Server for Windows – November 2005 Gentran:Server for Windows User’s Guide
Page 5

Chapter 4 Using Documents
◗ Introduction . . . . . . . . . . . . . . . . . . . . . . . . . . . . . . . . . . . . . . . . . . . . . . . . . . . . . . . . . .4-3
Document Browsers . . . . . . . . . . . . . . . . . . . . . . . . . . . . . . . . . . . . . . . . . . . . . . . . 4-4
◗ Accessing the Document Browsers . . . . . . . . . . . . . . . . . . . . . . . . . . . . . . . . . . . . . . . . 4-4
◗ In Documents Browser . . . . . . . . . . . . . . . . . . . . . . . . . . . . . . . . . . . . . . . . . . . . . . . . . 4-6
◗ ?In Documents Browser . . . . . . . . . . . . . . . . . . . . . . . . . . . . . . . . . . . . . . . . . . . . . . . . 4-8
◗ In Drawer Browser . . . . . . . . . . . . . . . . . . . . . . . . . . . . . . . . . . . . . . . . . . . . . . . . . . . 4-10
◗ Workspace Browser . . . . . . . . . . . . . . . . . . . . . . . . . . . . . . . . . . . . . . . . . . . . . . . . . . . 4-12
◗ Out Documents Browser . . . . . . . . . . . . . . . . . . . . . . . . . . . . . . . . . . . . . . . . . . . . . . . 4-14
◗ ?Out Documents Browser . . . . . . . . . . . . . . . . . . . . . . . . . . . . . . . . . . . . . . . . . . . . . . 4-16
◗ Out Drawer Browser . . . . . . . . . . . . . . . . . . . . . . . . . . . . . . . . . . . . . . . . . . . . . . . . . . 4-17
◗ Processing Browser . . . . . . . . . . . . . . . . . . . . . . . . . . . . . . . . . . . . . . . . . . . . . . . . . . . 4-19
Related Dialog Boxes . . . . . . . . . . . . . . . . . . . . . . . . . . . . . . . . . . . . . . . . . . . . . . 4-20
◗ View Choice Dialog Box . . . . . . . . . . . . . . . . . . . . . . . . . . . . . . . . . . . . . . . . . . . . . . . 4-20
◗ Print Choice Dialog Box . . . . . . . . . . . . . . . . . . . . . . . . . . . . . . . . . . . . . . . . . . . . . . . 4-22
◗ Select Export Method Dialog Box . . . . . . . . . . . . . . . . . . . . . . . . . . . . . . . . . . . . . . . 4-23
◗ Choose File to Export Document Dialog Box . . . . . . . . . . . . . . . . . . . . . . . . . . . . . . . 4-25
◗ Application Files to Import Dialog Box . . . . . . . . . . . . . . . . . . . . . . . . . . . . . . . . . . . 4-26
◗ Document Search Dialog Box . . . . . . . . . . . . . . . . . . . . . . . . . . . . . . . . . . . . . . . . . . . 4-27
◗ Filter Dialog Box . . . . . . . . . . . . . . . . . . . . . . . . . . . . . . . . . . . . . . . . . . . . . . . . . . . . . 4-29
iii
Creating and Editing Documents . . . . . . . . . . . . . . . . . . . . . . . . . . . . . . . . . . . . 4-31
◗ Creating Documents . . . . . . . . . . . . . . . . . . . . . . . . . . . . . . . . . . . . . . . . . . . . . . . . . . 4-31
◗ Opening and Editing Documents . . . . . . . . . . . . . . . . . . . . . . . . . . . . . . . . . . . . . . . . . 4-35
Managing Documents . . . . . . . . . . . . . . . . . . . . . . . . . . . . . . . . . . . . . . . . . . . . . 4-38
◗ Viewing Documents . . . . . . . . . . . . . . . . . . . . . . . . . . . . . . . . . . . . . . . . . . . . . . . . . . 4-38
◗ Viewing Currently Processing Documents . . . . . . . . . . . . . . . . . . . . . . . . . . . . . . . . . 4-41
◗ Finding Specific Text in a Document . . . . . . . . . . . . . . . . . . . . . . . . . . . . . . . . . . . . . 4-42
◗ Searching for Documents . . . . . . . . . . . . . . . . . . . . . . . . . . . . . . . . . . . . . . . . . . . . . . 4-45
◗ Sorting Documents . . . . . . . . . . . . . . . . . . . . . . . . . . . . . . . . . . . . . . . . . . . . . . . . . . . 4-46
◗ Filtering Out Drawer Documents by Status . . . . . . . . . . . . . . . . . . . . . . . . . . . . . . . . 4-47
◗ Deleting Documents . . . . . . . . . . . . . . . . . . . . . . . . . . . . . . . . . . . . . . . . . . . . . . . . . . 4-48
◗ Printing Documents . . . . . . . . . . . . . . . . . . . . . . . . . . . . . . . . . . . . . . . . . . . . . . . . . . . 4-49
Routing Documents . . . . . . . . . . . . . . . . . . . . . . . . . . . . . . . . . . . . . . . . . . . . . . . 4-51
◗ Moving Documents to the In Drawer . . . . . . . . . . . . . . . . . . . . . . . . . . . . . . . . . . . . . 4-51
◗ Copying a Document (to Reprocess and Resend) . . . . . . . . . . . . . . . . . . . . . . . . . . . . 4-52
◗ Posting Documents . . . . . . . . . . . . . . . . . . . . . . . . . . . . . . . . . . . . . . . . . . . . . . . . . . . 4-53
◗ UnPosting Documents . . . . . . . . . . . . . . . . . . . . . . . . . . . . . . . . . . . . . . . . . . . . . . . . . 4-54
◗ Responding to Documents . . . . . . . . . . . . . . . . . . . . . . . . . . . . . . . . . . . . . . . . . . . . . . 4-55
Gentran:Server for Windows User’s Guide Gentran:Server for Windows – November 2005
Page 6

iv
◗ Importing Documents . . . . . . . . . . . . . . . . . . . . . . . . . . . . . . . . . . . . . . . . . . . . . . . . . 4-57
◗ Exporting Documents . . . . . . . . . . . . . . . . . . . . . . . . . . . . . . . . . . . . . . . . . . . . . . . . . 4-59
Chapter 5 Using Communications
◗ Overview . . . . . . . . . . . . . . . . . . . . . . . . . . . . . . . . . . . . . . . . . . . . . . . . . . . . . . . . . . . .5-2
◗ Send Queue Browser . . . . . . . . . . . . . . . . . . . . . . . . . . . . . . . . . . . . . . . . . . . . . . . . . . . 5-3
◗ Communications Session Dialog Box . . . . . . . . . . . . . . . . . . . . . . . . . . . . . . . . . . . . . . 5-4
◗ Process File Dialog Box . . . . . . . . . . . . . . . . . . . . . . . . . . . . . . . . . . . . . . . . . . . . . . . . 5-5
◗ Sending Document . . . . . . . . . . . . . . . . . . . . . . . . . . . . . . . . . . . . . . . . . . . . . . . . . . . . 5-6
◗ Sending All Documents . . . . . . . . . . . . . . . . . . . . . . . . . . . . . . . . . . . . . . . . . . . . . . . . . 5-7
◗ Resending Documents . . . . . . . . . . . . . . . . . . . . . . . . . . . . . . . . . . . . . . . . . . . . . . . . . . 5-9
◗ Receiving Documents . . . . . . . . . . . . . . . . . . . . . . . . . . . . . . . . . . . . . . . . . . . . . . . . . 5-11
◗ Viewing the Send Queue . . . . . . . . . . . . . . . . . . . . . . . . . . . . . . . . . . . . . . . . . . . . . . . 5-13
◗ Processing Data Files . . . . . . . . . . . . . . . . . . . . . . . . . . . . . . . . . . . . . . . . . . . . . . . . . 5-14
Chapter 6 Using External Data
◗ Overview . . . . . . . . . . . . . . . . . . . . . . . . . . . . . . . . . . . . . . . . . . . . . . . . . . . . . . . . . . . .6-2
◗ External Data Summary Viewer . . . . . . . . . . . . . . . . . . . . . . . . . . . . . . . . . . . . . . . . . . 6-3
◗ External Data Filter Dialog Box . . . . . . . . . . . . . . . . . . . . . . . . . . . . . . . . . . . . . . . . . . 6-6
◗ Viewing External Data Files . . . . . . . . . . . . . . . . . . . . . . . . . . . . . . . . . . . . . . . . . . . . . 6-8
◗ Filtering External Data Files . . . . . . . . . . . . . . . . . . . . . . . . . . . . . . . . . . . . . . . . . . . . . 6-9
Chapter 7 Using Interchanges
◗ Overview . . . . . . . . . . . . . . . . . . . . . . . . . . . . . . . . . . . . . . . . . . . . . . . . . . . . . . . . . . . .7-2
◗ Interchanges Browser . . . . . . . . . . . . . . . . . . . . . . . . . . . . . . . . . . . . . . . . . . . . . . . . . . 7-3
◗ Interchange Filter Dialog Box . . . . . . . . . . . . . . . . . . . . . . . . . . . . . . . . . . . . . . . . . . . . 7-8
◗ Viewing Interchanges . . . . . . . . . . . . . . . . . . . . . . . . . . . . . . . . . . . . . . . . . . . . . . . . . 7-10
◗ Filtering the Display of Interchanges . . . . . . . . . . . . . . . . . . . . . . . . . . . . . . . . . . . . . 7-12
◗ Viewing Documents within Interchanges . . . . . . . . . . . . . . . . . . . . . . . . . . . . . . . . . . 7-14
◗ Attaching Interchanges to a Partner . . . . . . . . . . . . . . . . . . . . . . . . . . . . . . . . . . . . . . 7-16
◗ Resending Interchanges . . . . . . . . . . . . . . . . . . . . . . . . . . . . . . . . . . . . . . . . . . . . . . . . 7-18
◗ Manually Acknowledging an Interchange, Group, or Document . . . . . . . . . . . . . . . . 7-20
Chapter 8 Using Acknowledgements
◗ Overview . . . . . . . . . . . . . . . . . . . . . . . . . . . . . . . . . . . . . . . . . . . . . . . . . . . . . . . . . . . .8-2
◗ Defining Inbound Acknowledgement Criteria . . . . . . . . . . . . . . . . . . . . . . . . . . . . . . . 8-3
◗ Defining Outbound Acknowledgement Criteria . . . . . . . . . . . . . . . . . . . . . . . . . . . . . . 8-6
◗ Manually Acknowledging Documents . . . . . . . . . . . . . . . . . . . . . . . . . . . . . . . . . . . . 8-10
Gentran:Server for Windows – November 2005 Gentran:Server for Windows User’s Guide
Page 7

◗ Special Considerations for EDIFACT Acknowledgements . . . . . . . . . . . . . . . . . . . . 8-11
◗ Checking for Overdue Acknowledgements . . . . . . . . . . . . . . . . . . . . . . . . . . . . . . . . . 8-12
Chapter 9 Using Tracking
◗ Overview . . . . . . . . . . . . . . . . . . . . . . . . . . . . . . . . . . . . . . . . . . . . . . . . . . . . . . . . . . . .9-2
◗ Tracking Inbound Information . . . . . . . . . . . . . . . . . . . . . . . . . . . . . . . . . . . . . . . . . . . 9-3
◗ Tracking Outbound Information . . . . . . . . . . . . . . . . . . . . . . . . . . . . . . . . . . . . . . . . . . 9-6
◗ Viewing and Printing Data Audit Information . . . . . . . . . . . . . . . . . . . . . . . . . . . . . . . 9-9
◗ Viewing and Printing Tracking Information . . . . . . . . . . . . . . . . . . . . . . . . . . . . . . . . 9-10
Chapter 10 Using Archive and Restore
◗ Introduction . . . . . . . . . . . . . . . . . . . . . . . . . . . . . . . . . . . . . . . . . . . . . . . . . . . . . . . . . 10-2
Archiving Data . . . . . . . . . . . . . . . . . . . . . . . . . . . . . . . . . . . . . . . . . . . . . . . . . . . 10-3
◗ Overview . . . . . . . . . . . . . . . . . . . . . . . . . . . . . . . . . . . . . . . . . . . . . . . . . . . . . . . . . . . 10-3
◗ Archive Manager . . . . . . . . . . . . . . . . . . . . . . . . . . . . . . . . . . . . . . . . . . . . . . . . . . . . . 10-5
◗ Gentran EDI Archive Definition Dialog Box . . . . . . . . . . . . . . . . . . . . . . . . . . . . . . 10-11
◗ Interchange Selection Criteria Dialog Box . . . . . . . . . . . . . . . . . . . . . . . . . . . . . . . . 10-13
◗ Interchange Search Dialog Box . . . . . . . . . . . . . . . . . . . . . . . . . . . . . . . . . . . . . . . . . 10-15
◗ Group Search Dialog Box . . . . . . . . . . . . . . . . . . . . . . . . . . . . . . . . . . . . . . . . . . . . . 10-18
◗ Document Search Dialog Box . . . . . . . . . . . . . . . . . . . . . . . . . . . . . . . . . . . . . . . . . . 10-20
◗ Mailbox Archive Definition Dialog Box . . . . . . . . . . . . . . . . . . . . . . . . . . . . . . . . . . 10-22
◗ Mailbox Selection Criteria Dialog Box . . . . . . . . . . . . . . . . . . . . . . . . . . . . . . . . . . . 10-24
◗ Mailbox Search Dialog Box . . . . . . . . . . . . . . . . . . . . . . . . . . . . . . . . . . . . . . . . . . . 10-26
◗ External Data Archive Definition Dialog Box . . . . . . . . . . . . . . . . . . . . . . . . . . . . . 10-28
◗ External Data Selection Criteria Dialog Box . . . . . . . . . . . . . . . . . . . . . . . . . . . . . . 10-30
◗ External Data Search Dialog Box . . . . . . . . . . . . . . . . . . . . . . . . . . . . . . . . . . . . . . . 10-31
◗ Search Results Dialog Box . . . . . . . . . . . . . . . . . . . . . . . . . . . . . . . . . . . . . . . . . . . . 10-33
◗ Sort Preferences Dialog Box . . . . . . . . . . . . . . . . . . . . . . . . . . . . . . . . . . . . . . . . . . . 10-35
◗ Creating an Archive Definition . . . . . . . . . . . . . . . . . . . . . . . . . . . . . . . . . . . . . . . . . 10-36
◗ Archiving Data . . . . . . . . . . . . . . . . . . . . . . . . . . . . . . . . . . . . . . . . . . . . . . . . . . . . . 10-38
◗ Viewing Archived Data . . . . . . . . . . . . . . . . . . . . . . . . . . . . . . . . . . . . . . . . . . . . . . . 10-39
◗ Searching Archived Data . . . . . . . . . . . . . . . . . . . . . . . . . . . . . . . . . . . . . . . . . . . . . . 10-43
v
Restoring Archived Data . . . . . . . . . . . . . . . . . . . . . . . . . . . . . . . . . . . . . . . . . . 10-44
◗ Overview . . . . . . . . . . . . . . . . . . . . . . . . . . . . . . . . . . . . . . . . . . . . . . . . . . . . . . . . . . 10-44
◗ Restored Interchanges Browser . . . . . . . . . . . . . . . . . . . . . . . . . . . . . . . . . . . . . . . . . 10-46
◗ Viewing Restored Interchanges . . . . . . . . . . . . . . . . . . . . . . . . . . . . . . . . . . . . . . . . . 10-51
◗ Filtering the Display of Restored Interchanges . . . . . . . . . . . . . . . . . . . . . . . . . . . . . 10-53
◗ Viewing Restored Documents . . . . . . . . . . . . . . . . . . . . . . . . . . . . . . . . . . . . . . . . . . 10-55
Gentran:Server for Windows User’s Guide Gentran:Server for Windows – November 2005
Page 8

vi
◗ Reprocessing Restored Documents . . . . . . . . . . . . . . . . . . . . . . . . . . . . . . . . . . . . . . 10-57
◗ Resending Restored Interchanges . . . . . . . . . . . . . . . . . . . . . . . . . . . . . . . . . . . . . . . 10-58
Chapter 11 Using Process Control
◗ Introduction . . . . . . . . . . . . . . . . . . . . . . . . . . . . . . . . . . . . . . . . . . . . . . . . . . . . . . . . . 11-2
Sessions . . . . . . . . . . . . . . . . . . . . . . . . . . . . . . . . . . . . . . . . . . . . . . . . . . . . . . . . . 11-3
◗ Overview . . . . . . . . . . . . . . . . . . . . . . . . . . . . . . . . . . . . . . . . . . . . . . . . . . . . . . . . . . . 11-3
◗ Creating Sessions . . . . . . . . . . . . . . . . . . . . . . . . . . . . . . . . . . . . . . . . . . . . . . . . . . . . . 11-9
◗ Editing Sessions . . . . . . . . . . . . . . . . . . . . . . . . . . . . . . . . . . . . . . . . . . . . . . . . . . . . . 11-12
◗ Deleting Sessions . . . . . . . . . . . . . . . . . . . . . . . . . . . . . . . . . . . . . . . . . . . . . . . . . . . . 11-15
Events . . . . . . . . . . . . . . . . . . . . . . . . . . . . . . . . . . . . . . . . . . . . . . . . . . . . . . . . . 11-16
◗ Overview . . . . . . . . . . . . . . . . . . . . . . . . . . . . . . . . . . . . . . . . . . . . . . . . . . . . . . . . . . 11-16
◗ Creating New Events . . . . . . . . . . . . . . . . . . . . . . . . . . . . . . . . . . . . . . . . . . . . . . . . . 11-23
◗ Editing Events . . . . . . . . . . . . . . . . . . . . . . . . . . . . . . . . . . . . . . . . . . . . . . . . . . . . . . 11-27
◗ Deleting Events . . . . . . . . . . . . . . . . . . . . . . . . . . . . . . . . . . . . . . . . . . . . . . . . . . . . . 11-31
◗ Viewing Events . . . . . . . . . . . . . . . . . . . . . . . . . . . . . . . . . . . . . . . . . . . . . . . . . . . . . 11-32
◗ Activating and Suspending Events . . . . . . . . . . . . . . . . . . . . . . . . . . . . . . . . . . . . . . 11-36
◗ Executing an Event Immediately . . . . . . . . . . . . . . . . . . . . . . . . . . . . . . . . . . . . . . . . 11-38
Glossary
Index
Calendars . . . . . . . . . . . . . . . . . . . . . . . . . . . . . . . . . . . . . . . . . . . . . . . . . . . . . . 11-39
◗ Overview . . . . . . . . . . . . . . . . . . . . . . . . . . . . . . . . . . . . . . . . . . . . . . . . . . . . . . . . . . 11-39
◗ Creating and Editing Calendars . . . . . . . . . . . . . . . . . . . . . . . . . . . . . . . . . . . . . . . . . 11-41
◗ Deleting Calendars . . . . . . . . . . . . . . . . . . . . . . . . . . . . . . . . . . . . . . . . . . . . . . . . . . 11-43
Gentran:Server for Windows – November 2005 Gentran:Server for Windows User’s Guide
Page 9

-vii
PREFACE
About this Guide
Contents ◗ Introduction . . . . . . . . . . . . . . . . . . . . . . . . . . . . . . . . . . . . . . . . . . .viii
◗ What’s in this Manual . . . . . . . . . . . . . . . . . . . . . . . . . . . . . . . . . . . .ix
◗ Getting Support . . . . . . . . . . . . . . . . . . . . . . . . . . . . . . . . . . . . . . . . . xi
Gentran:Server for Windows User’s Guide Gentran:Server for Windows – November 2005
Page 10

viii
Introduction
Welcome Welcome to Gentran:Server
Data Interchange (EDI) software for the Windows operating system.
Gentran:Server provides you with the easy-to-use tools you need to electronically
exchange data with your trading partners, including:
◗ Data translation
◗ Process control
◗ Communications system
We believe that you will find this software and the supporting materials easy to
use and directly beneficial to your business.
®
for Windows®, the Sterling Commerce Electronic
Gentran:Server for Windows – November 2005 Gentran:Server for Windows User’s Guide
Page 11

What’s in this Manual
Introduction This manual is intended to support the online Help by assisting you in performing
various tasks in Gentran:Server. This task-oriented approach is intended to answer
any questions you may have about Gentran:Server with step-by-step instructions.
ix
Intended audience
Prerequisite
knowledge
Description of
contents
This manual is intended for the staff responsible for the following:
◗ Implementing EDI
◗ Setting up trading partner relationships
◗ Creating and using EDI documents
◗ Sending and receiving documents
◗ Acknowledging documents
◗ Tracking document flow
◗ Configuring and using unattended processing
This manual assumes that you are familiar with using a PC and with Microsoft®
Windows or Windows 2000 functions.
This User’s Guide contains the following chapters:
◗ Chapter 1, Getting Started, explains the content, organization, and
conventions in this guide. This chapter also describes how to get technical
support introduces Gentran:Server for Windows.
◗ Chapter 2, Using Translation Objects, explains how to register (install),
delete, and view translation objects.
◗ Chapter 3, Using Partners, explains how to set up a complete partner profile.
This chapter describes how to import and export a partner profile and partner
tables, and describes how to copy a partner profile.
◗ Chapter 4, Using Documents, explains all facets of managing your
documents.
◗ Chapter 5, Using Communications, explains how to send, receive, and resend
documents, and how to view the Send Queue.
◗ Chapter 6, Using Interchanges, explains how to view interchanges and the
documents within interchanges, how to filter the display of interchanges, how
to attach (link) an interchange to a partner, and how to resend interchanges.
◗ Chapter 7, Using External Data, explains how to view and print external data
files.
(Continued on next page)
Gentran:Server for Windows User’s Guide Gentran:Server for Windows – November 2005
Page 12

x
Description of
contents
(contd)
◗ Chapter 8, Using Acknowledgements, explains how to manually set a
document, group, or interchange to acknowledged, how to define inbound and
outbound acknowledgement criteria for document reconciliation, and how to
check for overdue acknowledgements.
◗ Chapter 9, Using Tracking, explains how to view and print tracking
information.
◗ Chapter 10, Using Archive and Restore, explains how to archive data and
restore archived data to the system.
◗ Chapter 11, Using Process Control, explains how to create, edit, delete,
activate, and suspend automatic process control events. This chapter also
describes how to use sessions and calendars.
◗ The Glossary contains definitions of EDI and Gentran:Server terms and
concepts.
Online Help The majority of the documentation for Gentran:Server is contained in the Online
Help system. This includes all dialog box element definitions, detailed processing
information, and the “how to” information that is contained in this manual.
Gentran:Server for Windows – November 2005 Gentran:Server for Windows User’s Guide
Page 13

Getting Support
Introduction The Sterling Commerce Gentran:Server software is supported by trained product
support personnel who are available to help you with product questions or
concerns.
Note
Gentran:Server Customer Support does not support non-Sterling Commerce
products (such as SQL Server and Oracle), but can assist you in configuring
non-Sterling Commerce products to work with Gentran:Server.
Phone number For assistance, please refer to the Getting Started Guide to determine which
support phone number you should use.
xi
Before calling
support
To help us provide prompt service, we ask that you do the following:
◗ Attempt to recreate any problem that you encounter and record the exact
sequence of events.
◗ When you call product support, you should be prepared to provide us with the
information below.
Information Description
Identification Your company name, your name, telephone number
and extension, and the case number (if the question
refers to a previously reported issue)
System Configuration The Gentran:Server version (and any service packs
installed) and information about the primary
Gentran system controller and all machines
experiencing problems, including the Windows
operating system version, amount of memory,
available disk space, database version, Microsoft
Data Access (MDAC) version, and Internet Explorer
version
Also, please describe any recent changes in your
hardware, software, or the configuration of your
system.
System Data Store Which machines contain folders in the system data
store?
(Continued on next page)
Gentran:Server for Windows User’s Guide Gentran:Server for Windows – November 2005
Page 14

xii
Information Description
Error Messages Record the exact wording of any error messages you
receive and the point in the software where the error
occurred, as well as any log files.
Attempted Solutions Record any steps that you took attempting to resolve
the problem and note all the outcomes. Provide an
estimate on how many times the problem occurred
and whether it can be reproduced.
Accessing the
Sterling
Commerce
Support Web
Site
The Sterling Commerce Customer Support Web Site contains valuable
information about getting support for Gentran:Server for Windows, including the
following:
◗ Scope of support services
◗ Customer support policies
◗ Call prioritizing
◗ Customer support phone directory
◗ Creating new Support on Demand cases
◗ Checking the status of Support on Demand cases
◗ Adding information to Support on Demand cases
The Customer Support Web site is constantly updated and all Sterling Commerce
customers have access to it. This web site also contains the most recent product
updates and is a valuable source of product information.
Reference
Refer to the Getting Started Guide for information about how to access the
Customer Support Web site.
Documentation The Customer Support Web site contains a documentation library, which contains
the entire Gentran:Server for Windows documentation set. You can download the
product manuals in PDF format from this library at any time.
Gentran:Server for Windows – November 2005 Gentran:Server for Windows User’s Guide
Page 15

-1
1 - 1
CHAPTER
1
Getting Started
Contents ◗ Introducing Gentran:Server for Windows . . . . . . . . . . . . . . . . . . .1 - 2
◗ Navigating in Gentran:Server . . . . . . . . . . . . . . . . . . . . . . . . . . . .1 - 6
◗ Gentran:Server Data Translation Process . . . . . . . . . . . . . . . . . . .1 - 9
◗ Changing your Password . . . . . . . . . . . . . . . . . . . . . . . . . . . . . . .1 - 14
3
Gentran:Server for Windows User’s Guide Gentran:Server for Windows – November 2005
Page 16

1 - 2
Introducing Gentran:Server for Windows Getting Started
Introducing Gentran:Server for Windows
Overview Gentran:Server for Windows is a combined data translation, process control, and
communication system that operates within the Microsoft Windows environment.
This product is primarily designed for the translation and communication of EDI
and other similar types of data.
Through the process control system, you can integrate Gentran:Server with a wide
variety of business applications in a manner that makes it a complementary
extension of the applications, rather than a cumbersome add-on.
System
components
The Gentran:Server system consists of several logical components.
Gentran:Server can be deployed in many ways in this environment through a
combination of a database, system data store, process controllers, communication
controllers, and user interface clients.
Mandatory components
Each system must have a primary Gentran system controller, system data store,
and a database.
Database The database is the relational database that Gentran:Server uses to store system
data. This database enables multiple users to access the same data. The other
components of the product interact with this database using ODBC™ (Open
Database Connectivity), which allows for many different database management
systems on the database controller.
Reference
See the Getting Support card to determine which database management systems
have been certified for use with Gentran:Server.
System data store The system data store serves as the repository of all shared Gentran:Server data.
The system data store may reside on any machine that is a file server to the
machines in the Gentran:Server system. There is only one system data store in the
Gentran:Server system, but the associated folders and files may be distributed
across multiple machines, if necessary.
Note
The machines where the system data store resides must be accessible by all
machines in the Gentran:Server system.
Gentran:Server for Windows – November 2005 Gentran:Server for Windows User’s Guide
Page 17

Getting Started Introducing Gentran:Server for Windows
1 - 3
Process
Controllers
Primary system
controller
Secondary
controllers
There are two types of controllers in the Gentran:Server system:
◗ A single primary system controller
◗ One or more secondary controllers (if required)
The primary system controller controls the management and dispatching of processing requests within the system, manages the audit functionality, and controls all other system components.
If you purchased a distributed license, you can deploy additional controllers (secondary controllers) across the Windows network to allow the processing load to be distributed for fast and efficient throughput. The secondary controller can be either or both of the following:
Process controller
The process controllers provide similar functions to the primary system controller.
They are controlled by the primary system controller and are used to distribute
processes across multiple machines in a Windows network.
Communication controller
The communication controllers regulate communication between Gentran:Server
and the organizations (value-added networks (VANs) or trading partners) with
whom data is exchanged. The communication controllers can support leased or
dialed connections, as well as interaction with third-party communication
packages using the file interface capability.
User interface
clients
A communication controller is installed via a communications gateway.
The user interface clients provide the functions that are necessary to monitor and control the system. The main data management component provides a graphical user interface to the following:
◗ Document locations
◗ Partner profiles
◗ Communication setup and logs
◗ System Audit Log
◗ Process control setup and management
Gentran:Server for Windows User’s Guide Gentran:Server for Windows – November 2005
Page 18

1 - 4
Introducing Gentran:Server for Windows Getting Started
User interface
client
components
Logical
components
The five main components of the Gentran:Server user interface client are the
following:
◗ The Electronic Commerce (EC) Manager window is a data management
component that serves as a high-level navigation tool, as well as a document
management tool. The EC Manager also provides access to the Partner Editor,
the Document Editor, Application Integration, and Forms Integration.
◗ Partner Editor allows you to define, edit, and delete all partner information
for your company and for all of your trading partners.
◗ Document Editor is your data entry tool. It allows you to create, modify, and
view documents.
◗ Application Integration is a subsystem that enables you to generate import,
export, and document turnaround translation objects.
◗ Forms Integration is a subsystem that enables you to generate screen entry
and print translation objects.
The user interface client and controller components are the logical components of
the Gentran system. These components can be deployed on a single machine or
over a number of machines, depending on your needs.
Typical system
Typically, your system initially consists of a small number of machines operating
as Gentran:Server user interface clients, and a larger, more powerful machine
operating as a combined primary system controller/communication controller/
process controller.
After you complete the necessary translation objects for your installation (using
Application Integration), you can add other process controllers and
communication controllers as required, to distribute the processing workload.
(Continued on next page)
Gentran:Server for Windows – November 2005 Gentran:Server for Windows User’s Guide
Page 19

Getting Started Introducing Gentran:Server for Windows
1 - 5
Logical
components
(contd)
Multiple Controllers
Secondary Controller 1
System component interaction diagram
The following diagram illustrated the interaction of the logical components of the
Gentran:Server system:
Installed Components:
Process Controller (default)
■
Client Access Components
■
Integration Components
■
Primary Gentran System Controller
System
Data
Database
Store
Windows 2003, Enterprise Edition
User Interface
Client
Gentran:
Server
User Interface
Client
Secondary Controller 2
Gentran:
Server
Windows 2003, Standard
Edition
Installed Components:
Process Controller
■
■
Client Access Components
Gentran:
Server
Windows 2000
Professional
Windows XP
Professional
Installed Components:
Client Access Components
■
Integration Components
■
Gentran:
Server
Gentran:
Server
Windows 2000 Server
Installed Components:
Process Controller (default)
■
Client Access Components
■
Gentran:Server for Windows User’s Guide Gentran:Server for Windows – November 2005
Page 20

1 - 6
Navigating in Gentran:Server Getting Started
Navigating in Gentran:Server
Overview The Gentran:Server Electronic Commerce (EC) Manager window allows you to
access its functionality in the following ways:
◗ Select the menu option from the Main Menu Bar.
◗ Click the appropriate button on the Main Toolbar.
◗ Click the appropriate button on the Browser Toolbar.
◗ Click the appropriate part of The Desk.
◗ Click the appropriate button within a chosen browser window.
Note
The Electronic Commerce Manager display is refreshed when you press F5 or
click
Refresh (available on most browsers).
Electronic
Commerce
Manager window
The following illustrates the Gentran:Server EC Manager window:
Control Menu
Title Bar Minimize/Maximize Buttons
Main Menu Bar
Browser Toolbar
Gentran:Server for Windows – November 2005 Gentran:Server for Windows User’s Guide
Status Bar
The Desk
Main Toolbar
Page 21

Getting Started Navigating in Gentran:Server
Components The following are the components of the main Gentran:Server window:
Control menu
The Control Menu contains the following commands: Restore, Move, Size,
Minimize, Maximize, and Close.
Title Bar
The Title Bar contains the name of the application and, on the Gentran:Server
desktop, it displays the name of the system you are logged in to. You can use this
to move the position of the Gentran:Server EC Manager window on your desktop.
Minimize/Maximize buttons
The Minimize button reduces the window to an icon. The Maximize button
enlarges the window to its maximum size.
Main menu bar
The Main Menu Bar contains the drop-down menus. Detailed descriptions of each
of the commands on these menus are found in the Online Help. Unavailable items
are dimmed.
1 - 7
Workspace
?In Documents
In Documents
Main toolbar
The Main Toolbar gives you access to some of the most common browsers and
functions in Gentran:Server. Unavailable items are dimmed. The Main Toolbar is
a dockable toolbar, so you can affix it to any edge of the EC Manager window.
The following illustrates the Main Toolbar.
Out Documents
?Out Documents
In Drawer
Interchanges
Out Drawer
Interchanges
Restored
External
Data
Document
Translation
Objects
Send Queue
Processing
Search
Send and
Receive
Audit
Log
Close
Active
Window
Window
Archive
Tr ad i n g
Partners
Process
Control
Mailbox
Client
(Continued on next page)
Forms
Integration
Configuration
Application
Integration
System
Gentran:Server for Windows User’s Guide Gentran:Server for Windows – November 2005
Page 22

1 - 8
Navigating in Gentran:Server Getting Started
Browser toolbar
The Browser Toolbar gives you access to the functions that are available from
browsers in Gentran:Server. Unavailable items are dimmed. The Browser Toolbar
is a dockable toolbar, so you can affix it to any edge of the EC Manager window.
The following illustrates the Browser Toolbar:
New
View External Data
Translator Report
Attach
View
Gentran
Data
Open
Delete
Export
Import
Print
View
Copy
Te xt
Copy
Document
Move to
In Drawer
Post
Sort/Filter
Respond
The Desk
The Desk is a graphic representation of the Gentran:Server components and
document locations. It provides a quick and easy way to access some of the most
commonly used browsers, functions, and subsystems of Gentran:Server. You can
click the appropriate part of The Desk any time you need to access a browser,
function, or subsystem represented on The Desk.
Some of the browser icons display a graphic representation of paper if the
document location contains documents. The Desk also allows you to access the
Partner Editor subsystem, the Help system, the Process Control function (clock
icon), and the Send/Receive functions (phone icon), and allows you to quit
Gentran:Server (Exit/door icon).
Acknowledge
Toggle
Interchange
Status
Status bar
The Status Bar displays status information about a selection, command, or
process, defines menu items as you highlight each item in the menu, and indicates
any current keyboard-initiated modes for typing (e.g., CAP for the “Caps Lock”
key, NUM for the “Num Lock” key).
Gentran:Server for Windows – November 2005 Gentran:Server for Windows User’s Guide
Page 23

Getting Started Gentran:Server Data Translation Process
Gentran:Server Data Translation Process
1 - 9
Translating
inbound data
diagram
The following illustrates the inbound translation process:
Receives interchanges from network
Communicator
Communicator
Translator
Translator
Receives interchanges from network
and passes to translator
and passes .
Unwraps interchange envelopes
and separates groups.
Unwraps groups envelopes and
separates transaction sets.
Unwraps transaction envelopes
and separates documents.
Updates document database.
Locates trading relationship
and associated translation object.
?In Documents
Temporary
Temporary
Storage
Storage
Temp orar y
Storage
Temporary
Storage
export or
export or
print
print
Generate and reconcile
acknowledgements.
acknowledgements
?Out Documents
Compliance checks and moves
compliant documents
Out Documents
document turnaround
Post to
Out
Out
Documents
Workspace
In Documents
automatic export
In Drawer
export or
export or
print
print
Gentran:Server for Windows User’s Guide Gentran:Server for Windows – November 2005
Page 24

1 - 10
Gentran:Server Data Translation Process Getting Started
Translating
inbound data
process
The system uses the following process to translate inbound data:.
Stage Description
1
The Communicator receives interchanges from your trading partners
via a network.
2
3
The Communicator passes the interchanges to the translator.
The translator uses a system interchange break translation object to
unwrap the interchange envelopes and separate each group into
temporary storage.
4
The translator uses a system group break translation object to
unwrap the group envelopes and separate each transaction set into
temporary storage.
5
The translator uses a system transaction break translation object to:
◗ Unwrap the transaction envelopes.
◗ Separate each document into a separate file on the system data
store.
◗ Write a record to the database with reference information about
the document.
6
Does the translator locate a trading relationship for each document?
◗ If yes (a trading relationship is located), the translator attempts
to identify the export, document turnaround, or print translation
object associated with that relationship. If the translator does
locate a trading relationship and translation object, it uses that
translation object to compliance check the document.
◗ If no (the translator does not locate the trading relationship or
translation object), the document is marked as not compliant and
is moved in the ?In Documents.
7
Is the document is compliant with the EDI standard?
◗ If yes, the translator changes the document status to compliant
and moves the document in the In Documents.
◗ If no, the document remains in the ?In Documents. The
translator writes a detailed error report to help you to determine
the problem that was encountered.
(Continued on next page)
Gentran:Server for Windows – November 2005 Gentran:Server for Windows User’s Guide
Page 25

Getting Started Gentran:Server Data Translation Process
Stage Description
1 - 11
8
In the trading relationship, if you specify that the system needs to
generate a functional acknowledgement for a document, the
translator uses the system acknowledgement translation object to
generate the acknowledgement.
◗ Compliant acknowledgements are moved to the Out Documents
to be sent.
◗ Non-compliant acknowledgements are moved to the ?Out
Documents. If an error occurred with the acknowledgement
translation object, the acknowledgement is also moved to the
?Out Documents.
The translator also reconciles acknowledgements if you receive an
acknowledgement-type transaction (such as 997 or CONTRL).
9
If you specified either automatic export or automatic turnaround in
the trading relationship, the translator uses the specified export or
document turnaround translation object to either export or generate
the appropriate response document.
Gentran:Server for Windows User’s Guide Gentran:Server for Windows – November 2005
Page 26

1 - 12
Gentran:Server Data Translation Process Getting Started
Translating
outbound data
diagram
The following illustrates the outbound translation process:
Import
Application
System
Configuration
System Import
Translation
Object
Partner
Database
Import
Translation
Object
Translator
Locates system import
translation object.
Determines trading
relationship.
Use trading
relationship to
determine Import
Translation Object.
Document
Editor
Compliance checks documents
and formats to EDI.
Imports
through
process
control.
Gentran:Server for Windows – November 2005 Gentran:Server for Windows User’s Guide
Posts compliant
documents to
Out Documents.
Sends documents to
partners.
Workspace
Out Documents
Page 27

Getting Started Gentran:Server Data Translation Process
1 - 13
Translating
outbound data
process
The system uses the following process to translate outbound data:
Stage Description
1
Use one of the following processes to initiate outbound translation:
◗ Import a file through the process control system using a timed or
polled session. This writes all valid documents to the database
with a compliant status and locates the documents in the Out
Documents. Invalid documents are marked with a
non-compliant status and located in the ?Out Documents.
◗ Import an application file. Documents that you import manually
are located in the Workspace.
◗ Use the Document Editor to enter documents (if there is an
appropriate data entry translation object registered with
Gentran:Server). These documents are located in the Workspace.
2
If you import a file, the translator checks the import definitions from
the system configuration to match the file name with a system
import translation object.
3
The translator uses the system import translation object to determine
which trading relationship (established in Partner Editor)
corresponds to each document in the application file, so the system
knows which import map to use to process the document.
4
After the translator determines which trading relationship
corresponds with a document in the file, it ascertains which import
translation object is specified in that relationship.
5
The translator uses the import translation object to compliance check
the document. If the document is compliant (valid), it is marked
“OK.” If the document is not compliant (invalid), it is marked
“NotOK.”
6
If there is another document remaining in the import file, the
translator repeats steps 3 - 5 until all documents are processed.
7
If you manually import a file through the EC Manager or use the
Document Editor, you need to post the compliant document to the
Out Documents.
Note
Once documents are located in the Out Documents, they can be sent
using the process control system or by using the EC Manager
transmit option.
Gentran:Server for Windows User’s Guide Gentran:Server for Windows – November 2005
Page 28

1 - 14
Changing your Password Getting Started
Changing your Password
Introduction Your Gentran:Server password is stored in your User Access profile.
Notes
◗ You must know your old password to change it. If you have forgotten your
password, please contact your system administrator.
◗ If you are using Integrated security, you may also need to change your
Gentran:Server and database passwords if you change your Windows
password.
Reference
See your system administrator if you have any questions about which security
mode you use.
Procedure Use this procedure to change your password.
Step Action
1
From the Options menu, select Preferences.
System response
The Preferences dialog box is displayed.
2
3
4
5
Select the Change Password tab to access that option.
In the Old Password box, type your old password.
In the New Password box, type your new password.
In the Confirm New Password box, type your new password again.
Note
If the Confirm New Password does not match the New Password,
you will be prompted to type it again.
6
Once complete, click OK to save the changes.
System response
The system is updated and the next time you log on to the system
you will need to enter the new password.
Gentran:Server for Windows – November 2005 Gentran:Server for Windows User’s Guide
Page 29

-1
2 - 1
CHAPTER
2
Using Translation Objects
Contents ◗ Overview . . . . . . . . . . . . . . . . . . . . . . . . . . . . . . . . . . . . . . . . . . . .2 - 2
◗ EDI Translation Object Browser . . . . . . . . . . . . . . . . . . . . . . . . . .2 - 3
◗ Register Translation Object Dialog Box . . . . . . . . . . . . . . . . . . . .2 - 6
◗ Registering New Translation Objects . . . . . . . . . . . . . . . . . . . . . .2 - 7
◗ Deleting Translation Objects . . . . . . . . . . . . . . . . . . . . . . . . . . . . .2 - 8
Gentran:Server for Windows User’s Guide Gentran:Server for Windows – November 2005
Page 30

2 - 2
Overview Using Translation Objects
Overview
In this chapter This chapter describes how to use translation objects with Gentran:Server.
Translation
object definition
Creating
translation
objects
Types of
translation
objects
A translation object is a set of definitions, links, and rules that combine to provide
the translator with all the information necessary to convert data from one format
to another. Translation objects are used in Gentran:Server to control the
processing of the translator subsystem.
Translation objects are created by compiling an application map or a form
definition using the Application or Forms Integration subsystem in
Gentran:Server.
Reference
See the Application Integration User’s Guide and Forms Integration User’s
Guide more information about those subsystems.
There are two types of translation objects:
System translation objects
System translation objects control the creation and separation of
interchanges, functional groups, and transaction sets. They are also used to
generate and reconcile functional acknowledgements.
User translation objects
User translation objects control screen entry, importing, exporting, and
creating printed reports. All required system translation objects are
automatically installed with the Gentran:Server system.
Gentran:Server for Windows – November 2005 Gentran:Server for Windows User’s Guide
Page 31
Using Translation Objects EDI Translation Object Browser
EDI Translation Object Browser
Introduction The following lists the system components that comprise the EDI Translation
Object feature.
Browser or
Dialog box Function
2 - 3
EDI Translation
Object browser
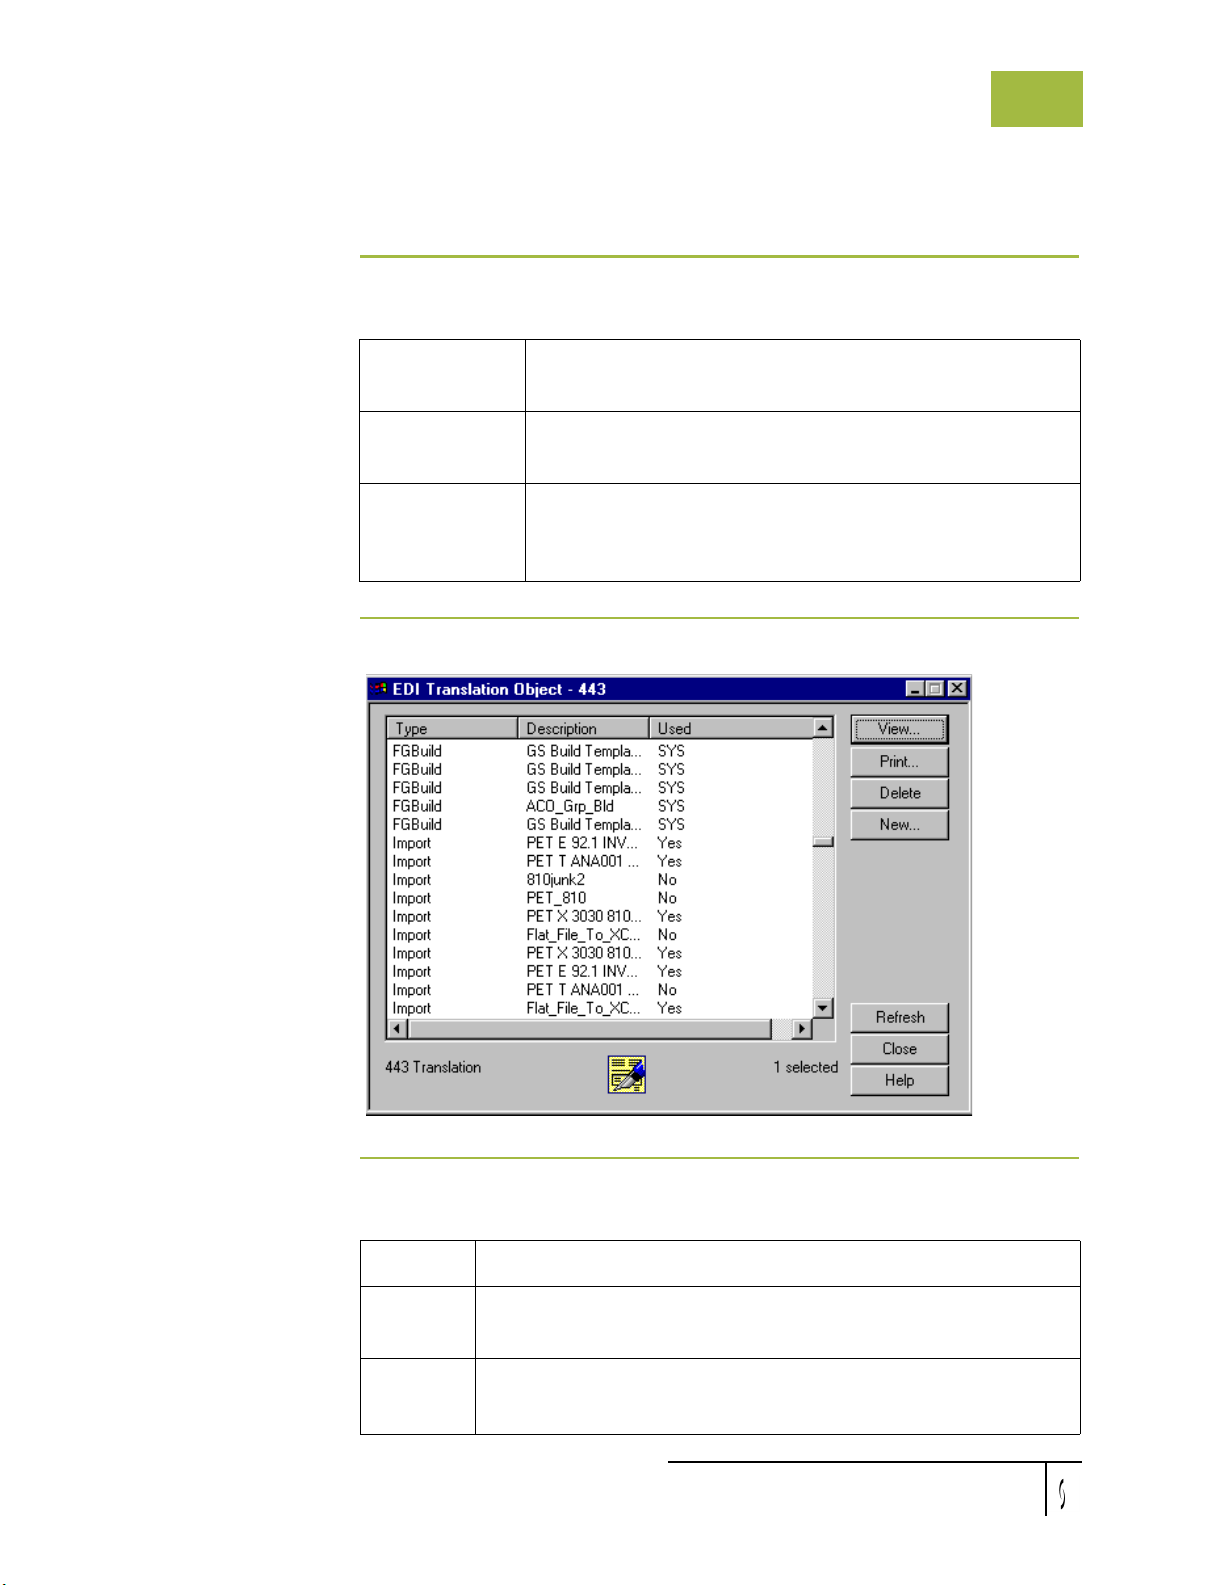
diagram
EDI Translation
Object
Register
Translation
Object
The following illustrates the EDI Translation Object browser.
Allows you to view, print, delete, or register translation
objects.
Allows you to select translation objects to be registered with
the system.
Parts and
functions
Gentran:Server for Windows User’s Guide Gentran:Server for Windows – November 2005
The following lists the parts of the EDI Translation Object browser and their
functions.
Part Function
Type
Description
Describes the type of translation object defined, such as export,
import, or system import.
Displays a description that further identifies the translation object.
(Continued on next page)
Page 32

2 - 4
EDI Translation Object Browser Using Translation Objects
Part Function
Used
View
Indicates whether the translation object is currently
associated with an Inbound or Outbound Partner
Relationship. Valid values are:
◗ Ye s —Indicates the translation object is in use.
◗ No—Indicates the translation object is not in use.
◗ SYS*—Indicates a system translation object that is in use.
◗ SYS—Indicates a system translation object that is not in use
Note
If a translation object is currently used (associated with an
Inbound or Outbound Partner Relationship), you cannot delete it.
Also, the system prevents you from deleting translation objects
that are designated as system translation objects (SYS* or SYS).
System Translation Objects are all translation objects except
Import, Export, Data Entry, Screen Entry, Turn Around, and Print.
Also, any translation object with “system” in the description is a
system translation object.
Displays a window containing descriptive information for the
selected translation object, including the following:
◗ Description of the translation object
◗ Type of translation object (for example, Export)
◗ Input and output agency (for example, X for ANSI X12)
◗ Input and output version (for example, 003030)
◗ Input and output transaction ID (for example, 850)
◗ Input and output release (for TRADACOMS only)
◗ File name of the translation object (for example, 3030.tpl)
Print
Displays the Print Choice dialog box, which allows you to specify
whether you want to print the selected translation objects or print a
summary list of the selected translation objects.
Note
The Formatted option is unavailable because a formatted
version is always printed when for a translation object.
Use this table to determine your next step.
Delete
New
Removes the selected translation object or objects.
Displays the Register Translation Object Dialog Box, which
allows you to identify a translation object to the system.
Refresh
Gentran:Server for Windows – November 2005 Gentran:Server for Windows User’s Guide
Refreshes the browser display.
(Continued on next page)
Page 33
Using Translation Objects EDI Translation Object Browser
Part Function
2 - 5
Close
Help
Exits the EDI Translation Object browser.
Accesses Online Help.
Gentran:Server for Windows User’s Guide Gentran:Server for Windows – November 2005
Page 34
2 - 6
Register Translation Object Dialog Box Using Translation Objects
Register Translation Object Dialog Box
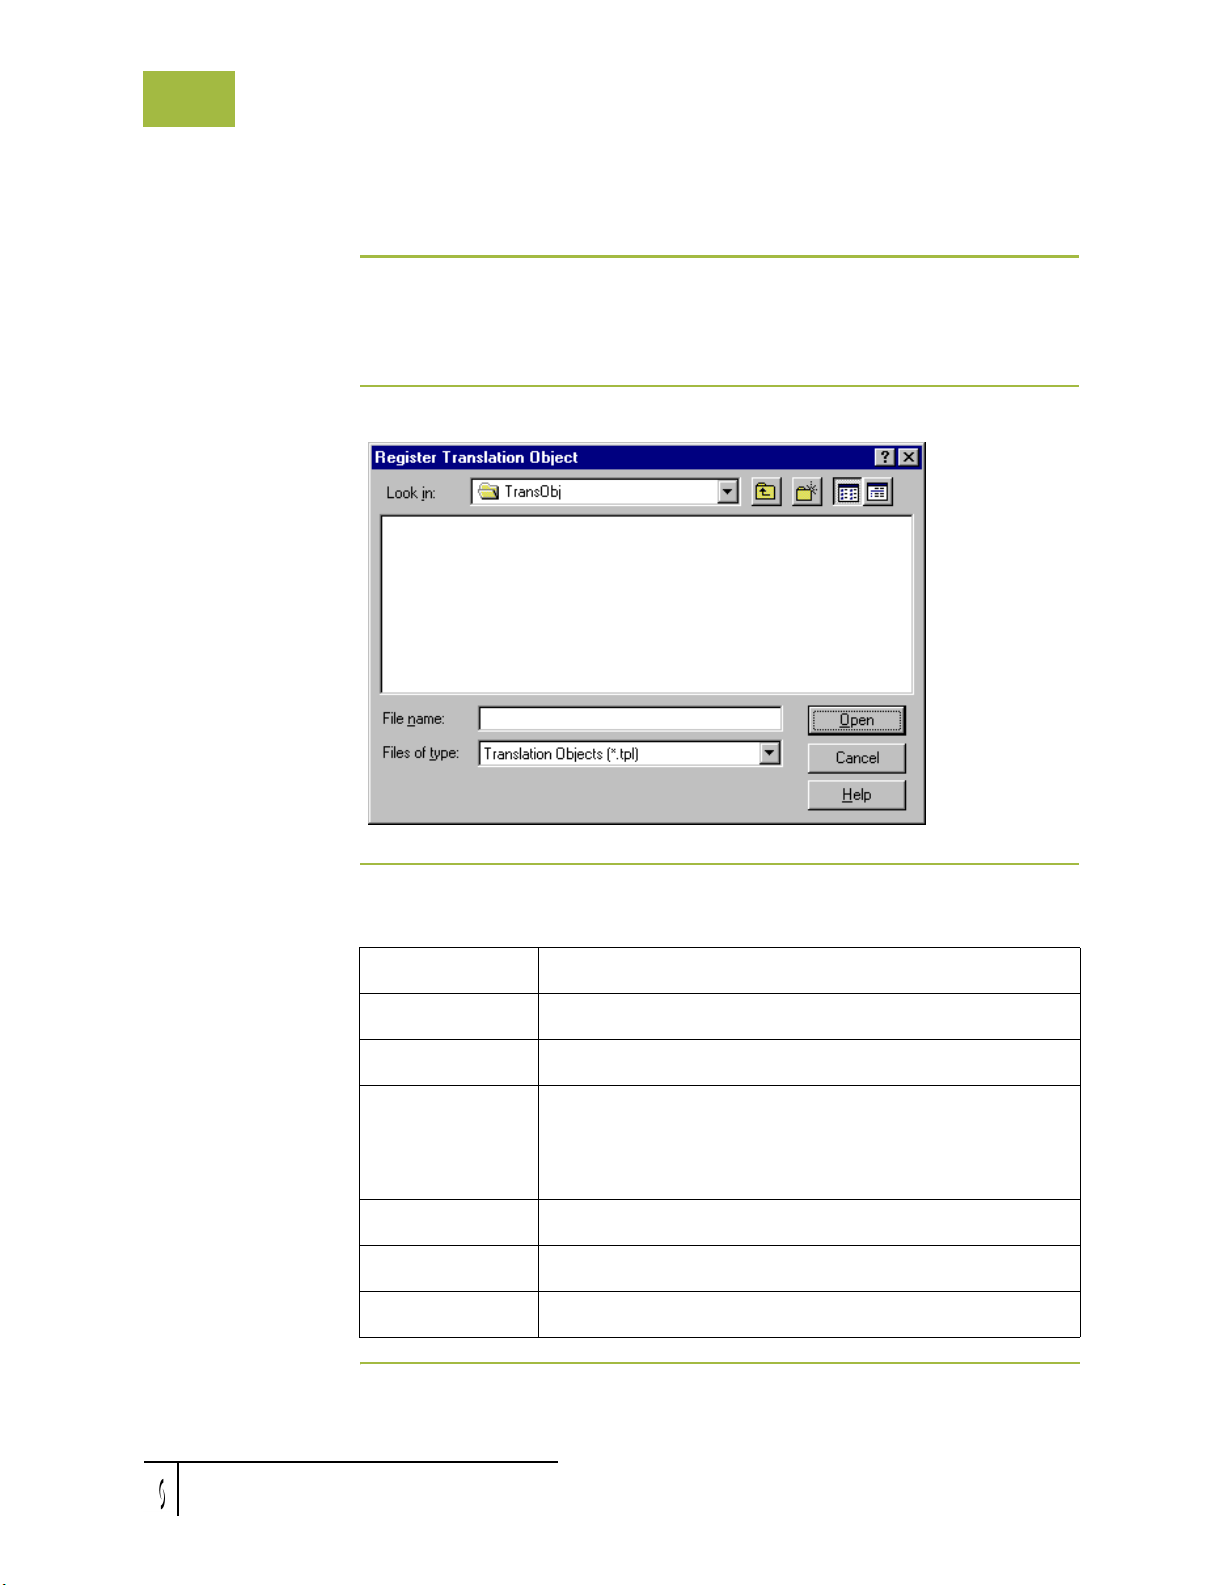
Introduction The Register Translation Object dialog box enables you to register a selected
translation object file with Gentran:Server (identify the translation object to the
system).
Diagram The following illustrates the Register Translation Object dialog box:
Parts and
functions
The following lists the parts of the Register Translation Object dialog box and
their functions:
Part Function
Look in Specify the drive and folder where the file is located.
File name Specify the name of the file that you want to register.
Files of type Specify the type of file that you want to access.
Note
The file extension for translation objects is .TPL.
Open
Cancel
Help
Selects the chosen file and exits the Open dialog box.
Exits the Open dialog box without selecting a file.
Accesses Online Help.
Gentran:Server for Windows – November 2005 Gentran:Server for Windows User’s Guide
Page 35
Using Translation Objects Registering New Translation Objects
Registering New Translation Objects
Introduction The Register Translation Object function enables you to register your translation
object file with Gentran:Server so the system can identify the translation object.
2 - 7
Automatic
registration
You can set the auto-register feature to automatically register translation objects
when they are compiled. See How to Set the Auto-register option in chapter 2 of
the Application Integration User’s Guide.
Procedure Use this procedure to register a translation object.
Step Action
1
2
3
From the View menu, select Translation Objects.
System response
The system displays the EDI Translation Object browser.
Click New.
System response
The system displays the Register Translation Object dialog box.
Select the translation object file that you want to register with the
system from the list or type it in the File name box.
Note
To highlight a group of translation objects, click on the first
translation object and then press the SHIFT key and then click
on the last translation object in the group. To highlight several
translation objects that are not adjacent to each other, press the
CTRL key and click on the translation objects.
4
Gentran:Server for Windows User’s Guide Gentran:Server for Windows – November 2005
Click Open.
System response
The system registers the translation object files exits the
Register Translation Object dialog box.
Note
If the selected file is invalid, you receive a warning message.
Only valid Gentran:Server translation object files can be
installed.
If the translation object is a duplicate, you are prompted with a
message asking whether or not you want to overwrite the
existing translation object.
Page 36
2 - 8
Deleting Translation Objects Using Translation Objects
Deleting Translation Objects
Introduction You can delete old or unused translation objects from the system only if they are
not currently associated with an Inbound or Outbound Partner Relationship (“No”
in the Used column on the EDI Translation Object browser).
The system prevents you from deleting translation objects that are designated as
“system translation objects” (SYS” or SYS).
Procedure Use this procedure to delete a translation object.
Step Action
1
From the View menu, select Translation Objects.
System response
The EDI Translation Object browser is displayed.
2
3
Select the translation object or objects you want to delete.
Click Delete.
System response
The Delete confirmation dialog box is displayed.
4
Do you want to delete these translation objects?
◗ If yes, click Ye s to confirm the delete.
◗ If no, click No to cancel the delete request.
Gentran:Server for Windows – November 2005 Gentran:Server for Windows User’s Guide
Page 37

-1
3 - 1
CHAPTER
3
Using Partners
Contents ◗ Introduction . . . . . . . . . . . . . . . . . . . . . . . . . . . . . . . . . . . . . . . . . .3 - 3
Using Partner Profiles. . . . . . . . . . . . . . . . . . . . . . . . . . . . . . . . . . . . . . . . . . .3 - 4
◗ Overview . . . . . . . . . . . . . . . . . . . . . . . . . . . . . . . . . . . . . . . . . . . .3 - 4
◗ Partner Editor Dialog Box . . . . . . . . . . . . . . . . . . . . . . . . . . . . . . .3 - 6
◗ Partner Definition (New/Edit) Dialog Box . . . . . . . . . . . . . . . . . .3 - 8
◗ Inbound Relationship Dialog Box . . . . . . . . . . . . . . . . . . . . . . . .3 - 10
◗ Inbound Translation Object Dialog Box . . . . . . . . . . . . . . . . . . .3 - 15
◗ Inbound Group Select Dialog Box . . . . . . . . . . . . . . . . . . . . . . .3 - 23
◗ Inbound Group Entry Dialog Box . . . . . . . . . . . . . . . . . . . . . . . .3 - 25
◗ Inbound Interchange Select Dialog Box . . . . . . . . . . . . . . . . . . .3 - 29
◗ Inbound Interchange Entry Dialog Box. . . . . . . . . . . . . . . . . . . .3 - 31
◗ Outbound Relationship Dialog Box. . . . . . . . . . . . . . . . . . . . . . .3 - 35
◗ Outbound Translation Object Dialog Box. . . . . . . . . . . . . . . . . .3 - 40
◗ Outbound Group Select Dialog Box . . . . . . . . . . . . . . . . . . . . . .3 - 44
◗ Outbound Group Entry Dialog Box. . . . . . . . . . . . . . . . . . . . . . .3 - 45
◗ Outbound Interchange Select Dialog Box . . . . . . . . . . . . . . . . . .3 - 50
◗ Outbound Interchange Entry Dialog Box . . . . . . . . . . . . . . . . . .3 - 52
◗ Creating a Partner Definition. . . . . . . . . . . . . . . . . . . . . . . . . . . .3 - 56
◗ Creating an Inbound Relationship . . . . . . . . . . . . . . . . . . . . . . . .3 - 58
◗ Creating an Outbound Relationship. . . . . . . . . . . . . . . . . . . . . . .3 - 66
◗ Editing and Deleting Partner Definitions . . . . . . . . . . . . . . . . . .3 - 76
Routing Partner Profiles. . . . . . . . . . . . . . . . . . . . . . . . . . . . . . . . . . . . . . . .3 - 78
◗ Import File Select Dialog Box. . . . . . . . . . . . . . . . . . . . . . . . . . .3 - 78
◗ Export File Build Dialog Box . . . . . . . . . . . . . . . . . . . . . . . . . . .3 - 79
◗ Partner Copy Dialog Box. . . . . . . . . . . . . . . . . . . . . . . . . . . . . . .3 - 81
◗ Importing Partner Profiles . . . . . . . . . . . . . . . . . . . . . . . . . . . . . .3 - 85
◗ Exporting Partner Profiles . . . . . . . . . . . . . . . . . . . . . . . . . . . . . .3 - 87
◗ Copying Partner Profiles . . . . . . . . . . . . . . . . . . . . . . . . . . . . . . .3 - 88
Using Partner Tables. . . . . . . . . . . . . . . . . . . . . . . . . . . . . . . . . . . . . . . . . . .3 - 92
◗ Overview . . . . . . . . . . . . . . . . . . . . . . . . . . . . . . . . . . . . . . . . . . .3 - 92
Gentran:Server for Windows User’s Guide Gentran:Server for Windows – November 2005
Page 38

3 - 2
Using Partners
◗ Partner Tables Dialog Box. . . . . . . . . . . . . . . . . . . . . . . . . . . . . .3 - 93
◗ New Table Dialog Box . . . . . . . . . . . . . . . . . . . . . . . . . . . . . . . .3 - 94
◗ CrossRef Select Dialog Box . . . . . . . . . . . . . . . . . . . . . . . . . . . .3 - 95
◗ CrossRef Entry Dialog Box . . . . . . . . . . . . . . . . . . . . . . . . . . . . .3 - 96
◗ Lookup Select Dialog Box. . . . . . . . . . . . . . . . . . . . . . . . . . . . . .3 - 97
◗ Lookup Entry Dialog Box . . . . . . . . . . . . . . . . . . . . . . . . . . . . . .3 - 98
◗ Table Export File Build Dialog Box . . . . . . . . . . . . . . . . . . . . . .3 - 99
◗ Table Import File Select Dialog Box. . . . . . . . . . . . . . . . . . . . .3 - 101
◗ Creating Partner Tables . . . . . . . . . . . . . . . . . . . . . . . . . . . . . . .3 - 103
◗ Editing Partner Tables . . . . . . . . . . . . . . . . . . . . . . . . . . . . . . . .3 - 105
◗ Deleting Entries in a Partner Table . . . . . . . . . . . . . . . . . . . . . .3 - 106
◗ Deleting Partner Tables . . . . . . . . . . . . . . . . . . . . . . . . . . . . . . .3 - 107
◗ Exporting Partner Tables . . . . . . . . . . . . . . . . . . . . . . . . . . . . . .3 - 108
◗ Importing Partner Tables . . . . . . . . . . . . . . . . . . . . . . . . . . . . . .3 - 111
Using Partner Locations . . . . . . . . . . . . . . . . . . . . . . . . . . . . . . . . . . . . . . .3 - 113
◗ Overview . . . . . . . . . . . . . . . . . . . . . . . . . . . . . . . . . . . . . . . . . .3 - 113
◗ Location Select Dialog Box. . . . . . . . . . . . . . . . . . . . . . . . . . . .3 - 114
◗ Location Entry Dialog Box . . . . . . . . . . . . . . . . . . . . . . . . . . . .3 - 115
◗ Creating Partner Locations . . . . . . . . . . . . . . . . . . . . . . . . . . . .3 - 117
◗ Editing Partner Locations . . . . . . . . . . . . . . . . . . . . . . . . . . . . .3 - 118
◗ Delete Partner Locations . . . . . . . . . . . . . . . . . . . . . . . . . . . . . .3 - 119
Gentran:Server for Windows – November 2005 Gentran:Server for Windows User’s Guide
Page 39

Using Partners Introduction
Introduction
In this chapter This chapter explains how to use the Gentran:Server Partner Editor, including:
◗ Using partner profiles
◗ Routing partner profiles
◗ Using partner tables
◗ Using partner locations
Partner Editor The Partner Editor allows you to define, edit, and delete all partner relationship
information for your company and all of your trading partners. Partner
relationships allow you to send and receive data to and from your trading partners.
The Partner Editor also allows you to use an internal system partner (Internal
System User) to define your company to the system.
3 - 3
Gentran:Server
for RosettaNet
See “Using Partner Editor with Gentran:Server for RosettaNet” in the
Gentran:Server for RosettaNet User’s Guide for more information about defining
®
partners for use with RosettaNet
.
Gentran:Server for Windows User’s Guide Gentran:Server for Windows – November 2005
Page 40

3 - 4
Overview Using Partners
Using Partner Profiles 0
Overview
Introduction You can set up your partner profiles using any of three methods: importing,
copying, and creating them yourself. The method you use depends on whether you
have a partner profile to use as a starting point, as shown in the following table:
Partner profile
creation method When to use
Import existing
profile
Copy existing profile Use this method when you have an existing profile that
Create a new profile Use this method when you do not have a profile to
Use this method if you receive partner profiles from
Sterling Commerce or if you have an existing profile
from which you can import partner details. The profile
can be exported from another copy of the
Gentran:Server system.
Reference
See Importing Partner Profiles on page 3 - 85 for more
information.
you can copy and then enter a unique partner definition
and key enveloping information for the copied partner.
Reference
See Copying Partner Profiles on page 3 - 88 for more
information.
import or copy.
Reference
See Process of defining a partner profile on page 3 - 5
for more information.
Partner
definition
Gentran:Server for Windows – November 2005 Gentran:Server for Windows User’s Guide
A partner profile begins with a partner definition. The partner definition contains the basic information about that partner that the system needs before you define the rest of the partner profile. You need to create a partner definition for each partner with whom you are going to exchange data.
Page 41
Using Partners Overview
Partner profile To complete the partner profile, you need to define an inbound or outbound
relationship or both:
◗ If you are receiving and processing information from this trading partner, you
need to define an appropriate inbound relationship.
◗ If you are sending information to this trading partner, you need to define an
outbound relationship.
You need to create a partner profile for each partner with whom you are going to
exchange data.
3 - 5
Process of
defining a
partner profile
The following describes the partner profile creation process:
Stage Description
1
Create the partner definition.
Reference
See Creating a Partner Definition on page 3 - 56.
2
If necessary, create the inbound relationship.
Reference
See Creating an Inbound Relationship on page 3 - 58.
3
If necessary, create the outbound relationship.
Reference
See Creating an Outbound Relationship on page 3 - 66.
4
Do you need to use a cross-reference or lookup table with the partner
relationship to supplement or convert data you enter or receive?
◗ If yes, see Creating Partner Tables on page 3 - 103.
◗ If no, continue with stage 5.
5
Do you need to use locations to contain address- and contact-related
information about the partner?
◗ If yes, see Creating Partner Locations on page 3 - 117.
◗ If no, you have completed the partner profile definition process.
Gentran:Server for Windows User’s Guide Gentran:Server for Windows – November 2005
Page 42
3 - 6
Partner Editor Dialog Box Using Partners
Partner Editor Dialog Box
Introduction The Partner Editor enables you to define, edit, and delete all partner information
for your company and all of your trading partners.
Diagram The following illustrates the Partner Editor dialog box:
Parts and
The following lists the parts of the Partner Editor dialog box and their functions:
functions
Part Function
Select a Partner Displays the list of partner profiles to select from.
Copy Displays the Partner Copy Dialog Box, which allows you
to copy a partner profile.
Import Displays the Import File Select Dialog Box, which allows
you to import a partner profile.
(Continued on next page)
Gentran:Server for Windows – November 2005 Gentran:Server for Windows User’s Guide
Page 43
Using Partners Partner Editor Dialog Box
Part Function
Export Displays the Export File Build Dialog Box, which allows
you to export a partner profile.
Exit Exits the Partner Editor dialog box.
Edit Displays the Partner Definition (New/Edit) Dialog Box,
which allows you to change information about the selected
partner.
New Displays the Partner Definition (New/Edit) Dialog Box,
which allows you to create a partner definition.
Delete Removes the selected partner profile from the system.
Inbound Displays the Inbound Relationship Dialog Box for the
selected partner.
Outbound Displays the Outbound Relationship Dialog Box for the
selected partner.
3 - 7
Tab le s Displays the Partner Tables Dialog Box for the selected
partner.
Locations Displays the Location Select Dialog Box for the selected
partner.
Refresh Refreshes the dialog box display.
Help Accesses Online Help.
Gentran:Server for Windows User’s Guide Gentran:Server for Windows – November 2005
Page 44
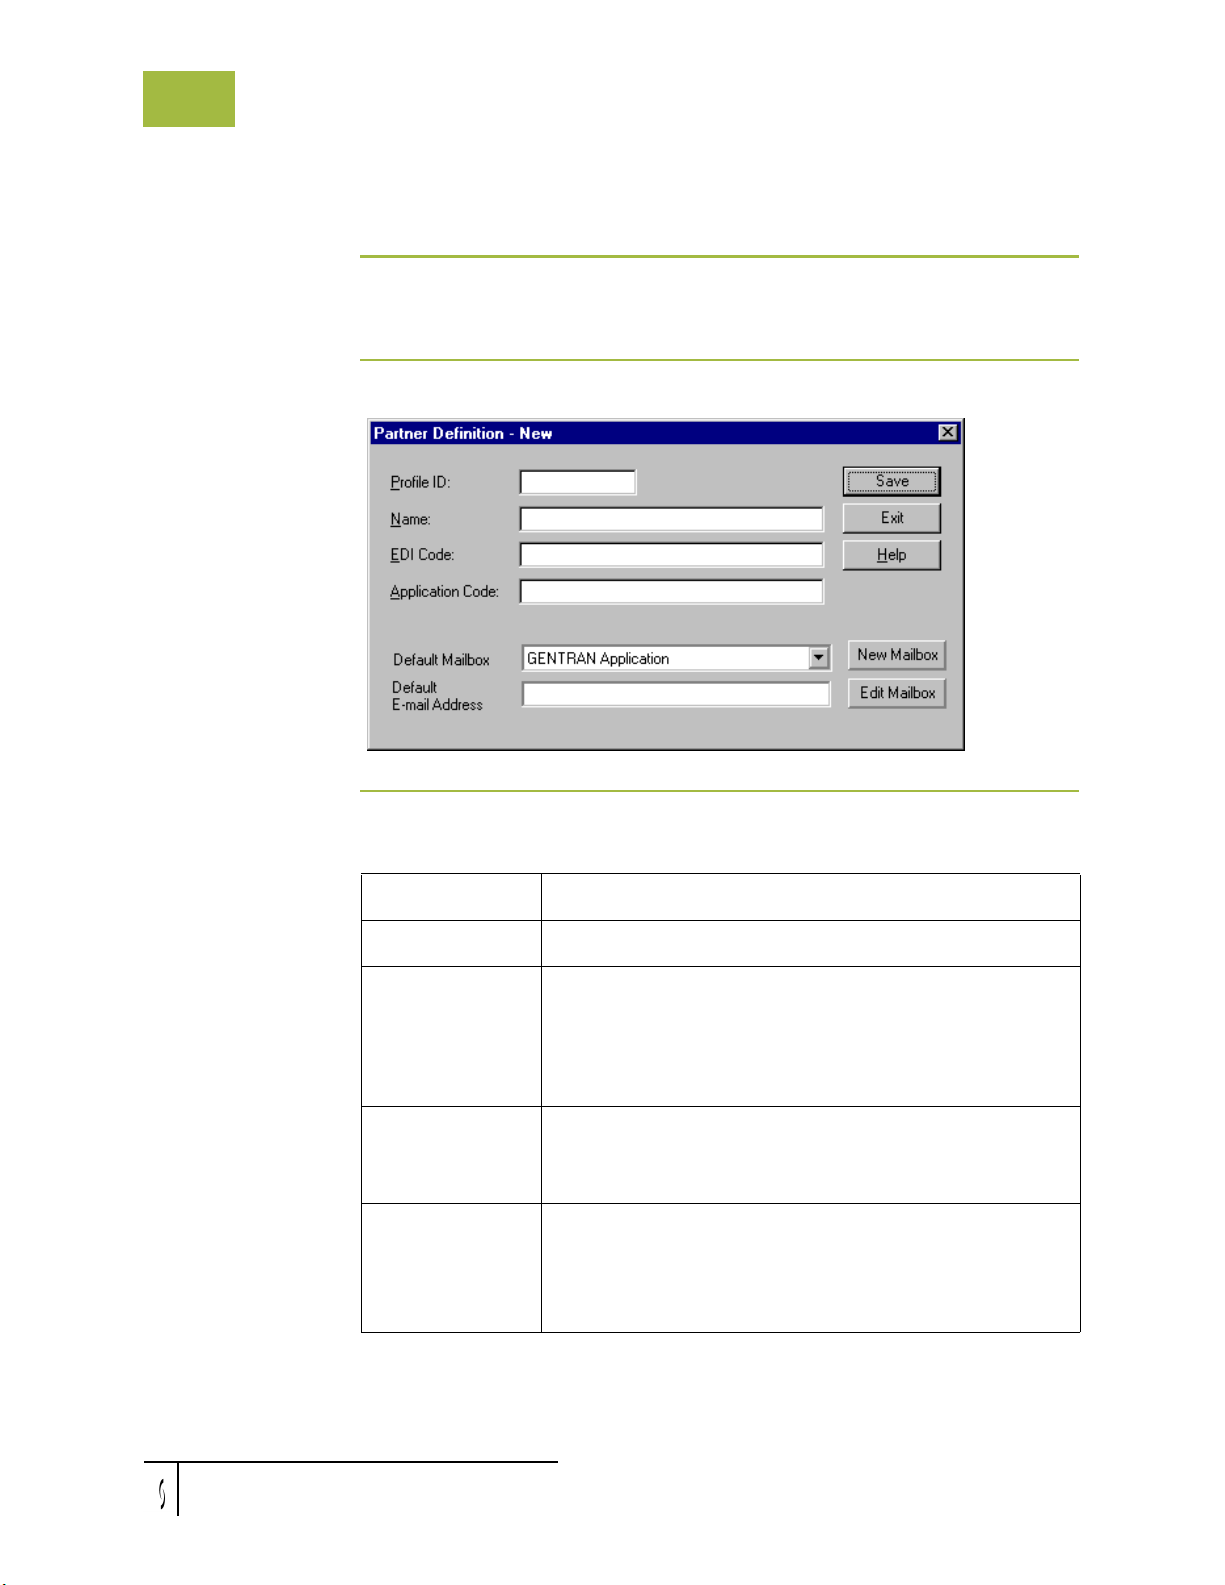
3 - 8
Partner Definition (New/Edit) Dialog Box Using Partners
Partner Definition (New/Edit) Dialog Box
Introduction The Partner Definition dialog box enables you to create a new partner definition
or, if you select a previously defined partner definition, it allows you to edit it.
Diagram The following illustrates the Partner Definition - New dialog box:
Parts and
functions
The following lists the parts of the Partner Definition dialog box and their
functions:
Part Function
Profile ID Specify a unique identifier for the selected partner.
Name Specify a unique name for the partner.
Note
Make this name as descriptive as possible, because this is
the name displayed in the partner selection list.
EDI Code Specify the EDI identifier for this partner. The system uses
this value during inbound processing to select the correct
trading partner definition.
Application Code Specify an application code used to identify this partner.
The system uses this value during outbound import
processing to select the correct trading partner definition.
(Continued on next page)
Gentran:Server for Windows – November 2005 Gentran:Server for Windows User’s Guide
Page 45
Using Partners Partner Definition (New/Edit) Dialog Box
Part Function
Default Mailbox Select a default mailbox to use to identify this partner for
non-RosettaNet EDI relationships.
Reference
See the Communications User’s Guide for more
information.
3 - 9
Default E-mail
Address
Specify a default e-mail address to use to identify this
partner for non-RosettaNet EDI relationships.
Reference
See the Communications User’s Guide for more
information.
Save Saves the modified information.
Exit Exits the Partner Definition dialog box.
Help Displays Online Help.
New Mailbox Displays the Create New Mailbox wizard, which allows
you to create a new mailbox.
Reference
See the Communications User’s Guide for more
information.
Edit Mailbox Displays the Mailbox Properties dialog box, which allows
you to edit the mailbox.
Reference
See the Communications User’s Guide for more
information.
Gentran:Server for Windows User’s Guide Gentran:Server for Windows – November 2005
Page 46
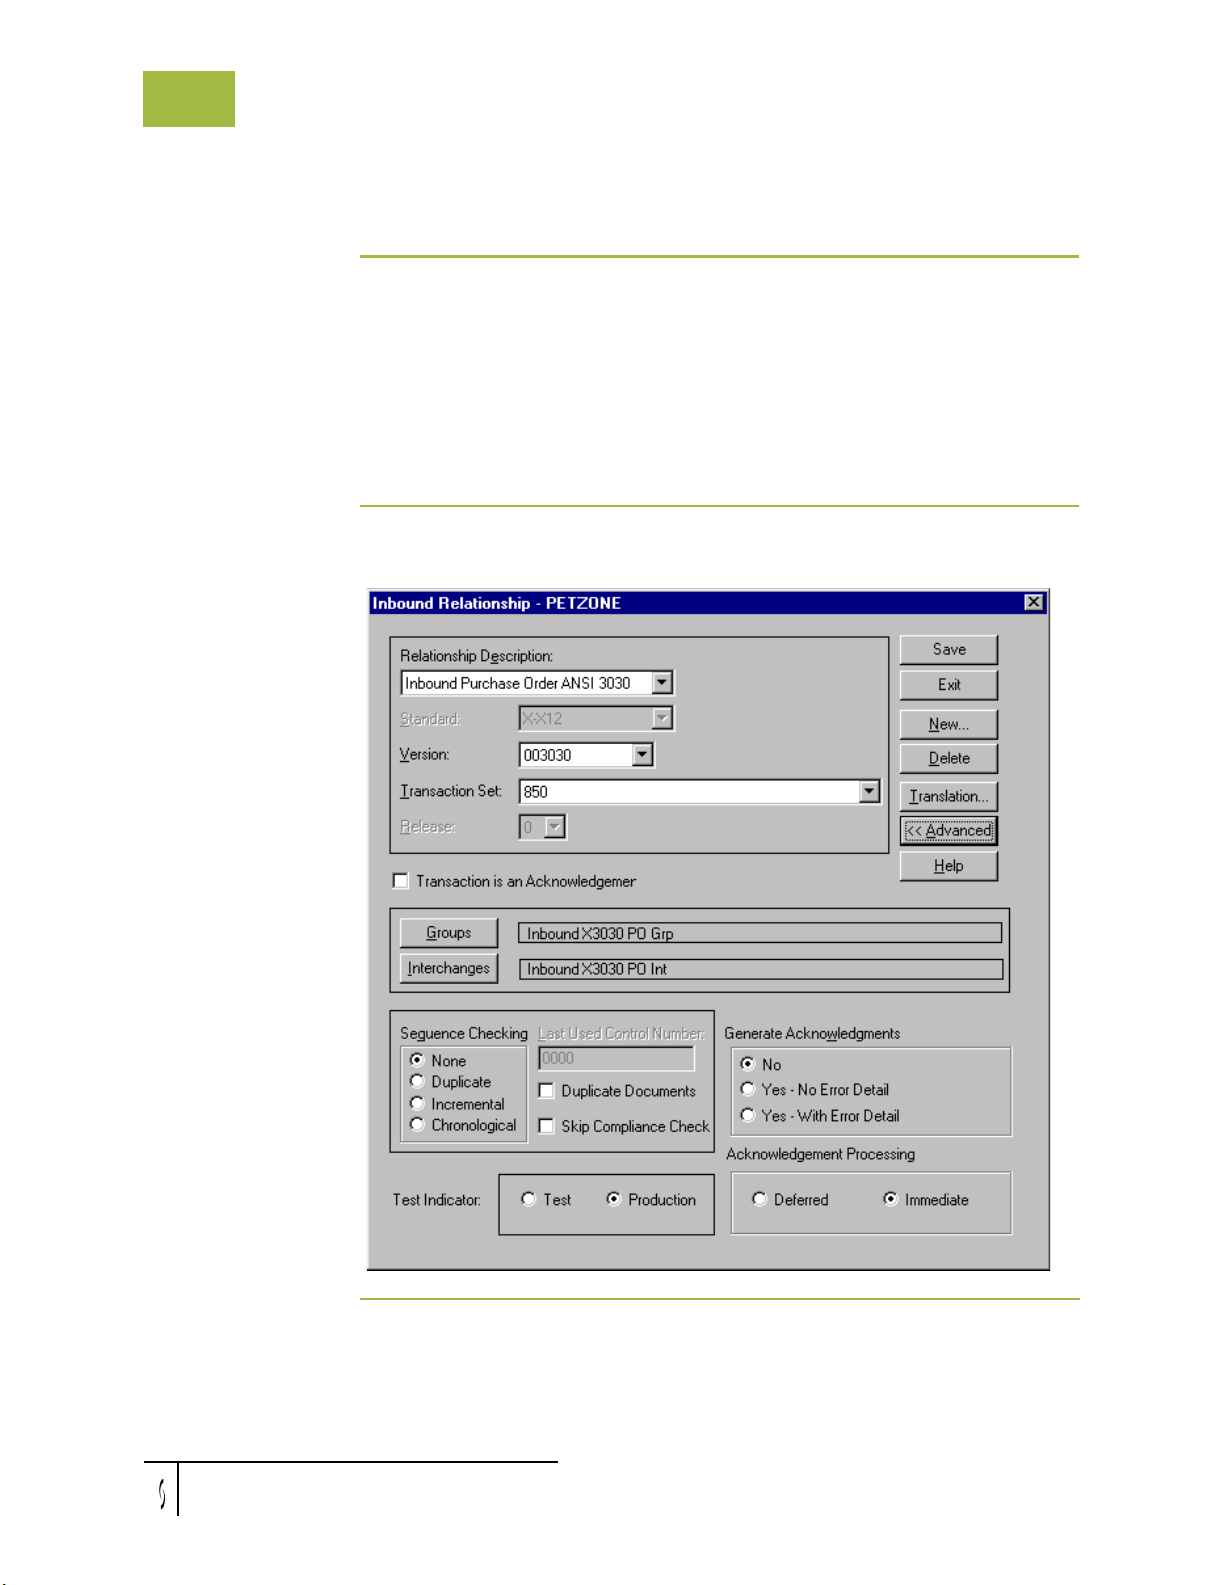
3 - 10
Inbound Relationship Dialog Box Using Partners
Inbound Relationship Dialog Box
Introduction Inbound relationships define the parameters the system needs to receive an EDI
document from a trading partner. The Inbound Relationship dialog box controls
other subordinate dialogs that allow you to define everything that is necessary to
establish the relationship.
You are required to specify exactly which document is to be received. You also
define which translation objects are used to define the turnaround documents,
export rules, or printing requirements.
Diagram The following illustrates the Inbound Relationship dialog box with the Advanced
options displayed:
Gentran:Server for Windows – November 2005 Gentran:Server for Windows User’s Guide
Page 47

Using Partners Inbound Relationship Dialog Box
3 - 11
Parts and
functions
The following lists the parts of the Inbound Relationship dialog box and their
functions:
Part Function
Relationship
Select the existing inbound relationship.
Description
Standard Specifies the EDI standard to be used in this
relationship.
Note
Only standards for which you have existing translation
objects are displayed. This box cannot be changed for an
existing relationship. Selection of this box is mandatory.
Valid values
◗ A - TRADACOMS
◗ C - CII
◗ D - NCPDP
◗ E - EDIFACT
◗ O - ODETTE
◗ P - OTHER
◗ R - ROSETTANET
◗ T - TDCC
◗ U - UCS
◗ V - VDA
◗ X - X12
Version Select the EDI standard version to be used in this
relationship.
Note
Only versions of the selected standard for which you
have existing translation objects are displayed. If this
box is changed for an existing relationship, all of the
information defined below it is cleared and must be
reselected. Selection of this box is mandatory.
Transaction Set Select the transaction set to be used in this relationship.
Note
Only transaction sets for the selected version for which
you have existing translation objects are displayed. If
this box is changed for an existing relationship, all of the
information defined below it is cleared and must be
reselected. Selection of this box is mandatory.
(Continued on next page)
Gentran:Server for Windows User’s Guide Gentran:Server for Windows – November 2005
Page 48
3 - 12
Inbound Relationship Dialog Box Using Partners
Part Function
Release Select the release number to be used in this relationship.
Note
Only releases for the selected transaction set for which
you have existing translation objects are displayed. This
box is currently only used for messages defined in the
TRADACOMS standard. Selection of this box is
mandatory for all TRADACOMS messages.
Transaction is an
Acknowledgement
Specify if the transaction defined in this partner
relationship is an acknowledgement.
Groups Accesses the Inbound Group Select Dialog Box.
Interchanges Accesses the Inbound Interchange Select Dialog Box.
Sequence Checking Specify if the system will use sequence checking and
whether sequence checking will be incremental or
chronological. You can also indicate that the system
must check for duplicate control numbers.
◗ None Do not use sequence checking.
◗ Duplicate Check for duplicate control
numbers.
◗ Incremental The control number must be one
greater than the last number.
◗ Chronological The control number must be greater
than the last number.
Note
If the system detects duplicate control numbers or
detects incremental or chronological control numbers
that are out of sequence, those documents will be put in
the ?In Documents.
Last Used Control
Number
Specify a value that is used to sequence check the next
transaction set control number or message reference.
This value is replaced with the sequence number of the
last transaction set or message received. This box is
initially set to zero.
Note
This box is disabled if Sequence Checking is None.
(Continued on next page)
Gentran:Server for Windows – November 2005 Gentran:Server for Windows User’s Guide
Page 49
Using Partners Inbound Relationship Dialog Box
Part Function
3 - 13
Duplicate
Documents
Skip Compliance
Check
Generate
Acknowledgements
Specify if the system will check for duplicate document
names.
Notes
◗ If the system detects duplicate document name it
will locate those documents in ?In Documents.
◗ If duplicate document checking is activated for a
relationship the translation object used in this
relationship must update the document name via a
standard or extended rule.
Reference
See the Application Integration User's Guide for more
information about using standard and extended rules.
Specify if you want the system to compliance check the
documents for this relationship.
Instructs the system to generate a functional
acknowledgement to this trading partner when you
receive the transaction set (message) defined in this
relationship. The default value for this box is No. Valid
values:
◗ No
Do not generate acknowledgements.
◗ Yes - No Error Detail
Generate acknowledgements without error detail.
◗ Yes - With Error Detail
Generate acknowledgements with error detail.
Note
This entire box is inactive (dimmed) if the document
(transaction set) in this relationship is an
acknowledgement.
Test Indicator Specify if this relationship definition is in test or
production mode. The default value is Production.
Acknowledgement
Processing
Specify if acknowledgement reconciliation will occur
during the inbound break session (Immediate) or during
its scheduled interval (Deferred). The default is
Immediate.
Save Saves the modified information.
Exit Exits the Inbound Relationship dialog box.
(Continued on next page)
Gentran:Server for Windows User’s Guide Gentran:Server for Windows – November 2005
Page 50
3 - 14
Inbound Relationship Dialog Box Using Partners
Part Function
New Accesses the New Inbound Relationship dialog box,
which allows you to create a new relationship.
Delete Removes the specified inbound relationship from the
system.
Transl at ion Accesses the Inbound Translation Object Dialog Box.
Advanced Toggles the display of the advanced options.
Help Displays Online Help.
Gentran:Server for Windows – November 2005 Gentran:Server for Windows User’s Guide
Page 51
Using Partners Inbound Translation Object Dialog Box
Inbound Translation Object Dialog Box
Introduction The Inbound Translation Objects dialog box is used to specify which translation
objects will be used to process the data defined by this relationship.
The following lists the inbound translation levels (from the lowest level up):
Translation Level Description
Document Validate the document against the specified translation
object to verify if the document is compliant with the
standard and translate from EDI to print or application
format.
Transaction Remove the EDI-specific enveloping around a single
document.
Group Remove the EDI-specific enveloping around a set of
related transactions (the transactions do not have to be
the same type).
3 - 15
Interchange Remove the EDI-specific enveloping around groups
destined for the same trading partner.
Gentran:Server for Windows User’s Guide Gentran:Server for Windows – November 2005
Page 52
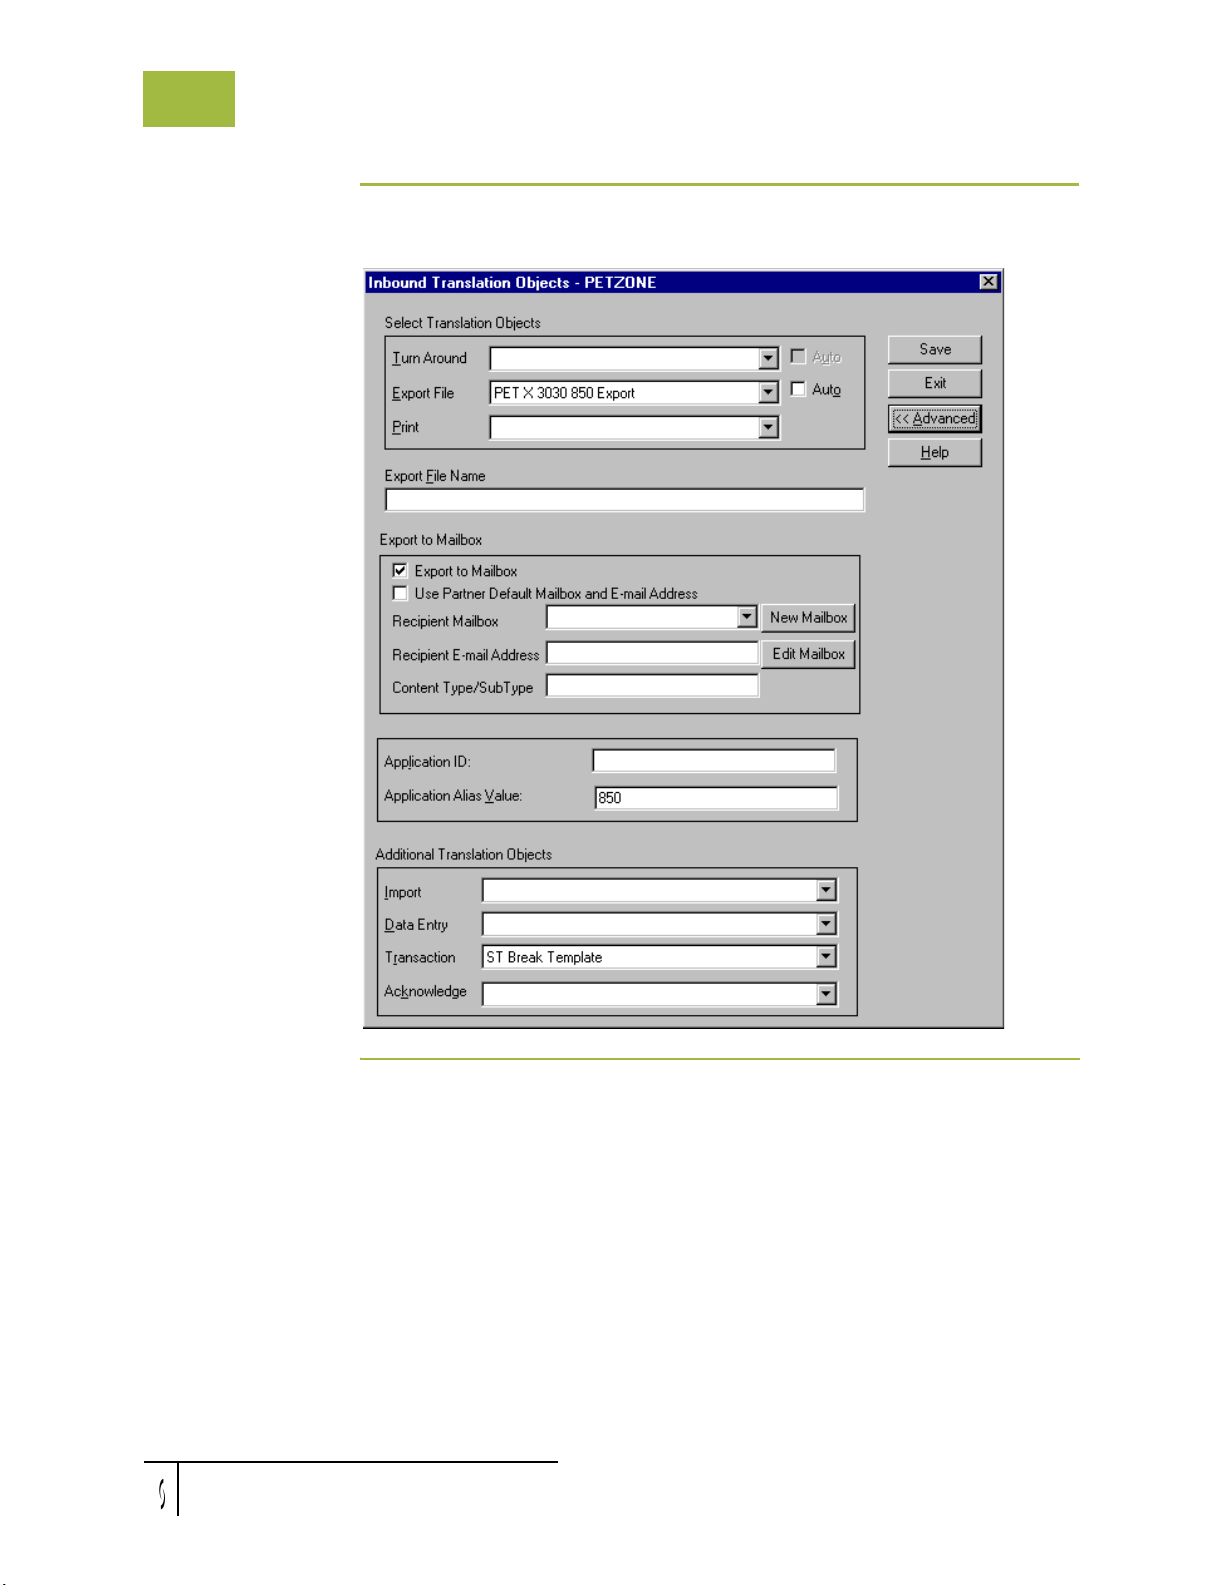
3 - 16
Inbound Translation Object Dialog Box Using Partners
Diagram The following illustrates the Inbound Translation Object dialog box with the
Advanced options displayed:
Gentran:Server for Windows – November 2005 Gentran:Server for Windows User’s Guide
Page 53

Using Partners Inbound Translation Object Dialog Box
3 - 17
Parts and
functions
The following lists the parts of the Inbound Translation Object dialog box and
their functions:
Part Function
Turn Around/
Auto
Displays all turnaround document options. When a document
is received, the turnaround document created is the natural
response document that contains as many elements from the
received document as possible.
Note
Select the Auto check box if you want the defined turnaround
process to be automatic. If the Auto box is not selected, the
received document will remain in the In Documents until it is
selected for processing.
Export File/
Auto
Displays all registered Export translation objects relative to
the Standard, Version, Transaction Set and Release defined
by this relationship. This allows you to specify that when an
EDI document is received, it will be exported into an output
file.
Notes
◗ Select the Auto check box if you want the export file
created automatically upon receipt of the document. If
the Auto box is not selected, the received document will
remain in the In Documents until it is selected for
processing.
◗ If the Export File Name is defined for this relationship,
each document can be exported individually to a unique
file. If you use formatting characters in the file name, the
document key changes for each document that is
exported, the Process ID stays the same (for all
documents exported from the same interchange), and the
unique ID changes. Therefore, using the “document key”
and “unique ID” special characters (defined below), a
unique file name can be derived.
Reference
See Export File Name on page 3 - 18 for more
information about these values.
Print Displays all print translation objects on the system for the
Standard, Version, Transaction Set, and Release defined by
the relationship. The selected translation object will be used
to print documents received from this partner.
(Continued on next page)
Gentran:Server for Windows User’s Guide Gentran:Server for Windows – November 2005
Page 54

3 - 18
Inbound Translation Object Dialog Box Using Partners
Part Function
Export File
Name
Specify the name of the file to be created or appended to as a
result of performing an export operation. This file name can
contain a mix of alphanumeric characters and formatting
characters, which are replaced by the translator with the
runtime value they represent.
Formatting characters supported
%y (two-digit year)
%Y (four-digit year)
%m (abbreviated month name)
%M (month as a decimal number)
%d (abbreviated weekday name)
%D (day of the month as a decimal number)
%H (hour in 24-hour format)
%N (minutes)
%S (seconds)
%K (document key)
%P (process identifier)
%U (unique number derived using the current time, export
filename, process identifier, and the rand() function)
Note
The runtime file name is generated once per export.
Example
The following is an example of a runtime file name using
formatting characters:
d:\GENSRVNT\exports\dockey%Kprocid%Puniqueid%U.dat
(Continued on next page)
Gentran:Server for Windows – November 2005 Gentran:Server for Windows User’s Guide
Page 55

Using Partners Inbound Translation Object Dialog Box
Part Function
3 - 19
Export to
Mailbox
Invokes the "Export to Mailbox" function, which delivers the
output of an inbound translation to the Mailbox Server
Manager. This allows the Mailbox Server Manager to act as a
message broker responsible for delivering the data to its final
destination.
Note
If you specified the Export File Name, it is still valid and will
become the Attachment Filename. Formatting characters are
still valid for the filename and could cause multiple
attachments to be created if document key is used. For
example, if the following filename is used:
d:\gensrvnt\exports\dockey%Kprocid%Puniqueid%U.dat
a new attachment is created for each document because the
document key creates a unique name for each document
processed.
To set up an export to a mailbox, you must complete the
following components on the Inbound Translation Objects
dialog box:
◗ In the Export File Name box, type the file name.
◗ Select the Export to Mailbox checkbox.
◗ From the Recipient Mailbox list, select the mailbox (the
Recipient E-mail Address is optional).
◗ In the Content Type/SubType box, type a content type
(content subtype is optional).
Use Partner
Default
Mailbox and
Specify if the output of the inbound translation is exported to
the default mailbox and e-mail address configured for this
partner.
E-mail Address
Recipient
Mailbox/
Select the mailbox to which the output of an inbound
translation is delivered.
New Mailbox
Or, click New Mailbox to display the Create New Mailbox
wizard, which allows you to create a new mailbox.
Reference
See the Communications User's Guide for more information.
(Continued on next page)
Gentran:Server for Windows User’s Guide Gentran:Server for Windows – November 2005
Page 56

3 - 20
Inbound Translation Object Dialog Box Using Partners
Part Function
Recipient
E-mail
Address/
Edit Mailbox
Specify the e-mail address to which the output of an inbound
translation is delivered.
Or, click Edit Mailbox to display the Create New Mailbox
wizard, which allows you to edit the mailbox.
Reference
See the Communications User's Guide for more information.
Content Type/
SubType
Specify the content type/sub type of the message containing
the output of the inbound translation.
Reference
See the Communications User's Guide for more information.
Application ID Specify the application identifier that indicates the
destination of the documents.
Application
Alias Value
Specify criteria for this relationship definition that is used
during the application import function.
Example
The application contains data that can generate either an
invoice or a credit memo. Use one relationship definition for
invoices and another for credit memos.
There is a box in the application that defines whether this is
an invoice or a credit memo. The box will display CREDIT if
a credit memo is created and INVOICE if an invoice is
created. Type CREDIT in the Application Alias Value for the
relationship defining the credit memo and type INVOICE for
the invoice.
Note
This box is only used if you receive translation objects that
are defined to use the Application Alias Value.
(Continued on next page)
Gentran:Server for Windows – November 2005 Gentran:Server for Windows User’s Guide
Page 57

Using Partners Inbound Translation Object Dialog Box
Part Function
Import Select other translation objects associated with the
relationship, which gives you the capability to change the
system behavior at the transaction and document translation
level. This allows you to use translation objects that are as
partner-specific as required and/or perform as many
functions as required.
Note
You must select a translation object from the Import list if
you have created a specific import translation object for this
relationship and if you want to change the way the system
behaves for this partner relationship. Import translation
objects may not be appropriate for an Inbound Relationship.
Data Entry Select other translation objects associated with the
relationship, which gives you the capability to change the
system behavior at the transaction and document translation
level. This allows you to use translation objects that are as
partner-specific as required and/or perform as many
functions as required.
3 - 21
Note
You must select a translation object from the Data Entry list if
you have created a specific data entry translation object for
this relationship and if you want to change the way the
system behaves for this partner relationship (e.g., if you want
to change the formatted view of Inbound data).
Transaction Select other translation objects associated with the
relationship, which gives you the capability to change the
system behavior at the transaction and document translation
level. This allows you to use translation objects that are as
partner-specific as required and/or perform as many
functions as required.
Note
You must select a translation object from the Transaction list
if you have created a specific Transaction Break translation
object for this relationship and if you want to change the way
the system behaves for this partner relationship.
(Continued on next page)
Gentran:Server for Windows User’s Guide Gentran:Server for Windows – November 2005
Page 58

3 - 22
Inbound Translation Object Dialog Box Using Partners
Part Function
Acknowledge Select other translation objects associated with the
relationship, which gives you the capability to change the
system behavior at the transaction and document translation
level. This allows you to use translation objects that are as
partner-specific as required and/or perform as many
functions as required.
Note
You must select a translation object from the Acknowledge
list if you have created a specific translation object for this
relationship and if you want to change the way the system
behaves for this partner relationship.
When the system reconciles an acknowledgement, it maps
the acknowledgement to an internal file and then processes it.
If you need the system to process acknowledgements
differently, you should select an additional translation object
from the Acknowledge list.
If the transaction set is an acknowledgement and you choose
an Acknowledge additional translation object, the system will
use the additional translation object in place of the export
translation object for acknowledgement reconciliation.
Save Saves the modified information.
Exit Exits the Inbound Translation Object dialog box.
Advanced Toggles the display of the advanced options.
Help Displays Online Help.
Gentran:Server for Windows – November 2005 Gentran:Server for Windows User’s Guide
Page 59
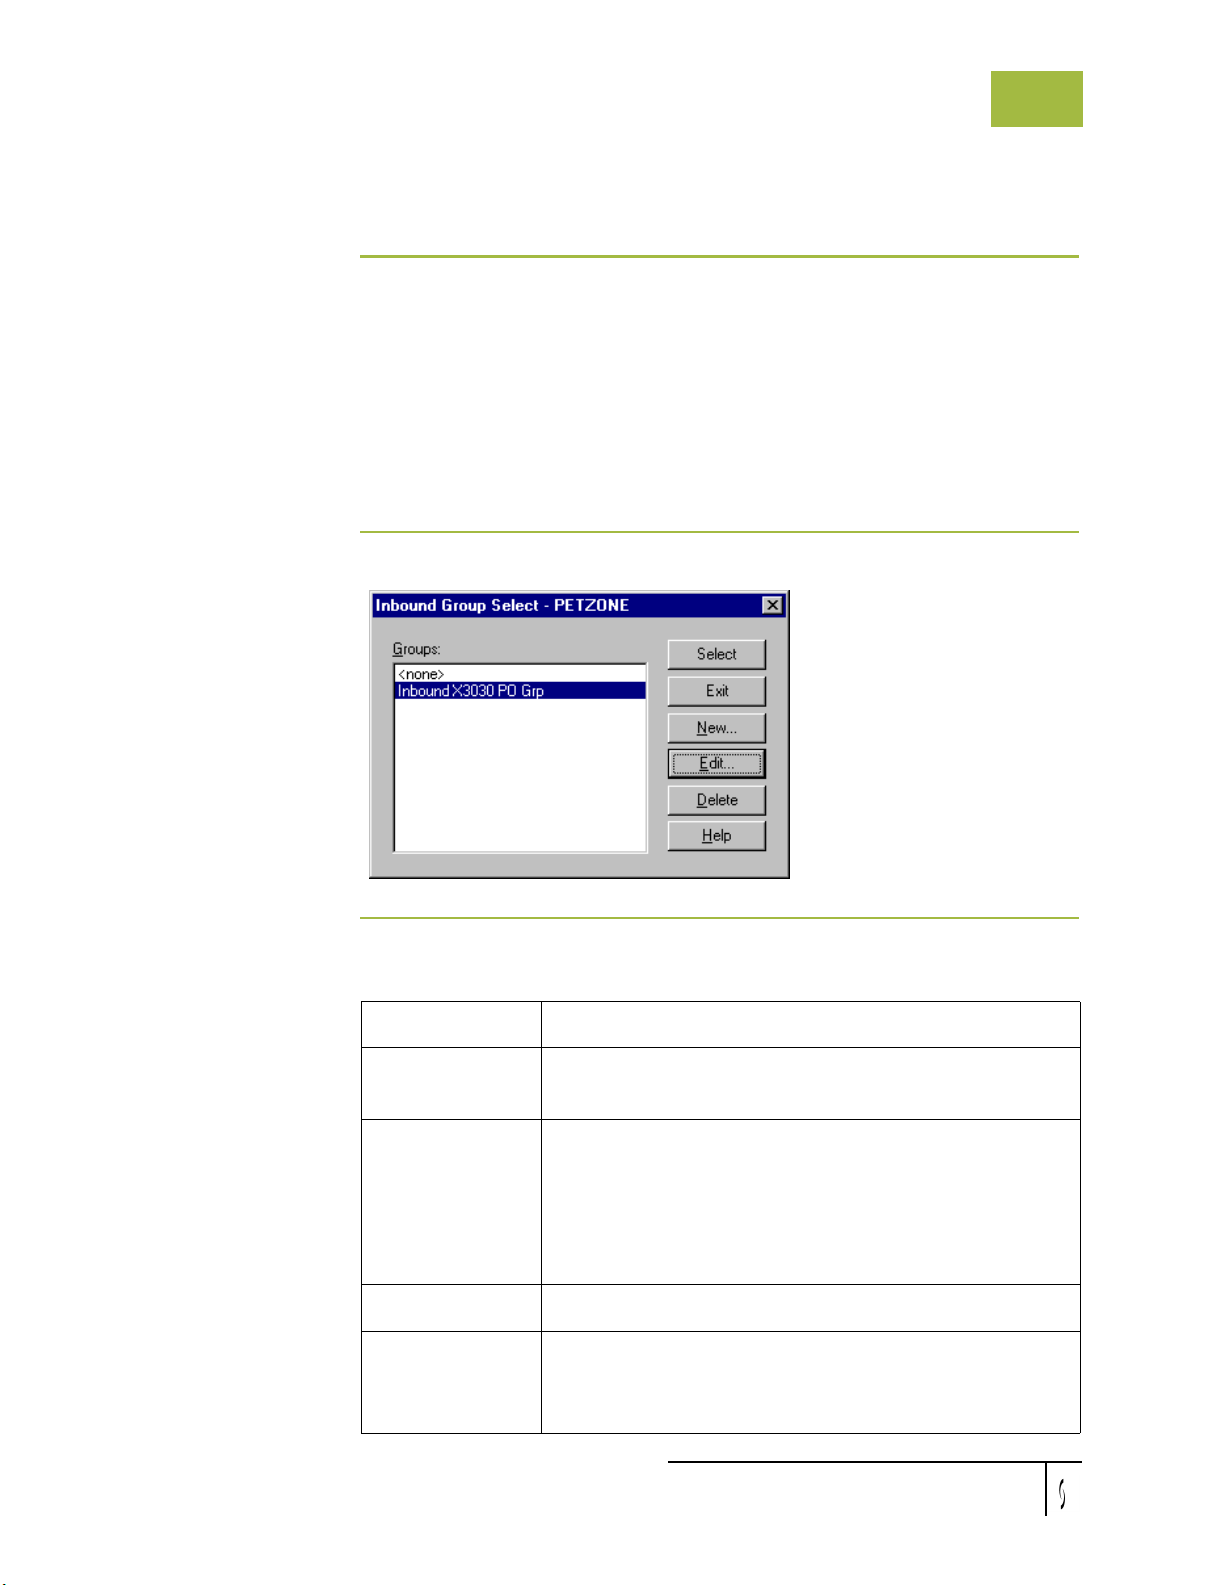
Using Partners Inbound Group Select Dialog Box
Inbound Group Select Dialog Box
Introduction The Inbound Group Select dialog box is used to select an existing functional
group definition to be associated with this relationship. It can also be used to
initiate the definition of a new functional group or to modify or delete an existing
definition. The groups available to you are determined by the version you selected
on the Inbound Relationship dialog.
Note
Functional groups are required for ANSI X12, TDCC, and UCS standards,
optional for EDIFACT and ODETTE, and not specified for TRADACOMS.
Diagram The following illustrates the Inbound Group Select dialog box:
3 - 23
Parts and
functions
Gentran:Server for Windows User’s Guide Gentran:Server for Windows – November 2005
The following lists the parts of the Inbound Group Select dialog box and their
functions:
Part Function
Groups Displays all functional group definitions established for
this trading partner.
Select Selects the indicated functional group to be used with this
relationship.
Note
Select <none> if the standard you are using does not
require groups and you do not want to use one.
Exit Exits the Inbound Group Select dialog box.
New Displays the Inbound Group Entry Dialog Box, which
allows you to create a new group.
(Continued on next page)
Page 60
3 - 24
Inbound Group Select Dialog Box Using Partners
Part Function
Edit Displays the Inbound Group Entry Dialog Box, which
allows you to edit the selected group.
Delete Removes the selected group from the system.
Help Displays Online Help.
Gentran:Server for Windows – November 2005 Gentran:Server for Windows User’s Guide
Page 61
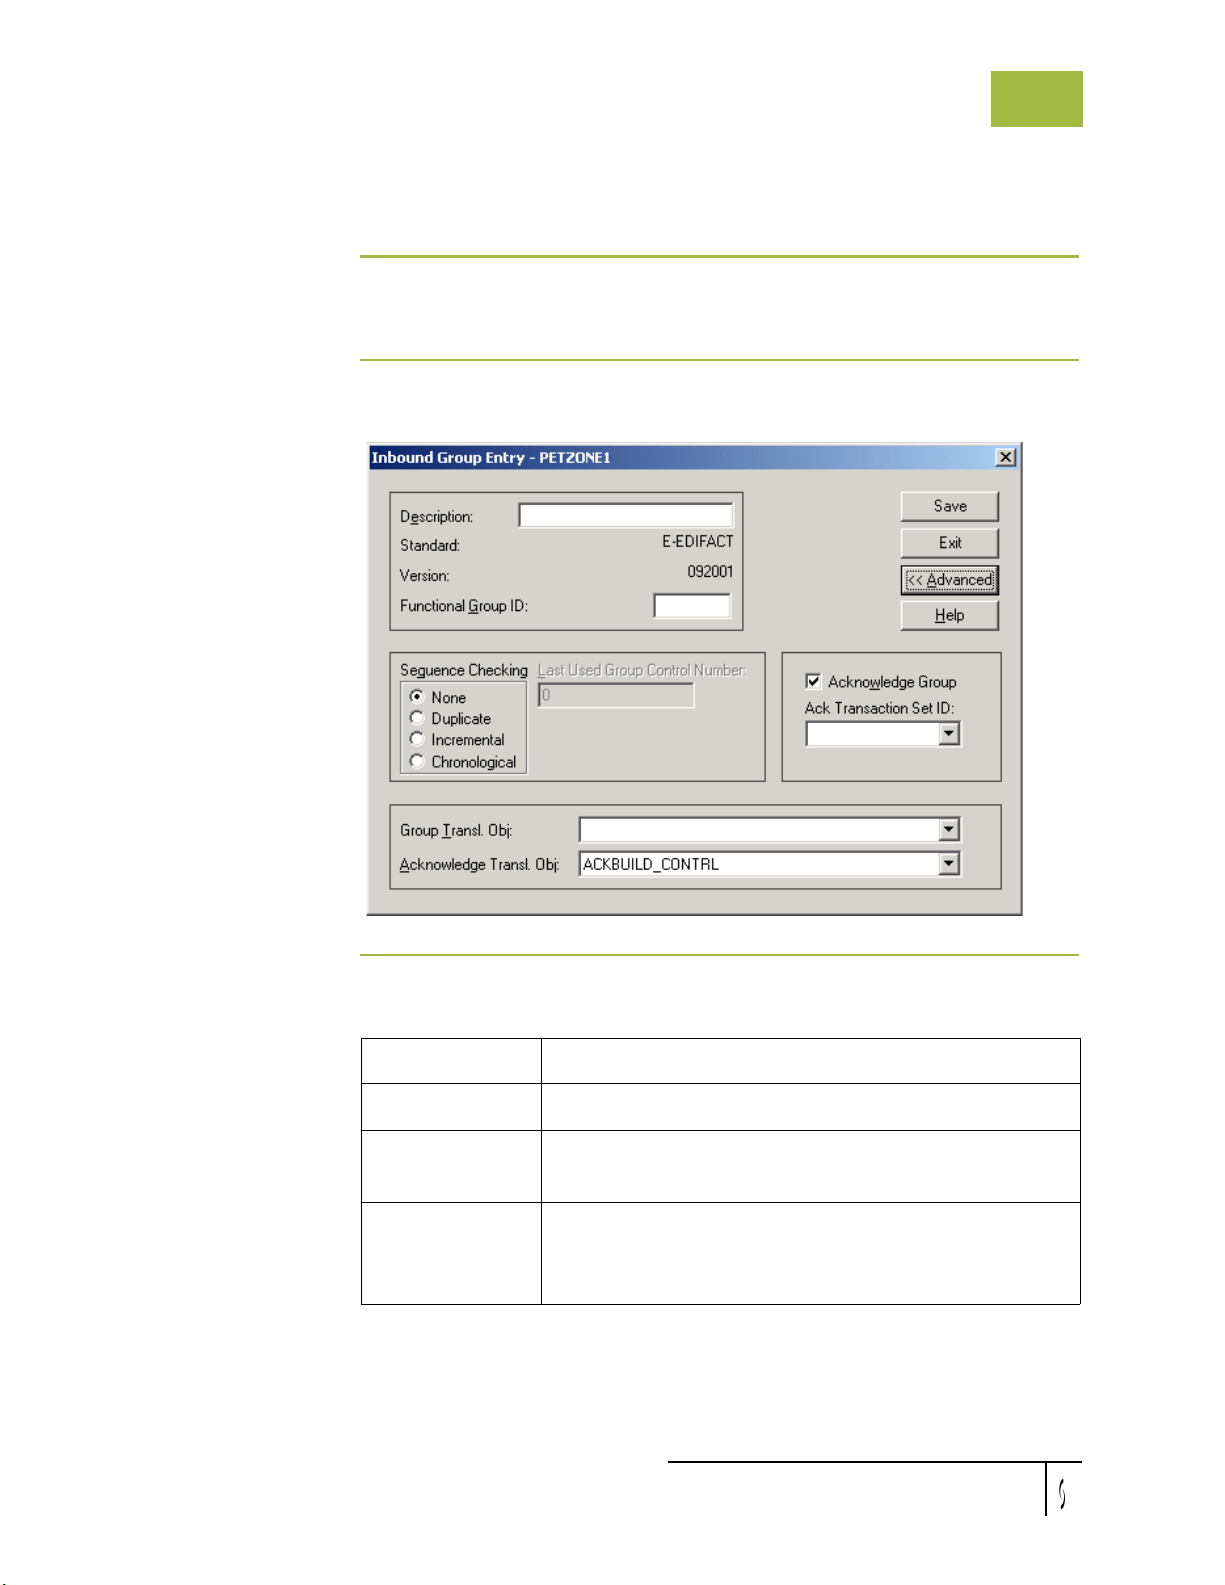
Using Partners Inbound Group Entry Dialog Box
Inbound Group Entry Dialog Box
Introduction The Inbound Group Entry dialog box is used to specify a functional group
definition.
Diagram The following illustrates the Inbound Group Entry dialog box with the Advanced
options displayed:
3 - 25
Parts and
functions
Gentran:Server for Windows User’s Guide Gentran:Server for Windows – November 2005
The following lists the parts of the Inbound Group Entry dialog box and their
functions:
Part Function
Description Specify the name of the functional group description.
Standard Displays the EDI standard the system is using for this
relationship definition.
Version Displays the version of the EDI standard the system is
using for this relationship.
(Continued on next page)
Page 62

3 - 26
Inbound Group Entry Dialog Box Using Partners
Part Function
Functional Group IDSpecify the functional group. These identification boxes
are defined by each appropriate standards group to group
like documents. The standard defines which functional
group ID should be used with each document type. This is
a mandatory box.
Examples
IN 810 X12 Invoice
PO 850 X12 Purchase Order
IG 830 UCS Invoice
OG 875 UCS P. O.
INVOIC EDIFACT INVOIC
ORDERS EDIFACT ORDERS
INVOIC Tradacoms INVOIC
ORDERS Tradacoms ORDERS
This element is located in:
Sequence
Checking
Last Used Group
Control Number
ANSI X12: GS01
EDIFACT: UNG01
TRADACOMS:BAT
Specify if inbound sequence checking will be used and
whether the type of sequence checking will be incremental
or chronological. You can also indicate that the system
must check for duplicate control numbers.
◗ None Do not use sequence checking.
◗ Duplicate Check for duplicate control numbers.
◗ Incremental The control number must be one
greater than the last number.
◗ Chronological The control number must be greater
than the last number.
Note
If the system detects duplicate control numbers or detects
incremental or chronological control numbers that are out
of sequence, those documents will be put in the ?In
Documents.
Specifies a value that the system will use to sequence
check the group control number. The number will be
replaced by the group control number that the system
receives. This box will initially be set to zero.
(Continued on next page)
Gentran:Server for Windows – November 2005 Gentran:Server for Windows User’s Guide
Page 63

Using Partners Inbound Group Entry Dialog Box
Part Function
3 - 27
Acknowledge
Group
Ack Translation
Set ID
Group Transl.
Obj.
Instructs the system to send a functional acknowledgement
to this trading partner when you receive the group defined
in this relationship. The default value for this box is not
checked (do not expect an acknowledgement).
Note
This check box is dimmed (inactive) if the transaction set
is an acknowledgement.
Select the acknowledgement you want generated for this
group.
Example
ANSI X12 = 997 Functional Acknowledgement
UCS/EDIA = 999 Acceptance/Rejection Advice
EDIFACT = CNTRL
Select a partner-specific Group Break Map translation
object if this trading partner group deviates from the
normal system behavior. You must select a translation
object from this list if you want the system to perform
partner-specific grouping.
War ning
We strongly recommend that you do not change the
translation objects in the Group Transl. Obj. and
Acknowledge Transl. Obj. lists, unless you have a specific
reason for doing so.
(Continued on next page)
Gentran:Server for Windows User’s Guide Gentran:Server for Windows – November 2005
Page 64

3 - 28
Inbound Group Entry Dialog Box Using Partners
Part Function
Acknowledge
Transl. Obj.
Select an Acknowledgement Break Map if one exists on
the system.
Note
You must select a translation object from the Acknowledge
Transl. Obj. list if you have created a specific translation
object for this relationship and if you want to change the
way the system behaves for this partner group. When the
system reconciles an acknowledgement, it maps the
acknowledgement to an internal file and then processes it.
If you need the system to process acknowledgements
differently, you should select an additional translation
object from the Acknowledge list.
War ning
We strongly recommend that you do not change the
translation objects in the Group Transl. Obj. and
Acknowledge Transl. lists, unless you have a specific
reason for doing so.
Save Saves the modified information.
Exit Exits the Inbound Group Entry dialog box.
Advanced Toggles the display of the advanced options.
Help Displays Online Help.
Gentran:Server for Windows – November 2005 Gentran:Server for Windows User’s Guide
Page 65
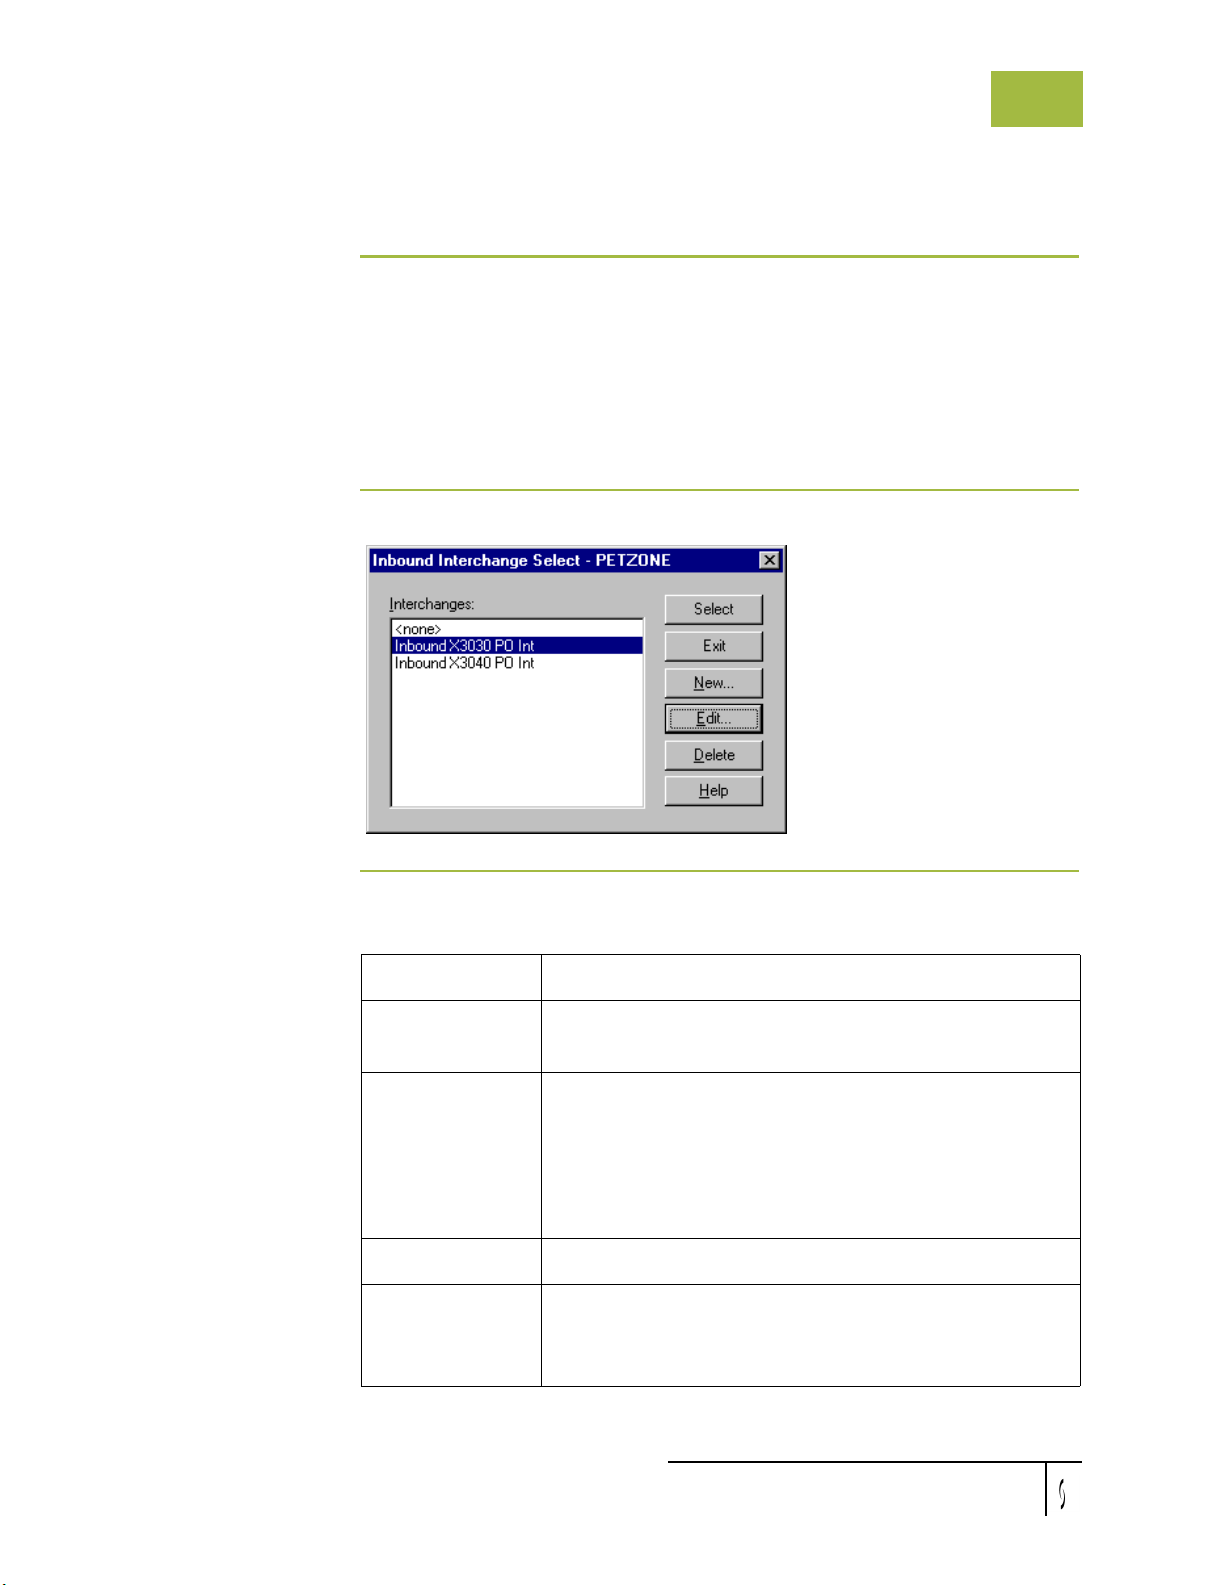
Using Partners Inbound Interchange Select Dialog Box
Inbound Interchange Select Dialog Box
Introduction The Inbound Interchanges Select dialog box is used to select an existing
interchange definition to be associated with this relationship. You can also use it
to initiate the definition of a new interchange or to modify or delete an existing
definition. The interchanges available to you are determined by the version you
selected on the Inbound Relationships dialog. Interchanges are required for
EDIFACT, ODETTE, TRADACOMS, and UCS, and optional for ANSI X12 and
TDCC.
Diagram The following illustrates the Inbound Interchange Select dialog box:
3 - 29
Parts and
functions
The following lists the parts of the Inbound Interchange Select dialog box and
their functions:
Part Function
Interchanges Displays all Interchange definitions established for this
trading partner.
Select Selects the indicated interchange to be used with this
relationship.
Note
Select <none> if the standard you are using does not
require interchanges and you do not want to use one.
Exit Exits the Inbound Interchange Select dialog box.
New Displays the Inbound Interchange Entry Dialog Box,
which allows you to create a new interchange.
(Continued on next page)
Gentran:Server for Windows User’s Guide Gentran:Server for Windows – November 2005
Page 66
3 - 30
Inbound Interchange Select Dialog Box Using Partners
Part Function
Edit Displays the Inbound Interchange Entry Dialog Box,
which allows you to edit the selected interchange.
Delete Removes the selected interchange from the system.
Help Displays Online Help.
Gentran:Server for Windows – November 2005 Gentran:Server for Windows User’s Guide
Page 67
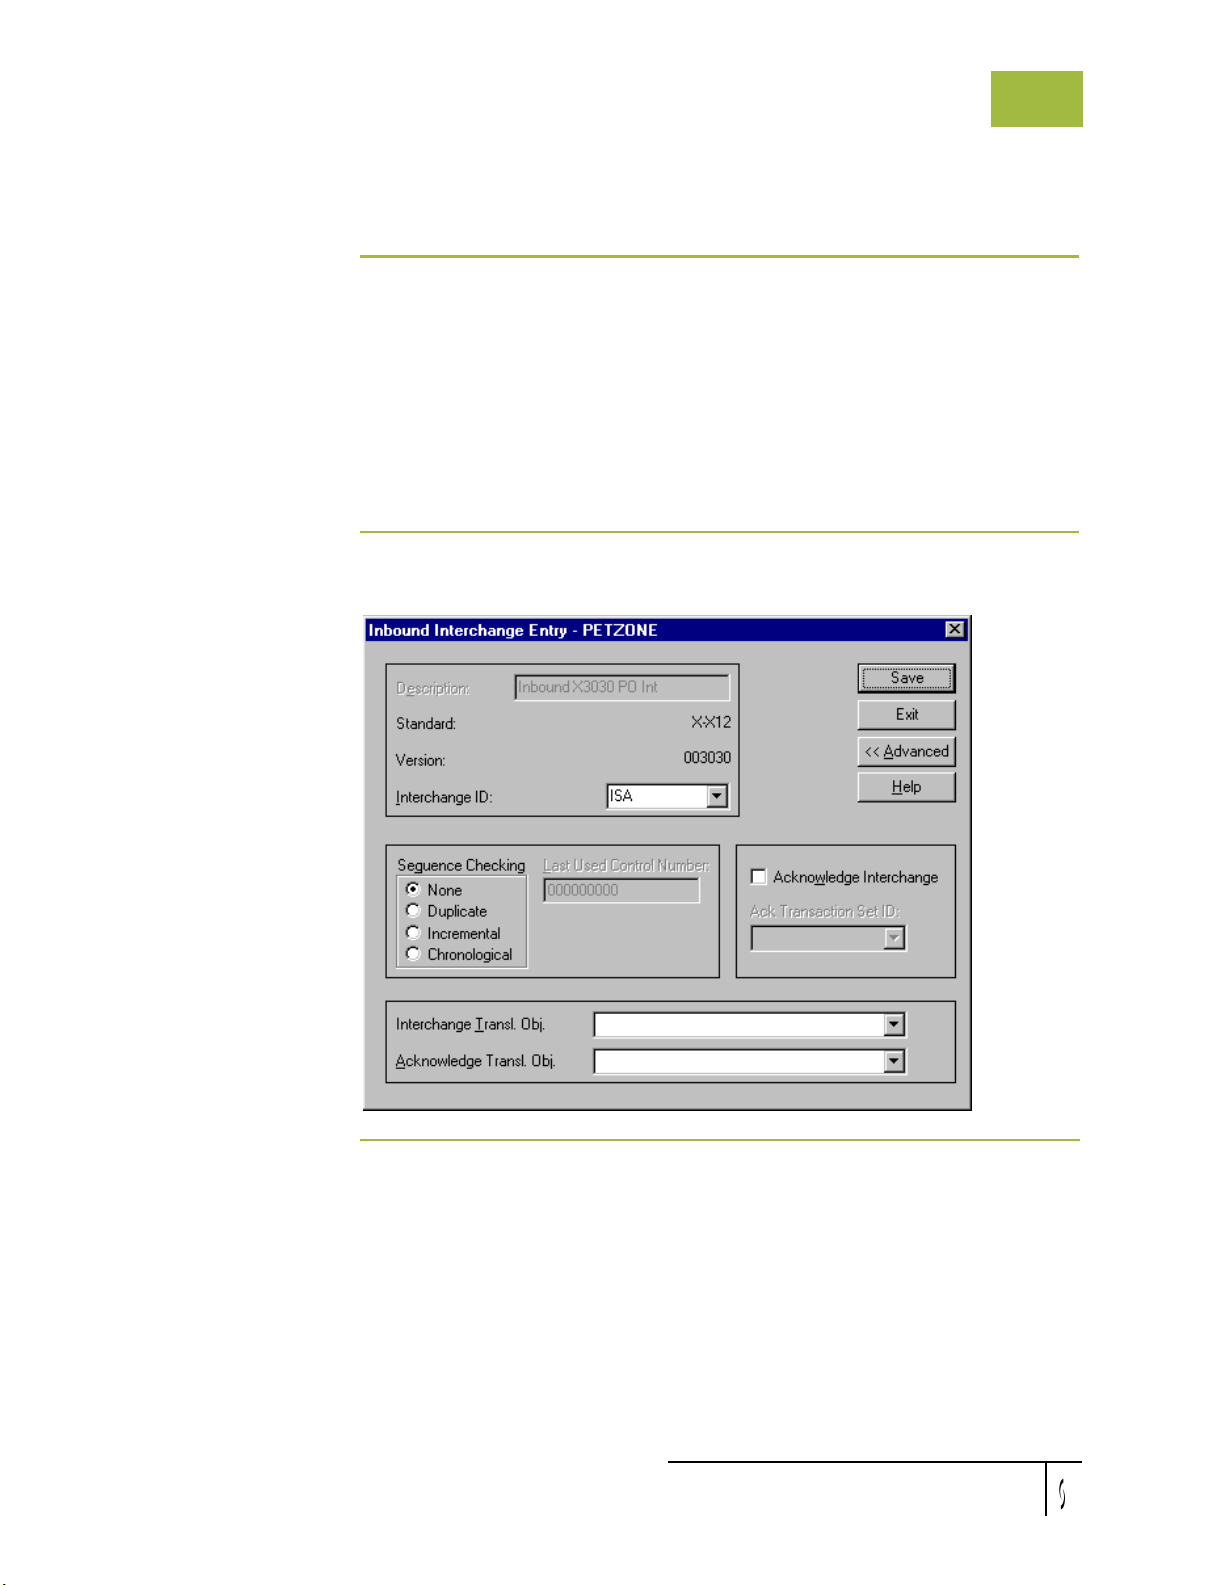
Using Partners Inbound Interchange Entry Dialog Box
Inbound Interchange Entry Dialog Box
Introduction The Inbound Interchange Entry dialog box is used to specify a new interchange
definition.
Note
EDIFACT version 4 defines the infrastructure necessary to support the creation
(and processing) of interchanges that have been encoded using a character set
other than 8-bit ASCII. Gentran:Server for Windows supports the processing of an
encoded interchange as long as the encoding of the interchange matches the
default code page of the operating system where Gentran:Server is running.
Diagram The following illustrates the Inbound Interchange Entry dialog box with the
Advanced options displayed:
3 - 31
Gentran:Server for Windows User’s Guide Gentran:Server for Windows – November 2005
Page 68
3 - 32
Inbound Interchange Entry Dialog Box Using Partners
Parts and
functions
The following lists the parts of the Inbound Interchange Entry dialog box and their
functions:
Part Function
Description Contains the name of the interchange description.
Standard Displays the EDI standard the system is using for this
relationship definition.
Version Displays the version of the EDI standard the system is
using for this relationship.
Interchange ID Select the type of interchange. The standard defines which
interchange ID should be used with each standard. This is a
mandatory box.
Example
ANSI X12 - ISA
-ICS
UCS - BG
EDIFACT - UNB
Tradacoms - STX
Sequence
Checking
Specify if the system will use sequence checking and
whether the sequence checking will be incremental or
chronological. You can also indicate that the system must
check for duplicate control numbers.
◗ None Do not use sequence checking.
◗ Duplicate Check for duplicate control numbers.
◗ Incremental The control number must be one
greater than the last number.
◗ Chronological The control number must be greater
than the last number.
Note
If the system detects duplicate control numbers or detects
incremental or chronological control numbers that are out
of sequence, those documents will be put in the ?In
Documents.
(Continued on next page)
Gentran:Server for Windows – November 2005 Gentran:Server for Windows User’s Guide
Page 69
Using Partners Inbound Interchange Entry Dialog Box
Part Function
3 - 33
Last Used
Control Number
Acknowledge
Interchange
Ack Translation
Set ID
Interchange
Transl. Obj.
Specifies a value that will be used to sequence check the
next interchange control number. The number will be
replaced by the control number on the last interchange
received. This box will initially be set to zero.
Note
This box is disabled if Sequence Checking is None.
Instructs the system to send a functional acknowledgement
to this trading partner when you receive the interchange set
defined in this relationship. The default value for this box
is not checked (do not expect an acknowledgement).
Select the acknowledgement you want generated for this
interchange.
Example
ANSI X12 = 997 Functional Acknowledgement
UCS/EDIA = 999 Acceptance/Rejection Advice
EDIFACT = CNTRL
Select a partner-specific Interchange Break Map
translation object if this trading partner interchange
deviates from the normal system behavior. You must select
a translation object from this list if you want the system to
perform partner-specific interchanging.
War ning
We strongly recommend that you do not change the
translation objects in the Interchange Transl. Obj. and
Acknowledge Transl. Obj. lists, unless you have a specific
reason for doing so.
(Continued on next page)
Gentran:Server for Windows User’s Guide Gentran:Server for Windows – November 2005
Page 70

3 - 34
Inbound Interchange Entry Dialog Box Using Partners
Part Function
Acknowledge
Transl. Obj.
Select an Acknowledgement Break Map if one exists on
the system.
You must select a translation object from the Acknowledge
Transl. Obj. list if you have created a specific translation
object for this relationship and if you want to change the
way the system behaves for this partner interchange. When
the system reconciles an acknowledgement, it maps the
acknowledgement to an internal file and then processes it.
If you need the system to process acknowledgements
differently, you should select an additional translation
object from the Acknowledge list.
War ning
We strongly recommend that you do not change the
translation objects in the Interchange Transl. Obj. and
Acknowledge Transl. Obj. lists, unless you have a specific
reason for doing so.
Save Saves the modified information.
Exit Exits the Inbound Interchange Entry dialog box.
Advanced Toggles the display of the advanced options.
Help Displays Online Help.
Gentran:Server for Windows – November 2005 Gentran:Server for Windows User’s Guide
Page 71
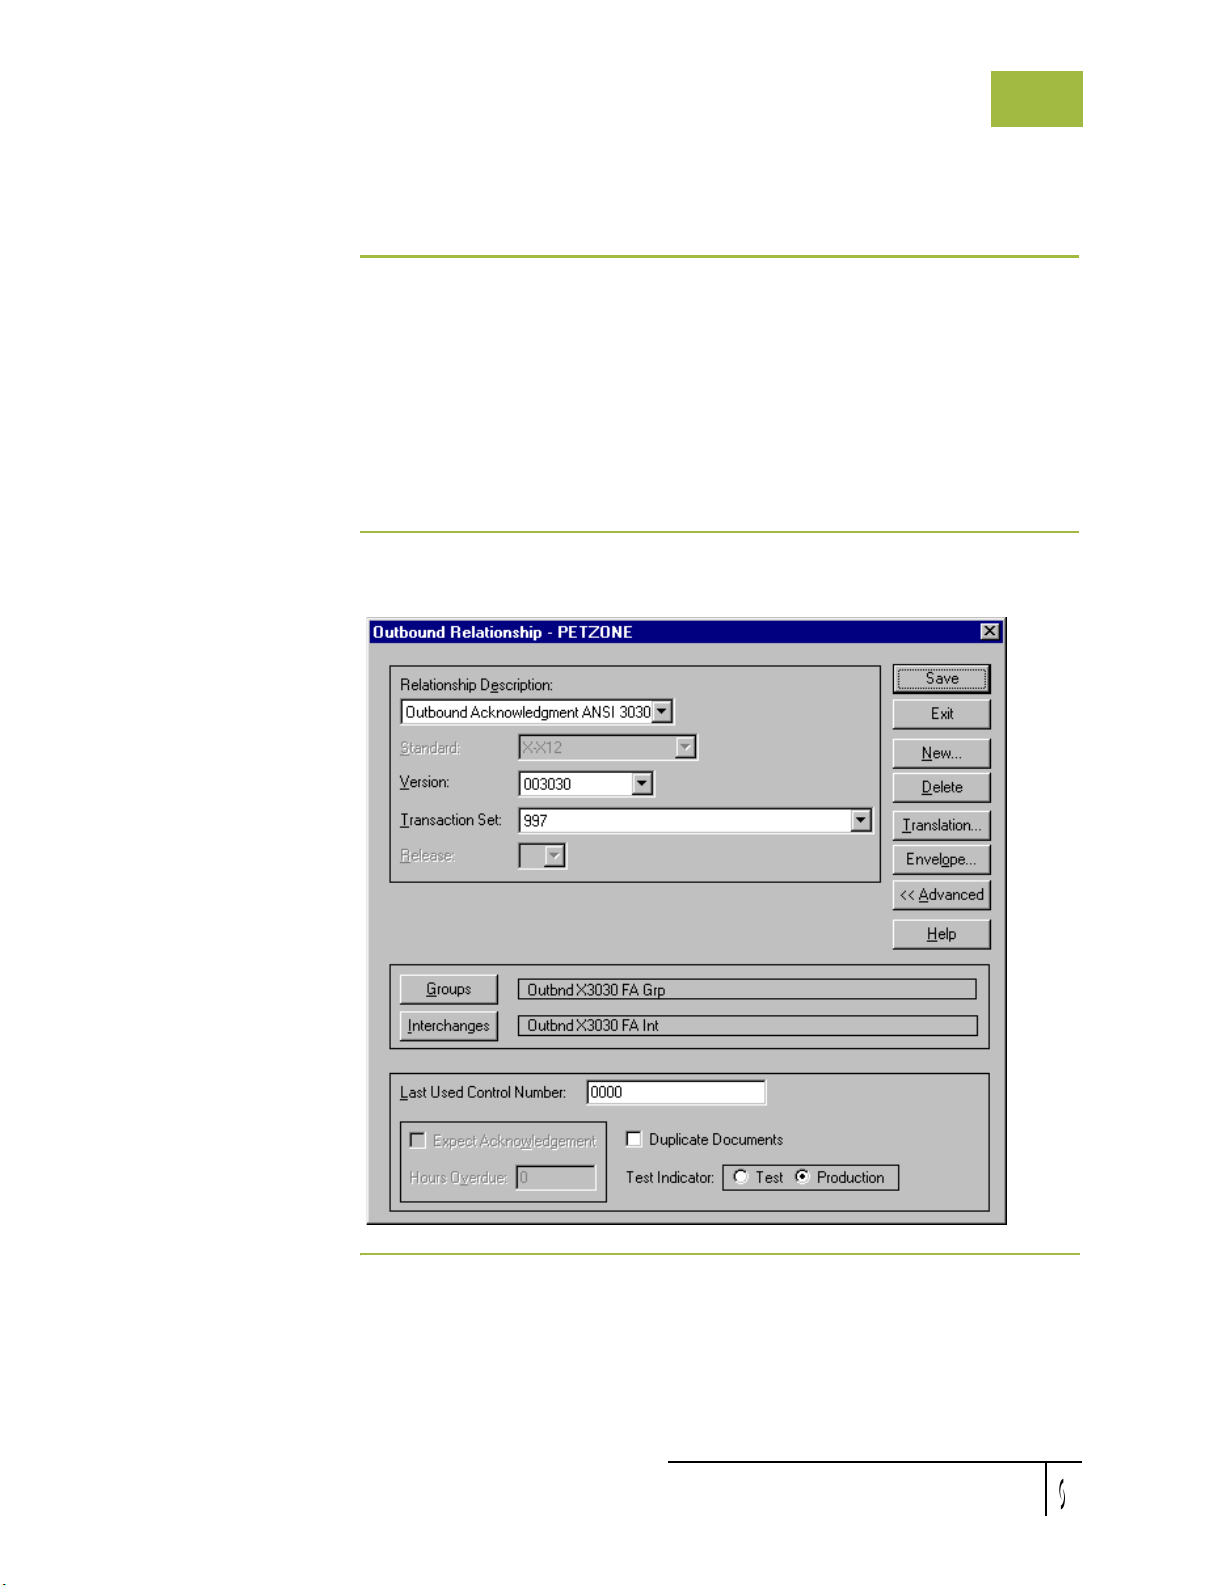
Using Partners Outbound Relationship Dialog Box
Outbound Relationship Dialog Box
Introduction Outbound relationships define the parameters needed to send an EDI document to
a trading partner. The Outbound Relationship dialog box controls other
subordinate dialogs that allow you to define everything that is necessary to
establish the relationship.
You are required to specify exactly which document the system sends. You must
also specify which translation objects will be used to define the data entry dialogs,
import rules, or printing requirements. In addition, you need to define the specific
EDI-enveloping requirements that you agreed on with your trading partner.
Diagram The following illustrates the Outbound Relationship dialog box with the
Advanced options displayed:
3 - 35
Gentran:Server for Windows User’s Guide Gentran:Server for Windows – November 2005
Page 72

3 - 36
Outbound Relationship Dialog Box Using Partners
Parts and
functions
The following lists the parts of the Outbound Relationship dialog box and their
functions:
Part Function
Relationship
Select the relationship description.
Description
Standard Specifies the EDI standard to be used in this
relationship.
Note
Only standards for which you have existing translation
objects are displayed. This box cannot be changed for an
existing relationship. Selection of this box is mandatory.
Valid values
◗ A-TRADACOMS
◗ C-CII
◗ D-NCPDP
◗ E-EDIFACT
◗ O-ODETTE
◗ P-OTHER
◗ R-ROSETTANET
◗ T-T DC C
◗ U-UCS
◗ V-V DA
◗ X-X12
Version Select the EDI standard version to be used in this
relationship.
Note
Only versions of the selected standard for which you
have existing translation objects are displayed. If this
box is changed for an existing relationship, all of the
information defined below it is cleared and must be
reselected. Selection of this box is mandatory.
Transaction Set Select the transaction set to be used in this relationship.
Note
Only transaction sets for the selected version for which
you have existing translation objects are displayed. If
this box is changed for an existing relationship, all of the
information defined below it is cleared and must be
reselected. Selection of this box is mandatory.
(Continued on next page)
Gentran:Server for Windows – November 2005 Gentran:Server for Windows User’s Guide
Page 73
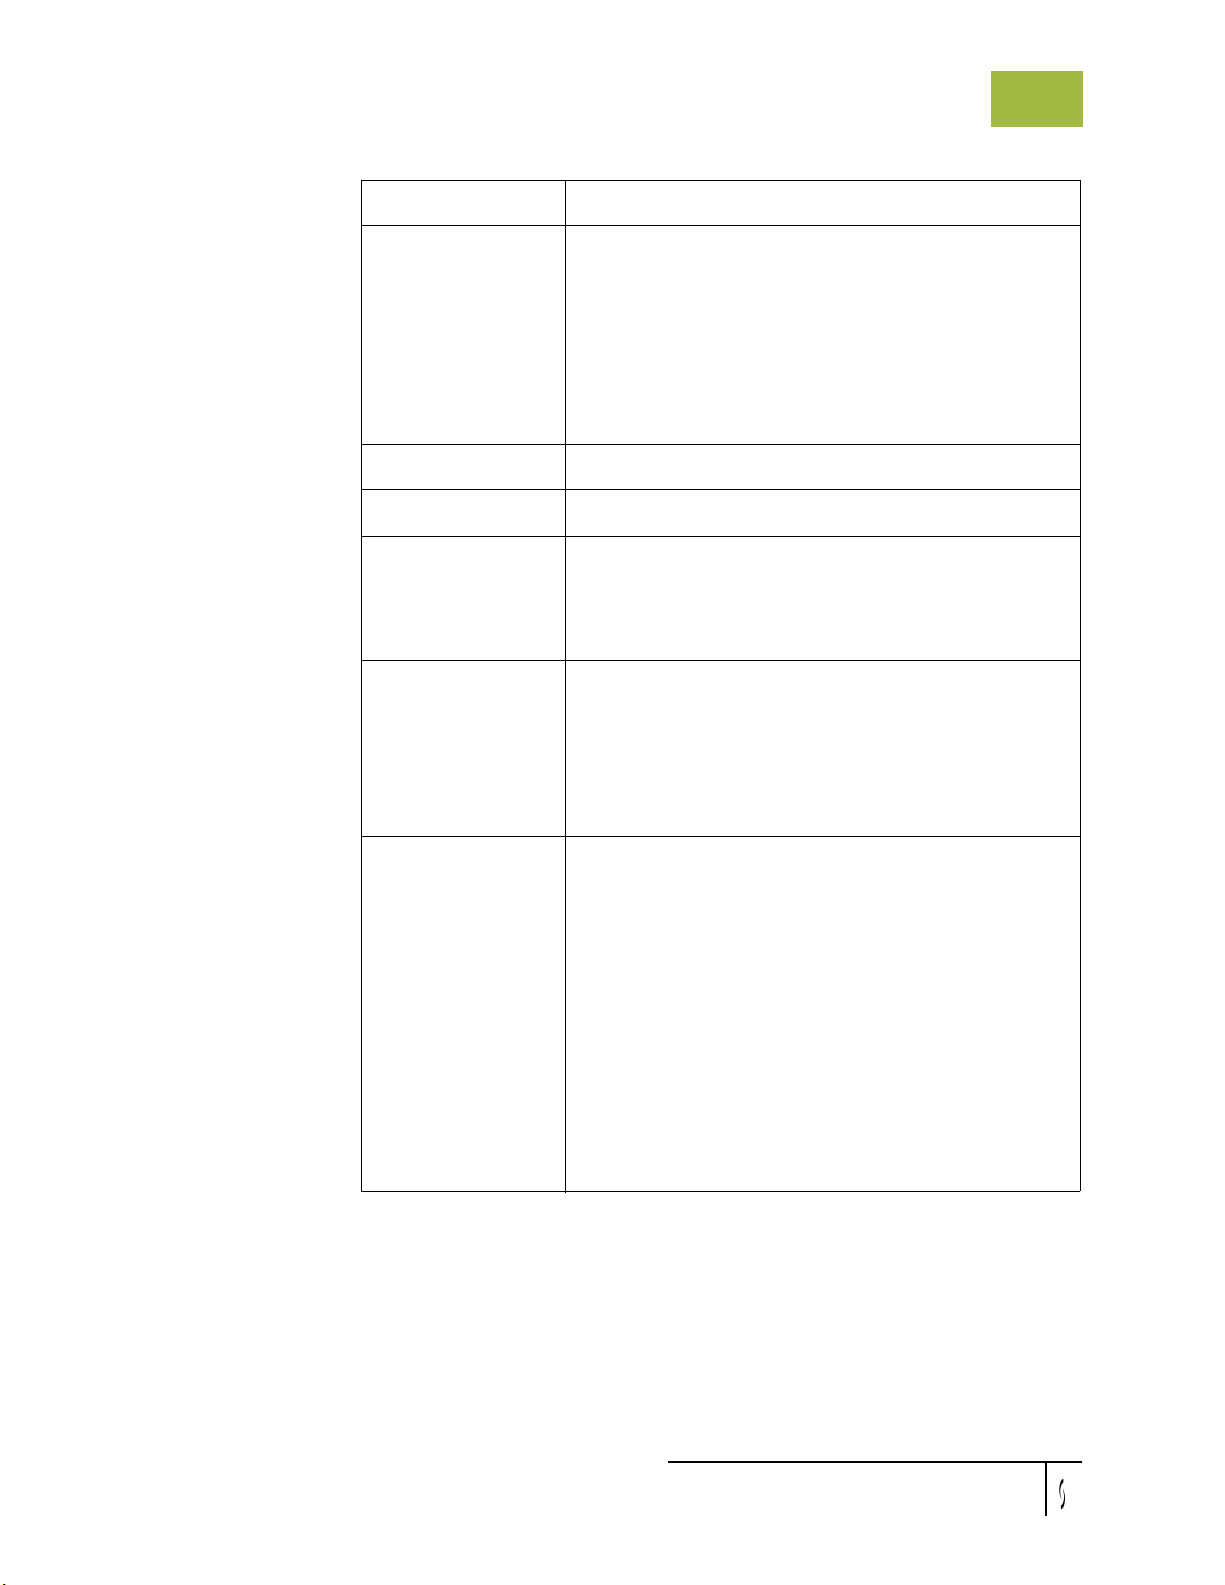
Using Partners Outbound Relationship Dialog Box
Part Function
Release Select the release number to be used in this relationship.
Note
Only releases for the selected transaction set for which
you have existing translation objects will be displayed.
This box is currently only used for messages defined in
the TRADACOMS standard. Selection of this box is
mandatory for all TRADACOMS messages.
Groups Accesses the Outbound Group Select Dialog Box.
Interchanges Accesses the Outbound Interchange Select Dialog Box.
3 - 37
Last Used Control
Number
Specify a value that will be used to generate the next
transaction set control number or message reference.
The number generated will always be one more than the
number in this box. Initially, this box will be set to zero.
Expect
Acknowledgement
Instructs the system to expect a functional
acknowledgement to be received from this trading
partner as a result of your partner receiving the
transaction set (message) defined in this relationship.
The default value for this box is not checked (do not
expect an acknowledgement).
Hours Overdue Defines how many hours must elapse before an
expected functional acknowledgement is considered
overdue. This box is only valid if the Expect
Acknowledgement box is checked. The default value for
this box is “48,” indicating that the acknowledgement
will be considered overdue in two days. If you enter a
value of zero in this box, the acknowledgement will be
immediately considered overdue.
Note
This box is disabled if Expect Acknowledgement is not
checked.
(Continued on next page)
Gentran:Server for Windows User’s Guide Gentran:Server for Windows – November 2005
Page 74
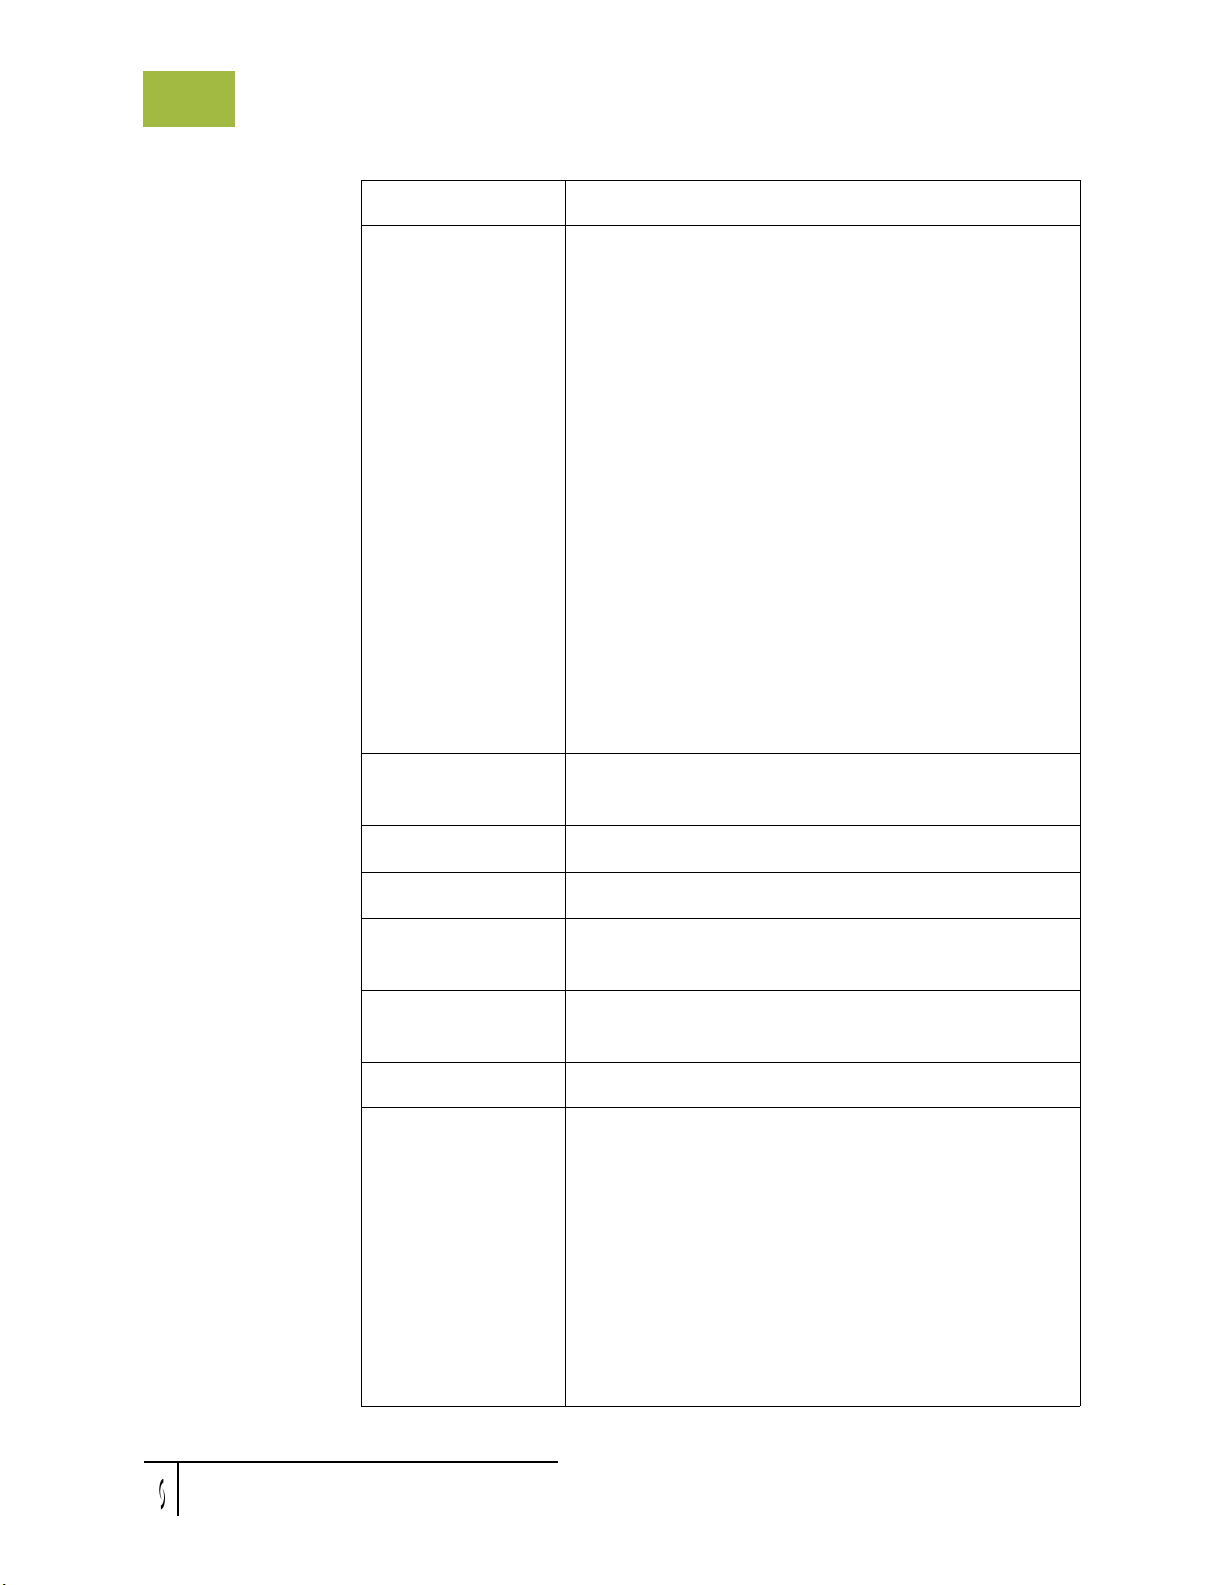
3 - 38
Outbound Relationship Dialog Box Using Partners
Part Function
Duplicate
Documents
Instructs the system to check for duplicate document
names.
Notes
◗ If you manually import documents into the
Workspace, this function checks for duplicate
documents. Duplicate documents remain in the
Workspace until they are deleted. If you try to move
or post a duplicate document, a warning message is
displayed. If you use the Process Control import
feature to import documents, the duplicate
document is located in ?Out Documents.
◗ If duplicate document checking is activated for a
relationship, the translation object used in this
relationship must update the document name via a
standard or extended rule.
Reference
See the Application Integration User's Guide for more
information about using standard and extended rules.
Test Indicator Specify if this relationship definition is in test or
production mode. The default value is production.
Save Saves the modified information.
Exit Exits the Outbound Relationship dialog box.
New Accesses the New Outbound Relationship dialog box,
which allows you to create a new relationship.
Delete Removes the specified outbound relationship from the
system.
Transl at ion Accesses the Outbound Translation Object Dialog Box.
Envelope Accesses one of the following Outbound Envelope
dialog boxes depending on which version you specified:
◗ Outbound UNH Envelope
◗ Outbound MHD Envelope
◗ Outbound ST Envelope
Reference
Refer to the Partner Editor online help for specific
information about the envelope dialog boxes.
(Continued on next page)
Gentran:Server for Windows – November 2005 Gentran:Server for Windows User’s Guide
Page 75
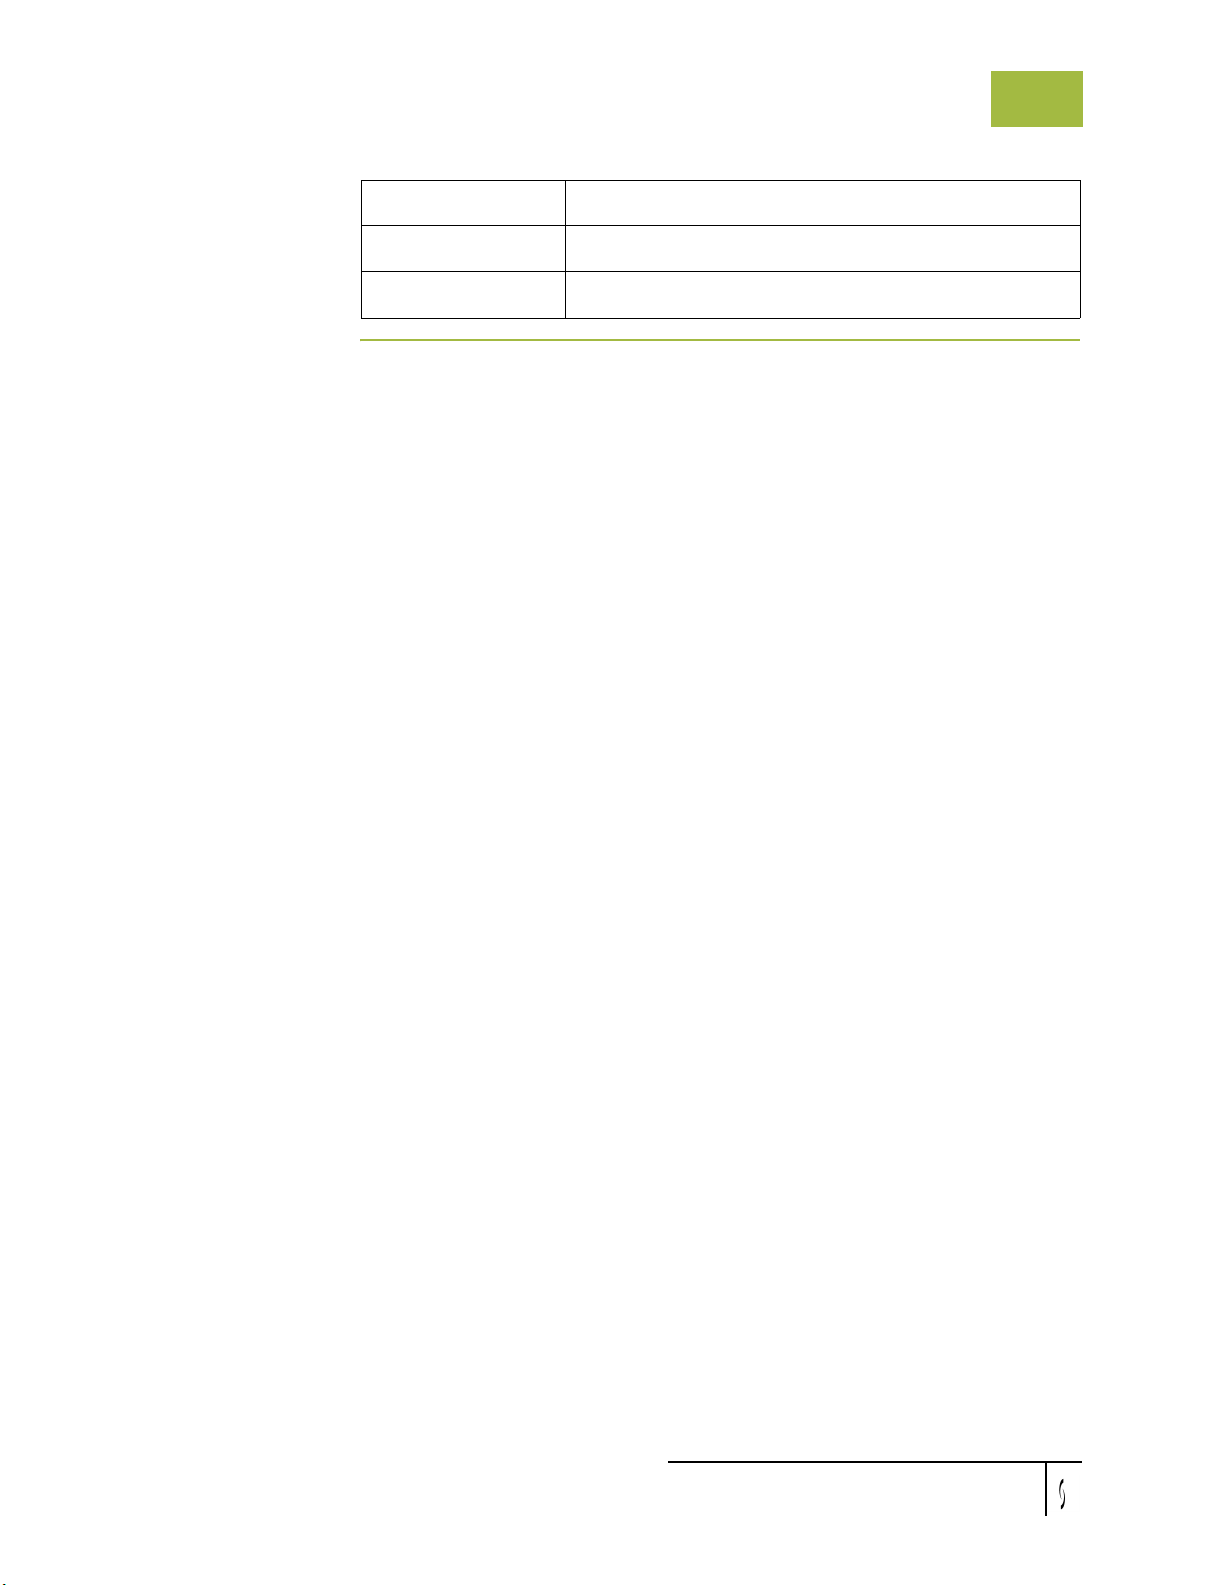
Using Partners Outbound Relationship Dialog Box
Part Function
Advanced Toggles the display of the advanced options.
Help Displays Online Help.
3 - 39
Gentran:Server for Windows User’s Guide Gentran:Server for Windows – November 2005
Page 76
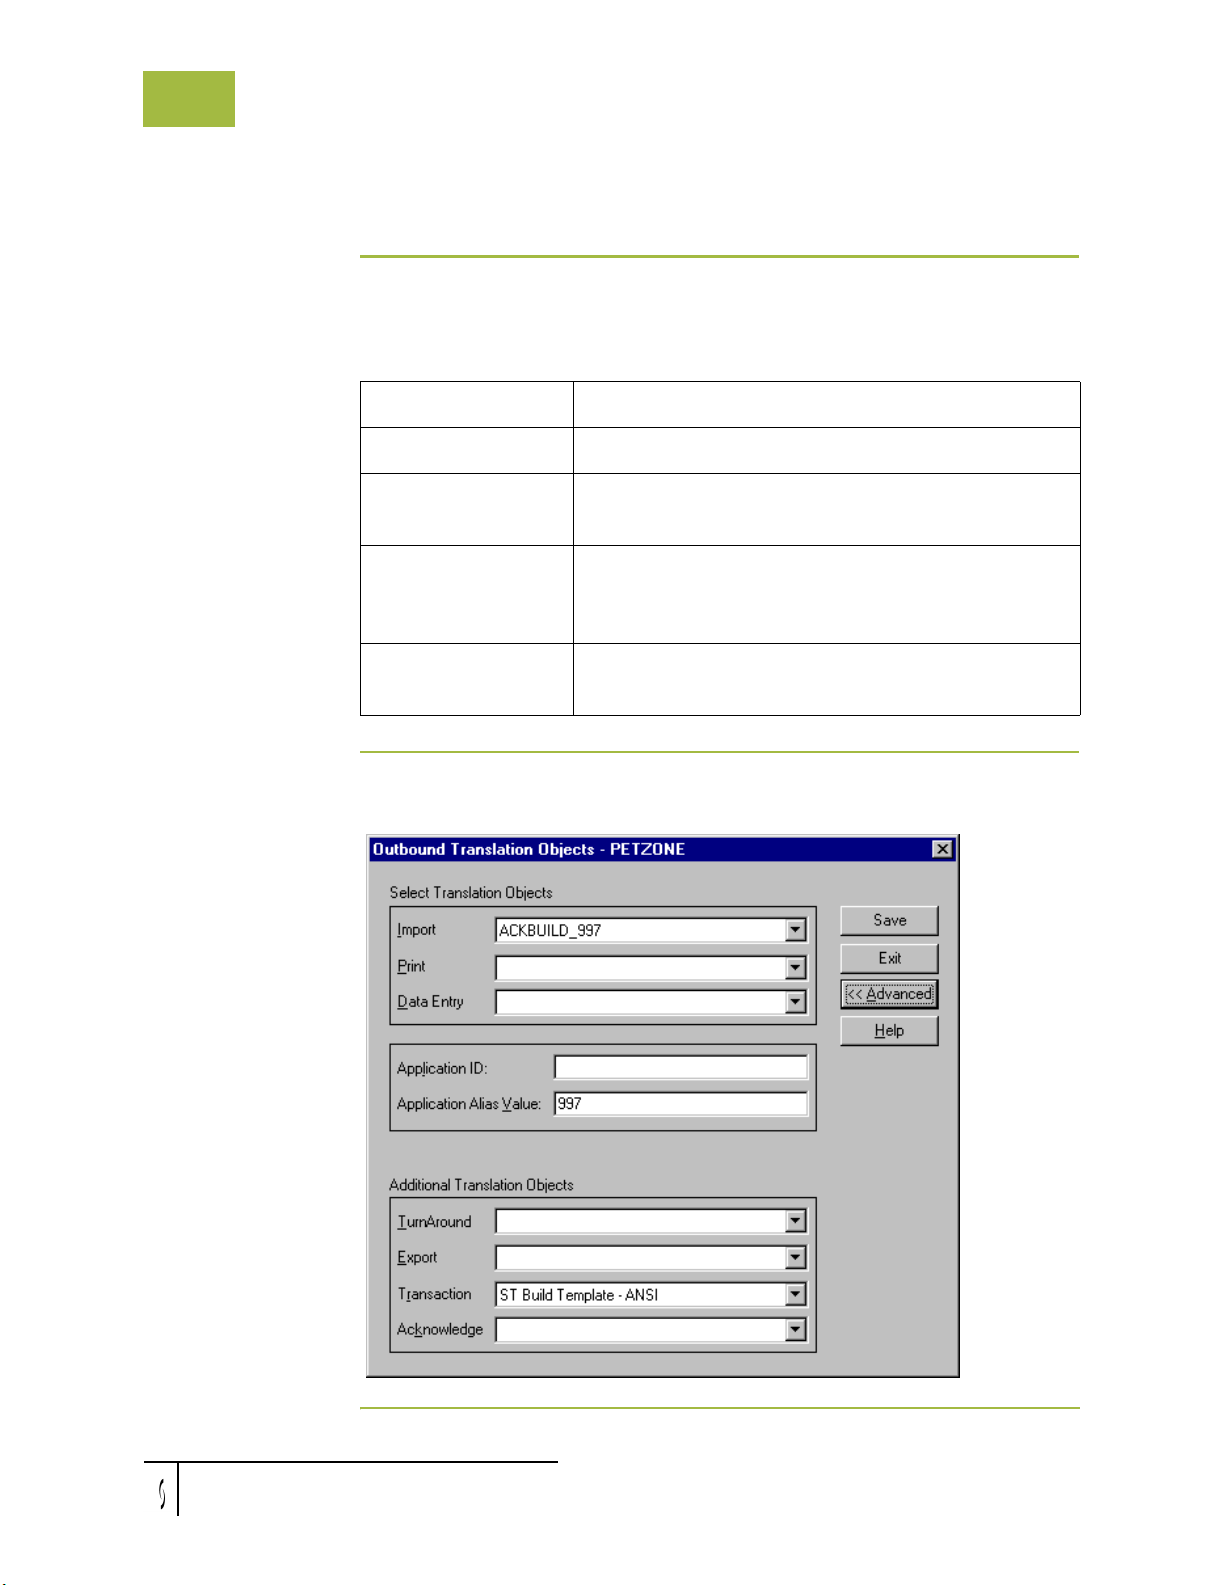
3 - 40
Outbound Translation Object Dialog Box Using Partners
Outbound Translation Object Dialog Box
Introduction The Outbound Translation Objects dialog box is used to specify which translation
objects are used to process the data defined by this relationship.
The following lists the outbound translation levels (from the lowest level up):
Translation Level Description
Document Translate from import format or data entry to EDI.
Transaction Build the EDI-specific enveloping around a single
document.
Group Build the EDI-specific enveloping around a set of
related transactions (the transactions do not have to be
the same type).
Interchange Build the EDI-specific enveloping around groups
destined for the same trading partner.
Diagram The following illustrates the Outbound Translation Object dialog box with the
Advanced options displayed:
Gentran:Server for Windows – November 2005 Gentran:Server for Windows User’s Guide
Page 77
Using Partners Outbound Translation Object Dialog Box
3 - 41
Parts and
functions
The following lists the parts of the Outbound Translation Object dialog box and
their functions:
Part Function
Import Displays all import translation objects in the system for the
Standard, Version, Transaction Set, and Release defined by
the relationship.
Print Displays all print translation objects in the system for the
Standard, Version, Transaction Set, and Release defined by
the relationship. The selected translation object will be
used to print documents sent to this partner.
Data Entry Displays all screen entry translation objects in the system
for the Standard, Version, Transaction Set, and Release
defined by the relationship.
Application ID Specify the application identifier that indicates the
destination of the documents.
Application Alias
Va l ue
Specify the criteria for this relationship definition, which
will be used during the application import function.
Example
The application contains data that can generate either an
invoice or a credit memo. Use one relationship definition
for invoices and another for credit memos.
There is a box in the application that defines whether this is
an invoice or a credit memo. The box will display CREDIT
if a credit memo is created and INVOICE if an invoice is
created. Type CREDIT in the Application Alias Value for
the relationship defining the credit memo or INVOICE for
the invoice.
Note
This box will only be used if you receive translation
objects that are defined to use the Application Alias Value.
(Continued on next page)
Gentran:Server for Windows User’s Guide Gentran:Server for Windows – November 2005
Page 78

3 - 42
Outbound Translation Object Dialog Box Using Partners
Part Function
TurnAround Select other translation objects associated with the
relationship, which gives you the capability to change the
system behavior at the transaction and document
translation level. This allows you to use translation objects
that are as partner-specific as required and/or perform as
many functions as required.
You must select a translation object from the TurnAround
list if you have created a specific turnaround translation
object for this relationship and if you want to change the
way the system behaves for this partner relationship.
Note
TurnAround translation objects may not be appropriate for
an Outbound Relationship.
Export Select other translation objects associated with the
relationship, which gives you the capability to change the
system behavior at the transaction and document
translation level. This allows you to use translation objects
that are as partner-specific as required and/or perform as
many functions as required.
You must select a translation object from the Export list if
you have created a specific export translation object for
this relationship and if you want to change the way the
system behaves for this partner relationship. Export
translation objects are used to export an outbound
document to a file.
Transaction Select other translation objects associated with the
relationship, which gives you the capability to change the
system behavior at the transaction and document
translation level. This allows you to use translation objects
that are as partner-specific as required and/or perform as
many functions as required.
You must select a translation object from the Transaction
list if you have created a specific Transaction Build
translation object for this relationship and if you want to
change the way the system behaves for this partner
relationship.
(Continued on next page)
Gentran:Server for Windows – November 2005 Gentran:Server for Windows User’s Guide
Page 79

Using Partners Outbound Translation Object Dialog Box
Part Function
Acknowledge Select other translation objects associated with the
relationship, which gives you the capability to change the
system behavior at the transaction and document
translation level. This allows you to use translation objects
that are as partner-specific as required and/or perform as
many functions as required.
You must select a translation object from the Acknowledge
list if you have created a specific translation object for this
relationship and if you want to change the way the system
behaves for this partner relationship. When the system
generates an acknowledgement, it writes the
acknowledgement to an internal file containing the
acknowledgement details and then maps that internal file.
If you need the system to process acknowledgements
differently, you should select an additional translation
object from the Acknowledge list.
3 - 43
Save Saves the modified information.
Exit Exits the Outbound Translation Object dialog box.
Advanced Toggles the display of the advanced options.
Help Displays Online Help.
Gentran:Server for Windows User’s Guide Gentran:Server for Windows – November 2005
Page 80
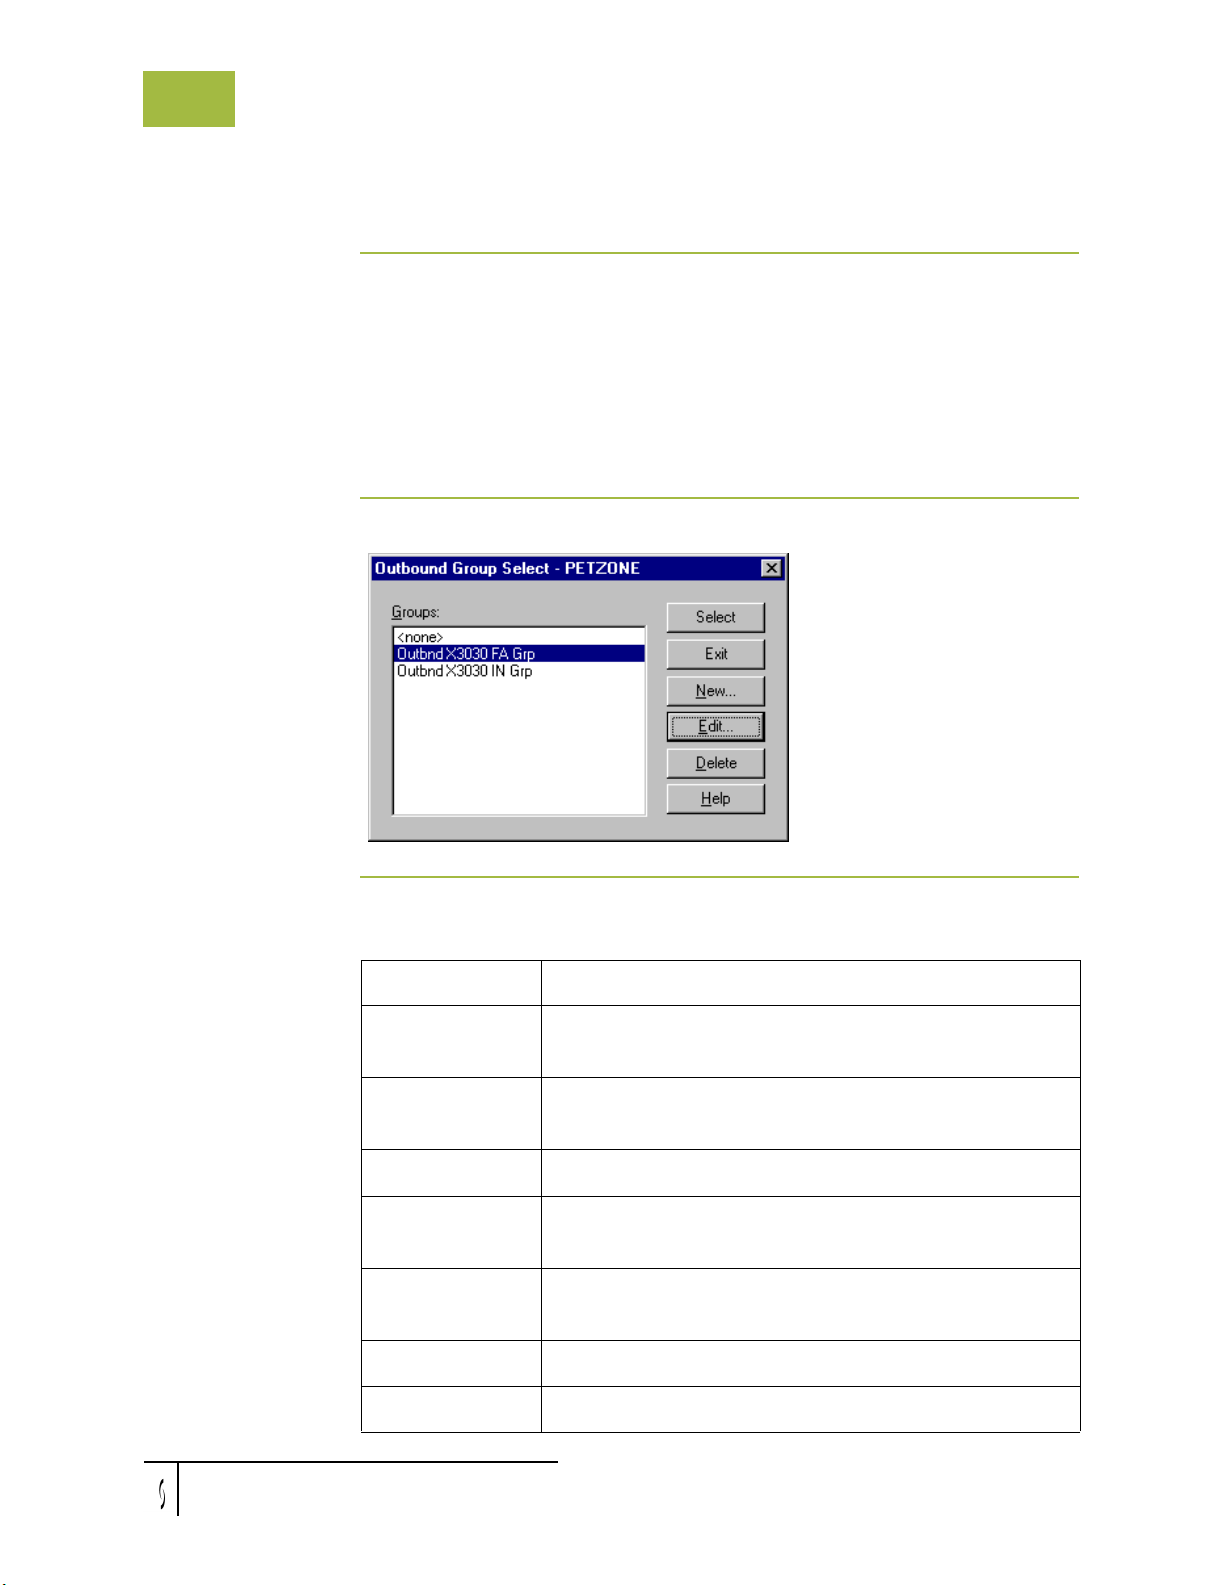
3 - 44
Outbound Group Select Dialog Box Using Partners
Outbound Group Select Dialog Box
Introduction The Outbound Group Select dialog box is used to select an existing functional
group definition to be associated with this relationship. You can also use it to
initiate the definition of a new functional group or to modify or delete an existing
definition. The groups that are available to you are determined by the version you
selected on the Outbound Relationship dialog box.
Functional groups are required for ANSI X12, TDCC, and UCS standards, are
optional for EDIFACT and ODETTE, and are not specified for TRADACOMS.
Diagram The following illustrates the Outbound Group Select dialog box:
Parts and
functions
Gentran:Server for Windows – November 2005 Gentran:Server for Windows User’s Guide
The following lists the parts of the Outbound Group Select dialog box and their
functions:
Part Function
Groups Displays all functional group definitions established for
this trading partner.
Select Selects the indicated functional group as the one the
system uses for this relationship.
Exit Exits the Outbound Group Select dialog box.
New Displays the Outbound Group Entry Dialog Box, which
allows you to create a new group.
Edit Displays the Outbound Group Entry Dialog Box, which
allows you to edit the selected group.
Delete Removes the selected group from the system.
Help Displays Online Help.
Page 81
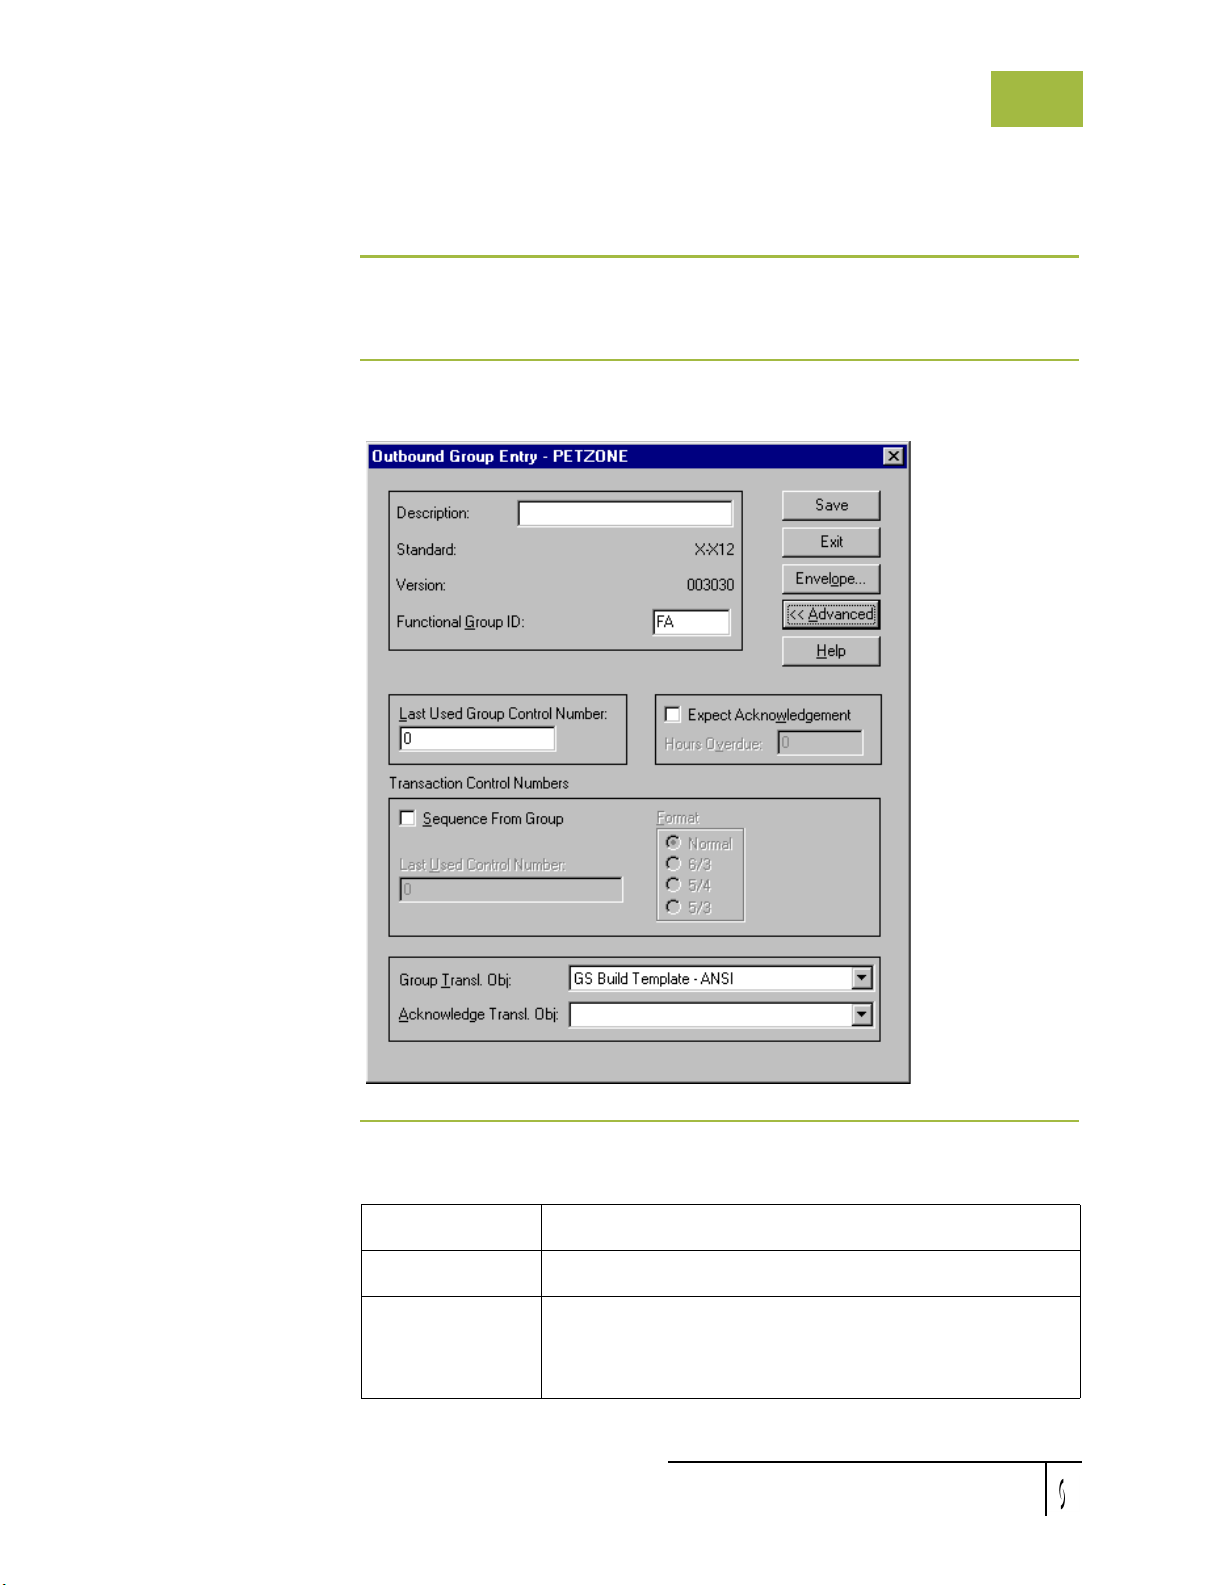
Using Partners Outbound Group Entry Dialog Box
Outbound Group Entry Dialog Box
Introduction The Outbound Group Entry dialog box is used to specify a new functional group
definition.
Diagram The following illustrates the Outbound Group Entry dialog box with the
Advanced options displayed:
3 - 45
Parts and
functions
Gentran:Server for Windows User’s Guide Gentran:Server for Windows – November 2005
The following lists the parts of the Outbound Group Entry dialog box and their
functions:
Part Function
Description Specify the name of the functional group description.
Standard Displays the EDI standard the system is using for this
relationship definition.
(Continued on next page)
Page 82

3 - 46
Outbound Group Entry Dialog Box Using Partners
Part Function
Version Displays the version of the EDI standard the system is
using for this relationship.
Functional Group IDSpecifies the functional group. These identification boxes
are defined by each appropriate standards group to group
like documents. The standard defines which functional
group ID should be used with each document type. This is
a mandatory box.
Examples
IN 810 X12 Invoice
PO 850 X12 Purchase Order
IG 830 UCS Invoice
OG 875 UCS P. O.
INVOIC EDIFACT INVOIC
ORDERS EDIFACT ORDERS
INVOIC Tradacoms INVOIC
ORDERS Tradacoms ORDERS
Last Used Group
Control Number
Expect
Acknowledgement
This element is located in:
ANSI X12: GS01
EDIFACT: UNG01
TRADACOMS:BAT
Specify a value that is used to generate the next
interchange control number. The number generated will
always be one more than the number in this box. This box
will initially be set to zero.
Note
To ensure that functional acknowledgements work
correctly, you must define a unique control number for
each group relationship that exists for the same partner
relationship.
Instruct the system to expect a functional
acknowledgement to be received from this trading partner
as a result of your partner receiving the group defined in
this relationship. The default value for this box is not
checked (do not expect an acknowledgement).
(Continued on next page)
Gentran:Server for Windows – November 2005 Gentran:Server for Windows User’s Guide
Page 83

Using Partners Outbound Group Entry Dialog Box
Part Function
Hours Overdue Specify how many hours must elapse before an expected
functional acknowledgement is considered overdue. This
box is only valid if the Expect Acknowledgement box is
checked. The default value for this box is “48,” indicating
that the acknowledgement will be considered overdue in
two days. If you enter a value of “0” (zero) in this box, the
acknowledgement will be immediately considered
overdue.
Note
This box is disabled if Expect Acknowledgement is not
checked.
3 - 47
Sequence From
Group
Last Used
Control Number
Specify if the transaction set control number options for
this group setup should be controlled at the group level. If
this box is not checked, the following two fields are
disabled.
Specify a value that will be used to generate the next
transaction set control number for the sets defined within
this functional group. The number generated will always
be one more than the number in this box. This box will
initially be set to zero.
Note
This box is disabled if Sequence From Group is not
checked.
(Continued on next page)
Gentran:Server for Windows User’s Guide Gentran:Server for Windows – November 2005
Page 84

3 - 48
Outbound Group Entry Dialog Box Using Partners
Part Function
Format Select the format of the transaction set control number that
will be generated:
Normal The number will be generated by incrementing the
last used control number. The length of the number
will be defined by the standard.
6/3 The number will be a composite of two numbers.
The first six digits are the last six digits of the
functional group control number. The last three
digits are a counter beginning at “1” within the
functional group. Use this format only as
instructed by your trading partner.
5/4 The number will be a composite of two numbers.
The first five digits are the last five digits of the
functional group control number. The last four
digits are a counter beginning at “1” within the
functional group. This is the normal TDCC
numbering convention. It is used by the Motor,
Rail, and Ocean transportation industries.
Group Transl.
Obj.
5/3 The number will be a composite of two numbers.
The first five digits are the last five digits of the
functional group control number. The last three
digits are a counter beginning at “1” within the
functional group. This is the normal UCS
convention, which is used by the Grocery and
Warehousing industries.
Note
This box is disabled if Sequence From Group is not
checked.
Select a partner-specific Group Build Map translation
object if this trading partner group deviates from the
normal system behavior. You must select a translation
object from this list if you want the system to perform
partner-specific grouping.
War ning
We strongly recommend that you do not change the
translation objects in the Group Transl. Obj. and
Acknowledge Transl. Obj. lists, unless you have a specific
reason for doing so.
(Continued on next page)
Gentran:Server for Windows – November 2005 Gentran:Server for Windows User’s Guide
Page 85

Using Partners Outbound Group Entry Dialog Box
Part Function
3 - 49
Acknowledge
Transl. Obj.
Select an Acknowledgement Build Map if one exists on the
system.
You must select a translation object from the Acknowledge
Transl. Obj. list if you have created a specific translation
object for this relationship and if you want to change the
way the system behaves for this partner group. When the
system reconciles an acknowledgement, it maps the
acknowledgement to an internal file and then processes it.
If you need the system to process acknowledgements
differently, you should select an additional translation
object from the Acknowledge list.
War ning
We strongly recommend that you do not change the
translation objects in the Group Transl. Obj. and
Acknowledge Transl. Obj. lists, unless you have a specific
reason for doing so.
Save Saves the modified information.
Exit Exits the Outbound Group Entry dialog box.
Envelope Accesses one of the following Outbound Functional Group
Envelope dialog boxes depending on which version you
specified on the Outbound Relationship Dialog Box:
◗ Outbound GS Functional Group
◗ Outbound UNG Functional Group
◗ Outbound BAT Functional Group
Reference
Refer to the Partner Editor online help for specific
information about the envelope dialog boxes.
Advanced Toggles the display of the advanced options.
Help Displays Online Help.
Gentran:Server for Windows User’s Guide Gentran:Server for Windows – November 2005
Page 86
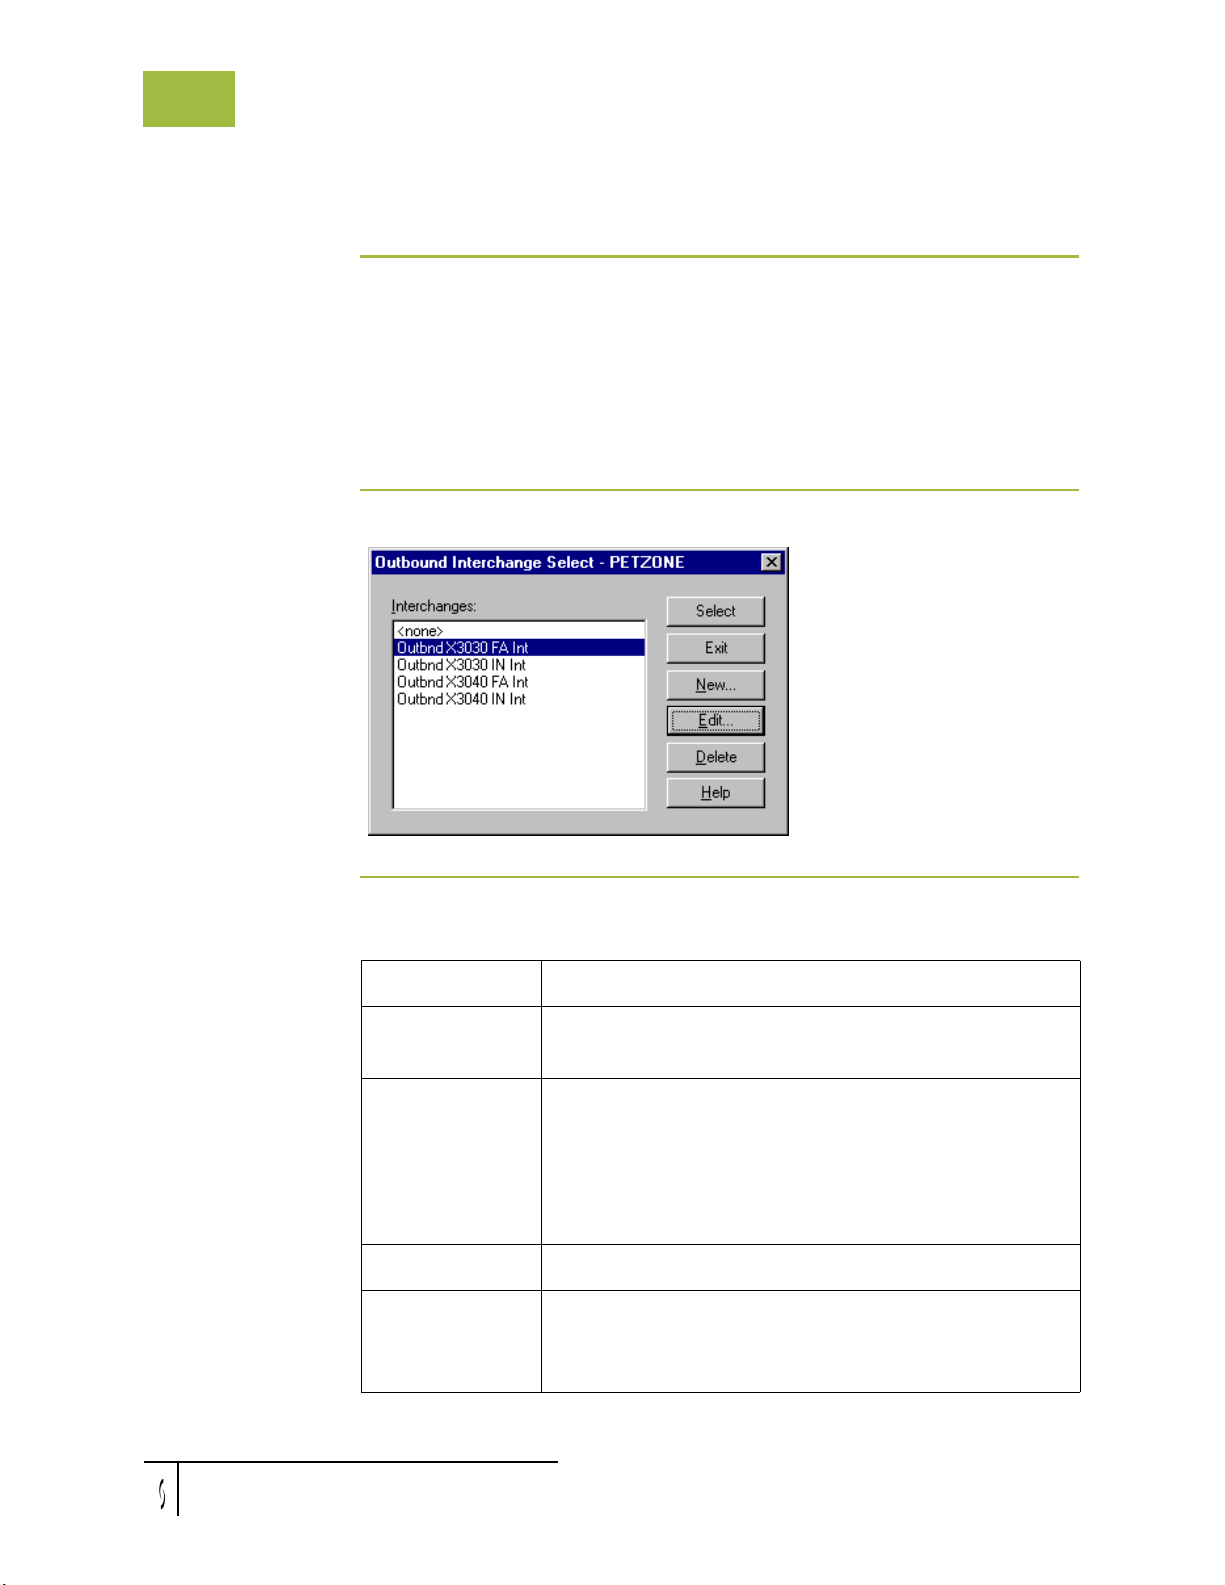
3 - 50
Outbound Interchange Select Dialog Box Using Partners
Outbound Interchange Select Dialog Box
Introduction The Outbound Interchange Select dialog box is used to select an existing
interchange definition to be associated with this relationship. It can also be used to
initiate the definition of a new interchange, or to modify or delete an existing
definition. The interchanges available to you are determined by the version you
selected on the Outbound Relationship dialog box. Interchanges are required for
EDIFACT, ODETTE, TRADACOMS, and UCS, and are optional for ANSI X12
and TDCC.
Diagram The following illustrates the Outbound Interchange Select dialog box:
Parts and
functions
Gentran:Server for Windows – November 2005 Gentran:Server for Windows User’s Guide
The following lists the parts of the Outbound Interchange Select dialog box and
their functions:
Part Function
Interchanges Displays all interchange definitions established for this
trading partner.
Select Selects the indicated interchange to be used with this
relationship.
Note
Select <none> if the standard you are using does not
require interchanges and you do not want to use one.
Exit Exits the Inbound Interchange Select dialog box.
New Displays the Outbound Interchange Entry Dialog Box,
which allows you to create a new interchange.
(Continued on next page)
Page 87
Using Partners Outbound Interchange Select Dialog Box
Part Function
Edit Displays the Outbound Interchange Entry Dialog Box,
which allows you to edit the selected interchange.
Delete Removes the selected interchange from the system.
Help Displays Online Help.
3 - 51
Gentran:Server for Windows User’s Guide Gentran:Server for Windows – November 2005
Page 88
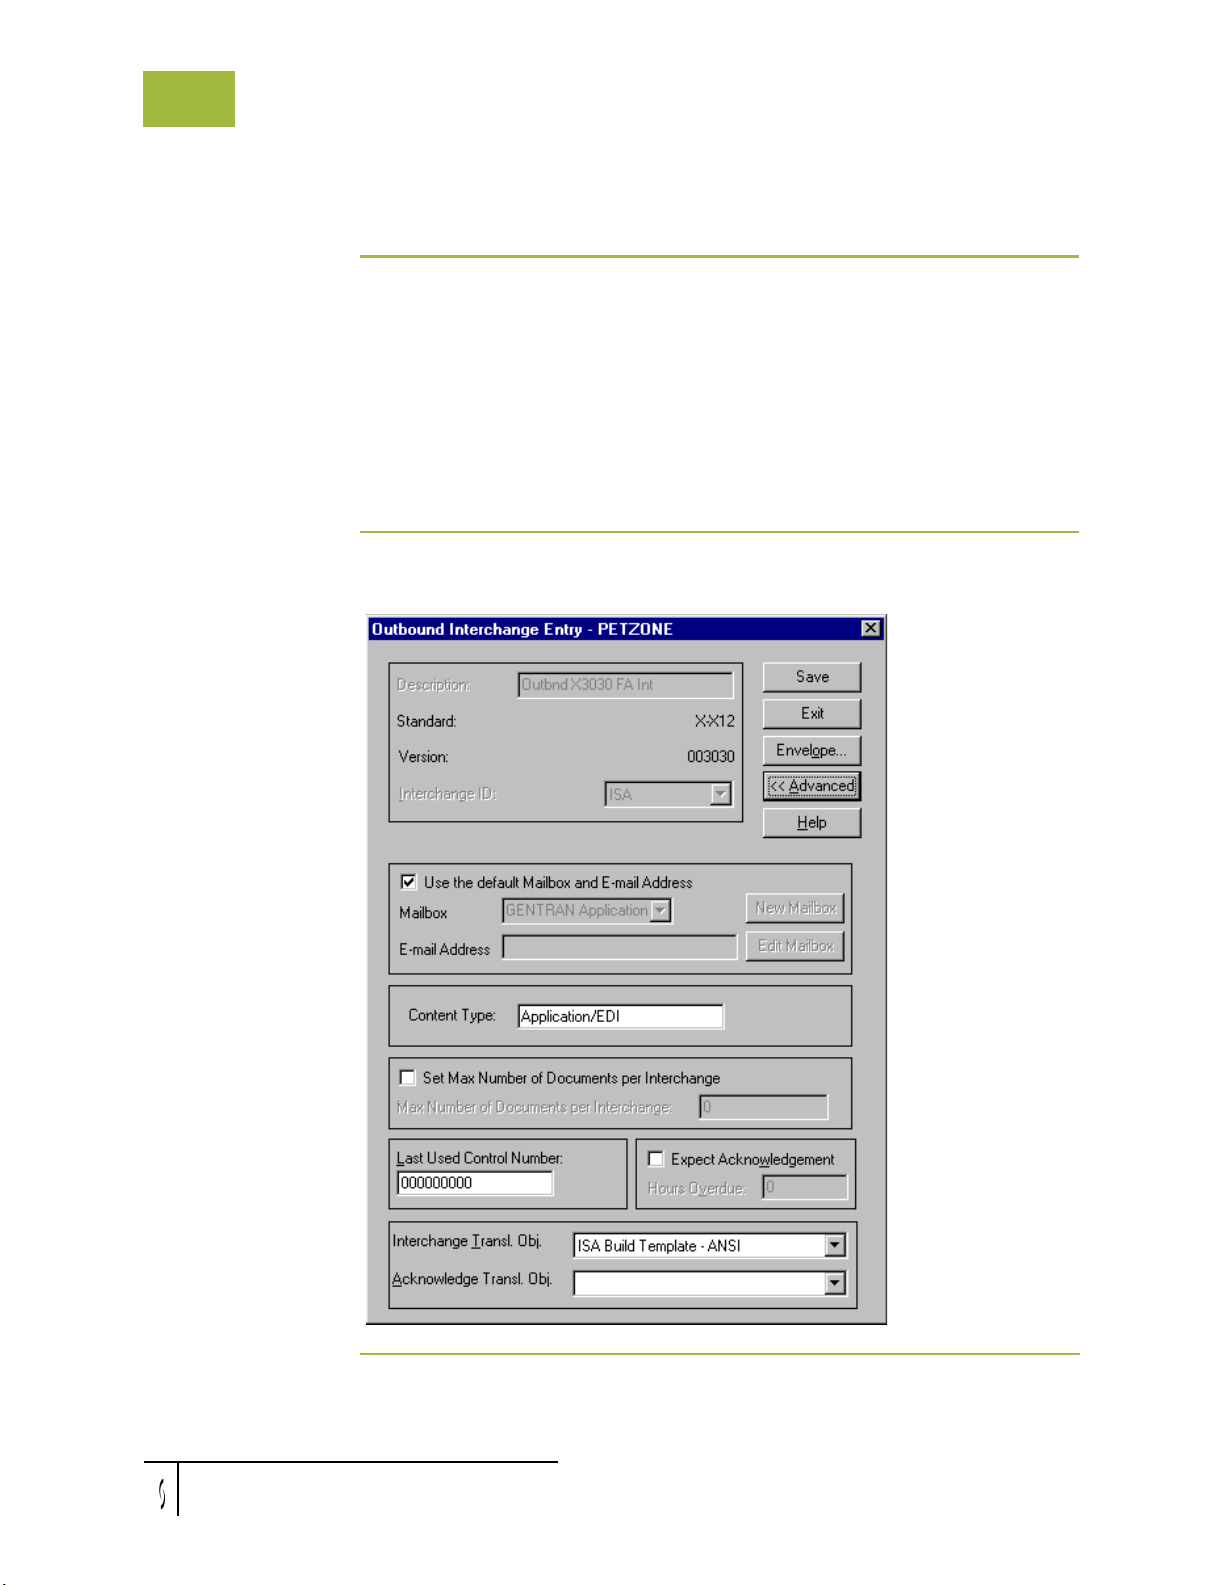
3 - 52
Outbound Interchange Entry Dialog Box Using Partners
Outbound Interchange Entry Dialog Box
Introduction The Outbound Interchange Entry dialog box is used to specify a new interchange
definition.
Note
EDIFACT version 4 defines the infrastructure necessary to support the creation
(and processing) of interchanges that have been encoded using a character set
other than 8-bit ASCII. Gentran:Server for Windows supports the processing of an
encoded interchange as long as the encoding of the interchange matches the
default code page of the operating system where Gentran:Server is running.
Diagram The following illustrates the Outbound Interchange Entry dialog box with the
Advanced options displayed:
Gentran:Server for Windows – November 2005 Gentran:Server for Windows User’s Guide
Page 89
Using Partners Outbound Interchange Entry Dialog Box
3 - 53
Parts and
functions
The following lists the parts of the Outbound Interchange Entry dialog box and
their functions:
Part Function
Description Displays the name of the interchange description.
Standard Displays the EDI standard the system is using for this
relationship definition.
Version Displays the version of the EDI standard the system is
using for this relationship.
Interchange ID Displays the type of interchange you specified. The
standard defines which interchange ID should be used with
each standard. This is a mandatory box.
Example
ANSI X12 - ISA
ICS
UCS - BG
EDIFACT - UNB
Tradacoms - STX
Use the default
Mailbox and
E-mail Address
Specify that the system will use the default Mailbox and
E-mail address specified on the Partner Definition (New/
Edit) Dialog Box.
Mailbox/
New Mailbox
Specify a mailbox to use to identify this partner for
RosettaNet relationships.
Or, click New Mailbox to display the Create New Mailbox
wizard, which allows you to create a new mailbox.
Reference
See the Communications User’s Guide for more
information.
E-mail Address/
Edit Mailbox
Specify an e-mail address to identify this partner for
RosettaNet relationships.
Or, click Edit Mailbox to display the Mailbox Properties
dialog box, which allows you to edit the mailbox.
Reference
See the Communications User’s Guide for more
information.
Content Type Specify the content type of the interchange.
(Continued on next page)
Gentran:Server for Windows User’s Guide Gentran:Server for Windows – November 2005
Page 90
3 - 54
Outbound Interchange Entry Dialog Box Using Partners
Part Function
Set Max Number
of Documents per
Instruct the system to only allow the specified maximum
number of documents per interchange for this relationship.
Interchange
Max Number of
Documents per
Specify the maximum number of documents allowed per
interchange for this relationship.
Interchange
Last Used
Control Number
Specify a value that will be used to generate the next
interchange control number. The number generated is
always one more than the number in this box. Initially, this
box will be set to zero.
Expect
Acknowledgement
Instruct the system to expect a functional
acknowledgement to be received from this trading partner
as a result of your partner receiving the interchange set
defined in this relationship. The default value for this box
is not checked (do not expect an acknowledgement).
Hours Overdue Specify how many hours must elapse before an expected
functional acknowledgement is considered overdue. This
box is only valid if the Expect Acknowledgement box is
checked. The default value for this box is “48,” indicating
that the acknowledgement will be considered overdue in
two days. If you enter a value of zero in this box, the
acknowledgement will be immediately considered
overdue.
Note
This box is disabled if Expect Acknowledgement is not
checked.
Interchange
Transl. Obj.
Select a partner-specific Interchange Build Map translation
object if this trading partner interchange deviates from the
normal system behavior. You must select a translation
object from this list if you want the system to perform
partner-specific interchanging.
War ning
We strongly recommend that you do not change the
translation objects in the Interchange Transl. Obj. and
Acknowledge Transl. Obj. lists, unless you have a specific
reason for doing so.
(Continued on next page)
Gentran:Server for Windows – November 2005 Gentran:Server for Windows User’s Guide
Page 91

Using Partners Outbound Interchange Entry Dialog Box
Part Function
3 - 55
Acknowledge
Transl. Obj.
Select an Acknowledgement Build Map if one exists on the
system.
You must select a translation object from the Acknowledge
Transl. Obj. list if you have created a specific translation
object for this relationship and if you want to change the
way the system behaves for this partner interchange. When
the system reconciles an acknowledgement, it maps the
acknowledgement to an internal file and then processes it.
If you need the system to process acknowledgements
differently, you should select an additional translation
object from the Acknowledge list.
War ning
We strongly recommend that you do not change the
translation objects in the Interchange Transl. Obj. and
Acknowledge Transl. Obj. lists, unless you have a specific
reason for doing so.
Save Saves the modified information.
Exit Exits the Outbound Interchange Entry dialog box.
Envelope Accesses one of the following Outbound Interchange
Envelope dialog boxes depending on which version you
specified on the Outbound Relationship Dialog Box:
◗ Outbound ISA Envelope
◗ Outbound ICS Envelope
◗ Outbound BG Envelope
◗ Outbound UNB Envelope
◗ Outbound UNA Envelope
◗ Outbound STX Envelope
◗ Outbound VDA Envelope
◗ Outbound NCPDP Envelope
◗ Outbound Envelope PIP Initiation
Reference
Refer to the Partner Editor online help for specific
information about the envelope dialog boxes.
Advanced Toggles the display of the advanced options.
Help Displays Online Help.
Gentran:Server for Windows User’s Guide Gentran:Server for Windows – November 2005
Page 92
3 - 56
Creating a Partner Definition Using Partners
Creating a Partner Definition
Introduction The partner definition contains the basic information about the trading partner that
the system needs before you define the rest of the partner profile.
Prerequisite
knowledge
Before setting up a new partner definition, you must have the following
information:
◗ The communication profile name you use to communicate with this partner
◗ The EDI code for this partner
◗ The application code used to identify this partner in the import file
This application code is needed only if the transactions are processed using
the file Import facility.
Procedure To create a partner definition, complete the following steps:
Step Action
1
2
From the Tools menu, select Partner Editor.
System Response
The system displays the Partner Editor Dialog Box.
Click New.
System response
The system displays the Partner Definition (New/Edit) Dialog Box.
3
In the Profile ID box, type a unique alphanumeric Profile ID for this
partner.
Note
Do not use special characters.
4
5
In the Name box, type the partner name.
In the EDI Code box, type the EDI identifier for this partner.
Note
The system uses this identifier during inbound processing to select
the correct partner.
(Continued on next page)
Gentran:Server for Windows – November 2005 Gentran:Server for Windows User’s Guide
Page 93
Using Partners Creating a Partner Definition
Step Action
3 - 57
6
If necessary, in the Application Code box, type an application code to
identify this partner.
Note
The system uses this identifier during outbound import processing, to
select the correct partner.
7
◗ Select the appropriate mailbox from the Default Mailbox list.
OR
◗ Click New Mailbox to create a new mailbox.
Note
See the Communications User’s Guide for more information about
creating mailboxes.
8
9
After you enter all the partner definition information, click Save.
Click Exit to return to the Partner Editor dialog box.
Note
To complete the partner profile, you need to define an inbound or
outbound relationship or both.
◗ If you are receiving and processing information from this trading
partner, you need to define an appropriate inbound relationship
established.
◗ If you are sending information to this trading partner, you need to
define an outbound relationship.
Gentran:Server for Windows User’s Guide Gentran:Server for Windows – November 2005
Page 94

3 - 58
Creating an Inbound Relationship Using Partners
Creating an Inbound Relationship
Introduction To correctly receive and process information from a trading partner, you must
have an appropriate inbound relationship established that defines the parameters
needed to receive data files from that partner. Each inbound relationship defines
which business documents are received from a partner.
Necessary
parameters
Translation
objects
Inbound groups
and interchanges
You must set up several parameters that are used to create an inbound relationship.
These parameters tell the system the following information:
◗ The type of data received
◗ The criteria the system uses to validate the information it receives
◗ The functional groups and interchanges in which you expect to receive the
documents
Each inbound relationship must have one or more associated inbound translation
objects. These translation objects determine how the received data is processed.
You need to specify which translation objects are used to define the rules for
exporting, printing, and creating turnaround documents. At a minimum, one
translation object must be available.
Note
If this relationship requires a new translation object, you must register that
translation object with the system before creating the inbound relationship. See
Registering New Translation Objects on page 2 - 7 for instructions.
You must define or select an inbound interchange and/or inbound functional group
before the system allows you to complete the setup of an inbound relationship.
The inbound functional group defines the format of the functional group and the
parameters that should be used to verify it. The inbound interchange defines the
format of the interchange and the parameters that should be used to verify it.
However, for some transactions, the functional group or interchange is optional
and if your trading partner has chosen not to use it then it is not necessary for you
to select one. Refer to the following standards to determine whether or not you are
required to select an inbound functional group or interchange:
◗ For some ANSI X12 documents, the interchange is optional and the
functional group is required. However, for most documents, both an
interchange and functional group are required.
◗ For TDCC, the interchange is optional and the functional group is required.
(Continued on next page)
Gentran:Server for Windows – November 2005 Gentran:Server for Windows User’s Guide
Page 95
Using Partners Creating an Inbound Relationship
3 - 59
Inbound groups
and interchanges
(contd)
◗ For UCS, the interchange is required and the functional group is also
required.
◗ For EDIFACT, the interchange is required and the functional group is
optional.
◗ For ODETTE, the interchange is required and the functional group is
optional.
◗ For TRADACOMS, the Interchange is required and there is no functional
group.
Note
If you do not want to use an optional functional group or interchange, you must
still select <none> from the appropriate dialog box to alert the system that you are
not using a group.
Before you begin Before setting up an inbound relationship, you must know the following
information to plan the implementation of this partner:
◗ The EDI standard you expect from this trading partner (such as ANSI)
◗ The standard version you expect from this trading partner (such as 003020 for
ANSI or 090001 for EDIFACT)
◗ The code for the transaction set you expect from this trading partner (such as
““INVOIC” for an EDIFACT invoice)
◗ The type of functional group and interchange the transaction set is wrapped in
when it is received from this partner
Inbound
relationship
dialog box
After you complete your implementation planning for this partner, you can set up
the inbound relationship by using the Inbound Relationship dialog box. The
Inbound Relationship dialog box controls other subordinate dialog boxes, where
you define everything that is necessary to establish the relationship.
Process of
The following describes the process for defining an inbound relationship:
defining an
inbound
relationship
Gentran:Server for Windows User’s Guide Gentran:Server for Windows – November 2005
Stage Description
1
2
Create a new inbound relationship.
Create and register the inbound translation object to be used with this
relationship.
Reference
See the Application Integration User’s Guide for more information
about creating a translation object. Also see Registering New
Translation Objects on page 2 - 7 for more information.
(Continued on next page)
Page 96

3 - 60
Creating an Inbound Relationship Using Partners
Stage Description
3
4
Select at least one inbound translation object.
Create and select at least one inbound group to define how the
document is received from this partner.
Note
Depending on the standards you are using, either the functional group
or interchange may be optional. (See Inbound groups and
interchanges on page 3 - 58 to determine what is optional for the
standard you are using.)
5
Create and select at least one inbound interchange to define how the
document is received from this partner.
Note
Depending on the standards you are using, either the functional group
or interchange may be optional. (See Inbound groups and
interchanges on page 3 - 58 to determine what is optional for the
standard you are using.)
6
If you are generating functional acknowledgements as a result of
receiving documents for an inbound relationship, you must set up the
corresponding outbound relationship to generate the
acknowledgements your partner requests.
Reference
See Creating an Outbound Relationship on page 3 - 66 for more
information.
Gentran:Server for Windows – November 2005 Gentran:Server for Windows User’s Guide
Page 97
Using Partners Creating an Inbound Relationship
Procedure To create an inbound relationship, complete the following steps:
Step Action
Creating a new inbound relationship
3 - 61
1
From the Tools menu, select Partner Editor.
System Response
The system displays the Partner Editor Dialog Box.
2
◗ Select the partner profile for which you want to create an
inbound relationship.
◗ Click Inbound.
System response
The system displays the Inbound Relationship Dialog Box.
Note
You must have already created a partner definition for this partner.
Reference
See Creating a Partner Definition on page 3 - 56 for more
information.
3
Click New.
System response
The system displays the New Inbound Relationship dialog box.
4
In the description box, type a unique relationship name (such as
Inbound Invoice).
5
Click Save.
System response
The system creates an inbound relationship and returns to the
Inbound Relationship dialog box.
(Continued on next page)
Gentran:Server for Windows User’s Guide Gentran:Server for Windows – November 2005
Page 98
3 - 62
Creating an Inbound Relationship Using Partners
Step Action
6
From the appropriate drop-down lists on the Inbound Relationship
dialog box, select the following:
◗ Standard
◗ Ve r si o n
◗ Transaction Set
◗ Release (for TRADACOMS only)
Notes
◗ The contents of these lists are displayed from the translation
objects registered in Gentran:Server. For example, if there are no
translation objects for ANSI X12 version 003040 registered with
Gentran, you will not be able to select that version on this dialog
box.
◗ The information required for this dialog box should be provided
to you by your trading partner when this partner defines the
details of the transactions they send you.
7
If you need to define parameters to comply with the processing needs
of your partner (such as Sequence Checking, Last Used Control,
Duplicate Documents, or Generate Acknowledgement), click
Advanced.
System response
The system displays the Advanced fields on the Inbound
Relationship dialog box.
Selecting an inbound translation object
1
On the Inbound Relationship dialog box, click Translation .
System response
The system displays the Inbound Translation Object Dialog Box.
2
From the drop-down lists, select the translation objects required for
this inbound relationship.
Note
◗ The lists display all translation objects registered in the system
that are appropriate for the type of translation object (such as
Export or Print) and the transaction set.
◗ If there are no translation objects displayed in the drop-down
lists, no translation objects of that type are registered for the
version of the document defined in the relationship.
(Continued on next page)
Gentran:Server for Windows – November 2005 Gentran:Server for Windows User’s Guide
Page 99
Using Partners Creating an Inbound Relationship
Step Action
3 - 63
3
If you selected an Export File translation object and you want to
export to a specific file, type the universal naming convention (UNC)
name of that file in the Export File Name box.
4
Do you want to use the “Export to Mailbox” function to specify a
mailbox and E-mail address so the output of the inbound translation
object can be delivered directly back to the Mailbox Server Manager?
◗ If yes, select Export to Mailbox and complete the appropriate
boxes. Continue with the next step.
Reference
See Inbound Translation Object Dialog Box on page 3 - 15 for
more information.
◗ If no, continue with the next step.
5
Click Save to save your selections and return to the Inbound
Relationship dialog box.
Selecting an inbound functional group
1
On the Inbound Relationship dialog box, click Groups to display a
list of existing groups.
System response
The system displays the Inbound Group Select Dialog Box.
2
Is the required group in the Groups list?
◗ If yes, select the group. Or, if you are not using groups, select
<none>.
Then, click Select. Continue with Selecting an inbound
interchange on page 3 - 64.
System response
This action selects the highlighted group and returns you to the
Inbound Relationship dialog box.
◗ If no, continue with the next step to create the group.
3
On the Inbound Group Select dialog box, click New.
System response
The system displays the Inbound Group Entry Dialog Box.
4
In the Description box, type the group description.
(Continued on next page)
Gentran:Server for Windows User’s Guide Gentran:Server for Windows – November 2005
Page 100
3 - 64
Creating an Inbound Relationship Using Partners
Step Action
5
In the Functional Group ID box, type the identification of the
functional group you are specifying.
Note
The EDI standards define which functional group ID should be used
for each type of document.
6
If you have more complex requirements for processing the functional
group, click Advanced to display the full list of functional group
setup options.
System response
The system displays the Advanced fields on the Inbound Group
Entry dialog box.
7
After you set up the required parameters in this dialog box, click
Save to store the information and return to the Inbound Group Select
dialog box.
8
◗ Highlight the new group.
◗ Click Select.
System response
Selects the group and returns to the Inbound Relationship dialog box.
Selecting an inbound interchange
1
On the Inbound Relationship dialog box, click Interchanges to
display a list of existing interchanges.
System response
The system displays the Inbound Interchange Select Dialog Box.
2
Is the required interchange in the Interchanges list?
◗ If yes, select the group. Or, if you are not using groups, select
<none>.
Then, click Select. Continue with Finalizing the inbound
relationship on page 3 - 65.
System response
This action selects the highlighted interchange and returns you to
the Inbound Relationship dialog box.
◗ If no, continue with the next step to create the interchange.
(Continued on next page)
Gentran:Server for Windows – November 2005 Gentran:Server for Windows User’s Guide
 Loading...