

Page 1
WARRANTY
The Gentec-EO UNO Single Channel Laser Power Meter comes with a one-year warranty (from date of
shipment) against material and/or workmanship defects, when used under normal operating conditions.
The warranty does not cover damages related to battery leakage or misuse.
Gentec-EO Inc. will repair or replace, optionally, any UNO that proves to be defective during the warranty
period, except in the case of product misuse.
Any attempt by an unauthorized person to alter or repair the product voids the warranty.
The manufacturer is not liable for consequential damages of any kind.
Customers must fill in and mail the warranty card in order to activate the warranty.
In case of malfunction, contact your local Gentec-EO distributor or nearest Gentec-EO Inc. office to obtain
a return authorization number. The material should be returned to:
Gentec Electro-Optics, Inc.
445, St-Jean-Baptiste, Suite 160
Québec, QC
Canada G2E 5N7
Tel: (418) 651-8003
Fax: (418) 651-1174
e-mail: info@gentec-eo.com
Website: www.gentec-eo.com
CLAIMS
To obtain warranty service, contact your nearest Gentec-EO agent or send the product, with a description
of the problem, prepaid shipping and insurance, to the nearest Gentec-EO agent. Gentec-EO Inc.
assumes no risk for damage in transit. Gentec-EO Inc. will, at its option, repair or replace the defective
product free of charge or refund your purchase price. However, if Gentec-EO Inc. deems that the failure
is caused by misuse, alterations, accident or abnormal condition of operation or handling, you will be
billed for the repair and the repaired product will be returned to you (repetitive, see above).
Page 2

UNO User’s Manual Revision – 6.1 1
WARRANTY
The Gentec-EO UNO Single Channel Laser Power, Energy and Power/Energy Meter carries a one-year
warranty (from date of shipment) against material and/or workmanship defects, when used under normal
operating conditions. The warranty does not cover damages related to battery leakage or misuse.
Gentec-EO Inc. will repair or replace, optionally, any UNO that proves to be defective during the warranty
period, except in the case of product misuse.
Any attempt by an unauthorized person to alter or repair the product voids the warranty.
The manufacturer is not liable for consequential damages of any kind.
In case of malfunction, contact your local Gentec-EO distributor or nearest Gentec-EO Inc. office to obtain
a return authorization number. The material should be returned to:
Gentec Electro-Optics, Inc.
445, St-Jean-Baptiste, Suite 160
Québec, QC
Canada G2E 5N7
Tel: (418) 651-8003
Fax: (418) 651-1174
e-mail: [email protected]
Website: www.gentec-eo.com
CLAIMS
To obtain warranty service, contact your nearest Gentec-EO agent or send the product, with a description
of the problem, transportation and insurance prepaid, to the nearest Gentec-EO agent. Gentec-EO Inc.
assumes no risk for the damage in transit. Gentec-EO Inc. will, at its option, repair or replace the
defective product free of charge or refund your purchase price. However, if Gentec-EO Inc. determines
that the failure is caused by misuse, alterations, accident or abnormal condition of operation or handling,
you will be billed for the repair and the repaired product will be returned to you, transportation prepaid.
Gentec Electro – Optics, Inc. All rights reserved
Page 3

UNO User’s Manual Revision – 6.1 2
SAFETY INFORMATION
Do not use the UNO if the device or the detector looks damaged, or if you suspect that the UNO is not
operating properly.
Appropriate installation must be done for water-cooled and fan-cooled detectors. Refer to the specific
instructions for more information. The user must wait for a while before handling these detectors after
power is applied. Surfaces of the detectors get very hot and there is a risk of injury if they are not allowed
to cool down.
Note: This equipment has been tested and found to comply with the limits for a Class B digital
device, pursuant to part 15 of the FCC Rules. These limits are designed to provide
reasonable protection against harmful interference in a residential installation. This
equipment generates, uses, and can radiate radio frequency energy and, if not installed
and used in accordance with the instructions, may cause harmful interference to radio
communications. However, there is no guarantee that interference will not occur in a
particular installation. If this equipment does cause harmful interference to radio or
television reception, which can be determined by turning the equipment off and on, it is
suggested to try to correct the interference by taking one or more of the following steps:
• Reorient or relocate the receiving antenna.
• Increase the distance between the equipment and receiver.
• Connect the equipment to an outlet that is on a different circuit than the receiver.
• Consult the dealer or an experienced radio/TV technician for help.
Caution: Changes or modifications not expressly approved in writing by Gentec-EO Inc. may
void the user’s authority to operate this equipment.
Gentec Electro – Optics, Inc. All rights reserved
Page 4

UNO User’s Manual Revision – 6.1 3
TABLE OF CONTENTS
WARRANTY .................................................................................................................................................. 1
CLAIMS ......................................................................................................................................................... 1
SAFETY INFORMATION .............................................................................................................................. 2
TABLE OF CONTENTS ................................................................................................................................ 3
LIST OF ILLUSTRATIONS ........................................................................................................................... 3
1 THE UNO SINGLE CHANNEL LASER POWER METER ..................................................................... 4
2.1 INTRODUCTION ............................................................................................................................................... 4
2.2 SPECIFICATIONS ............................................................................................................................................. 5
2.3 FRONT PANEL DESCRIPTION ........................................................................................................................... 6
2.4 CONNECTOR DESCRIPTION ............................................................................................................................. 7
3 GETTING STARTED ............................................................................................................................. 7
4.1 POWER MEASUREMENT PROCEDURE ............................................................................................................... 7
4.2 DISPLAY DESCRIPTION .................................................................................................................................... 9
5 BATTERIES ......................................................................................................................................... 10
6.1 BATTERY SELECTION .................................................................................................................................... 10
6.2 BATTERY INSTALLATION .............................................................................................................................. 10
6.3 BATTERY REMOVAL ..................................................................................................................................... 10
DECLARATION OF CONFORMITY .................................................................................................................... 11
7 APPENDIX ........................................................................................................................................... 12
8.1 RECYCLING AND SEPARATION PROCEDURE................................................................................................... 12
8.2 SEPARATION ................................................................................................................................................. 12
8.3 DISMANTLING PROCEDURE ........................................................................................................................... 12
LIST OF ILLUSTRATIONS
FIG. 1-1 UNO FRONT PANEL .......................................................................................................................... 6
FIG. 1-2 UNO CONNECTORS........................................................................................................................... 7
FIG. 1-3 UNO LCD DISPLAY ........................................................................................................................... 9
Gentec Electro – Optics, Inc. All rights reserved
Page 5

UNO User’s Manual Revision – 6.1 4
1 THE UNO SINGLE CHANNEL LASER POWER METER
2
2.1 Introduction
To obtain full performance from the UNO, we recommend that you read this manual carefully.
The UNO is a large display laser power monitor that features outstanding efficiency, ease of use and
battery life.
Unpacking
Each Gentec-EO UNO is thoroughly tested and calibrated prior to shipment.
Visually inspect every UNO unit after removing it from the shipping containers. If you see any damage,
retain all packaging materials and shipping receipts. Any damage claim should be made promptly to the
shipping company. Notify the nearest Gentec-EO representative concerning the claim, so that any repair
or replacement can be arranged as soon as possible.
Gentec Electro – Optics, Inc. All rights reserved
Page 6

UNO User’s Manual Revision – 6.1 5
UNO POWER METER SPECIFICATIONS
Power Range
10 nW to 10 kW
Power Scales
(photodetector)
autoscale
Power Scales
(thermal head)
single wide range scale
Digital Resolution
(photodetector)
1 pW
Digital Resolution
(thermal detector)
1 mW
Digital Resolution
(XLP-12 detector)
1 µW
Monitor Accuracy
±1 % 5 µV
Response Time
(accelerated)1
1 sec
Sampling Frequency
16.7 Hz
Digital Display
76 x 57 mm LCD
Display Rate
2 Hz
Dimensions
210 mm(W) x 122 mm (H) x 44 mm (D)
Weight (including
batteries)
0.47 kg
Batteries (included)
4 Alkaline AA batteries
Battery life (with
thermal detector)
670 hours (estimated)
External Power Supply
(not included)
Input: 100/240 VAC 50-60 Hz, Output 9 VDC 1.66 A
1
2.2 Specifications
The following specifications are based on a one-year calibration cycle, an operating temperature of 18 to
28ºC (64 to 82ºF) and a relative humidity not exceeding 80%.
Table 1-1 List of Specifications
Varies with detector head.
Gentec Electro – Optics, Inc. All rights reserved
Page 7
UNO User’s Manual Revision – 6.1 6
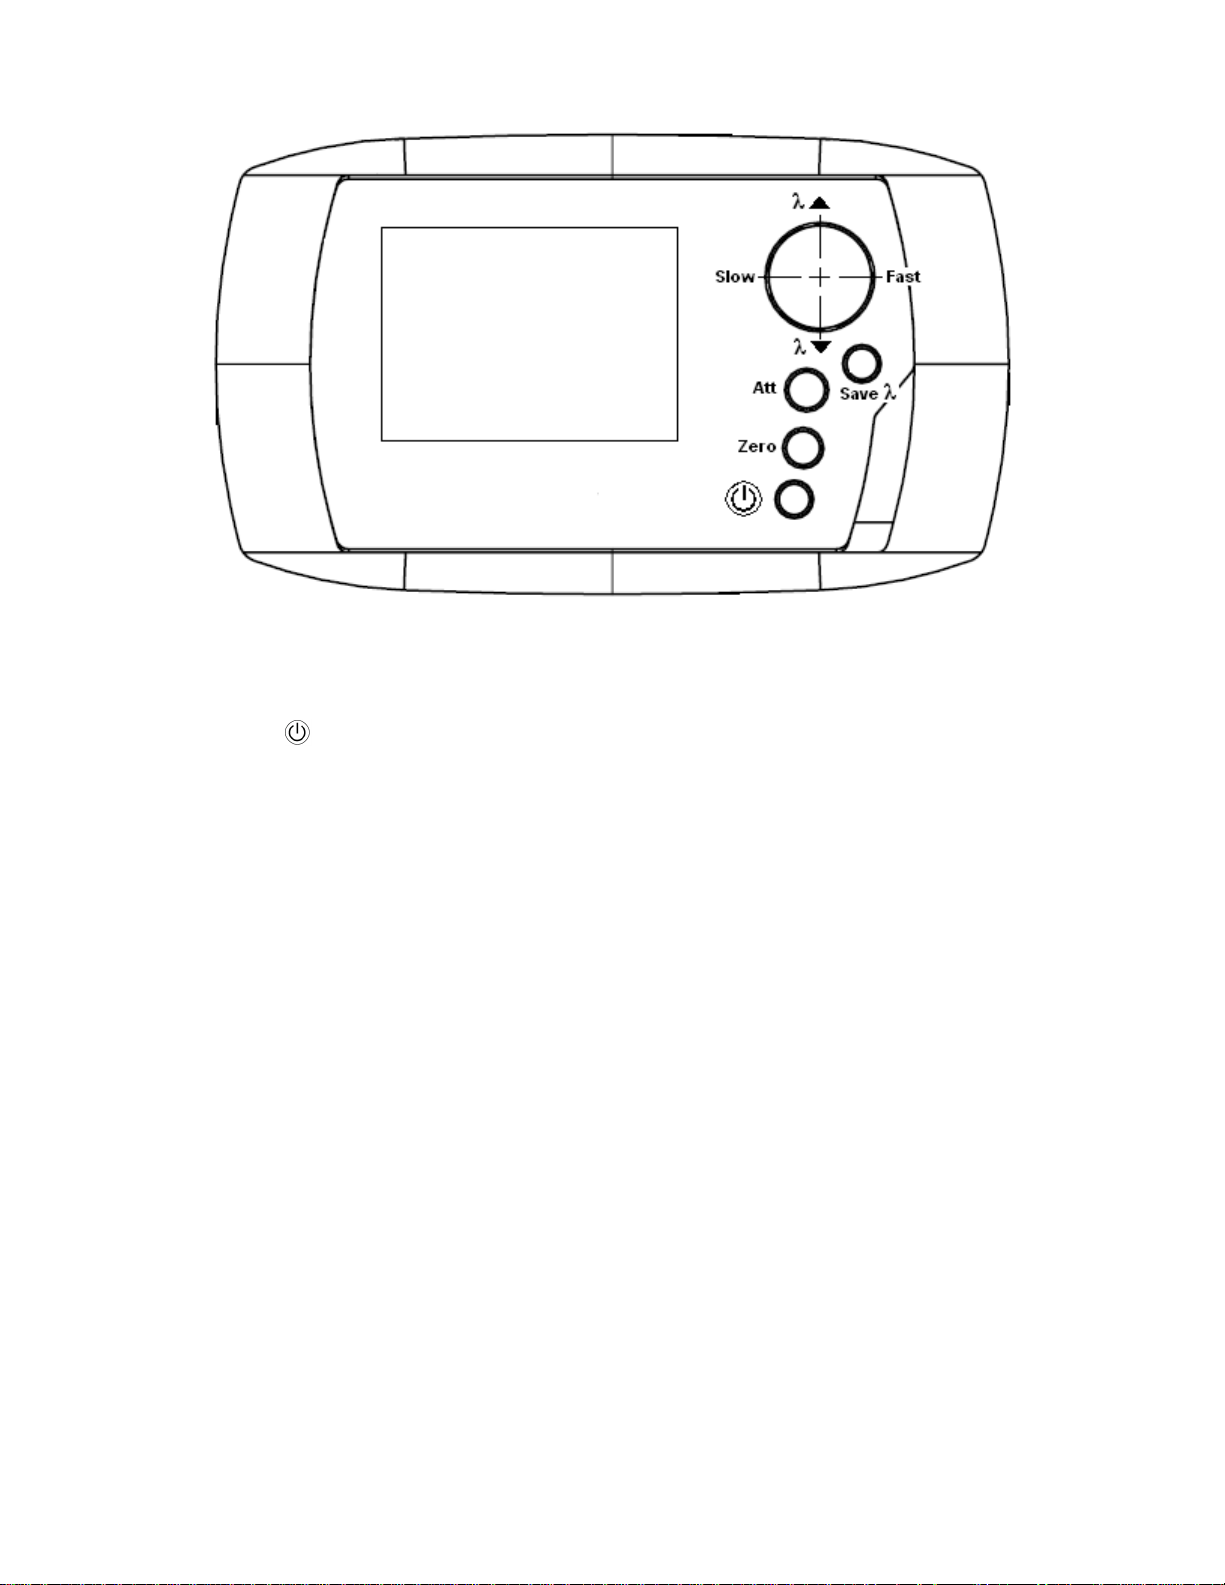
Fig. 1-1 UNO Front Panel
2.3 Front Panel Description
1- control key.
UNO on and off.
2- Zero / dBm control key.
Cancels electronic offset, detector offset and ambient light on the detector. This key
should be pressed before taking measurements. Refer to p.7 adjusting the zero (steps 8
and 9). The hidden dBm function is available by pressing more than 2 seconds on the
Zero control key.The Uno will convert the displayed number in dBm (dB referenced to
1mW) and will display “dBm” unit. To get back to the previous display in Watt, press again
more than 2 seconds on the Zero control key.
3- Att control key.
Photodetectors can be calibrated with and without attenuator. This key allows the user to
select the proper configuration and wavelength. The ATT LCD annunciate indicates
whether the attenuator sensitivity is activated.
4- Save λ control key.
After selecting the proper wavelength using the λ up and λ down control keys, pressing
the Save λ control key stores the wavelength in non-volatile memory and returns to the
measurements with the corresponding sensitivity.
5- λ up and λ down control keys.
Allows the user to select the appropriate wavelength.
6- Fast and Slow control keys.
These keys are only useful with thermal detector heads. The fast mode enables
anticipation, which shortens the natural response time of the detector. The slow mode
disables anticipation. By default, the monitor is in Fast mode. This setting is not stored
in non-volatile memory and therefore returns to Fast mode on every power-up.
Gentec Electro – Optics, Inc. All rights reserved
Page 8
UNO User’s Manual Revision – 6.1 7
CAUTION
Permanent damage to the optical meter may occur if an external
power supply other than the Gentec-EO P/N 200960A is used.
Please call Gentec-EO or your local distributor if extra power
supplies are needed.
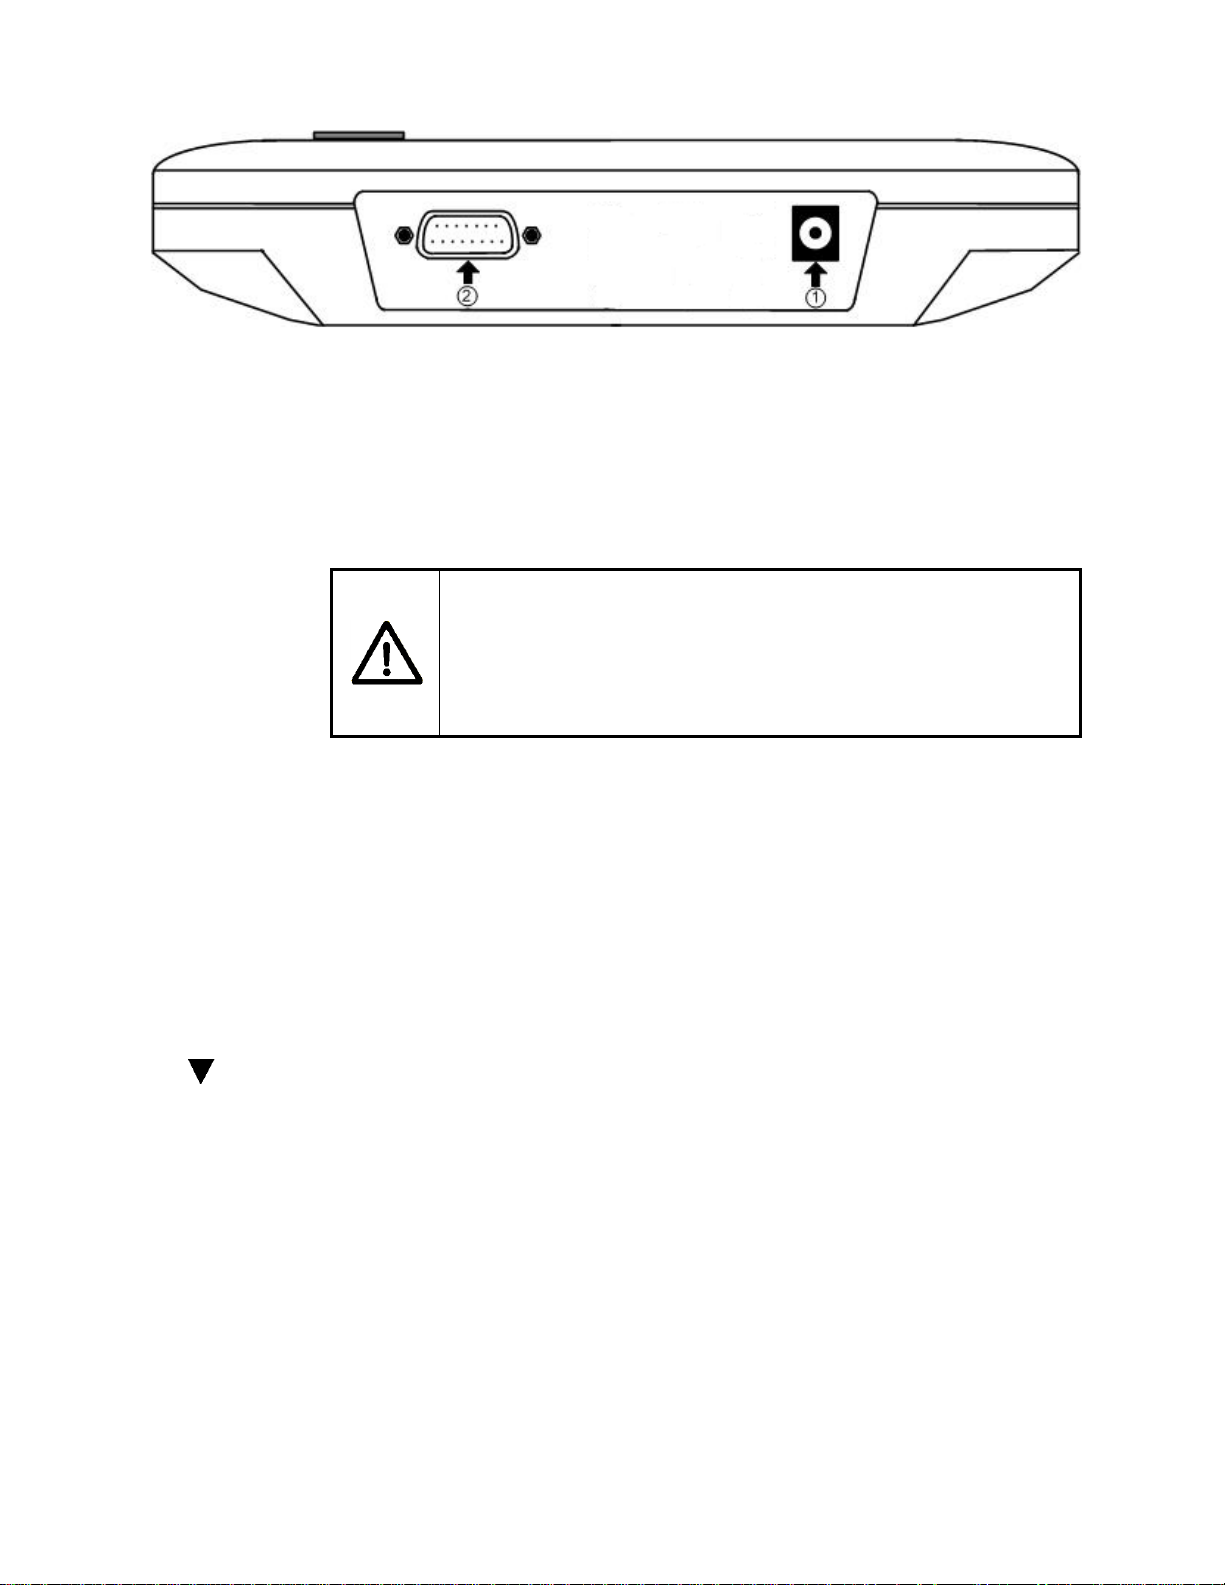
Fig. 1-2 UNO Connectors
2.4 Connector Description
1- EXTERNAL POWER SUPPLY INPUT JACK.
Input voltage required: 9 VDC/100 mA. The external power supply does not charge the
batteries; it allows the use of the monitor without batteries, with dead batteries or simply
to avoid discharging the batteries inside the monitor.
2- PROBE INPUT JACK.
The UNO uses a DB-15 female connector to mate with the detector heads (probes).
The UNO works with all Gentec-EO power detectors currently sold. It automatically
recognizes every power detector head, which ensures accurate auto-calibration. More
importantly, it can take advantage of our Personal wavelength correction™. It reads the
memory in the Smart Interface connector to provide a wavelength correction that is
based on spectral data measured from that specific detector.
3 Getting Started
4
This section contains important information concerning the installation and operation of the UNO. The
UNO is delivered ready to use. Just install the 4 AA batteries, insert a detector head in the Probe
Input Jack (#2 in Figure 1-2) and press the I/O key.
4.1 Power measurement procedure
1- Install the power detector on its optical stand.
2- First, slide the connector latch to the right to unlock the connector.
3- Turn the UNO off and connect a power detector head to the UNO using the PROBE INPUT
JACK (see Fig. 1-2). It is recommended to turn the UNO off before connecting a new head in
order to prevent any loss of information from the detector head’s EEPROM.
Gentec Electro – Optics, Inc. All rights reserved
Page 9

UNO User’s Manual Revision – 6.1 8
4- Slide the latch to the left to lock the connector into place.
5- Switch the UNO ON using the I/O key. The UNO displays the current wavelength for a moment
before displaying measurements. If this wavelength is not the wavelength of the laser, go to
step 6, otherwise proceed to step 7.
6- Select the proper wavelength using the λ up and λ down control keys. Then press the Save λ
control key to store the wavelength in non-volatile memory and return to the measurement
mode.
Adjusting the zero (steps 7 to 11)
7- Remove the detector’s protective cover.
Put the detector into the laser beam path. The entire laser beam must be within the sensor
aperture. Do not exceed maximum specified densities, energies or powers. For the most
accurate measurement, spread the beam across 60% to 80% of the sensor area. Leave it
there until the detector has reached its equilibrium temperature.
8- Block off laser radiation to the detector.
The power read by the UNO when no laser beam is incident on the detector may not be
exactly zero. This is because the detector is not thermally stabilized OR there was a heat
source in the detector’s field of view when you turned on the UNO, OR from the internal
electronic offset of the UNO.
9- To reset the zero, wait until the reading has stabilized and press the Zero button on the front
panel. The UNO will display “ZEro“ for a moment and then return to the normal measurement.
You are now ready to make an accurate measurement. Pressing the Zero button again will
not undo the zero; it will re-do it.
10- When you select ATT you must enter a wavelength and then press Save λ to exit.
11- Apply the laser beam to the detector. The laser must be CW for photodetectors.
Notes:
• Refer to the specific power detector documentation for complete installation and
operating instructions.
• The power detectors are thermal sensors sensitive to temperature variations.
For high-precision measurements, it is recommended to:
• Allow the power detector’s temperature to stabilize before zeroing the UNO.
• Do not touch the detector itself when handling the power detector. Touch only the stand.
• Avoid forced airflow or drafts around the detector.
Gentec Electro – Optics, Inc. All rights reserved
Page 10
UNO User’s Manual Revision – 6.1 9
4.2 Display description
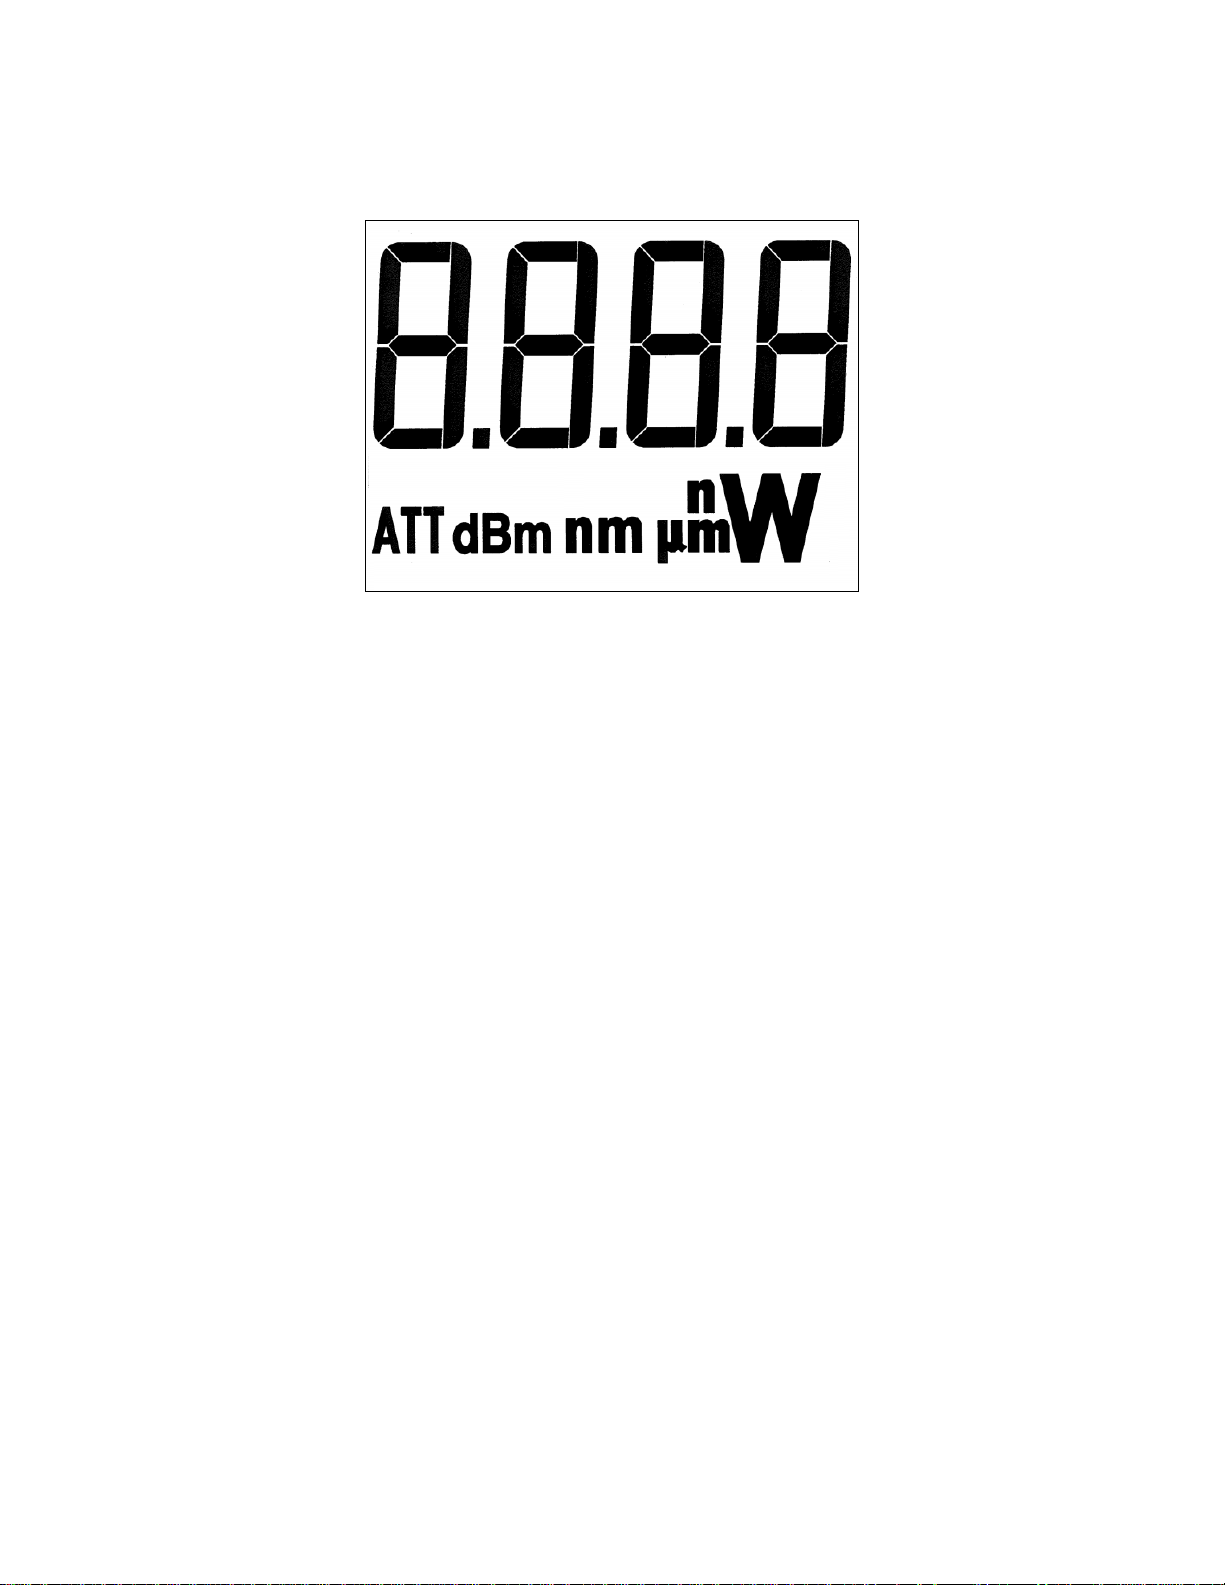
Fig. 1-3 UNO LCD Display
The LCD provides measurement information, wavelength information, attenuator selection and other
useful messages.
When the batteries are discharged enough to compromise the measurement, the UNO displays “LO”
instead of the measurement. Refer to the battery maintenance section to replace the batteries.
The ATT field indicates if the detector sensitivity used takes into account the presence of the attenuator
that the detector was calibrated with.
Error messages can also be displayed:
E-05 indicates that no detector is present on power-up.
E-07 appears after pressing the ATT control key with a detector that does not have attenuator
calibration. The message disappears a few seconds after pressing the control key.
E-08 indicates that the detector is not supported or that the detector calibration EEPROM is
corrupted. It can also appear if the DB15 is poorly secured or is worn out.
E-09 appears after pressing the FAST or SLOW control key with a detector that does not have
anticipation (photodetectors). The message disappears a few seconds after pressing the control
key.
Any other error message indicates a malfunction and should be reported.
Gentec Electro – Optics, Inc. All rights reserved
Page 11
UNO User’s Manual Revision – 6.1 10
5 BATTERIES
6
6.1 Battery selection
To avoid leakage and poor autonomy, it is highly recommended that only good quality, new and identical
alkaline batteries be put into the UNO. Good quality rechargeable batteries can also be used with the
UNO and recharged with an external charger.
The batteries need to be replaced if the UNO displays “LO” on its digital display or if it does not power -up
when the I/O control key is pressed.
6.2 Battery installation
- Put the UNO face down on a flat surface.
- Lift the kickstand.
- Open and remove the battery door.
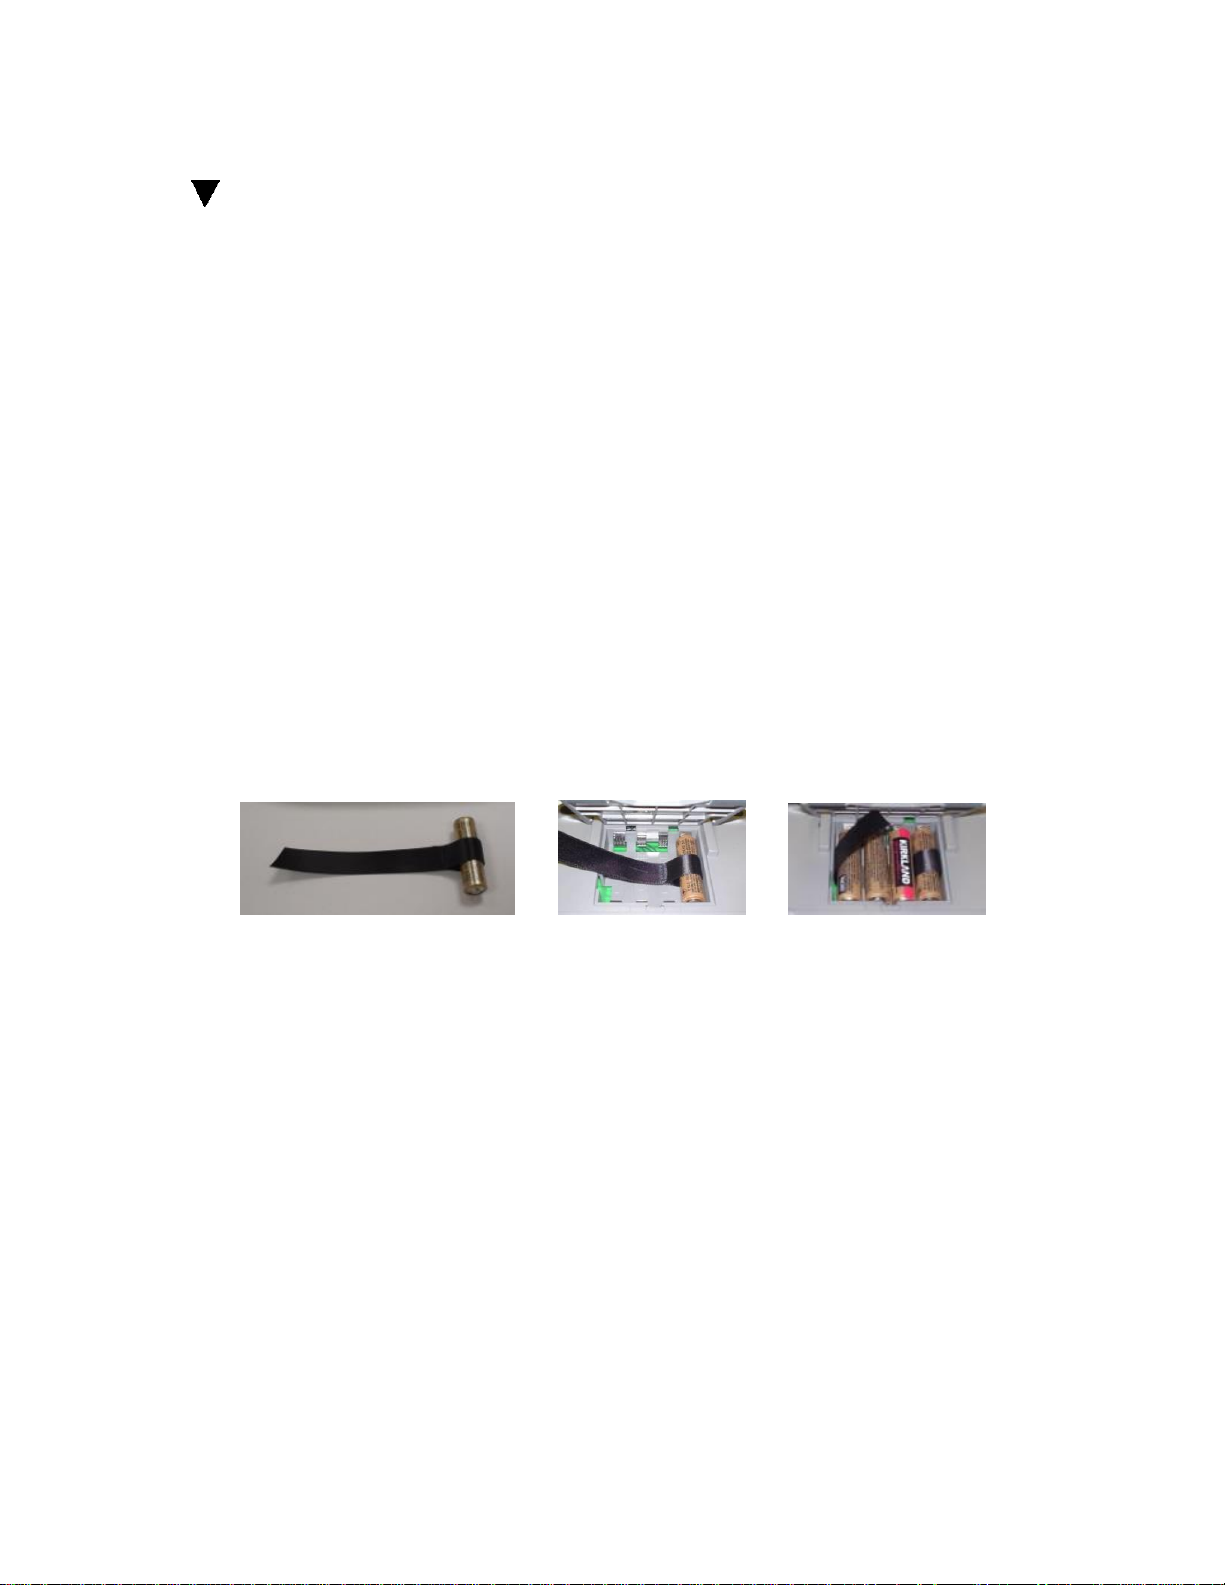
- Insert one battery in the nylon strap (to ease removal) and insert it at one extremity of the UNO battery
compartment with the right polarity. To avoid intermittent contact and involuntary disconnection, firmly
insert the batteries. Insert the other batteries over the nylon strap with the right polarity so that pulling on
the strap will pull every battery out of the UNO.
- Put the battery door back in place.
6.3 Battery removal
- Put the UNO face down on a flat surface.
- Lift the kickstand.
- Open and remove the battery door.
- Hold down the UNO and slowly pull on the nylon strap to remove the batteries. Do not use a pointed
tool to remove the batteries, since that could puncture them. The batteries need a firm pull to be removed
in order to have a reliable contact.
Gentec Electro – Optics, Inc. All rights reserved
Page 12
UNO User’s Manual Revision – 6.1 11
Standard
Description
Performance
Criteria
CISPR11 :2009
A1 :2010
Industrial, scientific and medical equipment – Radio-frequency
disturbance characteristics – Limits and methods of measurement
Class A
EN 61000-4-2 2009
Electromagnetic compatibility (EMC) – Part 4-2: Testing and
measurement techniques- Electrostatic discharge.
Class B
EN 61000-4-3 2006+
A2:2010
Electromagnetic compatibility (EMC) – Part 4-3: Testing and
measurement techniques- Radiated, Radio Frequency,
electromagnetic field immunity test
Class A
EN61000-4-4
2004+A1:2010
Electromagnetic compatibility (EMC) – Part 4-4: Testing and
measurement techniques- Electrical fast transient/burst immunity
test.
Class B
EN 61000-4-5 2006
Electromagnetic compatibility (EMC) – Part 4-5: Testing and
measurement techniques- Surge immunity test.
Class B
EN 61000-4-6 2009
Electromagnetic compatibility (EMC) – Part 4-6: Testing and
measurements techniques- Immunity to conducted Radio Frequency.
Class A
EN 61000-4-11
2004
Electromagnetic compatibility (EMC) – Part 4-11: Testing and
measurement techniques- Voltage dips, short interruptions and
voltage variations immunity tests
Class B
Class B
Class C
Class C
EN 61000-3-2:2006
+A1:2009
Electromagnetic compatibility (EMC) - Part 3-2: Limits - Limits for
harmonic current emissions (equipment input current <= 16 A per
Class A
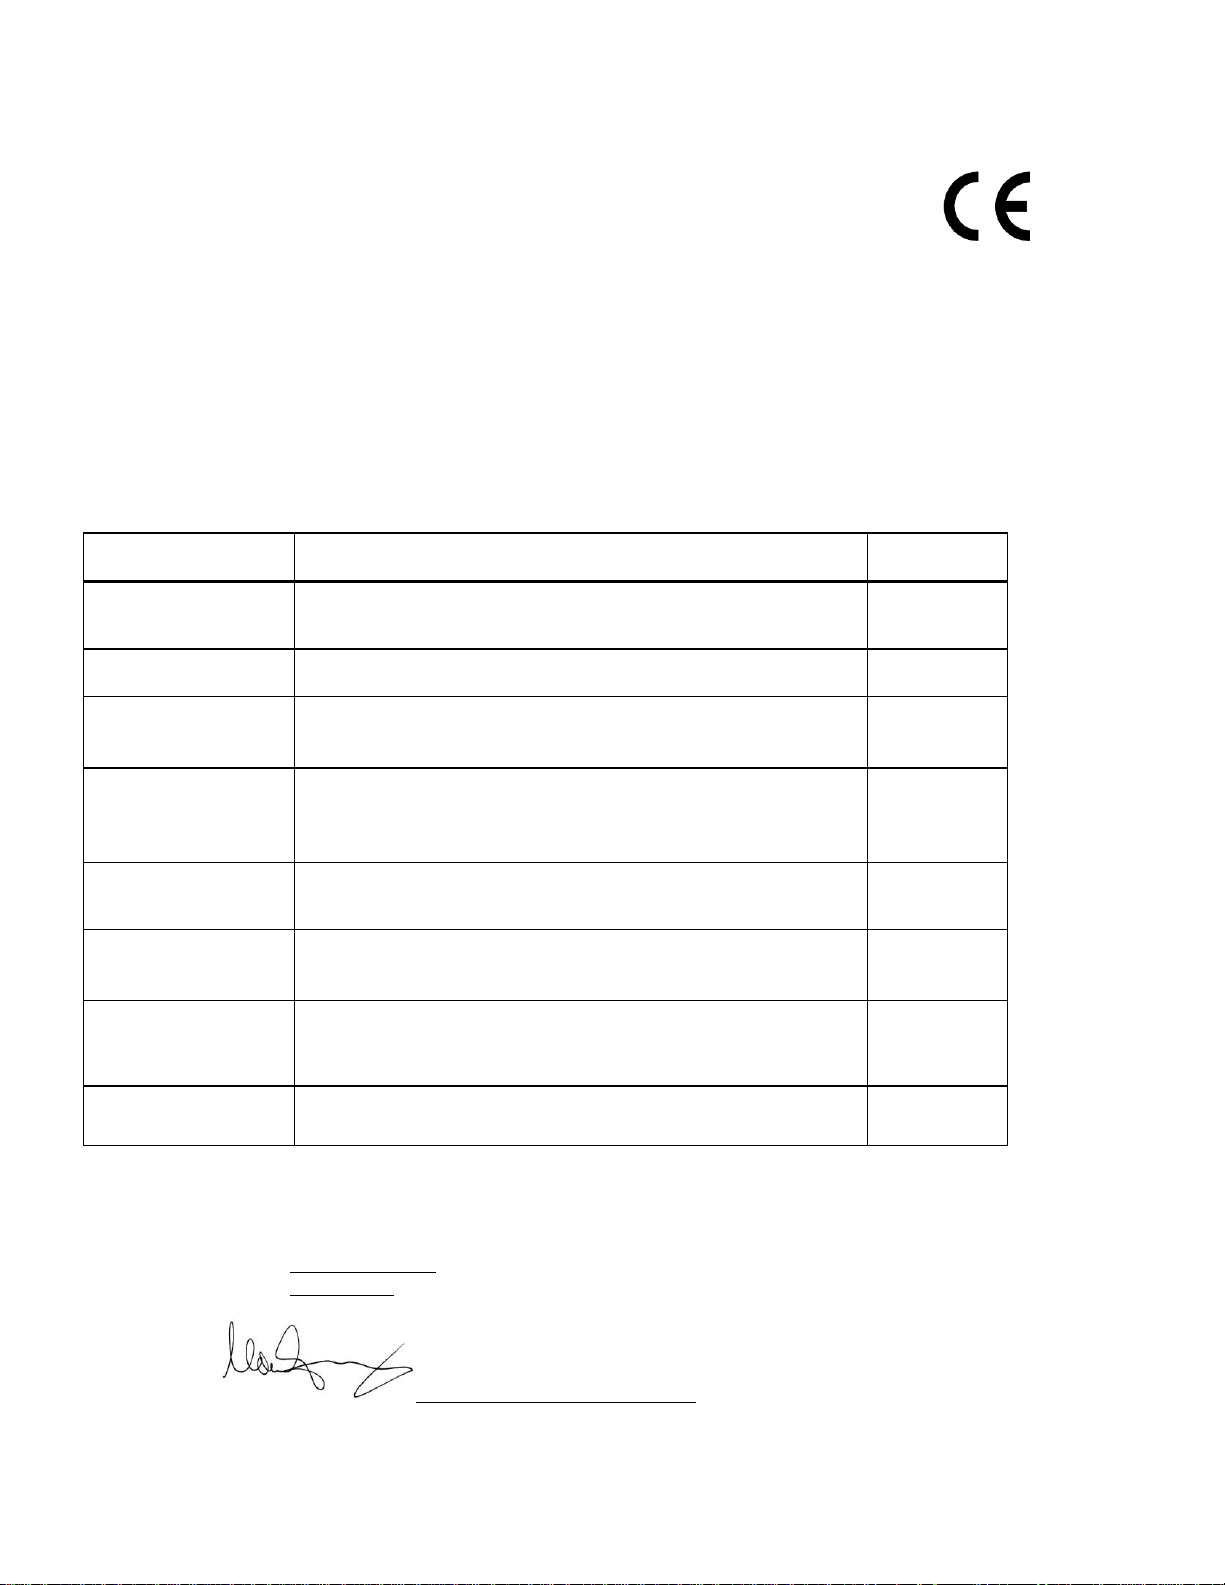
DECLARATION OF CONFORMITY
Application of Council Directive(s): 2004/108/EC EMC Directive
Manufacturer’s Name: Gentec Electro Optics, Inc.
Manufacturer’s Address: 445 St-Jean Baptiste, suite 160
Québec (Québec), Canada G2E 5N7
European Representative’s Name: Laser Components S.A.S.
Representative’s Address: 45 bis Route des Gardes
92190 Meudon (France)
Type of Equipment: Laser Power/Energy Meter
Model No.: UNO
Year of test & manufacture: 2011
Standard(s) to which Conformity is declared:
EN 61326-1: 2006 Emission generic standard
I, the undersigned, hereby declare that the equipment specified above
conforms to the above Directive(s) and Standard(s).
Place: Québec (Québec)
Date : May 4, 2011
(President)
Gentec Electro – Optics, Inc. All rights reserved
Page 13

UNO User’s Manual Revision – 6.1 12
7 APPENDIX
8
8.1 Recycling and separation procedure
This section is used by the recycling center when the monitor reaches its end of life. Breaking the
calibration seal or opening the monitor will void the UNO warranty.
The complete Monitor contains
1 Monitor
4 AA Alkaline Batteries
1 Instruction manual
1 Calibration certificate
8.2 Separation
Paper : manual and certificate.
Plastic: stand, connector plate, battery door, monitor enclosure, keypad.
Wires.
AA batteries: inside battery compartment.
Metal battery clips.
Printed circuit board: inside the monitor featuring a liquid crystal display less than 100 cm2.
8.3 Dismantling procedure
- Remove batteries.
- Remove the posts on each side of the DB15 connector using pliers.
- Open monitor by removing the Phillips head screws in the 4 corners.
- Cut the wires on the PCB side and battery clips side with cutters.
- Remove battery clips with pliers.
Gentec Electro – Optics, Inc. All rights reserved
Page 14
 Loading...