

Page 1
121-105627
Page 2

Beamage SDK User Manual Revision 1 2
WARRANTY
First Year Warranty
The Gentec-EO Beamage series beam profilers carry a one-year warranty (from date of shipment) against
material and/or workmanship defects, when used under normal operating conditions. The warranty does
not cover damages related to battery leakage or any other misuse.
Any attempt by unauthorized personnel to alter or repair the product will void the warranty.
The manufacturer is not liable for consequential damages of any kind.
Contacting Gentec Electro-Optics Inc.
In case of malfunction, contact your local Gentec-EO distributor or nearest Gentec-EO Inc. office to obtain
a return authorization number. The material should be returned to:
Gentec Electro-Optics, Inc.
445, St-Jean-Baptiste, Suite 160
Québec, QC
Canada, G2E 5N7
Tel: (418) 651-8003
Fax: (418) 651-1174
E-mail: [email protected]
Website: gentec-eo.com
CLAIMS
To obtain warranty service, contact your nearest Gentec-EO agent or send the product, with a description
of the problem, and prepaid transportation and insurance, to the nearest Gentec-EO agent. Gentec-EO Inc.
assumes no risk for damage during transit. Gentec-EO Inc. will, at its discretion, repair or replace the
defective product free of charge or refund your purchase price. However, if Gentec-EO Inc. determines that
the failure is caused by misuse, alterations, accident, or improper conditions of operation or handling, the
product shall therefore not be covered by the warranty.
Page 3

Beamage SDK User Manual Revision 1 3
TABLE OF CONTENTS
1. GENTEC-EO’S BEAMAGE SDK .......................................................................................................................... 5
1.1. WHAT IS THE BEAMAGE SDK ? ............................................................................................................................. 5
1.2. THE .NET COMPATIBLE PIPELINE FOR BEAMAGE CAMERAS .......................................................................................... 7
1.3. GETTING STARTED WITH THE BEAMAGE SDK ............................................................................................................ 7
1.4. WHAT YOUR VISUAL STUDIO SOLUTION NEEDS ......................................................................................................... 8
1.5. UNDERSTANDING THE CODE .................................................................................................................................. 8
1.6. BEAMAGE SDK CLASS DIAGRAM ......................................................................................................................... 10
2. GET STARTED EXAMPLE ................................................................................................................................ 11
2.1. FIRST EXAMPLE: C# EXAMPLE WITH VIEWER ........................................................................................................... 11
2.1.1. GENERAL INFORMATION ..................................................................................................................................... 11
2.1.2. GRAB IMAGES .................................................................................................................................................. 12
2.1.3. MATHEMATICAL OPERATIONS ON THE IMAGE BUFFER............................................................................................... 13
2.1.4. EVENTS ........................................................................................................................................................... 14
2.2. SECOND EXAMPLE: C++ CONSOLE APPLICATION ..................................................................................................... 14
3. BEAMAGE API .............................................................................................................................................. 15
3.1. BCAM ............................................................................................................................................................ 15
Class declaration .................................................................................................................................................. 15
Properties ............................................................................................................................................................. 15
Events .................................................................................................................................................................. 15
Functions .............................................................................................................................................................. 16
3.2. BCAMIMG ....................................................................................................................................................... 16
Class declaration .................................................................................................................................................. 16
Properties ............................................................................................................................................................. 16
Events .................................................................................................................................................................. 17
Functions .............................................................................................................................................................. 17
3.3. BCAMPROPERTIES ............................................................................................................................................ 18
Class declaration .................................................................................................................................................. 18
Properties ............................................................................................................................................................. 18
Events .................................................................................................................................................................. 18
Functions .............................................................................................................................................................. 18
3.4. BERRORSMANAGER .......................................................................................................................................... 18
Class declaration .................................................................................................................................................. 18
Properties ............................................................................................................................................................. 18
Events .................................................................................................................................................................. 18
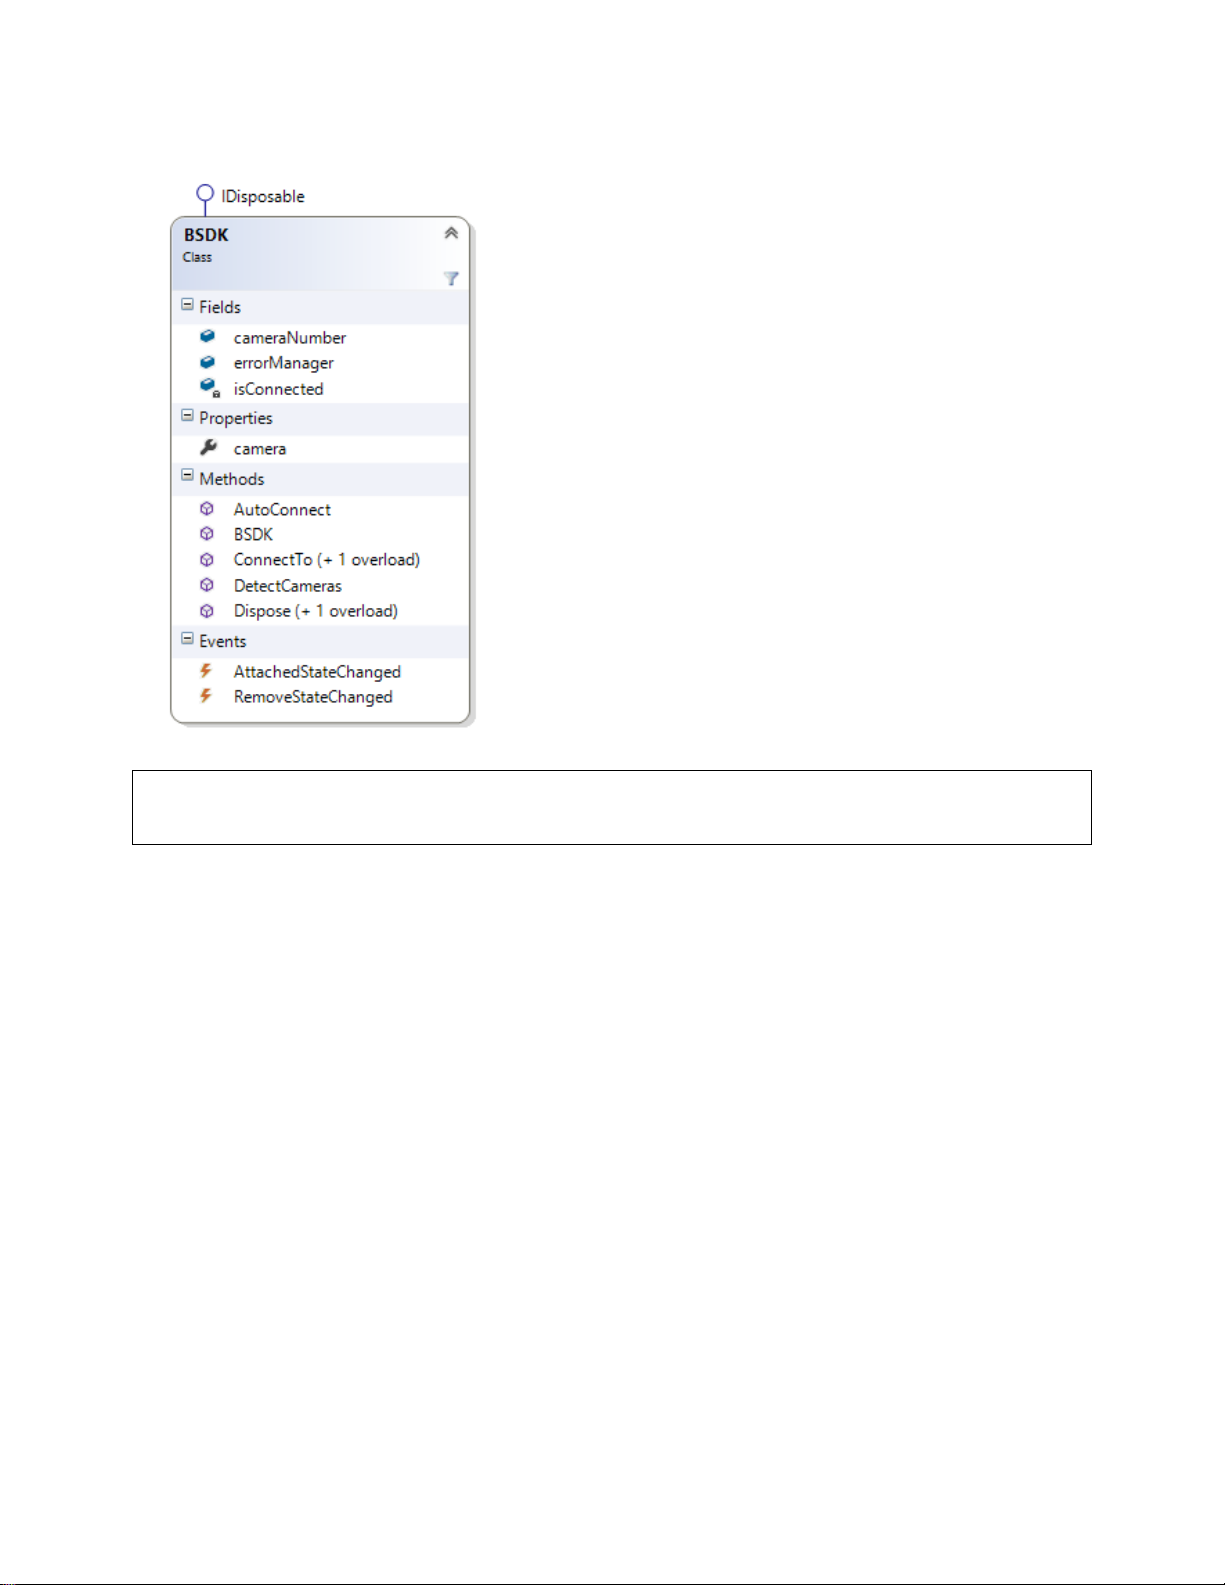
3.5. BSDK ............................................................................................................................................................. 19
Class declaration .................................................................................................................................................. 19
Properties ............................................................................................................................................................. 19
Events .................................................................................................................................................................. 19
Functions .............................................................................................................................................................. 19
3.6. FUTURE CLASSES AND FUNCTIONS ........................................................................................................................ 20
Page 4

Beamage SDK User Manual Revision 1 4
TABLE OF FIGURES
FIGURE 1 – CONCEPTUAL EXAMPLE OF BEAMAGE SDK INTEGRATION ON AN ASSEMBLY LINE ............................... 5
FIGURE 2 – A NEW WAY TO USE GENTEC-EO’S BEAMAGE CAMERA: THE BEAMAGE SDK ..................................... 6
FIGURE 3 - FUNCTIONAL SCHEMATIC OF THE.NET COMPATIBLE PIPELINE FOR BEAMAGE CAMERAS ...................... 7
FIGURE 4 - BEAMAGESDK.DLL HAS BEEN ADDED AS A REFERENCE TO THE CURRENT VISUAL STUDIO PROJECT .... 8
FIGURE 5 - BEAMAGE.IMG NEEDS TO BE ADDED AS AN EXISTING ITEM AND SET TO CONTENT FOR BUILD ACTION . 8
FIGURE 6 - BEAMAGE SDK CLASS DIAGRAM ................................................................................................... 10
FIGURE 7 - BEAMAGE SDK SIMPLE VIEWER USER INTERFACE WHEN A BEAMAGE-4M IS CONNECTED ................. 11
FIGURE 8 - BEAMAGE SDK SIMPLE VIEWER USER INTERFACE WHEN A BEAMAGE-3.0 IS CONNECTED ................. 12
FIGURE 9 - BEAMAGE IMAGE .......................................................................................................................... 17
FIGURE 10 - FALSE RAINBOW COLORS SCALE .................................................................................................. 17
Page 5
Beamage SDK User Manual Revision 1 5
Energy
Shape
1. Gentec-EO’s Beamage SDK
1.1. What is the Beamage SDK ?
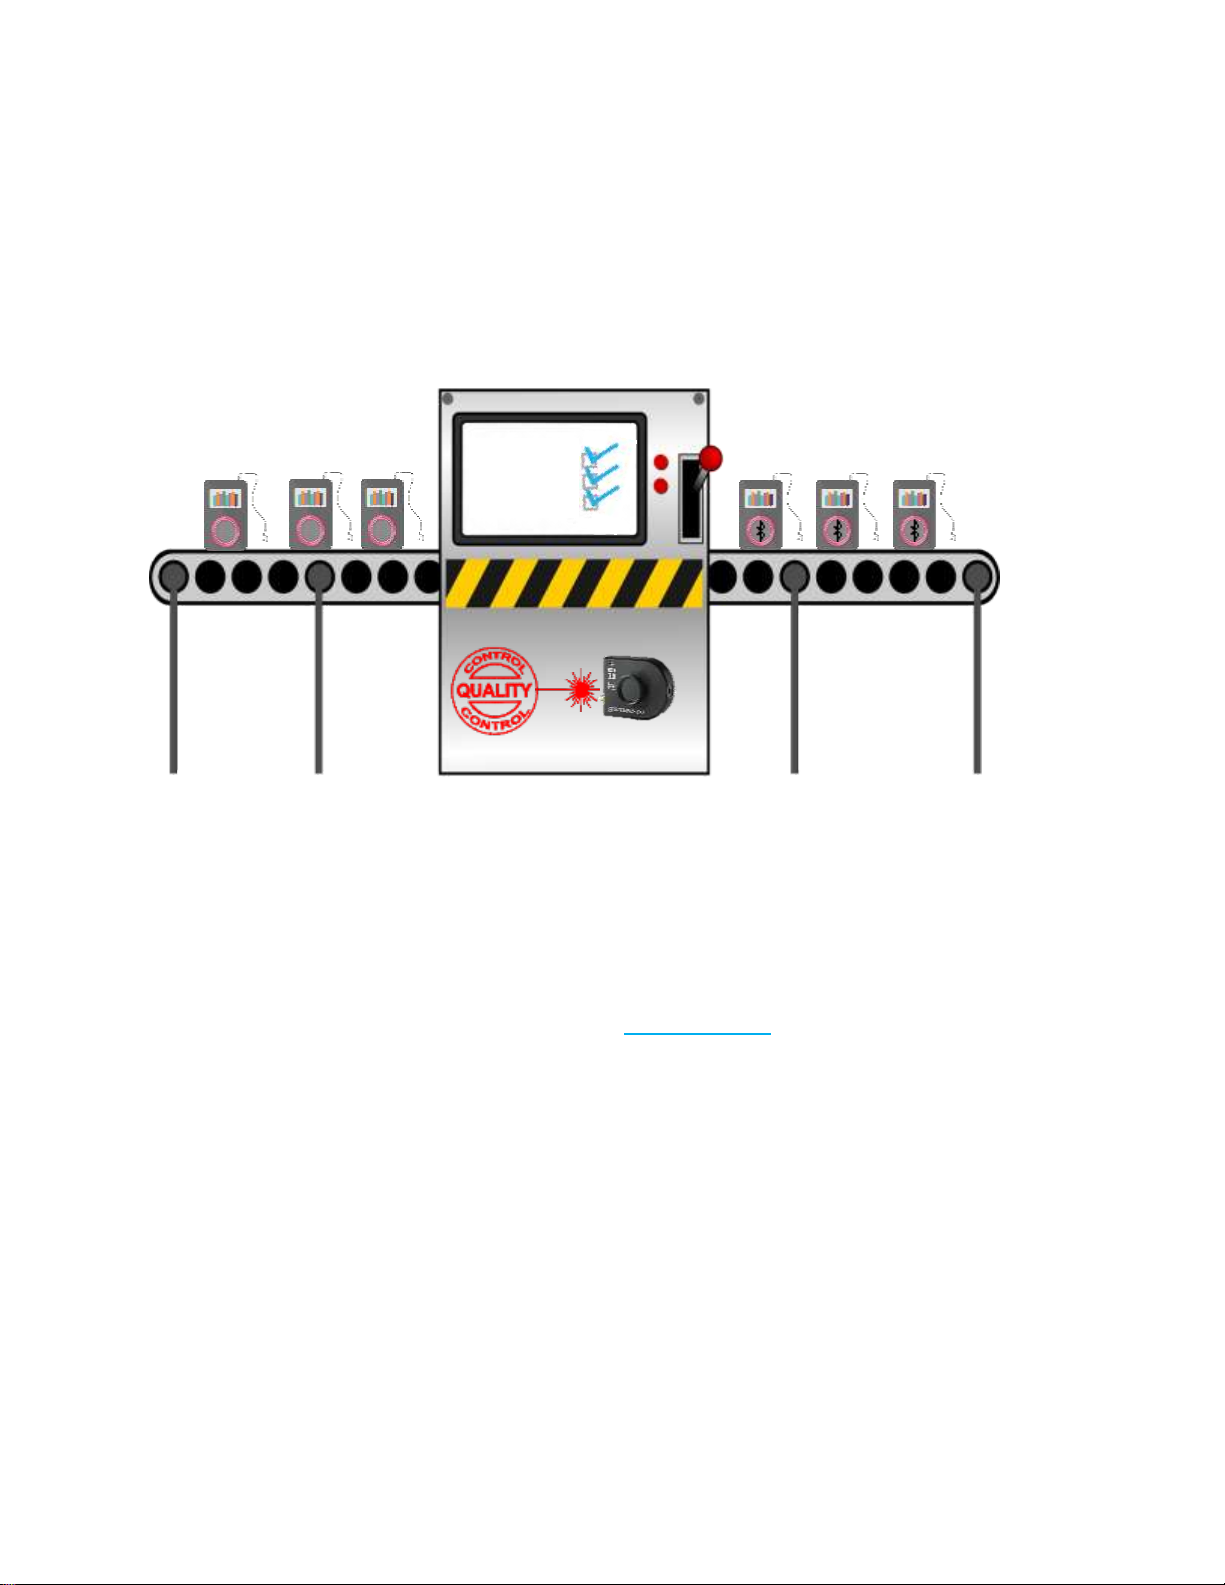
Gentec-EO’s Beamage SDK has been designed to help clients develop their own software user interface,
make their own image analysis, and integrate the Beamage camera to their system without necessarily
using Gentec-EO’s PC-Beamage software.
Diameter
Figure 1 – Conceptual example of Beamage SDK integration on an assembly line
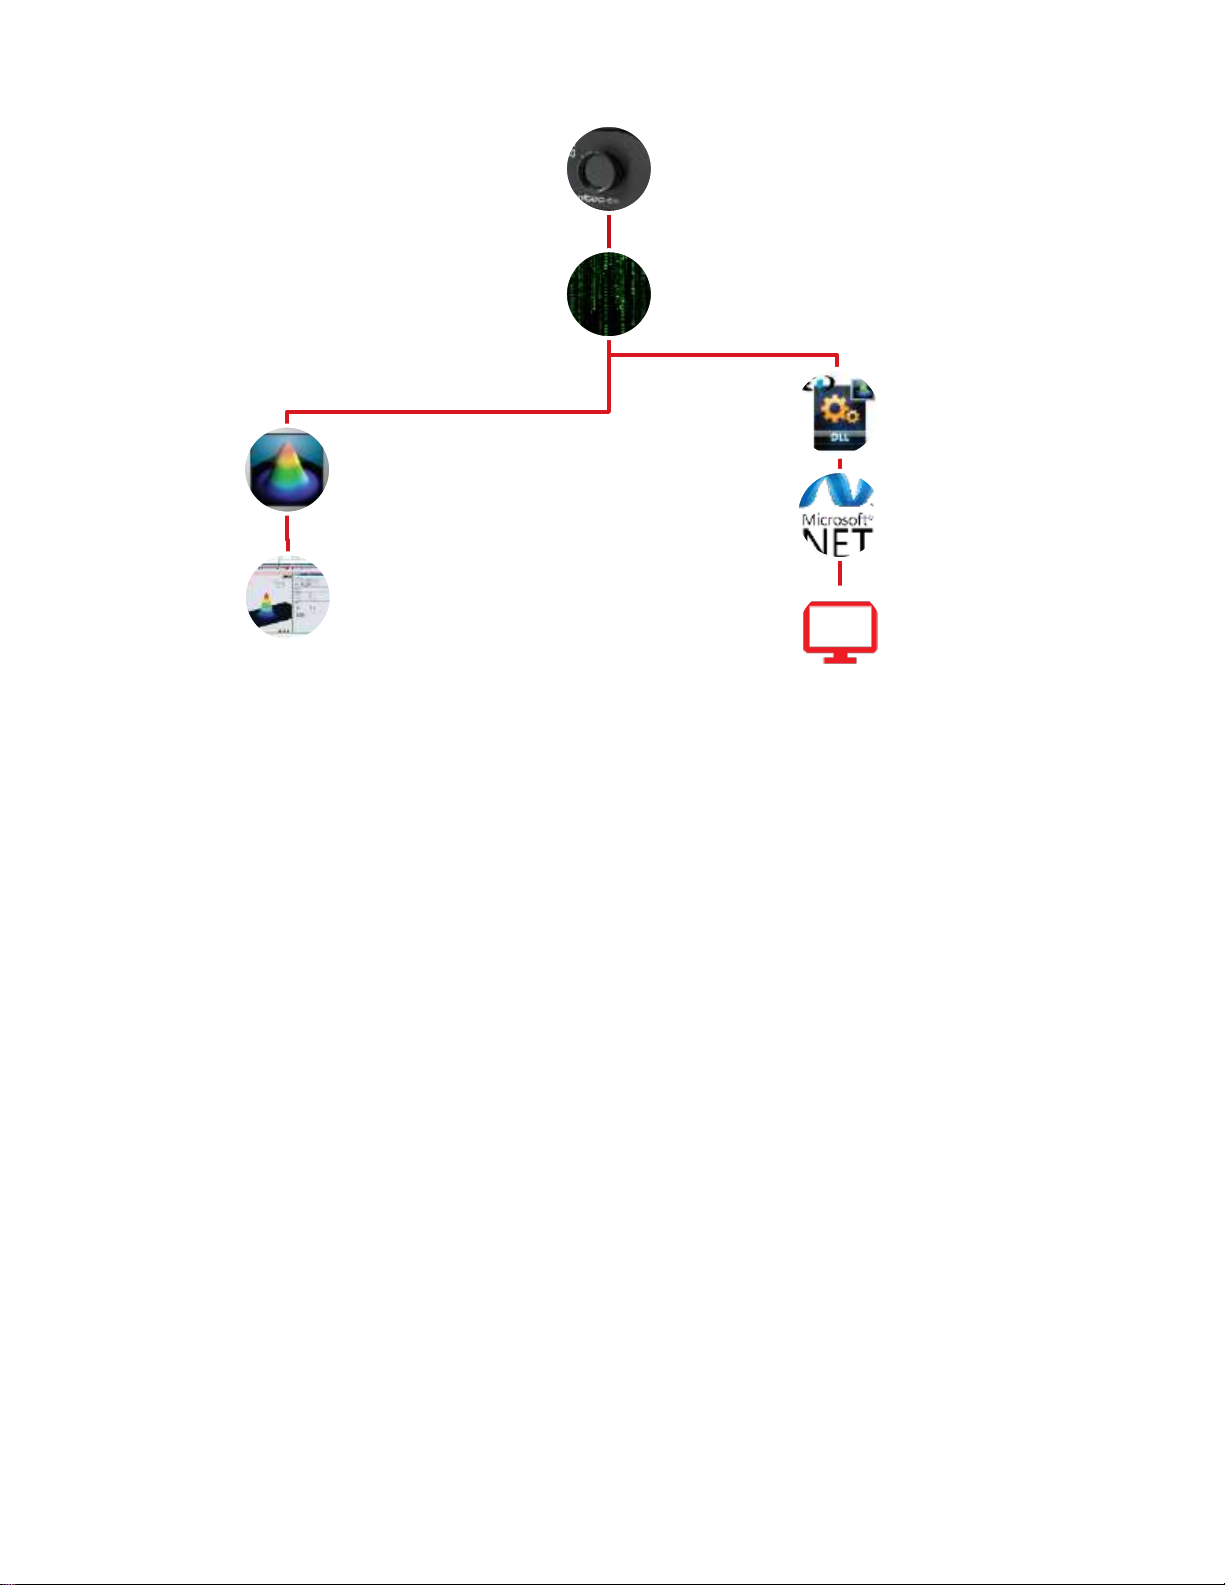
Gentec-EO’s Beamage SDK is a dll (Dynamic Link Library) that communicates with the camera drivers. It
provides our customers with specific software functions to control the Beamage camera and retrieve images
from it, in order to build custom Windows applications.
This dll is written in C# and is compatible with all .NET languages: C++, C#, Visual Basic, F#, etc.
Customers can build custom software or Windows applications to meet many specific needs: image
analysis, hardware integration, quality control, assembly line safety, laboratory maintenance, etc.
Below is a simple schematic that illustrates the difference between 2 ways of managing the Beamage
camera: the Beamage SDK and Gentec-EO’s PC-Beamage software.
Page 6
Beamage SDK User Manual Revision 1 6
Beamage
camera
Camera drivers
PC-Beamage
software
PC-Beamage
user interface
Gentec-EO's
Beamage SDK
Microsoft .NET
compatible
software
- Integration
- Custom user
interface
Figure 2 – A new way to use Gentec-EO’s Beamage camera: the Beamage SDK
Page 7
Beamage SDK User Manual Revision 1 7
Beamage camera
Camera drivers
PC-Beamage
software
PC-Beamage user
interface
RAM Pipeline
Microsoft .NET
compatible
software
Custom user
interface software
and integration
Labview software
1.2. The .NET compatible pipeline for Beamage cameras
Gentec-EO’s Beamage SDK offers basic functions and no calculation on diameter for now. If you would like
your custom Windows application to include the powerful advanced functions available in Gentec-EO’s
PC-Beamage software, the .NET compatible pipeline will be of great use to you.
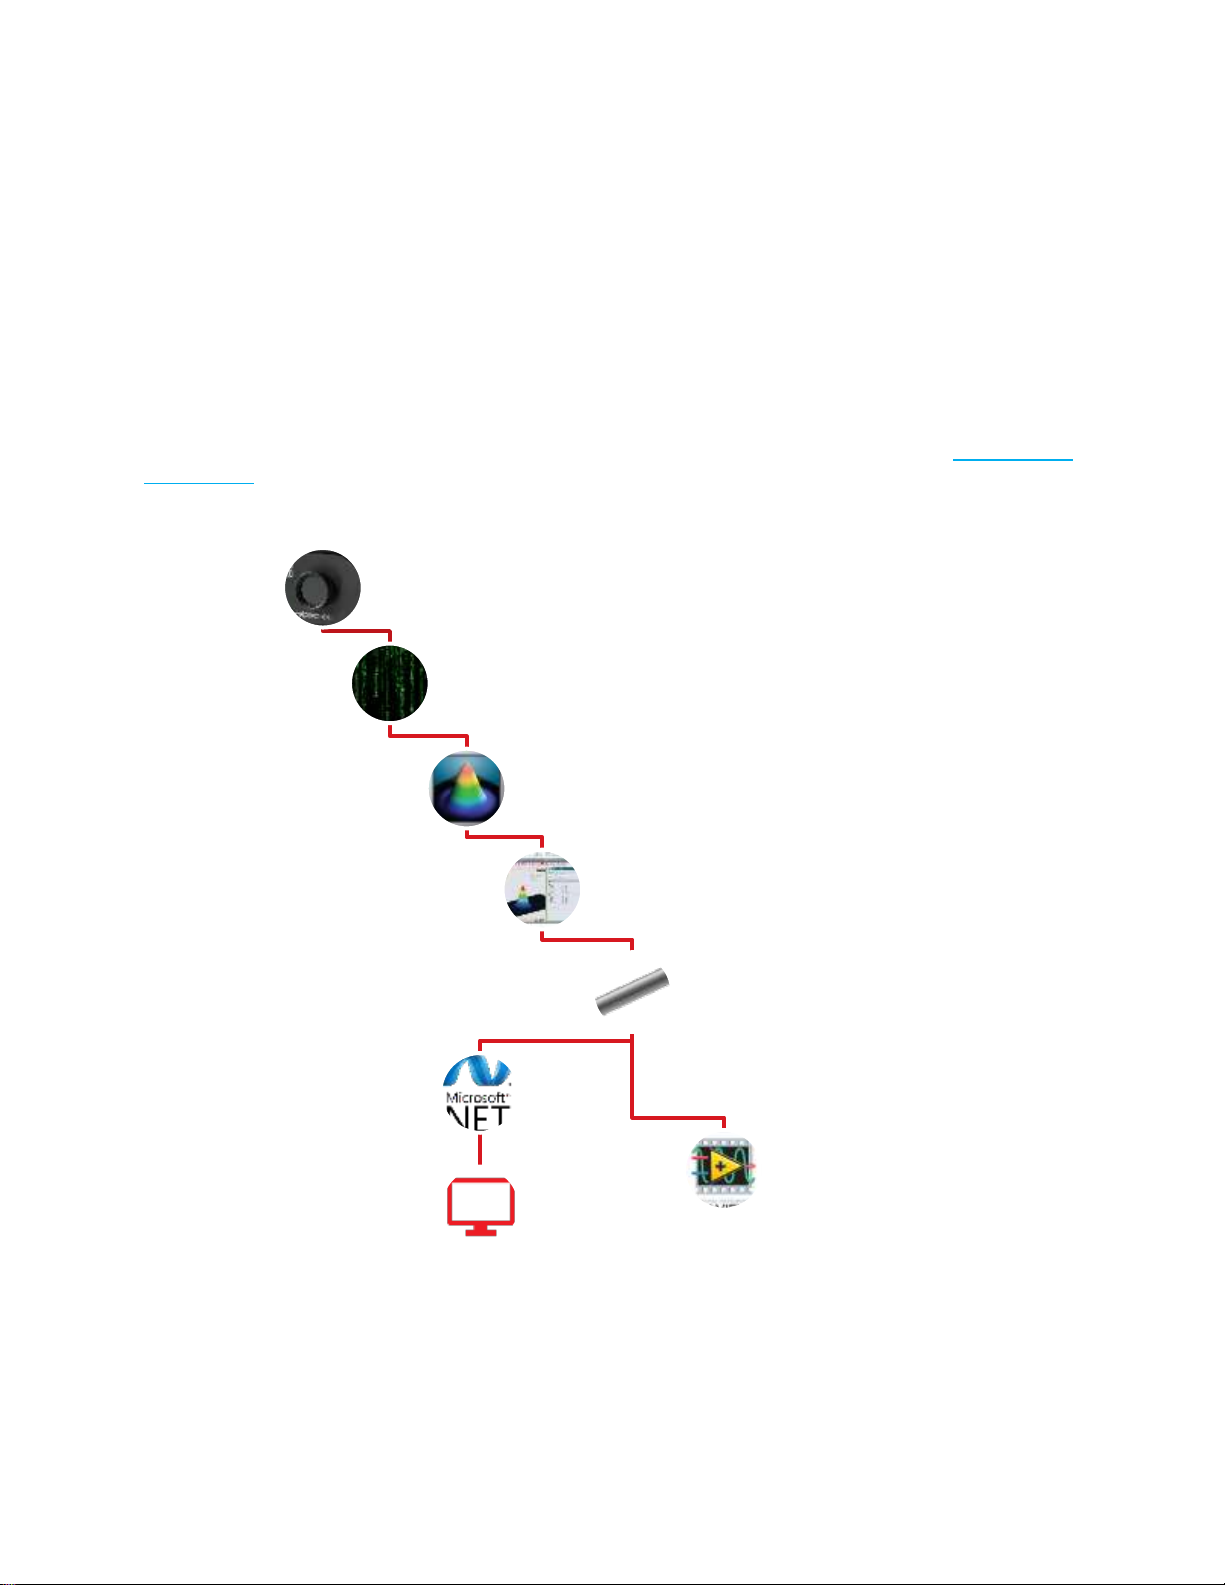
Instead of communicating directly with the camera, the .NET compatible pipeline option enables
communication with the PC-Beamage software via a RAM pipeline. Your custom Windows software
application can be made to control the Beamage camera and obtain almost any measurement through the
PC-Beamage software.
Below is a simple schematic that illustrates how the .Net compatible pipeline works.
For more information on the .NET compatible pipeline and how to use it, please refer to the PC-Beamage
user manual.
Figure 3 - Functional schematic of the.NET compatible pipeline for Beamage cameras
1.3. Getting started with the Beamage SDK
Gentec-EO offers different ways to get you up to speed using the Beamage SDK. Before using the
Beamage SDK, be sure that you are able to properly use the Beamage camera and its drivers with the PC-
Beamage software. The latest available version of PC-Beamage, the drivers and the User Manual can be
Page 8

Beamage SDK User Manual Revision 1 8
downloaded from the Resource Center on the following web page: https://gentec-eo.com/products/beam-
diagnostics/Beamage-3.0.
This document contains API documentation and code samples that will help you understand how to use
each function included in the Beamage SDK (BSDK).
Gentec-EO also provides a Beamage SDK Samples solution for Visual Studio. This example shows how
to create a Beamage camera object, connect to it, grab images, and how to use many other of the Beamage
SDK functions. The present document includes a
Page 9
Beamage SDK User Manual Revision 1 9
Get started example section that helps guide you through the Beamage SDK Samples.
1.4. What your Visual Studio solution needs
To create your first software application with Beamage SDK, launch Visual Studio and create a new project.
Then, download the Gentec-EO Beamage SDK.zip from our Download Center to your computer and extract
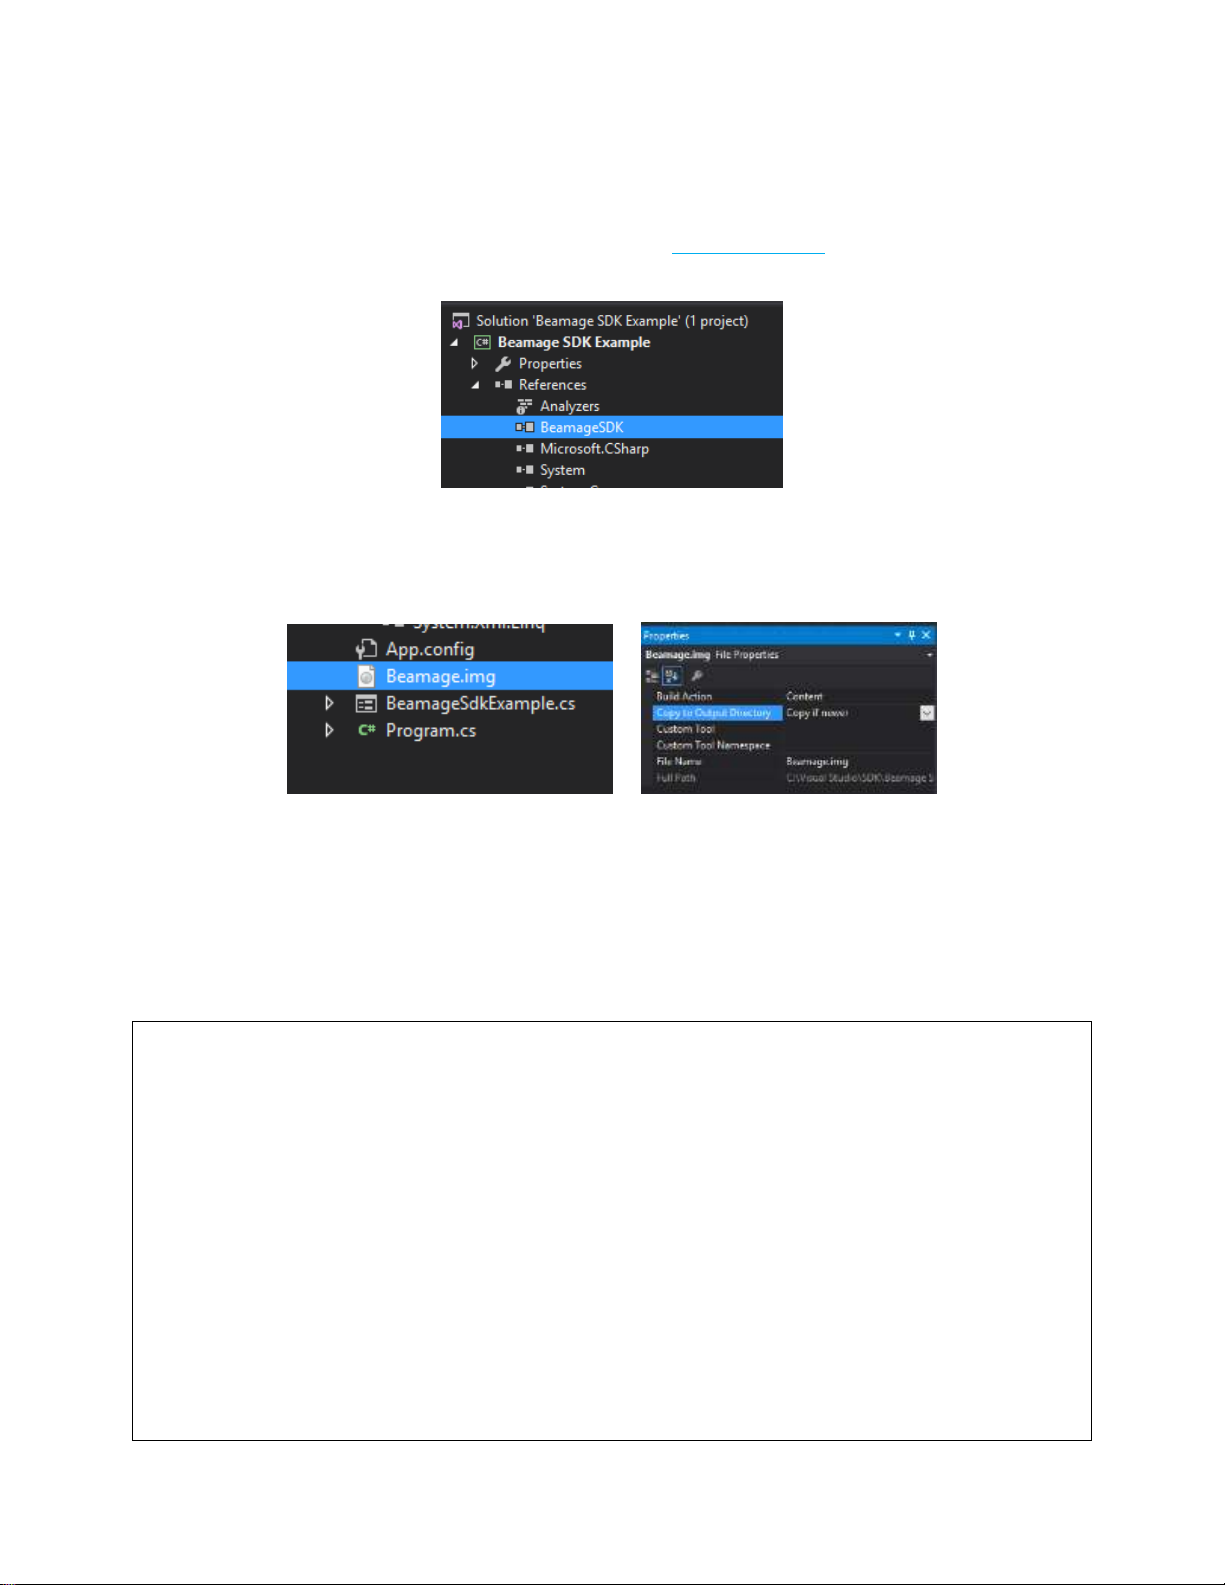
all files. Find the BeamageSDK.dll file and add it as a reference to your Visual Studio project.
Figure 4 - BeamageSDK.dll has been added as a reference to the current Visual Studio project
Then, add the Beamage camera firmware image file (Beamage.img) to your project as Existing Item and
set the Build Action properties to Content.
Figure 5 - Beamage.img needs to be added as an Existing Item and set to Content for Build Action
That’s it! Everything is now in place to start coding and communicating with the Beamage camera.
1.5. Understanding the code
Nothing is better than code samples to understand how to use the Beamage SDK. Here, we can see a
simple class that instantiates the BSDK class and makes a connection with the first Beamage camera
that the drivers will find on the computer:
using BeamageApi; // import reference from namespace BeamageApi
namespace Beamage_SDK_Example
{
public class BeamageSdkExample
{
BSDK bsdk; // Beamage SDK object
public BeamageSdkExample()
{
bsdk = new BSDK(); // Create Beamage SDK
bsdk.AutoConnect(); // This method will connect the first camera found by the drivers
// Resize the picture box if we have a Beamage-4M sensor
if(bsdk.camera.camProperties.Is4mSensor())
{
Size size = new Size(512, 512);
Code Sample
Page 10

Beamage SDK User Manual Revision 1 10
pictureBox1.Size = size;
labelBeamage.Text = "Beamage-4M";
}
else
{
Size size = new Size(512, 272);
pictureBox1.Size = size;
labelBeamage.Text = "Beamage-3.0";
}
}
}
}
That’s it! Once the BSDK object is created, all other functions in the Beamage SDK will be available.
For more code samples and to see how to use all functions, please refer to the
Page 11

Beamage SDK User Manual Revision 1 11
Get started example section or the Table of Content.
Page 12
Beamage SDK User Manual Revision 1 12
1.6. Beamage SDK Class Diagram
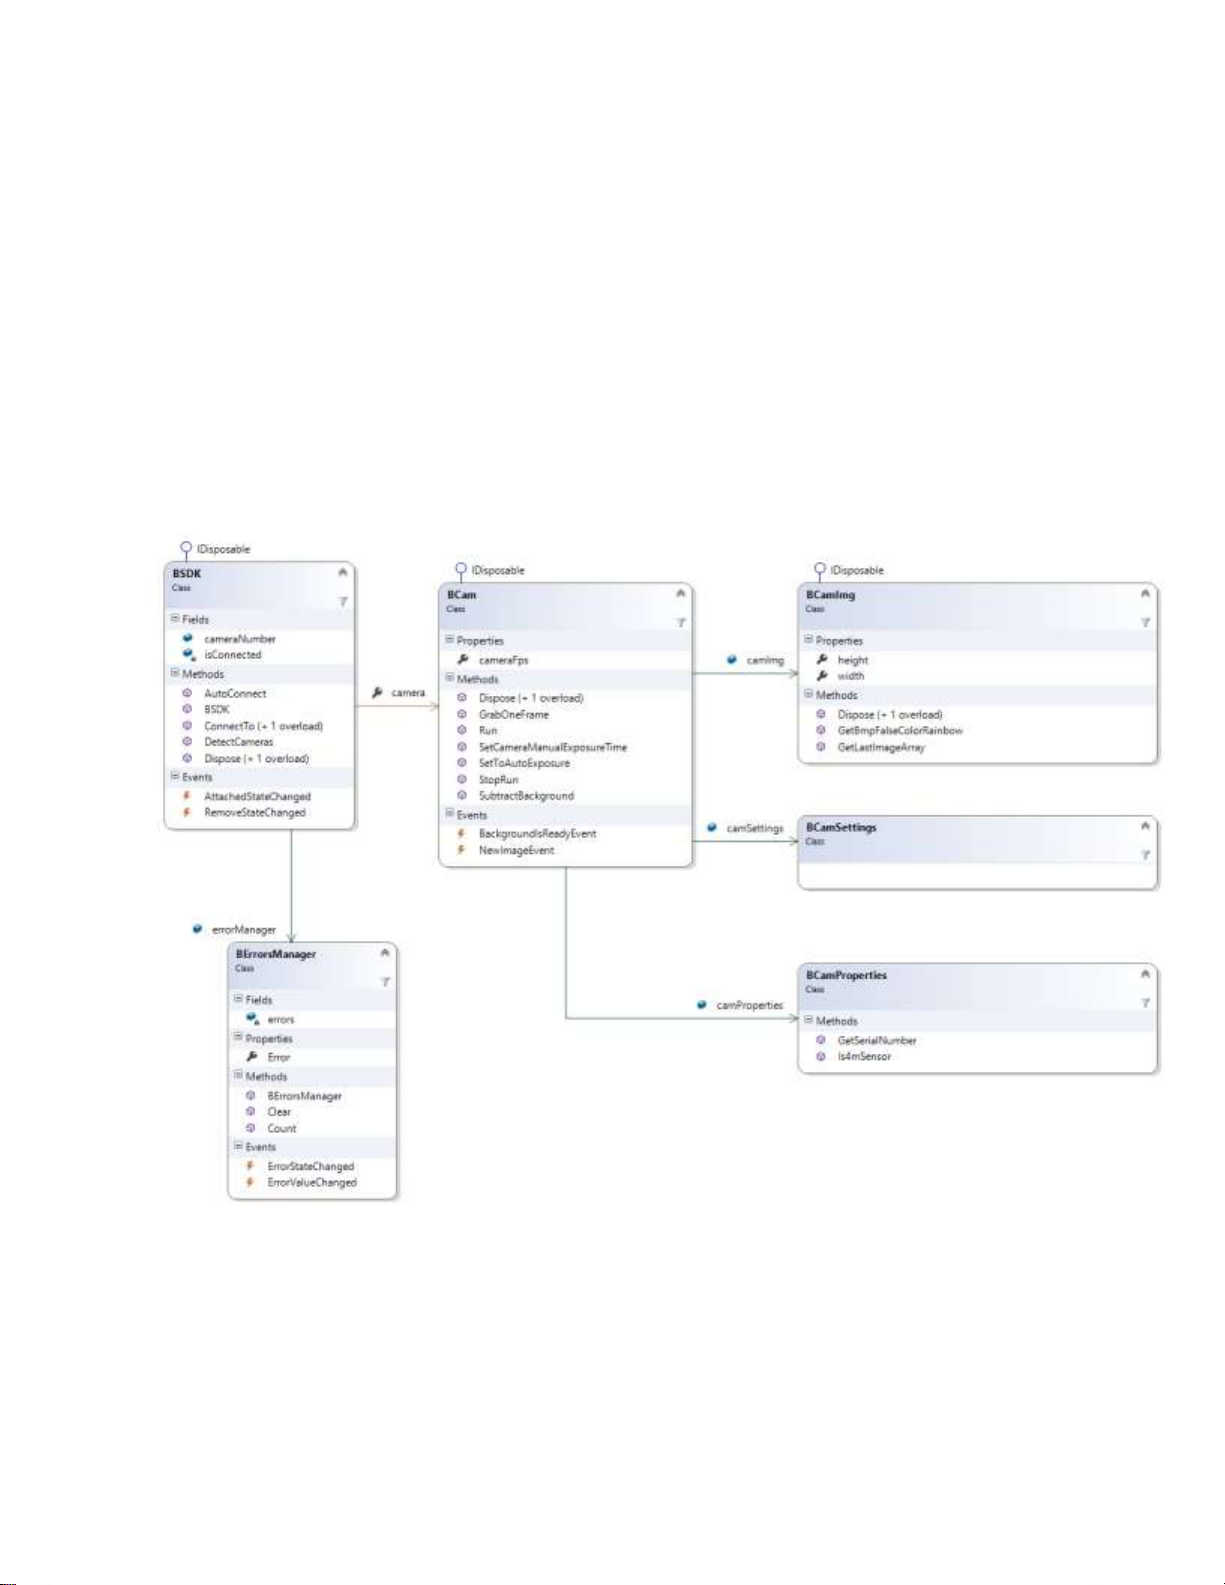
The Beamage SDK has been designed to be as simple as possible, for a fast, headache-free experience.
All object classes that are part of the Beamage SDK begin with the letter B (for Beamage).
The main object of the Beamage SDK is BSDK. Objects of this class have basic functions to detect and
connect a Beamage camera. The BSDK contains a BCam (camera) class and a BErrorsManager class.
The BCam (camera) class contains most functions used to control the camera. It contains the following
classes: BcamIm (images), BCamSettings (settings and parameters), and BCamProperties (read-only
properties).
The BErrorsManager class helps developers understand errors that can occur when using the
Beamage SDK.
Below is the class diagram of the Beamage SDK:
Figure 6 - Beamage SDK Class Diagram
Page 13
Beamage SDK User Manual Revision 1 13
2. Get started example
Two examples have been coded to help you get started with the Beamage SDK. The first one is written in
C# and helps you understand how to connect a camera and view images in your application. The second
example is a C++ console application that will show you how to make mathematical calculations on camera
images.
2.1. First example: C# example with viewer
2.1.1. General information
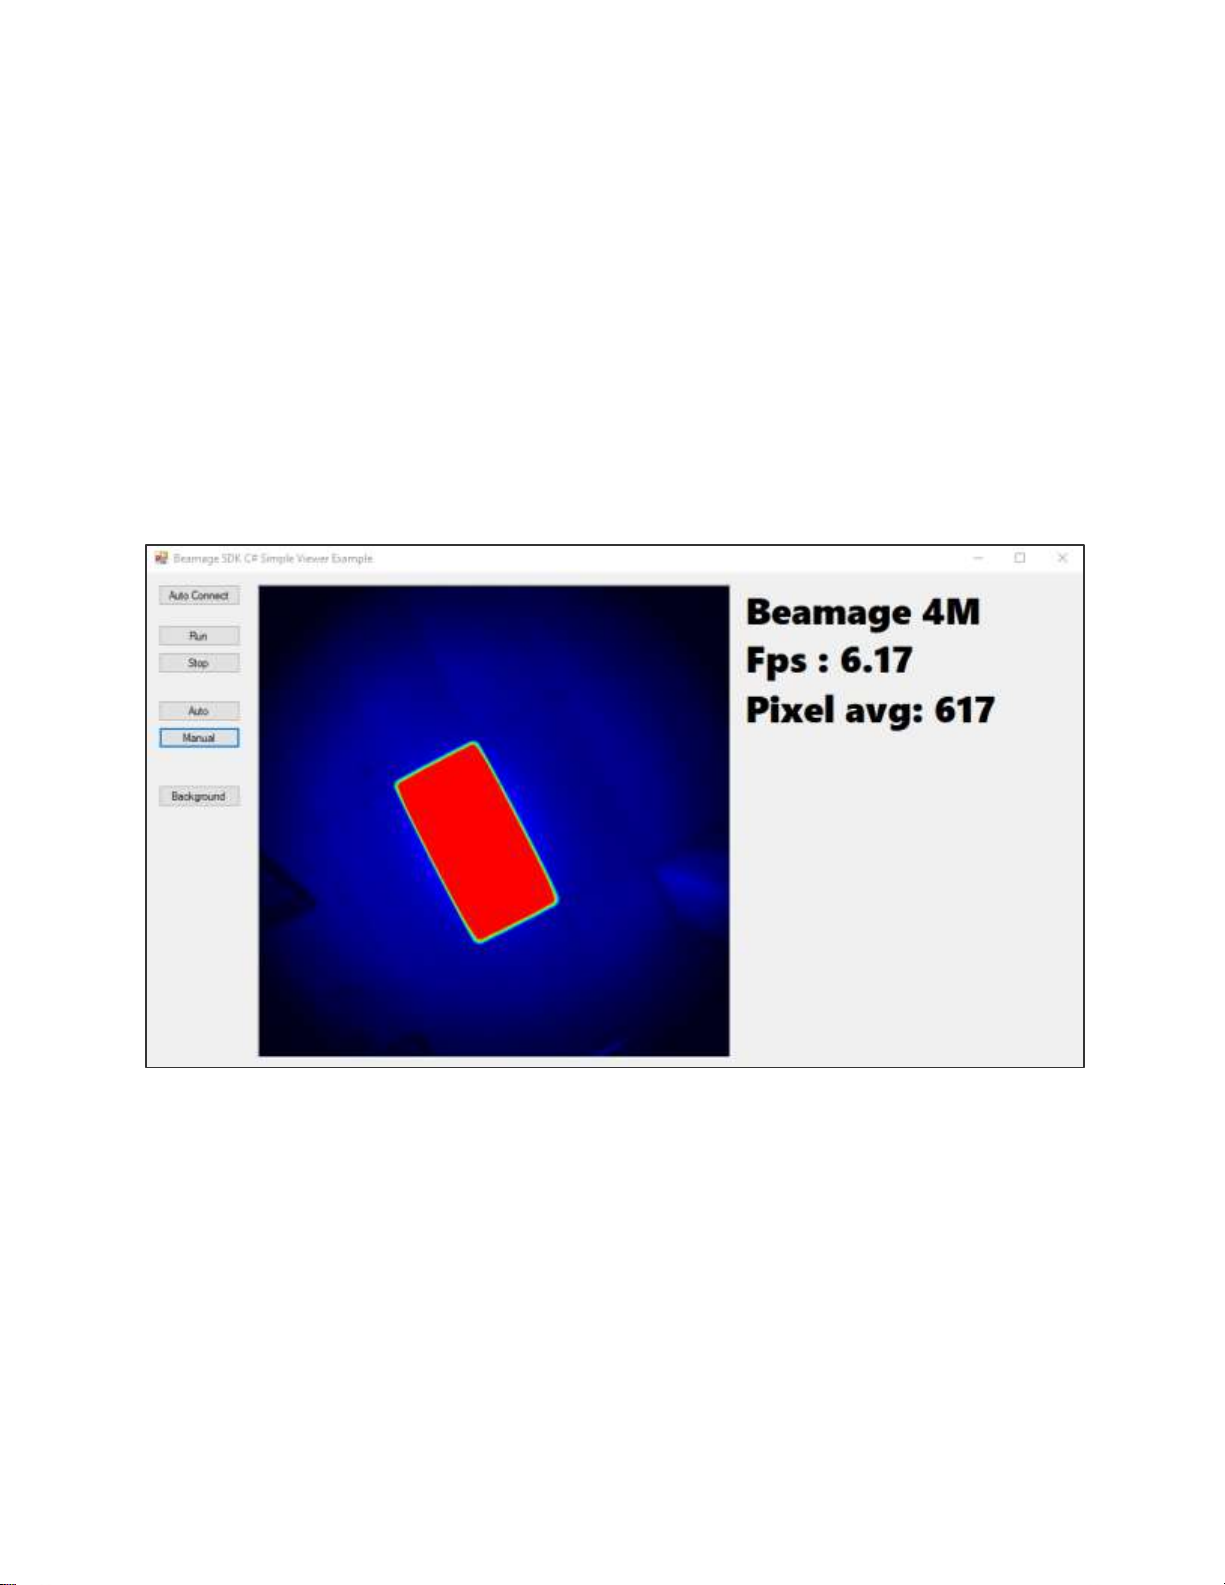
This example has been coded for you to understand and see in action how to use the Beamage SDK. This
Visual Studio solution already has the BeamageSDK.dll file as a reference and the Beamge.img file as a
resource. This example has a very simple user interface that was built for demonstration purposes. Please
take note that the code to visualize the images has not been optimized.
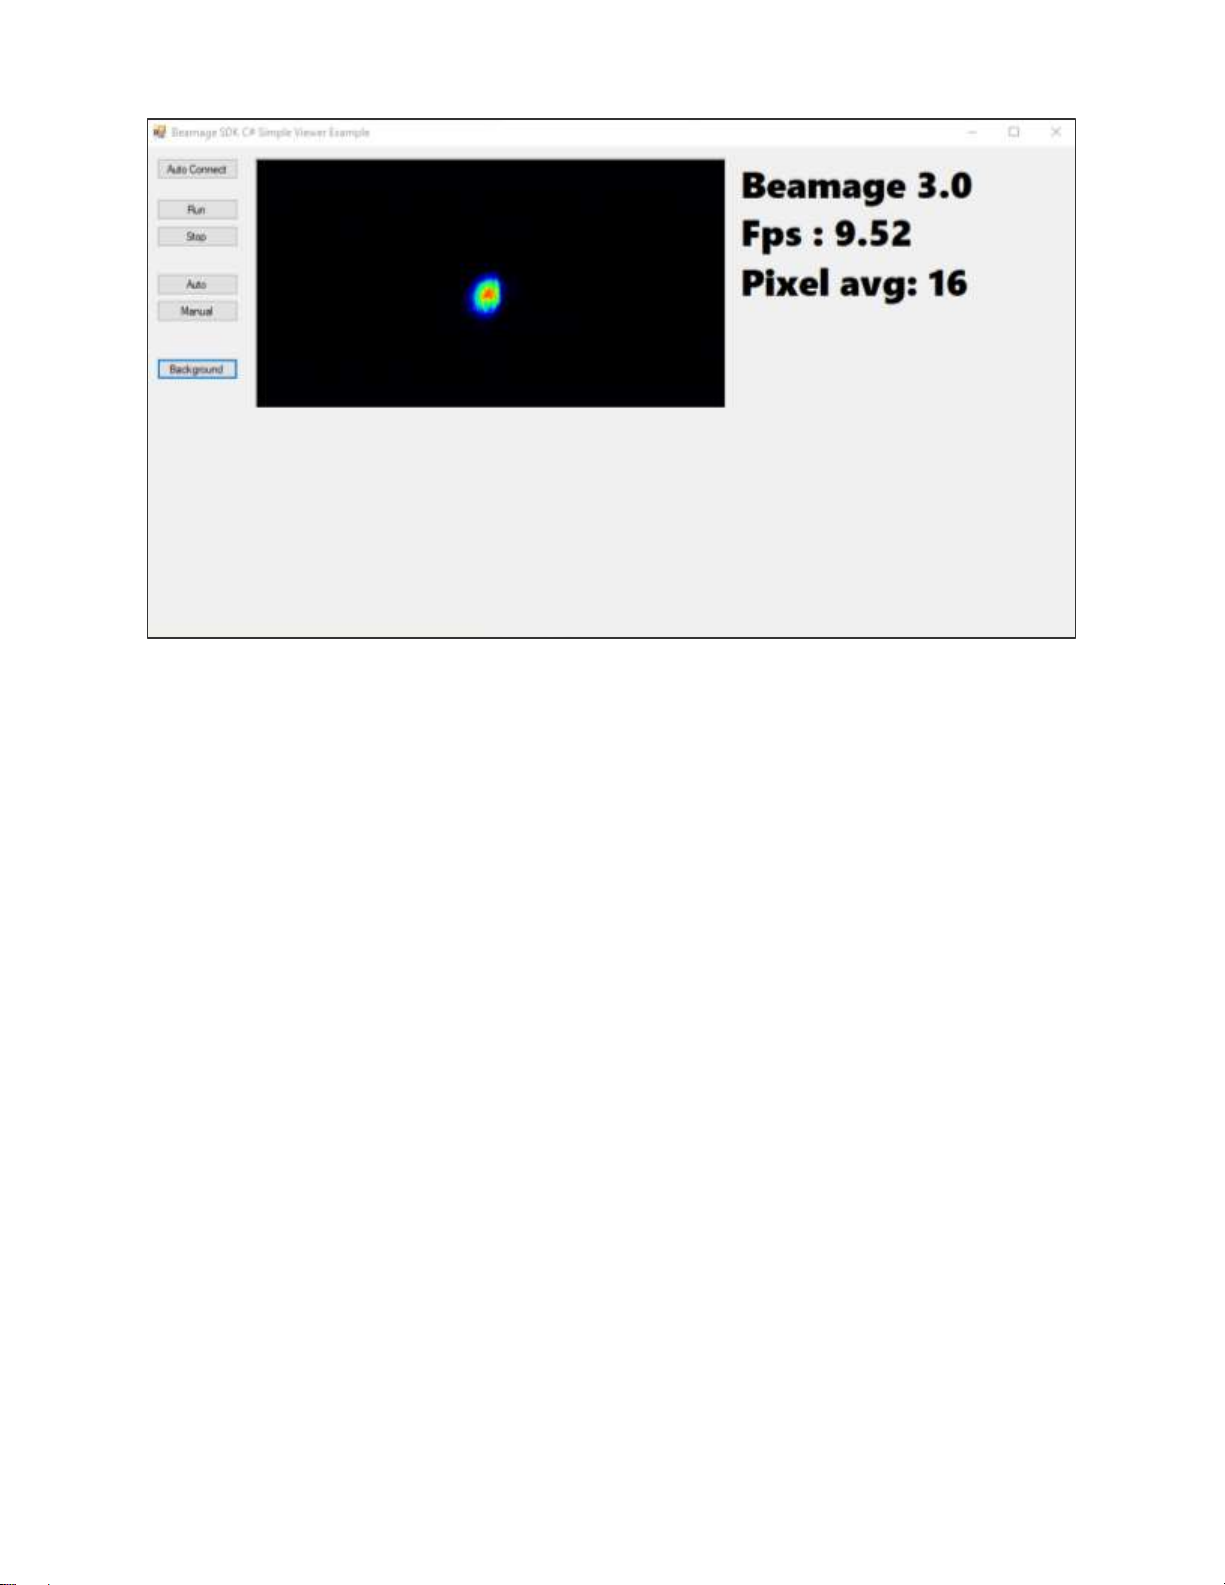
Here are two screenshots of the Beamage SDK Simple Viewer:
Figure 7 - Beamage SDK Simple Viewer user interface when a Beamage-4M is connected
Page 14
Beamage SDK User Manual Revision 1 14
Figure 8 - Beamage SDK Simple Viewer user interface when a Beamage-3.0 is connected
The Auto Connect button will open the camera drivers, detect all Beamage cameras plugged into the
computer, and then connect to the first detected camera. The application will adapt the pictureBox size
depending on the current Beamage camera model.
After pressing the Auto Connect button, the Run, Stop, Auto, Manual, and Background buttons will
become available.
Run: Start streaming camera
Stop: Stop streaming camera
Auto: Set the camera to automatic exposure time
Manual: Set the camera to manual exposure time
This demonstration application does not have an edit box to choose the manual exposure
time, but it could be easily added.
The manual exposure time used will be the last automatic exposure time.
Background: Perform an ISO subtract of the background.
This function requires the camera to be in manual exposure time mode, but will not
automatically turn the Beamage camera to manual exposure time. The user needs to
switch to manual exposure time before using this function.
This function will not prompt the user to block the laser, but the user should block the laser
before using this function.
A pop-up will appear when the background has been subtracted.
The Beamage must be streaming to use this function. It is the responsibility of the user to
ensure that the camera is streaming. There is no built-in verification of this
2.1.2. Grab images
To demonstrate how to get images from the camera, the ShowImage thread was coded. It is a very simple
(but not optimized) thread. This thread will continuously show the last image captured by the camera. This
thread is started when pressing the Run button and stopped when pressing the Stop button.
Here is the code for the Run button:
Page 15

Beamage SDK User Manual Revision 1 15
Code Sample
private void buttonRun_Click(object sender, EventArgs e)
{
// Assign an event when a new image is captured by the camera
bsdk.camera.NewImageEvent += new EventHandler(newImage);
// Start streaming a camera
bsdk.camera.Run();
// Here a simple thread that will update a BMP image into a picture box
// For demonstration purposes
// No optimization for CPU, GPU, or memory has been made
capture = true;
Thread newThread = new Thread(this.ShowImage);
newThread.Start();
}
After pressing the Run button, which uses the buttonRun_Click function, the camera will begin streaming
and the ShowImage function thread will send images to the user interface. Here is the code for the
ShowImage function:
Code Sample
public void ShowImage()
{
while (capture)
{
Image.GetThumbnailImageAbort myCallback = new
Image.GetThumbnailImageAbort(ThumbnailCallback);
// SDK recognizes the connected camera and its last image: camImg
// camImg has many functions
// One of them returns a false colors rainbow image
// This is not the best way to make a viewer
Image image = bsdk.camera.camImg.GetBmpFalseColorRainbow();
pictureBox1.Image = image.GetThumbnailImage(image.Width / 4, image.Height / 4,
myCallback, IntPtr.Zero);
}
}
We’ve seen here that the Beamage SDK example application simply continuously updates the pictureBox1
with a false-color rainbow BMP that the Beamage SDK has generated.
2.1.3. Mathematical operations on the image buffer
When pressing the Run button, we’ve also seen that the software assigns the bsdk.camera.NewImageEvent
event to the newImage function. We use this function to demonstrate how to operate mathematics operations
on the Beamage SDK. Here is the newImage function code:
Code Sample
private void newImage(object sender, EventArgs e)
{
// A new image has been captured by the camera
// GetLastImageArray function returns an int array of the image
// With the property’s width and height, the image can be retrieved
// Here, a simple average of all pixels’ intensity will be shown
Page 16

Beamage SDK User Manual Revision 1 16
var image = bsdk.camera.camImg.GetLastImageArray();
int width = bsdk.camera.camImg.width;
int height = bsdk.camera.camImg.height;
double pixelSum = 0.0;
for (int i = 0; i < height; i++)
{
for(int j = 0; j < width; j++)
{
pixelSum += image[i * height + j];
}
}
// Make an average
pixelSum /= (width * height);
}
We’ve seen how to perform analysis and mathematic operations directly on the camera’s image buffer.
Here, a simple averaging of all the pixels was been performed for demonstration purposes.
2.1.4. Events
The Beamage SDK includes Events. The Beamage SDK Samples demonstrates how to handle them. First,
assign an event handler to an event. The EventHandler will be called when the event is raised. Here is a
code sample of two event handlers that have been assigned to functions:
Code Sample
// Assign an event handler for attached and removed device
bsdk.AttachedStateChanged += new EventHandler(attachedEvent);
bsdk.RemoveStateChanged += new EventHandler(removeEvent);
private void removeEvent(object sender, EventArgs e)
{
// A camera has been disconnected from this PC
}
private void attachedEvent(object sender, EventArgs e)
{
// A camera has been connected to this PC
}
2.2. Second example: C++ Console Application
This second example, of a C++ Console application example, will be available soon.
Page 17
Beamage SDK User Manual Revision 1 17
3. Beamage API
This section provides a description of each of the classes and functions included in the Beamage SDK.
Code samples are included.
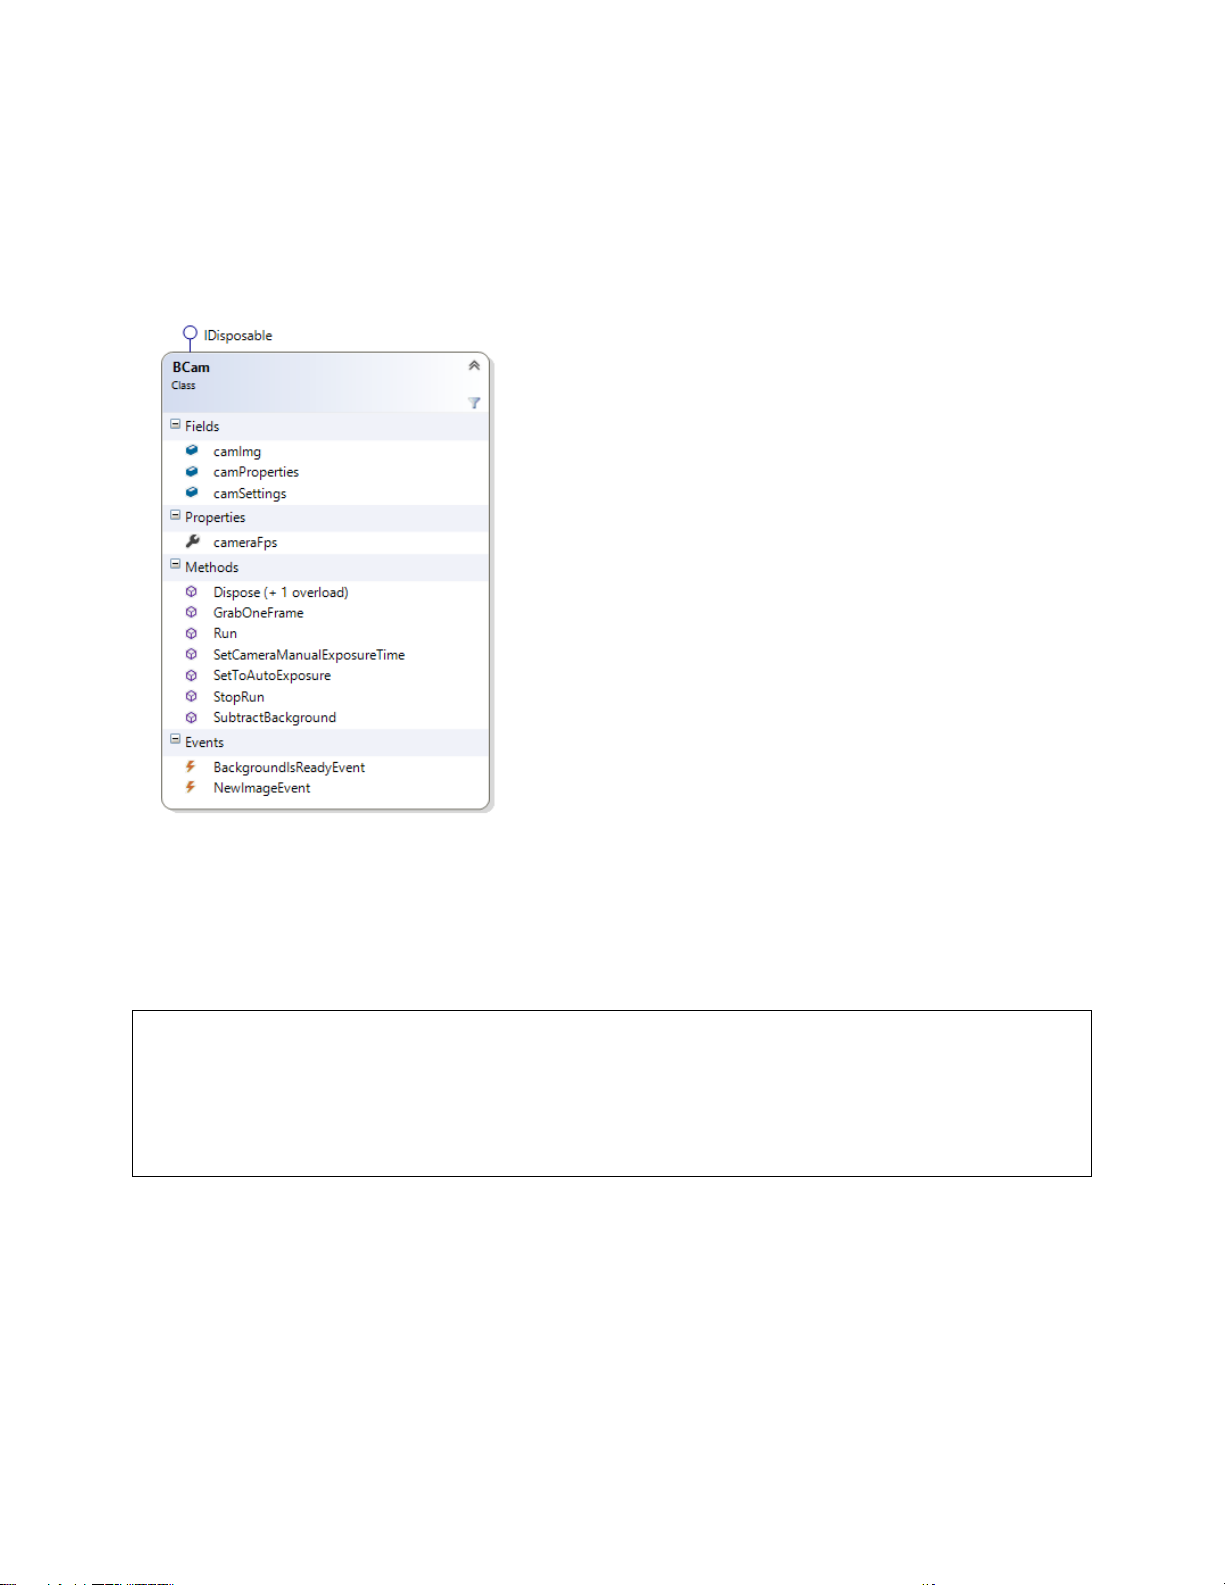
3.1. BCam
Bcam is the Beamage SDK’s camera class. Included are
basic functions to interact with the Beamage camera. For
example, the last captured image can be accessed by using
the BcamImg field. For now, BcamSettings is empty but some
properties and functions will be added in future versions of
Beamage SDK.
Class declaration
class Bcam
Properties
BcamImg camImg;
See section about BcamImg
BcamSettings camSettings;
See section about Erreur ! Source du renvoi introuvable.
BcamProperties camProperties;
See section about BCamProperties
float cameraFps { get; private set; }
Get current Frame Per Second of the Beamage camera.
Events
event EventHandler NewImageEvent;
This event is raised every time a new image is captured by the Beamage camera.
// Get notified when a new image is captured
bsdk.camera.NewImageEvent += new EventHandler(newImage);
private void newImage(object sender, EventArgs e)
{
// A new image has been captured by the camera
}
event EventHandler BackgroundIsReadyEvent;
This event is raised when the subtract background operation is completed.
Code sample
Page 18
Beamage SDK User Manual Revision 1 18
Code sample
bsdk.camera.BackgroundIsReadyEvent += new EventHandler(backgroundIsReady);
private void backgroundIsReady(object sender, EventArgs e)
{
MessageBox.Show(“Background is Ready”);
bsdk.camera.BackgroundIsReadyEvent -= new EventHandler(backgroundIsReady);
}
Functions
void Dispose()
Bcam class is derived from Idisposable and needs a Dispose function.
void GrabOneFrame()
Grabs only one image.
void Run()
Starts capturing images from the Beamage camera. Runs continuously until the StopRun() function is
called.
void SetCameraManualExposureTime(float exposureTime)
Manually sets the exposure time of the camera. Valid values for exposure time are those between 0.06 ms
and 5000 ms (5 seconds). There is no built-in check of the value entered; respecting the aforementioned
limits is the user’s responsibility.
void SetToAutoExposure(bool _autoExposure)
Set _autoExposure to True to use the Beamage camera’s automatic exposure time mode. Set it to False
to deactivate it and then use the SetCameraManualExposureTime() function to control the exposure time.
void SubtractBackground()
Performs an ISO subtract of the background. This function needs at least 10 captured frames to be effective.
void StopRun()
Stop capturing images from the Beamage camera until the Run() function is called.
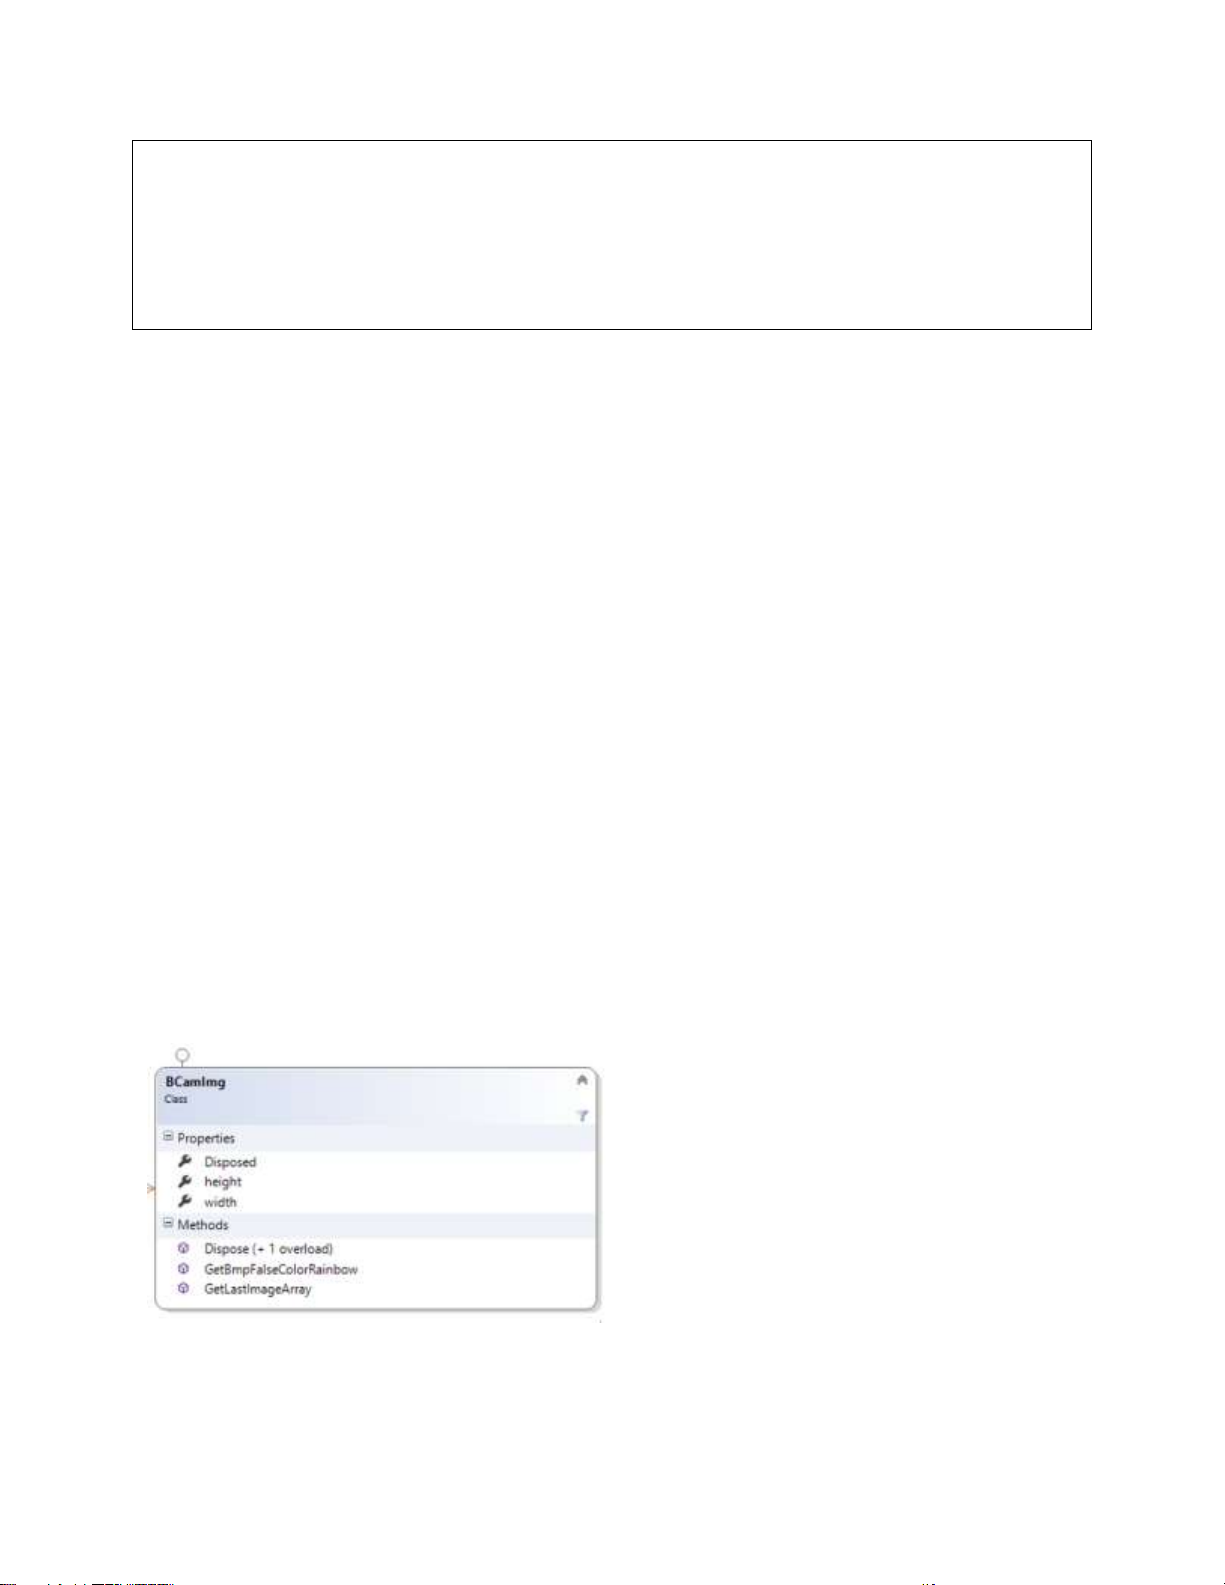
3.2. BcamImg
Width of the last captured image. Read only.
int height
Height of the last captured image. Read only.
BcamImg is a simple object class that will return a
raw image buffer or a false-color rainbow BMP
image.
The first format is useful to perform mathematical
operations and the second one to put on a viewer.
Class declaration
class BCamImg
Properties
int width
Page 19
Beamage SDK User Manual Revision 1 19
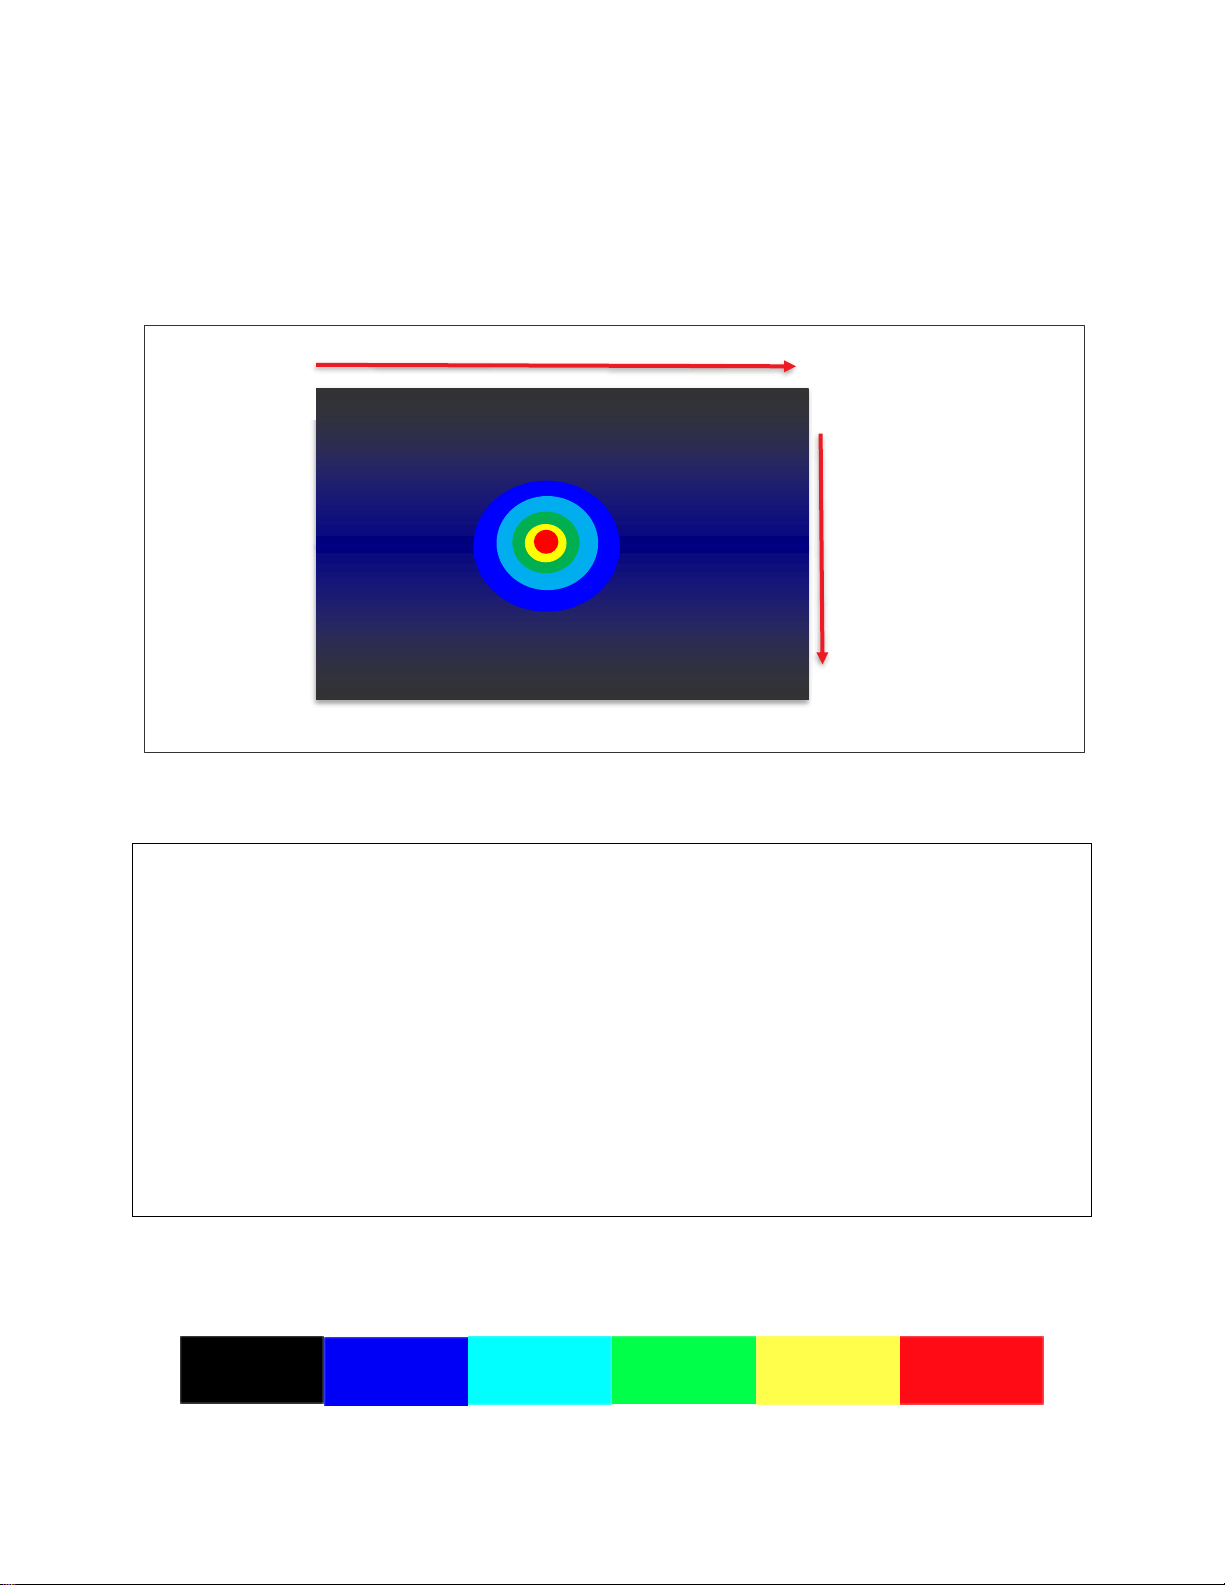
(0,0)
(max width, max height)
Last data point
First data point
(max width, 0)
Intermediate data point
Events
Functions
int[] GetLastImageArray()
Return a raw buffer of the last image. This is a one-dimension array. The elements in the array are ordered
in the following way: they begin in the top left corner of the image, progress in a left-to-right and then topto-bottom fashion and finish in the bottom right corner.
Figure 9 - Beamage image
It is simple to access any pixel of the image. Here is a code sample that shows how:
Code sample
var image = bsdk.camera.camImg.GetLastImageArray();
int width = bsdk.camera.camImg.width;
int height = bsdk.camera.camImg.height;
double pixelSum = 0.0;
for (int i = 0; i < height; i++)
{
for(int j = 0; j < width; j++)
{
pixelSum += image[i * height + j];
}
}
// Make an average
pixelSum /= (width * height);
Bitmap GetBmpFalseColorRainbow()
This function will take the raw buffer image and create from the associated energy values six series of false
colors to create a rainbow-like scale. Here is the scale that has been used in this function:
Figure 10 - False rainbow colors scale
Page 20
Beamage SDK User Manual Revision 1 20
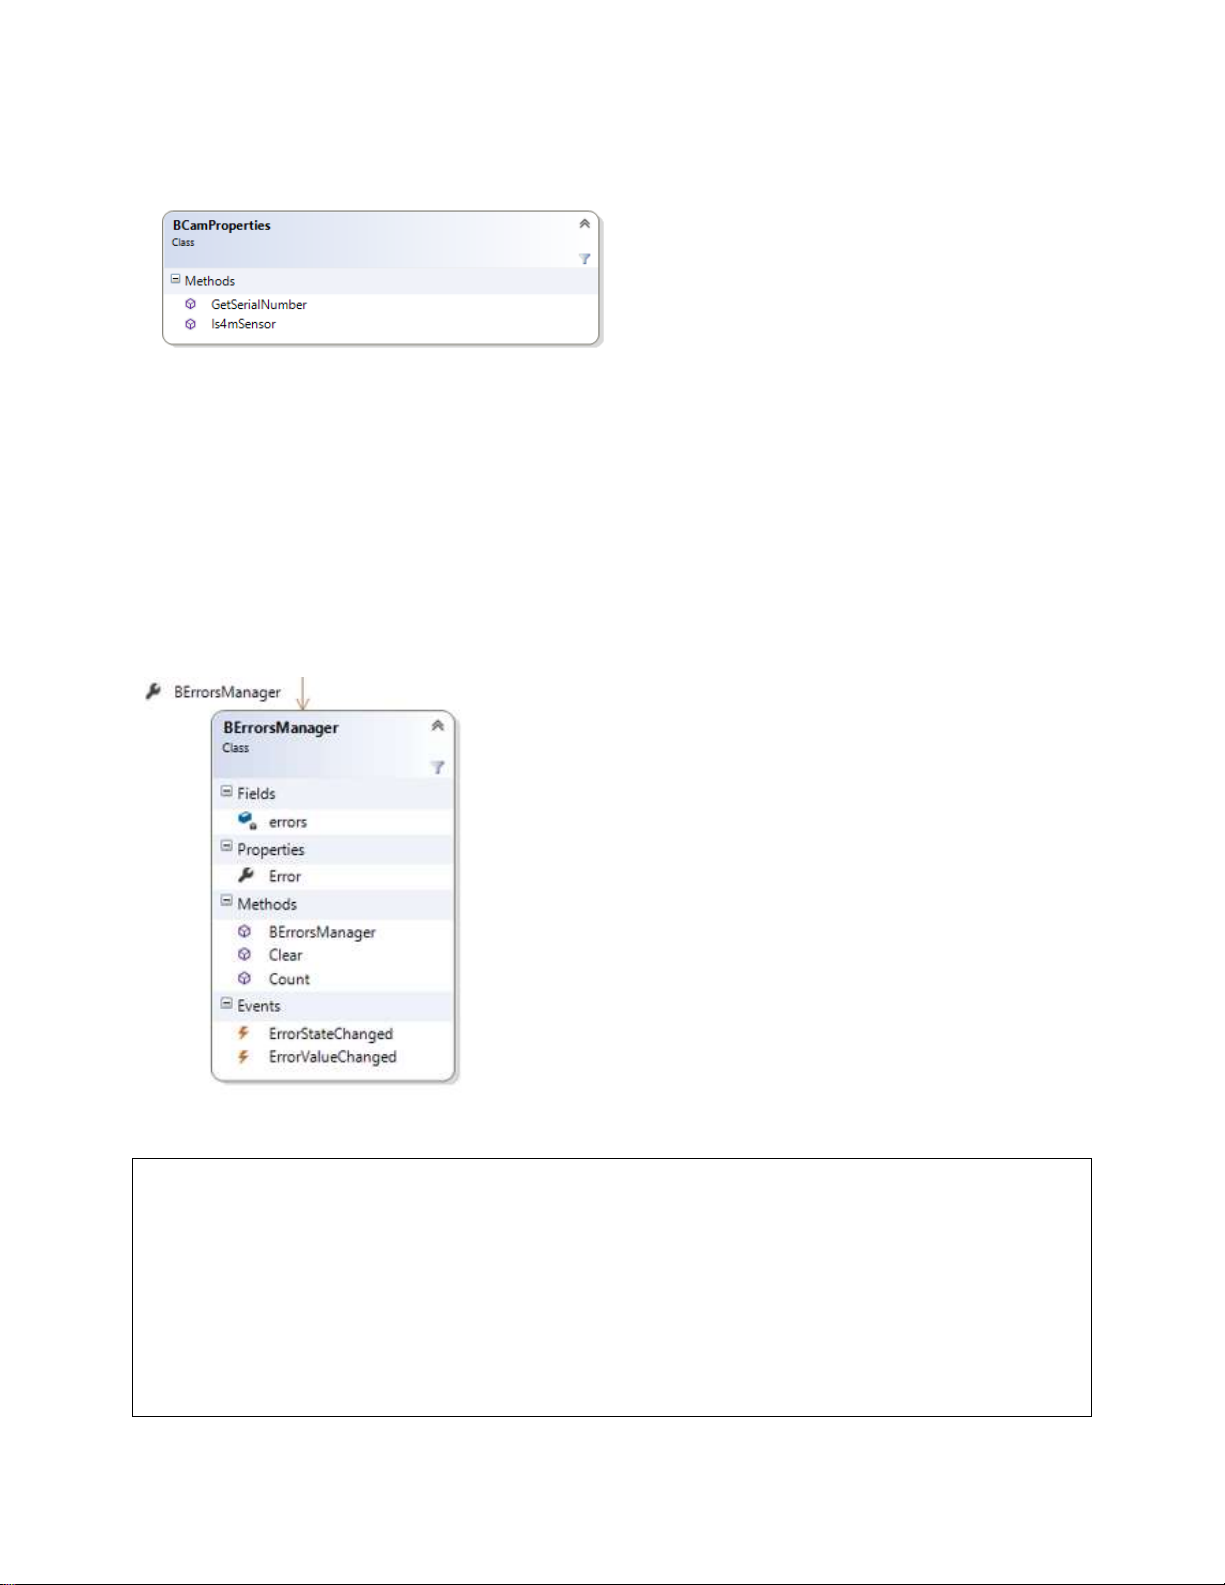
3.3. BCamProperties
BCamProperties are the internal properties of the
Beamage camera. Contrary to the BCamSettings
class, methods and properties of the
BCamProperties class are read-only.
Class declaration
Properties
Events
Functions
bool Is4mSensor()
This function returns True if the Beamage camera is a Beamage-4M model and False if the Beamage
camera is a Beamage-3.0 model.
string GetSerialNumber()
Returns the Beamage camera’s serial number as a string.
3.4. BErrorsManager
The BErrorsManager class contains events that the user can
subscribe to. It will help the programmer develop applications and
understand what could cause errors when using the Beamage
SDK. To receive error messages, it is mandatory to subscribe to
the EventHandler.
Class declaration
class BErrorsManager
Properties
string Error;
This is the error message string that gives the programmer details
about errors that occur when using the code.
Events
event EventHandler ErrorStateChanged;
event EventHandler ErrorValueChanged;
This is how to subscribe to these events:
// Assign an event handler for errors coming from BSDK
// The Error Manager will return errors if the SDK detects unusual behavior
bsdk.errorManager.ErrorStateChanged += new EventHandler(errorsEvent);
and
private void errorsEvent(object sender, EventArgs e)
{
// Errors messages from the Error Manager
string error = ((BErrorsManager)sender).Error;
MessageBox.Show(error);
}
Code sample
Page 21
Beamage SDK User Manual Revision 1 21
3.5. BSDK
BSDK is the main class of the Beamage SDK. See the
Understanding the code section for more information.
Class declaration
BSDK()
Main class of objects in the Beamage SDK.
Properties
BCam camera
Return BCam object for the connected camera.
Events
event EventHandler AttachedStateChanged;
This Event Handler will raise an event each time a device is
plugged into the computer. Subscribe to this event if you want to
plug in a camera after starting the software or if you have
multiple cameras in your setup.
event EventHandler RemoveStateChanged;
This Event Handler will raise an event each time a device is
unplugged from the computer. It will allow you to manage some
security elements or to check if your current device is still
operable before performing actions.
Code sample
// Assign an event handler for attached and removed devices
bsdk.AttachedStateChanged += new EventHandler(attachedEvent);
bsdk.RemoveStateChanged += new EventHandler(removeEvent);
Functions
void AutoConnect()
This function detects and initializes all Beamage cameras plugged into the computer, then connects to the
first detected Beamage camera.
void ConnectTo(int cameraNumber)
Connect to a specific Beamage camera using its camera number. Camera numbers are not available for
now, but will be in a future version.
void ConnectTo(String serialNumber)
Connect to a specific Beamage camera using its serial number. This function will detect all cameras plugged
into the computer and search for the specified one, then connect to it. If the camera is not found, an error
will be returned on the BErrorsManager.
public void DetectCameras()
This function will search and initialize any Beamage cameras plugged into the computer. If a camera was
already connected before calling this method, it will remain connected after calling this method.
void Dispose()
BSDK class derives from IDisposable and requires a Dispose function.
Page 22

Beamage SDK User Manual Revision 1 22
Classes
Functions
BCamImages
All
BCamSettings
All
BErrorsManager
int Count()
void Clear()
3.6. Future classes and functions
The following features are currently under development:
Page 23

Beamage SDK User Manual Revision 1 23
 Loading...