

Page 1

ENGLISH
1
Table of Content
1. Introduction 3
2. GENIUS VOIP MOUSE Installation and Un-installation 4
2.1 System requirement 4
2.2 IMs supported by GENIUS VOIP MOUSE 5
2.3 IMs not supported by GENIUS VOIP MOUSE at present 5
2.4 Website of each IM to download 5
2.5 GENIUS VOIP MOUSE software installation 6
2.6 GENIUS VOIP MOUSE software un-installation 8
3. Description of GENIUS VOIP MOUSE GUI 9
4. Accounting Management 10
4.1 Run the IMs automatically by GENIUS VOIP MOUSE 10
4.2 Run the IMs with pre-setting Auto Login by GENIUS VOIP MOUSE 10
4.3 Run the IMs with pre-setting Auto Run by GENIUS VOIP MOUSE 11
4.4 Run the IMs without pre-setting Auto Run, Auto Login by GENIUS VOIP MOUSE11
4.5 How to add/delete/edit your IM accounts in GENIUS VOIP MOUSE 12
4.6 How to setup automatic login account for each IM in GENIUS VOIP MOUSE 13
4.7 How to run the IM automatically in GENIUS VOIP MOUSE 13
5. IM account status management 14
5.1 Status Synchronization between IM status and GENIUS VOIP MOUSE 14
5.2 Definition on the status of the IM icons 15
6. Dialing function 16
6.1 Input +, *, # and 0~9 16
6.2 Remove button 16
6.3 Quick search for national region code 17
7. Contact list 18
7.1 Find the contact list according to the IM 19
7.2 Sorting the contact list by IM/Name in ascending/ descending 19
7.3 Show all the contacts or those online contacts only 19
7.4 Look at the information about the IM contact 20
7.5 Add a new IM friend 20
Page 2

ENGLISH
2
7.6 Search for a friend in the specific IM 21
7.7 Quick Search for a friend in contact list 22
7.8 Make an IM call 22
7.9 Chat with your friend 23
7.10 Send files to your friend 24
8. Active Call Function 25
9. Phone Book 26
9.1 Add a new friend to the phone book 27
9.2 Import contact friends to the phone book 27
9.3 Quick Search for a friend in phone book 28
9.4 Communication with contact in phone book function dialog 29
10. Call History 30
10.1 Description on the icons in call history 30
10.2 Make a call in call history dialog 30
11. Call Alert 31
12. Online Update 31
Page 3

ENGLISH
3
1. Introduction
Thank you for choosing this new Genius mouse device with the new software called GENIUS
VOIP MOUSE for main-stream Instant messenger programs (IMs). This software works with the
six most popular IMs -- Skype, Google Talk, MSN Messenger, AOL, Yahoo Messenger and QQ.
This universal interface can control the six main-stream IMs in a simple and convenient way to
chat, send files, message to/with your friends. You can easily manage the different IM’s contact
list in one dialog box with quick sorting, search, call history and editing support.
This GENIUS VOIP MOUSE software manual is a guide so you know how to (a) install or remove
the GENIUS VOIP MOUSE step by step, (b) the OS system requirement and (c) the information
of abnormal messages. We are confident that GENIUS VOIP MOUSE software will make all your
instant messaging easy.
Page 4
ENGLISH
4
2. GENIUS VOIP MOUSE Installation and Un-Installation
2.1 System requirement
We recommend using this device on a USB port. You need to confirm your PC operation
system supports USB function, USB 1.1 or 2.0.
OS Support: WinXP (SP1~SP2), Win2000 (SP1~SP4)
System recommended: Intel Pentium 4 or AMD K7 CPU above
At least 128MB RAM (Win2000 and WinXP)
At least 50 MB hard disk space
Supported IM version listed in the「Help」page of GENIUS VOIP MOUSE
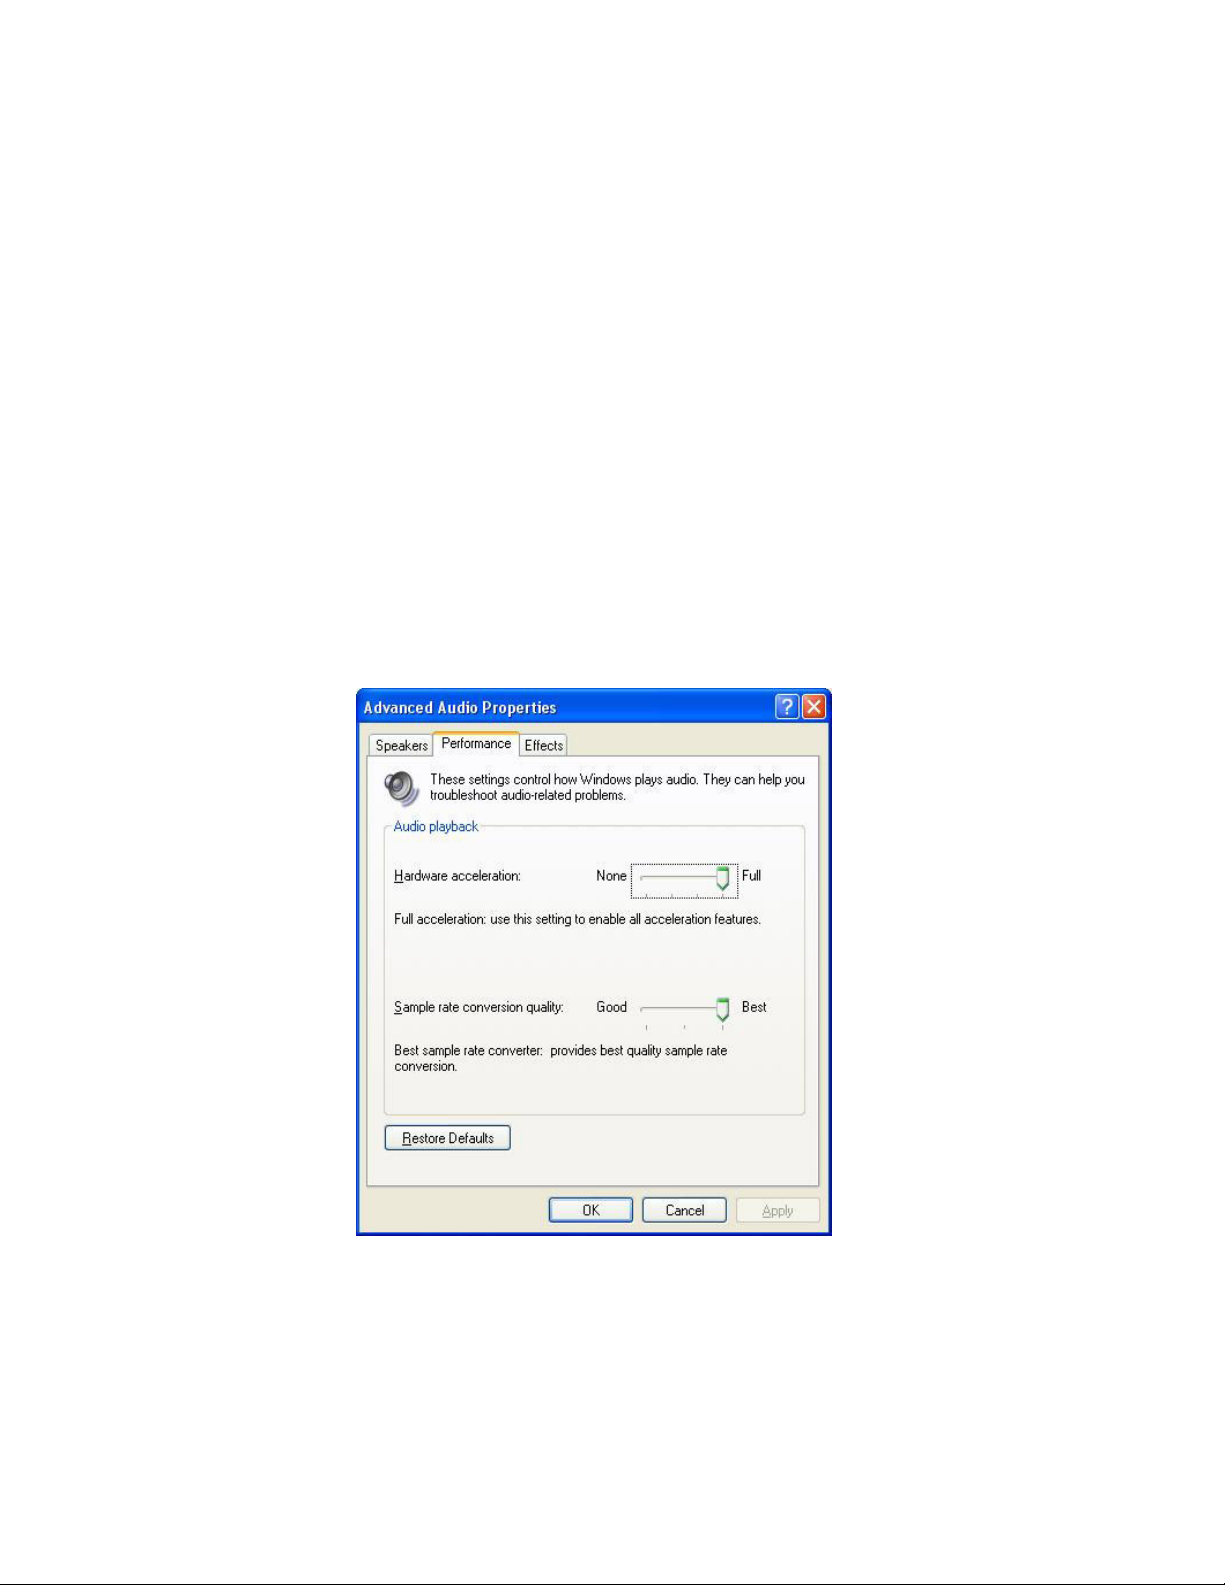
For good sound quality, please adjust your system’s H/W acceleration and Sample rate
conversion quality to Full and Best.
Page 5
ENGLISH
5
*
*
*
I
m
p
o
r
t
a
n
t
N
o
t
i
c
e
*
*
*
*
*
*
I
m
p
o
r
t
a
n
t
N
o
t
i
c
*
*
*
I
m
p
o
r
t
a
n
t
N
1. Before you install the VOIP software application and driver, you must make sure that the
Internet Phone Mouse is already connected to the PC. Otherwise, the GENIUS VOIP
MOUSE driver will fail to install during the installation.
2. For the call forward function, make sure that the Home Gate Way device has been
connected to a PSTN line and Telephone.
3. When you have completed the installation procedure, the system will keep on-board audio
priority and use Skype as the primary Internet Phone Mouse.
4. If your PC system has more than one USB port, please remember which one you used,
because the next time when you plug this Internet Phone Mouse to your PC, you have to
plug it into the same port to initialize the software driver.
o
e
t
i
c
e
*
*
*
*
*
*
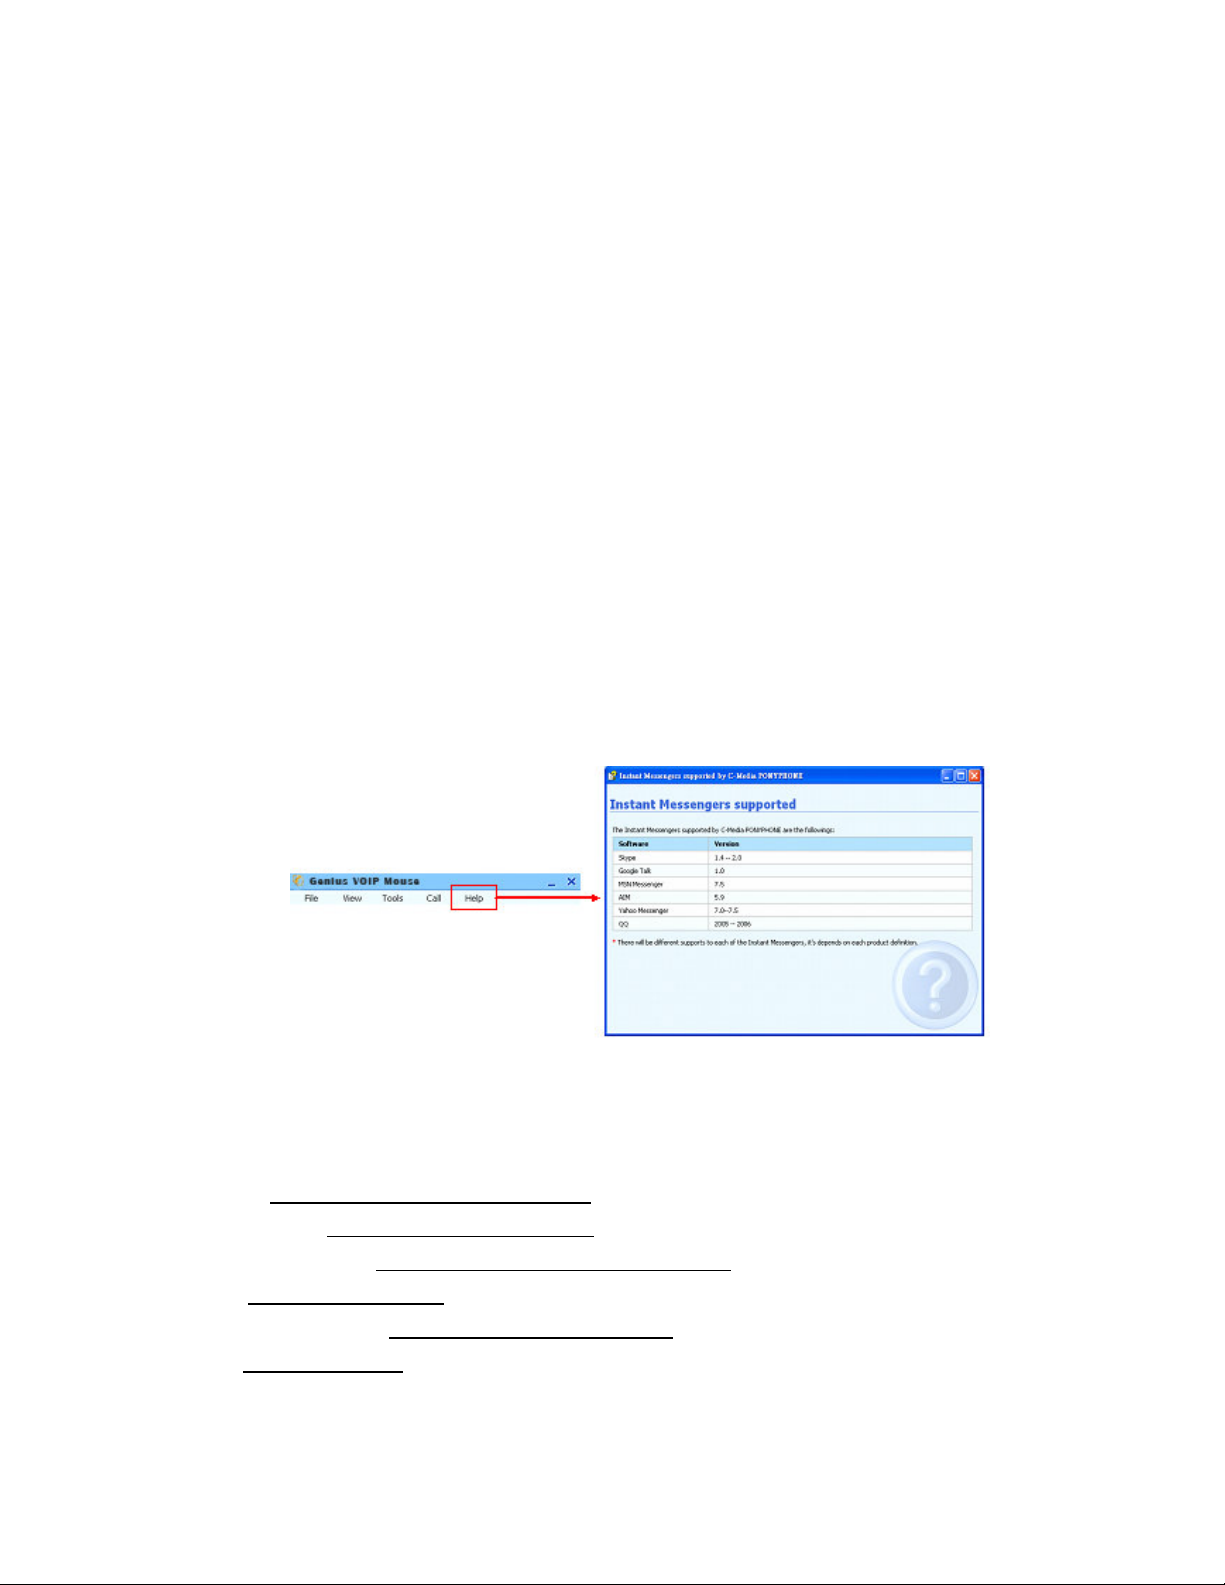
2.2 IMs supported by GENIUS VOIP MOUSE
You can get the supported IM version in the 「Help」sheet of the GENIUS VOIP MOUSE
main dialog UI.
2.4 Websites of Each IM to download
Skype: http://www.skype.com/download
Google Talk: http://www.google.com/talk
MSN Messenger: http://messenger.msn.com/downloa
AIM: http://www.aim.com
Yahoo Messenger: http://messenger.yahoo.com
QQ: http://im.qq.com
Page 6
ENGLISH
6
2.5 GENIUS VOIP MOUSE Software Installation
We recommend you remove the previous mouse software before you install the GENIUS
VOIP MOUSE software application
The installation steps are as follows:
STEP-1: Plug in Navigator 380 and insert Installation CD on your CD-ROM or DVD ROM, the
program will pop up GENIUS VOIP MOUSE.exe then execute the installation
program.
If you did not insert Navigator 380 prior to installing the GENIUS VOIP MOUSE software,
this dialog will not show up during the installation procedure. It will go to the end directly.
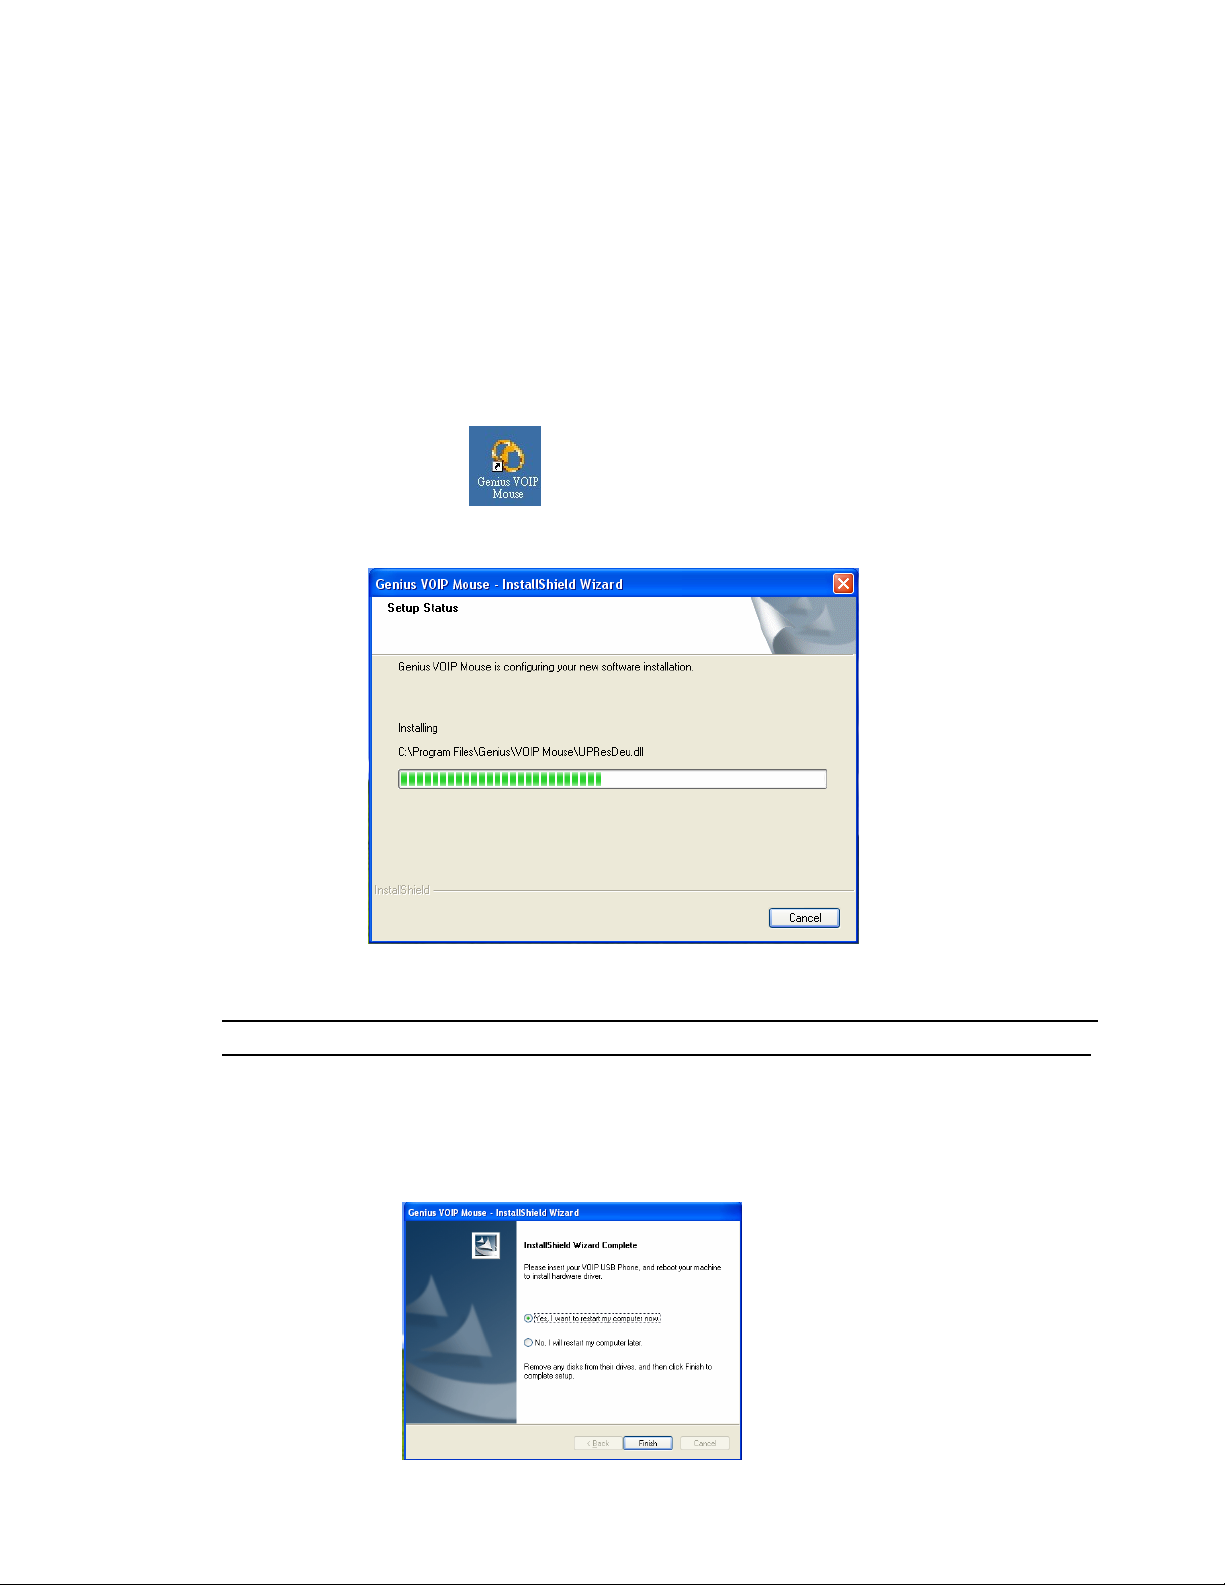
STEP-2: After you installed the GENIUS VOIP MOUSE and driver programs, a window will
pop up and ask you to restart your PC immediately or later. Select what you would
like and click 「Finish」 button to complete and launch GENIUS VOIP MOUSE.
Page 7
ENGLISH
7
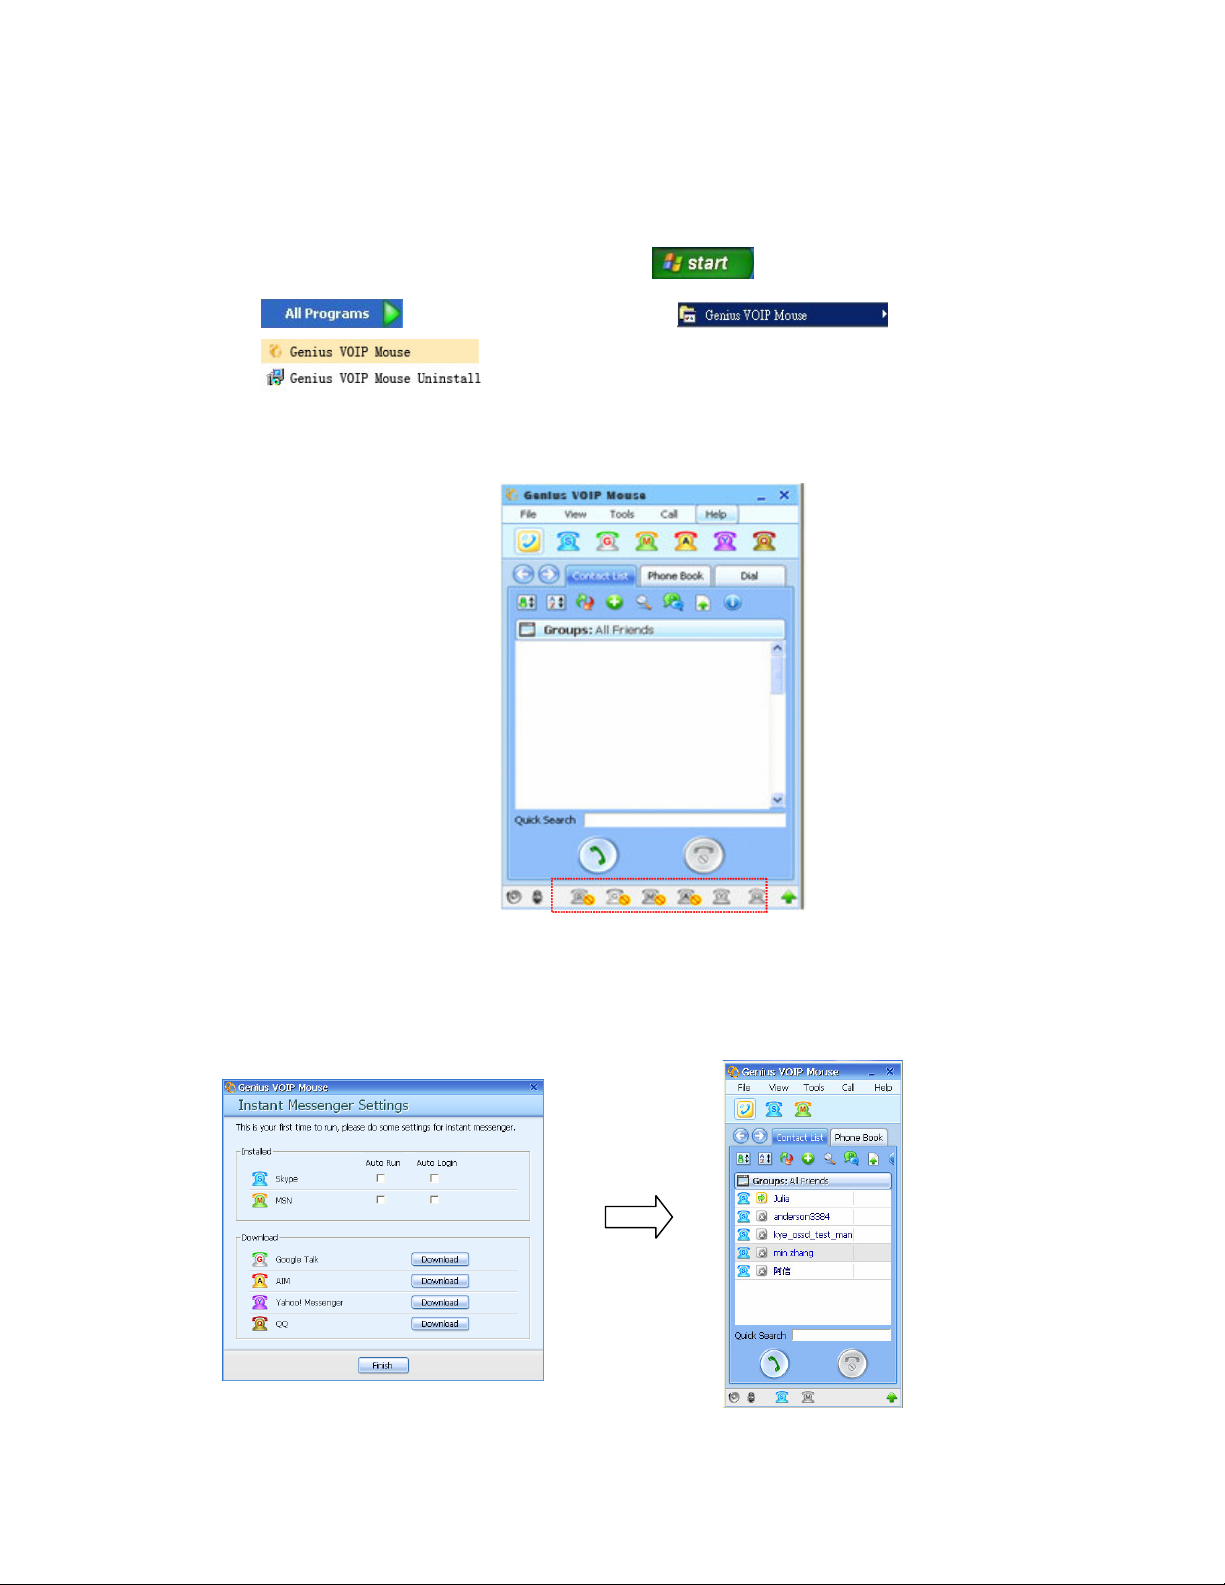
STEP-3: There are two methods to start GENIUS VOIP MOUSE. You can double click on the
short-cut GENIUS VOIP MOUSE icon on the PC screen or you can execute the AP
software in the OS through “Start Menu All programs Menu
GENIUS VOIP MOUSE
STEP-4: A GENIUS VOIP MOUSE Mail Dialog window will pop up on your PC screen with
the status of each IM.
STEP-5: If you did not install all the IMs supported by GENIUS VOIP MOUSE, a window will
pop up asking you to download those un-installed IMs and setup auto-run/auto login
for the first time.
Page 8
ENGLISH
8
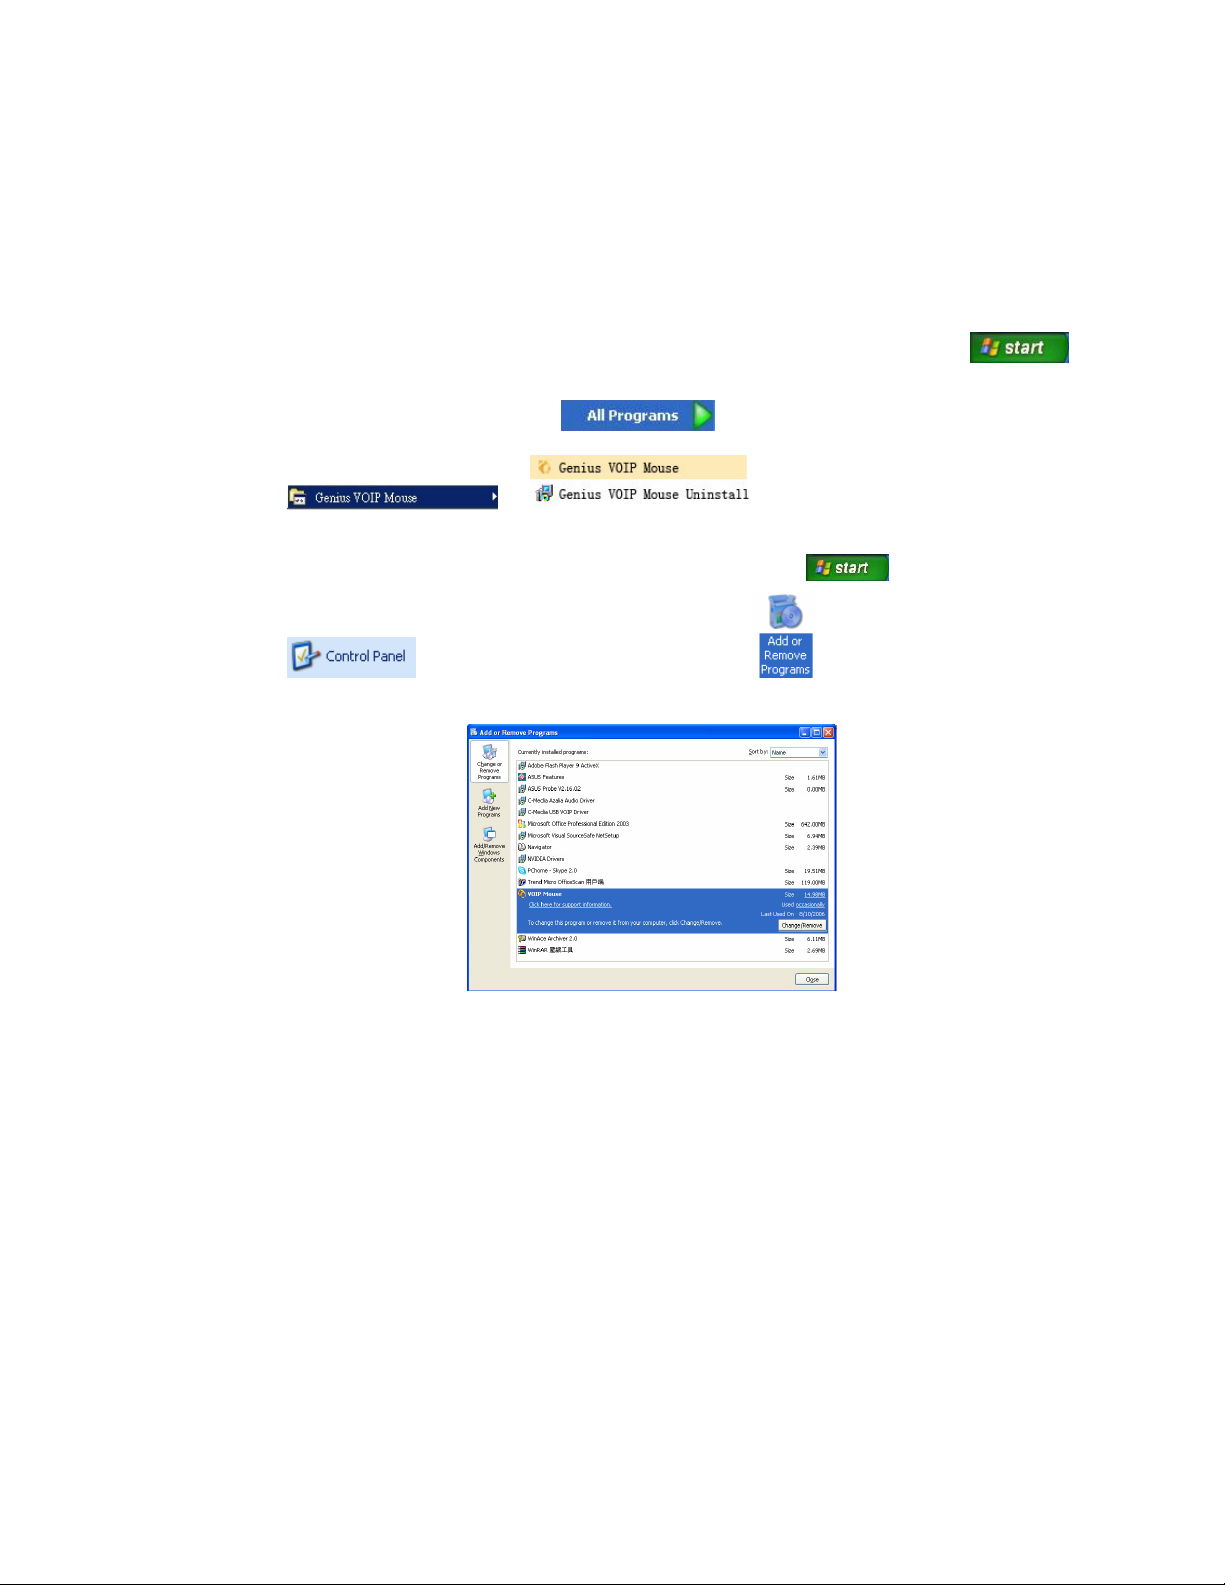
2.6 GENIUS VOIP MOUSE Software Un-installation
You can remove the GENIUS VOIP MOUSE and its driver from the PC these two ways.
Method-1, remove the GENIUS VOIP MOUSE software through “Start Menu
All Program Menu GENIUS VOIP MOUSE
Method-2, remove GENIUS VOIP MOUSE via “Start Menu Control Panel
Add or Remove programs Remove the GENIUS
VOIP MOUSE software.
Page 9
ENGLISH
9
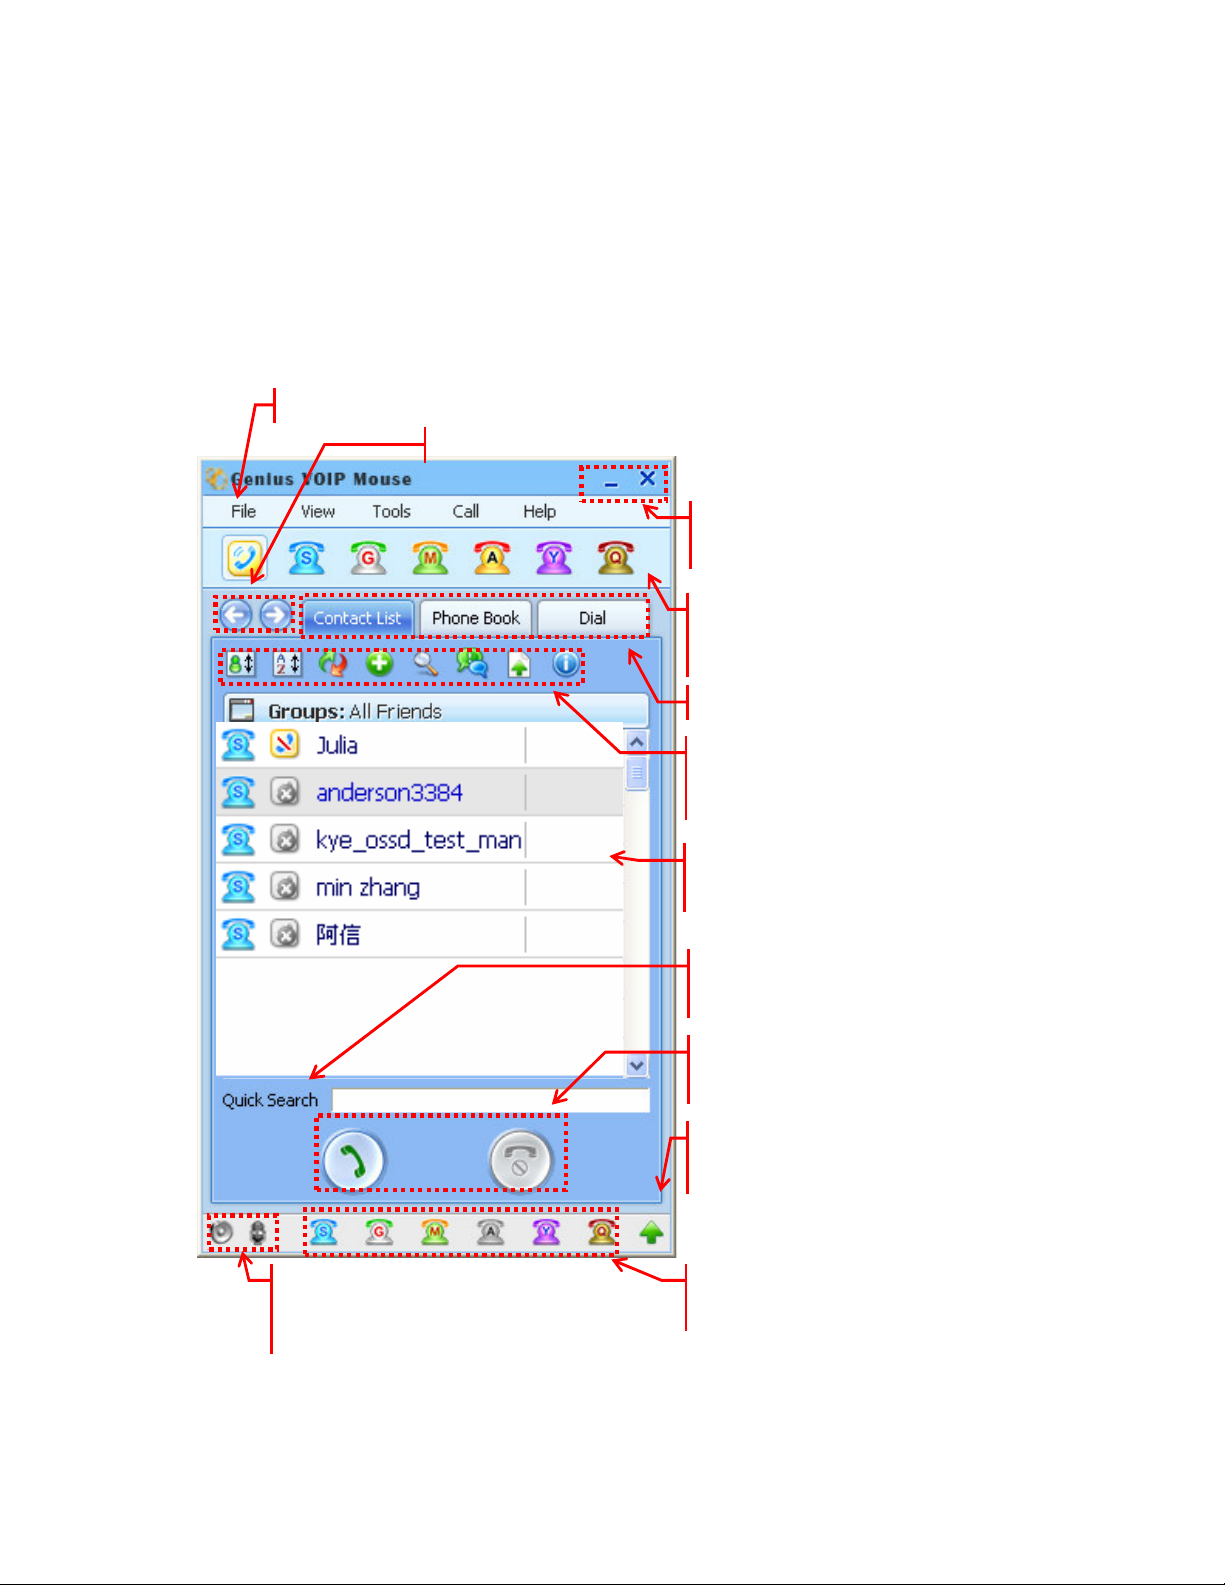
3. Description of the GENIUS VOIP MOUSE GUI
Once again, you must to install Navigator 380 into your PC before you can enjoy the GENIUS
VOIP MOUSE software. There are six functional sub-dialogs in the main of the GENIUS VOIP
MOUSE. Open the GENIUS VOIP MOUSE. In addition, this guide will describe all the functions
in detail.
Function buttons of the Genius VOIP Mouse
Left and right buttons to switch IM function dialogs
“_” minimize Genius VOIP Mouse UI,
“X” close Genius VOIP Mouse UI
Genius VOIP Mouse and 6 integrated IM
icons, choose the IM AP here
Six main function dialogs in each IM
Quick buttons to execute the IM function in
the sub-dialogs
Context in the function dialog of each IM
You can key in the key word to search for
information quickly
Buttons to pickup and hang up the VOIP
phone call
Updating the Genius VOIP Mouse through
the URL site
Volume control icons of speaker and
microphone separately.
You can change the IM status on those IM
status icons.
Page 10
ENGLISH
10
4. Accounting Management
This section will show you how to run each IM by GENIUS VOIP MOUSE automatically by
taking advantage of the accounting management.
4.1 Run the IMs automatically by GENIUS VOIP MOUSE
If you already installed the IMs by auto-run and auto-login in the account management,
GENIUS VOIP MOUSE will detect and run those IMs automatically.
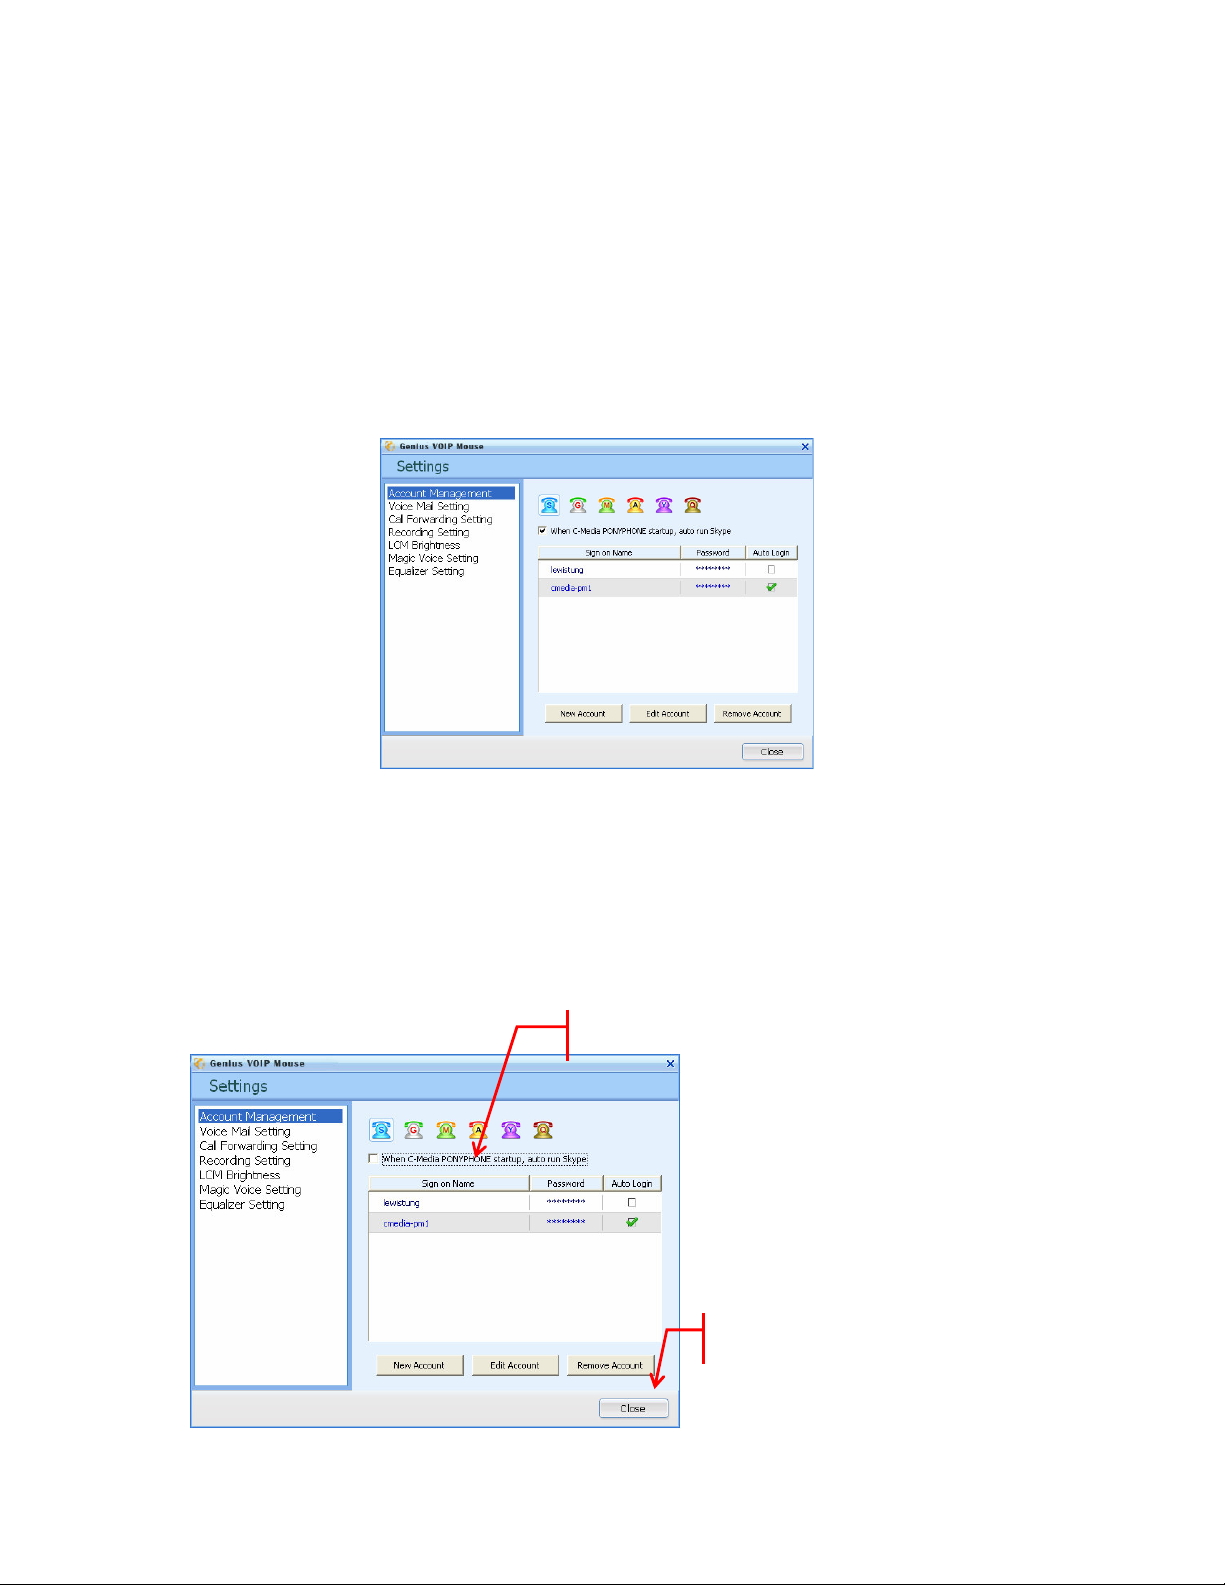
4.2 Run the IMs with pre-setting Auto Login by GENIUS VOIP MOUSE
If those IMs have been installed with setting auto-login previously, you can use the
Account Management to run these IMs by GENIUS VOIP MOUSE. The setting
procedure is as follows.
1. Enable the auto run in account management.
2. Close the Setting dialog
Page 11
11
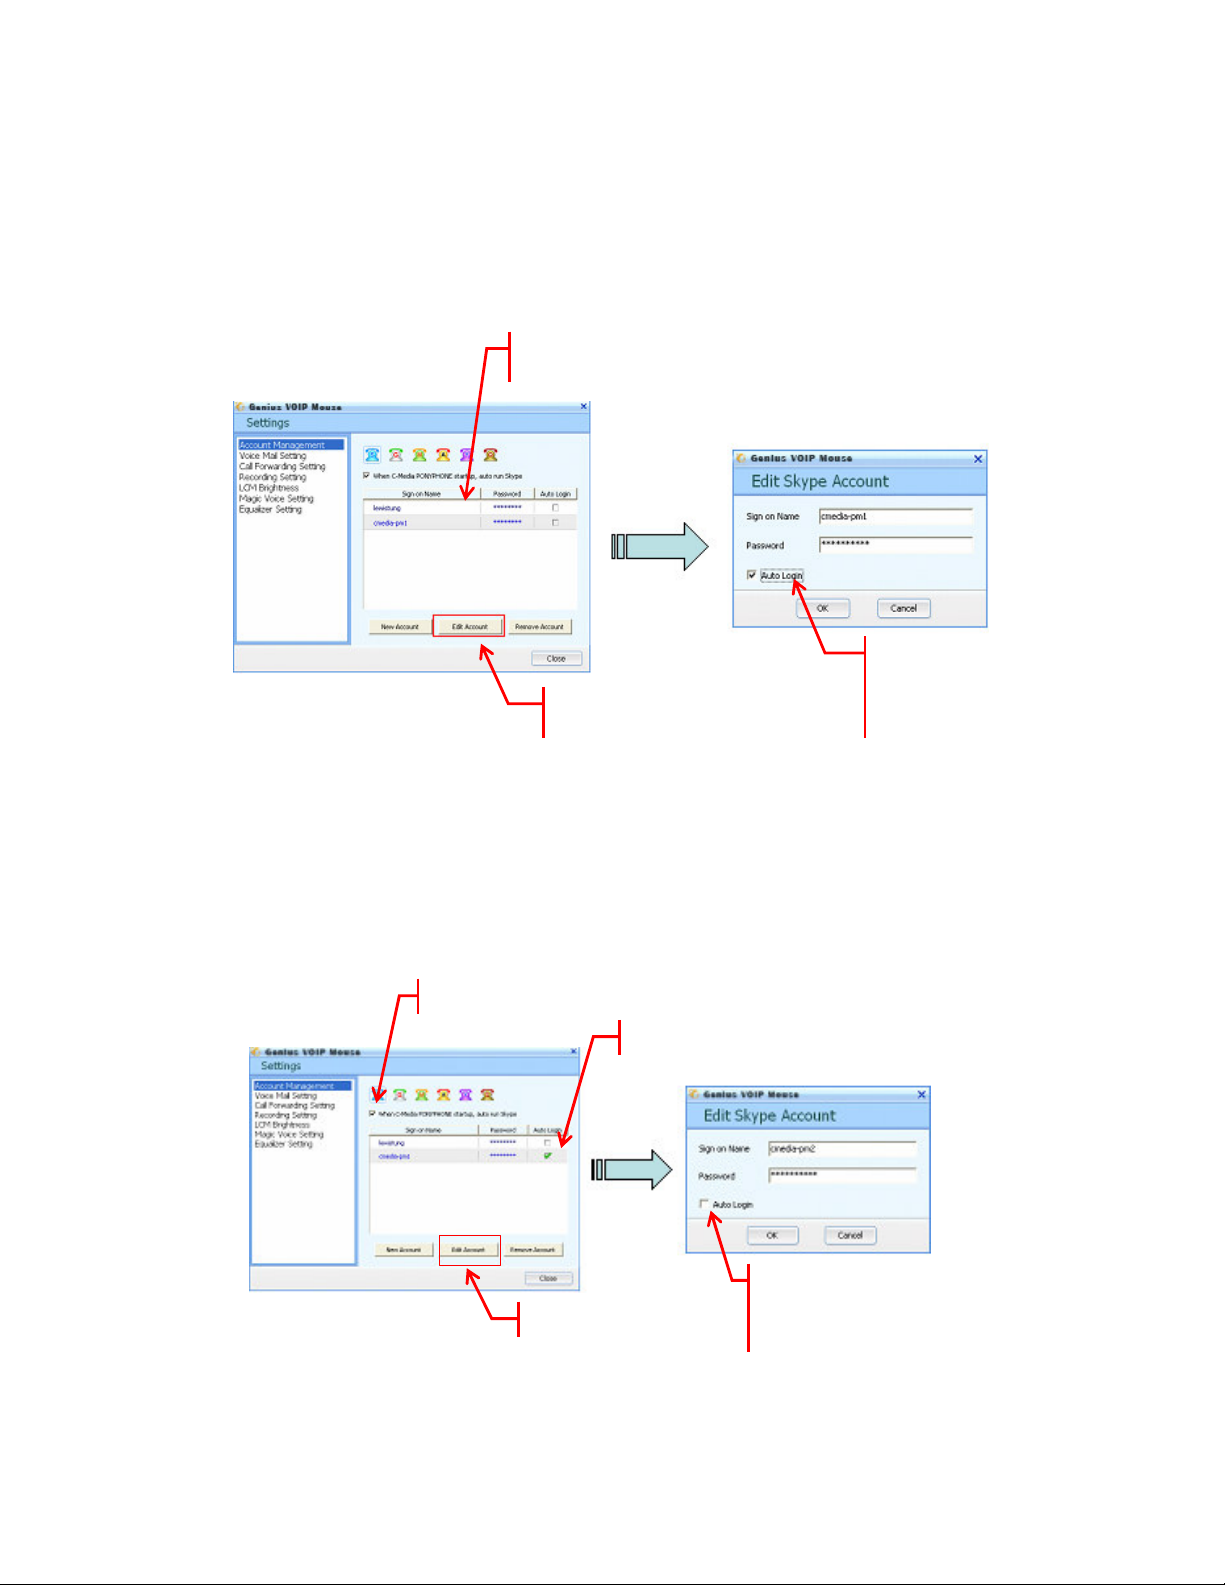
4.3 Run the IMs with pre-setting Auto-Run by GENIUS VOIP MOUSE
If those IMs have been installed with setting auto-run previously, you can use the
Account Management to run these IMs by GENIUS VOIP MOUSE. The setting
procedure is as follows.
1. Choose the account that you want to run by Genius VOIP Mouse
3. Enable Auto Login and
Click on O button, then close
2. Click on Edit Account
Setting dialog.
ENGLISH
4.4 Run the IM without pre-setting Auto Run and Auto Login by GENIUS VOIP
MOUSE
If those IMs have been installed without setting auto-login and auto-run previously, you
can still use Account Management to run these IMs by GENIUS VOIP MOUSE. The
setting procedure is as follows:
1. Enable Auto-Run by clicking on it
2. Choose the account that you want to edit
3. Click on Edit Account
4. Enable Auto Logic and Click
on OK, then close Setting dialog
Page 12

12
4.5 How to add/ delete/ edit your IM accounts in GENIUS VOIP MOUSE
STEP-1: Click on “File” in the main GENIUS VOIP MOUSE GUI to enter the Account
Management.
STEP-2: Choose the IM that the account will be added.
STEP-3: Click the New Account icon to pop up the edit IM account window.
STEP-4: Choose the IM account you want to edit. Then, click on the “Edit account” icon
in the account management. It will pop up the Edit IM Account window for you
to edit it.
ENGLISH
STEP-5: Choose the IM account you want to remove. Then, click on the “Remove
account” icon in the account management.
4.6 How to setup automatical log-in account for each IM in GENIUS VOIP
MOUSE
Each IM just can be assigned one auto-login account in GENIUS VOIP MOUSE.
STEP-1: Choose an account you want to login automatically.
STEP-2: Click on the “Edit Account” icon in account management. It will pop up the
window to edit.
STEP-3: Choose Auto-Login and click OK button. You can see this account is to be
assigned to be Auto Login in the account management dialog.
Page 13

ENGLISH
13
4.7 How to run the IM automatically in GENIUS VOIP MOUSE
You run the IM automatically with the GENIUS VOIP MOUSE initiation if you set
auto-run the IM with an assigned auto-login account.
STEP-1: Choose an auto-login account of the IM as described in 4.6.
STEP-2: Setup Auto Run in the account management dialog as shown below.
Page 14

14
5. IM account status management
5.1 Staus Synchronization between IM status and GENIUS VOIP MOUSE
You can change the IM status in all-instant-messenger as shown.
ENGLISH
In case there is any change on the contact person in IM, GENIUS VOIP MOUSE will
synchronize the status automatically to the IM status icons at the same time.
IM Display Icons The corresponding IM software
Skype
Google Talk
MSN Messenger
AOL Instant Messenger (abbreviate as AIM)
Yahoo Messenger
QQ
Page 15

ENGLISH
15
Contact person status display icons Status of contact person
On line
Off line
N/A
Invisible
Do not disturb
Away
5.2 Definition on the status of the IM Icons
GENIUS VOIP MOUSE can synchronize the status of each IM in real-time. You can
watch all the IM status on the bottom of the GENIUS VOIP MOUSE main dialog
window.
(IM status Icons in GENIUS VOIP MOUSE)
IM Status Definition:
Icons Status Skype
Color IM
Online
Icons
Away
N/A
Do not
disturb
Invisible
Off line
Gray IM
Logout
Icons
Google
Talk
MSN
Messenger
AIM
Yahoo
QQ
Messenger
Page 16

16
6. Dialing function
Click the buttons to control the dialing dialog interface for Skype Out.
Quick search for telephone region code
Display screen
Soft key group
Call / Hang off buttons
ENGLISH
6.1 Input +, *, # and 0 ~ 9
Input the phone numbers by clicking on the soft digital buttons on the dialing panel. At the same
time, the input numbers will show on the display screen.
6.2 Remove button
1. “” to remove the previous input digital one by one.
2. “C” to remove all the input digital at a time.
Page 17

ENGLISH
17
6.3 Quick search for national region code
1. Click icon on the display screen. It will pop up the region code window.
2. [Method-1]: Choose the Country/Region and Area/City using down arrow「 」
[Method-2]: Or you can type in 「Country/Region」or「Area/City」. It will search automatically
for you.
3. The region code will show on the display screen as below after your click the 「OK」 icon...
4. Further, user can call a PSTN phone through Skype out.
5. When users would like to search for a region code again, follow the steps above.
Page 18
ENGLISH
18
contact
pop up.
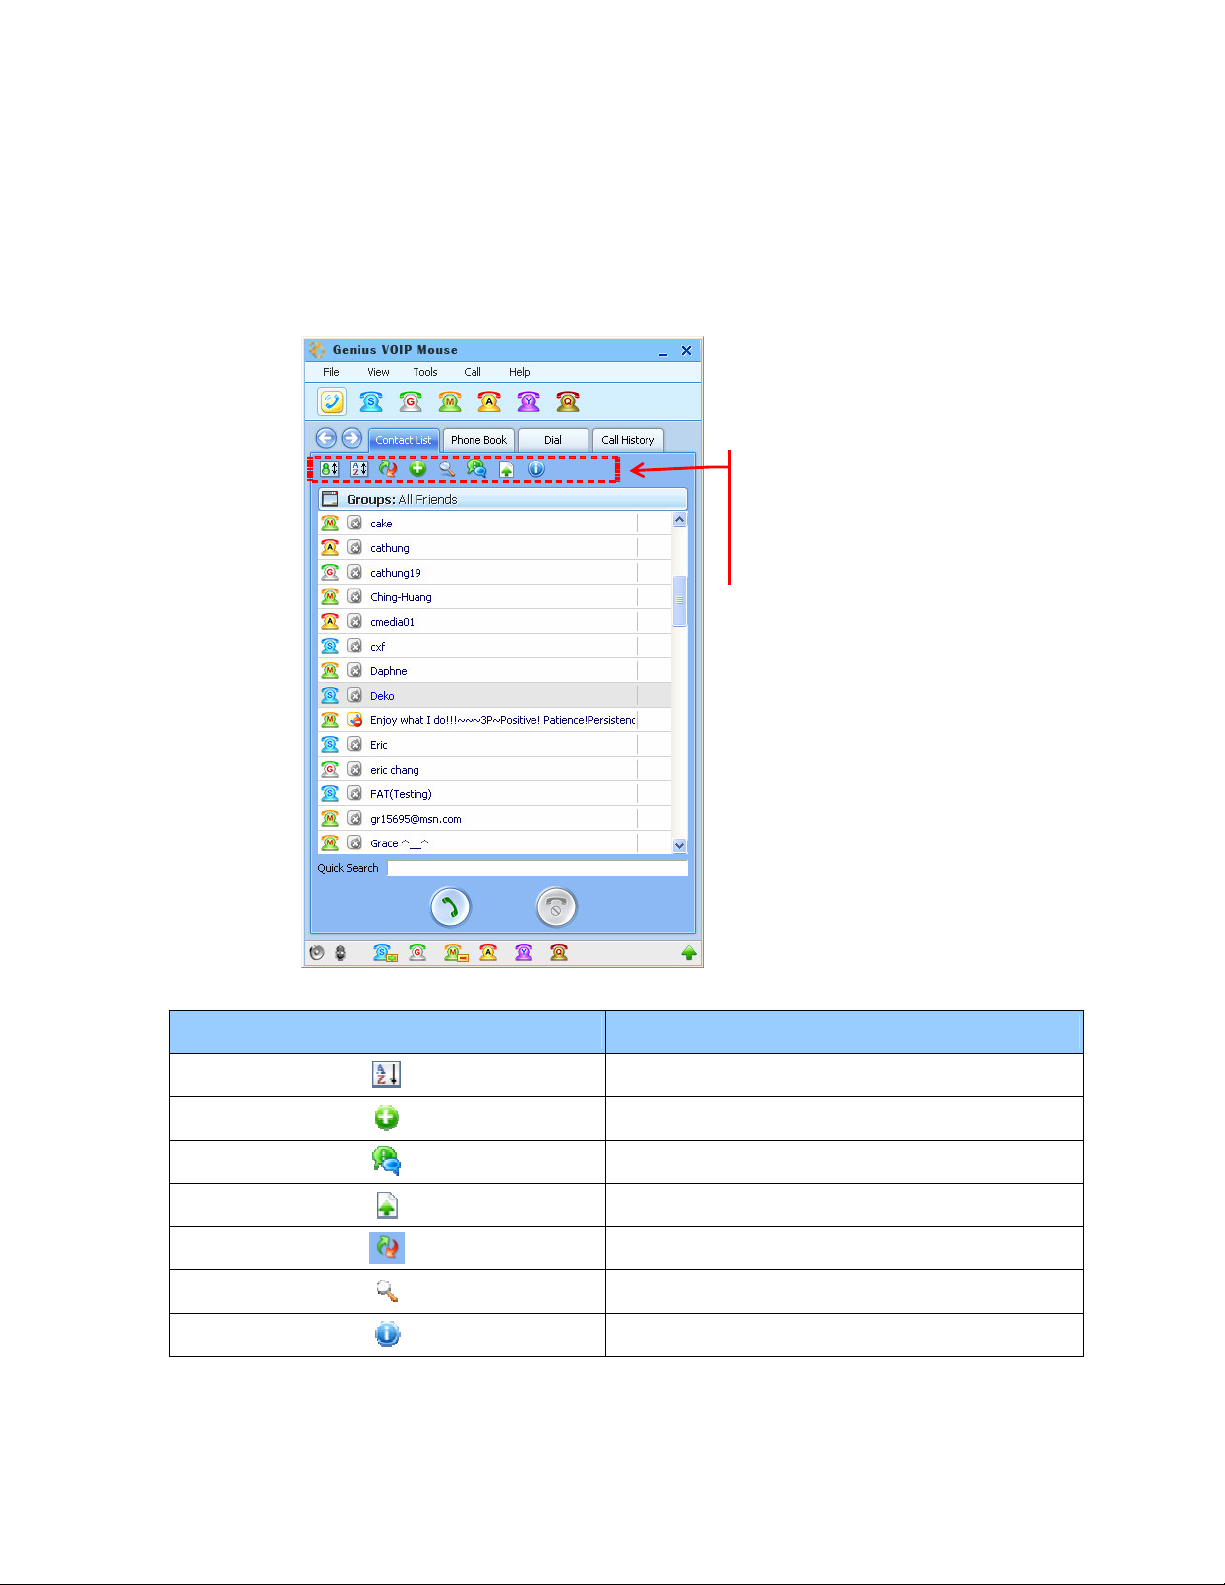
7. Contact list
This user interface support shows all IM contact lists in GENIUS VOIP MOUSE. When the
contact person was assigned a quick dialing number, the quick dialing number will show up
to the right of the contact person in the list.
Available functions in the
list. When users move mouse
over the icon, a description will
Function icons in contact list Description of this icon
Sort the contact list
Add a new IM friend
Chat with IM friend
Send files to IM friend
Refresh the contact list
Search for a IM friend
Information about the IM contact
Page 19

ENGLISH
19
7.1 Find the contact list according to the IM
STEP-1: Click on the IM icon.
STEP-2: The contact list will show the contact persons belonging to the assigned IM only.
7.2 Sorting the contact list by IM or Name in ascending or descending
STEP-1: Click on the icon (sorting by Name) or (sorting by IM)
STEP-2: Click the icon, the contact list will be sorted in ascending order by the first
character.
STEP-3: Click a second time, and the contact list will be sorted in descending order.
STEP-4: It will switch between descending and ascending order each time you click on the
icon.
7.3 Show all the contacts or those online contacts only
If you want to show IM contact persons by specific grouping, follow these steps.
STEP-1: Click on
STEP-2: Choose the approach you want. Then, all your IM contacts will show up in the
approach you have chosen.
You can choose from (a) All Friends (b) Online Friends (c) Offline Friends (d) Skype-Out
Friends
Page 20

20
7.4 Look at the information about the IM contact
STEP
-1
STEP
-2
If you want to look at the contact information in detail, follow these steps.
STEP-1: Choose the contact you want to look at the information
STEP-2: Click on the icon . It will pop up a contact information table.
Information window
(This information is from IM directly)
ENGLISH
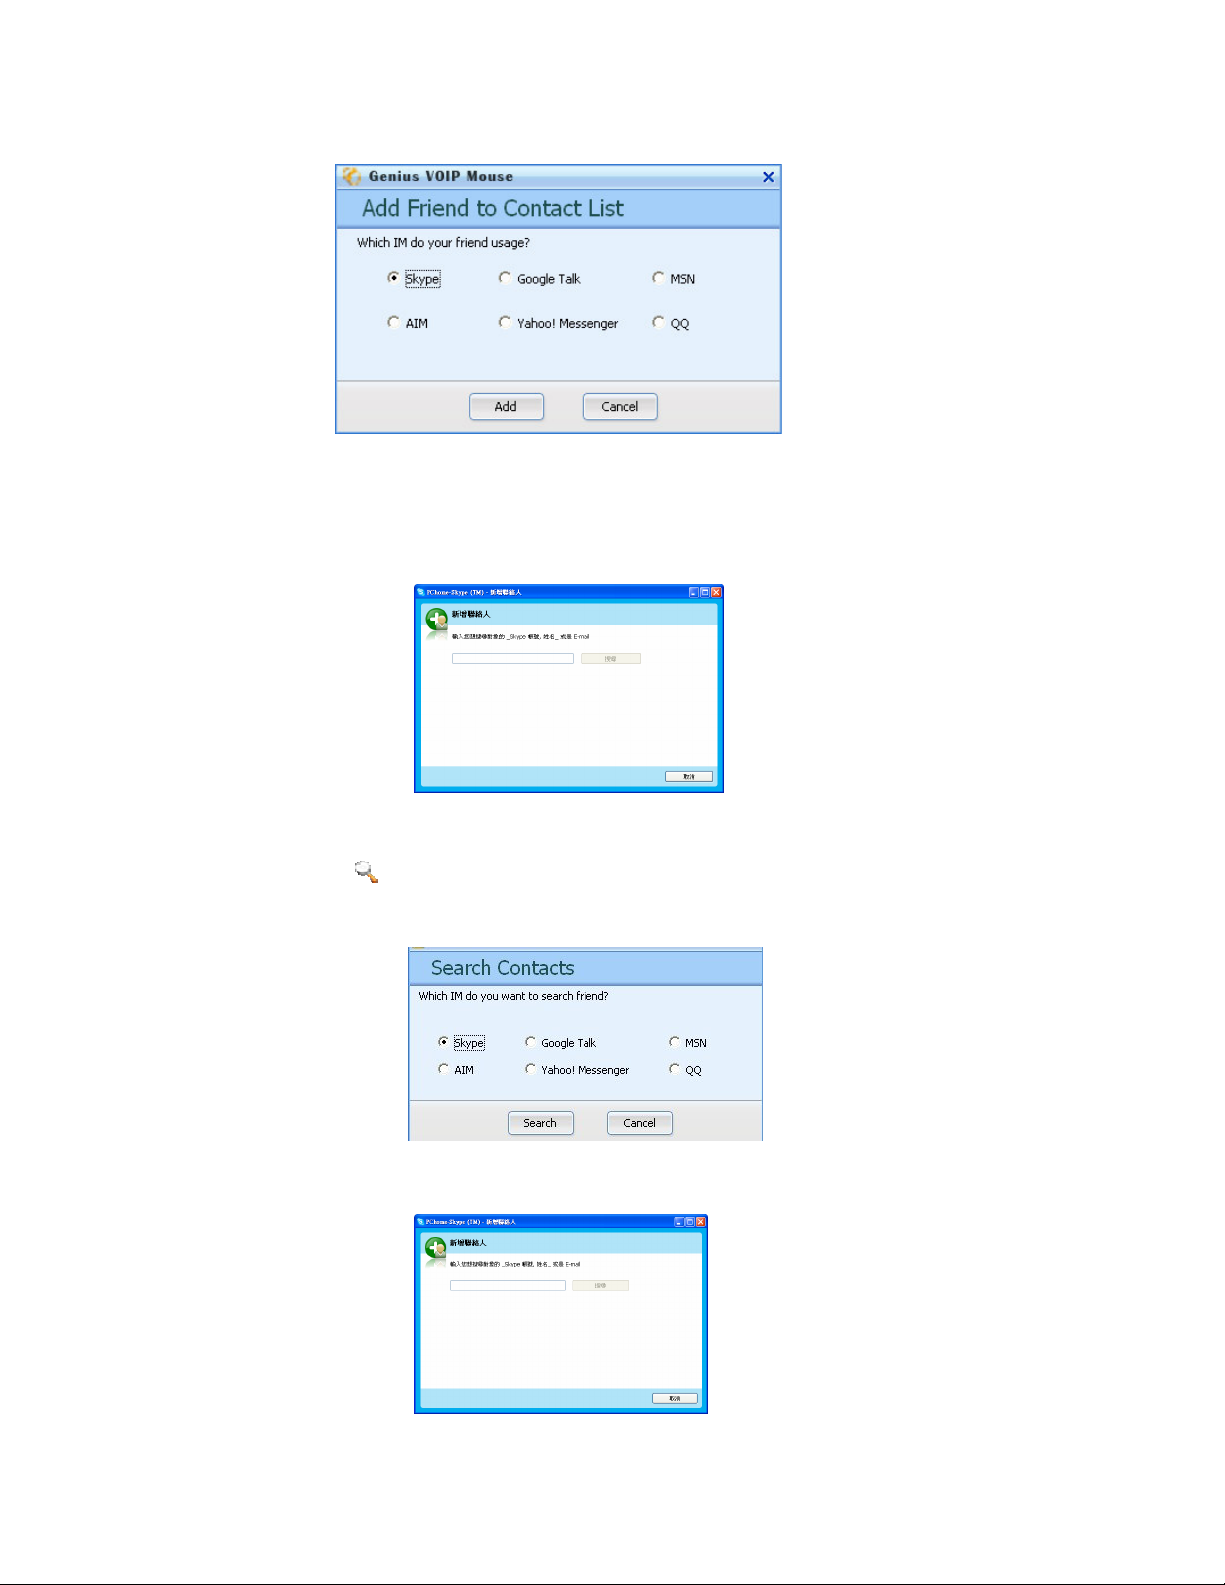
7.5 Add a new IM friend
Except IM itself, you can add a new IM friend in GENIUS VOIP MOUSE, too.
STEP-1: Click on the add icon.
STEP-2: A window will pop up to add a new contact friend.
Page 21
ENGLISH
21
STEP-3: Choose the IM you want to add the new friend and click add button.
STEP-4: It will link to this IM and popup the add/search contact window. (ex: Skype)
7.6 Search for a friend in the specific IM
STEP-1: Click the icon. The search contacts window will appear.
STEP-2: Choose the IM you want to search and click search button.
STEP-3: It will link to the IM and pop up its search window. (ex: Skype)
Page 22
ENGLISH
22
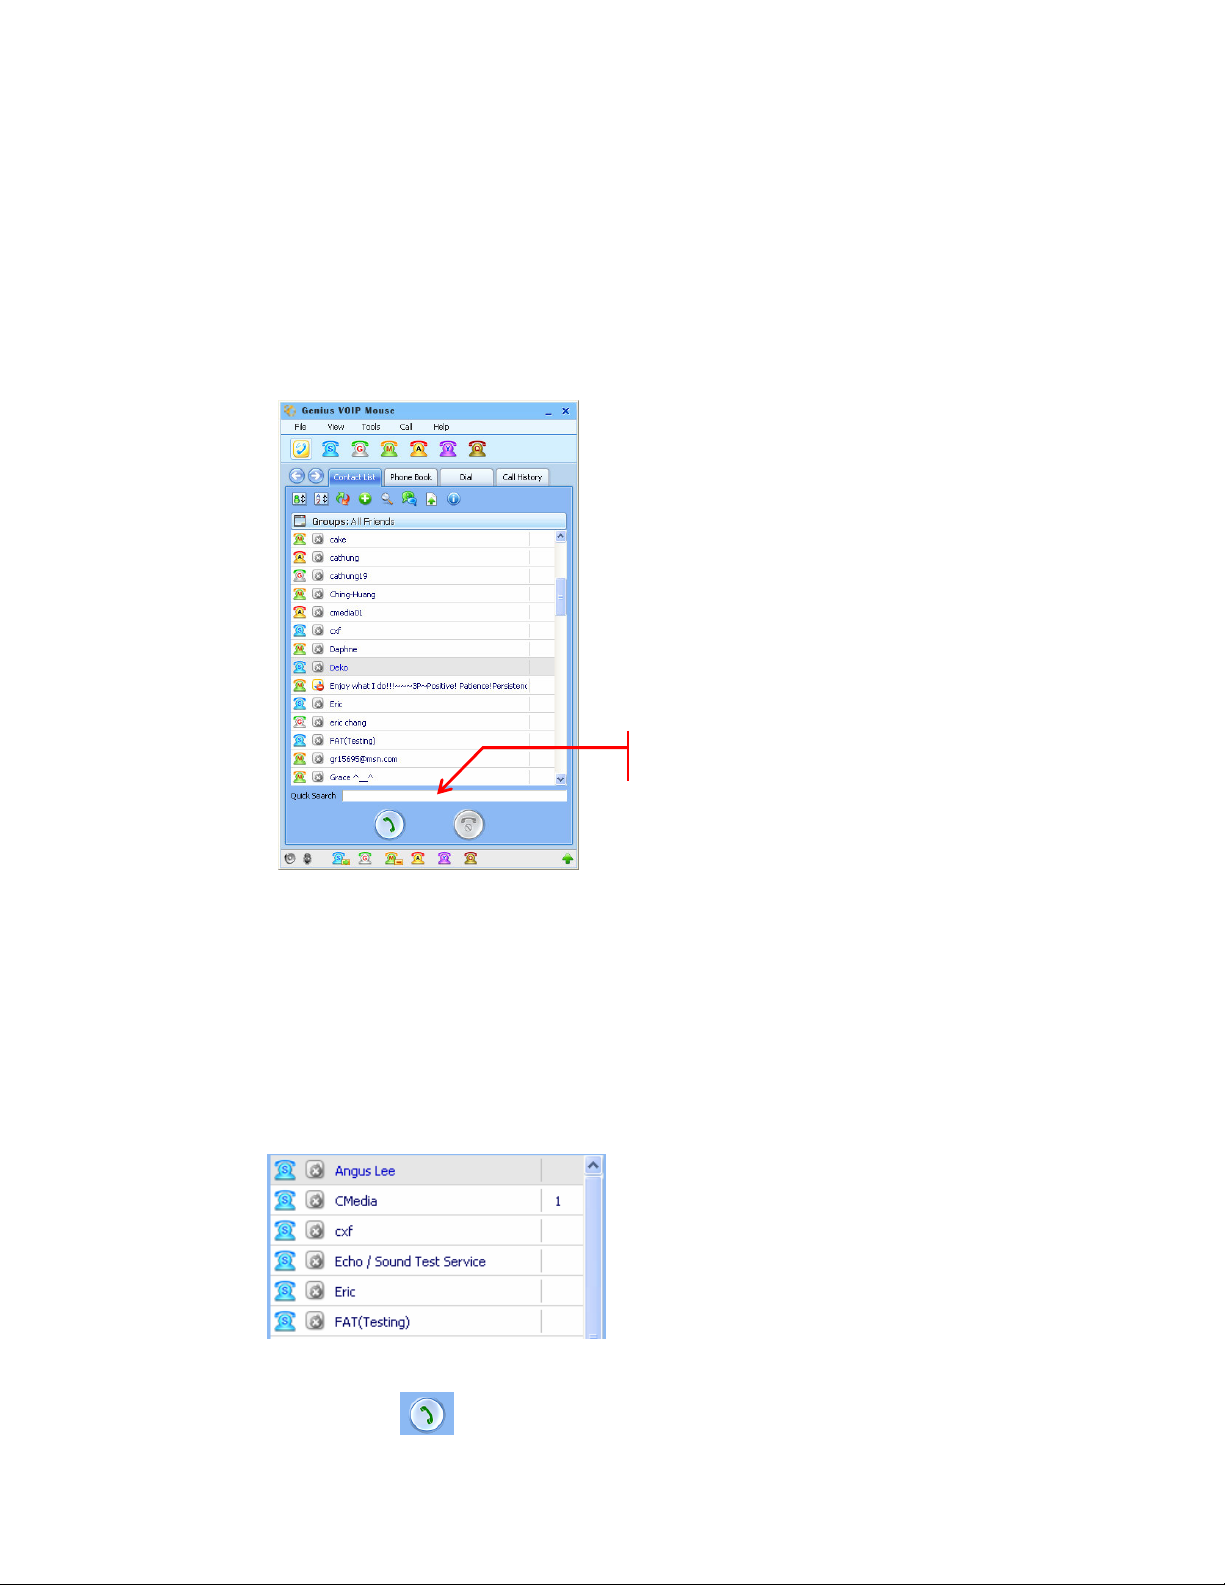
7.7 Quick Search for a friend in contact list
If you have many friends in your contact list, you can take advantage of the quick search
function by the following steps.
STEP-1: Type in the contact name in the quick search window.
STEP-2: The contact friend list will decrease with the characters you type in.
Key in the name in quick search
7.8 Make an IM phone call
You can make an IM phone call various ways.
[Approach-1]
STEP-1: Choose the contact in the contact list. The selected friend will be marked in grey.
STEP-2: Click on call button to make an IM phone call.
Page 23

ENGLISH
23
[Approach-2]
STEP-1: Choose the contact in the contact list. The chosen friend will be marked in grey.
STEP-2: Double click on the contact friend in contact list to make the IM phone call.
[Approach-3]
STEP-1: Choose the contact in the contact list. The chosen friend will be marked in grey.
STEP-2: Click the right button on the mouse.
STEP-3: Choose Call on the popup window to make the IM phone call.
7.9 Chat with your friends
You can chat with your friend in different ways.
[Approach-1]
STEP-1: Choose the contact in the contact list. The chosen friend will be marked in grey.
STEP-2: Click the right button on the mouse.
STEP-3: Choose Chat on the popup window to chat with your friend.
Page 24

24
[Approach-2]
STEP-1: Choose the contact in the contact list. The selected friend will be marked in grey.
STEP-2: Click icon to chat with your friend.
7.10 Send files to your friends
You can send files to your friend by various methods.
[Approach-1]
STEP-1: Choose the contact in the contact list. The chosen friend will be marked in grey.
STEP-2: Click the right button on the mouse.
ENGLISH
STEP-3: Choose Send Files on the popup window to send files to your friends.
[Approach-2]
STEP-1: Choose the contact in the contact list. The chosen friend will be marked in grey.
STEP-2: Click icon to send a file to your friend.
Page 25

ENGLISH
25
8. Active Call Function
The active call interface only shows up while the IM call is on going. This interface will
disappear when you hang up the IM call. After that, this call information will be recorded into
Call History dialog.
Active Call Icons Description of this icon
Answer or make a call
Hang up
Hold a IM call
Recoding the IM call
Page 26

ENGLISH
26
9. Phone Book
This function lets you manage the contact person information in detail in order to chat, call to
and send an e-mail to the friend quickly.
Function Icons in Phone Book Description of this icon
Sort the list (same as sort contact list)
Add a new IM friend to phone book
Chat with IM friend
Import contact to phone book
Send e-mail
Delete the contact from phone book
Information about the IM contact
Page 27

ENGLISH
27
9.1 Add a new friend to the phone book
STEP-1: Click [add] icon. Then, it will pop up the window for you to add a new friend to the
phone book.
STEP-2: Edit the information in the dialog box, then click [Add].
9.2 Import contact friends to the phone book
There are three methods to import contact information to the phone book.
STEP-1: Click to choose which method to import information to phone book.
STEP-2: It will pop up a window to import from IM, Outlook Express and vCAR file.
Page 28

28
Key in the n
ame in
quick
search
ENGLISH
9.3 Quick Search for a friend in Phone Book
If there are many contact friends in your phone book, you can use the quick search function.
STEP-1: Type in the contact name into quick search.
STEP-2: The whole contact friend list will decrease as you type in the characters.
Page 29

29
9.4 Communication with contact in phone book function dialog
All the communication approaches are same as that in contact list. You can refer to
sections7.7~7.10.
In addition, you can send e-mails to friends by the following steps.
STEP-1: Make sure the e-mail address is available in the phone book.
STEP-2: Click button to send e-mail.
ENGLISH
Page 30

ENGLISH
30
10. Call History
When the IM call ends, this call information will be recorded into the Call History dialog box.
10.1 Description on the icons in Call History
Icons Description
10.2 Make a Call in call history dialog
If you find any important missed calls in the call history, you can directly click on the contact
to make a call.
Sort the call history
Show all the call history
Show missed call history
Show incoming call history
Show outgoing call history
Delete the call information from call history
Page 31

31
11. Call Alert
If you do not take any action on the incoming call before your friend hangs up the call, the
GENIUS VOIP MOUSE software can support the call alert function and show a warning
message for a missed call automatically
The missing call alert will provide the names of the IM contact and how many times you
missed the IM call.
If the incoming call is missed over 3 times, the call alert will be listed in red.
ENGLISH
12. Online Update
You can go to the Genius website to update the GENIUS VOIP MOUSE software.
http://www.geniusnet.com
 Loading...