

Page 1

User’s Guide
Genius Scanner
All trademarks and brand names mentioned in this publication are
property of their respective owners.
2003 KYE Systems Corp. All rights reserved. No portion of this
document may be reproduced without permission.
Page 2

Table of Contents
INTRODUCTION ..................................................................................................... 1
How to Use This Guide.............................................................................................1
Conventions of this Guide.........................................................................................2
A Note about Icons ...................................................................................................2
System Requirements...............................................................................................2
Package Contents ....................................................................................................3
CHAPTER I. INSTALLING GENIUS SCANNER............................................................. 4
Software Requirements ............................................................................................4
Hardware Requirements ...........................................................................................4
Installing and Setting up the Scanner........................................................................5
Step 1. Hassle-Free Lock Mechanism................................................................................. 5
Step 2. Connecting the Genius Scanner to Your Computer................................................6
Step 3. Installing the Software.............................................................................................6
Software Setup Troubleshooting...............................................................................7
Installing Additional Software....................................................................................8
Uninstalling the Scanner...........................................................................................8
Uninstall from the “Start Menu” (Uninstall Wizard)................................................................ 8
Scanner Setup After Windows XP Upgrade..............................................................8
CHAPTER II. USAGE AND MAINTENANCE...............................................................10
Operating the Scanner............................................................................................10
Testing the Scanner................................................................................................10
Scan and Image Editing..........................................................................................11
Scanner Utility Program ..........................................................................................12
Connection Status............................................................................................................... 13
Aligning the Scanner........................................................................................................... 14
Lamp Control ...................................................................................................................... 14
Maintenance...........................................................................................................15
Removing the Document Cover..............................................................................15
APPENDIX A: SPECIFICATIONS............................................................................. 16
APPENDIX B: CUSTOMER SERVICE AND WARRANTY.............................................. 17
Statement of Limited Warrant y ...............................................................................17
FCC Radio Frequency Statement ...........................................................................18
CONTACTING GENIUS.......................................................................................... 20
Page 3

Introduction
Welcome to the world of Genius scanners, the ultimate in imaging. Your new
scanner will improve the professionalism of your day-to-day computing tasks by
allowing you to input images and electronic text into your computer system .
Like all of our products , your new scanner is thoroug hly tested and back ed by our
reputation for unsurpassed dependability and customer sat isfaction.
The last page of this user’s manual provides more information for contacting
Genius Service Center. Please feel fr ee to contact us or visit GeniusLife Homepage
(http://www.geniusnet .com .tw) for getting better service.
Thank you for choosing Genius Product. W e hope you will continue to turn to us
for additional quality products as your computing needs and interests grow.
How to Use This Guide
This User’s Guide provides instructions and illustrations on how to install and
operate your scanner. This guide assumes the user is familiar with the Microsoft
Windows XP/Me/2000/98. If this is not the case, we suggest you learn more about
Microsoft Windows by referring to your Microsoft W indows manual before using your
scanner.
The Introduction section of t his manual describes the box contents and minimum
computer requirements to use this scanner. Before you start installing your Genius
scanner, check the box contents to mak e sure all parts are included. If any item s are
damaged or missing, please contact the vendor where you purchased your scanner or
Genius’ customer service directly at one of the locations listed at the back of this
manual.
Chapter I describes how to install scanner’s software and connect the scanner t o
your computer.
Note: The scanner connects to your computer through the Universal Serial Bus
(USB). If your computer does not support USB technolog y, you will need to purchase
a USB interface card to add USB capabilities to your computer, or buy and install USB
connectors if your motherboard has USB capabilit ies. This guide assumes that your
computer is USB-ready and has a free USB port.
Chapter II describes how to test, maintain and clean your scanner. It also
describes how to use the Scanner Utility Program which helps you troubleshoot and fix
connection problems which may have occurred during the scanner installation.
Chapter III contains some basic descriptions on how to use your scanner. More
detailed descriptions can be found by using the Help function in the relevant scanner
programs.
Genius Scanner
1
Page 4

Appendix A contains the Specifications of this Genius scanner.
Appendix B contains Genius’ limited warranty agreement and FCC statement
concerning the product.
Conventions of this Guide
Bold — Important note or f irs t use of an important term in a chapt er .
ALL CAPS — Represents commands or contents on your computer screen.
A Note about Icons
This guide uses the following icons to point out informat ion that deserves special
attention.
Danger: A procedure that must be followed carefully to prevent injury,
Danger
or accidents.
Caution: Informat ion that, if not f ollowed, may result in dat a loss or
Caution
damage to the product.
Pay Special Attention: Instructions that are important t o r em ember
and may prevent mistakes.
Attention
1
System Requirements
! Windows/Intel Com pat ible Personal Computer
! Pentium II or above
! CD-ROM Drive
! 64 MB RAM (128 MB Recommended)
! 250 Free Hard Disk Space
! USB Port
! Microsoft™ Windows XP/Me/2000/98
NOTE: Windows NT 4.0 does not support Universal Serial Bus (USB) connectivity.
! Video card that supports 16-bit color or greater
1
Higher requirements might be needed when you scan or edit a large quantity of image data.
The system requirements herein are only a guideline, as in general the better the computer
(motherboard, processor, hard disk, RAM, video graphic card), the better the results.
Genius Scanner
2
Page 5

Package Contents
2
1. The Scanner
3
2. Power Adapter (18V, 800m A)
3. USB Cable
4. Quick Installation Guide
5. Setup / Applicat ion CD- ROM includes the following software applications
• Scanner Setup Program
• Genius TW AI N Program
• NewSoft Presto! PageManager (Photo Management Software)
• NewSoft Presto! ImageFolio ( I maging Editing Sof tware)
• NewSoft Presto! Mr. Photo (Web Photo Software)
• Bridgewell Page abc (Web Editing Software)
• ABBYY FineReader 5.0 Sprint (Text Recognition Software)
• Adobe Acrobat Reader (PDF Product Manuals Reading Program)
• This User’s Guide (Electronic Version)
4
2
Save the box and packing materials in case you need to transport this scanner in the future.
3
The scanner illustration(s) may appear different than from the actual scanner itself.
4
The bundled software may change at any time without prior notice.
Genius Scanner
3
Page 6

Chapter I.
Installing Genius Scanner
Before installing your scanner, please verify that you have all of the proper
components. A list of the pack age contents is provided in this guide.
Software Requirements
Your scanner comes with the software of NewSoft Presto! ImageFolio, ABBYY
FineReader, NewSoft Presto! PageManager, NewSof t Mr. Photo, Br idgewell Page abc,
Adobe Acrobat Reader, the scanner’s driver, Scanner Utility, and Genius TWAIN
Program. All of these software applications use approximat ely 160 megabytes of hard
disk space after t hey are installed into your computer. To ensur e ample room for t he
installation, as well as for scanning and saving images, a minimum of 250 meg abytes
of hard disk space is recommended.
Hardware Requirements
This scanner connects to your computer through the Universal Serial Bus (USB)
which supports hot Plug and Play. To determine whether your computer is USBcapable, you must check the rear of your PC to locate a USB jack that looks the same
as the one pictured below. Note that on some computers, the USB port at the rear of
the computer may be occupied and additional ports may be found on the monitor or
keyboard. If you are having trouble in locating t he USB port on your computer, please
refer to the hardware manual that cam e with your computer .
Upon examination, you should find one or two rectangular USB ports, which
usually appear as shown below.
Genius Scanner
4
Page 7
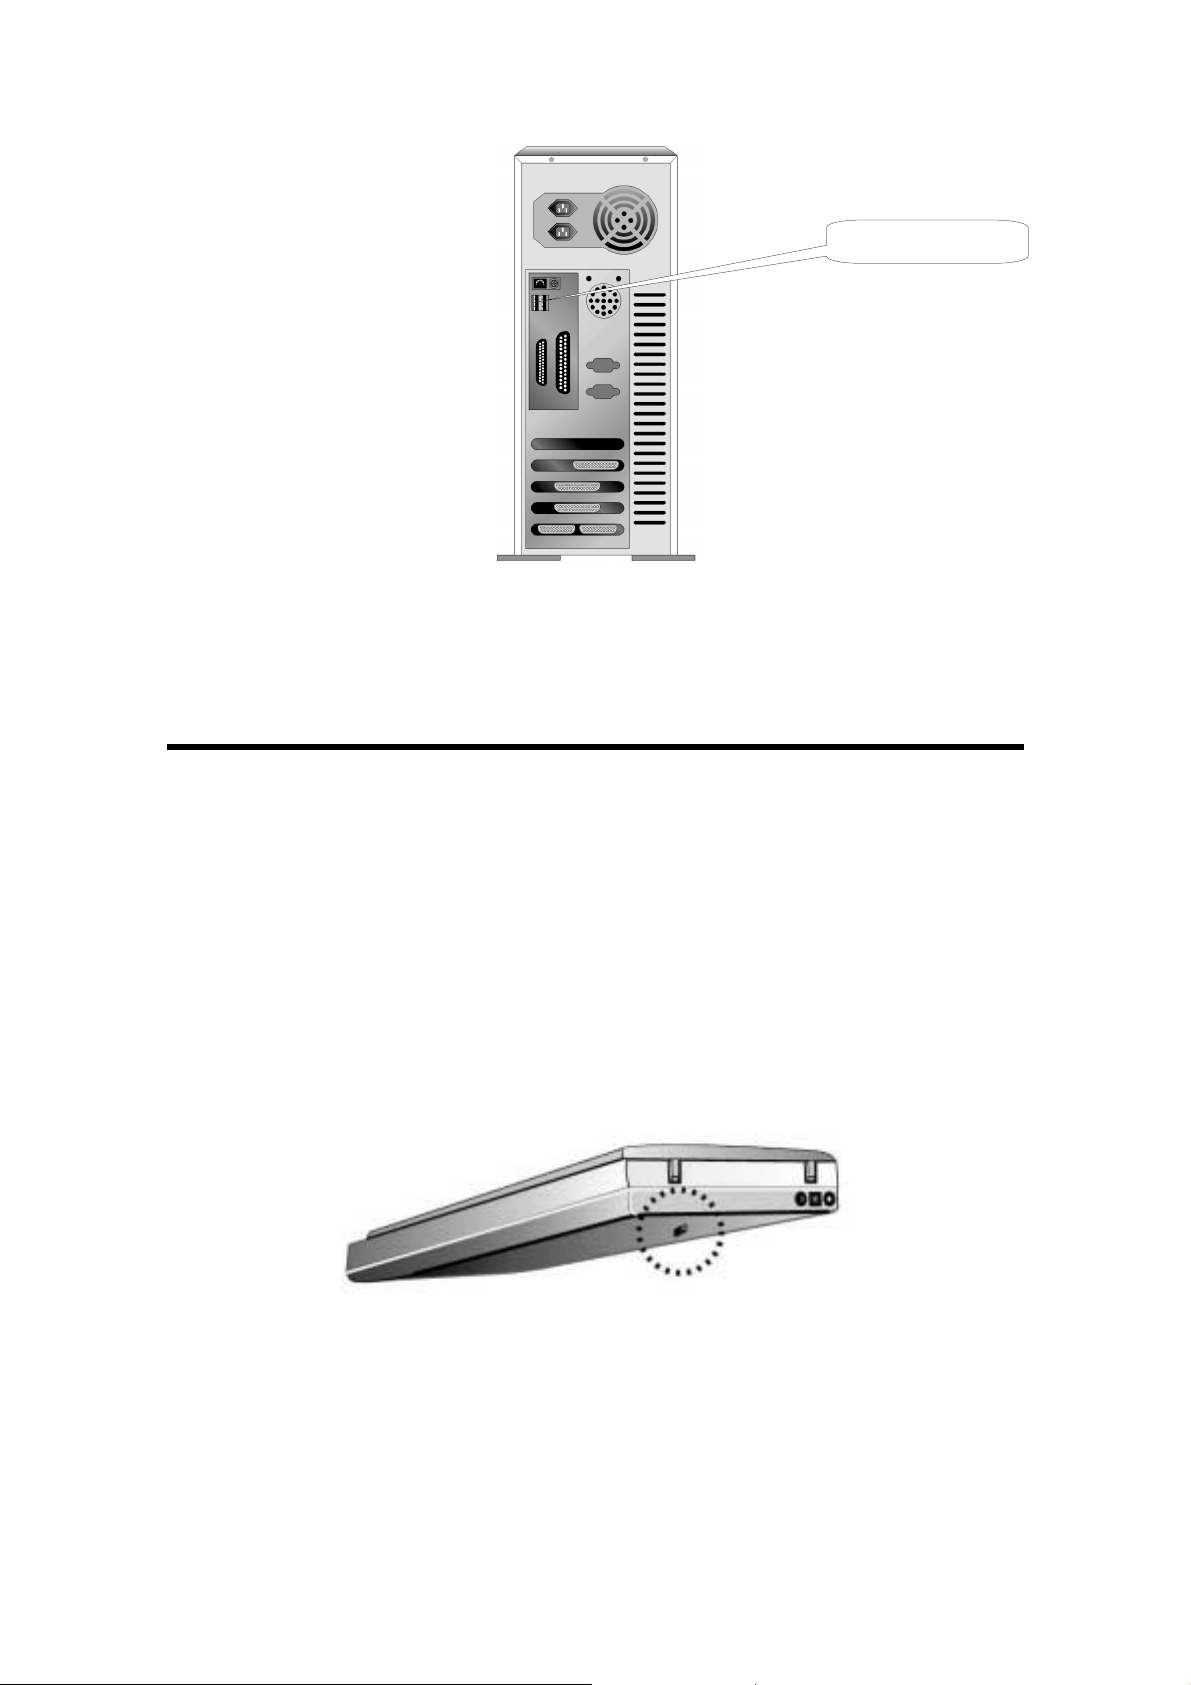
USB Connector(s)
If you don’t find such USB ports on your computer, then you need to purchase a
certified USB interf ace car d t o add USB capabilities to your computer.
Installing and Setting up the Scanner
SStteepp 11.. HHaassssllee--FFrreeee LLoocckk MMeecchhaanniissm
This scanner has an automatic locking mechanism to hold the scanning head in
place during transportation. When the locking switch (located on the scanner’s
underside) is pressed, it automat ically unlocks the scanning head; when not pressed, it
automatically locks up the scanning head again.
Always place your scanner on a flat and smooth surface before proceeding the
scanner setup or any scanning task.
Note: When you need to move the scanner, do keep the locking switch NOT
PRESSED to ensure accurate and problem-f r ee use of your scanner.
m
Genius Scanner
5
Page 8

SStteepp 22.. CCoonnnneeccttiinngg tthhee GGeenniiuuss SSccaannnneerr ttoo YYoouurr CCoommppuutteer
1. Plug the power adapter into the scanner’s power receptor.
2. Plug the other end of the power adapter into a standard AC power outlet.
3. Plug the square end of t he included USB cable to the USB port at the rear of
the scanner.
4. Plug the rectangular end of the USB cable to the USB port on the back of
your computer.
r
Note: If ther e is another USB device connected to the com puter, connect the
scanner to an available USB port.
5. If you plan to connect your scanner to a USB hub
connected to the USB port in your computer. Next, connect the scanner to
the USB hub.
Note: If you do not have a USB port available, you might need t o buy a USB
port.
SStteepp 33.. IInnssttaalllliinngg tthhee SSooffttwwaarre
1. If the USB components on your computer are functioning correctly, they will
automatically detect the scanner causing the “Add New Hardware W izard” or
“Found New Hardware Wizard” to be launched.
2. For Windows 98 & 2000
a. Click on the [Next] button when the “Add New Hardware Wizard”
window is displayed.
b. Select “SEARCH FOR THE BEST DRIVER FOR YOUR DEVICE
[RECOMMENDED]” and click on the [Next] button.
c. T he next window will ask you where to search to find the drive. Select
[CD-ROM drive], and deselect [Floppy disk drives] if it is checked.
e
5
, make sure that the hub is
5
The USB hub is not included with the scanner.
Genius Scanner
6
Page 9

d. Insert the Setup/Application CD-RO M, included with your scanner, into
your CD-ROM drive and then click on the [Next] button.
e. Click on the [Next] button in the window that appears. Af terwards, for
Windows 98 users, please skip t o St ep 4.
f. Windows 2000 users – During the process of the installation, a
message “Digital Signature required” might be prompted. Please
ignore it, and click on [Yes] to continue the installation without any
misgiving at your scanner functioning. Aft erwards, please skip to Step
4.
3. For Windows XP & Me
a. Insert the Setup/Application CD-RO M, included with your scanner, into
your CD-ROM drive.
b. Select “INSTALL THE SOFTWARE AUTOMATICALLY
[RECOMMENDED]” and click on the [Next] button.
c. Click on the [Next] button in the window that appears.
4. When the system com plet es the installation, click on the [Finish] button.
5. Follow the on-screen instructions to install all software that your new USB
scanner requires.
6. After the software is installed, close all open applications and click on the
[Finish] button to restart your computer.
If the scanner installation is not started and displayed
Attention
automatically on the screen, click START, select RUN and
type in “d:install” (where d: is the dr ive letter assigned to the
CD-ROM drive of your computer)
Software Setup Troubleshooting
Carefully review the steps outlined in this guide and the Quick Installation Guide
that accompanied your scanner.
If you are still having problems, please check t hat:
• You have 250MB of free space on your hard disk drive.
• The scanner is plugged in and has power.
• You are using the USB cable supplied with the scanner.
• The square end of the USB cable is plugged into the rear of the scanner .
• The rectangular end of the USB cable is plugged into the back of your
computer.
Genius Scanner
7
Page 10

If you deviated from the installation procedures defined in this manual, please
unplug the USB cable from the scanner and reinstall the software from the CD-ROM.
To reinstall your scanner’s software, click START, RUN, then type D:\Install (where D
represents the letter of your CD-ROM drive). Carefully follow all the installation
instructions presented in the Setup Wizard. Reboot your computer when prompted,
and plug the USB cable back into the scanner while your computer is st ill t urned on.
If you still need support, you can contact Genius at any office listed on the last
page of this guide during normal business hours in that area.
Installing Additional Software
Your scanner is TWAIN compliant and funct ions with virtually all available TW AIN
compatible program. If you purchase additional prog ram to be used with your scanner,
please make sure that it conf or ms to the T
Uninstalling the Scanner
WAIN standard.
Windows XP/Me/2000/98 provides an Uninstall Wizard for uninstalling your
scanner software driver and application program s:
UUnniinnssttaallll ffrroomm tthhee ““SSttaarrtt MMeennuu”” ((UUnniinnssttaallll WWiizzaarrdd)
1. From the Windows Start menu, select Programs, and t hen the model name of
the scanner you have installed.
2. From the drop-down menu, select Uninstall.
3. A window will pop up, asking you to confirm the deletion of the selected
application and all of its components. Click OK and the UninstallShield
program will run automatically and delete the scanner software driver.
4. Once completed, restart Windows.
Scanner Setup After Windows XP Upgrade
If you plan to upgrade your operating system from W indows 98 or Me to Windows
XP after having installed the scanner software, please follow the instructions below:
)
1. Unplug the scanner’s AC power adapter from the electrical outlet.
2. Unplug the scanner’s USB cable from t he r ear of the computer.
3. From the Windows START menu, click on “Programs” and then
“COLORPAGE-XXXX” (your scanner model name). In the pop-up menu that
Genius Scanner
8
Page 11

opens, click on “Uninstall Genius Scanner”. Follow the on-screen instructions
to remove all the scanner software.
4. After uninstallation completes, close all open applications and click the
“Finish” button to restart your comput er.
5. Start installing your Windows XP upgrade software by following Microsoft’s
related procedures.
6. When the Windows XP upgrade is done, re-install the scanner’s hardware
and software. Refer to the scanner setup quick guide f or details.
Genius Scanner
9
Page 12

Chapter II.
Usage and Maintenance
Operating the Scanner
Your scanner accepts documents as small as business cards and as large as
letter-sized documents. However, some software prog rams have limitations as to the
information they can handle. The capacity of the computer’s memory and f ree space
on your hard drive can also limit the physical size of the document that you scan.
Your scanner needs to be driven by some type of software program. Since all
documents or images (whether text or pictures) that ar e acquired f rom the scanner ar e
treated by your computer as images, most scanning will probably be done from an
image-editing program where you can view, edit, save and output the scanned images.
An image-editing program has been bundled with your scanner on the included
Setup/Application CD-ROM. It will allow you to alter and correct any scanned images
by using a variety of filters, tools and effects.
What about scanning text documents and editing them in a word processor? This
is the role of Optical Character Recognit ion (OCR) software. OCR software converts
the image files that are created from scanning text documents into text files that can be
viewed, edited and saved by word processors. An OCR program has also been
bundled on the included Setup/Application CD-ROM, and if you wish to use the
scanner in this way you should install the OCR software that is included.
Testing the Scanner
The following test procedure checks to see if the scanner is properly functioning
with your computer and the scanning progr am. Before test ing your scanner, check t o
make sure that all connections are securely f ast ened.
To properly test your scanner, please perfor m the following steps:
1. Open the scanner's document cover and place a picture onto the scanner
glass headfirst and face-down.
2. Gently close the document cover.
3. Next, open the scanner's image-editing program. Click on the Windows
START button and then PROGRAMS, PRESTO! IMAGEFOLIO, and then
PRESTO! IMAGEFOLIO.
Genius Scanner
10
Page 13

4. When Presto! I mageFolio opens, click on FILE and then SELECT SOURCE.
In the window that opens, choose the model name of the scanner you have
installed. Click on the SELECT button to close the window. This procedure
allows Presto! ImageFolio to gain access to t he scanner .
5. Within Presto! ImageFolio, click on FILE, ACQUIRE and then choose
ACQUIRE.
6. The Genius TWAIN window will open.
7. If an image appears on your screen, your scanner is work ing properly. If t he
image doesn’t appear to your liking , you might need to adjust some set tings
in the Genius TWAIN window. To learn how to adjust scanner settings,
please refer to the Genius Help by clicking the Help button in the Genius
TWAIN window.
Scan and Image Editing
1. Open the document cover. Place a picture headfirst and face down onto the
scanner glass and then close the document cover.
2. Open Presto! ImageFolio, and click on FILE, ACQUIRE, and then choose
ACQUIRE to open the Genius TWAIN window.
3. Select the appropriate scan mode and resolution, if desired. To proceed
scanning task, click the SCAN button from Genius TWAIN window.
4. When you complete the scanning task, click the CLOSE button to close the
Genius TWAIN window, and you may review the scanned image in Presto!
ImageFolio software.
Genius Scanner
11
Page 14

Scanner Utility Program
The Scanner Utility Program can help you get your new scanner up and running .
In addition, it contains a number of other features to help you tailor and control the
scanner.
Most significantly, the Scanner Utility Program checks to make sure that the
scanner software is properly installed and the scanner and computer are
communicating with each other.
Two other features of the Scanner Utility program are the scanning lamp
controls and the scanning position alignment utility. The Scanner Utility allows you
to turn the scanning lamp on and off, and define an idle time for the scanning lamp to
automatically turn itself off. Also, it allows you to define the exact position on the
scanning glass where scanning will begin. The scanner lock was designed to hold the
scanning lamp in place during shipping, but some refinement of the initial scanning
position may still be necessary.
Genius Scanner
12
Page 15

Turn Lamp
On/Off
Verify
Scan
Alignment
Window
Alignment
Position
The Scanner Utility program does NOT affect the quality of
scanned images. It is only used to establish a connection with
Attention
the scanner. Settings that aff ect the scanned image (i.e. , color,
size, readability, clarity, etc.) can be found in the scanner
software programs and especially the T WAIN inter face.
CCoonnnneeccttiioonn SSttaattuus
s
The first step to take when troubleshooting connection problems with your
scanner is to check all physical connections. Make sure your scanner is plugged in
and the USB cable is fit snugly into the rear of your scanner and computer.
Secondly, determine the status of your USB hardware and software configur ation.
To do this, please run the Scanner Utility program as described below:
1. Click on the START button, and then choose PROGRAMS, Genius Scanner
(the model name of your scanner) and t hen SCANNER UTILITY.
2. Once the Scanner Utility window is open, locate and click on the USB button
shown below:
This will check the status of your USB hardware and sof t ware configuration.
3. If there is a problem with the installat ion, the following message will appear:
Genius Scanner
13
Page 16

4. If the connection is OK, the following window will be displayed:
AAlliiggnniinngg tthhee SSccaannnneer
In most cases, the scanner doesn’t need to be aligned but there are instances
when the alignment might be req uired. You need to align t he scanner only if parts of
the scanned document are missing from any of its edges. For example, the heading of
a document might be missing f r om t he top edge after the document has been scanned.
To align the scanner, follow the st eps below:
1. Place a photograph on the top right side of the scanner glass (near the back
of the scanner). Please note that only part of the photograph will be scanned.
2. Click on the SCAN button
in the ALIGNMENT window.
3. Click on the ALIGN POSIT IO N butt ons unt il the top lef t corner of the scanned
photograph aligns with the top left corner of the preview window.
4. Click on the check mark button
completed.
r
. Part of the photograph will be displayed
when the alignment has been
LLaammpp CCoonnttrrool
The scanner’s lamp may be turned ON and OFF manually in the Scanner Utility
program. W hile there, you can also set a timer to turn the lamp off after the scanner
has been idle for a designated amount of time.
To do this, click on the Windows START button and choose PROGRAMS, Genius
Scanner (the model name of your scanner), SCANNER UTILITY. In t he window that
opens, find the Lamp Control section shown below:
Click on the On/Off switch at the far right of the section to im mediately turn the
scanning lamp on or off.
You may also set the default time for the lamp to automatically turn off after a
scan by clicking the up or down arrows next to the area that reads “minutes to turn off
lamp.”
l
Genius Scanner
14
Page 17

Caution
Maintenance
To keep your scanner working smoot hly, take a moment to review the following
maintenance tips.
• Avoid using the scanner in a dusty environment. W hen it is not in use, keep the scanner
covered. Dust particles and other foreign objects may damage the unit.
• Do not attempt to disassemble the scanner. There is danger of an electrical shock and
opening your scanner will void your warranty.
• Do not subject the scanner to excessive vibration. It may damage the internal components.
• Be sure not to bump or knock the scanner glass as it is fragile and could break.
• Clean the scanner glass by lightly spraying a non-abrasive glass cleaner onto a soft lint-free
cloth. Then, wipe the glass thoroughly with the cloth. DO NOT SPRAY CLEANER
DIRECTLY ONTO THE SCANNER GLASS. Excess liquid residue may fog or damage the
scanner.
• Your scanner operates best in temperatures between 10
Removing the Document Cover
° C to 40° C (50° F to 104° F).
The document cover has been designed for easy removal so that larger items,
such as bound books, can be placed on the scanner glass. To remove the cover,
open it all the way. Place your other hand f irmly at the back of the scanner and lif t the
document cover, separating it from the back of the scanner. To replace the cover,
simply slide it back into place.
Genius Scanner
15
Page 18

Appendix A:
Specifications
Genius ColorPage-Vivid 1200XE
Physical
dimensions
Weight 2.4 Kgs (5.29 Lbs)
Operating
Temperature
Max. Scan
Area
Scan Method Single-Pass
Scan Modes
Resolution Optical 1200 dpi (24000 dpi software interpolated)
Scaning
Materials
Protocols TWAIN Compliant
Connection USB Port
Lamp type Cold Cathode Lamp
Power adapter Power Output DC 18V, 800mA (Load)
Power
Consumption
EMI FCC Class B
456 x 272 x 62 mm
10° C to 40° C (50° F to 104° F)
Reflective: 8.5 x 11.69 in. (216 mm x 297 mm)
48 bit Color
8 bit Grayscale
1 bit Line-Art (Black & White)
Reflective color or black-and-white orig inals
Operation: 14.4 watts maximum
Idle: 4.5 watts
Genius Scanner
16
Page 19

Appendix B:
Customer Service and
Warranty
If you encounter problems with your scanner, please review the installation
instructions and troubleshooting sug gestions contained in this guide.
For further assistance call our customer support phone number listed on the last
page of this guide. To avoid any delay, please have the following information
available before calling:
• Scanner name and model number
• Scanner serial number (located at rear of scanner near port connectors)
• A detailed description of the problem
• Your computer manufacturer and its model number
• The speed of your CPU (Pentium 133, etc.)
• Your current operating system and BIOS (optional)
• Name of program package(s), version or release number and manufacturer of
the program
• Other USB devices installed
We are continuous ly enhancing the performance of our product drivers. T o check for the
updated device driver you may visit our W eb Site. (Please refer to the section of “Contacting
Genius” on the last page of this manual.)
Statement of Limited Warranty
This Statement of Limited Warranty applies only to the options you originally
purchase for your use, and not for r esale, from an authorized reseller.
If you transfer this product to another user, warranty service is available to that
user for the remainder of the warrant y period. You should give your proof of purchase
to that user.
We warrant t hat this machine will be in good working order and will conform t o its
functional descriptions in the documentation provided. Upon provision of proof of
purchase, replacement parts assume the r em aining warranty of the parts they replace.
Before presenting this product for warranty service, you must remove all
programs, data and removable storag e media. Products returned without progr am will
be replaced without program.
Genius Scanner
17
Page 20

This Limited Warranty service does not provide for carry-in exchange when the
problem results from accident, disaster, vandalism, misuse, abuse, unsuitable
environment, program modification, Electro Static Discharge (ESD) damage, another
machine or non-vendor modification for t his pr oduct.
If this product is an optional f eature, this Limited W arranty applies only when the
feature is used in a machine for which it was designed.
If you have any questions about your Limited Warranty, contact Genius.
THIS LIMITED W ARRANT Y REPLACES ALL OTHER WARRANTIES, EXPRESS
OR IMPLIED, INCLUDING, BUT NOT LIMITED TO , T HE IMPLIED W ARRANTI ES OF
MERCHANTABLITY AND FITNESS FOR A PARTICULAR PURPOSE. HOWEVER,
SOME LAWS DO NOT ALLOW THE EXCLUSION OF IMPLIED WARRANTIES. IF
THESE LAWS APPLY, THEN ALL EXPRESS AND IMPLIED WARRANTIES ARE
LIMITED IN DURATION TO THE WARRANTY PERIOD. NO OTHER WARRANTI ES
APPLY AFTER THAT PERIOD.
Some jurisdictions do not allow limitations on how long an implied warranty lasts,
so the above limitation may not apply.
Under no circumstances are we liable for any of the following:
1. Third party claims against you for losses or damages.
2. Loss of, or damage to, your recor ds or data; or
3. Economic consequential damages (including lost prof its or savings) or
incidental damages, even if we are infor m ed of their possibility.
Some jurisdictions do not allow the exclusion or limitations of incidental or
consequential damages, so the above limitat ion or exclusion may not apply to you.
This Limited Warranty gives you specific legal rights, and you may also have
other rights that vary from jurisdiction to jurisdiction.
FCC Radio Frequency Statement
This equipment has been tested and f ound to comply with the limits f or a Class B
digital device, pursuant to part 15 of the FCC rules. These limits are designed to
provide reasonable protection against harmful interference in a residential installation.
This equipment generates, uses and can radiate radio frequency energy and, if
not installed and used in accordance with the instructions, may cause harmful
interference to radio communications. However, there is no guarantee t hat inter f erence
will not occur in a particular television reception (which can be determined by turning
the equipment off and on), t he user is encouraged to try to correct the interf erence by
one or more of the following measures:
√ Reorient or relocate the receiving antenna.
√ Increase the separation between the equipment and receiver.
Genius Scanner
18
Page 21

√ Connect the equipment to an outlet on a circ uit diff erent fr om that which the receiver
is connected.
√ Shielded interconnect cables and shielded power cord which are supplied with this
equipment must be employed with this equipment to ensure compliance with the
pertinent RF emission limits governing t his device.
√ Consult the dealer or an experienced radio/T V technician for help if the conditions
persist.
√ Changes or modifications not expressly approved by the manuf acturer or aut horized
service center could void the users authority to operate this eq uipm ent .
Genius Scanner
19
Page 22

Contacting Genius
USA & Canada Europe
KYE International Corp.
Latin America
Suite 110, 8400 NW 25th St.,
Miami, FLORIDA 33162, U.S.A.
Tel: 305-468-9250
Fax:305-468-9251
W eb Site: http://www.ge nius-kye.com
Europe Asia Pacific
KYE Systems UK Ltd.
Unit 4, 131 Beddington Lane,
Croydon, Surrey. CR0 4TD, UK
Tel: (44) 208 664 2727 (sales)
(44) 208 664 2739 (Tech.
Support)
Fax:(44) 208 664 2721(sales)
(44) 208 664 2740(Tech. Support)
Web Site: http://www.kye.co.uk
KYE Systems Europe GmbH
Karl Benz Str. 9
D-40764 Langenfeld, Germany
Tel: (49) 21 73 9743-44
Fax:(49) 21 73-9743-17
Web Site: genius@kye.me.uunet.de
KYE Systems H.K. Corp. Ltd.
Unit 01, 17th Floor, Aitken Vanson Centre,
No.61 Hoi Yuen Road, Kwun Tong,
Kowloon, Hong Kong
Tel: (852)2342 3813
Fax:(852)2341 9517
Web Site: http://www.g eniusnet .com.hk
Asia Pacific Asia Pacific
KYE Systems Corp.
No.492, Sec. 5, Chung Hsin Rd., San
Chung, Taipei Hsien, 241, Taiwan,
R.O.C.
Tel: (886) 2 2995-6645
Fax:(886) 2 2995-6649
Web site: http://www.geniusnet .com.tw
Genius Scanner
KYE Systems (M) SDN BHD
NO. 2, Jalan BK 1/12, Kinrara Industrial
Park
Bandar Kinrara, 6 1/2 Miles, Jalan
Puchong,
58200 Kuala Lumpur, Malaysia
Tel: (603) 575 1355
Fax:(603) 575 6362 / 6962
Web site: sales_kye@kye-
systems.com.my
20
 Loading...