

Page 1

English
-i-
WEEE Warning Message
Symbol for Separate Collection in European Countries
This symbol indicates that this product is to be collected separately.
The following apply only to users in European countries:
z This product is designat ed f or sepa rate c ollecti on at an appro priat e colle ction po int. Do
not dispose of as household waste.
z For more information, contact the retailer or the local authorities in charge of waste
management.
FCC STATEMENT
This device complies with Part 15 of the FCC Rules. Operation is subject to the following two conditions:
(1). This device may not ca use harmful interf erence, and
(2). This device must accept any interference received, including interference that may cause undesired
operation.
Note:
This equipment has been tested and found to co mply with th e limits for Cla ss B digital devices, pursuant to Pa rt
15 of the FCC rules. These limits are designe d to pr ovide reasonable protection against harmful interference i n a
residential installation. This equipment generates uses and can radiate radio frequency energy and, if not
installed and used in accordance with the instructions, may cause harmful interference to radio communications.
However, there is no guarantee that interference will not occur in a particular installation. If this equipment does
cause harmful interference to radio or television recept ion, which can be determined by turning the equipment off
and on, the user is encouraged to try to correct the interference by one or more of the following measures:
Reorient or relocate the receiving antenna
Increase the separation between the equipment and receiver
Connect the equipment into an outlet on a circuit different from that to which the receiver is connected
Use of shielded cable is required to comply with Class B limits in Subpart B of Part 15 of the FCC rules.
Do not make any changes or modifications to the equipment unless otherwise specified in the manual. If such
Page 2

English
-ii-
changes or modifications should be made , y ou could be required to stop operation of the equi pme nt.
Product Information
1. Product design and specifications are subject to change without notice. This includes primary product
specifications, softw are, software drivers, and user’s manu al. Thi s Us er Manu al is a ge neral reference guide
for the product.
2. The product and accessor ies th at come w ith y our camera m ay be dif fere nt from tho se desc ribed in t his man ual.
This is due to the fact that different retailers often specify slightly different product inclusions and accessories
to suit their market requirements, customer demographics, and geographical preferences. Products very often
vary between retailers especially with accessories such as batteries, memory cards, cables, carrying
cases/pouches, and lan gu ag e su pport. Occasionally a retailer will specify a uniqu e product color, appearan ce,
and internal memory capacity. Contact your dealer for precise product definition and included accessories.
3. The illustrations in this manual are for the pur po se o f explanation and may differ f rom the actual design o f your
camera.
4. The manufacturer assumes no liability for any errors or discrepancies in this user manual.
5. For driver updates, you can check the “Download” section of our website, www.geniusnet.com
SAFETY INSTRUCTIONS
Read and understand all Warnings and Cautions before using this product .
Warnings
If foreign objects or water have entered the camera, turn the power OFF and remove the batteries.
Continued use in this state might cause fire or electric shock. Consult the stor e of pu rc has e.
If the camera has fallen or its case has been damaged, turn the power OFF and remove the
batteries.
Continued use in this state might cause fire or electric shock. Consult the stor e of pu rc has e
Do not disassemble, change or repair the camera.
This might cause fire or electric shock. For repair or internal inspection, ask the store of purchase.
Do not use the camera in areas near water.
This might cause fire or electric shock. Take special care during rain, snow, on the beach, or near
the shore.
Do not place the camera on inclined or unstable surfaces.
This might cause the camera to fall or tilt over, causing injury.
Page 3

English
-iii-
Keep the batteries out of the reach of children.
Swallowing batteries might cause poisoning. If the battery is accidentally swallowed, immediately
consult a physician.
Do not use the camera while you are walking, driving or riding a motorcycle.
This might cause you to fall over or result in traffic accident.
Cautions
Insert the batteries paying careful attention to the polarity (+ or –) of the terminals.
Inserting the batteries with its polarities inverted might cause fire and injury, or damage to the
surrounding areas due to the battery rupturing or leaking.
Do not fire the flash close to anyone’s eyes.
This might cause damage to the person’s eyesight.
Do not subject the LCD monitor to impact.
This might damage the glass on the screen or cause the internal fluid to leak. If the internal fluid
enters your eyes or comes into contact with your body or clothes, rinse with fresh water.
If the internal fluid has entered your eyes, consult a physician to receive treatment.
A camera is a precision instrument. Do not drop it, strike it or use excessive force when handling the
camera.
This might cause damage to the camera.
Do not use the camera in humid, steamy, smoky, or dusty places.
This might cause fire or electric shoc k.
Do not remove the battery immediately after long period of continuous use.
The battery becomes hot during use. Touching a hot battery might cause burns.
Do not wrap the camera or place it in cloth or blankets.
This might cause heat to build up and deform the case, resulting in fire. Use the camera in a
well-ventilated place.
Do not leave the camera in p lace s w here t he tem pe rature may rise signi f icantly , su ch as in side a car.
This might adversely affect the case or the parts inside, resulting in fire.
Before you move the camera, disconnect cords and cables.
Failure to do this might damage cords and cable s, re s ulting in fire and electric shock.
Notes on Battery Usage
When you use the battery, carefully read and strictly observe the Safety Instructions and the notes described
below:
Different battery types and surrounding temperatures may affect the battery performance.
Page 4

English
-iv-
Avoid using batteries in extremely cold environments as low temperatures ca n shorten the battery life and
reduce camera performance.
The battery may feel warm when using the camera for an extended period of time or using the flash
continuously. This is normal and not a malfunction.
The digital video camera may feel warm w hen bei ng used continu ously or for an extende d peri od of time. T his
is normal and not a malfunction.
If you will not be using the batteries for an extended period of time, remove them from the camera to prevent
leakage or corrosion.
Always keep the terminals in a clean state.
Never use manganese batteries.
Risk of explosion if battery is replaced by an incorrect type.
Dispose of used batte ries according to the instructions.
Page 5

i
Table of Contents
Introduction ............................................................................................... 1
System Requirements ............................................................................................. 1
Main Features ......................................................................................................... 1
Package Contents .............. ... ... ... ... .... ............................. ... ... ............................. .... . 2
Camera Views ................ .... ... ... ... ............................. .... ... ............................. ... ... .... . 3
Camera Buttons .................................... ............................. ... ... .... ........................... 5
Navigation Control ................................................................................................... 5
Camera Memory ...... ... ............................. ... .... ... ............................. ... ... .................. 7
Getting Started .......................................................................................... 8
Attaching the Wrist Strap ........................................................................................ 8
Inserting the Battery ................................................................................................ 8
Inserting an SD/SDHC Memory Card ..................................................................... 9
Charging the Battery ............................................................................................. 10
Turning the Power On and Off .............................................................................. 10
Initial Settings ........................................................................................................ 10
Modes ................................................................................................................... 11
Using the LCD Monitor ........................................................................... 13
LCD Monitor Layout . ... ... .... ... ... ... ... .............................. ... ... ... ............................. ... 13
Recording Photos, Videos and Voices ................................................. 22
Taking Photos ....................................................................................................... 22
Using the Stabilizer ............................................................................................... 22
Setting the Zoom Control ...................................................................................... 23
Using Flash ........................................................................................................... 24
Setting the Focus Mode ........................................................................................ 25
Using the Function Menu ...................................................................................... 26
Using the Record Menu ........................................................................................ 32
Page 6

ii
Recording Movies .... ... ... ....................................................................................... 51
Recording Voices ........................... .............................. ... ... ............................. ... ... 53
Playback .................................................................................................. 54
Viewing in Single Navigation .................... ... .... ...... ... .... ... ... ... ... .... ... ... ... .... ... ... ... ... 54
Viewing thumbnails ............................................................................................... 54
Zooming images .................................................................................................... 56
Playing Movies ............................... .............................. ... ... ... ............................. ... 56
Playing Voice Recording .......................... ... .... ............................. ... ... ... ................ 58
Playing Voice Memo ... ... ............................. .... ... ... ... ............................. .... ... ... ...... 58
Deleting an Image/Video/Audio ............................................................................. 59
Playback Menu ...................................................................................................... 60
Using the Setup Menu ............................................................................ 75
Setting Sounds ...................................................................................................... 75
Setting Power Save ............................................................................................... 76
Setting LCD Save .................................................................................................. 76
Setting Date & Time .............................................................................................. 77
Setting Language .................................................................................................. 77
Setting File Numbering .......................................................................................... 77
Setting TV Out ....................................................................................................... 78
Setting LCD Brightness ......................................................................................... 78
Setting Battery Type .............................................................................................. 78
Setting Memory Kit ................................................................................................ 79
Reset All ................... ... ... .... ... ... ............................. ... .... ............................. ... ... ... ... 79
Making Connections ............................................................................... 80
Connecting the Camera to a TV ............................ ... .... ... ... ... ... .... ... ... ... .... ...... ... ... 80
Connecting the Camera a PC ............................................................................... 80
Connecting the Camera to a Printer ............................. ... ... ... ... ....... ... ... .... ... ... ... ... 81
Appendix .................................................................................................. 82
About Folder and File Names ............................................................................... 82
Troubleshooting ...................................................................................... 83
Specifications .......................................................................................... 85
Page 7

1
Introduction
Congratulations on the purchase of your new digital camera. This manual provides step-by-step
instructions on how to use your camera, and is intended for your reference only.
System Requirements
In order to get the most out of your camera, your computer must meet the following system
requirements:
For Windows:
• Windows 2000/XP/Vista
• Processor: Pentium II 450MHz or above
• Memory: 512MB or above
• HDD space: 200 MB or above
• 16bit color display monitor
• Microsoft DirectX 9.0C
• USB port and CD-ROM drive
For Macintosh:
• Power Mac G3 or later
• Mac OS 10.0-10.4
• Memory: 64MB or above
• HDD space: 110MB or above
• USB port and CD-ROM drive
Main Features
• 12 mega pixels resolution
• Up to 3x optical zoom and 5x digital zoom
• 1/2.3 inch CCD image sensor
• 2.7 inch color LCD monitor
• 32MB internal flash memory with optional external SD/SDHC card
• Supports up to 4GB of SD card, and up to 32GB of SDHC card
• Sleek metallic finish
• Easy-to-use button interface
• DCF, DPOF, PictBridge compatibility
Page 8

2
• Slideshow feature to review your pictures and movies
• A/V output to view your pictures and movies on your TV
• USB port to transfer photos and movies to your PC
Package Contents
Please check the contents of your camera package. It should contain:
Digital camera AA battery x 2 pcs
Battery charger
(optional)
Wrist strap USB cable AV cable (optional)
CD-ROM Quick Start Guide/
User Manual (optional)
Camera pouch (optional)
Page 9
3
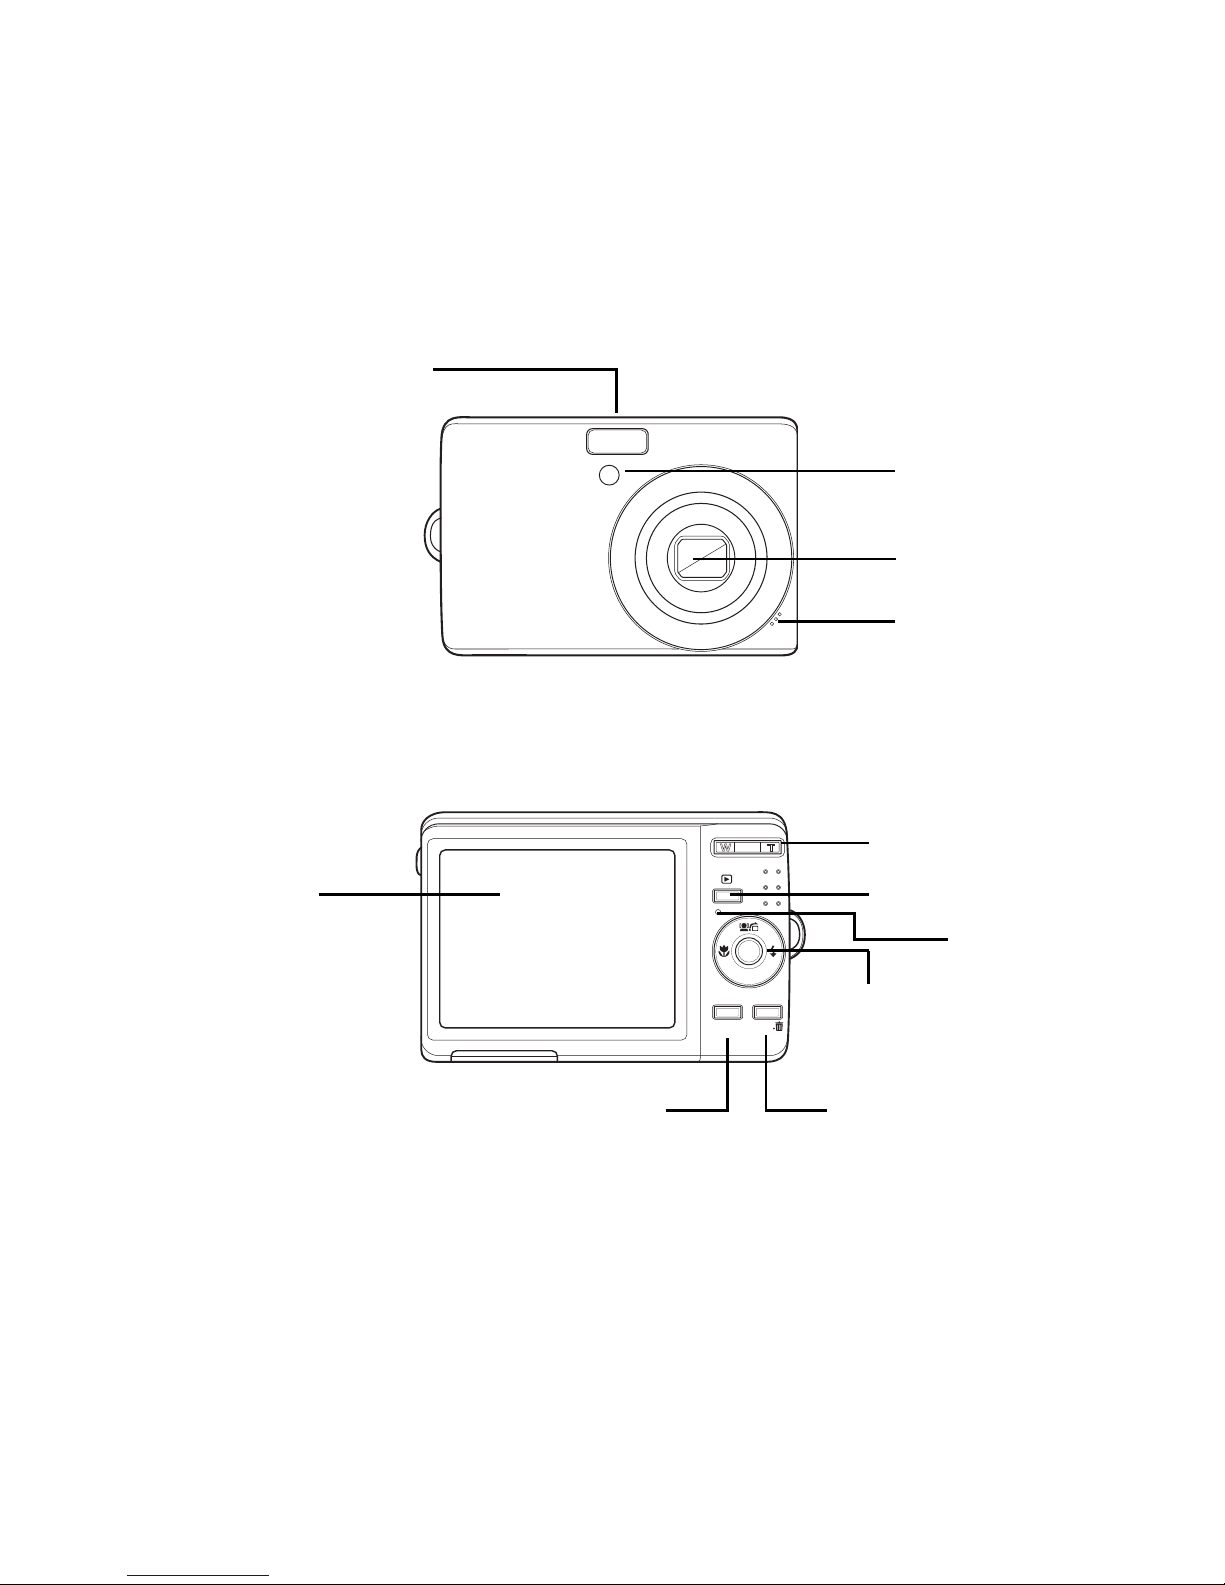
Camera Views
Front View
Back View
Flash
Zoom Lens
Self-timer LED / AF
Assist Lamp
Microphone
MENU
FUNC
DISP
SET
Zoom buttons
Play button
LCD screen
Menu button
SET button / 4-way
navigation control
Function / Delete button
LED indicator
Page 10
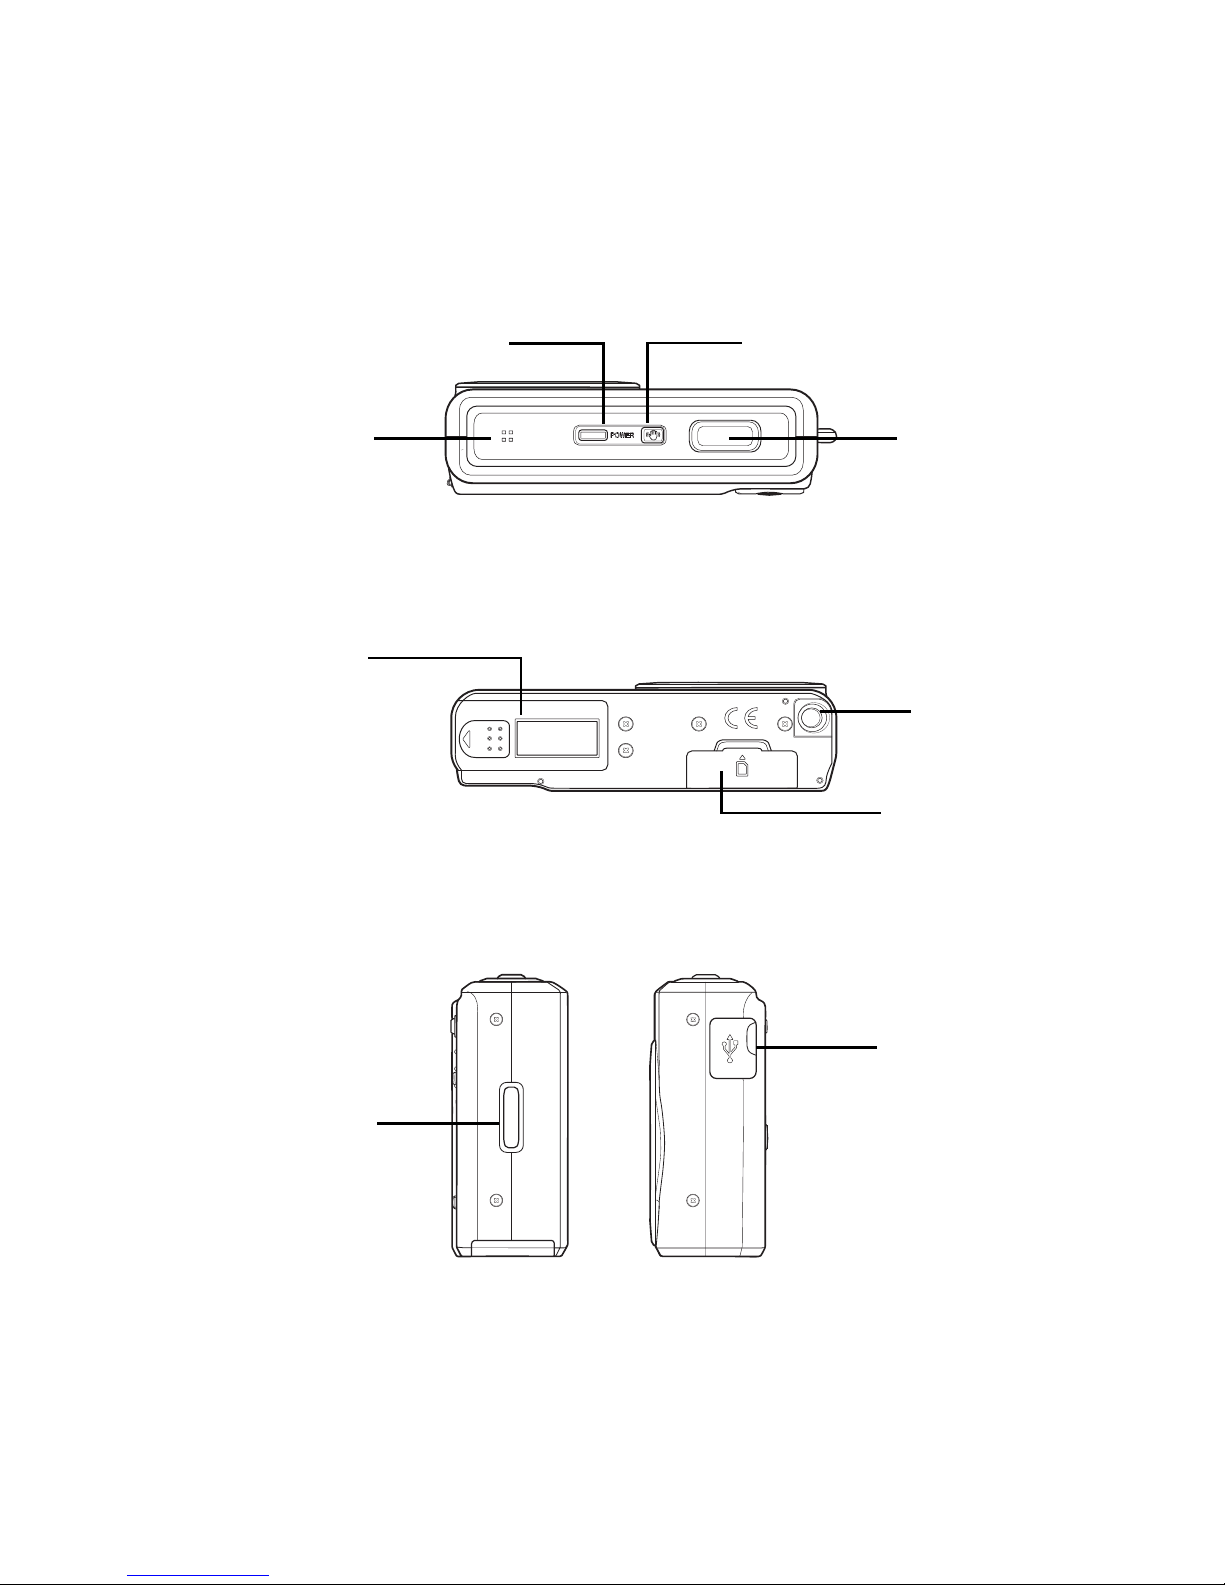
4
Top V i ew
Bottom View
Left/Right View
Stabilizer button
Shutter button
Power button
Speaker
OPEN
Battery compartment
Tripod screw hole
SD card compartment
Strap ring
USB / TV Out
Page 11

5
Camera Buttons
Your camera is equipped with different buttons for ease of use.
Navigation Control
The 4-way Navigation Control and the SET button allows you to access the various menus
available from the On Screen Display (OSD). You can configure a wide range of settings to
ensure maximum results from your photos and videos. Further functions of these buttons are as
follows:
Button Description
Power Press to turn on/off the power.
Stabilizer The stabilizer sets the optimal ISO value according to light levels to compensate for
camera shake.
Press to set stabilizer on/off.
Shutter Press to capture an image or start/stop recording video or audio clip.
Play If the camera is turned off, press and hold to turn on camera in Playback mode.
If the camera is turned on, press to toggle camera to Playback or Record mode.
Zoom Press the zoom buttons to change zoom focus.
Menu Press to enter menu.
Function/
Delete
In Record mode, press to enter function menu.
In Playback mode, press to delete an image, video or audio clip.
Page 12

6
Button Usage
SET 1. Confirm a selection when using the OSD menus.
Flash/ Right
1. In Record mode, press to scroll through the flash mode options. (Auto, Anti
Red-eye, Fill, Slow Sync and Off)
2. In Playback mode, press to view the next image, video or audio clip.
3. In Playback Video mode, press to fast forward video playback
4. In Menu, press to enter the submenu or to navigate through the menu
selections.
Macro/ Left
1. In Record mode, press to turn on/off Macro.
2. In Playback mode, press to view the previous image, video or audio clip.
3. In Playback Video mode, press to retract video playback
4. In Menu, press to exit a submenu or to navigate through the menu
selections.
Up/Face
Tracking/
Rotate
1. In Menu, press to navigate through the menu and submenu selections.
2. In Record mode, press to turn the face tracking function on and off.
3. In Playback Video/ Audio mode, press to Start/Pause video or audio
playback.
4. In Playback photo mode, press to rotate the image clockwise 90 degrees by
each press of the button. This feature is applicable for still images only.
Flash Button
Macro Button
SET Button
Face Tracking/
Rotate Button
Display Button
SET
DISP
Page 13

7
Camera Memory
Internal memory
Your camera is equipped with 32MB of internal memory. Users can store images up to 12MB. If
there is no memory card inserted in the memory card slot, all images, videos and audio clips
recorded are automatically stored in the internal memory.
External storage
Your camera supports SD cards of up to 4GB in size. It also supports SDHC cards with a
maximum capacity of 32GB. If there is a storage card inserted in the memory slot, the camera
automatically saves all images, videos and audio clips in the external storage card. The
icon indicates the camera is using SD card.
Not all cards may be compatible with your camera. When purchasing a card,
please check the card's specifications and take the camera with you.
Display/Down
1. In Playback mode, press to change the LCD screen display to show or hide
OSD icons.
2. In Record mode, press to change LCD screen display to show or hide OSD
icons and guide lines.
3. In Menu, press to navigate through the menu and submenu selections.
4. In Playback Video/ Audio mode, press to stop video/audio playback.
Button Usage
Warning
Page 14

8
Getting Started
Attaching the Wrist Strap
Follow these instructions to attach the wrist strap to your
camera to facilitate easy carrying:
1. Insert the short loop of the strap in the strap eyelet.
2. Thread the larger loop of the strap though the short loop
and pull tight to attach the strap to the camera.
Inserting the Battery
Follow these instructions to insert the AA batteries into the battery compartment. Please read
"Battery Information” on page iv before inserting/removing batteries.
1. Make sure the power is off before inserting the batteries.
2. Open the battery compartment at
the bottom of the camera.
3. Insert the batteries into the compartment with the
terminal facing inside the camera and the battery indent
next to the compartment door.
DISP
SET
MENU
FUNC
.
DISP
SET
OPENOPEN
DISP
SET
DISP
SET
Page 15

9
4. Close the battery compartment.
Inserting an SD/SDHC Memory Card
Expand your camera’s storage by using SD or SDHC
memory cards.
1. Open the SD card compartment at the bottom of
the camera.
2. Insert the SD/SDHC card into the memory card
slot with the metallic part facing the front side of
the camera.
3. Push the SD/SDHC card into the memory slot until
it clicks into place.
4. Close the SD card compartment.
To remove the SD/SDHC card
1. Open the battery compartment.
2. Gently push the card until it pops out.
3. Pull out the card carefully.
DISP
SET
OPEN
DISP
SET
OPEN
DISP
SET
OPENOPEN
DISP
SET
OPENOPEN
DISP
SET
OPENOPEN
Page 16

10
Charging the Battery
The battery that comes along with your package is not charged.
You need to charge the battery before using the camera.
1. Insert the battery into the battery charger as shown.
2. Plug the battery charger to the main outlet.
The battery charging time is 2 hours.
Turning the Power On and Off
There are two ways to turn on the camera:
• The start up image displays briefly and the startup sound
plays if enabled. The zoom lens extends and the camera is turned on in Record mode.
• The camera is turned on in Playback mode. The zoom lens are not extended.
To turn off the camera, press the Power button.
See "Modes” on page 11 to know more about Record and Playback mode.
Initial Settings
When you turn on your camera for the first time, you will be asked to do the initial settings of
your camera.
When you turn the Power button on, the Language Menu is displayed on the LCD screen for you
to setup the display language.
Setting the Language
1. Press , , or to move through the selection.
2. Select a language, then press SET to apply.
Setting the Date & Time
1. Press or to move through the selection.
2. Press
the or keys to change the value for the date and time.
Page 17

11
3. Press SET to apply.
4. If necessary, press to close the menu.
Now, you are ready to start taking photos and videos.
Holding down the or keys to change the values continuously.
Modes
Your camera has two modes:
Record mode
• Set to Record mode to capture images and record videos and audio clips.
• Record mode can be further set to mode options like auto, movie and scene selection
modes. See "Selecting the Record mode options" below.
Playback mode
• Set your camera to Playback mode to view and edit captured images and playback videos
and audio clips. You can also attach voice memo to images in this mode.
When you turn on your camera using the Power button, you are automatically turned on to
Record mode.
Switching between Record Mode and Playback Mode
In Record mode, press the Play button to switch to Playback mode.
In Playback mode, press the Play button to switch back to Record mode.
Selecting the Record mode options
Maximize the quality and ease of use of your camera by using the different mode options. The
mode options allow you to capture images with preset settings according to scene conditions.
MENU
Note
Page 18

12
1. Set the camera to Record mode.
2. Press to launch Record Mode Menu.
3. Select Record Mode, then press to enter
submenu.
4. Select a mode.
5. Press the SET button to apply selected mode.
• For more information, see "Using the Record Menu” on page 32.
• Use the 4-way navigation control to move through the menu selections.
OFF
OFF
Record Mode
Drive Mode
AEB
AF Area
AF Lamp
Sharpness
MENU
Note
Page 19

13
Using the LCD Monitor
The high resolution 2.7” LCD monitor shows all important information regarding camera settings
as well as the visual image of your photo or video. The display on the LCD monitor is called the
On Screen Display or OSD.
LCD Monitor Layout
The following illustrations show the LCD monitor layout and icon descriptions.
Record Mode Screen Layout
No. Item Description
1 Record Mode Indicates the current mode.
2 Flash Indicates flash settings.
3 Self-timer / Burst Indicates drive mode settings.
4 Zoom indicator Displays zoom.
12M
12M
307
307
307
ISO
AUTO
AUTO
F 3.0
F 3.0
F 3.0 1/ 30
1/ 30
1/ 300.0EV
0.0EV
0.0EV
1 2 3 4 5
141619 1518 1720
6
7
8
1
0
1
2
1
3
21
22
25
26
27
23
24
11
9
Page 20

14
5 Shots remaining Indicates the remaining shots available.
6 Battery Indicates battery level.
7 Storage media Indicates current storage media in use.
8 Date stamp Indicates date stamp is enabled.
9 AEB Indicates AEB function is enabled
10 Stabilizer Indicates stabilizer function is enabled.
11 Saturation Displays saturation settings.
12 Contrast Displays contrast settings.
13 Histogram Graphic display of ISO settings.
14 ISO Displays ISO settings.
15 Focus area Use to frame subject to capture.
16 Shutter speed Displays shutter speed settings.
17 Aperture value Displays aperture settings.
18 Shake warning Indicates that the camera is shaking.
19 Macro Indicates macro is enabled.
20 Exposure Displays exposure settings.
21 Face tracking Indicates face tracking is enabled.
No. Item Description
Page 21

15
22 White balance Displays white balance settings.
23 Metering Displays metering settings.
24 Sharpness Displays sharpness settings.
25 Quality Displays quality settings.
26 Resolution Displays resolution settings .
27 AF lamp Indicates AF lamp is enabled.
No. Item Description
Page 22

16
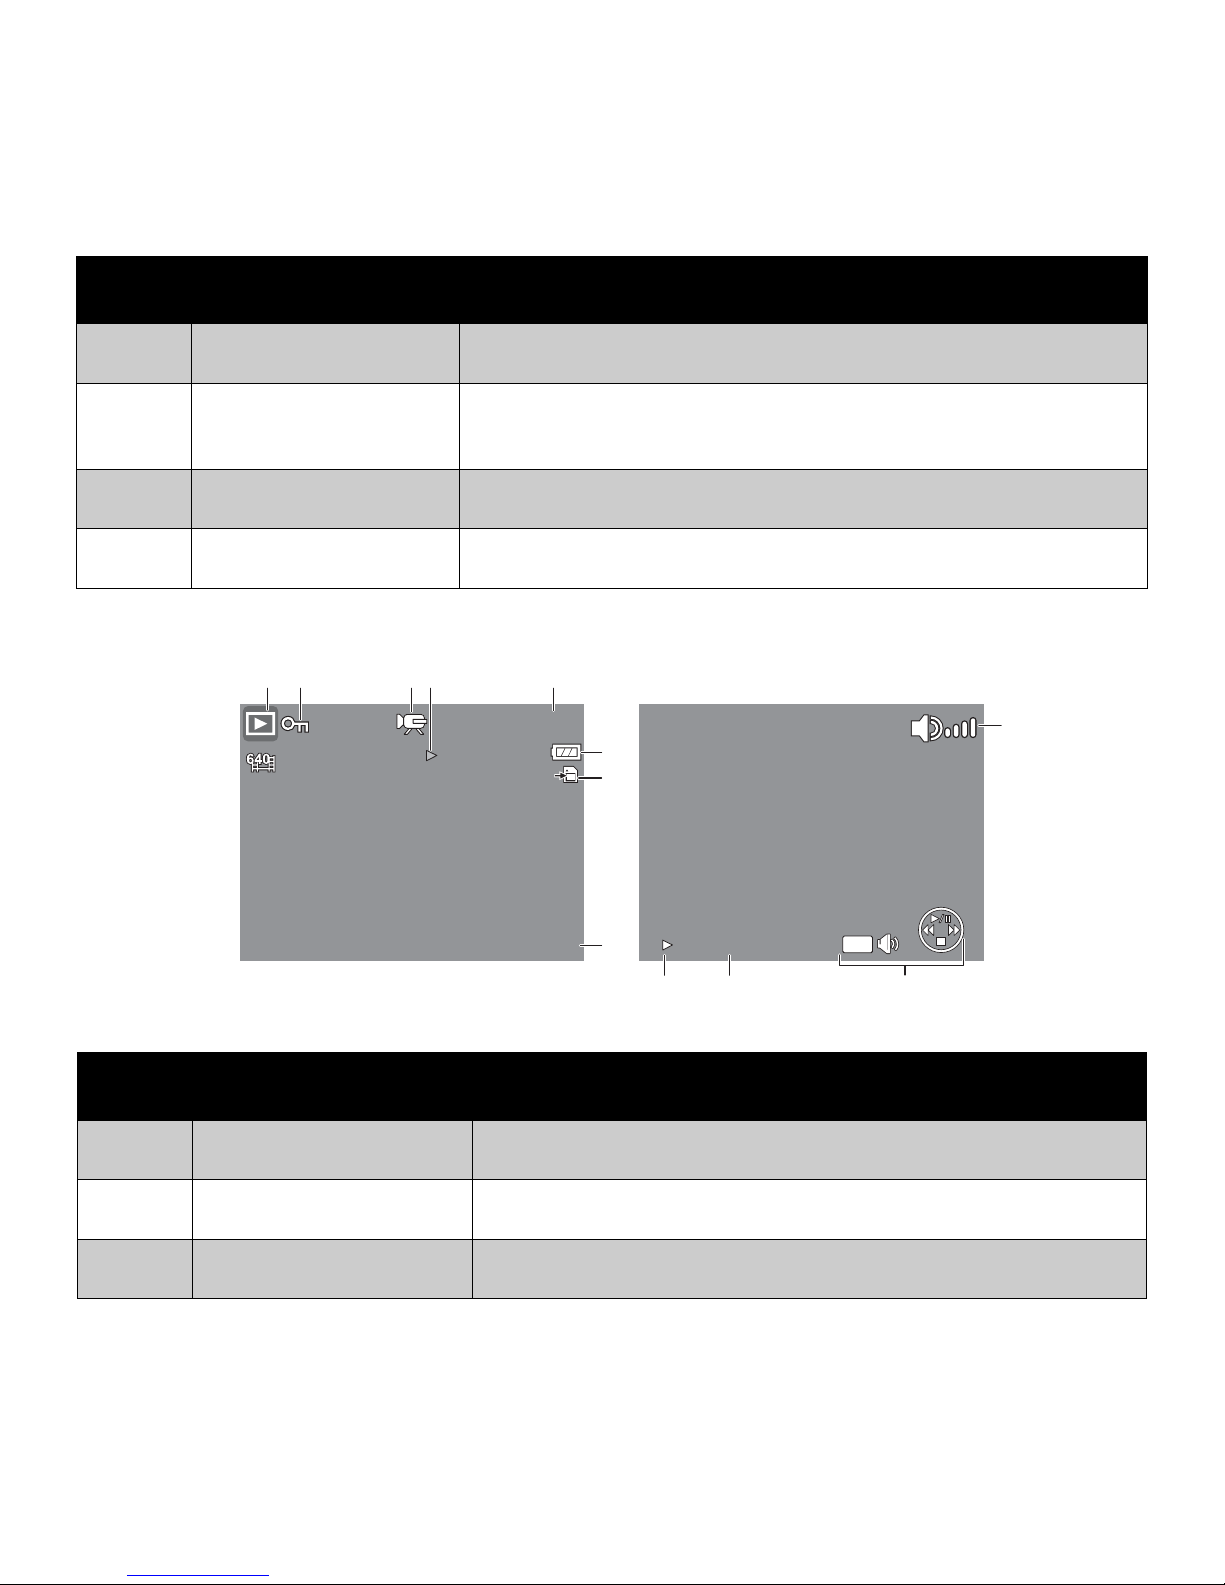
Playback Mode Screen Layout
The Playback mode display varies depending on the type of image being viewed.
Playback mode display of still images:
No. Item Description
1
Playback mode Indicates playback mode.
2
Protect Indicates file is protected.
3
Voice memo Indicates voice memo is attached.
4
Button intro
Indicates the button to press on the camera to play a movie
or audio file.
5
File no. / Total no.
Indicates the file number over the total number of files in the
storage card.
6
Battery Indicates battery level.
12M
12M
F 3.0
F 3.0
F 3.0
1/ 30
1/ 30
1/ 300EV
0EV
0EV
27/27
27/27
27/27
SET
SET
:
2009/01/01 01:57
2009/01/01 01:57
2009/01/01 01:57
ISO
400
400
1 2 3 4 5
6
7
8
10
9
Page 23
17
Playback mode of videos:
7
Storage media Indicates used storage memory.
8
Recording
information
Displays recording information of the file.
9
DPOF Indicates the file is marked for printing.
10
Resolution Displays the resolution settings.
No. Item Description
1
Playback mode Indicates playback mode.
2
Protect Indicates file is protected.
3
Movie clip Indicates the file is a movie.
No. Item Description
27/27
27/27
27/27
2009/01/01 01:57
2009/01/01 01:57
2009/01/01 01:57
SET
SET
:
WT
0:00:16 / 0:00:20
0:00:16 / 0:00:20
1 2 3 5
6
7
8
10
9
1112
4
Page 24

18
4
Button intro
Indicates the button to press on the camera to play a movie
or audio file.
5
File no. / Total no.
Indicates the file number over the total number of files in the
storage card.
6
Battery Indicates battery level.
7
Storage media Indicates used storage memory.
8
Recording information Displays recording information of the file.
9
Volume Indicates volume settings.
10
Key indicator
Indicates the buttons to press on the camera to apply the
functions.
11
Played time Indicates played time.
12
Playing status Displays playing status.
No. Item Description
Page 25

19
Playback mode of audio clips:
No. Item Description
1
Playback mode Indicates playback mode.
2
Protect Indicates the file is protected.
3
Button intro
Indicates the button to press on the camera to play a
movie or audio file.
4
File no. / Total no.
Indicates the file number over the total number of files in
the storage card.
5
Battery Indicates battery level.
6
Storage media Indicates used storage memory.
7
Recording information Displays recording information of the file.
8
Volume Indicates volume settings.
27/27
27/27
27/27
2009/01/01 01:57
2009/01/01 01:57
2009/01/01 01:57
SET
SET
:
WT
0:00:16 / 0:00:20
0:00:16 / 0:00:20
1 2 4
5
6
7
9
8
1011
3
Page 26
20
Changing the LCD Monitor Display
The type of information displayed on the LCD screen can be changed using the button.
Press the button repeatedly to change the LCD display from one type to another.
In Record Mode, the LCD display can be changed into any of the following:
9
Key indicator
Indicates the buttons to press on the camera to apply the
functions.
10
Played time Indicates played time.
11
Playing status Displays playing status.
No. Item Description
307
307
307
12M
12M
307
307
307
0.0EV
0.0EV
0.0EV
ISO
AUTO
AUTO
12M
12M
OSD on
Full OSD on
Guide lines on OSD off
Page 27

21
• The OSD information may vary depending on the record mode type.
• The following icons, if enabled, are still displayed on the LCD even when OSD
off or Guide lines on: AEB, Face tracking, AF lamp, Drive mode, and Macro.
• Use the “Guide lines” to properly set image for capture.
In Playback mode, the LCD display can be changed into any of the following:
LCD display cannot be changed in the following situations:
• Manual exposure mode
• Recording movie or audio clips
• Playing movie or audio clips
• Playing slideshow
Note
1/ 30
1/ 30
1/ 30
F 3.0
F 3.0
F 3.0
0EV
0EV
0EV
SET
SET
:
12M
12M
ISO
400
400
27/27
27/27
27/27
2009/01/01 01:57
2009/01/01 01:57
2009/01/01 01:57
SET
SET
:
27/27
27/27
27/27
2009/01/01 01:57
2009/01/01 01:57
2009/01/01 01:57
SET
SET
:
12M
12M
OSD on Full OSD on OSD off
Note
Page 28

22
Recording Photos, Videos and Voices
Taking Photos
Now that you are familiar with your camera, you are now ready to take your photos.
Taking photos with your camera is very simple.
1. Turn on the camera by pressing the Power button. By
doing this, your camera is also set to Record mode.
2. Frame the shot using the focus bracket on the LCD
monitor. See illustration on the right.
3. Half press the Shutter button. The camera
automatically adjusts the focus and exposure. When
the camera is ready to take the photo, the frame
bracket turns green, the shutter speed and aperture
value are displayed.
4. Fully press the Shutter button to capture image.
When the shake warning icon appears, hold the
camera steadily, with your arms at your side or use a tripod
to stabilize the camera to prevent blurred images.
Using the Stabilizer
The Stabilizer function prevents blurred images caused by shaking.
307
307
307
ISO
AUTO
AUTO
0.0EV
0.0EV
0.0EV
12M
12M
ISO
AUTO
AUTO
F 3.0
F 3.0
F 3.0 1/ 30
1/ 30
1/ 30
Stab il izer button
Page 29

23
To activate Stabilizer
•Press the Stabilizer button on top of
your camera to enable/disable stabilizer.
If Stabilizer is enabled, the stabilizer icon is
displayed on the LCD monitor and the ISO
setting is automatically set to Auto. See “ISO”
on page 30 for more details.
Setting the Zoom Control
Your camera features up to 3x optical zoom and up to 5x of digital zoom. Optical zoom is
achieved by mechanically adjusting the lens. While digital zoom is activated through the menu
settings. Please refer to “Setting the Digital Zoom” on page 48 on how to setup digital zoom.
To adjusts the optical zoom:
1. Press the Zoom buttons to zoom in or zoom out an image.
2. The zoom indicator appears on the LCD monitor.
To adjusts the digital zoom:
1. Activate digital zoom. See “Setting the Digital Zoom” on page 48.
2. Press the T button to optically zoom in to the maximum until it stops.
3. Release the button.
307
307
307
12M
12M
Stabilizer
on
Zoom buttons
Press to zoom in.Press to zoom out.
Page 30

24
4. Press the T button again to switch to digital zoom automatically. Zooming continues.
Digital zoom is not activated in recording movies.
Using Flash
When taking pictures in difficult lighting conditions, use the Flash button to get correct
exposure. This function cannot be activated in recording movies or continuous shooting.
To activate Flash:.
•Press the Flash/Right button on your camera
repeatedly until your desired flash mode is displayed
on the LCD monitor.
Your camera is equipped with five flash modes:
x5.0
x5.0
x5.0
307
307
307
x5.0
x5.0
x5.0
ISO
AUTO
AUTO
0.0EV
0.0EV
0.0EV
12M
12M
Optical zoom
Digital zoom
Note
SET
DISP
Flash button
Page 31

25
Auto. The flash fires automatically
whenever
extra lighting is needed.
Red-eye reduction. The flash fires
twice to
reduce the red-eye effect.
Forced on. The flash fires whenever
you press the shutter button regardless
of lighting conditions.
Slow sync. The flash fires with a slow
shutter speed.
Forced off. The flash is turned off.
• Flash function is only available in shooting sti ll images but not available in Burst and
AEB modes.
• Do not charge the flash while pressing the zoom button. Charge the flash after
releasing the zoom button if necessary.
Setting the Focus Mode
This function allows users to define the type focus when recording a still image or a movie clip.
To set the Focus mode
•Press the Macro button repeatedly until the desired focus mode icon is displayed on the
lower left corner of the LCD monitor.
307
307
307
12M
12M
Auto flash is enabled.
Note
SET
DISP
Macro button
Page 32

26
Your camera supports the four focus modes:
Normal. With normal focus, the focus range starts
from 0.8m. When the camera is set to Normal mode,
there is no icon displayed on the screen.
Macro. This mode is designed for close-up
photography. If Macro is enabled, you can capture
the detail and sharpness of a very close image by
fixed focus.
Pan Focus. When Pan Focus is set, the camera
focuses on every object.
Infinity. When Infinity is set, the camera focuses on distant objects.
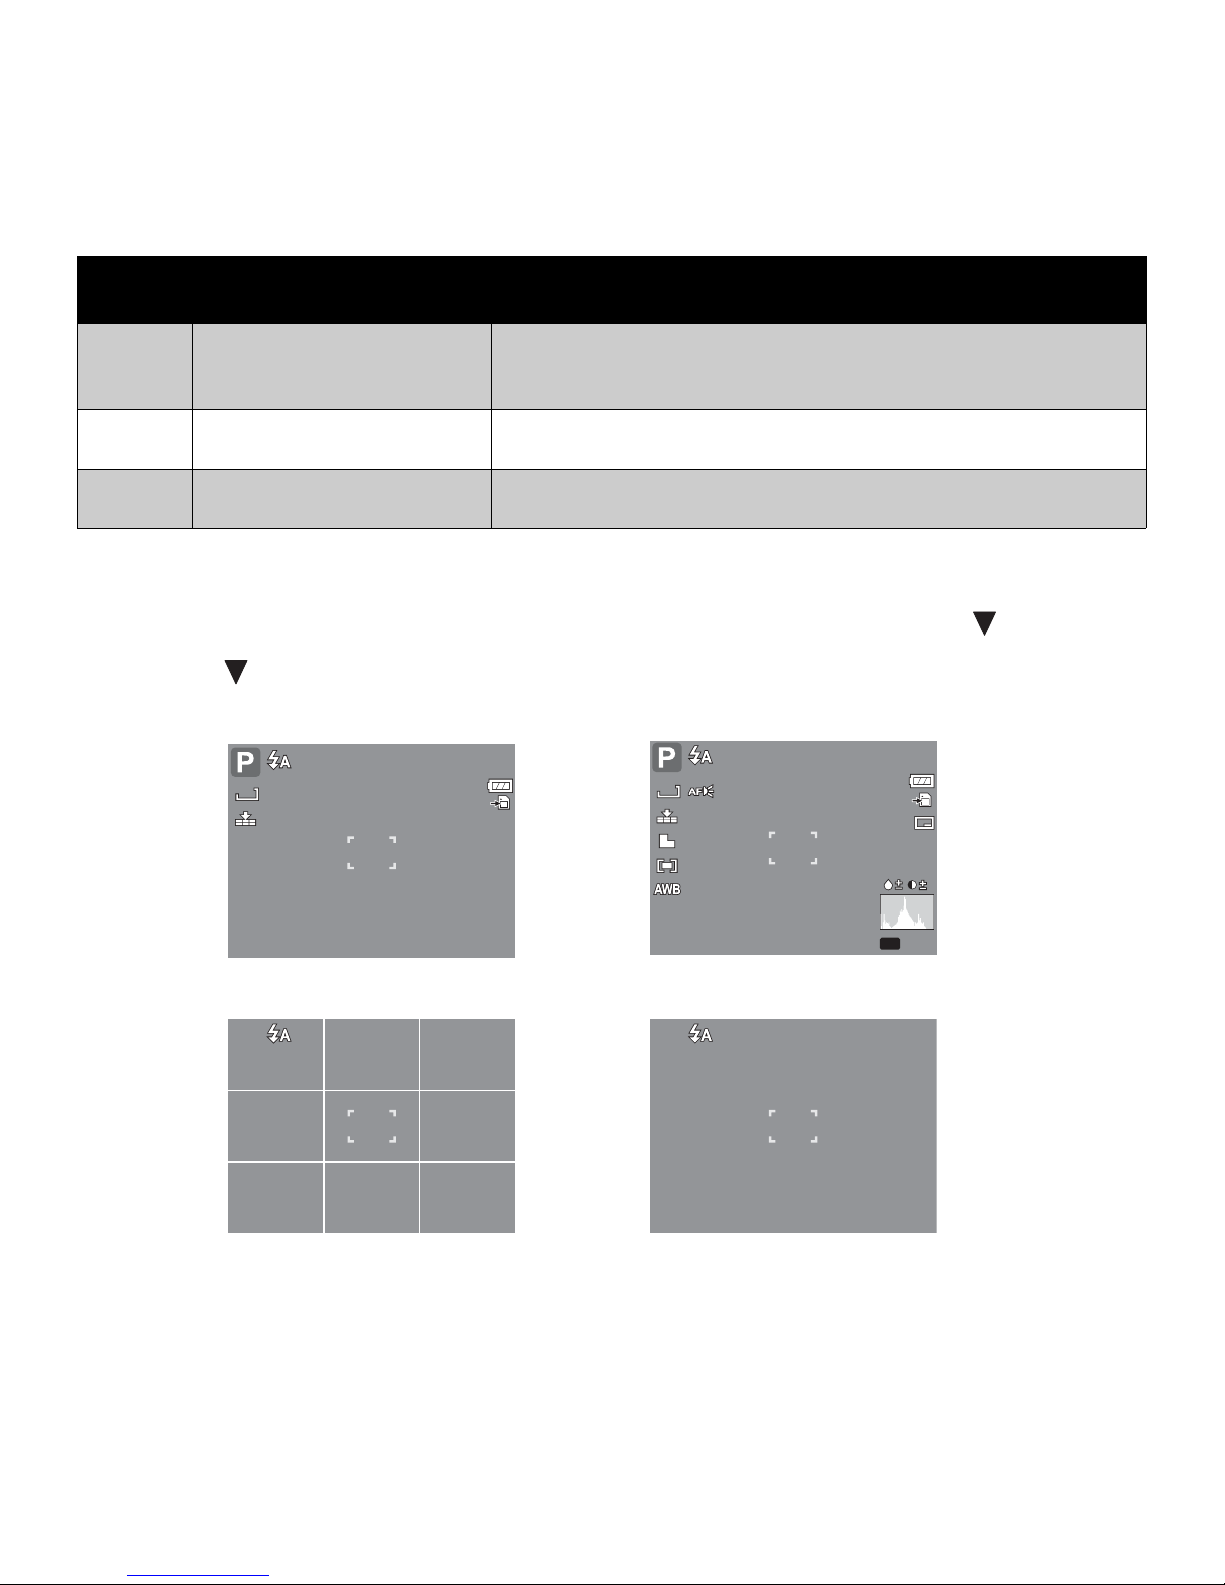
Using the Function Menu
The Function Menu is used to adjust capture settings in Record Mode. It contains My Mode,
Resolution, Quality, EV Compensation, White Balance, ISO, Metering, and Color Mode.
Press the FUNC button of your camera to launch the Function Menu.
Press the FUNC button again to close the menu.
• The Menu bar displays the current
status of your camera settings. Only the
available functions for the settings are
shown as icon on the menu bar.
• The available options for each item on
the menu bar are shown in the Menu
options.
• Use the or key to move through
the menu selections then press the SET
button to save and apply changes.
307307307
12M12M
Macro enabled
PF
INF
FUNC
Menu bar
Menu options
Program
N
12M
AWB
ISO
AUTO
0EV
Page 33

27
My Mode
The My Mode function displays the 6 most recent modes
used in order. When you move through the different
modes in the menu options, the items on the menu bar
changes synchronously to the corresponding available
settings.
Resolution
The Resolution function is used to set the resolution
before you capture the image. Changing the resolution
affects the number of images that can be stored in your
memory card. The higher the resolution, the more
memory space is required.
The table below shows the resolution values for still
images.
Icon Pixel Size
Print Size
Suggestion
Icon Pixel Size
Print Size
Suggestion
4000 x 3000 A2 Size 2048 x 1536 4” x 6”
4000 x 2672 A2 Size 1920 x 1080 HDTV
3264 x 2448 A3 Size 640 x 480 E-mail
2592 x 1944 A4 Size
Program
N
12M
AWB
ISO
AUTO
0EV
A2 Size
N
12M
AWB
ISO
AUTO
0EV
12M 8M 3M5M
3:2
16:9
12M
3M
3:2
16:9
8M
VGA
5M
Page 34

28
Quality
The Quality function lets you adjust the quality settings of
your photos before you capture them. The quality
determines the amount of compression applied to your
photos. More compression results in a more detailed
image. However, the higher the quality, the more memory
space is required in your memory card.
EV Compensation
EV stands for Exposure Value. In difficult lighting condition,
the auto exposure function of your camera may be misled
into giving the wrong readings. The EV Compensation
function allows you to adjust the exposure value and
correctly expose your images. Available for still images
only.
• To adjust EV settings, press the or keys to
increase/decrease the value. As you adjust the
settings, the LCD monitor synchronously displays the image applying the EV settings. Press
the SET button to save and apply changes.
• The available settings are: OEV, +0.3EV, +0.7EV, +1.0EV, +1.3EV, +1.7EV, +2.0EV, -0.3EV, -
0.7EV, -1.0EV, -1.3EV, -1.7EV, -2.0EV.
White Balance
The White Balance function allows you to adjust the
camera setting according to the white light when recording
still images and movies.
• As you move through the selection, you can see the
preview on the LCD monitor synchronously.
Fine
N
AWB
ISO
AUTO
0EV
12M
0EV
N
12M
AWB
ISO
AUTO
0EV
Auto
N
12M
AWB
ISO
AUTO
AWB
0EV
Page 35

29
Icon Item Description
Auto The camera automatically adjusts the white balance.
Daylight Ideally used for bright sunny conditions.
Cloudy Ideally used for cloudy conditions.
Tungsten
Ideally used for indoor photos with tungsten or halogen lighting
without a flash.
Flourescent 1
Ideally used for indoor photos with reddish fluorescent lighting
conditions.
Flourescent 2
Ideally used for indoor photos with bluish fluorescent lighting
conditions.
Custom
Used when light source cannot be specified.
Press the shutter button for the camera to automatically adjust
the appropriate white balance setting according to the
environment.
AWB
Page 36

30
ISO
The ISO function lets you adjust the ISO sensitivity in
recording still images depending on the lightning levels of
your surroundings.
• Use a higher ISO setting in dim conditions and a lower
ISO setting in brighter conditions.
• As you move through the selections, the preview on
the LCD monitor changes synchronously.
• Available settings are: Auto, 50, 100, 200, 400, 800,
1600,3200 (3M, 16:9<2M>, VGA), 6400 (16:9
<2M>, VGA)
If the St abilizer is enabled, ISO is automatically set to Auto and cannot be adjusted. To
adjust ISO, disable Stabilizer first.
Metering
The Metering function lets you select the area of the
subject or frame by which the camera measures light to
record still images or movies.
• As you move through the selection, the preview on
the LCD monitor changes synchronously.
Icon Item Description
Multi
The camera measures the exposure readings from multiple
points in the subject area.
Auto
N
12M
AWB
ISO
AUTO
ISO
AUTO
ISO50ISO
100
ISO
200
ISO
800
ISO
400
0EV
Note
Multi
N
12M
AWB
ISO
AUTO
0EV
Page 37

31
Color Mode
The Color Mode function lets you record still images or
movies and apply different colors or tones for a more
artistic effect.
• As you move through the selection, the preview on
the LCD monitor changes synchronously.
Center
The camera measures the average light from the entire frame but
gives more importance to the values near the center.
Spot
The camera selects the exposure value based on the center of
your picture.
Icon Item Description
Normal The camera records normally.
Vivid
The camera captures the image with more contrast and
saturation emphasizing on the bold colors.
Sepia Images are captured in sepia tones.
Icon Item Description
Normal
N
12M
AWB
ISO
AUTO
VN S R GBW
0EV
N
V
S
Page 38

32
Using the Record Menu
If you are in Record mode, you can access the Record menu simply by pressing the
MENU button on your camera.
When the menu is displayed, use the 4-way navigation control and the SET button to
move through menu selections and apply your desired settings. To close the menu
anytime, press the menu button again.
Record Menu
The Record menu allows you to change modes, and setup
other capture settings.
To go to Record Menu:
Set the camera to Record mode. See “Switching between
Record Mode and Playback Mode” on page 11.
1. Press to launch the Record Menu.
2. Use the or keys to move through the menu
selections.
B&W Images are captured in black and white.
Vivid Red
Captured image becomes reddish. Ideally used to record images
like flowers and cars to make them more vivid.
Vivid Green
Captured image becomes greenish. Ideally used to record
images like mountains and lawns to make them more vivid.
Vivid Blue
Captured image becomes bluish. Ideally used to record images
like the sky and the ocean, to make them look more vivid.
Icon Item Description
B
W
R
G
B
MENU
OFF
OFF
Record Mode
Drive Mode
AEB
AF Area
AF Lamp
Sharpness
MENU
Page 39

33
3. To select an item, press .
4. Change the submenu settings using the 4-way navigation control.
5. Press the SET button to save and apply settings.
Setting the Scene Mode
Setting the Scene mode allows you to capture images with
preset settings according to the scenes or environment.
1. From the Record Menu, press to select Record
Mode.
2. Use the navigation controls to move through the
selection.
3. Press the SET button to save and apply changes.
The table below shows the available scene mode settings.
Icon Item Description
Auto
The simplest way to shoot basic images. Settings are adjusted
automatically.
Program
The camera automatically adjusts suitable shooting settings like
shutter speed and aperture values.
Record Mode
Drive Mode
AEB
AF Area
AF Lamp
Sharpness
OFF
OFF
Select
Auto
OK
Page 40

34
Aperture Priority
This feature lets users to adjust the aperture value and the
camera automatically selects the shutter speed to match the
brightness. See “Using Aperture Priority Mode” on page 42.
Shutter Priority
This feature lets users to adjust the shutter speed and the
camera automatically selects the aperture value to match the
brightness.
Manual Exposure
This feature lets users to adjusts the shutter speed and
aperture value to correctly expose your images.
Intelligent Scene
The camera detects the shooting conditions and automatically
switches to the appropriate scene mode. See “Using Intelligent
Scene Mode” on page 38.
Portrait The camera blurs the background to focus on the subject.
Landscape This feature is used to emphasize wide scenic views.
Sunset This feature enhances the red hue for recording sunset images.
Backlight
This feature is used to capture the image of a backlight object
by changing the metering.
Kids This feature is used to capture still images of moving kids.
Icon Item Description
Page 41

35
Night Scene
This feature is used to capture images with night scenery
background.
Fireworks
This feature slows shutter speed to capture fireworks
explosions.
Snow This feature is used for beach and snow scenes.
Sports This feature captures still images in high speed motions.
-
Party This feature is used for wedding or indoor party settings.
Candlelight This feature is used to capture warm candle light effects.
Night Portrait
This feature is used to capture portrait pictures with night or
dark background.
Soft Skin
This feature enhances skin tone thus facial skin appears
smooth.
Soft Flowing Water This feature enhances smooth effects like water or silk.
Icon Item Description
Page 42

36
Food
This feature is used to capture food images. The increased
saturation in this mode makes the captured image more
enticing.
Building This feature enhances the edges of captured images.
Text
This feature enhances the black and white contrast normally
used when capturing text images.
Auction
Pictures taken in Auction mode are automatically saved under a
specific folder named “_AUCT”. See “Folder Structure” on
page 82 for more information.
Smile Capture
This feature uses face tracking to auto detect faces to capture.
When smiles are detected, it continuously captures the image.
See “Using Smile Capture Mode” on page 37.
Blink Detection
This feature detects if the subject blinked an eye when the
image is captured and gives the user an option whether to save
it or not. See “Using Blink Detection Mode” on page 41.
Pre-composition
This feature captures a image temporarily as a reference. Full
press shutter after referring the subject to the reference point.
Love Portrait
This feature uses face tracking to auto detect faces to capture
portraits photos without the help of others. When over two faces
are detected, AF is automatically activated. The camera starts
count down and captures a picture in two seconds.
Icon Item Description
Page 43

37
After selecting the scene mode, the selected mode, except Voice Rec, will be added to the
forefront in MyMode of Function Menu. See “Using the Function Menu” on page 26.
Using Smile Capture Mode
The Smile Capture mode uses smile tracking to automatically capture images. This feature is
most useful in capturing different angles and smiles of moving people. When capturing an image
with more than one person, the camera detects the smile of the closest person on the center of
the screen.
To activate Smile Capture
1. Select from the Scene Mode submenu.
2. Focus the camera on the subject to capture.
3. The smile capture icon blinks every second and the
white focus frame turns green to denote camera
activity.
4. When a smile is detected, the camera will
automatically take a shot of the image.
When capturing an image with several faces, face tracking function may take up more
time tracking faces for the first time.
Movie This mode is used to record movie clips.
Voice REC This mode is used to record audio clips.
Icon Item Description
307
307
307
12M
12M
The camera displays a white
frame when a face is detected.
Note
Page 44

38
Using Intelligent Scene Mode
With the Intelligent Scene Mode, the camera automatically detects the shooting conditions and
switches to the appropriate scene and settings when aiming on a subject. This feature is most
useful for novice users to capture great images even without basic knowledge of photography.
To activate Intelligent Scene
1. Select from the Scene Mode submenu.
2. Focus the camera on the subject to capture.
3. The camera detects the shooting conditions and
switches to an appropriate scene mode.
4. Half press the shutter button to focus the subject.
The frame turns green to indicate focus is set.
5. Press the shutter button to take the shot.
307
307
307
12M
12M
Intelligent scene icon. After the camera detects the
shooting conditions, this icon changes to show the
detected scene mode.
Face tracking is
automatically
enabled.
307
307
307
12M
12M
The camera displays a solid white
frame when a face is detected.
Page 45

39
When Intelligent Scene function is enabled, icons will be displayed even in Guideline,
None Display modes and when the shutter button is half pressed.
The table below shows the modes supported by Intelligent scene:
Icon
Intelligent
Scene Modes
Description
Portrait This mode is set when a face is detected.
Landscape
This mode is set when:
• There is no face detected.
• The focus distance is more th an 1.5 meters.
• The EV setting is greater than 11 or 10.5.
Sunset This mode is automatically set when sunset lighting is detected.
Macro
This mode is set when:
• There is no face detected
• The focus distance is within the macro range.
This mode can only be detected when you half press the shutter
button.
Backlight This mode is set when the EV setting greater than 2.5.
Backlight Portrait
This mode is set when a face is detected with an EV setting
greater than 2.5.
Note
Page 46

40
Night Scene
This mode is set when:
• There is no face detected.
• The focus distance is more th an 1.5 meters.
• The EV setting is lower than 5 or 4.5.
Night Portrait
This mode is set when a face is detected with an EV setting
lower than 5 or 4.5.
Icon
Intelligent
Scene Modes
Description
Page 47

41
Using Blink Detection Mode
The Blink Detection mode tracks faces and determines captured image that contain subjects
with blinked eyes. After shooting, when the camera detects that the subject blinked an eye, a
menu selection appears to ask the user whether to save the image or not. This feature saves
time in managing photos to be stored or deleted from the memory.
To activate Blink Detection
1. Select from the Scene Mode submenu.
2. Half press the shutter button to focus the subject. The frame turns green to indicate focus is
set.
3. Press the shutter button to capture the image. The
image is automatically saved unless the camera
detects that the subject blinked an eye. In this case,
the screen on the right is displayed:
4. Select Save Image to save or Cancel to disregard.
307
307
307
12M
12M
Detected faces
are framed.
Face tracking is
automatically
enabled.
Save image
Cancel
Page 48

42
Using Aperture Priority Mode
With Aperture Priority mode, users can adjust the aperture value and the camera automatically
sets the shutter speed to match the brightness.
To activate Aperture Priority
1. Select from the Scene Mode submenu.
2. Press SET button to enter the adjust mode.
3. Use the or keys to select the aperture value
options.
4. Press the shutter button to capture the image.
Using Shutter Priority Mode
With Shutter Priority mode, users can adjust the shutter speed and the camera automatically
sets the aperture value to match the brightness.
To activate Shutter Priority
1. Select from the Scene Mode submenu.
2. Press SET button to enter the adjust mode.
3. Use the or keys to select the shutter speed
options.
4. Press the shutter button to capture the image.
307307307
SET SET
: :
AdjustAdjust
F 3.0F 3.0F 3.0
12M12M
Displays the aperture value
307
307
307
SET
SET
:
:
Adjust
Adjust
1/ 30
1/ 30
1/ 30
12M
12M
Displays the shutter speed value
Page 49

43
Using Manual Exposure Mode
With Manual Exposure mode, users can manually adjust the shutter speed and the aperture
value.
To activate Manual Exposure
1. Select from the Scene Mode submenu.
2. Press SET button to enter the adjust mode.
3. Use the or keys to select the shutter speed
options or Use the or keys to select the
aperture value options.
4. Use the or keys to increase or decrease the
aperture or shutter speed values.
5. Use the SET button to switch between aperture and
shutter speed adjustment and vice versa.
6. Press the shutter button to capture the image.
When you half press the shutter button, the difference between the correct and selected exposure is displayed in red.
307
307
307
SET
SET
:
:
Adjust
Adjust
F 3.0
F 3.0
F 3.0 1/ 30
1/ 30
1/ 30
12M
12M
Displays the aperture
and shutter speed value
Note
Page 50

44
Setting the Drive Mode
Your camera features a Self-timer and Burst which can be
set in the Drive mode function in the Record Menu. The
Self-timer allows you to take photos after a pre-defined
delay. While burst lets you take consecutive shots. This
function is only available in recording still images. The
Drive mode setting is automatically set to off when you
turn off the camera.
To set the Drive Mode
1. From the Record menu, select Drive Mode.
2. Use the or keys to go through the selection.
3. Press the SET button to save and apply changes.
The table below shows the available Drive mode settings.
Icon Item Description
10 Sec Self-timer
Sets a 10-second delay to capture image after pressing the
shutter button.
2 Sec Self-timer
Sets a 2-second delay to capture image after pressing the
shutter button.
Record Mode
Drive Mode
AEB
AF Area
AF Lamp
Sharpness
OFF
OFF
Record Mode
Drive Mode
AEB
AF Area
AF Lamp
Sharpness
OFF
OFF
10 sec.
2 sec.
Double
Burst
Off
10
2
x
2
OFF
10
2
Page 51

45
Setting the AEB
AEB stands for Automatic Exposure Bracketing. This feature captures the same image with 3
different exposure settings.
• The settings are recorded in the following order: standard exposure, under exposure, and
over exposure.
To s et A EB
1. From the Record menu, select AEB.
2. Use the or keys to go through the selection.
3. Press the SET button to save and apply changes.
Double Self-timer
Performs delay and capture twice:
• Performs a 10-second delay, then captures the image.
• Performs another 2-second delay then captures the
image again.
Burst
Performs continuous shooting when the shutter button is
pressed. Stops shooting when the shutter button is released.
Off Captures an image without time delay.
Icon Item Description
x
2
Record Mode
Drive Mode
AEB
AF Area
AF Lamp
Sharpness
OFF
OFF
On
Off
OFF
ON
Page 52

46
Setting the AF Area
AF stands for Automatic Focus. This feature determines the
area on which the camera focuses.
To set AF Area
1. From the Record menu, select AF Area.
2. Use the or keys to go through the selection.
3. Press the SET button to save and apply changes.
The table below shows the available AF area settings.
Setting the AF Lamp
The AF Lamp function allows you to record images even in
low light conditions.
If AF Lamp is set to Auto, the AF lamp located in the front
of the camera, see “Front View” on page 3, emits an red
light by half pressing the shutter button allowing the
camera to focus easily.
To s et A F L amp
1. From the Record menu, select AF Lamp.
2. Use the or keys to go through the selection.
3. Press the SET button to save and apply changes.
Icon Item Description
Wide The camera automatically selects focus area within the wide frame.
Center The focus area is fixed on the center.
Record Mode
Drive Mode
AEB
AF Area
AF Lamp
Sharpness
OFF
OFF
Wide
Center
Record Mode
Drive Mode
AEB
AF Area
AF Lamp
Sharpness
OFF
OFF
Auto
Off
OFF
Page 53

47
Setting Sharpness
This function allows you to enhance or soften finer details
of your photos.
To s et S ha rpnes s
1. From the Record menu, select Sharpness.
2. Use the or keys to go through the selection.
3. Press the SET button to save and apply changes.
The table below shows the available Sharpness settings.
Setting Saturation
The Saturation function lets you adjust the color saturation
in your photos. Use a higher saturation setting for rich
colors and a lower saturation setting for more natural
tones.
To set Saturation
1. From the Record menu, select Saturation.
2. Use the or keys to go through the selection.
Icon Item Description
High Sharpens the image.
Normal Normal sharpness.
Low Softens the image.
Record Mode
Drive Mode
AEB
AF Area
AF Lamp
Sharpness
OFF
OFF
High
Normal
Low
Saturation
Contrast
Digital Zoom
Date Stamp
Auto Review
OFF
OFF
High
Normal
Low
Page 54

48
3. Press the SET button to save and apply changes.
The table below shows the available Saturation settings.
Setting Contrast
This function allows you to adjust the contrast of your
photos.
To s et C on trast
1. From the Record menu, select Contrast.
2. Use the or keys to go through the selection.
3. Press the SET button to save and apply changes.
Setting the Digital Zoom
This feature controls the digital zoom mode of your
camera.
Your camera enlarges an image using the optical zoom
first. When the zoom scale exceeds 5x, the camera uses
digital zoom.
To s et D ig ital Zoom
1. From the Record menu, select Digital Zoom.
Icon Item Description
High Enhances saturation.
Normal Normal saturation is applied.
Low Reduces saturation.
Saturation
Contrast
Digital Zoom
Date Stamp
Auto Review
OFF
OFF
High
Normal
Low
Saturation
Contrast
Digital Zoom
Date Stamp
Auto Review
OFF
OFF
Intelligent Zoom
Standard Zoom
Off
OFF
Page 55

49
2. Use the or keys to go through the selection.
3. Press the SET button to save and apply changes.
The table below shows the available Digital Zoom settings.
• Digital Zoom is not available in Smile Capture, Video, and Voice Recording modes.
• The maximum Intellect zoom scale varies depending on the image type and
resolution.
Setting the Date Stamp
The Date Stamp function allows you to add the recorded
date and time on your photos.
The recording date and time are based on your camera’s
clock settings. Once date and time are stamped on a
photo, they can no longer be edited or deleted.
Limitations of Date Stamp functions are as follows:
• Available for still images only.
• May slow down AEB/ continuous shooting when Date
Stamp is enabled in /AEB/ Burst mode.
• If Date Stamp is enabled, digital zoom is automatically
turned off.
• In vertical or rotated images, the date and time on your photos still appear horizontally.
Icon Item Description
Intelligent Zoom
Enlarges the image digitally with almost no distortion. This
feature is available for sti l l images only.
Standard Zoom
Enlarges all image sizes up to a maximum of 5x in playback, but
the image quality deteriorates.
Off Uses the optical zoom only.
Note
Saturation
Contrast
Digital Zoom
Date Stamp
Auto Review
OFF
OFF
Date
Date & Time
Off
OFF
Page 56

50
To set Date Stamp
1. From the Record menu, select Date Stamp.
2. Use the or keys to go through the selection.
3. Press the SET button to save and apply changes.
Setting Auto Review
The Auto Review function lets you view the captured image
right after shooting it.
If Auto review is On, the camera will display the captured
image for 1 second on the LCD monitor.
To set Auto Review
1. From the Record menu, select Auto Review.
2. Use the or keys to go through the selection.
3. Press the SET button to save and apply changes.
Saturation
Contrast
Digital Zoom
Date Stamp
Auto Review
OFF
OFF
Saturation
Contrast
Digital Zoom
Date Stamp
Auto Review
OFF
OFF
Saturation
Contrast
Digital Zoom
Date Stamp
Auto Review
OFF
OFF
On
Off
OFF
ON
Page 57

51
Recording Movies
You can record movies with the camera, the available
recording time depends on the capacity of the memory
card. Videos can be recorded until the maximum memory
capacity has been reached. However the length of a single
video may be limited (the limitation depends on the camera
model).
1. From the Record mode menu, select Movie.
2. Focus your camera on the subject that you want to
take.
3. Press the Shutter button to start recording.
4. Use the control to zoom in and zoom out
an image.
5. To pause recording, press the key.
6. To continue recording, press the key again.
7. To stop recording, press the Shutter button.
• When the maximum capacity for a single video has been reached, simple press the
shutter button again to continue recording.
• The camera will automatically stop recording when the memory capacity is full.
• Digital zoom is not available in movie recording.
• Sound cannot be recorded while pressing the control.
• Power save is not available in movie recording or pause recording.
Record Mode
Drive Mode
AEB
AF Area
AF Lamp
Sharpness
OFF
OFF
OFF
0:00:16
0:00:16
Note
Page 58

52
Setting the Movie Size
The Movie Size function icon appears only in Movie Mode.
Use this function to adjust the resolution and quality of
movie clips.
The table below shows the available size and corresponding
image quality settings.
To set other movie mode settings, please refer to “Using the Function Menu” on page 26.
Internet Mode
The Internet Mode allows you to record movies with predefined video settings for easy upload to
the Internet website.
The Internet supports two file upload standards:
• Single File Uploader. The maximum movie file size is up to 100 MB.
• Internet Uploader. The maximum movie file size is up to 1 GB.
Most uploaded movie length ranges within 5 minutes.
Therefore when you record using the YouTube mode, the following standards are followed:
Icon Frame Size Image Quality
720 x 400 HDTV
640 X 480 High Quality
320 x 240 Normal
640 x 480 For Internet, see “In te r net Mode” on page 52 below.
N
AWB
640
640 320
16:9
High Quality
Page 59

53
• Recorded movies are set to Internet standard resolution of 640 X 480.
• Recording automatically stops when the file reaches 100 MB.
Recorded movies in the Internet mode are stored following the DCF rule, however movies are
saved in a specific folder named “_UTUBE”. For more details, please refer to “Folder Structure”
on page 82.
• To record a YouTube movie, select from the Movie Size function.
Available recording time for a YouTube movie is up to 10 minutes.
Recording Voices
1. From the Record mode menu, select Voice. The Voice
Recording screen layout is displayed on the LCD
monitor.
2. Press the Shutter button to start recording.
3. Press the Shutter button again to stop recording.
Voice recording will automatically stop when the maximum memory capacity is full.
0:00:16
0:00:16
Note
Page 60

54
Playback
View images, videos and audio clips through your camera’s Playback mode.
Viewing in Single Navigation
The Single navigation mode displays the image one by one on the LCD monitor. To view images/
videos/audio clips, follow the steps below.
1. Press the Play button to set or turn on the camera to Playback mode.
2. The LCD monitor displays an image. To understand the icons and other information on the
screen, please see “Record Mode Screen Layout” on page 13.
3. Use the or keys to view next/previous image/video/audio.
4. To play a movie or audio clip, press the key. See “Playing Movies” on page 56 and
“Playing Voice Recording” on page 58 for more details.
Viewing thumbnails
1. Press the W button to view 9-image thumbnails.
2. Use the navigation controls to move through the items.
27/27
27/27
27/27
2009/01/01 01:57
2009/01/01 01:57
2009/01/01 01:57
SET
SET
:
12M
12M
27/27
27/27
27/27
2009/01/01 01:57
2009/01/01 01:57
2009/01/01 01:57
SET
SET
:
27/27
27/27
27/27
2009/01/01 01:57
2009/01/01 01:57
2009/01/01 01:57
SET
SET
:
Still Image Audio ClipMovie
Page 61

55
3. Press the SET button to select the image and view it normally.
Thumbnail icons
When you view the thumbnails, some images may contain icons. These icons indicate the type of
file or recording.
Icons Type Description
Voice Memo Indicates that a voice memo is attached to the image.
Movie
Indicates a recorded movie. The image displayed is the
first frame of the movie clip.
Locked File
Indicates that the image has been locked. Locked files
cannot be edited or deleted.
Voice Record Indicates a voice recording file.
Display
Display
Thumbnail view
Scroll bar. If scroll bars
appear, it indicates that the
screen can be scrolled.
Page 62

56
Zooming images
The zoom view function works with still images only.
• In normal view, press the T button repeatedly until
the desired zoom view.
• The 4 arrows on the LCD monitor indicate that the
image is zoomed in.
• You can zoom view an image of up to 12X.
• Use the navigation controls to view the zoomed
image.
•Press the Play button to close zoom view.
For 320 x 240 resolution images, you can only zoom in up to 6X.
Playing Movies
1. Set the camera to Playback mode.
2. Use the navigation controls to scroll through the saved
images. A movie clip has a movie icon displayed on
screen. See picture on the left.
3. Press the key to play the movie.
4. During playback, press the or keys to fast
forward or rewind the movie. The camera supports
forward and rewind speed of up to 4x.
File Error Indicates an error file.
Icons Type Description
x2.0
Note
27/27
27/27
27/27
2009/01/01 01:57
2009/01/01 01:57
2009/01/01 01:57
SET
SET
:
Page 63

57
5. During playback, use the to control
volume. Press the T button to increase volume. Press
the W button to decrease volume.
6. Press the key to pause playback. Press the key
again to resume. When paused, the play info will
remain on screen except .
7. To forward or rewind the movie frame by frame, press
the key to pause playback, then press the or
keys.
8. Press the key to stop the playback. The LCD monitor displays the movie frame image in
Single navigation mode.
• The play info, except the icon, will be displayed when the movie is paused,
during REW/FF or frame by frame modes
• Volume cannot be adjusted when paused or during REW/FF modes.
To capture screenshot image from a movie clip
1. During playback of movie, press the key to pause
playback on your desired movie frame to capture.
2. Press the Shutter button to capture screenshot.
3. The camera will automatically stop playback. The LCD
monitor displays the captured image in Single
navigation mode.
This feature does not function when the memory card is full or the folder cannot be
created. The icon does not appear on the screen either.
WT
0:00:16 / 0:00:20
0:00:16 / 0:00:20
WT
Note
WT
0:00:16 / 0:00:20
0:00:16 / 0:00:20
Capture photo
Capture photo
Note
Page 64

58
Playing Voice Recording
1. Set the camera to Playback mode.
2. Use the navigation controls to scroll through the saved
images. When viewing a voice recording file, the LCD
monitor displays the screen layout of Audio clips. See
picture on the right.
3. Press the key to play the voice recording.
4. During playback, use the to control
volume. The volume icon appears on the screen.
Press the T button to increase volume. Press the W
button to decrease volume.
5. Press the key to pause playback. Press the key again to resume. When paused, the
play info will remain on screen except .
6. Press the key to stop the playback. The LCD monitor displays the image in Single
navigation mode.
V olume cannot be adjusted during pause or REW/FF modes.
Playing Voice Memo
Voice memo is separately recorded and attached to a captured image. See “Voice Memo” on
page 68 on how to record voice memo.
1. Set the camera to Playback mode.
2. Use the navigation controls to scroll through the saved images. An image file with voice
memo has a voice memo icon located on the top center of the LCD monitor. See picture on
the right.
WT
0:00:16 / 0:00:20
0:00:16 / 0:00:20
WT
Note
Page 65

59
3. Press the key to play the voice recording.
4. During playback, use the to control
volume. Press the T button to increase volume. Press
the W button to decrease volume.
5. Press the key to pause playback. Press the key
again to resume. When paused, the play info will
remain on screen except .
6. Press the key to stop the playback. The LCD
monitor displays the image in Single navigation mode.
Volume cannot be adjusted when you pause the voice memo.
Deleting an Image/Video/Audio
There are two ways to delete an image/video/audio:
•Using the Delete button, or
• Using Playback Menu Delete settings. See “Delete” on page 62.
Using the Delete Button
Use the Delete button on your camera to delete or mark an image/video/audio clip for
deletion.
1. Set the camera to Playback mode.
2. View images/videos/audio clips in Single navigation mode.
3. Use the or keys to scroll the display.
4. When the desired image/video/audio clip is displayed on the LCD monitor, press the Delete
button.
1/ 30
1/ 30
1/ 30
F 3.0
F 3.0
F 3.0
0EV
0EV
0EV
SET
SET
:
12M
12M
ISO
400
400
27/27
27/27
27/27
2009/01/01 01:57
2009/01/01 01:57
2009/01/01 01:57
WT
Note
FUNC
Page 66

60
5. A confirmation selection appears on screen.
6. Select Delete.
7. Press the SET button to delete.
8. The next image is displayed on the LCD monitor. To
delete another file, use the or keys to scroll
through the images/videos/audio clips. Then, repeat
steps 4 to 7.
9. To close the Delete function and go back to viewing in
single navigation mode, select Cancel.
Locked files cannot be deleted at any time. When you try to delete a locked file, the
camera displays “File Locked” message on the LCD monitor.
Playback Menu
The Playback menu allows you to edit images, records
voice memo, and setup playback settings.
To go to Playback Menu:
1. Set the camera to Playback mode. See “Modes” on
page 11.
2. Press to launch the Playback Menu.
3. se the or keys to move through the menu
selections.
4. To select a menu, press or the SET button.
5. Change the submenu settings using the 4-way navigation control.
6. Press the SET button to save and apply settings.
Delete
Cancel
Note
Slide Show
Delete
Protect
Red-eye Correction
Voice Memo
Photo Edit
MENU
Page 67

61
Slideshow
The Slideshow function allows you to view all stored photos/videos in still image format in a
continuous sequence.
To view slideshow:
1. From the Playback menu, select Slideshow. The
Slideshow menu appears.
2. Set the slideshow settings.
3. Select Start, then press the SET button to start the
slideshow.
4. During slideshow, press the SET button to pause
slideshow.
5. Use the or keys t to move through the options.
Select whether to Continue or Exit the slideshow.
6. Press the SET button to apply selected option.
To change slideshow settings:
1. From the Slideshow menu, use the or keys t to move through the selections.
2. Select Interval setting. Press the or keys to adjust. Choose among the available
interval settings: 1 sec., 3 sec., 5 sec., and 10 sec.
Select
Slide Show
OK
Interval
Transition
Repeat
Start
Cancel
1 sec.
Horizontal
Yes
Page 68

62
3. Select Transition setting. Press the or keys to adjust. Choose among the available
transition settings:
4. Select Repeat setting. Press the or keys to adjust. Available settings are: Yes, No.
Delete
The Delete function lets you remove unwanted files in the internal memory or on the memory
card. Protected files cannot be erased, to delete, unprotect the file first. See “Protect” on
page 65.
To delete a photo/video/audio clip:
1. From the Playback menu, select Delete.
2. The Delete submenu is displayed on the LCD monitor.
Select available settings:
• Single. Select one file to delete.
• Voice Only. Delete only the attached voice
memo, the image is retained in the memory.
• Multi. Select multiple files to delete at the
same time.
• All. Delete all files.
To delete a single file:
1. Select Single in the Delete submenu, the images are
displayed on the LCD monitor in single navigation
mode.
2. Use the or keys to scroll the display.
3. When the desired image/video/audio clip is displayed
on the LCD monitor, select Delete.
4. Press the SET button to delete.
•Horizontal •Shrink •Fade •Random
Slide Show
Delete
Protect
Red-eye Correction
Voice Memo
Photo Edit
Single
Voice Only
Multi
All
Delete
Cancel
Page 69

63
5. The next image is displayed on the LCD monitor. To delete another file, use the or
keys to scroll through the images/videos/audio clips. Repeat steps 3 to 7.
6. To close the Delete function and go back Playback menu, select Cancel.
To delete attached voice memo:
1. Set the camera to Playback mode.
2. View images/videos/audio clips in Single navigation mode.
3. Use the or keys to scroll until the desired image with voice memo is displayed on
the screen.
4. Press to launch the Playback Menu.
5. Use the or keys to move through the Playback menu selections then select Delete.
6. From the Delete submenu, select Voice only.
7. A confirmation selection appears, select Delete.
8. Press the SET button to delete the attached voice memo and go back to Playback mode.
The Voice Only submenu is disabled if the current image displayed, at the time you
access the Delete menu, does not have any attached voice memo.
MENU
Note
Page 70

64
To delete multiple files:
1. Select Multi in the Delete submenu, the images are
displayed in thumbnail view on the LCD monitor.
2. Use the navigation control to move through the files.
3. When the desired image/video/audio clip is
highlighted, press the SET button to mark image/
video/audio clip for deletion.
4. Repeat step 3 until all desired images for deletion are
marked.
5. Press the MENU button. A confirmation selection
appears.
6. Select Yes to confirm.
7. Press the SET button to delete marked files.
To delete all files:
1. Select All in the Delete submenu. A confirmation
message appears.
2. Select Yes.
3. Press the SET button to delete all files.
Select
Select
Next
Next
Yes
Cancel
Delete selected files ?
Delete all files ?
Yes
Cancel
Page 71

65
Protect
The Protect function lets you lock a photo or video to protect it from being modified or
accidentally erased. A protected file has a lock icon when viewed on Playback mode.
To protect files:
1. From the Playback menu, select Protect.
2. The Protect submenu is displayed on the LCD monitor.
Select available settings:
• Single. Select one file to lock.
• Multi. Select multiple files from the thumbnail
view to lock.
• Lock All. Lock all files
• Unlock All. Unlock all files.
To protect/unprotect a single file:
1. Select Single in the Protect submenu, the images are
displayed on the LCD monitor in single navigation
mode.
2. Use the or keys to scroll the display.
3. When the desired file is displayed on the LCD monitor,
select Lock/Unlock.
4. Press the SET button to protect/unprotect the file and
go back to Playback mode.
To protect/unprotect multiple files:
1. Select Multi in the Protect submenu, the images are
displayed in thumbnail view on the LCD monitor.
2. Use the navigation control to move through the files.
3. When the desired file is highlighted, press the SET
button to mark/unmark the file clip for protection.
Slide Show
Delete
Protect
Red-eye Correction
Voice Memo
Photo Edit
Single
Multi
Lock all
Unlock all
Lock
Exit
Select
Select
Next
Next
Page 72

66
4. Repeat step 3 until all desired files to protect are
marked.
5. Press the MENU button. A confirmation selection
appears.
6. Select Yes.
7. Press the SET button to lock files and go back to
Playback mode.
To protect all files:
1. Select Lock all in the Protect submenu. A
confirmation message appears.
2. Select Yes.
3. Press the SET button to delete all files.
To unlock all files:
1. Select Unlock all in the Protect submenu. A
confirmation message appears.
2. Select Yes.
3. Press the SET button to unlock all protected files.
Yes
Cancel
Change protect settings ?
Yes
Cancel
Lock all files ?
Unlock all files ?
Yes
Cancel
Page 73

67
Red Eye Correction
The Red Eye Correction function is used to reduce red eye
in captured images. This function is only available for still
images. Red eye correction can be applied to an image
several times, but the quality may gradually deteriorate.
To activate Red Eye Correction:
1. Set the camera to Playback mode.
2. Press the or keys to scroll and select an image.
3. Press the MENU button to launch the Playback menu.
4. Select Red Eye Correction.
5. Select Start.
6. Press the SET button to start correction.
7. After completing Red eye correction, a menu selection appears. Select whether to:
• Overwrite. Save and replace the old file with the new one.
• Save As. Save the new file as a new one.
• Cancel. Cancel red eye correction.
8. Press the SET button to save/cancel changes.
Slide Show
Delete
Protect
Red-eye Correction
Voice Memo
Photo Edit
Red-eye Correction
Start
Cancel
Red-eye Correction
Overwrite
Save As
Cancel
Steps 5 and 6 Step 7
Page 74

68
Voice Memo
The Voice Memo function allows you to record and attach a voice memo to a saved image. You
can record a maximum of 30 seconds of Voice memo per image. This function is only available in
still images.
To record voice memo:
1. Set the camera to Playback mode.
2. Press the or keys to scroll and select an image
to attach voice memo to.
3. Press the MENU button to launch the Playback menu.
4. Select Voice Memo.
5. Select Start, then press the SET button to start recording.
6. Select Stop, then press the SET button to stop recording.
When you record voice memo to an image with an existing voice memo, the old recording is automatically changed to the new one.
Slide Show
Delete
Protect
Red-eye Correction
Voice Memo
Photo Edit
30
30
sec
sec
30
sec
Start
Cancel
Time left (n seconds) for
recording.
Note
Page 75

69
Photo Edit
The Photo Edit function lets you adjust edit still images to apply different colors or tones for a
more artistic effect. Edited photos in this function is saved as a new file.
To activate Photo Edit:
1. Set the camera to Playback mode.
2. Press the or keys to scroll and select an image to edit.
3. Press the MENU button to launch the Playback menu.
4. Select Photo Edit. The Photo Edit submenu appears.
5. Press the or keys to scroll and select an option. As you move through the selection,
the preview on the LCD monitor changes synchronously.
The succeeding table shows the available settings.
Icon Item Description
Normal No effect is added to the image.
Sepia Image is saved with a sepia tone.
Photo Edit
Normal
N S RBW
Neg.
Slide Show
Delete
Protect
Red-eye Correction
Voice Memo
Photo Edit
N
S
Page 76

70
Trim
The Trim function allows you to trim an image to another
image size. This function is only available for still images.
To trim an image:
1. Set the camera to Playback mode.
2. Use the or keys to scroll and select an image to
trim.
3. Press the MENU button to launch the Playback menu.
B&W Image is saved in black and white.
Negative Image appears to be the opposite of the original image.
Mosaic Image is saved with mosaic tiles.
Vivid Red Image is saved with reddish tint.
Vivid Green Image is saved with greenish tint.
Vivid Blue Image is saved with bluish tint.
Icon Item Description
B
W
Neg.
R
G
B
Trim
Resize
Startup Image
DPOF
Page 77

71
4. 選擇裁切。LCD 螢幕會顯示裁切畫面外觀。
5. 使用 控制變更尺寸。
6. 使用瀏覽鍵移動影像。
7. 按下 SET 按鍵套用變更隨即出現選單選項。
8. 選擇:
• 取代現有檔案。儲存新檔案並取代舊檔案。
• 另存新檔。將檔案另存成新檔案。
• 取消。取消尺寸變更。
9. 按下 SET 按鍵儲存 / 取消變更。
• 「裁切」功能不適用於影像解析度設為 3:2, 16:9 及 VGA 的照片。
• 無論原始影像比例為何,所有影像均會裁切成 4:3 比例。
尺寸變更
「尺寸變更」功能可讓您將大型影像的影像解析度變更為較小的解析度。本功能僅適用於靜態影
像。
欲變更影像尺寸:
SET: 5M
SET: 5M
SET: 5M
顯示已顯示區域的大致位置。
目前的影像尺寸。
四向指示器。
放大影像。
顯示區域。
ຘϸ
ڥф౪Ԥᔬ
ѪԆཱིᔬ
ڥ
Note
Page 78

72
1. 將相機設為播放模式。
2. 按下 或 鍵捲動選擇欲變更尺寸的影像。
3. 按下 MENU 按鍵開啟 「播放」選單。
4. 選擇尺寸變更。LCD 螢幕會顯示 「尺寸變更」子選單。
5. 選擇尺寸:8M、5M、3M 與 VGA。可用尺寸設定會因
原始影像尺寸而異。無法使用的設定會在 「尺寸變更」
子選單中顯示為灰色圖示。
6. 選擇尺寸後,會出現選單選項。選擇:
• 取代現有檔案。儲存新檔案並取代舊檔案。
• 另存新檔。將檔案另存成新檔案。
• 取消。取消尺寸變更。
7. 按下 SET 按鍵儲存 / 取消變更。
尺寸變更功能不適用於影像解析度設為 3:2, 16:9
及 VGA 的照片。
開機畫面
「開機畫面」功能可讓您設定開啟相機電源時的開機畫面。
1. 按下 MENU 按鍵開啟 「播放」選單。
2. 選擇開機畫面,隨即出現選單選項。
3. 選擇選項:
• 系統預設。使用相機預設影像。
ຘϸ
Џψᡐ
ᐠห
DPOF
8M
5M
3M
VGA
ڥф౪Ԥᔬ
ѪԆཱིᔬ
ڥ
Џψᡐ
Note
فಛႱ೩
רޟყа
ᜰ
ᐠห
Page 79

73
Startup Image
The Startup Image function allows you to setup a startup
image when you turn on your camera.
1. Press the MENU button to launch the Playback menu.
2. Select Startup Image. The menu selection appears.
3. Select options:
• System. Use camera default image.
• My Photo. Use the or keys to scroll and
select desired image.
• Off. Disable the startup image.
4. Press the SET button to apply changes.
,
The startup image will still be displayed startup even if the selected image was deleted.
DPOF
The Digital Print Order Format (DPOF) function allows you to mark image in your memory card
for printing and allows you to specify the number of copies that you want to print at a later date.
When all images to be printed are marked, take the memory card to a digital printing service, or
use a DPOF compatible printer.
To s et D PO F:
1. Press the MENU button to launch the Playback menu.
2. Select DPOF. The submenu appears. Available
settings are as follows:
• Single. Select a single image to mark.
• All. Mark all images in the memory card.
• Reset. Reset all DPOF settings to initial default
settings.
To set DPOF on a single image/all images:
System
My Photo
Off
Startup Image
Note
Trim
Resize
Startup Image
DPOF
Single
All
Reset
Page 80

74
1. Select Single or All on the DPOF submenu.
2. For single image, use the or keys to scroll and
select an image to mark for printing.
3. Specify the number of copies. Use the or to
increase/decrease number.
4. Press the FUNC button to toggle between turning on/
off the date stamp.
5. Press the SET button to save DPOF settings.
To r eset D PO F:
1. Select Reset on the DPOF submenu. A confirmation
message appears.
2. Select Yes.
3. Press the SET button to reset DPOF settings.
You can specify up to 99 copies for DPOF . If you specify 0 copies, the DPOF setting of
that image is automatically disabled.
PictBridge
The PictBridge function allows you to print images captured by your camera without connecting
the camera to a PC. Print images with a PictBridge compatible printer directly.
To activate PictBridge:
DPOF
Date stamp off
00
00
00
Copies
Yes
Cancel
Reset DPOF?
Note
Page 81

75
Connect your camera to a PictBridge compatible printer using the USB cable. See illustration
below.
If the printer does not support date stamp, the date stamp function will be disabled in
PictBridge.
Note
Page 82

75
Using the Setup Menu
You can access the Setup menu whether you are in Record or Playback mode.
The Setup menu allows you to configure general camera settings.
To go to Setup Menu:
1. Press to launch the Record/Playback Menu.
2. Use the or keys to change the menu tab to
Setup menu.
3. Use the or keys to move through the menu
selections.
4. To select an item, press the SET button or .
5. Change the submenu settings using the 4-way navigation control.
6. Press the SET button to save and apply settings.
Setting Sounds
Use the Sound menu functions to control the sounds
produced by the camera.
1. From the Settings menu, select Sounds.
2. Adjusts sound settings.
3. Press the SET button to apply changes.
Sounds
Power Save
LCD Save
Date & Time
Language
File Numbering
1min
OFF
MENU
Startup
Shutter
Operation
Volume
Sound1
On
On
Sounds
Select OK
Page 83

76
Setting Power Save
The Power Save function allows you to set an idle time
after which the camera automatically sets to sleep mode to
save power. After a minute of being in sleep mode, the
camera eventually turns off power.
This function is not available in the following instances:
• Recording a movie or audio file
• Playing a slideshow/movie/audio file
• Using the USB connector
Setting LCD Save
Enable the LCD Save function to automatically decrease the
LCD brightness to conserve battery power. When the
camera is idle for 20 seconds, the LCD darkens. Press any
button to resume to normal brightness.
• The camera is idle when no buttons are pressed. LCD
Save, though enabled, does not function during movie
playback, slideshow, and video recording.
Item Available Settings Description
Startup
Sound 1, Sound 2,
Sound 3, Off
Selects the startup sound when camera is turned
on.
Shutter On, Off
Enables or disables shutter sound when shutter
button is pressed. Shutter sound is not available
when recording movies or voice clips.
Operation On, Off Enables or disables operation sound.
Volume 0-4 Adjusts volume.
1min
Sounds
Power Save
LCD Save
Date & Time
Language
File Numbering
OFF
1 min.
3 min.
5 min.
Off
1min
3min
5min
OFF
OFF
Sounds
Power Save
LCD Save
Date & Time
Language
File Numbering
1min
On
Off
OFF
ON
Page 84

77
Setting Date & Time
Use the Date & Time function to set the date and time of
your camera. This function is useful in attaching date
stamps on captured images. Your camera uses a 24-hour
time format.
1. Press the navigation controls to adjust date and time
value. By holding down the or keys, the
numeric values changes continuously.
2. Press the SET button to apply changes.
Setting Language
The Language menu allows you to choose the language of
the on screen display (OSD) menu.
• Use the navigation control to scroll through the list
and select the desired language.
•Press the SET button to confirm and apply settings.
Setting File Numbering
This function allows you to select the method in which to
assign file numbers to images.
Available settings are:
• Series. Assigns number to files in sequence even
if the folder is changed.
• Reset. Starts from 0001 each time the folder is
changed.
To understand folder and file structure of your camera, see
“About Folder and File Names” on page 82.
2009 / 01 / 01 08 : 05
YY/MM/DD
Date & Time
Select OK
Language
Select OK
English
Français
Español
Deutsch
Italiano
Português
Português BR
Nederlands
Sounds
Power Save
LCD Save
Date & Time
Language
File Numbering
1min
OFF
Series
Reset
0001
0001
Page 85

78
Setting TV Out
Use the TV Out function to adjusts video output signal to accommodate different regional
settings. If TV out is not set correctly, the image may not display properly on TV.
Available settings are:
• NTSC. Applicable in Japan, USA, Canada, Taiwan
and others.
• PAL. Applicable in Europe, Asia (excluding
Taiwan), Oceania and others.
Setting LCD Brightness
Use the LCD Brightness function to control the LCD
brightness.
Setting Battery Type
Use this function to select the battery type used for the
camera.
NTSC
TV Out
LCD Brightness
Battery Type
Memory Kit
Reset All
A
lka
NTSC
PAL
PAL
NTSC
NTSC
PAL
TV Out
LCD Brightness
Battery Type
Memory Kit
Reset All
NTSC
A
lka
Bright
Normal
TV Out
LCD Brightness
Battery Type
Memory Kit
Reset All
NTSC
A
lka
Alkaline
NiMH
Lithium
Oxyride
A
lka
NiMH
Li
Oxy
Page 86

79
Setting Memory Kit
Use this function to manage contents of the internal
memory or memory card.
Available settings are:
• Format. Select to format currently used memory.
• Copy to Card. Select to copy all files stored in the
internal memory to the memory card.
• If there is a memory card inserted in the memory slot, the camera automatically saves
all files to the memory card.
• If there is no memory card or the internal memory is empty, th e Copy to Card
function is disabled.
Reset All
Use this function to reset the camera to its factory settings.
However, the following settings are exceptions and not
affected by Reset.
•Date and Time
•Language
•TV Out
• Custom White Balance data
TV Out
LCD Brightness
Battery Type
Memory Kit
Reset All
NTSC
A
lka
Format
Copy to Card
Note
Reset all settings?
Yes
Cancel
Page 87

80
Making Connections
You can connect your camera to: TV, computer, or a printer.
Connecting the Camera to a TV
To connect your camera to a TV:
1. Turn on the camera.
2. Set the TV out to match the TV’s video out
format. See “Setting TV Out” on page 78.
3. Connect the USB/AV 3-in-1 cable to the USB
port on the bottom of your camera.
4. Connect the other end of the cable to the TV’s
AV input port.
5. The LCD monitor turns black and all images
and video clips are displayed on the TV.
Connecting the Camera a PC
You can transfer photos, videos and audio files to
your PC.
1. Connect the camera to a PC using the USB
cable.
2. Turn on the camera.
3. The PC detects the connection. The camera’s
internal memory and memory card display as
removable drives in the file manager. No
image is displayed on the LCD monitor.
Audio
Video
Page 88

81
Connecting the Camera to a Printer
You can print your photos directly using a PictBridge compatible printer.
1. Turn on your camera.
2. Set PictBridge settings.
3. Connect the camera to the printer using the USB cable.
For more details on how to print photos, see “PictBridge” on page 74.
Page 89

82
Appendix
About Folder and File Names
Your camera automatically creates specific directory of folders in the internal memory cards to
organize captured images, videos and audio files.
Folder Structure
Your camera creates three directory names:
• DICAM. All captured images, videos and audio files are stored in
this folder except for files recorded using the Auction or YouTube
mode.
• _AUCT. Captured images using the Auction mode are saved in this
folder.
• _UTUBE. Captured videos using the YouTube mode are saved in
this folder.
Folder names begin with a 3-digit number from 100 to 999 and followed
by “DICAM” or “_AUCT” or “_UTUBE”. Each folder holds up to 9999 files.
If new files are saved, a new folder named in sequence will be
automatically created.
File Naming
File names begin with “DSCI” and followed by a 4-digit number that
increases in sequence. File numbering starts from 0001 when a new
folder is created.
If the highest folder number is 999 and the highest file number exceeds 9999, the camera will
display the warning message “Folder cannot be created.” When this happens, try one of the
following ways:
• Reset the file number. See “Setting File Numbering” on page 77
•Plug in a new memory card.
Do not change the folder and file names in the memory card using your PC. It may be
unable to playback the data using the camera.
Warning
Page 90

83
Troubleshooting
Problem Cause and/or Action
Camera does not turn on. The batteries may be exhausted. Charge or replace the batteries.
Camera turns off
automatically.
Press any button except the Power button to turn on the camera.
LCD turns blank. Press any button except the Power button to turn on the LCD.
Empty battery icon is
displayed on the LCD, then
the camera turns off.
Batteries are exhausted, please replace or recharge.
LCD screen displays ‘No
image’.
The image file on the memory card. Image file format may not be
supported.
LCD screen displays ‘Not
available for this file’.
Function is only available for specific file types. File format is not
supported.
LCD screen displays
‘Memory full’.
Memory card is full. Replace the memory card with a new one or
delete unnecessary images.
LCD screen displays ‘File
locked’
This file is locked. Unlock the file. See “Protect” on page 65.
LCD screen displays ‘Card
locked’.
The memory card is protected. Remove the card and slide the
write-protect switch to its unlock position.
LCD screen displays
‘Format error ’.
The memory card is protected. Remove the card and slide the
write-protect switch to its unlock position.
Page 91

84
LCD screen displays ‘Copy
error’.
The memory card is protected. Remove the card and slide the
write-protect switch to its unlock position.
The memory card is full. Replace card or delete unnecessary
files.
No image displays on the
TV screen
Incorrect TV-out type was selected. Set the correct
TV-out type to match your TV system.
The lens got stuck up.
Do not force the lens to go back. The type of the battery used
may be incorrect or the battery power level is too low. Change the
battery or charge the battery before using the camera.
Problem Cause and/or Action
Page 92

85
Specifications
Sensor 12 Mega Pixels, Type: 1/2.3
Lens Focal Length: f = 6.2 - 18.6 mm,
3X optical zoom, 5x digital zoom
LCD Monitor 2.7” color LCD
Focusing Range Normal: 80cm - Infinity
Macro Wide: 5cm - 100cm
Tele: 30 - 100cm
Aperture F = 3.0 - 5.6
Shutter Type: Mechanical and Electronic
Shutter Speed:
Auto: 1 - 1/2,000 sec.
Manual: 8 - 1/2,000 sec.
Night: 8 - 1/2,000 sec.
Fireworks: 2 sec.
File Format Still Image: EXIF 2.2 compatible format (JPEG compression)
Video: AVI (MJPEG)
Audio: WAV
Resolution
(Still image)
12M (4000 X 3000), 3:2 (4000 X 2672), 8M (3264 X 2448), 5M (2592 X
1944), 3M (2048 X 1536), HD (1920 x 1080), VGA (640 X 480)
Resolution (Video) 16:9, 640 X 480, 320 X 240, For Internet
Scene Mode Auto, Program, Aperture Priority, Shutter Priority, Manual Exposure,
Intelligent Scene, Portrait, Landscape, Sunset, Backlight, Kids, Night
Scene, Fireworks, Snow, Sports, Party, Candlelight, Night Portrait, Soft
Skin, Soft Flowing Water, Food, Building, Text, Auction, Smile Detection,
Blink Detection, Pre-Composition, Love Portrait, Movie, Voice Rec
Page 93

86
Sensitivity Auto, 50, 100, 200, 400, 800, 1600,3200 (3M, 16:9<2M>, VGA), 6400
(16:9<2M>, VGA)
White Balance Auto, Daylight, Cloudy, Tun gste n, Fluorescent 1, Fluorescent 2, Custom
Exposure Control -2EV to + 2EV (1/3EV steps)
Metering Multi, Center, Spot
Driver Mode 10 sec., 2 sec., Double, Burst, Off
Flash Auto, Red-eye Reduction, Forced On, Slow Sync, F orced Off
Effect (Preview) Normal, Vivid, Sepia, B&W, Vivid Red, Vivid Green, Vivid Blue
Photo Edit Normal, B&W, Sepia, Negative, Mosaic, Vivid Red, Vivid Green, V ivid Blue
Storage Internal memory: 32MB flash memory
External memory: SD (up to 4GB), SDHC card (up to 32GB guaranteed)
OSD Language English, French, Spanish, German, Italian, Russian, Portuguese, Brazil
Portuguese, Dutch, Turkish, Polish, Hungarian, Romanian, Czech,
Bulgarian, Croatian, Slovak, Slovenian, Greek, Swedish, Norwegian,
Finnish, Danish, Arabic, Indonesian, Malay, Thai, Japanese, Korean,
Simplified Chinese, Traditional Chinese
Interface USB / AV OUT
TV system NTSC, PAL
Battery 2 x battery
Operating
Temperature
0º C - 40º C
Operating Humidity 0% - 90%
Microphone Built-in
Page 94

87
Speaker Built-in
Dimensions 92 X 60.5 X 25.03 mm
Weight 125g
 Loading...