

Page 1

English
Chapter 1 Introduction of TVGo DVB-T02PRO
1.1 Introduction
The TVGo DVB-T02PRO can turn your notebook or desktop PC into a personal digital TV and let you
watch high definition free-to-air DVB-T TV on your notebook or desktop PC.
The compact size design makes it easy for you to take it anywhere and real -time record the TV program s to
DVD disc in DVD format. With the remote controller, you can easily to watch TV and record, also playback
high quality digital video programs on your NB or PC and channel preview. These functions supported by
TVGo DVB-T02PRO make this a product you don’t want to miss.
1.2 Package contents:
TVGo DVB-T02PRO
Remote Controller (includes battery)
Portable Digital Terrestrial TV Antenna
Antenna connector
Software Disc
Quick Installation Guide
Notice: We highly recommend you use the outdoor antenna for better signal reception.
1.3 Features of TVGo DVB-T02PRO
Watch worldwide free-to-air digital HDTV and SDTV TV programs and free-to air digital radio
Powered by USB2.0 cable
Supports time-shifting functions to avoid missing any TV programs
Supports real-time recording and schedule recording to hard disk
Supports continuous snapshot function that lets you capture your favorite images from programs and
turn it into wallpaper for your PC or NB
Supports EPG (Electronic Guide program) and Teletext function
PIP function: watch recorded and life TV at the same time
1.4. Minimum system requirements:
P4 2.4 GHz or above for watching HDTV TV program
P4 3.0 GHz or above for watching HDTV TV program and recording
256MB system memory size
Microsoft Windows 2000 SP4, Windows XP SP1/SP2 operating system, or Windows XP Media
Center Edition 2005, Vista
Microsoft DirectX version should be 9.0c or later
100MB available hard disk space (used by the driver and software),
3GB disk space per hour needed for TV program recording
1
Page 2
English
Chapter 2 Installation
You can install the TVGo DVB-T02PRO easily after reading this chapter. The following sections will provide
you detailed information how to install the TVGo DVB-T02PRO to your PC or NB.
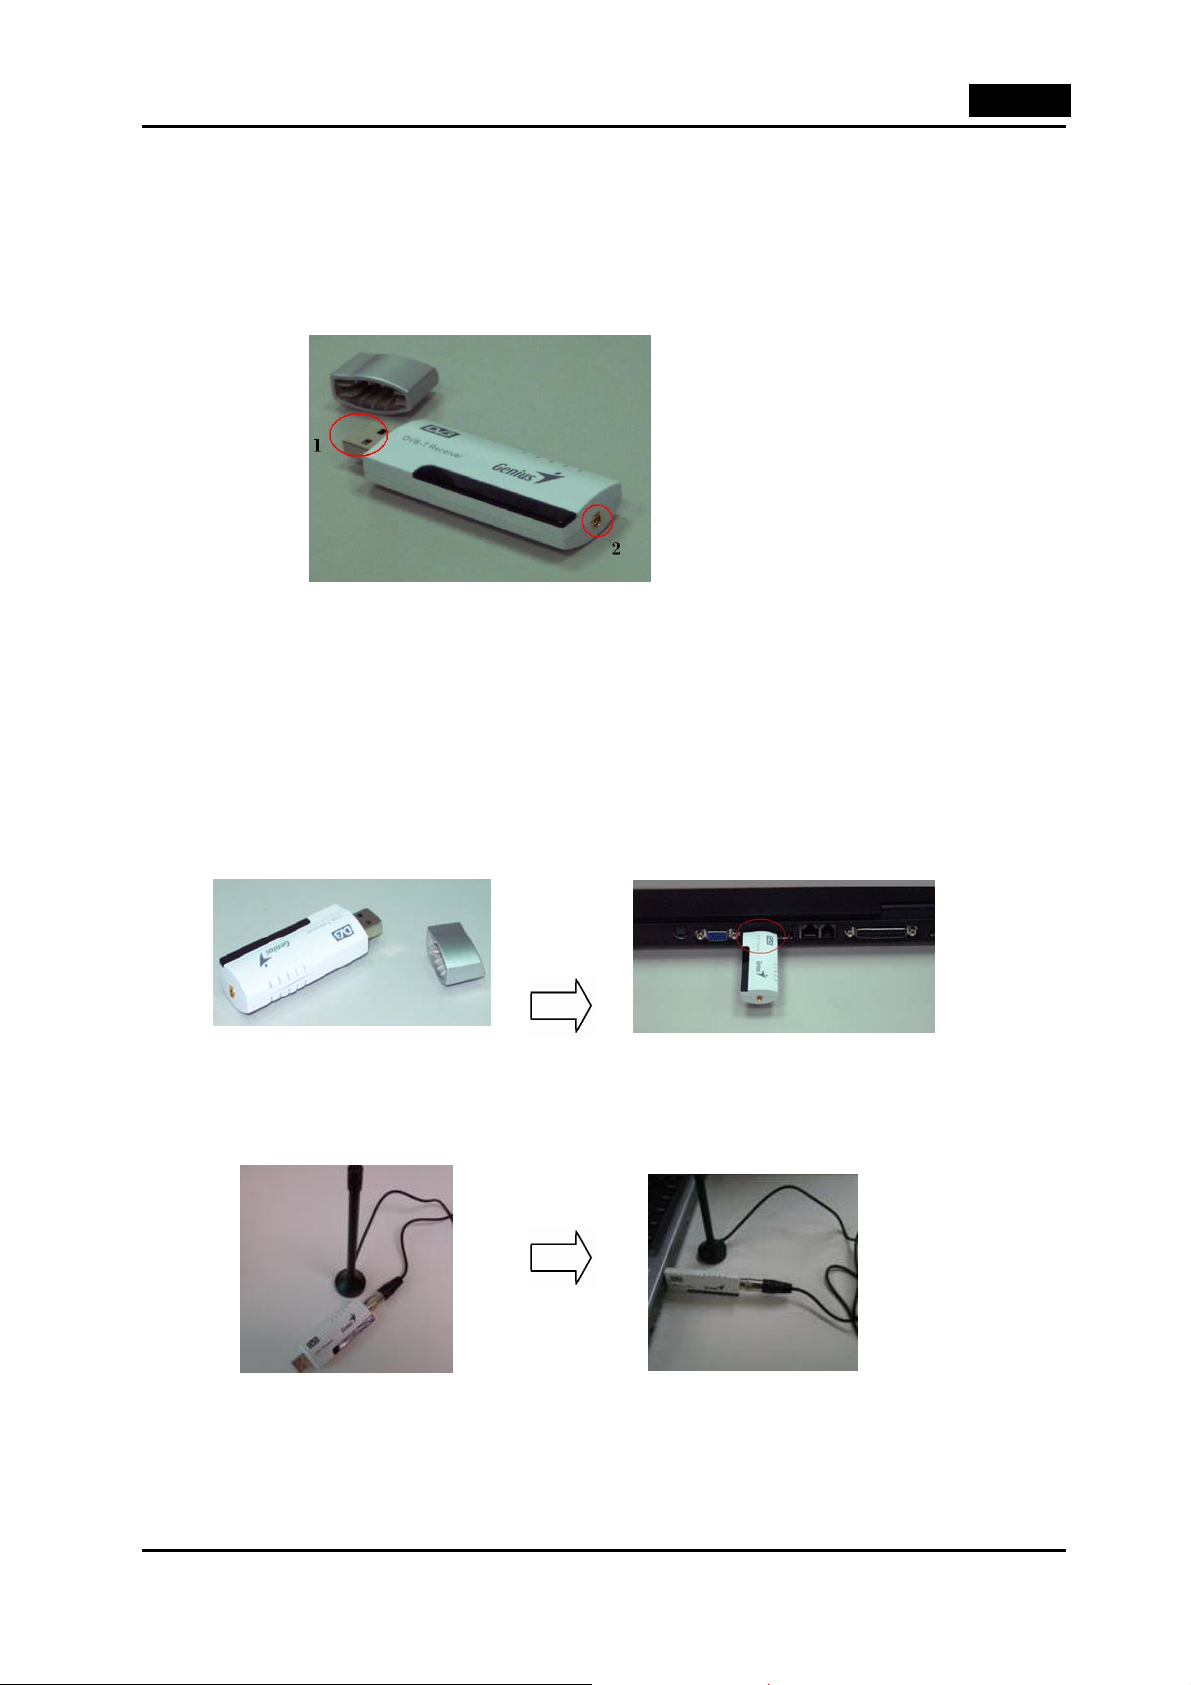
2.1 Brief introduction on hardware installation
1: USB Interface for USB port used to connect TV pen driver and PC / NB.
2: Antenna RF-In to connect to terrestrial antenna.
Step 1. USB connection
Connect the USB port and the TVGo DVB-T02PRO as shown below.
Step 2. Connect the antenna signal line
First connect the TV antenna signal line to the IEC-MMXC switch head. Second, connect the IEC-MMXC
switch head to TVGo DVB-T02PRO RF-IN as shown below.
Notice:
1. When the hardware is connected, you can start the software installation.
2. We highly recommend you use an outdoor antenna for better reception.
2
Page 3
English
2.2 Software installation
The TVGo DVB-T02PRO installation includes the application and driver; just follow the sections below to install the software.
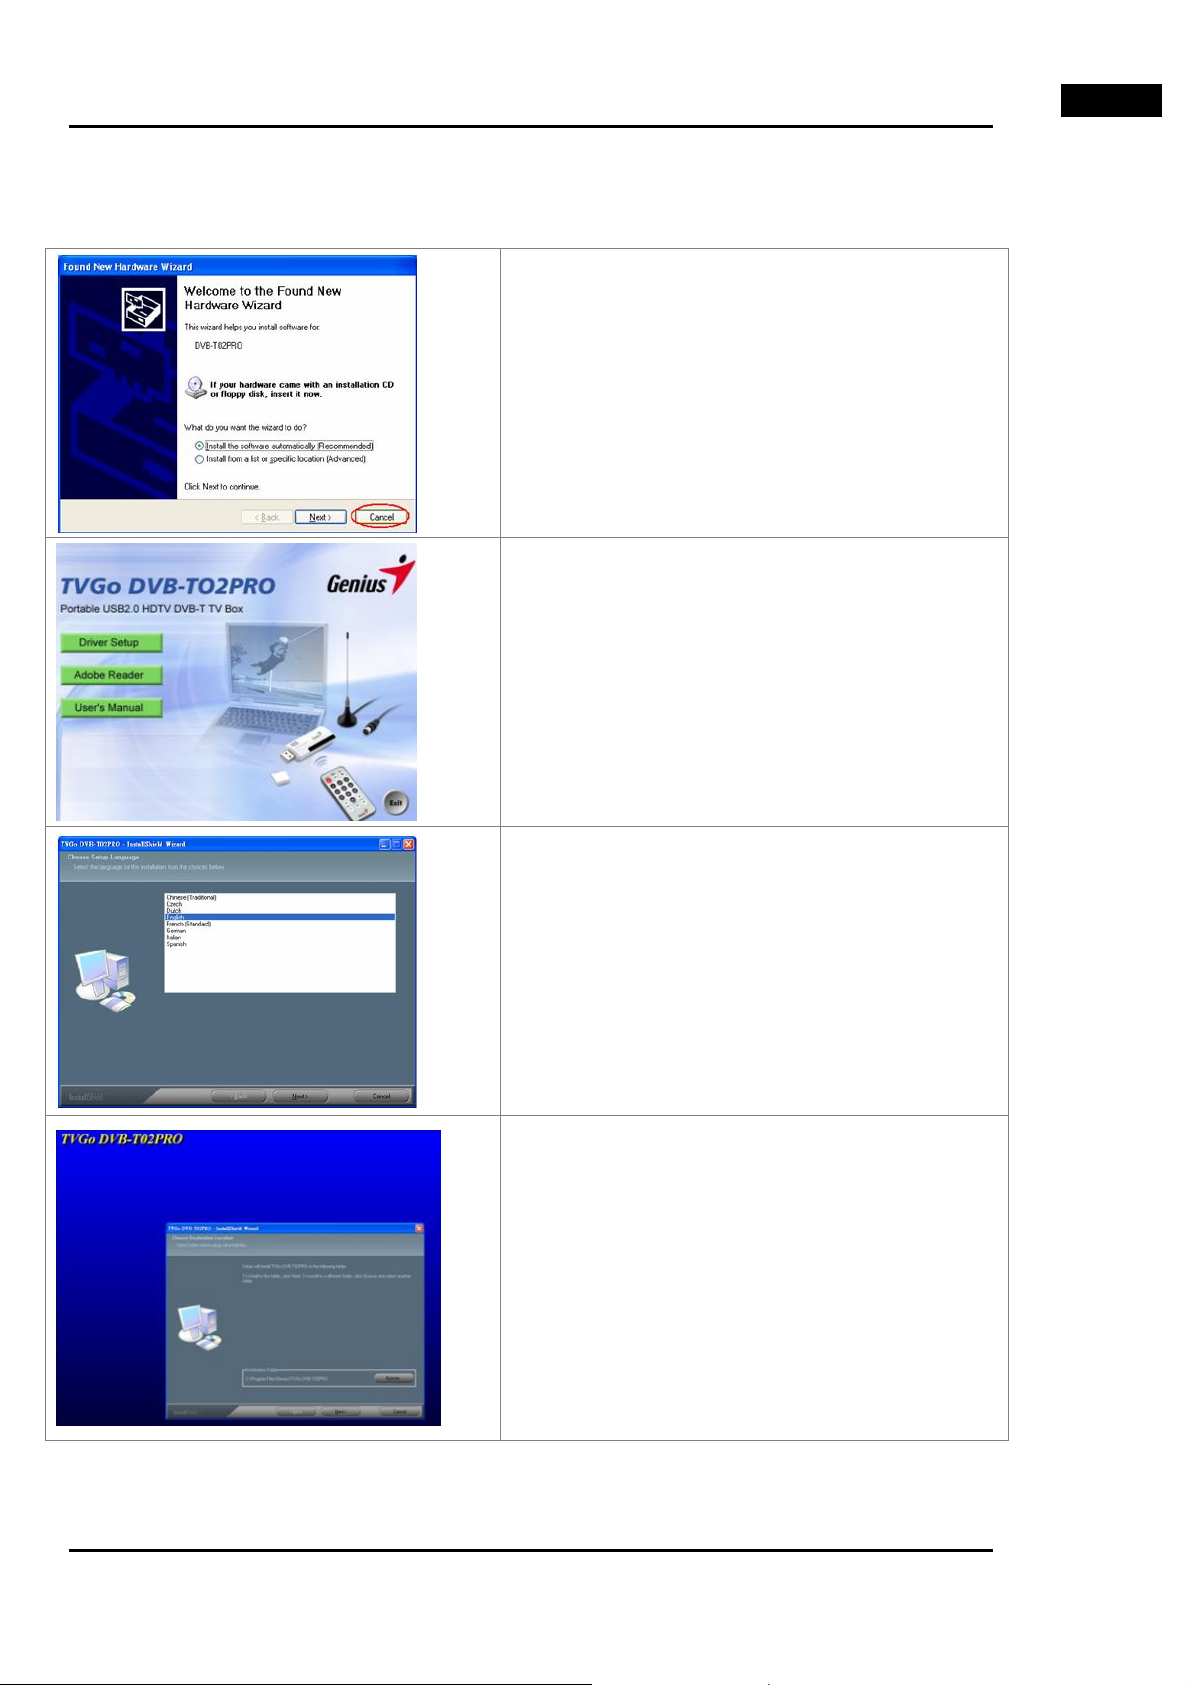
After the computer and TVGo DVB-T02PRO are
connected, the following window appears. Click on
“Cancel" to install the driver later.
Put into the software disc into your CD-ROM drive.
Select Driver Setup to install driver and application.
Then the following window will pop up.
If you do not see this window, manually run
setup.exe“ from the software disc
After entering Install Shield menu, choose the
languages installed, and then continue installing
according to the instructions.
Select “Next” to continue installing and choose the
desired file folder to install and go to next step.
3
Page 4

English
Choose “Next” to continue installing.
Click “Continue Anyway” to install the hardware.
After the installation is done, click on “Yes, I want to
restart my computer now.”
Then click and select “Finish” to complete the
installation procedure.
4
Page 5
English
Chapter 3 Launch the software
3.1 Click Start on Windo ws Taskbar, and then select Prog rams\TVGo DVB-T02PRO or double click the
TVGo software icon on the desktop.
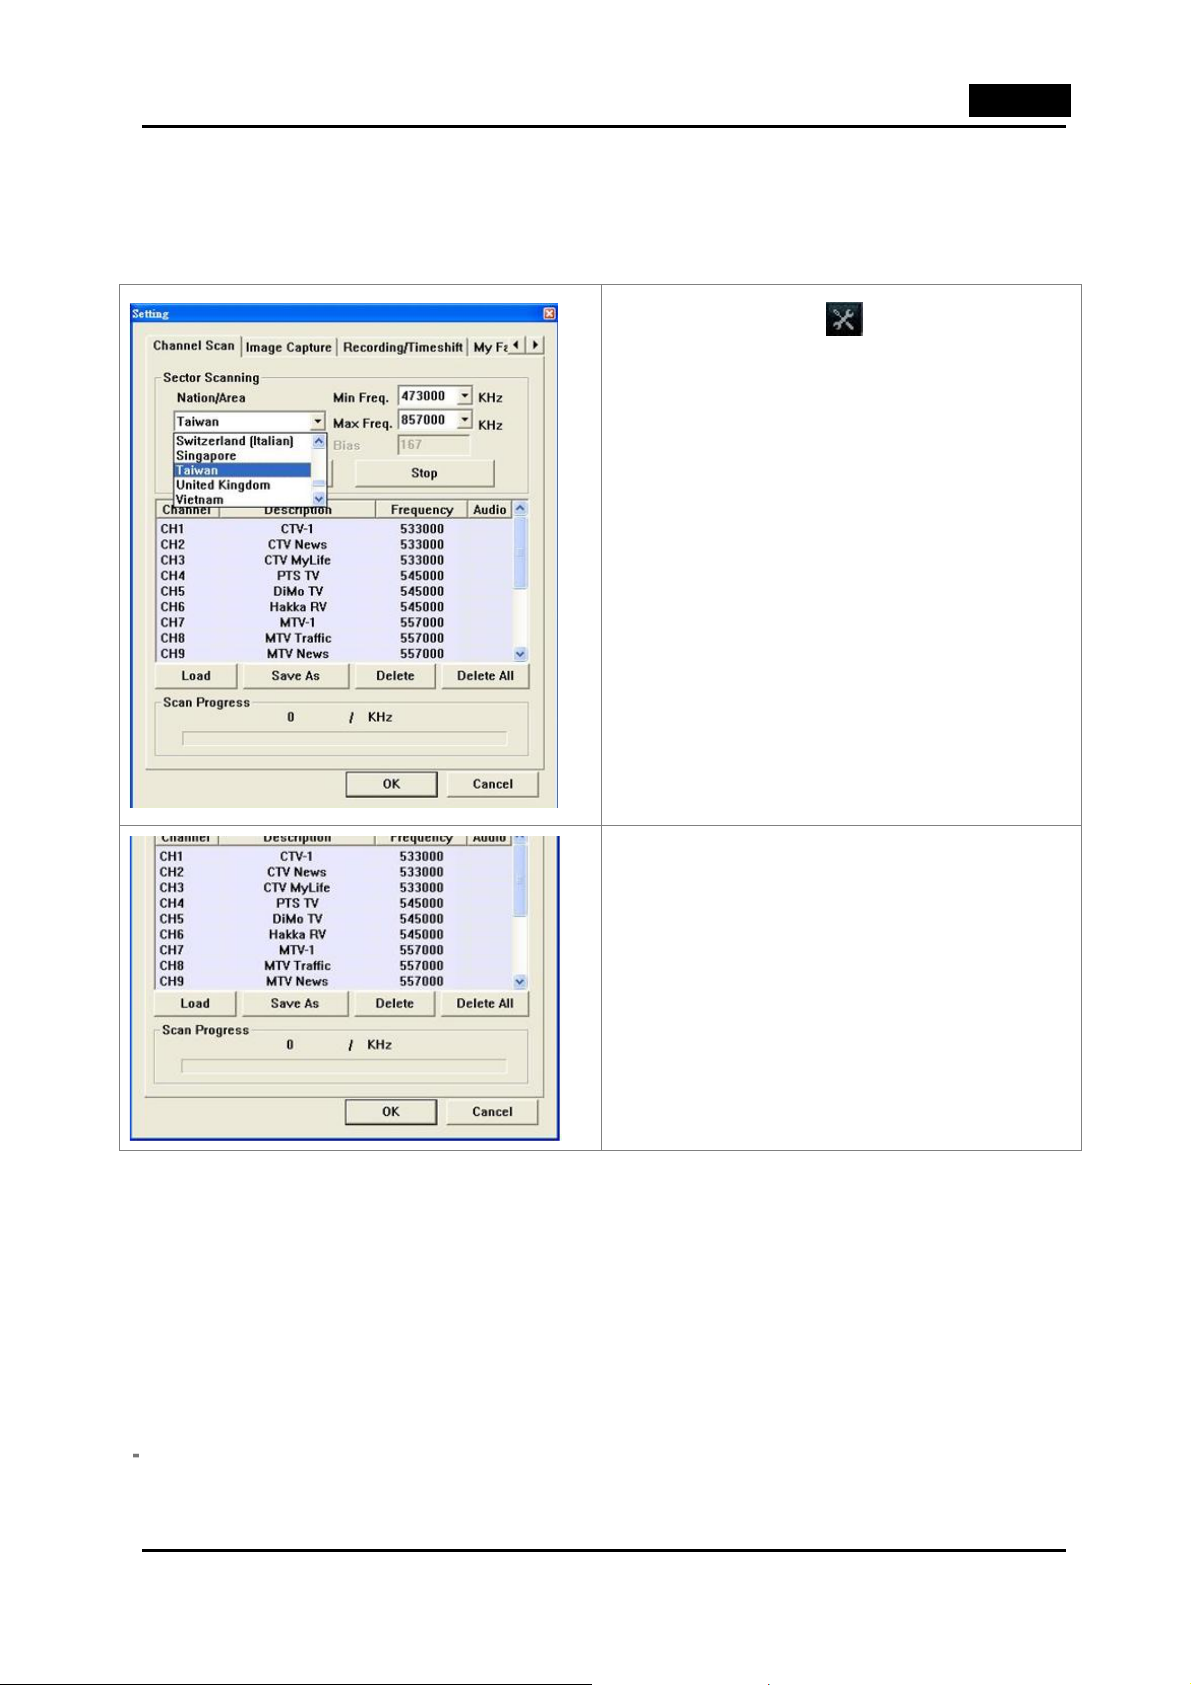
3.2 Scan channels
1. Select the small icon
enter the setting menu.
2. Select the country and press “Auto Scan” to scan
the channels.
You can select and click "Load" to use the channel
table stored before, or select some specific
on the control panel to
channels and select "Delete" to delete these
specific channels, or select and click "Delete All" to
delete all channels. Then, you can select "OK" to
store all changes. Or you can select "Cancel" to
give up all changes and exit.
5
Page 6
English
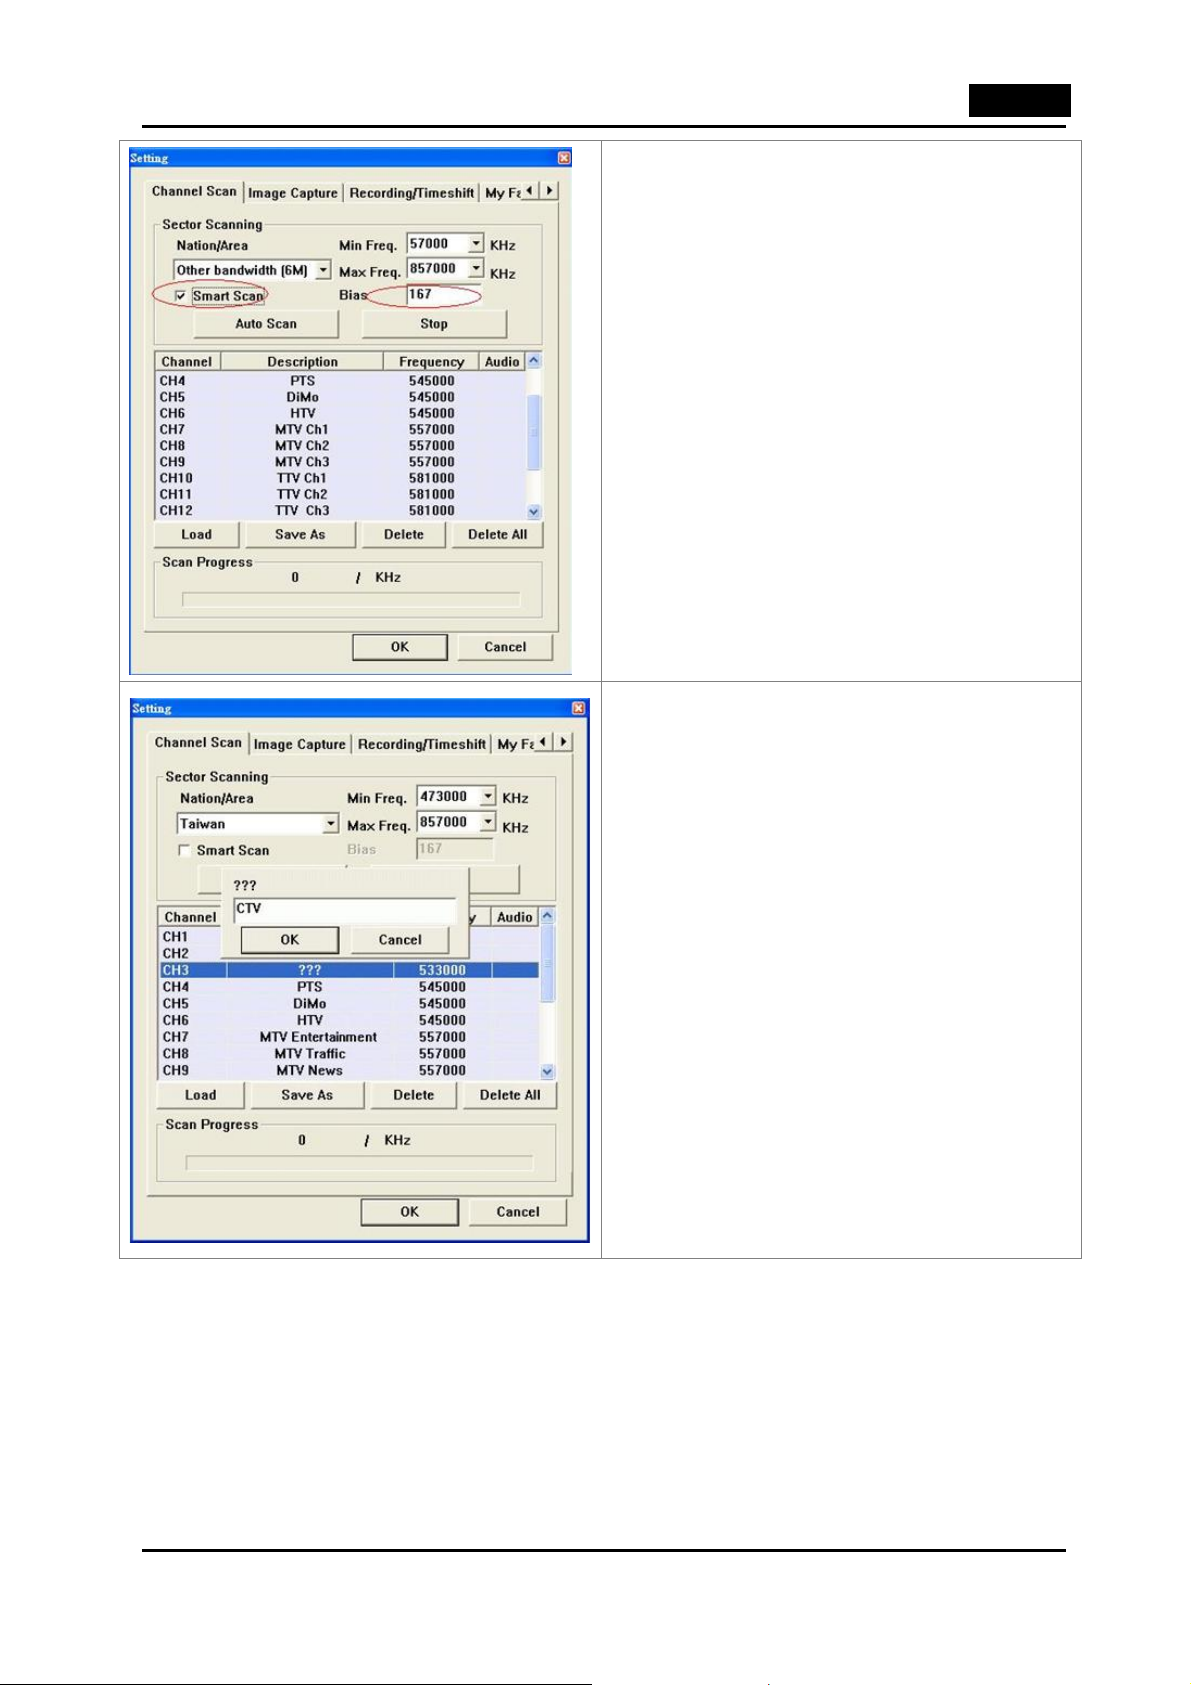
In case the area where you are does not have
regular frequency; you can enable the smart scan
and put in the bias value. When the system does
the channel scan, the bias value will be added or
subtracted in order to locate the correct channels.
After channel scanning is done, you can change the
Notice:
channel name to whatever you like. You can move
the mouse to the channel you want and click the
right button. There will pop up editor window to
allow you to change the name.
1. Good reception is required for watching digital TV. In case of weak signals, digital TV will not be able to
produce any pictures at all, unlike analog TV where the picture is merely unclear. If the signal is weak in
your room, you may need a digital TV antenna (similar to a UHF antenna mounted on the roof) that can
receive digital terrestrial signals, or the portable antenna supplied with the product to watch digital TV.
2. If you cannot find the area or sector in the country where you live, select "Other bandwidth (6M), Other
bandwidth (7M), Other bandwidth (8M)" or “Unknown (Scan All)” option.
6
Page 7

3.2 Introduction of control panel key
English
TVGo Main Screen
Control Panel
Icon Descriptions
Display TVGo Player information
TV Off
Full screen/Normal screen
Minimize TVGo Player
Set TV/Video screen always on top
Select video files for playback
Pause/resume video playback
Stop video playback/Deactivate Time-shift
Fast backward video playback on pre-recorded file or Time-shift
Fast forward video playback on pre-recorded file or Time-shift
Live TV recording: To record the current program you are watching, select this
icon.
7
Page 8

English
/
Activate Time-shift
Toggle to previous TV channel
Toggle to next TV channel
Volume Up
Volume Down
Volume level status and adjustment
Sound On/Off: To turn On/Off sound, select the icon
This icon
indicates "Mute" status.
on the control panel.
Mute Status
Bilingual Toggle: If the program supports bilingual, select this icon. It depends on
the availability of the channel transmitter and program.
To scan channels, change image capture properties, or change the path of
recording and Time-shift.
Frame capture
Enable video sub-screen
To program scheduled recording or change the recording path, select this icon on
the control panel.
TV channel preview
My Favorite Programs
8
Page 9

English
~
3.3 Image Capture
Open TeleText window of TV program
Activate EPG (Electronic Program Guide)
Select TV channels
Online Help
Back to previous TV channel
TV channel signal strength status
Stereo Status
Enter setting and select Image capture page to set the frames per capture and interval between each
frame.
Total Frames: You can use the left mouse button to
change the frames you want to capture each time.
Interval: You can use left mouse button to change the
capture interval (seconds) of each frame.
Default: You can click this button to restore the default
value stored on the system.
Frame Capture Path: You need to specify your
location to store the captured frames in this field.
If the settings of image capture are correct, you can
click "OK" to save your setting and exit. Or click
"Cancel" button to give up all the changes you made
and exit.
9
Page 10

English
Select
program you are watching.
You can click “Capture” again to capture another
frame.
You can delete the selected frames by clicking
“Delete”. Or, you can use “Delete All” to delete all
the frames you capture.
to take an image capture of the
Once you finish the selection, you can click “Save”
to save the capture frames or “Close” without
saving. You can also change the image saving path
by using the “Path” entry field section.
10
Page 11

3.4 Electronic Program Guide
English
If the program supports EPG (Electronic Program Guide), select the small icon
Notice: It depends on the availability of the channel transmitter and program.
You can choose a different program by pulling
down the sub-menu and make the selection.
You can also check the programs you want to
add into schedule recording.
After you click "Schedule Record", the system
will pop up a message to let you know if you did
it successfully.
on the control panel.
3.5 Time-shift
When you are watching a real time program and need to be out for a while, select the Time-shift button
on the control panel to start recording the program from this point of time.
11
Page 12

English
When you are back, you can use the left mouse button to click on the scroll bar to select the point you want
to watch.
Or you can also use Back-ward button
speed and up to x32 speed.
Use Stop button
click Stop button
to bring the player speed to normal. If you want to deactivate the Time-shift, you can
again to do it.
or Forward button to review the TV program from x2
Note! For VISTA users, when you activate this
feature you will see the following pop-up menu to
ask the permission to access the files. Select
"Allow" to continue.
3.6 TeleText
If the TV program supports TeleText, select the small icon
Note: It depends on the availability of the channel transmitter and program.
You can click Page-Up or Page-Down to go up or
down one page. Just click Pause to stay on the
current page. You can also click Home to jump to
page 100 or fill the page number into the GoTo field
to select a page.
12
on the numerical panel.
Page 13

3.7 My Favorite
English
To use my favorite feature, you need to set up your
favorite channel list first. After the setting is done, you
can select the small icon
watch your favorite programs.
Select the setting icon
enter the setting menu first. After you enter the setting
menu, select "My Favorite" sub-menu to enter my
favorite setting.
You can select your favorite channels and use the
RIGHT arrow key (
shown.
on the control panel to
on the control panel to
) to add into my favorite list as
You can remove your favorite channels by using the
LEFT arrow key (
13
) as shown.
Page 14

English
You can change your favorite channel sequence by
using the UP arrow key (
(
You can select the small icon
to watch your favorite programs.
Note! Once you activate this feature, the channel
up/down sequence will follow your setting on the My
Favorite window.
) as shown.
) or DOWN arrow key
on the control panel
3.8 Video Sub-screen
You can launch another video sub-screen while you are watching live TV or video file on the main screen.
You can press the button
launch the video sub-screen. Or you can use the
main menu from the main screen as shown.
on control panel to
14
Page 15

English
Live TV and Video
Video and Video
3.9 The multi-function remote control
ICON Explanation
POWER
REC
0-9 …
VOL /
CH /
RET/STOP
MUTE
TV On/Off
Records the currently viewed TV program
Channel selections
Adjust volume levels
Switch up/down the TV channel
Back to previous TV channel/Stop
Recording/Deactivate Time-shift
Sound On/Off
15
Page 16

English
3.10 Functions supported by mouse
Click the right mouse button anywhere on the TV main screen. You can see the menu pop up (pg. 17). The
functions are as follows:
Functions Descriptions
Always On Top
Device
PoP
Channel Up
Channel Down
Channel Return
Stop
Pause
Forward
Backward
Play File
Time-shift
My Favorite
TV Recording
Tele-Text
Mute (Cancel Mute)
Set TV screen always on top
Select TV tuner device to use for this screen
Open/Close sub-window to play previously recorded TV program
Set TV channel up
Set TV channel down
Back to previous TV channel
Stop playing a recorded program file or deactivate Time-shift function
Pause and stop playing a recorded program file
Fast forward a recorded program in playback
Fast backward a recorded program in playback
Play a previously recorded program file
Temporarily records the currently viewed TV program
Open my favorite programs list
Records the currently viewed TV program
Open Tele-Text information window
Toggle Sound Off/On
Zoom In/Zoom Out
About
Exit
Full screen / normal screen switch
Display TVGo player information
Close TVGo player
16
Page 17

3.11 Configuration for Record / Time shift
English
Recording Path
Select a path to save your recording file.
Time-shift Duration
The desired maximum period for Time-shift can be selected
from 30 to 60 minutes, depending on the storage space
available on your hard disk. (Time-shift: When you are watching
a real time program and are away for a while, use this function
to start recording the program from this point of time.)
To configure the schedule recording, select and click the icon on
the
Recording”.
Basic Setting
Job Title:
Action After / Recording:
after the schedule recording. These are:
Exit:
recording.
Enter Hibernate State:
hibernation after the schedule recording.
No Action:
schedule recording.
Recording Setting
Channel:
recording you want.
Note: You cannot record TV programs from different channels
control panel to open the dialog box of “Scheduled
You can type in a name for the video recording.
There are three actions you can select
Click this and the application will exit after schedule
Select this and the system will go into
Click this and the application will stay alive after the
You can type in the TV channel name for the schedule
at the same time.
Mute Duration Recording: Select this and the system will be
mute during schedule recording.
Minimize while Recording: Select this and the system will be
minimized during schedule recording.
17
Page 18

English
Date / Time Setting
Starting Date: You can choose to make an appointment to
make video recording by filling in the starting date here.
Recording Period: You can type in the recording length here.
Notice: You cannot type in a date and time in the past.
Once: Select this if you want to establish a video recording
reservation just this time.
Weekly: Click on this to establish the video recording
reservation the same time every week.
Working Day: Click this button to make a video recording reservation from Monday to Friday.
Daily: Click this button to make a video recording reservation each day.
New: Select this button to add a new video recording reservation.
Delete: Select this button to delete a pre-arranged schedule-recording job.
Del Obsolete Data: Click this button to delete all obsolete pre-arranged schedul e recording jobs.
Modify: Select this button to modify a pre-arranged schedule-recording job.
Save: Click this button to save the newly added or modified job.
After you click "Add" button, you can set a new schedule-recording job. Once all the data is filled in correctly, you can click the
“Save” button. The following window will pop up to show you the status of these jobs.
18
Page 19

English
Job title: Displays the name of the
schedule-recording job.
Channel: Displays the TV channel to be recorded in
this schedule-recording job.
Starting date/time: Shows the starting date and
time of this schedule-recording job.
Duration: The recording period of this
schedule-recording job.
Status: The state (wait / finished) of this
schedule-recording job.
Times: It displays how many times this
schedule-recording job will take (Single/Multiple)
If the settings of all schedule-recording jobs are correct, you can click "OK" to save all the changes and exit. Or click "Cancel”
to give up all the changes you made and exit.
Note: TVGo Player supports auto Power On for scheduled recording. It allows your computer to resume and start recording
from standby at a preset time. If you want to activate the auto Power On function for scheduled recording, make sure to:
1. Uncheck the box next to "Prompt for password when
computer resumes from standby" under the
Advanced tab in “Power Options Properties”.
19
Page 20

English
2. Check the “Enable hibernation” box und er the hibernate
section from “Power Options Properties”.
3. Make sure that the application “TVGo DVB-T02PRO Monitor”
is running now.
20
 Loading...