

Page 1

Contents
About this guide ................................................................. 4
FCC statement ................................................................... 4
Prohibition of co-location ................................................... 5
Important note .................................................................... 5
FCC specific absorption rate (SAR) statement .................. 5
WEEE notice ...................................................................... 5
CE regulatory notice .......................................................... 6
Battery warning .................................................................. 6
Caution .............................................................................. 7
Important information regarding the waterproofing of the
camera ............................................................................... 9
Important information regarding the property of the
waterproof casing ............................................................ 11
1 Introduction ................................................................. 12
1.1 System requirements ............................................ 12
1.1.1 Connection to a Computer ............................ 12
1.1.2 Linking a mobile device ................................ 13
1.2 Features ................................................................ 13
1.3 Package contents .................................................. 14
1.4 Product overview ................................................... 15
1.5 Button operation .................................................... 16
2 Getting started ............................................................ 17
2.1 Inserting the memory card .................................... 17
2.2 Charging the device .............................................. 18
1
Page 2

2.2.1 Charging from a computer ............................ 18
2.2.2 Charging from an outlet (optional) ................ 19
2.3 Definition of indicator lights ................................... 20
2.4 Information in LCM screen .................................... 22
2.5 Installing with a mount ........................................... 24
2.5.1 Installing onto the clip mount & strap ............ 24
2.5.2 Installing onto the bike mount ....................... 25
2.5.3 Installing onto the tripod mount .................... 28
2.6 Using the waterproof case .................................... 29
3 Initial set up ................................................................. 31
3.1 Camera application installation ............................. 31
3.2 Wi-Fi connecting ................................................... 32
4 Using the LIFE Shot Cam application ....................... 34
4.1 Recording videos .................................................. 34
4.1.1 The Recording screen ......................................... 35
4.2 Shooting photos .................................................... 37
4.2.1 The Shooting screen ............................................ 38
4.3 Timelapse videos .................................................. 40
4.3.1 The Timelapse screen.......................................... 42
4.4 Playback pictures and videos ............................... 44
4.4.1 Viewing pictures ............................................ 45
4.4.2 Playing videos .............................................. 46
5 Settings menu ............................................................. 48
5.1 Using the settings .................................................. 48
5.1.1 Menu items ................................................... 49
2
Page 3

6 Connecting to other devices ..................................... 51
6.1 Connecting to the computer .................................. 51
7 Installing the software ................................................ 52
8 Editing software .......................................................... 53
9 Specifications ............................................................. 54
3
Page 4

About this guide
The content in this document is for information purposes and is
subject to change without prior notice. We have made every effort to
ensure that this User Guide is accurate and complete.
However, no liability is assumed for any errors or omissions that
may have occurred.
The manufacturer reserves the right to change the technical
specifications without prior notice.
FCC statement
This equipment has been tested and found to comply with the limits
for a Class B digital device, pursuant to Part 15 of the FCC Rules.
These limits are designed to provide reasonable protection against
harmful interference in a residential installation. This equipment
generates, uses and can radiate radio frequency energy and, if not
installed and used in accordance with the instructions, may cause
harmful interference to radio communications. However, there is no
guarantee that interference will not occur in a particular installation.
If this equipment does cause harmful interference to radio or
television reception, which can be determined by turning the
equipment off and on, the user is encouraged to try to correct the
interference by one or more of the following measures:
• Reorient or relocate the receiving antenna.
• Increase the separation between the equipment and receiver.
• Connect the equipment into an outlet on a circuit different from
that to which the receiver is connected.
• Consult the dealer or an experienced radio/TV technician for
help.
This device complies with Part 15 of the FCC Rules. Operation is
subject to the following two conditions: (1) This device may not
cause harmful interference, and (2) this device must accept any
interference received, including interference that may cause
undesired operation.
FCC Caution: Any changes or modifications not expressly approved
by the party responsible for compliance could void the user's
authority to operate this equipment.
4
Page 5

Prohibition of co-location
This device and its antenna(s) must not be co-located or operated in
conjunction with any other antenna or transmitter.
Important note
Radiation Exposure Statement: This equipment complies with FCC
radiation exposure limits set forth for an uncontrolled environment.
End users must follow the specific operating instructions for
satisfying RF exposure compliance. To maintain compliance with
FCC exposure compliance requirements, please follow the
operating instructions as documented in this manual.
FCC specific absorption rate (SAR) statement
The product complies with the FCC portable RF exposure limits set
forth for an uncontrolled environment and is safe for the intended
operation as described in this manual. The further RF exposure
reduction can be achieved if the product can be kept as far as
possible from the user body or set the device to a lower power
output if such a function is available.
WEEE notice
Disposal of Waste Electrical and Electronic Equipment and/or
Battery by users in private households in the European Union
This symbol on the product or on the packaging indicates
that this cannot be disposed of as household waste. You
must dispose of your waste equipment and/or battery by
handling it over to the applicable take-back scheme for
the recycling of electrical and electronic equipment
and/or batteries. For more information about the
recycling of this equipment and/or battery, please
contact your city office, the shop where you purchased
the equipment or your household waste disposal service.
The recycling of materials will help to conserve natural
resources and ensure that it is recycled in a manner that
protects human health and the environment.
5
Page 6

CE regulatory notice
Herewith confirm to comply with the requirements set out in the
Council Directives on the approximation of the Laws of the Member
States relating Electromagnetic Compatibility of Radio and Telecom
device (1995/5/EC); the Low Voltage Directive (2006/95/EC); the
Restriction of The Use of Certain Hazardous Substances in
Electrical And Electronic Equipment Directive (2002/95/EC), Turkish
EEE Directive; the Commission Regulation (EC) No 1275/2008
implementing Directive 2005/32/EC of the European Parliament and
of the Council with regard to eco-design requirements for standby
and off mode electric power consumption of electrical and electronic
household and office equipment, and the Directive 2009/125/EC of
the European parliament and of the council establishing a
framework for the setting of eco-design requirements for
energy-related products.
Battery warning
• Always charge using the provided cable. Improper handling
of the battery may result in injuries.
• Never dismantle or pierce the battery or allow the battery to
short-circuit.
• Keep the battery out of reach of children and moisture
climates.
• Batteries may explode if exposed to naked fire. Never
dispose of batteries in a fire.
• Please refer to your Local Regulations for proper disposal of
used batteries.
• Never replace the battery on your own; please contact your
local dealer or authorized retailer for assistance.
6
Page 7

Caution
• Never disassemble the device or remove any parts by
yourself. This will void all warranty claims.
• Keep the device away from the reach of children or animals
to prevent them from swallowing.
• If you notice smoke or a strange smell coming from the
device, turn the power off immediately. Take the device to the
nearest authorized service center for repair. Never attempt to
repair the device on your own.
• Use only the recommended power accessories. Use of
power sources not expressly recommended for this
equipment may lead to overheating, distortion of the
equipment, fire, electrical shock or other hazards.
• Wi-Fi Signals are unable to pass through buildings. The
signal limit transmission is 10m.
• Wi-Fi Operation Channels List: Ch1-Ch11.
• The product employs wireless data communication which
may interfere, or be interfered by, a near-by device.
• Never use this device in the vicinity of a microwave oven or at
places where there is radio interference.
• Radio wave reception may be worsened in specific
environments.
• Please be advised that if another device is also using the
same 2.4GHz band as this product, the processing speed of
both devices may slow down.
• This product gets warm when in use; this is normal.
• Improper use or operation of the product may result in
damage of the product or its accessories and voids the
warranty.
• The radio frequency (RF) generated by this RF electronic
device may cause adverse effects on the operation of other
electronic devices and result in malfunctioning. Wireless
transmitters and circuitry may also interfere with other
electronic devices. Therefore, do observe the following
precautions:
7
Page 8

• Aircraft: Never use a radio transmitter when you are in
an airplane. Please switch off the Wi-Fi function of
the device.
• Vehicle: The radio frequency transmitted by this device
may affect the electronic system in a motorized
vehicle. Please consult the manufacturer or dealer
of your vehicle on the possible effect.
• Pacemaker: In order to prevent any potential
interference to a pacemaker, anyone who uses a
pacemaker should be advised, that, when using this
device, a minimum distance of 15cm (6 inch) should
be kept between the device and the pacemaker;
and never put this device in a chest pocket. In case
of any doubt of interference, switch off the device
immediately.
• Medical Device: If you use a personal medical device,
consult the device manufacturer or your physician to
confirm if your device is sufficiently shielded from
the RF transmission of this device.
• Medical Facilities: Hospitals and medical institutes may
use facilities that are sensitive to an external RF
energy. Observe such instructions when the
medical care personnel or any posted sign requests
you to switch off any device that may interfere the
radio frequency.
• Explosion sites or any location with a posted sign: In
order to prevent interfering with an explosion activity,
observe all the signage and instructions in the
Explosion Area or in a zone with a “Switch Off 2-way
Radios” sign by switching off devices that may
interfere with the radio frequency.
• This product is unsuitable for filming any barcode.
• The camera has become too hot and needs to cool down
after using over than 1 hour (continuous recording). Simply
shut down for cooling before attempting to use it again. It
won’t damage the camera, it is only for reminding the user
that the temperature of the equipment cannot be too high.
8
Page 9

Important information regarding the waterproofing of the
camera
This product complies with Class V of IEC waterproof classification
(IPX5), being capable of sustaining low-pressure water jets in all
directions, and possesses waterproof properties for normal
activities.
Precautions prior to using the device:
• Make sure that no foreign objects, sand or dust are attached
to the waterproof cover of the USB/memory card slot. If
foreign an object has become attached, remove it carefully
with a lint-free cloth.
• Make sure that there is no crack or damage on the
waterproof cover of the USB / Memory card slot.
• Verify carefully that the waterproof cover of the USB /
Memory card slot is sealed tightly; make sure the cover is not
open in a wet situation.
• Do not open/close the waterproof cover of the USB / Memory
card slot with a wet hands, otherwise electric shock or device
malfunction may occur and damage the unit.
• The product is only waterproof for activities encountered
during normal living; DO NOT immerse the product into water.
In the event of accidental soaking or ingression of water,
switch off the power immediately and bring the product to a
nearby authorized service center for repair.
• DO NOT allow the product to come into contact with any
chemicals or liquids.
• Internal moisture/misuse caused by human error will result in
a voided warranty.
• The product is only suitable for use within the normal
temperature range: -10° ~ 50° C (14° ~ 122° F) and humidity
range: 0 ~ 95% RH.
9
Page 10

Precautions after use:
• In the event of liquids on the product, clean the product
carefully using a lint-free cloth; make sure the product is fully
dry before opening the waterproof cover of the USB /
Memory card slot.
• If water gets into the internal side of the waterproof cover of
the USB / Memory card slot of the device, dry it fully before
using the device.
Storage and maintenance:
• Store the product in an environment of temperature range:
-20° ~ 60° C (-4° ~ 140° F) and humidity range: 0 ~ 90% RH
only.
• Never use any chemicals on the product for cleaning,
anti-rust, anti-fog, etc., or the waterproof capability may
deteriorate.
• Make sure the waterproof cover of the USB / Memory card
slot is sealed tightly before rinsing the stain with low-pressure
running water, followed by wiping dry with a lint-free cloth or
leave it to air-dry.
• To ensure the waterproof capability of the product, it is
suggested that you should replace the waterproof cover of
the USB / Memory card slot of the device on a yearly basis.
• Take heed to prevent any impact of the product, otherwise
the casing or lens may become damaged, or the waterproof
capability may be eroded.
10
Page 11

Important information regarding the property of the waterproof
casing
The exclusive waterproof casing for the product complies with IEC
Class VIII (IPX8) specification, which allows immersing the product
at a depth of 3m of fresh water for up to 30 minutes when properly
installed inside the waterproof casing.
Precautions for underwater operation:
• Never use the product at a depth exceeding 3m in the water;
never use the product under water for more than 30 minutes.
• NEVER open the waterproof casing when the device is
submerged in water.
Never jump into the water with the waterproof casing impacting
the surface of the water. An excessive impact force may cause
water to leak inside.
Failure to follow proper instructions each time you use the
camera can result in leaks that may damage your camera. The
warranty does not cover water damage or misuse. It is assumed
that you read and agree to the above statements. It is the users’
responsibility to secure the camera securely to any sport
equipment prior usage.
11
Page 12

1 Introduction
Thank you for purchasing this camera. This device is specifically
designed for real time video and audio recording during leisure
activities.
1.1 System requirements
1.1.1 Connection to a Computer
For connection to a PC, be sure your PC meets the following
specifications:
For Windows:
• Windows XP SP2 / Vista / Win 7 / Win 8
• Processor with at least Pentium IV 3.2GHz / AMD Athlon FX
2.6GHz or higher
• 2GB RAM at least
• NVIDIA GeForce 7600GT / ATI X1600 series or later
• USB port
• 16-bit color display compatible monitor
(1280x1024, 32-bit color display recommended)
• 250 MB of available hard disk space
• CD-ROM drive
For Macintosh:
• Mac OS 10.4 or higher
• Power Mac G3 or higher
• Minimum 256MB RAM
• 110MB of available hard disk space
• USB port
• CD-ROM drive
12
Page 13

1.1.2 Linking a mobile device
Linking a mobile device-be sure your mobile device meets the
following specifications:
For iOS operating system:
• Version: 6 / 7 or Greater
• Product Name: iPhone4S / iPhone5 / iPhone5S / iPad / iPad2 /
New iPad (Retina display) / iPad Air
For Android operating system:
• Version: 4 or Greater
• Brand Name: HTC / SONY / SAMSUNG / LG
• Screen Resolution: MDPI / HDPI
1.2 Features
• Excellent 8MP CMOS sensor
• Full HD camcorder (1920x1080 @30fps)
• Wi-Fi Built-in
• 4k MJPEG Time-Lapse video
• Complies with Class V of IEC waterproof classification (IPX5)
• The exclusive waterproof casing (optional) for the product
complies with IEC Class VIII (IPX8) specification
• Real-time live video preview via mobile device (iOS / Android
App)
• Self-timer function supported
• Support App / PC Edit Software
13
Page 14
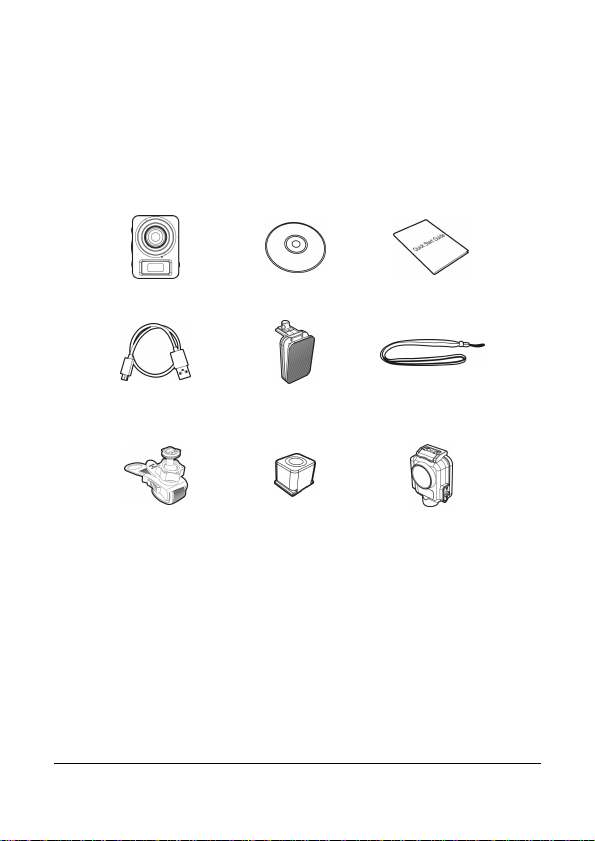
1.3 Package contents
The package contains the following items. In case there is any
missing or damaged items, contact your dealer immediately.
Camera CD-ROM
Quick start
guide
Micro USB cable Clip mount Strap
Bike mount Tripod mount
14
Waterproof
case
Page 15

15
1.4 Product overview
11
12
13
Side (left and
r
ight) views
Front view
1
3
5
7
2
4
6
Top and bottom views
No.
Item
No.
11
12
13
8
Rear view
9
10
Item
1 Bracket socket
2 Mode indicator light
3 Mode button
Timelapse / Capture /
4
Recording indicator light
5 Record Button
6 Wi-Fi indicator light
7 Wi-Fi button
Waterproof cover of the
8
USB / Memory card slot
9 Power indicator light
10 Power button
Lens
Microphone
LCM screen
Page 16

1.5 Button operation
You can operate the camera alone without connecting to a mobile
device via Wi-Fi/App. See the table below for a description of each
button’s function.
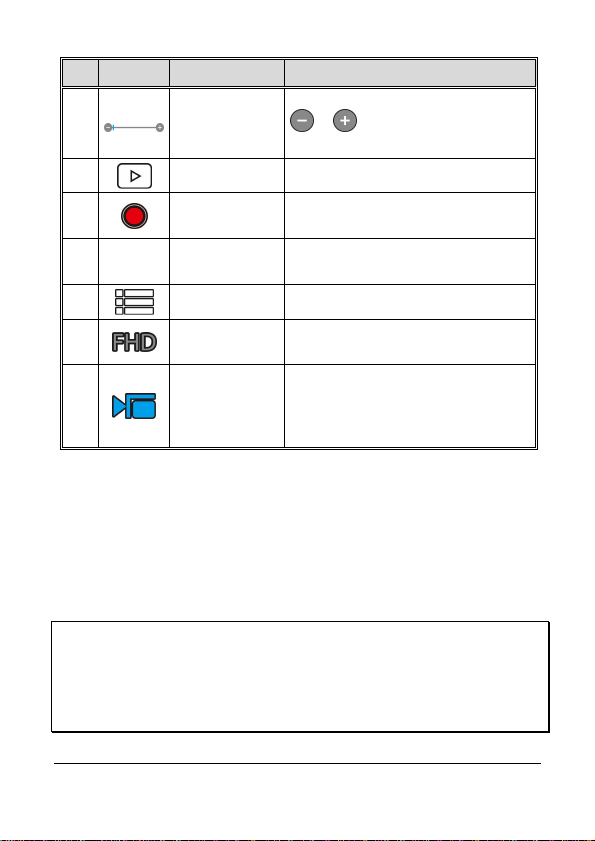
Item
Function
Mode button
Record button
Wi-Fi button Press to turn the Wi-Fi on or off.
Power button
Note:
If you want the recorder to go back to the
the camera’s Wi-Fi is turned off. Press and hold the
press the
indicates factory default setting is complete.
16
Wi-Fi
Changing Modes (Timelapse / Capture /
Recording Mode)
•••• In Timelapse mode, press the Record
button to start recording a video. Press it
again to stop recording (When the device
enters Power Saving Mode and is in
shutdown status, press the Power button to
stop recording).
•••• In Camera mode, press the Record button
to capture a photo.
•••• In Video mode, press the Record button to
start recording a video. Press it again to stop
recording.
•••• Press to turn the camera on or off.
•••• To reset, press and hold the Power button
for at least 5 seconds.
Default Setting
button. When two (2) beep tones are prompt, this
Mode
, make sure
button, then
Page 17
17
2 Getting started
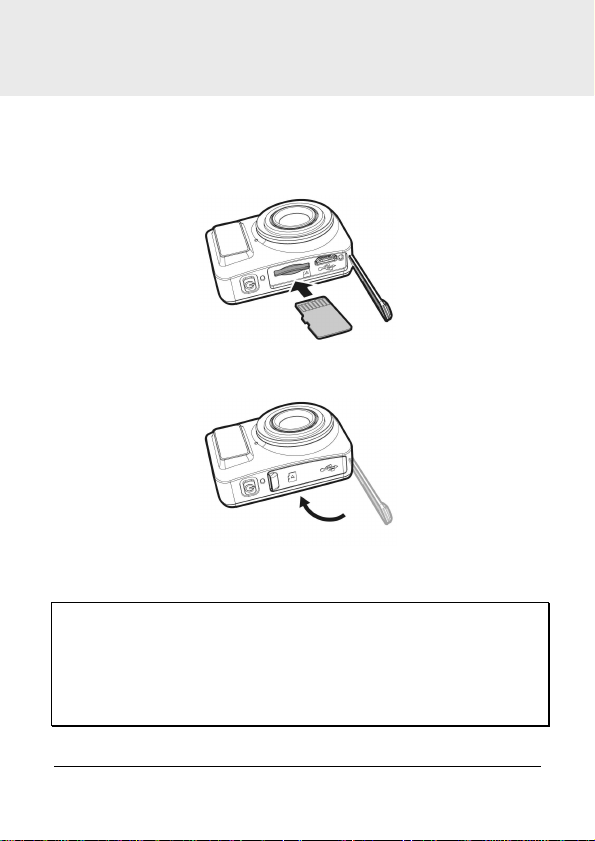
2.1 Inserting the memory card
1. Open the waterproof cover of the USB / Memory card slot.
2. Insert the memory card with the gold contacts facing the front of
the device. Push the memory card until it clicks into place.
3. Make sure the waterproof cover of the USB / Memory card slot
is sealed tightly, to achieve normal activity waterproofing.
4. To remove the memory card, push to eject the memory card
out of the slot.
Note:
1. Do not remove or insert the memory card while the device is turned
on. This may damage the device and memory card.
2. Please use a Class 10 or higher rating Micro SD card, max up to
32GB.
3. Please format the micro SD card before initial use.
Page 18

2.2 Charging the device
2.2.1 Charging from a computer
1. Open the waterproof cover of the USB / Memory card slot.
2. Connect the micro USB cable into the port on the device.
3. Connect the other end of the micro USB cable to an available
USB port on your computer.
4. On completion of charging, make sure the waterproof cover of
the USB / Memory card slot is sealed tightly, to achieve normal
activity waterproofing.
18
Page 19

2.2.2 Charging from an outlet (optional)
1. Open the waterproof cover of the USB / Memory card slot.
2. Connect the micro USB cable into the port on the device.
3. Connect the other end of the micro USB cable into the port on
the USB plug, and connect the outlet.(Adaptor is not included,
which is 5V/1A power equal to smartphone adaptor)
4. On completion of charging, make sure the waterproof cover of
the USB / Memory card slot is sealed tightly, to achieve normal
activity waterproofing.
Note:
1. Please take note if the environment temperature reaches 45°C
(113°F) or above, the wall outlet can still supply power to device, but
it will not charge the Lithium-ion battery. This is the characteristic of
Lithium-ion and is not a malfunction.
2. If the Wi-Fi function is not enabled, the device can sustain an
operation of about 1 hour.
3. If you turn on the device while charging, this will prolong the
charging time.
19
Page 20

2.3 Definition of indicator lights
1
34
2
No.
Item Status
LED
indicator
Sound
effect
Changing
modes
Mode
1
indicator light
Timelapse /
Capture /
2
Recording
indicator light
20
Self-timer Flash red
Timelapse
mode
Timelapse Flash red
Capture Flash red
Recording Flash red
Flash red
Flash red
One beep
None
None
One beep
(Time
interval)
One beep
One beep
Page 21

3
indicator light
Wi-Fi
Wi-Fi on
Wi-Fi off
Red One beep
No
indication
One beep
4
Power
indicator light
Power on
Power off
Power will
soon be out
Charging
Fully
charged
Red None
No
indication
Flash Red
Red None
No
indication
None
None
None
21
Page 22

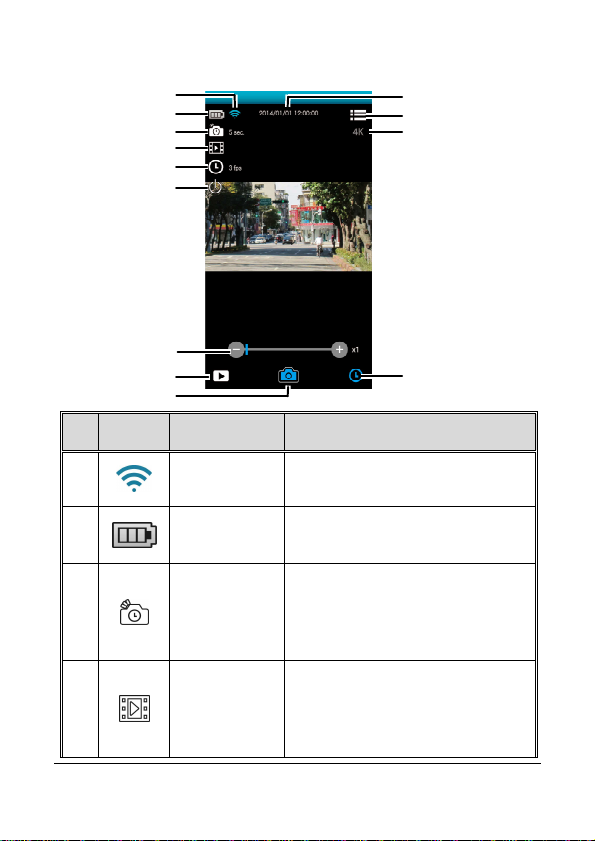
2.4 Information in LCM screen
1
2
3
No.
1 Battery status
2 Wi-Fi status
3
22
Item Icon Description
Full battery power
2/3 battery power
1/3 battery power
Out of battery power
Charging
Wi-Fi on
Wi-Fi off
Timelapse mode
Capture mode
Status
Recording mode
Memory card error (damaged,
locked or no card inside)
Page 23

Memory card full
Connect with mobile
Enter USB mode when
connected with a computer
Power will soon run out
23
Page 24

2.5 Installing with a mount
2.5.1 Installing onto the clip mount & strap
1. Push the fixture latch gently
into the support receptacle
on the device seated into
position.
2. Tie the hanger string into
the hole on the top of the
fixing.
3. Make sure the hanger string is firmly fixed to the device. The
base of the fixture allows a 360
° adjustment.
24
Page 25

25
2.5.2 Installing onto the bike mount
1. Loosen the knob of the bike
mount latch and push the
latch into the support
receptacle, until it clicks into
position.
2. Tighten the knob; make sure
that the device is firmly
fixed.
Page 26

26
3. Pass the bike mount rubber
band around the bike handle
and through the support
hole, pull the rubber band
backwards until a snug fit is
achieved.
4. Loosen the knob and adjust
the device vertically and/or
horizontally.
5. Tighten the knob, make sure the device is fixed firmly.
Page 27

27
6. To remove the bike mount,
first loosen the latch knob
and withdraw the device
from the support, followed
by pushing up the latch on
the bike mount, to loosen
the rubber band.
Page 28

2.5.3 Installing onto the tripod mount
1. Push the tripod adapter
latch gently into the support
receptacle on the device,
until the latch clicks into
position.
2. Make sure that the tripod adapter is firmly fixed to the device.
28
Page 29

2.6 Using the waterproof case
1. Place the device into the
front shell of the Waterproof
Case in accordance with the
position of the lens.
2. Lift up the buckle ring on top
of the casing and confirm
that the device is firmly
installed in the front casing;
then close up the back
cover.
Note:
1. After installed the waterproof housing, the mount hole is compatible
for others standard accessories.
29
Page 30

3. Push the buckle ring on top
of Waterproof Case
backwards to engage the
latch-hook on the back
cover.
4. Then push the buckle ring
on top of the Waterproof
Case down and forward so it
is in the fixed position.
5. Make sure that there is no gaps in the Waterproof Case, and
that the buckle ring has tightly fixed the Waterproof Case.
6. To remove the Waterproof Case, follow the reverse order of
Step 4 and Step 3 for loosening the buckle ring on top of the
Waterproof Case.
30
Page 31

3 Initial set up
Install a micro SD card (class 10 or higher rating, max up to 32GB)
into the camera device.
3.1 Camera application installation
The camera allows you to connect to the mobile devices via
software App. When using for the first time, install the LIFE Shot
App for your mobile device.
1. Download LIFE Shot App from Google Play or an App
Store.
2. Install the App.
Note:
APP layout and Features may be changed subject to different
software versions, please refer to Google Play or APP store for
update.
31
Page 32

3.2 Wi-Fi connecting
1. Press the Power button to switch on the Device.
2. Press the Wi-Fi button to activate the device’s wireless
broadcast.
3. Using your mobile device’s Wi-Fi, connect to the cameras
wireless broadcast signal by searching for the unique SSID
from the list, e.g. LifeShotFHD300XXXXXX (if the last 2 digits
are the same as the last 2 digits of your password, your device
corresponds).
4. Connect to the Wi-Fi and input the Wi-Fi password
5. The Wi-Fi password will be displayed on the LCM screen. Enter
the 4 numeral/letter shown from your LCM display twice. e.g. if
LCM display shows “1234”, the Wi-Fi password will be
“12341234”.
6. For iOS / Android Users:
Using the mobile device [Settings] → [Wi-Fi] → [Select device
ID no.: LifeShotFHD300XXXXXX] → [Enter the password] →
[Connecting].
7. Open the LIFE Shot App to begin using the camera
through your mobile device. The LCM display will show
, indicating the connection has been established.
Note:
1. Make sure the Wi-Fi function of the equipment is activated and the
mobile device is receiving Wi-Fi signal before executing the LIFE
Shot App, or the App will be exited.
2. The Wi-Fi connection has a maximum range of 10m from the
equipment without any obstructions in between the devices.
3. When there is no Wi-Fi activity on the camera for 3 minutes, the
Wi-Fi function will automatically disable and you will need to
re-enable the Wi-Fi signal on the camera.
4. We suggest that you should set the correct date and time for your
mobile device before using the equipment, so that the recorded
32
Page 33

video will be consistent with the date and time settings of the mobile
device.
5. After connecting the mobile device with the equipment, all the mode
switch,
be inoperable; all the operations shall be carried out via the LIFE
Shot App.
6. The language of the LIFE Shot App will be consistent with that of
your mobile device; it shall be the default language if it is not the
built-in one.
Record
and
operation buttons of the equipment will
Wi-Fi
33
Page 34

4 Using the LIFE Shot Cam
application
4.1 Recording videos
You can use this feature to record your life story, travel diary, or
sports clips.
1. Touch the button to switchover to Recording mode.
2. Touch the button to set video duration. (3 min. / 5 min. / 10
min. / 30 min.)
3. Touch the button to enable or disable Voice Record.
4. Press button to start recording a video.
5. Press button again to stop recording.
Note:
Prior to recording video, you may set
angle of the recorded video. See Using the
Rotate View
to alter the viewing
Rotate View
( 5.1.1).
34
Page 35

4.1.1 The Recording screen
2
3
4
5
6
7
The device will follow the set
recording video length to store
ired video
Available options: 3 min. / 5 min. /
voice
1
No. Icon Item Description
1
2
Wi-Fi status Indicates the Wi-Fi status.
Battery status
Indicates the remaining battery
power.
8
9
10
11
3
4
Video duration
Voice record
them as individual files.
Touch to select the requ
duration.
10 min. / 30 min.
Touch to select the required
record setting.
Available options: On / Off
35
Page 36
36
No. Icon Item Description
Indicates the zoom status. Touch
Touch to start recording, and
Indicates the current video
Indicates the current Recording
Touch to switch to Timelapse or
5
6
7
2014/01/01
8
12:00:00
9
10
11
Note:
When AVI file videos are downloaded to an iOS mobile device, the
device is not compatible with AVI files and cannot be viewable. To
browse files please use a computer or other media players. See Using
the
File Format On: MOV / Off: AVI
Zoom
indicator
Playback Touch to enter Playback mode.
Recording
Date and time
Menu Touch to enter the menu.
Video
resolution
Recording
mode
/ to adjust the zoom.
Available options: x1.0~x2.4
touch again to stop.
Indicates the current recording
date and time.
resolution.
mode.
Shooting mode.
( 5.1.1).
Page 37

37
4.2 Shooting photos
You can use this feature to capture photo, such as landscape and
portraits.
1. Touch the button to switch-over to Shooting mode.
2. Touch the button to set Self Timer and sequential (Burst)
capture. (Normal / 5 sec. / 10 sec. / Burst 3 Photos / Burst 5
Photos).
3. Touch the button to set Beauty class. (0 / 1 / 2).
4. Touch to capture the image, the file will be saved on the
camera device automatically.
Note:
1. When using the
seconds; you need to wait patiently.
2. Prior to taking a picture, you may set
viewing angle of the recorded picture. See Using the See Using the
Rotate View
( 5.1.1).
function, the algorithm takes about 8
Beauty
Rotate View
to alter the
Page 38

4.2.1 The Shooting screen
1
2
3
4
5
6
7
ions: Normal / 5 sec.
/ 10 sec. / Burst 3 Photos / Burst 5
8
9
10
11
No. Icon Item Description
1
2
3
4
38
Wi-Fi status Indicates the Wi-Fi status.
Battery status
Capture mode
Beauty
Indicates the remaining battery
power.
Touch to select Capture mode.
Available opt
Photos
Touch to select the desired
Beauty mode.
Available options: 0 / 1 / 2
Page 39

No. Icon Item Description
Indicates the zoom status. Touch
oto
Indicates the current Shooting
Touch to switch to Timelapse or
5
6
7
2014/01/01
8
12:00:00
9
10
11
Zoom
indicator
Playback Touch to enter Playback mode.
Shooting Touch to start shooting photos.
Date and time
Menu Touch to enter the menu.
Photo
resolution
Shooting
mode
/ to adjust the zoom.
Available options: x1.0~x2.4
Indicates the current recording
date and time.
Indicates the current ph
resolution.
mode.
Recording video modes.
39
Page 40

4.3 Timelapse videos
Stringing images together as a series of moments can capture
change over time. This technique is called Timelapse photography.
You can use this feature to record videos such as the evolution of a
construction project, weather changes, tree growth, or flower
blossom.
1. Touch the button to switch over to Timelapse mode.
2. Touch the button to set time interval of the Timelapse
mode in (5 sec. / 10 sec. / 30 sec. / 1 min. / 5 min. / 10 min. / 30
min.).
3. Touch the button to set the file format of Timelapse video
files.
•••• Picture: to save in picture files (Format: JPG).
•••• Video: to save in video files (Format: AVI / MOV).
•••• Picture / Video: to save in picture and video files (Format:
JPG; AVI / MOV).
4. Touch the button to set the desired frame rate of the
Timelapse mode (i.e. frames per second for picture playback).
•••• 3 fps: displays 3 frames per second.
•••• 5 fps: displays 5 frames per second.
•••• 10 fps: displays 10 frames per second.
5. Touch the
6. Activate power saving mode: the equipment powers on only at
intervals to take a picture (i.e. the equipment is powered off
40
button to set the power saving mode.
Page 41

between intervals. When you touch , the equipment will
automatically disable Wi-Fi and exit the LIFE Shot Cam App).
•••• Deactivate power saving mode: the equipment is
continuously in standby.
7. Touch to start shooting photos, the file will be saved
automatically on the camera device.
8. Touch again to stop.
Note:
1. The setting of
about 1s.
2.
Timelapse
equipment is out of power. It is suggested that you calculate the
number of pictures in advance or activate power saving mode
before starting Timelapse operation.
3. When the
saving mode cannot be enabled.
4. When playing video footage recorded in
playback speed (picture per second) will be in accordance with the
frame rate setting.
5. Prior to recording, you may set
angle of the recorded picture or video. See Using the
( 5.1.1).
Timelapse
function stops when the memory is fully used or
Timelapse
is an approximate time with a tolerance of
interval setting is less than 10s, the power
mode, the
Rotate View
Rotate View
Timelapse
to alter the viewing
41
Page 42
4.3.1 The Timelapse screen
1
2
3
4
5
6
7
8
9
5 sec. / 10 sec.
Available options: Picture / Video /
No. Icon Item Description
10
11
12
13
1
2
3
4
42
Wi-Fi status Indicates the Wi-Fi status.
Battery status
Timelapse
Store type
Indicates the remaining battery
power.
Touch to select a suitable Interval.
Available options:
/ 30 sec. / 1 min. / 5 min. / 10
min. / 30 min.
Touch to select the required
storage type.
Picture & Video
Page 43

No. Icon Item Description
frame
fps / 5 fps / 10
Touch to select the power saving
Indicates the zoom status. Touch
Indicates the current photo
Indicates the current Timelapse
Touch to switch to Shooting
Touch to select the required
5
Frame rate
rate.
Available options: 3
fps
6
7
8
9
10
11
12
13
2014/01/01
12:00:00
Power saving
mode
Zoom
indicator
Playback Touch to enter Playback mode.
Shooting Touch to start shooting photos.
Date and time
Menu Touch to enter the menu.
Photo
resolution
Timelapse
mode
mode.
Available options: On / Off
/ to adjust the zoom.
Available options: x1.0~x2.4
Indicates the current recording
date and time.
resolution.
mode.
photos or Recording video modes.
43
Page 44

4.4 Playback pictures and videos
Picture
Video
Timelapse
You can use this feature to view pictures and videos.
1. Touch to enter Playback mode.
2. You can touch Edit to enter Edit mode.
3. Touch to select the required pictures or videos, and touch /
to Delete or Download the selected files on your mobile
device.
Select
Note:
LIFE Shot Cam App is for users to preview approx. 800 of the most
recent files. If you want to overview all recorded files, please use a
computer or other media players to check.
44
Page 45

45
4.4.1 Viewing pictures
13
Indicates the recorded date and
Touch to download the current
Touch the photo to view it in full screen.
No. Icon Item Description
2
1
2014/01/01
2
12:00:00
3
Date and time
Download
Delete
Touch to delete the current
picture.
time.
picture.
Page 46

46
4.4.2 Playing videos
1
3
Touch to pause the video
Indicates the recorded date and
Touch the video to play it in full screen.
4
5
2
No. Icon Item Description
Date and time
Current
duration
Delete
Stop
1 00:00:01
2
3
2014/01/01
4
12:00:00
6
Indicates the video current
duration.
Touch to delete the current
video.
playback.
time.
Page 47

47
No. Icon Item Description
Touch to download the current
5 00:00:10 Total duration Indicates the video total duration.
6
Note:
1. Video recorded using
there is no audio when
played back.
2. The LIFE Shot App is only applicable for previewing a video without
audio playback. To view
the integral video content, download the file to your mobile device or
PC for playback.
3. Deleted files cannot be recovered. Ensure the files have been
backed-up before deletion.
4. Picture and video files could be downloaded to the internal memory
of your mobile device. Use the application program in your mobile
device to view the file.
5.
If you find the downloaded files could not be played or without
sound, which means the mobile phone itself does not support
the video decoding. It’s not the problem of the file. We
recommend you to install a free App software, such as VLC to
play.
6. IOS mobile device operating systems: Due to the resolution limit,
which may result in the recorded videos could not be downloaded to
your mobile device. If you want to upload the recorded video files to
the Internet, it is recommended that you pre-set the video resolution,
which can be supported by your mobile device, or you can use a
computer to read the files on the memory card.
Download
Timelapse
video.
is a string of pictures, therefore
Page 48

5 Settings menu
5.1 Using the settings
You can customize the video recording and other general settings
via the on-screen display (OSD) menus.
1. If recording is in progress, please touch to stop recording.
2. Touch to enter the OSD menu.
48
Page 49

5.1.1 Menu items
Refer to the below table for details of menu items and available
menu options.
Menu option
Set Photo
Resolution
Set Video
Resolution
Rotate View
Time Stamp
Loop
Recording
File Format
On: MOV / Off:
AVI
Anti-flicker
Description Available option
Set the desired photo
resolution.
Set the desired video
resolution.
Prior to recording
video, you may set
Rotate View
the viewing angle of
the recorded video.
Imprint the date and
time on the recorded
photo or video.
If start
Recording
when the memory card
storage space is
insufficient, the older
files will be
overwritten.
Set Timelapse
photography and
general video file
formats.
Domestic power
supply varies by area.
It is recommended that
you should check the
“Table of voltage and
to alter
function,
4K(3840x2160) / 5M
(2576x1932) / 2M
(1920x1080)
FHD (1080P/30fps) /
HD (720P/30fps)
Off / Flip Vertical /
180° Rotate
On / Off
Loop
On / Off
On / Off
50Hz / 60Hz
49
Page 50

Menu option
Recorder
Format
App Version
Product Name
Firmware
Version
About
Description Available option
frequency of different
countries” for the
correct setting.
Format the memory
card inserted in the
equipment. All the files
in the card will be
erased.
Indicates the current
application version.
Display the model
number of the device.
Indicates the current
firmware version.
The App software
maker.
No / Yes
LifeShotFHD300
Software produced by
Astrotek Ltd.
50
Page 51

6 Connecting to other devices
6.1 Connecting to the computer
You can connect the device to a desktop computer or notebook to
transfer or view files.
1. Open the waterproof cover of the USB / Memory card slot.
2. Connect the micro USB cable into the port on the device.
3. Connect the other end of the micro USB cable to an available
USB port on your computer.
4. Press the Power button to switch on the device, connecting the
device to your computer.
5. On completion, make sure the waterproof cover of the USB /
Memory card slot is sealed tightly, to achieve normal activity
waterproofing.
51
Page 52

7 Installing the software
1. Place the attached CD ROM into the CD player.
2. If the CD does not execute automatically, please use Windows
File Manager to execute the Install_CD.exe file in the CD.
The following screen will be shown up.
3. Press the [Menu] item to start the installation process according
to the instructions on-screen.
52
Page 53

8 Editing software
MAGIX Video easy SE is the perfect beginner program for the
whole family. Thanks to the intuitive program interface with extra
large buttons, a wide range of help functions and practical wizards,
you can transform your recordings into amazing videos, even if you
don't have any previous experience.
Your pictures, videos and music online. Let your friends and family
participate in your experiences.
• Free Online Album with your own web address.
• High-quality design templates.
• Unique design.
• Slideshows with text, music, and effective transitions.
• Upload videos and play them.
• You can go http://www.magix.com/us/ to for more information.
System requirements: Windows XP / Vista / Win 7 / Win 8
Note:
The
MAGIX Video easy SE
operating system.
software is only applicable to a Windows
53
Page 54

9 Specifications
Item Description
Image Sensor 8MP, 1/3.2’’ CMOS
F/NO
Lens Fixed focus lens
Focus Range 1M ~ infinity
Timelapse
Still Image
Movie Clip
F2.4
Resolution: 4K (3840×2160); 5M (2576x1932);
2M (1920x1080)
Format: JPG; AVI / MOV
Resolution: 4K (3840×2160); 5M (2576x1932);
2M (1920x1080)
Format: JPG
Resolution: FHD (1080P/30fps); HD30
(720P/30fps)
Format: AVI / MOV
Shutter
ISO Auto
White Balance Auto
Microphone
Buzzer
Interface
Waterproof
54
Electronic Shutter
Auto :1/60 ~ 1/4000 sec
Yes
Yes
Micro USB
IPX5 – Protected against water jets;
Page 55

55
Item Description
Function
Storage Media
Battery
Operating
Temperature
Operating
Humidity
Storage
Temperature
Dimensions
Weight Approx. 36g (without memory card)
Built-in IEEE 802.11n Wi-Fi module: WN7911B-WM
Frequency
range
Channel List
Contains FCC ID: 2ACFIWM7911B
IPX8 for Waterproof Case (optional)
Supports Micro SD (HC,XC) class 10 or above,
up to 32GB
Built-in 700mAh Li-polymer rechargeable
0° ~ 50° C (14° ~ 122° F)
0 ~ 95% RH
-20° ~ 70° C (-4° ~ 140° F)
38.5 x 50.3 x 20.4 mm
2412~2462MHz
Ch1~Ch11
Page 56

Copyright © 2014
All rights reserved.
All other marks, products or company names mentioned in this
guide are trademarks of their respective companies.
 Loading...