

Page 1
Digital Video Camcorder
DVR-FHD560
Please read this manual carefully before use
And keep it for future reference
Page 2

1
Table of Contents
Introduction .......................................................................................................... 2
Key Features
......................................................................................................... 2
What your digital video camera includes
........................................................... 3
Computer System Requirements for Windows XP ........................................... 3
Computer System Requirements for Windows Vista
........................................ 3
Computer System Requirements for Macintosh
............................................... 4
Quick Look at your Digital Video Camera .......................................................... 5
Preparing Your Camcorder for Use
.................................................................... 6
DVR Function Control
.......................................................................................... 8
Technical Specifications ................................................................................... 23
Trouble Shooting
............................................................................................... 24
Page 3

2
Introduction
Thank you for purchasing this Digital Video Camcorder. With your camcorder you can shoot video
clips, take individual photos, In additi on, an S D compatibl e memory card up to 32GB needs to be
inserted in order to expand the memory of your DVR camera.
Key Features
1. Circulation video.
2. Digital Video and Digital Camera Combined.
3. HD out.
4. High Definition Recording.
5. Cycled recording.
6. Power Supplied by car charger include the adapter 12V/24V transfer to 5v-5.5V.
7. Emergency locking, circulation video without being behind the fil e covered.
8. Digital Video resolutions –1920x1080P(FHD) 1440x1080(FHD) 1280x720(720P) 848x480 (WVGA)
640x480 (VGA) 320x240(QVGA)
9. 500 mega-pixels camera with choice of 7 digital camera resolutions-
4032*3024(12MP); 3648x2736(10MP); 3264x2448(8MP); 2592x1944 (5MP); 2048x1536
(3MP) ;1920x1080 (2MP 16:9 HD); 640x480 (VGA)
10.
2.4" TFT LCD
11. 4x Digital Zoom
12. TV out
13. Supports external SD memory card up to 32GB (Class 4 or above is recommended)
14. Speaker
Page 4

3
15. Takes digital photos and videos
16. Protect, slide show , delete photos
What your digital vide o cam era includes
1. Car Camcorder
2. USB cable
3. Car Charger
4. Adapter
5. TV cable
6. User manual
Computer System Requirements for Windows XP
To be able to download photos and videos to your PC you will need the following minimum configuration:
1. Pentium 4 Processor (or above), 2.6 GHz., with Windows XP and 7 Service Pack 2
2. 1GB RAM or Higher.200MB free disk space
3. Available USB Interface
4. CD-ROM Drive
5. Recommended screen resolution 1024 X 768 pixels or Higher.
6. 24-bit Color or high Display adaptor
7. With choices of 9 default media player.
Computer System Requirements for Windows Vista
To be able to download photos or videos to your PC you will need the following minimum configuration:
1. Windows Vista
Page 5

4
2. 1GHz Processor or Higher and 1GB of system memory
3.
40GB hard driver with at least 15GB of available space
4.
Support for Super VGA graphics
5. Available USB Interface
6. CD-ROM driv e
Computer System Requirements for Macintosh
1. Power Macintosh G3 500 MHz or higher
2.
Mac OS X version 10.5 or later
3.
512 MB or more available system RAM (1GB recommended),
150 MB free disk space
4. 800x600 or higher-resolution monitor displaying millions of colors
Page 6
5
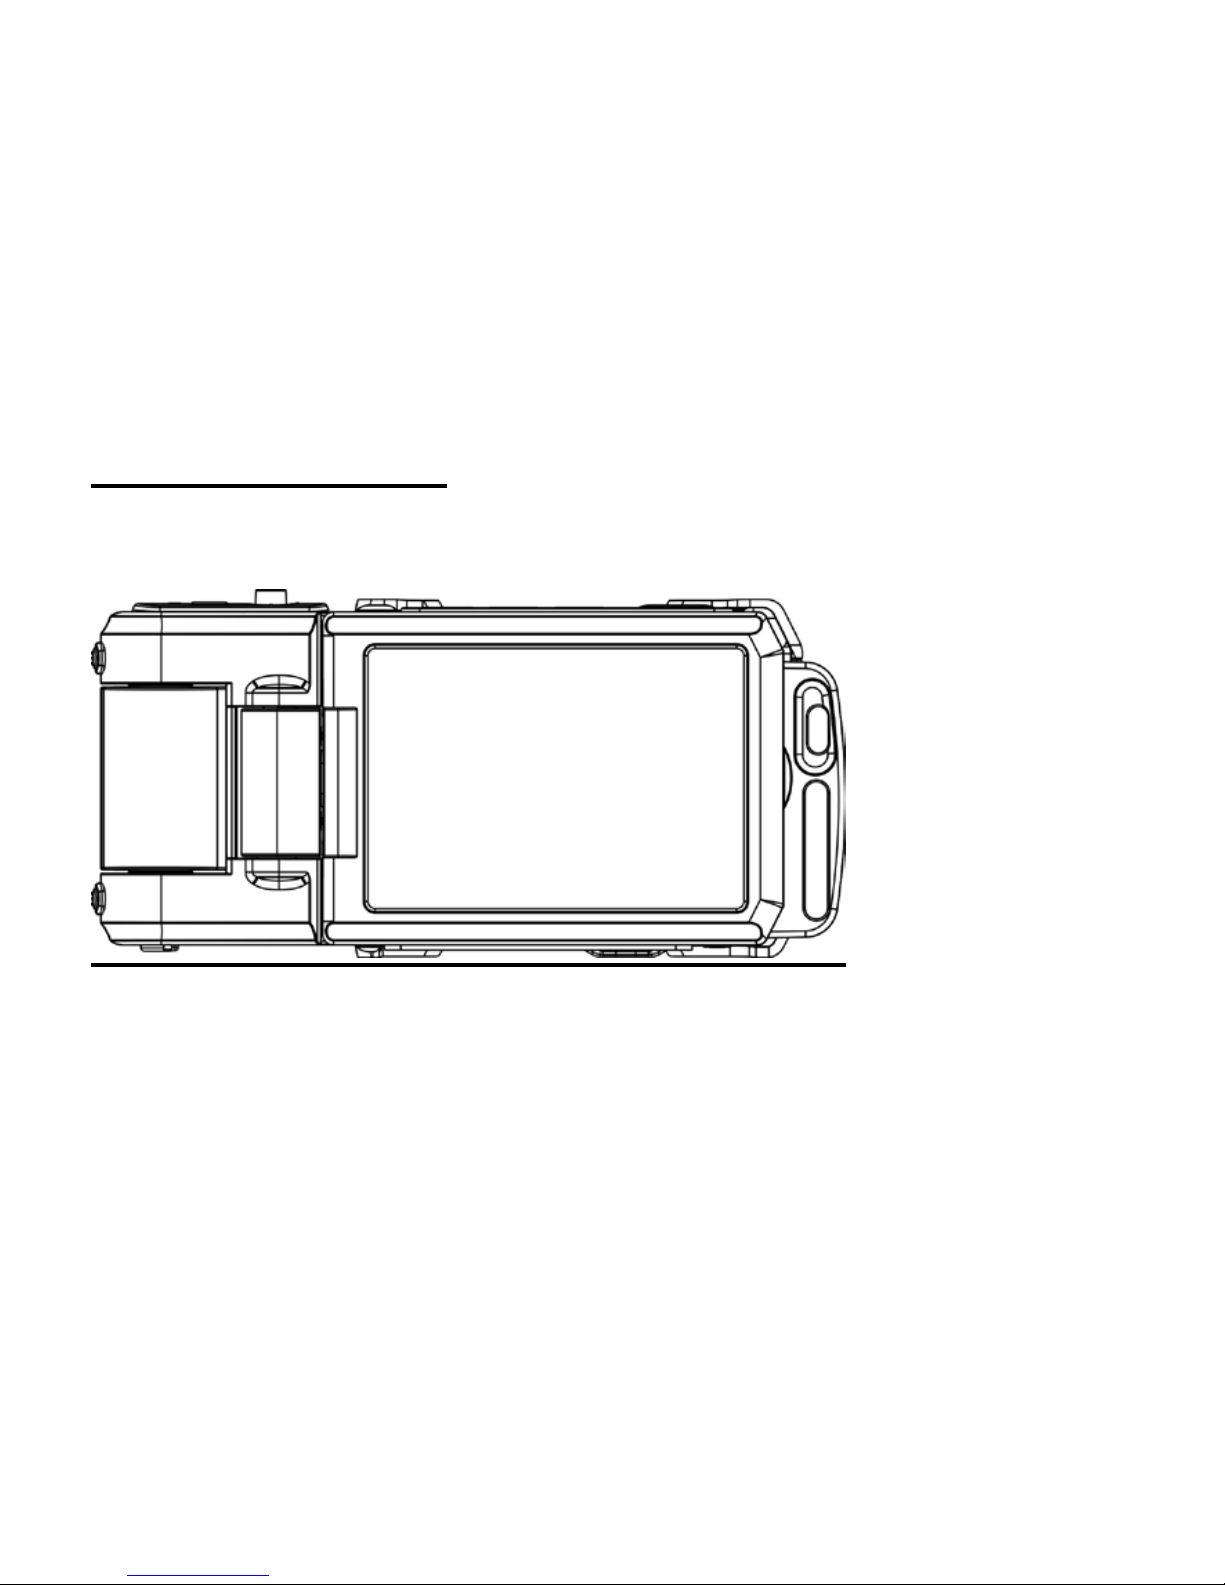
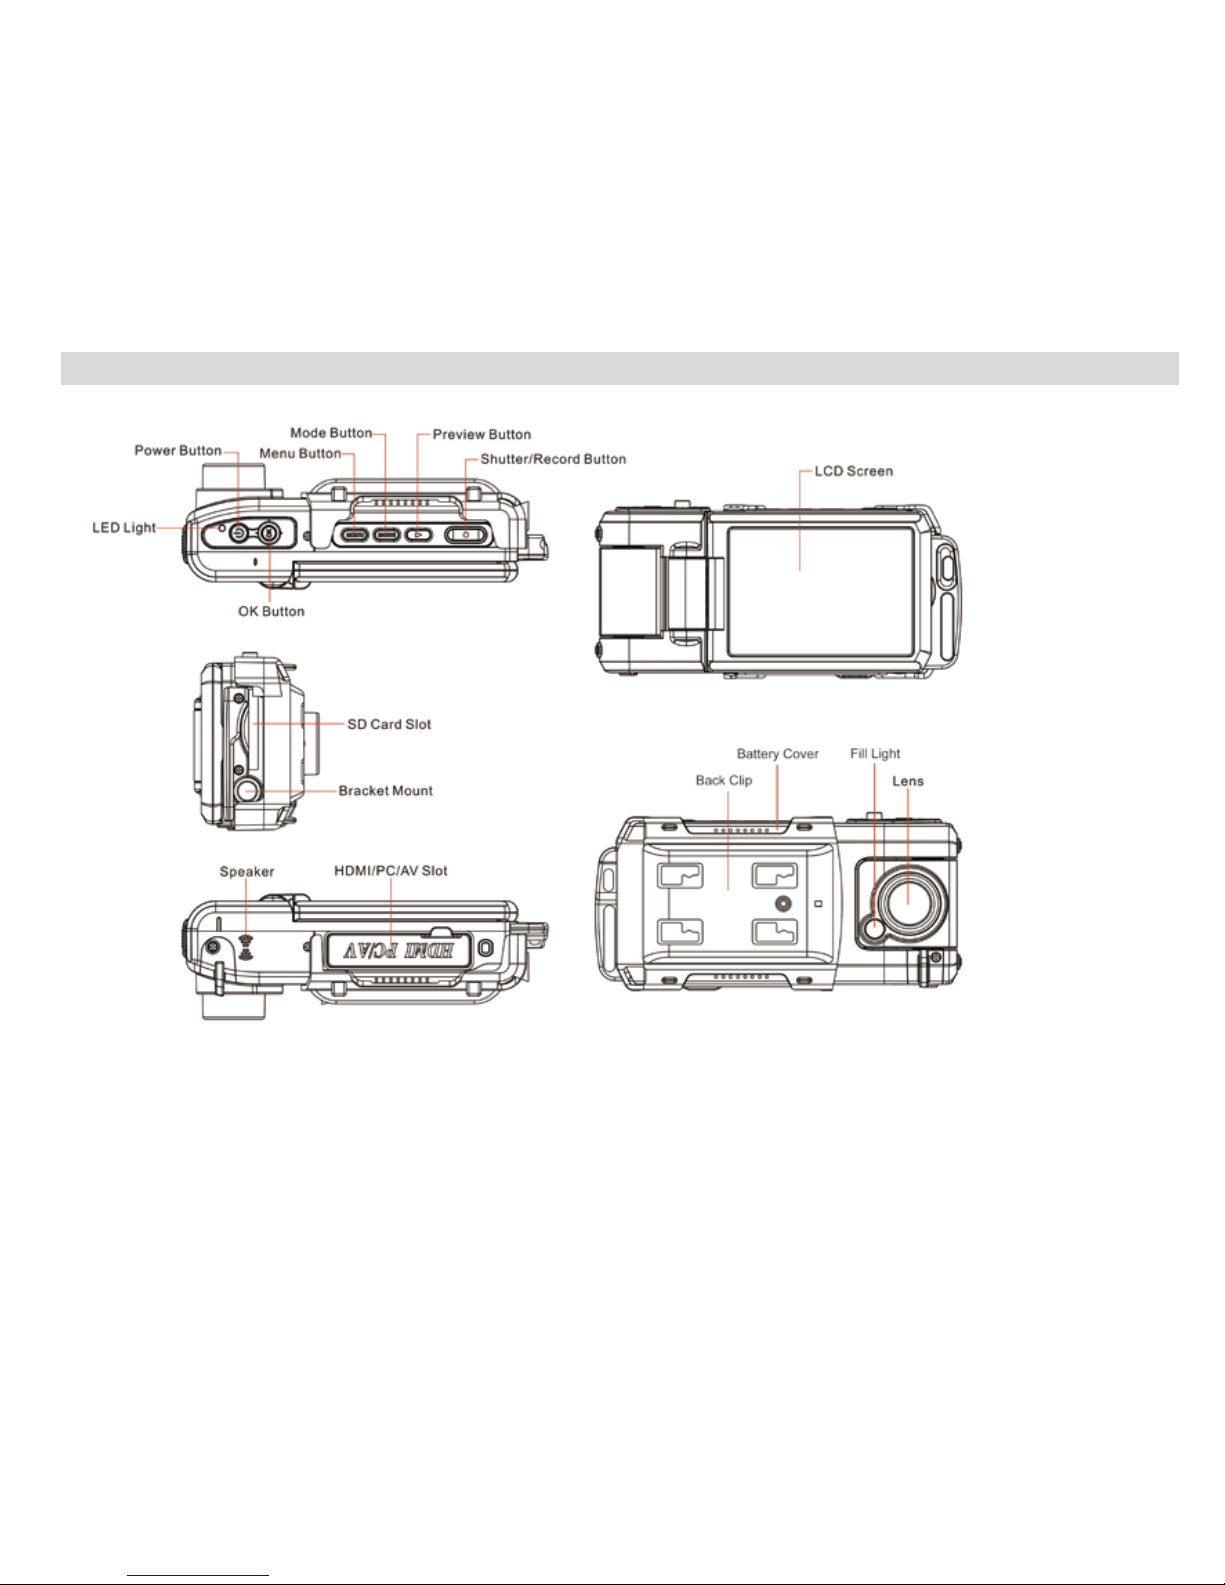
Quick Look at your Digital Video Camera
Page 7
6
Preparing Your Camcorder for Use
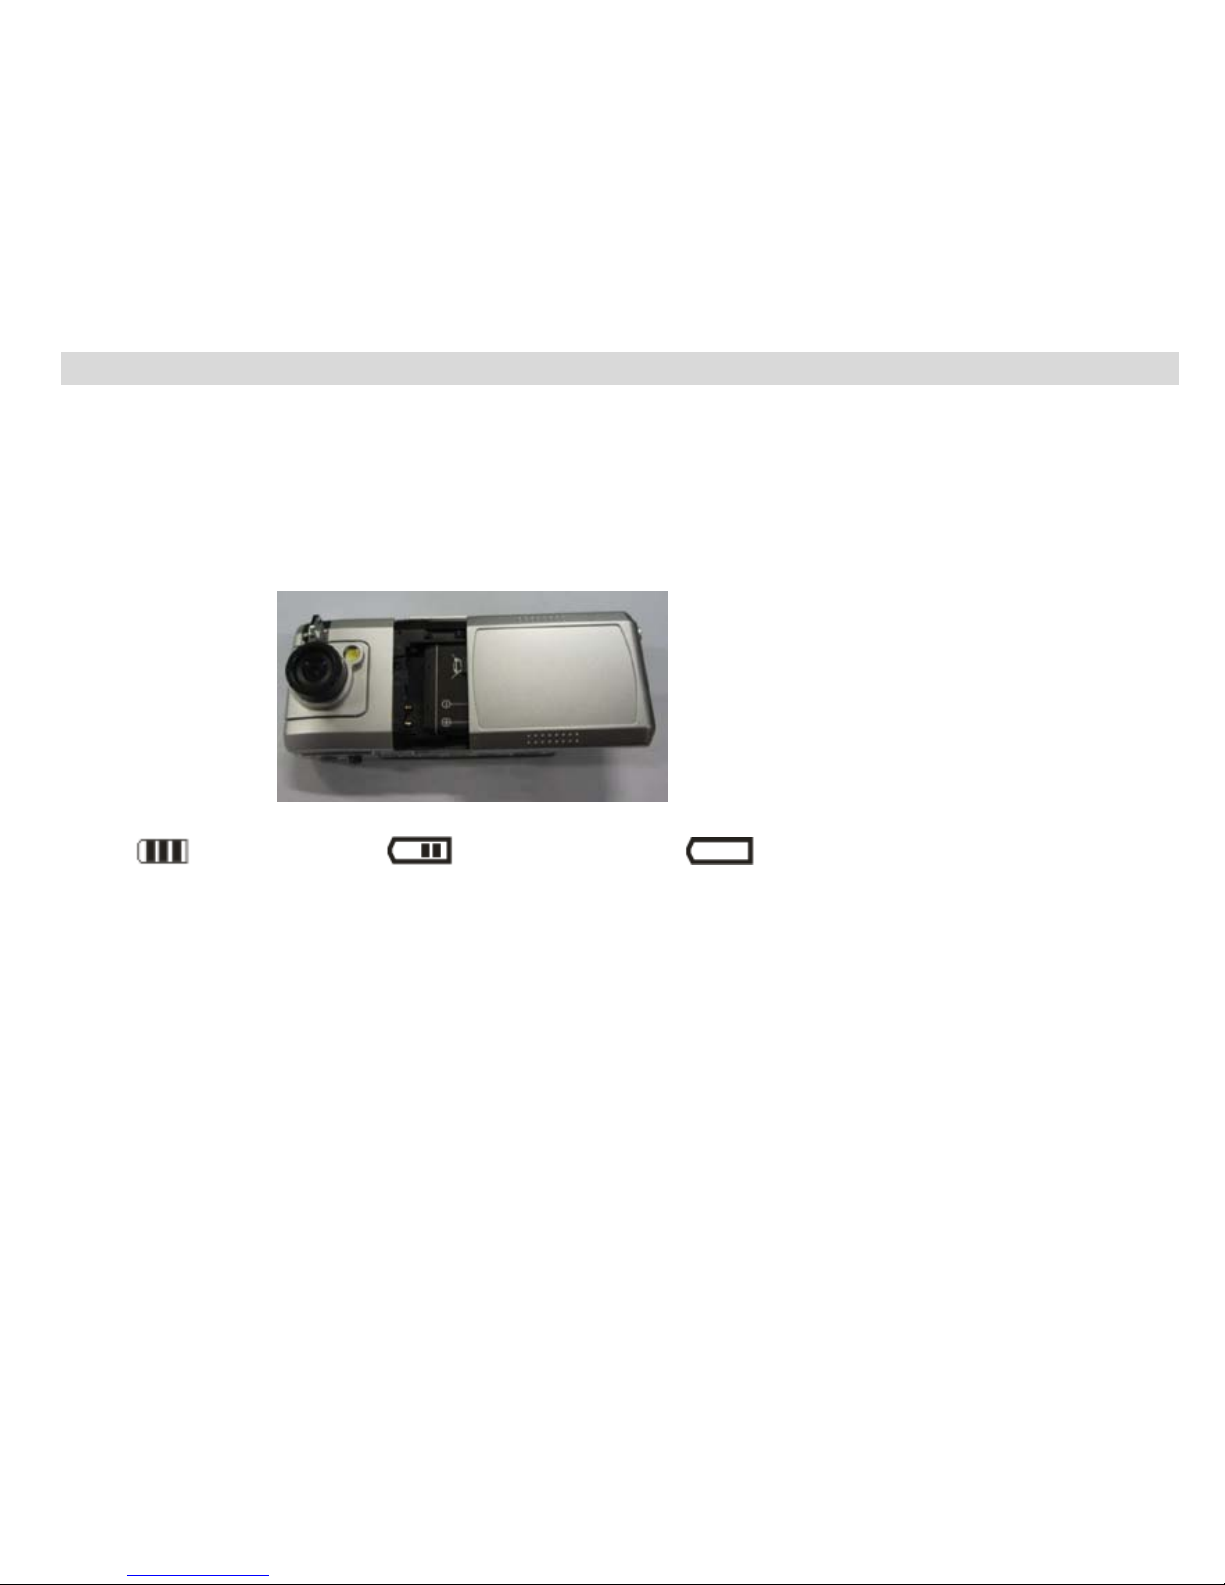
Installing battery
Your DVR camcorder requires Lithium battery, insert the battery into the camera:
1. Slide out battery cover in the side of the camera to open it.
2. Insert the Lithium battery and press it down.
3. Close the battery cover.
Full battery Medium battery Low battery
Note:
• All photos and videos clips in limited built-in memory will be lost while removing the battery from the
DVR or the DVR is turned off.
• We strongly recommend downloading your photos and videos regularly to your computer.
• Remove the battery from the DVR camera when not in use for an extended period.
Page 8
7
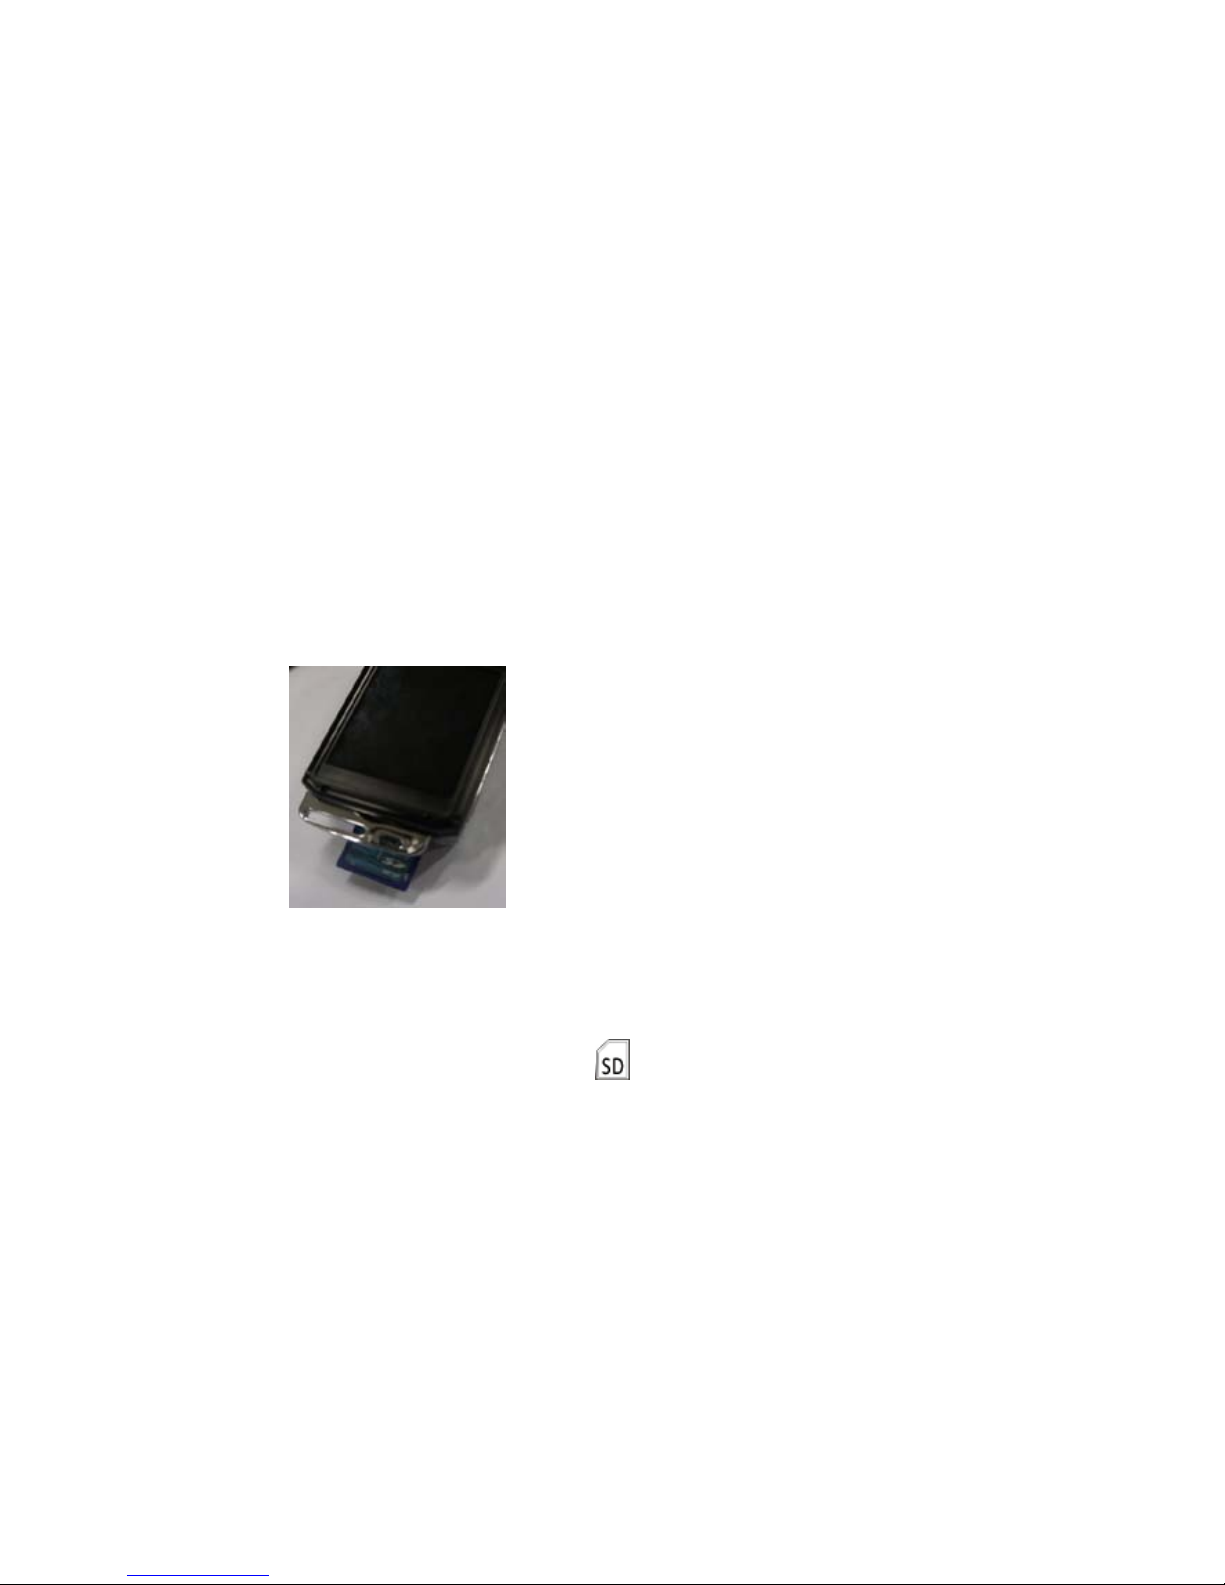
Inserting an SD Memory Card
An SD compatible memory card of up to 32GB (not included) should be inserted into your DVR camera. SD
Memory card expand the amount of memory thus allowing an increase in the number of movies, photos that
can be captured before transferring them to a computer.
Media sitting in the SD memory card will not lost when your camcorder’ s power runs low or on replacing the
batteries.
1. Locate the SD card slot on the right side of the camcorder.
2. Insert an SD memory card correctly in the direction shown.
3. Press the memory card until you hear a “Click” sound. The memory card when properly inserted will
flush with the camcorder.
Note: After you insert an SD memory card, the icon will appear on the LCD, indicating that your SD
memory card has been installed successfully, and the media you capture will now be stored on the card
and not in the limited internal memory.
• This product supports SD card up to 32GB.
Page 9

8
• Formatting will delete all data on the SD Memory Card including protected data.
• Do not remove the SD memory Card during formatting because this may damage the card and render it
unusable.
DVR Function Control
Power on
Press the Power button or turn on the LCD Screen to turn on your DVR.
The LCD monitor will light up indicating that your DVR is ready for use.
Power off
Press the Power button or close the LCD Screen to turn off your DVR camera.
When there is insufficient battery power, a “Low Battery” message will appear on the LCD screen. The
camcorder will automatically power off a few moments later
.
Setup Menu
Press Menu button and switch OK button to the left or right direction to enter into Setup mode. In this
mode you can set the Date/Time ,Auto Power Off, Beep Sound, Language, TV Mode, Frequency, Image
Rotation, Format, Default Setting, Version .
Date/Time Setup
Set the correct date and time by this function.
1. Press Menu button and switch OK button to right or left direction to open Setup menu.
Page 10

9
2. Move down the OK button to select Date/Time Setup.
3. Press OK button to enter the submenu.
4. Switch OK button (up or down) to select date/time setup ,switch OK button (up or down )to
setup the date and time ,press OK button to confirm and enter into the other set option, the firs t
line is for date setup, the second is for time setup, the third is for format setup.
5. Press Menu button to exit.
Auto Power Off
1. Press Menu button and switch OK button to right or left direction to open Setup menu.
2. Move down OK button to select Auto Power Off.
3. Press OK button to enter the submenu.
4. Switch OK button (up or down) to select 1m/3m/ Off.
5. Press OK button to confirm and exit.
Note: If you select Off, the DVR will not be powered off until the battery power is depleted or the
camcorder is turned off manually.
Beep Sound
1. Press Menu button and switch OK button to right or left direction to open Setup menu.
2. Move down OK button to select the Beep Sound.
3. Press OK button to enter the submenu.
4. Switch OK button (up or down) to select Off/On.
5. Press OK button to confirm and exit.
Language
Your camcorder supports 9 kinds of languages :
English, SChinese, TChinese,German, Spanish,
Portuguese, French, Russian, Japanese, you can choose what you want to use.
1. Press Menu button and switch OK button to right or left direction to open Setup menu.
2. Move down OK button to select the Language option.
3. Press OK button to enter the submenu.
Page 11

10
4. Switch OK button (up or down) to select the language.
5. Press OK button to confirm and exit.
TV Mode
The image of the picture you wish to capture on the LCD can also be displayed on your
TV screen. Use the USB cable provided. Plug one end into the TV and the other into the
HDMI slot next to the USB slot on your camera.
1. Press Menu button and switch OK button to right or left direction to open Setup menu.
2. Move down OK button to select the TV Out option.
3. Press OK button to enter the submenu –PAL/NTSC.
4. Switch OK button (up or down) to select PAL/NTSC mode according to your TV format.
5. Press OK button to confirm and exit.
6. Connect your DVR to your T V with the supplied USB cable.
Note: When plugged into the TV the image will not appear on the LCD screen, m aybe you choose the
wrong TV format.
Frequency
Generally speaking, 60HZ is for the U.S. and 50HZ for Europe and Japan. The default setting is 50HZ.
1. Press Menu button and switch OK button to right or left direction to open Setup menu.
2. Move down OK button to select Frequency option.
3. Press OK button to enter the submenu.
4. Switch OK button (up or down) to select the 50Hz/60Hz.
5. Press OK button to confirm and exit.
Image Rotation
1. Press Menu button and switch OK button to right or left direction to open Setup menu.
2. Move down OK button to s elect Image Rotation.
3. Press OK button to enter the submenu.
Page 12

11
4. Switch OK button (up or down) to select Off/On.
5. Press OK button to confirm.
Format
You can delete all files in internal memory or SD memory card by using this feature.
Please make sure to download the images before using this feature .All the images stored in the c ard or
internal memory will be erased. This process is irreversible.
1. Press Menu button and switch OK button to right or left direction to open Setup menu.
2. Move down OK button to select Format option.
3. Press SET button to enter the submenu.
4. Switch OK button (up or down) to select Yes/No/ Exit.
5. Press OK button to confirm and exit.
Default Setting
If your camera setting is in a confused status, you can execute this function to your camera original
setting.
1. Press Menu button and switch OK button to right or left direction to open Setup menu.
2. Move down OK button to select Default Set option.
3. Press OK button to enter the submenu.
4. Switch OK button (up or down) to select Yes/No.
5. Press OK button to confirm.
Version
1. Press Menu button and switch OK button to right or left direction to open Setup menu.
2. Move down OK button to select Version option.
3. Press OK button to enter the submenu.
Then the version of this camcorder will appear on the LCD screen .
Page 13

12
Mode Selection
Your DVR camera have 3 mode: Video Mode (Default Mode)/Camera Mode/Playback Mode. You can
switch mode through press Mode Button.
Video Mode (Default Mode)
In order to capture videos using your camcorder you need to press Mode button to the Video mode
which is the Default Mode of the camcorder. This camcorder requires a compatible SD card of up to 32
GB for normal operation.
The video icon
will now appear on the top left corner of the LCD.
1. Press Mode button repeatedly to open Video mode.
2. Press the Record button to start shooting.
3. A red dot will appear and begin to flash and the LED will begin to flash as well. The elapsed
time of the video will appear on the top left on the LCD.
4. Press the Record button again to stop the recording.
5. The recorded file will be saved in AVI format.
Note:
1. During shooting the video you can adjust the zoom to focus in on your subject.
2. You can view the video files in playback mode.
3. If transferred the file to the PC, you can view them by Quick Time.
4. As the internal memory of the camcorder is limited it should be used for test files only.
5. Please insert an SD memory card of up to 32 GB for normal use. You must insert an SD
memory card for shooting videos.
6. When the internal memory is full, a “Please Insert SD Card” message will flash on the LCD
screen when you attempt to shoot much more videos.
Page 14

13
In the Video mode there are 6 video resolutions: 1920x1080P (FHD) 1440x1080(FHD)
1280x720(720P) 848x480 (WVGA) 640x480 (VGA) 320x240 (QVGA) for you to choose from before
capturing your video. The higher the res oluti on selected the bett er the quality of the video it will take,
however higher quality videos need more memory.
Digital Zoom function
When taking photos o r video files, you can zoom in or zoom out your subject by using the OK button.
1. Switch OK button to upside to zo om in to the object.
2. Switch OK button to downside to zoom it back out.
3. The zoom icon will appear on your LCD screen.
To enter the Video Menu for Video mode you should press the menu button. The different function
menus are explained in detail below.
Resolution
You can select different Resolution– 1920x1080P (FHD) 1440x1080 (FHD) 1280x720(720P) 848x480
(WVGA) 640x480 (VGA) 320x240 (QVGA).
1. Press Mode button repeatedly to Video mode.
2. Press the Menu button to open the Video Menu.
3. Move down OK button to s elect Resolution
4. Press OK button to enter the submenu.
5. Switch OK button (to upside or downside) to select the desired Resolution option from the
menu that appears.
6. Press OK button to confirm and exit.
Loop Recording
1. Press Mode button repeatedly to Video mode.
2. Press the Menu button to open the Video Menu.
3. Move down OK button to s elect Loop Recording.
Page 15

14
4. Press OK button to enter the submenu.
5. Swit c h O K button (to upside or downside) to select the desired time option from the m enu that
appears.
6. Press OK button to confirm, save your choice and exit.
Exposure
This setting allows you to control the brightness of your images.
1. Press Mode button repeatedly t o open Video mode.
2. Press the Menu button to open the Video Menu.
3. Move down OK button to select Exposure.
4. Press SET button to enter the submenu.
5. Switch OK button (to upside or downside) to select an exposure value (f rom +2 to -2) f rom t he
menu that appears.
6. Press OK button to confirm and exit.
Note:
The corresponding exposure number will appear on the lef t side of the LCD screen.
Motion Detection
1. Press Mode button repeatedly to Video mode.
2. Press the Menu button to open the Video Menu.
3. Move down OK button to select Motion Detection.
4. Press OK button to enter the submenu.
5. Switch OK button (to upside or downside ) to select the Off or On
6. Press OK button to confirm and exit.
Record Audio
1. Press Mode button repeatedly to Video mode.
2. Press the Menu button to open the Video Menu.
Page 16

15
3. Move down OK button to s elect Record Audio.
4. Press OK button to enter the submenu.
5. Switch OK button (to upside or downside ) to select the Off or On
6. Press OK button to confirm and exit.
Date Stamp
1. Press Mode button repeatedly to Video mode.
2. Press the Menu button to open the Video Menu.
3. Move down OK button to select Date Stamp option.
4. Press OK button to enter the submenu.
5. Switch OK button (to upside or downside ) to select the Off or On
6. Press OK button to confirm and exit.
Camera Mode
After you power on your camcorder, press Mode button to open the camera mode.
The camera icon
will now appear on the top left corner of the LCD screen.
The camcorder’s internal memory is limited to one test photo per each resolution.
Important: Insert a compatible SD card of up to 32GB for normal camera use.
1. Hold the camcorder steady and press the shutter button on the top of the camcorder.
2. The picture you taken are saved to the memory now.
3. The number of photos that can be taken for each resolution and per the memory card inserted
appears on the right bottom of the LCD screen.
4. After the shot is taken the number is reduced by one.
5. When the camcorder's internal memory is full, “PLEASE INSERT SD CARD” message will
appear on the LCD screen when you attempt to press the Shutter button to take a photo.
Download these limited test photos to your PC or delete them in order to take more photos.
Alternatively, you can insert an SD memory card to expand the m emory and take more photos
before having to download them to the PC.
Page 17

16
6. The number of photos that can be captured not only depends on the SD card’s capacity but
also on the resolution selected. Better quality photos are taken at higher resolutions but these
will take up more memory on the card.
The following options are available to capture the best quality photos with your camcorder:
Capture Mode
You can include yourself in a photo by using t his feature to delay the time between you pressi ng the
Shutter button and when the photo is actually taken. It is recomm ended that you use a tripod or place
the camcorder on a flat and sturdy surface when using the Capture Mode.
1. Press Mode button repeatedly to Camera mode.
2. Press the Menu button to open the Camera Menu.
3. Move down OK button to s elect Capture Mode.
4. Press OK button to enter the submenu.
5. Switch OK button (to upside or downside) to select the delay time appeared on the
screen :Single/2 S Timer/5 S Timer/10 S Timer
6. Press OK button to confirm and exit.
7. The Capture Mode icon selected will appear on the top of the LCD screen.
8. Press Shutter button and your camera will count down 2, 5 or 10 seconds as per your choice,
the LED will flash and then automatically take the photo.
Resolution
The image size and quality settings determine the number of photos that can be saved and the amount
of memory required for each photo. The higher the quality of the photo the more memory it will take.
To set the resolution:
1. Press Mode button repeatedly to open Camera mode.
2. Press the Menu button to enter the camera menu.
Page 18

17
3. Move down OK button to select Resolution.
4. Press OK button to enter the submenu.
5. Switch OK button (to upside or downside) t o select the resoluti on size–4032*3024(12MP);
3648x2736(10MP); 3264x2448(8MP); 2592x1944 (5MP); 2048x1536 (3MP); 1920x1080
(2MP 16:9 HD); 640x480 (VGA).
6. Press OK button to confirm.
Note: The resolution icon will appear beneath the camera icon on the LCD screen.
Sequence
1. Press Mode button repeatedly to open Camera mode.
2. Press the Menu button to enter the camera menu.
3. Move down OK button to select Sequence.
4. Press OK button to enter the submenu.
5. Switch OK button (to upside or downside) to select the sequence Off or On.
6. Press OK button to confirm.
Note: The sequence icon will appear on the top center of LCD screen.
Quality
The quality of your photos also affects the number of shots you can take. The Super Fine setting means
you can take fewer photos, but they will be better quality.
1. Press Mode button repeatedly to open Camera mode.
2. Press the Menu button to enter the camera menu.
3. Move down OK button to select Quality.
4. Press OK button to enter the submenu.
5. Switch OK button (to upside or downside) to select the Fine/Normal/Econom y qualit y.
6. Press OK button to confirm and exit.
Note: The quality icon will appear on the right side of LCD screen.
Page 19

18
Sharpness
This setting allows you to adjust the sharpness of your images, making edges more or less distinct.
1. Press Mode button repeatedly to open Camera mode.
2. Press the Menu button to open the camera menu.
3. Move down OK button to select Sharpness.
4. Press OK button to enter the submenu.
5. Switch OK button (to upside or downside) to select: Strong/Normal/Soft.
6. Press OK button to confirm and exit.
White Balance
This setting is used to adjust the color of your videos as per your light source.
1. Press Mode button repeatedly to open Camera mode.
2. Press the Menu button to open the camera menu.
3. Move down OK button to select White Balance.
4. Press OK button to enter the submenu.
5. Switch OK button (to upside or downside) to choose the best option from the menu that
appears: Auto/Daylight/ Cloudy /Tungsten/Fluorescent.
6. Press OK button to confirm and exit.
Note:
The corresponding White Balance icon will appear on the left si d e of the LCD screen.
Color
This setting allows you to change image color.
1. Press Mode button repeatedly to open Camera mode.
2. Press the Menu button to open the camera menu.
3. Move down OK button to select color option.
Page 20

19
4. Press OK button to enter the submenu.
5. Switch OK button (to upside or downside) to choose the best option from the menu that
appears: Color/Black & White/Sepia.
6. Press OK button to confirm and exit.
ISO
This is a special function that allows you to compensate the light conditions when the light source is not
good and also where you are not using tripod. When you want to use ISO sensitization, please choose
the low ISO value to prevent blotch appearing on your photos.
1. Press Mode button repeatedly to open Camera mode.
2. Press the Menu button to open the camera menu.
3. Move down OK button to select ISO.
4. Press OK button to enter the submenu.
5. Switch OK button (to upside or downside) to select: ISO AUTO/ ISO 100/ ISO 200/ ISO 400.
6. Press OK button to confirm and exit.
Note: The corresponding ISO icon will appear at the left bottom of the LCD screen.
Exposure
This setting allows you to control the brightness of your images.
1. Press Mode button repeatedly to Camera mode.
2. Press the Menu button to open the camera menu.
3. Move down OK button to select Exposure.
4. Press OK button to enter the submenu.
5. Switch OK button (to upside or downside) to select an exposure value (f rom +2 to -2) f rom the
menu that appear.
6. Press OK button to confirm and exit.
You also can through switching OK button (up and down)to set the exposure.
Page 21

20
Note:
The corresponding exposure number will appear on the lef t side of the LCD screen.
Face Detection
Your camcorder supports face detecting that allows you to take best photos.
1. Press Mode button repeatedly to open Camera mode.
2. Press the Menu button to enter the camera menu.
3. Move down OK button to s elect Face Detection.
4. Press OK button to enter the submenu.
5. Switch OK button (to upside or downside) to select Off/Face Detection/Smile Detection.
6. Press OK button again to confirm and exit.
Note:
If you select Face detection/Smile detection,the corresponding icons will appear on the right side of
the LCD screen.
Anti-Shake
Your Digital Camcorder has a function that prevents blurry photos as a result of trembling when taking
photos. Due to this function, you are not required to use a tripod for steady shooting photos.
1. Press Mode button repeatedly to open Camera mode.
2. Press the Menu button to open the camera menu.
3. Move down OK button to select Anti-Shake.
4. Press OK button to enter the submenu.
5. Switch OK button (to upside or downside) to select: Off/On.
6. Press OK button to confirm and exit.
Note: The anti-shake icon will appear on the top of LCD screen.
Quick Review
Page 22

21
Your Digital Camcorder has a function that you can review the image and video quickly as your request.
1. Press Mode button repeatedly to open Camera mode.
2. Press the Menu button to open the camera menu.
3. Move down OK button to select quick review option.
4. Press OK button to enter the submenu.
5. Switch OK button (to upside or downside) to select: spacing interval for review: Off /2 S/5 S.
6. Press OK button to confirm and exit. .
Date Stamp
With thi s f unction, you may record the date and time on your photo.
1. Press Mode button repeatedly to Video mode.
2. Press the Menu button to open the Video Menu.
3. Move down OK button to s elect Date Stamp option.
4. Press OK button to enter the submenu.
5. Switch OK button (to upside or downside ) to select the Off or On
6. Press OK button to confirm and exit.
Playback mode
Press Mode button repeatedly to playback mode,the icon will appear on the top left corner of the LCD
screen. You can review the photos and videos in your camcorder.
Note:
If there are no images in your memory the “No FILE” message will appear on the LCD screen.
Delete
This function allows you to delete the photo/video have taken.
1. Switch OK button to downside to delete the last photo or video.
Page 23

22
2. A Delete message appears on the LCD with YES/N O .
3. Switch OK button (to upside or downside) button to select “Yes” or “No”.
4. Press OK button to confirm and exit.
Protect
You can protect your photos for accidental deletion.
1.
2. Press Mode button repeatedly to open playback mode.
3. Press the Menu button to open the Playback menu.
4. Move down OK button to s elect the Protect option.
5. Press OK button to enter the protect submenu.
6. Switch OK button (to upside or downside) to sel ect Lock Current/ Unlock Current / Lock All /
Unlock All.
7. Press OK button to confirm and exit.
Slide Show
When the camcorder is in the Playback Mode:
1. Press Mode button repeatedly to open playback mode.
2. Press the Menu button to open the Playback menu.
3. Move down OK button to select Slide Show.
4. Press OK button to enter the protect submenu.
5. Switch OK button (to upside or downside) to select 2 seconds/5 seconds/8 seconds.
6. Press OK button to confirm and exit.
Note: In the Playback Mode,Only J PEG file can be select to slide show.
Page 24

23
Technical Specifications
Image Sensor CMOS Sensor
Image Resolution
4032*3024
(
12MP
)
;3648x2736
(
10MP
)
;3264x2448
(8MP) ;2592x1944 (5MP); 2048x1536 (3MP) ;1920x1080
(2MP 16:9 HD); 640x480 (VGA)
Video Resolution
1920x1080P(FHD) 1440x1080(FHD) 1280x720(720P)
848x480 (WVGA) 640x480 (VGA) 320x240(QVGA)
LCD Display
2.4’’TFT
Internal Memory 16MB DDR1
External Memory
SD card(Up to 32GB,Class 4 or above is recomm ended)
Storage capability
With 8GB SD memory card
Video:
HFD/48Min FHD/44Min HD/60Min WVGA/68Min
VGA/80Mi n, QVGA/100Min
Digital Zoom
4X
Lens
Fixed focus( f=2.68mm F2.0)
Continue Shot
YES
Smile Capture YES
Face Detection
YES
Other Function
Video can be stored off, Motion Detection.
Shutter Speed
1/15360~1/2S
Light
LED
MSDC
YES
Page 25

24
Trouble
Shooting
Relative parts
Symptom
Explanation/Solution
Auto power off
The camcorder goes off
automatically
The battery pack is fully exhausted.
Battery pack
The battery pack is quickly
exhausted.
The atmospheric temperature is too low.
The battery pack is completely dead. Please
recharge the battery.
DV & battery
The DV or battery is hot
Using the DV continually for a long time.
Photos
The photos are too blur
Exposure is not sufficient.
Deleting
You can’t delete the files
The battery lever is low. Please
Recharge the battery in time.
You can’t insert an memory card
The direction of inserting card may be incorrect.
File Format
AVI ( Video) JPEG ( Still Image),
Exposure
EV-2.0~EV+2.0
ISO
Auto/100/200/400
White Balance
Auto/Daylight/Cloudy/Tungsten/Fluorescent
Scene
Auto
Anti-Shake
YES
TV o ut
YES
HD out
YES
Microphone
YES
Speaker YES
Interface
USB 2.0 High Speed
System
Requirements
Windows XP/ VISTA , MAC
Battery
Lithium
Working
Temperature
0-40 ℃
Page 26

25
SD card
correctly
Downloading
Movies/photos can’t be downloaded
to PC
The set is wrong. Please refer to how to enter
PC mode.
There may not install the drive of DV in your
PC.
Please install drive before downloading.
30503234
 Loading...