

Page 1
English
User’s Manual
Page 2

WEEE Warning Message
Symbol for Separate Collection in European
Countries
This symbol indicates that this product is to
be collected separately.
The following apply only to users in
European countries:
z This product is designated for separate
English
collection at an appropriate collection
point. Do not dispose of as household
waste.
z For more information, contact the retailer or the local authorities in
charge of waste management.
FCC STATEMENT
This device complies with Part 15 of the FCC Rules. Operation is subject to
the following two conditions:
(1). This device may not cause harmful interference, and
(2). This device must accept any interference received, including
interference that may cause undesired operation.
Note:
This equipment has been tested and found to comply with the limits for
Class B digital devices, pursuant to Part 15 of the FCC rules. These limits are
designed to provide reasonable protection against harmful interference in a
residential installation. This equipment generates uses and can radiate radio
frequency energy and, if not installed and used in accordance with the
1
Page 3

English
instructions, may cause harmful interference to radio communications.
However, there is no guarantee that interference will not occur in a
particular installation. If this equipment does cause harmful interference to
radio or television reception, which can be determined by turning the
equipment off and on, the user is encouraged to try to correct the
interference by one or more of the following measures:
Reorient or relocate the receiving antenna
Increase the separation between the equipment and receiver
Connect the equipment into an outlet on a circuit different from that to
which the receiver is connected
Use of shielded cable is required to comply with Class B limits in Subpart B
of Part 15 of the FCC rules. Do not make any changes or modifications to the
equipment unless otherwise specified in the manual. If such changes or
modifications should be made, you could be required to stop operation of
the equipment.
Product Information
1. Product design and specifications are subject to change without notice.
This includes primary product specifications, software, software drivers,
and user’s manual. This User Manual is a general reference guide for the
product.
2. The product and accessories that come with your camera may be different
from those described in this manual. This is due to the fact that different
retailers often specify slightly different product inclusions and accessories
to suit their market requirements, customer demographics, and
geographical preferences.
Products very often vary between retailers especially with accessories
such as batteries, chargers, AC adapters, memory cards, cables, carrying
cases/pouches, and language support. Occasionally a retailer will specify
a unique product color, appearance, and internal memory capacity.
Contact your dealer for precise product definition and included
2
Page 4
English
accessories.
3. The illustrations in this manual are for the purpose of explanation and
may differ from the actual design of your camera.
4. The manufacturer assumes no liability for any errors or discrepancies in
this user manual.
5. For driver updates, you can check the “Download” section of our website,
www.geniusnet.com
SAFETY INSTRUCTIONS
Read and understand all Warnings and Cautions before using this product.
Warnings
If foreign objects or water have entered the camera,
turn the power OFF and remove the battery.
Continued use
shock. Consult the store of purchase.
If the camera has fallen or its case has been damaged,
turn the power OFF and remove the battery.
Continued use in this state might cause fire or electric
shock. Consult the store of purchase.
Do not disassemble, change or repair the camera.
This might cause fire or electric shock. For repair or internal
inspection, ask retailer where you purchased it.
Do not use the camera in areas near water.
This might cause fire or electric shock. Take special care
during rain, snow, on the beach, or near the shore.
Do not place the camera on inclined or unstable surfaces.
This might cause the camera to fall or tilt over, causing
injury.
Keep the batteries out of the reach of children.
Swallowing batteries might cause poisoning. If the battery is
accidentally swallowed, immediately consult a physician.
in this state might cause fire or electric
3
Page 5
English
g
Do not use the camera while you are walking, driving or
riding a motorcycle.
This might cause you to fall over or result in a traffic
accident.
Cautions
Insert the batteries paying careful attention to the polarity
(+ or –) of the terminals.
Inserting the batteries with its polarities inverted might
cause fire and injury, or damage to the surrounding areas
due to the battery rupturing or leaking.
Do not fire the flash close to anyone’s eyes.
This might cause damage to the person’s eyesight.
Do not subject the LCD monitor to impact.
This might damage the glass on the screen or cause the
internal fluid to leak. If the internal fluid enters your eyes or
comes into contact with your body or clothes, rinse with
fresh water.
If the internal fluid has entered your eyes, consult a
physician to receive treatment.
A camera is a precision instrument. Do not drop it, strike it
or use excessive force when handling the camera.
This might cause damage to the camera.
Do not use the camera in humid, steamy, smoky, or
dusty places.
This might cause fire or electric shock.
Do not remove the battery immediately after long
period of continuous use.
The battery becomes hot during use. Touching a hot
battery might cause burns.
Do not wrap the camera or place it in cloth or blankets.
This mi
ht cause heat to build up and deform the case,
4
Page 6

English
resulting in fire. Use the camera in a well-ventilated
place.
Do not leave the camera in places where the
temperature may rise significantly, such as inside a car.
This might adversely affect the case or the parts inside,
resulting in fire.
Before you move the camera, disconnect cords and
cables.
Failure to do this might damage cords and cables,
resulting in fire and electric shock.
Notes on Battery Usage
When you use the battery, carefully read and strictly observe the Safety
Instructions and the notes described below:
Use only the specified battery.
Avoid using the battery in extremely cold environments as low
temperatures can shorten the battery life and reduce camera
performance.
When you are using the new rechargeable battery or rechargeable
battery that has not been used for an extended period of time (the battery
that passed the expiry date is an exception) might affect the number of
images that can be captured. Therefore, to maximize its performance and
lifetime, we recommend that you fully charge the battery and discharge
it for at least one complete cycle before use.
The battery may feel warm after long period of continuous use of the
camera or the flash. This is normal and not a malfunction.
The camera may feel warm after long period of continuous use. This is
normal and not a malfunction.
If the battery is not to be used for a long period of time, remove it from
the camera to prevent leakage or corrosion.
If the battery is not to be used for a long period of time, store it after no
battery power left. If the battery is stored for a long time in a fully
5
Page 7

English
6
charged state, its performance may be impaired.
Always keep the battery terminals in a clean state.
Risk of explosion if battery is replaced by an incorrect type.
Dispose of used batteries according to the instructions.
We recommend the battery should be charged 8 hours for first time use.
Page 8

English
7
CONTENTS
1 Introducing the camera ........................... 12
1.1 System requirements..............................................12
1.2 Unpacking the video camera.................................12
1.3 About the camera...................................................13
1.3.1 Front view ..................................................14
1.3.2 Top view.....................................................14
1.3.3 Back view ...................................................15
1.3.4 Right view ..................................................15
1.3.5 Bottom view...............................................16
1.3.6 LCD display ...............................................16
1.3.7 About the LEDs.........................................19
2 Getting started.......................................... 20
2.1 Inserting an SD card .............................................20
2.2 Inserting the batteries............................................21
2.3 Charging the battery..............................................22
2.4 Turning on for the first time .................................23
2.5 Changing modes ....................................................23
2.6 Before you start......................................................24
2.6.1 Setting the date and time .........................24
2.6.2 Setting the language .................................25
2.7 Shooting video........................................................26
2.7.1 To shoot a video clip: ...............................26
Page 9

2.7.2 To playback the video clip ......................27
2.8 Taking still pictures................................................28
2.8.1 To take a still picture: ...............................28
2.8.2 To playback the picture: ..........................29
2.9 Voice recording ......................................................30
2.9.1 To make a voice recording: .....................30
2.9.2 To playback a voice file:...........................30
2.10 Playing music files.................................................31
2.10.1 To playback a music file: .........................31
2.11 Connecting to a computer .....................................32
2.12 Connecting to a TV................................................32
English
3 Using the camera...................................... 33
3.1 Video mode .............................................................33
3.1.1 Video mode icons .....................................33
3.1.2 Help information ......................................35
3.1.3 Quick access menu ...................................36
3.2 Photo mode.............................................................37
3.2.1 Photo mode icons......................................37
3.2.2 Setting the flash.........................................39
3.2.3 Using the macro function ........................39
3.2.4 Using the zoom function .........................40
3.2.5 Help information ......................................41
3.2.6 Quick access menu ...................................42
3.3 Voice mode .............................................................43
8
Page 10

3.3.1 Voice mode icons ......................................43
3.3.2 Help information ......................................44
3.4 Music mode ............................................................45
3.4.1 Music mode icons .....................................45
3.4.2 Help information ......................................46
3.5 Playback mode .......................................................47
3.5.1 Displaying file information.....................47
3.5.2 Playback mode icons ................................48
3.5.3 Thumbnail mode.......................................49
3.6 USB mode...............................................................49
3.7 Storage device mode ..............................................49
English
4 Using the menus ....................................... 50
4.1 Video menu.............................................................50
4.1.1. Video Size...................................................50
4.1.2. Video Quality ............................................51
4.1.3. White balance ............................................52
4.1.4. Exposure adjustment (EV).......................53
4.1.5. Color effect.................................................54
4.1.6. Self timer ....................................................55
4.1.7. File format ..................................................56
4.1.8. Audio ..........................................................57
4.1.9. Continuous focus ......................................58
4.1.10. Stabilizer.....................................................59
4.2 Movie Playback menu ...........................................60
9
Page 11

4.2.1 Delete all.....................................................60
4.2.2 Unlock all ...................................................61
4.3 Picture menu ..........................................................62
4.3.1 Size ..............................................................62
4.3.2 Image Quality............................................63
4.3.3 White balance ............................................64
4.3.4 Exposure adjustment (EV).......................65
4.3.5 Color effect.................................................66
4.3.6 Self timer ....................................................67
4.3.7 Drive mode ................................................68
4.3.8 Date stamp .................................................69
4.3.9 Night mode ................................................70
English
4.4 Photo Playback menu............................................71
4.4.1 Delete all.....................................................71
4.4.2 Unlock all ...................................................72
4.4.3 Slide show ..................................................73
4.4.4 DPOF...........................................................74
4.5 Music menu............................................................76
4.5.1 Repeat .........................................................76
4.5.2 Delete all.....................................................77
4.5.3 Unlock all ...................................................78
4.6 System menu ..........................................................79
4.6.1 Date/time...................................................79
4.6.2 Beep.............................................................79
10
Page 12

English
4.6.3 Format.........................................................80
4.6.4 Default ........................................................81
4.6.5 Memory ......................................................82
4.6.6 Language....................................................82
4.6.7 TV ................................................................83
4.6.8 Power saving .............................................84
4.6.9 LCD brightness .........................................85
5 Installing software and drivers ............... 86
5.1 Drivers ....................................................................86
5.1.1 Mass Storage ..............................................86
5.2 Presto! Video Works 6............................................87
5.3 Presto! Mr. Photo 3 ...............................................87
5.4 XviD codec for PC .................................................88
Appendix............................................................ 92
Specifications ....................................................................92
11
Page 13
English
g
1 Introducing the camera
Read this section to learn about the features and functions of the video
camera. This chapter also covers system requirements, package contents,
and descriptions of the hardware components.
1.1 System requirements
The video camera requires a host PC with the following specifications:
• Windows® XP, 2000, ME, 98SE operating system
• Intel® Pentium III 500MHz CPU or higher
• At least 256 MB of RAM or higher
• Standard USB 1.1 port or higher
• 4x speed CD-ROM drive or higher
• At least 200MB of available disk space
Note: A USB 1.1 port will enable you to transfer files to and from your
host PC, but transfer speed will be much faster with a USB 2.0 port.
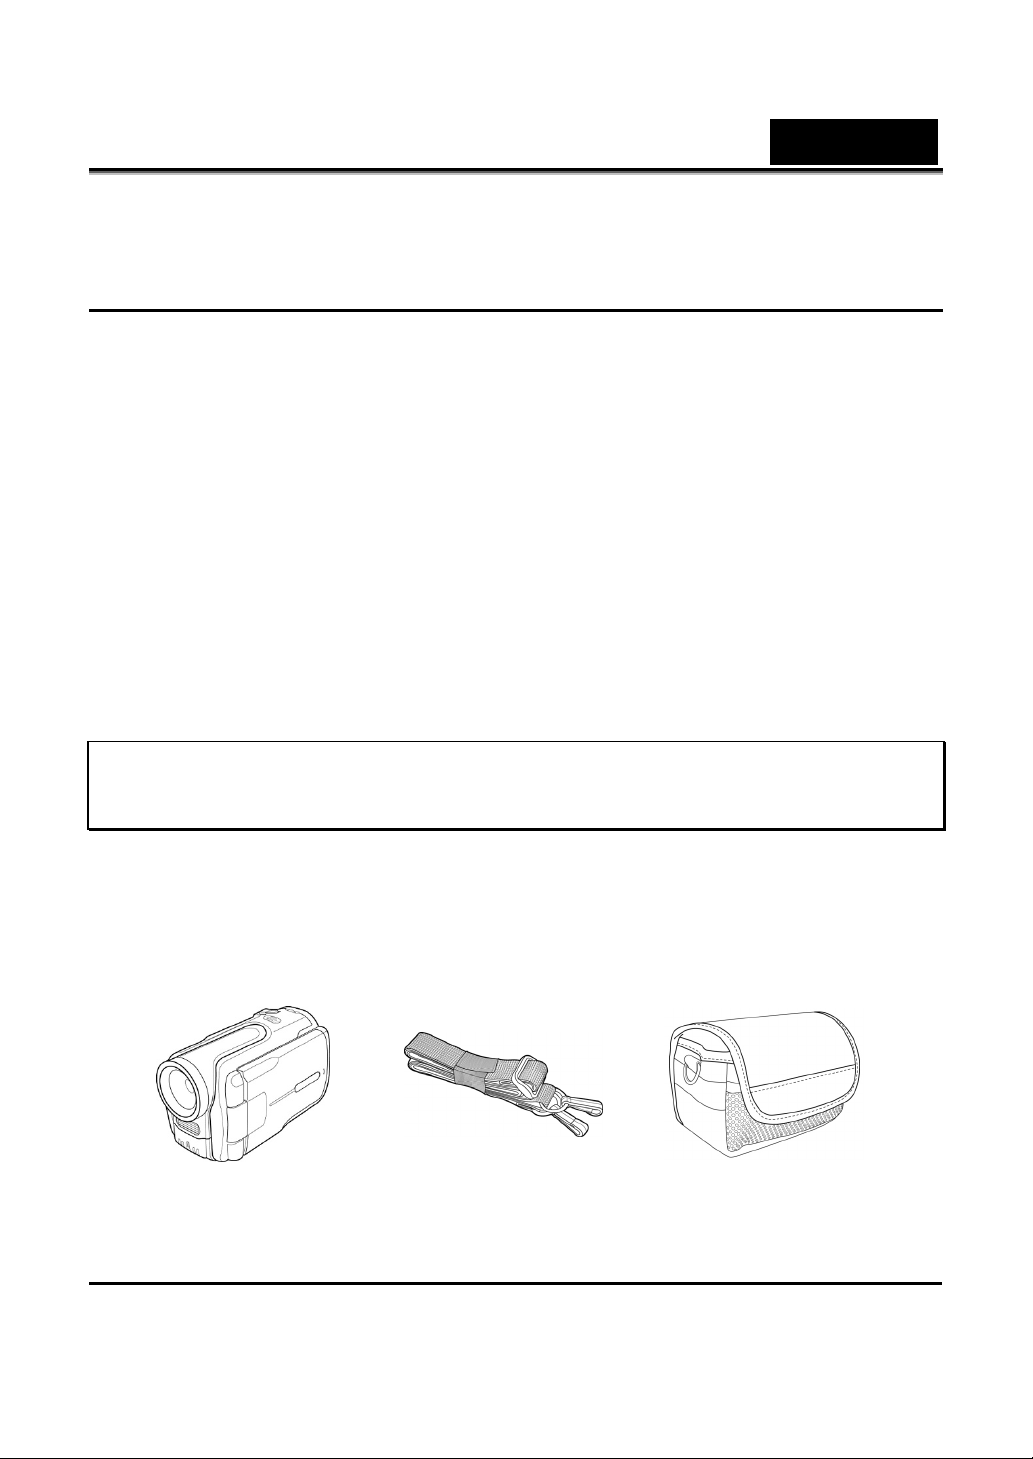
1.2 Unpacking the video camera
All the following items should be present in the camera package. If any
item is missing or appears damaged, contact your dealer immediately.
12
ital Video camera Shoulder strap Leather case and
Di
Page 14
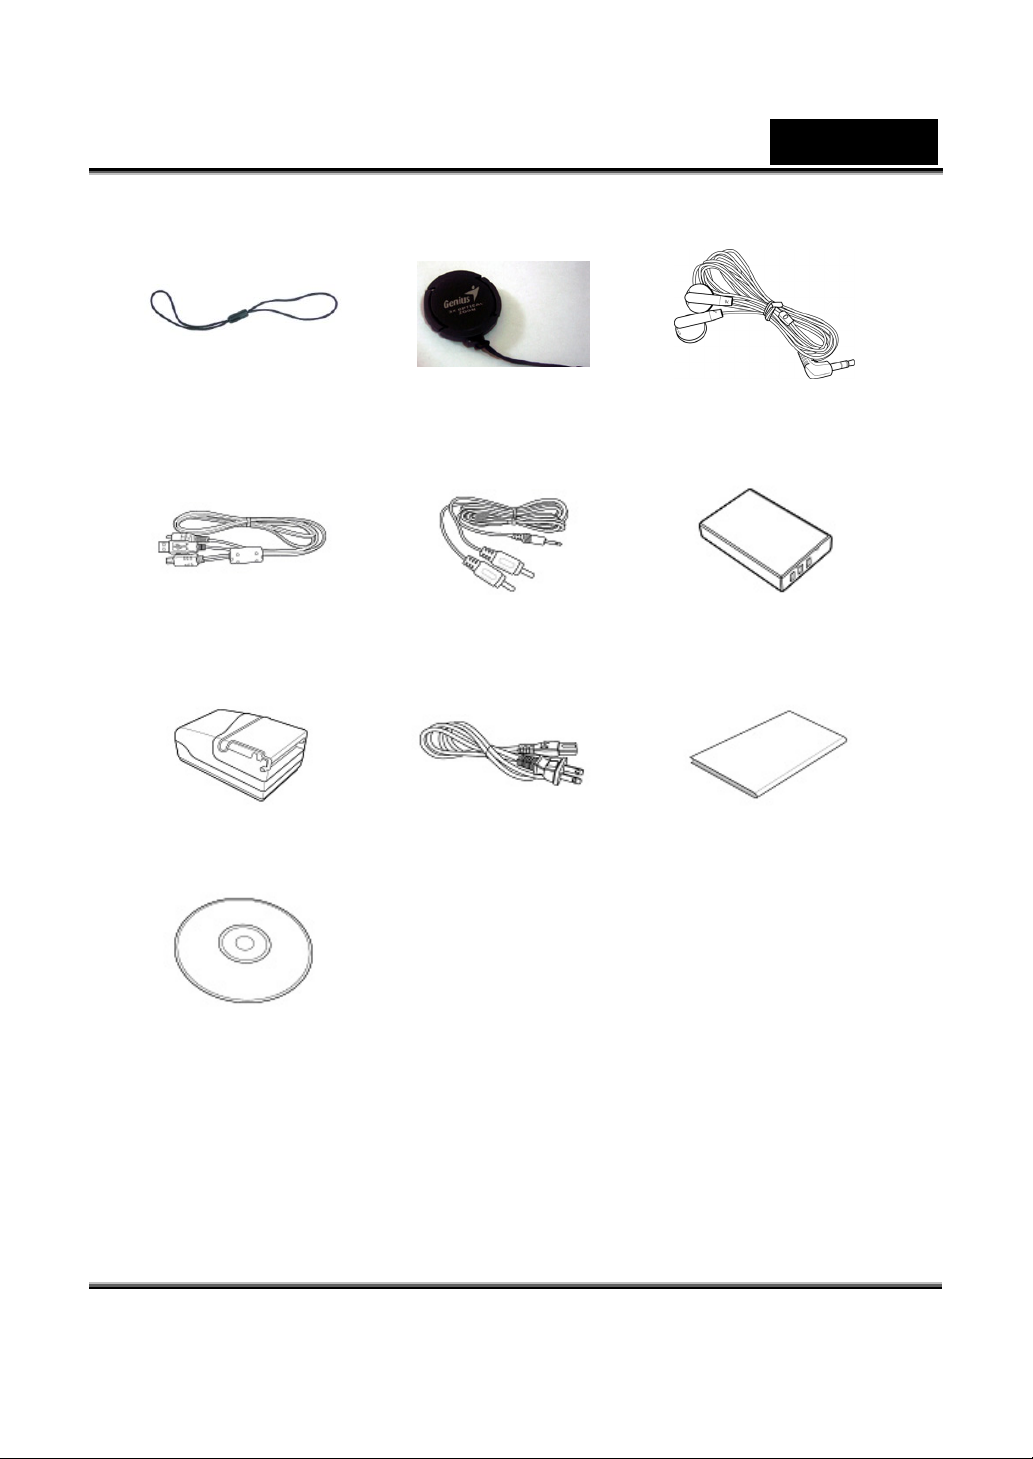
Lens cap strap Lens cap Headphones
USB/Video cable Audio cable Li-ion battery
English
Battery charger Power cord Quick Guide
CD-ROM
(Driver and
application software)
1.3 About the camera
Refer to the following illustrations to familiarize yourself with the
buttons and controls of the camera.
13
Page 15
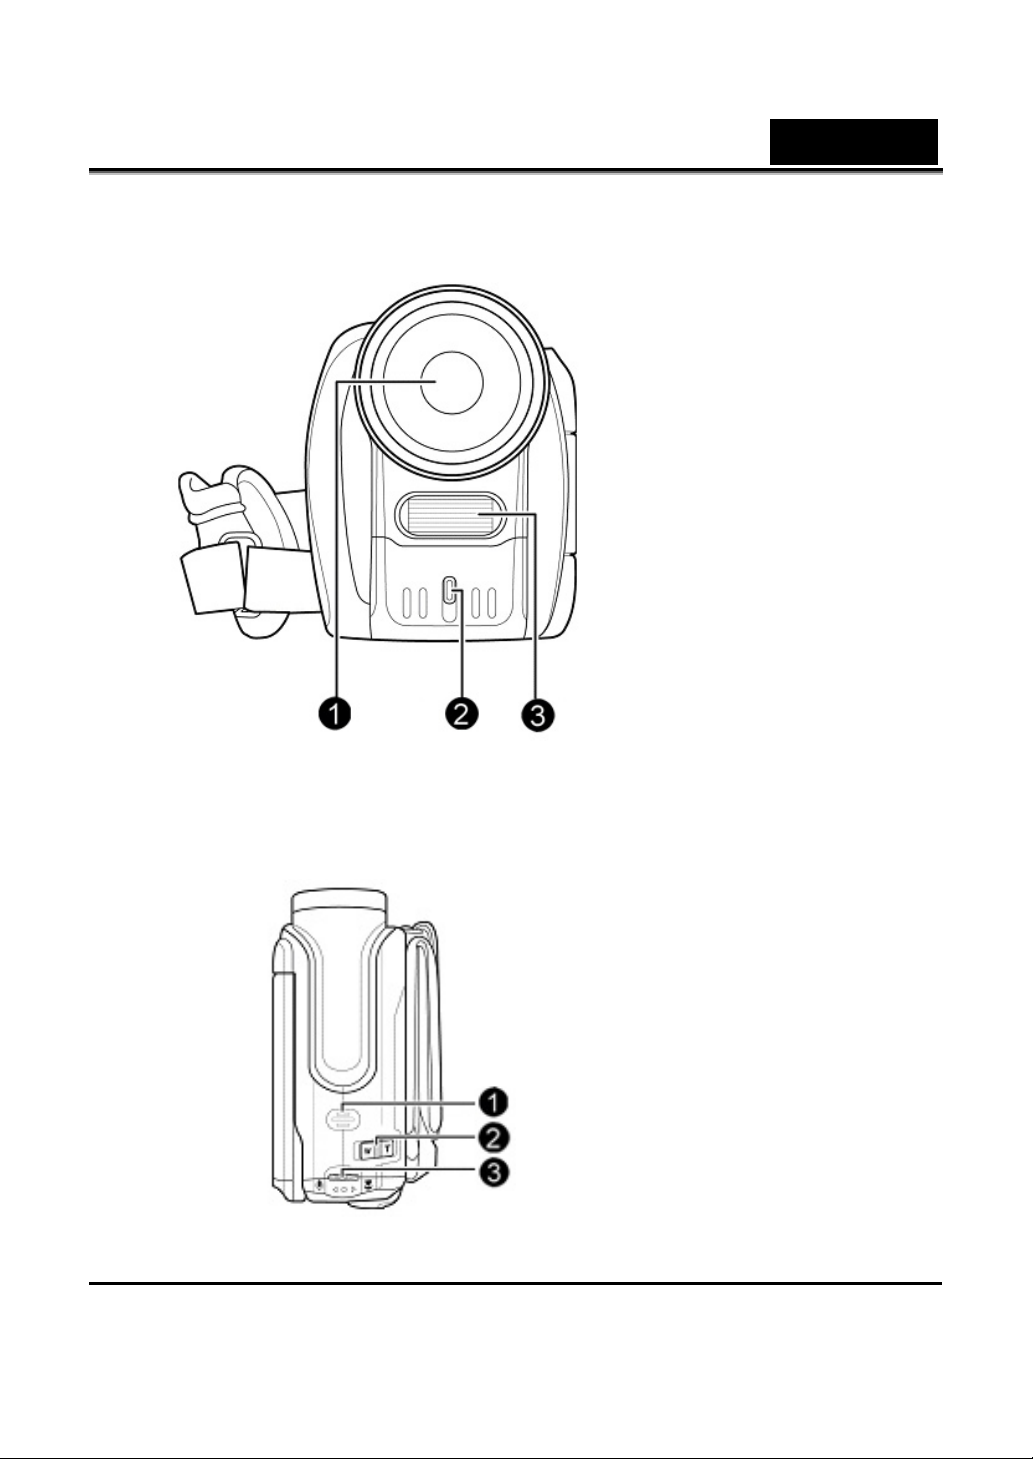
1.3.1 Front view
English
1. Lens assembly
2. Self-timer LED
3. Flash
1.3.2 Top view
14
1. Speaker
2. Zoom switch
3. Scroll wheel
Page 16
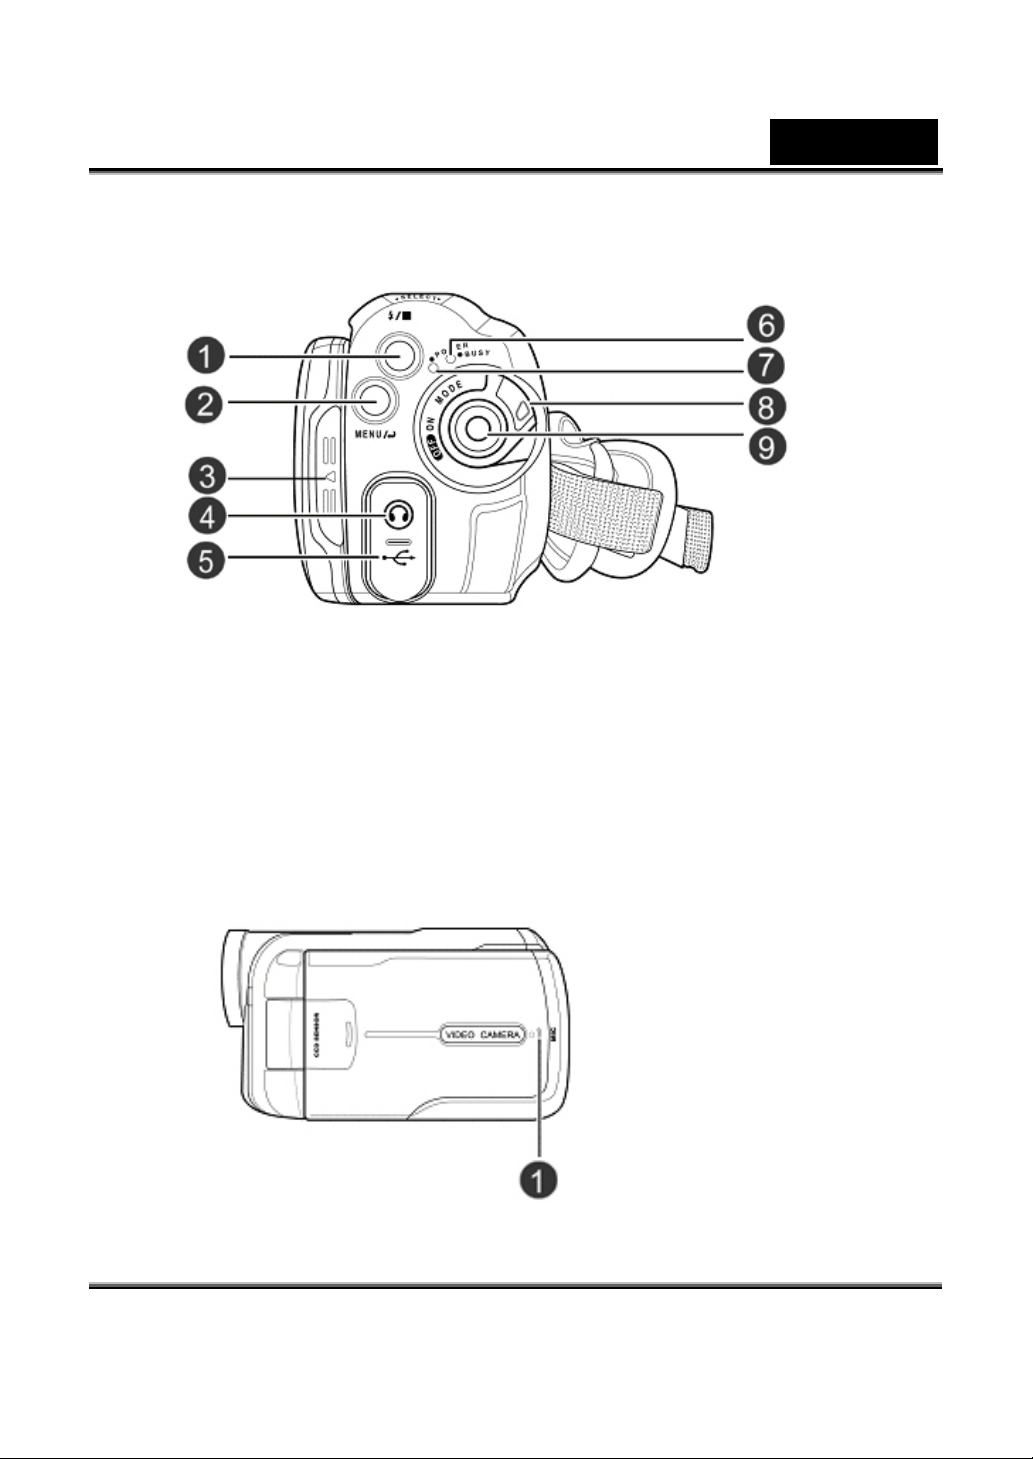
1.3.3 Back view
English
1. Flash/Stop button
2. Menu button
3. LCD screen cover
4. Earphone
5. USB port
1.3.4 Right view
6. Busy light LED (Red)
7. Power light LED (Green)
8. Mode switch
9. Shutter button
1. MIC
15
Page 17

1.3.5 Bottom view
1.3.6 LCD display
English
1. Battery cover
2. Tripod
connector
16
1. LCD screen
2. Display button
3. Playback button
4. Up and down
arrow keys
5. Delete / OK
button
Page 18
English
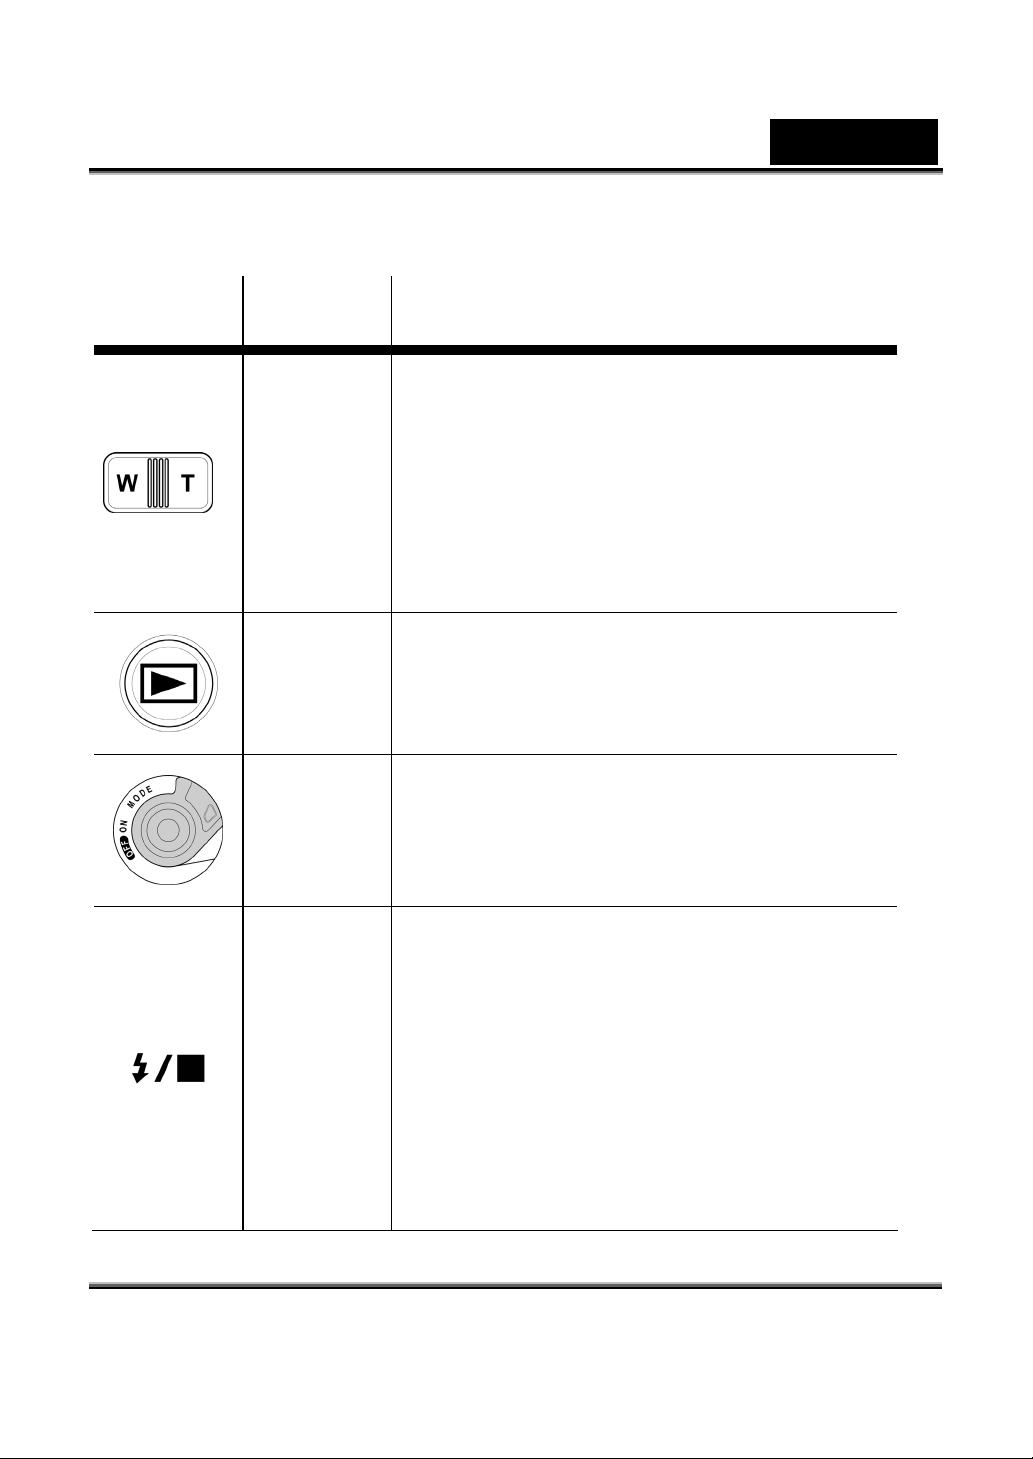
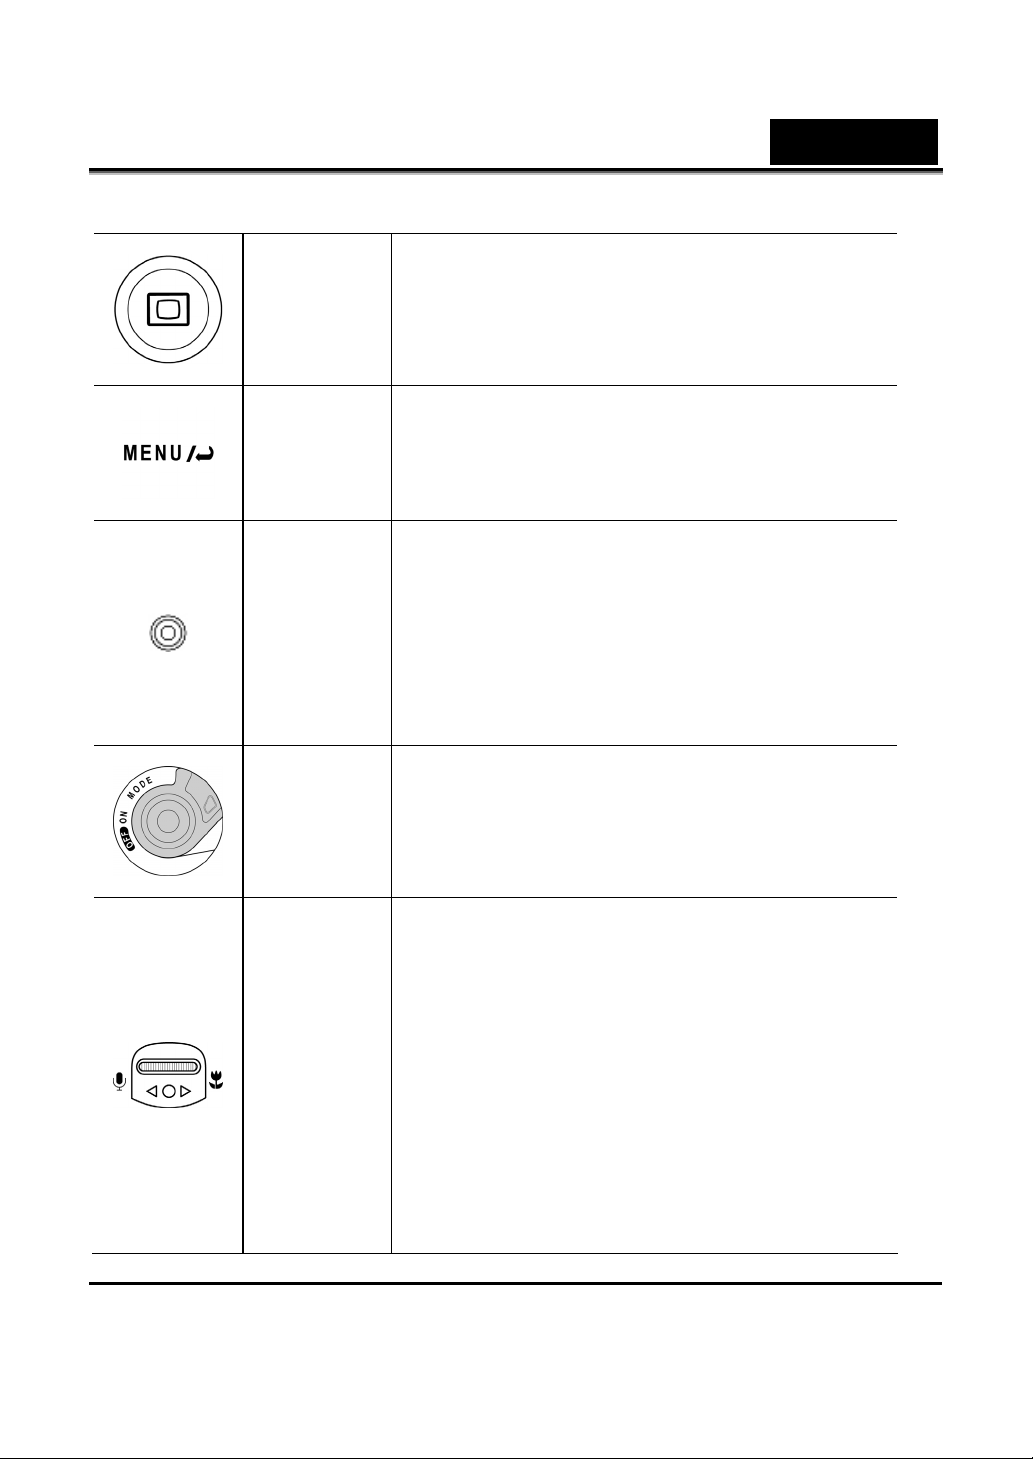
See the table below for a description of each button’s function.
Button Name
Zoom
out
Zoom in
Playback
Mode
Function
z Press to zoom out/in while
shooting video clips or taking
pictures.
z Press to enlarge/ reduce images
while reviewing still images.
z Press to adjust volume while
playing video or voice files.
z Press to playback images, video
clips, or recorded voice files.
z Turn to switch between Video
mode, Photo mode, Voice mode,
and Music mode.
z In Photo mode, press to switch
between flash modes.
z In Video and Voice Playback
mode, press to stop playing back a
video clip/ recorded voice
file/music file.
z In Photo Playback mode, press to
display the thumbnails of the
photos taken.
Flash /
Stop
17
Page 19
English
Display
Menu z Press to display main OSD menu.
Shutter
Power
z Press to switch between LCD
display modes and HELP function.
z Press to start/stop the video/voice
recording in Video/Voice mode.
z Press to capture a picture in Photo
mode.
z Press to play/pause while playing
video/voice/music
z Hold the blue button and turn the
mode switch at the same time to
turn power on/off.
18
z In Playback mode, scroll to select
previous/next video clip/image/
voice/ music file to play.
z In Video mode, scroll to
Scroll
wheel
enable/disable audio.
z In Photo mode, scroll to
enable/disable macro function.
z In Video/ Photo/ Voice /Music /
Playback mode, press to protect the
files from accidental deletion.
Page 20
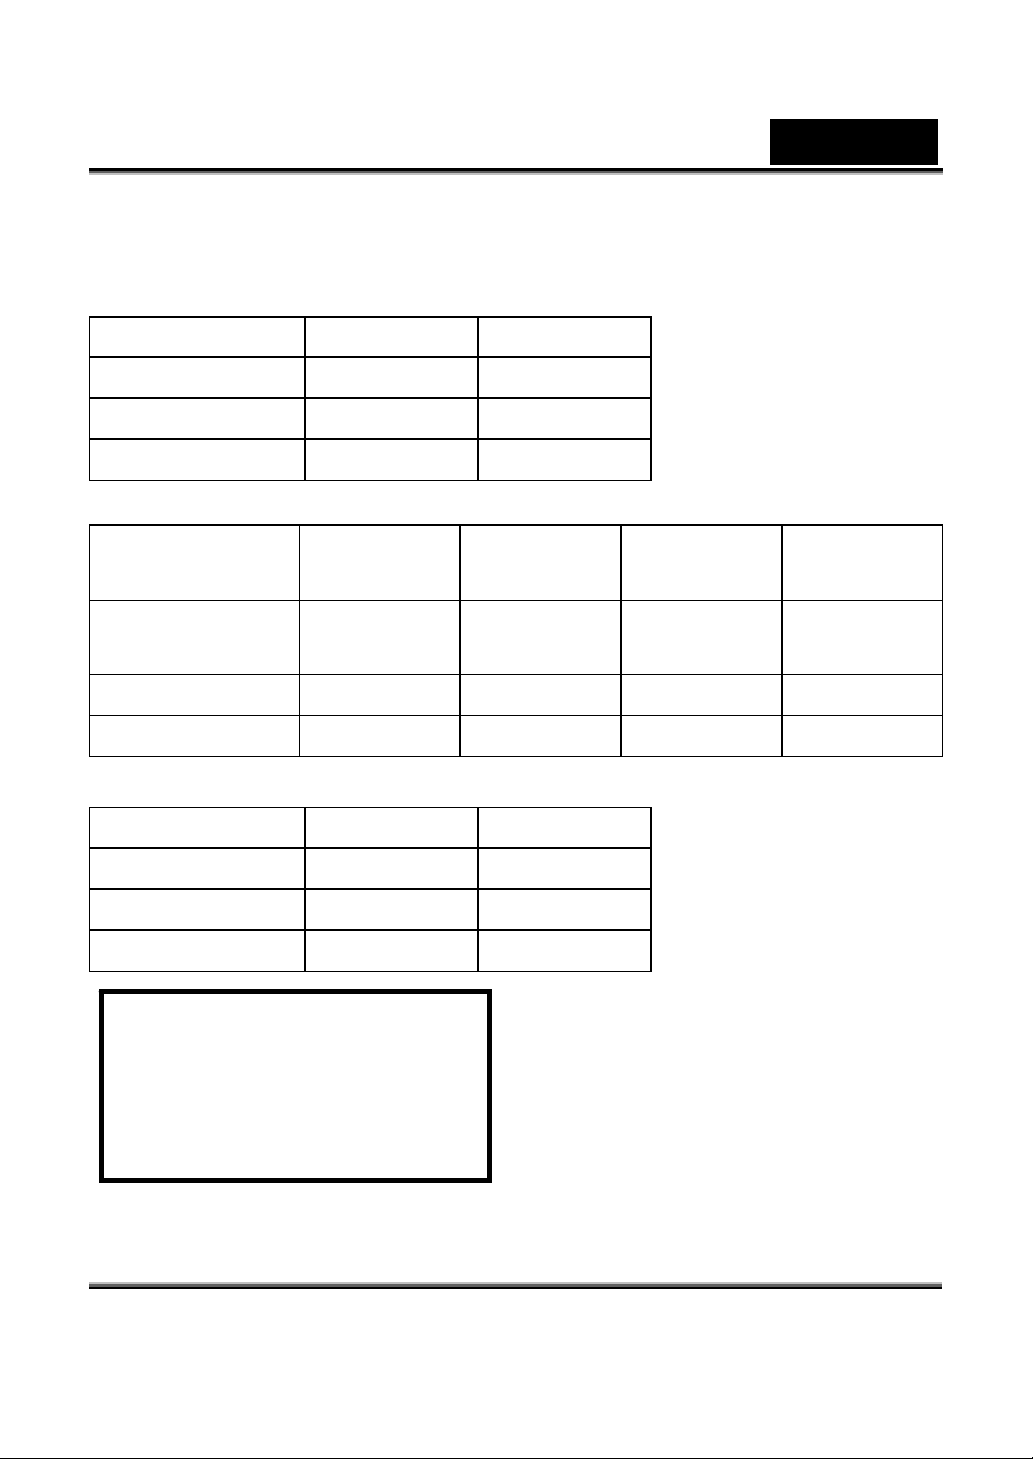
1.3.7 About the LEDs
The following tables explain the meaning of the LEDs.
Video mode Power on Recording
Self-timer LED N/A N/A
Power LED (G) ● –
Busy LED (R) ●
English
Photo mode Power on
Self-timer LED
(R)
Power LED (G) ● ●→ →● –/ N/A
Busy LED (R) ● ● ●
Voice mode Power on Recording
Self-timer LED N/A N/A
Power LED (G) ● N/A
Busy LED (R) ●
Legend:
● LED turns on then off
blinking LED
– Steady LED
N/A N/A N/A
Self-
capture
Shutter
button
Flash
charging
19
Page 21
English
2 Getting started
Read this section to learn how to start using the camera. This section
covers only basic functions such as inserting the battery and memory
cards, turning it on, and making preliminary settings. See later chapters
for advanced functions.
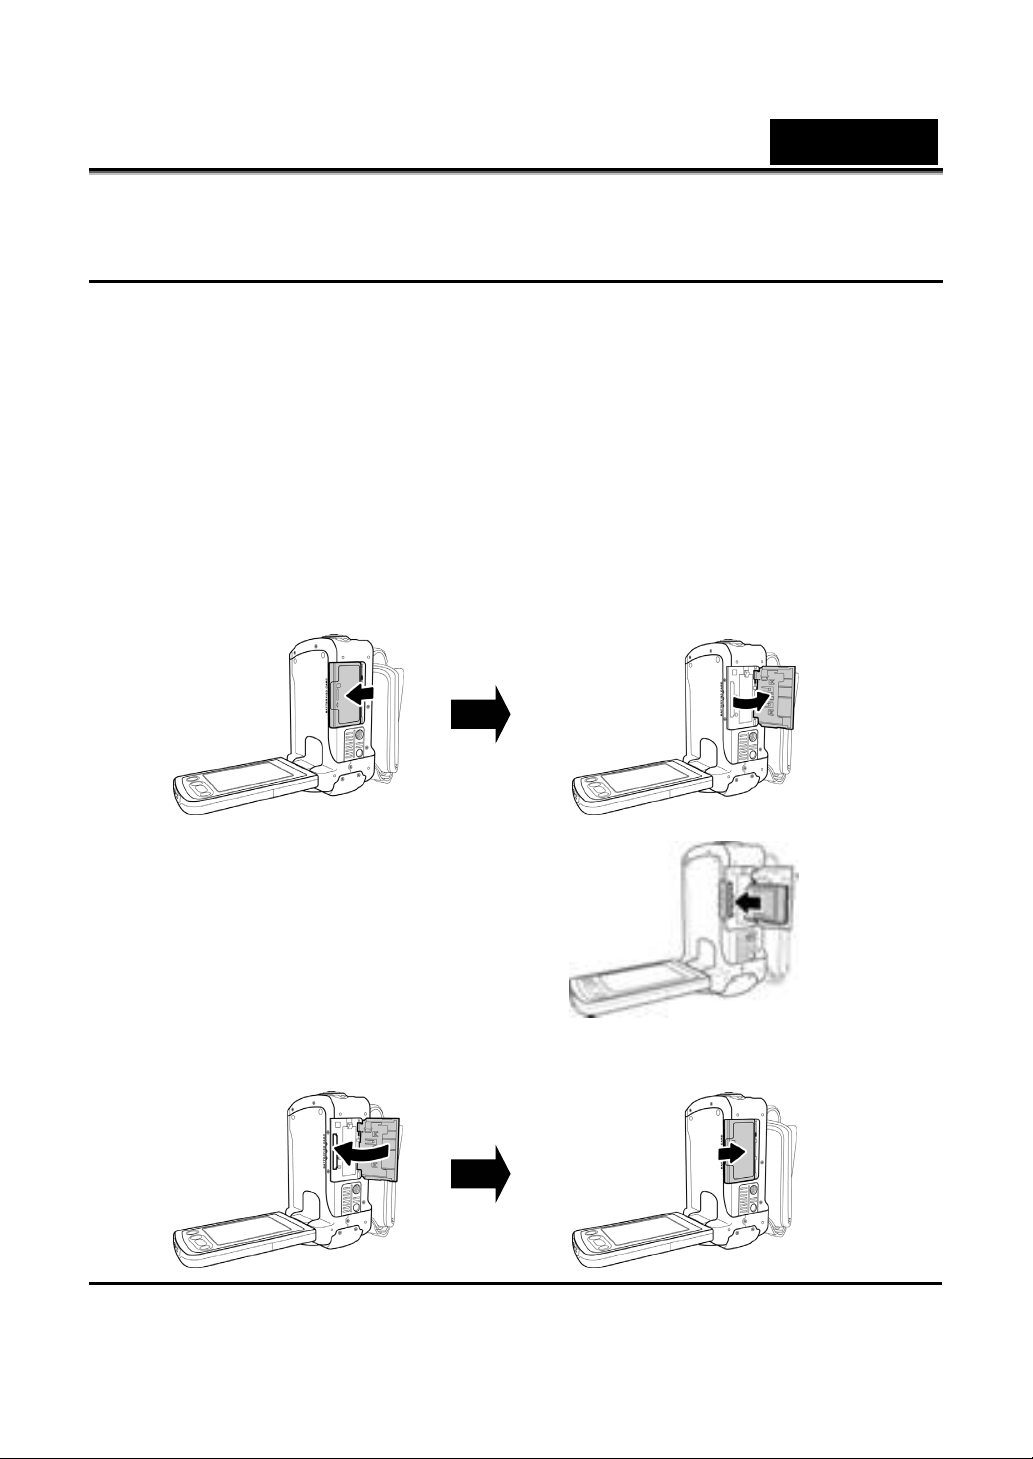
2.1 Inserting an SD card
An SD card can be installed in the camera to provide additional storage
space for still images, video clips, or other files.
1. Open battery cover.
2. Insert an SD card as shown.
Make sure the gold contacts are
facing down as shown.
3. Close the battery cover.
20
Page 22
English
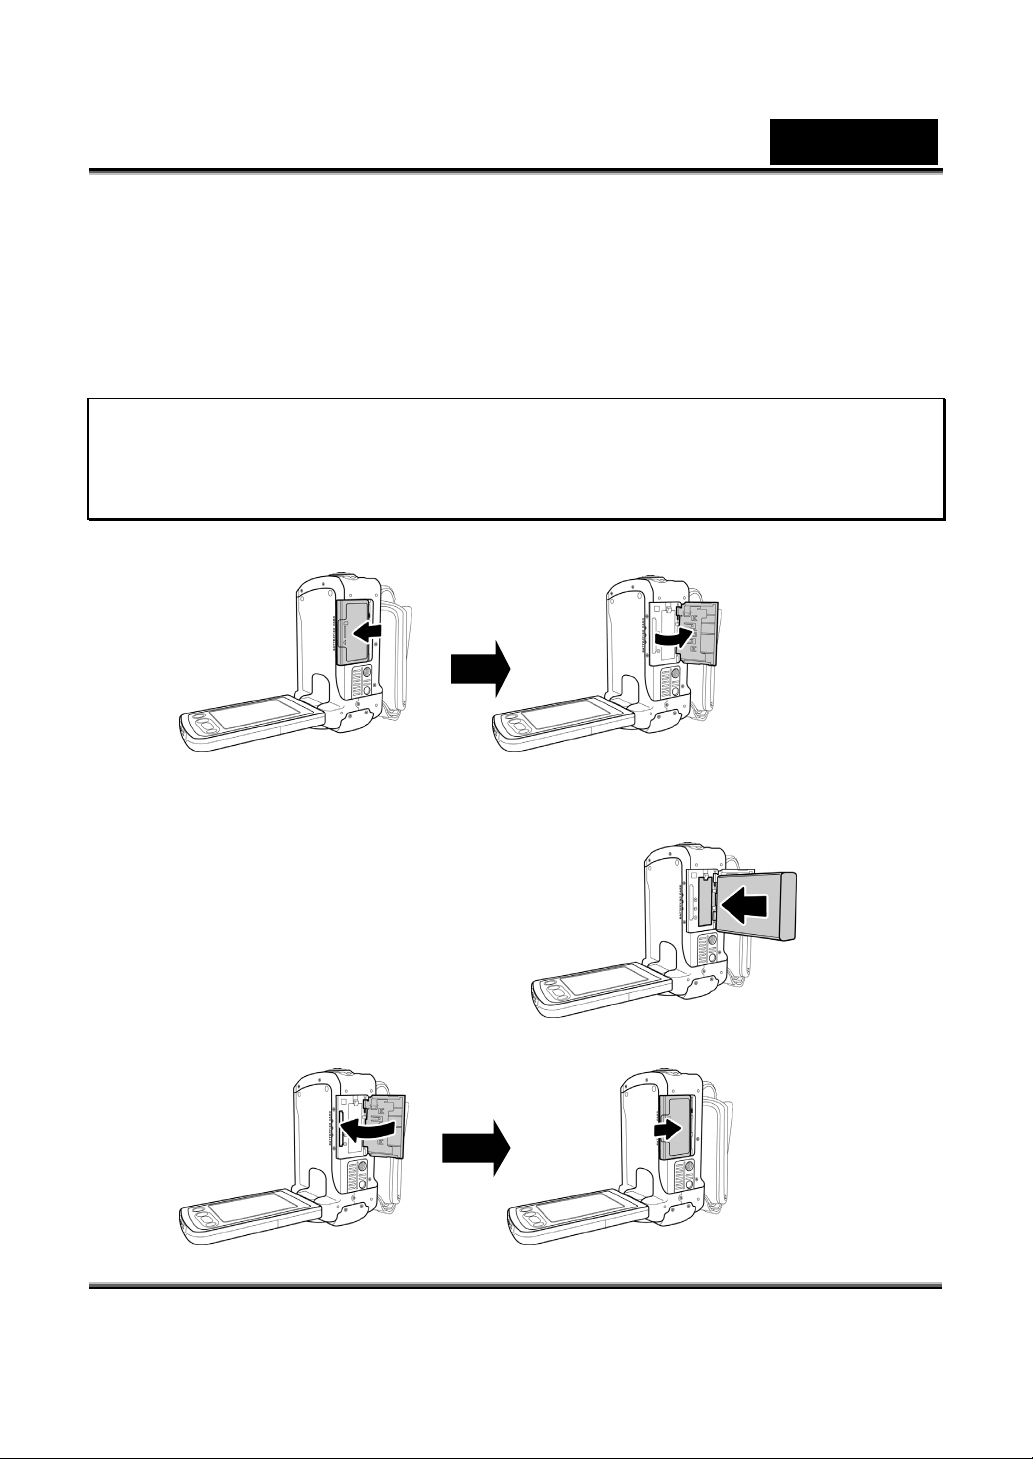
2.2 Inserting the batteries
This video camera is designed to use a rechargeable Li-ion battery. Only
the battery supplied or a similar battery recommended by the
manufacturer or your dealer should be used
Note: Install the batteries exactly as described here. Ensure that the
polarity of the batteries is correct. Installing the batteries incorrectly
could cause damage to the camera and possibly start a fire.
1. Open the battery cover.
2. Insert the batteries as shown.
3. Close the battery cover.
21
Page 23
English
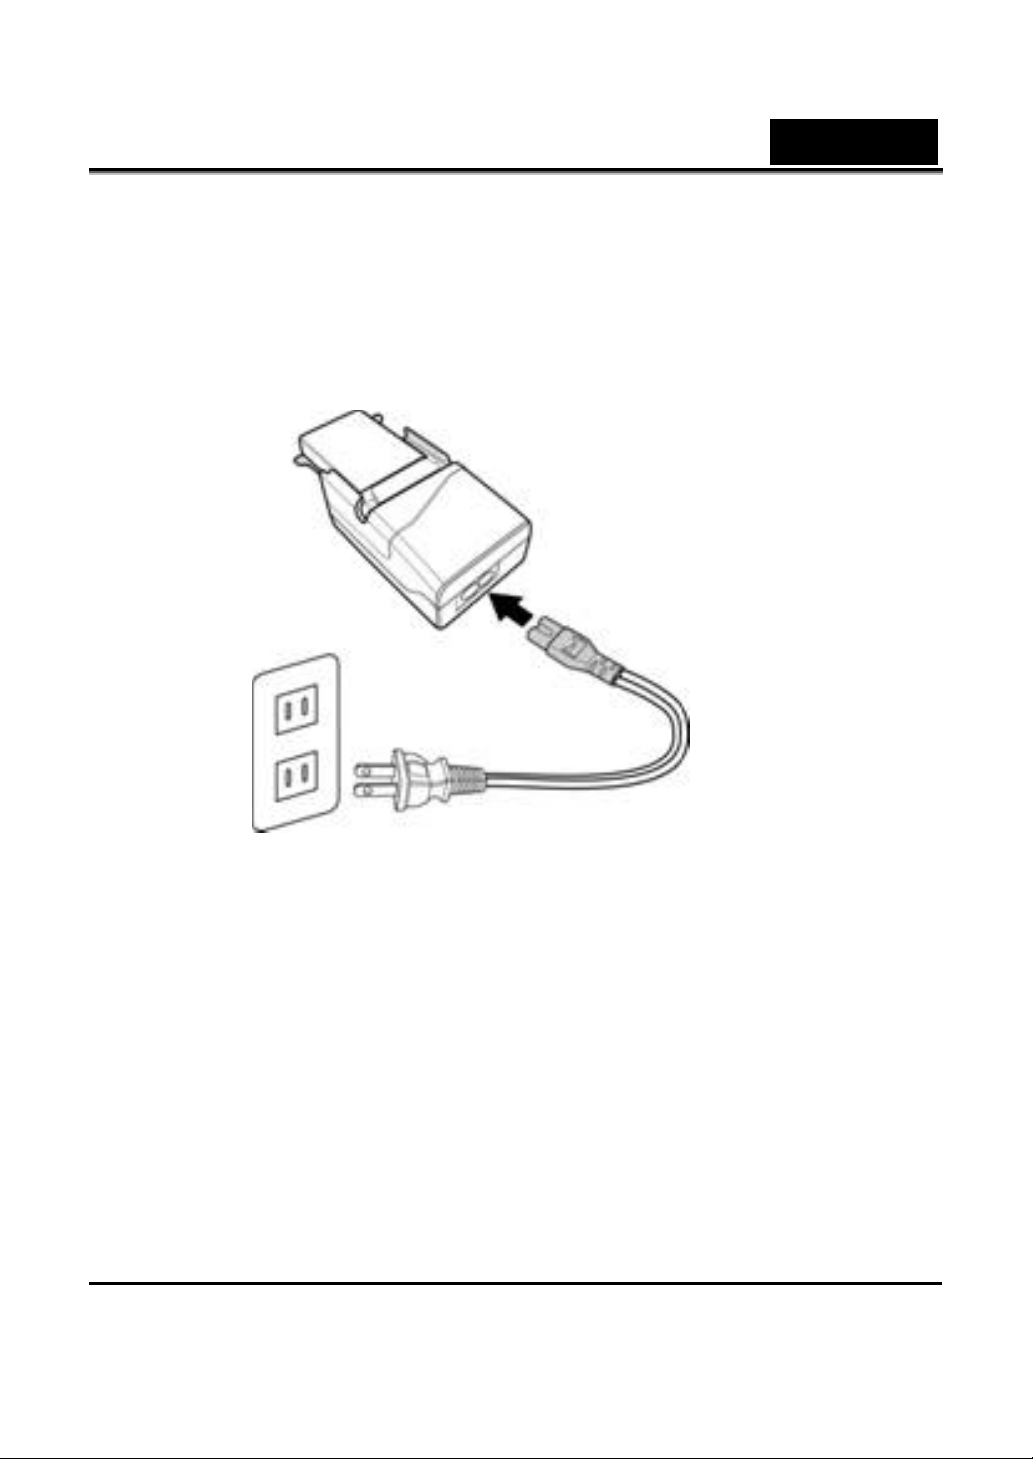
2.3 Charging the battery
Insert the battery into the charger as shown and connect the power
supply to the charging unit and the mains supply.
22
Page 24
English
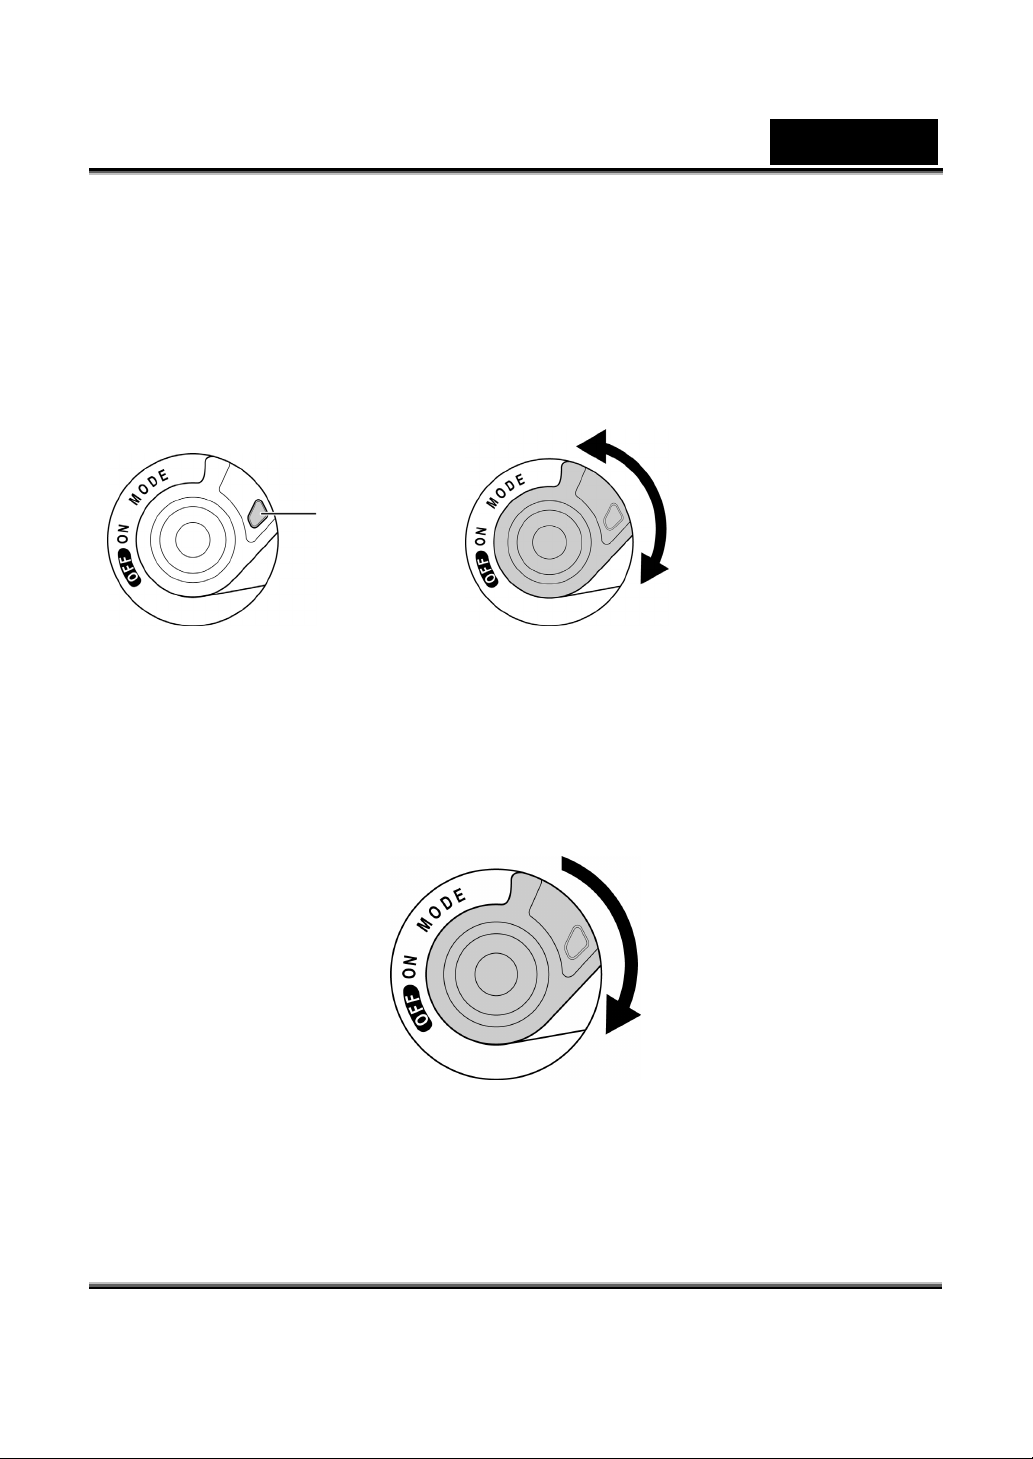
2.4 Turning on for the first time
Press and hold the blue button and turn the mode switch to the right to
turn on the video camera. Press and hold the blue button and turn the
mode switch to the left to turn the video camera off.
Blue button
Mode switch
2.5 Changing modes
The video camera can operate in four modes, Video mode, Photo mode,
Voice mode, and Music mode. Turn the mode switch to toggle between
modes.
Mode switch
23
Page 25
English
2.6 Before you start
Before using the video camera, some basic settings need to be
configured and are described in the following sections.
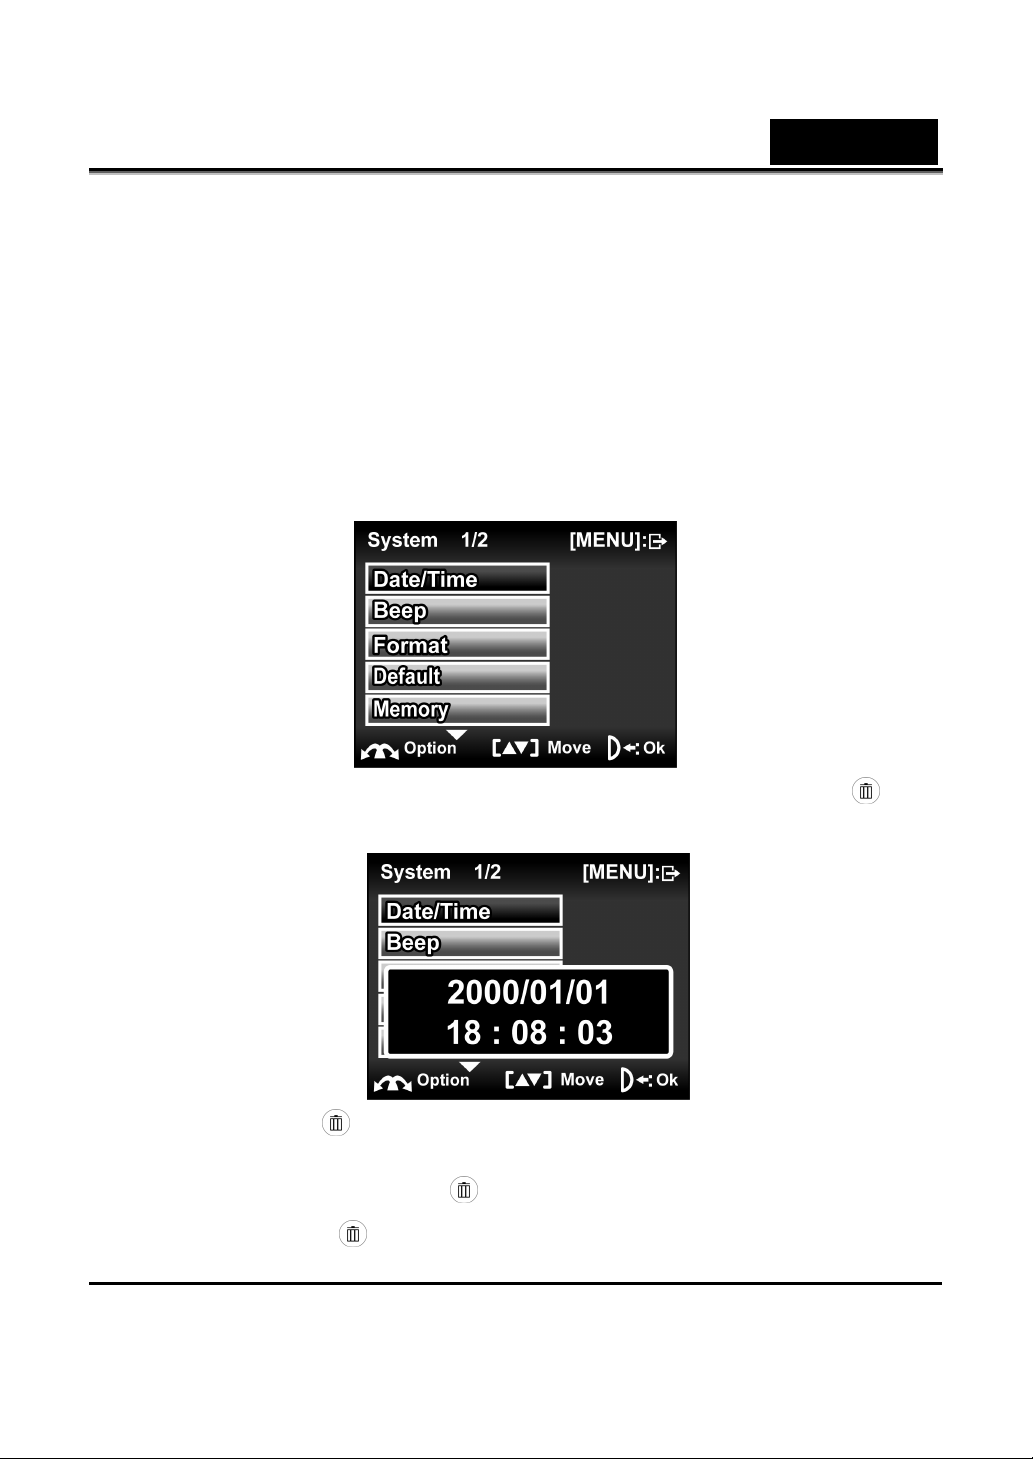
2.6.1 Setting the date and time
1. Turn on the video camera, and press the MENU button to
display the menu screen.
2. When the Date/Time option is highlighted, press the OK
button to display the submenu.
3. Use the OK
value by pressing the Up/Down arrow keys. After the changes
are done, press the OK
4. Press the OK
button to highlight each field, and adjust the
button again to confirm.
button to exit the menu.
24
Page 26
English
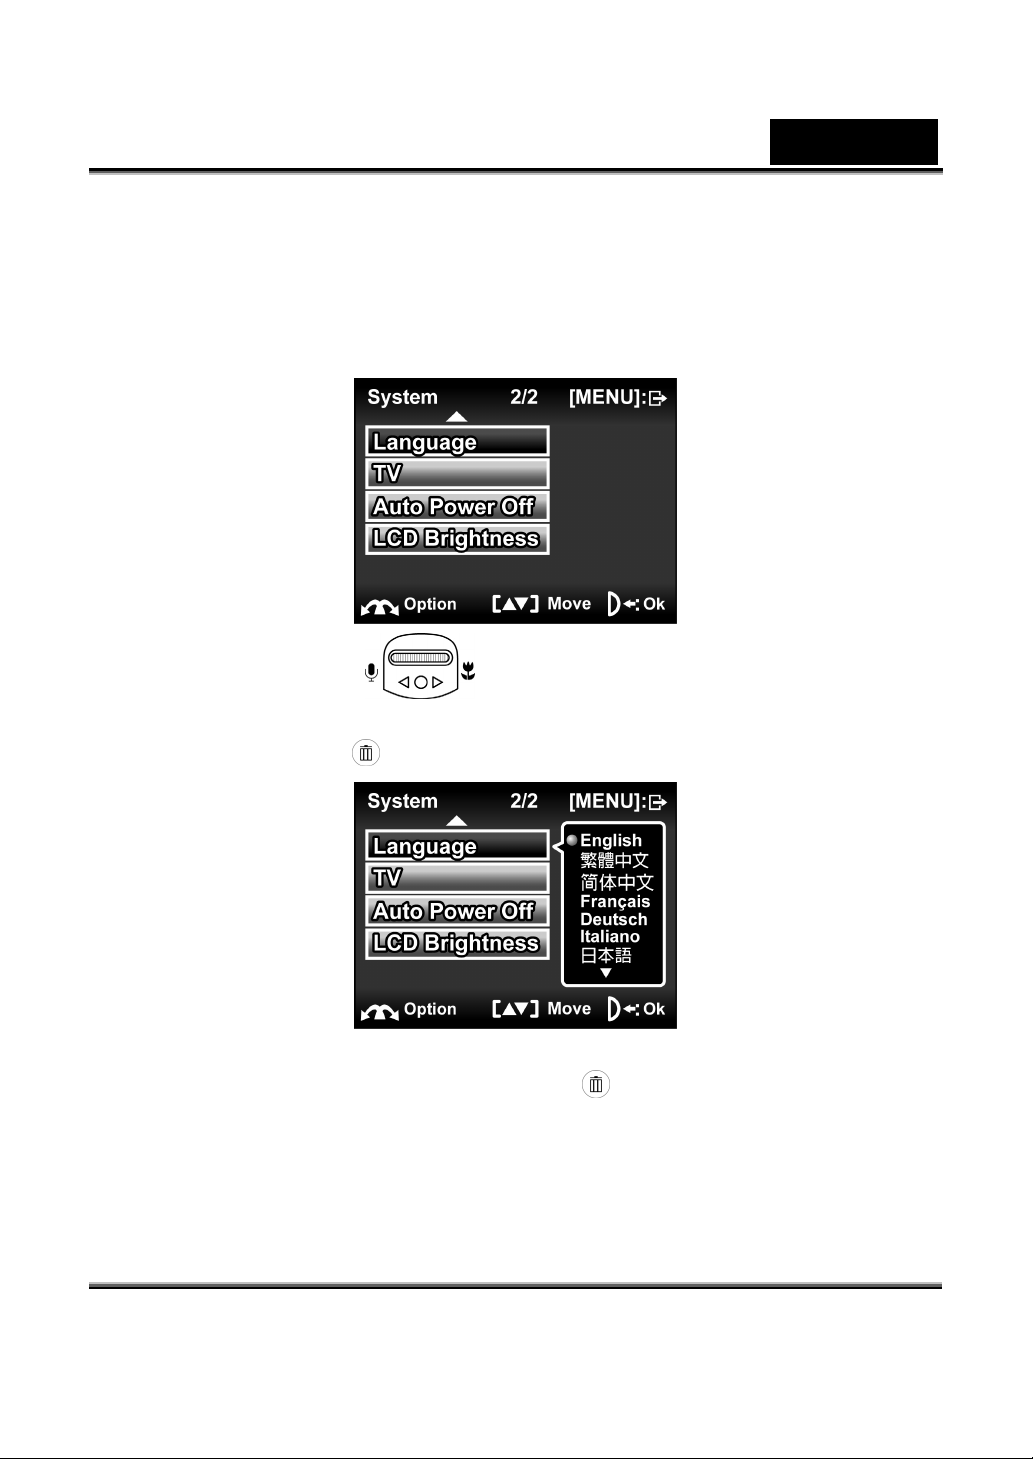
2.6.2 Setting the language
1. Turn the camera on, and press the MENU button to display the
menu screen.
2. Move the scroll
Up/Down arrow keys to highlight the Language option. Press
the OK button
3. Use the Up/Down arrow keys to select the language. After the
language is selected, press the OK
4. Press the MENU button to exit the menu.
to confirm.
to show the setup menu and use the
button to confirm.
25
Page 27
English
2.7 Shooting video
2.7.1 To shoot a video clip:
1. Turn on the camera and make sure it is in Video mode.
2. Use the LCD screen to frame the video.
3. Press the Shutter button to start recording.
4. Press the Shutter button again to end recording.
5. The video clip will automatically be saved with a unique file
name.
Note: To adjust the brightness of the LCD screen while shooting a video
clip, press the Up/Down arrow keys. A icon is displayed while
adjusting the brightness of the LCD screen.
26
Page 28
English
2.7.2 To playback the video clip
1. Make sure the camera is in Video mode.
2. Press the Playback button, the most recent file will be shown
on the LCD screen.
3. Press the Shutter button or the Up arrow key to playback the
video clip.
4. To pause while playing back the video clip, press the Shutter
button or the Up arrow key again.
5. When viewing the video clip, use the Zoom out/Zoom in switch
to adjust the volume.
6. Press the Stop button or the Down arrow key to stop playing.
7. Press the Playback button again to return to Video mode.
27
Page 29
2.8 Taking still pictures
2.8.1 To take a still picture:
1. Turn on the camera and make sure it is in Photo mode.
English
2. Use the LCD screen to frame the picture.
3. Press the Shutter button to capture the picture.
4. The picture will automatically be saved with a unique file name.
Note: To adjust the brightness of the LCD screen while taking a still
picture, press the Up/Down arrow keys. A icon is displayed while
adjusting the brightness of the LCD screen.
28
Page 30
English
2.8.2 To playback the picture:
1. Press the Playback button, and the most recent file will be
shown on the LCD screen.
2. Move the scroll wheel to select the previous/next image.
3. Use the Zoom out/Zoom in switch to enlarge/reduce the image.
Press the Up/Down arrow keys to move the zoomed image up
and down. Use the scroll wheel to move the zoomed image left
and right.
4. Press the Playback button again to return to Photo mode.
29
Page 31

2.9 Voice recording
2.9.1 To make a voice recording:
1. Turn on the camera and make sure it is in Voice mode.
English
2. Press the Shutter button to start recording.
3. Press the Shutter button again to stop.
4. The voice file will automatically be saved with a unique file
name.
2.9.2 To playback a voice file:
1. Press the Playback button, and the most recent file will be
shown on the LCD screen.
2. Press the Shutter button or the Up arrow key to playback the
voice file.
3. To pause while playing back the video clip, press the Shutter
button or the Up arrow key again.
4. When playing back a voice file, use the Zoom in/ out switch to
adjust the volume.
30
Page 32

English
5. Press the Stop button or the Down arrow key to stop.
6. Press the Playback button to return to Voice mode.
2.10 Playing music files
2.10.1 To playback a music file:
1. Turn on the camera and make sure it is in Music mode.
2. Use the scroll wheel to select the file to playback.
3. Press the Shutter button or the Up arrow key to playback the
voice file.
4. To pause while playing back the voice file, press the Shutter
button or the Up arrow key again.
5. When playing back a voice file, use the Zoom in/ out switch to
adjust the volume.
6. Press the Stop button or the Down arrow key to stop.
31
Page 33

2.11 Connecting to a computer
Read this section to learn how to
transfer files to a PC or use the
camera as a PC web-camera for
conferences.
Connect the camera to a computer
with the USB cable provided.
2.12 Connecting to a TV
English
Connect the camera to a TV as shown with the AV cables provided.
Connecting to video Connecting to audio
32
Page 34

English
3 Using the camera
Read this section to learn how to use the camera.
3.1 Video mode
Use Video mode to capture video clips and store them in internal
memory or on an SD card.
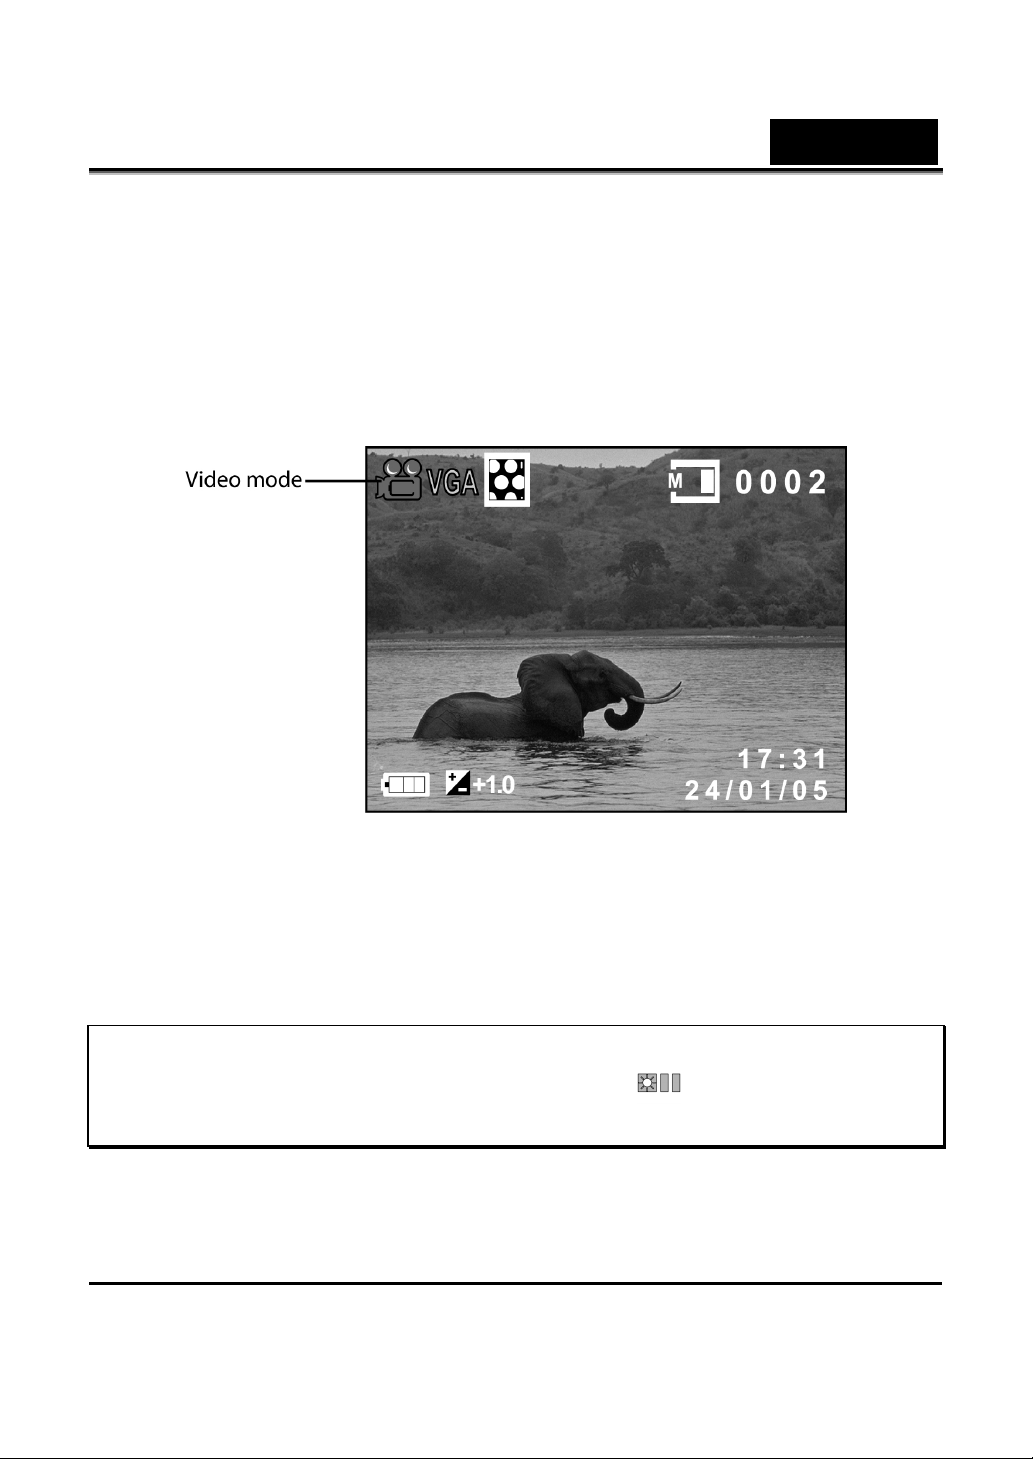
3.1.1 Video mode icons
Use the following picture to familiarize yourself with the Video mode
icons and symbols.
See the table below for a description of each icon and symbol.
1
2 0002 Display the number of files saved
3 17:31
YY/MM/DD
Memory status
Date and time.
33
Page 35

English
4
5
6
7
8
9
10
EV compensation indicator
Battery indicator
Audio indicator. An
when audio is disabled.
Zoom indicator. An
the zoom is displayed when the zoom
switch is pressed.
Video mode icon
Image file indicator
Image quality indicator
icon is displayed
icon indicating
34
Page 36

English
3.1.2 Help information
Press the Display button to display Help information for the
function keys in Video mode. Press the Display
return to main screen.
The following screen is displayed when the Display
pressed. An illustration of the functions for each button is displayed on
the screen.
button again to
button is
35
Page 37

English
3.1.3 Quick access menu
You can also make adjustments of the current setting by pressing the
scroll wheel button.
In Video mode, pressing the scroll wheel to display the quick access
menu. You can adjust settings for items such as file size, EV
compensation, self-timer, image quality, color effect, and white balance.
To make adjustments, do the following:
1. Use the scroll wheel to select the setting to be modified.
2. Press the Up/ Down arrow keys to modify the current setting.
3. Press the scroll wheel again to return to Video mode.
36
Page 38

English
3.2 Photo mode
Use Photo mode to capture still pictures and store them in the
internal memory or on an SD card.
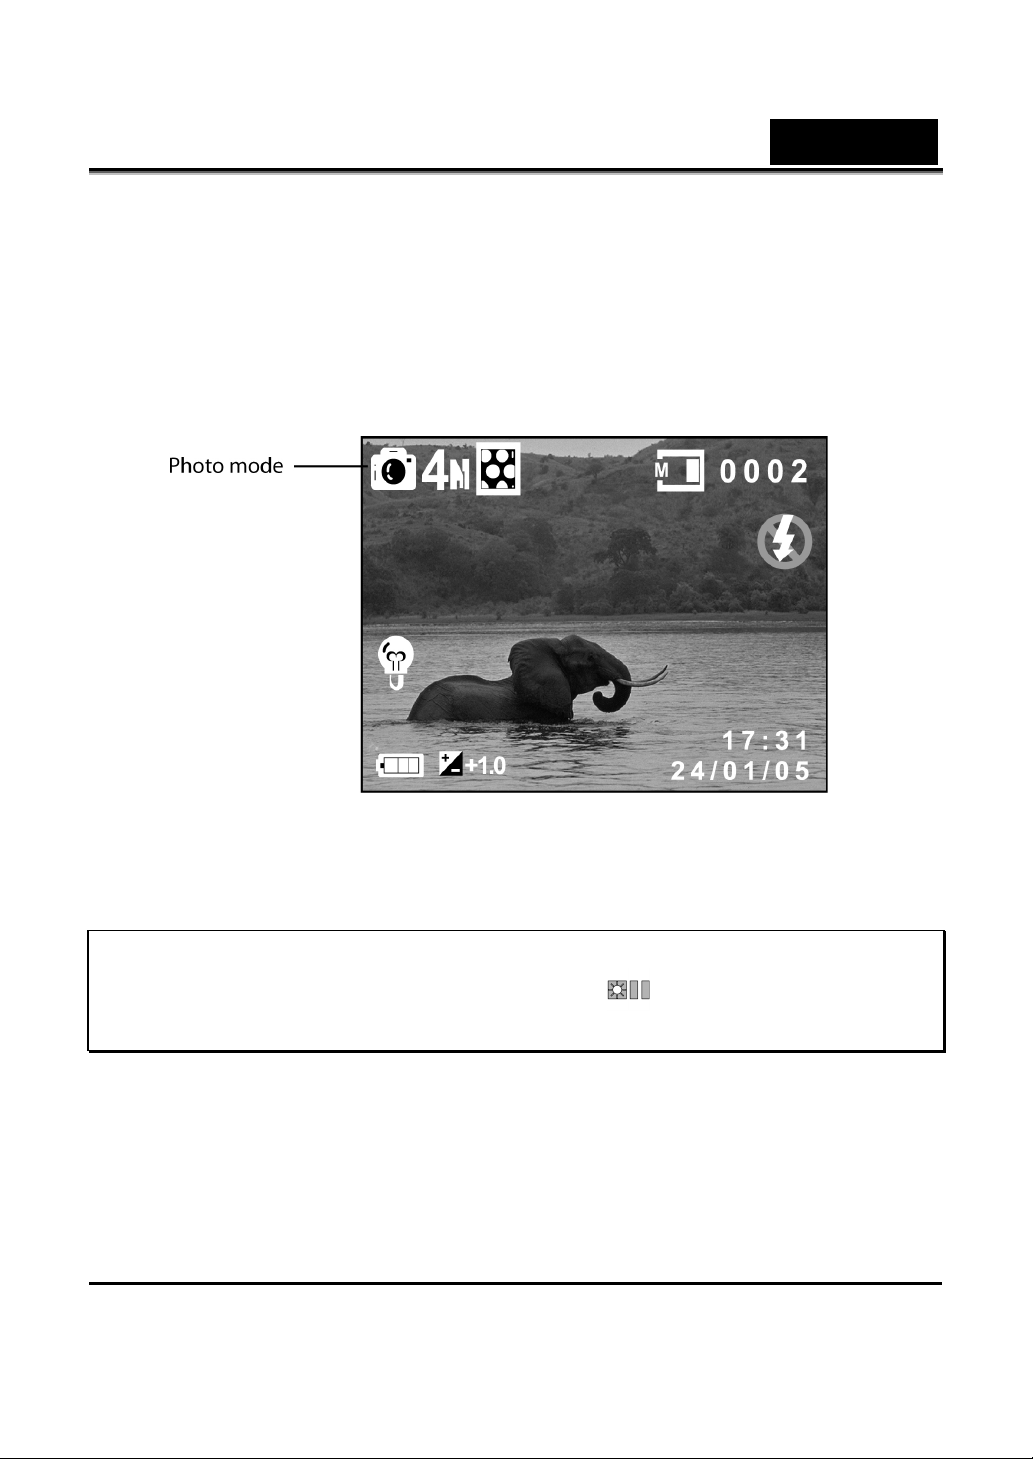
3.2.1 Photo mode icons
Use the following picture to familiarize yourself with the photo mode
icons and symbols.
See the table below for a description of each icon and symbol.
1
2 0002 Displays the number of saved files
3
4
5 17:31 Date and time
Memory status indicator
Flash mode indicator
Night mode indicator
37
Page 39

English
YY/MM/DD
6
7
8
9
10
11
EV compensation indicator
Battery status indication Picture mode
Capture mode indicator
: Continuous shot
No icon is shown when set to single
shot.
White balance indicator shows the
white balance setting.
Self-timer function (10/ 20 seconds)
Macro function indicator
This function is on when the
is displayed.
The icon is not shown when this
function is off.
icon
38
12
13
14
15
Photo mode indicator
Image size indicator
Image quality indicator
Zoom indicator
Page 40

English
3.2.2 Setting the flash
While in Photo mode, press the flash button to switch between flash
modes.
See the table below for a description of each icon and symbol.
Flash is turned off
Automatic flash, fires only when needed.
Flash fires automatically when needed and
flashes once before the picture is taken to reduce
the red-eye effect.
Forced flash, flash is always on.
Slow sync flash.
A flash mode designed for low light conditions
with long shutter speed.
3.2.3 Using the macro function
This function can capture subjects close to the lens. In macro mode,
subjects can be as close as 20 cm.
While in
to activate macro function, and an icon
screen.
Move the scroll wheel again to cancel the macro function.
Photo
mode, move the scroll wheel on top of the video camera
will appear on the LCD
39
Page 41

English
3.2.4 Using the zoom function
The camera is equipped with 3x optical zoom and 10x digital zoom. In
Video mode, the zoom function works with 3x optical and 10x digital
zoom. In Photo mode, the zoom function works with 3x optical zoom
and 4x digital zoom.
Move the zoom switch to the right to get closer to a subject.
Move the zoom switch to the left to move away from a subject.
The zoom ratio is displayed on the screen.
40
Page 42

English
3.2.5 Help information
Press the Display button to display Help information for the
function keys in Photo mode. Press the Display
return to main screen.
The following screen is displayed when the Display
pressed. An illustration of the functions for each button is displayed on
the screen.
button again to
button is
41
Page 43

English
3.2.6 Quick access menu
You can also make adjustments of the current setting by pressing the
scroll wheel.
In Photo mode, pressing the scroll wheel to display the quick access
menu. You can adjust the settings for items such as file size, EV
compensation, white balance, image quality, self-timer, driver mode,
and color effect.
To make adjustments, do the following:
1. Use the scroll wheel to select the setting to be modified.
2. Press the Up/ Down arrow keys to modify the current setting.
3. Press the scroll wheel again to return to Photo mode.
42
Page 44

English
3.3 Voice mode
Use Voice mode to record a voice file and store them in internal
memory or on an SD card.
3.3.1 Voice mode icons
Use the following picture to familiarize yourself with the Voice mode
icons and symbols.
See the table below for a description of each icon and symbol.
1 Displays number of voice files recorded
2 Displays recording time
43
Page 45

English
3.3.2 Help information
Press the Display button to display Help information for the
function keys in Voice mode. Press the Display
return to main screen.
The following screen is displayed when the Display
pressed. An illustration of the functions for each button is indicated.
button again to
button is
44
Page 46

English
3.4 Music mode
Use Music mode to play the music files stored on the SD card or
internal memory.
3.4.1 Music mode icons
Refer to the following picture to familiarize yourself with the Music
mode icons and symbols.
1
Displays number of music files stored on the SD
card.
2 Volume indicator
3 Battery indicator
4 Displays file playback time
5 File name indicator
6 Music mode indicator
7 Memory status indicator
45
Page 47

English
Notes: To playback music files, create a folder named “Music ” and
then save the music files in the Music folder on the SD card or internal
memory.
3.4.2 Help information
Press the Display button to display Help information for the
function keys in Music mode. Press the Display
return to main screen.
The following screen is displayed when the Display
pressed. An illustration of the functions for each button is displayed on
the screen.
button again to
button is
46
Page 48

English
3.5 Playback mode
Use Playback mode to review all the files stored in the camera.
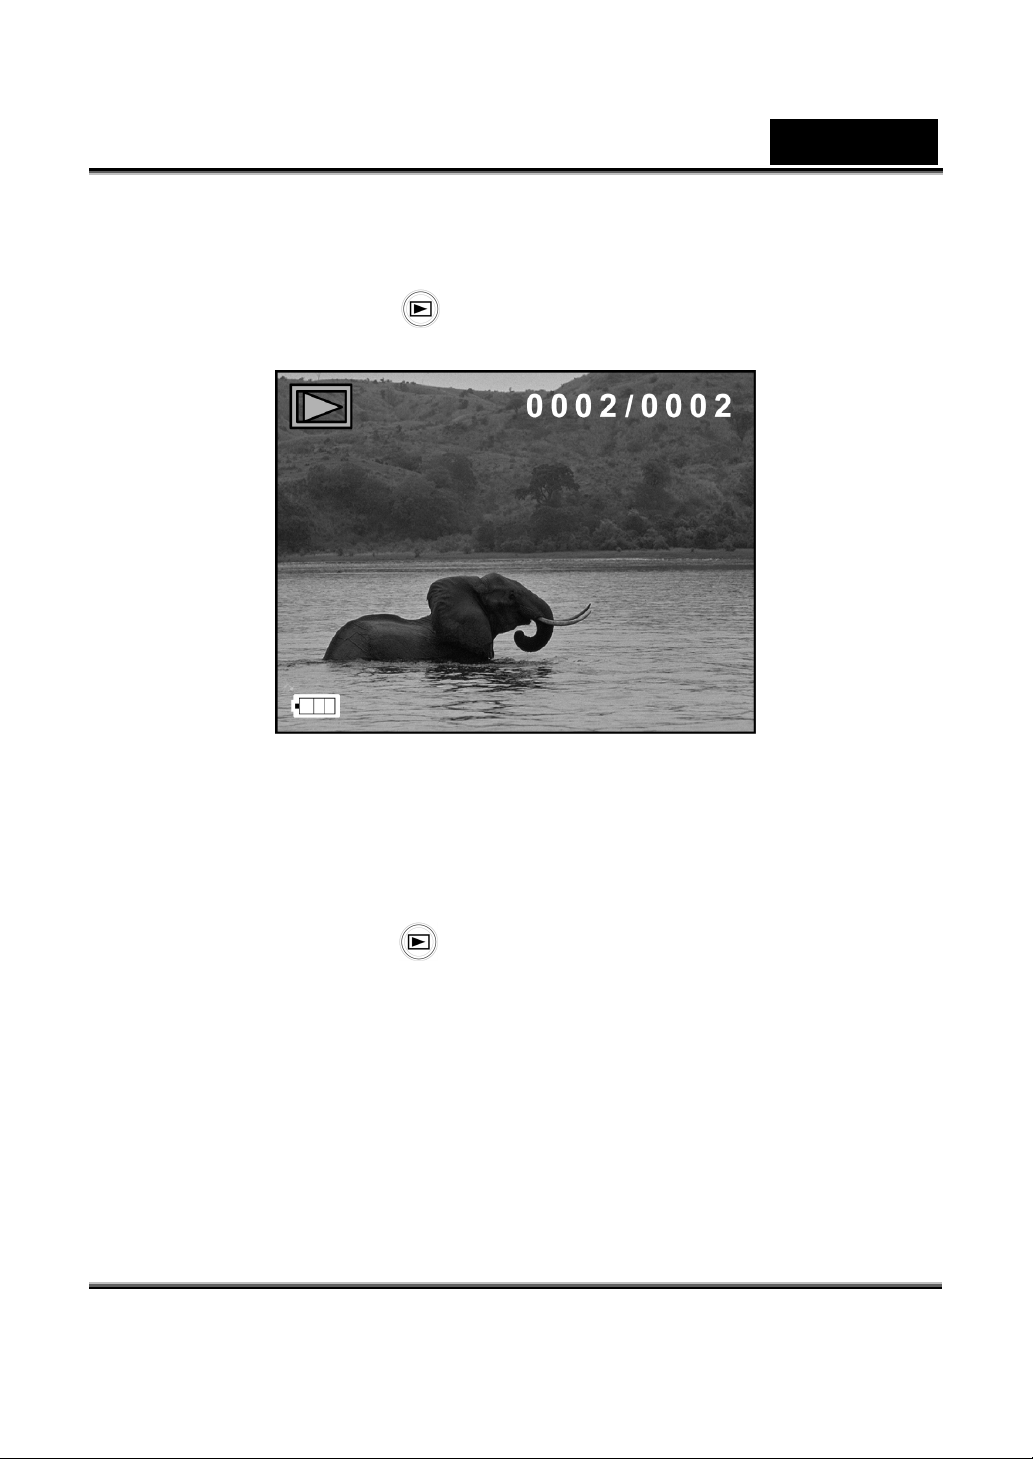
3.5.1 Displaying file information
Basic information is displayed by default on each image or video when
viewed in Playback mode. Press the Display
information on or off.
1. Turn on the camera and make sure it is in Playback mode.
2. The most recent file will be shown on the LCD screen with basic
information such as file type, storage directory, battery, etc.
button to switch this
3. Press the Display
information on the screen and show only the picture.
4. Press the Display
information.
Note: Video files only show basic information. Pressing the Display
button will remove the information from the screen. Press the button
again to return to the main screen.
button for the first time to remove all the
button for the second time to show help
47
Page 49

English
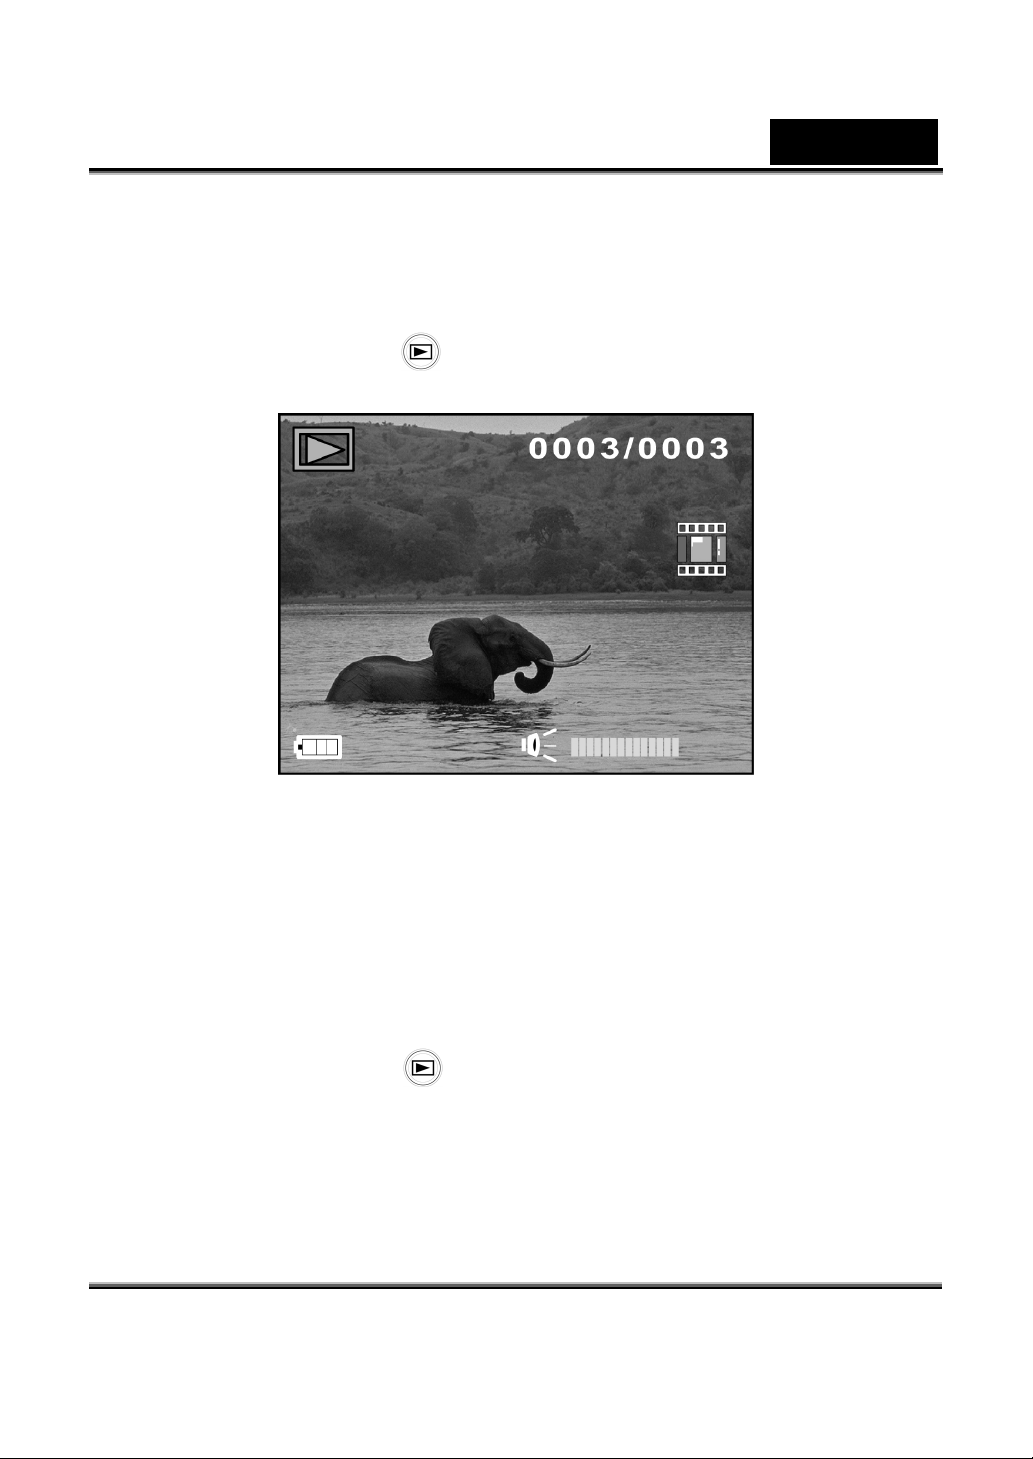
3.5.2 Playback mode icons
Refer to the following picture to familiarize yourself with the Playback
mode icons and symbols.
See the table below for a description of each icon and symbol.
1
2
3 Volume indicator
4 Battery status indication
5 Playback mode icon
Displays the number of current shot and total
number of pictures/video clips.
Shows current file type.
: Video clips
No icon is shown for still image files.
48
Page 50

English
3.5.3 Thumbnail mode
When in Photo Playback mode, press the Stop button to show image
thumbnails.
1. Turn on the camera and make sure it is in Playback mode.
2. The most recent image will show on the screen. Press the Stop
button for the first time to view four thumbnails on LCD screen,
and press the button again view nine thumbnails on the LCD
screen.
3. Use the scroll wheel to highlight an image, press the OK butt
functions on to view the image in full screen size.
4. Press the Stop button again to return to the thumbnail mode.
Note: Only image files are shown in thumbnail mode.
3.6 USB mode
Before connecting to a PC, refer to “Installing the software and drivers”
section.
The camera can be set as a USB mass storage device when connected to
a PC via the USB cable.
3.7 Storage device mode
When set as a USB mass storage device, the camera appears as one
removable drives in Windows Explorer. Drag and drop files to and
from the removable drives just like any other drive.
49
Page 51

English
4 Using the menus
Read this section to learn how to configure the camera and use the
advanced features.
4.1 Video menu
When in Video mode, press the MENU button to show video menu.
4.1.1. Video Size
Use this option to set the size of the captured image. Bigger images
contain more detail and therefore use more memory space.
1. Turn the camera on and ensure it is in Video mode.
2. Press the MENU button and use the arrow keys to highlight the
Size option. Press the OK
3. Use the arrow keys to select VGA or QVGA. Press the OK
button to confirm.
4. Press the MENU button again to exit the menu.
button to display the submenu.
50
Page 52

English
4.1.2. Video Quality
There are three different levels of video quality setting. Higher quality
video needs more memory storage space.
1. Turn the camera on and ensure it is in Video mode.
2. Press the MENU button and move the joystick downward to
highlight the Quality option. Press the OK
the submenu.
3. Use the joystick to select fine or normal. Press the OK button to
confirm.
4. Press the MENU button again to exit the menu.
button to display
51
Page 53

English
4.1.3. White balance
Use this option to correct color difference due to lighting conditions.
1. Turn the camera on and ensure it is in Video mode.
2. Press the MENU button and use the Up/Down arrow keys to
highlight the White Balance option. Press the OK
display the submenu.
3. Use the Down arrow key to select auto, sunny, cloudy, tungsten,
or fluorescent light. Press the OK button to confirm.
button to
4. Press the MENU button again to exit the menu.
52
Page 54

English
4.1.4. Exposure adjustment (EV)
Use this setting to change the exposure for the pictures. Usually, this
value would be set to zero. Increase the value to light up a subject with
strong back lighting, or decrease the value if taking a picture of
something very bright.
1. Turn the camera on and ensure it is in Video mode.
2. Press the MENU button and use the Up/Down arrow keys down
to the second page to highlight the EV option. Press the OK
button to display the submenu.
3. Use the Up/Down arrow keys to adjust EV value. The range is
from –2.0 to +2.0. Press the OK
button to confirm.
4. Press the MENU button again to exit the menu.
53
Page 55

English
4.1.5. Color effect
The camera can capture standard color images, black and white images,
or sepia tone to give an old-fashioned look.
1. Turn the camera on and ensure it is in Video mode.
2. Press the MENU button and press the Up/Down arrow keys
down to the next page to highlight the Color option. Press the
OK
3. Use the Up/Down arrow keys to select off, black and white, or
sepia. Press the OK
4. Press the MENU button again to exit the menu.
button to display the submenu.
button to confirm.
54
Page 56

English
4.1.6. Self timer
This function allows you to record a video clip of yourself by adding a
10 second delay between when the Shutter button is pressed and when
the video starts recording.
1. Turn the camera on and ensure it is in Video mode.
2. Press the MENU button and press the Up/Down arrow keys
down to the next page to highlight the Self timer option. Press
the OK
3. Use the Up/Down arrow keys to turn the function on or off.
button to display the submenu.
Press the OK
4. Press the MENU button again to exit the menu.
button to confirm.
55
Page 57

English
4.1.7. File format
This function enables you to choose the file format to save the video
clips you recorded. You can save the video clip in AVI, MOV, or ASF
format.
1. Turn the camera on and ensure it is in Video mode.
2. Press the MENU button and press the Up/Down arrow keys
down to the next page to highlight the File Format option. Press
the OK
3. Use the Up/Down arrow keys to select the file format to save
button to display the submenu.
your video clip. Press the OK
4. Press the MENU button again to exit the menu.
Note: The Video camera supports 3 MPEG4 video file formats; please
make sure you use the correct software while playing the videos on PC:
AVI: please install XviD 1.03 codec (included in the Software CD).
MOV: please install QuickTime 6.X or above.
ASF: Window Media player 9.0 or above is recommended.
button to confirm.
56
Page 58

English
4.1.8. Audio
Use this function to turn the volume on/ off while recording a video
clip.
1. Turn the camera on and ensure it is in Video mode.
2. Press the MENU button and press the Up/Down arrow keys
down to the second page to highlight the Audio function. Press
the OK
3. Use the Up/Down arrow keys to enable or disable audio while
recording. Press the OK
4. Press the MENU button again to exit the menu.
button to display the submenu.
button to confirm.
57
Page 59

English
4.1.9. Continuous focus
Use this function to turn the continue focus function on/ off while
recording a video clip.
1. Turn the camera on and ensure it is in Video mode.
2. Press the MENU button and press the Up/Down arrow keys
down to the second page to highlight the Continue Focus
function. Press the OK
3. Use the Up/Down arrow keys to turn Continue Focus function
on/off while recording. Press the OK
4. Press the MENU button again to exit the menu.
button to display the submenu.
button to confirm.
58
Page 60

English
4.1.10. Stabilizer
This function removes any shaking while recording a video clip.
1. Turn the camera on and ensure it is in Video mode.
2. Press the MENU button and press the Up/Down arrow keys
down to the second page to highlight the Stabilizer function.
Press the OK
3. Use the Up/Down arrow keys to turn Stabilizer function on/off
while recording. Press the OK
4. Press the MENU button again to exit the menu.
button to display the submenu.
button to confirm.
59
Page 61

English
4.2 Movie Playback menu
Use the playback menu to manage the files stored in the internal
memory or on the SD card.
4.2.1 Delete all
Use this function to delete files.
1. Turn the camera on and ensure it is in Video mode. Press the
Playback button and then press the MENU button to display
Movie Playback menu.
2. Use the Up/Down arrow keys to highlight the Delete all option.
Press the OK
3. Press the Up/Down arrow keys to confirm and select OK or
Cancel. Press the OK
4. Press the MENU button again to exit the menu.
Note: Once deleted, files cannot be recovered. Make sure the files are
transferred to PC via USB cable or saved to other storage device.
Files that have been locked will not be deleted. You have to unlock the
files first before deleting them.
button to display the submenu.
button to confirm.
60
Page 62

English
4.2.2 Unlock all
Use this function to unlock files that have been protected to prevent
accidental deletion.
1. Turn the camera on and ensure it is in Video mode. Press the
Playback button and then press the MENU button to display
Movie Playback menu to display Movie Playback menu.
2. Press the MENU button and use the arrow keys to highlight the
Unlock all option. Press the OK
submenu.
3. Use the Up/Down arrow keys to select OK or Cancel. Press the
OK
button to confirm.
button to display the
4. Press the MENU button again to exit the menu.
Note: To lock a file, press the scroll wheel button. A lock
displayed to show that the file has been protected.
icon is
61
Page 63

English
4.3 Picture menu
In Photo mode, press the MENU button to show the menu.
4.3.1 Size
Use this option to set the size of the captured image. Bigger images
contain more detail and therefore use more memory space.
1. Turn the camera on and ensure it is in Photo mode.
2. Press the MENU button and use the Up/Down arrow keys to
highlight the Size option. Press the OK
submenu.
3. Use the Up/Down arrow keys to select 8M, 4M, 2M, or VGA.
Press the OK
4. Press the MENU button again to exit the menu.
button to confirm.
button to display the
62
Page 64

English
4.3.2 Image Quality
Use this option to set the quality of the captured image. Better quality
contains more details and therefore uses more memory space.
1. Turn the camera on and ensure it is in Photo mode.
2. Press the MENU button and use the Up/Down arrow keys to
highlight the Quality option. Press the OK
the submenu.
3. Use the Up/Down arrow keys to select from fine, or normal.
Press the OK
4. Press the MENU button again to exit the menu.
button to confirm.
button to display
63
Page 65

English
4.3.3 White balance
Use this option to correct color difference due to lighting conditions.
1. Turn the camera on and ensure it is in Photo mode.
2. Press the MENU button and use the Up/Down arrow keys to
highlight the White Balance option. Press the OK
display the submenu.
3. Use the Up/Down arrow keys to select auto, sunny, cloudy,
button to
tungsten, or fluorescent. Press the OK
4. Press the MENU button again to exit the menu.
button to confirm.
64
Page 66

English
4.3.4 Exposure adjustment (EV)
Use this setting to change the exposure for the pictures. Usually, this
value would be set to zero. Increase the value to light up a subject with
strong back lighting, or decrease the value if taking a picture of
something very bright.
1. Turn the camera on and ensure it is in Photo mode.
2. Press the MENU button and use the Up/Down arrow keys to
highlight the EV option. Press the OK
submenu.
3. Use the Up/Down arrow keys to adjust EV value. The range is
from –2.0 to +2.0. Press the OK
button to confirm.
button to display the
4. Press the MENU button again to exit the menu.
65
Page 67

English
4.3.5 Color effect
The camera can capture standard color images, black and white images,
or sepia tone to give an old-fashioned look. When the color effect
function is turned off, it is set to color mode.
1. Turn the camera on and ensure it is in Photo mode.
2. Press the MENU button and use the Up/Down arrow keys to
highlight the Color option. Press the OK
the submenu.
3. Use the Up/Down arrow keys to select off, black and white, or
sepia. Press the OK
4. Press the MENU button again to exit the menu.
button to confirm.
button to display
66
Page 68

English
4.3.6 Self timer
This function allows you to capture an image of yourself by adding a 10
second delay between when the Shutter button is pressed and when the
picture is actually taken.
1. Turn the camera on and ensure it is in Photo mode.
2. Press the MENU button and press the Up/Down arrow keys
down to the next page to highlight the Self timer option. Press
the OK
3. Use the Up/Down arrow keys to turn the function on or off.
button to display the submenu.
Press the OK
4. Press the MENU button again to exit the menu.
button to confirm.
67
Page 69

English
4.3.7 Drive mode
Use this option to choose taking a picture in Single shot or Continuous
shot mode.
1. Turn the camera on and ensure it is in Photo mode.
2. Press the MENU button and press the Up/Down arrow keys
down to the second page to highlight the Drive mode option.
Press the OK
3. Use the Up/Down arrow key to select Single shot or Continuous
shot to be taken. Press the OK
4. Single shot: Only one picture will be taken.
5. Continuous shot: Three pictures will be taken when the Shutter
button is pressed.
6. Press the MENU button again to exit the menu.
button to display the submenu.
button to confirm.
68
Page 70

English
4.3.8 Date stamp
Use this option to turn on/off the date/time stamp when the photo is
captured.
1. Turn the camera on and ensure it is in Photo mode.
2. Press the MENU button and press the Up/Down arrow keys
down to the second page to highlight the Date stamp option.
Press the OK
3. Use the Up/Down arrow keys to select whether to show the date
stamp on the screen. Press the OK
again to exit the menu.
button to display the submenu.
button to confirm.
4. Press the MENU button
69
Page 71

English
4.3.9 Night mode
Use this function when taking pictures at night. It will set the camera to
use a slow shutter sync which allows the background images to show
though.
1. Turn the camera on and ensure it is in Photo mode.
2. Press the MENU button and press the Up/Down arrow keys
down to the second page to highlight the Night mode option.
Press the OK
button to display the submenu.
3. Use the Up/Down arrow keys to select on/off. Press the OK
button to confirm.
4. Press the MENU button again to exit the menu.
70
Page 72

English
4.4 Photo Playback menu
4.4.1 Delete all
Use this function to delete files.
1. Turn the camera on and ensure it is in Photo mode. Press the
Playback button and then press the MENU button to display
the Photo Playback menu.
2. Use the Up/Down arrow keys to highlight the Delete all option.
Press the OK
3. Use the Up/Down arrow keys to select OK or Cancel. Press the
OK
4. Press the MENU button again to exit the menu.
Note: Once deleted, files cannot be recovered. Make sure the files are
transferred to PC via USB cable or saved to other storage device.
Files that have been protected will not be deleted. See “Protect” section
for detailed information.
button to confirm.
button to display the submenu.
71
Page 73

English
4.4.2 Unlock all
Use this function to protect files from accidental deletion.
1. Turn the camera on and ensure it is in Photo mode. Press the
Playback button and then press the MENU button to display
the Photo Playback menu.
2. Use the Up/Down arrow keys to highlight the Unlock all option.
Press the OK
3. Use the Up/Down arrow keys to select OK or Cancel. Press the
OK
4. Press the MENU button again to exit the menu.
Note: To lock a file, press the scroll wheel button. A lock
displayed to show that the file has been protected.
button to confirm.
button to display the submenu.
icon is
72
Page 74

English
4.4.3 Slide show
The camera includes a slide show function, which displays each image
in turn with a regular interval between pictures.
1. Turn the camera on and ensure it is in Photo mode. Press the
Playback button and then press the MENU button to display
the Photo Playback menu.
2. Press the MENU button, and use the Up/Down arrow keys to
highlight the slide show option. Press the OK
display the submenu.
button to
3. Use the use the arrow keys to select start and press the OK
button to confirm.
4. Press the MENU button to return to main screen. The images
stored in memory will be displayed one after another.
5. Press the OK
button to stop the slide show.
73
Page 75

English
4.4.4 DPOF
Use the DPOF (Digital Print Order Format) function to tag pictures
stored in the memory card with print information. Tag all pictures to be
printed or just the current picture.
1. Turn the camera on and ensure it is in Photo mode. Press the
Playback button and then press the MENU button to display
the Photo Playback menu.
2. Press the MENU button, and use the arrow keys to highlight the
DPOF option. Press the OK
3. Use the arrow keys to select from none, one or all, and press the
OK
4. Press the MENU button to return to the image. Use the scroll
wheel to set the number of prints, and use the Up/Down arrow
keys to choose different photos. After setting the numbers of
prints, press the OK
button to confirm.
button to confirm.
button to display the submenu.
74
Page 76

English
5. Press the MENU button again to exit the menu.
Note: This function is available when an SD card is inserted into the
video camera.
75
Page 77

English
4.5 Music menu
4.5.1 Repeat
Use this function to repeat playing back a single music file or all music
files on the SD card or internal memory.
1. Turn the camera on and ensure it is in Music mode. Press the
MENU button to display the Music Playback menu.
2. Use the Up/Down arrow keys to highlight the Repeat option.
Press the OK
3. Use the Up/Down arrow keys to select Normal, Single or All.
Press the OK
4. Press the MENU button again to exit the menu.
button to display the submenu.
button to confirm.
76
Page 78

English
4.5.2 Delete all
Use this function to delete files.
1. Turn the camera on and ensure it is in Music mode. Press the
Display button and then press the MENU button to display
the Photo Playback menu.
2. Use the Up/Down arrow keys to highlight the Delete all option.
Press the OK
3. Use the Up/Down arrow keys to select OK or Cancel. Press the
OK
4. Press the MENU button again to exit the menu.
Note: Once deleted, files cannot be recovered. Make sure the files are
transferred to PC via USB cable or saved to other storage device.
Files that have been protected will not be deleted. See “Protect” section
for detailed information.
button to confirm.
button to display the submenu.
77
Page 79

English
4.5.3 Unlock all
Use this function to protect files from accidental deletion.
1. Turn the camera on and ensure it is in Music mode. Press the
MENU button to display the Music Playback menu.
2. Use the Up/Down arrow keys to highlight the Unlock all option.
Press the OK
3. Use the Up/Down arrow keys to select On or Off. Press the OK
button to confirm.
4. Press the MENU button again to exit the menu.
Note: To lock a file, press the scroll wheel button. A lock
displayed to show that the file has been protected.
button to display the submenu.
icon is
78
Page 80

English
4.6 System menu
The setup menu can be accessed from any camera mode and is used to
configure the miscellaneous camera functions.
4.6.1 Date/time
See section 2.6.1 “Setting the date and time”.
4.6.2 Beep
1. Turn the camera on, and press the MENU button to display the
menu screen.
2. Move the scroll wheel to show the System menu and use the
Up/Down arrow keys to highlight the Beep option. Press the OK
button to display the submenu.
3. Use the Up/Down arrow keys to turn the sound on/off, and
press the OK
4. Press the MENU button again to exit the menu.
button to confirm.
79
Page 81

English
4.6.3 Format
Use this function to format the current storage media. This format
action will delete everything on the media.
1. Turn the camera on, and press the MENU button to display the
menu screen.
2. Move the scroll wheel to show the System menu and press the
Up/Down arrow keys to highlight the Format option. Press the
OK
3. Use the Up/Down arrow keys to select OK or Cancel, and press
button to display the submenu.
the OK
z If you select OK, the formatting starts and returns to the
present operation mode after the process is complete.
z If you select Cancel, it will return to the present operation
mode. Press the MENU button again to exit the menu.
button to confirm.
80
Page 82

English
4.6.4 Default
Use this option to reset all settings to the default settings.
1. Turn the camera on, and press the MENU button to display the
menu screen.
2. Move the scroll wheel to show the System menu and press the
Up/Down arrow keys to highlight the Default option. Press the
OK
3. Use the Up/Down arrow keys select OK or Cancel, and press the
OK
4. Press the MENU button again to exit the menu.
button to display the submenu.
button to confirm.
81
Page 83

English
4.6.5 Memory
This function displays the memory status and the number of movie,
photo, voice, and MP3 files saved in the video camera.
1. Turn the camera on, and press the MENU button to display the
menu screen.
2. Move the scroll wheel to show the System menu and press the
Up/Down arrow keys to highlight the Memory option. Press the
OK
3. The number of files saved and the free memory space are
button to confirm.
displayed on the screen. Press the OK
4. Press the MENU button to exit the menu.
button to exit.
4.6.6 Language
Please refer to section 2.6.2“Setting the language”
82
Page 84

English
4.6.7 TV
1. Use the TV option to set the TV system for the area.
2. Turn the camera on, and press the MENU button to display the
menu screen.
3. Move the scroll wheel to show the System menu and press the
Down arrow key down to the second page to highlight the TV
option. Press the OK
4. Use the Up/Down arrow keys to select PAL or NTSC, and press
the OK
5. Press the MENU button again to exit the menu.
button to confirm.
button to display the submenu.
83
Page 85

English
4.6.8 Power saving
Use this function to switch the camera off automatically after a period
of inactivity for power saving.
1. Turn the camera on, and press the MENU button to display the
menu screen.
2. Move the scroll wheel to show the System menu and press the
Up/Down arrow keys down to the second page to highlight the
Auto Power Off option. Press the OK
submenu.
3. Use the Up/Down arrow keys to select Off, 2 minutes, or 5
minutes. Press the OK
button to confirm.
button to display the
4. Press the MENU button again to exit the menu.
84
Page 86

English
4.6.9 LCD brightness
Use this function to adjust the brightness of the video camera’s LCD
screen. You can do this by pressing the Up/Down arrow keys in Photo
mode and Video mode.
1. Turn the camera on, and press the MENU button to display the
menu screen.
2. Move the scroll wheel to show the System menu and press the
Up/Down arrow keys down to the second page to highlight the
LCD Brightness option. Press the OK
submenu.
3. Use the Up/Down arrow keys to adjust the LCD brightness.
Press the OK
4. Press the MENU button again to exit the menu.
button to confirm.
button to display the
85
Page 87

English
5 Installing software and drivers
Read this section to learn how to install drivers and software for the
camera.
5.1 Drivers
You can use the “Mass Storage” functions of the camera on the PC.
5.1.1 Mass Storage
The digital camera offers Mass Storage function as a card reader device.
You can treat this digital camera as an SD device
You will only need to install a driver for the camera if your operating
system is Windows 98SE. Windows XP/ME/2000 are plug and play
operating systems and do not require a driver to be manually loaded.
When the driver has been installed and the camera is connected, the
camera memory and any installed mini SD card will appear as Mass
Storage in Windows Explorer. Files can be dragged and dropped in the
same way as with an ordinary disk.
86
Page 88

English
To install the driver, do the following:
1. Insert the supplied CD-ROM in the CD-ROM drive.
2. If the CD-ROM doesn’t automatically boot, use Windows Explorer
to execute the InstallMgr.exe file in the root directory.
The following screen is displayed.
3. Click “Driver” to start installation.
4. Follow the on-screen instructions.
5. Click Finish to restart the computer and the video camera driver
installation is complete.
5.2 Presto! Video Works 6
Presto! Video Works 6 is an advanced software application for editing
video.
To install Presto! Video Works 6:
1. Insert the supplied CD-ROM in the CD-ROM drive.
2. If the CD-ROM doesn’t automatically boot, use Windows Explorer
to execute the InstallMgr.exe file in the root directory.
The following screen is displayed.
3. Click “VIdeoWorks” button to begin the installation and process
follow the instructions on-screen.
More information about Presto! Video Works 6 can be found in the help
files when the application is started.
5.3 Presto! Mr. Photo 3
Presto! Mr. Photo 3 is an advanced photo editing software application.
To install Presto! Mr. Photo 3:
87
Page 89

English
1. Insert the supplied CD-ROM in the CD-ROM drive.
2. If the CD-ROM doesn’t automatically boot, use Windows Explorer
to execute the InstallMgr.exe file in the root directory.
The following screen is displayed.
3. Click “Mr. Photo” to begin the installation process and follow the
instructions on-screen.
More information about Presto! Mr. Photo 3 can be found in the help
files when the application is started.
5.4 XviD codec for PC
Installing the XviD codec program
1. Insert the Software CD provided into the CD-ROM drive.
5. Double click the My Computer icon on the desktop. Then double
click the CD-ROM drive icon and then click the setup file of Xvid
in the root directory.
6. Click XviD.exe to start the installation. The setup screen appears.
Click Next to continue.
88
Page 90

English
7. Click I accept the agreement to accept the conditions of Software
License Agreement and click Next to continue.
8. Click Browse to select the folder location and click Next to
continue.
9. Click Browse to select a different program folder or click Next to
continue.
89
Page 91

English
10. Click Next to continue from the additional tasks setup screen.
11. Press Install to continue from the main program setup screen.
12. Press Cancel if you want to stop setup during installation.
90
Page 92

English
13. The following screen will appear after the installation is
completed. Click Finish to complete the installation.
91
Page 93

English
Appendix
Specifications
General
Imaging sensor 2.5” Sony 4.1 Megapixel CCD sensor
Active pixels 4.0 Megapixel
Storage media
Sensor sensitivity
Lens
Focus range Normal: 0.2m-infinity
Still image
Built-in 32 MB Flash memory
SD/MMC card (32/64/128/256/512
MB/1GB compatible)
Auto
3X optical zoom lens
Wide: F/2.8~7.5, f=6.0mm
Tele: F/4.7,~12.5, f=16.9 mm
Formats: JPEG (EXIF), DCF, DPOF, Direct
Print (DPS)
Resolution: VGA, 2M, 4M, 8M (Firmware
interpolation)
92
Quality: Fine, Normal
Page 94

English
General
Movie clips MPEG-4 (AVI, ASF, MOV)
640 x 480 pixels, 30 fps/320 x 240 pixels, 30
fps
Audio Support music audio format
Zoom 3x optical zoom
Movie: 10x digital zoom
Camera: 4x digital zoom
TFT Monitor 2.5” LTPS high resolution (960 x 240 pixels)
Flash
White balance
EV compensation -2.0 EV~+2.0 EV (in 0.3 EV steps)
Self timer Off, 10, 20 seconds (user definable)
PC interface USB 2.0
TV out format NTSC/PAL
Shutter
1.0~2.0m range
Auto/ Off/ Auto with Red Eye
Reduction/ Forced/ Slow Sync
Auto/ Sunny/ Cloudy/ Tungsten/
Fluorescent
Mechanical and electronic shutter
2~1/1000 second
93
Page 95

English
General
Auto power off Off, 2, 5 minutes (user definable)
Power supply One 1700mAh rechargeable Li-ion battery
Dimension 130 (L) x 57 (W) x 70 (H) mm
Weight 355 +/- 5g (without battery)
94
Page 96

Page 97

 Loading...