

Page 1

WEEE Warning Message
Symbol for Separate Collection in European Countries
This symbol indicates that this product is to be collected
separately.
The following apply only to users in European countries:
z This product is designated for separate collection at an
appropriate collection point. Do not dispose of as
household waste.
English
z For more information, contact the retailer or the local
authorities in charge of waste management.
FCC STATEMENT
This device complies with Part 15 of the FCC Rules. Operation is subject to the
following two conditions:
(1). This device may not cause harmful interferenc e, and
(2). This device must accept any interference received, including interference that
may cause undesired operation.
Note:
This equipment has been tested and found to comply with the limits for Class B digital
devices, pursuant to Part 15 of the FCC rules. These limits are designed to provide
reasonable protection against harmful interference in a residential installation. This
equipment generates uses and can radiate radio frequency energy and, if not installed
and used in accordance with the instructions, ma y cause harmful interference to ra dio
communications.
However, there is no guarantee that interference will not occur in a particular
installation. If this equipment does cause harmful interference to radio or television
reception, which c an be determined by turning the equipment off and on, the user is
encouraged to try to correct the interference by one or more of the following
measures:
Reorient or relocate the receiving antenna
Increase the separation between the equipment and receiver
Connect the equipment into an out let on a circuit differ ent from that to which t he
receiver is connected
-1-
Page 2

English
Use of shielded cable is required to comply with Class B limits in Subpart B of Part 15
of the FCC rules.
Do not make any changes or modifications to the equipment unless otherwise
specified in the m anual. If suc h changes or modifi cations shoul d be made, y ou could
be required to stop operation of the equipment.
Product Information
1. Product design and specifications are subject to change without notice. This
includes primary product specifications, software, software drivers, and user’s
manual. This User Manual is a general reference guide for the product.
2. The product and accessories that come with your camera may be different from
those described in this manual. This is due to the fact that different retailers often
specify slightly different product inclusions and accessori es to suit their market
requirements, customer demographics, and geographical preferences. Products
very often vary between retailers especially with accessories such as batteries,
memory cards, cables, carrying cases/pouches, and language support.
Occasionally a retailer will specify a unique product color, appearance, and internal
memory capacity. Contact your dealer for precise product definition and included
accessories.
3. The illustrati ons in this ma nual are for the pu rpose of explan ation and may di ffer
from the actual design of your camera.
4. The manufacturer assumes no liability for any errors or discrepancies in this user
manual.
5. For driver updat e s, you can check the “Downl oad” section of our websi te,
www.geniusnet.com
SAFETY INSTRUCTIONS
Read and understand all Warnings and Cautions before using this product.
Warnings
If foreign objects or water have enter ed the camera, tur n the power
OFF and remove the batteries.
Continued use in this st ate might cause fire or electric shock. Consult the
store of purchase.
If the camera has fallen or its case has been damaged, turn the
power OFF and remove the batteries.
Continued use in this st ate might cause fire or electric shock. Consult the
-2-
Page 3

English
store of purchase
Do not disassemble, change or repair the camer a.
This might cause fire or electric shock. For repair or internal inspection,
ask the store of purchase.
Do not use the camera in areas near water.
This might cause fire or electric shock. Take special care during rain,
snow, on the beach, or near the shore.
Do not place the camera on inclined or unstable s u r faces.
This might cause the camera to fall or tilt ov er, causing injury.
Keep the batterie s out of the reach of children.
Swallowing batt eries might cause poi soning. If the bat tery is accidentally
swallowed, i m m e diately consul t a physician.
Do not use the camera while you are walking, driving or riding a
motorcycle.
This might cause y o u to fall over or result in traffic accident.
Cautions
Insert the batter ies paying careful attention to t he pol ar i t y (+ or –) of
the terminals.
Inserting the batteries with its polarities inverted might cause fire and injury,
or damage to the surrounding areas due to the battery rupturing or leaking.
Do not fire the flash close to anyone’s eyes.
This might cause damage to the person’s eyesight.
Do not subject the LCD monitor to impact.
This might damage the glass on the screen or cause the internal fluid to
leak. If the inte rnal fluid enters your eyes o r comes into contact with your
body or clothes, rinse with fresh water.
If the internal fluid has entered your eyes, consult a physician to receive
treatment.
A camera is a precision instrument. Do not drop it, strike it or use
excessive force when handling the camera.
This might caus e damage to t he camera.
Do not use the camera in humid, steamy, smoky, or dusty places.
This might cause fire or electric shock.
Do not remove the battery immediately after long period of continuous
use.
The battery becomes hot during use. Touching a hot battery might c ause
burns.
Do not wrap the camera or place it in cloth or blankets.
This might cause heat to build up and deform the case, resulting in fire. Use
the camera in a well-ventilated place.
Do not leave the camera in places where the temperature may rise
significantly, such as insi de a car.
-3-
Page 4

English
This might adversely affect the case or the parts inside, resulting in fire.
Before you move the camera, disconnect cords and cables.
Failure to do this might damage cords and cables, resulting in fire and
electric shock.
Notes on Battery Usage
Ao utilizar as baterias, leia cuidadosamente e observe atentamente as Instruções de
segurança e as notas descritas aba ixo:
Use somente as baterias es pecificadas (AA).
Evite usar as baterias em ambientes extremamente frios, pois as baixas
temperaturas po dem diminuir a vida das baterias e reduzir a performance da
câmera.
As baterias pode rão esquentar dura nte a utilização da câmera por um lo ngo
período ou do flash de forma contínua. Isso é normal e não caract eriza mau
funcionamento.
A câmera poderá esquentar durante a utilização contínua ou por um longo
período. Iss o é normal e não caracteriza mau funcionamento.
Se não for utilizar as baterias por um longo período, retire-as da câmera para
evitar vazamento ou corrosão.
Se a bateria não for utilizada por um longo período, guarde-a após estar
descarregada. Se a bateria for guardada com carga por um longo período, sua
performance pode ser comprometida.
Mantenha os terminais sempre limpos.
Jamais utilize baterias de manganês.
Haverá risco de explosão caso as baterias sejam substituídas por um tipo
incorreto.
Descarte as baterias de acordo com as instruções.
-4-
Page 5

English
CONTENTS
GETTING TO KNOW YOUR CA MERA_______________________________7
O
VERVIEW ____________________________________________________7
TANDARD ACCESSORIES _________________________________________7
S
F
RONT VIEW ___________________________________________________8
EYPAD ILLUSTRATION____________________________________________8
K
S
IDE VIEW_____________________________________________________ 9
GETTING STARTED ____________________________________________10
L
OADING THE BATTERY __________________________________________10
I
NSERTING AND REMOVING AN SD CARD _____________________________10
P
ROTECTING DATA ON AN SD CARD _________________________________10
URNING THE CAMERA ON AND GETTING STARTED ______________________ 11
T
T
URNING THE CAMERA OFF _______________________________________ 11
RECORD MODE _______________________________________________12
B
UTTON FUNCTION _____________________________________________12
LCD
MONITOR INFORMATION______________________________________12
OVIE RECORDING _____________________________________________14
M
P
ICTURE RECORDING ___________________________________________14
SING DIGITAL ZOOM____________________________________________14
U
O
PTIONS FOR RECORD MODE _____________________________________15
PERATIONS FOR RECORD MODE __________________________________15
O
D
EFAULT SETTING AND VALIDATION _________________________________16
M
OVIE MODE SETTING___________________________________________16
Movie Resolution ____________________________________________16
Possible recording time / sec (video clip) __________________________17
Exposure ___________________________________________________ 17
Light ______________________________________________________18
Sharpness__________________________________________________19
White Balance_______________________________________________19
Motion Detection_____________________________________________20
Night Mode _________________________________________________21
C
AMERA MODE SETTING _________________________________________21
Picture Resolution____________________________________________ 21
Possible number of shots (still image) ____________________________22
Exposure ___________________________________________________ 22
Two in One (Camera Mode Only)________________________________22
Photo Frame (Camera Mode Only) ______________________________23
Flash______________________________________________________24
Self-timer (Camera Mode Only) _________________________________25
Sharpness__________________________________________________25
White Balance_______________________________________________26
Multi-Snap (Camera Mode Only) ________________________________26
Backlight (Camera Mode Only)__________________________________27
Date Printing (Camera Mode Only ) ______________________________27
Night Mode _________________________________________________28
V
OICE MODE __________________________________________________29
-5-
Page 6

English
EFFECT SETTING_______________________________________________29
ETTING MENU ________________________________________________30
S
Sound _____________________________________________________30
Start-up Screen______________________________________________30
Time Setting ________________________________________________31
Format Memory______________________________________________32
TV System _________________________________________________32
Selecting Interface Language___________________________________32
Default Setting ______________________________________________33
PLAYBACK MODE _____________________________________________34
B
UTTON FUNCTIONS ____________________________________________34
LCD Monitor Information_______________________________________35
M
OVIE PLAYBACK ______________________________________________36
Delete Movies_______________________________________________37
Thumbnail Function __________________________________________37
Lock Movies ________________________________________________38
Repeat Movies ______________________________________________39
P
ICTURE PLAYBACK_____________________________________________40
Delete Picture _______________________________________________40
Thumbnail Function __________________________________________41
Lock Pictures _______________________________________________42
Slide Show _________________________________________________42
V
OICE PLAYBACK_______________________________________________43
Tele/Wide and Right/Left Buttons Function_________________________43
LISTENING TO MP3 MUSIC______________________________________45
T
RANSFER MP3 MUSIC TO THE CAMERA______________________________45
L
ISTEN TO MP3 MUSIC __________________________________________45
Listen to MP3 Music with earphone ______________________________45
VIEWING MOVIE ON PC_________________________________________ 46
M
OTION JPEG MOVIE ___________________________________________46
IEW MOTION JPEG MOVIE ON PC _________________________________46
V
S
HARE MOTION JPEG MOVIE _____________________________________46
VIEWING PICTURES AND MOVIES ON A TV ________________________46
SYSTEM REQUIREMENT________________________________________47
TRANSFERRING DATA TO A COMPUTER __________________________47
I
NST AL LING THE DIGITAL CAMERA DRIVER_____________________________47
ONNECTING YOUR CAMERA TO A COMPUTER _________________________ 47
C
Mass Storage Device Mode ____________________________________48
Web Camera Mode___________________________________________48
I
NSTALLING BUNDLED SOFTWARE___________________________________48
BURNING THE RECORDED CLIP INTO DVD ________________________49
SPECIFICATIONS ______________________________________________51
TROUBLESHOOTING___________________________________________ 52
-6-
Page 7

English
Getting to Know Your Camera
Overview
Thank you for pur chasing the new digital video came ra!
This multi-function digital v ideo camera with a 5.2 Mega Pixel CMOS sensor can t ake
up to 11 mega pixel still images by interpolation. It also can take video in Motion JPEG
format in VG A and QVGA resolution. Other f e at ures provided by this camera include
the following:
True 5.0 Mega pixels CMOS sensor
Motion JPEG Digital Video Camera
Voice Recorder
Music Player
Security Motion Detect
Web Camera
8X Digital Zoom
2.4” TFT LCD
Supports up to 2GB SD Card
Night Mode, LED light and backlight
Photo frame
Standard Accessories
Unpack the package and make sure all standard accessories listed are included:
Digital Video Came r a
USB Cable
AV out Cable
CD-ROM ( Driver, Arcsoft Software and User Manual)
Quick Guide
2 x “AA” Alkaline batteries
Earphone
Pouch
Strap
Warranty card
-7-
Page 8
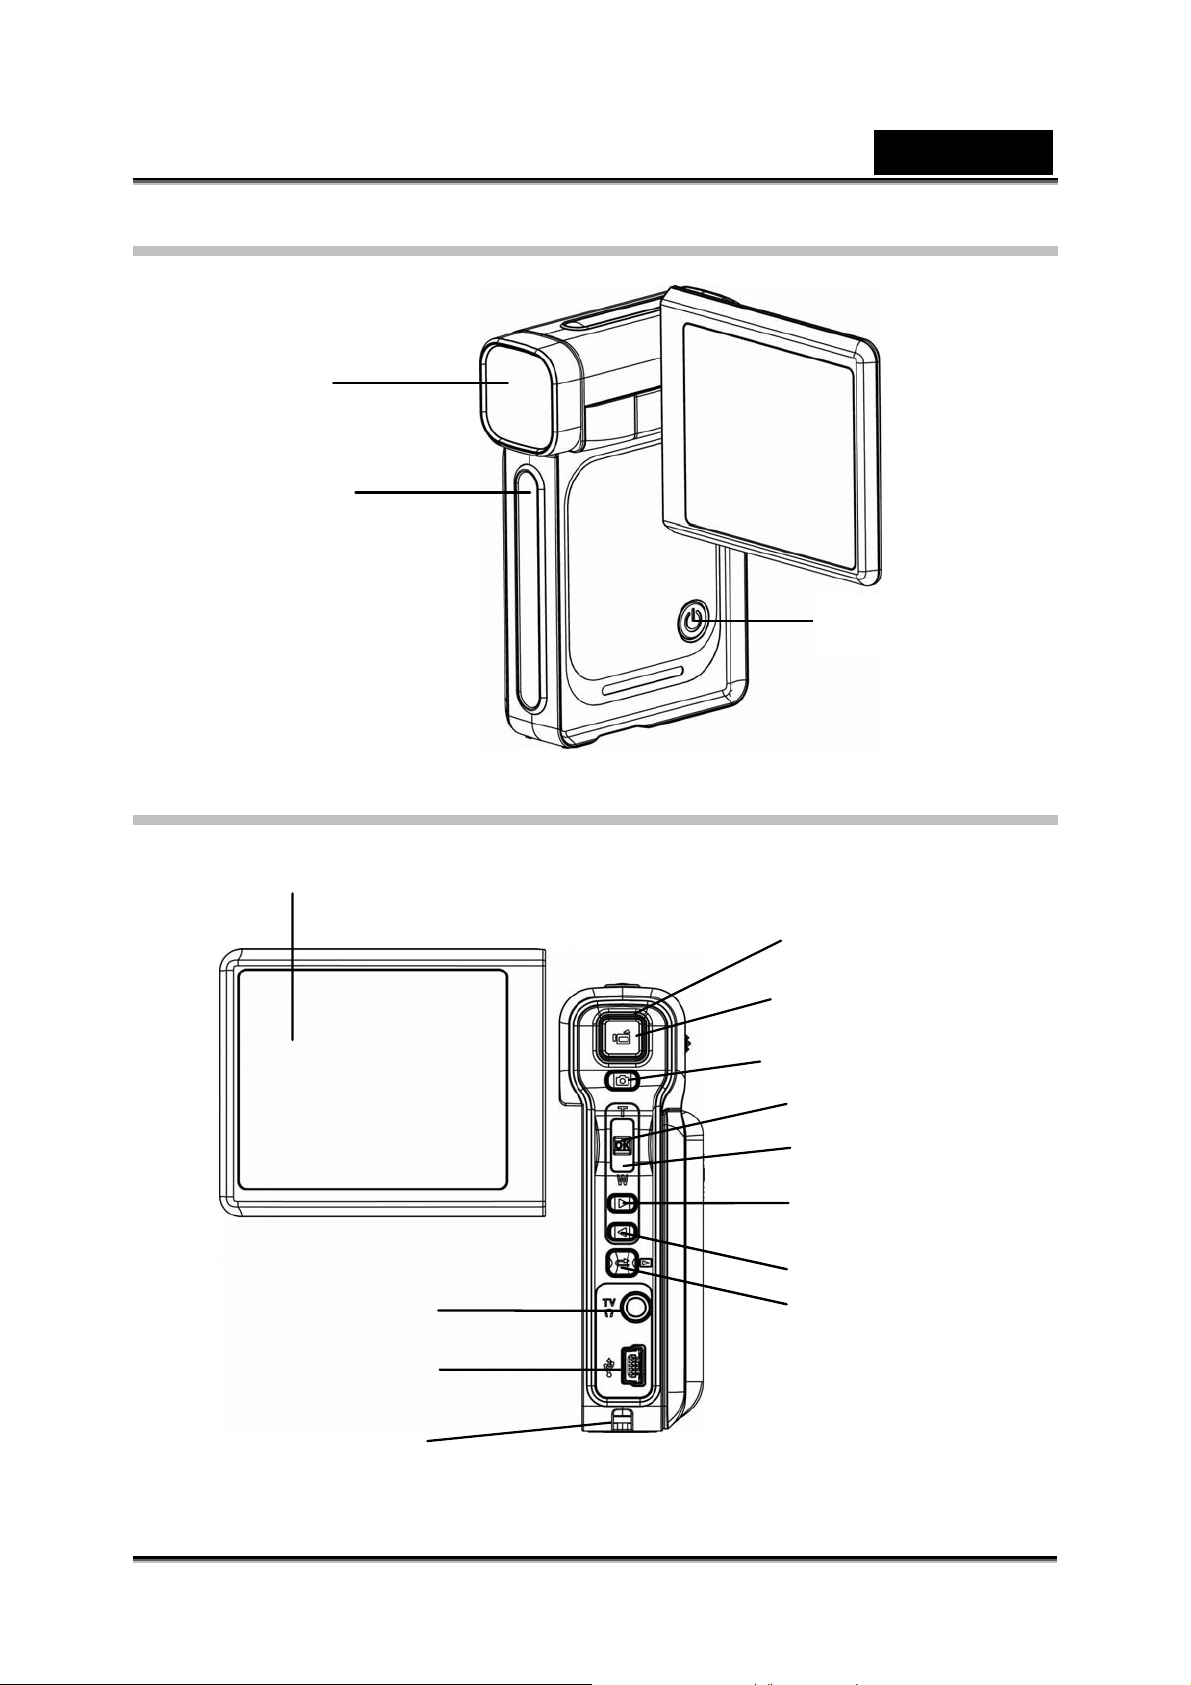
Front View
Lens
LED light
English
Power Button
KeyPad illustration
LCD Panel
TV Out /ear Phone Port
Mini USB 2.0 port
Strap hole
Green /Red LED
Movie Shutter Button
Picture Shutter Button
Enter Button
Tele/Wide Button
Right Button
Left Button
Record/Play Button
-8-
Page 9
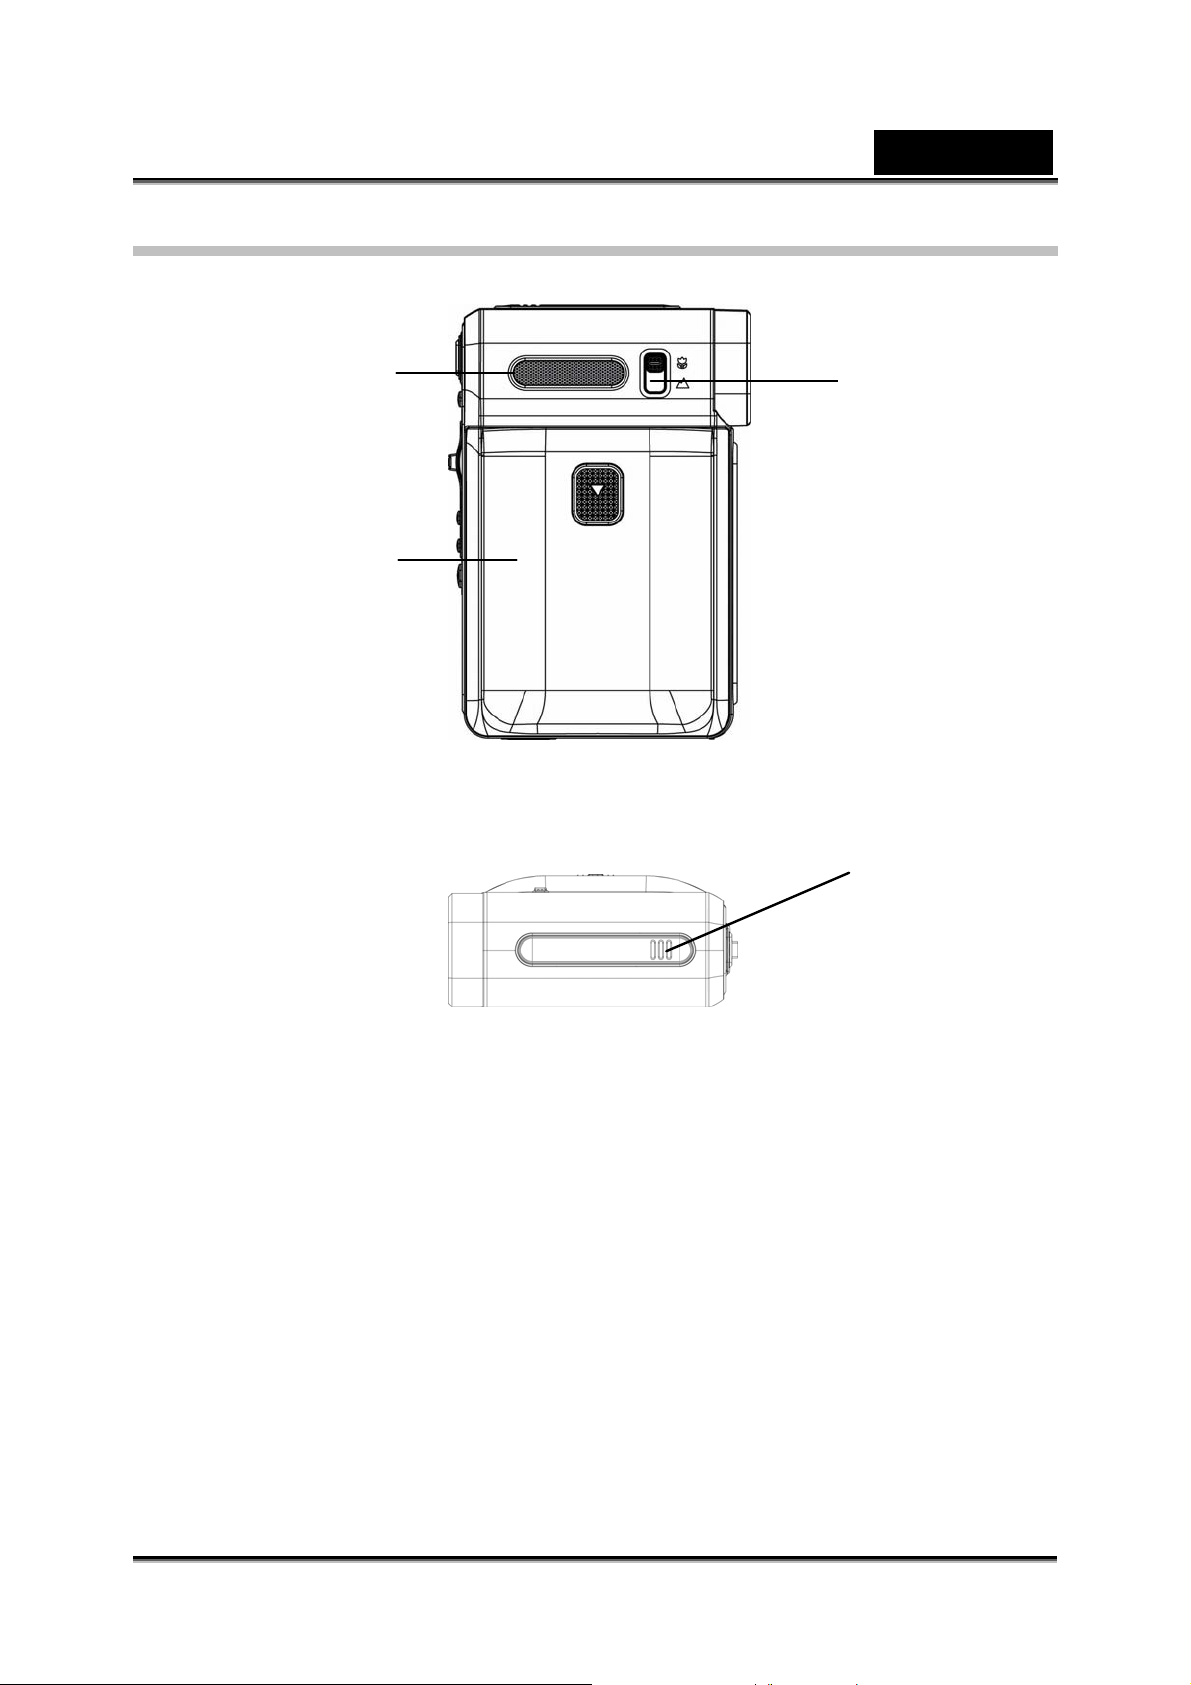
Side View
Speaker
Battery cover
English
Focus setting
Microphone
-9-
Page 10
Getting Started
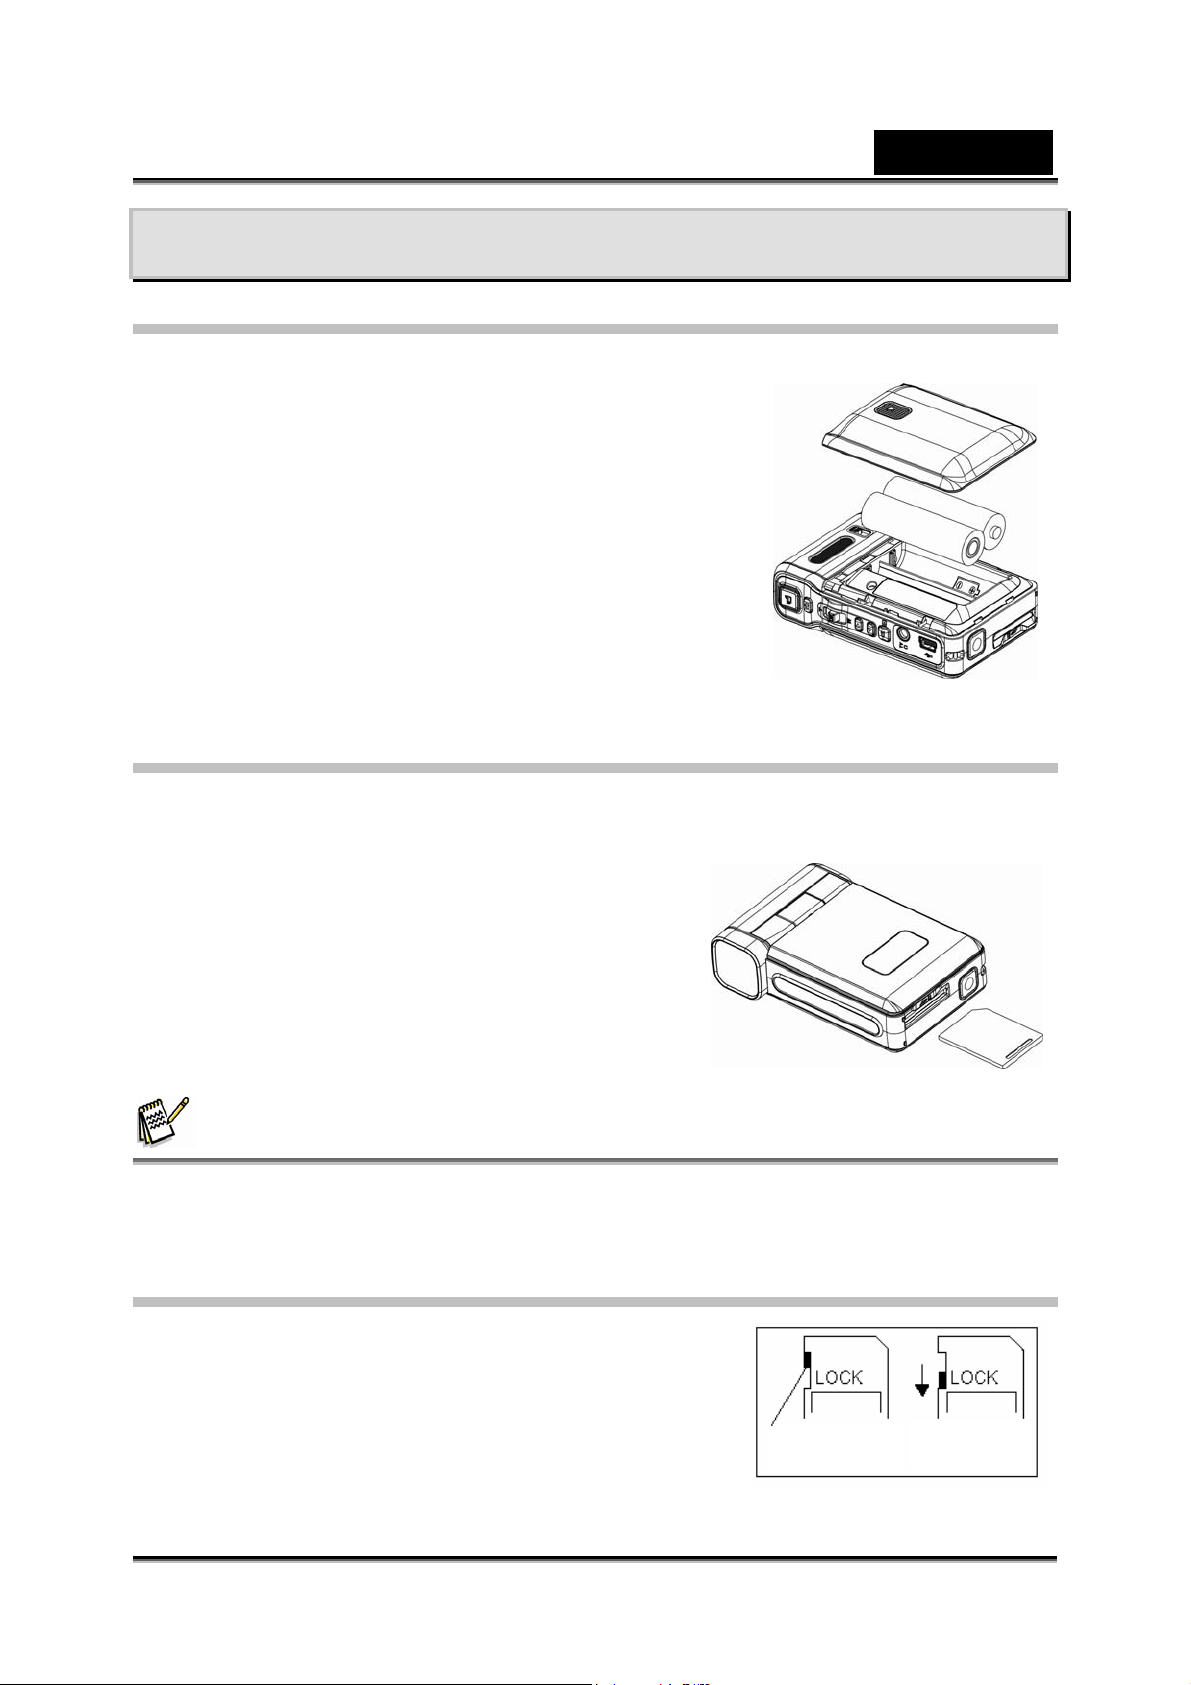
Loading the Battery
Before using th e camera, you must load two AA
(Alkaline) batteries.
1. Fol low the arrow direction to slide open the battery
cover.
2. Insert the batteries according to the corr ect polarity
marks ( + or -)
3. Clos e the battery cover firmly.
English
Inserting and Removing an SD Card
The camera comes with internal memory (64MB) which allows you to store pictures,
movies, record ed voice and music . You can expand the memory capacity by using an
optional SD memory card up to 2GB. To insert a
memory card:
1. Insert the memory card into the correct
position.
2. To remove an installed SD card, press the
card inwards to releas e it.
3. When the card pops out, gently remove it
from its slot.
NOTE
z When a memory card is being used, movies and pictures are saved on the card rather
than on the built-in memory.
Protecting Data on an SD Card
SD card is read-only by locking the SD card. No
pictures, movies and voice can be recorded when the
SD card is locked. Make sure the lock is in wri teable
position before recording any media.
-10-
Writeable position
Writeable position
Write-Protected
Write-Protected
Position
Position
Page 11

English
Turning the Camera On and Getting Started
To turn on the camera:
1. Flip out the LCD panel and the camera will turn on automatically.
2. Or you can press the Power Button for one second to turn it on.
To take a movie, press the Movie Shutter Button ( ).
To take a picture, press the Picture Shutter Button ( ).
To record voice, press the Enter Button and Right/Left Button for voice
recording.
To view stored movies, pictures or listen to Voice recordings and Music,
press the RECORD/ PLAY button once to switch to Playback Mode. Press
it a second time to return to Record Mode.
Turning the Camera Off
To turn off the Camera, you can either press the Power But ton for one second, or you
can place the LCD pa nel back to its original position.
-11-
Page 12
Record Mode
Button Function
Power Button: Press down for one seco nd to tu rn on or turn
off the camera.
Movie Shutter Button:
1. Start to take a movie, or record voice.
2. To stop recording, press it again.
Picture Shutter Button:
Take a picture
Tele/Wide Button: Digital Zoom in and out.
OK Button: Menu ON
English
Right Button : Flash ON / OFF/Red-Eye Reduction/Light
ON/Auto
Left Button: Self-Timer ON/OFF
RECORD/PLAY Button functions:
1. Switch between Record/Playback Mode.
2. Return to the previous page.
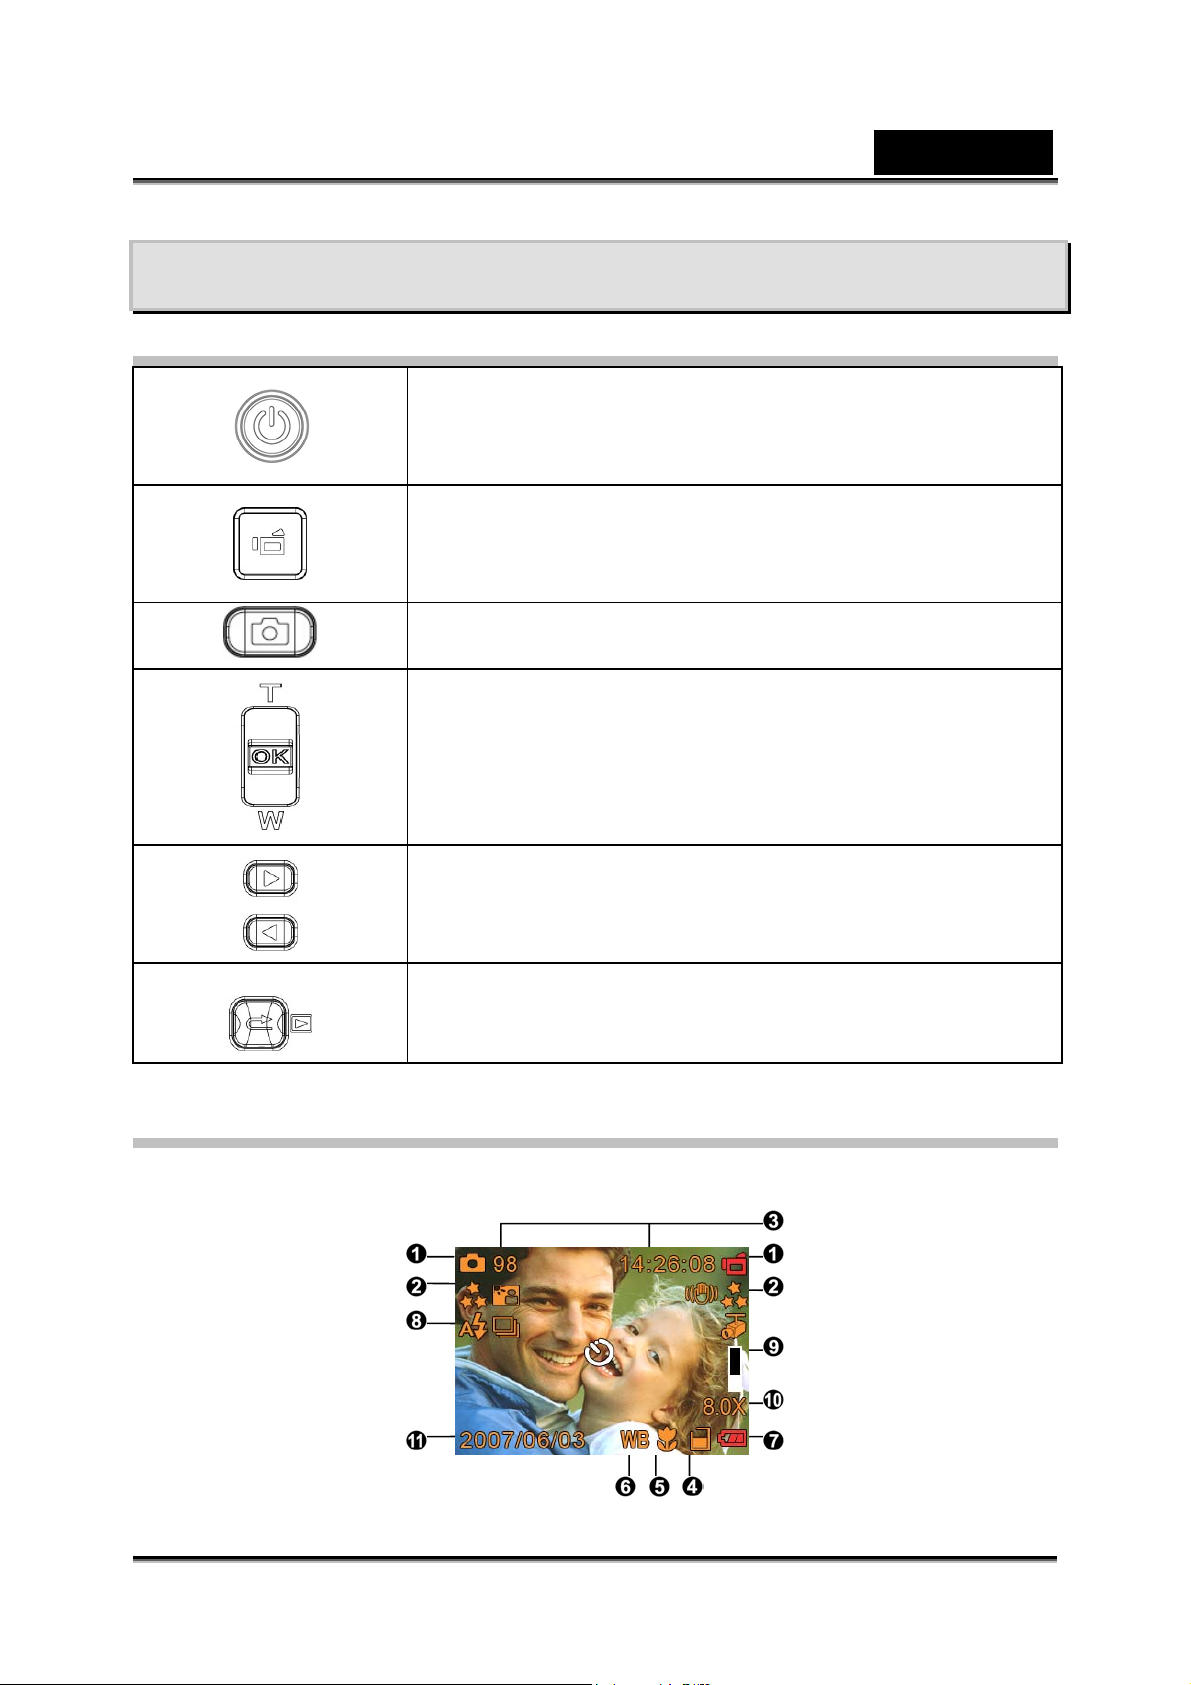
LCD Monitor Information
The indicators below will display on the LCD when movies and pictures are recorded:
-12-
Page 13
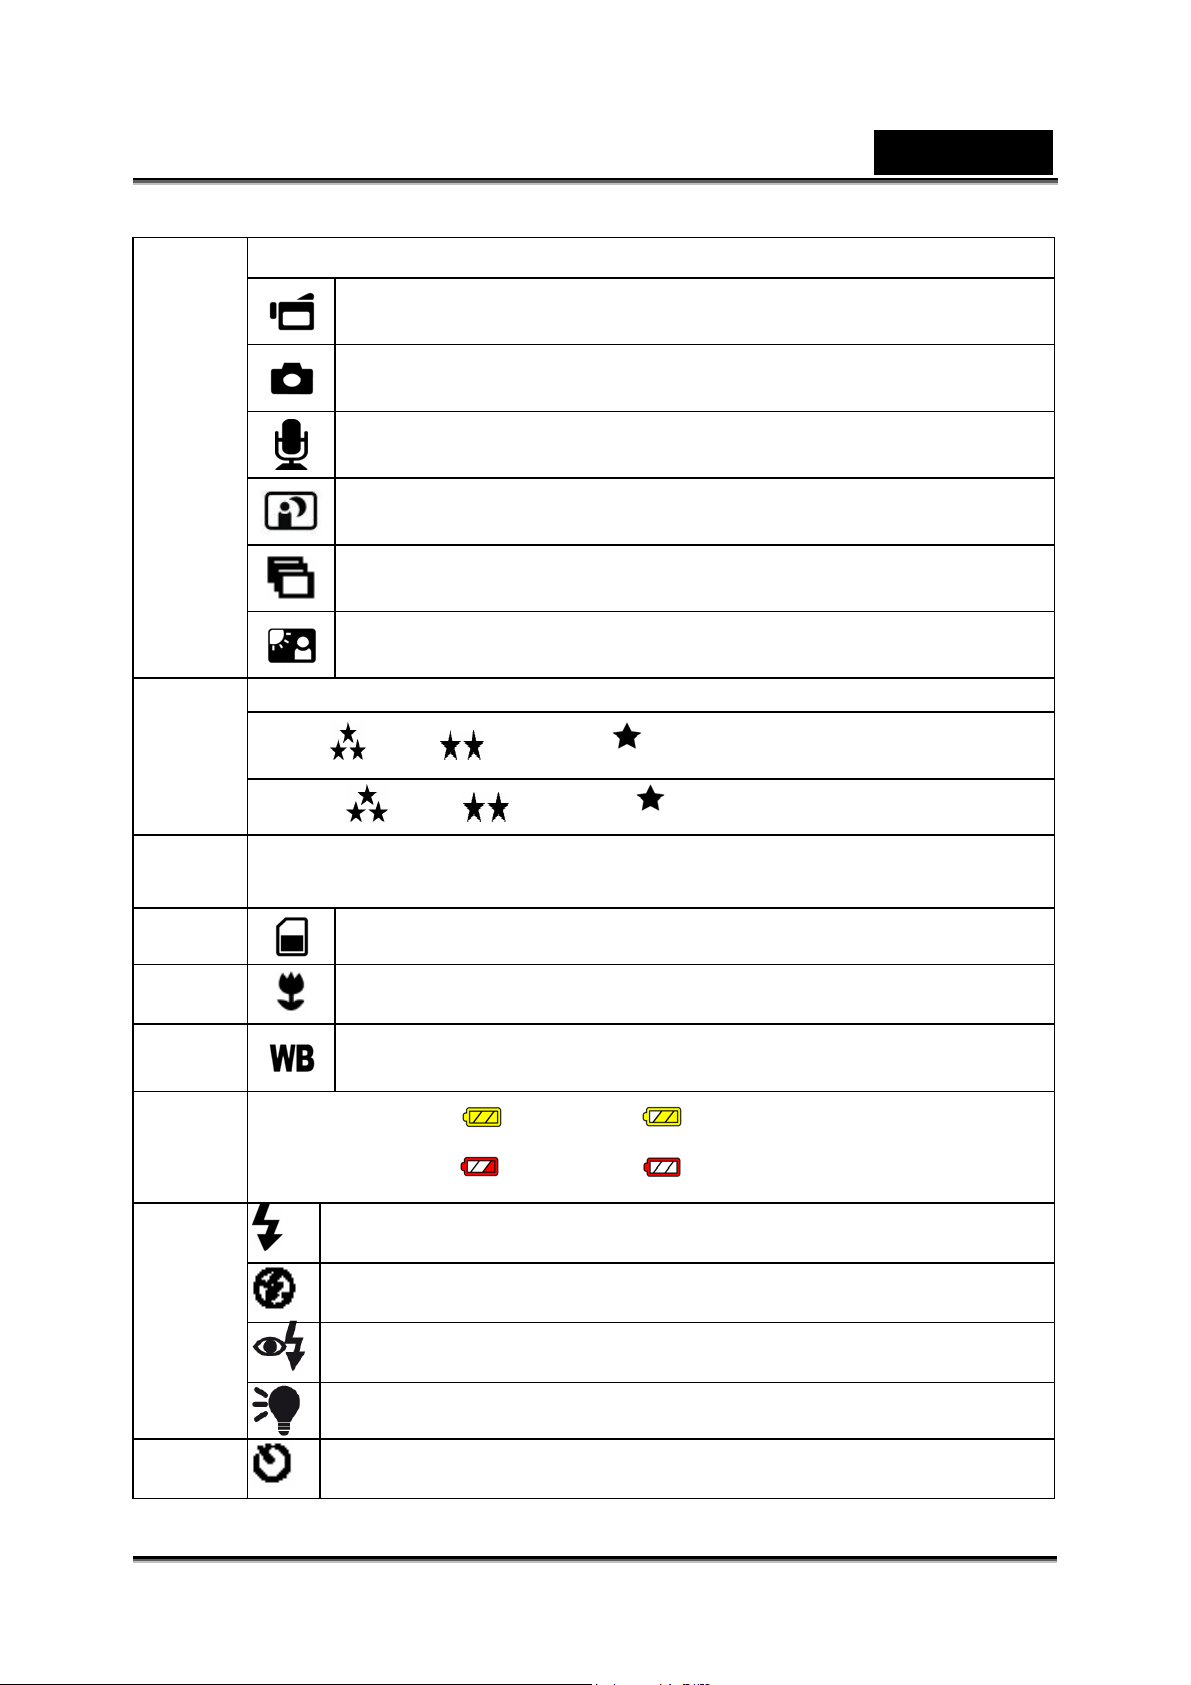
(1) Record Mode
English
(2) Resolution
Movie : High / Standard/ Low
Picture: High / Standard/ Low
Number of images or recording time of movie that can still be taken at
(3)
current resolution.
Movie Record Mode
Picture Record Mode
Voice Record Mode
Night Mode
Multi-Snap Mode
Backlight Mode
(4)
(5)
(6)
(7)
(8)
(9)
SD card inserted
Macro Position Focusing
White Balance
Battery indi cator:
Flash on
Flash Off
Red Eye Reduction
LED On
Self-timer enabled
full power, medium power
low power, no power
-13-
Page 14

(10) 8X digital zoom
English
(11)
(12)
Date: YYYY/MM/DD
Time: HH:MM:SEC
Motion Detection
Movie Recording
Press Movie Shutter button ( ) to start recording. When a movie is recording, a
time indicator will display on the LCD monitor. To stop recording, press Movie Shutter
Button (
Three resolution settings are available:
High Quality
Standard Quality
Low Quality
) again. Press RECORD/PLAY Button to view the recorded mov ie.
Quality
Picture Recording
Press the Picture Shutter Button ( ) to take a picture.
Press REC ORD/PLAY Button to view the picture.
Three resolution settings are available:
Quality
High Quality
Standard Quality
Low Quality
Using Digital Zoom
The digital zoom magnifies the images when recording movies or taking pictures.
1. To zoom in/out, press the Tele/Wide Button.
2. The digital zoom can b e set from 1x to 8x and the magnification ratio is shown on
the LCD monitor.
-14-
Page 15
Options for Record Mode
Movie Mode Camera Mode Voice Effect Set
English
z Resolution
z Exposure
z Light
z Sharpness
z White Balance
z Motion Detect
z Night Mode
z Exit
z Resolution
z Exposure
z Two in One
z Photo Frame
z Flash
z Self-timer
z Sharpness
z White Balance
z Multi-snap
z Backlight
z Date printing
z Night Mode
z Exit
z Enter
z Exit
z Normal
z B/W
z Classic
z Negative
z Exit
z Sound
z St art-up Screen
z Time Setting
z Format memory
z TV System
z Language
z Default Setting
z Exit
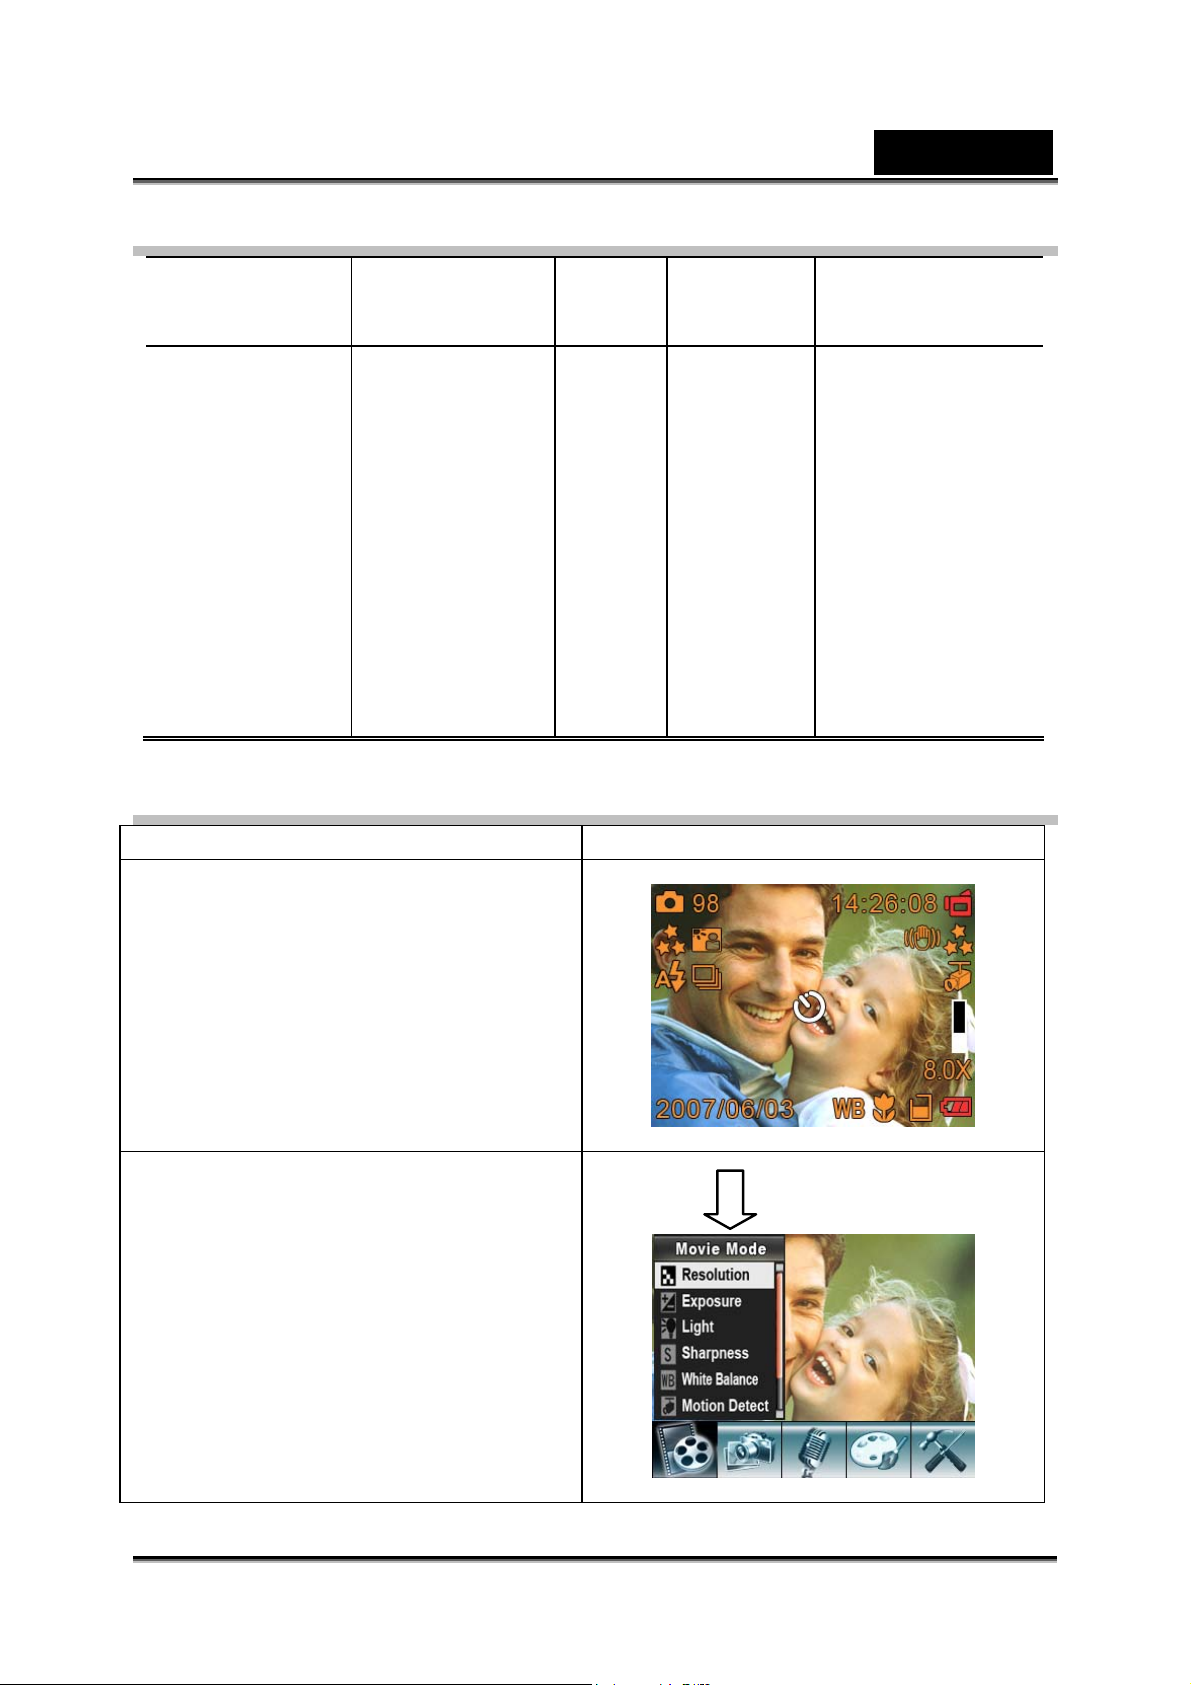
Operations for Record Mode
Operation Screen
1. Press Enter when in Movie/Picture
Record Mode.
2. Use Right/Left Buttons to move
between main menu options, which
are Movie Mode, Camera Mode,
Voice Mode, Ef fect, and Settin g
Mode. The submenu will appear
when you mo ve to each main option.
3. Pres s Enter to validate the sub
option you select.
4. Se l ec t Exit option to exit su bm e n u.
Enter Button
-15-
Page 16

English
Default Setting and Validation
The following table indicates the camera’s default setting as well as its validation.
Always: The settings always stay valid.
One Time: The setting is only valid once or till camera power is off.
Validation Default Factory Setting
Resolution Always High for Movie
Standard for Picture
Exposure One Time 0EV
Light One Time Off
Sharpness One Time Level 5
White Balance One Time Auto
Motion Detect One Time Off
Night Mode One Time Off
Two in One One Time Off
Photo Frame One Time Off
Flash Always Off
Self-Timer One Time Off
Multi-Snap One Time Off
Backlight Mode One Time Off
Date Printing Always Off
Effect One Time Normal
Sound Always On
Format memory One Time Off
Language Always English
Volume Always Level 6
Movie Mode Setting
Record main menu includes camera s et ting and other advanc ed settings. Y ou can
use Right/Left Buttons to move between the options and press E nte r t o validate the
setting.
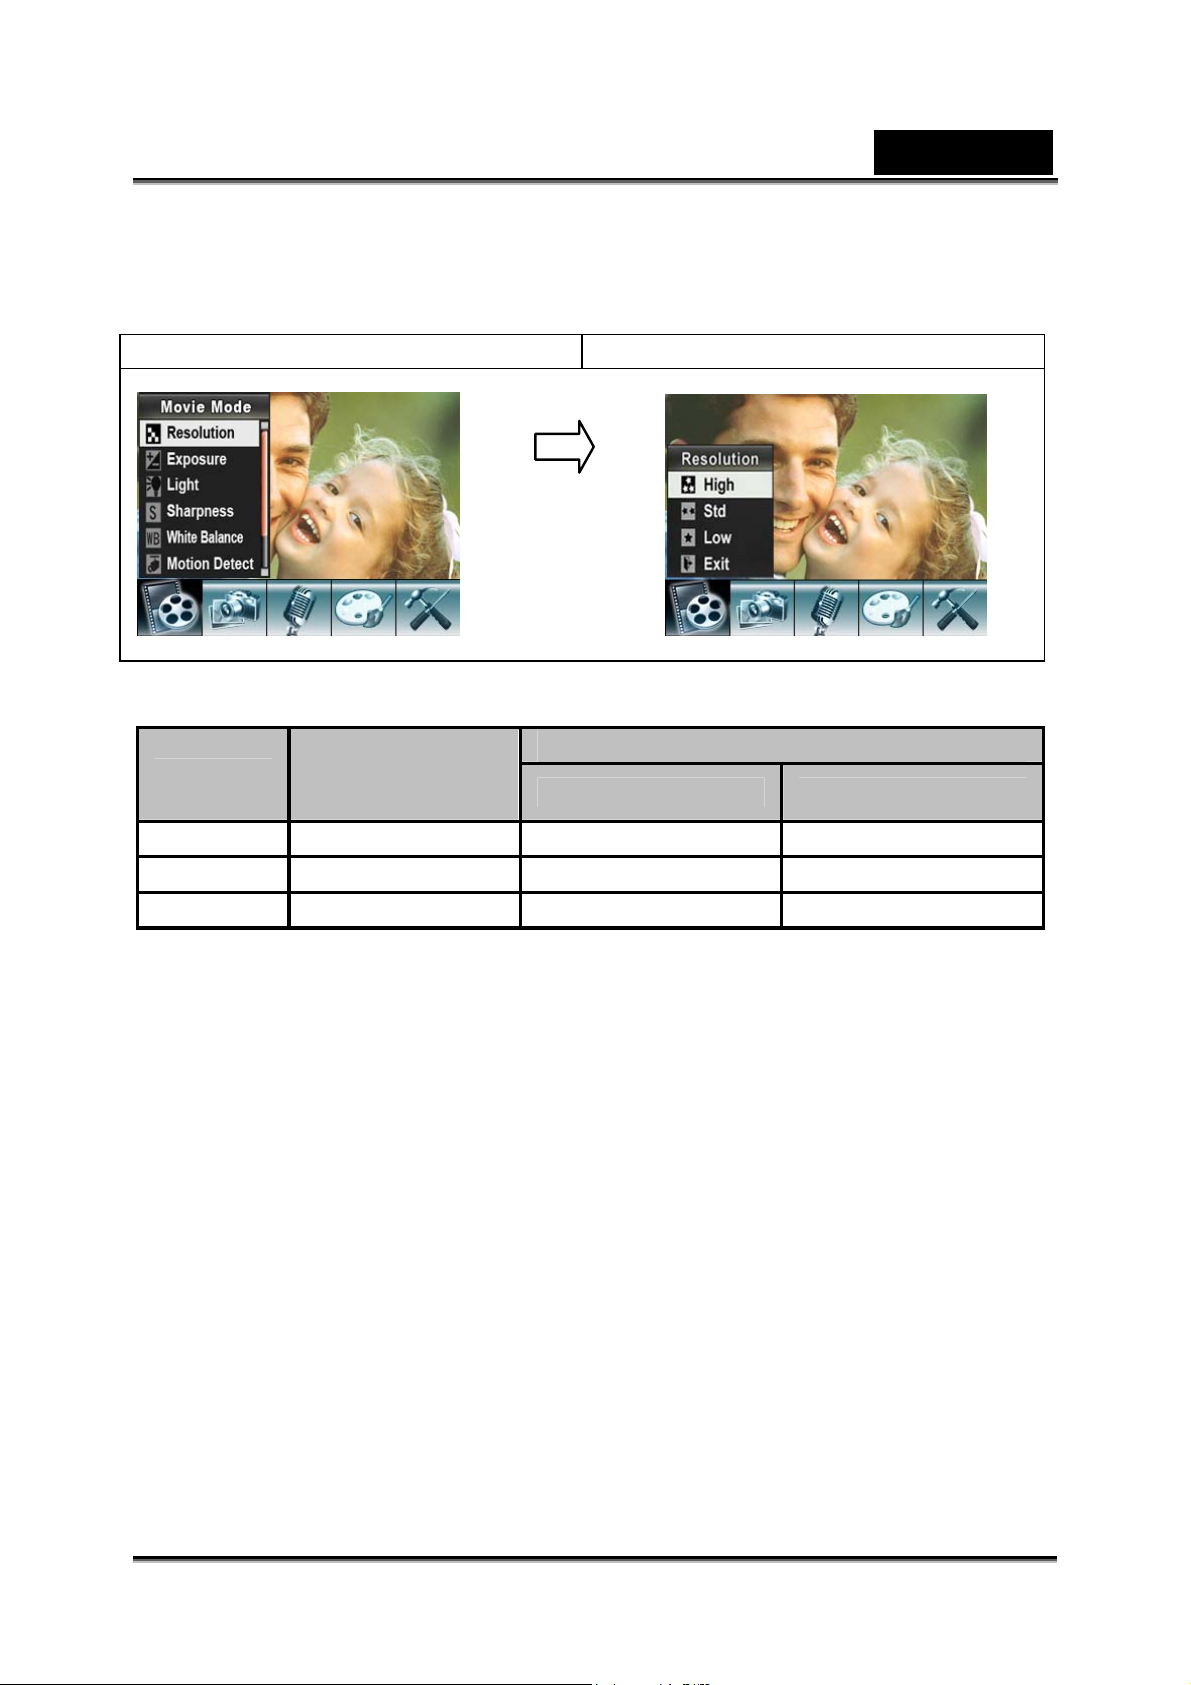
Movie Resolution
To change Movie Resolution:
1. In Movie/Picture Record Mode, press Enter to switch to record menu screen.
2. Use Right/Left B uttons to select Mo vie Mode. The submenu of M ovie Mode will
appear on the scr e en.
-16-
Page 17
English
3. Use Tele/Wide Button to se lect R esolu tion then press Ente r to switch to Re solu tion
submenu.
4. Use Tele/Wide B utton to move between three settings.
5. Press Enter to validate the setting and exit.
Display screen Video Resolution Option
Enter Button
Possible recording time / sec (video clip)
Quality
High 50 sec. 25 min. 50 min.
Standard 1 min. 33 min. 66 min.
Low 1 min. 30 sec. 48 min. 96 min.
64 MB internal
memory
SD memory Card capacity
1GB 2GB
Exposure
The camera adjusts image expos ure automati cally. In certain circums tances you m ay
wish to adjust the exposure compe nsation setti ng.
To change Exposure setting:
1. In Movie/Picture Record Mode, press Enter to switch to record menu screen.
2. Use Right/Left B uttons to select Mo vie Mode. The submenu of M ovie Mode will
appear on the scr e en.
3. Use Tele/Wide Button to move to Exposure Option. Press Enter and then the
Exposure Submenu will pop out on the screen.
4. Use Tele/Wide Button to choose preferred EV value. The change can be
previewed immediately.
5. Press Enter to validate the setting and exit.
-17-
Page 18

English
Display screen Exposure Option
Enter Button
Light
There are two flash settings under Movie. To change flash s ettings, pres s the hot key
(Right Button) or select from the option menu.
On (
Off: The LED is turned off.
To change the Light setting from the option menu:
1. In Movie/Picture Record Mode, press Enter to switch to record menu screen.
2. Use Right/Left B uttons to select Mo vie Mode. The submenu of M ovie Mode will
3. Use Tele/Wide Button to move to Light Option. Press Enter and the Exposure
4. Use Tele/Wide Button to move between the two settings.
5. Press Enter to validate the setting and exit.
): The LED will be turned on and provides light in a low light environment.
appear on the scr e en.
submenu will ap pear on the sc reen.
NOTE
z The flash will be disabled automatically when battery power is low ( )
Display screen Light Option
Enter Button
-18-
Page 19

English
Sharpness
You can soften and sharpen images to achieve different effects.
To change Sharpness setting:
1. In Movie/Picture Record Mode, press Enter to switch to record menu screen.
2. Use Right/Left B uttons to select Mo vie Mode. The submenu of M ovie Mode will
appear on the scr e en.
3. Use Tele/Wide Button to select Sharpness then press Enter to switch to the
Sharpness submenu.
4. Use Tele/Wide Button to move betw een the nine levels. The change can be
previewed immediately.
5. Press Enter to validate the setting and exit.
Display screen Sharpness Option
Enter Button
White Balance
The camera adjusts the color balance of images automatic ally. Three manual white
balance settings are available:
1. Auto (Default): The camera automatically adjusts white balance.
2. Daylight: Outdoors.
3. Fluorescent: Under fluorescent light condition.
4. Tungsten: Under tungsten light condition.
To change White Balance Setting:
1. In Movie/Picture Record Mode, press Enter to switch to record menu screen.
2. Use Right/Left B uttons to select Mo vie Mode. The submenu of M ovie Mode will
appear on the scr e en.
3. Use Tele/Wide Button to select White Balance, then press Enter to switch to the
White Balance submenu.
4. Use Tele/Wide Button to move betw een the four sett ings. The change can be
previewed immediately.
5. Press Enter to validate the setting and exit.
-19-
Page 20

English
Display screen W/B Option
Enter Button
Motion Detection
To enable Motion Detection:
1. In Movie/Picture Record Mode, press Enter to switch to record menu screen.
2. Use Right/Left B uttons to select Mo vie Mode. The submenu of M ovie Mode will
appear on the scr e en.
3. Use Tele/Wide Button to select Motion Detect then press Enter to switch to the
Motion Detect submenu.
4. Use Tele/Wide Button to choose ON or OFF.
5. Press Enter to validate the setting and exit.
6. The camera will start to record video at once if there is movement for three
consecutive seconds. It will stop recording if t here is no movement for three
seconds.
Display screen Motion Detect Option
Enter Button
-20-
Page 21

English
Night Mode
Use Night Mode for night scenes or low light conditions. A longer exposure captures
more detail of background subjects.
Display screen Night Mode Option
Enter Button
NOTE
z To avoid blurry pictures, place the camera on a flat, steady surface, or use a tripod.
Camera Mode Setting
Picture Resolution
To change Pictur e Resolution:
1. In Movie/Picture Record Mode, press Enter to switch to record menu screen.
2. Use Right/Left Buttons to select Camera Mode. The su bmenu of Camera Mod e will
appear on the scr e en.
3. Use Tele/Wide Button to select Resolution then press Enter to switch to the
Resolution submenu.
4. Use Tele/Wide Button to move between the three settings.
5. Press Enter to validate the setting and exit.
Display screen Picture Resolution Op ti on
Enter Button
-21-
Page 22

Possible number of sho ts (still image)
English
64 MB
Quality Resolution
High 3856 x 2892 10 360 720
Standard 2592 x 1944 20 560 1120
Low 1600 x 1200 50 1520 3040
internal
memory
SD memory Card capacity
1GB 2GB
Exposure
The camera adjusts image expos ure automati cally. In certain circums tances you m ay
wish to adjust the exposure compensation setting by yourself.
To change Exposure setting:
1. In Movie/Picture Record Mode, press Enter to switch to record menu screen.
2. Use Right/Left Buttons to select Camera Mode. The su bmenu of Camera Mod e will
appear on the scr e en.
3. Use Tele/Wide Button to select Exposure. Press Enter and the Exposure submenu
will appear on the screen.
4. Use Tele/Wide Button to choose the pr eferred EV v a lue.
5. Press Enter to validate the setting and exit.
Display screen Exposure Option
Enter Button
Two in One (Camera Mod e Only)
With camera set to Two in One mode, you can combine two snapshots into one
picture. To enabl e Tw o in One:
1. In Movie/Picture Record Mode, press Enter to switch to record menu screen.
2. Use Right/Left Buttons to select Camera Mode. The su bmenu of Camera Mod e will
appear on the scr e en.
3. Use Tele/Wide Button to select Two in One then press Enter to switch to the Two
in One submenu.
4. Use Tele/Wide Button to choose ON or OFF.
5. Press Enter to validate the setting and exit.
-22-
Page 23

Display screen Two in One Option
Enter Button
1. Press Picture Shut ter Button to
take first picture
English
2. Press Picture Sh utter Button to
take second picture.
3. Press the RECORD/PLAY Button
to view the Two in One pi cture.
Photo Frame (Camer a Mod e O nly)
Your camera features a popular el ectronic photo frame. You can take your picture
with a preferred electronic photo frame. To enable Photo Frame:
1. In Movie/Picture Record Mode, press Enter to switch to record menu screen.
2. Use Right/Left Buttons to select Camera Mode. The su bmenu of Camera Mod e will
appear on the scr e en.
3. Use Tele/Wide Button to select Photo Frame option, then press Enter to switch to
the Photo Frame subm enu.
4. Use Tele/Wide But t on to locate the prefe rr e d photo frame. Then select the Set
option and press Ent e r to validate the se t ting and exit.
-23-
Page 24

English
Display screen Photo Frame Option
Enter Button
Flash
This camera has two flash settings under Ca mera Mode. To change the flash setting,
use either the hot key (Right Button) or Option Setting.
1. Auto-flash (
mode for general photography.
2. Flash On (
3. Flash Off ( ): the flash will not fire under any circumstances. Use this mode when
taking images in a place where flash photography is prohibited, or when the
subject is distant (beyond the range of the flash).
4. Red-Eye Reduction (
To change Flash setting:
1. In Movie/Picture Record Mode, press Enter to switch to record menu screen.
2. Use Right/Left Buttons to select Camera Mode. The su bmenu of Camera Mod e will
appear on the scr e en.
3. Use Tele/Wide Button to select Flash Option, then press Enter to switch to the
Flash submenu.
4. Use Tele/Wide Button to select settings.
5. Press Enter to validate the setting and exit.
): the flash fires automati cally according to light conditions. Use this
): The flash will fire for every shot taken.
): The flash fires twice before the picture is taken.
NOTE
z The flash will be disabled automatically when battery power is low ( ).
z The LED light is available when you use the hot key to change the Flash setting.
Display screen Flash Option
Enter Button
-24-
Page 25

English
Self-timer (Camera Mode Only)
The self-timer allows you to take pictures wi th a ten-sec o nd time delay. Y ou can
activate the Self-timer using either the hot key (Left Button) or Option Setting. The
self-timer LED on the front of the camera beneat h t h e f lash light will also blink. The
speed of the blinking will increase just before the picture is taken.
To enable the Self-timer:
1. In Movie/Picture Record Mode, press Enter to switch to record menu screen.
2. Use Right/Left Buttons to select Camera Mode. The su bmenu of Camera Mod e will
appear on the scr e en.
3. Use Tele/Wide Button to select Self-timer, then press Enter to switch to the
Self-timer su bmenu.
4. Use Tele/Wide Button to choose On or Off.
5. Press Enter to validate the setting and exit.
Display screen Self-timer Option
Enter Button
Sharpness
You can soften and sharpen images to achieve different effects.
To change Sharpness setting:
1. In Movie/Picture Record Mode, press Enter to switch to record menu screen.
2. Use Right/Left Buttons to select Camera Mode. The su bmenu of Camera Mod e will
appear on the scr e en.
3. Use Tele/Wide Butt on to select Sharpness Option, then press Enter to switch to
the Sharpness submenu.
4. Use Tele/Wide Button to move between the nine levels.
5. Press Enter to validate the setting and exit.
Display screen
Sharpness Option
Enter Button
-25-
Page 26

English
White Balance
The camera adjusts the color balance of images automatic ally. Three manual white
balance settings are available:
1. Auto (Default): The camera automatically adjusts white balance.
2. Daylight: Outdoors.
3. Fluorescent: Under fluorescent light condition.
4. Tungsten: Under tungsten light condition.
To change White Balance Setting:
1. In Movie/Picture Record Mode, press Enter to switch to record menu screen.
2. Use Right/Left Buttons to select Camera Mode. The su bmenu of Camera Mod e will
appear on the scr e en.
3. Use Tele/Wide Button to select White Balance, then press Enter to switch to the
White Balance submenu.
4. Use Tele/Wide Button to move betw een the four sett ings. The change can be
previewed immediately.
5. Press Enter to validate the setting and exit.
Display screen W/B Option
Enter Button
Multi-Snap (Camera Mode Only)
With the camera set to Multi-Snap Mode, you can take five continuous pictures.
To enable Multi-Snap:
1. In Movie/Picture Record Mode, press Enter to switch to record menu screen.
2. Use Right/Left Buttons to select Camera Mode. Th e submenu o f Camera Mode will
appear on the scr e en.
3. Use Tele/Wide Button to select Multi-Snap, then press Enter to switch to the
Multi-Snap submenu.
4. Use Tele/Wide Button to choose On or Off.
5. Press Enter to validate the setting and exit.
6. Press Picture shutter Button to take five continuous pictures.
-26-
Page 27

English
Display screen Multi-Snap Option
Enter Button
Backlight (Camera Mode Only)
With the camera set to backlight Mode, you can take shots when bright light is behind
the subject.
To enable Backlight:
1. In Movie/Picture Record Mode, press Enter to switch to record menu screen.
2. Use Right/Left Buttons to select Camera Mode. The su bmenu of Camera Mod e will
appear on the scr e en.
3. Use Tele/Wide Button to select Backlight, then press Enter to switch to the
Backlight submenu.
4. Use Tele/Wide Button to choose On or Off.
5. Press Enter to validate the setting and exit.
Display screen Backlight Option
Enter Button
Date Printing (Camera Mode Only)
To enable Date Printing:
1. In Movie/Picture Record Mode, press Enter to switch to record menu screen.
2. Use Right/Left Buttons to select Camera Mode. The su bmenu of Camera Mod e will
appear on the scr e en.
3. Use Tele/Wide Button to select Date Printing, then press Enter to switch to the
Date Printing submenu.
-27-
Page 28

English
4. Use Tele/Wide Button to choose On or Off.
5. Press Enter to validate the setting and exit.
Display screen Date Printing Option
Enter Button
NOTE
z Date will be shown on the printed picture once date printing is enabled.
Night Mode
Use Night Mode for night scenes or low light conditions. A longer exposure captures
more detail of background subjects.
Display screen Night Mode Option
Enter Button
NOTE
z To avoid blurry pictures, place the camera on a flat, steady surface, or use a tripod.
-28-
Page 29

English
Voice mode
To enable voice recording:
1. In Movie/Picture Record Mode, press Enter to switch to record menu screen.
2. Use Right/Left Buttons to move to Voice Option. Then the Voice Submenu will
appear on the scr e en.
3. Use Tele/Wide Button to move between the Enter and Exit Option.
4. Choose Enter option to enable voice recording and press Enter to validate the
setting and exit.
5. Press Movie shutter Button to start/stop voice recording.
Display screen Voice Option
Enter Button
Effect Setting
There are four modes: Normal, Black/White, Classic and Negative.
To change Effect setting:
1. In Movie/Picture Record Mode, press Enter to switch to record menu screen.
2. Use Right/Left Buttons to move to Effect Option. Then the Effect Submenu will
appear on the scr e en.
3. Use Tele/Wide Button to move betw een the four sett ings. The change can be
previewed immediately.
4. Press Enter to validate the setting and exit.
Display screen
-29-
Page 30

English
Setting Menu
The Setting submenu contains options for conf iguring your cam e ra set up.
To change to advanced settings:
1. In Movie/Picture Record Mode, press Enter to switch to record menu screen.
2. Use Right/Left Buttons to move to Setting option, then the Setting Submenu will
appear on the scr e en.
3. Use Tele/Wide Button to move between settings.
Display screen Setting Opti on
z Sound (ope rati o n s ound)
z Start-Up Screen
z Time Setting
z Format Memory
z TV System
z Language
z Default Setting
Sound
Enable or disable the Keypad tone and operation sound by using the Tele/Wide
Button, then press Enter to validate the setting.
Display screen Sound Option
Enter Button
Start-up Scre en
Customize the Start-Up Screen with your favorite pictures. Press Right/Left Buttons to
select the picture you want and pres s Enter to validate the setting and e xit.
-30-
Page 31

English
Display screen Start-up
Enter Button
If you do not want to customize the start up screen, pres s Lef t/Right Buttons and
select No Start-Up Screen.
No Start-up screen
Time Setting
1. Move between Date, Time, Set and Exit by using the Left/Right Buttons.
2. Adjust date and time by using the Tele/Wide Button, then press Enter to validate
each change.
3. Select Exit to leave Time Setting without any change.
Display screen Time Setting
Enter Button
-31-
Page 32

English
Format Memory
Display screen Format Card option
Enter Button
Yes: Format the SD Card / built-in memo ry.
No (Default): Do not format SD Card / built in memory.
NOTE
z All the data will be erased if the SD ca rd is forma tted. Make sure all the da ta is duplica ted
to the PC before formatting a SD card.
TV System
Ensure that the appropriat e TV standard of your area is s elected – either NTSC or
PAL.
Wrong TV syst em setting may cause the image to fl icker.
NTSC standard: USA, Canada, Japan, South Korea, Taiwan, etc.
PAL standard: UK, Europe, China, Australia, Singapore, Hong Kong, etc.
Display screen TV System option
Enter Button
Selecting Interface Language
You can select what language you want by using the Tele/Wide Button, then press
Enter to validate the setting.
-32-
Page 33

Display screen
Default Setting
To restore the default factory setting, select this option.
Display screen Default setting option
English
Enter Button
-33-
Page 34

English
Playback Mode
Press RECORD/PLAY Button to switch from Record Mode to Playback Mode.
The Playback Mode is for viewing and managin g m ovies and pictures as w el l as
listening to voi ce or music on th e built-in memory or on an optional memory card.
Press RECORD/PLAY Button to switch from Record Mode to Playback Mode Main
Menu.
There are four options in Playback Mode: Movie, Picture, Voice and Music.
The Tele/Wide Button and Right/Left Buttons can be used to select the specific option.
Press Enter to view movies/pictures, listen to voice and music.
Button Functions
The Direction Buttons have the following functions in Movie and Picture Playback
Modes.
Right Button: Go to the next movie/ picture.
Movie fast forward
Left Button: Go to the previous m ovie/ picture.
Movie fast backward
RECORD/PLAY Button functions
1. Switch between Record and Playback m odes.
2. Return to the previous page.
Tele/Wide Button
Tele :
1. Zoom in
2. Volume adjustment
Wide :
1. Zoom out
2. Volume adjustment
3. LCD information ON/OFF
Enter Button: Enter movie, picture, or voice
option menu.
Movie Shutter Button
Start playing the r ecorded movie or voi ce.
-34-
Page 35

LCD Monitor Information
(1)
(4) (3)
Indicators on the LCD screen while in Playback Mode:
English
(1) Mode Indicator
Movie Play bac k Mode
(2)
(5)
Picture Playback Mode
(2) Resolution Indicator
(3) Indicates the selected movie/picture is locked.
Indicates the single movie/voice/MP3 is being repeated.
High Resolution
Standard Resolution
Low Resolution
-35-
Page 36

English
Indicates all of the movies/voi ces/MP3 are being repeated.
(4) Current Number/ Total number of movie, picture, voice, or MP3.
(5) Magnification Indicator.
Indicates the slide show is playing.
Movie Playback
Operation Display screen
1. Use Tele/Wide Button or Right/Left Buttons to select the Movie option.
2. Press Enter to go to Mov ie Playback Mode.
3. Use Right/Left Buttons to go to the next or
last movie.
4. Press Movie Shut ter Button to play and
press it again to pause.
5. While playing movie, press Right/Left
Buttons to fast forward/backward, then
release the button to stop.
6. Use Tele/Wide Button to adjust volume.
7. Press Enter to go to the movie option
menu.
8. Use Right/Left Buttons to select six
options: Delete, Thumbnail, Lock, Repeat
One or All and Exit.
-36-
Page 37

English
Delete Movies
Operation Display screen
1. Use Right/Left Buttons to select the Delet e
option.
2. Press E nter to go to the Delete menu.
3. Use Right/Left Buttons to select the movie.
4. Use Wide Button to delete a single mov ie
and the Tele Button to delete all movies.
5. Before a movie is deleted, a c o nfirmation
screen will appear; choosing “Yes ” to
execute the operation and “No” to cancel
the operation.
6. Press Enter Button to exit.
NOTE
z If a memory card is used, you can delete only those movies stored on the card.
z Movies on a written-protected memory card cannot be deleted.
z The delete function will only erase unlocked movies. Locked movies must be unlocked
before being deleted.
Thumbnail Functio n
Operation Display screen
1. Use Right/Left Buttons to select the
Thumbnail.
-37-
Page 38

English
2. P ress Enter to view nine thumbnail
movies.
3. To play a movie, use Right/Left Buttons to
select the movie and press Enter to view.
Lock Movies
Single or all movies can be locked. This function can prevent the movies from being
deleted accidentally.
Operation Display screen
1. Use Right/Left Buttons to select the Lock
option.
2. Press Enter to go to the Lock menu.
3. Use Right/Left Buttons to select the movie.
4. Use Tele Button to lo ck/unlock all movies and Wide Button to lock/unl ock single
movie.
5. Before a movie is locked/unlocked, a confirmation screen will appear; choosing
“Yes” will execute the operation, “No” will cancel the operation.
6. Press Enter to exit.
-38-
Page 39

English
Repeat Movies
This function automatically repeats playing a single movie or all movies in order.
Operation Display screen
1. Use Right/Left Buttons to select the
Repeat One option or Repeat A ll option.
2. Press Enter to start repeating.
-39-
Page 40

English
Picture Playback
Operation Display screen
1. Use Tele/Wide Button or Right/Left Buttons to select the Picture option.
2. Press Enter to go to Picture Playback Mode.
3. Use Right/Left Buttons to go to the next or
last picture.
4. Whil e the picture is selected, use
Tele/Wide Button to magnify.
5. For nav igation, press Enter and then use
Tele/Wide Button or Right/Left Buttons to
navigate the ma gnified pict ure.
6. P ress Enter again to go back to the
original size without navigatio n.
7. Then, press Enter to go to the picture
option menu.
8. Use Right/Left Buttons to select five
options: Delete, Thumbnail, Lock,
Slideshow, or Exit.
Delete Picture
Operation Display screen
1. Use Right/Left Buttons to select the Delete
option.
-40-
Page 41

English
2. P ress Enter to go to the Delete menu.
3. Use Right/Left Buttons to select the
picture.
4. Use Tel e Butt on to delete all pictures and
Wide Button to delete a single picture.
5. Before a picture is del e t e d, a c o nfirmation
screen will appear; choosing “Yes” will
execute the operation, “No” will cancel the
operation.
6. Press Enter to exit.
NOTE
z If you are using a memory card, you can delete only those pictures stored on the card.
z Pictures on a written-protected memory card cannot be deleted.
z The delete function will only erase unlocked pictures. Locked pictures must be unlocked
before being deleted.
Thumbnail Functio n
Operation Display screen
1. Use Right/Left Buttons to select the
Thumbnail option.
2. While selecting Thumbnail option, press
Enter to view nine thumbnail pictures.
3. To view a picture, use Right/Left Buttons
to select the picture.
4. Press Enter to view the selected picture.
-41-
Page 42

English
Lock Pictures
Single or all pictures can be locked. This func ti on c a n pr event the pictures f rom being
deleted accidentally.
Operation Display screen
1. Use Right/Left Buttons to select the Lock
option.
2. Press Enter to go to the Lock menu.
3. Use Right/Left Buttons to select the
picture.
4. Use Tel e Butt on to lock/unlock all pictures
and Wide Button to lock/unlock a single
picture.
5. Before a picture is l o c ked/unlocked, a
confirmation screen will appear; choosing
“Yes” will execute the operation, “No” will
cancel the operation.
6. P ress Enter Button to exit.
Slide Show
This function automatically repeats all pictures in order.
Operation Display screen
1. Use Right/Left Buttons to select the Slide
option.
2. Press Enter to start the slide show; pre ss it
again to stop.
-42-
Page 43

English
Voice Playback
Tele/Wide and Right / L eft Buttons Function
In Voice Playback Mode, the Tele/W ide and Right/Left Buttons have the following
functions:
Right/ Left Buttons: Select the last or next
voice.
Tele/Wide Button: Adjust the voice playback
volume.
Enter Button: Switch to voice option menu.
Operation Display screen
1. Use Tele/Wide or Right/Left Buttons to select the Voice option.
2. Press Enter to go to Vo ice Playback Mode.
3. Use Right/Left Buttons to go to the next or
last voice recording.
4. Press Movie Shutter Button to start playing
back the selected voice. Press it again to
stop.
5. Use Tele/Wide Button to adjust the
volume.
6. Press Enter to go to the v o i ce playback
option menu.
7. Use Tele Button to select Delete option
and Wide Button to select Repeat op tion.
-43-
Page 44

English
Delete option
Operation Display screen
1. In Voice Playback mode, press Enter to go
to the voice playback option menu.
2. Use Tele Button to select Delete option.
3. Use Tel e Button to delete all voice
recordings and Wi de Button to delete a
single voice recording.
4. Bef ore a v oice recording is deleted, a
confirmation screen will appear; choosing
“Yes” will execute the operation, “No” will
cancel the operation.
5. Press Enter to exi t the submenu.
6. Press Record/Play Button to exit Voice
Playback mode.
Repeat option
Operation Display screen
1. In Voice Playback mode, press Enter to go
to the voice playback option menu.
2. Use Wide Button to select Repeat option.
3. Use Tele Button to repeat a single voice
file; press twice to repeat all voice
recordings.
4. The repeat icons will be different while
selecting Repeat Once and Repeat All
option.
5. Press Enter to exi t the submenu.
6. Press Record/Play Button to exit Voice
Playback mode.
-44-
Page 45

English
Listening to MP3 Music
Transfer MP3 Music to the camera
1. C onnect your camera to the comp uter USB port.
2. The red LED will light when the camera is connected to the computer and is in
Mass Storage Mode.
3. Transfer MP3 music to My Computer\Removable Disk\MP3.
4. If you can’t find MP3 folder from a SD card, format the SD card first.
5. O n c e all the music is transferred, disconnect the USB cable from the PC.
Listen to MP3 Music
Operation Display screen
1. Use Tele/Wide or Right/Left Buttons to
select the Music option.
2. Press Enter to go to Music Playb ack Mode
and then play the first song after ward.
3. Press Movie Shutter Button to stop p laying back the selected music . Press it
again to start.
4. Use Tele/Wide Button to adjust the volume.
5. Press Enter to go to the music option menu.
6. Use Wide Button to select Repeat opti on .
7. Use the Tele Button to repeat single music; press twice to repeat all music files.
8. The repeat icons will be different while selecting Repeat Once and Repeat All
option.
7. Press Enter to exi t the submenu.
8. Press Record/Play Button to exit Music Playback mode.
Listen to MP3 Music with earphone
MP3 files stor ed in the camera c a n be played either
by the built-in speaker, earphone, or TV.
When the earphone cable is plugged in the camera,
the option menu of Earphone/TV appears on the LCD
Screen. Choose earphone or TV and press Enter
Button to validate the setting.
-45-
Page 46

English
Viewing Movie on PC
Motion JPEG Movie
Motion JPEG, the multimedia format and compression standards, is a cutting-edge
compression technology develo ped by Motion JPEG. Motion JPEG is adopted in this
camera to take movies.
View Motion JPEG Movie on PC
When playing a Motion JPEG movie for the first time, Motion JPEG Video Codec Xvid
should be installed in PC. To do this:
1. Insert the CD-ROM into the computer’s CD-ROM drive. Click “Device Driver” and
follow the on-screen instructions to complete the installation.
2. S tart video player s uch as Widows Media Play er to view Movies.
Share Motion JPEG Movie
When playing a Motion JPEG movie for the first time, Motion JPEG Video Codec
should be installed in PC. To do this:
1. Insert the CD-ROM into the computer’s CD-ROM drive. Click “Device Driver”
(Install Motion JPEG Video Co dec) and follow the on-screen instructions to
complete the installation.
2. S tart video player s uch as Widows Media Play er to view Movies.
Viewing Pictures and Movies on a TV
You can view stored movies and pi ctures on a television. To connect to a television:
1. Connect one end of the AV cable to your camera’s AV Out port.
2. Connect the other end of the cable t o a television.
3. The option menu of Earphone/TV pops out on the LC D S creen.
4. Cho ose TV option and pres s Enter to validate t he setting.
5. The steps for viewing stored pictures and movie on a TV are exactly the same as
for viewing them on the LCD monitor.
NOTE
z The LCD monitor does not work when the camera is connected to a television.
-46-
Page 47

System Requirement
Windows 98SE/2000/ME/XP/Vista
Pentium III 800MHz or higher
256MB RAM
CD ROM
500MB free HDD space
Available USB port
Transferring Data to a Computer
English
Installing the Digital Camera Driver
Before connecting this camera to a computer for the first tim e , you should install a
driver on the computer. The driver is on the CD-ROM disc provided in the package. To
install the driver:
1. Insert the CD-ROM into the computer’s CD-ROM drive. The autorun screen will
appear.
2. Click “Device Driver”. Follow the on-screen instructions to complete the installation.
Depending on your operating system, you may have to restart your computer after
installing the driver.
Connecting Your Camera to a Computer
You can transfer pictures, movies or voice recordings stored on your camera to a
computer and send them in emails to friends or post them on websites. To do this you
should:
1. Install the camera driver on your computer.
2. Con nect the computer and c a m era with the supplied mini USB cabl e.
3. Default mode is Mass St orage Mode when the came ra connects to PC
4. Transf er pic t ures or m o v i es or MP3 or voice recordings.
-47-
Page 48

English
Mass Storage Device Mode
The red LED will light up when the camera is connected to the computer. Movies,
pictures and voice recordings can be found on your computer at “My
Computer\Rem ovable Disk\DCIM\”. Music can be found on your computer at “My
Computer\Rem ovable Disk\ M P3\”. Under this mode, you can r ead, delete, mov e, or
copy any movie/picture/voice recording/music you want. Use the bundled Arcsoft
application soft ware to edit the movi es or pictures.
Web Camera Mode
When in Mass Storage Device Mode, press RECORD/PLAY Button to switch to Web
Camera Mode and the GREEN LED wi ll ligh t up. Under this mode, you can implement
live video conference meetings or use video email over the Internet.
Installing Bundled Software
The CD-ROM supplied with this video camera contains:
Multi-language manuals
Device driver (Windows 98SE/2000/ME/XP/Vista
Arcsoft Photo Impres sion is a user-friendly applic ation that helps y o u
read, edit and organize images.
Arcsoft ShowBiz allows you to edit movies and is equally easy to use.
To install the bundled software:
1. Insert the CD-ROM into your computer’s CD-RO M drive. The autorun screen
appears.
2. Select the software you want to install from the list, then click it. Follow the
on-screen instructions to complete the installation.
NOTE
To install the bundled software on Vista, please visi t http://www.arcsoft.com/ first to
get more information.
-48-
Page 49

English
Burning the Recorded Clip into DVD
ArcSoft Showb iz DVD is for burning th e m o vie clip into a DVD. You can preserve yo ur
precious movies on a DVD to share with famil y and friends. To c r eate a DVD:
1. Install Arcsoft Showbiz DVD
2. Click StartÆ Select ProgramsÆ Arcsoft Showbiz DVDÆ Showbiz DVD
3. Showbiz DVD main Screen will appear on your desktop.
4. Drag Video File to “ Drag Video Here”
-49-
Page 50

5. Click ” Create ”
English
6. Click “ Start “ to start DVD burning
-50-
Page 51

Specifications
Item Description
Image Sensor 5.2 Mega Pixel CMOS Sensor
Lens F3.2 (f=7.0mm)
Focus Range Marco: center 20cm; Normal: 150cm~infinite
LCD monitor 2.4” TFT LCD (480 x 240)
Digital Zoom 8X
Shutter Type Electronic, 1/15000-1/8 sec
Storage Media 64 MB built-in me m ory,
SD Card expandable up to 2GB
Image Resolution High: 3840 x 2880
English
Standard: 2592 x 1944
Low: 1600 x 1200
Movie Resolutio n VGA 640 x 480, 30fp s
QVGA 320 x 240, 30fps
White Balance Auto/Manual (D aylight, Fluorescent, Tungsten)
Exposure Auto/Manual(-1.0 ~ +1.0 EV)
Self-Timer 10 second delay
Flash Off/On/Red-Eye Reduction/LED light
File Format Photo: JPEG
Video: Motion JPEG
Voice: WAV
Image Play Single Image/Thumbnails/Slides how
Interface Mini USB 2.0/ TV Out
TV Output NTSC/PAL
Power Saving Mode 3 minutes
Battery type 2x AA Alkaline Batteries
Dimensions 56.6(W) x 90(H) x 28.5 (T) mm
Weight 110g
-51-
Page 52

English
Troubleshooting
Refer to the symptoms and measures listed below before sending the digital video
camera for repairs. If the problem persists, contact your local reseller or service
center.
Power Supply
Symptom
The power does not
come on.
The power cuts out
during use.
The power does not
go off.
The battery runs out
quickly.
Cause Measure
The battery is not loaded. Load the battery correctly.
The battery is exhausted.
The AC power adaptor is
not connected correctly.
The digital video camera
was left unattended and
unused, so auto power off
cuts it off.
The battery is exhausted.
Digital video camera
malfunction.
It is being used in extreme
low temperature.
Many images are being
captured in dar k places
inside, requiring flash.
Replace with a new set of
batteries.
Reconnect it properly.
Turn the power back on.
Replace with a new set of
batteries.
Replace with a new set of
batteries.
Don’t use this camera
under extreme low
temperature.
Prepare extra batteries if
you need take a lot of
images with flash.
The battery or digital
video camera feels
warm.
Long period of continuous
use of the digita l video
camera or the flash.
Shooting
Symptom Cause Measure
Even if I pres s the
shutter button, the
digital video camera
does not shoot.
The battery is
running low.
The power is not on. Turn the power on.
The digital video
camera is not in
shooting mode.
-52-
Replace with a new s et of
batteries.
Slide the mode switch to shooting
mode.
Turn off the camera if you
don’t use it.
Page 53

Symptom Cause Measure
English
Images do not
The shutter button is
not pressed all the
way.
The internal memory
or memory card
does not have any
free space.
End of memory card
life.
The flash is
recharging.
The memory card is
unrecognized by the
digital video ca m era.
The auto power off
function is activated.
The power is not on. Turn the power on.
Press the shutte r button all the
way.
Load a new memory card, or
delete unwanted files.
Load a new memory card.
Wait until the system LED off.
Format the memory card in the
digital video camera before its
first use or when it was used
other than this digital video
camera.
Turn the power on agai n.
appear on the LCD
monitor.
The LCD monitor is
dark.
Adjust the bri ghtness of th e LCD
monitor in the System Menu.
Symptom Cause Measure
Although it is set to
Auto Focus, it does
not focus.
The flash does not
fire. The flash cannot
recharge.
The lens or
Self-timer LED is
dirty.
The distance to the
subject is smaller
than the effective
range.
The flash is set to
flash off.
Wipe clean with a soft, dry cl oth
or lens paper.
Get your subject within the
effective focus range.
Set the flash to something other
than flash off mode.
-53-
Page 54

English
Symptom Cause Measure
Even though the flash
fired, the image is dark.
The image is too dark.
The image is too bright. It is over-exp osed.
The image lacks natural
color.
The distance to the subject
is greater than flash
effective range.
The image was captured in
a dark place while set to
flash off.
It is under-exposed.
The image was captured in
conditions that are hard for
Auto White Balance to
adjust to.
Get closer to yo ur
subject and capture.
Set the flash to
something other than
flash off mode.
Set the exposure
compensation to a
larger value.
Set the exposure
compensation to a
smaller value.
Add a white object to
the compositi on.
Playback
Symptom Cause Measure
Cannot playback. It is not set to playback
mode.
The contents of
memory card cannot
be replayed.
Files cannot be
deleted.
Cannot format a
memory card.
The playback image is
dark though I used the
flash.
You played back a memory
card that was not formatted
by this device.
The file is prot ected. Cancel protection.
You played back a memory
card that was not formatted
by this device.
The memory card is writeprotected.
End of memory card life. Load a new memory
The LCD monitor is too
dark.
Slide the mode switch
to playback mode.
Load a card that was
formatted and stored
on by this device.
Load a card that was
formatted and stored
on by this device.
Remove the writeprotection.
card.
Adjust the brightness of
LCD monitor in th e
System Menu.
-54-
Page 55

Other Problems
Symptom Cause Measure
English
Cannot load the
memory card.
Even when the digital
video camera’s
buttons are pressed, it
does not operate.
The date and time is
wrong.
The date set has
disappeared.
The card is facing the wrong
way.
The battery is running low.
Digital video came ra
malfunction.
The correct dat e and time is
not set.
The battery is removed with
the power still on.
Load correctly.
Replace with a new set
of batteries.
Turn the power off and
remove the battery
once, and try again.
Set the correct date
and time.
Set the date and time
again.
About connecting to your computer/software
Symptom Cause Measure
Cannot download files.
The free space on the
hard disk drive of your
Check whether the hard
disk drive has enough
computer may be
insufficient.
No power supply.
The USB driver is not
installed (for Windows
98/98SE).
space for runni ng
Windows, and if the
drive for loading files has
a capacity at least that of
the memory card
inserted in the digital
video camera.
Replace with a new set
of batteries.
Install Device driver.
-55-
 Loading...