

Page 1

2
Table of Contents
Proper Care 2
Introduction
Batteries 2
Package Contents 3
Device Installation 3
Getting to Know Your Camera
Front 3
Rear 4
Getting Your Camera Ready
Loading the Batteries 4
Button Modes 5
LCD Description 5
Getting Started
Power On/Off 5
Battery Life Indicator 5
Auto Power OFF Function 6
Basic Operation 6
Movie recording 6
Using the Self-Timer 6
Deleting Images 6
Image Resolution 6
Using the Flash Light 7
Downloading Photos/Movies from camera 7
Using Genius VideoCAM Smart as a video camera 8
Page 2
USB connector
1-1 Insert the DSC-1.3M Smart Software CD into the CD-ROM drive of your computer.
automatically. Just follow the on-screen prompts.
1.Go to the Taskbar and click start, then Run.
2.Type D:\SETUP.EXE, WHERE D: is the designation of your CD-ROM drive, then press the Enter key.
1.Click the Start button on Windows Taskbar, and choose Programs > DSC-1.3M
Smart> DSC-1.3M Smart Uninstall
2.Follow the uninstall steps
1-2 Click the Utility Driver button and wait a few seconds. Setup will guide you through the software setup sequence
1-3 Please install DirectX 9 and Arcsoft software of the CD-ROM.
3.Do not heat or toss the batteries into a fire.
4.Do not expose the polarities of a battery to moisture.
5.Do not attempt to disassemble or adapt a battery.
6.Do not use a battery if it is distorted, discolored or leaking.
7.Do not place a battery in an environment subject to extremely high temperatures or humidity.
8.Remove the batteries if the camera will not be used for an extended period of time to avoid battery leakage.
9.Low temperatures (below 10C) may reduce the output efficiency of batteries, thereby shortening the operation time of camera.
10.If battery leakage happens, please remove batteries from the compartment and clean the base before loading the new batteries.
immediately rinse with fresh water and then consult a physician for treatment as soon as possible.
11.If you accidentally touch or get leakage stains on clothes, please wash with clean water. If the leakage gets in your eyes, please
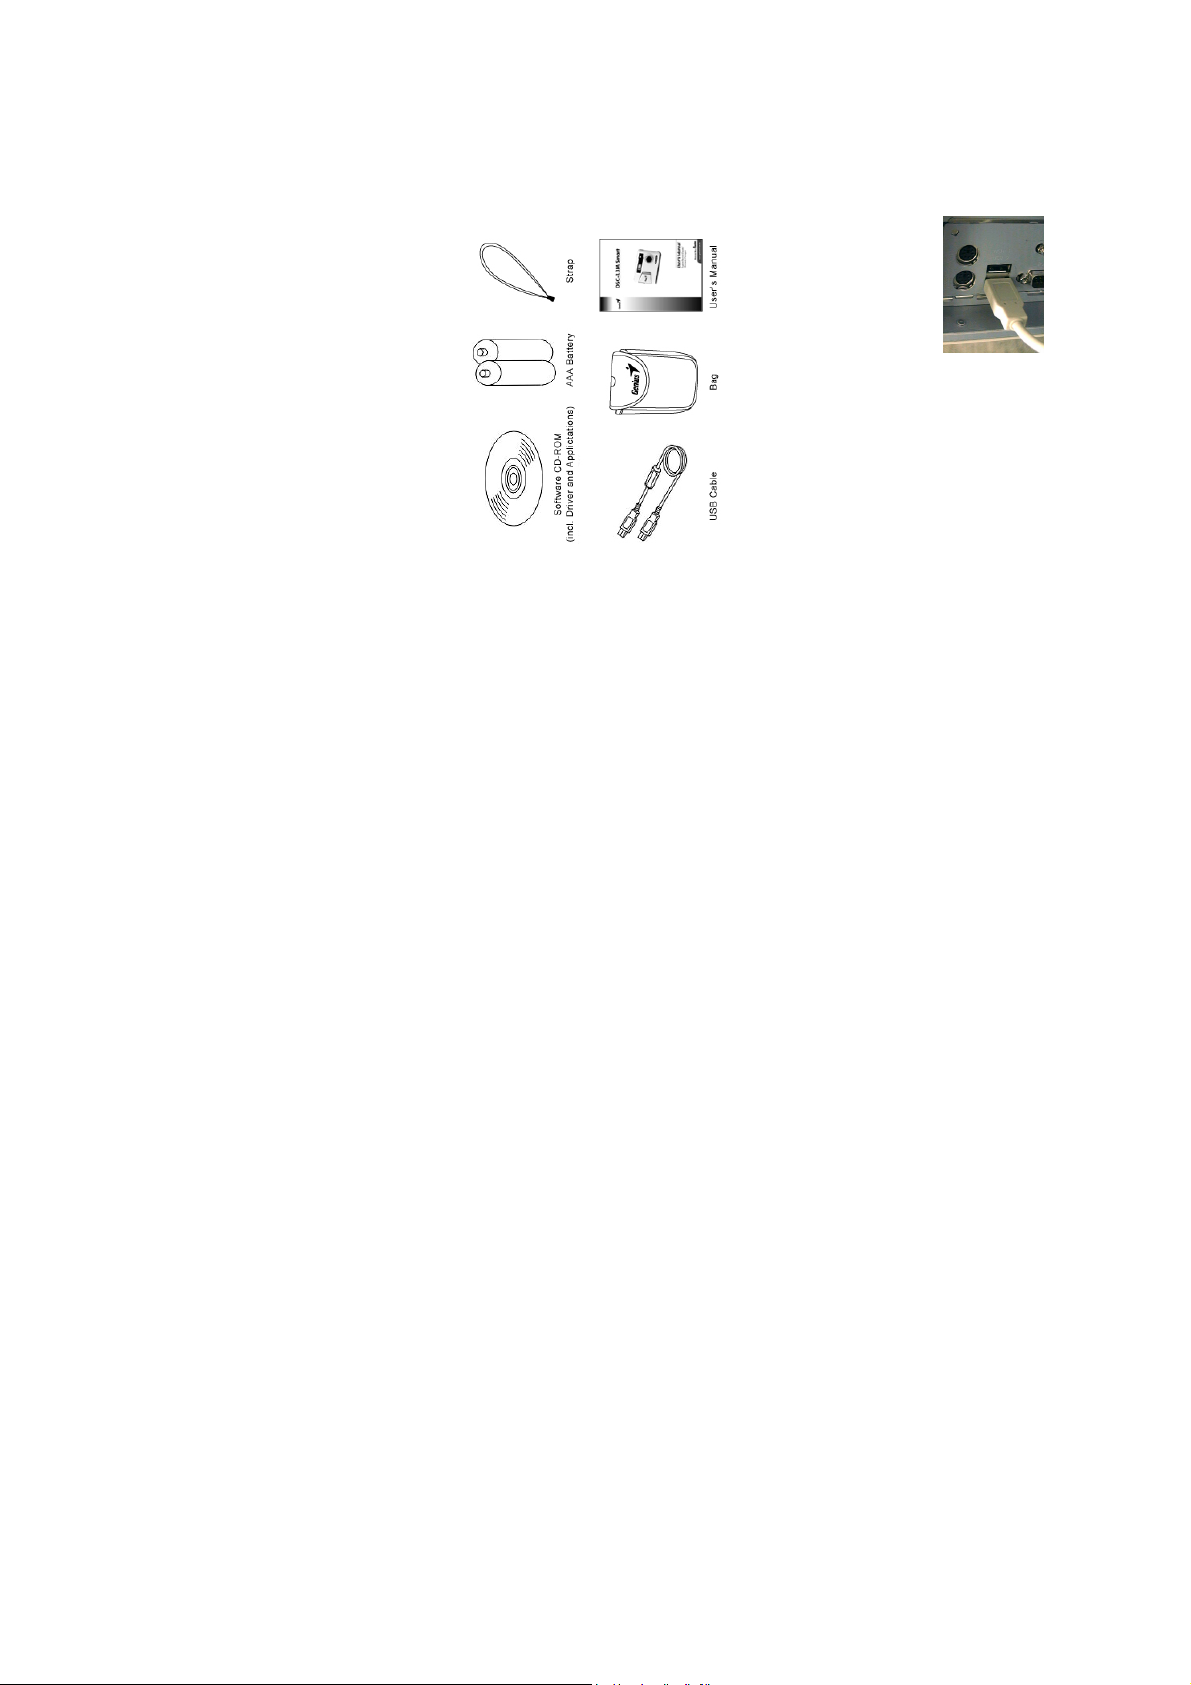
Make sure the following items are in the package
when you open it up.
Software CD-ROM (incl. Driver and Applications)
Two AAA Batteries
Wrist Strap
USB Cable
Bag
Package Contents
User Manual
Device Installation
1.Install/Uninstall the DSC-1.3M Smart Software!
Install:
Note:If the DSC-1.3M Smart Setup screen does not display automatically,
Uninstall:
3.restart computer
2. Connect DSC-1.3M Smart to your Computer
1.When prompted, conne t Camera to the USB port of your ct the DSC-1.3M Smar
computer, as shown in the drawing.
Do not open the battery cover when the power is on.
Congratulations are due for picking up one of the more powerful digital cameras currently available. We expect it will give you all the
things you hoped for. But before you begin using it, please read through this manual carefully and follow the instructions to avoid any
possible damages caused by improper usage.
Introduction
This product consists of intricate electrical parts. To use it properly, do not drop or hit the camera when taking pictures.
Avoid using or placing the camera in the following locations:
Proper Care
1. Damp or dusty places.
2. Sealed vehicles or places exposed to direct sunlight or places subject to extremely high temperatures or heat.
3. Environments with lots of turbulence.
4. Locations full of smoke, oil fumes or steam.
5. Locations subject to a strong magnetic field.
6. When it’s raining or snowing.
If water has entered the camera, immediately turn the power OFF and remove the batteries.
7. How to maintain your camera:
touch the lens with your fingers.
1. If the lens, LCD display or the viewfinder surface is dirty, use a lens brush or a soft cloth to wipe the surface clean. Do not
2. Do not hit the camera with any solid object to avoid scratching the lens, LCD display or viewfinder surf ace.
3. Do not use any detergent or volatile solution, which will cause the camera case and paint to dissolve or distort. Use a soft cloth
only.
1.Use two "AAA" type batteries only.
Batteries
2.Do not use different types of batteries together, or mix old and new batteries.
Caution for battery usage
Please follow these instructions to install the batteries.
1.Check the polarity marks on the battery ( + and - ) before loading the batteries in the camera.
2.Turn the camera off before removing the batteries.
Page 3
follows:
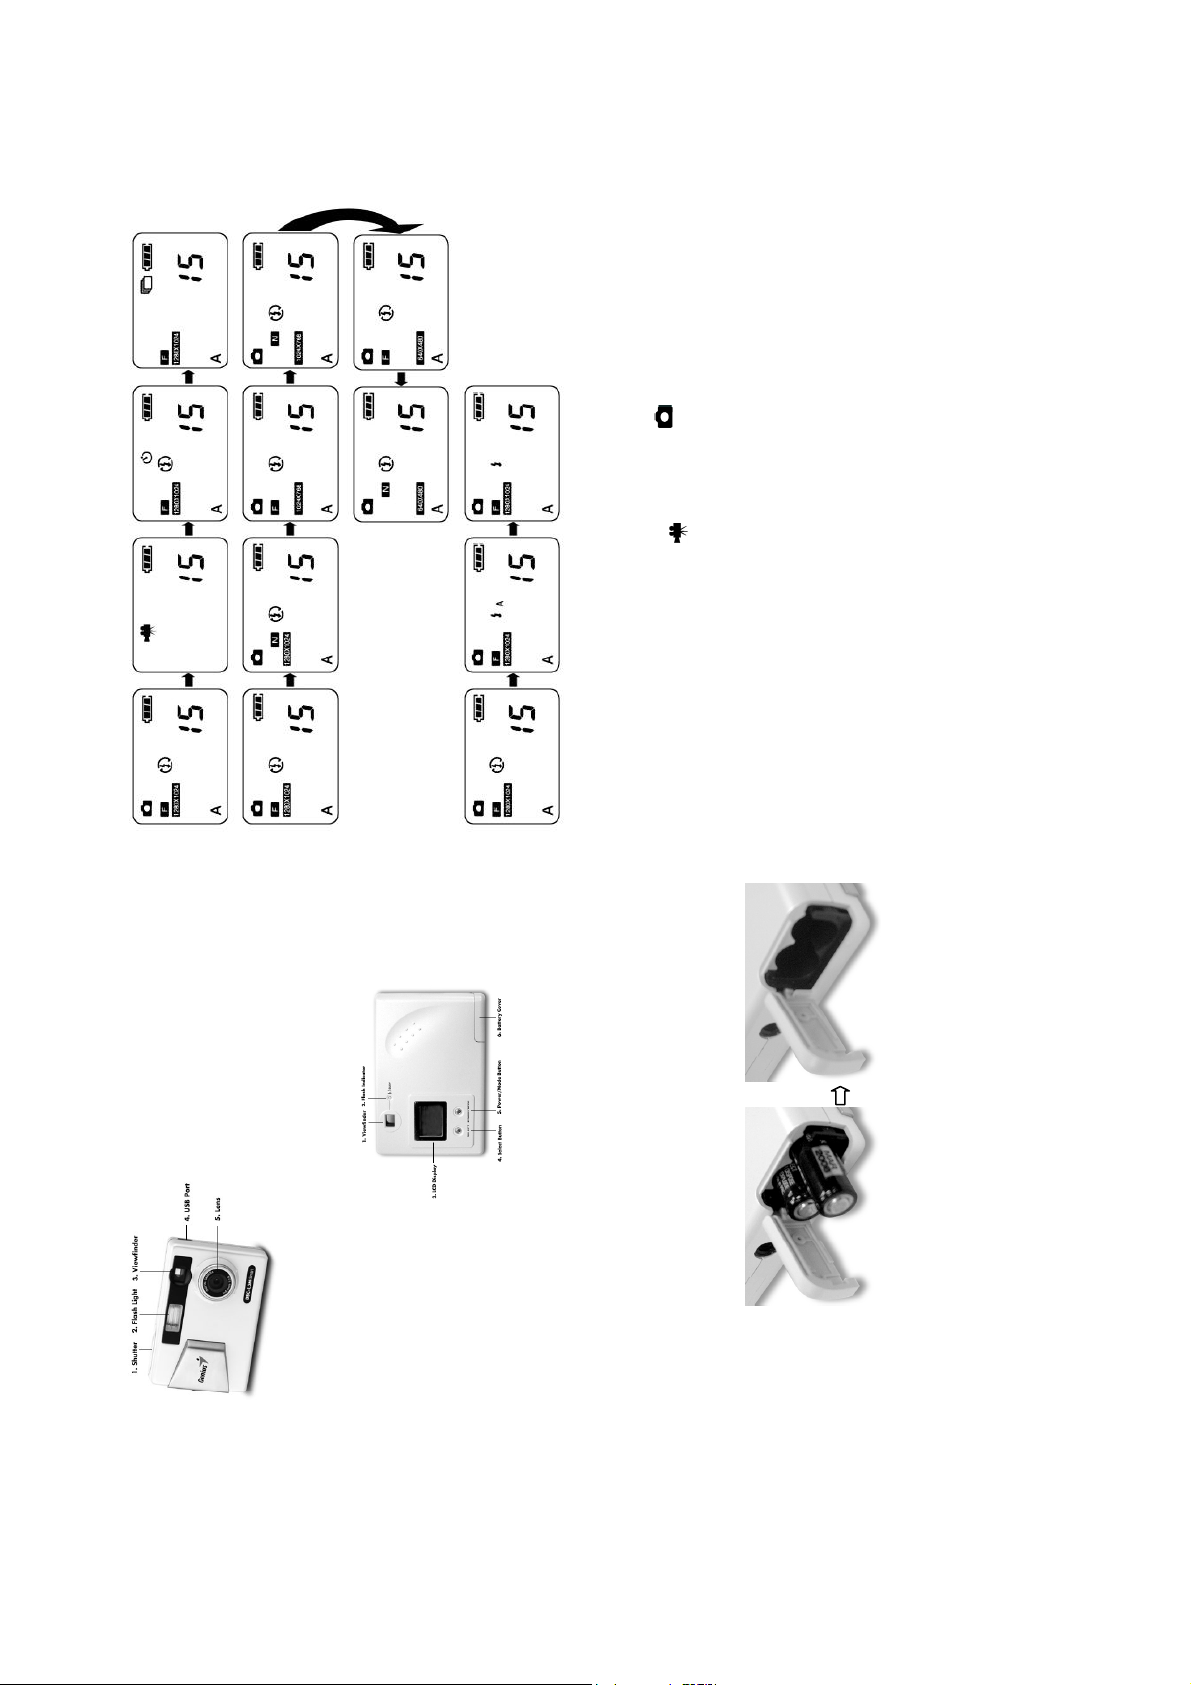
Front view
Getting to Know Your Camera
1. Shutter
2. Flash Light
3. Viewfinder
4. USB Port
5. Lens
Rear View
1. Viewfinder
2. Flash Indicator
3. LCD Display
4. Select Button
5. Power/Mode Button
6. Battery Cover
Loading the Batteries
1.Turn off the power of the camera.
2.Open the Battery Cover. then insert the batteries
as shown on the inside of the cover.
3.Close and lock the battery cover.
NOTE: We recommend that you gently open the battery cover to avoid damaging it.
Button Modes
Shutter button: Press this button to take pictures or to capture video.
Select button: Press this button to change mode in the required function.
Power/Mode button: Press this button to power on your camera or switch to required function. The sequential order of functions is as
Page 4

icon flash.
mode.
e and you will see the
Mode button once and the icon flashes. Then press the Select button until the icon appears. Press Shutter to confirm,
icon of Capture appears. Press Shutter button to confirm and press it again. The camera will
start to record video.
If no operation is carried out for a fixed amount of time (about 30 seconds), the power is turned OFF to prevent batter y wear. This is
called Auto Power OFF.
If no operation is carried out for a fixed amount of time (about 30 seconds), the power is turned OFF to prevent batter y wear. This is
called Auto Power OFF.
Auto Power OFF Func tion Auto Power OFF Func tion
Battery Life Indicator Battery Life Indicator
(1) (1) Full Battery Power (2) Low Battery Power
Note: If your batter power is low, you can’t use the Flash light any more but you still can use the camera.
Turn on the power of the camera.
Press and release the Shutter button to take a picture.
(At this time, you will hear one beep.)
The LCD will display and add up the number of pictures taken. When the internal memory is full, the camera will beep, then you will see
FULL appears on the LCD. No photos can be taken after this.
Basic Operation
(1) Turn on the power of the camera.
(2) Press Mode button once and you will see this icon flash. Then press Select button until the
(3) Press Shutter button to stop recording.
Movie recording
cable to download images to a PC.
(4) Recorded images will be saved in the camera with the AVI file format. You can use the USB
Press the
F(Fine): High Quality: default value
Press the MODE button twic
then press Shutter again, the camera will take a picture three times automatically.
Three Auto Shot
Image Resolution
Press the Select button to change the Resolution
N(Normal): Low Quality
(1) Three Auto-Shot Mode
(2) Self-Timer
(3) Flash
(4) Motion Movie Mode
(5) Still Image Mode
(6) Still Image Quality
(7) Still Image Resolution
(8) White Balance Mode
(9) Image/Movie Counter
(10) Delete e
(11) Battery Life Indicator (11) Battery Life Indicator
LCD Description
Press the Power/Mode Button and hold it for a second. The power is on after you hear beeps. Press the Power/Mode Button and hold it for a second. The power is on after you hear beeps.
Power On/Off Power On/Off
Page 5

White Balance Mode
USB
.
puter, as shown in the picture. Power on your computer. Click the
e Start > Program Files >
ess the Mode button five times and the icon flashes. Then you
Pr can press the Select button to change White Balance Mode.
Auto: Sunny: Cloudy:
luorescent lamp(Strip lighting): Tungsten lamp:
F
Downloading photos/video from camera
One: Connect the Camera to the USB port of your com
PhotoImpression icon on Windows Desktop, or choos
ArcSort PhotoImpression 3.0 > PhotoImpression 3.0. The following PhotoImpression
ou have two methods to download photos/video from camera.
Y
ke sure the ArcSoft PhotoImpression software is installed. If not, please install it fir
main screen will appear.
Note: Ma st
omeplace with enough light, the
Turning on/off the flash light
mes until the icon flashes. Press the Select button to switch between flash light modes. Press the Shutter button to
Press the MODE button three ti
confirm. If you choose Auto Flash mode or Force Flash mode, you will see the FLASH indicator blink. After the FLASH indicator stops
blinking, your camera has been charged. Now you can use the flashlight.
Flashlight won’t be enable. Auto Flash Mode
Auto Flash Mode: The camera will detect light automatically. If you are s
ce and e the sh. Press the Select button
until the icon of Self-Timer a then press Shutter to confirm (and you will hear one ppears,
Press the MODE button on you will se icon fla
Using the Self-Timer
beep from the camera).
10 seconds. After 10 seconds, the camera takes a picture automatically.
The camera will beep for
or images. Press the Mode button four times until the icon of Delete ONE appears. Press the Select button to
leting Images
Delete recorded video
switch to Delete ONE or Delete ALL mode. Then press the Shutter button to delete video or images.
De
Using the flashlight
quipped with a flashlight. It is re
Delete the last image. Delete all images.
Your camera is e commended that you use the flash within the best working
range (1.5m~3m).
Force Flash Mode: The Flashlight will enable no matter where you are.
eted when the FLASH indicator
blinks, you can’t use the flashlight. Force Flash Mode
stops blinking. When the icon
Note: During charging, the FLASH indicator blinks. Charging is compl
Page 6

lick New button then the following Album screen will appear.
C
ation or click the Save button
lick Capture button and the Capture screen will appear.
C
USB
D display. Press the
flash. Now click
mera/Scanner button then
Click Ca click the Acquire button . The Twain Interface window will appear. Choose the picture that you have taken on
t and click the Tran sf er button to transfer the picture from the camera to the applic
r video to the compute
image lis
the
to download the picture o r.
elect button once and you will see the icon S Shutter to confirm. After this ,
Second: Connect the camera to PC and you will see this icon appear on the LC
our camera will become a Mass Storage drive and you can copy photos/video from the camera to
your PC directly.
y
Using DSC-1.3M Smart as a video camera
onnect the DSC-1.3M Smart Camera to the USB port of your computer, as shown in the picture.
ower on the computer. Click the Start button on Windows Taskbar, and choose Programs > ArcSoft VideoImpression > VideoImpression.
C
The following VideoImpression main screen will appear.
P
Page 7

and you can capture the video.
Click Record button
If you want to stop capturing, Press ESC or Click Pause button.
 Loading...