

Page 1
1
For Your Safety: Read this user guide carefully to ensure proper use of the product and to avoid
any danger or physical damage.
Use your player properly to prevent explosion, fire, electric shock, etc.
1. Do not repair the player by yourself, or your warranty will expire.
2. Do not get the player wet or drop it in water.
3. Backup important data to your personal computer as repair or other causes may result in data loss.
4. Always use the accessories provided by or approved by our company, and do not spray water on
the player.
5. The user guide is for reference only.
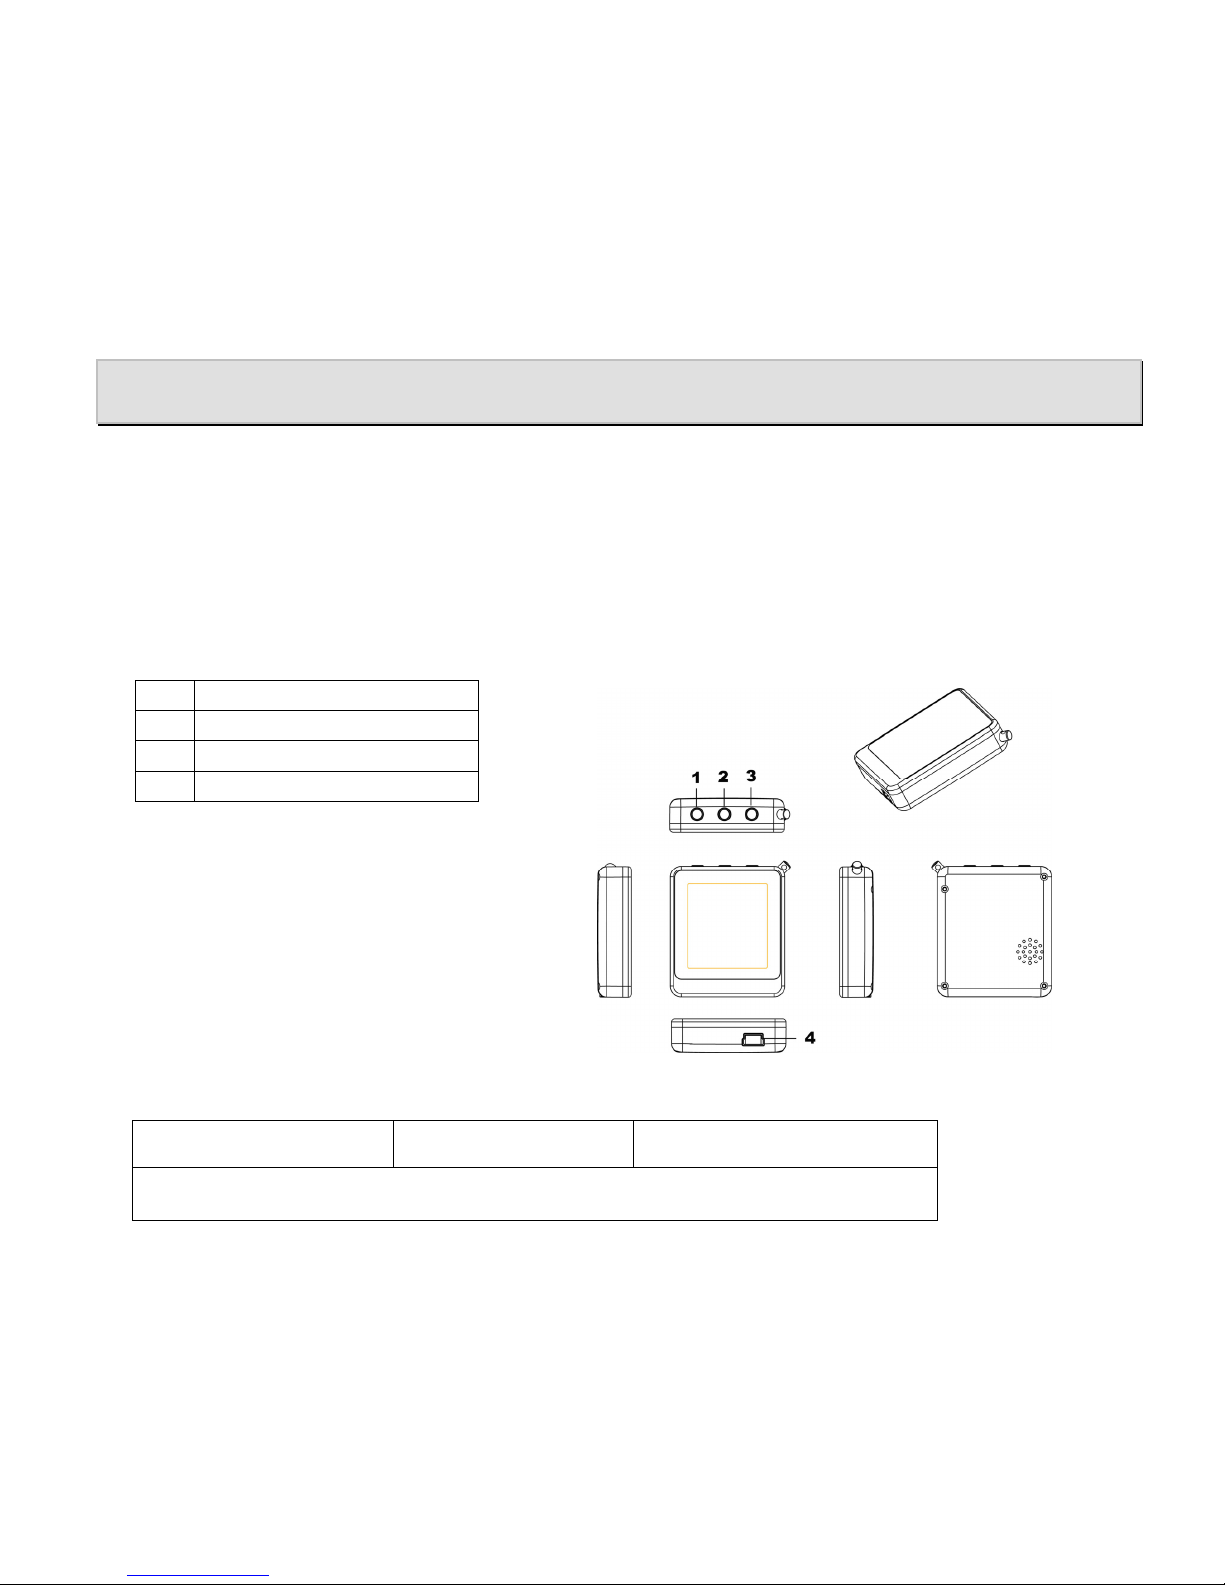
Getting to know the DPF-K150
z Function Features
A. Stores up to 60 images using the bundled photo software
B. Supports JPEG/BMP Photo slide show playback
C. Real-time clock and calendar display
D. Schedule turn on/off setting
.
z Components and button functions
z Package contents
¾ Photo Viewer ¾ USB cable ¾ User’s manual
¾ CD-ROM with photo compression software
1 Previous one
2 MENU
3 Next one
4 USB cable port
Page 2
2
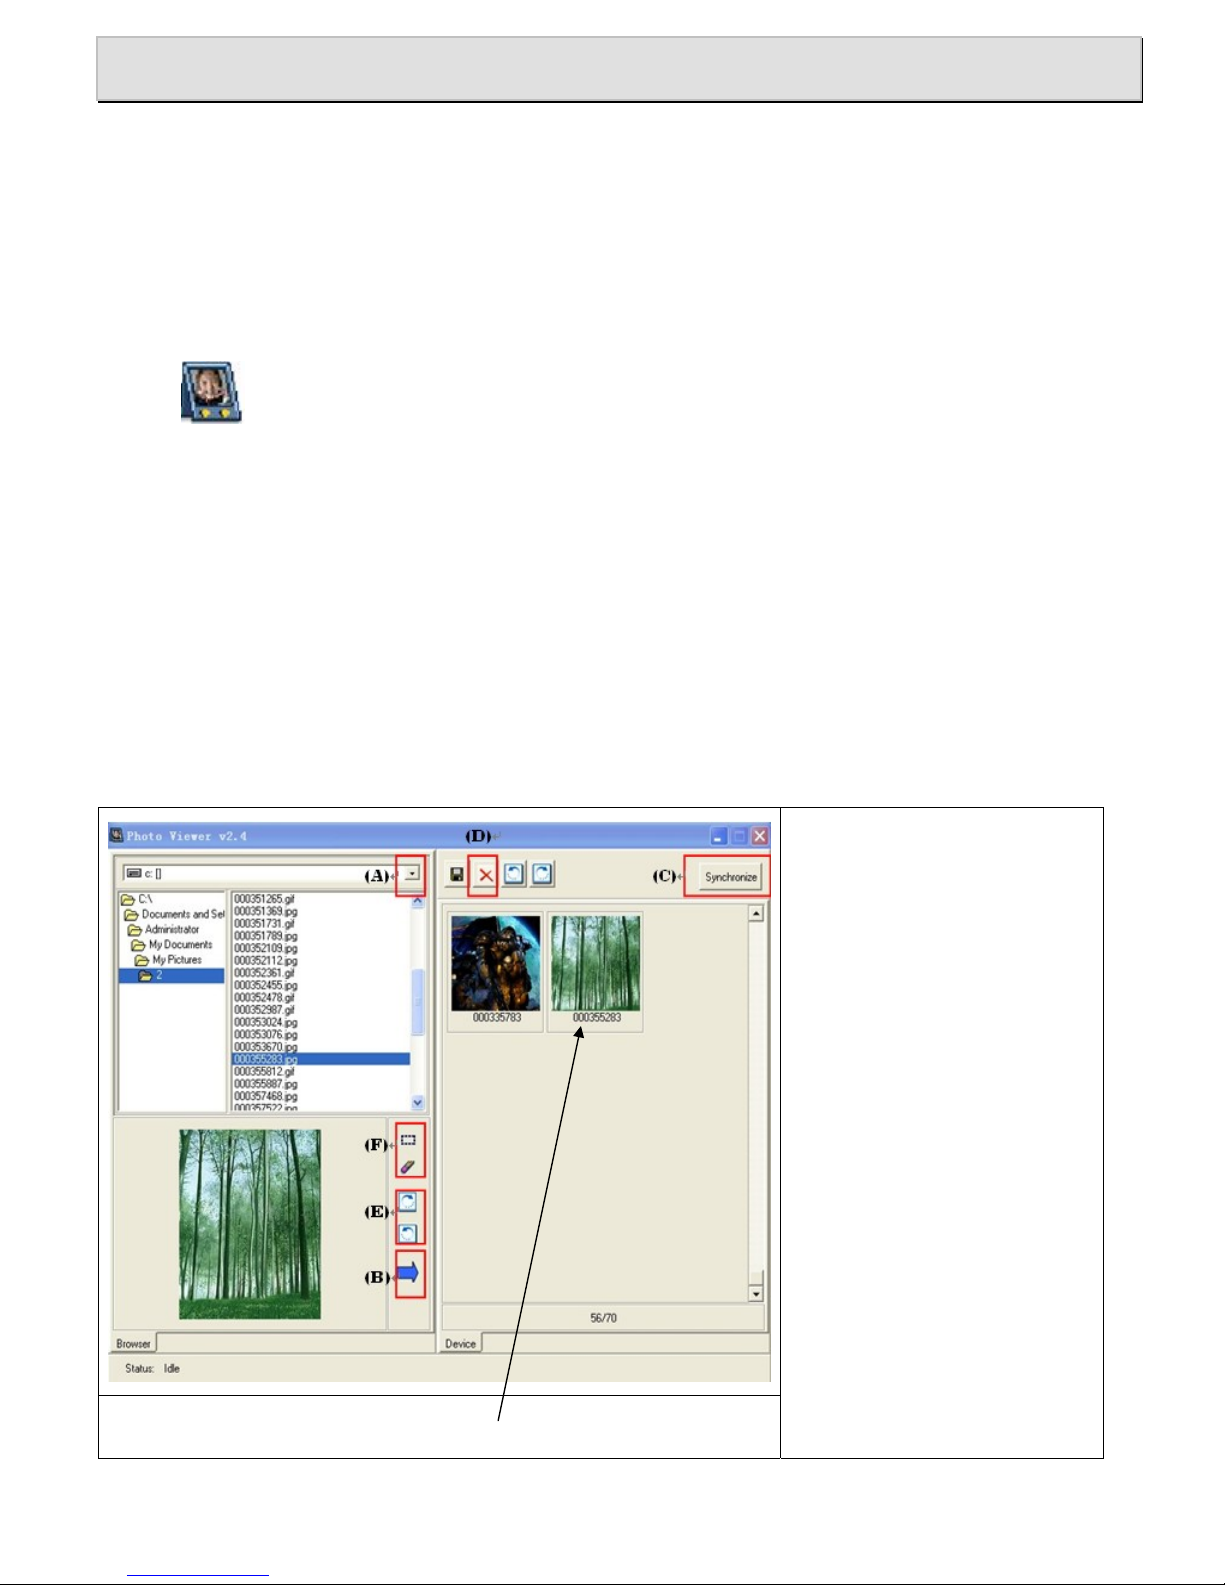
Photo Viewer Software
z Adding/Removing pictures into the Photo Viewer.
1. Install the Photo Viewer driver.
(A) Insert the CD-ROM and install the file “Photo Viewer” and Follow the on screen instructions.
(B)The application Photo Viewer will be installed on your computer and a shortcut to the application
will appear on your desktop.
<DO NOT LAUNCH THE SOFTWARE YET.>
2. Add pictures into the Photo Viewer.
Turn on the Photo Viewer; connect the PC USB port and the photo viewer USB port with the provided
USB cable. After a few of seconds, the photo viewer will display:
USB Charge/ USB Update
Select “USB Update” mode.
Note:
1. Do not use “My Computer” → double click “Removable Disk *G: to add photo files into the player, or an
error will occur.
2. When connecting to your PC, do not select “g:” disk when selecting the disk location on the Photo
Viewer software or there will be an error message.
(G:): Photo Viewer might not always be shown as (Disk g) when connecting to the PC.
3. You can remove the Photo Viewer from the PC directly.
You can see the photos in DPF-K150 from this area.
1. Check (A) to select the
photos stored in your
computer.
2. Press (B) to add the photos
to DPF-K150.
3. Press (C) to match photos
to DPF-K150 or press (D) to
delete the photo.
4. To rotate photos, press (E).
(The rotate speed depends
on your photo size). You
can also use item (F) to
frame the photo area.
Page 3

3
Basic Operations
Turn power on and play photos
1. Press and hold MENU button (about 3 seconds) until power on then the player will start to playback
photos automatically or manually.
2. After playback of all photos, the player will go on playing continuously no power, then it will power off.
3. When in playback photos, press MENU button, the screen will display the submenu as following: OFF /
Display Mode / Clock Set / Power/ Clock Display/ Calendar/ Alarm/ LCD Contrast/ Beep ON/ Exit.
Display Mode
Select <Display Mode> by pressing / buttons, then you can select photo browsing mode by
pressing / buttons: <Auto> / <Manual> and press MENU button to confirm.
* <Auto> mode, the player will playback photos automatically
*<manual> mode, you need to press / buttons to browse photos one by one.
Clock Set
Select <Clock Set> by pressing / buttons, and press MENU button to enter, then you can setup
the time and the date (from year to second).
For example, after entering the <Clock set> mode, it will move to the year, then press / buttons to
adjust the year. Then press MENU button to will skip to the month, then you can continue to setup one by
one.
Power
Select <Power> mode by pressing / buttons, and press MENU button to enter, then you can select
the time segment by adjusting the top screen :1.3.5.10.or 30 minutes to Power Off automatically. Or you
can press the <Auto ON/OFF> to set the real time schedule to Power On/Off automatically.
● Auto On/Off _ON : start Auto On/Off function, enter to set up the real time schedule
separately to Auto Power On/Off.
Notice : pls make sure you have set the exact time on <Clock Set> already.
● Auto On/Off _Off : switch off Auto On/Off function.
Clock Display
Select <Clock Display> mode by pressing / buttons, and press MENU button to enter, then the
screen will show “Disp Clock Normal” and “Disp Clock Water Mark”. When you choose “Disp Clock
Normal” the date and time displayed in the screen. Or you can select “Disp Clock Water Mark”, it will show
in right bottom while in the picture playing mode.
Calendar
Select <Calendar> mode by pressing / buttons, and press MENU button to enter, then the screen
will display the Calendar that you set in the Clock Set mode.
For example, after entering the <Clock set> mode, it will acquiescently pitch on the year, then press
/ buttons to adjust the year.
After this, press MENU button it will skip to the month, then you can continue to setup one by one.
Alarm
Select <Alarm> mode by pressing / buttons, and press MENU button to enter, then you can set
the alarm time by yourself. After alarm time setting, you can also select the dates (from Monday to
Sunday) at the same time or select Exit to go back to the menu list.
Page 4

4
LCD Contrast
Select <LCD Contrast> mode by pressing / buttons, and press MENU button to enter, then you
can select its level from 0 to 12 as your favorable. Then press MENU to go back to the menu list
Beep ON
Select <Auto ON/OFF> mode by pressing / buttons, and press MENU button to enter, then you
choose key’s beep on or beep off.
 Loading...