

Page 1

English
1
For Your Safety: Read this user guide carefully to ensure proper use of the product
and to avoid any danger or physical damage.
Use your player properly to prevent explosion, fire, electric shock, etc.
1. Do not repair the player by yourself, or your warranty will expire.
2. Do not get the player wet or drop it in water.
3. Backup important data to your personal computer as repair or other causes may
result in data loss.
4. Always use the accessories provided by or approved by our company, and do not
spray water on the player.
5. The user guide is for reference only.
z Function Features
A. 1.5-inch color display
B. Stores up to 50~60 images using the bundled photo software
C. Supports JPEG/BMP Photo slide show playback
D. Real-time clock/ alarm/ calendar/ temperature display
z Components and button functions
1. Screen
2. Mode (for photo frame
function)
3. Up
4. Down
5. Thermometer in F0/ C0
6. Light
7. USB connection
8. Mode (for clock function)
9. Alarm/+12/24
10. Clock battery
z Package contents
¾ DPF-151 ¾ USB cable ¾ User’s manual
¾ CD-ROM with photo compression software and multi-language
detailed manuals
z Charging the battery of DPF-151
The internal battery of the device may be charged using the USB cable when connected to
a powered USB port (such as a USB port on your computer) or hub. At full charge, the
device can provide up to three hours of run time.
Notes:
1. For first time use, connect the DPF-151 to your PC and recharge the battery for 2~3
hours.
2. You can also connect the DPF-151 to your PC and continuously watch the photo slide
show.
10
Page 2
English
2
z Adding/ removing pictures into the Photo Viewer.
IMPORTANT: You must install the software to your computer first before you connect the
device to your computer.
1. Install the photo viewer driver.
(A) Insert the CD-ROM and install the file “ PhotoViewer for PC” or “Photo Viewer
for MAC” and Follow the on screen instructions.
(B)The application Photo Viewer will be installed on your computer and a shortcut to the
application will appear on your desktop.
<DO NOT LAUNCH THE SOFTWARE YET.>
(C) After the software is installed, connect the device to the computer with the
included USB cable.
(D) After the hardware installation is complete, launch the Photo Viewer application
from the shortcut on your PC desktop.
Note:
You can not view the photos stores in the device directly from “My
Computer”->disk:”G”. The only way is to use the Photo Viewer software.
2. Add pictures into the DPF-151
When you installed the PhotoViewer software and connect the DPF-151, open the
PhotoViewer software to manage your photos.
When
you
open the
Photo
Viewer
software,
the
photos
won’t
display
properly.
You
have to
press
“View
Photos”
first.
Page 3

English
3
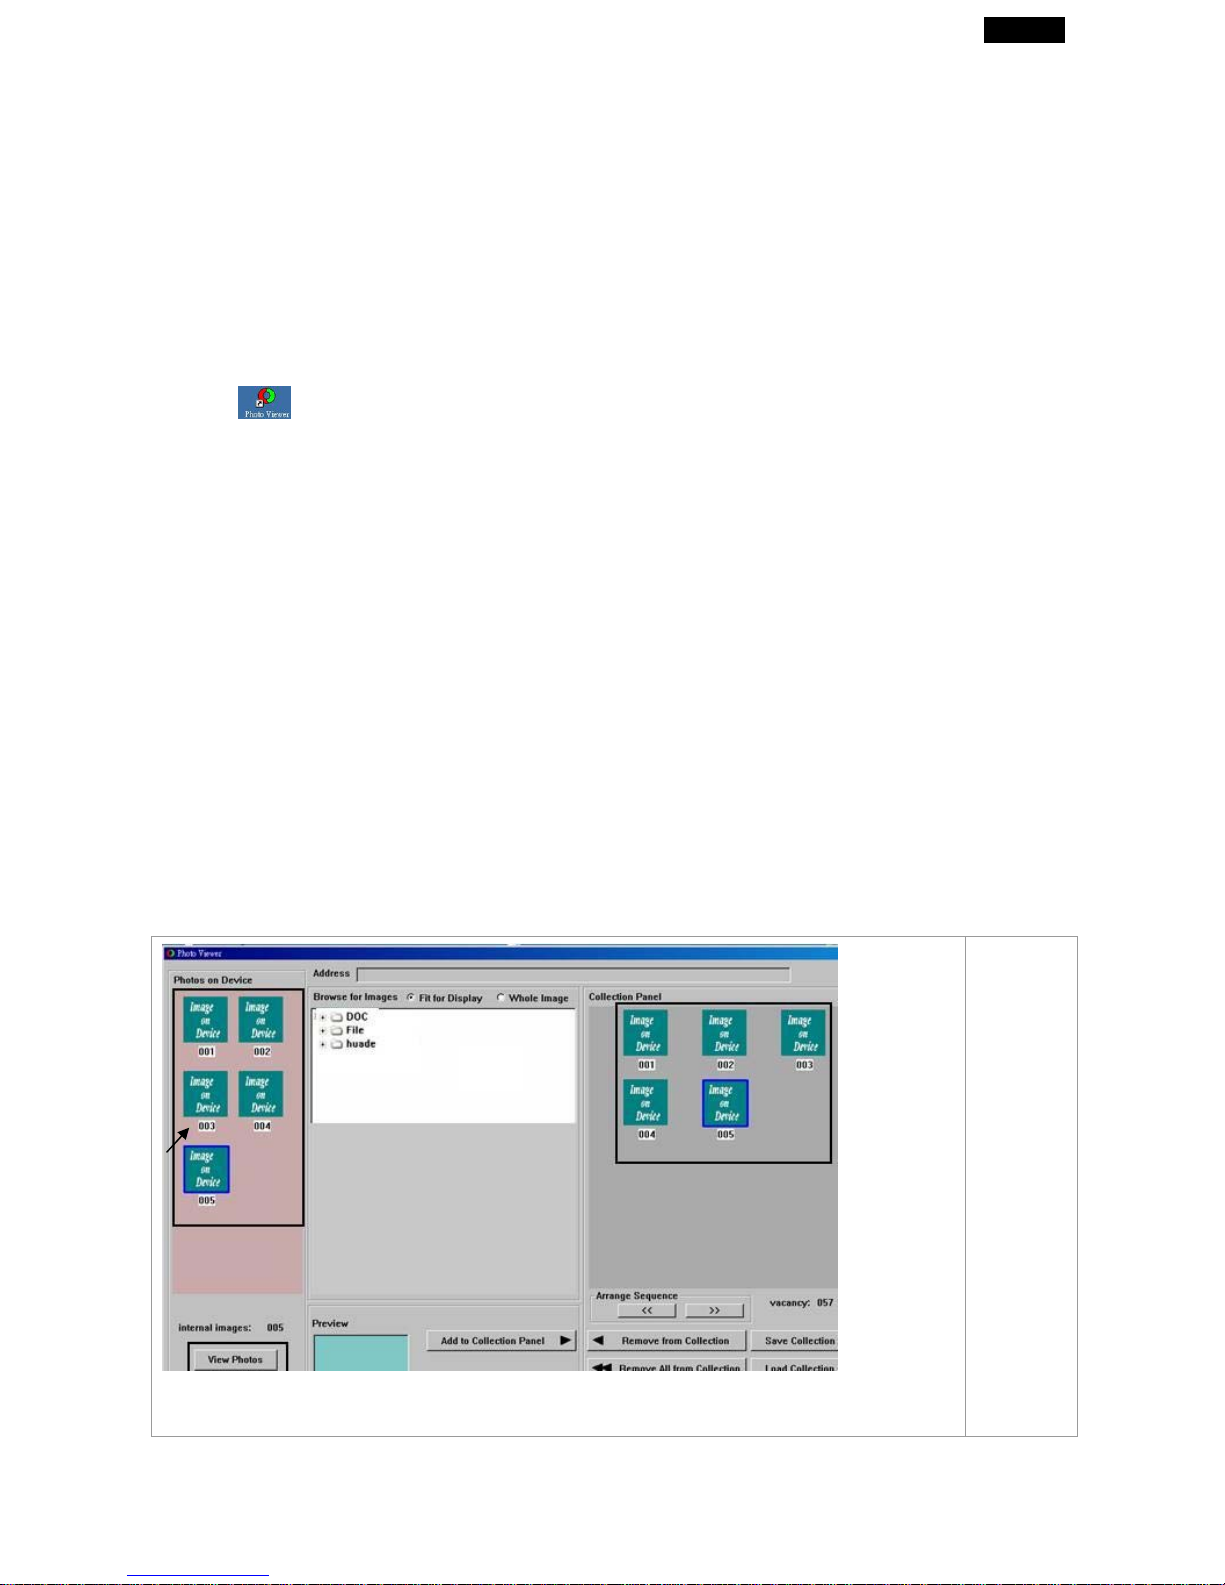
1. Check area (A) to select the
photos stored in your
computer.
2. Select the photos from
thumbnail area (B) and press
(C) button to add the photos
to “Collection Panel” (D).
3. You can press (E) button to
alter the image before
transferring (see Edit
Images below).
4. You may remove images from the “Collection Panel” (D) by selecting (F or G button).
5. Finally, press (H) button to
transfer the images in the collection panel to DPF-151.
z Edit images
1. Select an image to Edit
Select a photo first in the image Preview Area (B) and press Edit Image button (E) to edit
the image.
2. Edit Image
You can do the following:
Crop: click and drag the smaller boxes to increase or
decrease the area to be cropped.
Reposition: click and drag in the center of the large box to change the
position of the crop.
Brightness / Contrast: click and drag the slider bars.
Rotate: use the Rotate arrows
for
clockwise or counterclockwise.
3. Click DONE
The edited image will be added to the
“C
ollection panel” (D).
z Basic operations for photo display function
Turn power on/off and play photos
Hold MODE button for 5 sec. (The MODE button is on the top left side of the device.) until
power is on. Press MODE button again (about 5 seconds) to turn off the device.
Manually/automatically view the photos
Once the DPF-151 is on, press MODE button once to change the photo slide show mode
between automatic or manual.
Page 4

English
4
Delete photos (only under manual mode)
Delete single photo: Hold UP button for 3 seconds and press MODE button to confirm.
Delete all photos: Hold DOWN button for 3 seconds and press MODE button to confirm.
z Basic operations for alarm clock function
Setting the time, year, month, date, day of w eek
Note:
This
“MODE”
button is on the right side of the device)
1.
Hold
the button
MODE
for 3 sec. until you hear a beep and the year digits flash on
the display.
2.
Repeatedly press
the button of “
C0/F0” and “12/24” to
set the correct year.
3.
Press MODE to confirm.
4.
Repeat steps
2
and 3 to set month, date, time and the language for the day of
the
week.
Alarm Clock with Snooze -
lets you use it as an event reminder (date alarm), or simply
as a daily wakeup alarm with snooze.
Thermometer - displays ambient temperature in C0 or
F0.
100 Year Calendar -
gives you the correct date from 2000 to 2099.
Setting the Alarm Time
1.
Press MODE
(button on right side) to set the
alarm display.
2.
Press and hold down MODE until you hear a beep and the month digits flash on
the display.
3.
Repeatedly press (or hold down) “C0/0F0” and “12/24” to
set the correct month.
4.
Press MODE to confirm.
5. Repeat steps 3 and 4 to set date and time.
Note: if no month and date are set (
it
shows “-“ ), the alarm becomes a daily alarm.
Turning the Alarm/Snooze ON/OFF
1.
Hold MODE
(on right side)
until the clock shows the alarm display
2.
Hold ALARM to turn on the alarm ( appears on the display), and to turn on the
snooze (ZZ
appears).
3.
To turn off
the
alarm, repeatedly press ALARM until
it
disappears.
At the preset alarm time, the alarm sounds for
one
minute and turns off
automatically. To silence the alarm sooner, press any key.
Changing 12H/24H Time Format and Temperature Format
1. In
time display mode, repeatedly press “12/24
“button to
change
to 12
hour or 24
hour display format.
2. In
time display mode, repeatedly press “C0/F0” to change
the
temperature display
format.
Page 5

English
5
Replacing the Battery
Your clock uses three AG12 batteries for power. If the clock does not operate,
replace the batteries. Follow these steps to install or replace batteries.
1.
Slide off the battery compartment cover (on the rear of the device).
2.
Remove the old batteries and insert three fresh AG12 batteries in the
compartment with the “+” polarity (flat side of the battery) facing up.
3.
Replace the cover.
 Loading...