

Page 1

1
Page 2

Table of Contents
Getting Started with TWAIN Source
Opening the TWAIN Source Window..................................................3
Main Page ............................................................................................ 4
Settings in Main Page...................................................................... 5
Destination............................................................................. 5
Scan Mode............................................................................. 6
Filter ...................................................................................... 6
Resolution.............................................................................. 7
Brightness.............................................................................. 7
Contrast.................................................................................. 7
Control Buttons in Main Page ......................................................... 8
Advance Page....................................................................................... 9
Image Enhancement Tools – Image Box......................................... 9
Zoom.................................................................................... 10
Mirror .................................................................................. 10
Invert.................................................................................... 10
Descreen.............................................................................. 11
Gamma................................................................................. 11
HSV..................................................................................... 12
Tone Adjustment................................................................. 13
Auto Color Control.............................................................. 14
Color Correction.................................................................. 14
Image Enhancement Tools – Special Effect.................................. 15
Blur...................................................................................... 15
Blur More ............................................................................ 15
Sharpen................................................................................ 15
Sharpen More ...................................................................... 15
Preference Page.................................................................................16
Prescan Setting............................................................................... 16
Auto Scanning Setting................................................................... 17
Destination Default Setting............................................................ 18
Monitor Calibration ....................................................................... 18
Scanner Calibration .......................................................................20
Error Message................................................................................ 21
TroubleShooting ............................................................................ 23
Appendix........................................................................................ 25
2
Page 3

Getting Started with TWAIN Source
Opening the TWAIN Source Window
There are two ways to open the scanner TWAIN source wind ow.
>>
To request the TWAIN source from application programs:
1. Choose the "Select Source" command from the File menu of the
your application. The Select Source dialog box will be
displayed. If you only have installed this TWAIN Source, y ou
can skip this step and step 2. The host application will
automatically select it as the default TW AIN source.
2. Select the ColorPage-View Pro TWAIN source from the
"Sources" list box.
3. Click the "Acquire" command to activate the TWAIN Source.
>>
To activate the TWAIN source directly from Windows (standalone mode):
1. Click the Windows “Start” bu tton to open the Start menu.
2. Choose Programs > ColorPage-View Pro > ColorPage-View
Pro from the menu to run TWAIN source.
NOTE:
Not all application softwares put their "Select Source" and "Acquire" commands
under the File menu. If you couldn't locate these two commands, please check
other menus for them. For best results, make sure the Document Cover is closed
before performing scanning.
3
Page 4
There are four property pages available in the TWAI N source window:
Main page
Advance page
Preference page
About page
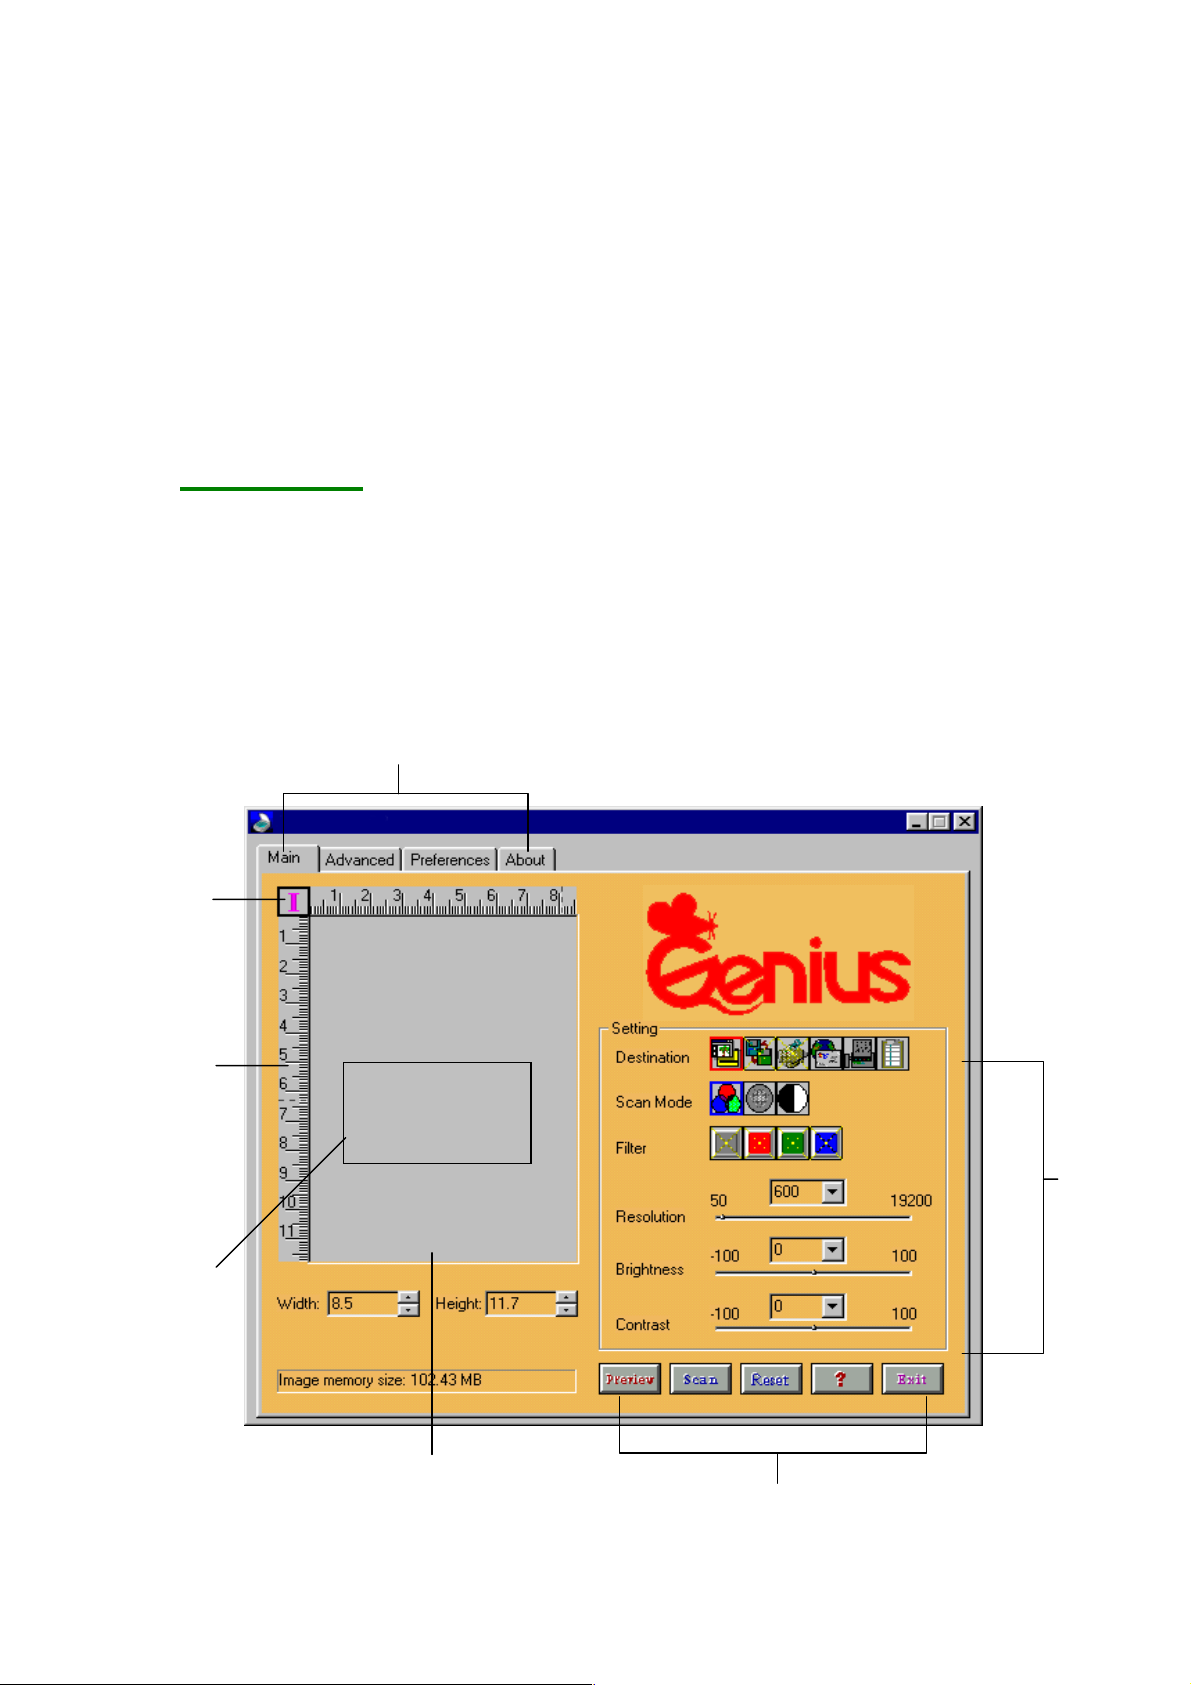
Main Page
This page lets your scanner work in the basic mode. All the control
settings available here are fundamental to the scanning process.
These settings include scanning destination, scan mode, filter,
resolution, brightness, and contrast. The Main page window is
shown as fol lows.
Property pages
You can select any property page
by clicking the page tag.
Ruler Switch
Click here to
switch among
ruler units.
Ruler
Three measure
units are
available: Inch,
Cm and Pixel.
Scan Rectangle
You can define
the image area
that will be
comprised in the
final scan.
Scanner
Control
Settings
Preview Window
You can preview the prescan
image. The maximum size of
the preview window is A4.
Control Buttons
4
Page 5
Settings in Main Page
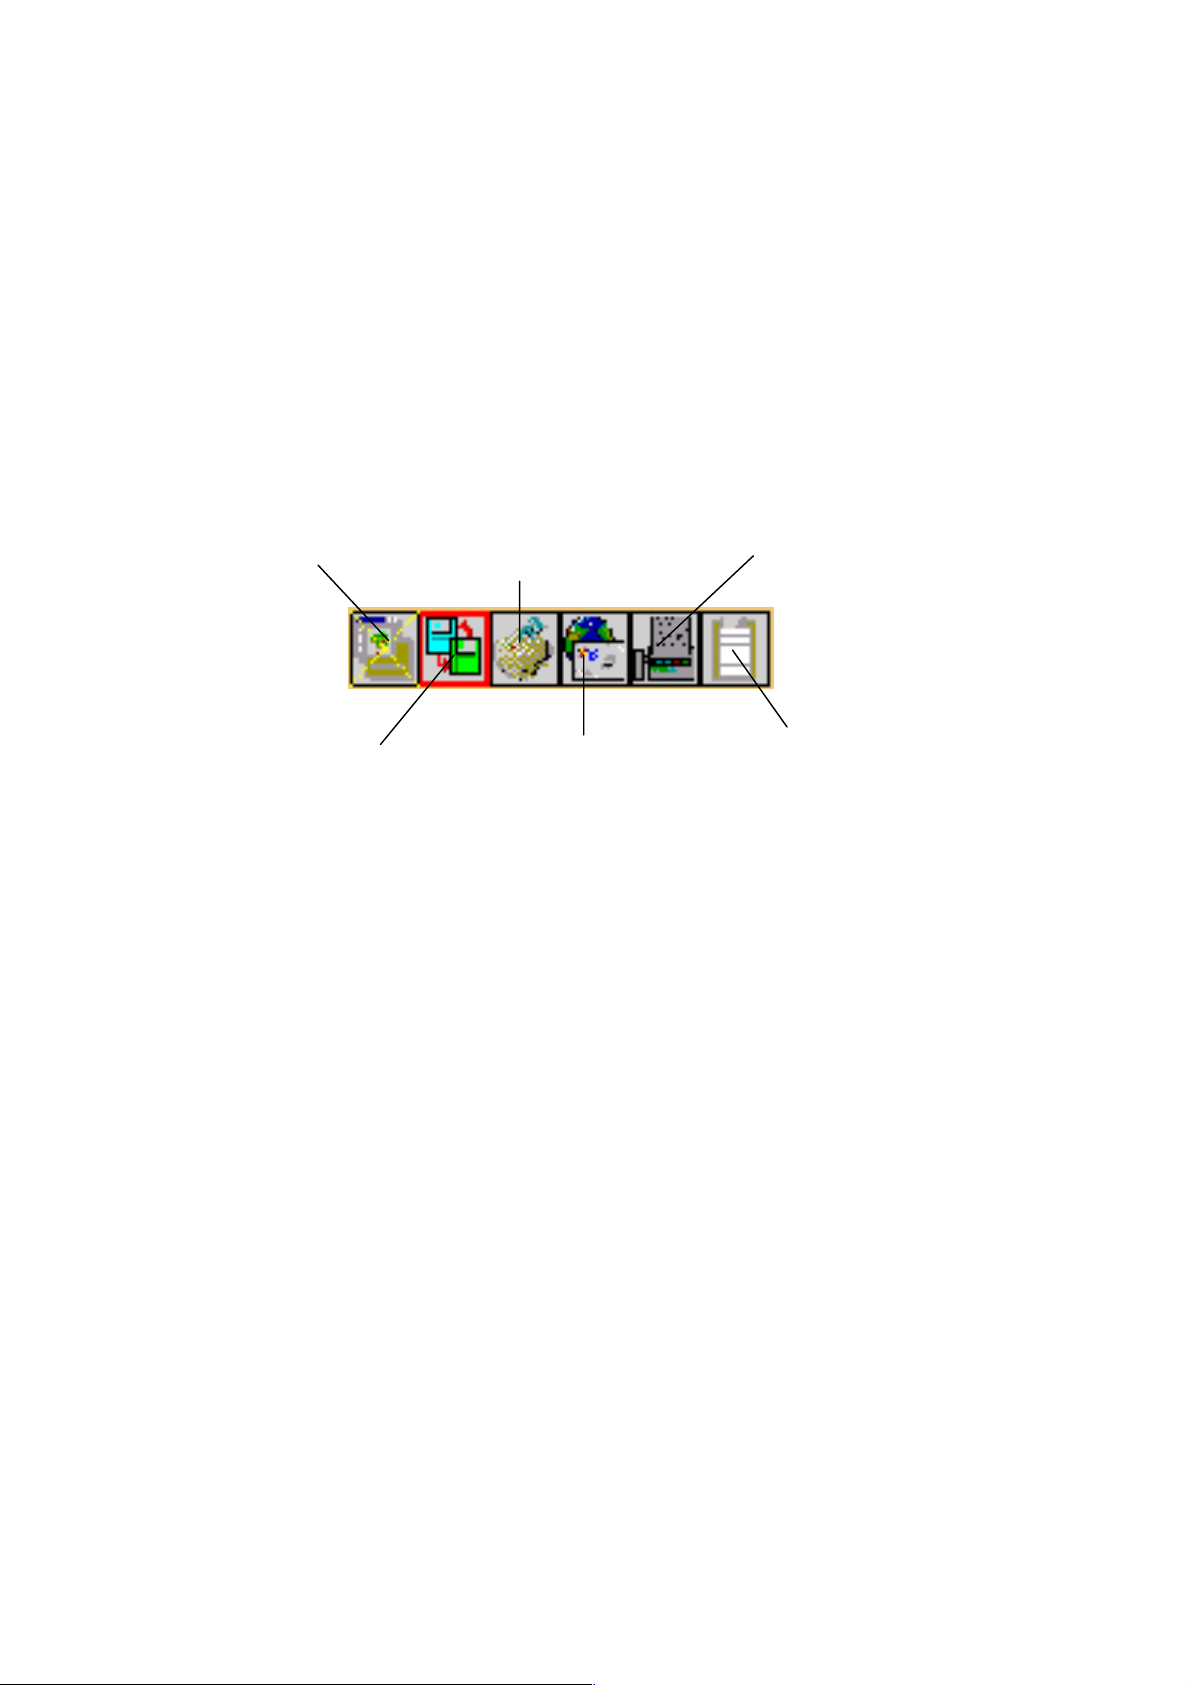
Destination
Destination is the location where you want your final scanned
image to be sent. There are six options ava ilable: Application,
Disk, Printer, Mail, Fax, and Clipboard.
Send to Application
Click this button to send
the scanned image to your
application program.
Send to Printer
This selection lets you
send your scanned image
directly to the printer for a
printout.
Send to Fax
This lets you send your
scanned image to other
people through fax.
Please go to the
Preference page to set
up the fax driver.
Send to Disk
You can save your
scanned image in a disk.
NOTE
Make sure that the MS Exchange, MS FAX, Modem and its driver are setup
properly. Please refer to Microsoft’s web site (http://www.microsoft.com) for
instructions about setting MS Exchange and MS FAX.
Send to Mail
This function lets you send
the scanned image to others
through e-mail. Please go to
the Preference page to set up
the e-mail address.
Send to clipboard
Click this button to save the
scanned image in the clipboard
and wait for your further
application.
5
Page 6
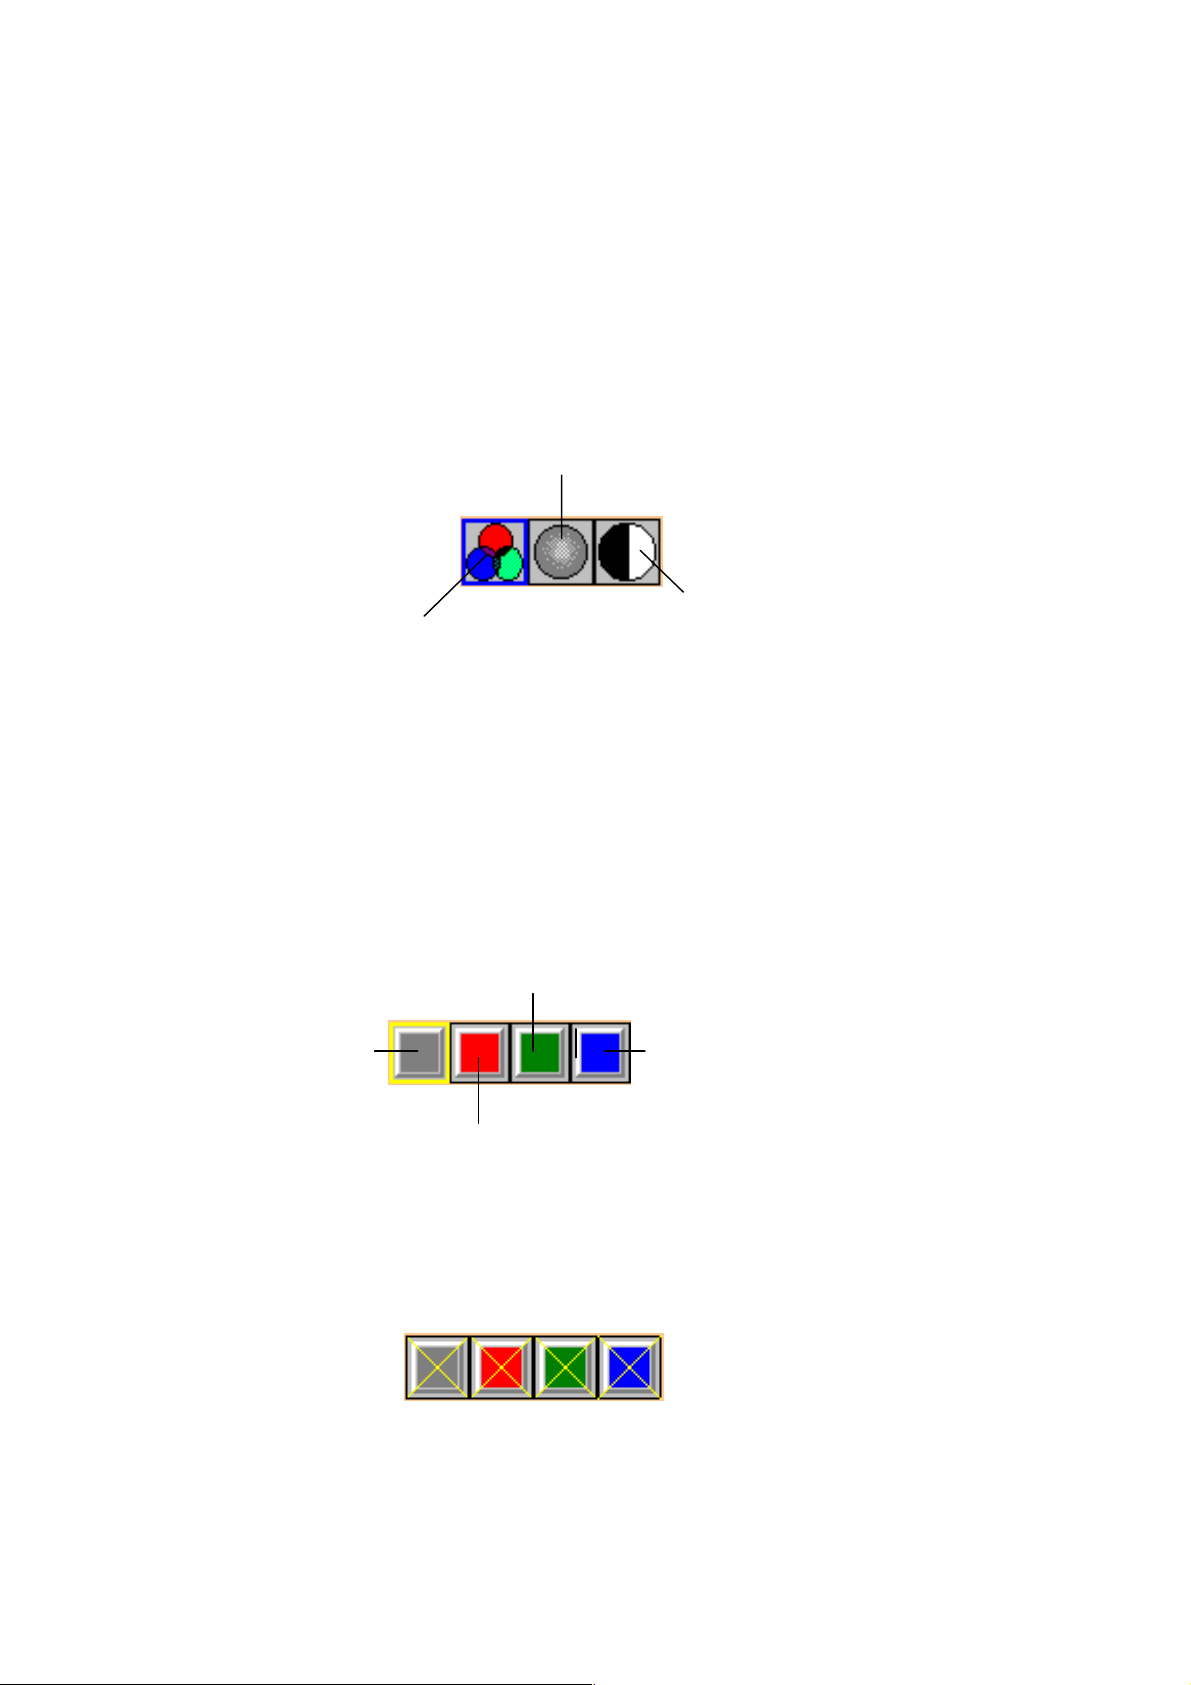
Scan Mode
y
Scan mode lets you decide how the scanner will interpret y our image.
Three choices are available in the TWAIN source: Color mode, Gray
mode, and Black/White mode.
Gray mode
Select Gray mode for images that
contain 256 shades of gray.
Color mode
Select this for 24-bit color images.
Line Art mode
Select Line Art for texts and illustrations that
contain onl
black/white without gray shading.
Filter
Filters are provided to produce dropout effects, i.e., to drop the part of the
image that is in a color difference from the specified fil ter. Four options
are available: True gray, Red, Green, and Blue filter.
Green Filter
True Gray
Filter
Red Filter
Blue Filter
Please note that the filter option will be unavailable if you select the
“Color mode” in Scan Mode. The disablemen t of the filter is shown as
follows.
6
Page 7
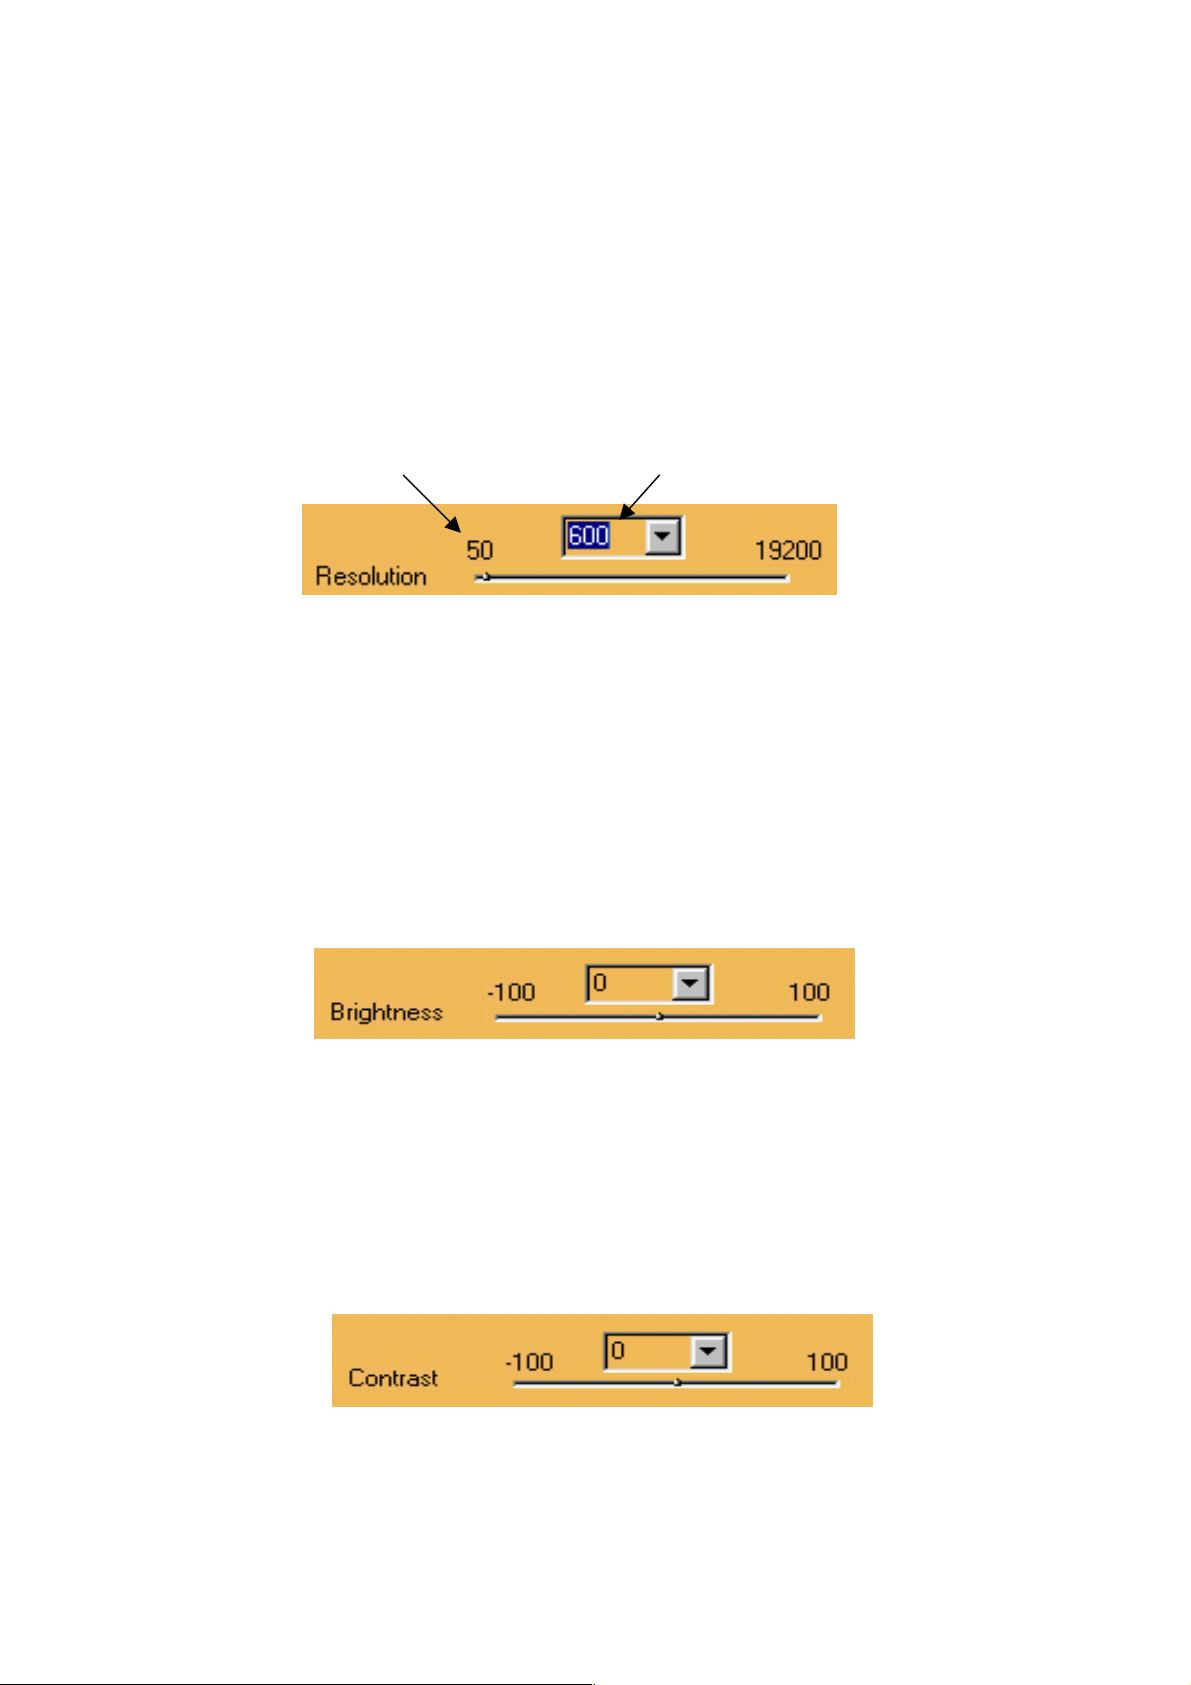
Resolution
The resolution is measured in dots per inch (dpi), which is used to represent the
image detail in a given area. The available resolution ranges from 50 to 19200.
Generally, the higher the resolution is, the sharper and higher the quality of the
scanned image gets. However, in some cases, high resolution is not necessary
because resolution is determined or limited by many factors: image type, the
original image's resolution, the output device's resolution, the available
memory space in your hard disks, etc.
Pointer
You can adjust the resolution by dragging the pointer to the desired resolution ,
directly key the value in the Edit box, or choose the value by clicking on the
pull-down button.
Edit box
Brightness
Brightness refers to the intensity of light reflected from or transmitted through
an image. The larger the brightness value, the brighter the image appears. You
can either drag the pointer, key the value into the Edit box to change the value,
or choose the value by clicking on the pull-down button.
Contrast
Contrast refers to the differences in the brightness between the light areas and
the dark areas of an image. The larger the contrast value, the higher the
differentiation between the light and the dark areas.You can either drag the
pointer, key the value in the Edit box to change the value, or choose the value
by clciking on the pull-down button.
7
Page 8

Control Buttons in Main Page
g
Scan Button
Click the Scan button to perform the final scan and
send the result to the destination determined by you.
Prescan Button
Click the Prescan button to perform a
prompt low-resolution scan. The prescan
image will be displayed in the Preview
window.
Reset Button
Click this button to return
to the default setting.
Help Button
Click this button to
et on-line help.
Exit Button
Close this TWAIN
source window.
8
Page 9

Advance Page
j
While including the basic functions of the Main page, the Advance
page also encompas ses image enhancement tools that ca n be used
to compensate for any color distortio n of the scanned image. The
Advance page is illustrated as follows.
Preview
Window
Size
Press the right
mouse button in
the preview
window, and a
rectangle box
with a list of
sizes will pop-up.
Please select one
of them and press
"Scan" directly.
Image Enhancement Tools – Image Box
Image
Enhancement
Tool
Scan Control
Tools ( the same
as Main page)
Auto Color
Mirror
Descreen
HSV
Control
Color
Correction
Zoom
Invert
Gamma
9
Tone Ad
ustment
Page 10

Zoom
The Zoom command allows you to enlarge the view of an image in the
Preview window. However, t he zo om function can only enlarge the
image view with one defined scale.
To zoom in:
Click the Zoom command. It w ill magnify the view in the Preview
window.
To disable zoom in:
After magnifyin g the view, click the Zoom command again to reduce the
view to its ori ginal size.
NOTE:
When zooming in, a vertical scroll bar and/or a horizontal bar will
appear to let you scroll thr ough t he entire im a ge.
Mirror
Mirror command lets you change t he horizontal orientation of a prescan
image to one that mirrors the current orientation of the image view across
a vertical im aginary line.
To mirror an image:
Click the Mirror command in the Image box.
Invert
The Invert function en ables you to make a positive view of a scanned
image negative or to make a negative image positive. By applying this
command, the brightn e ss value of ea ch pixe l will c hange t o an inver se
value on 256-color scale.
To invert an im age:
Click the Invert command from the Image box after a pplying the Prescan
function.
10
Page 11

Descreen
Descreen filter is used to eliminate the moire patterns (wavelike lines) from
the images. As the images are scanned directly from screen-print media (like
newspapers or magazines), you should notice that the scanned images usually
come with wavelike patterns and banding lines. As long as the scanning
resolution is not set very high, you can apply this function to remove those
annoying effects. (When this function is activated, the scanning speed will
become slow.)
Click on the descreen icon, and a
dialog box titled "Descreen" will
appear. There are three items in the top
dialog box: Normal Scan, Default
Setting and Customize. Select
"Normal" then descreen will not
perform onto the scanned images.
Select "Default" to perform the default
setting of various document types. In
addition, select "Customize" to define
your own descreen level by entering a
desired value in the number box.
Gamma
Sometimes you wish to adjust the brightness of midtones of the scanned image
while keeping shadow and highlight areas relatively unchanged. The Gamma
correction function allows you to increase or decrease the intensity of the
middle gray tones.
The available gamma value
ranges from 0.01 to 7.99. The
default value is 1.0. Changing
the gamma value above 1.0 will
brighten the midtones, while
below 1.0 will darken the
midtones. You can either enter
the desired gamma value in the
edit box or use the scroll bar to
select your desired value.
11
Page 12

In the “Channel” checking box:
All
Red
Green T
Blue
To correct all color components (red, green, and blue) of the
image with the sam e gamma value.
To correct red compone nt of the image.
o correct green component of the image.
To correct blue component of the image.
If channel “All” is chosen, the gamma value is applied to all the
red/green/blue channel. Otherwise, gamma value for red/green/blue is
applied to red/green /blue component respectively.
HSV
Choose the HSV command from the Tools menu. The Hue & Saturation
dialog box will display and allow you to adjust the hue and saturation of
its pixels in an image while the brightness level remains unc hanged.
Hue is the wavelength of light reflected dire ctly from an image and it is
represented by the name of colors. The adjustment of the hue will change
the whole color appearance of the image. Saturation is the strength of the
color, referring to how far the color is from a gray of equal intensity. The
adjustment of the saturation will change the degree of the purity in
proportion to the hue.
To adjust Hue and Saturat ion:
1. Hue adjustment
In the “Hue” box, specify an angle value (you can either directly enter
the desired value in the edit box or use the scroll bar to select your
desired value). The specified angle value represents a move around the
color wheel. (Remember that hues are specified as angles on the color
wheel. If you are not f a miliar with the notation of
color wheel,
please
refer to any related books about color.)
12
Page 13

2. Saturation adjustment
In the “Saturation” box, specify a desired percentage value of the
saturation. A value of –100 con verts the image completely to a
grayscale image and a value of +100 shows the image with fully
saturated hues.
Tone Adjustment
For the purpose of correcting image distortions that take place during the
scanning, you can use the Tone adjustment to make the compensation on
scanned images. Tone adjustment allows you control the conjunction
between the shadows, midtones, and highlights of your image. Use it to
restore detail that is missin g in shadows or highlights, to correct over or
under-exposure, and to improve the tonal quality of y our image.
From the Tools menu, choose “Tone”. A dialog box entitled “Tone
Adjustment” appears.
You can adjust the tone value by using the mouse cursor to reshape the
tone. Curve-based editing enables you to find out a problem area and
make subtle or notable change in that image area. The available range for
Tone Adjustment is from 0 to 255, and the defa ult value is x= 130 and
y=130.
The Tone Curve ta kes an original pixel brightne ss value X as input and Y
as a new output brightness value. The resulting curve is a visual
representation of the balance between shadows, midtone s, and highlight s.
13
Page 14

Auto Color Control
The Auto Color Contr ol automatical ly adjusts the colors of the scanned
document spread over a 256-color scale. Before performing this function,
please click on the Preview icon first.
Color Correction
Click on Color Correction icon, and a dialog b ox will appear. Choose
Disable Color Correction item for scanning without color corrected.
Choose Enable Color Correction item for color correction to acquire high
fidelity images. If you check Enable Color Correction, the scanning
speed will become slow.
14
Page 15

Image Enhancement Tools – Special Effect
p
Special effect tool enables you to create special and spectacular
effects in your scanned image. As you move the pointer to the left,
you will get the Blur effect. Reversely, as you move the pointer to
the right, you will get the Sharpen effect.
Blur
More
Default location for the
Blur
Sharpen
ointer
Sharpen
More
Blur
Blur is used to slightly soften all or part of an image. It smoothes an
image by decreasing the contrast between adjacent pixels.
Blur More
Blur more softens the image moderately.
Sharpen
Sharpen places emphasis on the color differences between adjacent pixels
of different colors. It is used to electronically strengthen the focus of
blurry images by means of increasing the contrast of adjacent pixels.
Sharpen More
The use of Sharpen More is to moderately sharpen the image.
15
Page 16

Preference Page
g
g
The preference page mainly lets you do three diff ere nt set ting s:
Prescan setting, Auto scanning setting, and Destination default
setting. The preference page is shown as follows.
Auto scanning settin
Prescan
setting
Destination
default
settin
Monitor
Calibration
Scanner
Calibration
Check
Box
Prescan Setting
By checking the “
Area detecting
” option in the Prescan
setting area, you enable the auto area detection function.
Next time you perform the prescan function, the whole
area of your scanned image will be automatically
highlighted by the scan rectangle in the preview window.
16
Page 17

Auto Scanning Setting
Auto scanning Setting is a fully automatic function, which enables
you to complete a scanning process at your fingertips. By checking
the “Enable auto scanning” option in the Auto scanning setting
area, the auto scanning function is empowered. Please note that the
default settings for Auto scanning setting are shown as follows.
Default
Setting
The steps for auto scanning are:
1. Locate the auto scan button which is situated in the front panel
of the scanner.
2. Push the button. The sc anner will start the scanning process.
3. If you check the “Prescan” box, it first makes a preview
scanning and displays the scanned image in the prev iew
window. (If the “Prescan” box is not checked, you can omit
steps 3 & 4.)
4. The scanner performs the auto area detect function (please first
check the “Area detection” option) to define the actual area of
your scanned image in the preview window. Later, this defined
area will be used for final scanning.
5. The final scanning starts to run and the scanned result will be
sent to the desti nation (e.g., File, Application, Mail, Clipboard,
Fax or Disk), which de pends on your choice. For the purpose of
performing this step, please ensure that the “Scan and send to
destination” option is checked. (If the “Scan and send to
destination” is not checked, the scanning process will stop at
step 4.)
17
Page 18

Destination Default Setting
Destination default setting area lets you define the location to save
or send your scanned result. You can set up File, Printer, E-Mail,
and Fax in this area.
By clicking here, the “Save As” dialog box will
display. You can decide the location and folder
to save your scanned image file.
Appoint the
printer here. This
printer will
perform the
printing job as
you apply the
Send to Printer
in Destination
setting.
Click here and choose the fax
device driver installed.
Monitor Calibration
The Monitor Calibration allows you to adjust the
gamma value and gain parameters of your monitor to
increase the visual perception. After clicking this icon, a
new dialog box entitled “Monitor Color Matching”
appears as follows.
Click here to name the file which you
will attach to the email sent later.
18
Page 19

To perform monitor calibration to your computer:
In the “Gamma Adjustment” box, adjust for a suitable value for each
of the primary color ch annels used by the monitor.
….until by your
Vary the
value here...
visual judgment the
colors of these two
areas come to one
To vary the gamma values of the three channels together, check the “All”
box.
In the “Gain Adjustment” box, adjust for a suitable gain value for each
of the primary color channels.
…until by your visual judgment the rightmost edges of this color
Vary the value here…..
strip appears black which fades in graduation to the left.
To vary the gain values of the three channels together, che c k the “All”
box.
19
Page 20

Scanner Calibration
The preview scanned image has uneven vertical lines
or incorrect color registration. Use this function to
rectify the value and acquire better screen display.
20
Page 21

Error Message
It might pop-up some messag e s as you launch the scanner driver. We will
explain the errors on the following list.
Error Message Solution
Insufficient memory to operate.
Can't load dynamic library.
Failed to load the scanner driver.
Mail system has not been set up
in your computer.
Failed to load your E-mail
function from the mail library.
Failed to log on MAPI.
Failed to send the documents via
MAPI.
Failed to log off MAPI.
Failed to log on E-mail system.
Failed to send documents via
E-mail system.
Can't log off.
Errors occurred while calibrating.
No default printer.
Can't print.
1. Failed to activate the printer.
2. Failed to prepare the printing
job.
Failed to activate the fax.
Failed to send the scanne d image to
the Clipboard!
The image is too large to export
to the Clipboard!
Adjust the size of the scanning
image or the resolution.
Close all the other applications.
Close all the other applications
which probably using the dri ver.
Reinstall the driver from drier
disk or Scanner CD.
Check whether the Microsoft
Mail is setup in your computer
correctly.
Check whether the scanner
connects to the computer.
Make sure that the scanner
connects to power, and the LED
is on.
Install a printer driver and
connect the printer to the
computer.
Make sure that the printer and its
driver are setup properly.
Make sure that the f a x device and
its driver are set up properly.
Not enoug h system memory.
Close the other applications.
Reducing the image size by
adjusting the width or resolution
21
Page 22

Image size exceeds 15.9375MB. of the scan area.
Can’t save the file. Insufficient disk
space.
Reduce the width of the scan area
or the resolution.
Increase free disk space.
22
Page 23

Troubleshooting
If your scanner fails to operate norm ally, first look through the symptoms
listed below and find the one t hat is closest to the symptom of your
scanner. Then follow the recommended remedies listed f or that symptom.
No Symptom Remedy
01 Scanner does not react. Please follow these steps:
1. Make sure the power adapter is properly
connected. (The LED in the front panel
should be on.)
2. Make sure the scanner cable is properly
connected.
3. Remove any other EPP device
(IOMEGA or Mini SICI device.)
4. Check the BIOS to see if the parallel port
is set to “EPP mode.” (Please refer to the
manuals of your pc and its ma inboard.)
5. Reselect the scanner source in the
application.
6. Reinstall the scanner driver.
7. Reboot your computer.
02 Scanning speed is too
slow.
03
Printer does not
function.
04
Scanner does not react
when the AutoScan
button on the front panel
is pressed.
05
The image on the screen
or the scanned image is
too dark or too bright.
Lower the resolution (reduce the DPI)
Check the BIOS to see if the parallel port
is set to “EPP mode.” (Please refer to the
manuals of your pc and its mainboard.)
Remove EPP device or remove Keypro.
Make sure the scanner cable and the
printer cable are properly connected.
Make sure the LED is on.
Activate the scanner driver (open the
scanner user interface) first, then press
the AutoScan bu tton.
Make sure the “AutoScan” function is
activated.
Monitors of different brands have
different Gamma values which affect the
brightness of the image displayed in the
Preview Window. Please open the
TWAIN source, and click the Monitor
Calibration icon on the Preferences page
23
Page 24

06 The preview scanned
image has uneven
vertical lines or
incorrect color
registration.
to adjust the Gamma value of the image.
You should use the same procedure if this
problem occurs in image processing
software.
Remove the display screen filter if you
have one.
Adjust the light source on your desk.
Use the function of Scanner Calibration
to rectify the value and acquire better
screen display.
24
Page 25

I. Scanner Specification
APPENDIX
1. Scanning Method
2. Scanning Width
3. Scanning Length
4. Scanning Mode
5. Optical Resolution
6. DPI Selection
7. Interface
8. Contrast Control
9. Scan Button
10. Exposure Time
11. Paper Size Limitation
12. Color Depth
13. Temperature
14. Humidity
CIS moving operation in scanning direction
8.5 inch +/- 3%
11.7 inch +/- 3%
Line-Art, Gray (True gray, Red Gray, Green
Gray, Blue Gray), Color mode (with On/Off
average mode selected by software)
600x1200 dpi
50 to 19200 dpi selected by software
Parallel Port with SPP, Byte, EPP
Controlled by software with 256 steps ranged
from 100% (Least) -0% (Default) -100% (Most)
Scan: Auto trigger on default scanning
6ms x 3/line for 600-dpi color picture mode
6ms/line for 300-dpi black & white text mode
Single page
Paper length : 20mm to 297mm
Paper width : 20mm to 216mm
36-bit
Storage : -10 to 70 Degree C
Operation : 10 to 40 Degree C
Storage : 10% to 90% RH non-condensing
Operation : 35% to 80% RH non-condensing
15. Power 13.5VDC, +/-10%, 1A
II. Regulation Requirement
Safety : UL 1950
cUL 1950
TUV/GS EN60950
C-Tick
CNS
EMI : FCC Part 15 Sub-Part J Class B
CE Mark (ESD 8KV without error, 10KV without
damage)
CNS
VCCI (optional)
25
 Loading...