

Page 1
Use’s Manual
RC 520A
A
iBOT
Robotic Vacuum Cleaner
Page 2

T
able of Contents
En
g
lish
SAFETY
ADVISORY ------------------------------------------------------------------ 2
Safety Precautions
Battery Precautions
SPECIAL FEATURES ----------------------------------------------------------------- 3
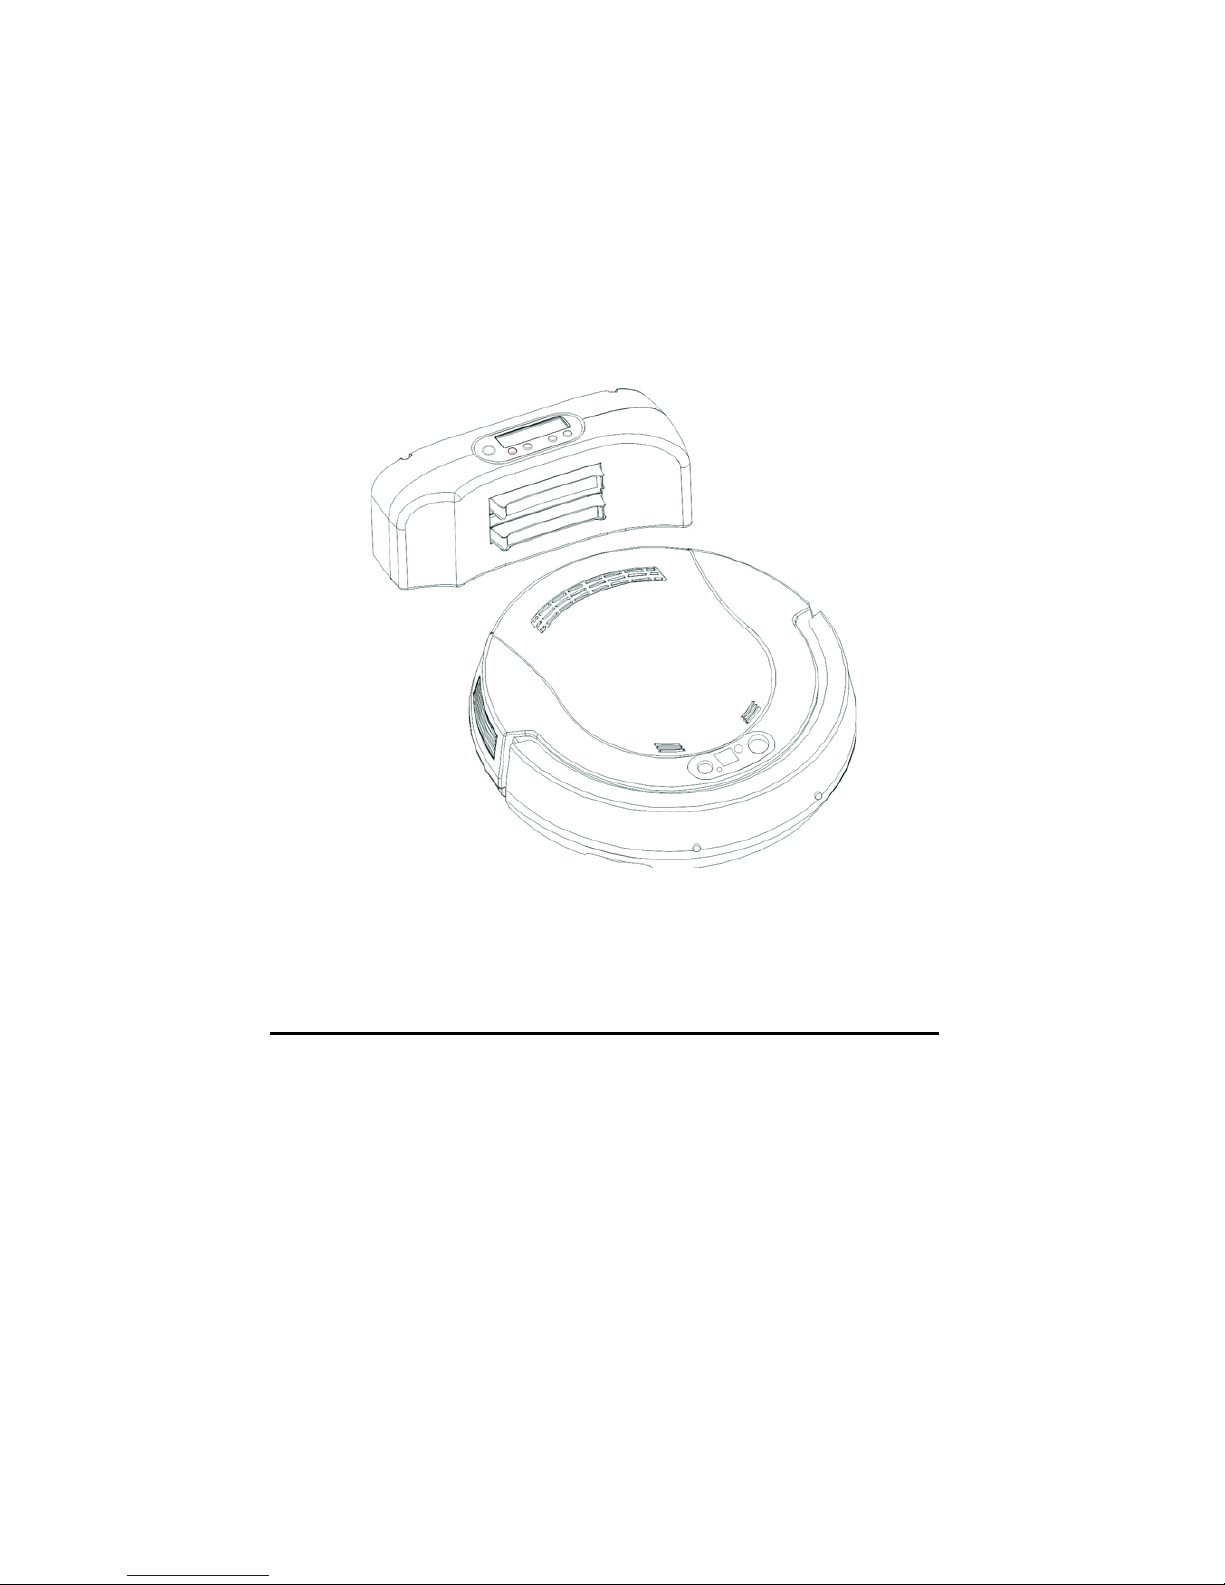
MAJOR COMPONENTS AND ATTACHMENTS --------------------------------- 4
MAJOR COMPONENTS OF DOCKING STATION ------------------------------ 6
CONTROL PANEL & REMOTE CONTROL --------------------------------------- 7
CONTROL PANEL OF DOCKING STATION ------------------------------------ 10
INSTALLATION GUIDE ------------------------------------------------------------ 11
Install The Docking Station
Installation of Side Brushes
Dust Paper
Installing and Removing th e Battery
CHARGING THE BATTERY ----------------------------------------------------- - - - 16
GENERAL OPERATION ------------------------------------------------------------- 17
Preparation for Operation
Basic Operation
Manual work
Schedule work
Stop operation
Safety Device
CLEANING AND MAINTENANCE ---------------------------------------------- 18
Maintenance
Clean The Dustbin
Clean The Intake
Clean Side Brushes
-------------------------------------------------
1
Page 3

Safety Advisory
En
g
lish
Read through the safety instructions in this Operation Manual before
operating this product and keep this manual handy for future reference.
Observe the basic safety rules to prevent any occurrence of accident.
Safety precautions
1. Read the Operation Manual before use.
2. The unit is for indoor use only.
3. Keep the vacuum away from water, as water
may damage the unit.
4. Before operating the vacuum remove any loose articles on the floor such
as clothes, paper, loose cables and extension cords as well as making
sure to lift curtains and drapes off the floor to avoid any possible accident.
5. Never stand on the vacuum.
6. Never use the vacuum to
clean lighted cigarette butts or hot ashes.
7. Never use the vacuum to clean combustible or highly volatile liquids.
8. Make sure exit doors leading outdoors ar e closed.
9. During operation, care should be taken to avoid the heat vent from
becoming clogged during operation. This could damage the vacuum.
10. If the cleaner is damaged or
does not function normally, do not use it.
11. The power should be turned off and the battery removed if the unit will no
t
be used for a long period of time.
Battery precautions
1. The battery is rechargeable. Use only the adaptor equipped with the uni
t
Do not use the adaptor with any other unit.
2. Use only the battery supplied with your vacuum.
3. Do not use the battery if the cable or plug is damaged.
4. Never touch the adaptor, plug or cable with wet hands.
5. If the vacuum requires cleaning, unplug the unit and take out the battery.
6. If you need to dispose the unit, the battery must be taken out
of the unit.
7. Turn off the unit before taking out the battery.
8. Rec
y
cle and dispose the waste batter
y
prop
erly.
2
Page 4

Features
En
g
lish
Congratulations! You have made a wise choice to own this RC 520A (RVC) Roboti
c
Vacuum Cleaner with Docking Station.
This revolutionary automatic vacuum cleaner with a remote control and dust paper
make it ideal for cleaning floor s o f wood floor, tile, synthetic plastic tile and ceramic
tile. RC 520A is definitely an automatic house helper. Once the RC 520A starts
working, it runs in four courses of movement, random -->spiral --> along the wall -->
spiral--> "Z" type--> spiral and finally returns to random. Its movements can cover
most parts of the room.
The side brushes are excellent for sweeping dust and hair into the dust bin. After
finishing one round of the program, the unit will run the four courses of movement
repeatedly to work cont inu ous ly until the battery is running low or the preset clean
time is done.
These movements ensure a thorough cleaning of the room.
With the remote control, the unit can also run in single mode of random, spiral, alon
g
the wall and Z-type by pushing a button on the remote control (refer to P.9) for your
desire.
With the docking station, wh en the battery is running low or the preset schedule is
done, the unit is programmed to return to the docking station automatic al ly for
charging.
Random
Spiral
A
long the wall
Spiral
"Z"Type
Spiral
3
Page 5
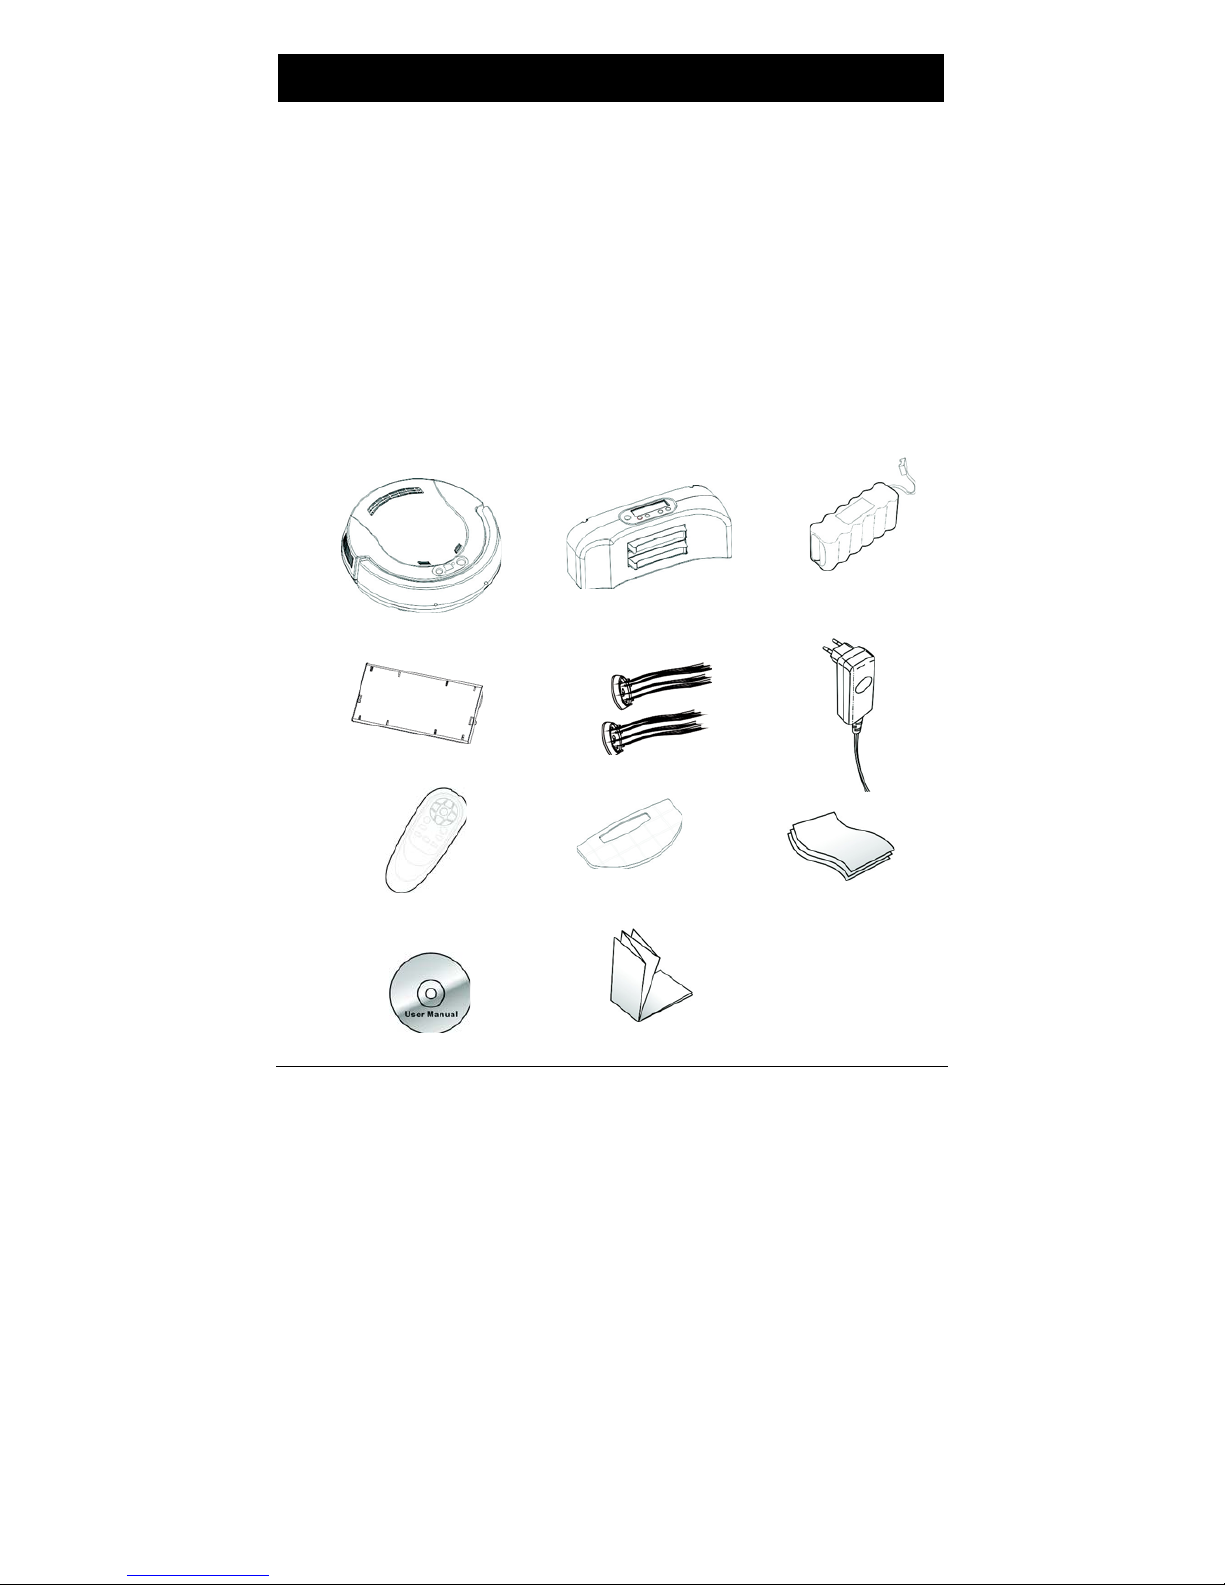
Package Contents
En
g
lish
1. Robotic Cleaner
2. Docking station
3. Rechargeable battery
4. Dusting holder
5. Side brushes - 2
6. Adaptor (DC 30V 1000mA)
7. Remote control
8. Dust bin filter
9. Dust paper - 3
10. Multi-language us er manual (on CD-ROM
11. Multi-language quick guide
1. 2. 3.
4. 5. 6.
7. 8. 9.
10. 11.
4
Page 6

Name of Parts
En
g
lish
IR receiver
Dust full indicato
r
Vacuum switch
Cove
r
Selection button
Bumpe
r
Heat vent
DC jack
Contact points
Anti-cliff senso
r
Powerswitch
A
nti-cliff sensor with
adjustable window
Side brush
A
nti-cliff sensor
Wheel
Removable
sensor switch
5
Control panel
Caster
Intake Valve
Page 7

Docking Station
En
g
lish
1. Docking station
2. Mounting Bracket
3. Screws - 2
Control Panel
Socket for adaptor
Hook Slot
6
Page 8
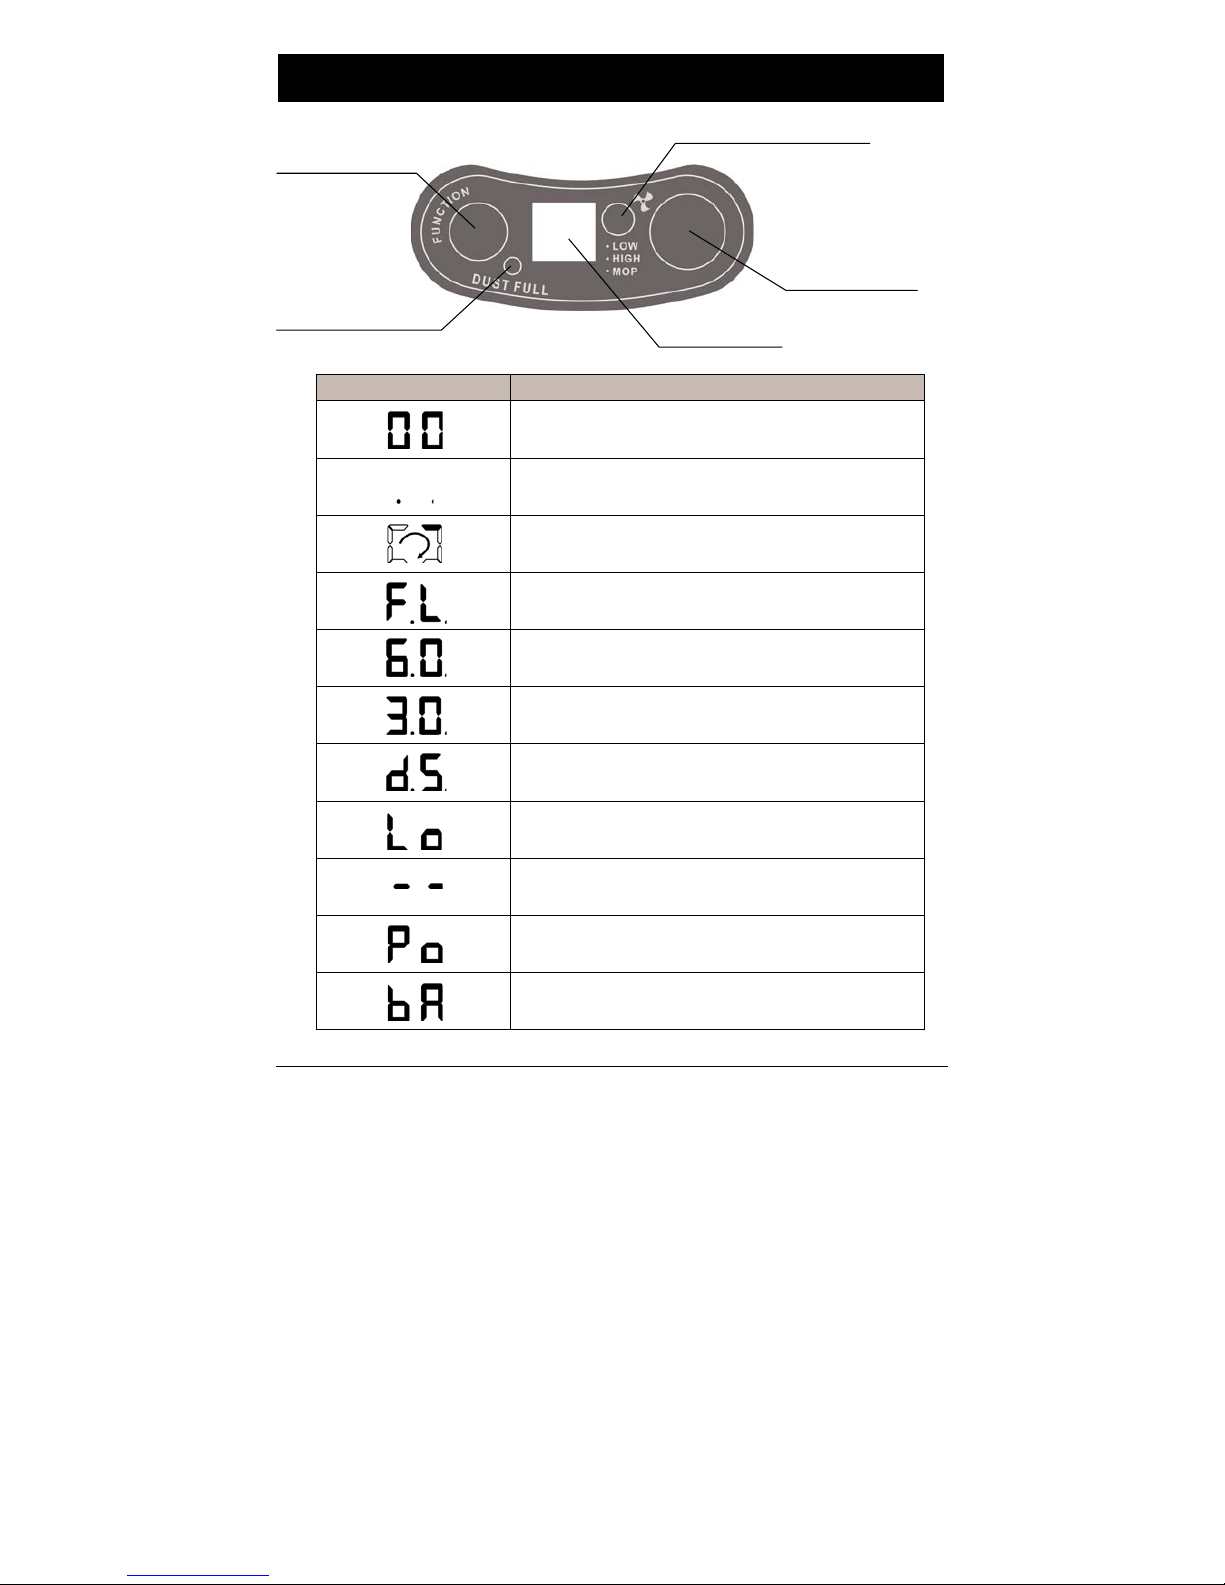
Control Panel
En
g
lish
Time switch button
VacuumSwitchbutton
IR receiver
Dust full indicato
r
LED Dis
play
Displayon screen
Indication
Poweron mode: If the unit is not switchedto cleaning
mode within 15 sec, it will switch to conservation mode.
Conservation mod e:Two dots flashing.
Chargingmode: Unitis in Chargingstate.
Chargingmode: Battery is fully charged.
60-minute working mode:The timerwillcount down
while the unit is working.
30-minute working mode:The timerwillcount down
while the unit is working.
Docking mode: The unit is searching fordocking station
for charging.
Battery Low: Battery needs to be charged.
A
utocut-offmode: The unit is being lifted up off the
floor.
Wheels jammed orb
atterylow with not enou gh power
to return to docking station.
The battery is not correctly installed.
Table 1
7
Page 9

Control Panel
En
g
lish
2. The Selection Button - “Funct ion”:
Sequence of
“FUNCTION” butto
n
pressed
1
st
Press
“TIME” indicator
“60” LED
is on.
Function
60-minute working time with
dockin
g
function ON(Note1)
2
nd
Press
3
rd
Press
“30” LED
is on.
“00” LED
is on.
30-minute working time with
docking function ON
Stop
Note1: Dockingfunction on: The unit will return to the dockingstation to charge the battery.
Table 2
3. Cleanin
g
Mode Switching:
【CLEANING MODE】
CLEANING TIME
CLEANINGMODE INDICATOR:
* FLASHING: LOW VACUUM MODE
* SOLID: HIGH VACUUM MODE
* OFF: MOPPING MODE (VACUUM OFF)
Press Vacuum button on remote control to switch the cleaning mode between
LOW - HIGH - MOP
4. Dust Full Indicator: When the “Dust Full Indicator” lights up, the dust bin needs
cleaning (refer to p.18).
8
Page 10

Remote Control
En
g
lish
IR
A
uto
Spiral
Vacuumswitch
Random
A
long the wall
Docking
“Z” type
Forward
Stop
Turn Left
Turn Right
Backward
1. Two "AAA" batteries required.
2. Butt on f unctions:
Ke
y
Pressed
AUTO
FORWARD
LEFT
RIGHT
STOP
BACKWARD
VACUUM
DOCKING
SPIRAL
RANDOM
ALONG THE
WALL
Z TYPE
Action
Refer to Table 2 for pressing AUTO button.
Move forward with vacuum on and will stop when bumper encounter
any obstacle or by pressing “STOP” button.
Turn left: Press and hold the button to make it turn left continuously.
Turn right: Press and hold the button to make it turn right continuously.
Stop the unit immediately.
The unit moves backward for 20 cm. The unit doesn't have the back anti-
cliff sensor to prevent it from falling from stairs when moving backward.
Switch the vacuum power or turn off vacuum and sweeper (with mop
function on only).
Search the docking station for recharge.
Move in spiral pattern with vacuum on until the bumper encounters an
obstacle or stairs, then the unit will
continue operate to in AUTO mode
with 60 minutes working time or until battery low.
Operate in random mode continuously with 60 minutes working time or until
the battery low.
Operates he along-the-wall mode continuously with 60 minutes working
time or until the battery low.
Operates in Z type mode continuously with 60 minutes
working time or
until the batter
y
low.
9
Page 11

Docking Station
En
g
lish
Present Time Setting
Battery Indicator
Hou
r
Minute
Dayof Week
Completed setting
for time of cleaning
1 2 3 4
Function of buttons
1. “Set”: Press Set to switch between setting the present time and the working schedule.
A
. Set present time:
Press “SET” once, “SET CLK” will flash.
Press “Select” to switch among time setting modes of Hour, Minute, and Week.
Press “+” and “-” to adjust amount.
B. Set working schedule:
Press “SET” twice, “ ” on the left side of the screen will flash.
Press “Select” to switch between “Hour”/ “Minute” / “Week” for the setting. If the time
setting been done before, the screen will show “--:--”, press “+” and “-” to adjust the
digits.
2. “+” and “-” : Press to adjust the amount.
Format of schedules:
a. Work everyday (Su ~ Sa).
b. Five days a week (Mo ~ Fr).
c. Six days a week (Mo
~ Sa).
d. Two days a week (Su and Sa).
e. Once a week.
When the unit is successfully docked at the docking station, the batter
y
indicator on
the LCD display of the docking station will flash and the LED display on the unit will
run in circular motion to indicate the unit is in charging state.
10
With “ ” shown on the LCD display indicates the working schedule is completed.
Page 12

Docking Station
En
g
lish
INSTALL THE DOCKING STATION
1. Tear
off the adhesive tape from the back of the docking station mounting
bracket in Fig. 1. Affix the mounting bracket to the wall, and keep both
sides of the wall where the docking station
is
mounted free of obstacles.
The distance to the left and to the right of the docking station should be at
least 100 cm and 30 cm In Fig. 2.
2. Remove the docking station from the mounting bracket then plug in the DC
jack
and store the excess cord in the back of the docking station.
3.
It is best to secure the dockingstation to the wall with the
enclosed
screws
.
Fig. 1
Fi
g
. 2
11
Page 13

n
T
esting
En
g
lish
Proof Test
Try one of these methods to test the installation of the docking station. If the
vacuum does not go back to the docking station and charge successfully,
then adjust the docking station to the proper height.
1. Test the unit: Press down the selection button, do not release, and turn on
the power switch of the unit, when the unit begins to move, release the
selection button. The unit will switch the mode to return to the Docking
Station for charging (see Fig.3).
2. Test by remote control: Turn on the power switch of the unit, press the
button "Docking" on the remote control, the unit will return to the docking
station for charging (see Fig.4).
Fig. 3
Selection switch
“Keep pressing”
Fi
g
. 4
Press " Docking "
Powe
r
switchon
12
Page 14

Insert the Battery
En
g
lish
1. Before inserting or
removing the batte
r
y
,turn o
f
f
the powerswitch.
2. Press
and slide out the cover in the direction of the arrows as shown in Fig.5.
3. Insert (unplug if removing) the battery plug into the socket (note the direction)
as shown in Fig.6.
4. Place the battery in the battery compartment and close the battery cover. Make sur
e
the cover snaps into the slot.
Fi
g
. 5
Fi
g
.6
Batter
y
socket
13
Page 15

Side Brush Installation
En
g
lish
14
Put the brushes in the holders then mount the brush as shown in Fig.5. and Fig.6.
Fi
g
. 5
Fig. 6
Side brush
PUSH DOWN!
Holder
Page 16

Dust Paper Installation
En
g
lish
DUST
P
A
PER
NOTE:
Do not use the mopping function on carpet.
At the same time you should remove the side brushes to prevent an y
dama
g
e to them.
Installing the Dust Paper
1. Insert the border of the dust paper into the grip slot of the dust paper holder
as shown in Fig.10.
2. Put the two bolts of the dust mopping paper holder in the two holes (inside
the two big wheels) and click the holder on the bottom of the cleaner as
shown in Fig.11.
Fig.10
Gripslot
Dust pape
r
specially for cleaner
Dust holde
r
Fig. 11
Dust Holde
r
locks into the small hole
15
Page 17

Battery Charging
En
g
lish
1. Before charging, make sure the battery is installed correctly.
2. There are two ways to charge the battery:
A
. Make sure the docking station is installed properly, place the unit in the docking
station as shown in fig.12, and make sure the contact points at the back of the uni
t
is connected with the contact plate of the docking station.
B. Plug the DC end of the adaptor into DC jack on the side of the unit first, and then
plug the AC end of the adaptor into the AC power outlet on the wall. (C onnect the
adaptor to the unit first before
connecting to the AC power outlet.) Refer to Fig.13.
Fig. 12
Fi
g
. 13
DC
jack
A
daptor plug
3. Fo
r
a new battery or if the batteryhas not been used for over3 months, the battery
should be charged for 12 hours before operation.
4. It takes at mos t 6~7 hours to fully charge the battery.
5. During the charging state, the LED display on the control panel will flash in a circula
r
motion clockwise.
6. The LED display on the control panel will show FL when the battery is fully charged.
16
Page 18

General Operation
En
g
lish
Preparation for
Operation
1. Install the docking station, side brushes and battery as have been
explained.
2.
Turn on the power switch on the side of the unit, and charge the batte
r
for
eight
hours prior to the first operation.
3.
To ensure the best efficiency of the unit, remove
any
clothes, paper,
cable, extension cable scattered on the floor, roll up the curtains and
drapes if any to avert the possible accident.
Basic operation
Manual
work
1.
Press the AUTO on the remote control or press FUNCTION on the unit.
(FUNCTION
will work only while the unit is not connected
to
the docking
station )
and
select the work time: “60” or “30”.(refer to table 2.)
2.
After
two
seconds, the unit will begin cleaning automatically.
3.
After the work is completed, the unit will emit a
warning
buzz and stop or
return to the docking station depending on the function selected (refer to
table 1). If the LED display shows Lo (battery low) at the same time, the
unit will emit a buzz every minute until you switch off
the
power switch,
the
battery is exhausted or returned to the docking station.
Working Time
1. Set up the schedule according to the manual of CONTROL PANEL O
F
DOCKING STATIO N. ( r e fe r to page 9.)
2. The unit will work accordingto the schedule set.
Stop operation
1. To stop the operation of the unit immediately, you can turn off the power
switch, lift the unit off the floor, and the unit will stop after
three
seconds
or press “STOP” on the remote control.
2. If you want the unit continue to work, place the unit on the floor and pres
s
the “ A U TO ” button on the remote control.
17
Page 19

General Operation
En
g
lish
Safety
Devices
1.
The unit will STOP when
it is
lifted up from the floor.
2.
The unit will STOP if the wheels
are
jammed for more than 10 seconds.
3.
Adjustable anti-cliff sensors (refer to p.5). If the distance between the
stair and the ground is shorter than usual (around 2-3cm),
you can
adjust the windows of both "Anti-cliff" sensors.
T
he windows are
adjustable according to the height of the step and the color of the floor.
The
windows have four settings: 3,2,1,0. The default setting is “3”. The
smaller the number is, the shorter distance can be detected. You can
adjust the windows if necessary .The scale of the windows must be the
same in order the unit to function normally.
4. If the color of the floor is dark (e.g. Black), it means the reflectivity of
the floor will confuse RC 320A and it might move backward
continuously. Under this circumstance, open the window position to
the max (’2’ or ‘3’ positions).
5.
Removable back sensors switch is to increase or restrict the mobility of the
unit
and they can be removed or added based on the condition of the
environment.
18
Page 20

Maintenance and Cleaning
En
g
lish
Maintenance
The operation and maintenance of the cleaner is very simple. Clean the dust and dir
t
left in the dustbin and on the filter. It is not necessary to clean the intake and the sid
e
brushes every time.
Clean the Dust bin
1. Press on the positions as indicated in Fig.14.
2. Release the dust bin from the grip slot and take out the dust bin as shown in Fig.15
3. Open the upper cover of the dust bin as shown in Fig.16.
4. Lift up and take out the filter as shown in Fig.17.
5. Throw away the dust and dirt from the
dust bin as shown in Fig.18.
6. Rinse the dustbin with tap water as shown in Fig.19, it is not necessary to wash
it every time.
7. Clean the filter wit h a toothbrush as shown in Fig.20. The filter should be changed
every three months, if used frequently. If the filter is broken, replace with a ne w one
immediately. A
broken filter may cause damage to the unit.
8. Dry t horou ghly, replace the filter and the dust bin lid as shown in Fig.21.
9. Replace the dust bin and ensure it is fastened correctly as shown in Fig.22.
19
Fig. 14
Fig. 15
Grip slot for the dust bin.
Page 21

Maintenance and Cleaning
En
g
lish
Fig. 16
Fi
g
. 17
Fig. 18
20
Page 22

Maintenance and Cleaning
En
g
lish
Fig. 19
Fig. 20
Fig. 21
Fig. 22
A
TTENTION!!
Before starting the cleaner
,
make sure to install the dust bin filter
pr ope rl y or you will da mage the unit.
21
Page 23

Maintenance and Cleaning
En
g
lish
Clean the Intake
To ensure the efficiency and constant airflow of the cleaner, periodically remove
the dust and dirt that will accumulate around the intake.
1. Turn off the power of the cleaner.
2. Clean up the dust on the intake (Fig. 23).
Intake Valve
Fig. 23
22
Clean Side Brushes
1. Pull up the brushes and remove any hair as shown in Fig.24.
2. The side brushes can be rinsed and if they become crooked, you ca
n
soak them in hot water so they return to their original shape.
Fig. 24
PULL UP!
Page 24

T
roubleshooting
En
g
lish
Trouble Possible Reason Resolution
1. Batte
r
y
is not installed correctly.
2. Very low battery.
3.
The unit might have been
turned off. If the
battery is on
more than 1 min without being
switched to cleaning mode (at
this time, there will only be 2
dots flashing.)
1. Install the batte
r
y according
to the manual.
1
Tur
n on the power switch with
no LED display shown.
3. Try to operate it with
remote control or press
the function button on unit
to check if the cleaner
can work or not.
2
The LED display shows error.
Batt
erylow Un
itlifted
Uni
tstuck
Charging error.
3
Remote control doesn't work.
1. The batteriesfo
r
the remote
control are exhausted.
2. The AAA batteries are not
install correctly or not installed.
3. The unit and remote control
are exposed in the sunlight or
stron
glig
ht.
1. Change a new set of
batteries.
2. Re-install the batteries
correctly.
3. Please close the curtai
n
to avoid the unit directl
y
to sunlight .
4
Can't use the remote to control
the unit while it is in docking
station.
The powerswitchof the unit
is not on.
Tur
n on thepower switch.
5
6
7
Vacuum on but can not collect
dirt or hair.
The unit is moving backward
constantly
The unit is stuck on the
edge of the rug.
1. The dustbin is full.
2. The filter is not installed
correctly.
1. Bumper is stuck.
2. The anti-cliff sensors are
covered with dirt.
3. The adjustable windows open
are too na rrow.
The dust paper holder can't
g
o over the rug.
1. Clean the dustbin.
2. Re-install the filter
correctly.
1. Push the bumper and
release it.
2. Clean the lens with Q-tip
3. Re-adjust the windows
to suitable position.
Remove the dust paper
holde
r
.
23
2. Charge the battery
according the manual.
Refe
r
to table 1 on
page 7
for solving the problem.
Trouble Shooting
En
g
lish
Page 25

A. Batt er y and Charging
1. How long does it take to fully charge the robot
?
It takes about eight hours to fully charge the robot.
2. Why does it take so long to charge up the battery?
The robot uses a slow charging technology whi c h could keep up the work performance and li
span of the rechargeable batteries better.
3. Can I use rechargeable batteries otherthan 2000mAh?
Yes, as long as all eight pieces of AA rechargeable batteries are the same brand, same series
and same capacity, it is okay. However, if the capacity of the batteries is lower than 2000mAh,
the working time of the robot may be shorter.
4. Why is the g reen lamp still blinking after8 hours ofcharging?
As the recharge function relies on the timer inside the robot, in case the charging power input
has been interrupted during the recharge, the timer will re-sta rt counting (so the power
indication lamp will still be blinking in green.) It will stop again after 8 hours of uninterrupted
charging.
5. Would I get electric shock ifI touch the robot when it is recharging?
NO. The output of the contact points is only 19V. It is safe for humans and pets.
6. Do I need to turn o
f
f
the robot before charging it?
YES. Please turn off the robot before recharging, otherwise it could not be recharged properly.
7. Would the robot be overcharg ed orget burnt ifit is connected to the adaptor
all the time?
NO. The recharge will stop automatically after 8 hours. However, if you expect a longer
period of idleness, it is recommended to unplug the adaptor.
8. What would happen if I start using the robot before it gets fully charged?
It will still work until the voltage drops to a certain level and stop on the floor. The working tim
e
would be shorter than normal.
9. How long is the battery life? When do I need to replace withnew batteries?
Lifespan of Ni-MH batteries is usually around 9-12 months (it will also depend on the usage and
storage condition). When the batteries start to age, the working time will drop gradually. When
the working time drops to a level that the ro bot can not clean up your home effectively (you still
find obvious
dirt on floor after the cleaning program) you need to replace wit h ne w batteries.
Frequently Asked Questions (FAQs
)Eng
lish
24
Page 26

1. Why is the suction power ofthis robot so low?Can itclean my flooreffectively?
SURE! The robot is designed to handle everyday dirt in our home, which includes dust, hair,
dead skin
,
pet hair, food crumbs, etc. All these are very light in weight but it is tedious for us to
clean by ourselves day after day
.
The robot is a lot more effective in cleaning all these tiny dirt,
thanks to its fuzzy logic program, and the robot uses very little power
,
so it saves you a lot of
energy
(
and money) as well as keeping itself extremely quiet during operation.
2. Do I need to keep my pet or baby away while the robot is working?
NO. The robot is so gentle and quiet it will not scare anybody or even a pet. But you are still
recommended to observe in the first few runs of the robot to see how your baby or pet react to
the motion of the robot just for safety reasons
.
3. Is the robot able to handle watered floor?
NO. Water and moisture would damage the robot.
4. Is the robot able to treat wooden floor other than tile floor?
YES. The robot is designed to work on a tiled floor, wooden floor and linoleum floor.
5. Is the robot suitable for outdoor use?
NO. Never use the robot outdoors. Weather could damage it.
6. Do I need to clean up the dust bin every time after vacuuming?
You are recommended to clean it up and remove dusts/hair on the filter with a soft brush gently
for every two times of use
.
It would extend the lifespan of your filter if you take good care of it.
7. Do I need to maintain the robot frequently?
NO. The robot is designed to be so user friendly that you just need to inspect the side brushes
every month to see whether there is any tangled hair
.
If there is any, remove them by
unscrewing the side brushes and screwing them back in good order upon completion
.
8. What will happen if the robot gets stuck?
Thanks to the user-friendly design, it will stop itself if it gets stuck.
9. How long the robot can run after it is fully charged?
The robot can run continuously for around 60 minutes if it is fully charged and in good condition.
However
,
it would remain around 80% of the original running duration after the battery is aged.
10.There are several bedrooms in my home, could the robot clean up all of them?
The working area for RC 520A is around 1050-1100 square feet (around 100 square meters).
Simply keep all the room doors open
,
the robot will go inside and clean them one by one.
11.My home is quite big. Could I use RC 320A?
Yes, you can. However, since the working area for RC 320A is around 1050-1100 square feet
(
around 100 square meters), you may need to separate your home into several portions and do the
cleaning in several rounds
.
Our recommendation is to consider a model from our range which
could handle larger working area.
B. Applications
Frequently Asked Questions (FAQs
)Eng
lish
25
 Loading...