

Page 1

S
S
-
2
S
-
S
-
Inspection Instructions
G
G
G
martLink Software Update
669 DC
3369 DC
4069 DC
Part No. 1253604
Rev A
Page 2

Instructions Rev A
Introduction
Introduction
Introduction
Note: These installation instructions only apply
to the Genie models listed on the front cover,
as required by Safety Notice 130010.
Tools Required:
Laptop or desktop computer with an Ethernet Port
Observe and Obey:
and Internet Browser
This procedure shall be completed by a person
trained and qualified on the repair of this
machine.
Immediately tag and remove from service a
damaged or malfunctioning machine.
Repair any machine damage or malfunction
before operating the machine.
Before Starting Installation:
Read, understand and obey the safety rules
and operating instructions in the appropriate
operator's manual.
Be sure that all necessary tools and parts are
available and ready for use.
Read this procedure completely and adhere to
the instructions. Attempting shortcuts may
produce hazardous conditions.
Indicates that a specific result is expected after
performing a series of steps.
Indicates than an incorrect result has occurred
after performing a series of steps.
Torx T10 screw driver
CAT5 Ethernet cable of suitable length
Glossary of Terms
ECM - Electronic Control Module
GCON - Ground Controller. This ECM is located at
the ground controls.
PCON - Platform Controller. This ECM is located at
the platform controls.
CAT5 Cable - Standard Ethernet cable used for
networking purposes.
Components of Kit 1253597
Printing Instructions
Genie part number 1255048
Qty. 1
Thumb drive
Genie part number 1253598
Qty. 1
Includes:
Software, SL1000, APP
Genie part number 137641
Qty. 1
SmartLink Software Update Installation Instructions
Genie part number 1253604
Qty. 1
2 SmartLink Software Update Part No. 1253604
Page 3
Rev A Instructions
Procedure
Procedure
Updating Machine Software
1 Turn on the computer.
Using a thumb drive:
2 Insert the thumb drive into the USB port. Genie
part number 1253598.
3 Copy the .gff file onto your hard disk or
desktop.
All applications:
Note: Disable all external internet or network
connections before continuing.
4 At the GCON, turn the key switch to the GCON
position.
5 At the PCON, pull out the red Emergency Stop
button to the on position.
6 At the GCON, press and hold the Enter and
Escape buttons. Pull out the red Emergency
Stop button to the on position.
Result: The GCON LCD will display the
following screen.
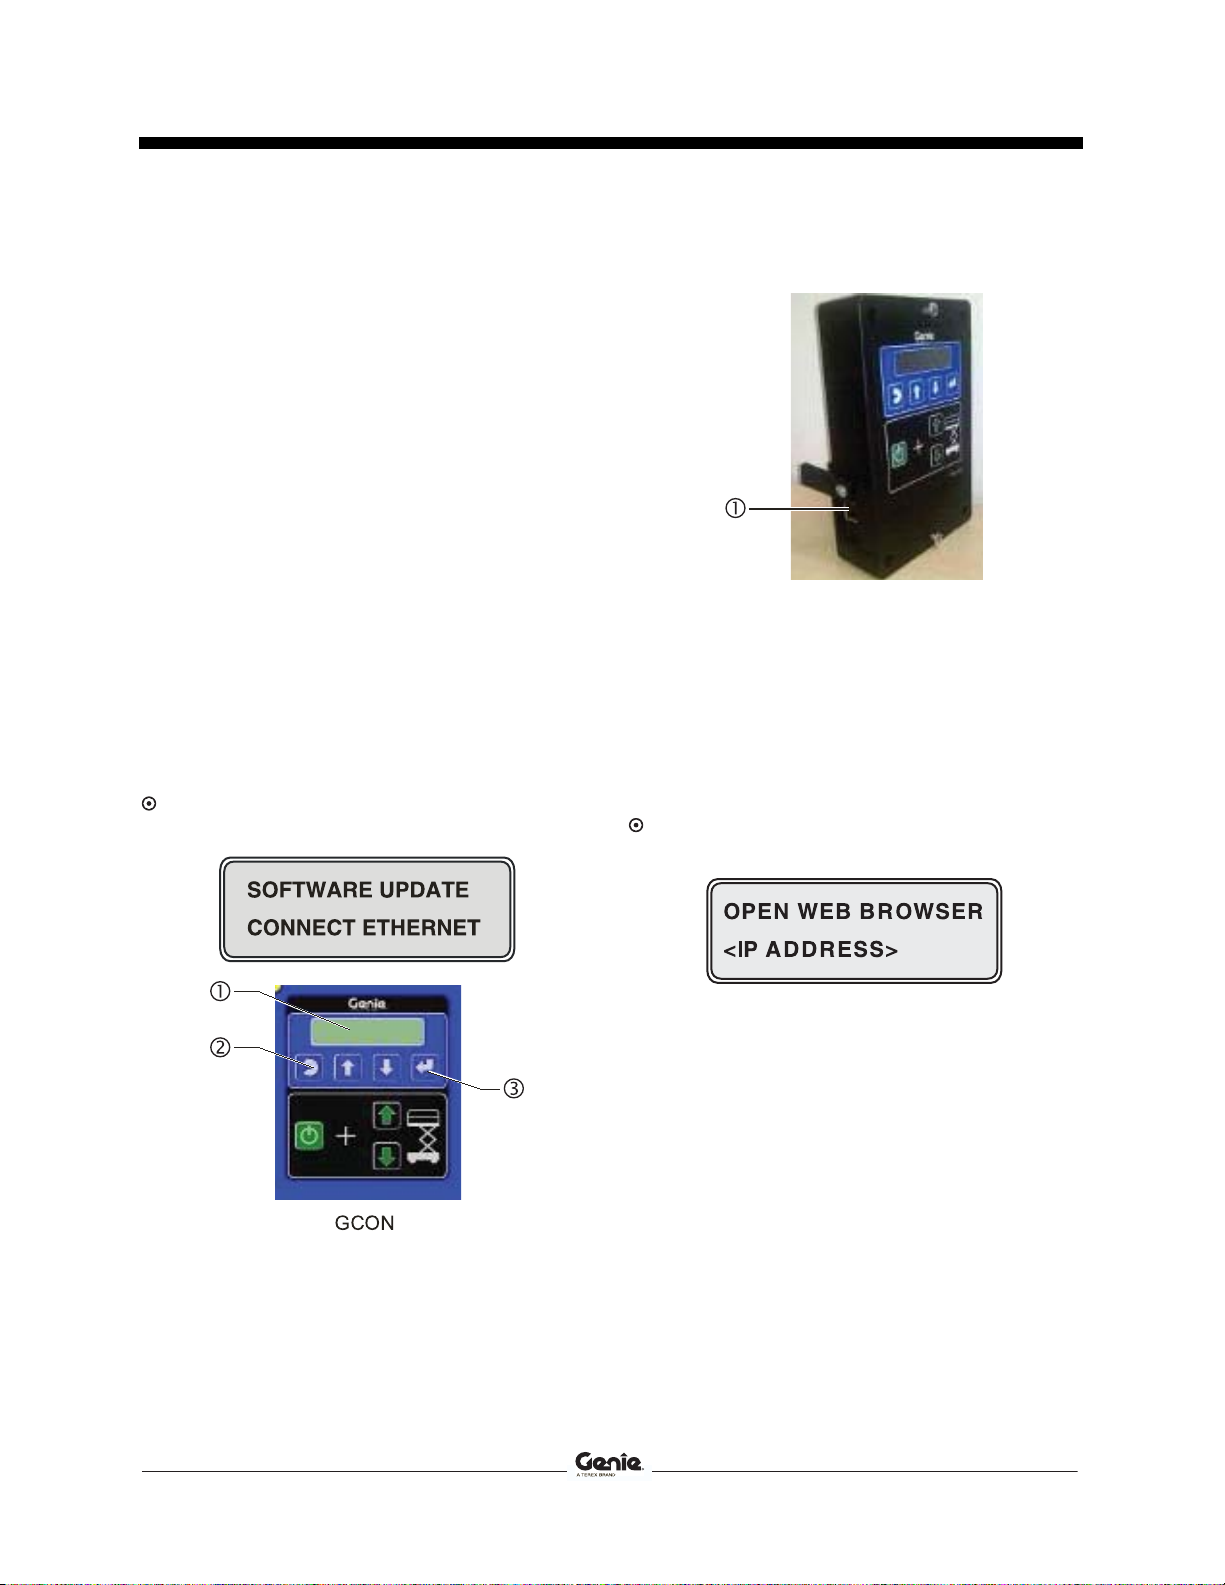
7 Locate the diagnostic port on the side of the
GCON.
1 Diagnostic Port
8 Remove one of the fasteners securing the
cover and set aside. Loosen the other fastener.
Do not remove it.
9 Connect one end of a CAT5 Ethernet cable into
the diagnostic port. Connect the other end into
a PC or laptop.
Result: The GCON LCD will display the
following screen.
10 Read and record the IP address.
1 LCD
2 ESCAPE button
3 ENTER button
Part No. 1253604 SmartLink Software Update 3
Page 4

Instructions Rev A
Procedure
11 Launch a web browser such as Internet
Explorer
®
or Firefox® on your PC or laptop.
14 Select the Reprogram Device (s) button to
start the ECM software update.
Type in the IP address from steps 8 and 9 into
the web browser address bar and press Enter.
Result: The following screen will be displayed
after the software update is complete.
Result: The following screen will be displayed.
Note: Do not turn off power while the ECM is
being reprogrammed. This process may take
up to 5 minutes.
Y
Y
12 Select the Browse button. Navigate to the
firmware file located on your hard disk or
desktop and select the file. Firmware number
137641Y.gff (rev Y or above).
Note: Verify that the firmware number is displayed
in the box marked "Current:". Firmware number
137641Y (rev Y or above).
Note: Depending on your web browser, this button
may be shown as Choose File. 137641Y.gff (rev Y
Example: 137641Y
or above).
Example: 137641Y.gff
file extension
revision level
part number
13 Select the Load Flash File button.
15 Select the Run application button to exit the
software update mode.
16 Push in the red Emergency Stop button at the
revision level
part number
GCON and disconnect the CAT5 cable.
Note: Verify it is the correct flash file.
Remove the thumb drive if installed.
Result: The following screen will be displayed.
Note: This process may take 1 to 2 minutes.
Y
Y
17 Secure the diagnostic port cover using the
retaining fasteners removed in step 5. Do not
over tighten.
4 SmartLink Software Update Part No. 1253604
Page 5

Rev A Instructions
Procedure
18 Perform function test. Refer to the Operator's
Manual on your machine.
19 Return the machine to service.
20 Fill out and sign the attached completion form
and fax or email to Terex AWP Warranty
Department. This will serve as verification that
you have completed Safety Notice 130010.
If you have any further questions regarding these
instructions or need assistance, please contact
Genie Product Support at one of the following
telephone numbers:
United States: 800-536-1800
Canada: 425-881-1800
Europe: UK 0044 1476 584 333
Middle East:
Australia: 61 7 3456 4444
All other locations 001-425-881-1800
France 0033 237 260 986
Germany 0049 4221 491 821
Iberica 0034 935 725 090
Italy 0039 075 941 8132
Scandinavia 0046 3157 5154
Other locations 0031 653 221 908
0097 143 391 800 or
0097 150 459 7937
Part No. 1253604 SmartLink Software Update 5
Page 6

Instructions
This page intentionally left blank.
6 SmartLink Software Update Part No. 1253604
Page 7

SAFETY NOTICE
130010
Completion Form
Your signature on this form will verify that you have installed kit P/N 1253597.
Fax to:
Email to:
Date:
Company Name:
Account # (if applicable):
Address:
(street)
(city)
(state, zip code)
Phone:
Please list the complete serial number(example: GS6911-256 or GS6913-1837).
Serial Number:
United States 877-738-7530 United Kingdom 0044 1476 584 330
Canada 425-498-7530 France 0033 237 260 998
Australia 61 733751002 Germany 0049 4221 491 820
All other locations 001-425-498-7530 Italy 0039 075 941 8146
Iberica 0034 935 725 080
Scandinavia 0046 3157 5104
Middle East 0097 143 990 382
All other locations 0031 165 510 826
Serial Number:
Print (service manager)
Signature
Date
 Loading...