

Page 1
Programming
Quick Reference Card
For help, refer t o the ow ner’s manual or call 1-8 0 0-35 - GENIE.
WA R NING: The do or could mov e dur i ng program ming. S tay clear of doo r
and all m oving part s at this t i me.
Programming Wireless Keyless Entry Pad
Model Number GK-BX, P/N 37224R
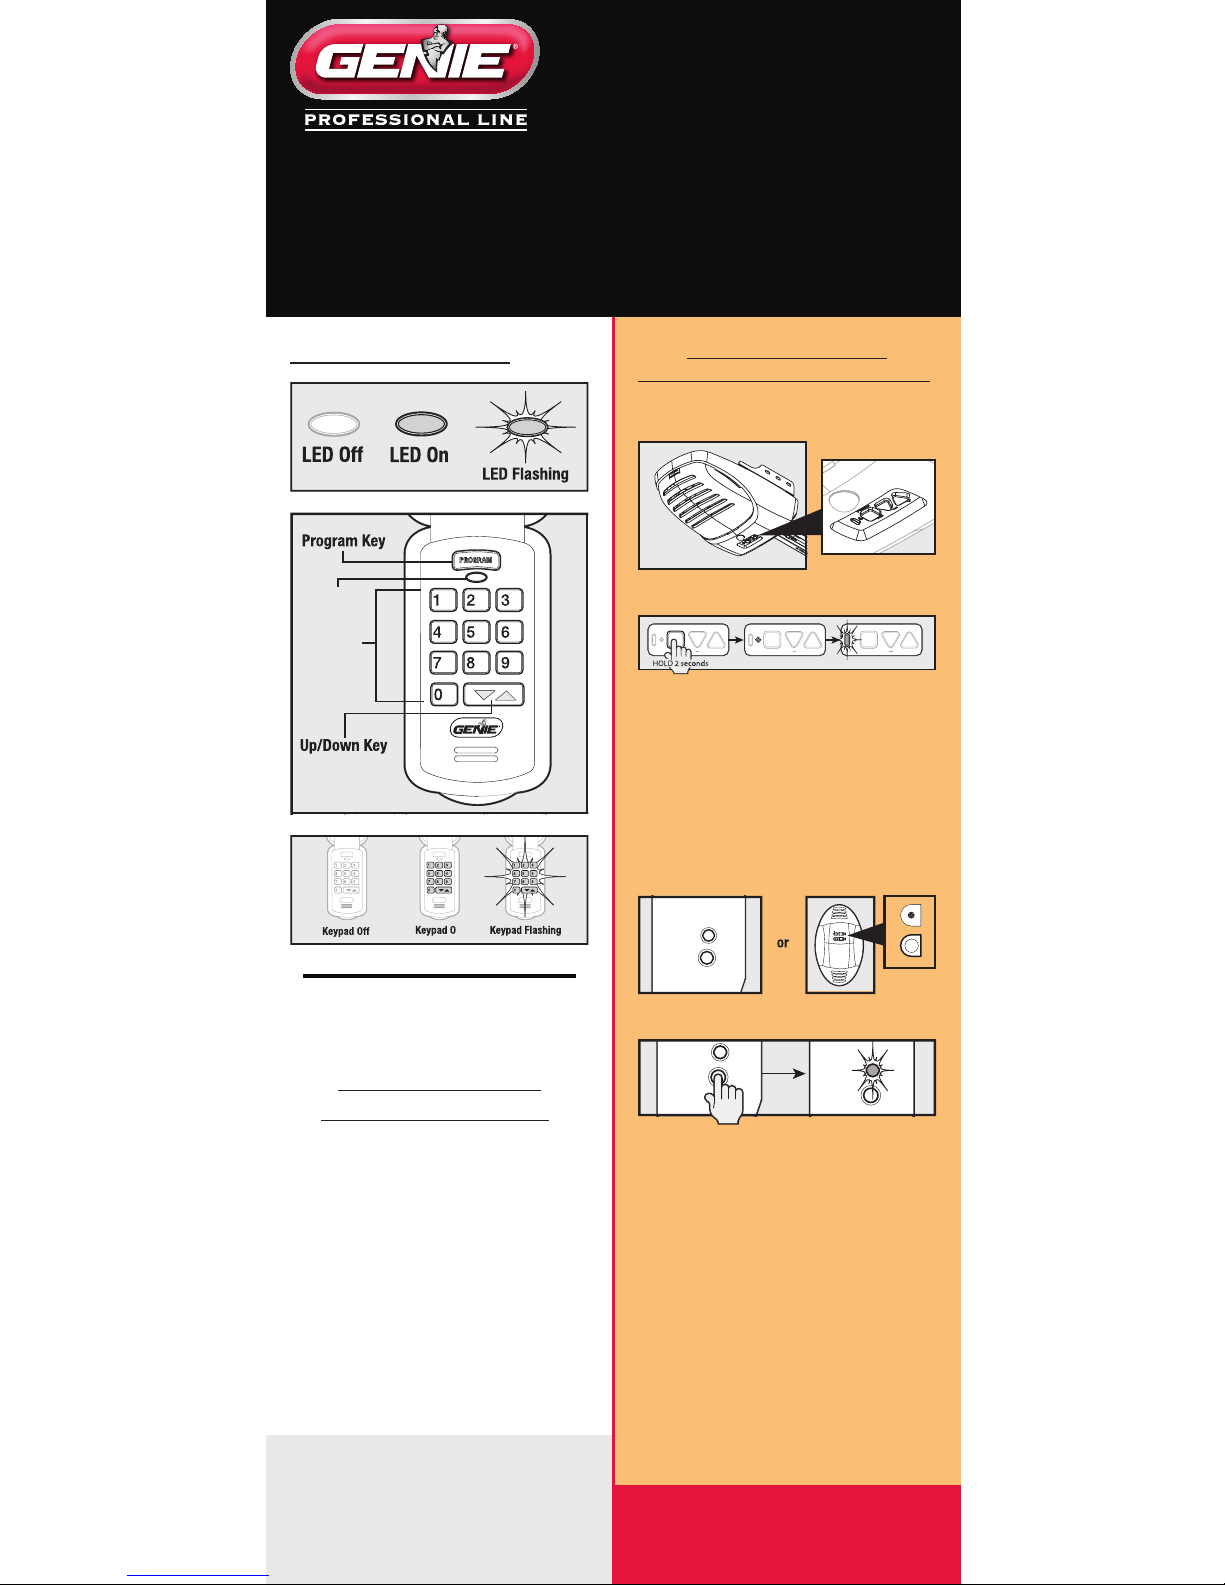
Locate your Opener’s
Programming Buttons and LED:
The process of programming ONE
keypad to ONE opener is complete.
NOTE: If your LED light is green, please begin
at the last step on the back of this card. If the
LED light is red, continue below.
Setting the PIN
for the First Time:
1. Press in order the numbers
3-5-7
2. Press the Program key
3. Type your new PIN (3-8 digits)
4. Press the Program key again
You are now ready to program
the keypad to an opener. For use
on a Single Door, continue right
to 1A OR 1B.
1A. If they look like this:
• Press Program Set button 2
seconds until the round LED turns
blue, then release. The long purple
LED will blink. Immediately
proceed to Step 2 below.
-OR-
PROGRAM
SET
+
PROGRAM
SET
+
PROGRAM
SET
+
Synchronizing Keypad to Opener
1B. If they look like this:
• Press the Learn Code button and
LED will blink. Immediately
proceed to Step 2 below.
2. Type your new PIN on the
keypad.
3. Press Up/Down key and Opener
LEDs will stay on steady.
4. Press Up/Down key again and
Opener LEDs turn off.
5. Press Up/Down key a third time
and Opener runs.
RADIO
SIGNAL
LEARN
CODE
CODE
LEARN
SET
SET
OPEN
FORCE
CLOSECODE
LEARN LIMITMANUAL
RADIO
SIGNAL
LEARN
CODE
RADIO
SIGNAL
LEARN
CODE
Synchronizing Keypad to Opener
To use the keypad to control
multiple doors, continue
directly to the Multiple Door
Section on the back.
Keypad Overview:
Keypad
(enter)
LED
Keypad
(enter)
LED
n
Keypad
(enter)
LED
n
Page 2
Multiple Door Section:
1. Type your new PIN (3-8 digits).
2. Press the Program key 2
times.
3. Enter how many total
doors you want to control
with this keypad (press 2 or 3
accordingly).
4. Press the Program key.
The keypad now understands
it will be receiving multiple
opener signals.
On the opener head, find the
programming buttons and LEDs.
See 1A OR 1B images on the
front for examples.
5A. (Images from 1A) Press
Program Set button 2 seconds
until the round LED turns blue,
then release. The long purple
LED will blink.
-OR-
5B. (Images from 1B) Press the Learn
Code key and LED will blink.
Back to the keypad:
6. Type your new PIN
(3-8 digits).
7. Press the Up/Down key 1 time.
8. Press the door number you
want this opener to operate
(1, 2, or 3).
9. Press that door number a
second time.
10. Press that same door
number a third time and the
door will operate.
Wait for the keypad to go dark
(30 seconds) and then start with
5A/5B for the additional opener
head/keypad combination as
needed.
Changing an Existing PIN:
1. Enter your current PIN.
2. Press the Program key 1 time.
3. Type your new PIN
(3-8 digits).
4. Press the Program key 1 time.
NOTE: Unlike “Reset ting PIN,” you DO NOT
need t o reprogram your opener after changing
your PIN.
Resetting a PIN
Completely:
To erase the old programming.
1. Press and hold both the
Program key and the Up/Down
key for about 5 seconds.
The LED will slowly blink and then
go out. When the LED goes out,
you have successfully erased the
old programming. To put in a new
PIN, start with “Setting the PIN
for the first time”.
If the LED on your
Keypad is Green:
1. Follow the ‘Resetting the Pin’
Step 1 instruction above and
wait for the LED to blink and
go out.
2. Press in order the numbers
3-5-7.
3. Press the Up/Down key.
4. When the keypad lights stay
on steady, hold the Program
key down until the LED
changes from green to red.
5. Release the Program key and
allow your keypad to go dark.
The keypad is now ready
for use with all Genie model
openers.
6. Go to the front of this card
and start with ‘Setting the
Pin for the First Time:’
NOTE: For Int elliG® 1000, IntelliG® 1200,
TriloG™ 1200, TriloG™ 1500, GPower™ 90 0 with
a serial number starting with 1118 8 or smaller,
see the instruction sheet provided with the
Keyless Entr y Pad.
To add another opener to a keypad that
is already programmed to an opener,
follow all the steps in the “Multiple
Door Section” above. Please note
at Step 8, the keypad assumes the
original opener programmed to the
keypad is opener #1. Keypads can
accept up to 3 openers.
 Loading...