

Genie 3 Button Remote Operating Instructions Manual
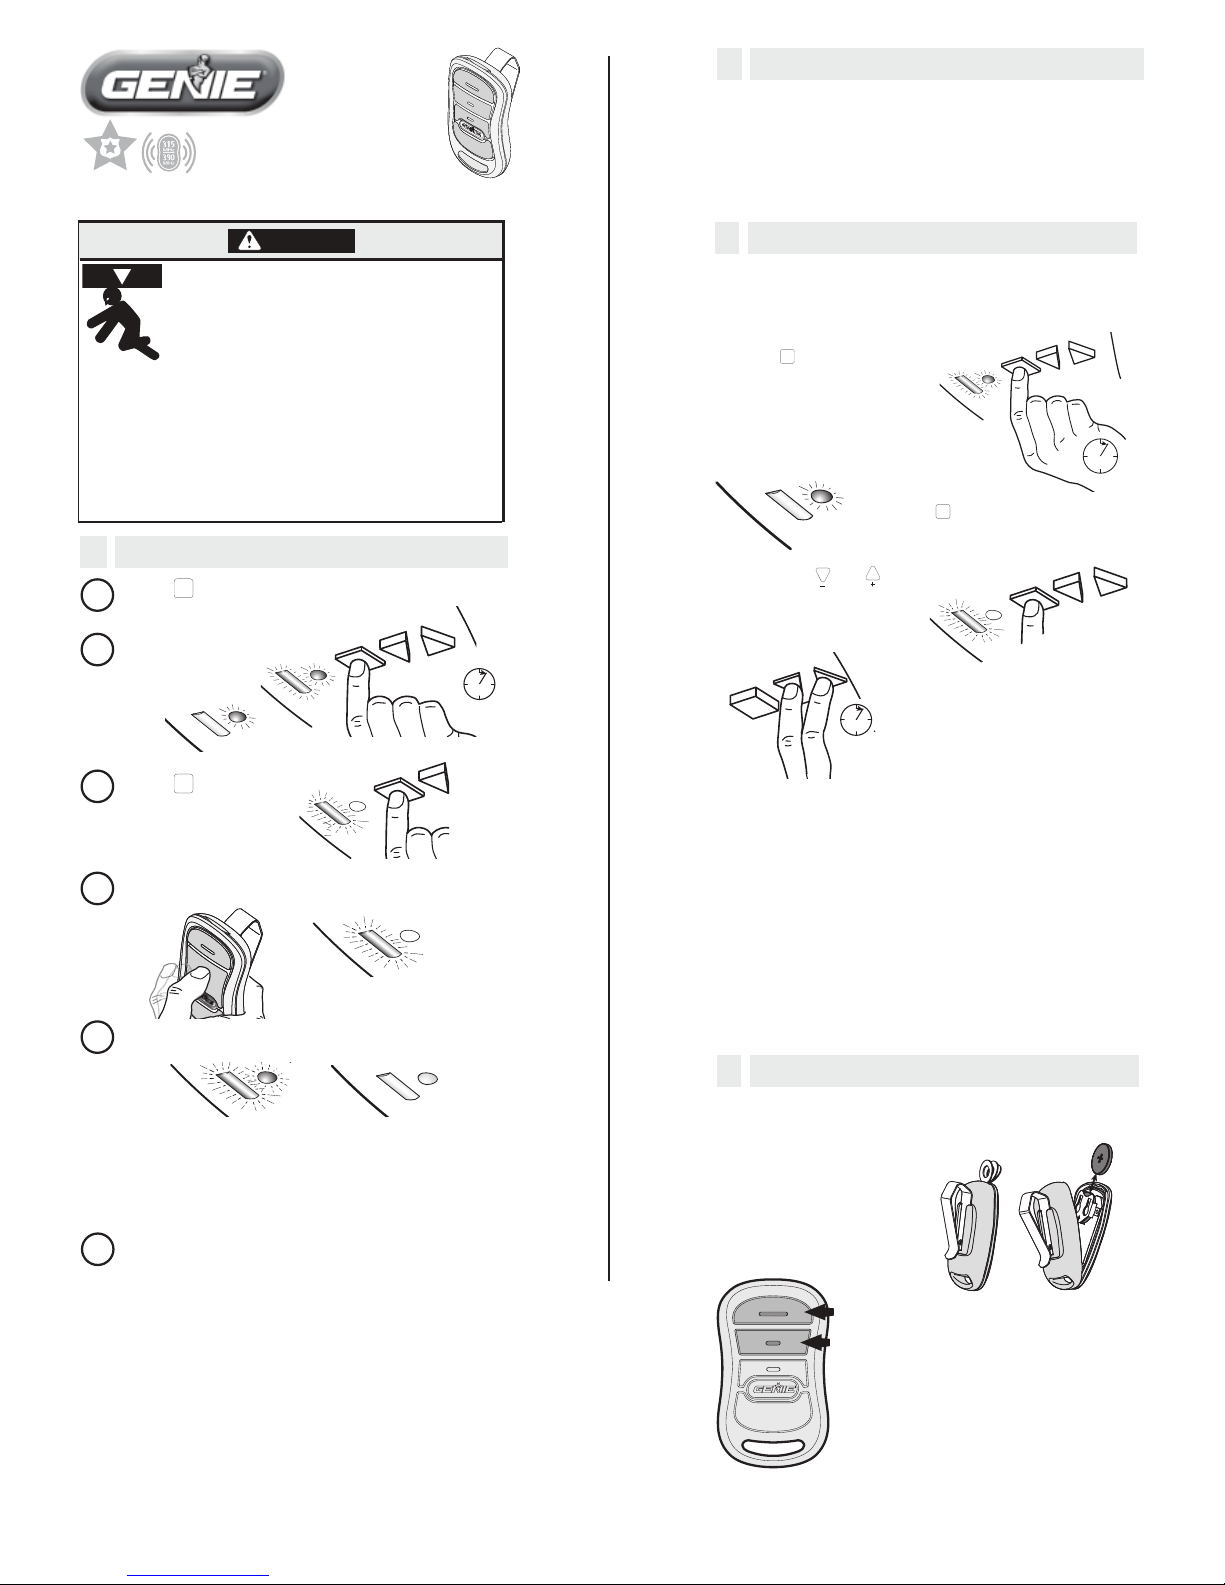
Follow these instructions to erase remote codes for
ALL other Genie® openers.
3 LOST OR STOLEN REMOTE
ALL Remote Codes will be erased from Opener
(powerhead) memory.
These instru
NOTE: For openers
manufactured between
1995-1997,
use the two upper
buttons on the remote
ctions are for openers with the type
keypad shown below.
1. Press
PROGRA M
SET
and hold until
both lights come ON
blue. Release button.
2. Lights go out and
Round BLUE light
comes ON.
3. Press
PROGRAM
SET
again and see long
purple LED fl ashing.
4. Press both
and
simultaneously on the
powerhead and hold for
5 seconds.
Test remote operation.
Remote should not activate
door opener.
5. Reprogram the Opener with the remaining Remote(s)
(Repeat Section 2 for each remote).
PROGRAM
SET
—
+
PR
OGR AM
SET
—
+
5 SECS
PROGRAM
SET
—
+
5 SECS
PROGRA M
SET
—
+
PROGRA M
SET
—
PRESS and HOLD until you
SEE BOTH Blue LEDs come ON
SEE long Purple LED
come steady ON
RELEASE
SEE round
Blue LED
come ON
1
2
3
4
5
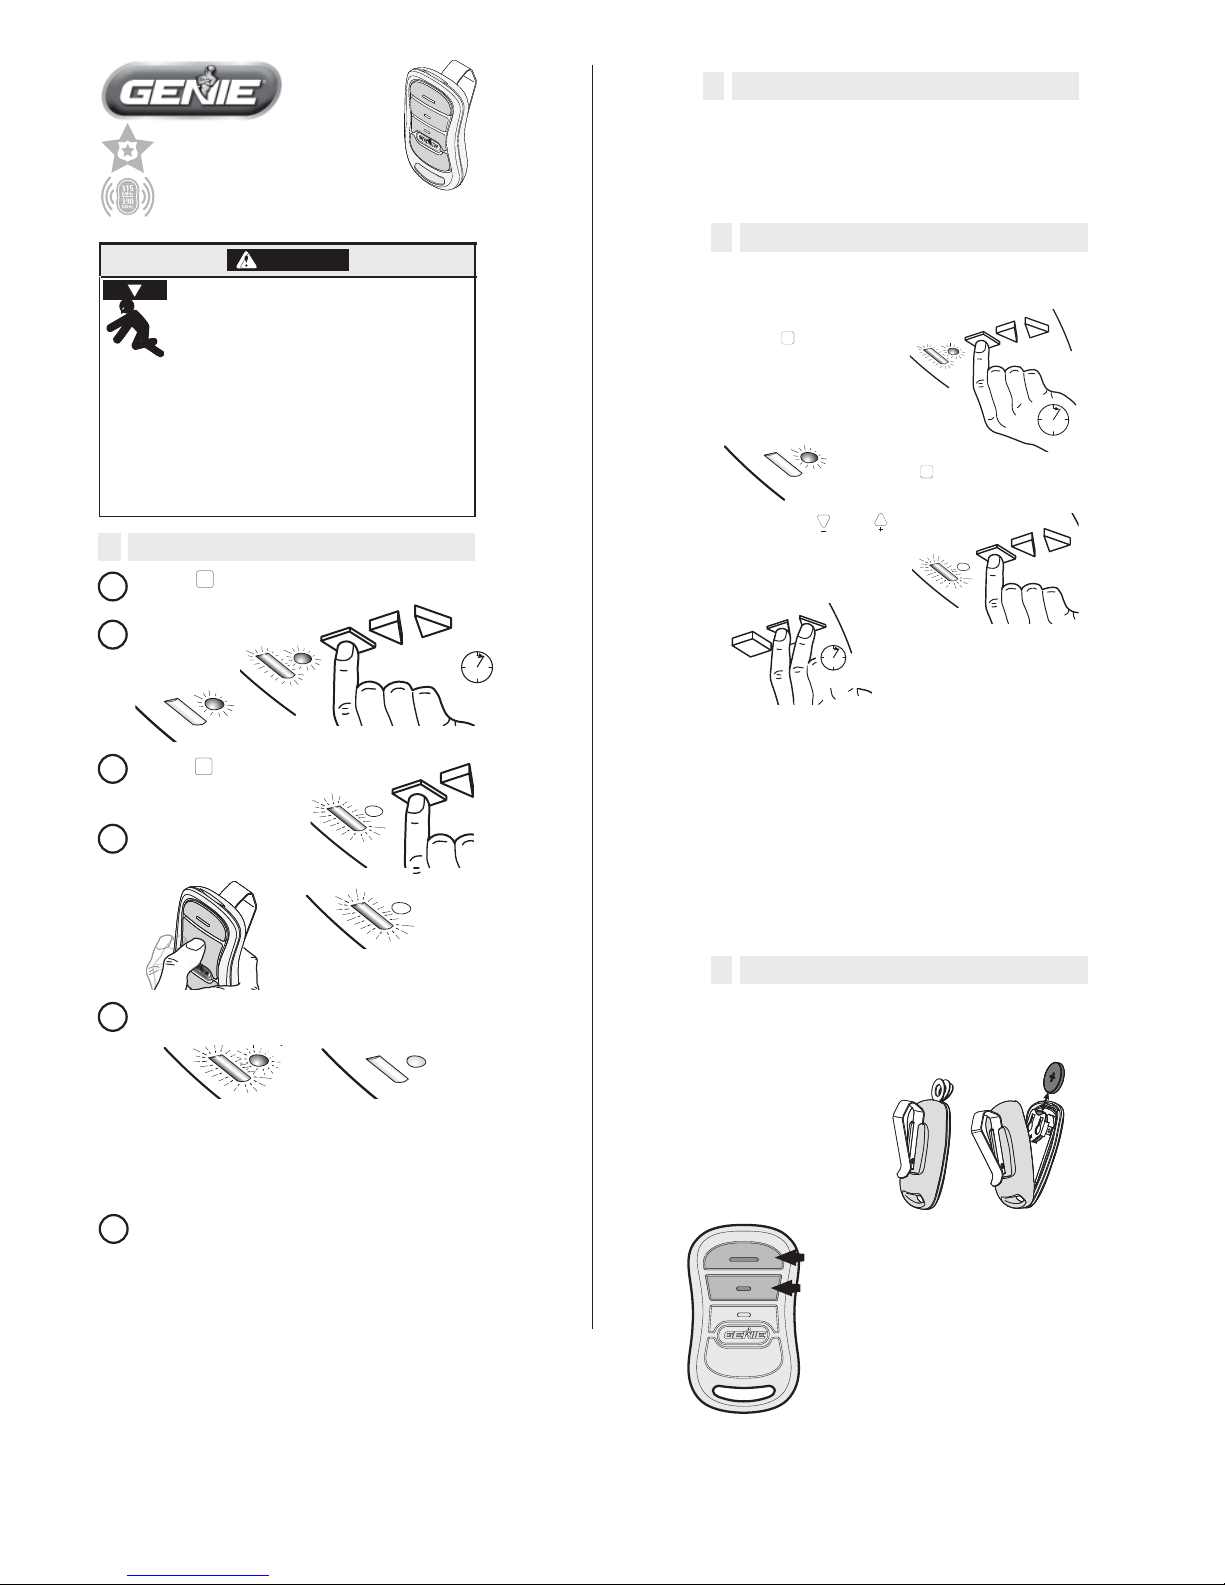
Programming is complete. This remote button can
now be used to operate door opener.
Repeat as necessary for other remotes or buttons on
the same remote.
PRESS remote and RELEASE
(the button you want to program.)
PRESS and RELEASE
SEE long Purple LED
fl ashing
SEE both LEDs fl ash Blue and go OFF
PRESS and RELEASE remote button again
6
PRESS and RELEASE remote button a third time
1 PROGRAM THE OPENER
3 Button Remote
OPERATING INSTRUCTIONS
PRO GRA M
SET
PRO GRA M
SET
1. Press and HOLD the Learn Code button on the
powerhead for 10 seconds or until Radio Signal LED
indicator goes out.
2. Reprogram the Opener with the remaining Remotes
following the programming instructions for that
powerhead.
3. Reprogram the Opener with a remote or any other
access device using the instructions accompanying
those devices.
4 BATTERY REPLACEMENT
Replace remote battery with a CR 2032 coin cell battery.
1. Open the remote case using a washer or coin that fi ts
into the slot at the top of the remote.
2. Replace battery. Match battery
polarity with symbols
inside battery housing.
3. Align components and
WARNING
Moving Door can cause serious injury
or death.
• Wall Console must be mounted in sight
of door, at least 5 feet above fl oor and
clear of moving door parts.
• Keep people clear of opening while door is moving.
• Do NOT allow children to play with the Remote or
door opener.
If safety reverse does not work properly:
• Close door then disconnect opener using the
manual release handle.
• Do NOT use Remote or door opener.
• Refer to Door and Door Opener Owner’s Manuals
before attempting any repairs.
2 REMOTE OPERATION
• Point Remote at the garage door and press the
button. Door will move.
• Press the Remote Button again and the door will
stop.
• Press the Remote Button again and the door will
move the opposite way. The door automatically
stops at the end of the open or close cycle.
©2013 GMI Holdings, Inc. DBA The Genie Company Part Number 38381502287 09/2013
snap case closed.
For additional information or help contact Customer Service:
GMI Holdings Inc. d/b/a
The Genie Company
1 Door Drive
Mt. Hope, Ohio 44660
FCC and IC CERTIFIED
This device complies with FCC Part 15 and Industry Canada license exempt RSS standard(s). Operation is subject to the
following two conditions: (1) this device may not cause interference, and (2) this device must accept any interference,
including interference that may cause undesired operation of the device.
This equipment generates, uses and can radiate
radio frequency energy and, if not installed and used in accordance with the instructions, may cause harmful interference
to radio communications. However, there is no guarantee that interference will not occur in a particular situation. If this
equipment does cause harmful interference to radio or television reception, which may be determined by turning the
equipment OFF and ON, the user is encouraged to try and correct the interference by one or more of the following
measures: (a) Re-orient or relocate the receiver antenna, (b) Increase the separation between the opener and receiver,
(c) Connect the opener into an outlet on a circuit dierent from that to which the receiver is connected, and (d) Consult
your local dealer. Any modications or changes to this equipment which are not expressly approved by the manufacturer
could void the users authority to operate the equipment.
Note: It is possible to press the remote button too quickly or lightly.
If the LED’s do not go off, press the remote button several more
times to achieve confirmation (the LED’s turn off). If the LED’s
turn red, return to Step 1 and repeat steps 1 through 6.
5 SECS
Call 1-800-35-GENIE or write:
©2013 GMI Holdings, Inc. DBA The Genie Company Part Number 38381502287 09/2013
Para la información adicional o ayuda a contactar Servicio de atención al cliente:
Llame 1-800-35-GENIE o escriba:
GMI Holdings Inc. d/b/a The Genie Company
1 Door Drive
Mt. Hope, Ohio 44660
Siga estas instrucciones para borrar códigos remotos
para todo el otro Genie® abridores.
3
TELEMANDO PERDIDO O ROBADO
TODOS los Códigos Remotos serán borrados
del Abridor (powerhead) memoria.
Estas instrucciones son para abridores con el teclado
numérico de tipo mostrado abajo.
1. Apriete y hasta que ambas
luces vengan EN azul.
Suelte botón.
PROGRAM
SET
2. Las luces se apagan y
Redondean la luz de AZUL
viene EN.
3. Apriete otra vez y vea morado
largo DIRIGIO destellar.
PROGRAM
SET
4. Apriete tanto como
simultáneamente en el
powerhead y asidero
por 5 segundos.
Pruebe operación remota.
El telemando no debe activar
abridor de puerta.
5. Reprograme el Abridor con los Telemandos restantes
(Repita Sección 2 para cada telemando).
PROGRAM
SET
—
+
PR
OGRA M
SET
—
+
5 SECS
PROGRAM
SET
—
+
5 SECS
PROGRAM
SET
—
+
PROGRAM
SET
—
APRIETA y mantenga pulsado hasta que vea
ambos LEDs se vuelven AZULES.
VEA Morado largo
DIRIGIDO viene
constante EN
LIBERACION. VEA
alrededor Azul
DIRIGIDO
viene EN
1
2
3
4
5
Programación es completo. Este botón remoto ahora
puede ser utilizado para operar abridor de puerta.
Repita como sea necesario para otros telemandos o
botones en el mismo telemando.
APRIETE telemando y
LIBERACION
(el botón que usted quiere programar).
APRIETE y LIBERACION
VEA Morado largo
DIRIGIO destellar
VEA ambos LEDs Azul y váyase
La PRENSA y SUELTA botón remoto otra vez
6
La PRENSA y el telemando de la LIBERACION
abotonan una tercera vez
1 PROGRAME EL ABRIDOR
3 Telemando
de Botón
INSTRUCCIONES OPERADORAS
PROGR AM
SET
PROGR AM
SET
1. Apriete y TENGA el Aprende que botón de Código en el
powerhead por 10 segundos o hasta que la Señal de
Radio DIRIGIERA indicador sale.
2. Reprograme el Abridor con los Telemandos restantes
que siguen las instrucciones de la programación para
ese powerhead.
3. Vulva a programar el abridor con un control remoto o
cualquier otro dispositivo de acceso siguiendo las
instrucciones que acompañan a dichos dispositivos.
4 REEMPLAZO de BATERIA
Reemplace batería remota con un CR 2032 batería de
célula de moneda.
1. Abra el caso remoto que utiliza una arandela o la
moneda que en la ranura a la cabeza del telemando.
2. Reemplace batería. Empareje
polaridad de batería con
símbolos envoltura
interior de batería.
3. Alinee el caso de
componentes y
cierre cerró.
ADVERTENCIA
Mover Puerta puede causar herida o
muerte graves.
• La Consola de la pared debe ser montada a la
vista de puerta, por lo menos 5 pies arriba y vacía
de partes móviles de puerta.
•
Mantenga a personas vacían de abrir mientras
puerta mueve.
•
No permita a niños para jugar con el Telemando ni
abridor de puerta.
Si el revés de la seguridad no trabaja apropiadamente:
•
La puerta cercana entonces abridor de desconexión
que utiliza el asidero manual de la liberación.
•
No utilice Telemando ni abridor de puerta.
• Refiérase a la Puerta y el Abridor de la Puerta
Manuales antes de procurar cualquier reparación.
2 OPERACION REMOTA
• Señale Telemando en la puerta de garaje y apriete el
botón. La puerta moverá.
• Apriete el Botón Remoto otra vez y la puerta parará.
• Apriete el Botón Remoto otra vez y la puerta moverá la
manera opuesta. La puerta para automáticamente a
fines del ciclo abierto o cercano.
CERTIFICADO FCC e IC
Este dispositivo comple con la Parte 15 de la FCC y de Industry Canada RSS exento de licencia estándar(s). La operación
está sujeta a las siguientes dos condiciones: (1) este dispositivo no puede causar interferncia, y (2) este dispositivo debe
aceptar cualquier interferencia, incluidas las interferencias que puedan provocar un funcionamiento no deseado del
dispositivo.
Este equipo general, itiliza y puede irradiar energia de frecuencia de radio, y si no se instala y utiliza de
acuerdo con las instrucciones, puede provocar interferencias perjudiciales en las comunicaciones de radio. Sin embargo,
no se garantiza que no habrá interferencias en alguna instalación determinada. Si este equipo provocar interferencias en
la recepción de radio y televisión, lo que se puede determinar ENCENDIENDO y APAGANDO el equipo, se recomienda
que el usario trate de corregirlas mediante una el varias de las siguientes medidas: (a) Cambiar la orientación o la
ubricación de la antena receptora, (b) Aumentar la separación entre abridor y el receptor, (c) Conectar el abridor en un
tomacorriente que pertenezca a un circuito distinto de aquél en el que está conectado el receptor, (d) Consultar al
distribudor local. Los cambios o modicaciones no aprobados expresamente por el fabricante podrian invalidar la
autoridad del usario de operar el equipo.
NOTA: Para dispositivos fabricados
entre 1995-1997, usar los dos
botones superiores del mando a
distancia.
5 SECS
Nota: Es posible presionar el botón del control remoto demasiado
rápido o ligera. Si el LED no se apaga, pulse el mando a distancia
varias veces para lograr la confirmación que (el LED se ha apagado).
Si el LED cambia a rojo, vuelva al paso 1 y repita los pasos del 1 al 6.
 Loading...