

Page 1

400 Series IP Phones
Administrator's Guide
Version 2.2.16
(for PureEngage)
Page 2

The information contained herein is proprietary and confidential and cannot be disclosed or
duplicated without the prior written consent of Genesys Telecommunications Laboratories, Inc.
Copyright © 2018 Genesys Telecommunications Laboratories, Inc. All rights reserved.
About Genesys
Genesys powers 25 billion of the world's best customer experiences each year. Our
success comes from connecting employee and customer conversations on any channel,
every day. Over 10,000 companies in 100+ countries trust our #1 customer experience
platform to drive great business outcomes and create lasting relationships. Combining
the best of technology and human ingenuity, we build solutions that mirror natural
communication and work the way you think. Our industry -leading solutions foster true
omnichannel engagement, performing equally well across all channels, on-premise and
in the cloud. Experience communicatio n as it should be: fluid, instinctive a nd profoundly
empowering. Go to
Each product has its own documentation for online viewing at the Genesys
Documentation website or on the Documentation Library DVD, which is available from
Genesys upon request. For more information, contact your sales representative.
Notice
Although reasonable effort is made to ensure that the information in this document is
complete and accurate at the time of release, Genesys Telecommunications
Laboratories, Inc. cannot assume responsibility for any existing errors. Changes and/or
corrections to the information contained in this document may be incorporated in future
versions.
Your Responsibility for Your System’s Security
You are responsible for the security of your system. Product administration to prevent
unauthorized use is your responsibility. Your system administrator should read all
documents provided with this product to fully understand the features available that
reduce your risk of incurring charges for unlicensed use of Genesys products.
Trademarks
Genesys and the Genesys logo are registered trademarks of Genesys
Telecommunications Laboratories, Inc. All other company names and logos may be
trademarks or registered trademarks of their respective holders. © 2018 Genesys
Telecommunications Laboratories, Inc. All rights reserved.
Technical Support from VARs
If you have purchased support from a value -added reseller (VAR), please contact the
VAR for technical support.
Ordering and Licensing Information
Complete information on ordering and licensing Genesys products can be found in the
Genesys Licensing Guide
Released by: Genesys Telecommunications Laboratories, Inc.
http://www.genesys.com/
Document Version : 400_IP_Phone_Administrator’s_Guide _12-2018_2.2.161.00
www.genesys.com
.
for more information.
2 Administrator’s Guide Version 2.2.16
Page 3

Administrator’s Guide Contents
Table of Contents
1 Introduction....................................................................................................... 18
Configuration Tools ................................................................................................ 19
2 IP Phone User Interface ................................................................................... 20
2.1 Accessing the Administration Menu ..................................................................... 20
2.2 Changing Display Language ................................................................................ 21
3 Web Interface .................................................................................................... 22
3.1 Accessing Web Interface ..................................................................................... 22
3.2 Getting Started with the Web ............................................................................... 23
3.3 Configuring the Web Interface's Port .................................................................... 24
3.4 Configuring User Login Credentials ...................................................................... 24
4 Configuration File ............................................................................................. 26
4.1 Introduction .......................................................................................................... 26
4.2 File Syntax ........................................................................................................... 26
4.3 Linking Multiple Files ............................................................................................ 26
4.4 Downloading the Configuration File from the Phone............................................. 27
4.5 Creating Configuration Files using VoIProvision Utility ......................................... 27
4.5.1 Configuration File Format ....................................................................................... 27
4.5.2 Global Configuration File ........................................................................................ 27
4.5.3 VoIProvision Utility Overview .................................................................................. 28
4.5.4 CSV File .................................................................................................................. 28
4.5.5 Template File .......................................................................................................... 28
4.5.6 Generated Configuration Files ................................................................................ 28
4.5.7 Starting the VoIProvision Utility .............................................................................. 29
4.5.8 Usage ...................................................................................................................... 29
4.6 Using the Encryption Tool .................................................................................... 29
4.6.1 Encrypting Configuration Files ................................................................................ 29
4.6.2 Encrypting Passwords in the Configuration File ..................................................... 30
Automatic Provisioning .......................................................................................... 32
5 Introduction....................................................................................................... 34
6 Updating the Configuration File Manually ...................................................... 36
7 Setting up Network for Auto Provisioning ..................................................... 38
8 Obtaining Firmware and Configuration Files ................................................. 40
8.1 Provisioning Hunt Order ....................................................................................... 40
8.2 Dynamic URL Provisioning ................................................................................... 40
8.2.1 Provisioning using DHCP Option 160 ..................................................................... 43
8.2.2 Technician's Digit Key Code ................................................................................... 44
8.2.3 Provisioning using DHCP Option 66/67 .................................................................. 45
8.2.4 Provisioning using DHCP Option 43 ....................................................................... 45
8.2.5 Provisioning using the User-Class Option .............................................................. 46
8.2.6 SIP SUBSCRIBE and NOTIFY Messages.............................................................. 55
8.2.7 Hardcoded Domain Name for Provisioning Server ................................................. 57
8.2.8 Cached Address of Last Provisioning Server Used ................................................ 57
8.3 Static URL Provisioning ....................................................................................... 58
Genesys 400 Series IP Phones 3
Page 4

Contents
Quick Setup ............................................................................................................. 60
9 Quick Setup....................................................................................................... 62
Networking .............................................................................................................. 64
10 Introduction....................................................................................................... 66
11 Configuring Date and Time Manually ............................................................. 68
11.1 Configuring Daylight Saving Time ........................................................................ 69
11.2 Configuring the NTP Server ................................................................................. 72
11.3 Configuring NTP Server via DHCP ....................................................................... 74
12 Configuring IP Network Settings ..................................................................... 76
12.1 Configuring Static IP Address .............................................................................. 76
12.1.1 Configuring Static IP Address on the Phone .......................................................... 76
12.1.2 Configuring IP Network Settings ............................................................................. 77
12.2 Configuring Partial DHCP..................................................................................... 79
13 Configuring LAN and PC Port Settings .......................................................... 82
14 Configuring VLAN Settings ............................................................................. 84
14.1 Configuring Manual or Automatic VLAN Assignment ............................................ 85
14.1.1 Configuring Manual VLAN Assignment to the Phone ............................................. 85
14.1.2 Configuring Automatic VLAN Assignment to the IP Phone .................................... 85
14.1.3 Configuring VLAN via DHCP Provisioning Path ..................................................... 85
VoIP Settings ........................................................................................................... 86
15 Configuring SIP Settings ................................................................................. 88
15.1 Configuring General SIP Settings ......................................................................... 88
15.2 Configuring Proxy and Registration ...................................................................... 93
15.2.1 Configuring Proxy Redundancy .............................................................................. 96
15.2.2 Device Registration Failover/Failback .................................................................... 99
15.3 Configuring a Line .............................................................................................. 101
15.4 Configuring Shared Call Appearance ................................................................. 102
15.5 Configuring SIP Timers ...................................................................................... 103
15.6 Configuring SIP QoS .......................................................................................... 105
15.7 Configuring SIP Reject Code ............................................................................. 106
16 Configuring Dialing ........................................................................................ 108
16.1 Configuring Voice Dialing through VocaNOM ..................................................... 108
16.2 Configuring General Dialing Parameters ............................................................ 109
16.3 Configuring Auto Redial ..................................................................................... 111
16.4 Configuring Dial Tones ....................................................................................... 112
16.5 Configuring DTMF .............................................................................................. 114
16.6 Configuring Digit Maps and Dial Plans ............................................................... 115
16.7 Configuring Headset LED to Stay On ................................................................. 117
16.8 Configuring Default Audio Device....................................................................... 118
17 Configuring Ring Tones ................................................................................. 119
17.1 Configuring Distinctive Ring Tones .................................................................... 119
17.1.1 Example of Configuring a Distinctive Ring............................................................ 120
17.2 Configuring CPT Regional Settings .................................................................... 121
4 Administrator’s Guide Version 2.2.16
Page 5

Administrator’s Guide Contents
17.3 Uploading Ring Tones ........................................................................................ 123
17.4 Configuring Beeps to Headsets when a Call Comes in to a Call Center ............. 124
17.5 Configuring the Phone to play Fast Busy Tone if Automatically Disconnected
on Remote Side...................................................................................................125
18 Configuring Media Settings ........................................................................... 127
18.1 Configuring Media Streaming ............................................................................. 127
18.2 Configuring RTP Port Range and Payload Type ................................................ 128
18.3 Configuring RTP QoS ........................................................................................ 129
18.4 Configuring Codecs............................................................................................ 130
19 Configuring Voice Settings............................................................................ 133
19.1 Configuring Gain Control .................................................................................... 133
19.2 Configuring Jitter Buffer ..................................................................................... 133
19.3 Configuring Silence Compression ...................................................................... 134
19.4 Configuring Noise Reduction .............................................................................. 135
19.5 Configuring Echo Cancellation ........................................................................... 136
20 Configuring Extension Lines ......................................................................... 137
20.1 On the Phone ..................................................................................................... 137
20.2 Using the Web Interface and Configuration File ................................................. 138
21 Configuring Supplementary Services ........................................................... 141
21.1 Selecting the Application Server......................................................................... 141
21.2 Configuring Call Waiting ..................................................................................... 142
21.3 Configuring Call Forwarding ............................................................................... 143
21.4 Configuring a Conference .................................................................................. 145
21.5 Allowing the Initiator to Drop out of a Conference .............................................. 145
21.6 Configuring Automatic Dialing ............................................................................ 146
21.7 Configuring Automatic Answer ........................................................................... 146
21.8 Configuring Do Not Disturb (DnD) ...................................................................... 149
21.9 Configuring Call Pick Up .................................................................................... 150
21.10 Configuring Message Waiting Indication ............................................................ 151
21.11 Configuring Busy Lamp Field ............................................................................. 152
21.12 Configuring Advice of Charge ............................................................................ 154
21.13 Configuring a Tone to Alert to Long Hold ........................................................... 154
21.14 Disabling the HOLD Key .................................................................................... 156
21.15 Configuring Onhook Disconnect when Held ....................................................... 156
21.16 Configuring Ringing on the Default Audio Device ............................................... 157
21.17 Allowing an Incoming Call when the Phone is Locked ........................................ 158
21.18 Allowing Call Center Agents to Record Welcome Greetings ............................... 158
21.19 Enabling the Electronic Hook Switch .................................................................. 159
21.20 Disabling the Hard Mute Key on the Phone ........................................................ 160
21.21 Configuring Attended and Semi-Attended Call Transfer ..................................... 161
21.22 Configuring Blind Transfer.................................................................................. 161
21.23 Creating a Speed Dial File for Configuration File ................................................ 162
22 Configuring Volume Levels ........................................................................... 163
22.1 Configuring Gain Control .................................................................................... 163
Genesys 400 Series IP Phones 5
Page 6

Contents
22.2 Configuring Tone Volume .................................................................................. 166
22.3 Configuring Ringer Volume ................................................................................ 167
22.4 Configuring Speaker Volume ............................................................................. 168
22.5 Configuring Handset Volume ............................................................................. 171
22.6 Configuring Headset Volume ............................................................................. 173
Advanced Phone Settings .................................................................................... 176
23 Configuring the Phone Directory .................................................................. 177
23.1 Configuring the Corporate Directory ................................................................... 177
23.1.1 Configuring the LDAP-based Corporate Directory ............................................... 177
23.1.2 Loading a Text-based Corporate Directory File .................................................... 179
23.2 Modifying the Local Phone Directory .................................................................. 181
24 Configuring Keys ............................................................................................ 183
24.1 Configuring Function Keys ................................................................................. 183
24.1.1 440HD Phone ....................................................................................................... 183
24.1.2 Configuring Additional Function Keys ................................................................... 184
24.2 Configuring Programmable Keys........................................................................ 185
24.2.1 440HD Phones ...................................................................................................... 185
24.3 Configuring Speed Dials .................................................................................... 188
24.3.1 420HD and 405/405HD Phone Models ................................................................ 188
24.3.2 Deleting Speed Dials ............................................................................................ 190
24.3.3 Saving Configured Speed Dials ............................................................................ 190
24.3.4 Creating a Speed Dial File for the Configuration File ........................................... 191
24.4 Configuring Softkeys .......................................................................................... 192
24.4.1 Configuring Programmable Softkeys (PSK) ......................................................... 195
24.5 Configuring Navigation Control Button Positions ................................................ 196
24.5.1 Saving Configured Keys ....................................................................................... 197
24.5.2 Loading Saved Keys to Phones ............................................................................ 197
25 Disabling Hard Keys and Softkeys ............................................................... 198
26 Configuring Paging ........................................................................................ 200
26.1 Configuring a Key for Paging using the Web Interface ....................................... 200
26.1.1 Configuring Barge-in ............................................................................................. 201
26.2 Configuring Paging Using the Configuration File ................................................ 202
27 Configuring Feature Key Synchronization ................................................... 205
Security .................................................................................................................. 207
28 Implementing X.509 Authentication .............................................................. 209
28.1 Factory-Set Certificates and AudioCodes Trusted Root CA ............................... 209
28.2 User-Generated Certificates ............................................................................... 210
28.3 External Trusted Root CAs ................................................................................. 211
29 Loading a Certificate ...................................................................................... 213
29.1 Loading the Trusted Root CA Certificate to the Phone ....................................... 213
29.1.1 Loading Trusted Root CA Certificate Using Configuration File ............................ 213
29.2 Loading the Client Certificate to the Phone ........................................................ 214
29.2.1 Loading the Client Certificate to the Phone using the configuration file ............... 214
29.2.2 Enabling Server-side Authentication (Mutual Authentication) .............................. 215
29.3 Generating a Certificate Signing Request .......................................................... 216
6 Administrator’s Guide Version 2.2.16
Page 7

Administrator’s Guide Contents
29.4 Using Previously Loaded Certificates ................................................................. 217
30 Configuring SIP TLS ....................................................................................... 219
30.1 Configuring TLS ................................................................................................. 219
30.1.1 Configuring SIP TLS using the Web Interface ...................................................... 219
31 Configuring 802.1x ......................................................................................... 221
31.1 Configuring 802.1x in the Phone Screen ............................................................ 221
31.1.1 Configuring EAP-MD5 Mode ................................................................................ 222
31.1.2 Configuring EAP-TLS Mode ................................................................................. 222
31.2 Configuring 802.1x Using Web and Configuration File ....................................... 222
31.2.1 Configuring EAP MD5 Mode ................................................................................. 222
31.2.2 Configuring EAP TLS Mode .................................................................................. 223
32 Configuring SRTP ........................................................................................... 225
33 Configuring HTTP/S ....................................................................................... 228
34 Logging into a Remote HTTP/S Server from the Phone*9 .......................... 230
35 Securing the Web Interface using HTTP/S ................................................... 232
35.1 Provisioning ....................................................................................................... 232
36 MAC-Based Authentication ........................................................................... 234
Maintenance .......................................................................................................... 236
37 Changing Administrator Login Credentials ................................................. 237
38 Restarting Phones .......................................................................................... 239
38.1 Restarting from the Phone ................................................................................. 239
38.2 Restarting the Phone using the Web Interface ................................................... 240
39 Restoring Phone Defaults .............................................................................. 241
39.1 Restoring Factory Defaults from the Phone's Screen ......................................... 241
39.2 Restoring Factory Defaults using the Web Interface........................................... 242
Status and Monitoring .......................................................................................... 244
40 Determining Network Status.......................................................................... 245
40.1 Determining LAN Status ..................................................................................... 245
40.2 Determining Port Status ..................................................................................... 245
40.3 Determining 802.1x Status ................................................................................. 245
41 Determining VoIP Status ................................................................................ 248
41.1 Determining Phone Status ................................................................................. 248
41.2 Determining Line Status ..................................................................................... 248
41.3 Determining Memory Status ............................................................................... 249
41.4 Viewing Current Call Information ........................................................................ 250
42 Viewing Call History ....................................................................................... 252
43 Accessing System Information ..................................................................... 254
43.1 Accessing Phone Firmware Version ................................................................... 254
43.1.1 Accessing Firmware Version using the Web Interface ......................................... 254
43.1.2 Accessing Firmware Version from the Phone's Screen ....................................... 254
43.2 Viewing Phone Firmware Release Information ................................................... 255
Genesys 400 Series IP Phones 7
Page 8

Contents
43.2.1 Viewing Firmware Release Information in the Web Interface............................... 255
43.2.2 Viewing Firmware Release Information on the Phone ......................................... 256
44 Monitoring Quality of Experience ................................................................. 258
44.1 Configuring Remote Voice Quality Monitoring .................................................... 258
44.1.1 Configuring RTCP Extended Report ..................................................................... 258
44.1.2 Configuring Voice Quality Monitoring ................................................................... 259
Diagnostics and Troubleshooting ................................................................ ....... 261
45 Diagnosing Phone Hardware ......................................................................... 262
45.1 Testing Keypad and Hook .................................................................................. 263
45.2 Testing Handset ................................................................................................. 264
45.3 Testing the Headset ........................................................................................... 264
45.4 Testing Hands Free............................................................................................ 264
46 Recovering Firmware ..................................................................................... 266
47 Configuring System Logging (Syslog) ......................................................... 268
47.1.1 Analyzing and Debugging Traffic using Regular Syslog ....................................... 268
47.1.2 Analyzing and Debugging Traffic using 'Lightweight Syslog' ................................ 270
48 Viewing Error Messages Displayed in the Phone Screen ........................... 271
49 Debugging using Packet Recording Parameters ......................................... 273
50 Creating a Crash Dump File........................................................................... 275
51 Configuring Port Mirroring ............................................................................ 277
52 Enabling Tracing ............................................................................................ 279
Appendices ........................................................................................................... 282
A Configuring Phones in Server-Specific Deployments ......................................... 283
A.1 BroadSoft's BroadWorks ....................................................................................... 283
A.2 Asterisk, Coral and Metaswitch ............................................................................ 299
A.3 Genesys SIP Server for Contact Centers ............................................................. 299
B Configuring Automatic Call Distribution (ACD) ................................................... 314
B.1 Softkey Display and Command Menu Options ..................................................... 318
C Recovering Genesys’ IP Phone ......................................................................... 319
C.1 Identifying that the Phone is in Recovery Mode ................................................... 319
C.2 Verifying that the Phone is in Recovery Mode ...................................................... 319
C.3 Recovering the Phone .......................................................................................... 321
C.4 Verifying that the Phone is Downloading the Image File ...................................... 323
D Deploying Genesys IP Phones - Use Case ........................................................ 326
D.1 Preparing Configuration (cfg) Files for the Enterprise Customer ......................... 326
D.2 Preparing the DHCP Server to Automatically Provision Phones .......................... 330
D.3 Making Sure Phones are Correctly Provisioned ................................................... 330
E Supported SIP RFCs and Headers .................................................................... 332
E.1 SIP Compliance Tables ........................................................................................ 334
F Parameters Requiring Reload / Reboot .............................................................. 338
G Specifications ..................................................................................................... 340
H RTCP-XR Parameters ........................................................................................ 344
I Example SIP - PUBLISH Message ..................................................................... 346
8 Administrator’s Guide Version 2.2.16
Page 9

Administrator’s Guide Contents
List of Figures
Figure 2-1: Language ............................................................................................................................ 21
Figure 3-1: Web Interface Login ............................................................................................................ 22
Figure 3-2: Web Interface Areas ........................................................................................................... 23
Figure 3-3: User Account ....................................................................................................................... 24
Figure 6-1: Configuration File (430 HD) ................................................................................................ 36
Figure 6-2: Load New Configuration File ............................................................................................... 36
Figure 8-1: Automatic Provisioning – Dynamic URL ............................................................................. 40
Figure 8-2: Automatic Provisioning - DHCP Option 160 ....................................................................... 43
Figure 8-3: Provisioning using DHCP Option 43 in the DHCP Server .................................................. 46
Figure 8-4: DHCP Options Assigned to IPv4 Addresses ...................................................................... 47
Figure 8-5: Defining User Classes ......................................................................................................... 47
Figure 8-6: DHCP User Classes ............................................................................................................ 47
Figure 8-7: New Class ........................................................................................................................... 49
Figure 8-8: Packet Bytes Window ......................................................................................................... 49
Figure 8-9: DHCP User Classes ............................................................................................................ 50
Figure 8-10: Set Predefined Options ..................................................................................................... 50
Figure 8-11: Predefined Options and Values ........................................................................................ 51
Figure 8-12: Option Type – Add AudioCodes 160 Option ..................................................................... 51
Figure 8-13: Predefined Options and Values – Add OVOC Server Location ........................................ 52
Figure 8-14: 'Scope Leased' Folder - Configure Options ...................................................................... 52
Figure 8-15: Configure Options 1 .......................................................................................................... 53
Figure 8-16: Configure Options 2 .......................................................................................................... 53
Figure 8-17: Server Options .................................................................................................................. 54
Figure 8-18: Three Scope Options Created .......................................................................................... 54
Figure 8-19: Automatic Provisioning – Static URL ................................................................................ 58
Figure 9-1: Quick Setup ......................................................................................................................... 62
Figure 11-1: Date and Time ................................................................................................................... 68
Figure 11-2: NTP & Time Settings ......................................................................................................... 69
Figure 11-3: Daylight Saving Time ........................................................................................................ 69
Figure 11-4: NTP & Time Settings ......................................................................................................... 72
Figure 11-5: NTP and Time Settings ..................................................................................................... 74
Figure 12-1: Network Settings ............................................................................................................... 77
Figure 13-1: Network Settings - Port Mode ........................................................................................... 82
Figure 14-1: Network Settings - VLAN Settings .................................................................................... 84
Figure 15-1: Signaling Protocols- SIP General...................................................................................... 88
Figure 15-2: Web Interface - SIP Proxy and Registrar .......................................................................... 93
Figure 15-3: Proxy Redundancy ............................................................................................................ 96
Figure 15-4: Line Settings.................................................................................................................... 101
Figure 15-5: Line Settings.................................................................................................................... 101
Figure 15-6: Shared Call Appearance ................................................................................................. 102
Figure 15-7: Signaling Protocols - SIP Timers .................................................................................... 103
Figure 15-8: Quality of Service ............................................................................................................ 105
Figure 15-9: General Parameters - Reject Code ................................................................................. 106
Figure 16-1: Web Interface - VocaNOM .............................................................................................. 108
Figure 16-2: Web Interface Dialing ...................................................................................................... 109
Figure 16-3: Automatic Redial On Busy .............................................................................................. 111
Figure 16-4: Dialing Page - Tones ....................................................................................................... 112
Figure 16-5: Services Page - Tones .................................................................................................... 112
Figure 16-6: DTMF Transport Mode .................................................................................................... 114
Figure 16-7: Digit Map and Dial Plan ................................................................................................... 115
Figure 16-8: Default Audio Device ....................................................................................................... 118
Figure 17-1: Distinctive Ringing ........................................................................................................... 119
Figure 17-2: Distinctive Ringing ........................................................................................................... 120
Figure 17-3: Example of the Alert-Info Header .................................................................................... 120
Figure 17-4: Tones - Regional Settings ............................................................................................... 121
Figure 17-5: Upload Ringing Tone ...................................................................................................... 123
Figure 18-1: Media Streaming ............................................................................................................. 128
Figure 18-2: Quality of Service ............................................................................................................ 129
Genesys 400 Series IP Phones 9
Page 10

Contents
Figure 18-3: Media Streaming - Codecs .............................................................................................. 130
Figure 18-4: Media Streaming - Codecs .............................................................................................. 131
Figure 19-1: Voice – Jitter Buffer ......................................................................................................... 133
Figure 19-2: Voice - Silence Compression .......................................................................................... 134
Figure 19-3: Voice - Noise Reduction .................................................................................................. 135
Figure 20-1: Line Settings.................................................................................................................... 138
Figure 21-1: Services ........................................................................................................................... 141
Figure 21-2: Services - Call Waiting .................................................................................................... 142
Figure 21-3: Services - Call Forward ................................................................................................... 143
Figure 21-4: Services - Conference ..................................................................................................... 145
Figure 21-5: Dialing - Automatic Dialing .............................................................................................. 146
Figure 21-6: Services - DnD ................................................................................................................ 149
Figure 21-7: Services - BLF Support - Call Pick Up ............................................................................ 150
Figure 21-8: Services - BLF ................................................................................................................. 152
Figure 22-1: Voice - Gain Control ........................................................................................................ 163
Figure 23-1: LDAP ............................................................................................................................... 177
Figure 23-2: Corporate Directory ......................................................................................................... 180
Figure 23-3: Directory - Add Contact ................................................................................................... 181
Figure 24-1: 440HD Phone Personal Settings - Function Keys .......................................................... 183
Figure 24-2: Programmable Keys (440HD Phones) ............................................................................ 185
Figure 24-3: Line Settings.................................................................................................................... 186
Figure 24-4: Programmable Keys ........................................................................................................ 187
Figure 26-1: Services – Enable Paging ............................................................................................... 200
Figure 26-2: Enable Barge-in .............................................................................................................. 201
Figure 28-1: Certificate ........................................................................................................................ 211
Figure 29-1: Root CA Certificate ......................................................................................................... 213
Figure 29-2: Client Certificate .............................................................................................................. 214
Figure 29-3: Certificate Signing Request ............................................................................................. 216
Figure 30-1: Signaling Protocols - SIP General .................................................................................. 219
Figure 31-1: Web Interface –801.1X Settings - EAP-MD5 .................................................................. 222
Figure 31-2: Web Interface –801.1X Settings - EAP-TLS ................................................................... 223
Figure 32-1: SRTP ............................................................................................................................... 225
Figure 35-1: Securing Web Interface Management with HTTP/S ....................................................... 232
Figure 35-2: Automatic Provisioning .................................................................................................... 233
Figure 37-1Users – Administrator Account .......................................................................................... 237
Figure 38-1: Restart System ................................................................................................................ 240
Figure 38-2: Confirmation Box ............................................................................................................. 240
Figure 39-1: Restore Defaults ............................................................................................................. 242
Figure 39-2: Confirmation to Restore Defaults .................................................................................... 242
Figure 40-1: LAN Information .............................................................................................................. 245
Figure 40-2: Port Mode Status ............................................................................................................ 245
Figure 40-3: 802.1X Status .................................................................................................................. 245
Figure 41-1: VoIP Status - Phone Status ............................................................................................ 248
Figure 41-2: Line Status ...................................................................................................................... 248
Figure 41-3: Memory Status ................................................................................................................ 249
Figure 41-4: Memory Status – Linux meminfo Command – Displayed Information ............................ 250
Figure 41-5: Web Interface –Line 1 Call Information ........................................................................... 250
Figure 42-1: Call History ...................................................................................................................... 252
Figure 43-1: System Information–Firmware Version ........................................................................... 254
Figure 43-2: System Information – Release Information ..................................................................... 255
Figure 44-1: Media Streaming - RTCP-XR .......................................................................................... 258
Figure 45-1: Diagnostic Tests Displayed in Phone LCD ..................................................................... 262
Figure 45-2: Keypad and Hook Test– On-Hook (e.g., 440HD) ........................................................... 263
Figure 45-3: Keypad Test – Off-Hook (e.g., 440HD) ........................................................................... 263
Figure 47-1: Web Interface –System Logging ..................................................................................... 268
Figure 49-1: Recording ........................................................................................................................ 273
Figure 50-1: Crash Dump .................................................................................................................... 275
Figure 51-1: Web Interface –Port Mirroring ......................................................................................... 277
Figure 52-1: Tracing System Key Behavior ......................................................................................... 279
Figure A-1: BLF Configuration in a BroadSoft Environment ................................................................ 284
10 Administrator’s Guide Version 2.2.16
Page 11

Administrator’s Guide Contents
Figure A-2: Configuring Call Forwarding using BroadSoft's BroadWorks ........................................... 286
Figure A-3: Configuring DnD in BroadSoft's BroadWorks - Status ..................................................... 287
Figure A-4: Configuring DnD in BroadSoft's BroadWorks ................................................................... 287
Figure A-5: Services ............................................................................................................................ 288
Figure A-6: Services - Feature Key Synchronization .......................................................................... 288
Figure A-7: Shared Call Appearance with Multiple Call Appearance .................................................. 291
Figure A-8: BroadSoft Server - Assigning Shared Calls Appearance to a User ................................. 291
Figure A-9: BroadSoft Server – Shared Call Appearance Add ........................................................... 293
Figure A-10: Line Settings - Shared Line ............................................................................................ 293
Figure A-11: Services - Conference .................................................................................................... 294
Figure A-12: Directory .......................................................................................................................... 295
Figure A-13: Directory – Delete a Contact ........................................................................................... 296
Figure A-14: BLF Configuration for Application Server Type - Asterisk .............................................. 299
Figure A-15: Registering a Phone on the Redundant Genesys Server .............................................. 311
Figure B-1: ACD .................................................................................................................................. 315
Figure B-2: ACD – Unavailable Reason Code .................................................................................... 315
Figure C-1: Identifying Recovery Mode ............................................................................................... 319
Figure C-2: Verifying Recovery Mode in Wireshark ............................................................................ 319
Figure C-3: Source Ethernet MAC Address in Wireshark Identical to Phone Base's ......................... 320
Figure C-4: Recovering the Phone - Configure the PC NIC to which the Phone is Connected .......... 321
Figure C-5: Verifying with Wireshark that the Phone is Downloading Phone .img File ....................... 323
Figure C-6: Verifying .img File Download with Wireshark – Filtering by TFTP ................................... 324
Figure C-7: Verifying .img File Download using tftpd64 ...................................................................... 324
Figure C-8: Verifying .img File Download using tftpd64 ...................................................................... 325
Figure C-9: Verifying .img File Download on the Phone ..................................................................... 325
Genesys 400 Series IP Phones 11
Page 12

Contents
List of Tables
Table 2-1: Language Display Parameters ............................................................................................. 21
Table 3-1: Port Parameters ................................................................................................................... 24
Table 3-2: User Name and Password Parameters ................................................................................ 24
Table 4-1: Example of CSV File ............................................................................................................ 28
Table 8-1: DHCP Automatic Provisioning Parameters .......................................................................... 41
Table 8-2: Auto Provisioning via DHCP Option 66/67 ........................................................................... 45
Table 8-3: DHCP User Class Entry for Each AudioCodes Phone Model Deployed ............................. 50
Table 8-4: Static URL Automatic Provisioning Parameters ................................................................... 59
Table 11-1: Date Display Format ........................................................................................................... 68
Table 11-2: Daylight Saving Time Parameters ...................................................................................... 69
Table 11-3: NTP Server Parameters ..................................................................................................... 72
Table 11-4: NTP Server and GMT Parameters ..................................................................................... 75
Table 12-1: Network Settings Parameters............................................................................................. 78
Table 12-2: Partial DHCP Parameters .................................................................................................. 79
Table 13-1: Port Settings ....................................................................................................................... 82
Table 14-1: VLAN Settings .................................................................................................................... 84
Table 15-1: SIP General Parameters .................................................................................................... 89
Table 15-2: Proxy and Registrar Parameters ........................................................................................ 93
Table 15-3: SIP Proxy Server Redundancy Parameters ....................................................................... 97
Table 15-4: Device Registration Failover Parameters ........................................................................... 99
Table 15-5: Device Registration Failback Parameter .......................................................................... 100
Table 15-6: SIP Timers Parameters .................................................................................................... 103
Table 15-7: SIP QoS Parameters ........................................................................................................ 105
Table 15-8: Reject Code Parameter .................................................................................................... 106
Table 16-1: Voice-Dialing Parameter Descriptions ............................................................................. 108
Table 16-2: Dialing Parameters ........................................................................................................... 109
Table 16-3: Automatic Redial On Busy Parameters ............................................................................ 111
Table 16-4: Dial Tones Parameters ..................................................................................................... 112
Table 16-5: DTMF Transport Mode ..................................................................................................... 114
Table 16-6: Digit Map and Dial Plan Parameters ................................................................................ 115
Table 16-7: Headset LED Parameter .................................................................................................. 117
Table 16-8: Audio Device Parameter .................................................................................................. 118
Table 17-1: Distinctive Ringing Parameters ........................................................................................ 119
Table 17-2: Regional Parameters ........................................................................................................ 121
Table 17-3: Ring Tone Parameters ..................................................................................................... 124
Table 17-4: Configuring Beeps to be Played to Headsets when Calls Come in ................................. 124
Table 17-5: Configuring the Phone to Play a Fast Busy Tone when Automatically Disconnected on Remote
Side ...................................................................................................................................................... 125
Table 18-1: Media Streaming Parameters........................................................................................... 127
Table 18-2: RTP Port Range and Payload Type Parameters ............................................................. 128
Table 18-3: RTP QoS Parameter ........................................................................................................ 129
Table 18-4: Codec Parameters ........................................................................................................... 130
Table 19-1: Jitter Buffer Parameters ................................................................................................... 133
Table 19-2: Silence Compression Parameters .................................................................................... 134
Table 19-3: Noise Reduction Parameters ........................................................................................... 135
Table 20-1: Line Parameters ............................................................................................................... 138
Table 21-1: General Supplementary Services Parameters ................................................................. 141
Table 21-2: Call Waiting Parameters ................................................................................................... 142
Table 21-3: Call Forward Parameters ................................................................................................. 143
Table 21-4: Conference Parameters ................................................................................................... 145
Table 21-5: Allowing a Conference Initiator to Drop Out when On-Hooking ....................................... 145
Table 21-6: Automatic Dialing Parameters .......................................................................................... 146
Table 21-7: Automatic Answer Parameters ......................................................................................... 146
Table 21-8: Do Not Disturb Parameters .............................................................................................. 149
Table 21-9: Call Pick Up Parameters .................................................................................................. 150
Table 21-10: BLF Parameters ............................................................................................................. 152
Table 21-11: Reminder Tone after Long Hold ..................................................................................... 155
Table 21-12: Onhook Disconnect when Held ...................................................................................... 156
12 Administrator’s Guide Version 2.2.16
Page 13

Administrator’s Guide Contents
Table 21-13: Allowing an Incoming Call when the Phone is Locked ................................................... 158
Table 21-14: Disabling the Hard Mute Key on the Phone ................................................................... 160
Table 22-1: Automatic Gain Control Parameters ................................................................................ 163
Table 22-2: Tone Volume Parameter .................................................................................................. 166
Table 22-3: Ringer Volume Parameters .............................................................................................. 167
Table 22-4: Speaker Parameters ........................................................................................................ 168
Table 22-5: Handset Gain Parameters ................................................................................................ 171
Table 22-6: Headset Gain Parameters ................................................................................................ 173
Table 23-1: LDAP Parameters ............................................................................................................ 177
Table 23-2: Provisioning Parameters .................................................................................................. 180
Table 24-1: 440HD Phone Function Keys Parameters ....................................................................... 184
Table 24-2: Programmable Keys Parameters (440HD Phones) ......................................................... 185
Table 24-3: Configuring a Key Event ................................................................................................... 188
Table 25-1: Parameters that can be Configured to Disable Hard Keys / Softkeys ............................. 198
Table 26-1: Paging Function Key Parameters .................................................................................... 201
Table 26-2: Barge-in Parameters ........................................................................................................ 201
Table 26-3: Configuring File Paging Parameters ................................................................................ 202
Table 27-1: Feature Key Synchronization Parameters ....................................................................... 205
Table 29-1: Root CA Certificate Parameters ....................................................................................... 213
Table 29-2: Client Certificate Parameters ........................................................................................... 214
Table 29-3: Server-side Authentication ............................................................................................... 215
Table 30-1: SIP-over-TLS Parameters ................................................................................................ 219
Table 31-1: EAP MD5 Parameters ...................................................................................................... 223
Table 32-1: SRTP Parameters ............................................................................................................ 225
Table 34-1: HTTP/S Login Authentication ........................................................................................... 230
Table 36-1: Authentication ................................................................................................................... 234
Table 37-1: Username and Password Parameters ............................................................................. 237
Table 41-1: Memory Status – Linux Commands ................................................................................. 249
Table 44-1: RTCP_XR Parameters ..................................................................................................... 259
Table 44-2: Voice Quality Monitoring Parameters ............................................................................... 259
Table 47-1: Syslog Parameters ........................................................................................................... 268
Table 48-1: Error Messages Displayed in the Phone Screen ............................................................. 271
Table 49-1: Recording Parameters ..................................................................................................... 273
Table 50-1: Crash Dump Parameters .................................................................................................. 275
Table 51-1: Port Mirroring Parameters ................................................................................................ 277
Table 52-1: Tracing Parameters .......................................................................................................... 280
Table A-1: Features Supported in a BroadSoft Environment .............................................................. 283
Table A-2: Connecting Phones to BroadWorks over HTTP/S – Configuration File Parameters ......... 289
Table A-3: BroadSoft Server - Shared Call Appearance – Identity/Device Profile Type ..................... 292
Table A-4: BroadSoft Server - Shared Call Appearance Add ............................................................. 293
Table 52-5: Remote Conference Parameters ..................................................................................... 294
Table A-6: BroadSoft Server - Shared Call Appearance Add ............................................................. 297
Table 52-7: Displaying a Message in Agents' Phone Screens ............................................................ 297
Table 52-8: Backlight Timeout ............................................................................................................. 297
Table A-9: Displaying a Message on Agents’ Phones ........................................................................ 311
Table A-10: Redundant Genesys Server - Parameters ....................................................................... 311
Table A-11: Retransmission Timer T1 - Parameter ............................................................................. 312
Table B-1: ACD Parameters ................................................................................................................ 316
Table B-2: BroadSoft-Softkey Display States and Command Menu Options ..................................... 318
Table 52-3: Configuring tftpd64 Settings ............................................................................................. 321
Table D-1: CSV File Description .......................................................................................................... 327
Table E-1: Supported IETF RFCs ....................................................................................................... 332
Table E-2: Supported SIP Methods ..................................................................................................... 334
Table E-3: Supported SIP Headers ..................................................................................................... 335
Table G-1: IP Phone Specifications ..................................................................................................... 340
Table H-1: RTCP-XR Parameters ....................................................................................................... 344
Genesys 400 Series IP Phones 13
Page 14

Genesys 400 Series IP Phones
Preface
Note:
Pursuant to the WEEE EU Directive, electronic and electrical waste must not be
disposed of with unsorted waste. Please contact your local recycling authority for
disposal of this product.
Welcome to the 400 Series IP Phones Administrator’s Guide. This guide shows system
administrators how to configure Genesys 420HD and 405 IP Phone to operate with Genesys
SIP
Server in a Genesys contact center.
About 420HD and 405/405HD IP Phones
Genesys IP phones are based on advanced voice technology, providing clarity and a rich
audio experience in Voice-over-IP (VoIP) calls. The phones are fully-featured telephones
that provide voice communication over an IP network, allowing you to place and receive
phone calls, put calls on hold, transfer calls, make conference calls, and so on.
The phone offers a wide variety of management and configuration tools:
• Phone screen - easy-to-use, menu-driven display screen, providing basic phone
configuration and status capabilities
• Web interface - provides a user-friendly Web interface that runs on a Web browser
(Microsoft® Internet Explorer is the recommended browser).
• Configuration file - text-based file (created using any plain text editor such as
Microsoft’s Notepad) containing configuration parameters and which is loaded to the
phone using the Web interface or a TFTP, FTP, HTTP or HTTPS server.
For a detailed description on hardware installation and for operating the phone's call
features, see the User's Manual.
Making Comments on This Document
If you especially like or dislike anything about this document, feel free to e-mail your
comments to [email protected].
When you send us comments, you grant Genesys a nonexclusive right to use or distribute
your comments in any way it believes appropriate, without incurring any obligation to you.
14 Administrator’s Guide Version 2.2.16
Page 15

Administrator’s Guide Notices
Contacting Genesys Customer Care
If you have purchased support directly from Genesys, please read the Genesys Care
Support Guide for On-Premises for complete information on how and when to contact
Customer Care.
Document Version Number
A version number appears at the bottom of the inside front cover of this document. Version
numbers change as new information is added to this document. Here is a sample version
number:
400_IP_Phone_Administrator’s_Guide _12-2018_2.2.161.00
You will need this number when you are talking with Genesys Customer Care about this
product.
Genesys 400 Series IP Phones 15
Page 16

Genesys 400 Series IP Phones
Document Name
420HD IP Phone User's Manual
420HD IP Phone Quick Guide
405 and 405HD IP Phone User's Manual
405 and 405HD IP Phone Quick Guide
One Voice Operations Center (OVOC) IOM Manual
OVOC User's Manual
LTRT
Description
11947
Version 2.2.2.
11948
Version 2.2.4. 405 CC features: Supervisor Listen, Select Ring Audio Device, Disable
Hands-Free Mode, Greeting Recording, BroadSoft-based ACD Hoteling, SHA2, Blind
Transfer, Drop From Local Conference, Factory-Set Certificates and AudioCodes Trusted
Root CA, Factory-Installed Certificates Status Displayed, Send DTMF via SIP and via RTP
Together, HTTP/S Provisioning, CDP Enhanced, Restoring Phone Settings to Defaults;
Slovak, Czech, Turkish.
11949
Version 2.2.8 - preliminary. Proxy and Registrar parameter values, Headset LED, ring-tone ,
RTP Port Range (media_port), Codec Type updated, Media Streaming – Codecs updated,
DnD Activate, Function Keys pqs, Firmware Release Information, RTCP-XR, Disabling
Handset Mode, Displaying a Message in Agents' screens, hide ACW softkey, 3PCC
restored.
11950
Version 2.2.8 - official. Multiple lines. Dual registration (Genesys), 3PCC. voip/talk_event.
unregister_on_voip_reload. Lightweight Syslog. Recovering phone.
11951
11953
11955
11956
Version 2.2.12. 3DES. Multiple Lines. system/syslog/mode. Locking A-B keys –
applicability. User-Class. Distinctive Ring Tone. 405HD. with high resolution screen.
Version 2.2.14. Call Log sync. Technician's Digit Key Code. XSI. EMS > OVOC server.
Removed Redundant Outbound proxy; new note recommending DNS queries. OPUS
payload. Auto_answer_use_180. Paging. Barge-in. voip/services/group_paging/codec.
voip/services/group_paging/end_income_paging_timeout. System Logging. Connecting to
BroadWorks over HTTP/S.
SIP SUBSCRIBE and NOTIFY Messages. USB Headsets. VocaNOM. Disable HOLD key.
Disable mute key. Disabling Hard Keys and Softkeys. SRTP. Backlight timeout. USB
headsets.
voip/signalling/sip/PAI_On_Replay/enable. voip/auto_answer/enabled. Tone played after
long hold.
Related Documentation
Document Revision Record
This table applies to AudioCodes documentation rather than Genesys documentation for these IP
Phones.
16 Administrator’s Guide Version 2.2.16
.
Page 17

Administrator’s Guide Notices
Note: In the tables in this document, boldened parameters enclosed in square brackets
[ ] indicate Configuration File parameters. Web interface parameters are displayed in
regular font above their counterparts.
Genesys 400 Series IP Phones 17
Page 18

1. Introduction
1 Introduction
This manual is intended for the system administrator responsible for setting up and
configuring the 420HD, 405 and 405HD IP phones.
Genesys’ IP phones are based on the proprietary High Definition (HD) voice technology,
providing clarity and a rich audio experience in Voice-over-IP (VoIP) calls. The phones are
fully-featured telephones that provide voice communication over an IP network, allowing you
to place and receive phone calls, put calls on hold, transfer calls, make conference calls, and
so on.
The phone offers a wide variety of management and configuration tools:
Phone screen - easy-to-use, menu-driven display screen, providing basic phone
configuration and status capabilities
Web interface - provides a user-friendly Web interface that runs on a Web browser
(Microsoft® Internet Explorer is the recommended browser).
Configuration file - text-based file (created using any plain text editor such as
Microsoft's Notepad) containing configuration parameters and which is loaded to the
phone using the Web interface or a TFTP, FTP, HTTP or HTTPS server.
For a detailed description on hardware installation and for operating the phone's call features,
refer to the User's Manual.
18 Genesys 400 Series IP Phones
Page 19

Part I
Configuration Tools
Page 20
2. IP Phone User Interface
Note: Screenshots of the 440HD are shown in this document. Screenshots of the 420HD
and 405/405HD are only shown if they significantly differ.
Note:
• The phone is password protected. The default password is 1234. To change the
login password, use the phone's Web interface or Configuration file.
• After entering the password, the access session is applied to all the submenus.
• To change the Administration screen’s login password, use the phone's Web
interface or use the configuration file.
Note: Alternatively, after pressing the MENU key you can press an item's number to
navigate to the item, for example, press 6 to navigate to Administration.
2 IP Phone User Interface
The phone provides a Liquid Crystal Display (LCD) based screen, offering an intuitive, menudriven interface for configuring the phone. The administrative tasks are performed in the
phone's Administration menu.
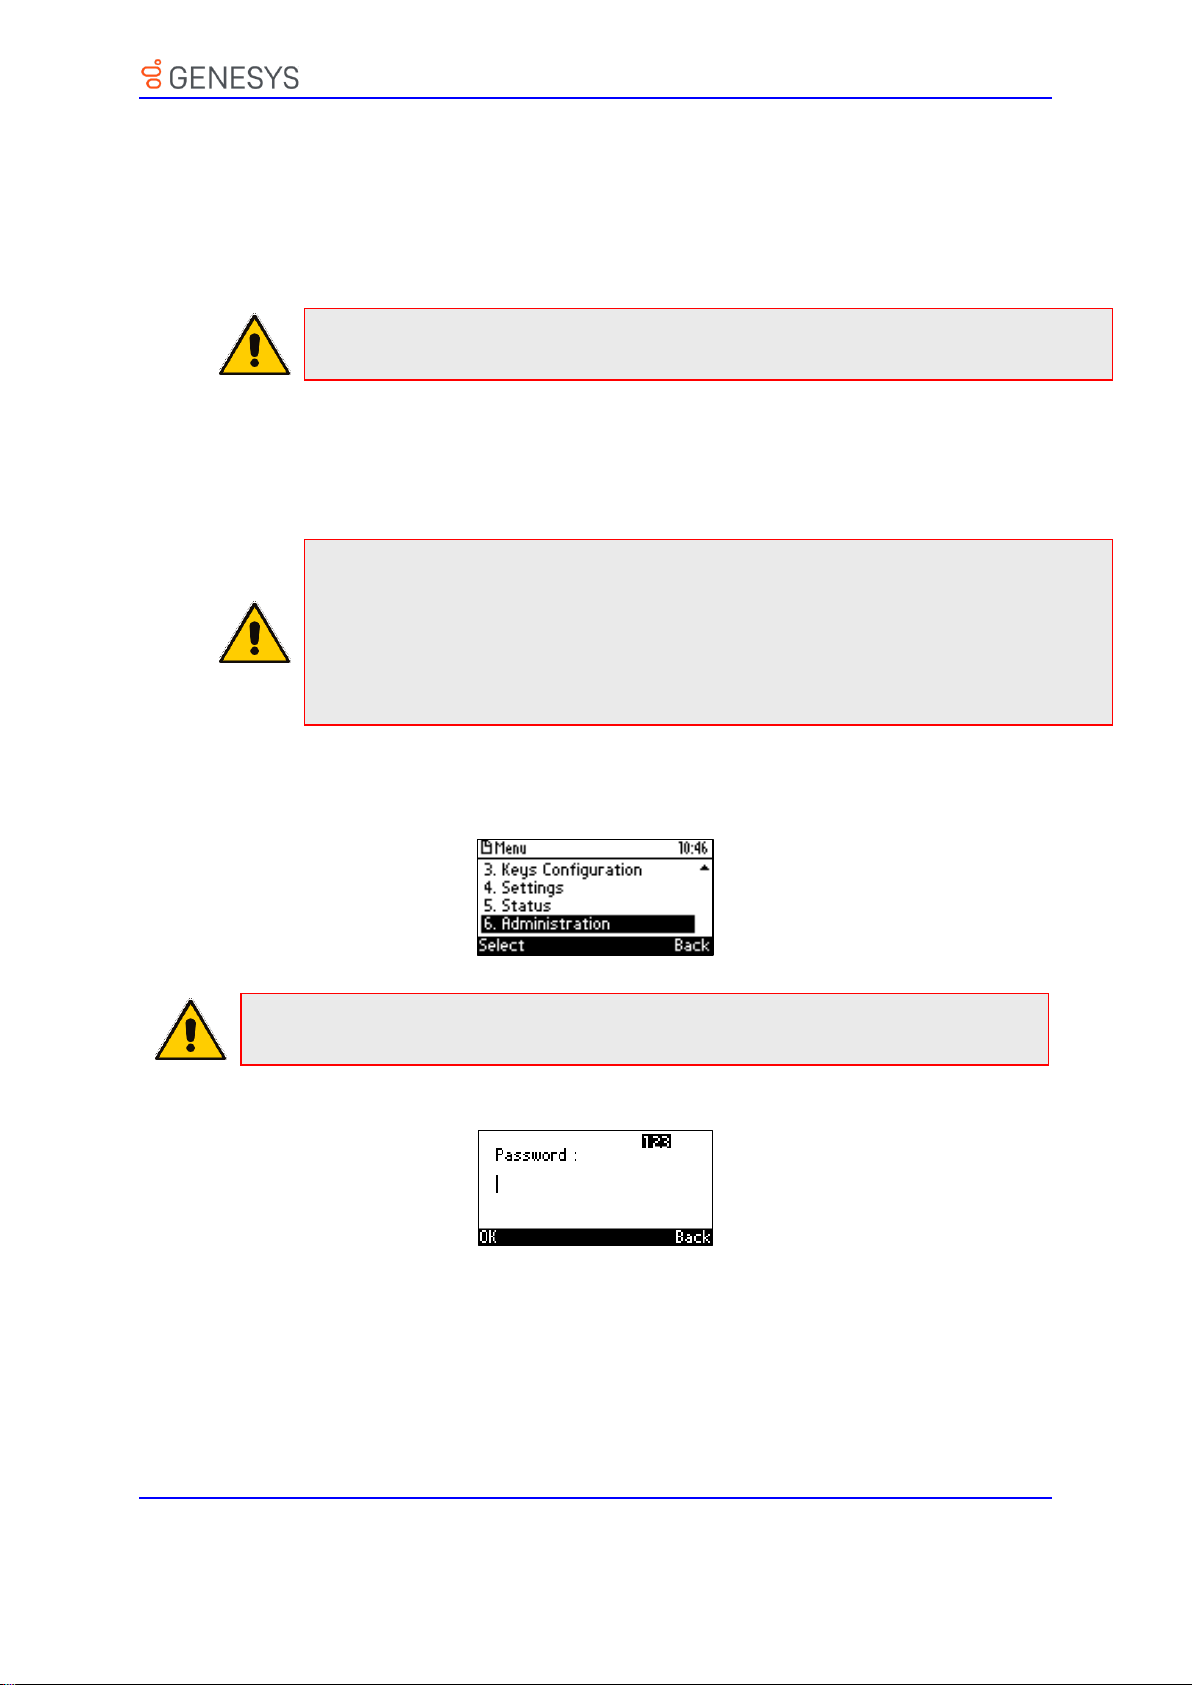
2.1 Accessing the Administration Menu
Here's how to access the Administration menu on the phone.
➢ To access the Administration screen:
1. Press the MENU key on the phone and navigate down to Administration.
2. Press Select; you are prompted for a password.
3. Enter the administration password (Default: 1234) and then press the OK softkey.
20 Administrator’s Guide Version 2.2.16
Page 21
2. IP Phone User Interface
Parameter
Description
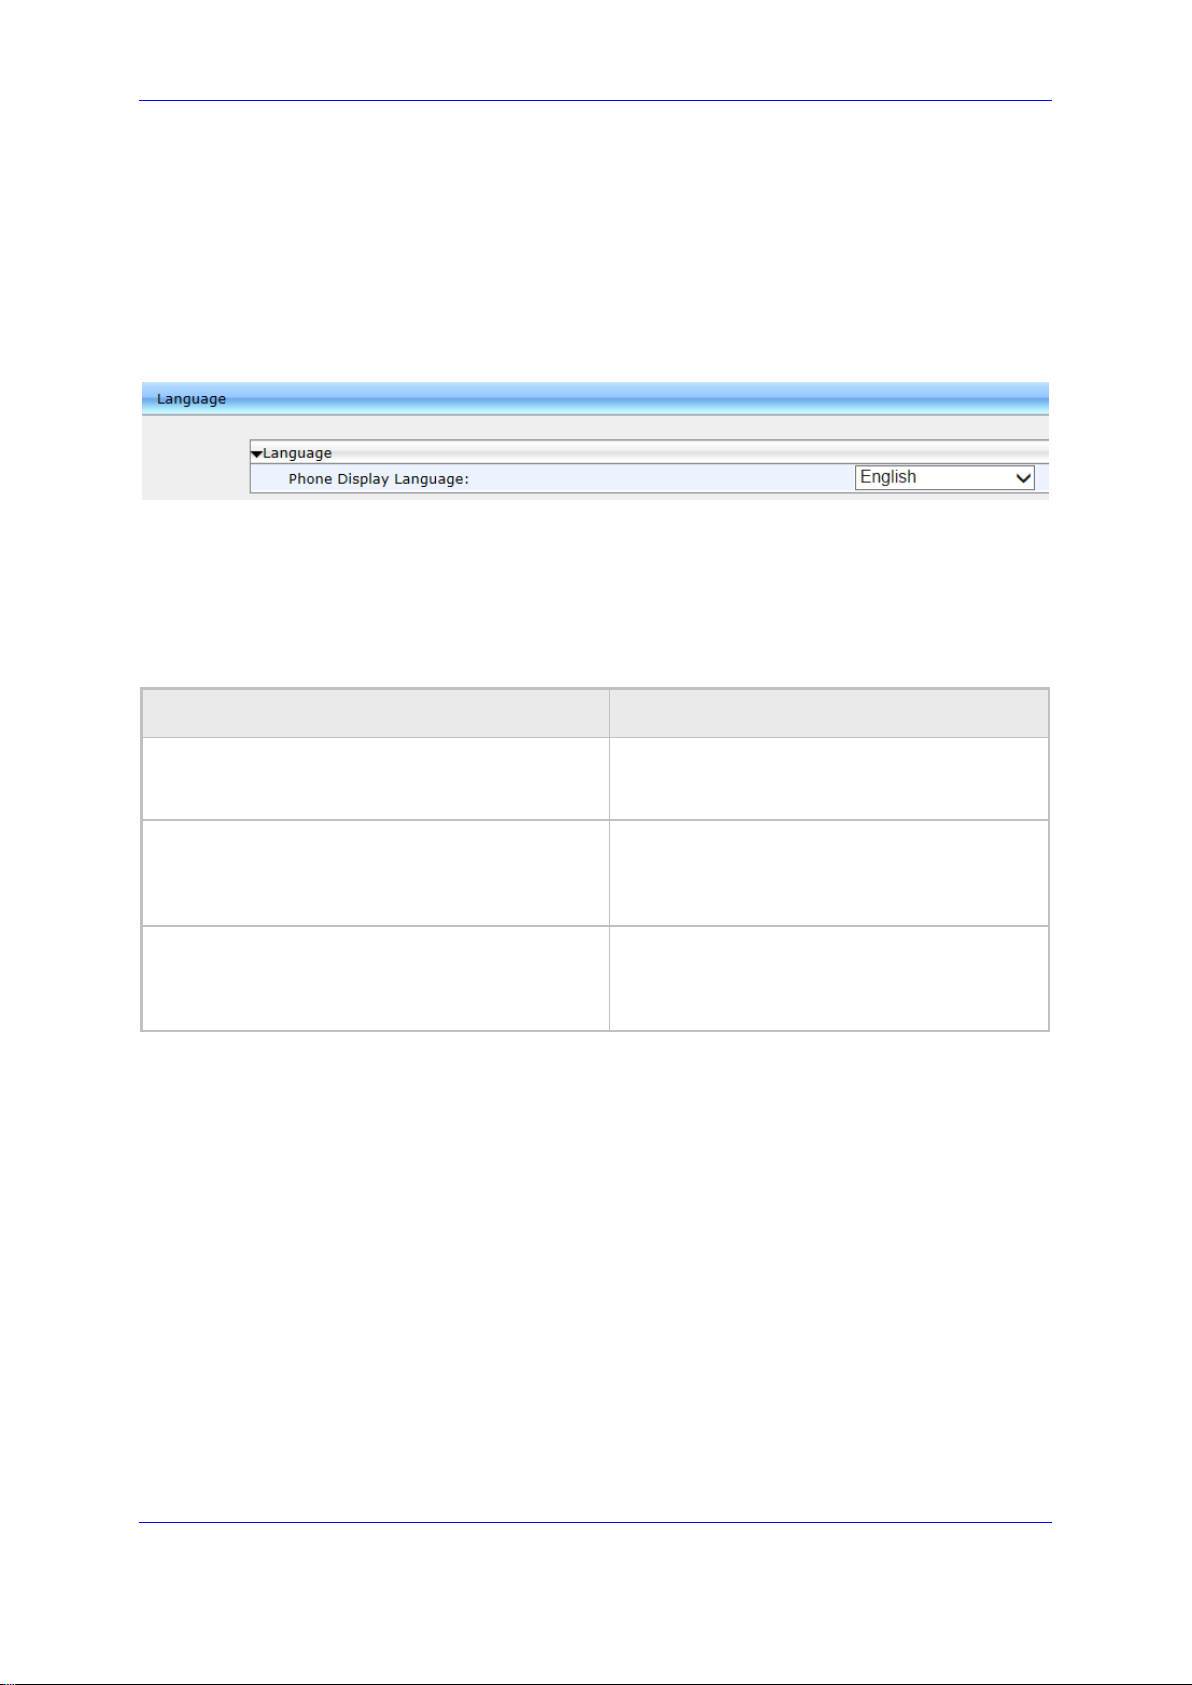
Phone Display Language
[personal_settings/language]
Determines the screen language. See the
Release Notes for the list of languages
supported.
[personal_settings/lcd_contrast]
Determines the screen contrast. Configure to
a level that is comfortable for the user. Range:
0-35 (440HD) and 0-30 (420HD). The default
depends on the hardware revision.
[personal_settings/blf_lcd_contrast]
Applies only to 440HD phone. Determines the
sidecar BLFs contrast. Configure to a level
comfortable for the user.
Range: 0-39. Default: 16.
2.2 Changing Display Language
Here's how to change the language in the phone screen. Language can be configured
using the Web interface or configuration file.
➢ To choose a language using the Web interface:
1. Open the Language page (Configuration tab > Personal Settings menu > Language).
Figure 2-1: Language
2. Select the language according to the parameter in the table below, and then click
Submit; the phone reboots and changes the screen language.
➢ To choose a language using the configuration file:
• Use the table below as reference.
Table 2-1: Language Display Parameters
Genesys 400 Series IP Phones 21
Page 22
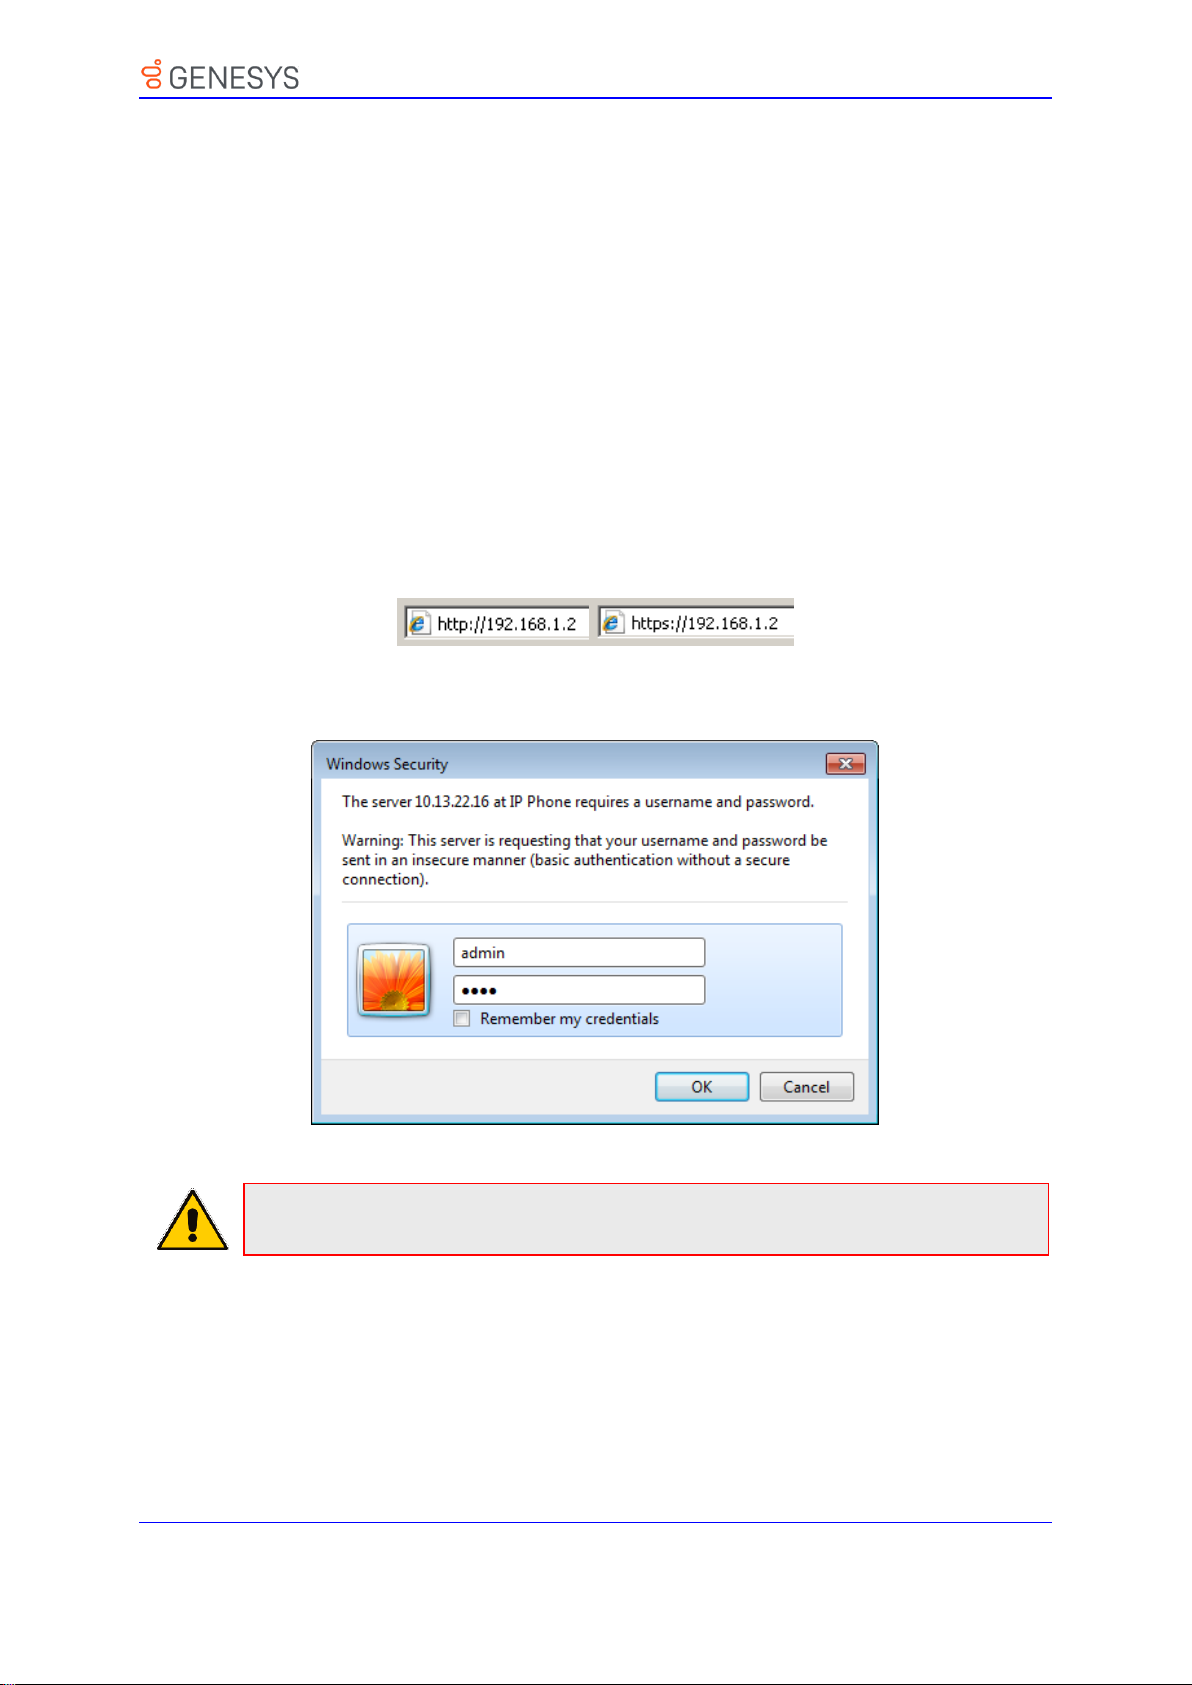
3. Web Interface
Note: The administrator's default login user name and password are admin and 1234
respectively.
3 Web Interface
This section describes the phone's Web interface. You can use the Web interface to
configure the device.
3.1 Accessing Web Interface
You can use any standard Web browser (such as Microsoft Internet Explorer) to access the
phone's Web interface. The IP address used for accessing the Web interface is the phone's
IP address, received from a DHCP server or manually configured (static IP address).
➢ To access the phone's Web interface:
1. Connect the LAN port of your phone to the IP network (using the Cable or ADSL modem
from your Internet Service Provider).
2. Determine the phone's IP address obtained from the DHCP server.
3. Open a Web browser, and then in the URL address field, enter the phone's IP address
(for example, http://192.168.1.2 or https://192.168.1.2), as displayed below:
The Web login window appears:
Figure 3-1: Web Interface Login
4. Alternatively, if your DHCP and DNS servers are synchronized, you can access the
phone Web browser by using the following method:
http://<Phone Model>-<MAC Address>.<Domain Name>
E.g. http://440hd-001122334455.corp.YourCompany.com
5. Enter the User name and Password, and then click OK.
22 Administrator’s Guide Version 2.2.16
Page 23
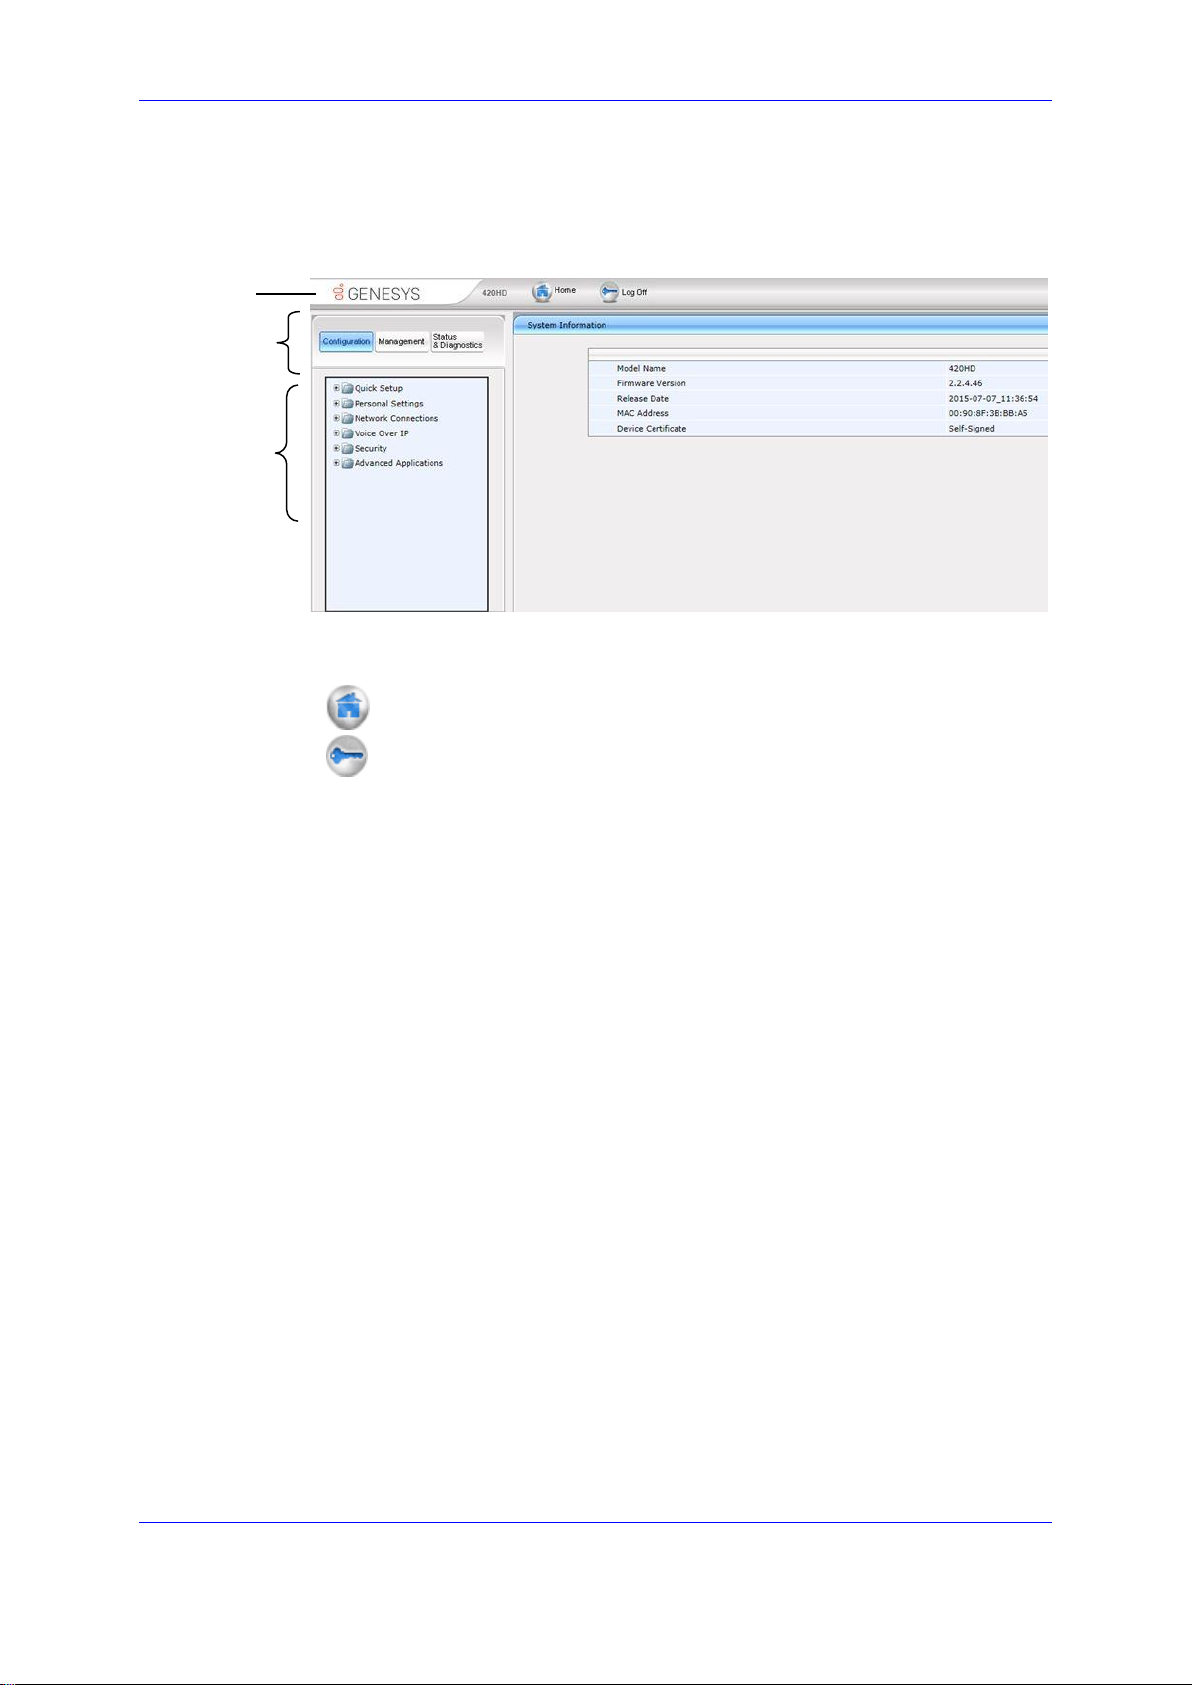
3. Web Interface
Navigation
Bar
Toolbar
Navigation
Tree
3.2 Getting Started with the Web
The areas of the Web interface are shown below:
Figure 3-2: Web Interface Areas
The Web interface is composed of the following main areas:
Toolbar: displays AudioCodes logo and provides the following buttons:
• Home: opens the Home page
• Log off: closes the Web interface
Navigation bar: provides tabs for accessing the configuration menus:
• Configuration: provides menus for configuring the phone.
• Management: provides menus for various management tasks such as firmware
upgrade and changing the login username and password.
• Status& Diagnostics: provides menus for displaying information on the status of
the phone, such as call history.
Navigation tree: tree-like, hierarchical structure of menus pertaining to the selected
tab on the Navigation bar.
Configuration pane: displays the configuration parameters pertaining to a selected
menu in the Navigation tree.
Genesys 400 Series IP Phones 23
Page 24
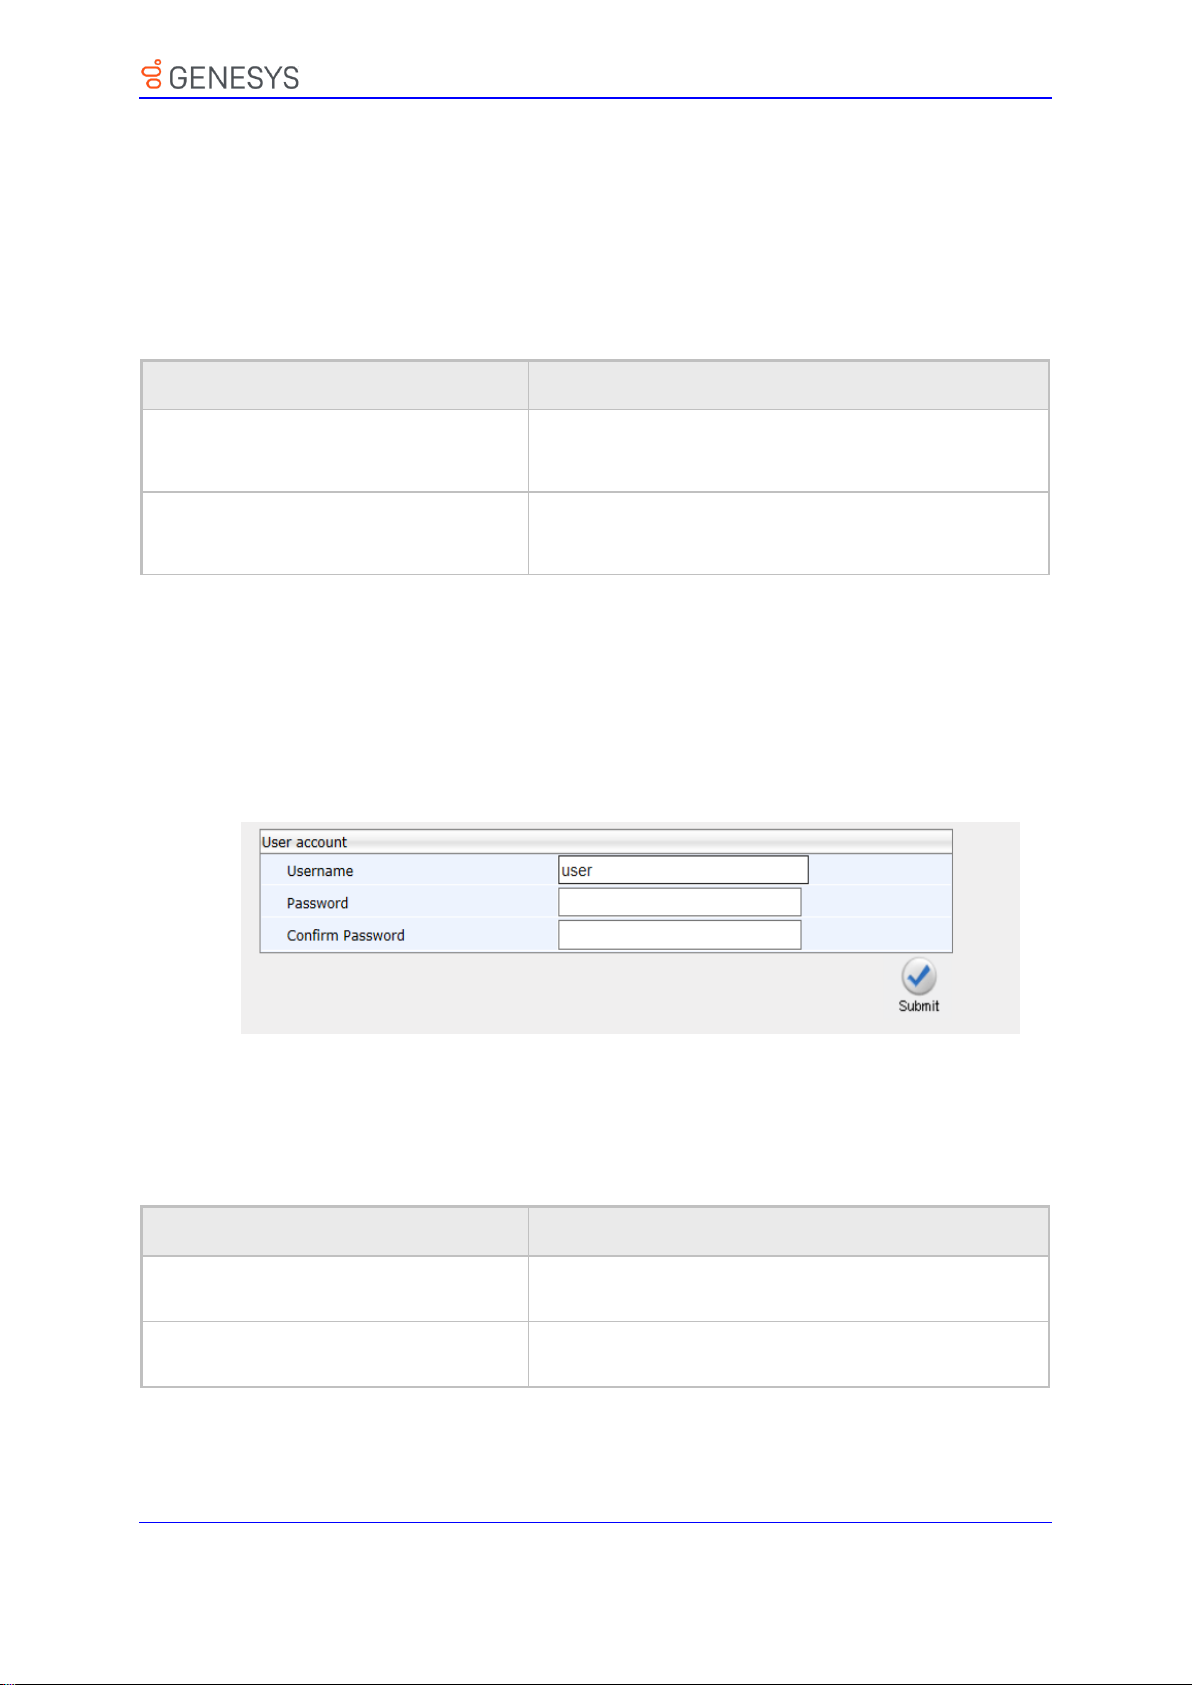
3. Web Interface
Parameter
Description
[system/http_server_port]
Assigns a port number to the Web interface.
The HTTP server by default uses port number 80.
Range: 0-65535.
[system/https_server_port]
Assigns a port number to the Web interface.
The HTTPS server by default uses port number 443.
Range: 0-65535.
Parameter
Description
Username
[system/web_user_name]
The phone user name. Default: admin.
Applies only to the Web interface.
Password
[system/web_user_password]
The encrypted phone password. Default: 1234.
Applies only to the Web interface, and phone screen.
3.3 Configuring the Web Interface's Port
Here's how to assign a port number to the Web interface, using the configuration file.
➢ To configure the Web interface port using the configuration file:
• Use the table below as reference.
Table 3-1: Port Parameters
3.4 Configuring User Login Credentials
Here’s how to configure the phone user's name and password.
➢ To configure the phone user's name and password using the Web interface:
1. Open the User Account page (Management menu > Administration > Users):
Figure 3-3: User Account
2. Configure using the table below as reference, and click Submit.
➢ To configure using the configuration file:
• Use the table below as reference.
Table 3-2: User Name and Password Parameters
24 Administrator’s Guide Version 2.2.16
Page 25

3. Web Interface
This page is intentionally left blank.
Genesys 400 Series IP Phones 25
Page 26

4. Configuration File
4 Configuration File
This section describes the configuration file and the parameters you can configure in it.
4.1 Introduction
The configuration file can be loaded to the phone using the automatic provisioning
mechanism, or manually from your local computer using the Web interface. The subsections
below describe configuration file syntax and linking additional configuration files to a
configuration file.
4.2 File Syntax
The configuration file can be created using a standard ASCII, text-based program such as
Notepad. The configuration file is a .cfg file with the file name being the phone's MAC
address: <phone's MAC address>.cfg.
The syntax of the configuration file is as follows:
<parameter name>=<value>
Make sure the configuration file conforms to these guidelines:
No spaces on either side of the equals (=) sign.
Each parameter must be on a new line.
Below is an example of part of a configuration file:
system/type=440HD
voip/line/0/enabled=1
voip/line/0/id=1234
voip/line/0/description=440HD
voip/line/0/auth_name=1234
voip/line/0/auth_password=4321
4.3 Linking Multiple Files
The Configuration file allows you to include links (URL and/or file name) to other
Configuration files that provide additional parameter settings. This is especially useful in
deployments with multiple phones, where the phones share common configuration but where
each phone has some unique settings. In such a scenario, a phone's Configuration file can
include unique parameter settings as well as links to additional Configuration files with
settings common to all phones.
Linking additional files is achieved by using the include function in the phone's Configuration
file. For example, the below Configuration file provides links to additional Configuration files
(shown in bolded font):
system/type=440HD
include 440HD_<MAC>_voip.cfg
include vlan_conf.cfg
include network_conf.cfg
include provisioning_conf.cfg
26 Administrator’s Guide Version 2.2.16
Page 27

4. Configuration File
Note: If no URL is provided in the Configuration file, the files are retrieved according to
the provisioning information (e.g. DHCP Option 160 as well as Option 66/67).
In addition, the Configuration file can provide URL paths (FTP, TFTP, HTTP, or HTTPS) to
where the additional files are located, as shown in the example below (shown in bolded font):
system/type=440HD
include http://10.10.10.10/440HD_<MAC>_voip.cfg
include https://remote-pc/vlan_conf.cfg
include tftp://10.10.10.10/440HD_<MAC>_network.cfg
include ftp://remote-pc/provisining_conf.cfg
4.4 Downloading the Configuration File from the Phone
For more information, see Maintenance.
4.5 Creating Configuration Files using VoIProvision Utility
When installing Genesys’ IP Phones, the network administrator typically configures each
installed phone automatically. Using DHCP options or other methods, the phone can be
instructed to download a configuration file. This file is typically unique to each phone, based
on the MAC address. This MAC-specific configuration file is generated with phone specific
configuration parameters; such as, the extension ID, name and authentication password.
Not all of the iPBX and SoftSwitch vendors (and especially the full solution vendors) include
provisioning in their interoperability programs. As an IP phone vendor, Genesys is required
to provide a standalone provisioning tool that will enable the provisioning of its phones in
such environments.
Genesys now provides a tool that assists in the automatic generation of configuration files.
These files can be generated for the initial configuration of the phones and then later
regenerated for subsequent configuration updates as required.
4.5.1 Configuration File Format
The detailed format of the phones’ configuration files are described in the appendix.
The following is an output example of an automatically generated MAC-specific file:
system/type=440HD
voip/line/0/enabled=1
voip/line/0/id=56832432
voip/line/0/auth_name=3423fdwer2tre
voip/line/0/auth_password=123456
include global.cfg
4.5.2 Global Configuration File
In addition to the MAC-specific files, it is recommended to maintain a single global
configuration file, which contains parameters that are common to all phones in the specific
site. The MAC-specific files can call the global file (using the 'include' method) as illustrated
in the above example. For more information, see 'Linking Additional Files using “Include”' in
the Administrator's Manual.
Genesys 400 Series IP Phones 27
Page 28
4. Configuration File
[mac]
[name]
[id]
[password]
00908F123456
Jonathan
4071
12345
00908F123457
David
4418
12345
4.5.3 VoIProvision Utility Overview
The VoIProvision utility is a generic tool that automatically generates multiple MAC-specific
configuration files (.cfg). The utility generates a separate .cfg file for each IP phone.
To execute the utility, the user needs to prepare a csv file and a template file. The csv file
contains the tagged records for each phone and the template file maps these tagged records
to a configuration file format, which can be read by the phone.
4.5.4 CSV File
The csv file contains a list of tags and a list of the tag's values. The first line in the file contains
the list of tags (comma-separated) and each of the other lines contains a list of values, where
each line record represents an individual phone.
The csv file is usually exported from the customer's IP-PBX or some other database and
typically contains the list of phones (e.g. MAC, extension ID, user name and password of
each phone).
Table 4-1: Example of CSV File
When opened as a text file, the csv file appears similar to the example below:
[mac],[name],[id],[password]
00908F123456,Jonathan,4071,12345
00908F123457,David,4418,12345
4.5.5 Template File
The template file defines the format of the generated configuration files, but contains tags
instead of actual values. The VoIProvision utility reads the template file and replaces each
tag with actual values from the csv file.
Example of a template file:
system/type=440HD
voip/line/0/enabled=1
voip/line/0/id=[id]
voip/line/0/auth_name=[name]
voip/line/0/auth_password=[password]
include global.cfg
4.5.6 Generated Configuration Files
The generated configuration (.cfg) files use a similar format to the template file; however the
tags are replaced with the actual values that are read by the VoIProvision utility from the csv
file. One of the tags defined in the csv file, should be used as the .cfg file name (in order for
the VoIProvision utility to generate a separate .cfg file for each line record in the csv file).
Typically the tag which defines the MAC address is used as the .cfg file name.
28 Administrator’s Guide Version 2.2.16
Page 29

4. Configuration File
4.5.7 Starting the VoIProvision Utility
The VoIProvision utility can run on both the Linux and Windows platforms. The VoIProvision
utility initially parses the csv file to generate the list of tags. The VoIProvision then reads each
line record of values in the csv file and for each line record, does the following:
Parses the line record to create a list of values
Opens the template file
Generates the .cfg file name and create a new .cfg file
Reads the template file, associates the mapped tags with actual values from the csv
file and writes the result to the .cfg file
Closes the .cfg file and template file
4.5.8 Usage
USAGE: VoIProvision<csv file><template file><.cfg file>
Note the following:
The first line of the csv file contains the list of tags (e.g.,
[mac],[name],[id]).
The remainder of the csv file contains a line record per .cfg file (e.g.
00908f112233,4071,Ethan).
There is no restriction on the format of the tags (e.g., [tag] or @tag@).
The template file defines the .cfg file format. During VoIProvision
run-time, the mapped tags in the template file are associated to actual
values that are read from the csv file.
Currently only a single tag can be defined per line record in the
template file.
The .cfg file name should represent the string of one of the predefined
tags in order to generate a separate .cfg file per csv line record
(e.g., [mac].cfg).
4.6 Using the Encryption Tool
Genesys’ phones use the Triple Data Encryption Standard (3DES) algorithm for encryption.
Here’s how to use the encryption tool.
4.6.1 Encrypting Configuration Files
Here’s how to encrypt the configuration file. For example, you may wish to encrypt the
configuration file when it is send over an unsecure network.
➢ To encrypt the configuration file:
At the command line prompt, specify the following:
encryption_tool.exe –f <filename>.cfg
where <file name>.cfg specifies the name of the Configuration file that you wish to
encrypt.
Once the Configuration file is encrypted, it receives the suffix '.cfx' (e.g. Conf.cfx). This
is the file that you should specify in the 'Configuration URL' and the 'Dynamic
Configuration URL' fields when performing automatic provisioning (see Part II
'Automatic Provisioning').
Genesys 400 Series IP Phones 29
Page 30
4. Configuration File
Note: It's recommended to encrypt the 'System' password using this procedure. If you
choose not to, the 'System' password is by default encrypted using MD5.
4.6.2 Encrypting Passwords in the Configuration File
Here’s how to encrypt phone passwords used in the configuration process, for example, the
'System' password and the 'SIP Authentication' password.
➢ To encrypt passwords:
1. At the command line prompt, specify the following:
encryption_tool.exe –s <password_string>
where <password_string> specifies the string of the password that you wish to
encrypt.
Once the password is encrypted, a string is generated with the following syntax:
{"<encrypted_string>"}
For example:
{"0qrNRpSJ6aE="}
2. Copy the generated string (including the {“ “}) with the syntax specified above to the
relevant parameter in the Configuration file.
For example, if you encrypted the SIP authentication password, the following is
displayed in the relevant line in the configuration file:
voip/line/0/auth_password={"0qrNRpSJ6aE="}
30 Administrator’s Guide Version 2.2.16
Page 31

4. Configuration File
This page is intentionally left blank.
Genesys 400 Series IP Phones 31
Page 32

Part II
Automatic Provisioning
Page 33

4. Configuration File
This page is intentionally left blank.
Genesys 400 Series IP Phones 33
Page 34

5. Introduction
Note:
• In the DHCP Discover message, the phone publishes its model name in Option
fields 60 and 77 (e.g. 440HD). If the administrator wants to provide different
provisioning information to different phone models, the administrator can set up a
policy in the DHCP server according to the phone model name.
• If the phone is powered off for some reason during the firmware upgrade process,
the phone will be unusable and the recovery process must be performed.
• You can only use firmware files with an .img extension and configuration files with a
.cfg extension.
• To "force" the firmware or configuration file to be retrieved immediately regardless
of the 'Check Period' value, click the Check Now button on the relevant page on
the Web interface.
• An additional auto-provisioning mechanism is supported if the provisioning
environment does not provide all the required information (e.g. DHCP options).
5 Introduction
By default, the phone is ready for out-of-the-box deployment using its automatic provisioning
capabilities.
The phone offers a built-in mechanism for automatically upgrading its software image and
updating its configuration. This method is used to upgrade the phone firmware and update
its configuration, by remotely downloading an updated software image and configuration file.
The automatic update mechanism helps you keep your software image and configuration
up-to-date, by performing routine checks for newer software versions and configuration files,
as well as allowing you to perform manual checks.
The automatic update mechanism is as follows:
Before connecting the phone, verify that the provisioning server is running and that the
firmware and configuration files are located in the correct location.
Connect your phone to the IP network, and then connect the phone to the power
outlet.
During DHCP negotiation, the phone requests for DHCP options 66/67/160 to receive
provisioning information. The DHCP server should respond with Option 160 providing
the provisioning URL or Options 66 and 67 providing the TFTP IP address and
firmware file name respectively.
The phone then checks whether new firmware is available by checking the firmware
file header. If the version is different from the one currently running on the phone, the
phone downloads the complete image and burns it to its flash memory.
If a new firmware is unavailable, the phone then checks whether a new configuration
is available. If a configuration file is available on the server, the phone downloads it
and updates the phone's configuration after verifying that the configuration file is
related to the phone model. When a configuration update is needed, the phone might
reboot.
34 Administrator’s Guide Version 2.2.16
Page 35

5. Introduction
This page is intentionally left blank.
Genesys 400 Series IP Phones 35
Page 36
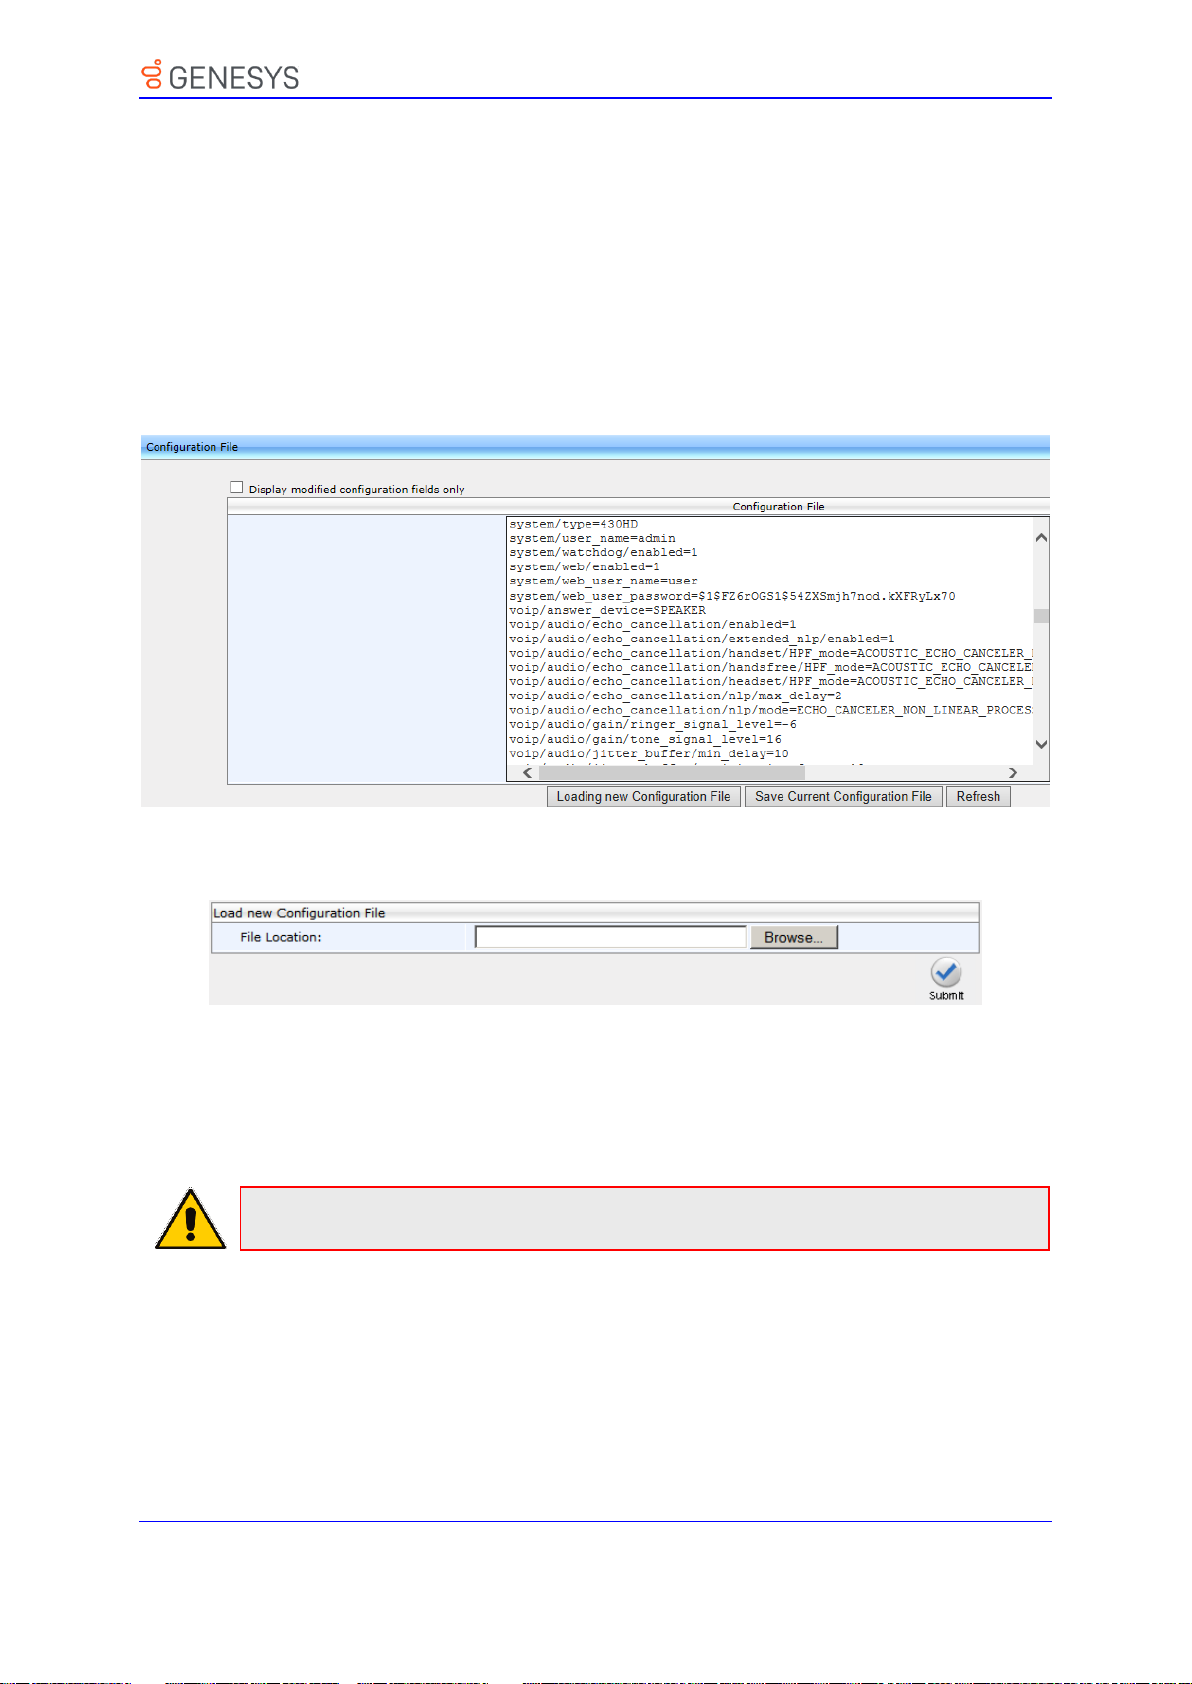
6. Updating the Configuration File Manually
Note: The configuration file name must have the extension .cfg.
6 Updating the Configuration File Manually
The phone enables you to view, save, and load its configuration file to backup and restore
the current configuration.
➢ To manually update the configuration file:
1. Open the Configuration File page (Management tab > Manual Update menu >
Configuration File). The current configuration file settings are displayed in the text
pane.
Figure 6-1: Configuration File (430 HD)
2. Click the Loading new Configuration File button; the following page appears:
Figure 6-2: Load New Configuration File
3. Click the Browse button and then select the required configuration file located on your
local PC; the phone verifies that the configuration file is related to the phone model. The
configuration file is then loaded to the phone. Once loaded, the phone reboots (indicated
by a message displayed on the phone's screen). The phone is now updated with the
new configuration.
36 Administrator’s Guide Version 2.2.16
Page 37

6. Updating the Configuration File Manually
Note: When creating a new configuration file, make sure the system/type parameter in
the configuration file is set to the correct phone model (e.g., 440HD).
➢ To save the configuration file:
In the Configuration File page, click the Saving Current Configuration File button,
and then save the current phone configuration file to a folder on your local PC.
Genesys 400 Series IP Phones 37
Page 38

7. Setting up Network for Auto Provisioning
Note: For manual configuration of Network Settings, see Section 12.
7 Setting up Network for Auto Provisioning
The phone supports dynamic VLAN discovery, dynamic IP addressing (DHCP), and NTP (as
client).
38 Administrator’s Guide Version 2.2.16
Page 39

7. Setting up Network for Auto Provisioning
This page is intentionally left blank.
Genesys 400 Series IP Phones 39
Page 40
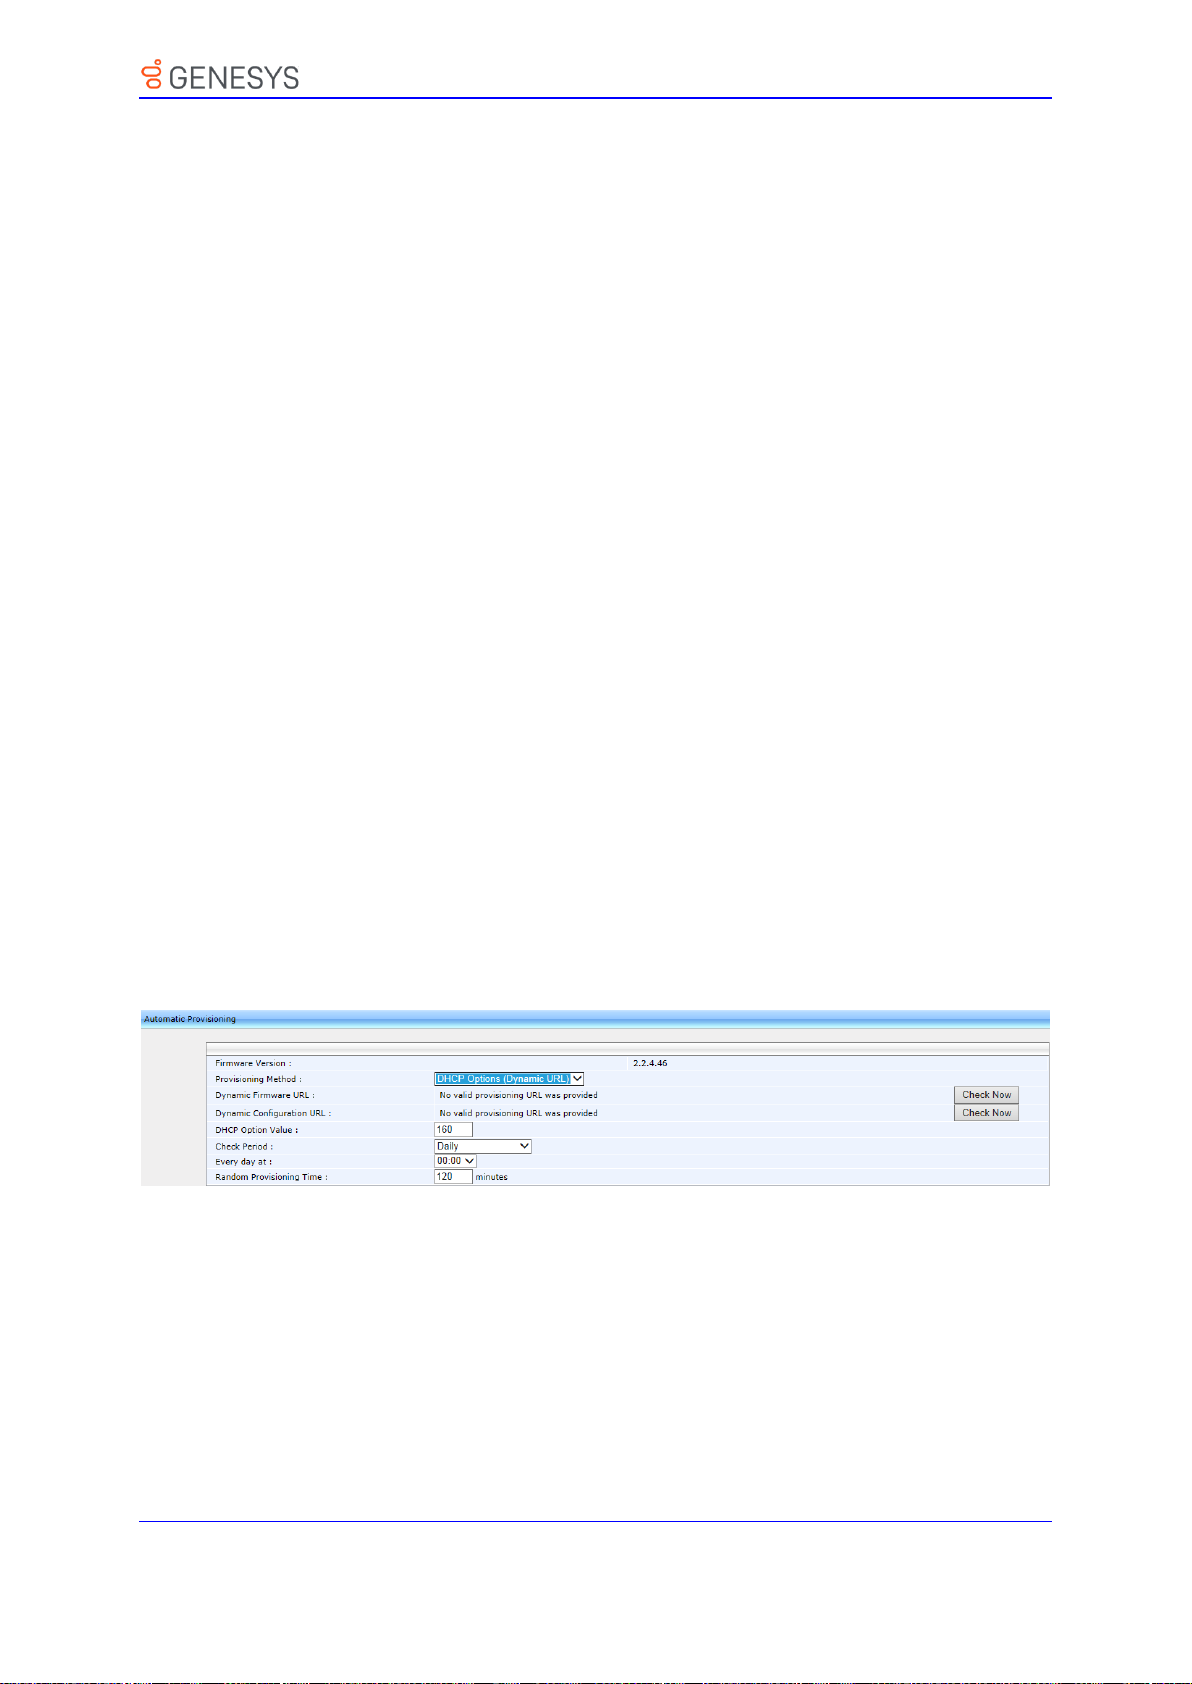
8. Obtaining Firmware and Configuration Files
8 Obtaining Firmware and Configuration
Files
The Web interface allows you to:
Automatically update firmware and configuration files
Manually update firmware and configuration files
8.1 Provisioning Hunt Order
The phone always attempts to use the first provisioning method listed below (DHCP Option
160). If it cannot use this method, it attempts to use the second method listed below, and so
on, until it reaches a successful provisioning method. This is called the provisioning 'hunt
order'. The 'hunt order' is:
1. DHCP Option 160 (see Section 8.2.1)
2. DHCP Options 66-67 (see Section 8.2.3)
3. DHCP Options 43 (see Section 8.2.4)
4. SIP SUBSCRIBE and NOTIFY Messages (see Section 8.2.6)
5. Static and Globally Accessible Domain (see Section 8.2.7)
6. Cached Addresses of the Last Provisioning Server Used on Reboots (see Section
8.2.8)
8.2 Dynamic URL Provisioning
Dynamic Host Configuration Protocol (DHCP) can be used to automatically provision the
phone. The DHCP feature can be configured using the Web interface or configuration file.
➢ To configure DHCP using the Web interface:
1. Open the Automatic Update page (Management tab > Automatic Update menu >
Automatic Provisioning).
Figure 8-1: Automatic Provisioning – Dynamic URL
2. Configure the parameters using the table below as reference, and then click Submit.
40 Administrator’s Guide Version 2.2.16
Page 41

8. Obtaining Firmware and Configuration Files
Parameter
Description
Provisioning Method
[provisioning/method]
Defines the provisioning method:
▪ [Disable] Disable - Automatic update is disabled.
The phone attempts to upgrade its firmware and
configuration
▪ [Dynamic] DHCP Options (Dynamic URL)
(default) - Using DHCP option 160 as well as
option 66/67 for provisioning
▪ [Static] Static URL - Using Static URL for
provisioning
DHCP Option Value
[provisioning/url_option_value]
Determines the DHCP option number to be used for
receiving the URL for provisioning.
The default value is 160.
The phone supports DHCP Option 160 for complete
URL as well as Options 66/67 for TFTP usage.
Option 160 has the highest priority and if absent,
Options 66/67 are used.
The following syntax is available for DHCP option
160:
▪ <protocol>://<server IP address or host name>
▪ <protocol>://<server IP address or host
name>/<firmware file name>
▪ <protocol>://<server IP address or host
name>/<firmware file name>;<configuration file
name>
▪ <protocol>://<server IP address or host
name>/;<configuration file name>
Where <protocol> can be one of the following: ftp,
tftp, http or https.
For example:
▪ ftp://192.168.2.1 – retrieved firmware file
is440HD.img and the configuration file name is
<MAC address>.cfg. For example,
001122334455.cfg
▪ tftp://192.168.2.1/different_firmware_name.img
- retrieved firmware file is
Different_Firmware_Name.img and the
configuration file name is <MAC address>.cfg. For
example, 001122334455.cfg
▪ http://192.168.2.1/different_firmware_name.img
; <MODEL>_<MAC>_conf.cfg - retrieved
firmware file is different_firmware_name.img and
the configuration file name is <Model
type>_<MAC address>_conf.cfg. For example,
440HD_001122334455_conf.cfg
• https://192.168.2.1/;<MODEL>_<MAC>_conf.cfg -
if the model is 440HD, the retrieved firmware file is
➢ To configure DHCP using the configuration file:
• Use the table below as reference.
Table 8-1: DHCP Automatic Provisioning Parameters
Genesys 400 Series IP Phones 41
Page 42

8. Obtaining Firmware and Configuration Files
Parameter
Description
440HD.img and the configuration file name is
440HD_<MAC Address>_conf.cfg.
For example, 440HD_001122334455_conf.cfg
The following syntax is available for DHCP Options
66/67:
▪ Option 66 must be a valid IP address or host
name of a TFTP server only.
▪ Option 67 must be the firmware name.
If Option 67 is absent, the phone requests for the
440HD.img image file. For example:
▪ Option 66: 192.168.2.1 or myTFTPServer
▪ Option 67: 440HD_2.2.2.img
Note:
▪ This parameter is applicable only when method is
configured to Dynamic.
▪ It is recommended to leave the parameter at its
default value to avoid conflict with other DHCP
options settings.
Random Provisioning Time
[provisioning/random_provisioning_time]
Defines the maximum random number to start the
provisioning process.
This is used for periodic checking of firmware and
configuration files to avoid multiple devices from
starting the upgrade process at the same time. When
the device is meant to start the upgrade, the device
randomly selects a number between 1 and the value
set for random_provisioning_time and performs the
check only after the random time.
The valid range is 0-65535. The default value is 120.
Check Period
[provisioning/period/type]
Defines the period type for automatic provisioning:
▪ [hourly] Hourly - Sets an interval in hours.
▪ [daily] Daily (default) - Sets an hour in the day.
▪ [weekly] Weekly - Sets a day in the week and an
hour in the day.
▪ [powerup] On Power-up Only - The phone tries to
upgrade only after power-up.
Every (Check Period = Hourly)
[provisioning/period/hourly/hours_interval]
The interval in hours for automatically checking for
new firmware and configuration files.
The valid range is 1 to 168. The default is 24.
Note: This parameter is applicable only when type
is configured to hourly.
Every day at
[provisioning/period/daily/time]
The hour in the day for automatically checking for
new firmware and configuration files.
The format of this value is hh:mm, where hh is hour
and mm is minutes. For example, 00:30.
The default time is 00:00.
Note: This parameter is applicable only when type is
configured to daily.
42 Administrator’s Guide Version 2.2.16
Page 43
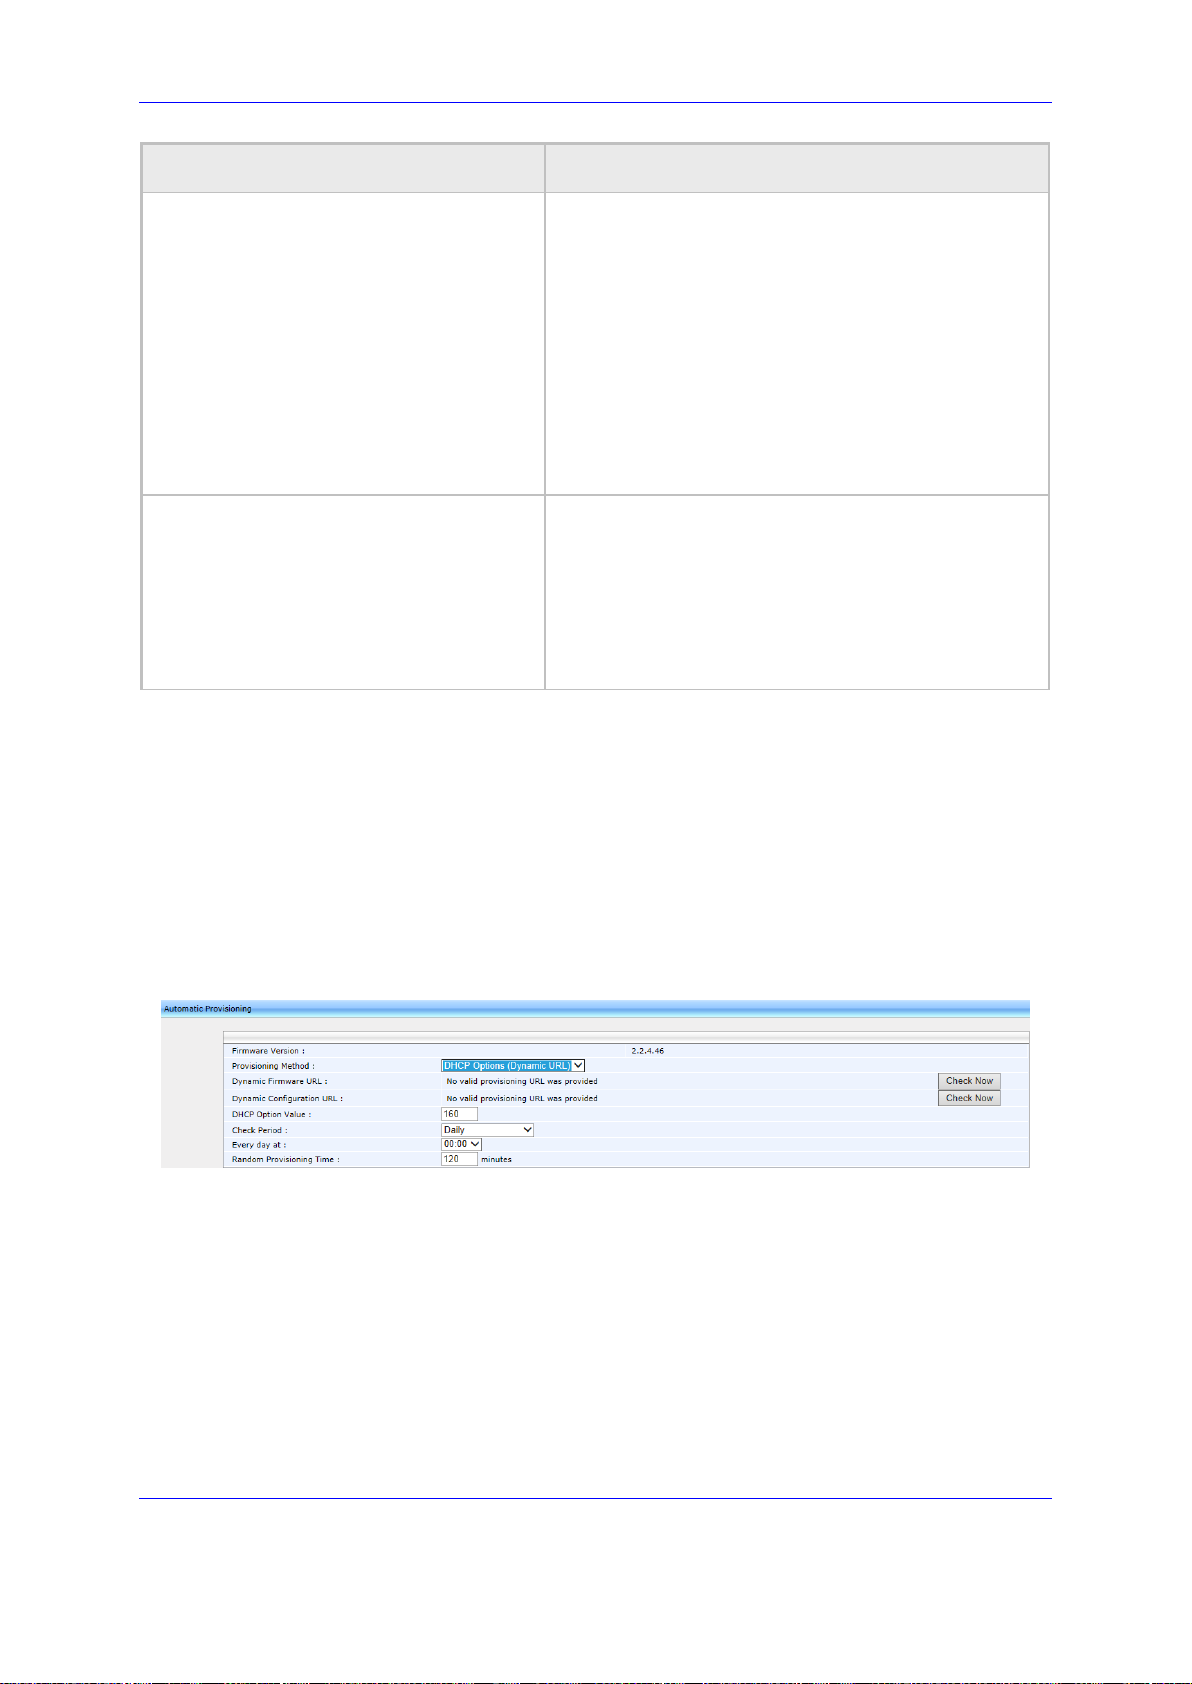
8. Obtaining Firmware and Configuration Files
Parameter
Description
Every (Check Period = Day)
[provisioning/period/weekly/day]
The day in the week for automatically checking for
new firmware and configuration files.
▪ [Sunday] Sunday (default)
▪ [Monday] Monday
▪ [Tuesday] Tuesday
▪ [Wednesday] Wednesday
▪ [Thursday] Thursday
▪ [Friday] Friday
▪ [Saturday] Saturday
Note: This parameter is applicable only when type is
configured to weekly.
Every (Check Period = Weekly)
[provisioning/period/weekly/time]
The hour in the day for automatically checking for
new firmware and configuration files.
The format of this value is: hh:mm, where hh is hour
and mm is minutes. For example: 00:30
The default time is 00:00.
Note: This parameter is applicable only when type is
configured to weekly.
8.2.1 Provisioning using DHCP Option 160
Phones can get a provisioning URL from DHCP Option 160, 66/67 or 43. Option 160 has the
highest priority, following by Option 66/67, and then Option 43. DHCP Option 160 can be
configured using the Web interface.
➢ To configure DHCP Option 160 using the Web interface:
1. Open the Automatic Update page (Management tab > Automatic Update menu >
Automatic Provisioning).
Figure 8-2: Automatic Provisioning - DHCP Option 160
2. From the 'Provisioning Method' dropdown, select DHCP Option (Dynamic URL).
3. In the 'DHCP Option Value' field, enter 160.
4. Configure the remaining parameters, and then click Submit.
5. After reboot, confirm that the firmware and configuration files have been updated.
Genesys 400 Series IP Phones 43
Page 44

8. Obtaining Firmware and Configuration Files
Note: The feature requires software customization.
8.2.2 Technician's Digit Key Code
Technicians installing phones at customer sites do not need to connect laptops to phones to
provision them. After connecting phones to the network, technicians can enter a specific digit
key code which changes the phones' provisioning URL to the server's URL. If the code that
the technician enters matches, the phones are automatically provisioned from that server.
44 Administrator’s Guide Version 2.2.16
Page 45

8. Obtaining Firmware and Configuration Files
Option 66
Option 67
Result
Comment
1
Doesn’t exist or empty
Any
No URL from Option 66/67
When Option 66
doesn’t exist, or
it’s empty, the
phone cannot get
a URL from Option
66/67.
2
Server address exists but there is no
protocol header such as TFTP, FTP,
HTTP, HTTPS.
File names do not exist.
Example:
Audiocodes.com
192.168.0.11
Non-existent
Firmware URL:
Tftp://genesys.com/<hardware
type>.img
Configuration file url:
Tftp:// genesys.com/.<mac>cfg
When protocol is
not specified, tftp
is added as the
default protocol.
Contains names.
Example:
abc.img;efg.cfg
Firmware URL:
Tftp:// genesys.com/abc.img
Configuration file URL:
Tftp:// genesys.com/efg.cfg
3
Server address exists
File names do not exist.
Example:
http://Audiocodes.com
http://192.168.0.11
Non-existent
Firmware URL:
http:// genesys.com/<hardware
type>.img
Configuration file URL:
http:// genesys.com/.<mac>cfg
Contains names.
Example:
abc.img;efg.cfg
Firmware URL:
http:// genesys.com/abc.img
Configuration file URL:
http:// genesys.com/efg.cfg
4
Server address exists.
File names exist.
Example:
http://Audiocodes.com/abc.image;efg
.cfg
Any
Firmware URL:
http:// genesys.com/abc.img
Configuration file URL:
http:// genesys.com/efg.cfg
If any file name
exists in Option
66, the names in
Option 67 are
ignored.
8.2.3 Provisioning using DHCP Option 66/67
Phones can get a provisioning URL from DHCP Option 66/67. Option 160 has the highest
priority, following by Option 66/67, and then Option 43. The table below shows the behaviors
for Option 66/67.
Table 8-2: Auto Provisioning via DHCP Option 66/67
➢ To operate with DHCP Options 66 and 67:
Configure DHCP Options 66 and 67 in the DHCP server, instead of configuring Option
8.2.4 Provisioning using DHCP Option 43
Phones can get a provisioning URL from DHCP Option 43. Option 160 has the highest
priority, following by Option 66/67, and then Option 43.
➢ To operate with DHCP Options 43:
Configure DHCP Options 43 in the DHCP server. Use the example in the figure below
Genesys 400 Series IP Phones 45
160. See the DHCP server related documentation for detailed information.
as reference.
Page 46
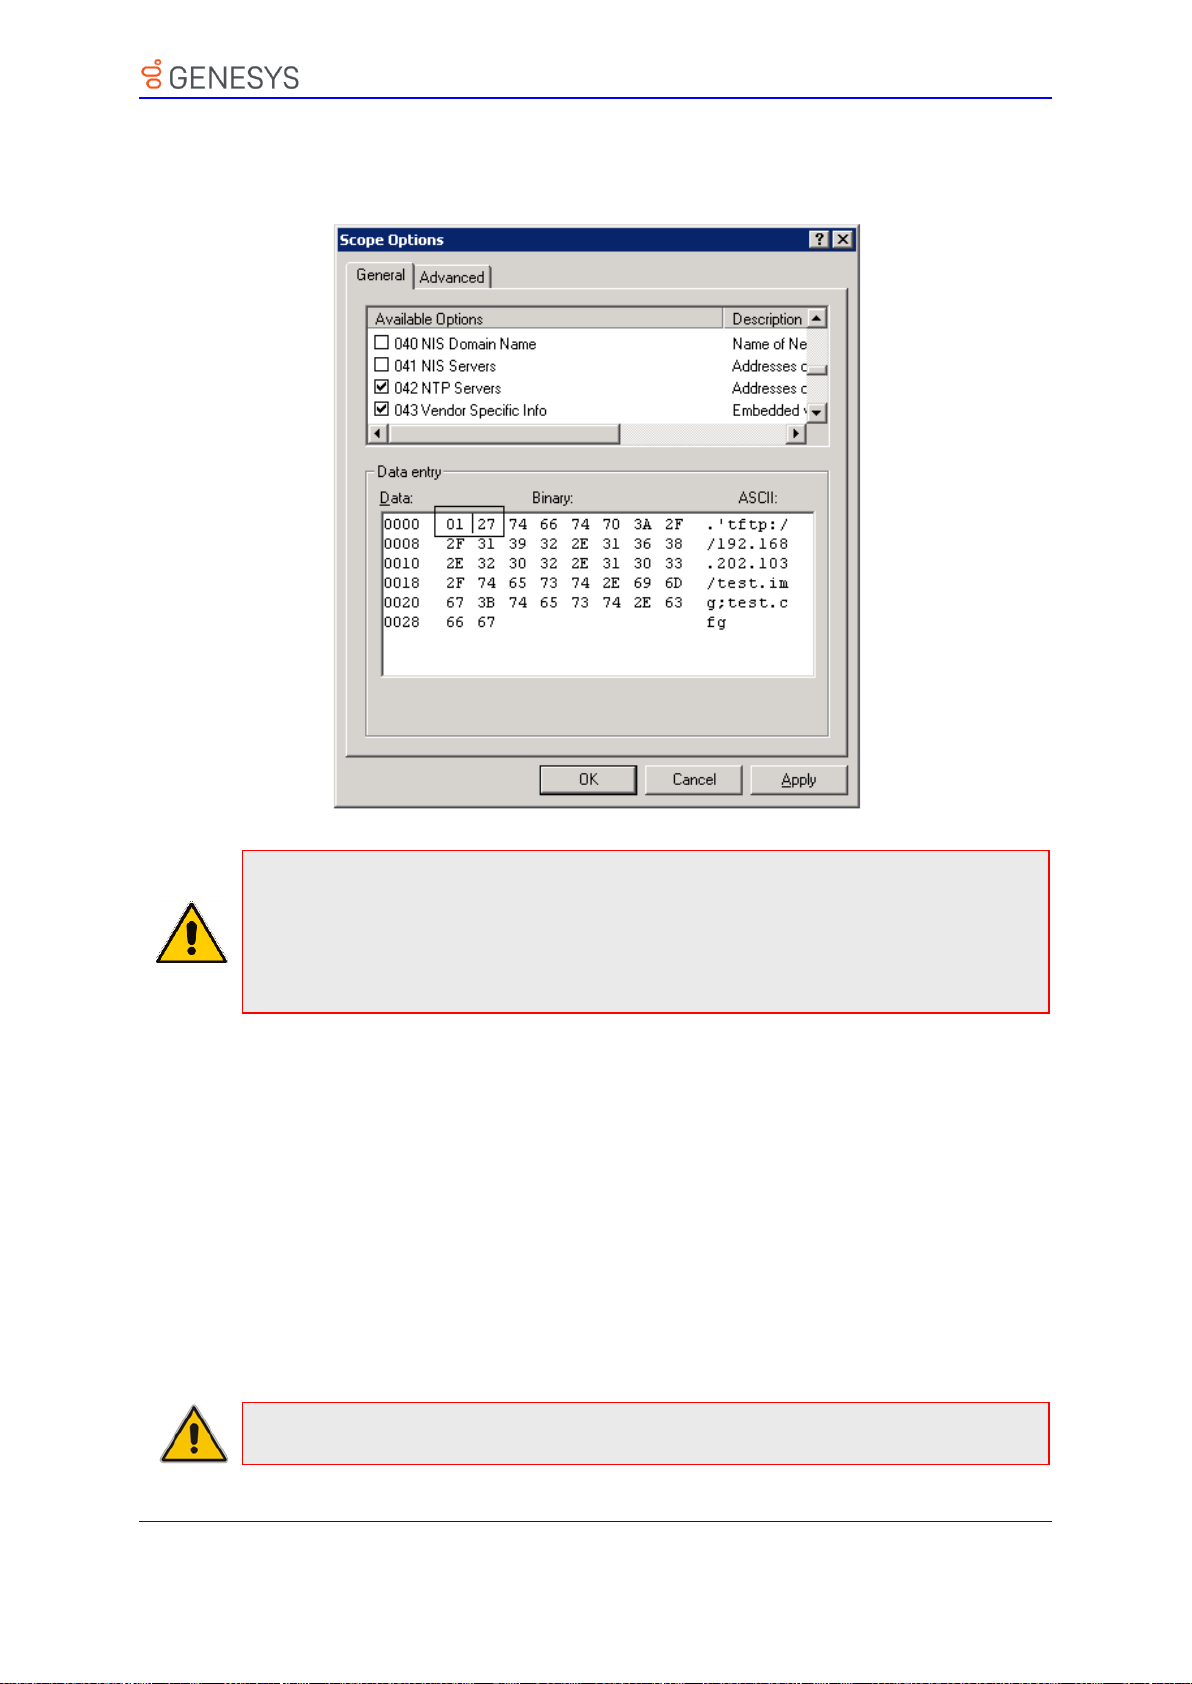
8. Obtaining Firmware and Configuration Files
Note:
• 01 is the sub option
• 27 is the length (in HEX) of the provisioning path string that you configured
• The remainder is the provisioning path, in ASCII code.
Example: tftp://192.168.202.103/test.img;test.cfg
Note:
Figure 8-3: Provisioning using DHCP Option 43 in the DHCP Server
8.2.5 Provisioning using the User-Class Option
Provision using the User-Class Option if vendor phones other than those of Genesys are
deployed in the same enterprise as Genesys’ phones and a DHCP Option cohabitation issue
consequently occurs.
This section shows how to configure provisioning of Genesys phones using the User-Class
Option when other vendor phones in the enterprise point to the same DHCP server and use
one of the standard DHCP Options described in the previous sections.
➢ To configure provisioning of Genesys phones using the User-Class Option:
1. Determine the DHCP server hosting the phones.
2. Determine if DHCP Options are assigned to IPv4 or IPv6 addresses.
46 Administrator’s Guide Version 2.2.16
Page 47
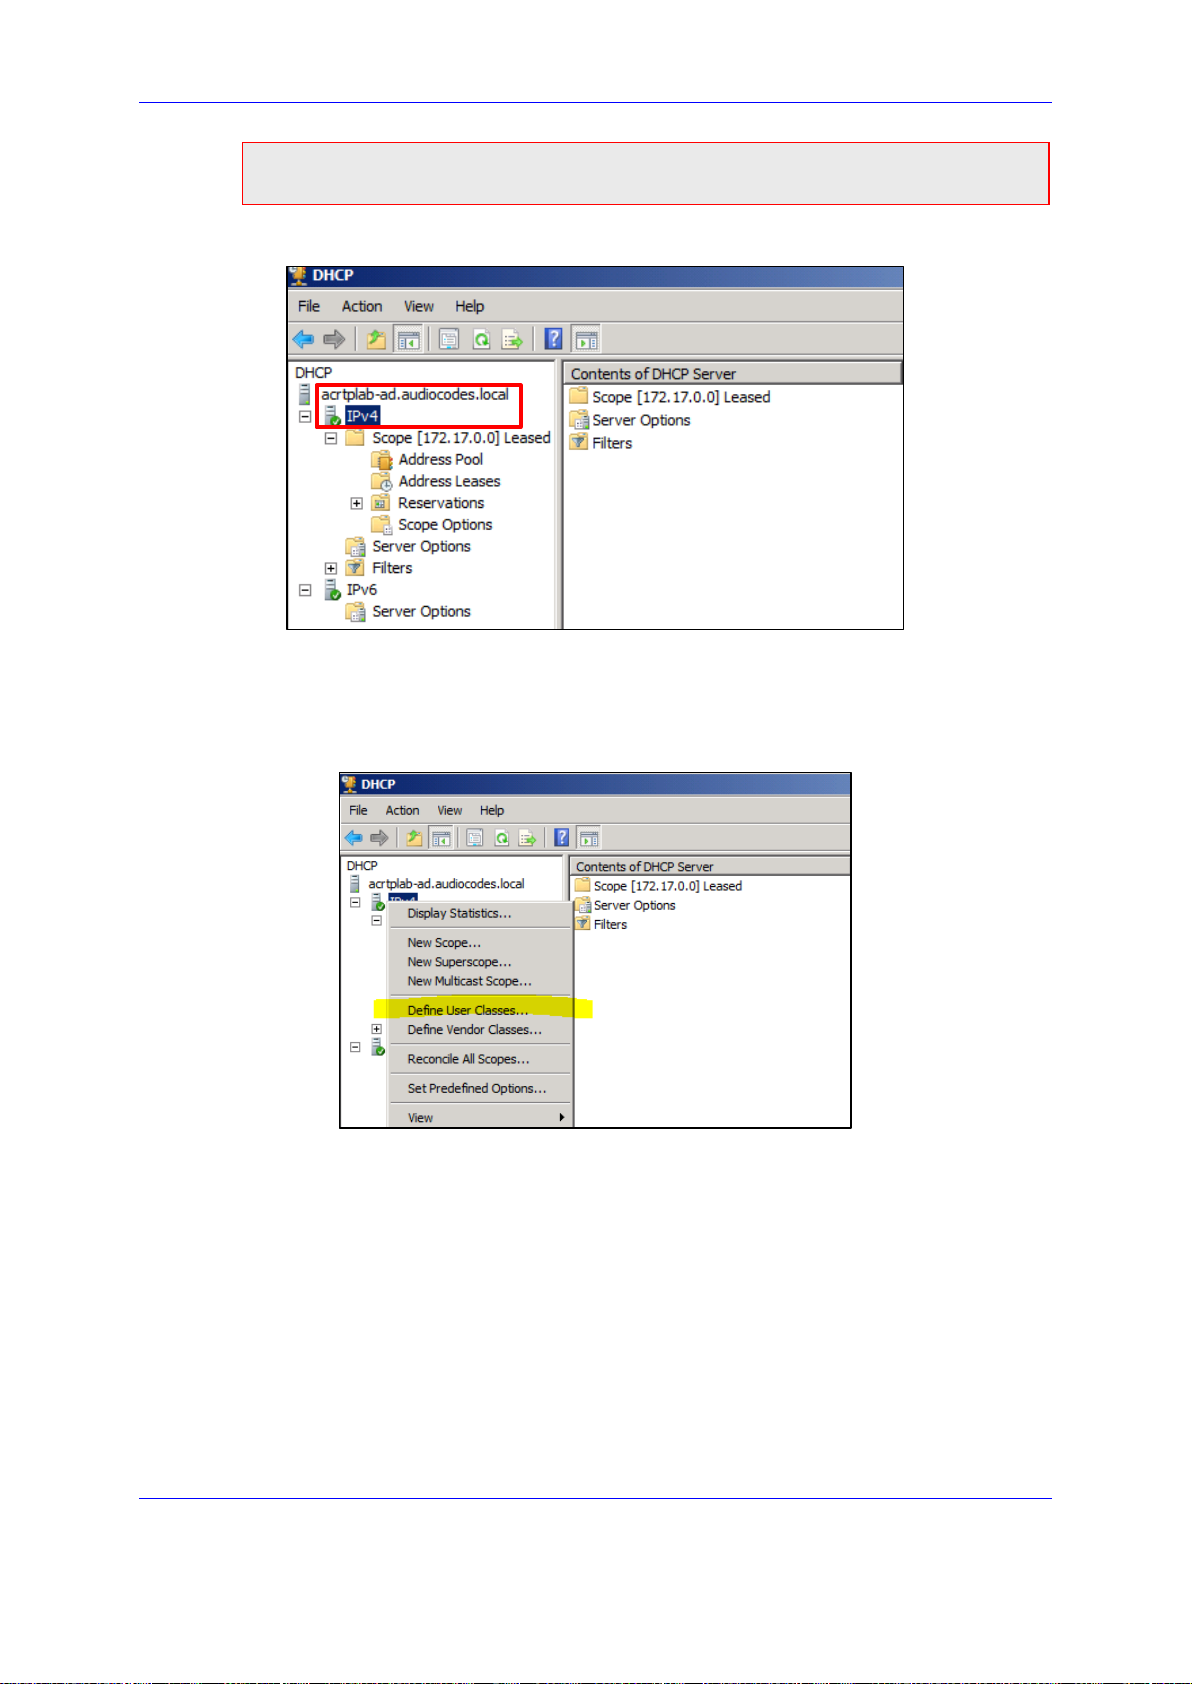
8. Obtaining Firmware and Configuration Files
• The examples below show DHCP server acrtplab-ad.audiocodes.local
• The examples below show IPv4 addresses
Figure 8-4: DHCP Options Assigned to IPv4 Addresses
3. Define a separate User Class for each Genesys phone model deployed (420HD and
440HD phone models): Right-click the IPv4 server icon and from the popup menu,
select Define User Classes…
Figure 8-5: Defining User Classes
The DHCP User Classes screen opens.
Figure 8-6: DHCP User Classes
Genesys 400 Series IP Phones 47
Page 48
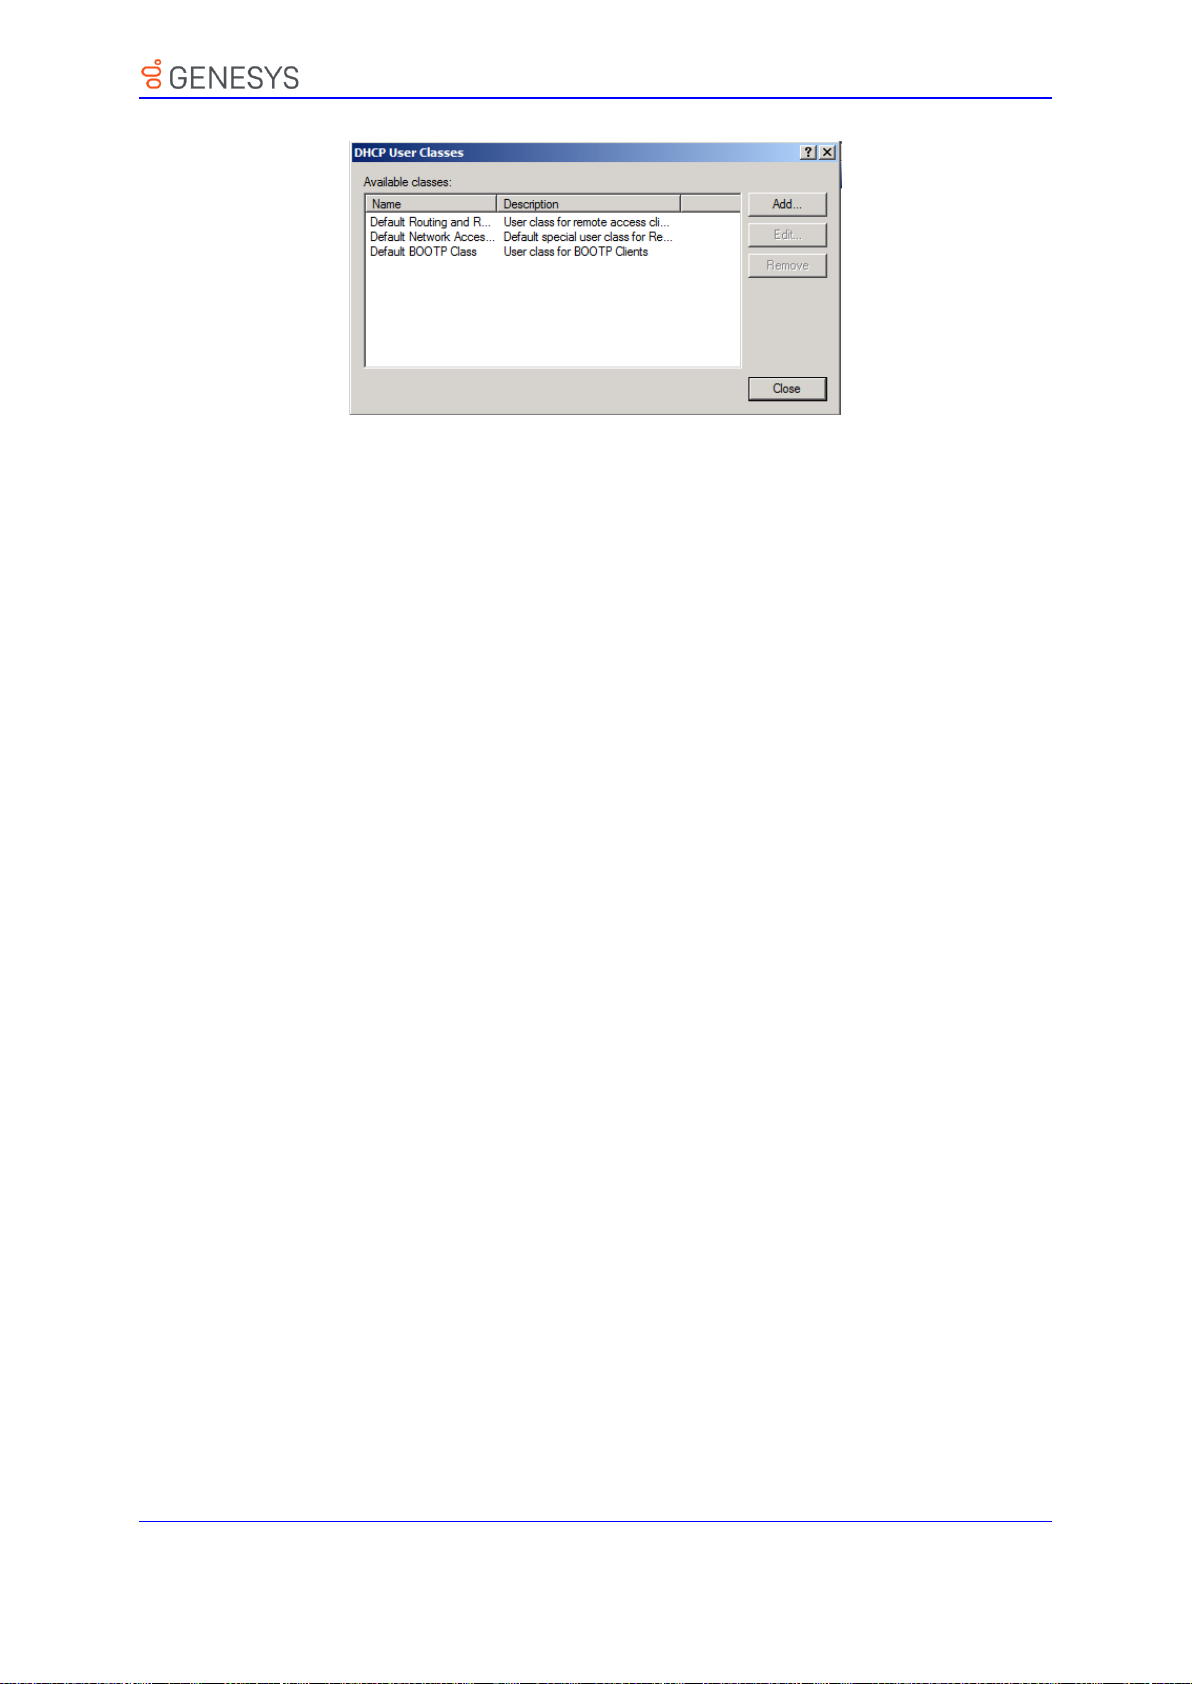
8. Obtaining Firmware and Configuration Files
4. Click the Add… button.
48 Administrator’s Guide Version 2.2.16
Page 49
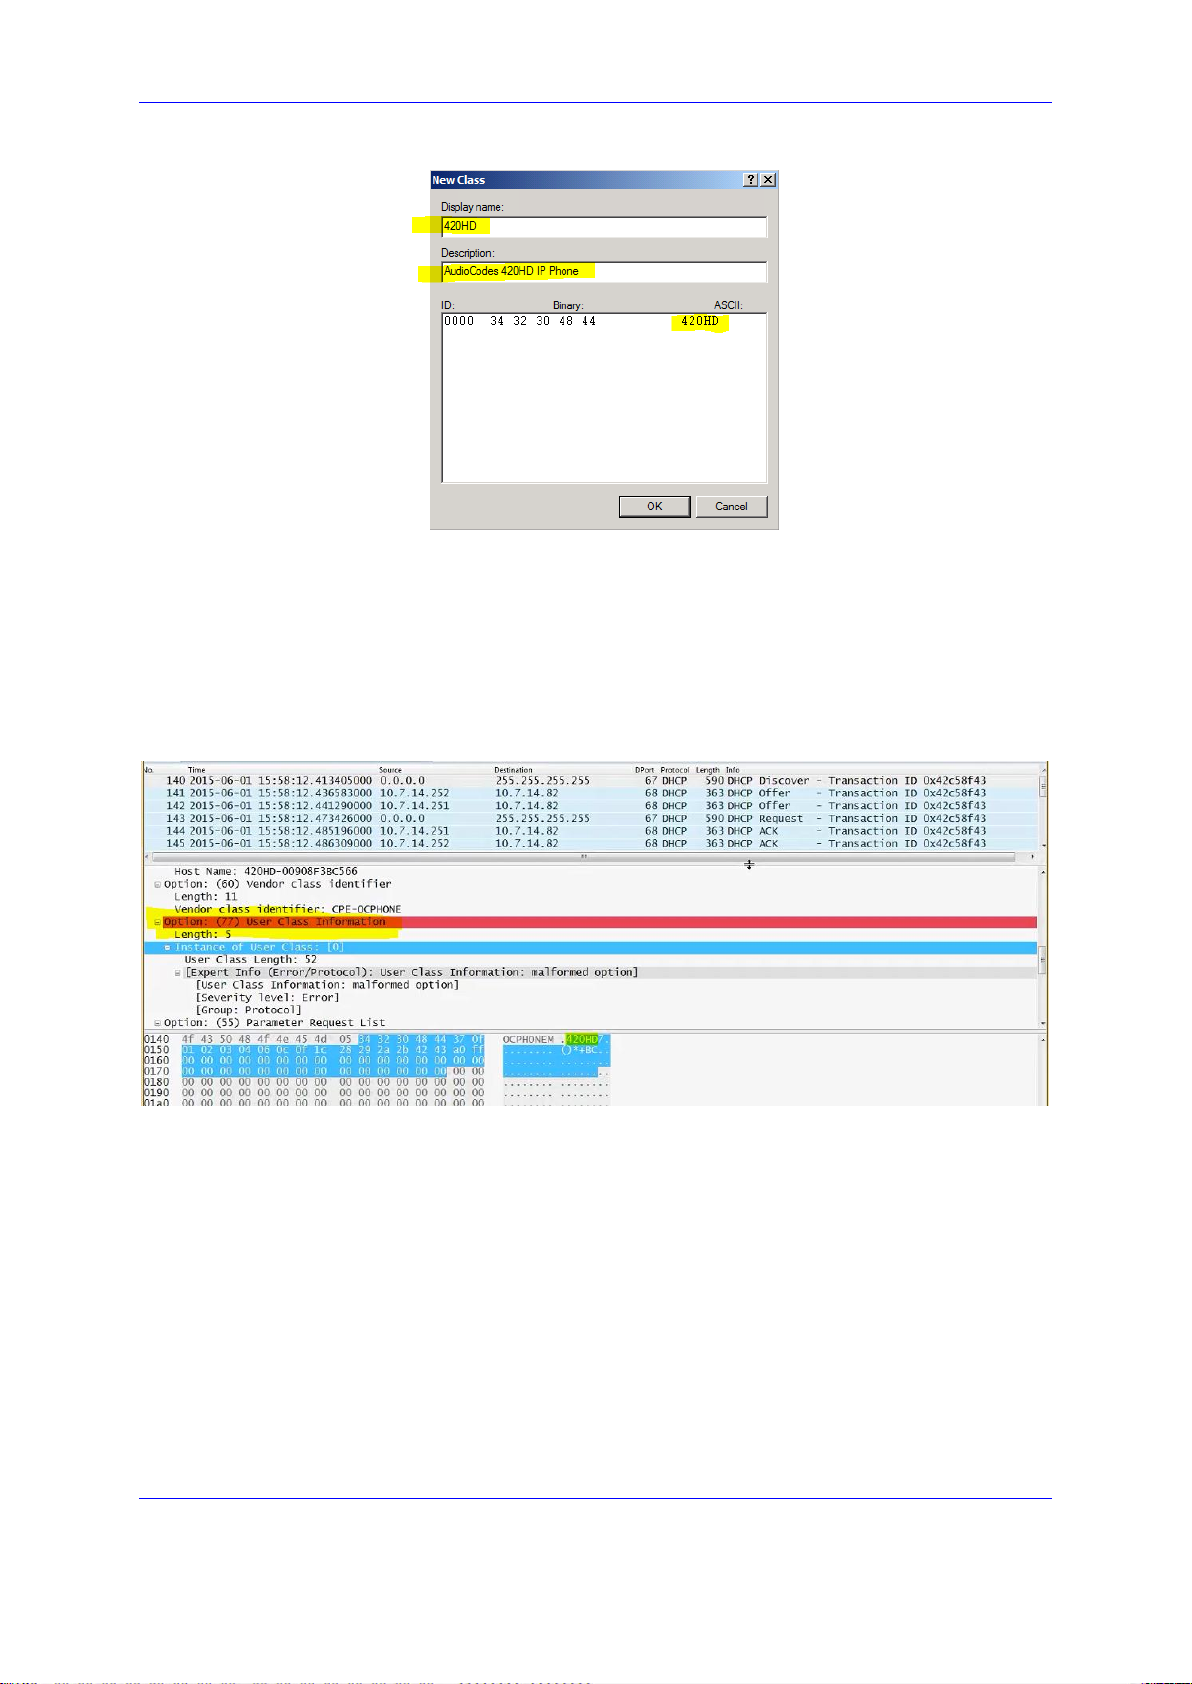
8. Obtaining Firmware and Configuration Files
Figure 8-7: New Class
5. In the New Class screen, enter Display name and Description as shown in the figure
above, and then in the ASCII field, enter the User Class Phone Type (see the Packet
Bytes window in Wireshark below for an example of the 420HD phone, and see the
table below for the other AudioCodes phone models) to be sent from the phone during
DHCP Discover via Option 77 (supported by DHCP Server 2008). Do this for each
AudioCodes phone model so that a User Class entry for each model deployed will exist
when completed.
Figure 8-8: Packet Bytes Window
6. Make sure one DHCP User Class entry exists for each AudioCodes phone model
deployed in the enterprise.
Genesys 400 Series IP Phones 49
Page 50
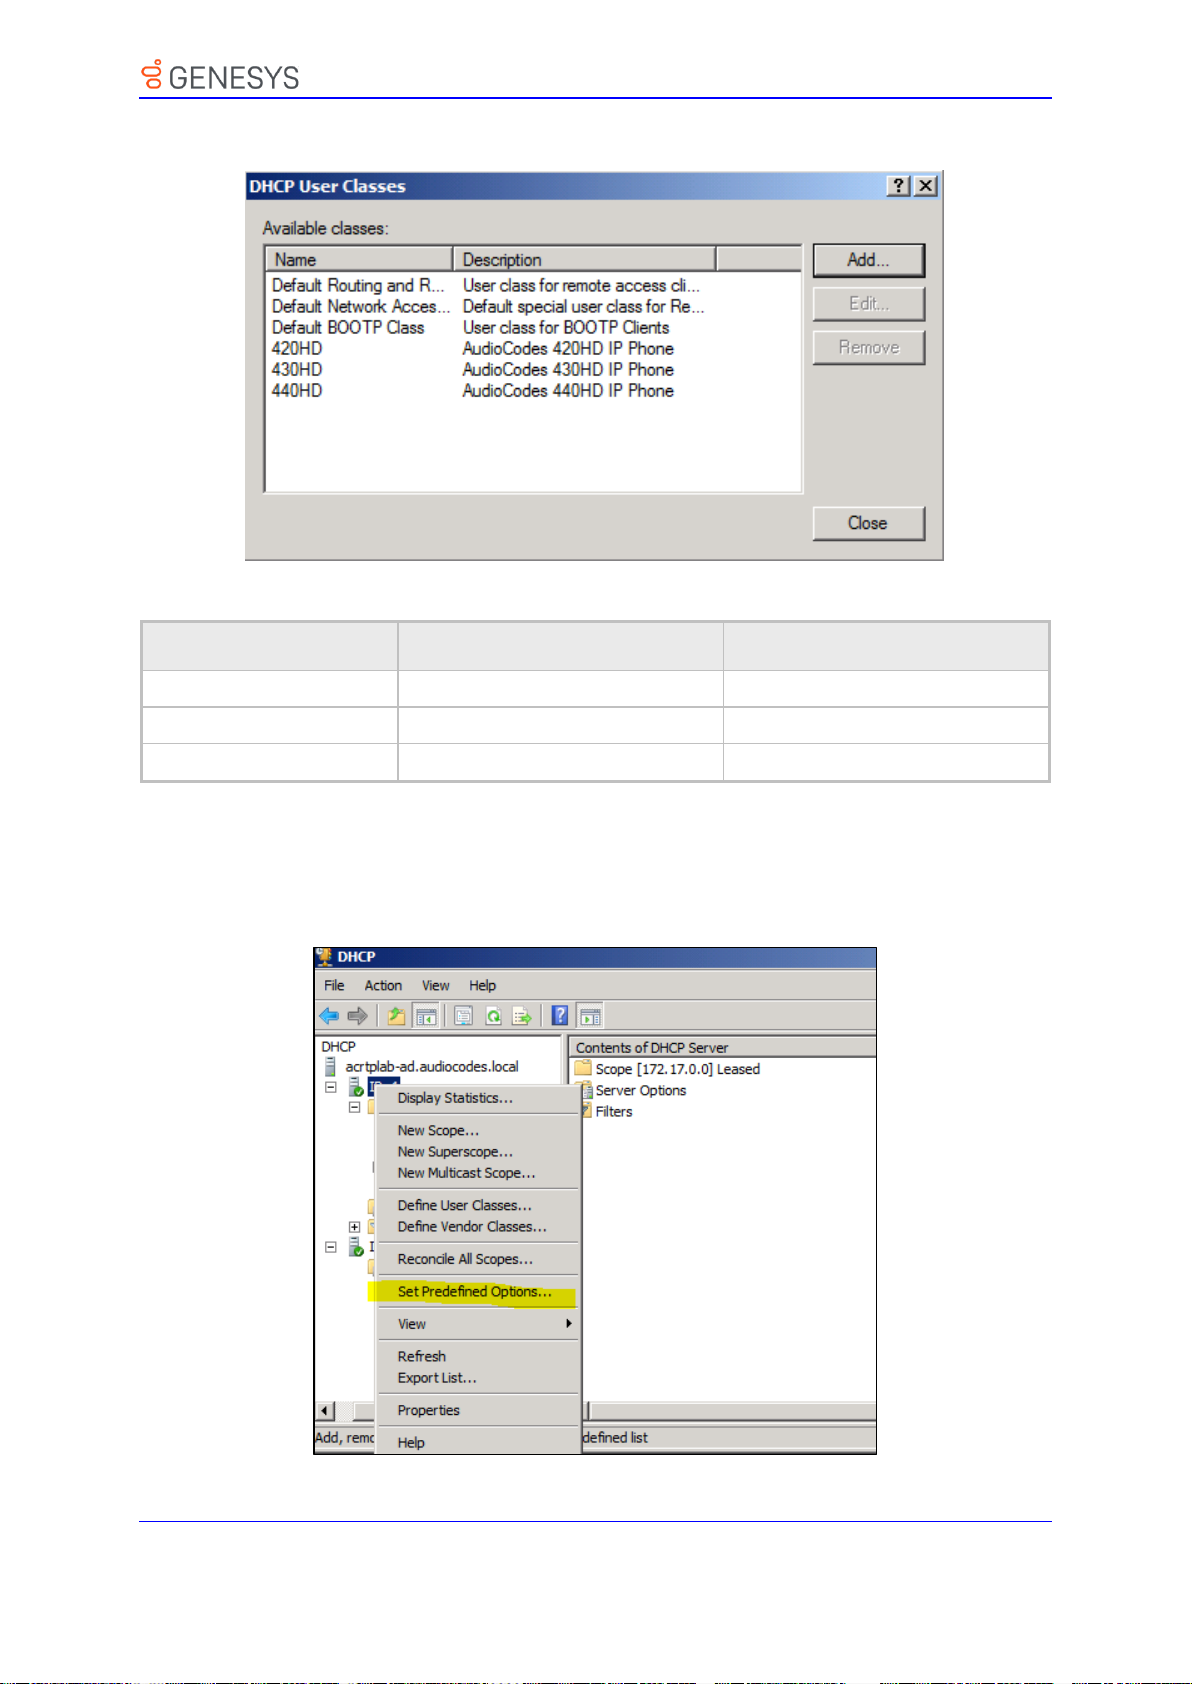
8. Obtaining Firmware and Configuration Files
Display Name
Description
ASCII
420HD
Genesys 420HD IP Phone
420HD
440HD
Genesys 440HD IP Phone
440HD
405
Genesys 405 IP Phone
405
Figure 8-9: DHCP User Classes
Table 8-3: DHCP User Class Entry for Each AudioCodes Phone Model Deployed
7. Configure Scope Option 160. This is not a standard Scope Option, so it needs to be
created. To create it on the server, select the IP version (IPv4) and select Set
Predefined Options…
Figure 8-10: Set Predefined Options
50 Administrator’s Guide Version 2.2.16
Page 51
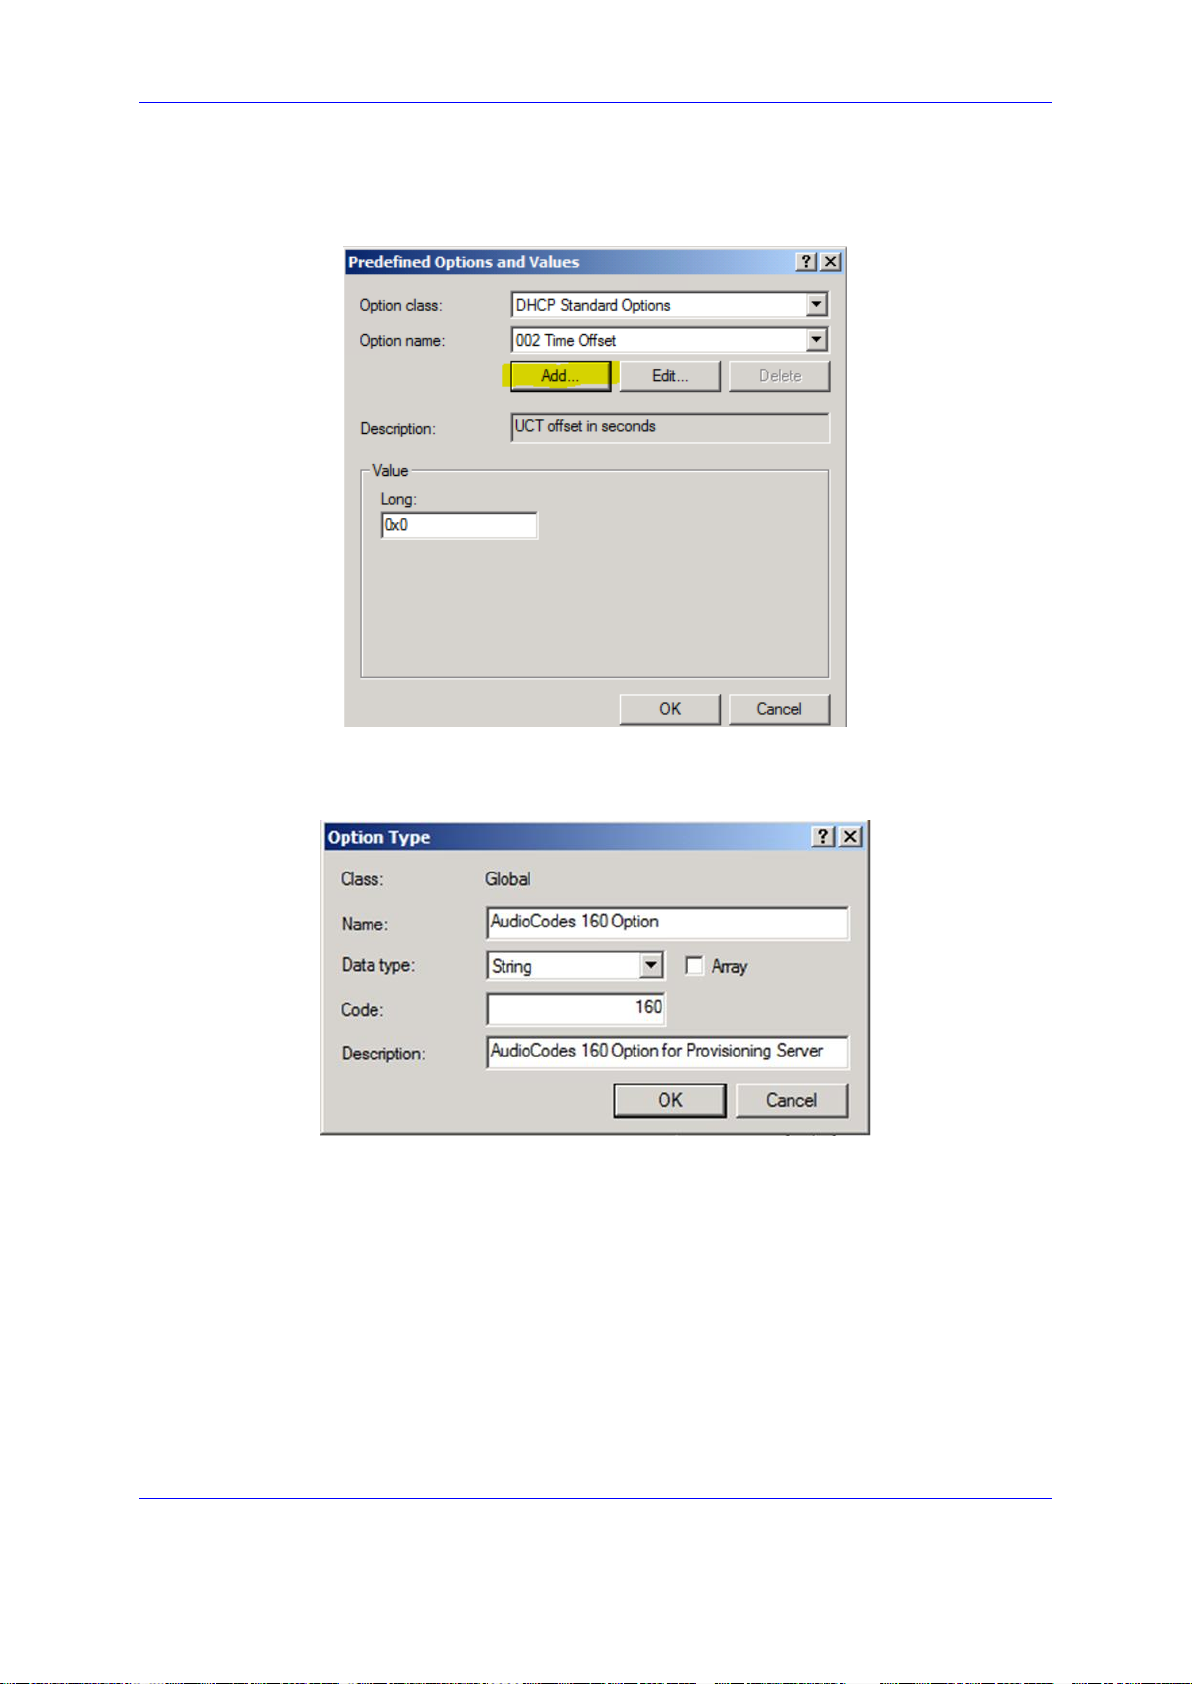
8. Obtaining Firmware and Configuration Files
8. From the 'Option class' dropdown, select DHCP Standard Options, and then click the
Add… button.
Figure 8-11: Predefined Options and Values
9. Add the AudioCodes 160 Option as shown below, and then click OK.
Figure 8-12: Option Type – Add AudioCodes 160 Option
Add the IP Phone Management Server location using HTTP. In the figure below, it's
http://<EMS IP address>/firmwarefiles;ipp/dhcpoption160.cfg. See the IP Phone
Management Server Administrator’s Manual for detailed information.
Genesys 400 Series IP Phones 51
Page 52
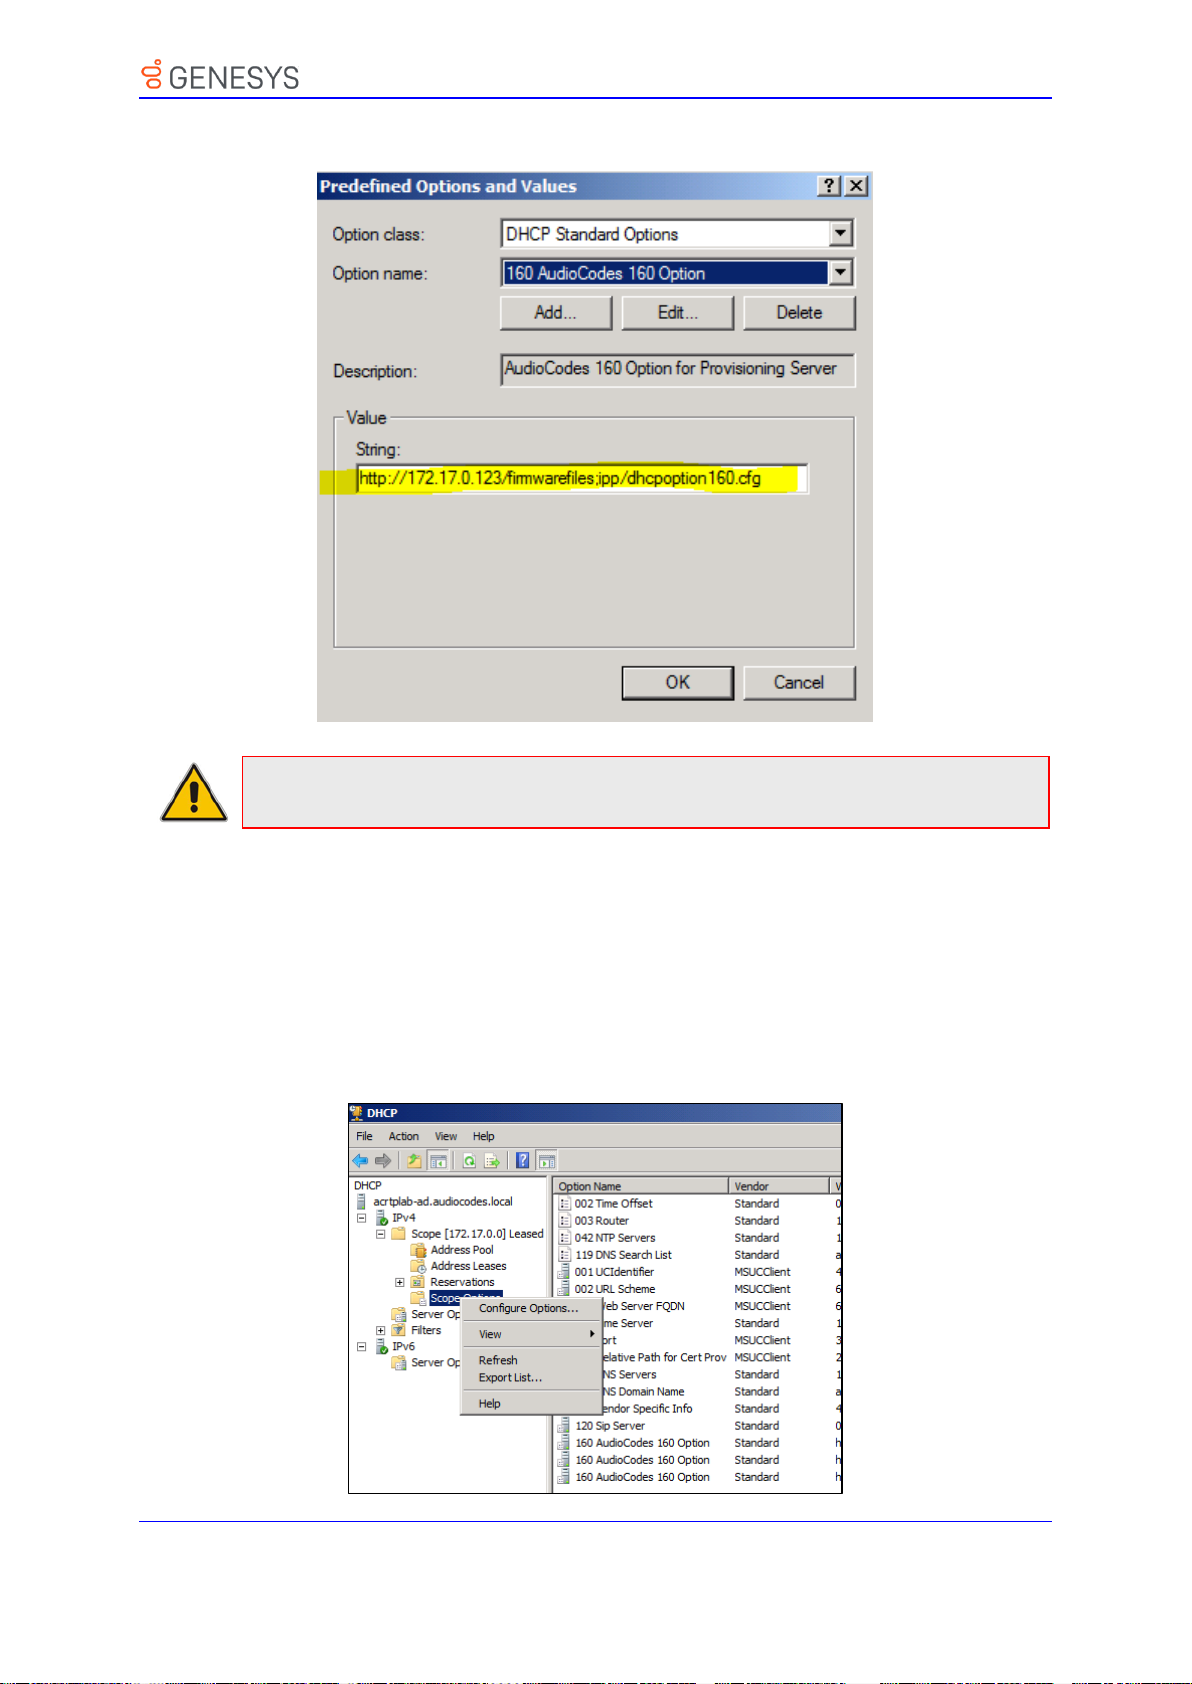
8. Obtaining Firmware and Configuration Files
Note: Make sure you defined in the enterprise's DHCP server http://<OVOC server IP
address>/firmwarefiles;ipp/dhcpoption160.cfg for DHCP Option 160.
Figure 8-13: Predefined Options and Values – Add OVOC Server Location
10. Decide if the DHCP Scope Option needs to be assigned to phones in a specific VLAN
(Scope), or to the entire server (acrtplab-ad.audiocodes.local) for IPv4 addresses.
VLAN Scope
11. Assign to a specific VLAN (Scope of IP addresses such as the Scope below 172.17.0.0,
or to multiple Scopes, to be performed separately on each Scope).
a. If selecting a VLAN, expand the 'Scope Leased' folder, select 'Scope Options',
and then select Configure Options from the popup menu.
Figure 8-14: 'Scope Leased' Folder - Configure Options
52 Administrator’s Guide Version 2.2.16
Page 53
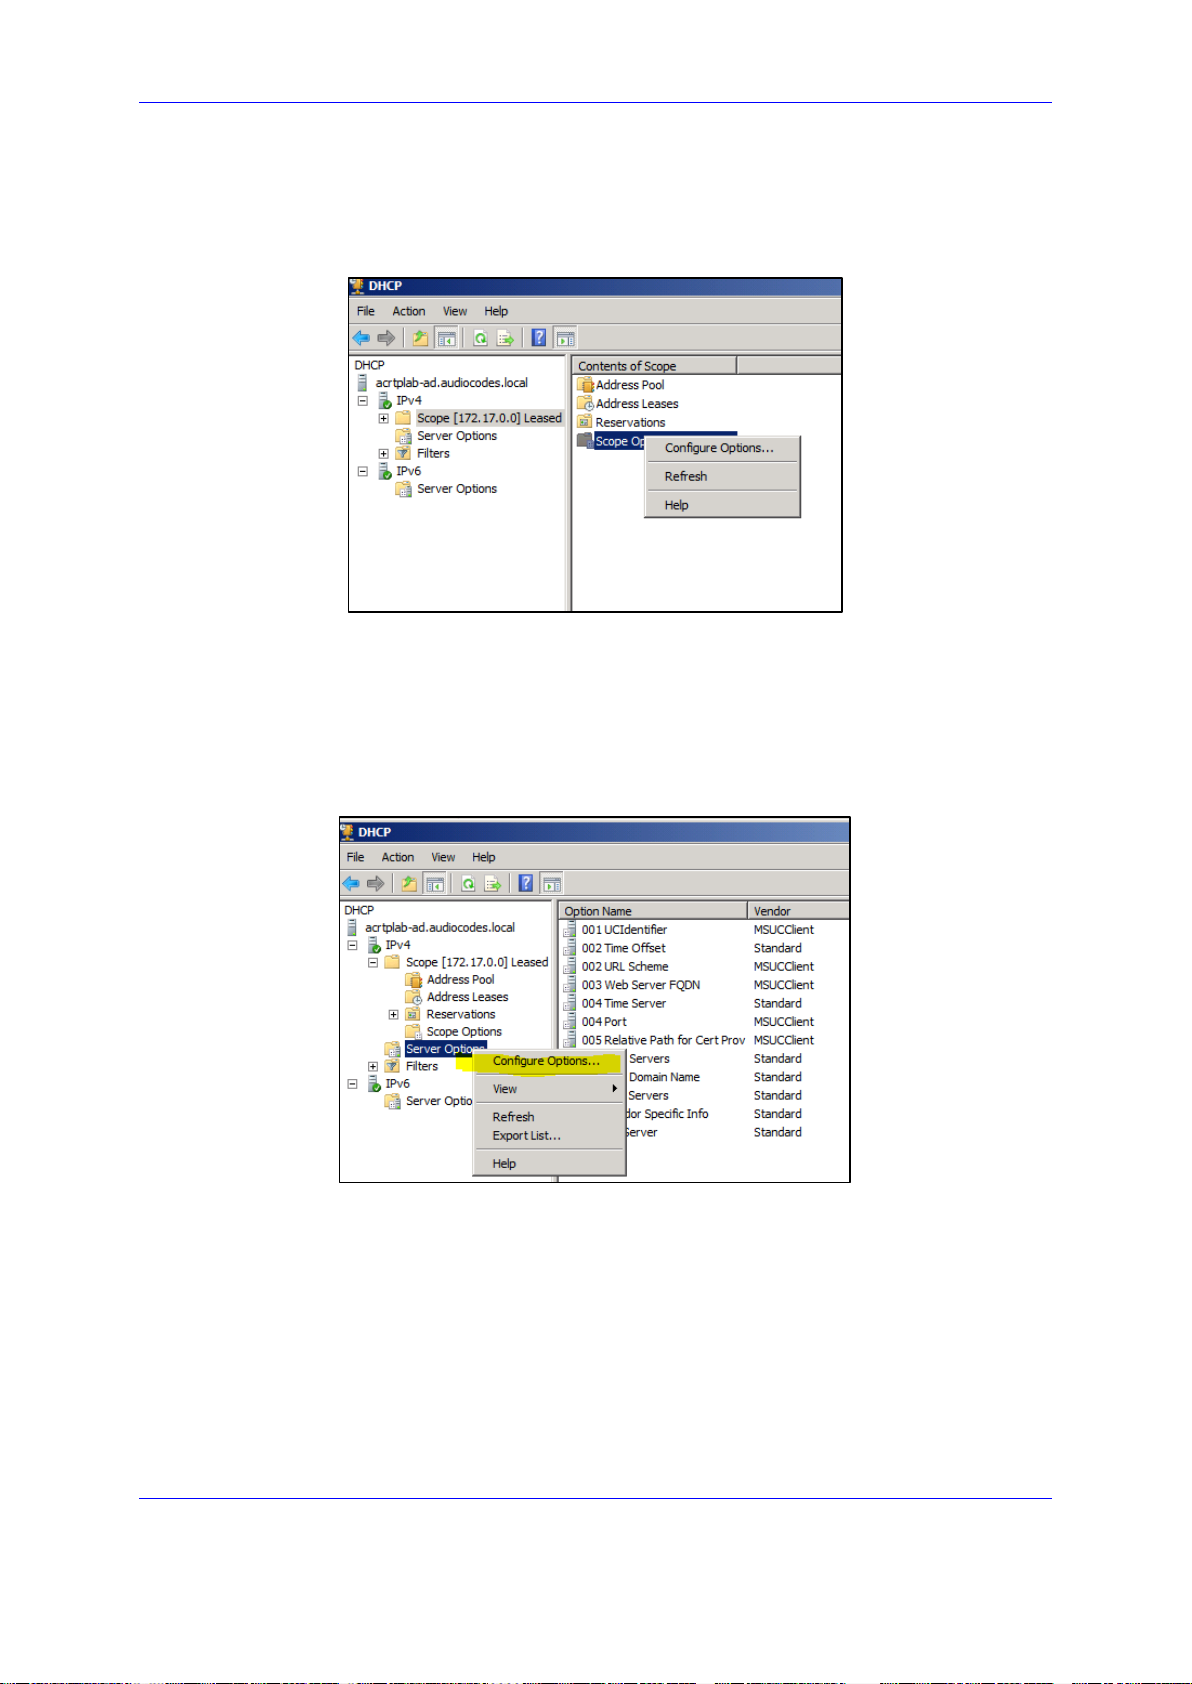
8. Obtaining Firmware and Configuration Files
-OR-
b. Select the collapsed folder 'Scope Leased' and in the main screen, right-click
'Scope Options' and select Configure Options…
Figure 8-15: Configure Options 1
-OR-
Server Option
12. If assigning to the entire server (acrtplab-ad.audiocodes.local), select the 'Server
Options' folder under server IPv4, right-click 'Server Options' and select Configure
Options...
Figure 8-16: Configure Options 2
13. In the Server Options page (or Scope Options page) that opens, select the Advanced
tab, make sure DHCP Standard Options remains selected, and select 420HD User
Class for the first phone model to be defined. Scroll through the Available Options (all
are cleared) and select only 160 AudioCodes 160 Option.
The figure below shows the Server Options page. The Scope Options page is identical.
Note that the String value you defined for Scope Option 160 is automatically
populated, so it's unnecessary to change it. Note also that if additional DHCP Options
are required (such as DNS or time server) that are different from the Servers Options
for the rest of the Scopes on the server, they can also be selected, but this is typically
not needed.
Genesys 400 Series IP Phones 53
Page 54
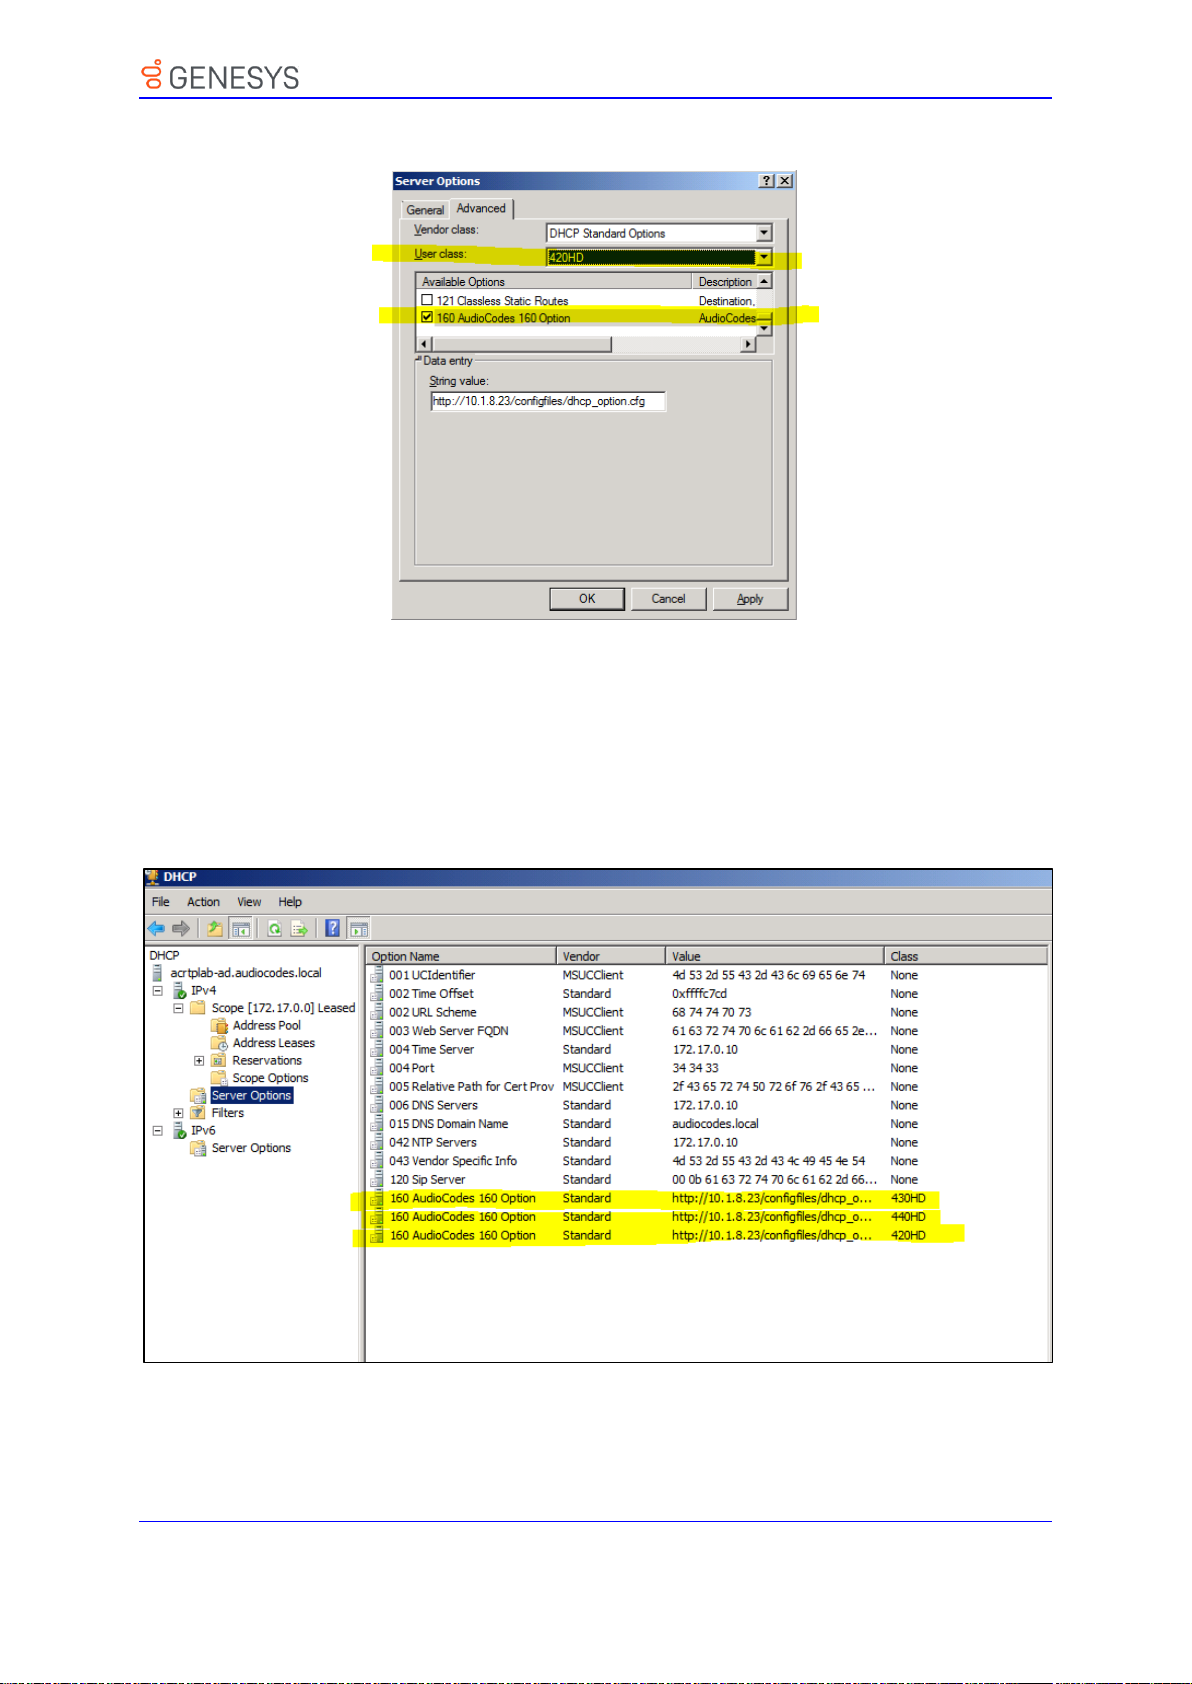
8. Obtaining Firmware and Configuration Files
Figure 8-17: Server Options
14. Click Apply and then follow the same procedure to add the 440HD user classes. After
adding them, click the OK button.
You have successfully created three separate Scope Options that will only allow
AudioCodes phones to connect to the IP Phone Manager when they boot up and will
not allow other vendor phones from receiving AudioCodes' IP Phone Management
Server as their configuration server.
Figure 8-18: Three Scope Options Created
54 Administrator’s Guide Version 2.2.16
Page 55

8. Obtaining Firmware and Configuration Files
Note: If the provisioning server supports using SIP SUBSCRIBE and NOTIFY messages
and the device receives the provisioning URL in the NOTIFY message, the automatic
provisioning mechanism then periodically tries to retrieve a new firmware/configuration
according to the information provided.
8.2.6 SIP SUBSCRIBE and NOTIFY Messages
If the provisioning information (e.g. Option fields 66/67/160) is not provided by the DHCP
server, the phone sends a SIP SUBSCRIBE message to the multicast address
224.0.1.75:5060 as shown below.
SUBSCRIBE sip:224.0.1.75:5060 SIP/2.0
From: <sip:[email protected]:5060>;tag=87a5a8-25020d0a-13c4-
50029-386d4398-66dc40c-386d4398
To: <sip:224.0.1.75:5060>
Call-ID: 8884c8-25020d0a-13c4-50029-386d4398-3e2bcb8e-386d4398
CSeq: 1 SUBSCRIBE
Via: SIP/2.0/UDP 10.13.2.37:5060;rport;branch=z9hG4bK-386d4398-
6ad00ca2-7ca3606e
Expires: 0
Event: ua-profile;profile-
type="application";model="440HD";version="2.2.2"
Max-Forwards: 70
Supported: replaces,100rel
Accept: application/url
Contact: <sip:[email protected]:5060>
User-Agent: AUDC-IPPhone/2.2.2
Content-Length: 0
The provisioning server or any other entity replies with a 200 OK message to the
SUBSCRIBE message (see below) and sends a NOTIFY SIP message with the provisioning
URL in the message body as shown below. (The provisioning URL can be in any format as
described in the Administrator's Manual).
If no response is received by the provisioning server, the phone resends SUBSCRIBE
messages for five seconds.
With the above method, the phone uses its built-in auto-provisioning mechanism while the
provisioning information is retrieved through the NOTIFY message.
The following code describes SIP 200 OK Response on the SUBSCRIBE Message:
SIP/2.0 200 OK
Via: SIP/2.0/UDP 10.13.2.37:5060;rport;branch=z9hG4bK-386d4398-
6ad00ca2-7ca3606e
Contact: <sip:10.13.2.37:5060>
To: <sip:224.0.1.75:5060>
From: <sip:[email protected]:5060>;tag=87a5a8-25020d0a-13c4-
50029-386d4398-66dc40c-386d4398
Call-ID: 8884c8-25020d0a-13c4-50029-386d4398-3e2bcb8e-386d4398
CSeq: 1 SUBSCRIBE
Expires: 0
Content-Length: 0
Genesys 400 Series IP Phones 55
Page 56

8. Obtaining Firmware and Configuration Files
The following code describes SIP NOTIFY Message with Provisioning Information.
NOTIFY sip:10.13.2.37:5060 SIP/2.0
Via: SIP/2.0/UDP 10.13.2.37:5060;rport;branch=z9hG4bK-386d4398-
6ad00ca2-7ca3606e
Max-Forwards: 20
Contact: <sip:10.13.4.121:5060>
To: <sip:224.0.1.75:5060>
From: <sip:[email protected]:5060>;tag=87a5a8-25020d0a-13c4-
50029-386d4398-66dc40c-386d4398
Call-ID: 8884c8-25020d0a-13c4-50029-386d4398-3e2bcb8e-386d4398
CSeq: 1 NOTIFY
Content-Type: application/url
Subscription-State: terminated;reason=timeout
Event: ua-profile;profile-
type="application";model="440HD";version="2.2.2"
Content-Length: 18
tftp://10.13.4.121
The following code describes SIP SUBSCRIBE Message to Obtain Provisioning
Information.
SUBSCRIBE sip:224.0.1.75:5060 SIP/2.0
From: <sip:[email protected]:5060>;tag=87a5a8-25020d0a-13c4-
50029-386d4398-66dc40c-386d4398
To: <sip:224.0.1.75:5060>
Call-ID: 8884c8-25020d0a-13c4-50029-386d4398-3e2bcb8e-386d4398
CSeq: 1 SUBSCRIBE
Via: SIP/2.0/UDP 10.13.2.37:5060;rport;branch=z9hG4bK-386d4398-
6ad00ca2-7ca3606e
Expires: 0
Event: ua-profile;profile-
type="application";model="440HD";version="2.2.2"
Max-Forwards: 70
Supported: replaces,100rel
Accept: application/url
Contact: <sip:[email protected]:5060>
User-Agent: AUDC-IPPhone/2.2.2
Content-Length: 0
With the above method, the phone uses its built-in auto-provisioning mechanism while the
provisioning information is retrieved through the NOTIFY message.
56 Administrator’s Guide Version 2.2.16
Page 57
8. Obtaining Firmware and Configuration Files
Note: If Generic Domain Name is used, the automatic provisioning mechanism
periodically tries to retrieve new firmware/configuration from Provisioning Server domain
name.
8.2.7 Hardcoded Domain Name for Provisioning Server
If no higher-priority provisioning method applied, the phone automatically searches in the
DNS server for the domain named "ProvisioningServer". After the DNS server gives the
domain IP address, the phone contacts the provisioning server. The phone tries to retrieve
firmware and configuration files using URL tftp://ProvisioningServer/<Phone Model
Name>/
For example:
The phone tries to obtain the following firmware file:
tftp://ProvisioningServer/440HD.img
where 440 is optional; if omitted, the phone will try to retrieve the firmware file
according to its model name.
The phone tries to obtain the following configuration file:
tftp://ProvisioningServer/<MAC address>.cfg
where MAC address is optional; if omitted, the phone will try to retrieve the
configuration file according to its MAC address.
(e.g. tftp://ProvisioningServer/440HD/001122334455.cfg)
The network administrator must configure a DNS entry called "ProvisioningServer" on the
DNS server and set it to the TFTP server IP address.
8.2.8 Cached Address of Last Provisioning Server Used
These are the addresses of the last provisioning servers used, stored in cache memory.
When the device starts up and connects to the provisioning server, it can pull firmware,
configuration and private label files from the provisioning server using the cached address
of the last provisioning server used.
After the phone creates a successful connection with a provisioning server, this server's
address is cached by the phone. The next time the phone is rebooted, if it doesn't receive
provisioning details, the device performs provisioning using the cached IP address.
Genesys 400 Series IP Phones 57
Page 58
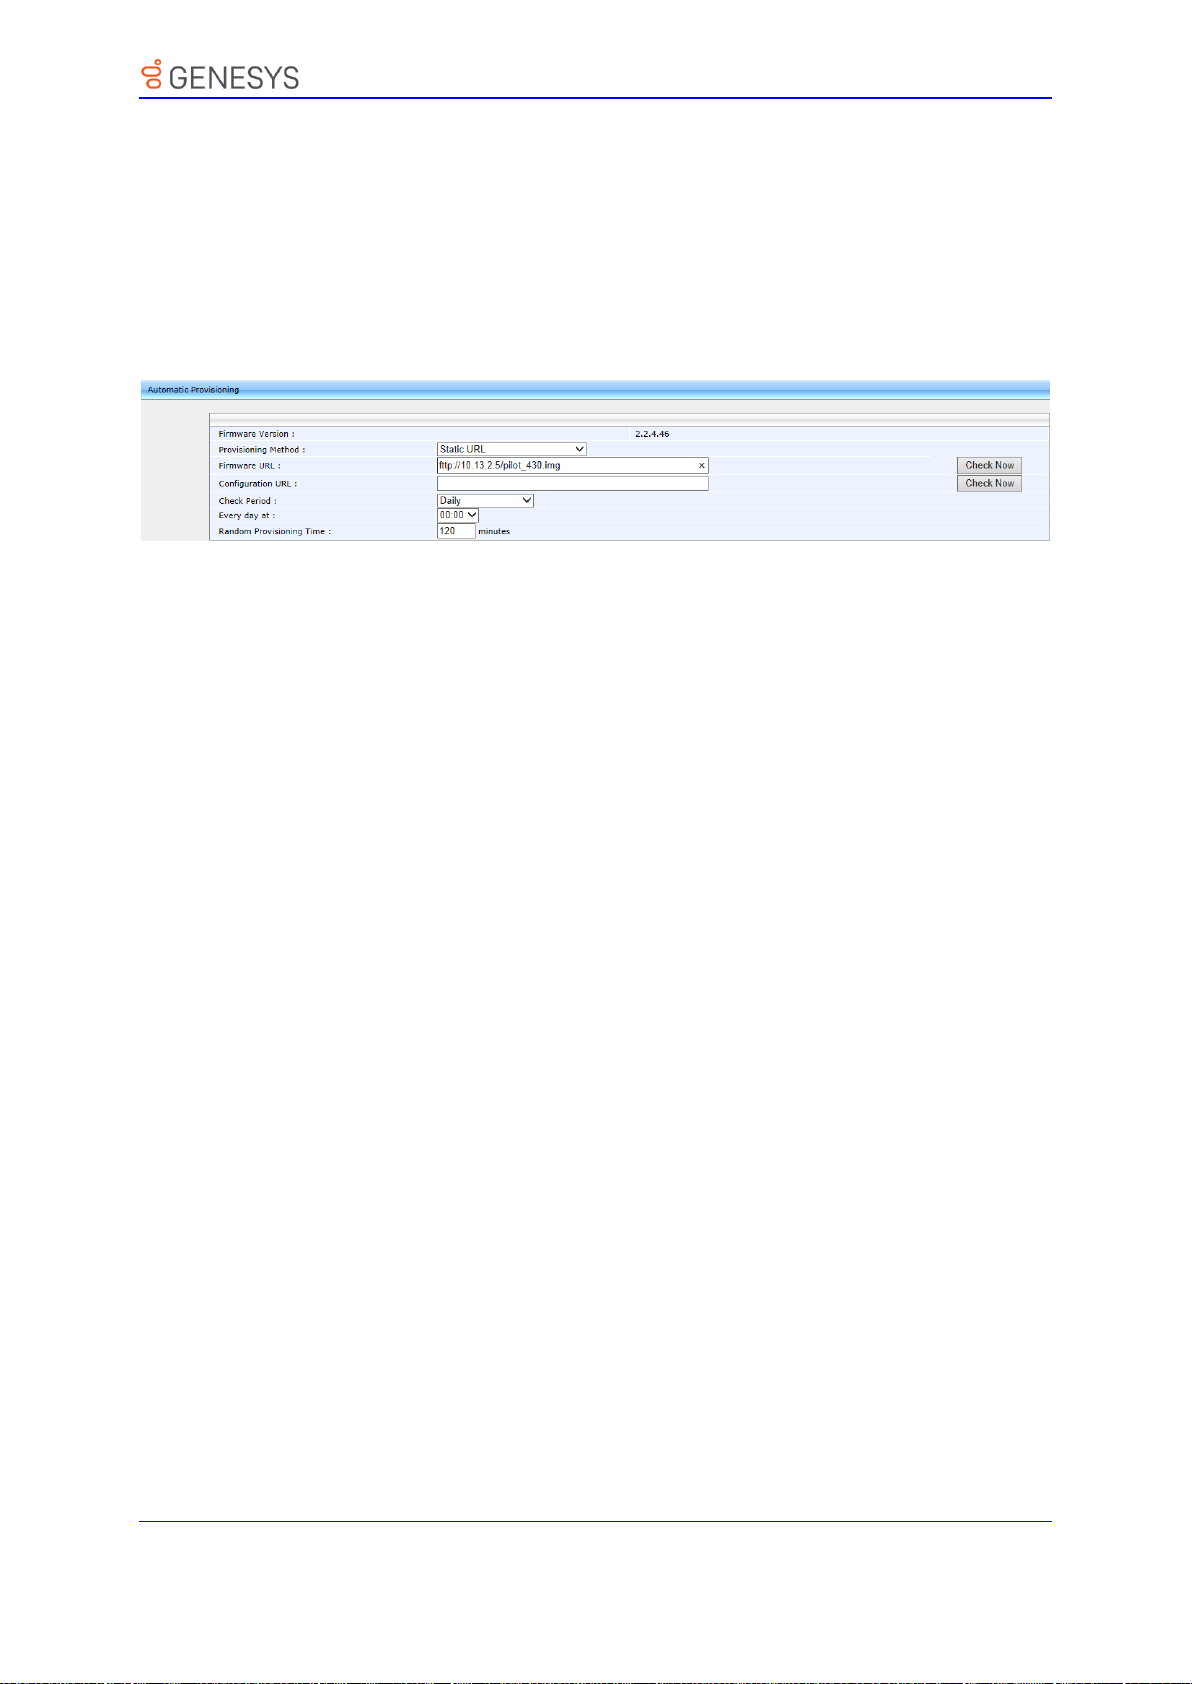
8. Obtaining Firmware and Configuration Files
8.3 Static URL Provisioning
Here’s how to configure the phone using the Static URL method.
➢ To configure static provisioning information using the Web interface:
1. Open the Automatic Provisioning page (Management tab > Automatic Update menu
> Automatic Provisioning).
Figure 8-19: Automatic Provisioning – Static URL
2. Configure the parameters using the table below as reference, and then click Submit.
58 Administrator’s Guide Version 2.2.16
Page 59

8. Obtaining Firmware and Configuration Files
Parameter
Description
Provisioning Method
[provisioning/method]
Defines the provisioning method:
▪ [Disable] Disable - Automatic update is disabled. The
phone attempts to upgrade its firmware and configuration
▪ [Dynamic] DHCP Options (Dynamic URL) (default) -
Using DHCP Option 160 and Options 66/67 for
provisioning
▪ [Static] Static URL - Using Static URL for provisioning
Firmware URL
[provisioning/firmware/url]
The static URL for checking the firmware file. The URL must
be entered using one of the following syntax options:
▪ <protocol>://<server IP address or host name>
▪ <protocol>://<server IP address or host name>/<firmware
file name>
Where<protocol> can be one of the following protocols: ftp,
tftp, http or https. For example:
▪ tftp://192.168.2.1 – retrieved firmware file is440HD.img
▪ ftp://192.168.2.1/Different_Firmware_Name.img - retrieved
firmware file is Different_Firmware_Name.img
Note: This parameter is applicable only when 'method' is
configured to Static.
Configuration URL
[provisioning/configuration/url]
The static URL for checking the configuration file. The URL
must be entered using one of the following syntax options:
▪ <protocol>://<server IP address or host name>
▪ <protocol>://<server IP address or host
name>/<configuration file name>
Where<protocol> can be one of the following protocols: "ftp",
"tftp", "http" or "https". For example:
▪ http://192.168.2.1 - configuration file name is <MAC
Address>.cfg, for example, 001122334455.cfg
▪ https://192.168.2.1/440HD_<MAC>_conf.cfg - retrieved
configuration file name is 440HD_<MAC
Address>_conf.cfg, for example,
440HD_001122334455_conf.cfg
Note: This parameter is applicable only when 'method' is
configured to Static.
➢ To configure static provisioning information using the configuration file:
• Use the table below as reference.
Table 8-4: Static URL Automatic Provisioning Parameters
Genesys 400 Series IP Phones 59
Page 60

Part III
Quick Setup
Page 61

8. Obtaining Firmware and Configuration Files
This page is intentionally left blank.
Genesys 400 Series IP Phones 61
Page 62
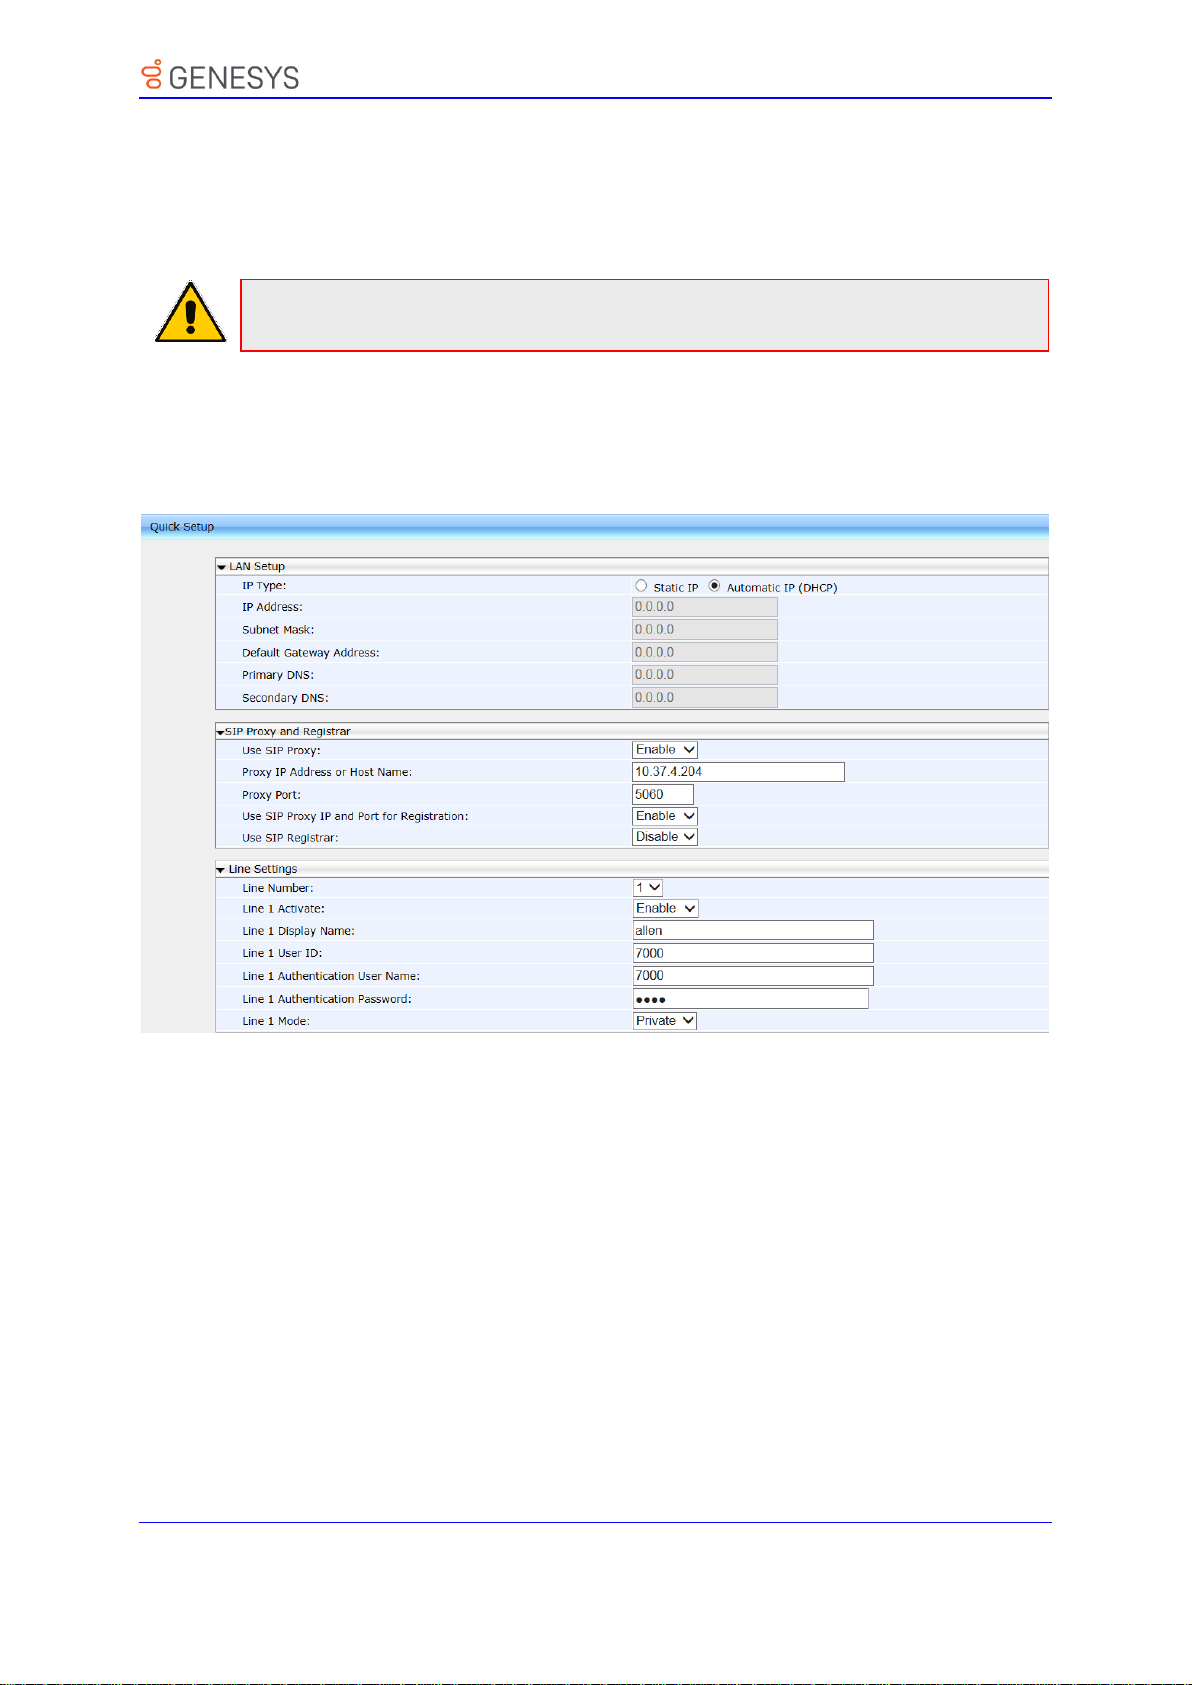
9. Quick Setup
Note: For Quick Setup parameters descriptions, see Part IV (Networking) and Part V
(VoIP Features).
9 Quick Setup
The Web interface provides a Quick Setup page that lets you configure basic features to
quickly set up your phone to operational level.
➢ To quickly set up your phone:
1. Open the Quick Setup page (Configuration tab >Quick Setup menu >Quick Setup).
Figure 9-1: Quick Setup
2. For descriptions of parameters on this page:
• Section 12.1.2 for descriptions of parameters under the LAN Setup group.
• See Section 15.2 for descriptions of parameters under the SIP Proxy and
Registrar group
• See Section 20 for descriptions of parameters under the Line Settings group
62 Administrator’s Guide Version 2.2.16
Page 63

9. Quick Setup
This page is intentionally left blank.
Genesys 400 Series IP Phones 63
Page 64

Part IV
Networking
Page 65

9. Quick Setup
This page is intentionally left blank.
Genesys 400 Series IP Phones 65
Page 66

10. Introduction
Note: By default, the network settings are set for automatic provisioning. However, if you
need to change them, you can do so manually, as described in this section.
10 Introduction
Here’s how to configure network settings manually, if required.
66 Administrator’s Guide Version 2.2.16
Page 67

10. Introduction
This page is intentionally left blank.
Genesys 400 Series IP Phones 67
Page 68
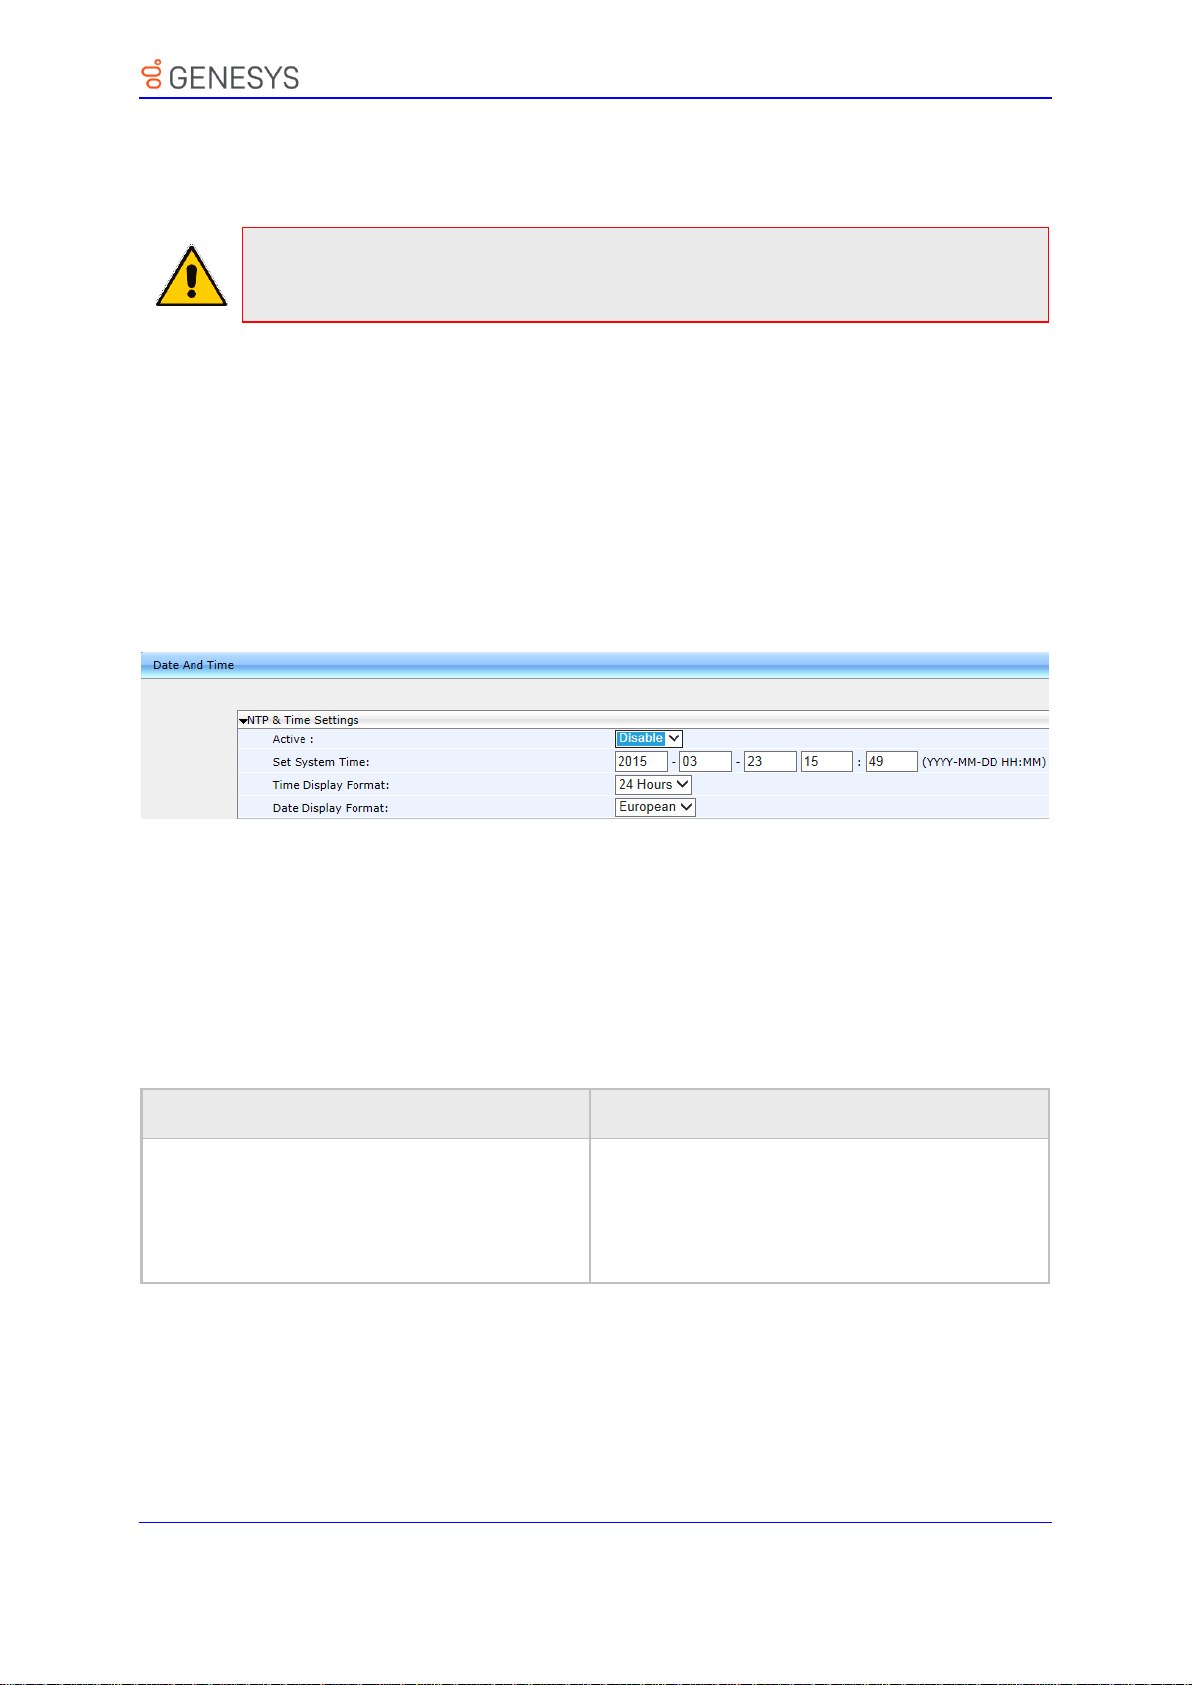
11. Configuring Date and Time Manually
Note: By default, date and time settings are automatically provisioned via the enterprise
DHCP server when the phone is connected to the Internet and to the power supply, but
you can manually change them if required. This section shows how.
Parameter
Description
Date Display Format
[system/ntp/date_display_format]
Select either:
▪ EUROPEAN (default)
▪ AMERICAN
The European date format is DDMMYYYY.
The American format is MMDDYYYY.
11 Configuring Date and Time Manually
The phone automatically retrieves date and time from a Network Time Protocol (NTP) server
when connected to the internet. To configure the NTP server for automatic provisioning of
date and time, see Section 11.2. NTP is a protocol for distributing Coordinated Universal
Time (UTC) by synchronizing the clocks of computer systems over packet-switched,
variable-latency data networks. Date/time can also be manually configured in the Web
interface.
➢ To manually configure date and time using the Web interface:
1. Open the Date and Time page (Configuration tab > Advanced Applications menu >
Date and Time).
Figure 11-1: Date and Time
2. Configure the 'Set System Time' parameter.
3. Set the 'Time Display Format' to 24 Hours or 12 Hours
4. Set the 'Date Display Format' to European or American. See the table below.
5. Click Submit.
➢ To configure date and time using the configuration file:
• Use the table below as reference.
Table 11-1: Date Display Format
68 Administrator’s Guide Version 2.2.16
Page 69
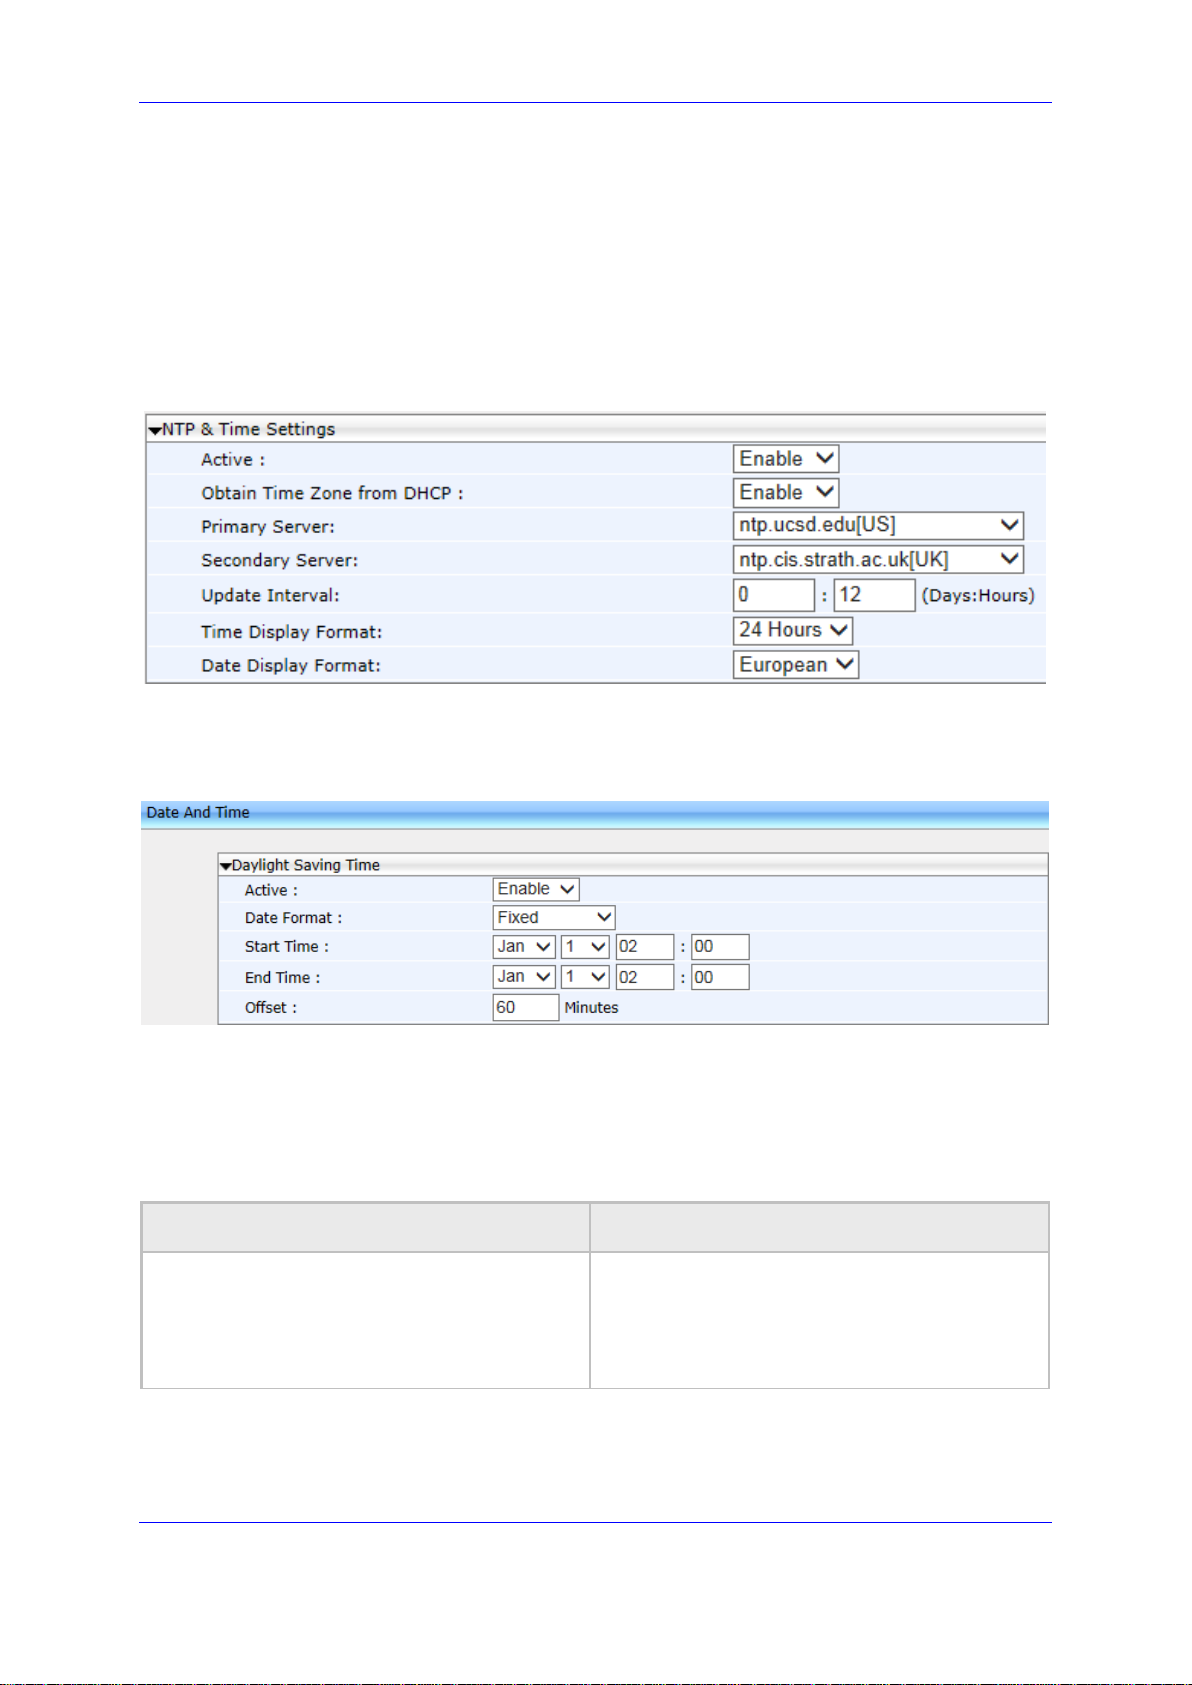
11. Configuring Date and Time Manually
Parameter
Description
Active
[system/daylight_saving/activate]
Determines whether the phone automatically
detects the Daylight Saving Time for the
selected Time Zone.
▪ [DISABLE] Disable (default)
▪ [ENABLE] Enable
11.1 Configuring Daylight Saving Time
You can configure Daylight Saving Time using the Web interface or configuration file.
➢ To configure Daylight Saving Time using the Web interface:
1. Open the Date and Time page (Configuration tab > Advanced Applications menu >
Date and Time) as described above.
2. Set the 'Active' parameter to Enable; the page shown below opens.
Figure 11-2: NTP & Time Settings
3. Set the 'Obtain Time Zone from DHCP' parameter to Disable; the Daylight Saving Time
page shown below opens:
Figure 11-3: Daylight Saving Time
4. Configure the settings using the table below as reference.
➢ To configure Daylight Saving Time using the configuration file:
• Use the table below as reference.
Table 11-2: Daylight Saving Time Parameters
Genesys 400 Series IP Phones 69
Page 70
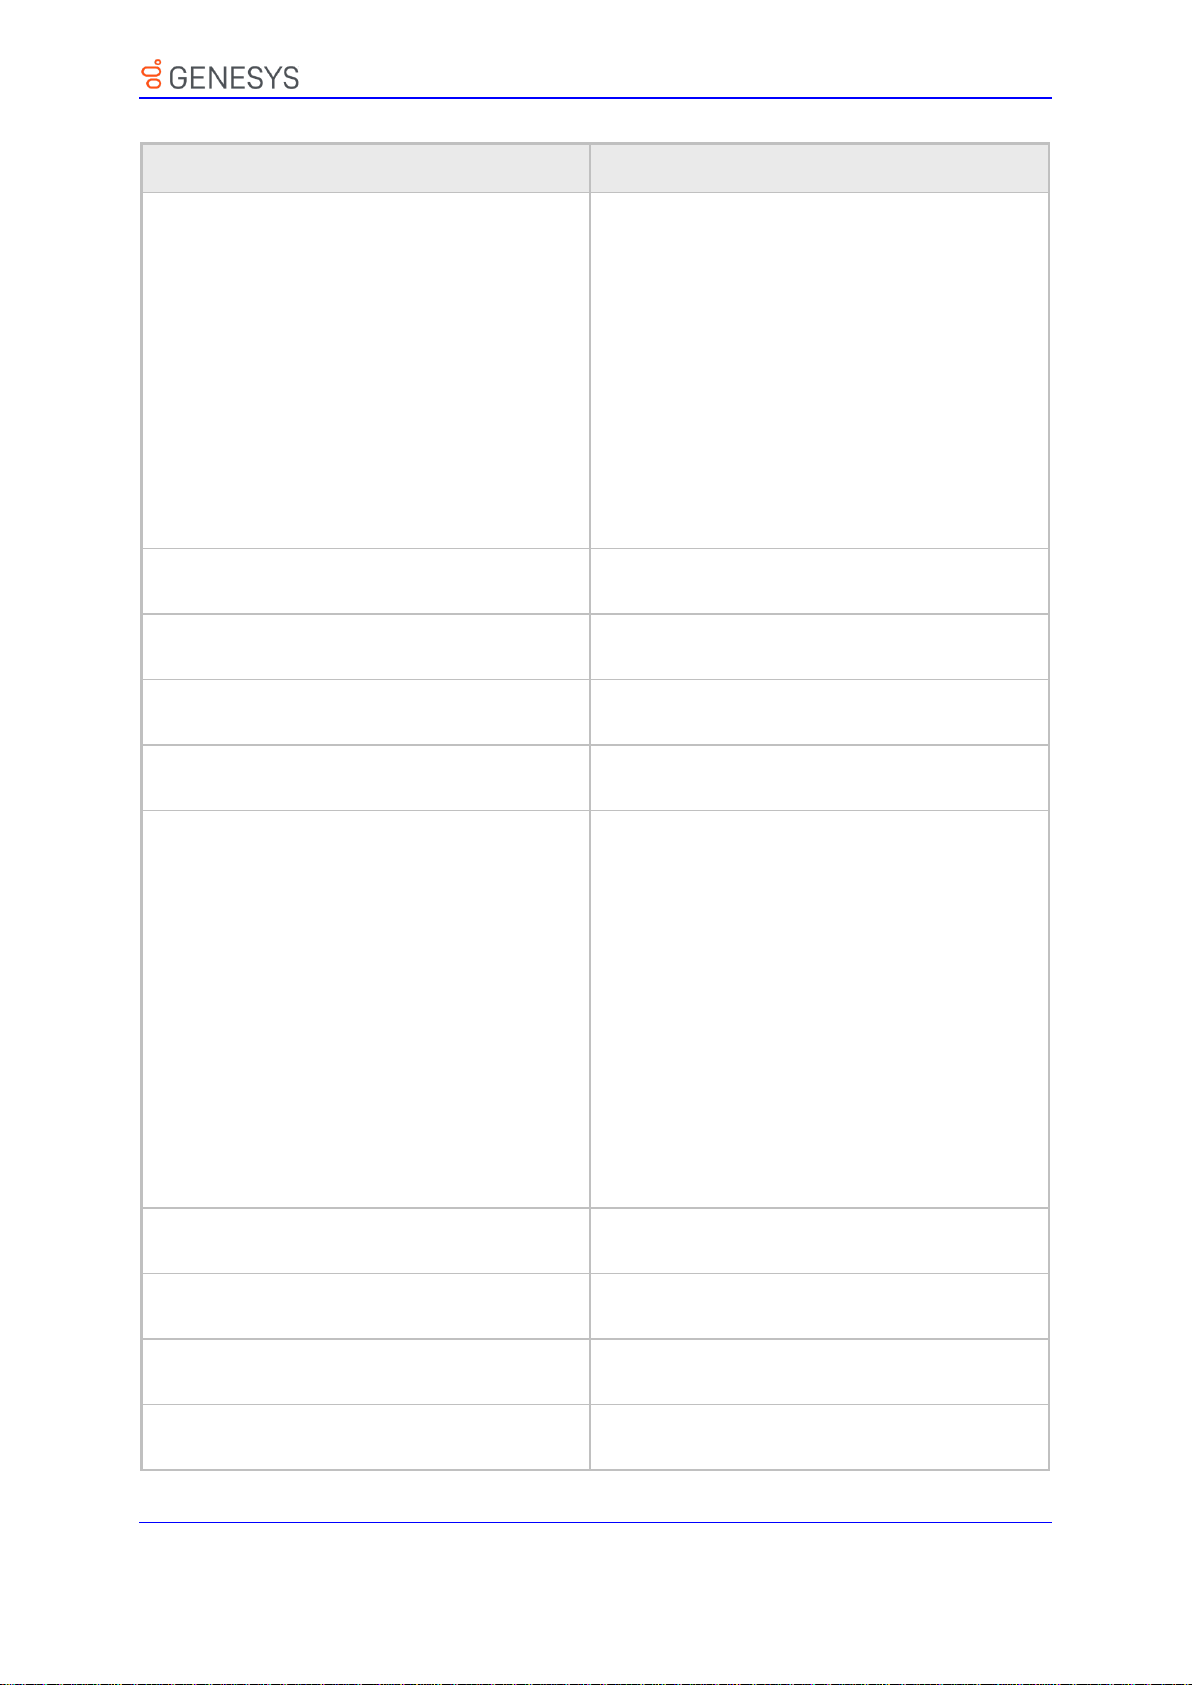
11. Configuring Date and Time Manually
Parameter
Description
Start Time
[system/daylight_saving/start_date]
This subsection defines the starting day for the
daylight saving offset.
▪ [month] - defines specific month in year
▪ [day] - defines specific day in month
▪ [hour] - defines specific hour in day
▪ [minute] - defines specific minute in hour
Example: To configure the phone to start
daylight savings with a specific offset on
February 22nd at 14:30, set the following:
system/daylight_saving/start_date/month=2
system/daylight_saving/start_date/day=22
system/daylight_saving/start_date/hour=14
system/daylight_saving/start_date/minute=30
Start Time
[system/daylight_saving/start_date/month]
The month in a year.
The valid range is 1 to 12.
Start Time
[system/daylight_saving/start_date/day]
The day in a month.
The valid range is 1 to 31.
Start Time
[system/daylight_saving/start_date/hour]
The hour in the day.
The valid range is 0 to 23.
Start Time
[system/daylight_saving/start_date/minute]
The minute in an hour.
The valid range is 0 to 59.
End Time
[system/daylight_saving/end_date]
This subsection defines the ending day for the
daylight saving offset.
▪ [month] - defines the specific month in a
year
▪ [day] - defines the specific day in a month
▪ [hour] - defines the specific hour in a day
▪ [minute] - defines the specific minute in an
hour
For example: To configure the phone to end the
daylight savings on July 16th at 22:15, set the
following:
system/ntp/daylight_saving/end_date/month=7
system/ntp/daylight_saving/end_date/day=16
system/ntp/daylight_saving/end_date/hour=22
system/ntp/daylight_saving/end_date/minute=15
End Time
[system/daylight_saving/end_date/month]
The month in a year.
The valid range is 1 to 12.
End Time
[system/daylight_saving/end_date/day]
The day in a month.
The valid range is 1 to 31.
End Time
[system/daylight_saving/end_date/hour]
The hour in the day
The valid range is 0 to 23.
End Time
[system/daylight_saving/end_date/minute]
The minute in an hour.
The valid range is 0 to 59.
70 Administrator’s Guide Version 2.2.16
Page 71

11. Configuring Date and Time Manually
Parameter
Description
Offset
[system/daylight_saving/offset]
The offset value for the daylight saving.
The valid range is 0 to 180. The default offset is
60.
[system/daylight_saving/mode]
Configures the daylight saving mode.
Valid values are
[FIXED]= Date is specified as: Month, Day of
month.
[DayOfWeek]= Date is specified as: Month,
Week of month, Day of week.
[system/daylight_saving/start_date/week]
Relevant to 'Day of week' mode:
The week of month (values 1-5) for start of
daylight saving time.
[system/daylight_saving/start_date/day_of_week]
Relevant to 'Day of week' mode:
The day of week for daylight saving time start
Valid values :
[SUNDAY]
[MONDAY]
[TUESDAY]
[WEDNESDAY]
[THURSDAY]
[FRIDAY]
[SATURDAY]
[system/daylight_saving/end_date/week]
Relevant to 'Day of week' mode:
The week of month (values 1-5) for end of
daylight saving time.
[system/daylight_saving/end_date/day_of_week]
Relevant to 'Day of week' mode:
The day of week for daylight saving time start
Valid values :
[SUNDAY]
[MONDAY]
[TUESDAY]
[WEDNESDAY]
[THURSDAY]
[FRIDAY]
[SATURDAY]
Genesys 400 Series IP Phones 71
Page 72
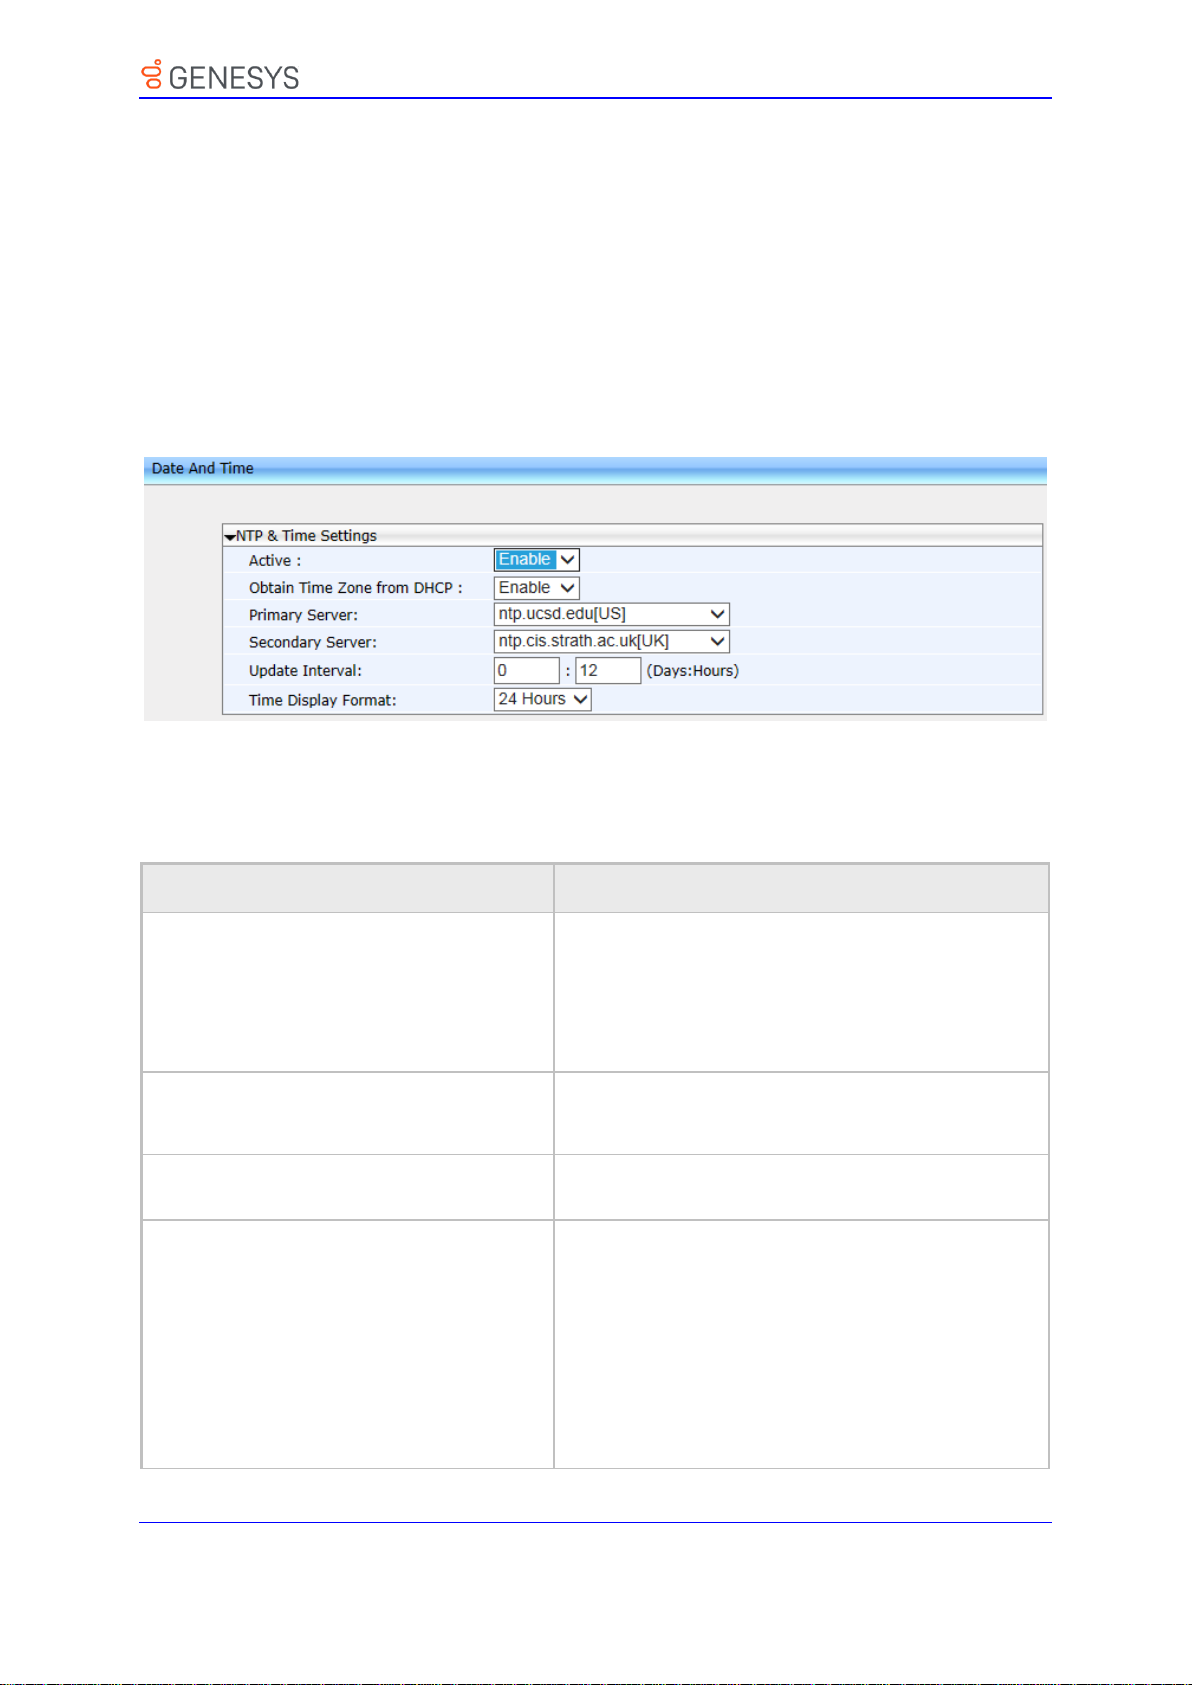
11. Configuring Date and Time Manually
Parameter
Description
Active
[system/ntp/enabled]
Enables the NTP server from which the phone
automatically retrieves the date and time.
▪ [0] Disable
▪ [1] Enable – obtains the time information
automatically from a configured NTP server
(default)
Primary Server
[system/ntp/primary_server_address]
Defines the address of the main NTP server (this
can be a domain name, for example,
tick.nap.com.ar).
Secondary Server
[system/ntp/secondary_server_address]
Defines the address of the secondary NTP server.
Update Interval
[system/ntp/sync_time]
This sub-section defines how often the phone must
perform an update with the NTP server.
▪ [days] -defines the number of days
▪ [hours] - defines the number of hours
For example: To configure the phone to perform an
update with an NTP server every 1 day and 6 hours,
set the following:
system/ntp/sync_time/days=1
system/ntp/sync_time/hours=6
11.2 Configuring the NTP Server
The Network Time Protocol (NTP) server can be configured using the Web interface or
configuration file. When activated, date and time are automatically obtained from the NTP
server.
➢ To configure the NTP server using the Web interface:
1. Open the Date and Time page (Configuration tab > Advanced Applications menu >
Date and Time).
2. Configure the parameters using the table below as reference, and then click Submit.
Figure 11-4: NTP & Time Settings
➢ To configure the NTP server using the configuration file:
• Use the table below as reference.
Table 11-3: NTP Server Parameters
72 Administrator’s Guide Version 2.2.16
Page 73

11. Configuring Date and Time Manually
Parameter
Description
Update Interval
[system/ntp/sync_time/days]
The number of days.
The valid range is 0 to 7. The default of days is 0.
Update Interval
[system/ntp/sync_time/hours]
The number of hours.
The valid range is 0 to 24. The default is 12.
Time Display Format
[system/ntp/time_display_format]
The format of the time displayed on the phone
screen.
▪ [24Hour] (default)
▪ [12Hour]
Genesys 400 Series IP Phones 73
Page 74
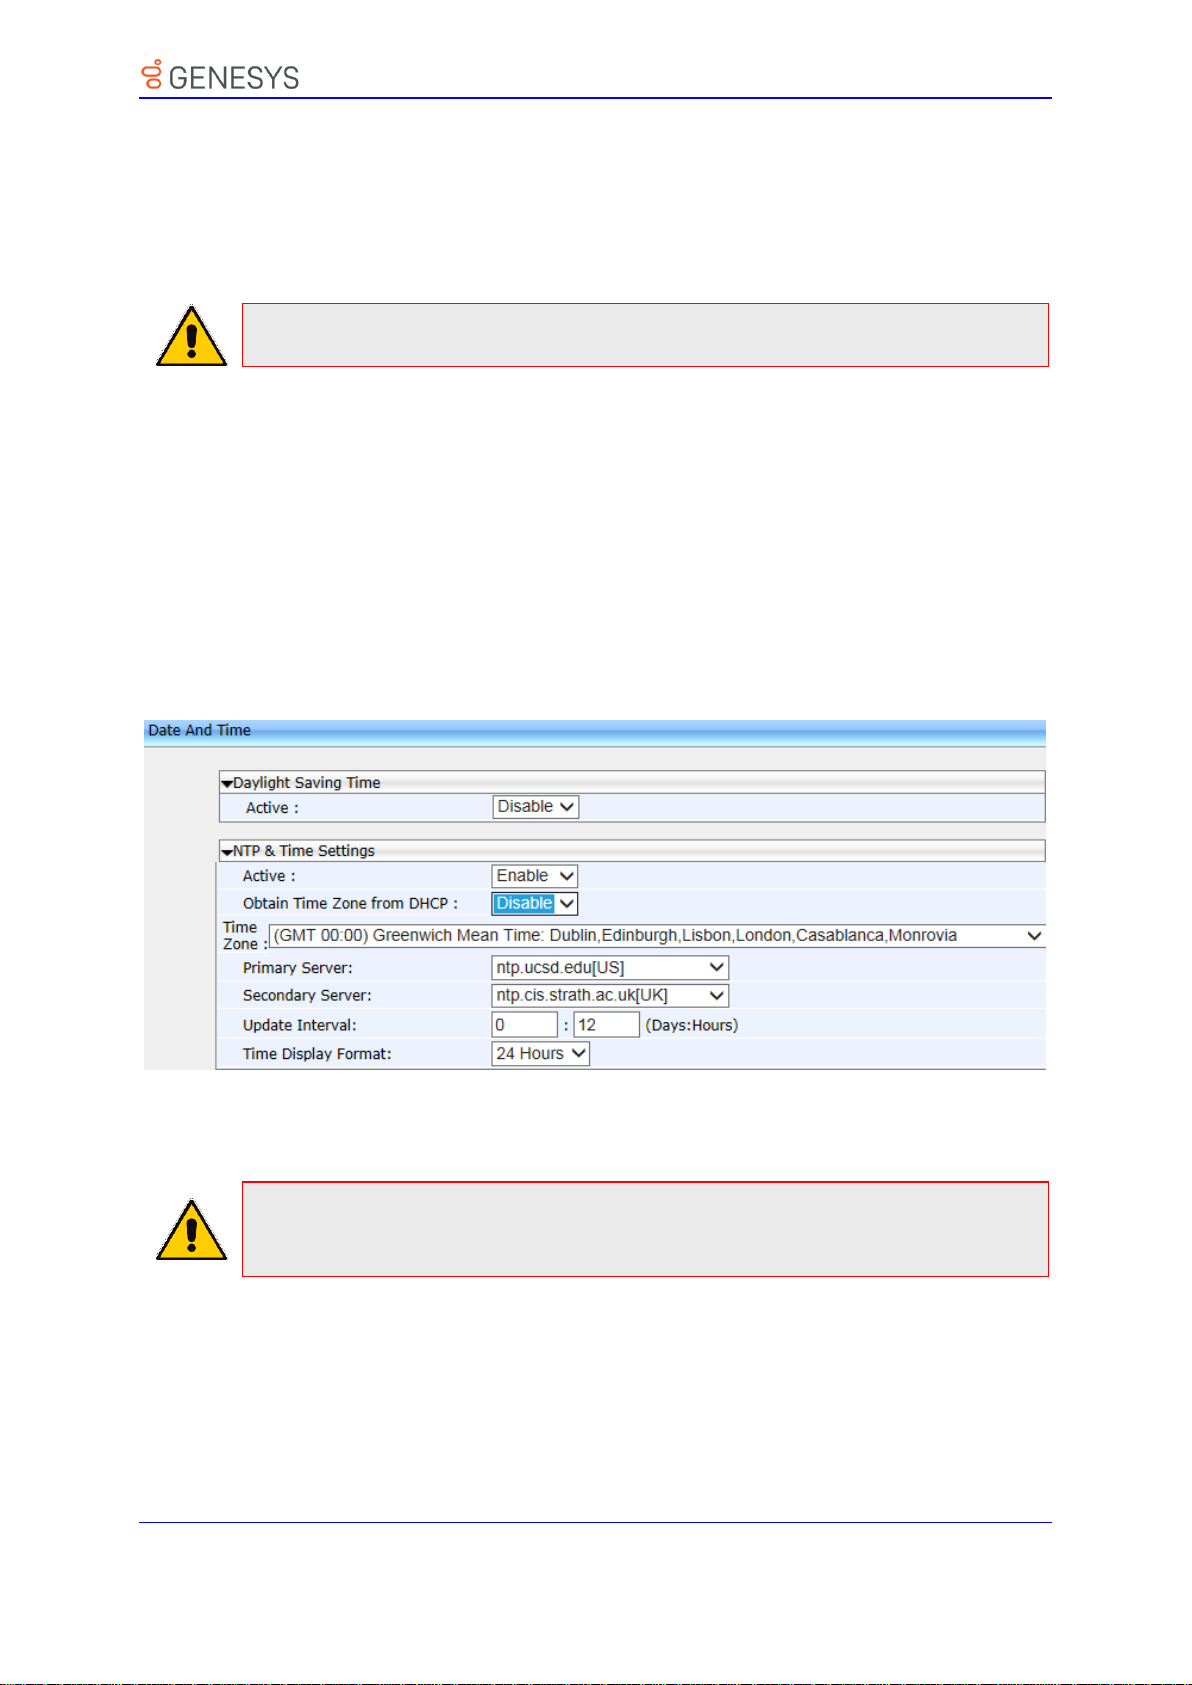
11. Configuring Date and Time Manually
Note: If both options (4 and 42) are received, priority is given to Option 42.
Note: These values will have no affect if TimeZone is set to be obtained from DHCP. If
Time Zone and NTP server are manually set, the phone acts as described above but the
values are obtained from the configuration file and not from DHCP.
11.3 Configuring NTP Server via DHCP
If the phone is set to obtain GMT offsets and NTP servers via DHCP (default), it receives the
following fields in the DHCP options:
Primary Server and Secondary Server – (Option 4 or 42).
Time Zone – (Option 2)
The phone sends an NTP request to the Primary NTP server. If there is no response, the
NTP request is sent to the Secondary NTP server.
After obtaining the time from the server, it adds the GMT offset in Option 2. This is the
updated system time.
➢ To manually configure NTP / GMT offset via DHCP using Web interface:
1. Open the Date and Time page (Configuration tab > Advanced Applications menu >
Date and Time).
2. From the 'Obtain Time Zone From DHCP' drop-down list, select Disable.
Figure 11-5: NTP and Time Settings
3. Configure the NTP and Time Settings according to the parameters in the table below,
and then click Submit.
74 Administrator’s Guide Version 2.2.16
Page 75

11. Configuring Date and Time Manually
Parameter
Description
[system/ntp/gmt_offset]
Default: 00:00
Enables the NTP server from which the phone
retrieves the date and time.
▪ [0] Disable (default)
▪ [1] Enable – obtains the time information
from a configured NTP server
Table 11-4: NTP Server and GMT Parameters
Genesys 400 Series IP Phones 75
Page 76
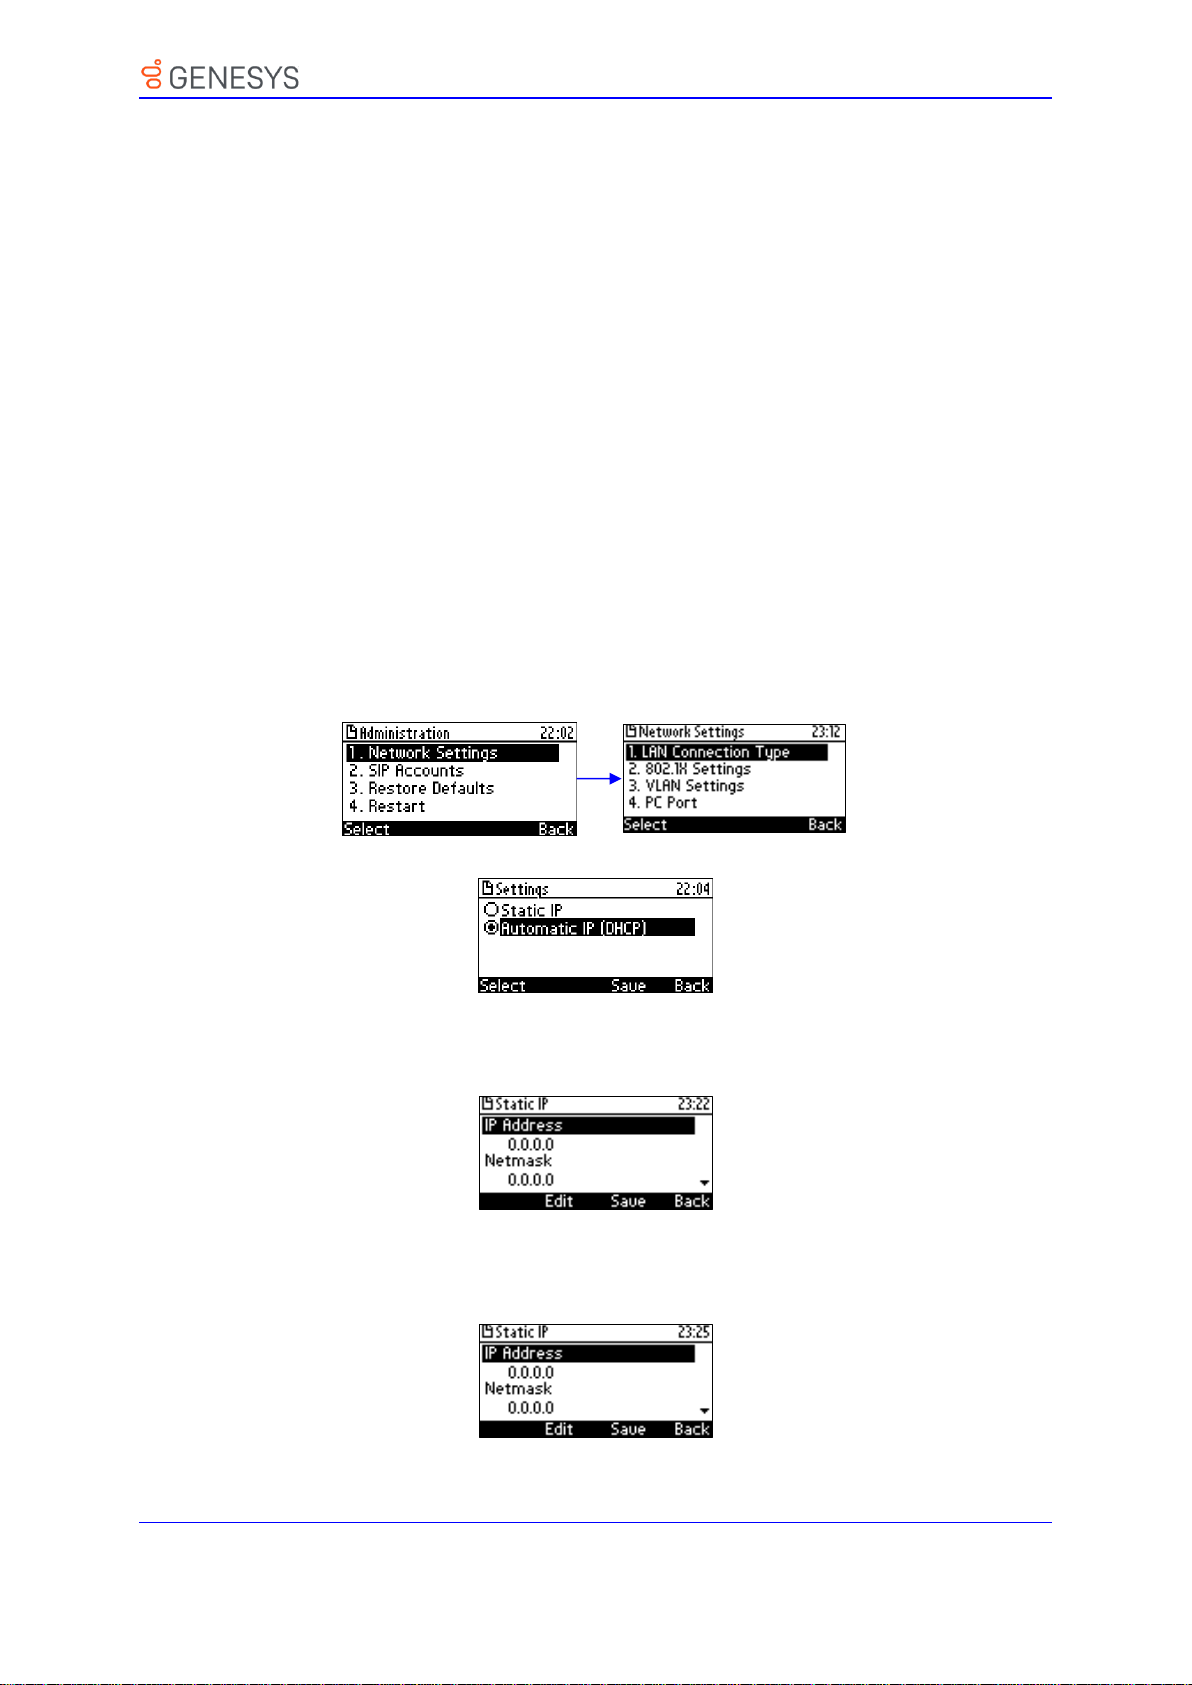
12. Configuring IP Network Settings
12 Configuring IP Network Settings
The following section shows how to configure IP Network Settings including:
Static IP Address
Partial DHCP
12.1 Configuring Static IP Address
The static IP address can be configured using the following:
Phone screen
Web interface and configuration file
12.1.1 Configuring Static IP Address on the Phone
Here’s how to configure Static IP Address on the phone.
The LAN connection interface can be manually defined (static IP address) or automatically
provisioned using a DHCP server from where the LAN IP address is obtained.
➢ To configure the phone's LAN connection type:
1. Access and select the LAN Connection Type option (MENU key > Administration >
Network Settings).
2. Navigate to and select Static IP or Automatic IP (DHCP) IP addressing scheme.
3. If you select Static IP, continue with the next step (Step 4); else skip to Step 5.
4. Define a static IP addressing scheme:
c. Press the Edit softkey; the Static IP screen appears:
d. To configure each required network parameter, i.e., IP Address, Netmask,
Gateway, Primary DNS and Secondary DNS, navigate to and choose the
parameter, and then press the Edit softkey, for example, navigate to IP Address
and press the Edit softkey:
e. Enter the new address in dotted-decimal notation, using the following keys:
76 Administrator’s Guide Version 2.2.16
Page 77
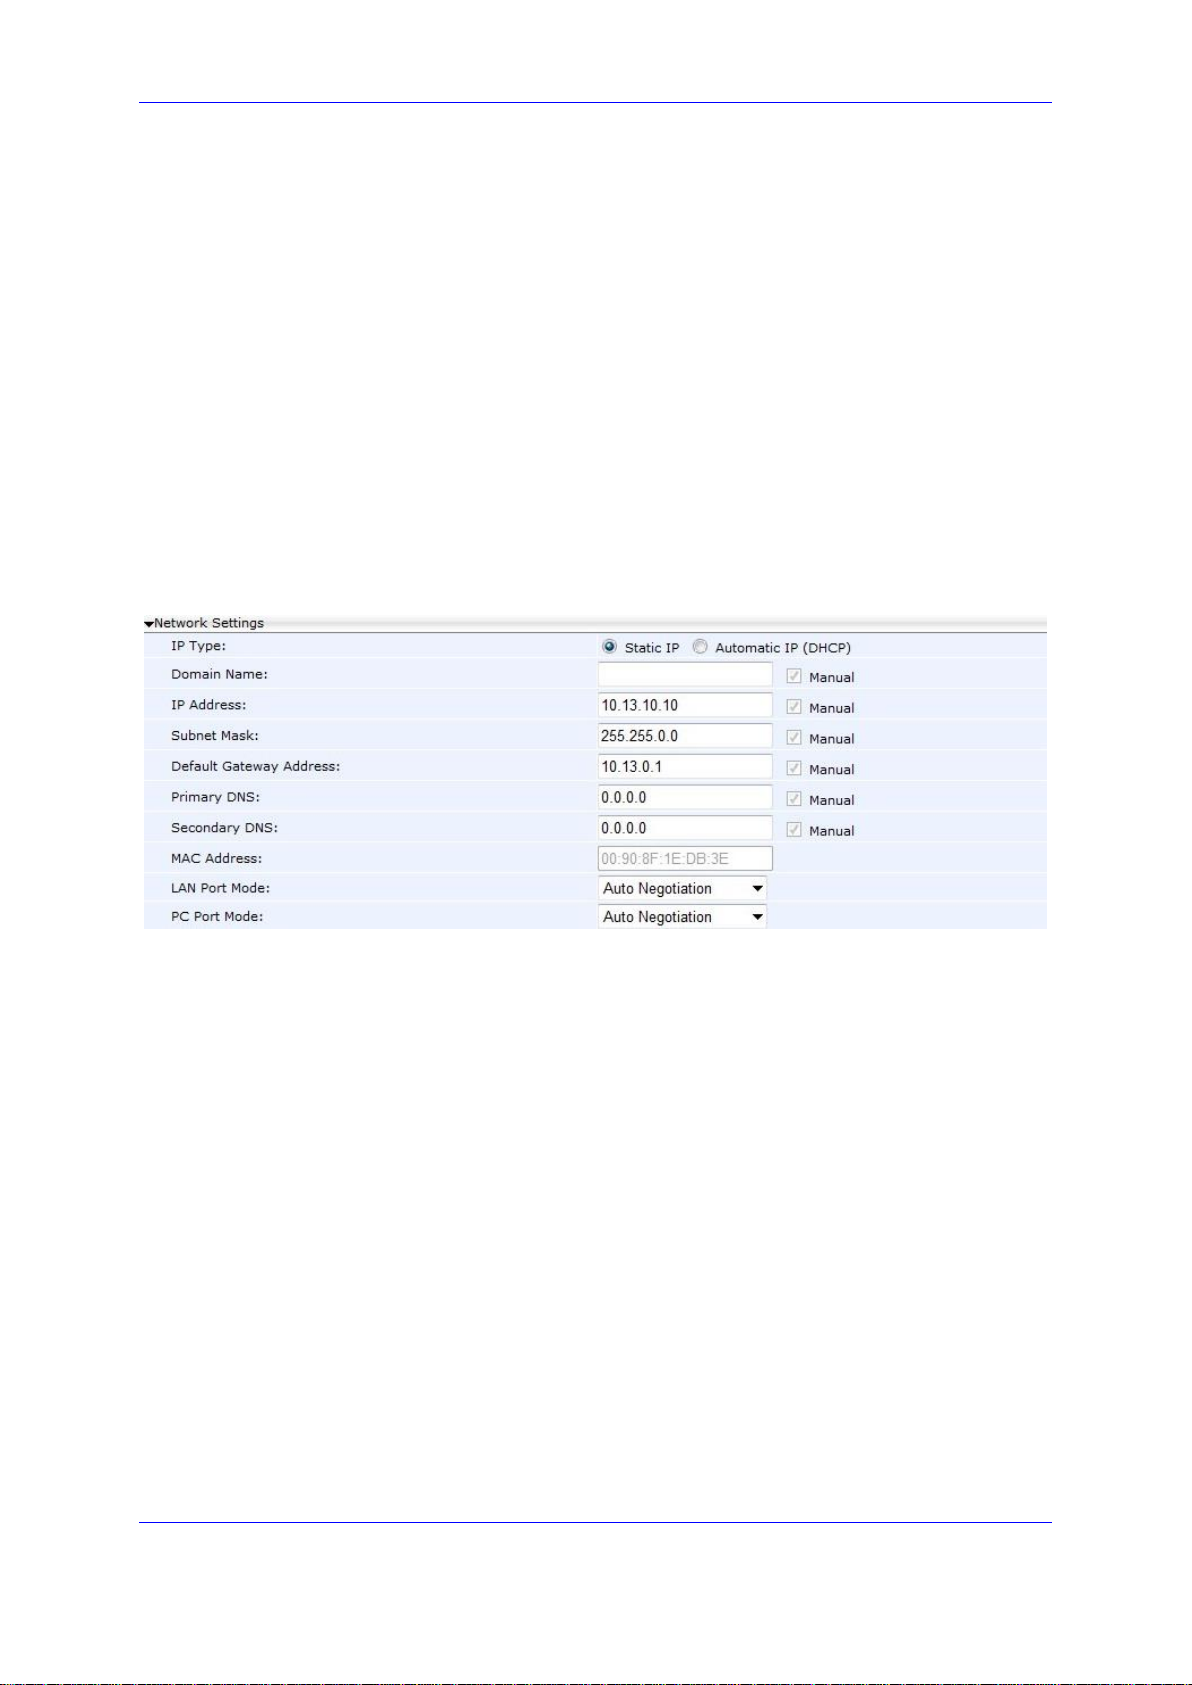
12. Configuring IP Network Settings
Navigation control: moves the cursor left or right in the IP address
Clear softkey: deletes the digit to the left of the cursor.
f. Press the Save and then Apply softkey.
5. Press the Save softkey.
12.1.2 Configuring IP Network Settings
Here’s how to configure IP Network settings using the Web interface or configuration file.
The phone's LAN configuration includes defining the method for obtaining an IP address.
The phone's IP address can be static whereby the IP address is manually entered, or
automatic whereby the IP address is acquired from a DHCP server. For Automatic IP, you
can manually define some of the main parameters.
➢ To define the phone's LAN settings using the Web interface:
1. Open the LAN Settings page (Configuration tab > Network Connections menu >
Network Settings).
Figure 12-1: Network Settings
2. Configure the LAN parameters using the table below as reference, and then click
Submit.
Genesys 400 Series IP Phones 77
Page 78
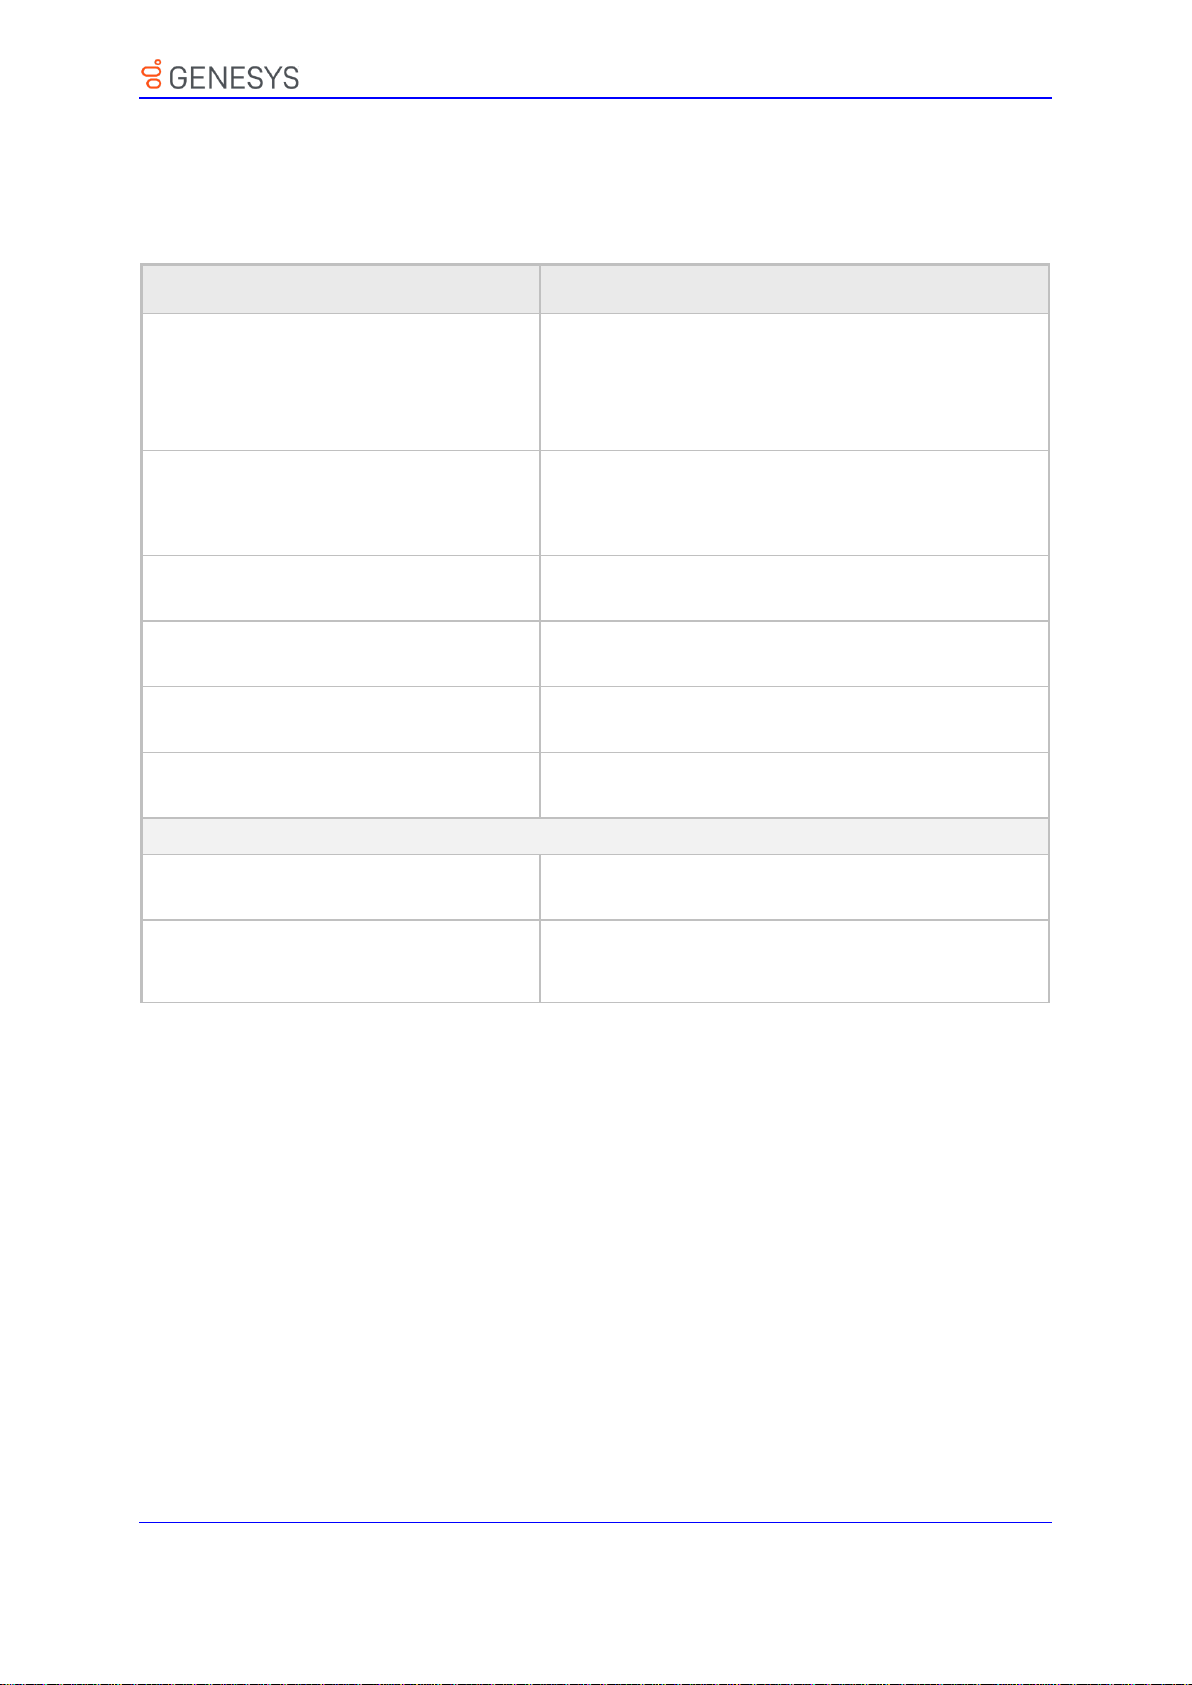
12. Configuring IP Network Settings
Parameter
Description
IP Type
[network/lan_type]
Defines the IP addressing method:
▪ [STATIC] Static IP (default)- Phone's IP address is
defined manually
▪ [DHCP] Automatic IP DHCP - Phone's IP address
is acquired automatically from a DHCP server
network/lan/fixed_ip
This subsection defines the relevant parameters if
'lan_type' is configured to STATIC or the
corresponding 'network/lan/dhcp' parameter is set to
1.
IP Address
[network/lan/fixed_ip/ip_address]
The LAN IP address.
Subnet Mask
[network/lan/fixed_ip/netmask]
The subnet mask address.
Default Gateway Address
[network/lan/fixed_ip/gateway]
The IP address of the default gateway.
Domain Name
[network/lan/fixed_ip/domain_name]
The domain name.
Domain Name Server (DNS)
Primary DNS
[network/lan/fixed_ip/primary_dns]
The primary DNS server address.
Secondary DNS
[network/lan/fixed_ip/secondary_dns]
The secondary DNS server address. The phone
connects to this server if the primary DNS server is
unavailable.
➢ To define the phone's LAN settings using the configuration file:
• Use the table below as reference.
Table 12-1: Network Settings Parameters
78 Administrator’s Guide Version 2.2.16
Page 79

12. Configuring IP Network Settings
Parameter
Description
Partial DHCP
network/lan/dhcp
This subsection defines the parameters to
configure if 'lan_type' is configured to DHCP.
Domain Name - Manual
[network/lan/dhcp/domain_name/enabled]
Enables setting the domain name manually.
▪ [0] Disable (default)
▪ [1] Enable
Note: If enabled, network/lan/fixed_ip/domain_name
must be set.
IP Address - Manual
[network/lan/dhcp/ip_address/enabled]
Enables setting the IP address manually.
▪ [0] Disable
▪ [1] Enable (default)
Note: If enabled,
network/lan/fixed_ip/ip_address must be set.
Subnet Mask - Manual
[network/lan/dhcp/netmask/enabled]
Enables setting the network mask manually.
▪ [0] Disable
▪ [1] Enable (default)
Note: If enabled, network/lan/fixed_ip/netmask
must be set.
[network/lan/dhcp/gateway/enabled]
Enables setting the default gateway manually.
▪ [0] Disable
▪ [1] Enable (default)
Note: If enabled, network/lan/fixed_ip/gateway
must be set.
Primary DNS - Manual
[network/lan/dhcp/primary_dns/enabled]
Enables setting the primary DNS manually.
▪ [0] Disable (default)
▪ [1] Enable
Note: If enabled,
network/lan/fixed_ip/primary_dns must be set.
Secondary DNS - Manual
network/lan/dhcp/secondary_dns/enabled
Enables setting the secondary DNS manually.
▪ [0] Disable (default)
▪ [1] Enable
Note:If enabled,
network/lan/fixed_ip/secondary_dns must be
set.
12.2 Configuring Partial DHCP
Partial DHCP can be configured with the following parameters:
Table 12-2: Partial DHCP Parameters
Genesys 400 Series IP Phones 79
Page 80
12. Configuring IP Network Settings
Parameter
Description
DHCP-Related Parameters
network/lan/dhcp/ntp/server_list/enabled
Enables prioritization of the NTP server's
information received from the DHCP server
(Option fields 42 or 4), over the static
configuration
(system/ntp/primary_server_address and
system/ntp/secondary_server_address).
▪ [0] Disable
▪ [1] Enable (default)
network/lan/dhcp/ntp/gmt_offset/enabled
Enables prioritization of the NTP GMT offset
information received from the DHCP server
(Option field 2), over the static configuration
(system/ntp/gmt_offset).
▪ [0] Disable
▪ [1] Enable (default)
80 Administrator’s Guide Version 2.2.16
Page 81

12. Configuring IP Network Settings
This page is intentionally left blank.
Genesys 400 Series IP Phones 81
Page 82
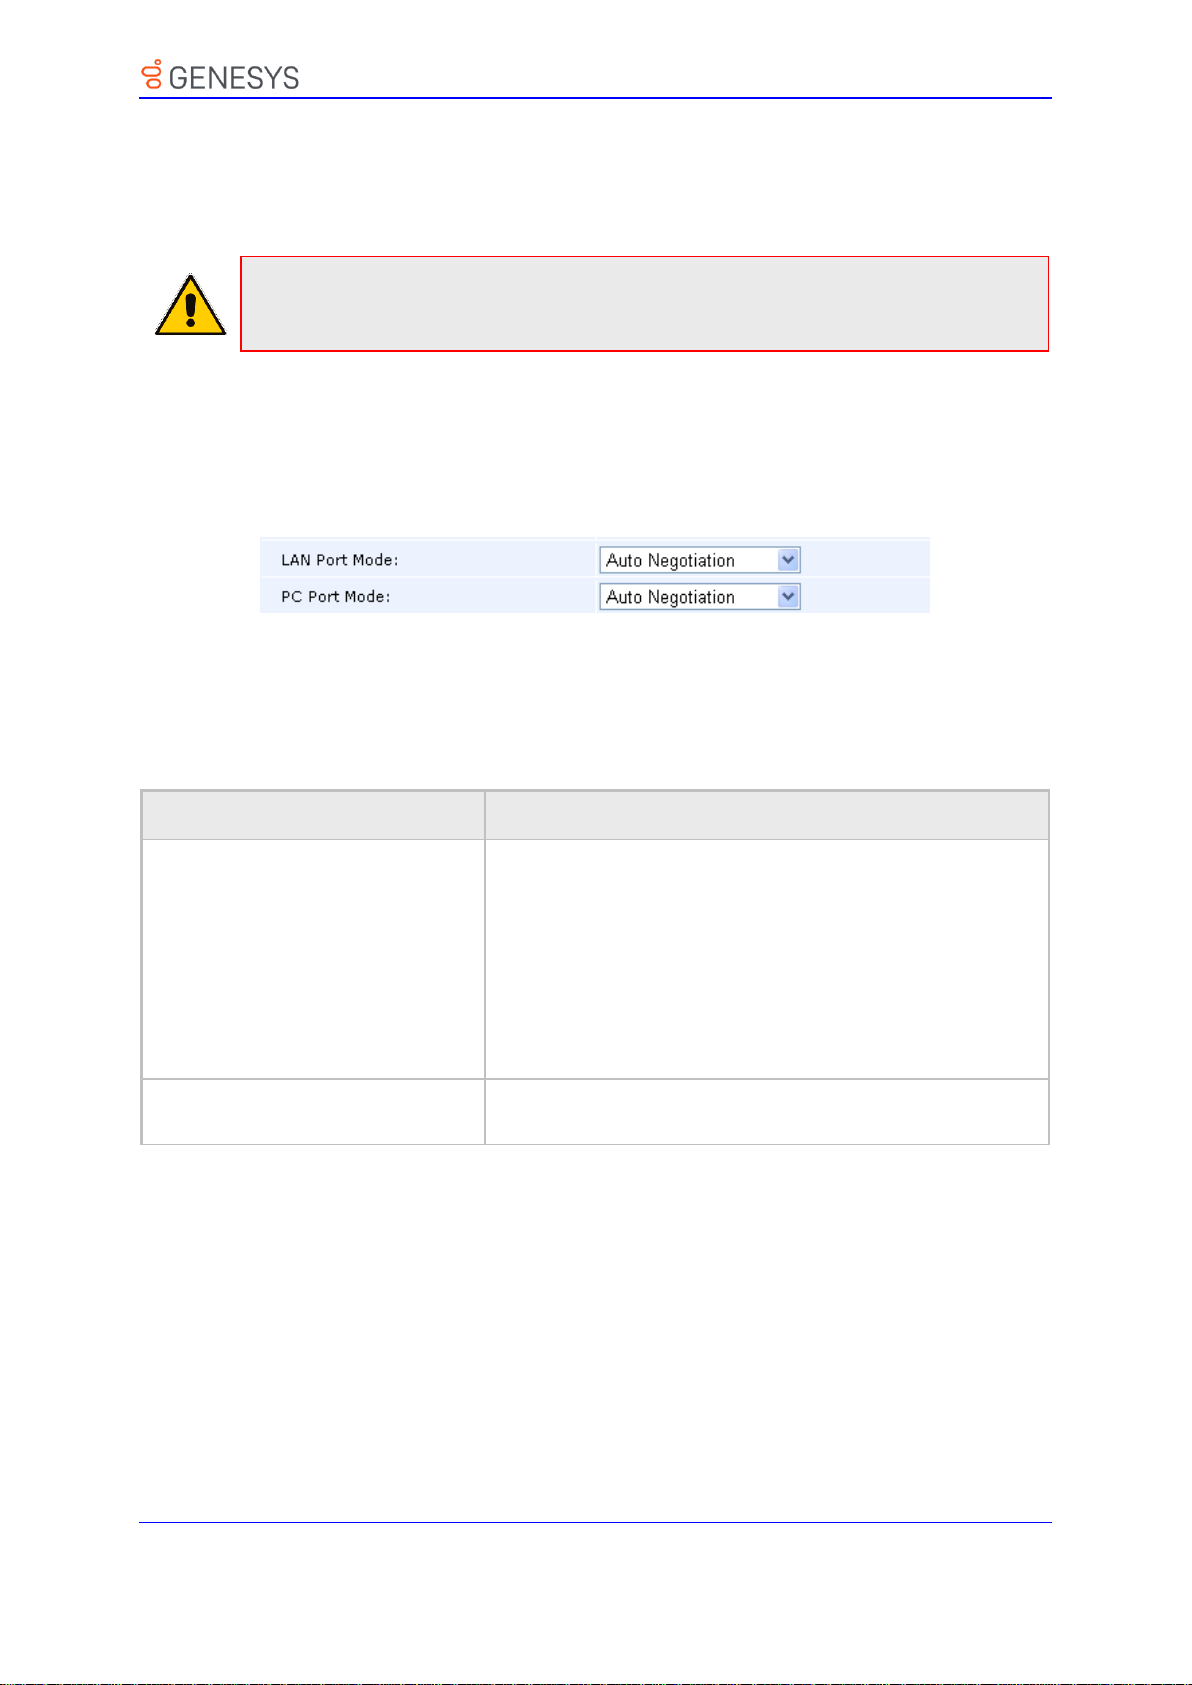
13. Configuring LAN and PC Port Settings
Note: The optional values of the configuration file parameters are enclosed in square
brackets while its corresponding Web values are written outside the square brackets, for
example, [1] Enable.
Parameter
Description
LAN Port Mode
[network/lan/port_mode]
Sets the LAN port mode.
Valid values are :
[AUTOMATIC] = Auto negotiation.
[FULL_10] = 10Mbps + full duplex
[FULL_100] = 100Mbps + half duplex
[HALF_10] = 10Mbps + full duplex
[HALF_100] = 100Mbps + half duplex
[FULL _ 1Gbps] = 1 Gbit/s port + full duplex
PC Port Mode
[network/pc/port_mode]
Sets the computer port mode.
See valid values above.
13 Configuring LAN and PC Port Settings
Port settings can be configured using the Web interface or configuration file.
➢ To configure the phone's port settings using the Web interface:
1. Open the Network Settings page (Configuration tab > Network Connections menu >
Network Settings).
Figure 13-1: Network Settings - Port Mode
2. Configure the parameters using the table below as reference, and then click Submit.
➢ To define the phone's port settings using the configuration file:
• Use the table below as reference.
Table 13-1: Port Settings
82 Administrator’s Guide Version 2.2.16
Page 83

13. Configuring LAN and PC Port Settings
This page is intentionally left blank.
Genesys 400 Series IP Phones 83
Page 84
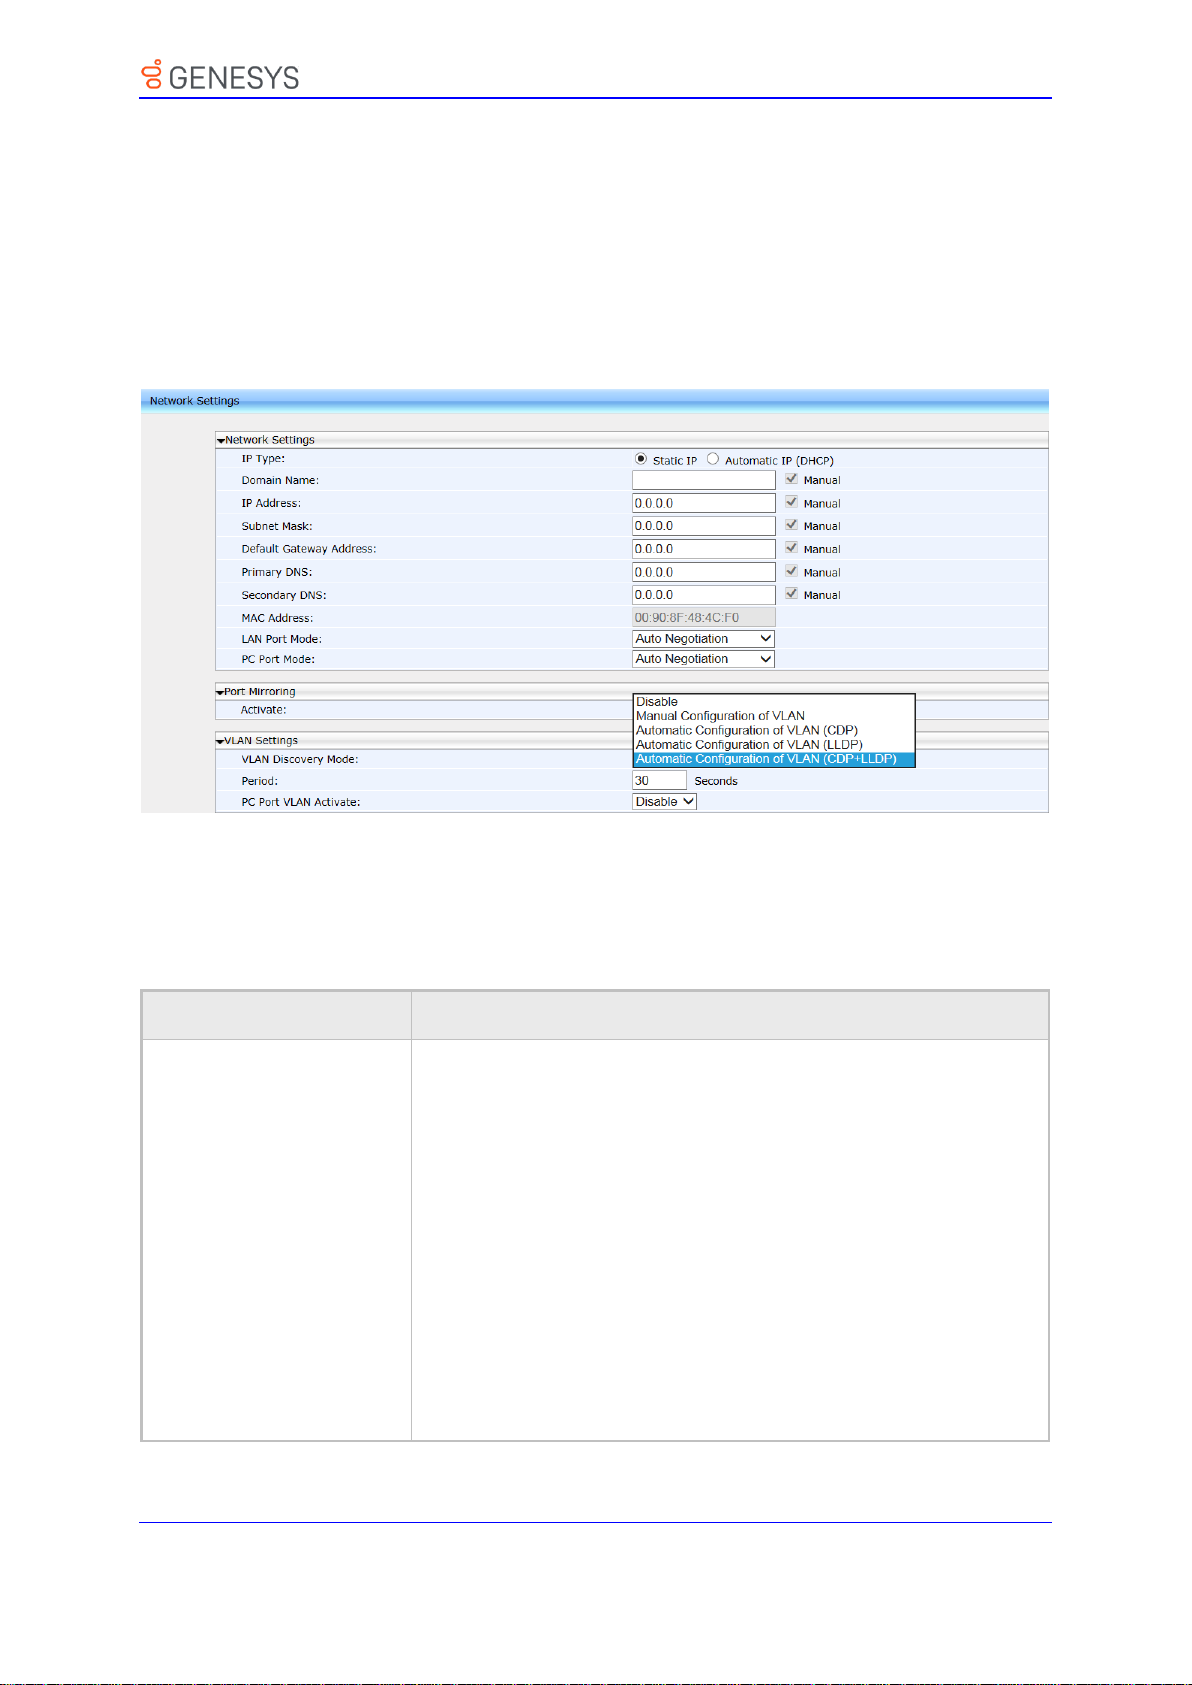
14. Configuring VLAN Settings
Parameter
Description
VLAN Discovery Mode
[network/lan/vlan/mode]
Determines how VLAN is assigned to your phone, i.e., manually or
automatically, and if automatically, according to which protocol.
▪ Disable [Disable]
▪ Manual Configuration of VLAN [Manual] - If selected, the screen
extends to also display 'VLAN ID' and 'VLAN Priority' (see these
settings below) for static configuration of VLAN ID and priority.
See Section 14.1 below for a detailed explanation.
▪ Automatic Configuration of VLAN (CDP) [CDP] - VLAN discovery
mechanism based on Cisco Discovery Protocol (CDP). See
Section 14.1 below for a detailed explanation.
▪ Automatic Configuration of VLAN (LLDP) [LLDP] - VLAN
discovery mechanism based on LLDP. See Section 14.1 below
for a detailed explanation.
▪ Automatic Configuration of VLAN (CDP+LLDP) [CDP_LLDP]
(default) - VLAN discovery mechanism based on LLDP and CDP.
LLDP is higher priority. See below for a detailed explanation.
14 Configuring VLAN Settings
You can configure VLAN settings using the Web interface or configuration file.
➢ To configure the phone's VLAN settings using the Web interface:
1. In the Web interface access the Network Settings page (Configuration tab > Network
Connections menu > Network Settings).
Figure 14-1: Network Settings - VLAN Settings
2. Configure the settings using the table below as reference, and then click Submit.
➢ To configure the phone's VLAN settings using the configuration file:
• Use the table below as reference.
Table 14-1: VLAN Settings
84 Administrator’s Guide Version 2.2.16
Page 85

14. Configuring VLAN Settings
Parameter
Description
Period
[network/lan/vlan/period]
The time period, in seconds, between discovery messages when
configured to CDP, LLDP or CDP+LLDP. The default value is 30.
VLAN ID
[network/lan/vlan/id]
The VLAN ID. The valid range is 0 to 4096. The default is 0.
VLAN Priority
[network/lan/vlan/priority]
The priority of traffic pertaining to this VLAN. The valid range is 0 to
7 (where 7 is the highest priority). The default is 0.
PC Port VLAN Activate
[network/lan/vlan/pc_port_
tagging/enable]
Default = Disable [0]. Change to Enable (1) for the traffic from the
PC to the network to be VLAN-tagged.
14.1 Configuring Manual or Automatic VLAN Assignment
You can configure the VLAN to be assigned manually or automatically to your phone. This
section shows when to configure what, and why.
14.1.1 Configuring Manual VLAN Assignment to the Phone
Configure manual assignment of the VLAN in order to set up two separate VLANs in your
enterprise, one for voice (your phone) and the other for data (your pc). Security
considerations may require this. If you configure manual assignment, the switch in your
enterprise will assign the VLAN to your phone. See Sections 12.1.1 and 12.1.2 for details.
14.1.2 Configuring Automatic VLAN Assignment to the IP Phone
Configure automatic assignment of VLAN if you do not need to separate voice from data,
i.e., if there are no security considerations requiring it. In this case, configure either:
Automatic Configuration of VLAN (CDP) [CDP]
Automatic Configuration of VLAN (LLDP) [LLDP] -OR-
Automatic Configuration of VLAN (CDP+LLDP) [CDP_LLDP]
What you select depends on whether the switch deployed in your enterprise supports Ciscoproprietary Cisco Discovery Protocol (CDP), or LLDP (Link Layer Discovery Protocol) which
is a vendor-neutral protocol used by devices in an IEEE 802 LAN to advertise their identity,
capabilities, and neighbors. Not all switches support CDP. If you’re unsure, select
CDP+LLDP. LLDP includes enhanced LLDP for Media Endpoint Devices, i.e., LLDP-MED,
to specifically address voice applications.
14.1.3 Configuring VLAN via DHCP Provisioning Path
VLAN can be configured using (1) Link Layer Discovery Protocol (LLDP) (2) Cisco Discovery
Protocol (CDP) (3) DHCP Option 43, sub option 10 and (4) manually.
If (1) is unsuccessful, (2) is attempted.
If (2) is unsuccessful, (3) is attempted.
If (3) is unsuccessful, (4) is attempted.
The capability provides an alternative VLAN configuration option.
Genesys 400 Series IP Phones 85
Page 86

Part V
VoIP Settings
Page 87

14. Configuring VLAN Settings
This page is intentionally left blank.
Genesys 400 Series IP Phones 87
Page 88
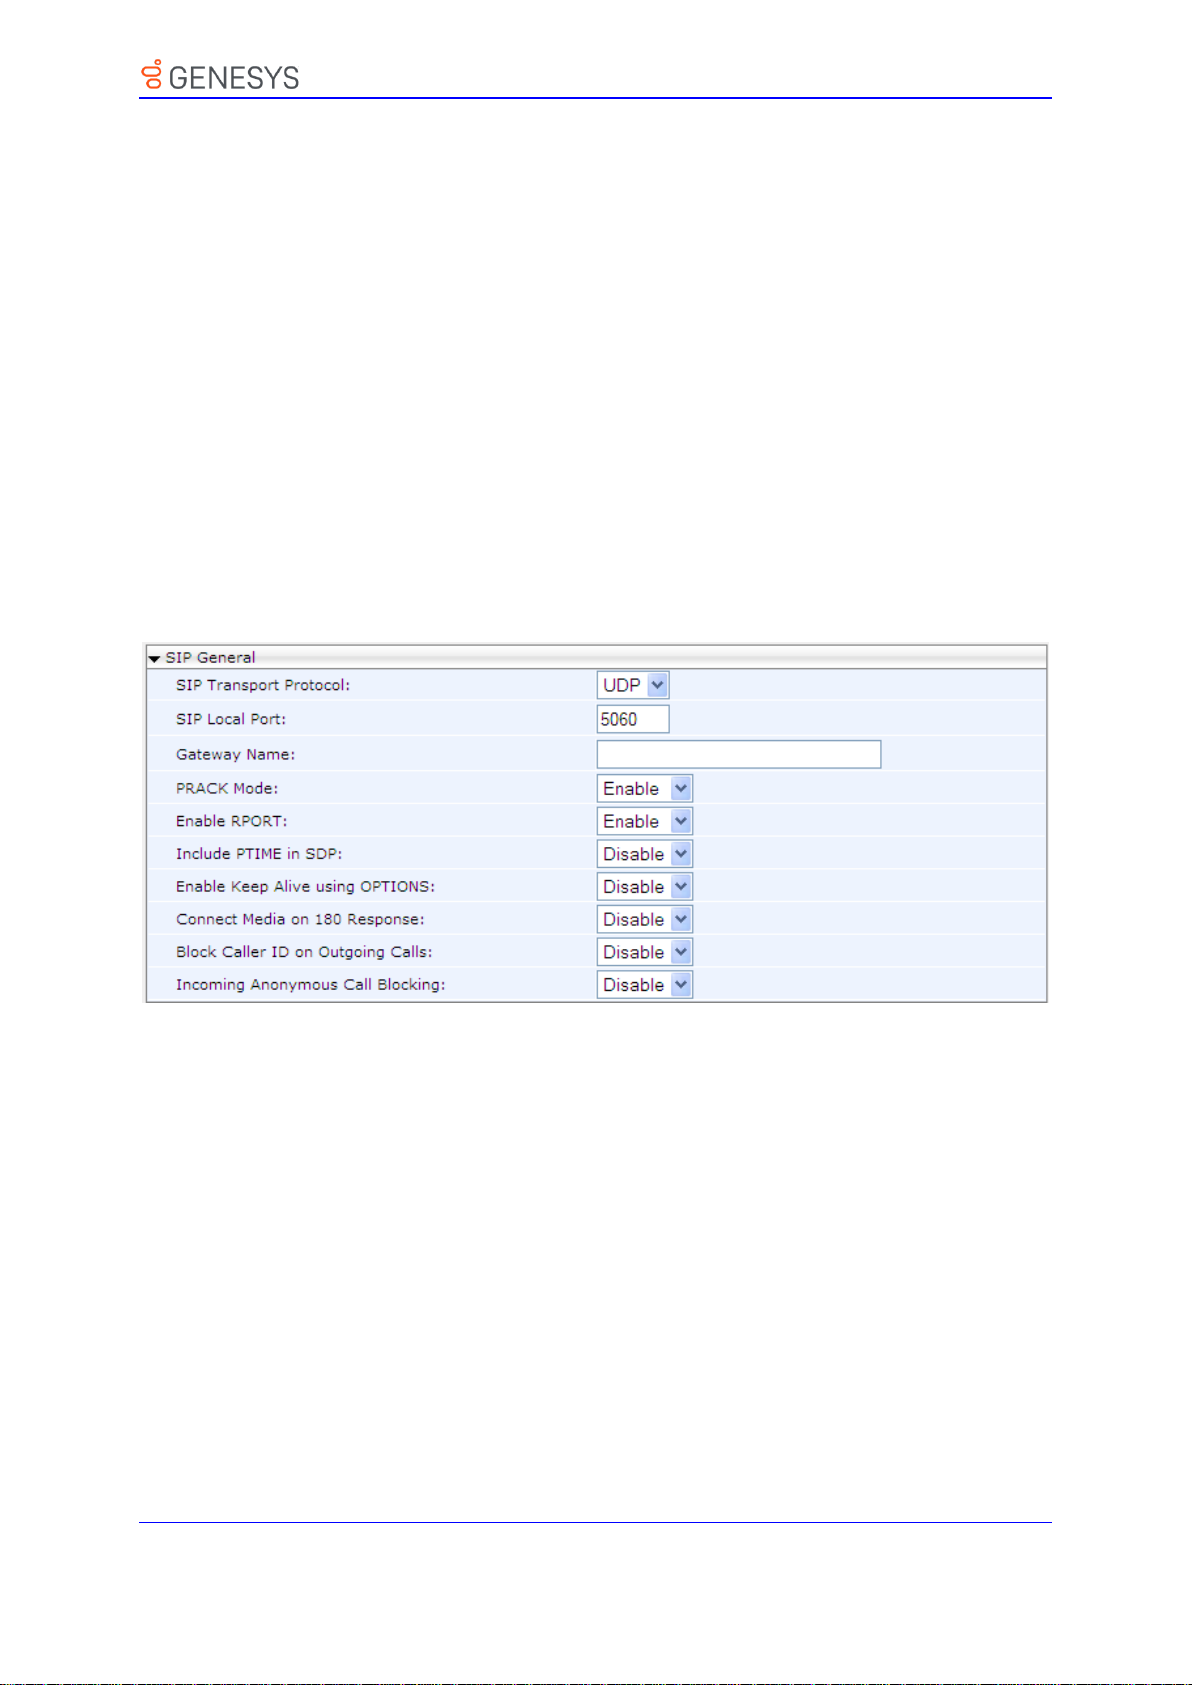
15. Configuring SIP Settings
15 Configuring SIP Settings
You can configure the following SIP settings using the Web interface or configuration file:
General
Proxy and Registration
SIP Timers
SIP QoS
15.1 Configuring General SIP Settings
The phone's General SIP settings can be configured using the Web interface or configuration
file.
➢ To configure general SIP settings using the Web interface:
1. Open the Signaling Protocols page (Configuration tab > Voice Over IP menu >
Signaling Protocols).
Figure 15-1: Signaling Protocols- SIP General
2. Configure the SIP General parameters using Table 16-1 below as reference, and then
click Submit.
88 Administrator’s Guide Version 2.2.16
Page 89

15. Configuring SIP Settings
Parameter
Description
SIP Transport Protocol
[voip/signalling/sip/transport_protocol]
Determines the transport layer for
outgoing SIP calls initiated by the
phone.
▪ [UDP] UDP (default)
▪ [TCP] TCP
▪ [TLS] TLS
TLS Port
[voip/signalling/sip/tls_port]
Defines the local TLS SIP port for
SIP messages.
The valid range is 1024 to 65535.
The default value is 5061.
[voip/signalling/sip/enable_sips]
Relevant for TLS only, if enabled,
the request URI prefix will be
“sips:” otherwise, the prefix will
be “sip:”
[voip/signalling/sip/subs_no_notify_timer]
Indicates the maximum time (in
milliseconds) that a subscription
waits from receiving 2xx response
for a SUBSCRIBE request, until
receiving the first NOTIFY
request. If the timer expires, the
subscription will be terminated.
SIP Local Port
[voip/signalling/sip/port]
Defines the local SIP port (UDP
or TCP) for SIP messages.
The valid range is 1024 to 65535.
The default value is 5060.
Gateway Name
[voip/signalling/sip/proxy_gateway]
Assigns a name to the phone.
The name is used as the host
part of the SIP URI in the From
header.
Note:
▪ Ensure that the name you
choose is the one with which
the Proxy is configured to
identify the phone.
▪ If not specified, the phone's IP
address is used (default).
PRACK Mode
[voip/signalling/sip/prack/enabled]
Determines whether the phone
sends PRACK (Provisional
Acknowledgment) messages
upon receipt of 1xx SIP reliable
responses.
▪ [0] Disable
▪ [1] Enable (default)
➢ To General SIP parameters using the configuration file:
• Use the table below as reference.
Table 15-1: SIP General Parameters
Genesys 400 Series IP Phones 89
Page 90

15. Configuring SIP Settings
Parameter
Description
Enable RPORT
[voip/signalling/sip/rport/enabled]
Determines whether the phone
adds the 'rport' parameter to the
relevant SIP message (in the SIP
Via header).
▪ [0] Disable (default)
▪ [1] Enable
Include PTIME in SDP
[voip/signalling/sip/sdp_include_ptime]
Determines whether the phone
adds the PTIME parameter to the
SDP message body.
▪ [0] Disable (default)
▪ [1] Enable
Enable Keep Alive using OPTIONS
[voip/signalling/sip/keepalive_options/enabled]
Determines whether keep-alive is
performed using SIP OPTIONS
messages sent to the Proxy.
▪ [0] Disable (default)
▪ [1] Enable
Keep Alive Period
[voip/signalling/sip/keepalive_options/timeout]
Defines the Proxy keep-alive time
interval (in seconds) between
Keep-Alive messages.
The valid range is 0 to 86400.
The default value is 300.
Connect Media on 180 Response
[voip/signalling/sip/connect_media_on_180]
Determines whether the media is
connected upon receipt of SIP
180, 183, or 200 messages.
When the parameter is disabled,
media is connected upon receipt
of 183 and 200 messages only.
▪ [0] Disable (default)
▪ [1] Enable
90 Administrator’s Guide Version 2.2.16
Page 91

15. Configuring SIP Settings
Parameter
Description
Block Caller ID on Outgoing Calls
[voip/signalling/sip/block_callerid_on_outgoing_calls]
Can be configured only if the
BroadSoft BroadWorks
application server is used.
When enabled, the outgoing
INVITE message is sent with an
anonymous From header and PAsserted-Identityheader.
▪ [0] Disable (default)
▪ [1] Enable
For example:
▪ FROMheader contains
anonymous URI:
From: "Anonymous"
sip:[email protected]
nvalid
▪ P-Asserted-Identityheader:
P-Asserted-Identity: "1001"
[email protected]
Incoming Anonymous Call Blocking
[voip/signalling/sip/anonymous_calls_blocking]
Can be configured only if the
BroadSoft BroadWorks
application server is used.
When enabled, incoming INVITE
messages with anonymous From
header are rejected.
▪ [0] Disable (default)
▪ [1] Enable
For example:
From:"Anonymous"<sip:anonymo
[email protected]>
The phone responds with a SIP
403 "Forbidden" response.
[voip/signalling/sip/auth_retries]
Defines the number of times
authenticated register messages
are re-sent if 401 or 407 SIP
responses with a different
"nonce" are received.
The valid range is 0 to 100. The
default value is 4.
[voip/signalling/sip/display_name_in_registration_msg/enabled]
Sets the Display Name in the 'To'
and 'From' fields of the SIP
REGISTER message.
▪ [0] Disable (default)
▪ [1] Enable
Genesys 400 Series IP Phones 91
Page 92
15. Configuring SIP Settings
Parameter
Description
[voip/signalling/sip/semi_transfer_with_no_cancel/enabled]
Determines whether semiattendant transfer is performed
without sending the SIP CANCEL
message to the remote side.
▪ [0] Disable (default)
▪ [1] Enable
Note:
▪ In this flow ("with_no_cancel"),
the Transferor's User Agent
continues the transfer as an
attended transfer even after
the Transferor hangs up. This
is the recommended flow
defined by
http://tools.ietf.org/html/draf
t-ietf-sipping-cc-transfer-03.
▪ Existing / current behavior is
retained for backward
compatibility (disabled by
default)
92 Administrator’s Guide Version 2.2.16
Page 93
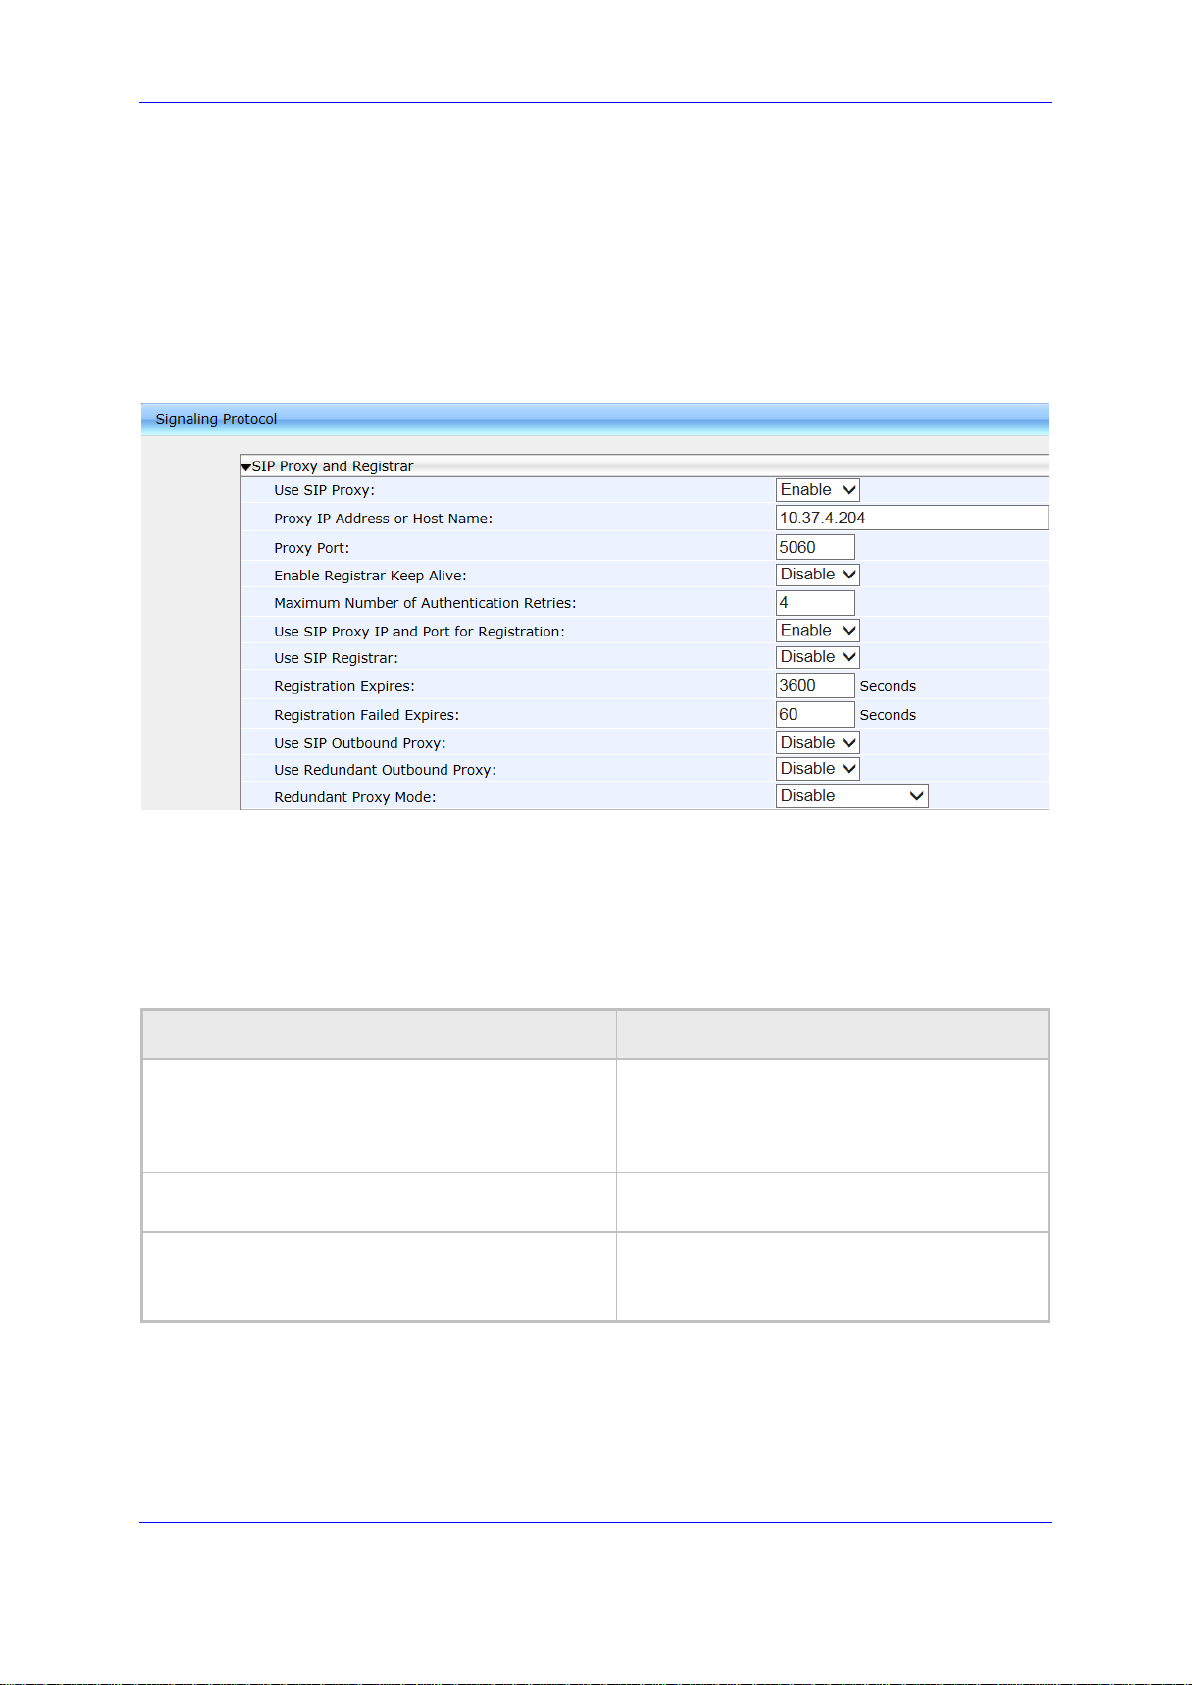
15. Configuring SIP Settings
Parameter
Description
Use SIP Proxy
[voip/signalling/sip/use_proxy]
Determines whether to use a SIP Proxy
server.
▪ [0] Disable (default)
▪ [1] Enable
[voip/signalling/sip/proxy_address]
The IP address or host name of the SIP
proxy server. Default: 0.0.0.0
Proxy Port
[voip/signalling/sip/proxy_port]
The UDP or TCP port of the SIP proxy
server.
Range: 1024 to 65535. Default: 5060.
15.2 Configuring Proxy and Registration
Here’s how to configure Proxy and Registration settings using the Web interface or
configuration file.
➢ To configure Proxy and Registration using the Web interface:
1. Access the Signaling Protocol page (Configuration tab > Voice Over IP menu >
Signaling Protocols).
Figure 15-2: Web Interface - SIP Proxy and Registrar
2. Configure Proxy and Registration parameters using the table below as reference, and
then click Submit.
➢ To configure Proxy and Registration using the configuration file:
• Use the table below as reference.
Table 15-2: Proxy and Registrar Parameters
Genesys 400 Series IP Phones 93
Page 94
15. Configuring SIP Settings
Parameter
Description
Enable Registrar Keep Alive
[voip/signalling/sip/registrar_ka/enabled]
Determines whether to use the registration
keep-alive mechanism based on SIP
OPTION messages.
▪ [0] Disable (default)
▪ [1] Enable
Note:
▪ If there is no response from the server, the
timeout for re-registering is automatically
reduced to a user-defined value
(voip/signalling/sip/registration_failed_
timeout)
▪ When the phone re-registers, the keep-
alive messages are re-sent periodically.
Registrar Keep Alive Period
[voip/signalling/sip/registrar_ka/timeout]
Defines the registration keep-alive time
interval (in seconds) between Keep-Alive
messages.
Range: 40 to 65536. Default: 60.
Maximum Number of Authentication Retries
[voip/signalling/sip/proxy_timeout]
The SIP proxy server registration timeout (in
seconds).
Range: 0 to 86400. Default: 3600.
Use SIP Proxy IP and Port for Registration
[voip/signalling/sip/use_proxy_ip_port_for_registrar]
Determines whether to use the SIP proxy's IP
address and port for registration. When
enabled, there is no need to configure the
address of the registrar separately.
▪ [0] Disable (default)
▪ [1] Enable
Use SIP Registrar
[voip/signalling/sip/sip_registrar/enabled]
Determines whether the phone registers to a
separate SIP Registrar server.
▪ [0] Disable (default)
▪ [1] Enable
Registrar IP Address or Host Name
[voip/signalling/sip/sip_registrar/addr]
[Only displayed if the 'Use SIP Registrar'
parameter is enabled.]
The IP address or host name of the Registrar
server. Default: 0.0.0.0
Registrar Port
[voip/signalling/sip/sip_registrar/port]
[Only displayed if the 'Use SIP Registrar'
parameter is enabled.] The UDP or TCP port
of the Registrar server.
Range: 1024 to 65535. Default: 5060.
Registration Expires
[voip/signalling/sip/registration_failed_timeout]
If registration fails, this parameter determines
the interval between the register messages
periodically sent until successful registration.
Range: 1 to 86400. Default: 3600.
Registration Failed Expires
[voip/signalling/sip/registration_failed_timeout]
If registration fails, this parameter determines
the interval between the register messages
periodically sent until successful registration.
Range: 1 to 86400. Default: 300.
94 Administrator’s Guide Version 2.2.16
Page 95
15. Configuring SIP Settings
Parameter
Description
Use SIP Outbound Proxy
[voip/signalling/sip/sip_outbound_proxy/enabled]
Determines whether an outbound SIP proxy
server is used (all SIP messages are sent to
this server as the first hop).
▪ [0] Disable (default)
▪ [1] Enable
Outbound Proxy IP Address or Host Name
[voip/signalling/sip/sip_outbound_proxy/addr]
[Only displayed if the 'Use SIP Outbound
Proxy' parameter is enabled.] The IP address
of the outbound proxy. If this parameter is
set, all outgoing messages (including
Registration messages) are sent to this Proxy
according to the Stack behavior. Default:
0.0.0.0.
Outbound Proxy Port
[voip/signalling/sip/sip_outbound_proxy/port]
[Only displayed if the 'Use SIP Outbound
Proxy' parameter is enabled.] The port on
which the outbound proxy listens.
Range: 1024 to 65535. Default: 5060.
[voip/signalling/sip/register_before_expires_p
ercent]
Allows administrators to configure the
registration expired time. The registration
expired time is that time that lapses before
the refresh registration message is sent.
Default: 15%. Non-percentage values are 5-
85. These represent the time that must lapse
before the new registration message is sent,
for example, 15% means that if the expiration
time is 100 seconds, the registration refresh
message will be sent after 85% of the
registration expiring timeout. In releases
before version 2.2.12, it was 33%.
Redundant Proxy Mode
[voip/signalling/sip/redundant_proxy/mode]
See the next section.
Note:
It’s recommended to use DNS queries to complete FQDN for a redundant outbound
proxy.
Genesys 400 Series IP Phones 95
Page 96
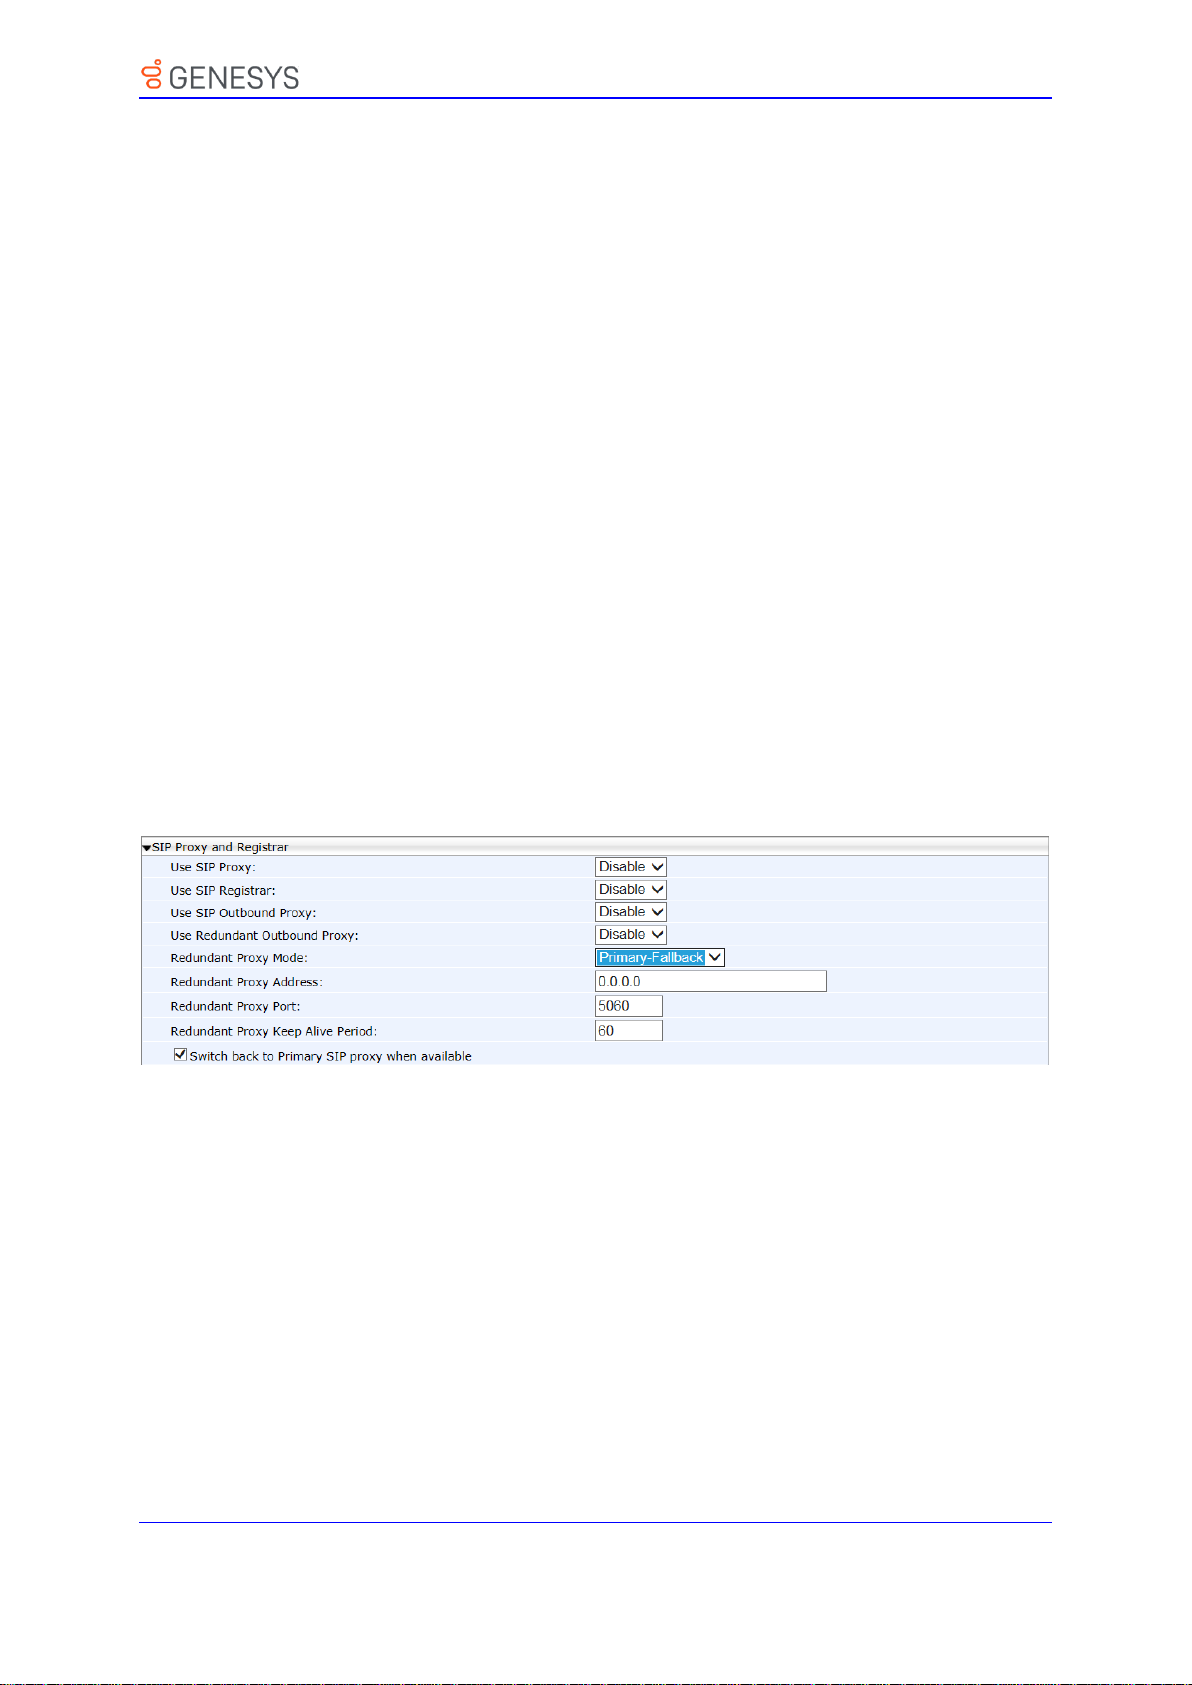
15. Configuring SIP Settings
15.2.1 Configuring Proxy Redundancy
The Redundant Proxy feature allows the configuration of a backup SIP proxy server to
increase QoS stability. After the feature is enabled, the phone identifies cases where the
primary proxy does not respond to SIP signaling messages. In these scenarios, the phone
registers to the redundant proxy and the phone seamlessly continues normal functionality,
without the user noticing any connectivity failure or malfunction with the primary proxy.
The Redundant Proxy feature can operate in one of the following modes:
Asymmetric mode: The primary proxy is assigned a higher priority for registration
than the redundant proxy. Once the phone is registered to the primary proxy, it sends
keep-alive messages (using SIP OPTIONS messages) to the primary proxy. If the
primary proxy does not respond, the phone registers to the redundant proxy, but
continues sending keep-alive messages to the primary proxy. If the primary proxy
responds to these keep-alive messages, the phone re-registers to the primary
proxy.
Symmetric mode: Both proxies are assigned the same priority for registration. Once
the phone is registered to a proxy, it sends keep-alive messages to this proxy. The
phone switches proxies only once the proxy to which it has registered, does not
respond.
For more information see the [voip/signalling/sip/redundant_proxy/symmetric_mode]
description in the SIP Proxy Server Redundancy Parameters table below.
Proxy Redundancy can be configured using the Web interface or Configuration file.
➢ To configure Proxy Redundancy using the Web interface:
1. Open the Signaling Protocol page (Configuration tab > Voice Over IP menu >
Signaling Protocols).
Figure 15-3: Proxy Redundancy
2. Configure the Proxy Redundancy parameters using the table below as reference, and
then click Submit.
96 Administrator’s Guide Version 2.2.16
Page 97

15. Configuring SIP Settings
Parameter
Description
[voip/signaling/sip/redundant_proxy/enabled]
Mandatory for the phone to operate in
redundancy.
Commands the phone to operate with the
other voip/signalling/sip/redundant_proxy
parameters.
Redundant Proxy Mode
[voip/signalling/sip/redundant_proxy/mode]
Mandatory for the phone to operate in
redundancy. Defines the two proxies' mode of
operation: Primary-Fallback or Simultaneous.
Defines a backup SIP proxy server to
increase QoS stability. Enable the parameter
if you want to operate with a proxy server that
will serve as a backup if the first goes down.
▪ Disable = (Default) Phone doesn't use
redundant proxy. If set to Disable in the
Web interface, it will set the previously
described ini file parameter
redundant_proxy/enabled as well.
▪ Primary-Fallback = Phone registered to
redundant proxy if the primary proxy does
not respond to SIP signaling messages.
▪ Simultaneous = Applies only in some
environments. If selected, dual registration
is performed; the phone registers
simultaneously to both servers. .
Redundant Proxy Address
[voip/signalling/sip/redundant_proxy/address]
[Only displayed if the 'Redundant Proxy
Mode' parameter is enabled (PrimaryFallback)]
Defines the IP address of the backup proxy
server. Default: 0.0.0.0
Redundant Proxy Keep Alive Period
voip/signalling/sip/redundant_proxy/keepalive
_period
[Only displayed if the 'Redundant Proxy
Mode' parameter is enabled (PrimaryFallback)]
Defines how often a keep alive message is
sent by the phone to the proxy server.
Range: 0 to 300.
Default: Every 60 seconds.
Redundant Outbound Proxy Port
voip/signalling/sip/redundant_proxy/port
[Only displayed if the 'Redundant Proxy
Mode' parameter is enabled (PrimaryFallback)]
Defines the UDP or TCP port of the backup
redundant proxy server. If occupied by other
enterprise devices, you can configure
another.
Range: 1024 to 65535. Default = 5060.
➢ To configure Proxy Redundancy using the configuration file:
• Use the table below as reference.
Table 15-3: SIP Proxy Server Redundancy Parameters
Genesys 400 Series IP Phones 97
Page 98

15. Configuring SIP Settings
Parameter
Description
Switch back to Primary SIP proxy when available
[voip/signalling/sip/redundant_proxy/symmetri
c_mode]
[Only displayed if the 'Redundant Proxy
Mode' parameter is enabled (PrimaryFallback)]
The phone identifies cases where the primary
proxy does not respond to SIP signaling
messages. In these scenarios, the phone
registers to the redundant proxy and the
phone seamlessly continues normal
functionality, without the user noticing any
connectivity failure or malfunction with the
primary proxy.
[0] = Asymmetric (default). In this mode, the
primary proxy is assigned a higher priority for
registration than the redundant proxy. Once
the phone is registered to the primary proxy,
it sends keep-alive messages (using SIP
OPTIONS messages) to the primary proxy. If
the primary proxy does not respond, the
phone registers to the redundant proxy, but
continues sending keep-alive messages to
the primary proxy. If the primary proxy
responds to these keep-alive messages, the
phone re-registers to the primary proxy.
Therefore, the phone assigns the primary
proxy a higher priority for registration. If
asymmetric mode is configured and the
primary server goes down, an attempt will be
made to revert to the primary server.
[1] = Symmetric. In this mode, both proxies
are assigned the same priority for
registration. Once the phone is registered to
a proxy, it sends keep-alive messages to this
proxy. The phone switches proxies only once
the proxy to whom it has registered does not
respond. Therefore, the phone assigns both
proxies the same priority for registration. If
symmetric mode is configured and the
primary server goes down, you'll operate with
the redundant proxy without ever reverting to
the primary unless the redundant proxy also
goes down.
In both modes, the following applies:
If the phone is not registered (i.e., if the proxy
server – redundant or primary – to which the
phone currently tries to register does not
respond), the phone attempts to register to
an alternative proxy. These attempts continue
until the phone successfully registers.
If this feature is enabled and the user reboots
the phone, the phone registers to the last
proxy to which it was trying to register, and
not necessarily to the primary proxy.
98 Administrator’s Guide Version 2.2.16
Page 99
15. Configuring SIP Settings
Note:
• For failover to function, the Proxy DNS server must be configured with a list of the
names of the proxies, in order and priority, i.e, SRV record. Before the phone tries to
register, it performs an NAPTR / SRV query (see the table below for an explanation
of these). The DNS server send a prioritized list. The phone sends a Registration
request to the first SIP server; if it isn’t responsive in n time retries (i.e.,
'outgoing_request_no_response_timeout' parameter), it goes to the second, etc.,
until it gets a response.
• SIP Proxy/Outbound Proxy must be configured as the host name.
Parameter
Description
SIP Transport Protocol
[voip/signalling/sip/transport_protocol]
Either:
▪ UDP (default)
▪ TCP
▪ TLS encryption
In the SIP protocol, Name Authority
Pointers (NAPTRs) are used to map
servers and user addresses. Combined
with Service Records (SRVs), they
enable determining the service types
available for a name, the name to use
for an SRV lookup, and the port and 'A'
DNS records to use to find the IP for the
service.
[voip/signalling/sip/outgoing_request_no_response
_timeout_ms]
This is the timeout, in milliseconds, that
lapses until the phone failovers to the
secondary proxy. Default: 32000
Outbound Proxy IP Address or Host Name
Configure this parameter as an SRV
host name.
Outbound Proxy Port
[voip/signalling/sip/sip_outbound_proxy/port]
Configure a value of 65535 for this
parameter. Configure the parameter
when you're using an Outbound Proxy.
Either configure this parameter or the
parameter 'Proxy Port'.
15.2.2 Device Registration Failover/Failback
15.2.2.1 Failover
This feature enables a secondary server to take over the functions of the primary server on
the enterprise network, if SIP communication between the SIP access device and the primary
proxy server is blocked or delayed or the primary server isn't available.
No phone functionality is lost when the secondary server takes over.
➢ To configure failover using the configuration file:
• Use the table below as reference.
Table 15-4: Device Registration Failover Parameters
Genesys 400 Series IP Phones 99
Page 100
15. Configuring SIP Settings
Parameter
Description
Proxy IP Address or Host Name
Configure this parameter as an SRV
host name.
Proxy Port
[voip/signalling/sip/proxy_port]
Configure a value of 65535 for this
parameter. Configure the parameter
when you're using a regular Proxy
server.
Either configure this parameter or the
parameter 'Outbound Proxy Port'.
Registrar Port
[voip/signalling/sip/sip_registrar/port]
Configure this parameter when you're
using a regular Proxy server.
Parameter
Description
[voip/signalling/sip/failback_retry_timeout]
[Only applies to BroadSoft]. Applies only
if you're operating with the DNS mode of
failover, i.e., with a DNS server.
▪ [0] Disable (default) – it'll never try to
access back to the first one.
▪ [n] Time, in seconds, that must lapse
before failback is performed.
15.2.2.2 Failback
➢ To configure failback using the configuration file:
• Use the table below as reference.
Table 15-5: Device Registration Failback Parameter
100 Administrator’s Guide Version 2.2.16
 Loading...