

Page 1

DIGITAL
MOISTURE METER
USER’S MANUAL
TS06
Please read this manual carefully and thoroughly before using this product.
Page 2

TABLE OF CONTENTS
Introduction. . . . . . . . . . . . . . . . . . . . . . . . . . . . . . . 2 –3
Key Features . . . . . . . . . . . . . . . . . . . . . . . . . . . . . . . . . 3
What’s in the Package . . . . . . . . . . . . . . . . . . . . . . . . . 3
Product Overview . . . . . . . . . . . . . . . . . . . . . . . . . . 4 –5
Setup Instructions. . . . . . . . . . . . . . . . . . . . . . . . . . . . . 5
Operating Instructions . . . . . . . . . . . . . . . . . . . . . . 6 –7
Checking Calibration. . . . . . . . . . . . . . . . . . . . . . . . . . . 8
Specifications . . . . . . . . . . . . . . . . . . . . . . . . . . . . . . . . 9
Operating, Maintenance & Safety Tips. . . . . . . . . 9 – 10
Warranty Information . . . . . . . . . . . . . . . . . . . . . 10 – 11
Return for Repair Policy . . . . . . . . . . . . . . . . . . . . . . . 11
FCC Statement. . . . . . . . . . . . . . . . . . . . . . . . . . . 11 – 12
Manual del Usuario . . . . . . . . . . . . . . . . . . . . . . . 13 - 28
INTRODUCTION
Thank you for purchasing General Tools & Instruments’
(General’s) TS06 Digital Moisture Meter. Please read this
user’s manual carefully and thoroughly before using the
instrument.
The TS06 can be used as a standalone moisture meter, or
with General’s free ToolSmart
phone. When used in concert with an iPhone
smartphone, the meter can stream—via Bluetooth®— to the
phone all measurements it makes. The phone initiates the
data transfer using the ToolSmart
downloaded from the iTunes
The measurements can then be used to tag photos taken by
™
app running on your mobile
™
app, which can be
®
App Store or Google Play Store.
®
or Android
™
2
Page 3

the phone’s camera. For example, the app can attach
moisture percentages to icons of different surfaces in a
rendering of a room as a way to compare their readiness for
finishing.
iPhone®and iTunes®are trademarks of Apple Inc., registered in the U.S. and other
countries.
Android™is a trademark of Google Inc.
The Bluetooth®word mark and logos are registered trademarks owned by Bluetooth
SIG, Inc. and any use of such marks by General Tools & Instruments is under license.
KEY FEATURES
• Incorporates separate moisture-resistance curves for
wood and building materials
• 99.9 count backlit high-contrast reverse-type (black on
white) LCD w/0.3 in. high digits
• Audible high moisture alert
• Squeezing trigger holds displayed readings
• Replaceable stainless steel test pins
• Pin cap doubles as calibration checker
• 3-minute Auto Power Off
• 1 year limited warranty
WHAT’S IN THE PACKAgE
The TS06 comes in a display box along with a “9V” battery and
an extra set of test pins.
3
Page 4
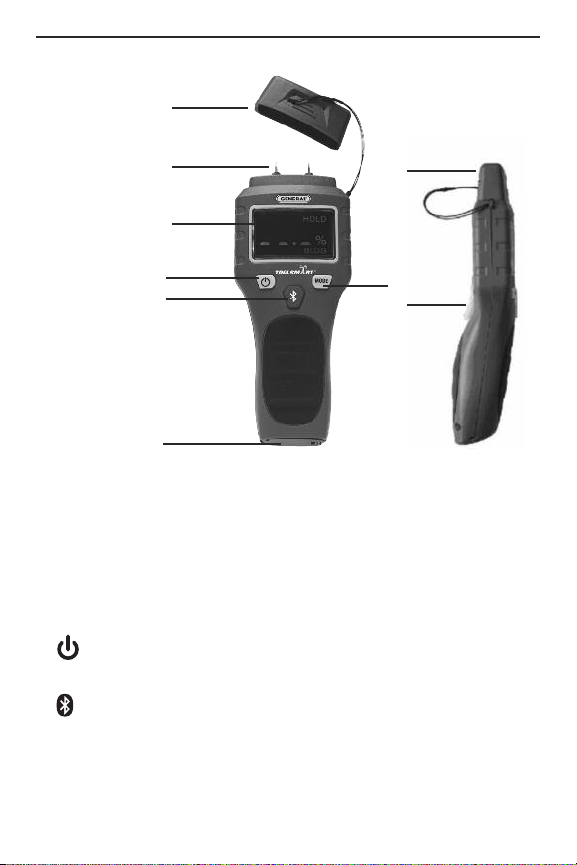
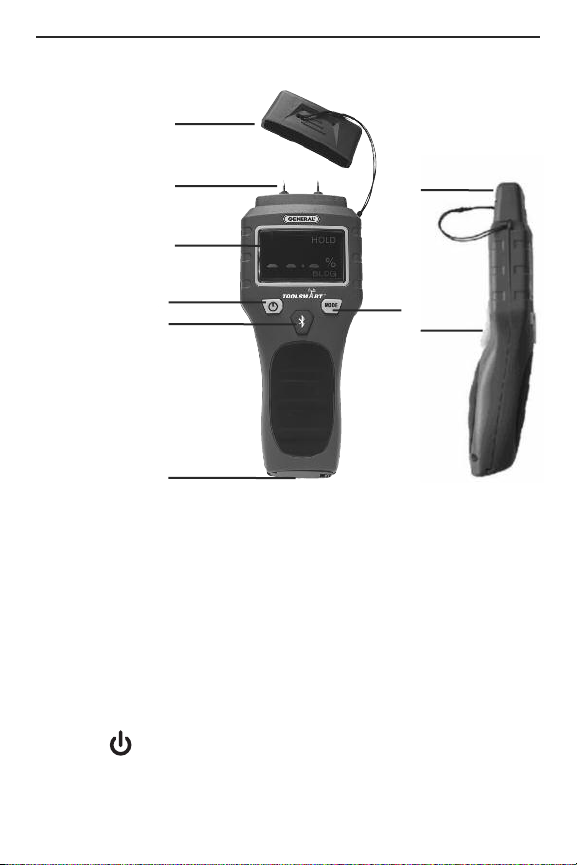
PRODUCT OVERVIEW
A
B
J
Fig. 1. The
controls,
C
indicators
and physical
structures
D
E
F
G
of the TS06
H
Fig. 1 above shows all controls, indicators and physical
components of the TS06. Fig. 2 on the next page shows all
possible indications on the LCD.
A. Protective pin cap with calibrating resistor inside
B. Test pins with black rubber sleeves (sleeves not shown)
C. LCD
D. button. Press briefly to power meter on; press and
hold for >2 seconds to power meter off.
E. button. Press and hold to transmit moisture level
measurements to your smartphone via Bluetooth.
Press and hold again to silence transmission.
4
Page 5
F. MODE button. Press briefly to toggle between wood and
building materials measurement modes. Press and hold
to disable high moisture level alarm.
G. Measurement hold trigger. Squeeze to freeze displayed
reading. Squeeze again to release display.
H. Battery compartment
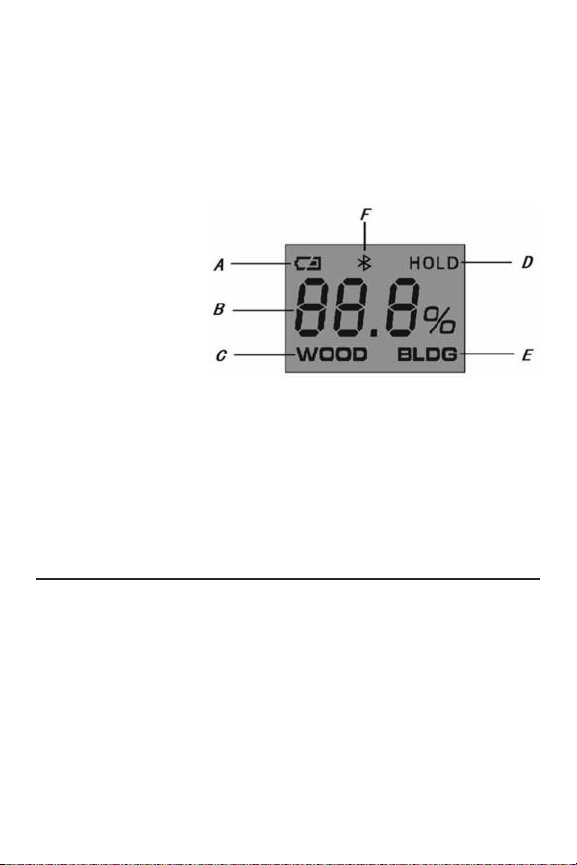
Fig. 2. All possible
indications on the
TS06 display
A. Low battery indicator
B. Moisture level reading
C. Wood measurement mode indicator
D. Indicates reading is being held
E. Building materials measurement mode indicator
F. Bluetooth enabled indicator
SETUP INSTRUCTIONS
INSTALL BATTERY
Snap the battery compartment (Fig. 1, Callout H) open and
plug the included "9V" battery into the wired socket inside.
The terminals of the battery and the socket mate in only one
way, with the smaller male terminal plugging into the larger
female terminal. Close the compartment by snapping its
cover shut.
5
Page 6

OPERATINg INSTRUCTIONS
To measure a moisture level:
1. Remove the protective pin cap.
2. Remove the black rubber protective sleeve from each test
pin.
3. Press the button to power the meter on. The meter will
sound one beep and the LCD will temporarily illuminate
with a backlight and the following readout:
4. If you are measuring the moisture content of wood, skip
ahead to Step 5. To measure the moisture content of a
building material, briefly press the MODE button. This will
change the display to the following:
5. Carefully press the test pins into the material whose
moisture level you wish to measure. The level will be
displayed as a percentage if it is within the measurement
range for the selected material:
For wood, the measurement range of the TS06 is 5 to
50%WME (Wood Moisture Equivalent). A moisture level
lower than 5% will produce the following readout: _ _ _%.
A level higher than 50% will produce a readout of
and sound the high moisture level audible alarm. The alarm
will sound for any wood moisture reading above 15.9%.
To silence the alarm, press and hold the MODE button.
For building materials, the measurement range of the
TS06 is 1.5 to 33%WME (Wood Moisture Equivalent). A
moisture level lower than 1.5% will produce the following
readout: _ _ _%. A level higher than 33% will produce a
readout of
_ _ _
% and sound the high moisture level
audible alarm. The alarm will sound for any building
_ _ . _%
WO
__ __ . __
BLDG
O
%
D
_ _ _
%
6
Page 7
material with a moisture reading above 19.9%. To silence the
alarm, press and hold the MODE button.
If silenced, the high moisture level alarm will automatically
be re-enabled after the TS06 is powered off and powered
on again. To re-enable the alarm without powering off the
meter, press and hold the MODE button.
To hold any reading (“freeze” the display), squeeze the
trigger (Fig. 1, Callout G). This will cause the word HOLD to
appear in the upper right corner of the LCD. To resume
measuring, squeeze the trigger again to make HOLD
disappear. This feature allows you to make a measurement in
a dark place or around a corner, hold the reading, and display
it within 3 minutes later where the lighting is better.
Measurements can be held for up to 3 minutes—the duration
of the meter’s Auto Power Off trigger.
To power off the meter, press the button and hold it for
more than 2 seconds.
To use the TS06 with your phone, begin by downloading
the ToolSmart
™
app from the iTunes Store or Google Play
Store and installing it. Then, pair the meter and your phone by
activating Bluetooth on your phone and pressing the
button (Fig. 1, Callout E) on the meter.
Pressing the button on the TS06 will cause the icon to
blink on the LCD for 30 seconds while the meter searches for
a device to pair with. If no Bluetooth device is detected within
30 seconds, Bluetooth transmission will cease and the
meter's internal Bluetooth circuitry will power down to save
battery power.
A tutorial on the app explains how to save moisture level
measurements to your phone and overlay them on photos of
your project taken by the phone’s camera.
7
Page 8
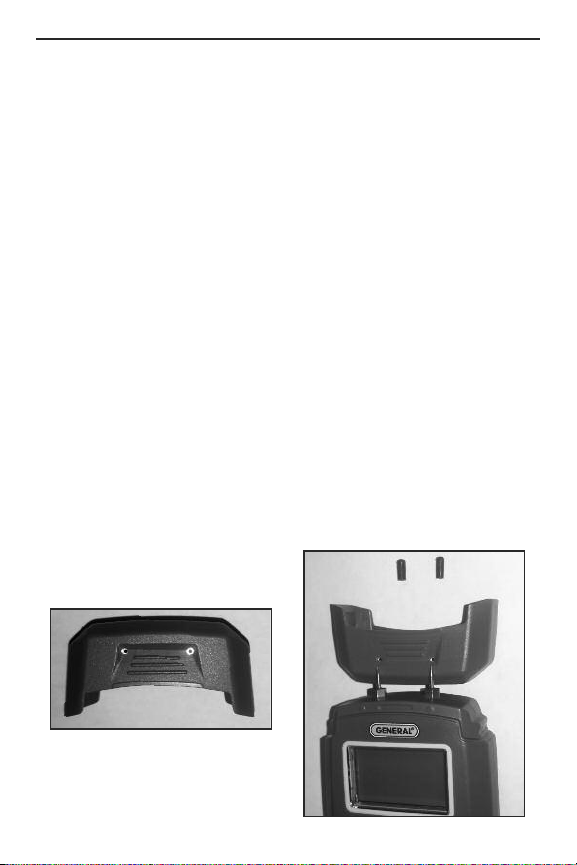
CHECKINg CALIBRATION
You can verify the accuracy of the TS06’s readings by
manually checking its calibration at any time. To do so:
1. Remove the protective pin cap and note the small circuit
board attached to the inside of its rear wall. The rear wall also
has two small holes (left photo below) that provide access to
terminals on the circuit board. The circuit board contains a
resistor whose fixed value can be used to simulate a precise
moisture level and therefore check the calibration of the
meter.
2. Power on the meter, remove the black rubber protective
sleeves from the test pins, and push the pins into the
calibration holes (right photo below). If the meter is properly
calibrated, the displayed reading will be between 17.3%
and 19.3% in Wood Measurement mode. If you do not
obtain a reading within this range and your meter is still
under warranty, call General’s Customer Service
Department at 212-431-6100 to arrange to return the
meter for service or replacement.
8
Page 9

SPECIFICATIONS
Measurement Range 5 to 50% for wood; 1.5 to 33% for
building materials
Measuring Accuracy ±2%
Test Pin Length 9mm (0.35 in.)
Operating Temperature -4º to 140ºF (-20º to 60ºC)
@ <85%RH
Current Consumption <50mA
Auto Power Off Trigger 3 minutes of inactivity
Backlight Characteristics 20 seconds at full brightness
after last button press; switches to
half-brightness after 20 seconds
Low Battery Icon Trigger <5.5V
Dimensions 7.01 x 2.76 x 1.65 in.
Weight (without battery) 4.1 oz. (115g)
Power Source “9V” battery (included)
(178 x 70 x 42mm)
OPERATINg, MAINTENANCE &
SAFETY TIPS
• Measurements of wood moisture level are skewed by two
variables: ambient humidity and the density of the wood
species. The best way to compensate for the effect of these
variables is to develop your own moisture level curves,
based on your experience working with different species of
wood on a day-to-day basis in your neighborhood.
For example, the humidity level affects the dryness of
interior wood considered “acceptable” for finishing. In the
steamy Deep South, where 60% relative humidity is the
norm, fine carpenters have learned how to work with wood
9
Page 10

with 11% moisture content. But in bone-dry Nevada, Utah,
and Arizona, where 30% humidity is common, the same
piece of wood would have to have less than 6% moisture to
be considered “ready for finishing”.
• To locate the source of a leak behind wood, plaster, drywall
or a ceiling, make measurements at different locations. The
leak is where the meter displays the highest reading.
• Never use force to drive the test pins into a hard surface.
• Do not operate the TS06 in the presence of flammable or
explosive gases.
• Be careful not to stab yourself with the extremely sharp test
pins.
• Replace the protective pin cap and black rubber protection
sleeves after making measurements 1) for safety reasons
and 2) to avoid bending or dulling the pins.
• After subjecting the meter to a large change in ambient
temperature, wait at least 30 minutes before making
measurements to guarantee the accuracy of readings.
• Remove the battery when storing the unit or when you do
not expect to use it for an extended period of time (months
rather than weeks).
WARRANTY INFORMATION
In the U.S, General warrants its instruments and accessories,
and digital tools against defects in material or workmanship for
one year from the date of purchase unless otherwise stated on
the packaging, manual, and/or marketing materials. General
also warrants its non-digital tools products against defects in
material or workmanship on a limited lifetime term. The
company will replace or repair the defective unit, at its option,
subject to verification of the defect.
10
Page 11

This warranty does not apply to defects resulting from abuse,
neglect, accident, unauthorized repair, alteration, or
unreasonable use of the product.
Any implied warranties arising from the sale of a General
product, including but not limited to implied warranties of
merchantability and fitness for a particular purpose, are limited
to the above. General shall not be liable for loss of use of the
product or other incidental or consequential damages,
expenses, or economic loss, or for any claim of such damage,
expenses, or economic loss.
State laws vary. The above limitations or exclusions may not
apply to you.
RETURN FOR REPAIR POLICY
Every effort has been made to provide you with a reliable
product of superior quality. However, in the event your
instrument requires repair, please contact our Customer Service
to obtain an RGA (Return Goods Authorization) number before
forwarding the unit via prepaid freight to the attention of our
Service Center at this address:
General Tools & Instruments
75 Seaview Drive Secaucus, NJ 07094 212-431-6100
Remember to include a copy of your proof of purchase, your
return address, and your phone number and/or e-mail address.
FCC STATEMENT
This device complies with part 15 of the FCC Rules. Operation is
subject to the following two conditions: (1) This device may not
cause harmful interference, and (2) This device must accept any
interference received, including interference that may cause
undesired operation.
11
Page 12

This equipment has been tested and found to comply with the
General Tools & Instruments
GeneralToolsNYC
limits for a Class B digital device, pursuant to part 15 of the FCC
Rules. These limits are designed to provide reasonable
protection against harmful interference in a residential
installation. This equipment generates, uses and can radiate
radio frequency energy and, if not installed and used in
accordance with the instructions, may cause harmful
interference to radio communications.
However, there is no guarantee that interference will not occur
in a particular installation. If this equipment does cause harmful
interference to radio or television reception, which can be
determined by turning the equipment off and on, the user is
encouraged to try to correct the interference by one or more of
the following measures:
• Reorient or relocate the receiving antenna.
• Increase the separation between the equipment and receiver.
• Connect the equipment to a different circuit than the one the
receiver is connected to.
• Consult your supplier or an experienced radio/TV technician
for help.
GENERAL TOOLS & INSTRUMENTS
PHONE (212) 431-6100 FAX (212) 431-6499 TOLL FREE (800) 697-8665
NOTICE - WE ARE NOT RESPONSIBLE FOR TYPOGRAPHICAL ERRORS.
75 Seaview Drive Secaucus, NJ 07094
e-mail: sales@generaltools.com www.generaltools.com
Specifications subject to change without notice
©2016 GENERAL TOOLS & INSTRUMENTS
TS06 User’s Manual
MAN# TS06
07/08/16
12
Page 13

MEDIDOR DIGITAL
DE HUMEDAD
MANUAL DEL USUARIO
TS06
Lea cuidadosamente todo este manual antes de usar este producto.
13
Page 14

ÍNDICE
Introducción . . . . . . . . . . . . . . . . . . . . . . . . . . . . 14 – 15
Características principales . . . . . . . . . . . . . . . . . . . . 15
Contenido de la caja . . . . . . . . . . . . . . . . . . . . . . . . . . 15
Descripción general del producto . . . . . . . . . . . 16 – 17
Instrucciones de preparación. . . . . . . . . . . . . . . . . . . 17
Instalacíon de la batería . . . . . . . . . . . . . . . . . . . 17
Instrucciones de operación . . . . . . . . . . . . . . . . 18 – 20
Control de calibración. . . . . . . . . . . . . . . . . . . . . 20 – 21
Especificaciones . . . . . . . . . . . . . . . . . . . . . . . . . . . . . 21
Funcionamiento, mantenimiento
y consejos de seguridad . . . . . . . . . . . . . . . . . . 22 – 23
Información de garantía . . . . . . . . . . . . . . . . . . . . . . 24
Política de devolución para reparaciones . . . . . . . . . 25
Declaración de FCC. . . . . . . . . . . . . . . . . . . . . . . 25 – 26
INTRODUCCIÓN
Gracias por haber comprado el medidor digital de humedad
TS06 de General Tools & Instruments (General). Lea
cuidadosamente todo este manual del usuario antes de usar
el instrumento.
El TS06 se puede usar como un medidor de humedad
independiente, o con la aplicación gratuita ToolSmart
instalada en su teléfono móvil. Cuando se utiliza junto con un
teléfono inteligente iPhone
enviar (por Bluetooth
®
®
o Android™, el medidor puede
) todas las mediciones que hace al
teléfono. El teléfono inicia la transferencia de datos mediante
una aplicación ToolSmart
™
descargada del iTunes®App Store
o del Google Play Store.
14
™
Page 15

Las mediciones se pueden usar para colocarlas en fotos
tomadas con la cámara del teléfono. Por ejemplo, la
aplicación puede asociar las mediciones de humedad a
íconos de distintas superficies en el dibujo de un cuarto como
una forma de indicar si están listas para su acabado.
iPhone®y iTunes®son marcas registradas de Apple Inc., registradas en Estados
Unidos y en otros países.
AndroidMRes una marca registrada de Google Inc.
La palabra y los logotipos Bluetooth®le pertenecen a Bluetooth SIG, Inc. y cualquier
uso de ellos por parte de General Tools & Instruments se hace bajo su autorización.
CARACTERÍSTICAS PRINCIPALES
• Incorpora curvas separadas de resistencia a la humedad
para madera y materiales de construcción
• Pantalla LCD iluminada, de alto contraste, de 99,9
cuentas, con dígitos blancos sobre negro (invertida), con
dígitos de 7 mm de alto
• Alarma sonora de alta humedad
• Manteniendo apretado el gatillo se congelan las
mediciones de la pantalla.
• Puntas de prueba de acero inoxidable reemplazables
• Cubierta para las puntas que sirve también para controlar
la calibración
• Apagado automático luego de 3 minutos
• Garantía limitada de 1 año
CONTENIDO DE LA CAJA
El TS06 viene en una caja exhibidora junto con una batería de
9 V y un juego adicional de puntas de prueba.
15
Page 16
DESCRIPCIÓN gENERAL DEL
PRODUCTO
A
Fig. 1.
Controles,
B
C
J
indicadores y
características
físicas del
D
E
F
G
TS06
H
La figura 1 de arriba muestra todos los controles, indicadores
y características físicas del TS06. La Figura 2 de la página
siguiente muestra todas las indicaciones posibles de la
pantalla LCD.
A. Tapa protectora de las puntas con resistor de calibración
en su interior
B. Puntas de prueba con fundas de goma negra (no se
muestran las fundas)
C. Pantalla LCD
D. Botón . Presionarlo brevemente para encender el
Medidor. Mantenerlo presionado durante más de
2 segundos para apagarlo.
16
Page 17

E. Boton . Mantenerlo presionado para transmitir las
mediciones de humedad a su teléfono inteligente por
Bluetooth. Mantenerlo presionado nuevamente para
desactivar la transmisión.
F. Botón MODE. Presionarlo levemente para cambiar entre
los modos de medición para madera y para materiales de
construcción. Mantenerlo presionado para desactivar la
alarma de alto nivel de humedad.
G. Botón para mantener la medición. Apretarlo para congelar
la lectura de la pantalla. Apretarlo nuevamente para liberar
la pantalla.
H. Compartimiento para la batería
Fig. 2. Todas las
indicaciones
posibles de la
pantalla del
TS06
A. Indicador de batería baja
B. Lectura del nivel de humedad
C. Indicador del modo de medición para madera
D. Indica que se está manteniendo el valor medido
E. Indicador del modo de medición para materiales de
construcción
F. Indicador de Bluetooth activado
17
Page 18

INSTRUCCIONES DE PREPARACIÓN
INSTALACIÓN DE LA BATERÍA
Abra el compartimiento de la batería (Fig. 1, detalle H) y
enchufe la batería de 9 V en el enchufe cableado del interior
del compartimiento. Los terminales de la batería se adaptan a
los del enchufe de una sola forma, con el pequeño terminal
macho dentro del terminal hembra más grande. Cierre el
compartimiento trabando su tapa.
INSTRUCCIONES DE OPERACIÓN
Para medir el nivel de humedad:
1. Saque la tapa protectora de las puntas de prueba.
2. Saque la funda protectora de goma negra de cada punta
de prueba.
3. Presione el botón para encender el medidor. El medidor
emitirá un pitido y la pantalla se encenderá
temporariamente con su iluminación y la siguiente
indicación:
4. Si está midiendo el contenido de humedad en madera,
vaya al paso número 5. Para medir el contenido de
humedad en un material de construcción, presione
levemente el botón MODE. Esto cambiará la pantalla a so
siguiente:
5. Presione cuidadosamente las puntas de prueba contra el
material en el cual desea medir el nivel de humedad. El
nivel se mostrará como un porcentaje siempre que esté
dentro del rango de medición para el material
seleccionado:
Para madera, el rango de medición del TS06 es de 5 a
_ _ . _
WOOD
_ _ . _
BLDG
%
%
18
Page 19

50% WME (Humedad equivalente de la madera). Un nivel
de humedad menor al 5% producirá la siguiente lectura:
_ _ _%. Un nivel mayor al 50% producirá una lectura
_ _ _
de
% y activará la alarma sonora de alto nivel de
humedad. La alarma sonará para cualquier medición de
humedad en madera por encima del 15,9%. Para apagar la
alarma, mantenga presionado el botón MODE.
Para materiales de construcción, el rango de medición del
TS06 es de 1,5 a 33% WME (Humedad equivalente de la
madera). Un nivel de humedad menor al 1,5% producirá la
siguiente lectura: _ _ _%. Un nivel mayor al 33% producirá una
lectura de
_ _ _
% y activará la alarma sonora de alto nivel de
humedad. La alarma sonará para cualquier medición de
humedad en materiales de construcción por encima del 19,9%.
Para apagar la alarma, mantenga presionado el botón MODE.
Si se apaga, la alarma de alto nivel de humedad se
volverá a activar automáticamente cuando el TS06 se
apague y se vuelva a encender. Para volver a activar la
alarma sin tener que apagar y volver a prender el medidor,
mantenga presionado el botón MODE.
Para mantener cualquier lectura (“congelar” la pantalla),
apriete el gatillo (Fig. 1, detalle G). Esto hará que aparezca la
palabra HOLD en el extremo superior derechos de la pantalla.
Para seguir midiendo, apriete nuevamente el gatillo para
hacer desaparecer la palabra HOLD. Esta función le permite
hacer mediciones en un lugar oscuro o detrás de obstáculos,
mantener la lectura y poder verla hasta 3 minutos después
con mejor iluminación. Las mediciones se pueden almacenar
por hasta 3 minutos, que es lo que tarda el medidor en
apagarse automáticamente.
19
Page 20

Para apagar el medidor, mantenga presionado el botón
durante 2 segundos como mínimo.
Para usar el TS06 con su teléfono, comience descargando la
™
aplicación ToolSmart
del iTunes Store o Google Play Store e
instalándola. Luego, acople el medidor y su teléfono
activando Bluetooth en su teléfono y presionando el botón
(Fig. 1, detalle E) del medidor.
Al presionar el botón del TS06, el ícono comenzará a
parpadear en la pantalla durante 30 segundos mientras el
medidor busca un dispositivo con el cual acoplarse. Si no
detecta ningún dispositivo Bluetooth dentro de los 30
segundos, el medidor desactivará sus circuitos internos de
transmisión Bluetooth para ahorrar batería.
Una demostración en la aplicación explica cómo almacenar
mediciones de niveles de humedad en su teléfono y
colocarlas sobre fotos de su proyecto tomadas con la cámara
de su teléfono.
CONTROL DE CALIBRACIÓN
Usted puede verificar la exactitud de las lecturas del TS06
verificando manualmente su calibración en cualquier
momento. Para hacerlo:
1. Saque la tapa protectora de las puntas y note que hay un
pequeño circuito impreso en el interior de la pared
posterior. La pared interior también tiene dos pequeños
orificios (foto de la página siguiente a la izquierda) que
brindan acceso a los terminales del circuito impreso. El
circuito impreso contiene un resistor de un valor fijo que se
puede usar para simular un nivel preciso de humedad y
verificar la calibración del medidor.
20
Page 21

2. Encienda el medidor, remueva las fundas protectoras de
goma negra de las puntas de prueba e inserte las puntas
dentro de los orificios de calibración (foto de abajo a la
derecha). Si el medidor está calibrado correctamente, la
pantalla mostrará entre 17,3% y 19,3% en el modo de
medición en madera. Si no obtiene esta medición y su
medidor todavía está en garantía, llame al departamento
de servicio al cliente de General al 212-431-6100 para
retornar el medidor para que sea reparado o reemplazado.
21
Page 22

ESPECIFICACIONES
Rango de medición 5 a 50% para madera; 1,5 a
33% para materiales de
construcción
Exactitud de medición ±2%
Longitud de las puntas deprueba 9 mm
Temperatura de funcionamiento -20 a 60 ºC @ <85% HR
Consumo de corriente <50 mA
Apagado automático 3 minutos de inactividad
Características de 20 segundos a máxima
iluminación de la pantalla iluminación luego de presionar
cualquier botón; 50% de
iluminación luego de
20 segundos
Ícono de batería baja <5,5 V
Dimensiones 178 x 70 x 42 mm
Peso (sin la batería) 115 g
Alimentación Batería de 9 V (incluida)
FUNCIONAMIENTO,
MANTENIMIENTO Y CONSEJOS DE
SEgURIDAD
• Las mediciones del nivel de humedad en madera se ven
afectadas por dos variables: la temperatura ambiente y la
densidad de los distintos tipos de madera. La mejor forma
de compensar por el efecto de esas variables es desarrollar
sus propias curvas de nivel de humedad en base a su
experiencia trabajando todos los días con distintos tipos de
madera en su vecindario.
22
Page 23

Por ejemplo, el nivel de humedad afecta lo seco que esté una
madera de interior para que se la considere "aceptable" para
acabados. En el sur húmedo, donde generalmente hay un
60% de humedad relativa ambiente, los mejores carpinteros
saben cómo trabajar maderas que contienen un 11% de
humedad. Pero en la ultra seca Nevada, Utah y Arizona, donde
es normal tener un 30% de humedad relativa ambiente, el
mismo trozo de madera deberá contener menos de un 6% de
humedad para que se la pueda considerar "apta para
acabados".
• Para localizar la fuente de una pérdida detrás de madera,
yeso, paneles de yeso o un techo, realice mediciones en
distintos lugares. La pérdida está donde el medidor muestra
la lectura más alta.
• Nunca haga fuerza para clavar las puntas de prueba en una
superficie dura.
• No utilice el TS06 en presencia de gases inflamables o
explosivos.
• Tenga cuidado de no pincharse con las puntas de prueba
filosas.
• Vuelva a colocar la tapa protectora y las fundas protectoras
de goma negra después de hacer las mediciones 1) por
motivos de seguridad y 2) para que las puntas no se doblen
ni se desafilen.
• Luego de someter el medidor a un cambio muy grande de
temperatura ambiente, espere por lo menos 30 minutos
antes de volver a hacer mediciones para garantizar la
precisión de las lecturas.
• Remueva la batería al guardar la unidad o cuando no
piensa usarla durante mucho tiempo (meses en lugar de
semanas).
23
Page 24

INFORMACIÓN DE LA gARANTÍA
General garantiza sus instrumentos, accesorios y herramientas
digitales contra defectos de materiales y de fabricación durante
un año a partir de la fecha de compra, a menos que se
especifique lo contrario en la caja, manual y/o material
publicitario del producto. General también garantiza sus
herramientas no digitales contra defectos de materiales y de
fabricación de forma limitada, de por vida.
General reemplazará o reparará la unidad defectuosa, a su
criterio, luego de verificar el defecto.
Esta garantía no cubre defectos causados por abuso,
negligencia, accidente, reparaciones no autorizadas, alteraciones
o uso inadecuado del producto. Tampoco cubre a los productos
que se hayan comprado en distribuidores no autorizados. Cada
reclamo de garantía deberá estar acompañado por un
comprobante de compra.
Cualquier garantía implícita originada por la venta de un
producto General, incluyendo sin limitación las garantías
implícitas de comerciabilidad e idoneidad para un fin
determinado, quedan limitadas a lo anterior. General no se hace
responsable por no poder utilizar el producto o por cualquier otro
daño incidental o indirecto, gastos o pérdida económica, o por
cualquier reclamo por dichos daños, gastos o pérdida
económica.
Las leyes varían de estado en estado. Las limitaciones o
exclusiones anteriores pueden no tener validez en su caso.
Por mayor información o para realizar un reclamo de garantía,
comuníquese con el Soporte técnico de General Tools &
Instruments en techsupport@generatools.com.
24
Page 25

POLÍTICA DE DEVOLUCIÓN PARA
REPARACIÓN
Se han hecho todos los esfuerzos para proporcionarle un
producto confiable de excelente calidad. Sin embargo, si
necesitara reparar su equipo, por favor, póngase en contacto con
nuestro Servicio de atención al cliente para obtener un número
de RGA (Autorización de devolución de mercancía) antes de
enviar la unidad utilizando un servicio de transporte prepagado a
nuestro Centro de Servicios a la siguiente dirección:
General Tools & Instruments
75 Seaview Drive
Secaucus, NJ 07094
212-431-6100
Recuerde incluir una copia de su comprobante de compra, su
dirección de devolución, y su número telefónico y/o dirección de
correo electrónico.
DECLARACIÓN DE LA FCC
Este dispositivo cumple con la parte 15 del reglamento FCC.
Funcionamiento está sujeto a las siguientes dos condiciones: (1)
Este dispositivo no debe causar interferencias perjudiciales y (2)
Este dispositivo debe aceptar cualquier interferencia recibida,
incluyendo interferencia que pueda causar un funcionamiento no
deseado.
Este equipo ha sido probado y cumple con los límites para un
dispositivo digital de clase B, conforme a la parte 15 del
reglamento FCC. Estos límites están diseñados para proporcionar
protección razonable contra interferencia dañina en una
instalación residencial. Este equipo genera, utiliza y puede
irradiar energía de radiofrecuencia y, si no se instala y utiliza de
25
Page 26

acuerdo con las instrucciones, puede causar interferencia
perjudicial a comunicaciones de radio.
Sin embargo, no hay ninguna garantía de que no habrá
interferencias en una instalación en particular. Si este equipo
causa interferencia dañina a la radio o la recepción de televisión,
que puede determinarse apagando y encendiendo el equipo, se
recomienda al usuario para intentar corregir la interferencia
mediante una o más de las siguientes medidas:
• Reoriente o reubique la antena receptora.
• Aumentar la separación entre el equipo y el receptor.
• Conecte el equipo a un circuito diferente al que está conectado
el receptor
• Consulte a su proveedor o a un técnico experimentado en
radio/TV para ayuda.
PRECAUCIÓN: Cualquier cambio o modificación no aprobados
expresamente por la parte responsable del cumplimiento podría
anular la autoridad del usuario para operar el equipo.
26
Page 27

NOTAS
____________________________________________________
____________________________________________________
____________________________________________________
____________________________________________________
____________________________________________________
____________________________________________________
____________________________________________________
____________________________________________________
____________________________________________________
____________________________________________________
____________________________________________________
____________________________________________________
____________________________________________________
____________________________________________________
____________________________________________________
____________________________________________________
27
Page 28

GENERAL TOOLS & INSTRUMENTS
General Tools & Instruments
GeneralToolsNYC
75 Seaview Drive
Secaucus, NJ 07094
TELÉFONO (212) 431-6100
FAX (212) 431-6499
SIN CARGO (800) 697-8665
Correo electrónico: sales@generaltools.com
Especificaciones sujetas a modificaciones sin previo aviso.
©2016 GENERAL TOOLS & INSTRUMENTS
ADVERTENCIA - NO NOS RESPONSABILIZAMOS
28
www.generaltools.com
Manual del usuario TS06
POR ERRORES TIPOGRÁFICOS.
MAN# TS05
08/07/16
 Loading...