

Page 1
LASER DISTANCE MEASURER
USER’S MANUAL
TS01
Please read this manual carefully and thoroughly before using this product.
Page 2

TABLE OF CONTENTS
Introduction . . . . . . . . . . . . . . . . . . . . . . . . . . . . . . . . . . . . . . . . . . . . . 3
Key Features . . . . . . . . . . . . . . . . . . . . . . . . . . . . . . . . . . . . . . . . . . 3 –4
What’s in the Box . . . . . . . . . . . . . . . . . . . . . . . . . . . . . . . . . . . . . . . . . 4
Product Overview . . . . . . . . . . . . . . . . . . . . . . . . . . . . . . . . . . . . . . 4 –7
Safety Instructions . . . . . . . . . . . . . . . . . . . . . . . . . . . . . . . . . . . . . . . . 7
Setup Instructions . . . . . . . . . . . . . . . . . . . . . . . . . . . . . . . . . . . . . . . . 8
Install Batteries . . . . . . . . . . . . . . . . . . . . . . . . . . . . . . . . . . . . . . . . 8
Operating Instructions . . . . . . . . . . . . . . . . . . . . . . . . . . . . . . . . . 8 – 18
Powering On and Off . . . . . . . . . . . . . . . . . . . . . . . . . . . . . . . . . . . . 8
Quick Start Instructions . . . . . . . . . . . . . . . . . . . . . . . . . . . . . . . 8 –9
Choosing a Measurement Reference . . . . . . . . . . . . . . . . . . . . . . . 9
Clearing Values/Undoing Actions . . . . . . . . . . . . . . . . . . . . . . . . . . 9
Changing the Measurement Unit . . . . . . . . . . . . . . . . . . . . . . . . . . 10
Turning the Backlight On and Off . . . . . . . . . . . . . . . . . . . . . . . . . 10
Measuring Distances . . . . . . . . . . . . . . . . . . . . . . . . . . . . . . . 10 – 16
Direct Measurements . . . . . . . . . . . . . . . . . . . . . . . . . 10 – 11
Continuous Distance Measurement
(Distance Tracking) . . . . . . . . . . . . . . . . . . . . . . . . . 11 – 12
Adding and Subtracting Distances . . . . . . . . . . . . . . . 12 – 13
Indirect Measurements of Height
and Length using Triangulation . . . . . . . . . . . . . . . 13 – 16
Measuring Areas and Perimeters . . . . . . . . . . . . . . . . . . . . . . . . . 16
Measuring Volumes . . . . . . . . . . . . . . . . . . . . . . . . . . . . . . . . . . . . 17
Recalling Stored Measurements/Calculations . . . . . . . . . . . 17 – 18
Using the Laser Distance Measurer with the ToolSmart™ App
and an Apple iOS or Android Smartphone . . . . . . . . . . . . . . . . . . . 18
Specifications . . . . . . . . . . . . . . . . . . . . . . . . . . . . . . . . . . . . . . . . . . . 19
Operating & Maintenance Tips . . . . . . . . . . . . . . . . . . . . . . . . . . . . . 20
Warranty Information . . . . . . . . . . . . . . . . . . . . . . . . . . . . . . . . . . . . . 21
Return for Repair Policy . . . . . . . . . . . . . . . . . . . . . . . . . . . . . . . . . . . 22
FCC Statement . . . . . . . . . . . . . . . . . . . . . . . . . . . . . . . . . . . . . . . . . . 23
Manual del Usuario (en Español) . . . . . . . . . . . . . . . . . . . . . . . . 25 – 48
2
Page 3

INTRODUCTION
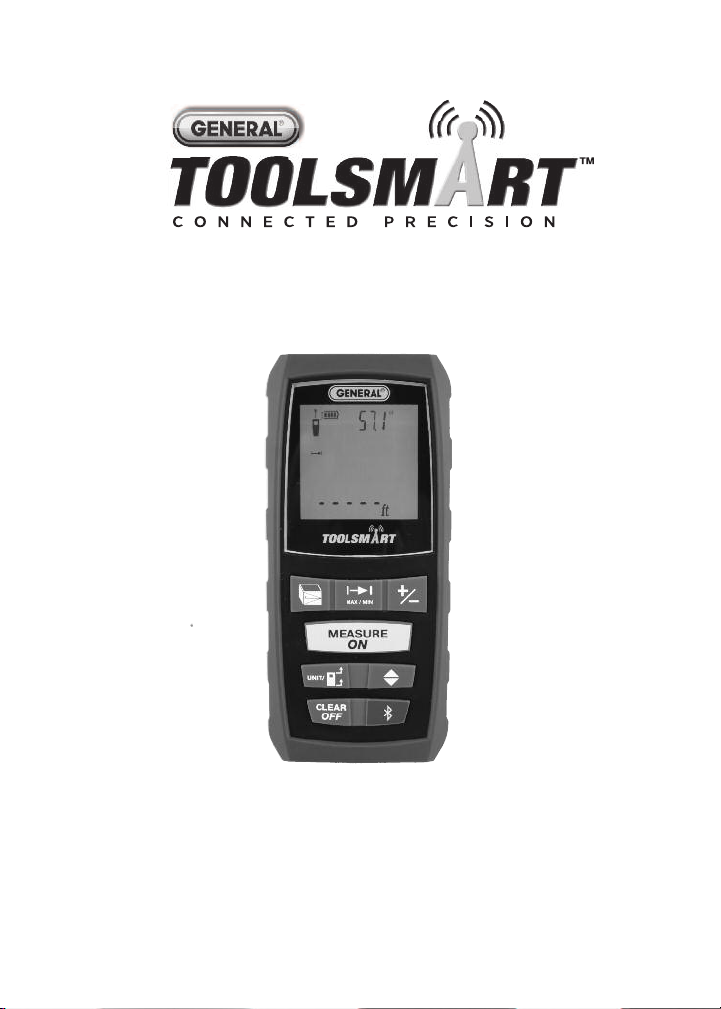
Thank you for purchasing General Tools & Instruments’ (General’s) TS01 ToolSmart
Laser Distance Measurer. Please read this user’s manual carefully and thoroughly
before using the instrument.
The Laser Distance Measurer (LDM) is designed to replace a tape measure for
professionals such as builders, architects, engineers, surveyors, carpenters,
plumbers, painters, electricians, realtors, home inspectors, HVAC system designers
and installers, and carpet/flooring installers and salesmen. The LDM works the
®
same whether used alone or in concert with an iOS
or Android™smartphone: it
projects a red laser beam onto a target and measures how long it takes the
reflected beam to return to the LDM. This time is proportional to the distance to the
target. The LDM’s range of 100 ft. (30m) makes it suitable for most indoor
measuring tasks and many outdoor jobs as well.
®
When used in concert with an iPhone
®
transmit—via Bluetooth
— to the mobile device all measurements and groups of
or Android™smartphone, the LDM can
measurements and calculations it makes. The phone initiates the data transfer
®
using a free app downloaded from the iTunes
App Store or Google Play Store.
Measured lengths, areas, perimeters and volumes can then be overlaid on photos
that the user can take using the app and the phone’s camera.
KEY FEATURES
• 100 ft. (30m) range
• Accuracy of ±1/16 in. (±1.5mm)
• Displays distances in feet with decimal fraction (default), feet + fractional inches,
inches or meters
• Calculates areas, perimeters and volumes
• Uses triangulation to calculate height or length from a distance
• Backlit 4-line LCD
• Continuous on-screen digital readout of LDM's angle with respect to the
horizontal in most measurement modes
™
iPhone®and iTunes®are trademarks of Apple Inc., registered in the U.S. and other countries.
™
is a trademark of Google Inc.
Android
The Bluetooth
General Tools & Instruments is under license.
®
word mark and logos are registered trademarks owned by Bluetooth SIG, Inc. and any use of such marks by
3
Page 4

• Addition, subtraction, and continuous measurement (tracking) modes ideal for
layout work
• Fast response time
• Automatically stores 20 most recent measurements/calculations
• References measurements from top or bottom of housing or end of extension
ruler
• Auto power off, auto laser off and auto backlight off
• Splashproof and dustproof to IP54 standard
• Pocket-sized and lightweight
• Powered by two “AAA” Alkaline batteries (included)
WHAT’S IN THE BOX
The LDM comes in a display box along with:
• A holster (soft pouch with a belt loop)
• Two “AAA” Alkaline batteries
• A small flat-head screwdriver for opening the battery compartment
• This user’s manual
PRODUCT OVERVIEW
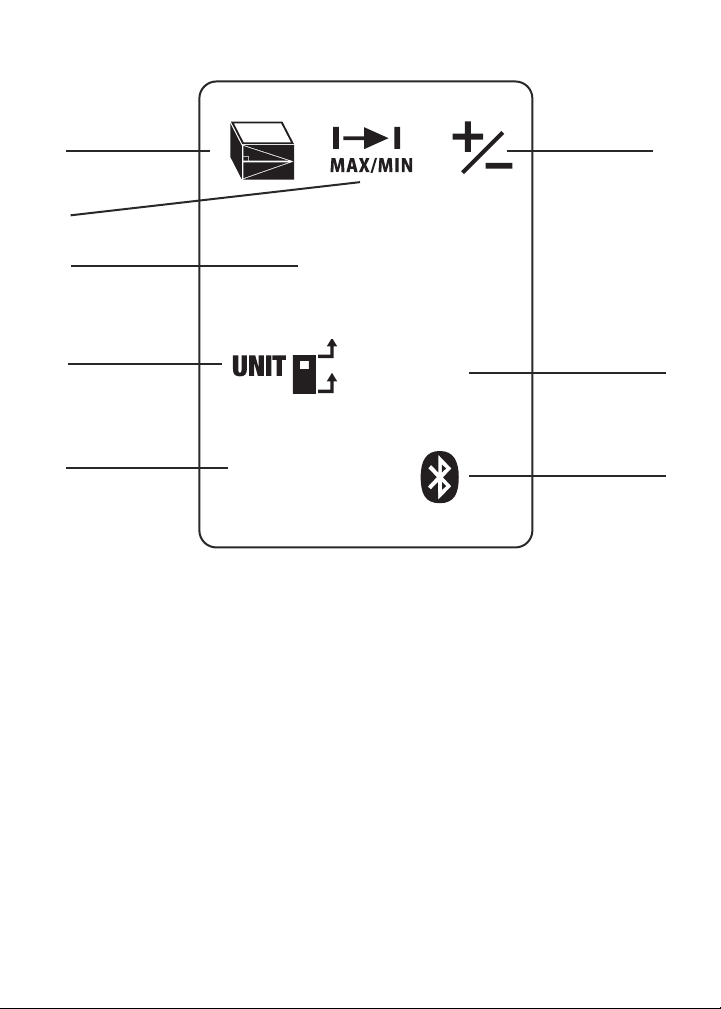
Fig. 1 shows all of the controls on the LDM’s front panel. Fig. 2 shows all possible
display icons and indications. Familiarize yourself with the positions and functions
of these controls and indicators before moving on to the safety, setup and operating
instructions.
Fig. 1. The LDM’s front-panel controls
1.
Five-function button
measurement modes: Area, volume, two-point triangulation, three-point
triangulation, automatic height
2.
Enters Continuous Distance Measurement (tracking) mode
of Max and Min values
Adds/subtracts next measurement to/from previous one
3.
Recall mode, increments/decrements Record counter
4
. Press briefly to cycle through the five available
. In Memory
, with display
Page 5
1
MEASURE
ON
CLEAR
OFF
▲
▼
3
2
4
5
7
Fig. 1
4.
Measurement button
Two-function button
5.
reference options: top and bottom of LDM housing, and bottom of extension ruler.
Press and hold to cycle through four available distance units.
6.
Enters Memory Recall mode
7.
Two-function button
last action or clear (reset to zero) the last measurement or calculation
Activates/deactivates Bluetooth transmission
8.
calculations
. Activates laser and makes measurement
. Press briefly to cycle through three measurement
. Press and hold to power LDM off. Press briefly to undo
of measurements and
6
8
5
Page 6

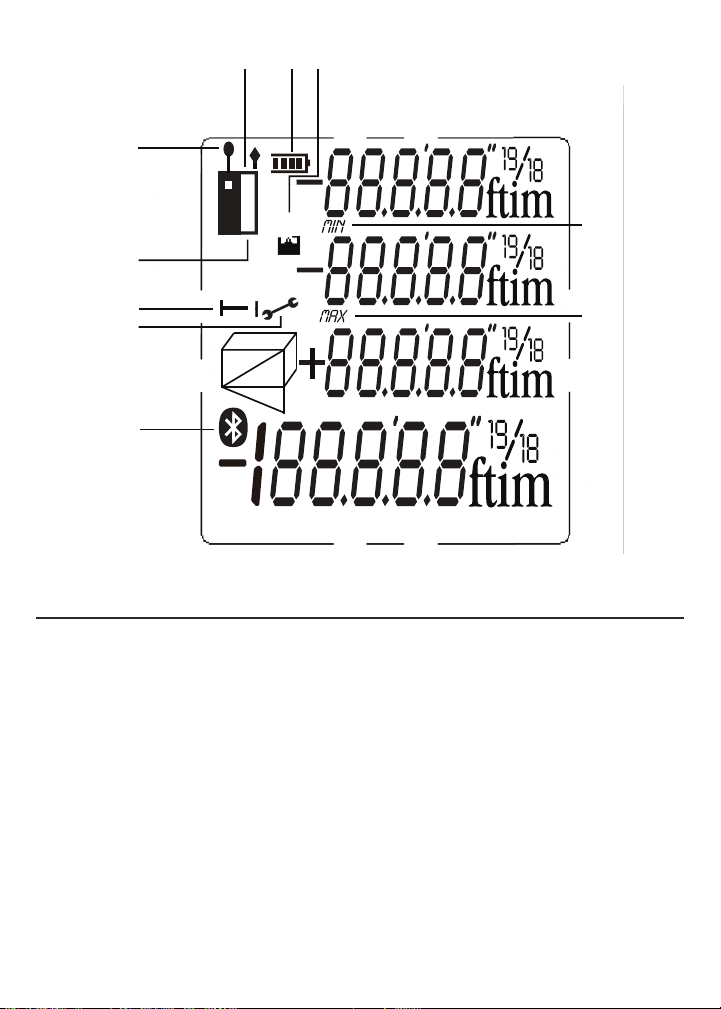
Fig. 2. The LDM’s display indications and icons
1. Measurements referenced from top of LDM housing
2. Flashes when laser is on
3. Measurements referenced from bottom of LDM housing or bottom of
extension ruler
4. Operating in Direct or Continuous Measurement Mode
5. Operating error indication
6–10. Measurement type indicator
Distance (direct)
Distance (indirect—triangulation with two inputs)
Distance (indirect—triangulation with three inputs)
Area and perimeter
Volume
11. Battery charge indicator
12. No. of stored record displayed
13. Top display line
14. Value displayed on second line is a minimum
15. Second display line
16. Value displayed on third line is a maximum
17. Third display line
18. Bottom (summary) display line (shows last measurement or calculation
result)
19. Bluetooth transmission enabled icon
6
Page 7

{
{
{
{
{
2
3
4
5
1 11 12
6,7,8,9,10
13
14
15
16
17
18
8
8
➤
11 12
1
2
13
14
3
4
5
6,7,8,9,10
19
Fig. 2
SAFETY INSTRUCTIONS
The LDM’s targeting laser is a Class 2 type that emits less than 1 mW of radiation
at a wavelength between 630 and 660 nanometers.
Avoid direct eye contact with the laser, and do not point it at people or animals. Eye
protection is normally afforded by the blink reflex. U.S. law prohibits pointing a laser
beam at aircraft; doing so is punishable by a fine of up to $10,000 and
imprisonment.
CAUTION!
15
16
17
18
7
Page 8
SETUP INSTRUCTIONS
MEASURE
ON
CLEAR
OFF
MEASURE
ON
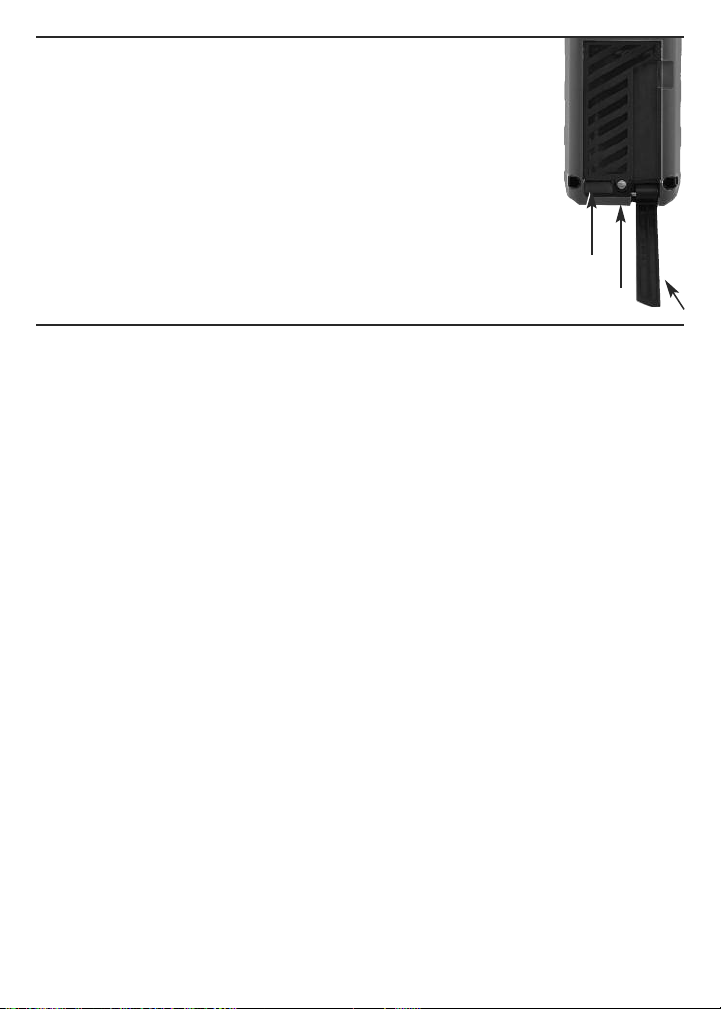
INSTALL BATTERIES
The LDM is ready to use after you install the two supplied “AAA”
batteries in a compartment in the back of the unit. To open the
compartment, use the included flat-head screwdriver to loosen
the single screw holding the battery compartment cover in place
(see photo at right). After opening the extension ruler, remove
the cover and set it aside. Position the batteries so their polarity
marks match the diagram inside the compartment. Replace the
cover and tighten the screw to secure it.
LIFT
COVER
HERE
SCREW
EXTENSION RULER
OPERATING INSTRUCTIONS
POWERING ON AND OFF
To turn the LDM on
backlight and laser. It also sounds a chirp, causes the laser icon (Callout 2 of Fig. 2)
to flash, and places the LDM in direct distance measurement mode.
While the LDM is powered on, any push of any button produces a chirp to confirm
that some action has taken place (a measurement was made, an operating mode or
measurement unit was changed, etc.). The only actions that are
by a chirp are the laser timing out (after 30 seconds of inactivity) for safety reasons
and the backlight timing out (after 10 seconds of inactivity) to conserve battery
charge. The LDM also chirps when it automatically powers off after 3 minutes of
inactivity. The chirp cannot be disabled.
To turn the LDM off
will respond with a chirp as it powers off.
, press and hold the button. This activates the display,
not
accompanied
manually, press and hold the button. The instrument
QUICK START INSTRUCTIONS
To make a quick distance measurement:
1. Power the LDM on.
2. Within 30 seconds, point the top of the instrument at a target and press the
button. The distance to the target—in the default measurement unit of
feet with decimal fraction—will be displayed on the bottom line of the display. The
top line will indicate the LDM’s angle with respect to the horizontal. When making
direct distance measurements, always orient the LDM so the top line reads close
to
0.0º
.
8
Page 9
To temporarily change the distance measurement unit, follow the instructions
MEASURE
ON
on p. 10.
If the laser has timed out (i.e., it has been on for more than 30 seconds), or if you
have just made a measurement, you will not see a red dot on the target and there
will be no flashing icon (Callout 2 of Fig. 2) on the display.
To make a distance
measurement with the laser off, you must press the button
—once to activate the laser and once to make the measurement.
twice
See page 20 for additional operating tips.
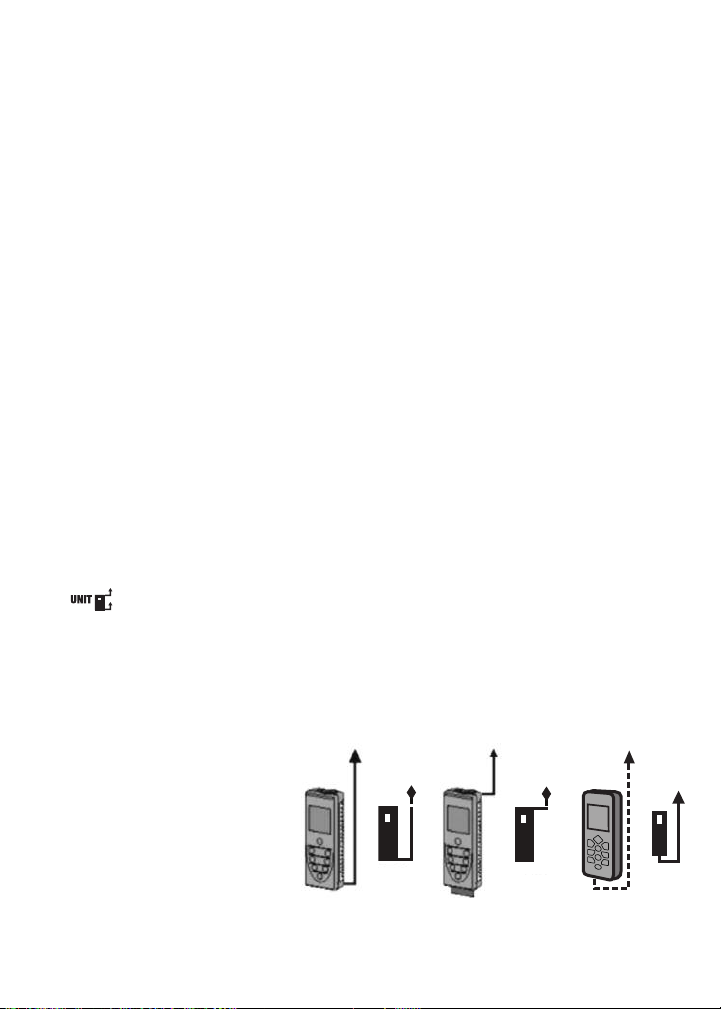
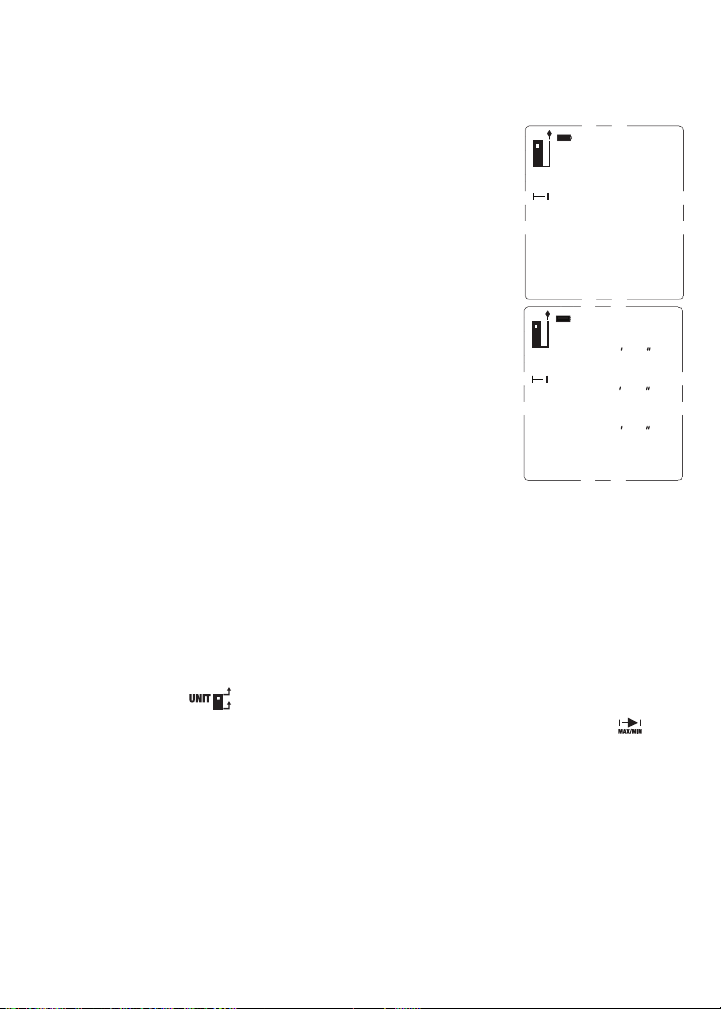
CHOOSING A MEASUREMENT REFERENCE
The LDM can reference its measurements from the top or bottom of the housing, or
the bottom of the extension ruler (see photo on page 8 for its location).
For most distance measurements, choosing the bottom of the housing as the
reference produces the most accurate readings. Doing so allows you to hold the
bottom of the LDM horizontally against one wall of a room, or vertically against the
floor, and send the laser beam out the top of the unit toward the opposite wall or
the ceiling.
However, for continuous distance (tracking) measurements (see p. 11), using the
top of the LDM as the reference produces the most accurate readings. In tracking
mode, you typically walk the instrument back from a wall to a distance specified on
a blueprint. In this case, what you want to measure is the distance to the wall from
the top of the unit.
The button on the front panel lets you select the bottom or top of the
housing, or the bottom of the extension ruler, as the measurement reference. The
three black icons shown in Fig. 3 below are the corresponding display indications.
When the LDM is powered off and on again, the measurement reference
automatically resets to the default: the bottom of the unit.
Fig. 3. Referencing
measurements
from the bottom (left)
and top (center)
of the LDM housing,
or the bottom of the
LDM’s extension ruler (right)
9
Page 10

CLEARING VALUES/UNDOING ACTIONS
C
LEAR
OFF
MEASURE
ON
MEASURE
ON
When pressed briefly, the two-function button:
1. Works like the “Clear Entry” button on a calculator to clear the last value
entered in a calculation sequence
2. Works like the “Undo” command on a computer menu to cancel the last
action selected
CHANGING THE MEASUREMENT UNIT
The LDM’s default distance measurement unit is feet with decimal fraction. The
2
default area measurement unit is square feet, expressed as ft
3
measurement unit is cubic feet, expressed as ft
.
To temporarily change the distance measurement unit
. The default volume
, press and hold the
button as many times as necessary until the desired unit appears on the
bottom display line. The alternatives to feet with decimal fraction, in order, are
inches (in), feet + fractional inches (expressed as X'Y", where X is a whole number
and Y is a whole number plus a common fraction), and meters (m).
When the LDM is powered off and on again, the distance measurement unit
automatically resets to the default: feet with decimal fraction.
TURNING THE BACKLIGHT ON AND OFF
To turn the display backlight on
, briefly press the button. The backlight
will remain on for ten seconds and then automatically turn off (silently) to conserve
battery charge.
MEASURING DISTANCES
Direct Measurements
To measure the distance to a target:
1. Power on the LDM and select a measurement unit, an appropriate measurement
reference (in most cases, the bottom of the LDM) and an appropriate backlight
state (on for indoor work, off for outdoor work).
2. If the laser icon (Callout 2 of Fig. 2) is not flashing and the laser pointer is
not
visible, press the button to activate the laser. Doing so will sound a
chirp, cause the laser icon to flash, and place the LDM in direct distance
measurement mode.
3. After confirming that the laser is on, level the LDM horizontally by referring to the
top line of the display, aim the unit at a target, and press the button. The
10
Page 11
LDM will chirp, and the distance to the target—in the default distance unit of feet
15
/
16
5’01”
0.0º
➤
0.0º
13
/
16
3
/
4
1
/
8
113 04
53 03
3 03
➤
with decimal fraction—will appear on the bottom line of the display.
To temporarily change the distance measurement unit, follow the instructions on
p. 10. Figure 4 is a screen shot of a measurement of
5 feet, 1 and 15/16 inches.
Fig. 4. A direct distance measurement of
5 feet, 1 and 15/16 inches
In direct distance measurement mode, you can display up to
three consecutive measurements in the order in which they
were made. Fig. 5 is a screen shot which shows the values
of three direct distance measurements made in top-tobottom order.
Fig. 5. Three direct distance measurements made in
order from top to bottom
Continuous Distance Measurement
(Distance Tracking)
This operating mode is ideal for transferring measurements
from construction plans or blueprints. In practice, you walk the LDM back from a
wall a specified distance while the unit tracks its own position by measuring the
distance to the wall twice per second. As you make these dynamic measurements
and you close in on the specified distance, the LDM takes note of the closest and
farthest you have been from the wall and displays these minimum and maximum
distances along with the final distance.
Before entering continuous distance measurement mode, be sure to temporarily
change the measurement reference from the bottom of the housing to the top by
briefly pressing the button (see p. 9). Next, hold the LDM horizontally with its
top against the wall. Then, after making sure that the laser is on, press the
button and back away from the wall while continuing to point the laser at the wall.
Initially (until the LDM reaches its minimum measurement distance of several
inches from the wall), the display will show an
minimum measurement threshold is passed, the LDM will begin to measure the
distance from to the wall twice per second. The measurements, accompanied by
chirps twice per second, will be shown and continuously updated on the bottom
line of the display. At the same time, the second and third display lines continuously
update the LDM’s minimum and maximum distance from the wall during this
measurement session.
Error 261
message. Once the
11
Page 12
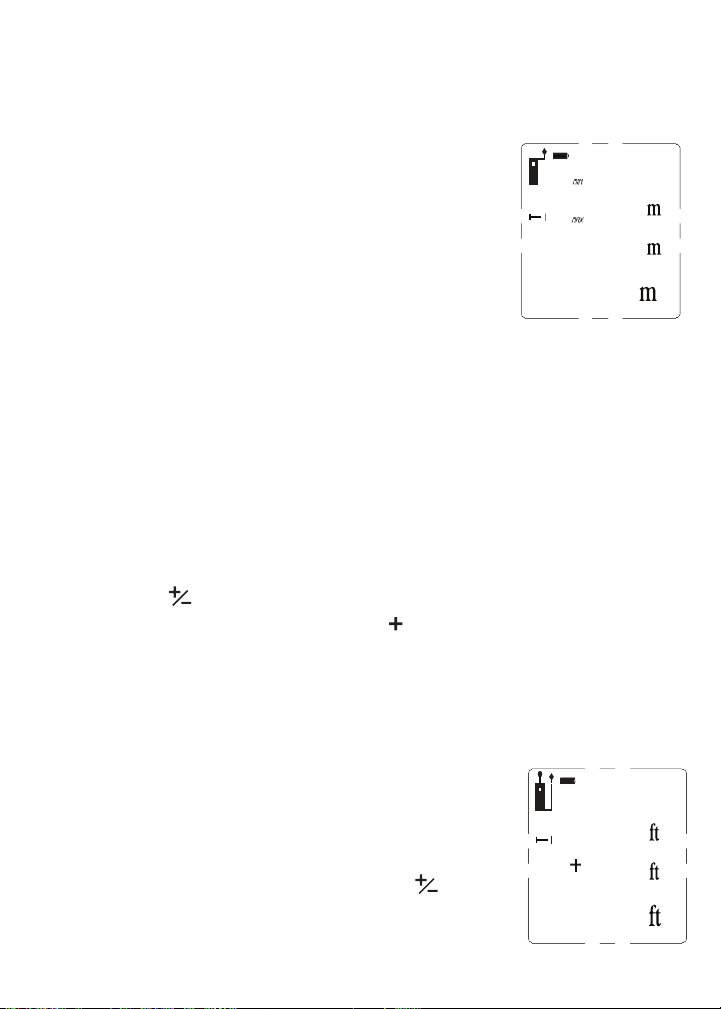
When you and the LDM reach the specified distance, press the button to
MEASURE
ON
MEASURE
ON
u
➤
0.0º
11.33
10.000
0.112
0.0º
16.325
18.415
2.090
➤
silence the chirping. The subsequent inactivity triggers the 30-second countdown
to laser power off and the 3-minute countdown to LDM power off. The LDM’s MIN,
MAX and current distance values remain on the display (Fig. 6) until it powers off
automatically.
Fig. 6. The results of using continuous measurement
to step off a specified distance (10m) from a
wall
Adding and Subtracting Distances
The LDM has a front-panel button that makes it easy to add
or subtract a distance measurement from an existing measurement, in effect
turning the earlier measurement into a baseline. This addition/subtraction function
comes in handy when accumulating multiple distance measurements.
For example, consider how the LDM could speed up the measurements needed to
lay out a long brick wall of multiple sections that are not in a straight line. Once
stakes, strings and frame are in place, the LDM could accurately measure the
length of each section by shooting from one stake to the next. It would also keep a
running total of these measurements and display the final result—the wall’s
perimeter—on its bottom line.
To add a measurement
briefly press th
bottom line to the second line and a flashing icon will appear at the left of five
dashes (representing the distance value to be added) on the third line. Then press
the button while aiming the laser
measurement was made
the dashes on the third line with that value, and display the sum of the two
measurements on the bottom line (Fig. 7).
Fig. 7. A display showing the addition of a 16.325 ft.
e
measurement to a measurement of 2.090 feet
to an existing measurement displayed on the bottom line,
button. The earlier measurement will be moved from the
at the point from which the first
. The LDM will measure the distance to that point, replace
To subtract a measurement
displayed on the bottom line, press and hold the button.
The earlier measurement will be moved from the bottom line
12
from an existing measurement
Page 13
to the second line and a flashing icon will appear at the left of five dashes
MEASURE
ON
(representing the distance value to be subtracted) on the third line. Then press the
button while aiming the laser at the point from which the first
measurement was made. The LDM will measure the distance to that point, replace
the dashes on the third line with that value, and display the difference of the two
measurements on the bottom line.
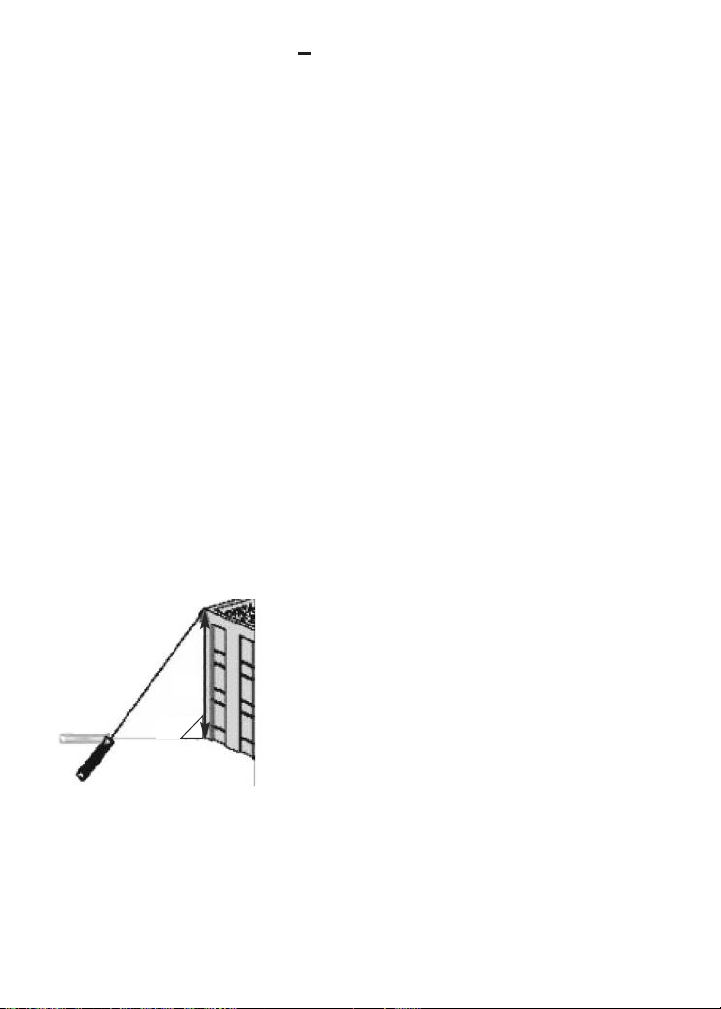
Indirect Measurements of Height or Length using Triangulation
The LDM can use triangulation (one type of indirect measurement based on
Pythagorean geometry) to calculate the height or length of an object from a
distance. The instrument can perform three kinds of Pythagorean calculations:
Triangulation with two inputs.
•
This kind of distance measurement can be
made only for distances that present you with a right angle. A good example is
measuring the height of a building from across the street at ground level (Fig. 8).
Because the LDM and the bottom of the building are both at ground level, the side
of the building (whose height “A” is unknown) forms one leg of a right triangle
whose other leg is the distance across the street (“B” in the figure). In other
words, you can use triangulation to determine the height “A” using only two
inputs because “A” is perpendicular to “B”—one of the distances you can
measure. The LDM can measure “B” as well as the distance to the top of the
building (“C” in the figure), which is the hypotenuse of the right triangle. Once
the LDM has determined the values of “B” and “C”, it calculates the value of “A”
according to Pythagoras’ famous equation: A
2
+ B2= C2.
C
A
Fig. 8. Triangulating a height using two inputs
B
•
Triangulation with three inputs.
made for distances that do
not
This kind of distance measurement can be
present you with a right angle. A good example is
measuring the height of a building from another building across the street through
an open fourth-floor window (Fig. 9). Because the LDM and the bottom of the
target building are not both at ground level, you must measure one common leg
“B1/B2” (which is perpendicular to the wall of the building) and the hypotenuses of
13
Page 14
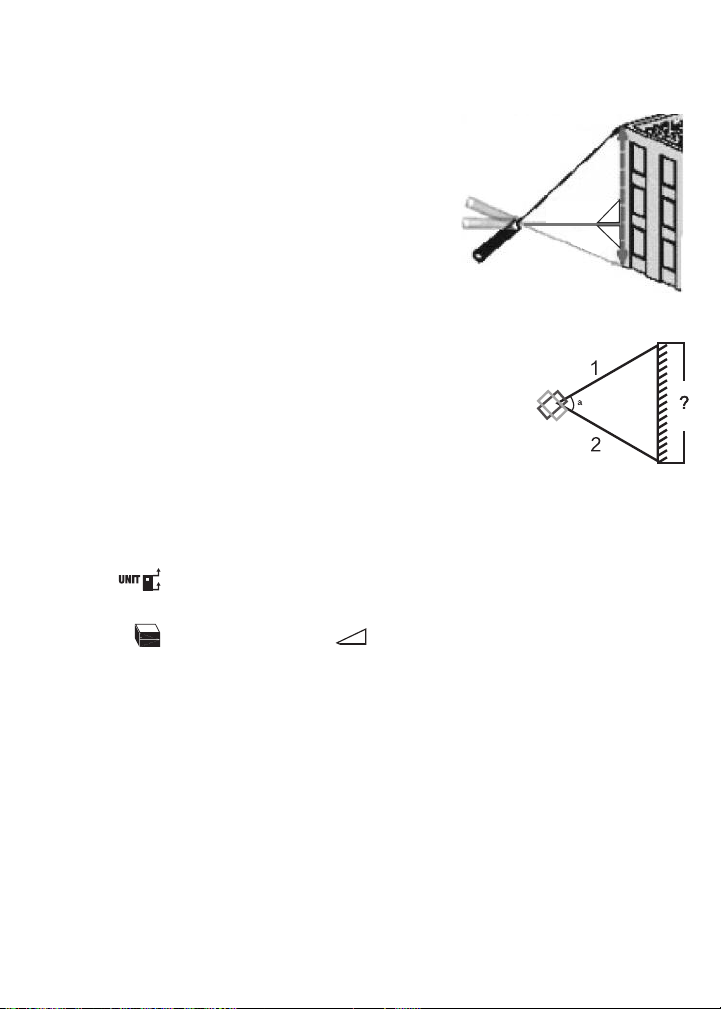
two right triangles “C1” and “C2”. Once these two values are known, the LDM can
MEASURE
ON
MEASURE
ON
solve two Pythagorean equations for the missing values of the other two legs
(“A1” and “A2”). The final calculation, which solves for A—the height of the
building—is A = A1 + A2.
C1
Fig. 9. Triangulating a height using three inputs
A1
B1/B2
• Auto height measurement. Using a slightly
different technique (see Fig. 10), the LDM can
quickly calculate the height of any object using
C2
A=A1+A2
A2
only two inputs.
Fig. 10. Automatic calculation of a height using
two inputs
To measure the height of an object using triangulation
with two inputs:
1. First make sure that the line of sight from the LDM to the bottom of the object
forms a right angle.
2. Use the button to choose the top of the LDM as the measurement
reference. Also make sure the laser is on.
3. Press the button three times. A icon will appear on the left side of the
display with the hypotenuse flashing.
4. Aim the laser at the top of the object and press the button. The distance
measured (the hypotenuse) will appear on the second line of the display and the
horizontal leg of the on-screen triangle will begin flashing.
5.
Without moving the LDM
, and keeping it as horizontal as possible, aim the laser
at the bottom of the object and press the button. The distance measured
will appear on the third line of the display and the height of the object will appear
on the bottom (summary) line. The final display will look similar to Fig. 11 at the
top of the next page.
14
Page 15
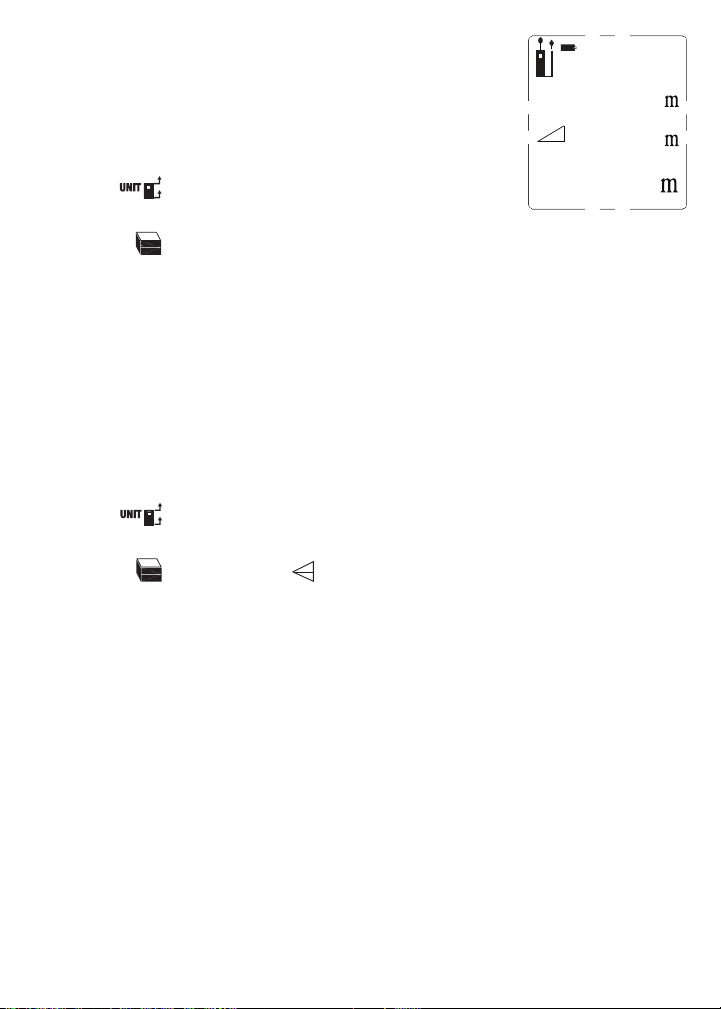
Fig. 11. A two-input indirect measurement of the
MEASURE
ON
MEASURE
ON
MEASURE
ON
MEASURE
ON
MEASURE
ON
0.0º
5.846
4.990
7.687
height of a tree standing 4.990 meters tall
To automatically measure the height of any object
using triangulation with two inputs:
Use the button to choose the top of the LDM as the
1.
measurement reference. Also make sure the laser is on.
2.
Press the button five times. An isosceles triangle will appear on the left side
of the display with its upper leg flashing.
3.
Aim the laser at the top of the object and press the button. The distance
measured will appear on the second line of the display and the triangle's lower
leg will begin flashing.
4. Without moving the LDM
, press the button again. The distance
measured will appear on the third line of the display and the height of the object
will appear on the bottom (summary) line.
To measure the height of an object using triangulation with three inputs:
1.
Use the button to choose the top of the LDM as the measurement
reference. Also make sure the laser is on.
2.
Press the button twice. A icon will appear on the left side of the display
with the upper hypotenuse flashing.
3.
Aim the laser at the top of the object and press the button. The distance
measured will appear on the top line of the display and the horizontal line
bisecting the on-screen triangle will begin flashing.
4. Without moving the LDM
and keeping it as horizontal as possible, aim the laser
directly at the object and press the button. The distance measured will
appear on the second line of the display, the horizontal line will stop flashing, and
the lower hypotenuse will begin flashing.
5. Without moving the LDM
, aim the laser at the bottom of the object and press
the button. The distance measured will appear on the third line of the
display and the height of the object will appear on the bottom (summary) line.
The final display will look similar to Fig. 12 at the top of the next page.
15
Page 16
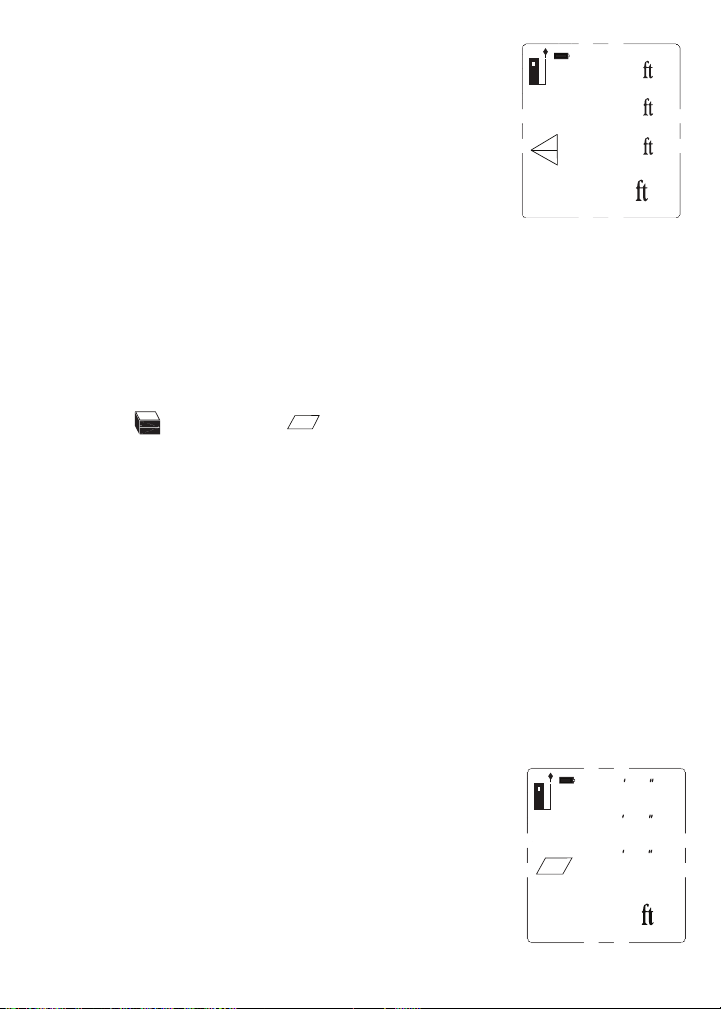
Fig. 12. A three-input indirect measurement of the
MEASURE
ON
MEASURE
ON
➤
19.54
19.02
14.27
17.90
2
5
/
8
51 10
13
/
16
1
/
2
9 06
155.65
16 03
height of a wall standing 14.27 ft. tall
MEASURING AREAS & PERIMETERS
The LDM can calculate the area of a square or rectangular room or space by
measuring its length and width and multiplying the two values. It can also calculate
the perimeter of the room or space by adding the length and width and mulitplying
by two.
To measure an area or perimeter:
1. Make sure the LDM is using its bottom as the measurement reference and that
the laser is on.
2. Press the button once. A icon will appear on the left side of the display
with its bottom leg flashing.
3. Holding the bottom of the LDM against one wall of the room or space, aim the
laser pointer at the opposite wall and press and hold the button. The
distance measured will appear on the top line of the display, the bottom leg of
the parallelogram will stop flashing, and the right leg of the parallelogram will
begin flashing.
4. Move the LDM to an adjacent wall of the room or space and hold its bottom
against that wall. Aim the laser at the opposite wall and press the
button. The distance measured will appear on the second line of the display and
the area of the room or space—in “square” units—will appear on the bottom
line. The calculated perimeter of the room or space will appear on the third line
of the display. The final display will look similar to Fig. 13.
Fig. 13. Calculation of the perimeter
and area of a room measuring
16 feet, 3 and 13/16 inches
by 9 feet, 6 and 1/2 inches
16
Page 17

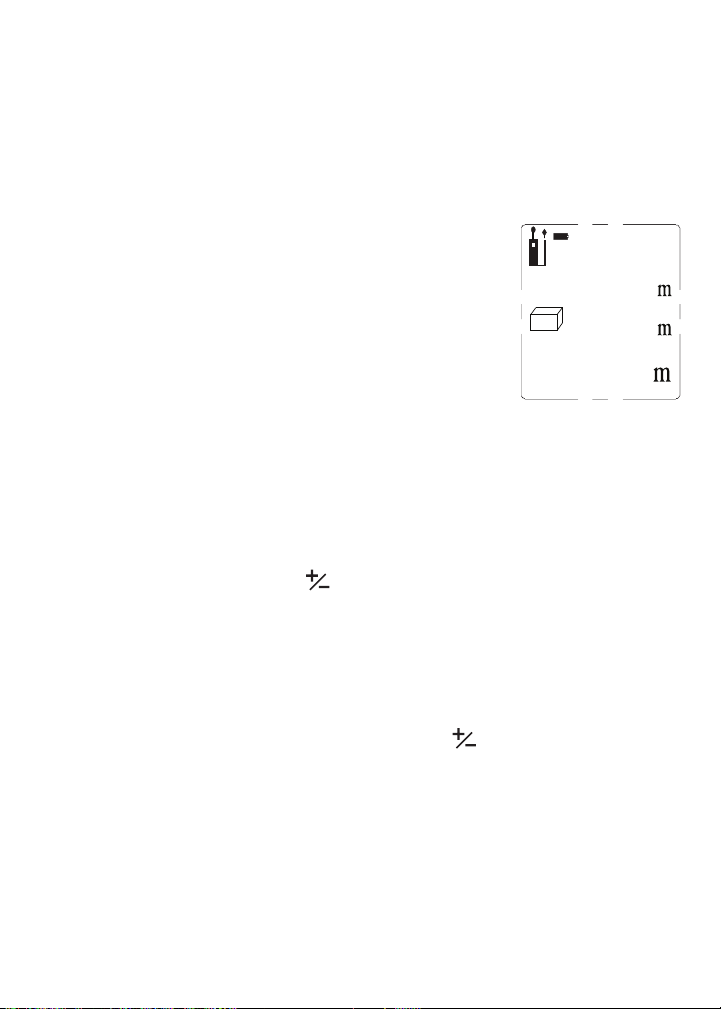
MEASURING VOLUMES
MEASURE
ON
MEASURE
ON
MEASURE
ON
3.959
5.106
58.582
2.898
3
The LDM can calculate the volume of a square or rectangular room or space by
measuring its height, depth and width and multiplying the three values.
To measure a volume:
1. Make sure the LDM is using its bottom as the measurement reference and that
the laser is on.
2. Press the button twice. A icon will appear on the left side of the display
with its top front “width” leg flashing.
3. Holding the bottom of the LDM against the floor of the room or space, aim the
laser pointer at the ceiling and press the button. The distance measured
will appear on the top line of the display, the top front “width” leg of the cube will
stop flashing, and the top right “depth” leg of the cube will begin flashing.
4. Move the LDM to one wall of the room or space and hold its rear against that
wall. Aim the laser pointer at the opposite wall and press the button. The
distance measured will appear on the second line of the display, the top right
“depth” leg of the cube will stop flashing, and the right front “height” leg of the
cube will begin flashing. The third line of the display will display the calculated
area of the plane bounded by the width and depth of the volume.
5. Move the LDM to an adjacent wall of the room or space and hold its bottom
against that wall. Aim the laser at the opposite wall and press the
button. The distance measured will replace the planar area on the third line of the
display and the volume of the room or space—in “cubic” units—will appear on
the bottom line. The final display will look similar to Fig.14.
Fig. 14. Calculation of the volume of a room
measuring 3.959 x 2.898 x 5.106 meters
RECALLING STORED MEASUREMENTS/
CALCULATIONS
The LDM automatically stores its last 20 measurements or calculations and retains
them in memory after being powered off. The records also are unaffected by a
battery discharge or battery change. Once the memory is full, the next
17
Page 18

measurement or calculation overwrites the oldest record in a first in-first out (FIFO)
▲
▼
▲▼▲
▼
0.0º
6.02
4
scheme. Record #1 is the most recent measurement or calculation, and Record #20
is the oldest. The records are recalled sequentially, using the front-panel
button. Records cannot be deleted individually or in bulk.
To recall a record
, press the button. The value of the first (most recent)
measurement or calculation will appear on the bottom line, and a “1” will appear
over the icon near the top of the display, below the battery charge indicator.
Briefly press, or press and hold, the button to navigate up or down through the
memory to the desired record number (Fig. 15). Repeatedly
pressing the button briefly recalls stored records in reverse
chronological order. Repeatedly pressing and holding the
button recalls the records in chronological order. Tip: Pressing
and holding the button with Record #1 displayed recalls
Record #20.
Fig. 15. The LDM’s fourth most recent measurement
or calculation had a value of 6.02 inches
™
USING THE LDM WITH THE ToolSmart
APP
AND AN APPLE iOS OR ANDROID PHONE
To download measurements and calculations made by the LDM to an Apple iOS or
Android smartphone, begin by downloading the ToolSmart
™
app from the iTunes
Store or Google Play Store to your mobile device.
Once you have downloaded the app, install it. Then, pair the LDM and your phone
by activating Bluetooth on your phone and pressing the button on the LDM.
A tutorial on the app explains how to save LDM measurements and calculations to
your phone and overlay them on photos of your project made with the phone’s
camera.
18
Page 19

SPECIFICATIONS
Measurement Range (indoor) 8 in. to 100 ft. (200mm to 30m)
Measurement Accuracy ±1/16 in. (±1.5mm)
Resolution 1mm
Display Unit Options feet with decimal fraction (default), feet plus fractional
inches, inches, meters
Response Time 2 seconds, max
Laser Type, Wavelength, Power Class 2, 630 to 660nm, < 1mW
Operating Modes Direct Distance Measurement, Distance Addition/
Subtraction, Continuous Distance Measurement
(Distance Tracking), Indirect Distance Measurement
(Triangulation) with 2 or 3 inputs, Auto Height
Measurement, Area and Perimeter Measurement,
Volume Measurement
Display 4-line backlit LCD measuring 1-3/4 in. (45mm) diagonal
Memory 20 measurements
Splashproof and Dustproof To IP54 standard
Auto Power Off After 3 minutes of inactivity
Auto Laser Off After 30 seconds of inactivity
Auto Backlight Off After 10 seconds of inactivity
Battery Life 3000 measurements, typical
Operating Temperature 32° to 104°F (0° to 40°C)
Storage Temperature 14º to 140ºF (-10º to 60ºC) @ <85% R.H.
Power Source 2 “AAA” batteries
Dimensions 4.5 x 2.0 x 1.3 in. (115 x 52 x 32mm)
Weight 4.2 oz. (120g), excluding batteries
19
Page 20

OPERATING & MAINTENANCE TIPS
MEASURE
ON
MEASURE
ON
Because the laser silently auto powers off after 30 seconds of inactivity while the
LDM remains powered on, you’ll often find that when you press the button
expecting to make a measurement, all you have done is reactivate the laser. In this
case, you have to press the button a second time to take a reading.
When measuring horizontal distances, keep the LDM as horizontal as possible,
using the digital angle reading on the top line of the display as a guide.
When measuring long distances, use a target plate made of white paper or
cardboard. Using a monopod or resting the LDM on a surface (rather than holding it
in your hand) helps to steady the laser on distant targets.
The LDM will almost always register an “Error 204” if the target is an LCD or
plasma computer or TV screen. The calculation error results because the display
absorbs the incoming beam and reflects nothing back to the LDM.
The following errors can be corrected:
Code Cause Corrective Measure
Error 204 Calculation error Repeat the measurement(s)
Error 252 Temperature too high Cool down the LDM
Error 220 Low battery Install fresh batteries
Error 253 Temperature too low Warm up the LDM
Error 255 Received signal too weak/ Use white target plate
Measurement time too long
Error 256 Received signal too strong Use target plate
(target too reflective)
Error 500 Hardware/uncertainty error Power the LDM off and on
Replace the batteries (see page 8) when the on-screen battery icon
indicates that their charge has been depleted.
Use Alkaline batteries only.
To avoid having old batteries leak and ruin the LDM, remove the batteries when you
do not expect to use the instrument for a long period of time (several months).
Clean the LDM with wiping it with a damp soft cloth. Never use solvents or
abrasives.
Keep the LDM away from water, toxic environments and temperature extremes.
20
Page 21

WARRANTY INFORMATION
General warrants its instruments and accessories, and digital tools products against
defects in material or workmanship for one year from the date of purchase unless
otherwise stated on the packaging, manual, and/or marketing materials. General
also warrants its non-digital tools products against defects in material or
workmanship on a limited lifetime term.
General will replace or repair the defective unit, at its option, subject to verification
of the defect.
This warranty does not apply to defects resulting from abuse, neglect, accident,
unauthorized repair, alteration, or unreasonable use of the product. It also does not
cover products purchased from unauthorized distributors. A proof of purchase must
accompany each warranty claim.
Any implied warranties arising from the sale of a General product, including but not
limited to implied warranties of merchantability and fitness for a particular purpose,
are limited to the above. General shall not be liable for loss of use of the product or
other incidental or consequential damages, expenses, or economic loss, or for any
claim of such damage, expenses, or economic loss.
State laws vary. The above limitations or exclusions may not apply to you.
For more details or to file a warranty claim, contact General Tools & Instruments
Technical Support at techsupport@generatools.com.
21
Page 22

RETURN FOR REPAIR POLICY
Every effort has been made to provide you with a reliable product of superior
quality. However, in the event your instrument requires repair, please contact our
Customer Service to obtain an RGA (Return Goods Authorization) number before
forwarding the unit via prepaid freight to the attention of our Service Center at this
address:
General Tools & Instruments
75 Seaview Drive
Secaucus, NJ 07094
212-431-6100
22
Page 23

FCC STATEMENT
This device complies with part 15 of the FCC Rules. Operation is subject to the
following two conditions: (1) This device may not cause harmful interference,
and (2) This device must accept any interference received, including
interference that may cause undesired operation.
This equipment has been tested and found to comply with the limits for a Class
B digital device, pursuant to part 15 of the FCC Rules. These limits are designed
to provide reasonable protection against harmful interference in a residential
installation. This equipment generates, uses and can radiate radio frequency
energy and, if not installed and used in accordance with the instructions, may
cause harmful interference to radio communications.
However, there is no guarantee that interference will not occur in a particular
installation. If this equipment does cause harmful interference to radio or
television reception, which can be determined by turning the equipment off and
on, the user is encouraged to try to correct the interference by one or more of
the following measures:
• Reorient or relocate the receiving antenna.
• Increase the separation between the equipment and receiver.
• Connect the equipment to a different circuit than the one the receiver is
connected to.
• Consult your supplier or an experienced radio/TV technician for help.
Caution: Any changes or modifications not expressly approved by the party
responsible for compliance could void the user's authority to operate the
equipment.
23
Page 24

General Tools & Instruments
GeneralToolsNYC
NOTICE - WE ARE NOT RESPONSIBLE FOR TYPOGRAPHICAL ERRORS.
24
GENERAL TOOLS & INSTRUMENTS
75 Seaview Drive
Secaucus, NJ 07094
PHONE (212) 431-6100
FAX (212) 431-6499
TOLL FREE (800) 697-8665
e-mail: sales@generaltools.com
www.generaltools.com
TS01 User’s Manual
Specifications subject to change without notice
©2016 GENERAL TOOLS & INSTRUMENTS
MAN# TS01
01/14/16
Page 25

MEDIDOR DE DISTANCIA A LÁSER
MANUAL DEL USUARIO
TS01
Lea cuidadosamente todo este manual antes de usar este producto.
Page 26

ÍNDICE
Introducción . . . . . . . . . . . . . . . . . . . . . . . . . . . . . . . . . . . . . . . . . . . . 27
Características principales . . . . . . . . . . . . . . . . . . . . . . . . . . . . 27 – 28
Contenido de la caja . . . . . . . . . . . . . . . . . . . . . . . . . . . . . . . . . . . . . 28
Descripción general del producto . . . . . . . . . . . . . . . . . . . . . . 28 – 31
Instrucciones de seguridad . . . . . . . . . . . . . . . . . . . . . . . . . . . . . . . 31
Instrucciones de preparación . . . . . . . . . . . . . . . . . . . . . . . . . . . . . . 32
Instalación de las baterías . . . . . . . . . . . . . . . . . . . . . . . . . . . . . . 32
Instrucciones de operación . . . . . . . . . . . . . . . . . . . . . . . . . . . 32 – 42
Encendido y apagado . . . . . . . . . . . . . . . . . . . . . . . . . . . . . . . . . . 32
Instrucciones rápidas . . . . . . . . . . . . . . . . . . . . . . . . . . . . . . . . . . 33
Escogiendo una referencia de medición . . . . . . . . . . . . . . . 33 – 34
Borrando valores/deshaciendo acciones . . . . . . . . . . . . . . . . . . . 34
Cambiando las unidades de medición . . . . . . . . . . . . . . . . . . . . . 34
Encendiendo y apagando la iluminación de pantalla . . . . . . . . . . 35
Midiendo distancias . . . . . . . . . . . . . . . . . . . . . . . . . . . . . . . 35 – 40
Mediciones directas . . . . . . . . . . . . . . . . . . . . . . . . . . . . . . 35
Medición continua de distancia
(Seguimiento de distancia) . . . . . . . . . . . . . . . . . . . . . . 36
Sumando y restando distancias . . . . . . . . . . . . . . . . . 36 – 37
Mediciones indirectas de altura y longitud
usando triangulación . . . . . . . . . . . . . . . . . . . . . . . 37 – 40
Midiendo áreas y perímetros . . . . . . . . . . . . . . . . . . . . . . . . . 40 – 41
Midiendo volúmenes . . . . . . . . . . . . . . . . . . . . . . . . . . . . . . . 41 – 42
Recuperando mediciones/cálculos almacenados . . . . . . . . 42 – 43
Usando el medidor de distancia a láser con la aplicación
ToolSmart
Especificaciones . . . . . . . . . . . . . . . . . . . . . . . . . . . . . . . . . . . . . . . . 44
Consejos de operación y mantenimiento . . . . . . . . . . . . . . . . . 45 – 46
Información de garantía . . . . . . . . . . . . . . . . . . . . . . . . . . . . . . . . . . 46
Política de devolución para reparaciones . . . . . . . . . . . . . . . . . . . . . 47
Declaración de la FCC . . . . . . . . . . . . . . . . . . . . . . . . . . . . . . . . . . . . 47
™
en un teléfono inteligente Apple iOS o Android . . . . . 43
26
Page 27

INTRODUCCIÓN
G
racias por haber comprado el Medidor de distancia a láser TS01 ToolSmart™de
General Tools & Instruments (General). Lea cuidadosamente todo este manual del
usuario antes de usar el instrumento.
El Medidor de distancia a láser (LDM) está diseñado para reemplazar una cinta
métrica, para profesionales de la construcción, arquitectos, ingenieros, agrimensores,
carpinteros, plomeros, pintores, electricistas, agentes de bienes raíces, inspectores
de viviendas, diseñadores e instaladores de sistemas de climatización e instaladores
y vendedores de alfombras/pisos. El LDM funciona de la misma forma ya sea solo o
®
junto con un teléfono inteligente iOS
o Android™: proyecta un haz láser rojo sobre el
objetivo y mide el tiempo que tarda el haz reflejado en volver al LDM. El tiempo que
tarda es proporcional a la distancia a la que se encuentra el objetivo. El rango de
30 m del LDM es suficiente para la mayoría de las tareas de medición en interiores
y también para muchas tareas en exteriores.
®
Cuando se usa junto con un teléfono inteligente iOS
o Android™, el LDM puede
transmitir al teléfono inteligente (por Bluetooth) todas las mediciones y grupos de
mediciones y cálculos que realice. El teléfono inicia la transferencia de datos
®
mediante una aplicación gratuita descargada del iTunes
App Store o del Google
Play Store.
Luego se pueden agregar las mediciones de longitudes, áreas, perímetros y volúmenes
a fotos que el usuario puede tomar utilizando la aplicación y la cámara del teléfono.
CARACTERÍSTICAS PRINCIPALES
• Rango de 30 m
• Precisión de ±1,5 mm
• Muestra distancias en pies con fracciones decimales (por defecto),
pies + fracciones de pulgada, pulgadas o metros
• Calcula áreas, perímetros y volúmenes
• Usa triangulación para calcular la altura o la longitud desde lejos
• Pantalla LCD de 4 líneas con iluminación
• Indicación digital continua en la pantalla, del ángulo del LDM con respecto a la
horizontal en la mayoría de los modos de medición
iPhone®y iTunes®son marcas de Apple Inc., registradas en Estados Unidos y en otros países.
™
es una marca registrada de Google Inc.
Android
La palabra y los logotipos Bluetooth
Instruments se hace bajo su autorización.
®
le pertenecen a Bluetooth SIG, Inc.y cualquier uso de ellos por parte de General Tools &
27
Page 28

• Modos de suma, resta y medición continua (seguimiento), ideales para trabajos
de distribución
• Respuesta rápida
• Almacena automáticamente las últimas 20 mediciones/cálculos
• Toma mediciones de referencia desde la parte de arriba o de abajo del gabinete o
desde el extremo de la regla de extensión
• Apagado automático de alimentación, apagado automático del láser y apagado
automático de iluminación de la pantalla
• Resiste salpicaduras y polvo hasta la norma IP54
• Portátil y liviano
• Se alimenta con dos baterías alcalinas "AAA" (incluidas)
CONTENIDO DE LA CAJA
El LDM viene en una caja exhibidora junto con:
• Un estuche (funda blanda con gancho para el cinturón)
• Dos baterías alcalinas “AAA”
• Un destornillador plano pequeño para abrir el compartimiento de las baterías
• Este manual del usuario
DESCRIPCIÓN GENERAL DEL PRODUCTO
La Fig. 1 muestra todos los controles del panel delantero del LDM. La Fig 2 muestra
todos los íconos posibles e indicaciones de la pantalla. Aprenda las ubicaciones y
funciones de todos los controles e indicadores antes de avanzar a las Instrucciones
de seguridad, preparación y de operación.
Fig. 1. Controles frontales del LDM
1.
Botón de cinco funciones
cinco modos disponibles de medición: Área, volumen, triangulación de dos
puntos, triangulación de tres puntos, altura automática
2.
Ingresa al modo de medición continua de distancia (seguimiento)
muestra los valores máximo y mínimo
3.
Suma/resta la siguiente medición a la anterior
recuperación de memoria, contador de incrementos/decrementos almacenados
28
. Presiónelo levemente para moverse a través de los
. En el modo de
, el que
Page 29

1
MEASURE
ON
CLEAR
OFF
▲
▼
3
2
4
5
7
Fig. 1
4.
Botón de medición
Botón de dos funciones
5.
tres opciones de referencia de medición: arriba y abajo del gabinete del LDM, y
parte de abajo de la regla de extensión. Manténgalo presionado para moverse a
través de las cuatro unidades de longitud disponibles.
6.
Entra en el modo de recuperación de memoria
7.
Botón de dos funciones
Presiónelo levemente para deshacer la última acción o para borrar (volver a cero)
la última medición o cálculo.
8.
Activa/desactiva la transmisión Bluetooth
. Activa el láser y realiza la medición
. Presiónelo levemente para moverse a través de las
. Manténgalo presionado para apagar el LDM.
de mediciones o cálculos
6
8
29
Page 30

Fig. 2. Indicadores e íconos de la pantalla del LDM
1. Mediciones desde la parte de arriba del gabinete del LDM
2. Parpadea cuando el láser está encendido
3 Mediciones desde la parte de abajo del gabinete del LDM o desde la
parte de abajo de la regla de extensión
4. Funcionando en modo de medición directa o continua
5. Indicación de error de funcionamiento
6-10. Indicador del tipo de medición
Distancia (directa)
Distancia (indirecta — triangulación con dos puntos)
Distancia (indirecta — triangulación con tres puntos)
Área y perímetro
Volumen
11. Indicador de carga de la batería
12. Número del registro mostrado
13. Línea superior de la pantalla
14. El valor que aparece en la segunda línea es un mínimo
15. Segunda línea de la pantalla
16. El valor que aparece en la tercera línea es un máximo
17. Tercera línea de la pantalla
18. Línea inferior (resumen) de la pantalla (muestra la última medición o
cálculo)
19. Ícono de transmisión Bluetooth activado
30
Page 31
{
{
{
{
{
2
3
4
5
1 11 12
6,7,8,9,10
13
14
15
16
17
18
8
8
➤
11 12
1
2
13
14
3
4
5
6,7,8,9,10
19
Fig. 2
INSTRUCCIONES DE SEGURIDAD
El láser del puntero del LDM es del tipo Clase 2 que emite menos de 1 mW de
potencia a una longitud de onda entre 630 y 660 nanómetros.
Evite el contacto directo de los ojos con el láser, y no lo apunte hacia personas o
animales. El ojo se protege normalmente mediante el reflejo de parpadeo. La ley de
EE.UU. prohíbe apuntar un láser a un avión. El hacerlo se sanciona con una multa
de hasta $10.000 y encarcelamiento.
¡CUIDADO!
15
16
17
18
31
Page 32

INSTRUCCIONES DE PREPARACIÓN
MEASURE
ON
CLEAR
OFF
INSTALACIÓN DE LAS BATERÍAS
El LDM está listo para usar luego de instalarle las dos baterías
“AAA” incluidas en el compartimiento que está detrás de la unidad.
Para abrir el compartimiento, use el destornillador plano incluido
para aflojar el tornillo que sostiene la tapa del compartimiento de
las baterías (ver la foto a la derecha). Luego de abrir la regla
de extensión, remueva la tapa y déjela a un lado. Coloque las
baterías de modo que sus polaridades coincidan con las
marcas dentro del compartimiento. Reinstale la tapa y ajuste
el tornillo para asegurarlo.
LEVANTE
LA TAPA
AQUÍE
TORNILLO
REGLA DE EXTENSIÓN
INSTRUCCIONES DE OPERACIÓN
ENCENDIDO Y APAGADO
Para encender el LDM
pantalla, la iluminación de pantalla y el láser. También emite un pitido, hace que el
ícono del láser (Fig 2 detalle 2) parpadee y coloca al LDM en el modo de medición
directa de distancia.
Cuando el LDM está encendido, la pulsación de cualquier botón produce un pitido
para confirmar que se ha realizado alguna acción (se realizó una medición, se
cambió el modo de operación o las unidades de medición, etc.). Las únicas acciones
que no producen un pitido son el apagado automático del láser (luego de 30
segundos de inactividad) como medida de seguridad, y el apagado automático de la
iluminación de la pantalla (luego de 10 segundos de inactividad) para conservar la
carga de la batería. El LDM también emite un pitido al apagarse automáticamente
luego de 3 minutos de inactividad. El pitido no se puede desactivar.
Para apagar manualmente el LDM
instrumento emitirá un pitido al apagarse.
, mantenga presionado el botón . Esto activa la
, mantenga presionado el botón . El
32
Page 33

INSTRUCCIONES RÁPIDAS
MEASURE
ON
MEASURE
ON
Para realizar una medición rápida de distancia:
1. Encienda el LDM.
2. Dentro de los 30 segundos, apunte la parte superior del instrumento a un
objetivo y presione el botón . La línea inferior del instrumento mostrará la
distancia al objetivo en las unidades de medición por defecto (pies con
decimales). La línea superior indica el ángulo del LDM con respecto a la
horizontal. Al realizar mediciones directas de distancia, oriente siempre el LDM
0.0°
de modo que la línea superior indique los más cerca posible a
.
Para cambiar temporariamente las unidades de medición, siga las instrucciones de
la página 34.
Si el láser se apagó automáticamente (por ejemplo, pasaron más de 30 segundos),
o si ya ha realizado una medición, no verá un punto rojo en el objetivo y no habrá
un ícono parpadeando en la pantalla (Fig. 2 detalle 2).
Para realizar una
medición de distancia con el láser apagado, deberá presionar el botón
dos veces
, una vez para activar el láser y otra vez para realizar la
medición.
Consulte la página 45 por consejos adicionales de operación.
ESCOGIENDO UNA REFERENCIA DE MEDICIÓN
El LDM puede realizar sus mediciones desde la parte de arriba o de abajo de su
gabinete, o desde la parte de abajo de la regla de extensión (ver la foto de la
página 32 por su ubicación).
Para la mayoría de las mediciones de distancia, elegir como referencia la parte
inferior del gabinete produce las mediciones de mayor exactitud. De esta forma
usted puede sostener la parte de abajo del LDM de forma horizontal contra la pared
de un cuarto, o verticalmente contra el piso, y enviar el haz del láser desde la parte
superior de la unidad hacia la pared opuesta o hacia el techo.
Sin embargo, para las mediciones continuas (seguimiento) de distancia (ver
página 36), elegir como referencia la parte superior del LDM produce las
mediciones de mayor exactitud. En modo seguimiento, usted típicamente mueve
hacia atrás el instrumento desde una pared hasta una distancia especificada en un
plano. En este caso, lo que usted quiere medir es la distancia a la pared desde la
parte superior de la unidad.
33
Page 34

El botón del panel delantero le permite seleccionar la parte inferior o superior
CLEAR
OFF
del gabinete, o la parte inferior de la regla de extensión, como referencia para la
medición. Los tres íconos negros que se muestran en la Fig. 3 de abajo son las
indicaciones correspondientes de la pantalla.
Cuando se apaga y se vuelve a encender el LDM, el instrumento vuelve
automáticamente a su referencia por defecto: la parte inferior de la unidad.
Fig. 3. Fig. 3. Tomando como
referencia para las
mediciones la parte
inferior (izquierda) y
la parte superior
(centro) del gabinete
del LDM, o la parte inferior de la regla de extensión
del LDM (derecha)
BORRANDO VALORES/DESHACIENDO ACCIONES
Al presionar levemente el botón de doble función :
1. Funciona como el botón “Borrar” de una calculadora para borrar el
último valor ingresado en una secuencia de cálculo
2. Funciona como el comando “Deshacer” en el menú de una computadora
para cancelar la última acción seleccionada
CAMBIANDO LAS UNIDADES DE MEDICIÓN
La unidad de medición de distancia por defecto del LDM es pies con fracciones
decimales. La unidad de medición de área por defecto es pies cuadrados, expresada
2
como ft
como ft
. La unidad de medición de volumen por defecto es pies cúbicos, expresada
3
.
Para cambiar temporariamente la unidad de medición de distancia, mantenga
presionado el botón las veces que sea necesario hasta que la unidad deseada
aparezca en la línea inferior de la unidad. Las alternativas a pies con fracciones
decimales, en orden, son pulgadas (in), pies + fracciones de pulgadas (expresada
como X'Y", donde X es un número entero e Y es un número entero más una fracción
común), y metros (m).
Cuando se apaga y se vuelve a encender el LDM, la unidad de medición de distancia
vuelve automáticamente a su unidad por defecto: pies con fracciones decimales.
34
Page 35

ENCENDIENDO Y APAGANDO LA ILUMINACIÓN DE
MEASURE
ON
MEASURE
ON
15
/
16
5’01”
0.0º
➤
0.0º
13
/
16
3
/
4
1
/
8
113 04
53 03
3 03
➤
PANTALLA
Para encender la iluminación de la pantalla
, presione levemente el botón
. La iluminación permanecerá encendida durante 10 segundos y luego se
apagará automáticamente (sin hacer ruido) para conservar la carga de la batería.
MIDIENDO DISTANCIAS
Mediciones directas
Para medir la distancia a un objetivo:
1. Encienda el LDM y seleccione una unidad de medición, una referencia adecuada
de medición (en la mayoría de los casos, la parte inferior del LDM) y un estado
apropiado de iluminación de la pantalla (activado para trabajos de interior y
desactivado para trabajos de exterior).
2. Si el ícono del láser (Fig 2, detalle 2) no está parpadeando y no se ve el puntero
láser, presione el botón para activar el láser. Al hacerlo emitirá un pitido,
hará que el ícono del láser parpadee y colocará al LDM en el modo de medición
directa de distancia.
3. Luego de confirmar que el láser está activado, nivele horizontalmente el LDM
usando como referencia la línea superior de la pantalla, apunte a un objetivo y
presione el botón . El LDM emitirá un pitido y aparecerá la distancia al
objetivo en la línea inferior de la pantalla, en las unidades por defecto de pies
con fracciones decimales.
Para cambiar temporariamente las unidades de medición,
siga las instrucciones de la página 34. La Fig. 4 es una foto
de la pantalla midiendo 5 pies y 1 15/16 pulgadas.
Fig. 4. Una medición directa de distancia de 5 pies y
1 y 15/16 pulgadas
En el modo de medición indirecta de distancia, puede ver
hasta tres mediciones consecutivas en el orden en que
fueron realizadas. La Fig. 5 es una foto de la pantalla con los
valores de tres mediciones directas de distancias hechas en
el orden de arriba a abajo.
Fig. 5. Tres mediciones directas de distancia en orden
de arriba a abajo
35
Page 36

Medición continua de distancia (Seguimiento de distancia)
MEASURE
ON
u
➤
0.0º
11.33
10.000
0.112
Este modo de operación es ideal para transferir mediciones desde planos de
construcción. En la práctica, usted mueve el LDM hacia atrás desde una pared
hasta una distancia específica mientras la unidad va siguiendo su propia posición,
midiendo la distancia a la pared dos veces por segundo. A medida que realiza esas
mediciones dinámicas y se va acercando a la distancia específica, el LDM
memoriza las distancias máxima y mínima desde la pared y las muestra junto con
la distancia final.
Antes de ingresar al modo de medición continua de distancia, asegúrese de
cambiar temporariamente el punto de referencia desde la parte de abajo a la parte
de arriba del gabinete presionando levemente el botón (ver la página 33).
Luego sostenga el LDM horizontalmente con su parte de arriba contra la pared.
Finalmente, después de verificar que el láser esté encendido, presione el botón
y aléjese de la pared mientras sigue apuntando el láser contra la pared.
Al principio (hasta que el LDM alcance su mínima distancia de medición, que es de
algunas pulgadas desde la pared), la pantalla mostrará el mensaje
Luego de haber superado esta distancia mínima, el LDM comenzará a medir la
distancia hasta la pared dos veces por segundo. Estas mediciónes se mostrarán y
se actualizarán continuamente en la línea inferior de la pantalla. Al mismo tiempo,
la segunda y la tercera línea de la pantalla actualizarán continuamente la distancia
mínima y máxima entre el LDM y la pared durante la sesión de medición.
Cuando usted y el LDM lleguen a la distancia especificada, presione el botón
para silenciar los pitidos. La siguiente inactividad dispara la cuenta
regresiva de 30 segundos para apagar el láser y la cuenta regresiva de 3 minutos
para apagar el LDM. Los valores de distancia MIN, MAX y actual permanecerán en
la pantalla del LDM (Fig. 6) hasta que se apague automáticamente.
Fig. 6. Resultados del uso de medición continua para
alejarse una distancia especificada (10 m)
desde una pared
Sumando y restando distancias
El LDM tiene un botón en el panel frontal que facilita sumar o
restar una medición de distancia a otra medición existente,
convirtiendo a la primera medición en un punto de referencia.
Esta función de suma/resta es muy útil cuando se acumulan
muchas mediciones.
36
Error 261
.
Page 37

Por ejemplo, piense cómo el LDM podría acelerar las mediciones necesarias para
MEASURE
ON
MEASURE
ON
0.0º
16.325
18.415
2.090
➤
colocar una larga pared de ladrillos de muchas secciones, que no estén en línea
recta. Una vez que las estacas, los hilos y el bastidor estén en su lugar, el LDM
podría medir con exactitud la longitud de cada sección disparando desde una
estaca hasta la siguiente. También mantendría la suma total de las mediciones y
mostraría el resultado final (el perímetro de la pared) en su línea inferior.
Para sumar una medición
inferior de la pantalla, presione levemente el botón . La medición anterior se
moverá desde la línea inferior a la segunda línea y un ícono “ ” parpadeante
aparecerá a la izquierda de cinco guiones (representando el valor de la distancia a
sumar) en la tercera línea. Luego presione el botón mientras apunta el
láser al punto desde el que se realizó la primera medición. El LDM medirá la
distancia hasta ese punto, reemplazará los guiones de la tercera línea con ese valor
y mostrará la suma de las dos mediciones en la línea inferior (Fig. 7).
Fig. 7. A display showing the addition of a 16.325 ft.
measurement to a measurement of 2.090 feet
Para restar una medición a una medición existente que
aparezca en la línea inferior de la pantalla, mantenga
presionado el botón .
La medición anterior se moverá desde la línea inferior a la
segunda línea y un ícono parpadeante aparecerá a la izquierda de cinco
guiones (representando el valor de la distancia a restar) en la tercera línea. Luego
presione el botón mientras apunta el láser al punto desde el que se realizó
la primera medición. El LDM medirá la distancia hasta ese punto, reemplazará los
guiones de la tercera línea con ese valor y mostrará la diferencia de las dos
mediciones en la línea inferior.
Mediciones indirectas de altura o longitud usando triangulación
El LDM puede usar triangulación (un tipo de medición indirecta basado en el
teorema de Pitágoras) para calcular la altura o la longitud de un objeto desde lejos.
El instrumento puede realizar tres tipos de cálculos pitagóricos:
•
Triangulación con dos entradas
hacer únicamente para distancias que se le presentan con un ángulo recto. Un
buen ejemplo es medir la altura de un edificio desde el otro lado de la calle desde
el nivel del piso (Fig. 8).
a una medición existente que aparezca en la línea
. Este tipo de medición de distancia se puede
37
Page 38

Como el LDM y la parte inferior del edificio están ambos al nivel del piso, el lado del
edificio (cuya altura “A” es desconocida) forma uno de los lados del ángulo recto,
del cual el otro lado sería la distancia a lo largo de la calle (“B” en la figura). En
otras palabras, usted puede usar triangulación para determinar la altura “A” usando
solamente dos entradas, ya que “A” es perpendicular a “B” (una de las distancias
que puede medir). El LDM puede medir “B” y la distancia hasta la parte superior del
edificio (“C” en la figura), que es la hipotenusa del triángulo recto. Una vez que el
LDM haya determinado los valores de “B” y “C”, calculará el valor de “A” de
2
acuerdo con la famosa ecuación de Pitágoras: A
+ B2= C2.
C
A
Fig. 8. Triangulando una altura usando dos
entradas
B
•
Triangulación con tres entradas
. Este tipo de medición de distancia se puede
hacer para distancias que no le presentan con un ángulo recto. Un buen ejemplo
es medir la altura de un edificio desde otro edificio al otro lado de la calle desde
la ventana abierta del cuarto piso (Fig. 9). Como el LDM y la parte inferior no
están ambos al nivel el piso, deberá medir un lado en común “B1/B2” (que es
perpendicular a la pared del edificio) y la hipotenusa de los dos triángulos
rectángulos “C1” y “C2”. Una vez que se conocen esos dos valores, el LDM
puede resolver dos ecuaciones pitagóricas para calcular los valores de los otros
dos lados (“A1” y “A2”). El cálculo final, para averiguar A (la altura del edificio) es
A = A1 + A2.
Fig. 9. Triangulando una altura usando tres
entradas
C1
A1
B1/B2
•
Medición automática de altura
técnica levemente diferente (ver la Fig. 10), el LDM
puede calcular rápidamente la altura de cualquier
objeto usando solamente dos entradas.
. Usando una
C2
A2
A=A1+A2
38
Page 39

Fig. 10. Cálculo automático de una altura usando dos
MEASURE
ON
MEASURE
ON
MEASURE
ON
MEASURE
ON
0.0º
5.846
4.990
7.687
entradas
Para medir la altura de un objeto usando triangulación
con dos entradas:
1. Primero verifique que la línea visual desde el LDM hasta la
parte inferior del objeto forme un ángulo recto.
2. Use el botón para elegir la parte superior del LDM como referencia de
medición. También verifique que el láser esté activado.
3. Presione el botón tres veces. Un ícono aparecerá en la parte izquierda
de la pantalla con la hipotenusa parpadeando.
4. Apunte el láser a la parte superior del objeto y presione el botón . La
distancia medida (la hipotenusa) aparecerá en la segunda línea de la pantalla y
comenzará a parpadear el lado horizontal del triángulo en la pantalla.
5. Sin mover el LDM y manteniéndolo lo más horizontal posible, apunte el láser a la
parte inferior del objeto y presione el botón . La distancia medida
aparecerá en la tercera línea de la pantalla y la altura del objeto aparecerá en la
línea inferior (resumen). La pantalla final será similar a la de la Fig. 11 abajo.
Fig. 11. La medición indirecta con dos entradas de la
altura de un árbol de 4,990 metros de altura
Para medir automáticamente la altura de cualquier
objeto usando triangulación con dos entradas:
1.
Use el botón para elegir la parte superior del LDM
como referencia de medición. También verifique que el láser
esté activado.
2.
Presione el botón cinco veces. Un triángulo isósceles aparecerá en la parte
izquierda de la pantalla con su lado superior parpadeando.
3
.
Apunte el láser a la parte superior del objeto y presione el botón . La
distancia medida aparecerá en la segunda línea de la pantalla y comenzará a
parpadear el lado inferior del triángulo en la pantalla.
4.
Sin mover el LDM, presione nuevamente el botón . La distancia medida
aparecerá en la tercera línea de la pantalla y la altura del objeto aparecerá en la
línea inferior (resumen).
39
Page 40

Para medir la altura de un objeto usando triangulación con tres entradas:
MEASURE
ON
MEASURE
ON
MEASURE
ON
➤
19.54
19.02
14.27
17.90
Use el botón para elegir la parte superior del LDM como referencia de
1.
medición. También verifique que el láser esté activado.
2.
Presione dos veces el botón . Un ícono aparecerá en la parte izquierda
de la pantalla con la hipotenusa superior parpadeando.
3.
Apunte el láser a la parte superior del objeto y presione el botón . La
distancia medida aparecerá en la línea superior de la pantalla y comenzará a
parpadear la línea horizontal que divide en dos el triángulo en la pantalla.
4.
Sin mover el LDM y manteniéndolo lo más horizontal posible, apunte el láser
directamente al objeto y presione el botón . La distancia medida
aparecerá en la segunda línea de la pantalla, la línea horizontal dejará de
parpadear y la hipotenusa inferior comenzará a parpadear.
5.
Sin mover el LDM, apunte el láser a la parte inferior del objeto y presione el
botón . La distancia medida aparecerá en la tercera línea de la pantalla y
la altura del objeto aparecerá en la línea inferior (resumen). La pantalla final será
similar a la de la Fig. 12 abajo.
Fig. 12. La medición indirecta con tres entradas de la
altura de una pared de 14,27 pies de altura
MIDIENDO ÁREAS Y PERÍMETROS
El LDM puede calcular el área de un cuarto o espacio cuadrado o rectangular
midiendo su largo y ancho y multiplicando ambos valores. También puede calcular
el perímetro del cuarto o espacio sumando el largo y el ancho y multiplicándolo por
dos.
Para medir un área o perímetro:
1. Verifique que el LDM esté usando su parte inferior como referencia de medición
y que el láser esté activado.
2. Presione el botón una vez. Un ícono aparecerá en la parte izquierda de
la pantalla con su lado inferior parpadeando.
40
Page 41

3. Sosteniendo la parte inferior del LDM contra la pared del cuarto o espacio,
M
EASURE
ON
MEASURE
ON
MEASURE
ON
MEASURE
ON
2
5
/
8
51 10
13
/
16
1
/
2
9 06
155.65
16 03
apunte el puntero láser a la pared opuesta y mantenga presionado el botón
. La distancia medida aparecerá en la línea superior de la pantalla, la
línea inferior del paralelogramo dejará de parpadear y el lado derecho del
paralelogramo comenzará a parpadear.
4. Mueva el LDM hasta una pared adyacente del cuarto o espacio y sostenga su
parte inferior contra la pared. Apunte el láser a la pared opuesta y presione el
botón . La distancia medida aparecerá en la segunda línea de la pantalla
y el área del cuarto o espacio (en unidades “cuadradas”) aparecerá en la línea
inferior. El perímetro calculado del cuarto o espacio aparecerá en la tercera línea
de la pantalla. La pantalla final será parecida a la de la Fig. 13.
Fig. 13. Cálculo del perímetro y área de un cuarto que
mide 16 pies, 3-13/16 pulgadas por 9 pies,
6-1/2 pulgadas
MIDIENDO VOLÚMENES
El LDM puede calcular el volumen de un cuarto o espacio cuadrado o rectangular
midiendo su alto, largo y ancho y multiplicando los tres valores.
Para medir un volumen:
1. Verifique que el LDM esté usando su parte inferior como referencia de medición
y que el láser esté activado.
2. Presione dos veces el botón . Un ícono aparecerá en la parte izquierda
de la pantalla con su “ancho” delantero parpadeando.
3. Sosteniendo la parte inferior del LDM contra el piso del cuarto o espacio, apunte
el puntero láser al techo y presione el botón . La distancia medida
aparecerá en la línea superior de la pantalla, la línea del "ancho" delantero del
cubo dejará de parpadear y la línea superior derecha de la “profundidad” del
cubo comenzará a parpadear.
4. Mueva el LDM hasta una pared del cuarto o espacio y sostenga su parte inferior
contra la pared. Apunte el puntero láser a la pared opuesta y presione el botón
línea superior derecha de la “profundidad” del cubo dejará de parpadear y la
línea delantera derecha de la “altura” del cubo comenzará a parpadear. La
. La distancia medida aparecerá en la segunda línea de la pantalla, la
41
Page 42
tercera línea de la pantalla mostrará el área calculada del plano limitado por el
MEASURE
ON
▲▼▲
▼
▲
▼
3.959
5.106
58.582
2.898
3
largo y el ancho del volumen.
5. Mueva el LDM hasta una pared adyacente del cuarto o espacio y sostenga su
parte inferior contra la pared. Apunte el láser a la pared opuesta y presione el
botón . La distancia medida reemplazará al área del plano en la tercera
línea de la pantalla y el volumen del cuarto o espacio (en unidades “cubicas”)
aparecerá en la línea inferior. La pantalla final será parecida a la de la Fig. 14.
Fig. 14. Cálculo del volumen de un cuarto que mide
3,959 x 2,898 x 5,106 metros
RECUPERANDO MEDICIONES/CÁLCULOS
ALMACENADOS
El LDM almacena automáticamente las últimas 20 mediciones o cálculos y los
retiene en su memoria luego de apagarse. Estos registros no se ven afectados por
la descarga o reemplazo de la batería. Una vez que la memoria se llena, la
siguiente medición o cálculo sobrescribe el registro más viejo siguiendo la
secuencia FIFO (primero en entrar, primero en salir). El registro #1 es la medición o
cálculo más reciente, y el registro #20 es el más viejo. Los registros se recuperan
secuencialmente, usando el botón del panel frontal. Los registros no se pueden
borrar individualmente o en grupos.
Para recuperar un registro
o cálculo (más reciente) aparecerá en la línea inferior, y aparecerá “1” sobre el
ícono cerca de la parte superior de la pantalla, debajo del indicador de carga de
la batería.
Presione levemente, o mantenga presionado el botón para desplazarse hacia
arriba o hacia abajo por la memoria hasta llegar al número de registro deseado
(Fig. 15). El presionar levemente varias veces el botón recupera los registros
almacenados en orden cronológico inverso. El mantener presionado varias veces el
botón recupera los registros en orden cronológico. Consejo: El mantener
presionado el botón cuando está mostrando el registro #1 recupera el registro #20.
, presione el botón . El valor de la primera medición
42
Page 43

Fig. 15. La cuarta medición o cálculo más recientes
0.0º
6.02
4
del LDM tuvo un valor de 6,02 pulgadas
USANDO EL LDM CON LA APLICACIÓN
ToolSmart
INTELIGENTE APPLE iOS O ANDROID
Para descargar mediciones y cálculos del LDM a un teléfono
inteligente Apple iOS o Android, comience por descargar la aplicación ToolSmart
del iTunes Store o Google Play Store en su dispositivo móvil.
Una vez que haya descargado la aplicación, instálela. Luego, acople el LDM y su
teléfono activando Bluetooth en su teléfono y presionando el botón en el LDM.
Una demostración en la aplicación explica cómo almacenar mediciones y cálculos
del LDM en su teléfono y colocarlos sobre fotos de su proyecto tomadas con la
cámara de su teléfono.
™
EN UN TELÉFONO
™
43
Page 44

ESPECIFICACIONES
Rango de medición (interior) 200 mm a 30 m
Precisión de la medición ±1,5 mm
Resolución 1 mm
Opciones de unidades de medición pies con fracciones decimales (por defecto), pies
con fracciones de pulgada, pulgadas, metros
Tiempo de respuesta 2 segundos máximo
Tipo de láser, longitud de onda, potencia Clase 2, 630 a 660 nm, < 1 mW
Modos de operación Medición directa de distancia, suma/resta de
distancia, medición continua de distancia
(seguimiento), medición indirecta de distancia
(triangulación con 2 o 3 entradas, medición
automática de altura, medición de perímetro y
área, medición de volumen
Pantalla LCD de 4 líneas con iluminación, de 45 mm en
diagonal
Memoria 20 mediciones
Resistencia a salpicaduras y polvo Hasta la norma IP54
Apagado automático Luego de 3 minutos de inactividad
Apagado automático del láser Luego de 30 segundos de inactividad
Apagado automático de iluminación Luego de 10 segundos de inactividad
de pantalla
Vida de la batería 3000 mediciones, típica
Temperatura de funcionamiento 0 a 40 °C
Temperatura de almacenamiento -10 a 60 °C @ <85% H.R.
Alimentación 2 baterías “AAA”
Dimensiones 115 x 52 x 32 mm
Peso 120 g, a excepción de las baterías
44
Page 45

CONSEJOS DE OPERACIÓN Y
MEASURE
ON
MEASURE
ON
MANTENIMIENTO
Como el láser se apaga automáticamente luego de 30 segundos de inactividad
mientras que el LDM permanece encendido, le pasará a menudo que cuando
presiona el botón para hacer una medición, lo que realmente hará es
reactivar el láser. En esos casos, deberá presionar el botón por segunda
vez para realizar la medición.
Al medir distancias horizontales, mantenga al LDM lo más horizontal que pueda,
usando como referencia el medidor digital de ángulos de la línea superior de la
pantalla.
Al medir distancias largas, use un objetivo hecho de papel o cartón blanco. El usar
un monópode o apoyar el LDM sobre una superficie (en lugar de sostenerlo con la
mano) ayuda a estabilizar el láser en caso de objetivos muy lejanos.
El LDM casi siempre indicará un “Error 204” si el objetivo es una pantalla de
computadora o de TV LCD o de plasma. Este error se produce porque la pantalla
absorbe el haz incidente y no refleja nada hacia el LDM.
Se pueden corregir los siguientes errores:
Código Causa Corrección
Error 204 Error de cálculo Repita la medición
Error 252 Temperatura demasiado alta Deje que el LDM se enfríe
Error 220 Batería baja Instale baterías nuevas
Error 253 Temperatura demasiado baja Deje que el LDM se caliente
Error 255 Señal recibida demasiado Use una placa blanca como objetivo
baja/tiempo de medición
demasiado largo
Error 256 Señal recibida demasiado alta Use una placa como objetivo
(objetivo muy reflectante)
Error 500 Error de hardware/indefinido Apague y vuelva a encender el LDM
45
Page 46

Reemplace las baterías (consulte la página 32) cuando el ícono de batería de la
pantalla indica que están gastadas.
Use baterías alcalinas solamente.
Para evitar que las baterías viejas tengan fugas y dañen el LDM, remueva las
baterías cuando no piense utilizar el instrumento durante mucho tiempo (varios
meses).
Limpie el LDM con un trapo suave húmedo. Nunca use solventes ni abrasivos.
Mantenga el LDM lejos del agua, ambientes tóxicos y temperaturas extremas.
INFORMACIÓN DE LA GARANTÍA
General garantiza sus instrumentos, accesorios y herramientas digitales contra
defectos de materiales y de fabricación durante un año a partir de la fecha de
compra, a menos que se especifique lo contrario en la caja, manual y/o material
publicitario del producto. General también garantiza sus herramientas no digitales
contra defectos de materiales y de fabricación de forma limitada, de por vida.
General reemplazará o reparará la unidad defectuosa, a su criterio, luego de
verificar el defecto.
Esta garantía no cubre defectos causados por abuso, negligencia, accidente,
reparaciones no autorizadas, alteraciones o uso inadecuado del producto. Tampoco
cubre a los productos que se hayan comprado en distribuidores no autorizados.
Cada reclamo de garantía deberá estar acompañado por un comprobante de
compra.
Cualquier garantía implícita originada por la venta de un producto General,
incluyendo sin limitación las garantías implícitas de comerciabilidad e idoneidad
para un fin determinado, quedan limitadas a lo anterior. General no se hace
responsable por no poder utilizar el producto o por cualquier otro daño incidental o
indirecto, gastos o pérdida económica, o por cualquier reclamo por dichos daños,
gastos o pérdida económica.
Las leyes varían de estado en estado. Las limitaciones o exclusiones anteriores
pueden no tener validez en su caso.
Por mayor información o para realizar un reclamo de garantía, comuníquese con el
Soporte técnico de General Tools & Instruments en techsupport@generatools.com.
46
Page 47

POLÍTICA DE DEVOLUCIÓN PARA REPARACIÓN
Se han hecho todos los esfuerzos para proporcionarle un producto confiable de
excelente calidad. Sin embargo, si necesitara reparar su equipo, por favor, póngase
en contacto con nuestro Servicio de atención al cliente para obtener un número de
RGA (Autorización de devolución de mercancía) antes de enviar la unidad utilizando
un servicio de transporte prepagado a nuestro Centro de Servicios a la siguiente
dirección:
General Tools & Instruments
75 Seaview Drive Secaucus, NJ 07094 212-431-6100
DECLARACIÓN DE LA FCC
Este dispositivo cumple con la parte 15 del reglamento FCC. Funcionamiento está
sujeto a las siguientes dos condiciones: (1) Este dispositivo no debe causar
interferencias perjudiciales y (2) Este dispositivo debe aceptar cualquier
interferencia recibida, incluyendo interferencia que pueda causar un
funcionamiento no deseado.
Este equipo ha sido probado y cumple con los límites para un dispositivo digital de
clase B, conforme a la parte 15 del reglamento FCC. Estos límites están diseñados
para proporcionar protección razonable contra interferencia dañina en una
instalación residencial. Este equipo genera, utiliza y puede irradiar energía de
radiofrecuencia y, si no se instala y utiliza de acuerdo con las instrucciones, puede
causar interferencia perjudicial a comunicaciones de radio.
Sin embargo, no hay ninguna garantía de que no habrá interferencias en una
instalación en particular. Si este equipo causa interferencia dañina a la radio o la
recepción de televisión, que puede determinarse apagando y encendiendo el
equipo, se recomienda al usuario para intentar corregir la interferencia mediante
una o más de las siguientes medidas:
• Reoriente o reubique la antena receptora.
• Aumentar la separación entre el equipo y el receptor.
• Conecte el equipo a un circuito diferente al que está conectado el receptor
• Consulte a su proveedor o a un técnico experimentado en radio/TV para ayuda.
PRECAUCIÓN: Cualquier cambio o modificación no aprobados expresamente por la
parte responsable del cumplimiento podría anular la autoridad del usuario para
operar el equipo.
47
Page 48

GENERAL TOOLS & INSTRUMENTS
General Tools & Instruments
GeneralToolsNYC
75 Seaview Drive
Secaucus, NJ 07094
TELÉFONO (212) 431-6100
FAX (212) 431-6499
SIN CARGO (800) 697-8665
Correo electrónico: sales@generaltools.com
Especificaciones sujetas a modificaciones sin previo aviso.
©2016 GENERAL TOOLS & INSTRUMENTS
ADVERTENCIA - NO NOS RESPONSABILIZAMOS POR ERRORES TIPOGRÁFICOS.
www.generaltools.com
Manual del usuario TS01
MAN# TS01
14/01/16
 Loading...