

Page 1
MSV350D
USER’S MANUAL
DIGITAL 3-IN-1
STUD/VOLTAGE/METAL
DETECTOR
This digital 3-In-1 Stud/Volt/Metal Detector is
an unique instrument combining 3 tools in one
unit. It detects wood studs, metal studs, objects
carrying voltage, metal pipes and conduits
behind walls, floors and ceilings. By employing
the latest CPU technology, it will give an
accurate visual reading shown on the LCD
screen along with an audio signal. Ideal for the
Professional Technician, Handyman, Homeowner,
and Hobbyist.
MSV350D-FINAL- 033009:Layout 1 3/30/09 9:36 AM Page 1
Page 2
2
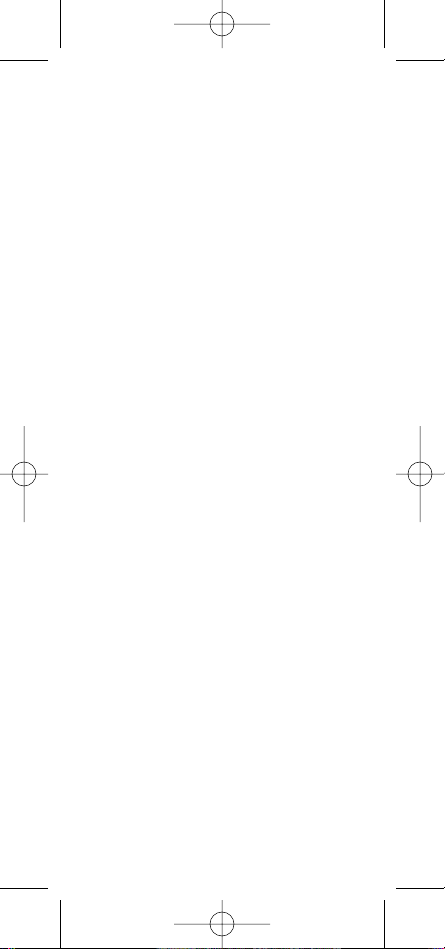
DESCRIPTION
1. Metal/Voltage Sensor Location
2. Marking Hole for Stud Edge
3. LCD Screen
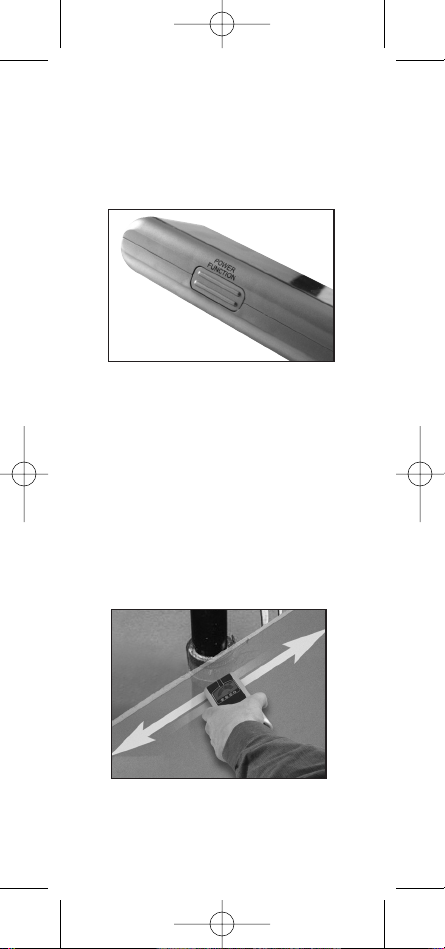
4. Power & Function Selector Switch
5. Scan Switch
6. “SCAN” Symbol (This icon will appear when
calibration is completed)
7. Scanning Indicators (Full scale reading will
display when a target is being detected)
8. Battery Level Indicator
9. Metal Symbol (This icon will appear when
metal detector is being used or when metal
object is detected when auto mode is
selected)
10. Voltage Symbol & Warning Indicator (These
icons will appear when voltage detector is
being used or when voltage is detected
during auto mode)
11. Stud Symbol (This icon will appear when
stud detector is being used or when a stud
edge is detected during the auto mode
selection)
12. Auto Mode (This icon will appear when
performing metal, voltage and stud
detections simultaneously)
13. Stud Sensor Location
14. Battery Cover
OPERATING INSTRUCTIONS
BATTERY INSTALLATION
This unit is operated by one “9V” battery which is
not included.
• Slide open the battery cover on the back of the
instrument
• Attach the battery to the battery connector and
insert it into the battery compartment.
• Slide the battery cover back into place.
MSV350D-FINAL- 033009:Layout 1 3/30/09 9:36 AM Page 2
Page 3
3
9
10 11 12
6
8
7
2
3
5
13
14
4
FRONT
BACK
2
1
MSV350D-FINAL- 033009:Layout 1 3/30/09 9:36 AM Page 3
Page 4
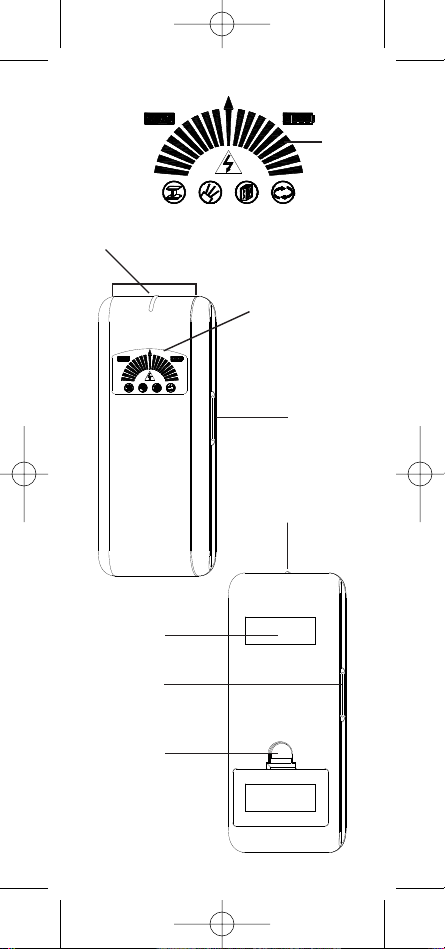
Hold down
the button
“STUD”
Figure 1
4
POWER
Power on the instrument by pressing the power
switch on the left side of the unit.
SET-UP
Hold the instrument against the wall surface in a
vertical position (see Figure 1). Press and release
selector switch until the stud icon appears on the
LCD screen.At this moment, auto calibration for
stud detection will start by displaying the
scanning bars from the bottom of the scanning
indicators. This procedure will be complete when
the scanning indicators show a full scale and
then disappear quickly. At the same time, the
scan symbol will display on the LCD screen with
a short “beep” tone. The instrument is now ready
for stud scanning. (See “Notes for Stud Seeking”)
For locating a vertical batten or wall stud:
Place the instrument against the wall in a
vertical orientation (see Figure 1). Move the
instrument horizontally across the wall. As the
instrument moves towards a stud, the scanning
bars Icon will appear progressively from the
bottom. When the full scanning bars Icon with
steady tone sound appears, a stud edge has
been detected. Mark the first spot at the marking
position at the head of the instrument. Continue
moving the instrument in the same direction until
the arrow bar disappears and the sound ceases,
mark the second spot. The stud is now located
and the middle of stud is at the center between
the two marks.
MSV350D-FINAL- 033009:Layout 1 3/30/09 9:36 AM Page 4
Page 5
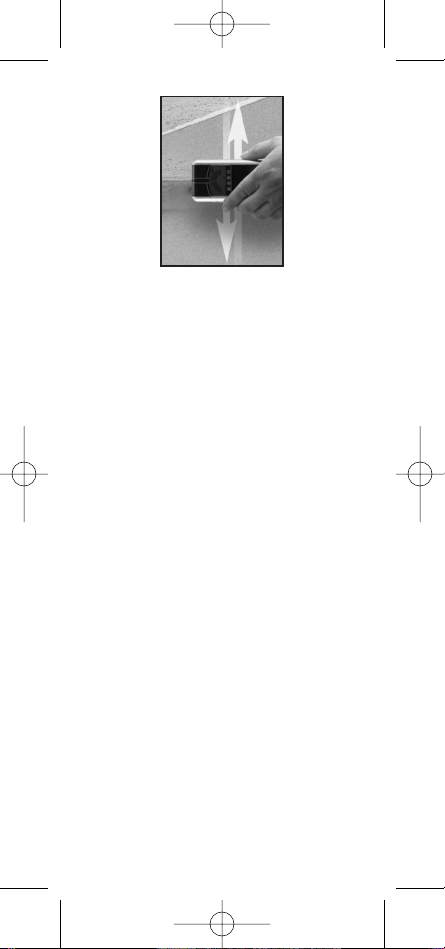
Figure 2
For locating the horizontal batten or wall stud:
Place the instrument against the wall in a
horizontal position (see Figure 2). Repeat the
same procedure for locating a vertical wall stud
but move the instrument in a vertical (top to
bottom) direction.
NOTES FOR STUD SEEKING
• In case of the instrument is placed over a
dense wall surface material, such as concrete
wall, during calibration procedure; the reading
only shows difference of wall density on the
surface. It is actually not a stud.
• If by chance the instrument is placed over the
wall batten or stud during calibration, the other
studs may be hard to detect. It is suggested
that you frequently re-calibrate on various
place on the same wall to avoid the false
readings. To do so, press Scan button once and
repeat the above procedures.
• The stud detection can be carried out normally
on wallpapered walls. However, it may not
function on some types of foil-backed or
metallic fabric surfaces.
• A double width of stud will be detected around
door or window frames as a double batten or
double stud is encountered.
• A solid wood header may exist in some doors.
The stud location will not be found if the
instrument is calibrated over the header.
However, if the unit is calibrated on a normal
wall first and then moved to the header area, it
will indicate the presence of the header.
• If the wall material is especially dense or thick,
the top arrow bar icon may not appear. Instead,
Hold down
the button
“STUD”
5
MSV350D-FINAL- 033009:Layout 1 3/30/09 9:36 AM Page 5
Page 6
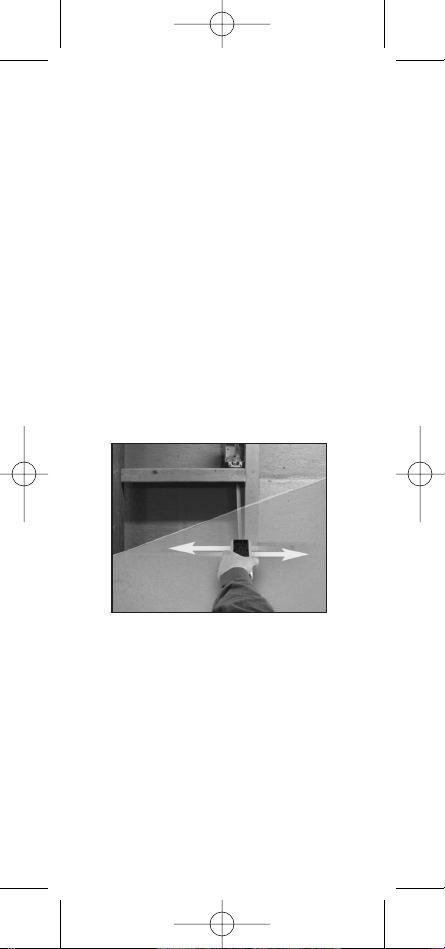
Water Pipe
Figure 3
6
the other scanning bars might appear which
will actually be the “PEAK”.
• It is recommended to perform metal/voltage
detection to make sure the detected wood stud
or batten is not a metal pipe or energized
cable. Please note that some small securing
screws or nails may be detected.
METAL DETECTION
Check that there is no metal in the immediate
vicinity. Turn on the instrument by pressing the
Power Function selector button once which is
located on the left side of main body of the unit.
The icon will appear on the LCD screen.
At this moment, auto calibration for metal
detection will start by displaying the scanning
bars from the bottom of the scanning indicator.
This procedure will complete when the scanning
Indicator shows a full scale of reading and then
quickly disappears. At the same time, the scan
symbol will display on the LCD screen with a
short “beep” tone. The instrument is ready for
metal scanning now.
Metal Scanning
Hold the instrument horizontally with the sensor
head pointing towards the wall (see Figure 3) and
sweep systematically over the required area. If a
MSV350D-FINAL- 033009:Layout 1 3/30/09 9:36 AM Page 6
Page 7
7
metal object is detected, the scanning bars Icon
will appear from bottom. When the full scanning
bars Icon with steady tone sound appears, a
metal object is close to the sensor head. To
pinpoint the exact position after the metal has
been located, press the scan button once which
is located on the left side of main body of the
unit and repeat the above procedures.
VOLTAGE DETECTION
Check that there is no source of electricity in the
immediate vicinity. Then press and release
selector switch until icons appears on the LCD
screen. At this moment, auto calibration for
voltage detection will start by displaying the
scanning bars from bottom of the scanning
indicators. This procedure will complete when
the scanning Indicators show a full scale of
reading and disappear quickly. At the same time,
the scan symbol will display on the LCD screen
with a short “beep” tone. The instrument is now
ready for voltage scanning.
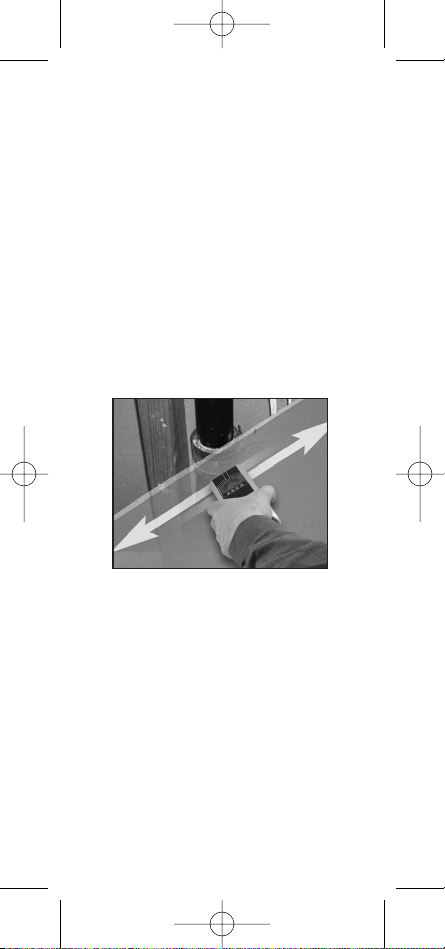
Voltage Scanning
Hold the instrument horizontally with the sensor
head pointing towards the wall (see Figure 4) and
sweep systematically over the required area. If a
source of voltage is detected, the scanning bars
Icon will appear from bottom. Once a full
scanning indicators icon with steady tone sound
appears. This represents a source of voltage is
close to the sensor head. To pinpoint the exact
position after a voltage carrying object has been
located, press the scan button once and repeat
the above procedures.
Electrical
Wire
Figure 4
MSV350D-FINAL- 033009:Layout 1 3/30/09 9:36 AM Page 7
Page 8
8
NOTES FOR VOLTAGE DETECTION
• Some walls may contain metallic fiber for
fireproofing; this will spread the area of voltage
pick-up. Placing your free hand on the wall
may cancel the effect.
• Rubbing or banging the instrument on the wall
may generate static electricity and cause a
false reading.
• Only a small amount of electricity will trigger
the detector and can cause false readings,
such as a badly insulated cable touching a
damp wall.
• When the instrument gives a “No Voltage”
reading, check the unit on a known voltage
source before touching any conductor.
• It will not detect shielded conductors (i.e. those
in metal conduct, the unit only shows presence
of METAL).
• Never take risks! If unsure, consult a qualified
electrician.
• The instrument can operate both Metal
Detecting and Stud Seeking simultaneously.
Since plumbing may exist at same location
inside the wall (see Figure 5), Metal as well
as Stud Indicators will come on together. If the
wiring that is carrying voltage is located at
the wall batten or stud inside the wall
(see Figure 5), Voltage as well as Stud
indicators will come on together.
In case of abnormal performance when
operating the unit, replace with a fresh battery.
Figure 5
Water Pipe
and Stud
MSV350D-FINAL- 033009:Layout 1 3/30/09 9:36 AM Page 8
Page 9
9
AUTO MODE
When this mode is selected, the instrument can
detect STUD, VOLTAGE & METAL simultaneously.
Press and release selector switch until icon
appears on the LCD screen. At this moment, auto
calibration will start by displaying the scanning
bars from bottom of the scanning indicators. This
procedure will complete when the scanning
indicators show a full scale of reading and
disappear quickly. At the same time, the scan
symbol will display on the LCD screen with a
short “beep” tone. The instrument is ready for
Auto Mode Scanning. For scanning procedure,
please refer to Sections 1, 2 & 3. In case of Stud,
Voltage and Metal being detected at the same
time, all four icons will show on the display.
BATTERY LEVEL INDICATOR
This shows current status of battery. Full
segments indicate battery in perfect condition.
Three segments indicate battery in good
condition and two segments indicate battery in
normal condition. When one segment or no
segment appears, replace battery immediately.
AUTO-POWER OFF
The instrument will turn off automatically when
not in use in about 3 minutes.
MSV350D-FINAL- 033009:Layout 1 3/30/09 9:36 AM Page 9
Page 10

MSV350D
MANUAL DEL USUARIO
DETECTOR DIGITAL
3 EN 1 DE VIGAS,
VOLTAJE, METALES
El detector digital 3 en 1 para Vigas/Voltaje y
Metal es un instrumento único que combina
3 herramientas en una sola. Detecta vigas de
madera o metal, objetos con voltaje y tuberías
o conductos metálicos dentro de paredes, pisos
o cielo rasos. Gracias al empleo de la última
tecnología CPU, ofrece lecturas visuales precisas
sobre la pantalla LCD en simultaneidad con
señales acústicas. Ideal para el técnico
profesional, aficionados, propietarios y operarios.
DESCRIPCIÓN
1. Ubicación del sensor de Metal/Voltaje
2. Orificio para marcar el borde de vigas
3. Pantalla LCD
4. Llave de encendido y selectora de funciones
5. Interruptor de exploración
6. Símbolo de “EXPLORACIÓN” - Aparecerá al
finalizar la calibración
7. Indicador de exploración - Una lectura a
plena escala indicará la detección del
objetivo
8. Indicador del nivel de la batería
9. Símbolo de Metal - Este icono aparecerá
cuando se emplee el aparato en modo
detección de metales o cuando se detecte
una masa metálica mientras el aparato
funciona en modo automático
10. Símbolo de Voltaje e Indicador de precaución
– Estos íconos aparecerán cuando se use el
detector de voltaje o cuando se detecte
voltaje mientras el aparato funciona en modo
automático
11. Símbolo de Viga – Este símbolo parecerá
cuando se use el detector de vigas o cuando
se detecte el borde de una viga mientras el
aparato funciona en modo automático
10
MSV350D-FINAL- 033009:Layout 1 3/30/09 9:36 AM Page 10
Page 11

11
12. Modo automático. Este icono aparecerá
cuando simultáneamente se realicen
detecciones de metal, voltaje y vigas
13. Ubicación del sensor de vigas
14. Tapa del receptáculo de la batería
9
10 11 12
6
8
7
2
3
5
13
14
4
FRENTE
ESPALDA
2
1
MSV350D-FINAL- 033009:Layout 1 3/30/09 9:36 AM Page 11
Page 12

INSTRUCCIONES DE OPERACIÓN
INSTALACIÓN DE LA BATERÍA
Esta unidad funciona con una batería de “9V” no
provista con el dispositivo.
• Deslice la tapa del receptáculo de batería, en la
parte de atrás del instrumento, para abrirlo.
• Conecte la batería al respectivo conector e
insértela dentro del receptáculo.
• Vuela a cerrar la tapa del receptáculo de la
batería.
ENCENDIDO
Encienda el instrumento presionando el
interruptor de encendido localizado en el costado
izquierdo de la unidad.
PREPARADO
Sostenga el instrumento en posición vertical y
contra la superficie de la pared (ver Figura 1).
Presione y suelte la llave selectora hasta que
aparezca el icono de ‘viga’ en la pantalla LCD.
En este momento comenzará la calibración
automática para la detección de vigas,
activándose las barras inferiores del indicador de
exploración. Este procedimiento estará completo
cuando el indicador de exploración de una
indicación de fondo de escala y se apague
rápidamente. Al mismo tiempo, se mostrará el
símbolo de exploración en la pantalla LCD y se
escuchará un breve pitido. En ese momento el
instrumento estará listo para comenzar la
exploración de vigas. (Refiérase“Comentarios
Sobre la Busqueda de Vigas”)
12
Mantenga
el botón
“STUD”
Figura 1
MSV350D-FINAL- 033009:Layout 1 3/30/09 9:36 AM Page 12
Page 13

Para localizar un listón o una viga vertical
en la pared:
Coloque el instrumento contra la pared en
posición vertical (ver Figura 1). Desplace el
instrumento horizontalmente a lo ancho de la
pared. A medida que el instrumento se acerque
a una viga, comenzará a incrementarse el
número de segmentos activos del indicador de
exploración. Se habrá detectado el borde de la
viga cuando se activen todos los segmentos del
indicador y se genere una indicación sonora.
Marque el primer punto de localización a través
del orificio que se encuentra a tal efecto en la
parte superior del instrumento. Continúe
desplazando el instrumento en la misma
dirección hasta que desaparezca la flecha de
segmentos y se extinga la indicación sonora.
Marque allí el segundo punto de localización. Se
habrá localizado la viga y su centro estará en el
punto intermedio entre las dos marcas realizadas.
Para localizar un listón o viga horizontal
en la pared:
Coloque el instrumento contra la pared en
posición horizontal (ver Figura 2). Repita el mismo
procedimiento que para encontrar una viga
vertical en la pared, pero ahora moviendo el
instrumento de arriba hacia abajo en dirección
vertical.
COMENTARIOS SOBRE LA BÚSQUEDA DE VIGAS
• En caso de que durante el procedimiento de
calibración el instrumento haya estado
apoyado sobre un sector de la pared de
material denso, tal como concreto, las lecturas
serán representativas de las diferencias de
densidad de dicha pared. Y no se estará
indicando realmente la presencia de una viga.
13
Figura 2
Mantenga
el botón
“STUD”
MSV350D-FINAL- 033009:Layout 1 3/30/09 9:36 AM Page 13
Page 14

• Si por casualidad el instrumento estaba
posicionado sobre un listón o una viga en el
momento de la calibración, podría ser difícil
detectar las otras vigas. Se sugiere que
recalibre frecuentemente el instrumento en
otras partes de la pared para evitar falsas
lecturas. Para hacerlo, presione el botón ‘Scan’
una vez y repita los procedimientos indicados
más arriba.
• La detección de vigas se puede realizar con
absoluta normalidad en paredes empapeladas.
Sin embargo, podría no funcionar sobre
algunos tipos de superficies con respaldos de
film o tejido metalizado.
• Se pueden detectar vigas del doble de ancho
alrededor de puertas y ventanas ya que allí se
suelen emplear listones o vigas dobles.
• En algunas puertas puede haber un travesaño
o dintel de madera maciza. No se detectará la
posición de las vigas si se calibró el
instrumento sobre dicho dintel. Sin embargo,
si la unidad se calibró primero en un sector
normal de la pared y luego se lo desplazó a la
zona del dintel, el mismo indicará la presencia
de dicho dintel con total normalidad.
• Si el material de la pared es particularmente
denso o grueso, podría no encenderse jamás el
segmento superior del icono. En su lugar, solo
se encenderán los segmentos restantes, lo que
pasará a constituirse en la indicación ‘pico’ de
la exploración.
• Se recomienda realizar la detección metal/
voltaje para asegurarse de que la viga o listón
detectado no es en realidad una tubería
metálica o un cable con energía eléctrica. Por
favor note que podrían detectarse algunos
clavos o tornillos de fijación.
DETECCIÓN DE METALES
Verifique que no haya metal inmediatamente al
lado del instrumento. Encienda el instrumento
presionando una vez el botón de Encendido,
ubicado sobre el costado izquierdo del cuerpo
principal de la unidad. Aparecerá el icono
respectivo en la pantalla LCD.
14
MSV350D-FINAL- 033009:Layout 1 3/30/09 9:36 AM Page 14
Page 15

En este momento comenzará la calibración
automática para la detección de metales,
activándose las barras inferiores del indicador de
exploración. Este procedimiento habrá finalizado
cuando el indicador de exploración provea una
breve indicación de fondo de escala y luego se
apague totalmente. Al mismo tiempo, se
mostrará el símbolo de exploración en la pantalla
LCD y se escuchará un breve pitido. En ese
momento el instrumento estará listo para
comenzar la exploración.
BÚSQUEDA DE METALES
Mantenga el instrumento horizontal, con su
cabeza apuntando hacia la pared (ver Figura 3)
y barra sistemáticamente sobre el área
seleccionada. Si se detecta un objeto metálico se
comenzarán a encender, comenzando por los
inferiores, los distintos segmentos del indicador
de exploración. El cabezal del instrumento estará
cerca de un objeto metálico cuando se prendan
todos los segmentos del icono y se genere una
indicación sonora permanente. Para localizar
exactamente la posición de dicho metal, presione
una vez el botón ‘Scan’, en el costado izquierdo
de la unidad, y repita el procedimiento anterior.
15
Pipa de aqua
Figura 3
MSV350D-FINAL- 033009:Layout 1 3/30/09 9:36 AM Page 15
Page 16

DETECCIÓN DE VOLTAJE
Verifique que no haya ningún dispositivo eléctrico
inmediatamente al lado del instrumento. Luego
presione y suelte la llave selectora hasta que
aparezca el icono en la pantalla LCD. En este
momento comenzará la calibración automática
para la detección de voltaje, activándose las
barras inferiores del indicador de exploración.
Este procedimiento habrá finalizado cuando el
indicador de exploración provea una breve
indicación a fondo de escala y luego se apague
totalmente. Al mismo tiempo, se mostrará el
símbolo de exploración en la pantalla LCD y se
escuchará un breve pitido. En ese momento el
instrumento estará listo para comenzar la
exploración de voltaje.
Exploración de voltajes
Mantenga el instrumento horizontal, con su
cabeza apuntando hacia la pared (ver Figura 4)
y barra sistemáticamente sobre el área
seleccionada. Si se detecta una fuente de voltaje
se comenzarán a encender, comenzando desde
abajo, los segmentos del indicador de
exploración. Luego el indicador de exploración
dará una lectura a fondo de escala y se
escuchará una señal sonora continua. Esto
quiere decir que un objeto con voltaje está cerca
del cabezal del instrumento. Para localizar la
posición exacta del objeto con voltaje aplicado,
presione una vez el botón de ‘Scan’ y repita los
procedimientos de más arriba.
COMENTARIOS SOBRE LA DETECCIÓN
DE VOLTAJE
• Algunas paredes, para hacerlas a prueba de
incendios, pueden contener fibras metálicas.
16
Alambre
Eléctrico
Figura 4
MSV350D-FINAL- 033009:Layout 1 3/30/09 9:36 AM Page 16
Page 17

Esto agrandará las áreas donde se indique
voltaje. El colocar su mano libre sobre la pared
puede ayudar a cancelar dicho efecto.
• Frotar o golpear el cabezal del instrumento
contra la pared puede generar electricidad
estática y provocar una falsa lectura.
• Apenas una pequeña cantidad de electricidad
disparará el detector, pudiendo provocar falsas
lecturas, como en el caso de que exista un
cable con problemas de aislamiento tocando
la pared húmeda.
• Cuando el instrumento dé una lectura de ‘No
voltaje’, antes de tocar ningún conductor
pruebe la unidad sobre una fuente de voltaje
conocida.
• No se detectarán conductores blindados (p. ej.
Aquellos dentro de un conducto metálico, en
cuyo caso la unidad solo reportará la presencia
de METAL).
• ¡Nunca tome riesgos! Si está inseguro,
consulte con un electricista calificado.
• El instrumento puede operar simultáneamente
detectando metales y buscando vigas. Desde
el momento en que puede haber cañerías
dentro de la pared (ver la Figura 5), pueden
encenderse simultáneamente los indicadores
de Viga y de Metal. Si el cableado que tiene
voltaje aplicado está junto a un listón o viga
dentro de la pared (ver la Figura 5), pueden
encenderse simultáneamente los indicadores
de Viga y de Voltaje.
En caso de que note un desempeño anormal del
instrumento durante su operación, colóquele una
batería nueva.
17
Figura 5
Pipa de
aqua
y Viga
MSV350D-FINAL- 033009:Layout 1 3/30/09 9:36 AM Page 17
Page 18

MODO AUTOMÁTICO
Cuando se seleccione el modo automático, el
instrumento simultáneamente podrá detectar
VIGAS, VOLTAJES y METALES. Presione y suelte la
llave selectora hasta que aparezca el icono en la
pantalla LCD. En este momento comenzará la
calibración automática, activándose las barras
inferiores del indicador de exploración. Este
procedimiento habrá finalizado cuando el
indicador de exploración provea una breve
lectura a fondo de escala y luego se apague
totalmente. Al mismo tiempo, se mostrará el
símbolo de exploración en la pantalla LCD y se
escuchará un breve pitido. En ese momento el
instrumento estará listo para comenzar la
exploración en modo automático. Respecto al
procedimiento de exploración, por favor refiérase
a las Secciones 1, 2 & 3. En caso de detectarse
al mismo tiempo una viga, voltaje y metal, se
activarán los cuatro iconos de la pantalla.
INDICADOR DE NIVEL DE BATERÍA
Indica el estado actual de la batería. Todos las
barritas encendidas indican que la batería está
en perfecto estado. Tres líneas indican que la
batería está en buen estado y dos líneas que la
misma está ‘normal’. Cuando no aparezca ningún
segmento o solo uno de ellos, reemplace
inmediatamente la batería.
AUTO APAGADO
El instrumento se apagará automáticamente
después de 3 minutos de inactividad.
18
MSV350D-FINAL- 033009:Layout 1 3/30/09 9:36 AM Page 18
Page 19

MSV350D
Manuel de utilisateur
DÉTECTEUR
NUMÉRIQUE DE
MONTANT/TEN-
SION/METAUX 3 en 1
Le détecteur numérique de montant/tension/
métaux 3 en 1 est un instrument unique qui
combine 3 outils dans un même appareil. Il
détecte des montants en bois, en métal, les
objets portant de la tension, et même les tuyaux
en métal et les conduits derrière les murs, les
planchers et les plafonds. En utilisant la dernière
technologie de CPU, il donnera une lecture
visuelle précise affichée sur l’écran à cristaux
liquides avec un avertisseur sonore. Idéal pour
les Techniciens, les Bricoleurs, les Propriétaires
et les Amateurs professionnels.
DESCRIPTION
1. Détecteur de tension/métal
2. Trou de marquage pour le bord des montants
3. Écran à cristaux liquides
4.
Interrupteur sélecteur d’Alimentation et Fonction
5. Interrupteur de balayage
6. Symbole « SCAN » (balayage) (Ce symbole
s’affichera lorsque le calibrage est complet)
7. Indicateurs de balayage (L'échelle de lecture
complète s'affichera lorsqu’une cible est
détectée)
8. Indicateur de l’état des piles
9. Symbole de métal (Ce symbole s’affichera
lorsque le détecteur de métaux est en
fonctionnement ou lorsqu’un objet métallique
est détecté quand le mode automatique est
sélectionné)
11. Symbole de tension et Indicateur
d’avertissement (Ces symboles s’afficheront
lorsque le détecteur de tension est en
fonctionnement ou lorsque la tension est
détectée avec le mode automatique)
12. Symbole de montant (Ce symbole s’affichera
lorsque le détecteur de montant est en
19
MSV350D-FINAL- 033009:Layout 1 3/30/09 9:36 AM Page 19
Page 20

fonctionnement ou lorsque le bord des
montants est détecté avec la sélection de
mode automatique)
13. Mode automatique (Ce symbole s’affichera
lorsque vous faites de détections de
montant/tension/métaux tout en même temps)
14. Détecteur de montant
15. Couvercle de pile
20
9
10 11 12
6
8
7
2
3
5
13
14
4
DEVANT
DOS
2
1
MSV350D-FINAL- 033009:Layout 1 3/30/09 9:36 AM Page 20
Page 21

CONSIGNES D’UTILISATION
MISE EN PLACE DES PILES
Cet appareil fonctionne avec une pile de 9 volts
qui n’est pas incluse.
• Ouvrez en glissant le couvercle de la pile à
l’arrière de l’instrument
• Attachez la pile au connecteur et insérez-la
dans le compartiment de la pile.
• Mettez la couverture de la pile en place.
PUISSANCE
Mettez l’instrument en marche en appuyant sur
l’interrupteur d’alimentation sur le côté gauche
de l’appareil.
PRÉPARATION
Tenez l’instrument contre la surface murale en
position verticale (voir Figure 1). Appuyez et
relâchez l’interrupteur sélecteur jusqu’à ce que
le symbole de montant s’affiche sur l’écran à
cristaux liquides. À ce moment-ci, le calibrage
automatique de détection de montant
commencera par afficher les barres de balayage
dans le coin inférieur des indicateurs de
balayage. Cette procédure sera complétée
lorsque les indicateurs de balayage afficheront
une échelle complète puis disparaîtront
rapidement. En même temps, le symbole de
balayage s’affichera sur l'écran à cristaux
liquides avec court bip. L’instrument est
maintenant prêt pour commencer le balayage
de montant. (Référez-vous “Remarques Pour
Rechercher un Montant”)
21
Maintenez
le bouton
“STUD”
Figure 1
MSV350D-FINAL- 033009:Layout 1 3/30/09 9:36 AM Page 21
Page 22

Pour localiser une plinthe verticale ou un
poteau de cloison :
Placez l’instrument contre la surface murale en
position verticale (voir Figure 1). Déplacez
l’instrument de manière horizontale sur le mur.
Lorsque l’instrument se déplace vers le montant,
le symbole des barres de balayage s'affichera
progressivement dans le coin inférieur. Lorsque
l’ensemble des barres de balayage s’affiche avec
un ton régulier, un bord des montants a été
détecté. Marquez le premier endroit sur les
endroits déterminés dans le coin supérieur de
l’instrument. Continuez à déplacer l’instrument
dans la même direction jusqu’à ce que la barre
en flèche s’affiche et le son s’arrête, marquez
donc le deuxième endroit. Le montant est
maintenant localisé et le milieu du montant est
au centre entre les deux marques.
Pour localiser une plinthe horizontale ou un
poteau de cloison :
Placez l’instrument contre la surface murale en
position horizontale (voir Figure 2). Suivez la
même procédure pour localiser un poteau de
cloison vertical, mais déplacez l’instrument en
position verticale (du haut vers le bas).
REMARQUES POUR RECHERCHER UN MONTANT
• Dans le cas où l’instrument est placé sur un
matériel dense de la surface murale, comme
un mur de béton, au cours d'une procédure de
calibrage, la lecture ne montrera que la
différence de densité du mur dans la surface.
Ce n’est pas exactement un montant.
• Si par hasard l’instrument est placé sur une
plinthe de mur ou un poteau de cloison lors du
calibrage, il peut être difficile de trouver les
22
Figure 2
Maintenez
le bouton
“STUD”
MSV350D-FINAL- 033009:Layout 1 3/30/09 9:36 AM Page 22
Page 23

autres montants. Il est suggéré que vous
recalibriez souvent dans les différents endroits
sur le même mur pour éviter les fausses
lectures. Pour le faire, appuyez sur le bouton
Scan (balayer) une fois et suivez les
instructions ci-dessus.
• La détection de montant peut se faire
normalement sur les murs avec du papier
peint. Cependant, il ne fonctionnera pas sur
certains types de surfaces métalliques ou
recouvertes de feuilles d'aluminium à l'endos.
• Une largeur double de montant sera détectée
autour de la porte ou des cadres de la fenêtre
lorsque vous rencontrez une double plinthe ou
un double montant.
• Un en-tête en bois solide peut exister sur
certaines portes. L’emplacement du montant ne
sera pas trouvé si l'instrument est réglé sur l’entête. Toutefois, si l’appareil est réglé sur un mur
normal d’abord et ensuite déplacé vers la zone
d’en-tête, il indiquera la présence de l’en-tête.
• Si le matériel du mur est particulièrement
dense ou épais, la barre de la flèche vers le
haut pourrait ne pas apparaître. À sa place, les
autres barres de balayage pourraient
apparaître, qui seront effectivement le sommet.
• Il est suggéré de faire une détection de
tension/métal pour vous assurer que le
montant ou la plinthe en bois détecté ne soit
pas un tuyau de métal ou un câble sous
tension. Veuillez remarquer que certains petits
clous ou vis peuvent être détectés.
DÉTECTION DE MÉTAUX
Vérifiez qu’il n’y a pas du métal dans les
environs immédiats. Allumez l'instrument en
appuyant sur le bouton sélecteur Power (fonction
d'alimentation) une seule fois. Ce bouton se
trouve sur le côté gauche du corps principal de
23
MSV350D-FINAL- 033009:Layout 1 3/30/09 9:36 AM Page 23
Page 24

l’appareil. Le symbole s’affichera sur l’écran à
cristaux liquides.
À ce moment-ci, le calibrage automatique de
détection de métaux commencera par afficher
les barres de balayage dans le coin inférieur de
l’indicateur de balayage. Cette procédure sera
complétée lorsque l’indicateur de balayage
affichera une échelle complète de la lecture puis
disparaîtra rapidement. En même temps, le
symbole de balayage s’affichera sur l'écran à
cristaux liquides avec court bip. L’instrument est
maintenant prêt pour commencer le balayage de
métaux.
Balayage de métaux
Maintenez l'instrument horizontalement avec la
tête du détecteur vers le mur (voir Figure 3) et
balayez systématiquement sur l’endroit requis.
Si un objet de métal est détecté, le symbole des
barres de balayage s’affichera au bas. Lorsque
l’ensemble des barres de balayage s’affiche avec
le ton régulier, un objet de métal est proche de la
tête du détecteur. Pour indiquer la position
exacte après avoir localisé le métal, appuyez sur
le bouton de balayage une seule fois. Ce bouton
se trouve sur le côté gauche du corps principal
de l’appareil. Ensuite, suivez les indications cidessus.
DÉTECTION DE TENSION
Vérifiez qu’il n’y a aucune source d’électricité
dans les environs immédiats. Ensuite, appuyez et
relâchez l’interrupteur sélecteur jusqu’à ce que
le symbole s’affiche sur l’écran à cristaux
liquides. À ce moment-ci, le calibrage
automatique de détection de tension
commencera par afficher les barres de balayage
24
Conduite
d’eau
Figure 3
MSV350D-FINAL- 033009:Layout 1 3/30/09 9:36 AM Page 24
Page 25

dans le coin inférieur des indicateurs de
balayage. Cette procédure sera complétée
lorsque les indicateurs de balayage afficheront
une échelle complète de la lecture puis
disparaîtront rapidement. En même temps, le
symbole de balayage s’affichera sur l'écran à
cristaux liquides avec court bip. L’instrument est
maintenant prêt pour commencer le balayage
de tension.
Balayage de tension
Maintenez l'instrument horizontalement avec
la tête du senseur vers le mur (voir Figure 4) et
balayez systématiquement sur l’endroit requis.
Si une source d’électricité est détectée, le
symbole des barres de balayage s’affichera au
bas. Le symbole de l’indicateur de balayage
complet avec un son régulier s’afficha une seule
fois. Ceci signifie qu'une source de tension est à
proximité de la tête du détecteur. Pour indiquer
la position exacte après avoir localisé un objet
ayant de la tension, appuyez sur le bouton de
balayage une seule fois et suivez les instructions
ci-dessus.
REMARQUES POUR LA DÉTECTION DE TENSION
• Certains murs peuvent contenir des fibres
métalliques résistantes au feu ; ce qui répartira
la zone de détection de tension. En plaçant
votre main libre sur le mur, vous pouvez éviter
cet effet.
• Frotter ou cogner l’instrument sur le mur peut
générer de l’électricité statique et provoquer
une fausse lecture.
• Seulement une petite quantité d’électricité
déclenchera le détecteur et peut provoquer des
25
Fil Éléctrique
Figure 4
MSV350D-FINAL- 033009:Layout 1 3/30/09 9:36 AM Page 25
Page 26

erreurs de lecture, comme un câble mal isolé
touchant un mur humide.
• Lorsque l’instrument donne une lecture
« No Voltage » (sans tension), vérifiez l’appareil
sur une source de tension connue avant de
toucher un autre conducteur.
• Il ne détectera pas les conducteurs blindés (par
exemple, ceux qui sont en conduite de métal,
l’appareil montre seulement la présence du
METAL).
• Ne prenez jamais des risques ! En cas de
doute, consultez un électricien qualifié.
• L’instrument peut fonctionner simultanément
en fonction Détection de Métaux et Recherche
de montants. Puisqu’il peut exister une
tuyauterie dans le même endroit dans le mur
(voir Figure 5), les indicateurs de métaux et de
montants s’afficheront ensemble. Si le câblage
qui est en tension est situé dans la plinthe de
mur ou un poteau de cloison dans le mur (voir
Figure 5), les indicateurs de tension et de
montants s’afficheront ensemble.
En cas de résultats anormaux pendant le
fonctionnement de l’appareil, remplacez avec
une nouvelle pile.
MODE AUTOMATIQUE
Lorsque ce mode est sélectionné, l’instrument
peut détecter du MONTANT (STUD),TENSION
(VOLTAGE) et MÉTAL simultanément. Appuyez et
relâchez l’interrupteur sélecteur jusqu’à ce que
les symboles s’affichent sur l’écran à cristaux
liquides. À ce moment-ci, le calibrage
automatique commencera par afficher les barres
de balayage dans le coin inférieur des
indicateurs de balayage. Cette procédure sera
26
Figure 5
Conduite
d’eau et
Montant
MSV350D-FINAL- 033009:Layout 1 3/30/09 9:36 AM Page 26
Page 27

complétée lorsque les indicateurs de balayage
afficheront une échelle complète de la lecture
puis disparaîtront rapidement. En même temps,
le symbole de balayage s’affichera sur l'écran à
cristaux liquides avec court bip. L’instrument est
prêt pour commencer le balayage en mode
automatique. Pour une procédure de balayage,
veuillez vous référer aux Sections 1, 2 et 3. En
cas de détection de montant, tension ou métal en
même temps, les quatre symboles s'afficheront
sur l'écran.
INDICATEUR DE L’ÉTAT DES PILES
Ceci montre l’état actuel de la pile. L’ensemble
des barres indique que la pile est en parfait état.
Trios barres indiquent que la pile est bon état et
deux barres indiquent que la pile est en condition
normale. Lorsqu’une seule barre ou aucune ne
s’affiche, remplacez la pile immédiatement.
ARRÊT AUTOMATIQUE
L’instrument s’arrêtera automatiquement lorsqu’il
n’est pas en fonctionnement environ 3 minutes.
27
MSV350D-FINAL- 033009:Layout 1 3/30/09 9:36 AM Page 27
Page 28

28
GENERAL TOOLS & INSTRUMENTS
™
80 White Street,
New York,NY10013-3567
PHONE (212) 431-6100
FAX (212) 431-6499
TOLL FREE (800) 697-8665
e-mail: sales@generaltools.com
www.generaltools.com
MSV350D User’s Manual
Specifications subject to change without notice
©2009 GENERAL TOOLS & INSTRUMENTS
™
NOTICE - WE ARE NOT RESPONSIBLE FOR TYPOGRAPHICAL ERRORS.
MAN#MSV350D 4/09
MSV350D-FINAL- 033009:Layout 1 3/30/09 9:36 AM Page 28
 Loading...