

Page 1

MMD7003
USER’S MANUAL
DIGITAL and LED
PRECISION
MOISTURE METER
Page 2

INTRODUCTION:
Congratulations on your purchase of this Digital and LED Precision
Moisture Meter. This unit detects moisture in wood and other building
materials such as brick, wall board, sheet rock, cardboard, paper,
plaster, concrete, and mortar.
FEATURES:
• Designed to check the moisture level of wood, concrete, and
other non-wood material
• Measures from 6% to 40% moisture in wood
• Measures 0% to 100% relative moisture value for concrete and
other non-wood material
• Measurements are shown on Red LED bargraph indicator and
LCD digital display
• All-In-One meter with build-in test pins
• Optional separate probe, available for remote moisture
measurement
• Microprocessor provides high accuracy and advanced features
such as MIN/MAX
• Data Hold feature freezes displayed reading
• Heavy duty and compact housing enhance portability and
durability
• Built-in low battery indicator
SPECIFICATIONS:
PRINCIPAL: Use the 2 pin electrodes to measure the conductive ability
of the species, then it converts to the reading of %
“Moisture of Content”
CIRCUIT: Custom one-chip of microprocessor LSI circuit
DISPLAY: LCD size: 51 mm x 37 mm
Digit size: 16 mm (0.62")
MATERIAL/RANGE:
Material 1: 0 to 100% relative moisture value for concrete and other
non-wood material.
Material 2: 6 % to 40 % moisture range on wood.
RESOLUTION: 0.1 %
ACCURACY: ± (5 % rdg + 5 digits)
@23±5°C
@Material 1: 13% to 100%
@Material 2: 6% to 40%
PROBE: 2 pins moisture electrode
ELECTRODE PIN LENGTH: 0.44" (11mm)
ELECTRODE PIN TYPE: Integrated, replaceable
OPERATING TEMPERATURE: 32º to 122ºF (0°to 50ºC)
Page 3
OPERATING HUMIDITY: 80% Relative Humidity maximum
MEMORY RECALL: Maximum & Minimum readings can be saved and
viewed
SAMPLING TIME: Approx. 0.8 seconds
POWER SOURCE: “9V” battery
POWER CONSUMPTION: 16mA DC (approx.)
ACCESSORIES INCLUDED: Instruction Manual and 10 pcs. extra of
contact pins
OPTIONAL ACCESSORIES: Separate Probe, (Part #MP7003)
DIMENSIONS: 8.4" x 2.7" 1.2" (216.5 x 68.5 x 29.7mm)
WEIGHT: 8.8 oz. (251g)
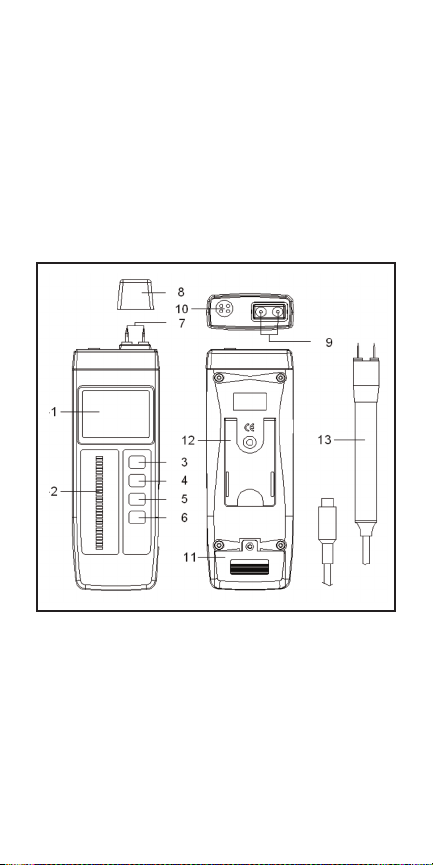
FRONT PANEL DESCRIPTION
1. Display
2. Red LED bar graph indicator
3. Power button
4. Hold button
5. REC (MAX/MIN) button
6. Material button
7. Test pins
8. Protection cover
9. Lock nut for test pin
10. Input socket for external
probe
11. Battery compartment/Cover
12. Stand
13. Optional separate probe
Page 4

OPERATION
CAUTION: The electrode measurement pins are extremely sharp. Use
care when handling this instrument. Cover the pins with the
protective cap when the instrument is not in use.
MEASURING PROCEDURE:
The electrode pins must be inserted before the meter can be used.
To insert or replace the pins refer to the instructions below:
• Remove the protective cap at the top of the unit
• To remove the pins, loosen the locknut at the base of the
electrode pins
• Install the new pins and tighten the locknuts
• Replace the protective cap
OPERATION:
• Remove the protective cap away from the test pins
• Press the POWER button to turn the unit on
• Press the “Material” button to select the desired testing material
Material 1: 0 to 100% relative moisture value for concrete and other
non-wood material. A ‘1’ will display on the bottom right.
Material 2: 6% to 40% moisture range for wood. A ‘2’ will display on
the bottom right.
It is recommended that the test pins are to be inserted to a minimum
depth of 1/8" (.125") into the material under test. If a depth of 1/8"
(.125") can not be obtained, then insert the test pins to their
maximum achievable depth.
Display will show the moisture contents in “% moisture content”
directly.
Consideration: If the sample test has high moisture content, it may
take a few minutes to obtain a stable reading.
Replace the protective cap when finished.
Page 5

1/8"
.125"
OTHER FUNCTIONS:
DATA HOLD:
During measurement, push the “HOLD” button. It will hold the display
values and the LCD will show the “D.H” symbol.
To cancel the Data Hold function, press the “HOLD” button again.
DATA RECORD:
This function records the minimum and maximum readings. Press the
“REC” button once to start the Data Record function. The “REC” will be
displayed.
With the “REC” symbol on the display:
Press the “REC” button once and the “REC MAX.” symbol along with
the maximum value will appear in the display. To delete the maximum
value, press the “HOLD” button once. The display will show “REC” and
execute the memory function continuously.
Press the “REC” button again, the “REC MIN” symbol along with the
minimum value will appear on the display. To delete the minimum
value, just press the “HOLD” button once, then the display will show
the “REC” symbol only and execute the memory function continuously.
To exit the memory record function, press the “REC” button for at least
2 seconds. The display will revert to the current reading.
OPTIONAL SEPARATE PROBE:
If intending to use the separate probe to take the moisture
measurement, just prepare the separate probe and connect the probe
plug into the “Input Socket”.
Optional Extendable Probe (MP7003).
Page 6

Lock Nut
MAINTENANCE:
Replacing battery: A low battery is indicated by “LBT” symbol in the
left corner of the display. To replace the battery, remove the battery
cover with a small screwdriver or coin and replace with a new “9V”
battery. Put the battery cover back in place and secure with a
screwdriver or coin.
Replacement of test pins: To replace test pins on the probe, first
loosen the lock nut at the base of the pin, slide pin out and replace
with new pin.
Page 7

NOTES
______________________________________________________
______________________________________________________
______________________________________________________
______________________________________________________
______________________________________________________
______________________________________________________
______________________________________________________
______________________________________________________
______________________________________________________
______________________________________________________
______________________________________________________
______________________________________________________
______________________________________________________
______________________________________________________
______________________________________________________
______________________________________________________
______________________________________________________
______________________________________________________
______________________________________________________
Page 8

GENERAL TOOLS & INSTRUMENTS
80 White Street
New York,NY10013
-
3567
PHONE (212) 431-6100
FAX (212) 431-6499
TOLL FREE (800) 697-8665
e-mail: sales@generaltools.com
www.generaltools.com
MMD7003 User’s Manual
Specifications subject to change without notice
©2008 GENERAL TOOLS & INSTRUMENTS
NOTICE - WE ARE NOT RESPONSIBLE
FOR TYPOGRAPHICAL ERRORS.
MAN#MMD7003 7/08
™
™
 Loading...