

Page 1
Please read this manual carefully and thoroughly before using this product.
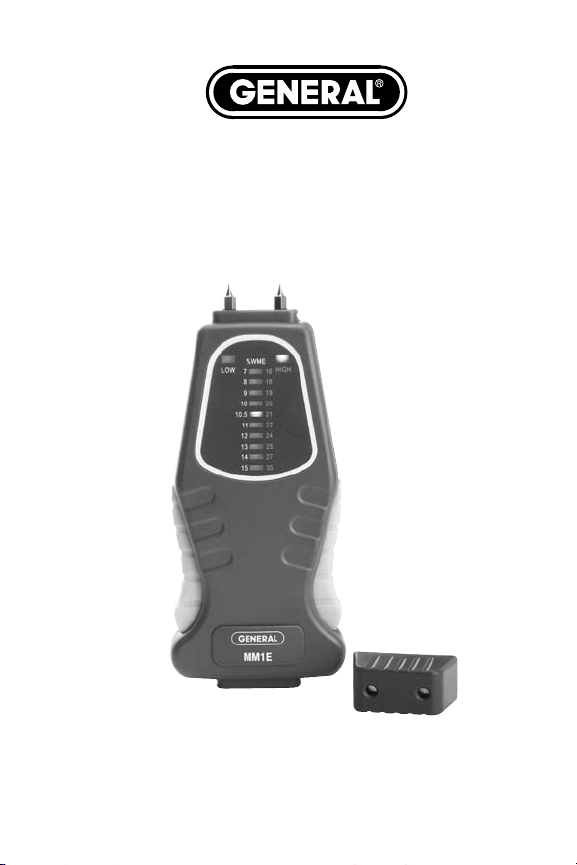
PIN-TYPE LED BAR GRAPH
MOISTURE METER
USER’S MANUAL
MM1E
Page 2

2
TABLE OF CONTENTS
Introduction . . . . . . . . . . . . . . . . . . . . . . . . . . 3 – 4
Key Features . . . . . . . . . . . . . . . . . . . . . . . . . . . . . 4
What’s in the Blister Pack . . . . . . . . . . . . . . . . . . 4
Product Overview . . . . . . . . . . . . . . . . . . . . . . . . . 5
Setup Instructions . . . . . . . . . . . . . . . . . . . . . . . . 6
Install Battery . . . . . . . . . . . . . . . . . . . . . . . . . 6
Operating Instructions . . . . . . . . . . . . . . . . . . 6 – 8
Specifications. . . . . . . . . . . . . . . . . . . . . . . . . . . . 8
Replacement Parts . . . . . . . . . . . . . . . . . . . . . . . . 9
Warranty Information . . . . . . . . . . . . . . . . . . . . . . 9
Return for Repair Policy . . . . . . . . . . . . . . . . . . . 10
User’s Manual (Spanish) . . . . . . . . . . . . . . 11 – 21
User’s Manual (French) . . . . . . . . . . . . . . . 22 – 31
Page 3

3
INTRODUCTION
Thank you for purchasing General Tools & Instruments’ MM1E
Pin-Type LED Bar Graph Moisture Meter. Please read this
user’s manual carefully and thoroughly before using the
meter.
The MM1E is designed for applications in woodworking,
building construction and home inspection. Examples include:
• Checking for moisture on or below the surface of
carpets and sub-flooring
• Measuring the surface moisture content of wood,
drywall and concrete before painting/wallpapering,
sealing or treating
• Locating water leaks in roofs, floors and walls
• Selecting dry lumber
The meter bases its measurements on the relationship
between the moisture content of a material and its electrical
conductivity. The wetter a material, the higher its conductivity.
The two replaceable steel pins at the top of the MM1E serve
as the electrodes of a conductance meter optimized for
measuring moisture content. The meter displays
measurements in the unit %WME (Wood Moisture Equivalent).
For hard materials like wood or concrete, the meter’s
readings largely reflect surface moisture content because:
1) Moisture close to a surface has a greater effect on a
reading than moisture deep below it; and 2) The pins of the
MM1E are only 3/8 in. (10mm) long and cannot be driven
deep into a hard material. For softer materials like soil, paper
or powders, readings are more likely to reflect the average
moisture level of the material between its surface and the
penetration depth of the pins (normally far less than 3/8 in.).
Page 4

The MMD5NP’s front-panel bar graph of 10 LEDs measures
%WME (Wood Moisture Equivalent) over two different ranges:
7 to 15%, and 16 to 35%. A slide switch on the back of the
meter requires the user to choose the right range for the
material under test. The same switch functions as the power
switch. Whenever the meter is powered on, the bar graph
momentarily indicates remaining battery life. After powering
on, the meter’s calibration can be checked by inserting the
test pins into holes in the pin protection cover.
The MM1E is powered by a “9V” battery included in the
blister pack.
KEY FEATURES
• 10-LED display
• 7 to 35% measurement range, with separate High
and Low scales
• Protective cap doubles as calibration checker
• Full Battery and Low Battery indications
WHAT’S IN THE BLISTER PACK
The MM1E comes in a plastic blister pack along with a “9V”
battery, a protective cover for the test pins and this user’s
manual.
4
Page 5
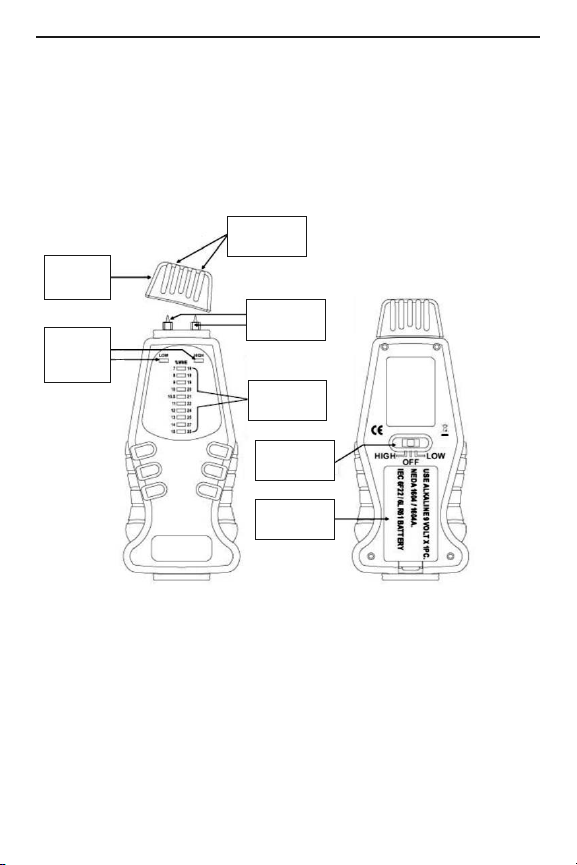
PRODUCT OVERVIEW
The figure below shows all of the controls and indicators on
the front and the back of the MM1E, as well as the location of
the battery compartment on the back.
5
Protective
Cover
HIGH and
LOW scale
lights
Battery
compartment
Power/Scale
switch
10-LED
bar graph
Test pins
(replaceable)
Calibration
check holes
FRONT
BACK
Page 6

SETUP INSTRUCTIONS
INSTALL BATTERY
To open the battery compartment, turn the meter over and
push the flange on the bottom of the battery compartment
cover up with your thumb. Lift and remove the cover and set
it aside. Plug the included “9V” battery into the wired socket
inside the compartment. The terminals of the battery and the
socket mate in only one way, with the smaller male terminal
plugging into the larger female terminal. Close the battery
compartment by replacing its cover and snapping it shut.
OPERATING INSTRUCTIONS
To power on the MM1E, slide the Power/Scale switch on the
back of the meter to the HIGH position.
Moving the switch should cause some or all of the LEDs on
the front panel to illuminate in sequence from bottom to top.
If no LEDs light, you can assume that the battery is dead and
must be replaced.
The number of LEDs that light corresponds to remaining
battery life. If all eight LEDs light, that means the battery is
fully charged. If only a few light, the battery is weak and
should be replaced soon.
A few seconds after the LEDs light, they will go dark. If most
of the LEDs lit up at power on, the HIGH LED at upper right
will light and remain lit. If only a few LEDs lit up, the HIGH
light will blink, indicating a weak battery that should be
replaced.
6
Page 7

To check the calibration of the MM1E, remove the
protective cap from the top of the meter, taking care not to
stab yourself with the two sharp pins beneath the cap. Then
turn the cap over and place its two holes over the two pins.
If the meter is calibrated, an LED at the 20%, 21% or 22%
position on the HIGH scale will illuminate.
To measure the moisture level of a material, place the test
pins on it. If the material has a moisture level between 16%
and 35%, one of the LEDs will light. The number at its right
indicates the moisture level in %WME.
If the moisture level is higher than 35%, the bottom LED will
light. This indicates that the material’s moisture level is
beyond the range of the MM1E. If the material’s moisture
level is less than 16%, no LED will light.
To determine whether the material’s moisture level is
between 16% and 35%, slide the Power/Scale switch on the
back of the meter to the LOW position. If one LED lights, the
number at its left indicates the moisture level in %WME. If no
LED lights, the material’s moisture level is less than 16% and
beyond the measurement range of the MM1E.
Some measurement tips:
1. To locate the source of a leak behind wood, plaster, drywall
or a ceiling, make measurements at different locations. The
leak is located when the meter displays the highest
reading.
2. Never use force to drive the pins into a hard surface.
3. When measuring the moisture level of soil, surface
readings will be lower than readings with the test pins
deep in the soil.
7
Page 8

4. Conductive or metallic objects will always light the lowest
LED on the bar graph, regardless of the selected scale.
5. Measurements of wood are skewed by two variables:
ambient humidity and the density of the wood species. The
best way to compensate for the effect of these variables is
to develop your own moisture level curves, based on your
experience working with different species of wood on a
day-to-day basis.
6. The MM1E has no auto power off function. To avoid
discharging the battery, manually power off the meter after
each measurement session by sliding the Power/Scale
switch on the back to the OFF position.
SPECIFICATIONS
Measurement Range 7 to 35% WME (Wood Moisture
Equivalent) over two scales: 7% to
15% (Low) and 16% to 35% (High)
Measurement Accuracy ±1 LED (~1%)
Pin Length 3/8 in. (10mm)
Calibration Check Point 21% ±1%
Low Battery Alarm Level <7.5V
Operating Temperature 32° to 140°F (0° to 60°C)
@<80% R.H.
Storage Temperature 23° to 140°F (-5° to 60°C)
Current Consumption <15mADC
Dimensions 6.5 x 2.7 x 1 in. (164 x 69 x 26mm)
Weight 3.2 oz. (91g)
Power Source “9V” battery (included)
8
Page 9

REPLACEMENT PARTS
The only replacement parts available for the MM1E are
replacement test pins (Part No. PIND4E). To order, visit
www.generaltools.com or call 800-697-8665.
WARRANTY POLICY
General Tools & Instruments’ (General’s) MM1E Pin-Type
LED Bar Graph Moisture Meter is warranted to the original
purchaser to be free from defects in material and
workmanship for a period of one year. Subject to certain
restrictions, General will repair or replace this instrument if
after examination it is determined by General to be defective
in material or workmanship.
This warranty does not apply to damages that General
determines to be from an attempted repair by non-authorized
personnel or misuse, alterations, normal wear and tear or
accidental damage. The defective unit must be returned to
General Tools & Instruments or to a General-authorized
service center, freight prepaid and insured.
Acceptance of the exclusive repair and replacement remedies
described herein is a condition of the contract for purchase of
this product. In no event shall General be liable for any
incidental, special, consequential or punitive damages,
attorneys’ fees, expenses, losses alleged to be a
consequence of damage due to failure of, or defect in any
product including, but not limited to, any claims for loss of
profits.
9
Page 10

RETURN FOR REPAIR POLICY
Every effort has been made to provide you with a reliable
product of superior quality. However, in the event your
instrument requires repair, please contact our Customer
Service Department. If the product is determined to require
repair under the General Tools & Instruments Warranty Policy,
you will be issued a Return Goods Authorization. The unit will
be sent via prepaid freight to the attention of our Service
Center at this address:
General Tools & Instruments
80 White Street
New York, NY 10013
212-431-6100
Remember to include a copy of your proof of purchase,
your return address, and your phone number and/or e-mail
address.
10
Page 11

HIGROMETRO CON
FICHA Y BARRA DE
GRAFICOS DE DIODO
ELECTRO LUMINISCENTE
GUIA DEL USUARIO
MM1E
Por favor lea cuidadosamente esta guía del usuario
antes de utilizar éste producto.
11
Page 12

CONTENIDO
Introducción . . . . . . . . . . . . . . . . . . . . . . 13 – 14
Principales características . . . . . . . . . . . . . . . 14
Contenido del empaque . . . . . . . . . . . . . . . . . 15
Vista general del producto . . . . . . . . . . . . . . . 15
Instrucciones de ajuste . . . . . . . . . . . . . . . . . . 16
Instalación de la batería . . . . . . . . . . . . . . 16
Instrucciones de funcionamiento . . . . . . 16 – 18
Especificaciones . . . . . . . . . . . . . . . . . . . . . . . 19
Piezas de repuesto . . . . . . . . . . . . . . . . . . . . . 19
Información acerca de la garantía . . . . . . . . . 20
Procedimiento para retorno y reclamación . . 21
12
Page 13

INTRODUCCION
Gracias por preferir el Higrómetro con ficha y barra de gráficos de
diodo electro luminiscente MM1E de General Tools & Instruments.
Por favor lea cuidadosamente esta guía del usuario antes de
utilizar su higrómetro.
El higrómetro MM1E esta diseñado para utilización en madera,
materiales de construcción y en la inspección de casas. Entre los
ejemplos se incluyen:
• Verificación de la humedad encima o debajo de la superficie
de alfombras y bajoalfombras
• Medición del contenido de humedad superficial de la
madera, paneles de yeso y concreto antes de pintar o
tapizar, sellar o tratar
• Localizar goteras en los techos, pisos y paredes
• Seleccionar madera seca
Las mediciones del higrómetro se basan en la relación entre el
contenido de humedad de un material y su conductividad
eléctrica. Entre mas húmedo esté el material, mayor será su
conductividad. Las dos fichas reemplazables de acero en la parte
superior del higrómetro MM1E sirven como electrodos de un
medidor de conductancia mejorado para efectuar mediciones del
contenido de humedad. El higrómetro muestra en la pantalla en
la unidad de porcentaje %WME (Equivalente de la humedad del
a madera).
En materiales duros como madera o concreto, las lecturas del
higrómetro reflejan ampliamente el contenido de humedad de la
superficie debido a que:
1) La humedad cercan a la superficie posee un mayor efecto en
una lectura que la humedad en profundidad, y 2) Las fichas del
higrómetro MM1E miden únicamente 10mm (3/8 de pulgada) y
13
Page 14

no pueden penetrar en un material duro. Para materiales mas
suaves como el piso, el papel o polvos, las lecturas van a reflejar
el nivel promedio de humedad del material entre la superficie y la
profundidad de penetración de las fichas (normalmente no más
de 10mm [3/8 de pulgada]).
La barra de gráficos frontal del 10LED (diodos electro
luminiscentes) del higrómetro MM1E mide el porcentaje WME
(Equivalente de humedad de la madera [Wood Moisture
Equivalent]) en dos gamas diferentes:
De 15%, y de 35%. Un interruptor deslizante en la parte trasera
del higrómetro permite al usuario seleccionar la gama de
medición correcta para el material. El mismo interruptor funciona
como interruptor de Encendido /Apagado. Al encender el
higrómetro, la barra de gráficos indica momentáneamente la vida
de puede verificar la calibración del higrómetro después de
haberlo encendido, para esto, es necesario introducir las fichas
de prueba en los orificios de la cubierta de protección.
El higrómetro MM1E viene en un empaque de burbujas de aire en
el que se incluye una batería de 9V.
PRINICIPALES CARACTERISTICAS
• Pantalla de 10LED (diodos electro luminiscentes)
• Gama de medición de 35%, con dos escalas separadas de
Alta y Baja
• Cubierta de protección que permite verificar la calibración
del instrumento
• Indicadores de batería cargada y batería baja
14
Page 15

CONTENIDO DEL EMPAQUE
El higrómetro MM1E viene en un empaque de burbujas de aire en
el que se incluye una batería de 9V, una cubierta de protección
para las fichas de prueba y ésta guía del usuario.
VISTA GENERAL DEL PRODUCTO
La siguiente figura muestra los controles e indicadores en el
frente y en la parte trasera del higrómetro MM1, así como la
ubicación del compartimiento para la batería.
15
Cubierta de
protección
Indicadores
de la
escala
ALTA
y BAJA
Compartimiento
para la bateria
Encendido/
Apagado/
Escala
Barra de grafi-
cos de 10 LED
Fichas de prueba
(reemplazables)
Orificios para la verificación
de la calibración
FRENTE
ATRAS
Page 16

INSTRUCIONES DE AJUSTE
INSTALACION DE LA BATERIA
Para abrir el compartimiento de la batería, invierta el higrómetro,
con su pulgar empuje la pestaña del fondo de la cubierta del
compartimiento de la batería. Retire la tapa y colóquela aparte.
Introduzca la batería de 9V que se incluye en el soporte dentro
del compartimento. Los terminales de la batería y el soporte solo
se conectan de una manera, el terminal macho es más pequeño y
se inserta en el terminal hembra que es más grande. Coloque la
tapa y cierre el compartimiento de la batería presionando hasta
escuchar un chasquido.
INSTRUCCIONES DE FUNCIONAMIENTO
Para encender el higrómetro, deslice el botón Encendido/
Apagado/Escala en la parte trasera del higrómetro hacia la
posición ALTA.
Al deslizar el interruptor algunos o todos los diodos del panel
frontal se iluminan en una secuencia de abajo hacia arriba. Si los
diodos no se iluminan, se debe suponer que la batería esta
muerta y que debe ser reemplazada.
La cantidad de diodos que se ilumina corresponde a la vida que
resta a la batería. Si los 10 diodos se iluminan, indican que la
batería esta completamente cargada. Si únicamente unos
cuantos diodos se iluminan, indican que la batería esta baja y
pronto deberá ser reemplazada.
Unos segundos después de haberse iluminado, los diodos se
apagaran. Si la mayoría se iluminaron, el diodo indicador ALTO
(HIGH) se iluminará en la esquina superior derecha de la pantalla
y permanecerá encendido. Si únicamente unos cuantos se
iluminaron, el diodo indicador ALTO (HIGH) parpadeara en la
pantalla para indicar que la batería esta baja y debe ser
reemplazada.
16
Page 17

Para verificar la calibración del higrómetro MM1E, retire la
cubierta de protección de la parte superior del instrumento,
teniendo cuidado de no pincharse los dedos con las dos fichas
afiladas al retirar la cubierta. Invierta la cubierta e introduzca las
fichas del instrumento en los dos orificios de la cubierta. Si el
higrómetro esta calibrado, uno de los diodos indicadores de la
posición del 20%, 21% o del 22% en la escala ALTA (HIGH) se
iluminara.
Para medir el nivel de humedad de un material, coloque las
fichas de prueba sobre el material. Si este posee un nivel de
humedad entre el 16% y el 35%, uno de los diodos indicadores
se iluminara. El número a la derecha indica el nivel de humedad
en WME.
Si el nivel de humedad es mayor del 35%, el diodo indicador del
fondo se ilumina. Esto indica que el nivel de humedad del
material esta fuera de la gama de medición del higrómetro
MM1E. Si la nivel de humedad del material es menor del 16%,
ningún diodo indicador se ilumina.
Para determinar si el nivel de humedad del material se encuentra
entre el 16% y el 35%, deslice el interruptor Encendido/Escala en
la parte trasera del instrumento hacia la posición BAJA (LOW).
Si un diodo indicador se ilumina, el número a su izquierda indica
el nivel de humedad en porcentaje WME. Si ningún diodo
indicador se ilumina, el nivel de humedad del material es menor
del 16% y se encuentra fuera de la gama de medición del
higrómetro MM1E.
Algunos consejos para las mediciones:
1. Para localizar la fuente de una fuga por debajo de la madera,
yeso, placa de yeso o del techo efectúe las mediciones en
lugares diferentes. Se localiza una fuga cuando el instrumento
muestra la lectura más alta.
17
Page 18

2. Nunca force las fichas para introducirlas en una superficie dura.
3. Al efectuar mediciones de la humedad del suelo, las lecturas
de la superficie serán menores que las lecturas con las fichas
introducidas en el suelo.
4. No importa que escala se haya seleccionado, los objetos
conductivos o metálicos iluminaran siempre el diodo mas bajo
en la barra de gráficos.
5. Las curvas de la medición de la humedad en la madera están
regidas por dos variables: la humedad del ambiente y la
densidad de la especie de mejor manera de compensar el
efecto de estas dos variables es desarrollar su propia grafica
de curvas de medición basándose en su experiencia cotidiana
al trabajar con diferentes especies de madera.
6. El higrómetro MM1E no posee una función de Auto –Apagado.
Para evitar que la batería se descargue, apague manualmente
el higrómetro después de cada sesión de medición deslizando
el interruptor Encendido/Escala a la posición Apagado en la
parte trasera del instrumento.
18
Page 19

ESPECIFICACIONES
Gama de medición Del 7 al 35% WME (Equivalente
de la humedad de la madera
[Wood Moisture Equivalent]) en
dos escalas: del 7% al 15%
(Baja) y del 16% al 35% (Alta)
Precisión de medición ±1 LED (~1%)
Largo de las fichas 10mm (3/8 de pulgada)
Punto de verificación 21% ±1%
de la calibración
Nivel de alarma de <7.5V
batería baja
Temperatura de De 0° a 60°C (de 32° a 140°F)
funcionamiento @<80% R.H.
Temperatura de De -5° a 60°C (de 23° a 140°F)
almacenamiento
Consumo de energía <15mADC
Dimensiones 6.5 x 2.7 x 1 in.
(164 x 69 x 26mm)
Peso 3.2 (91g)
Fuente de alimentación Batería de “9V” (incluida)
PIEZAS DE REPUESTO
Las únicas piezas de repuesto disponibles para el higrómetro
MM1E son las fichas de prueba (Pieza No. PIND4E). Para efectuar
un pedido, visite la página www.generaltools.com o llame al
800-697-8665.
19
Page 20

INFORMACION ACERCA DE LA GARANTIA
El higrómetro MM1E con ficha y barra de gráficos de diodos
electro luminiscentes de General Tools & Instruments esta
garantizado al comprador original contra defectos del material de
fabricación o de la mano de obra por un periodo de un año. Bajo
ciertas restricciones, General Tools efectuará las reparaciones o
reemplazará el producto si, después de un examen, la compañía
determina que hay un defecto en el material o en la mano de
obra.
Esta garantía no se aplica a los daños que General Tools
determina como producto de un intento de reparación por
personal no autorizado, mal uso del aparato, modificaciones,
desgaste y roturas normales o por daños accidentales. Se debe
retornar la unidad defectuosa a General Tools & Instruments o a
un centro de servicio autorizado, con porte y seguro pagado.
La aceptación de la reparación exclusiva y las medidas de
reemplazo descritas anteriormente es una condición del contrato
de compra de éste producto. En ningún caso, General Tools será
designado como responsable del pago de indemnizaciones por
cualquier daño incidental, especial, a consecuencia de, o por
cualquier costo de honorarios de abogados, gastos o pérdidas
alegados como consecuencia de daños debido a un fallo de, o un
defecto de, en cualquier producto, incluyendo, sin limitar las
reclamaciones de pérdidas de ganancias.
20
Page 21

PROCEDIMIENTO PARA RETORNO Y
RECLAMACION
Nos hemos esforzado para proporcionarle un producto fiable de
calidad superior. Sin embargo, en el caso de que su aparato
necesite reparaciones, póngase en contacto con nuestro Servicio
a la Clientela para obtener un número de autorización de retorno
del aparato (RGA) antes de devolver su unidad con porte pagado
a la atención de nuestro Centro de Servicio a la siguiente
dirección:
General Tools & Instruments
80 White Street
New York, NY 10013
212-431-6100
No olvide incluir una copia de la factura de compra, la dirección
de retorno y el número de teléfono y/o una dirección de correo
electrónica.
21
Page 22

HUMIDIMÈTRE À POINTES
AVEC GRAPHIQUE À
BARRES DEL
MANUEL DE L’UTILISATEUR
MM1E
Veuillez lire attentivement tout le manuel
avant d’utiliser ce produit.
22
Page 23

TABLE DES MATIÈRES
Introduction . . . . . . . . . . . . . . . . . . . . . . . 24 – 25
Principales caractéristiques . . . . . . . . . . . . . . 25
Contenu de l’emballage . . . . . . . . . . . . . . . . . 25
Aperçu du produit . . . . . . . . . . . . . . . . . . . . . . 26
Instructions d’assemblage . . . . . . . . . . . . . . . 26
Installation de la pile . . . . . . . . . . . . . . . . . 26
Instructions de fonctionnement . . . . . . . 27 – 29
Caractéristiques techniques . . . . . . . . . . . . . . 29
Pièces de remplacement . . . . . . . . . . . . . . . . . 30
Information sur la garantie . . . . . . . . . . . . . . . 30
Politique de retour pour réparation . . . . . . . . 31
23
Page 24

INTRODUCTION
Merci d’avoir acheté un humidimètre à pointes avec graphique à
barres DEL MM1E de General Tools & Instruments. Veuillez lire
attentivement tout le manuel avant d’utiliser cet appareil.
L’humidimètre MM1E est conçu pour servir pour le travail du bois,
la construction de bâtiments et l’inspection de bâtisses. Voici des
exemples d’utilisation :
• vérifier le degré d’humidité à la surface ou sous la surface
des moquettes et des sous-planchers
• mesurer le degré d’humidité à la surface du bois, des
cloisons sèches et du béton avant d’appliquer de la peinture,
du papier peint, un scellant ou un traitement
• localiser les fuites d’eau dans les toits, les planchers et les
murs
• sélectionner du bois de charpente sec
L’appareil fait ses mesures à partir de la relation entre l’humidité
contenue dans un matériau et sa conductivité électrique. Plus un
matériau est humide, plus sa conductivité est élevée. Les deux
pointes d’acier remplaçables situées sur le dessus de
l’humidimètre MM1E servent d’électrodes mesurant la
conductance optimisées pour mesurer la teneur en humidité.
L’appareil affiche les mesures en % WME (équivalence en
humidité du bois).
Pour les matériaux durs, comme le bois et le béton, les lectures
de l’appareil reflètent en grande partie la teneur en humidité de la
surface pour les raisons suivantes : 1) l’humidité près d’une
surface a un plus grand effet sur la lecture que l’humidité située
en profondeur; et 2) les pointes du MM1E ne mesurent que
(3/8 po) et ne peuvent pénétrer dans un matériau dur. Pour les
matériaux plus mous, comme le sol, du papier ou de la poudre,
24
Page 25

les lectures vont probablement refléter le degré d’humidité
moyen du matériau entre sa surface et la profondeur de
pénétration des pointes (normalement bien inférieures à
[3/8 po]).
Le graphique à barres situé à l’avant du MM1E, doté de 10 DEL,
indique le % WME (équivalence en humidité du bois) selon deux
échelles différentes : de 7 à 15 % et de 16 à 35 %. L’utilisateur
doit choisir quelle échelle choisir selon le matériau à tester. Pour
ce faire, il doit utiliser le commutateur à glissière situé à l’arrière
de l’appareil. Ce même commutateur sert aussi d’interrupteur.
Chaque fois que l’appareil est mis en marche, le graphique à
barres indique momentanément la charge de la pile. Après la
mise en marche de l’appareil, la calibration peut être vérifiée en
insérant les pointes de test dans les trous du capuchon
protecteur.
L’appareil MM1E fonctionne avec une pile de 9 V, incluse dans
l’emballage.
PRINCIPALES CARACTÉRISTIQUES
• Affichage à 10 DEL
• Plage de mesure de 7 à 35 %, avec échelles indépendantes
pour les valeurs élevées et basses
• Capuchon protecteur servant aussi de vérificateur de
calibration
• Indicateur de pile faible/pile chargée
CONTENU DE L’EMBALLAGE
L’emballage-coque de plastique contient un humidimètre MM1E,
une pile de 9 V, un capuchon protecteur pour les pointes de test
et ce manuel de l’utilisateur.
25
Page 26

APERÇU DU PRODUIT
La figure ci-dessous montre tous les contrôles et indicateurs
présents à l’avant et à l’arrière du MM1E, de même que
l’emplacement du compartiment de la pile à l’arrière.
INSTRUCTIONS D’ASSEMBLAGE
INSTALLATION DE LA PILE
Pour ouvrir le compartiment de la pile, retourner l’appareil et
pousser sur le rebord à la base du compartiment de la pile avec
le pouce. Soulever et retirer le couvercle, puis le mettre de côté.
Brancher la pile de 9 V fournie à la connexion située dans le
compartiment. Les bornes de la pile se fixent à la connexion
d’une seule façon : la borne mâle (plus petite) entre dans la borne
femelle (plus grande). Refermer le compartiment de la pile en
replaçant le couvercle et en le fermant d’un petit coup sec.
26
Capuchon
protecteur
Voyants
pour
échelle
ÉLEVÉE et
BASSE
Compartiment
de la pile
Interrupteur/
commutateur
d’échelle
Graphique à
barres à 10 DEL
Pointes de test
(remplaçables)
Trous de vérification
de la calibration
AVANT
ARRIÈRE
Page 27

INSTRUCTIONS DE FONCTIONNEMENT
Pour mettre en marche l’appareil MM1E, glisser l’interrupteur/
commutateur d’échelle à l’arrière de l’appareil pour qu’il soit en
position ÉLEVÉE (HIGH).
Ce glissement de l’interrupteur devrait faire allumer quelques
DEL ou bien toutes les DEL à l’avant de l’appareil, du bas vers le
haut. Si aucune DEL ne s’allume, la pile est probablement à plat
et doit être remplacée.
Le nombre de DEL allumées correspond à la charge restante
de la pile. Si les 10 DEL sont allumées, la pile est entièrement
chargée. Si seulement quelques DEL sont allumées, la pile est
faible et devrait bientôt être remplacée.
Après quelques secondes d’illumination, les DEL s’éteindront.
Si la plupart des DEL s’allument lors de la mise en marche de
l’appareil, la DEL ÉLEVÉE (HIGH) dans le coin droit supérieur
s’allumera et demeurera allumée. Si seulement quelques DEL
s’allument, le voyant ÉLEVÉE (HIGH) clignotera, indiquant que la
pile est faible et devrait être remplacée.
Pour vérifier la calibration du MM1E, retirer le capuchon
protecteur du dessus de l’appareil en prenant soin de ne pas se
piquer avec les deux pointes sous le capuchon. Retourner ensuite
le capuchon et placer les deux trous sur les deux pointes. Si
l’appareil est calibré, une DEL vis-à-vis 20 %, 21 % ou 22 %
s’allumera sur l’échelle ÉLEVÉE (HIGH).
Pour mesurer le degré d’humidité d’un matériau, placer les
pointes de test sur le matériau. Si ce dernier a une teneur en
humidité entre 16 % et 35 %, l’une des DEL s’allumera. Le
nombre à droite de la DEL indique le degré d’humidité en % WME
(équivalence en humidité du bois).
27
Page 28

Si le degré d’humidité est supérieur à 35 %, la DEL inférieure
s’allumera, indiquant ainsi que le degré d’humidité du matériau
dépasse la capacité du MM1E. Si le degré d’humidité du matériau
est inférieur à 16 %, aucune DEL ne s’allumera.
Pour déterminer si le degré d’humidité du matériau se situe entre
16 % et 35 %, glisser l’interrupteur/commutateur d’échelle à
l’arrière de l’appareil à la position BASSE (LOW). Si une DEL
s’allume, le nombre à sa gauche indique le degré d’humidité en
% WME (équivalence en humidité du bois). Si aucune DEL ne
s’allume, le degré d’humidité du matériau est inférieur à 16 % et
trop faible pour être mesuré par le MM1E.
Conseils d’utilisation :
1. Pour localiser la source d’une fuite derrière le bois, le plâtre,
les cloisons sèches ou un plafond, prendre des mesures à
différents endroits. La fuite se trouve là où l’appareil affiche les
lectures les plus élevées.
2. Ne jamais utiliser la force pour insérer les pointes dans une
surface dure.
3. Lorsqu’il y a mesure du degré d’humidité du sol, les lectures
de surface seront plus faibles que celles prises avec les
pointes plus en profondeur dans le sol.
4. Les objets conducteurs ou métalliques feront toujours allumer
la DEL la plus basse sur le graphique, peu importe l’échelle
choisie.
5. Les mesures du bois sont fonction de deux variables :
l’humidité ambiante et la densité des essences de bois. La
meilleure façon d’annuler l’effet de ces variables est de créer
ses propres courbes de niveau d’humidité selon l’expérience
acquise au quotidien en travaillant avec les différentes
essences de bois.
28
Page 29

6. LE MM1E n’est pas doté d’une fonction d’arrêt automatique.
Pour éviter d’épuiser la pile, fermer manuellement l’appareil
après chaque session de mesures en glissant
l’interrupteur/commutateur d’échelle en position ARRÊT (OFF).
CARACTÉRISTIQUES TECHNIQUES
Plage de mesure De 7 à 35 % WME (équivalence
en humidité du bois) sur deux
échelles : de 7 % à 15 % (basse)
et de 16 % à 35 % (élevée)
Précision de mesure ±1 DEL (~1 %)
Longueur des pointes 10 mm (3/8 po)
Point de vérification 21 % ±1 %
de la calibration
Niveaux d’avertissement <7,5 V
de pile faible
Température de service De 0° à 60 °C (de 32° à 140 °F)
@ < 80 % d’humidité relative
Température d’entreposage De -5° à 60 °C (de 23° à 140 °F)
Consommation courante <15 mADC
Dimensions 164 x 69 x 26 mm
(6,5 x 2,7 x 1 po)
Poids 91 g (3,2 oz)
Source d’alimentation Pile de 9 V (incluse)
29
Page 30

PIÈCES DE REMPLACEMENT
Les seules pièces de remplacement pour l’appareil MM1E sont
les pointes de test. (pièce n°PIND4E). Pour commander ces
pièces, visitez le site www.generaltools.com ou téléphonez au
800-697-8665.
INFORMATION SUR LA GARANTIE
L’humidimètre à pointes avec graphique à barres DEL MM1E de
General Tools & Instruments (General) est garanti pour l’acheteur
original contre tout défaut de matériau et de main-d’œuvre pour
une période de un an. General réparera ou remplacera, sous
certaines restrictions, cet appareil si, après examen, l’entreprise
détermine qu’il y a un défaut de matériau ou de main-d’œuvre.
La présente garantie ne s’applique pas aux dommages que
General juge avoir été causés par une tentative de réparation par
du personnel non autorisé ou par un usage abusif, par des
modifications, par l’usure normale ou par des dommages
accidentels. L’unité défectueuse doit être retournée à General
Tools & Instruments ou à un centre de service autorisé par
General, port payé et garanti.
L’acceptation des solutions de réparation et de remplacement
exclusives décrites dans les présentes est une condition du
contrat d’achat de ce produit. En aucun cas, General ne sera
responsable des dommages indirects, spéciaux, consécutifs ou
punitifs, ni de tout coût, honoraires d’avocat ou pertes présumées
être une conséquence de tout dommage attribuable à une
défaillance ou à un défaut du produit, incluant, sans toutefois s’y
limiter, toute réclamation pour pertes de profits.
30
Page 31

POLITIQUE DE RETOUR POUR RÉPARATION
Tous les efforts sont faits pour vous offrir un produit fiable de
qualité supérieure. Toutefois, si votre instrument nécessite des
réparations, veuillez vous adresser à notre service à la clientèle.
Si le produit nécessite des réparations en vertu de la politique de
garantie de General Tools & Instruments, un numéro
d’autorisation de retour sera émis. L’unité sera envoyée, port
payé, à l’attention de notre centre de service à l’adresse
suivante :
General Tools & Instruments
80 White Street
New York, NY 10013
212-431-6100
N’oubliez pas d’inclure une copie de votre preuve d’achat, votre
adresse et votre numéro de téléphone et/ou votre adresse
courriel.
31
Page 32

GENERAL TOOLS & INSTRUMENTS
80 White Street
New York, NY 10013-3567
PHONE (212) 431-6100
FAX (212) 431-6499
TOLL FREE (800) 697-8665
e-mail: sales@generaltools.com
www.generaltools.com
MM1E User’s Manual
Specifications subject to change without notice
©2011 GENERAL TOOLS & INSTRUMENTS
NOTICE - WE ARE NOT RESPONSIBLE FOR TYPOGRAPHICAL ERRORS.
MAN#MM1E 6/17/11
 Loading...