

General Electric HL7 INTERFACE TEST PLAN_INTEGRATION MANUAL V5E_SM_2020285-028_A 250 Ultrasound Operator's Manual

GE Medical Systems Information Technologies
HL7 Interface
Test Plan and Integration
Instructions
Software Version 005E

127(This manual reflects MUSE CV system software version 005E.
Trademarks
Trademarked names appear throughout this document. Rather than list
the names and entities that own the trademarks or insert a trademark
symbol with each mention of the tra demarked name, the publis her states
that it is using the names o nly fo r editori al purpos es an d to t he benefi t of
the trademark owner with no intention of improperly using that
trademark.
900 SC, ACCUSKETCH, AccuVision, APEX, AQUA-KNOT, ARCHIVIST, Autoseq, BABY
MAC, C Qwik Connect, CardioServ, CardioSmart, CardioSys, CardioWindow, CASE, CD
TELEMETRY, CENTRA, CHART GUARD, CINE 35, CORO, COROLAN,
COROMETRICS, Corometrics Sensor Tip, CRG PLUS, DASH, Digi store, Digital DATAQ, E
for M, EAGLE, Event-Link, FMS 101B, FMS 111, HELLIGE, IMAGE STORE,
INTELLIMOTION, IQA, LASER SXP, MAC, MAC-LAB, MACTRODE, MANAGED USE,
MARQUETTE, MARQUETTE MAC, MARQUETTE MEDICAL SYSTEMS, MARQUETTE
UNITY NETWORK, MARS, MAX, MEDITEL, MEI, ME I in t he circle logo, MEMOPORT,
MEMOPORT C, MINISTORE, MINNOWS, Monarch 8000, MULTI-LINK ,
MULTISCRIPTOR, MUSE, MUSE CV, Neo-Trak, NEUROSCRIPT, OnlineABG,
OXYMONITOR, Pres-R-Cuff, PRESSURE-SCRIBE, QMI, QS, Quantitative Medicine,
Quantitative Sentinel, RAC RAMS, RSVP, SAM, SEER, SILVERTRACE, SOLAR,
SOLARVIEW, Spectra 400, Spectra-Overview, Spectra-Tel, ST GUARD, TRAM,
TRAM-NET, TRAM-RAC, TRAMSCOPE, TRIM KNOB, Trimline, UNION STATION,
UNITY logo, UNITY NETWORK, Vari-X, Vari-X Cardiomatic, VariCath, VARIDEX, VAS,
and Vision Care Filter are trademarks of GE Medical Systems Information Technologies
registered in the United States Patent and Trademark Office.
12SL, 15SL, Access, AccuSpeak, ADVANTAGE, BAM, BODYTRODE, Cardiomatic,
CardioSpeak , C D TE LEMETRY
Event-Link Cirrus, Event-Link Cumulus, Event-Link Nimbus, HI-RES, ICMMS, IMAGE
VAULT, IMPACT.wf, INTER-LEAD, IQA, LIFEWATCH, Managed Use, MARQUETTE
PRISM, MARQUETTE
CardioWindow, NST PRO, NAUTILUS, O
Prism, QUIK CONNECT V, QUICK CONNECT, QT Guard, SMART-PAC, SMARTLOOK,
Spiral Lok, Sweetheart, UNITY, Universal, Waterfall, and Walkmom are trademarks of GE
Medical Systems Information Technolo g ies
®
®
-LAN, CENTRALSCOPE, Corolation, EDIC, EK-Pro,
RESPONDER, MENTOR, MicroSmart, MMS, MRT, MUSE
SENSOR, Octanet, OMRS, PHi-Res, Premium,
2
© GE Medical Systems Information Technologies, 2004. All rights
reserved.
T-2 HL7 Interface Professional Toolkit Revision A
2020285-028 1 April 2004

Contents
1 Introduction . . . . . . . . . . . . . . . . . . . . . . . . . . . . . . . . . . . . 1-1
Manual Information . . . . . . . . . . . . . . . . . . . . . . . . . . . . . . . . . . . . . . . . . . . . . . . . . . 1-3
Revision History . . . . . . . . . . . . . . . . . . . . . . . . . . . . . . . . . . . . . . . . . . . . . . . . . . .1-3
Manual Purpose . . . . . . . . . . . . . . . . . . . . . . . . . . . . . . . . . . . . . . . . . . . . . . . . . . .1-3
Chapter Contents . . . . . . . . . . . . . . . . . . . . . . . . . . . . . . . . . . . . . . . . . . . . . . . . . .1-3
Conventions . . . . . . . . . . . . . . . . . . . . . . . . . . . . . . . . . . . . . . . . . . . . . . . . . . . . . 1-5
Safety Information . . . . . . . . . . . . . . . . . . . . . . . . . . . . . . . . . . . . . . . . . . . . . . . . . . . 1-6
Responsibility of the Manufacturer . . . . . . . . . . . . . . . . . . . . . . . . . . . . . . . . . . . . .1-6
General . . . . . . . . . . . . . . . . . . . . . . . . . . . . . . . . . . . . . . . . . . . . . . . . . . . . . . . . .1-6
Warnings and Cautions . . . . . . . . . . . . . . . . . . . . . . . . . . . . . . . . . . . . . . . . . . . . 1-7
Service Information . . . . . . . . . . . . . . . . . . . . . . . . . . . . . . . . . . . . . . . . . . . . . . . . . . 1-8
Service Requirements . . . . . . . . . . . . . . . . . . . . . . . . . . . . . . . . . . . . . . . . . . . . . .1-8
Equipment Identification . . . . . . . . . . . . . . . . . . . . . . . . . . . . . . . . . . . . . . . . . . . . 1-9
Requirements . . . . . . . . . . . . . . . . . . . . . . . . . . . . . . . . . . . . . . . . . . . . . . . . . . . . .1 -9
Summary . . . . . . . . . . . . . . . . . . . . . . . . . . . . . . . . . . . . . . . . . . . . . . . . . . . . . . .1-10
Common MUSE CV System Operations . . . . . . . . . . . . . . . . . . . . . . . . . . . . . . . . 1-11
Logging Into the MUSE CV System . . . . . . . . . . . . . . . . . . . . . . . . . . . . . . . . . . .1-11
Logging Out of the MUSE CV System . . . . . . . . . . . . . . . . . . . . . . . . . . . . . . . . 1-12
Exit to Windows from the MUSE CV System . . . . . . . . . . . . . . . . . . . . . . . . . . . 1-13
Enter the MUSE CV System from Windows . . . . . . . . . . . . . . . . . . . . . . . . . . . .1-13
2 Configure the HL7 Test Environment . . . . . . . . . . . . . . . 2-1
Pre-Configuration Survey . . . . . . . . . . . . . . . . . . . . . . . . . . . . . . . . . . . . . . . . . . . . . 2-3
Locations . . . . . . . . . . . . . . . . . . . . . . . . . . . . . . . . . . . . . . . . . . . . . . . . . . . . . . . .2 -3
Site Setup Information . . . . . . . . . . . . . . . . . . . . . . . . . . . . . . . . . . . . . . . . . . . . . 2-6
Users . . . . . . . . . . . . . . . . . . . . . . . . . . . . . . . . . . . . . . . . . . . . . . . . . . . . . . . . . . 2-8
Configure Interface Workstation in a Stand-Alone Test Mode . . . . . . . . . . . . . . 2-10
Network Connections . . . . . . . . . . . . . . . . . . . . . . . . . . . . . . . . . . . . . . . . . . . . . .2-10
Configure the HL7 Interface on the Interface Workstation . . . . . . . . . . . . . . . . . 2-13
Configure MUSE CV System on the Interface Workstation . . . . . . . . . . . . . . . . . 2-14
Configure Sites for Testing . . . . . . . . . . . . . . . . . . . . . . . . . . . . . . . . . . . . . . . . .2-14
Configure Locations for Testing . . . . . . . . . . . . . . . . . . . . . . . . . . . . . . . . . . . . . 2-20
Configure Devices for Testing . . . . . . . . . . . . . . . . . . . . . . . . . . . . . . . . . . . . . . 2-27
Configure Users for Testing . . . . . . . . . . . . . . . . . . . . . . . . . . . . . . . . . . . . . . . . 2-30
Configure Report Distribution for Testing . . . . . . . . . . . . . . . . . . . . . . . . . . . . . . 2-32
Revision A HL7 Interface Professional Toolkit i
2020285-028

Configuring Additional Sites for Testing . . . . . . . . . . . . . . . . . . . . . . . . . . . . . . . 2-36
3 Testing the HL7 Interface . . . . . . . . . . . . . . . . . . . . . . . . . 3-1
Introduction . . . . . . . . . . . . . . . . . . . . . . . . . . . . . . . . . . . . . . . . . . . . . . . . . . . . . . . . 3-3
Test Goals . . . . . . . . . . . . . . . . . . . . . . . . . . . . . . . . . . . . . . . . . . . . . . . . . . . . . . .3-3
TCP/IP Monitor . . . . . . . . . . . . . . . . . . . . . . . . . . . . . . . . . . . . . . . . . . . . . . . . . . 3-4
Troubleshooting . . . . . . . . . . . . . . . . . . . . . . . . . . . . . . . . . . . . . . . . . . . . . . . . . . .3-5
Test Procedures . . . . . . . . . . . . . . . . . . . . . . . . . . . . . . . . . . . . . . . . . . . . . . . . . . .3-5
Test Sequence . . . . . . . . . . . . . . . . . . . . . . . . . . . . . . . . . . . . . . . . . . . . . . . . . . . .3-5
Testing ADT Transactions . . . . . . . . . . . . . . . . . . . . . . . . . . . . . . . . . . . . . . . . . . . . 3-6
Test Transactions that Add Patient Data . . . . . . . . . . . . . . . . . . . . . . . . . . . . . . . 3-7
Test Transactions that Change Patient Data . . . . . . . . . . . . . . . . . . . . . . . . . . . 3-11
Test Transactions that Merge Patient Data . . . . . . . . . . . . . . . . . . . . . . . . . . . . 3-12
Test Transactions that Delete Patient Data . . . . . . . . . . . . . . . . . . . . . . . . . . . . 3-13
Testing Order Transactions . . . . . . . . . . . . . . . . . . . . . . . . . . . . . . . . . . . . . . . . . . 3-14
Testing Results Transactions . . . . . . . . . . . . . . . . . . . . . . . . . . . . . . . . . . . . . . . . . 3-20
Test Data . . . . . . . . . . . . . . . . . . . . . . . . . . . . . . . . . . . . . . . . . . . . . . . . . . . . . . .3-20
Acquisition of Patient Test Data . . . . . . . . . . . . . . . . . . . . . . . . . . . . . . . . . . . . . 3-21
Test Procedures . . . . . . . . . . . . . . . . . . . . . . . . . . . . . . . . . . . . . . . . . . . . . . . . . 3-23
Testing Result Transactions on Systems With No Inbound Message Interface 3-24
Testing Result Transactions on Systems Supporting ADT Only . . . . . . . . . . . . 3-33
Testing Result Transactions on Systems Supporting ADT with Accounts . . . . . 3-42
Testing Result Transactions on Systems Supporting ADT with Orders . . . . . . . 3-52
Testing Result Transactions on
Systems Supporting ADT with Accounts and Orders . . . . . . . . . . . . . . . . . . . . 3-62
Testing Financial Transactions . . . . . . . . . . . . . . . . . . . . . . . . . . . . . . . . . . . . . . . 3-72
Recovery Testing . . . . . . . . . . . . . . . . . . . . . . . . . . . . . . . . . . . . . . . . . . . . . . . . . . . 3-76
Sample Test Plans . . . . . . . . . . . . . . . . . . . . . . . . . . . . . . . . . . . . . . . . . . . . . . . . . . 3-77
ADT Test Plan . . . . . . . . . . . . . . . . . . . . . . . . . . . . . . . . . . . . . . . . . . . . . . . . . . .3-77
Orders Test Plan . . . . . . . . . . . . . . . . . . . . . . . . . . . . . . . . . . . . . . . . . . . . . . . . 3-83
Results Test Plan . . . . . . . . . . . . . . . . . . . . . . . . . . . . . . . . . . . . . . . . . . . . . . . . 3-86
4 Configure Interface for Production . . . . . . . . . . . . . . . . . 4-1
Introduction . . . . . . . . . . . . . . . . . . . . . . . . . . . . . . . . . . . . . . . . . . . . . . . . . . . . . . . . 4-3
Summary of Steps . . . . . . . . . . . . . . . . . . . . . . . . . . . . . . . . . . . . . . . . . . . . . . . . .4-3
Configure MUSE CV System for Outbound-to-HIS Messages . . . . . . . . . . . . . . . . 4-4
Define the HIS as a Device in System Setup . . . . . . . . . . . . . . . . . . . . . . . . . . . . .4-4
Configure Report Distribution . . . . . . . . . . . . . . . . . . . . . . . . . . . . . . . . . . . . . . . . 4-8
ii HL7 Interface Professional Toolkit Revision A
2020285-028

Configure Users . . . . . . . . . . . . . . . . . . . . . . . . . . . . . . . . . . . . . . . . . . . . . . . . . .4-11
Configure Interface PC as a MUSE CV System Workstation . . . . . . . . . . . . . . . . 4-13
Introduction . . . . . . . . . . . . . . . . . . . . . . . . . . . . . . . . . . . . . . . . . . . . . . . . . . . . .4-13
Determine Identity of MUSE CV System File Server . . . . . . . . . . . . . . . . . . . . . .4-13
Edit the Windows WIN.INI File . . . . . . . . . . . . . . . . . . . . . . . . . . . . . . . . . . . . . . 4-15
Verify Administrators Group . . . . . . . . . . . . . . . . . . . . . . . . . . . . . . . . . . . . . . . . .4-15
Configure Workstation Network Identity . . . . . . . . . . . . . . . . . . . . . . . . . . . . . . . .4-17
Prepare Auto Update File . . . . . . . . . . . . . . . . . . . . . . . . . . . . . . . . . . . . . . . . . .4-20
Verify Network Communications with HIS . . . . . . . . . . . . . . . . . . . . . . . . . . . . . 4-21
Execute Interface Integration Program . . . . . . . . . . . . . . . . . . . . . . . . . . . . . . . . . 4-22
Pre-integration Procedure . . . . . . . . . . . . . . . . . . . . . . . . . . . . . . . . . . . . . . . . . .4-22
Execute the Interface Integration Program . . . . . . . . . . . . . . . . . . . . . . . . . . . . .4-22
Install MUSE CV System Services . . . . . . . . . . . . . . . . . . . . . . . . . . . . . . . . . . 4-33
Verify Interface is Operating Correctly . . . . . . . . . . . . . . . . . . . . . . . . . . . . . . . . 4-38
Configure MUSE CV System for Inbound-from-HIS Messages . . . . . . . . . . . . . . 4-39
Mapping of MUSE CV System Locations to Interface Manager (Optional) . . . . .4-39
Appendix A – Troubleshooting . . . . . . . . . . . . . . . . . . . . .A-1
Introduction . . . . . . . . . . . . . . . . . . . . . . . . . . . . . . . . . . . . . . . . . . . . . . . . . . . . . . . . A-3
Troubleshooting Tools . . . . . . . . . . . . . . . . . . . . . . . . . . . . . . . . . . . . . . . . . . . . . . . A-4
Introduction . . . . . . . . . . . . . . . . . . . . . . . . . . . . . . . . . . . . . . . . . . . . . . . . . . . . . .A-4
HIS Event Log . . . . . . . . . . . . . . . . . . . . . . . . . . . . . . . . . . . . . . . . . . . . . . . . . . . A-5
Communication Transaction Log . . . . . . . . . . . . . . . . . . . . . . . . . . . . . . . . . . . . . .A-6
Connection Log . . . . . . . . . . . . . . . . . . . . . . . . . . . . . . . . . . . . . . . . . . . . . . . . . . A-7
Inbound Interface Log . . . . . . . . . . . . . . . . . . . . . . . . . . . . . . . . . . . . . . . . . . . . . A-8
Outbound Interface Log . . . . . . . . . . . . . . . . . . . . . . . . . . . . . . . . . . . . . . . . . . . . A-9
MUSE Error Log . . . . . . . . . . . . . . . . . . . . . . . . . . . . . . . . . . . . . . . . . . . . . . . . . A-10
Interface Manager Search Feature . . . . . . . . . . . . . . . . . . . . . . . . . . . . . . . . . . A-11
Troubleshooting Recommendations . . . . . . . . . . . . . . . . . . . . . . . . . . . . . . . . . . . A-12
Introduction . . . . . . . . . . . . . . . . . . . . . . . . . . . . . . . . . . . . . . . . . . . . . . . . . . . . .A-12
Inbound Message Processing . . . . . . . . . . . . . . . . . . . . . . . . . . . . . . . . . . . . . . .A-12
Outbound Message Processing . . . . . . . . . . . . . . . . . . . . . . . . . . . . . . . . . . . . . A-14
Communications . . . . . . . . . . . . . . . . . . . . . . . . . . . . . . . . . . . . . . . . . . . . . . . . A-16
Miscellaneous . . . . . . . . . . . . . . . . . . . . . . . . . . . . . . . . . . . . . . . . . . . . . . . . . . A-19
Error Codes . . . . . . . . . . . . . . . . . . . . . . . . . . . . . . . . . . . . . . . . . . . . . . . . . . . . . . . A-21
InstallShield Errors . . . . . . . . . . . . . . . . . . . . . . . . . . . . . . . . . . . . . . . . . . . . . . . .A-21
Btrieve Database Files . . . . . . . . . . . . . . . . . . . . . . . . . . . . . . . . . . . . . . . . . . . . .A-21
DOS Files . . . . . . . . . . . . . . . . . . . . . . . . . . . . . . . . . . . . . . . . . . . . . . . . . . . . . . A-23
TCP/IP (Socket) Communications . . . . . . . . . . . . . . . . . . . . . . . . . . . . . . . . . . . A-24
Appendix B – Test Data Samples . . . . . . . . . . . . . . . . . . .B-1
Introduction . . . . . . . . . . . . . . . . . . . . . . . . . . . . . . . . . . . . . . . . . . . . . . . . . . . . . . . . B-3
Revision A HL7 Interface Professional Toolkit iii
2020285-028

Resting ECG Report . . . . . . . . . . . . . . . . . . . . . . . . . . . . . . . . . . . . . . . . . . . . . . . . . B-4
Signal-Averaged ECG Report . . . . . . . . . . . . . . . . . . . . . . . . . . . . . . . . . . . . . . . . . B-11
Stress Report from Case 15 . . . . . . . . . . . . . . . . . . . . . . . . . . . . . . . . . . . . . . . . . . B-14
Holter Report from Holter SXP System . . . . . . . . . . . . . . . . . . . . . . . . . . . . . . . . . B-17
iv HL7 Interface Professional Toolkit Revision A
2020285-028

1 Introduction
Revision A HL7 Interface Professional Toolkit 1-1
2020285-028

For your notes
1-2 HL7 Interface Professional Toolkit Revision A
2020285-028

Introduction: Manual Information
Manual Informatio n
Revision History
Each page of the document has the document part number and revision
letter at the bottom of the page. The revision letter identifies the
document’s update level.
The revision history of this document is summarized in the tabl e below
Table 1. Revision History PN 2020285-028
Revision Date Comments
A 1 April 2004 Initial release of document, corresponds with MUSE software version 005E.
Manual Purpose
These instructions will help you connect, confi gure, and test your HL7
interface.
Where necessary the manual identifies additional sources of relevant
information and/or techn ical assistan ce.
Chapter Contents
This manual is organized into the following chapters:
1 Introduction
Contains general information and guidelines for using this manual, and
provides common procedures referenced t hroughout the manual.
2 Configure the HL7 Test Environment
Provides instructions for configuring a test environment in which to test
the HL7 interface before integrating it into the producti on MUSE CV
system network.
3 Testing the HL7 Interface
Provides instructions and sample data for testing the HL7 interface.
Revision A HL7 Interface Professional Toolkit 1-3
2020285-028

Introduction: Manual Information
4 Configure the HL7 Production Environment
Provides instructions for integrating the HL7 interface into the
production MUSE CV system network.
Appendix A—Troubleshooting
Contains troubleshooting information and instructions for accessing the
various event log files needed to evaluate oper ation of the system.
Appendix B—Test Data Samples
Contains samples of each type of test result.
Related Manuals
See these documents for additional information
Functional Description of HIS Interface
HIS XFER Communications Mapped Configuration
HIS XFER Communications FTP Configuration
HIS Interface and MUSE CV Information System Product
Information
GE Medical Systems Information Technologies HL7 Interface PreInstallation Guide
GE Medical Systems Information Technologies HL7 Interface
Reference Manual
1-4 HL7 Interface Professional Toolkit Revision A
2020285-028

Conventions
Safety Messages
Definitions
Introduction: Manual Information
These are the conventions used in this manual.
DANGER safety messages indicate an imminently hazardo us situation
which, if not avoided, WILL result in death or serious injury.
WARNING safety messages indicate a potentially hazardous situation
which, if not avoided, COULD result in death or serious injury.
CAUTION safety messages indicate a potentially hazardous situation
which, if not avoided may result in minor or moderate injury.
NOTE messages provide additional user information.
Items shown in Bold text are keys on the keyboard, text to be
entered, or hardware items such as buttons or switches on the
equipment.
Items shown in Italicized text are software terms which identify
menu items, buttons, or options in various windows.
To perform an operation which appear s with a plus (+) sign between
the names of two keys, you press and hold the first key while
pressing the second key once. This is called a keystroke combination.
For example, “Press Ctrl+Esc” means to press and hold down the
Ctrl key while pressing the Esc key.
When instructions are given for typing a precise text string with one
or more spaces, the point where the spacebar must be pressed is
indicated as: <Space>. The purpose of the < > brackets is to ensure
you press the spacebar when required.
Enter means to press the “Enter” or “Return” key on the keyboard.
Do not type “enter”.
Revision A HL7 Interface Professional Toolkit 1-5
2020285-028

Introduction: Safety Information
Safety Information
Responsibility of the Manuf acturer
GE Medical Systems Information Technologies is responsible for the
effects of safety, reliability, and performance only if:
Assembly operations, extensions, readju stments, modifications, or
repairs are carried out by persons authorized by Information
Technologies.
The electrical installation of the relevant room complies with the
requirements of the appropriate regulations.
The equipment is used in accordance with the instructions for use.
General
This device is intended for use under the direct supervision of a licensed
health care practitioner.
To ensure patient safety, use only parts and access ories manufactured or
recommended by GE Medical Systems Information Technologies.
Contact GE Medical Systems Information Technologies for information
before connecting any devices to this equipment that are not
recommended in this manual.
If the installation of this equipment, in the USA , will use 240 V rather
than 120 V, the source must be a center-tapped, 240 V, single-phase
circuit.
Parts and accessories used must meet t he requireme nts of t he appli cable
IEC 601 series safety standards, and/or the system configuration must
meet the requirements of the IEC 601-1-1 medical electrical systems
standard.
The use of ACCESSORY equipment not complying with the equivalent
safety requirements of this equipment may lead to a reduced level of
safety of the resulting system. Consideration relating to the choice shall
include:
use of the accessory in the PATIENT VICINITY; and
evidence that the safety certification of the ACCESSORY has been
performed in accordance to the appropriate IEC 601-1 and/or IEC
601-1-1 harmonized national standard.
1-6 HL7 Interface Professional Toolkit Revision A
2020285-028
Warnings and Cautions
Introduction: Safety Information
DANGER
Do NOT use in the
presence of flammable
anesthetics.
M15287-1B
WARNING
This is Class I
equipment. The mains
plug must be connected
to an appropriate power
supply.
M15287-5C
CAUTION
To reduce the risk of electric shock, do
NOT remove cover (or back). Refer
servicing to qualified personnel.
M15287-16A
CAUTION
Federal law restricts this device to sale by
or on the order of a physician.
M15287-17A
Revision A HL7 Interface Professional Toolkit 1-7
2020285-028

Service Information
Service Requirements
Equipment Provided by GE
Refer equipment servicing to GE Medical Systems Information
Technologies’ authorized service personnel only. Any unauthorized
attempt to repair equipment under warranty voi ds that warranty.
It is the user’s responsibility to report the need for serv ice to Information
Technologies or to one of their authorized agents.
Failure on the part of the responsible individual, hospital, or institution
using this equipment to implement a satisfactory maintenance schedule
may cause undue equipment failure and possible health hazards.
Regular maintenance, irrespective of usage, is essential to ensure that
the HL7 interface will always be functional when required.
Introduction: Service Information
Equipment Provided by the Customer
The customer is responsible for servicing their own hardware with the
software-only option of the HL7 Interface Professional Toolkit.
1-8 HL7 Interface Professional Toolkit Revision A
2020285-028

Equipment Identification
Every Information Technologies device has a unique serial number for
identification. The serial number appears on the product label on the
base of each unit
Introduction: Service Information
A
B
CDEFGHI
MD1113-022D
Table 2. Equipment Identifications
Item Name Description
A name of device HL7 Interface Workstation
B manufacturer GE Medical Systems, Inc.
C serial number Unique identifier
D device characteristics One or two letters that further describe the unit, for example: P = prototype not
E division F = Cardiology G = Monitoring J = GW Labs
F product sequence
number
G product code Two-character product descriptor TD = HIS
H year manufactured 6 = 1996, 7= 1997, 8= 1998, (and so on)
I month manufactured A = January, B = February, C = March, D = April, E = May, F = June, G = July,
Requirements
conforming to marketing specification; R = refurbished equipment; S = special product
documented under Specials part numbers; U = upgraded unit
Manufacturing number (of total units manufactured)
H = August, J = September, K = October, L = November, M = December
In order to implement your HL7 interface, you’ll need the following
items:
An interface workstation with the HL7 and MUSE CV system
software already installed.
A diskette (p/n 421128-001) supplied with your interface workstation
that contains sample patient test data (ECG, stress, holter, etc.), or a
similar collection of patient tests that can be used to verify the
processing of Results transactions.
Revision A HL7 Interface Professional Toolkit 1-9
2020285-028

Summary
Introduction: Service Information
In order to successfully connect and test your HL7 interface, you’ll need
to perform the following steps.
Connect the HL7 interface workstation to the hospital’s network.
Configure the MUSE CV system software on the interface
workstation to run as a stand-alone test environment.
Test the HL7 interface while it is running in the te st environment.
Add the interface workstation to the hospital’s MUSE CV system
network.
Configure the interface workstation as a MUSE CV system
workstation.
Integrate the HL7 interface into the production MUSE CV system.
Verify the HL7 interface is running properly in the pro duction
MUSE CV system en v ir o n men t .
1-10 HL7 Interface Professional Toolkit Revision A
2020285-028

Introduction: Common MUSE CV System Operations
A
Common MUSE CV System Operations
There are certain operations that you may need to perform repeatedly
throughout these instructions. These oper ations are explained in detail
below and should be referenced as needed throughout your interface
implementation.
Logging Into the MUSE CV System
1. When you turn on or reboot the interface workstation, or the MUSE
CV information system, the monitor displays a series of power up
self-test messages as the major assemblies and system configuration
are being tested.
After the power up self-test is completed, the MUSE CV system
Authorization window appears.
Authorization
User ID:
Password:
Site Number:
OK Cancel
MD1267-046
2. Log on to the MUSE CV system from the Authorization window as
follows:
User ID:1
Password:MACLINK
Site Number:1
127(As you type the password, it does not appear in the box.
Instead, an asterisk (*) appears as you type each character in
the password.
Click the OK button.
The Authorization window closes and the MUSE CV system
application starts with the Edit List as the opening screen.
Revision A HL7 Interface Professional Toolkit 1-11
2020285-028

Introduction: Common MUSE CV System Operations
Logging Out of the MUSE CV System
Whenever you are done us in g t he MU SE CV sy st em, you sho uld Exit the
system. Note that this will NOT completely shut the computer down, it
will simply log you out of the MUSE CV system environment.
Log out of the MUSE CV system as follows:
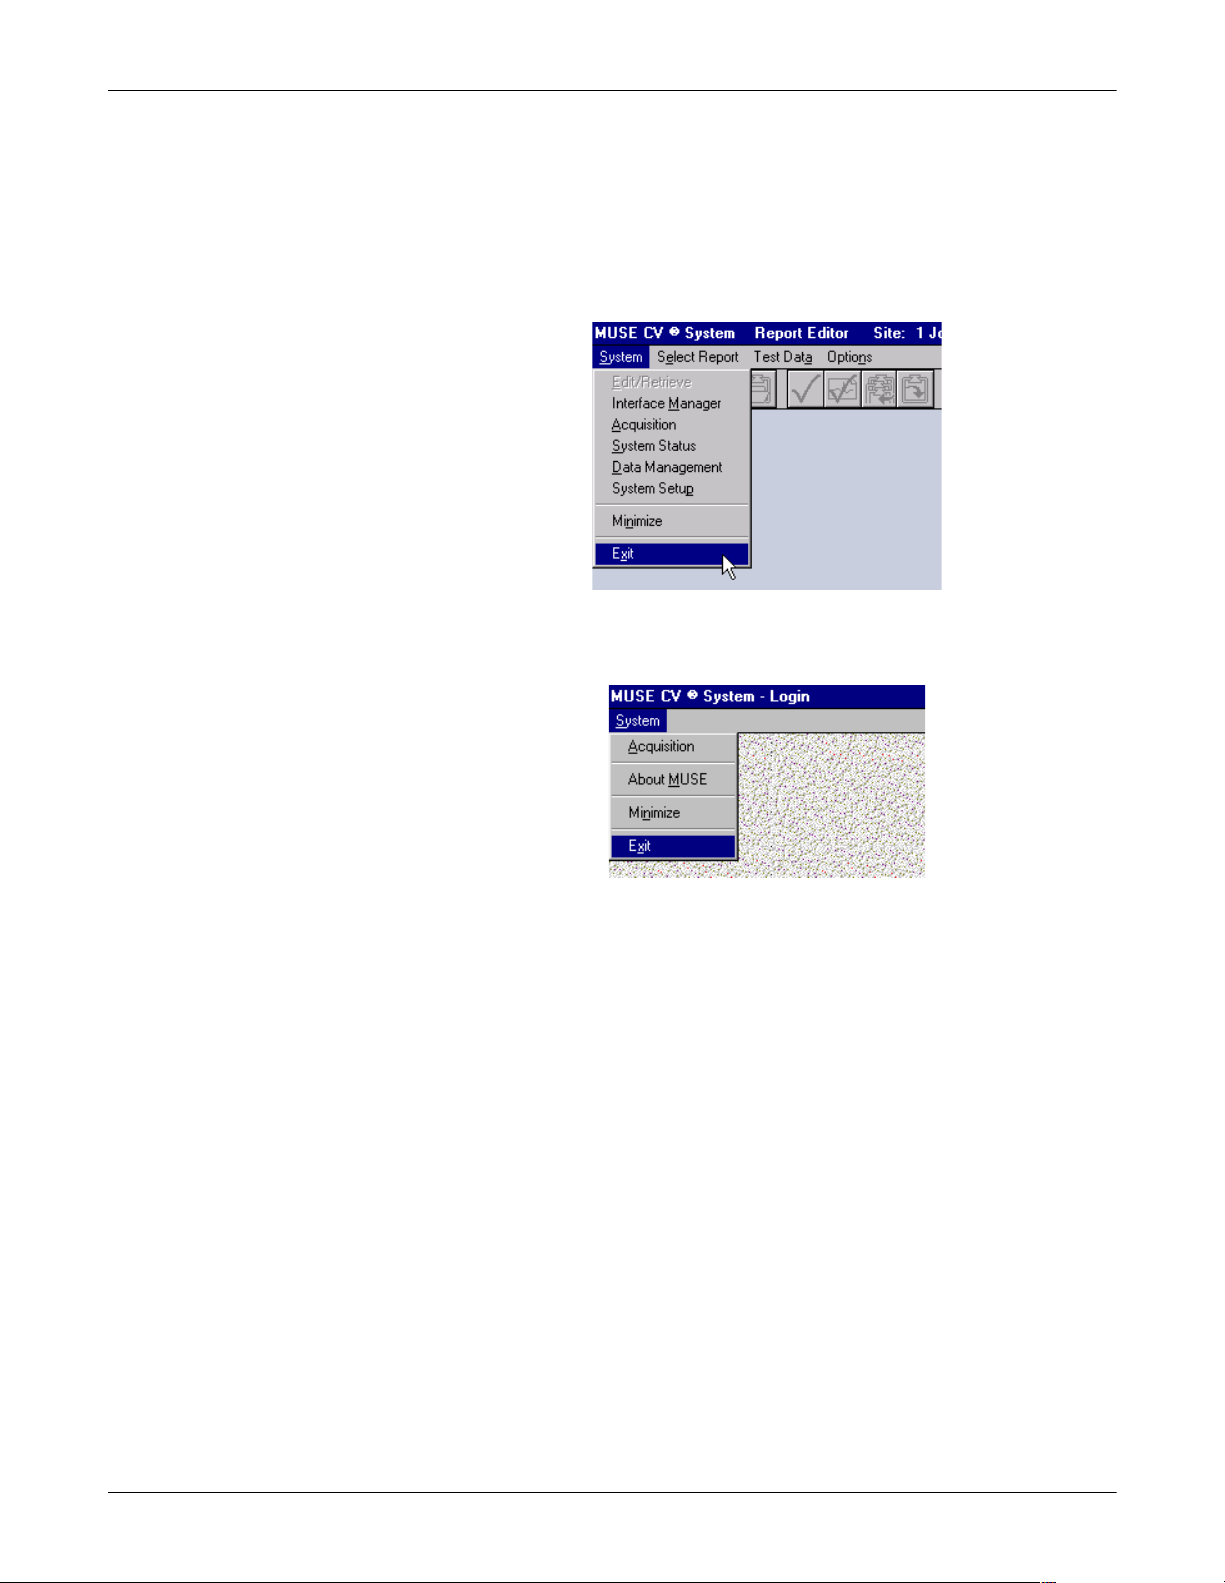
1. Select System from the menu bar.
The System menu will be displayed.
MD1310-006A
127(This menu may differ depending on what area of the MUSE
CV system you are using when you select the System menu.
2. Select Exit. When the Authorization window appears, you are logged
out and the next user can log into the system.
1-12 HL7 Interface Professional Toolkit Revision A
2020285-028
Introduction: Common MUSE CV System Operations
A
Exit to Windows from the MUSE CV System
You can exit the MUSE CV system application and move directly to the
Windows environment as follows:
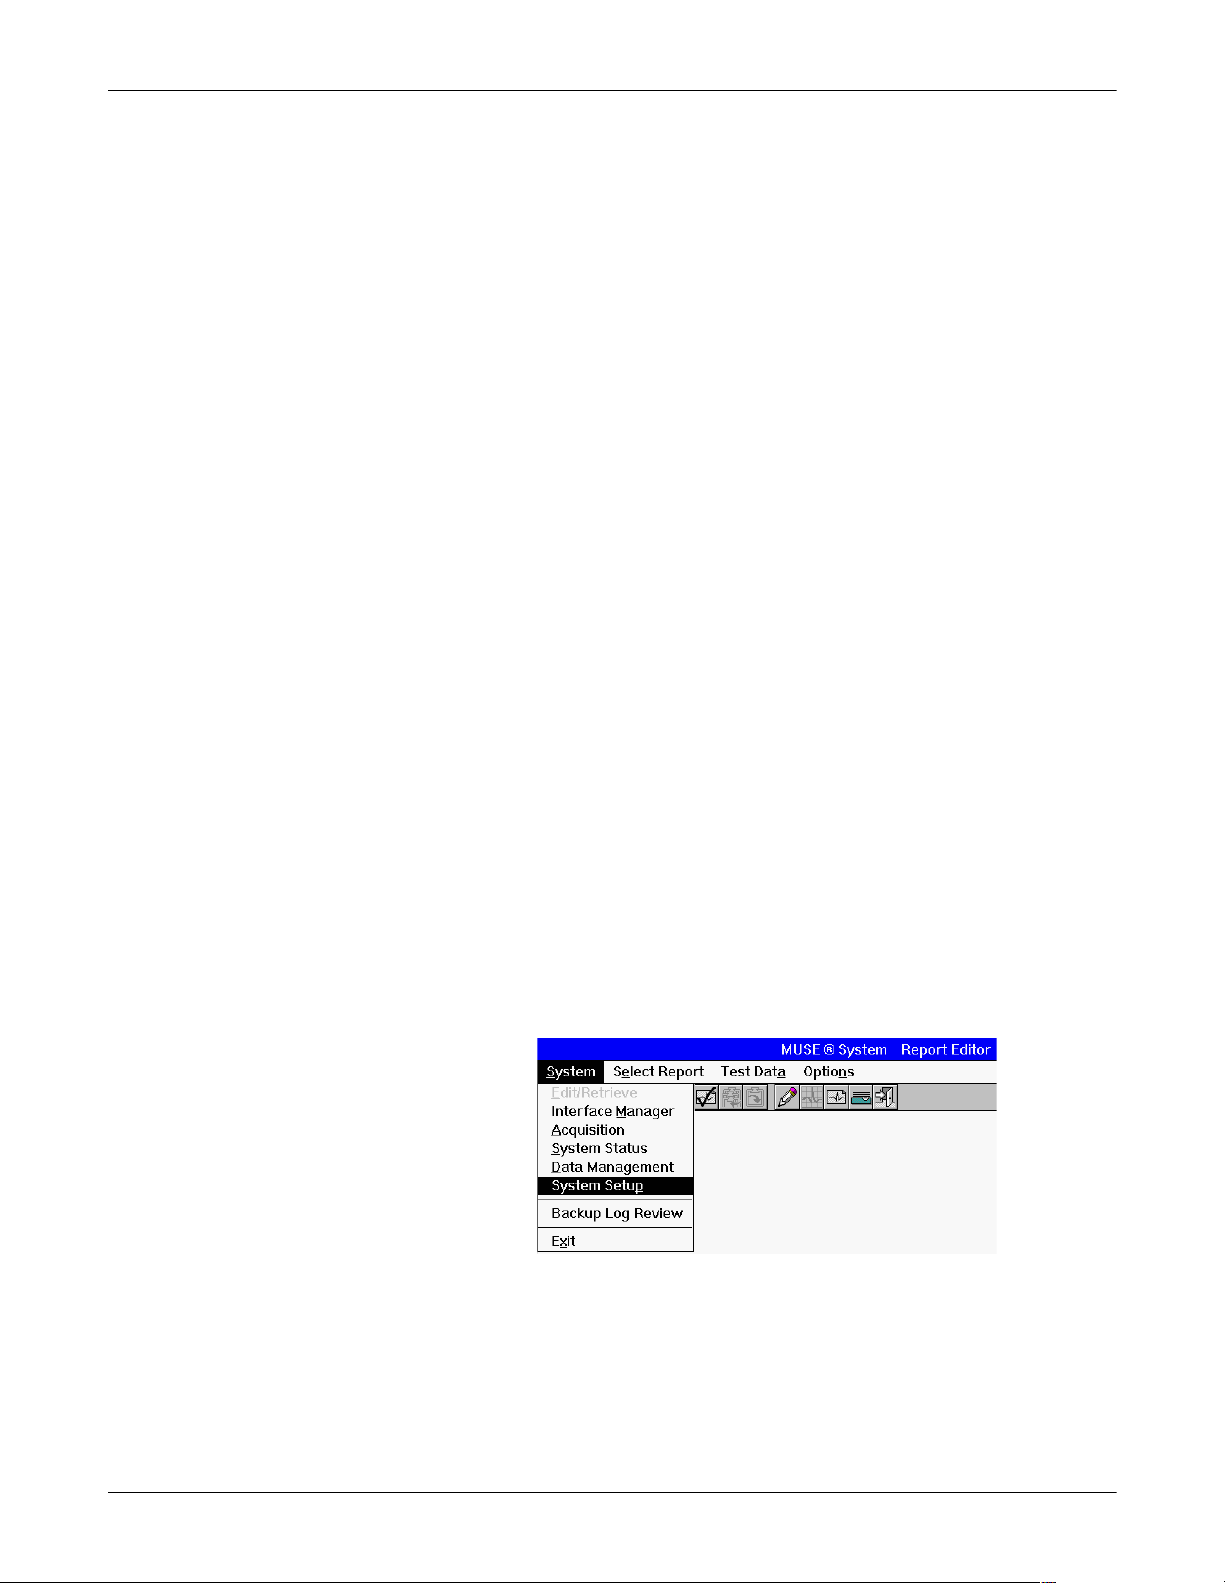
1. From the MUSE CV System Report Editor, choose the System menu
and select Exit.
2. From MUSE CV System Setup, choose the System menu and select
Exit.
MD1334-202A
3. The MUSE CV system is closed a nd you are put directly into the
Windows environment.
Enter the MUSE CV System from Windows
To enter the MUSE CV system fro m the Windows environment, double
click on the Start MUSE CV icon found on your desktop.
MD1334-154
Revision A HL7 Interface Professional Toolkit 1-13
2020285-028

For your notes
Introduction: Common MUSE CV System Operations
1-14 HL7 Interface Professional Toolkit Revision A
2020285-028

2 Configure the HL7 Test
Environment
Revision A HL7 Interface Professional Toolkit 2-1
2020285-028

For your notes
2-2 HL7 Interface Professional Toolkit Revision A
2020285-028
Configure the HL7 Test Environment: Pre-Configuration Survey
Pre-Configuration Survey
To most accurately test the HL7 interface in a test environment, the
MUSE CV system sof tw are on the in te rf ace wo r ks ta tio n mus t be
configured to match the configuration of your production MUSE CV
system. This will help to identify and resolve any problems with the
interface during testing, and should ensure a smooth transition to the
production network.
Before you can configure the MUSE CV system software on the interface
workstation, you must su rvey the production MUSE CV system for
certain information that must be duplicated on the interface
workstation. This section outlines the st eps to gather this information.
The information that must be gathered from the MUSE CV system
includes locations, site setup information, and users.
Locations
Determine the locations from the production MUSE CV system to
be configured on the interface workstation
The MUSE CV system software is capable of storing up to 600 definable
“locations” on the MUSE CV system file server. You must survey these
locations to determine which of these locations will be utilized in your
test data, and then duplicate these locations on the interface
workstation.
The easiest way to ident i fy th e Locations on the MUSE CV system file
server is to print a list of these locations. The following are instructions
to print this list. You may need the assistance of the MUSE CV system
administrator.
1. Log into the production MUSE CV system’s file server.
2. From the System menu, select System Setup.
MD1334-001A
Revision A HL7 Interface Professional Toolkit 2-3
2020285-028

Configure the HL7 Test Environment: Pre-Configuration Survey
3. From the Select List menu, select Locations to display the Location
window similar to the one below.
217B
4. With the Locations window open, select Print from the Options
menu.
MD1334-004A
5. In the Send Report To ... windo w, se lect t he des ired pri nter fro m th e
Devices Defined in System Setup pull-down list and click OK.
MD1334-005A
2-4 HL7 Interface Professional Toolkit Revision A
2020285-028

Configure the HL7 Test Environment: Pre-Configuration Survey
6. In the Print Options window, yo u can either select Print All to print a
list of all locations on your MUSE CV system’s file server, or
selectively print only the locations utilized in your test data. Click
OK when you have made your selection.
When printed, this list will be used to determine which locations are
needed for testing. The interface workstation must be configured for all
locations utilized by your test data. You will need to enter the Location
Name and the Location Name Abbreviation when configuring locations
on the interface wo rks tation.
MD1334-006A
Revision A HL7 Interface Professional Toolkit 2-5
2020285-028

Configure the HL7 Test Environment: Pre-Configuration Survey
B
Site Setup Information
While logged into the production MUSE CV system, the configured sites
must be surveyed. Access the Site Information window as follows:
1. From the System menu, select System Setup.
2. From the Select List menu, select Sites.
3. The Site Information window is shown below.
17B
18B
2-6 HL7 Interface Professional Toolkit Revision A
2020285-028

Configure the HL7 Test Environment: Pre-Configuration Survey
4. Click the Select button to display a list of all sites configured on the
production MUSE CV system.
127(In most circumstances there will be only one site configured
on a MUSE CV system.
The interface workstation must be configured for all sites that will be
supporting the HL7 interface. Highlight a site on the selection list and
click OK to display the Site Information for that site.
5. For each site required for testing, record ALL of the information from
this window so that an identical site configuration can be entered on
the interface workstation.
It is NOT necessary to configure the Defib Setup information on the
interface workstation.
Revision A HL7 Interface Professional Toolkit 2-7
2020285-028

Users
Configure the HL7 Test Environment: Pre-Configuration Survey
For testing purposes, if a Results/Financial interface option has been
purchased, it will be necessary to set up at least one User as an
Overreading Physician for the purpose of confirming reports.
1. From the Select List menu, select Users.
MD1334-031A
2. In the User window, click the Select button to display the Select User
dialog box.
MD1334-035A
2-8 HL7 Interface Professional Toolkit Revision A
2020285-028

Configure the HL7 Test Environment: Pre-Configuration Survey
3. Enter the User Name or User ID Number for a physician with
overreading privileges in the Cardio log y department. Click OK to
display the setup information for that User.
MD1334-032A
4. Record the Last Name, First Name, Job Title and Medicare Provider
ID for any users desired for testing purposes. Only one valid User is
required for confirming reports.
If the Medicare Provider ID is not displayed in the User window on
the production MUSE CV system, this information can be obtained
from the HIS. The Medicare Provider ID is the same as the Physician
ID or the Universal Provider ID on the HIS.
This concludes the Pre-Configuration Survey on the production MUSE
CV system. To exit the System Setup mode, select Exit from the System
menu.
The next step is to configure the interface workstation with the
information gathered here.
Before configuration of the interface workstation can begin, you should
record the TCP/IP configuration information for the following:
The IP address and li stening port of t he Hospital Informa tion System
server to be utilized for testing results
The network location for the HL7 interface workstation
For interfaces receiving inbound messages to the MUSE CV system,
the desired listening port value necessary for the HL7 interface to
receive messages
Revision A HL7 Interface Professional Toolkit 2-9
2020285-028

Configure the HL7 Test Environment: Configure Interface Workstation in a Stand-Alone Test Mode
Configure Interface Workstation in a Stand-Alone Test Mode
We’ll begin the implementation of your HL7 interface by connecting the
interface workstation to your hospital network in a stand-alone test
mode. We will not be connecting the interface workstation to the MUSE
CV system at this time. This will allow you to configure and test the HL7
interface in a safe environment without impacting the actual MUSE CV
system. Once the interface is working successfully, we’ll then connect it
to the production MUSE CV system.
Network Connections
In order for the interface workstation to operate as a stand-alone server
on your hospital’s network, we’ll need to configure the node name and
TCP/IP address of the interface workst ation.
Summary of Steps
Configure TCP/IP Address
The following steps provide a summary of the tasks involved in moving
the interface workstation onto the hospital network. Detailed
instructions follow this summary.
Configure the TCP/IP address.
Edit the Windows WIN.INI file.
Connect the interface workstation to the hospital network.
Verify the interface workstation is successfully communicating on
the hospital network.
Note that depending on how the MUSE CV system and/or hospital
networks are configured, one or two network cards may be required in
the interface workstation.
If the MUSE CV system is runni ng on a hos pital en terprise n et work, the
interface workstation will contain one network card for communicating
with both the HIS and the MUSE CV system’s file server through the
hospital network.
If the MUSE CV system runs on its own network, two network cards are
required in the interfa ce workstation; one to communicate with the
MUSE CV syste m, and one to communicate with the HIS. If this is the
case, we will only configure one of these network cards at this time. For
testing purposes, we only need to communicate with the HIS. We will
configure the second network card to communicate with the MUSE CV
system after the testing has been completed and we are ready to “go live”
on the production MUSE CV system.
2-10 HL7 Interface Professional Toolkit Revision A
2020285-028

Configure the HL7 Test Environment: Configure Interface Workstation in a Stand-Alone Test Mode
Configure the TCP/IP address as follows:
1. Access the networking properties for the LAN connection.
2. Select Protocols.
3. Highlight TCP/IP Protocol and select Properties.
MD1334-141A
MD1334-142A
Revision A HL7 Interface Professional Toolkit 2-11
2020285-028

Configure the HL7 Test Environment: Configure Interface Workstation in a Stand-Alone Test Mode
4. You have two choices in this window:
5. Make the appropriate selection. If you choose Specify an IP Address,
enter the IP Address, Subnet Mask and Default Gateway.
6. Click OK to save your changes and close the Network window.
Physical Connection
The interface workstation is now ready to be physically connected to your
hospital network. Make the necessary connections now.
127(We do not want to communicate with the MUSE CV system’s file
After the interface workstation has been connected, shutdown and
restart the interface workstation.
Verify Network Communications
Obtain an IP address from a DHCP server
Specify an IP address
server at this time. If your system contains two network cards,
DO NOT connect the sy st em to t he MUS E CV sy stem pr oduc tio n
network at this time.
After configuring the system, you must verify that the interface
workstation and the HIS system are communicating on the network.
1. Access the Windows desktop.
2. Open a Command Prompt window.
3. At the prompt, typ e:
ping xxx.xxx.xxx.xxx <Enter>
where xxx.xxx.xxx.xxx is the TCP/IP address of the HIS system
server.
4. The system will display a message to inform you if the HIS server
has responded.
If you receive a message indicating that the ping attempt has timed
out, refer to the Troubleshooting information at the back of this
manual.
5. Close the Command Prompt window.
6. Repeat this same procedure from the HIS system to verify that it can
communicate with th e in ter f ace wo r ks ta tio n.
2-12 HL7 Interface Professional Toolkit Revision A
2020285-028

Configure the HL7 Test Environment: Configure the HL7 Interface on the Interface Workstation
Configure the HL7 Interface on the Interface Workstation
Install using the installation instructions (pn 2006660-055).
Use the Professional Toolkit manual to configure your HL7 interface
components.
Revision A HL7 Interface Professional Toolkit 2-13
2020285-028

Configure the HL7 Test Environment: Configure MUSE CV System on the Interface Workstation
A
Configure MUSE CV System on the Interface Workstation
After the pre-configuration survey is completed and the interface
workstation is connected on the network, log into the interface
workstation and configure the MUSE CV system software using the
information gathered in the pre-configuration survey.
These configuration procedures will include the following:
Site Setup
Locations
Devices
Users
Report Distribution.
Configure Sites for Testing
Before testing can begin, site configuration must be complet ed on the
interface workstation. To accurately test the interface, a site
configuration must be set up on the interface workstation to match each
site on the production MUSE CV system required for testing. Site
configuration is accomplished using the information gathered in the PreConfiguration Survey earlier in this manual.
1. Restart the interface workstation. After the power up self-test is
completed, the MUSE CV system Authorization window appears.
Authorization
User ID:
Password:
Site Number:
OK Cancel
MD1267-046
2. Log on to the MUSE CV system from the Authorization window as
follows:
User ID: 1
Password: MACLINK
Site Number: 1
2-14 HL7 Interface Professional Toolkit Revision A
2020285-028

Configure the HL7 Test Environment: Configure MUSE CV System on the Interface Workstation
B
3. From the System menu, select System Setup.
4. From the Select List menu, select Sites.
1
5. The Site Information window for Site Number 1 is displayed.
Using the information gathered during the Pre-Configuration
Survey, enter the Site Name, Site Name Abbreviation, and
Characters in ID for the site to be configured for testing. Click OK to
save this Site Information.
17B
161C
Revision A HL7 Interface Professional Toolkit 2-15
2020285-028
Configure the HL7 Test Environment: Configure MUSE CV System on the Interface Workstation
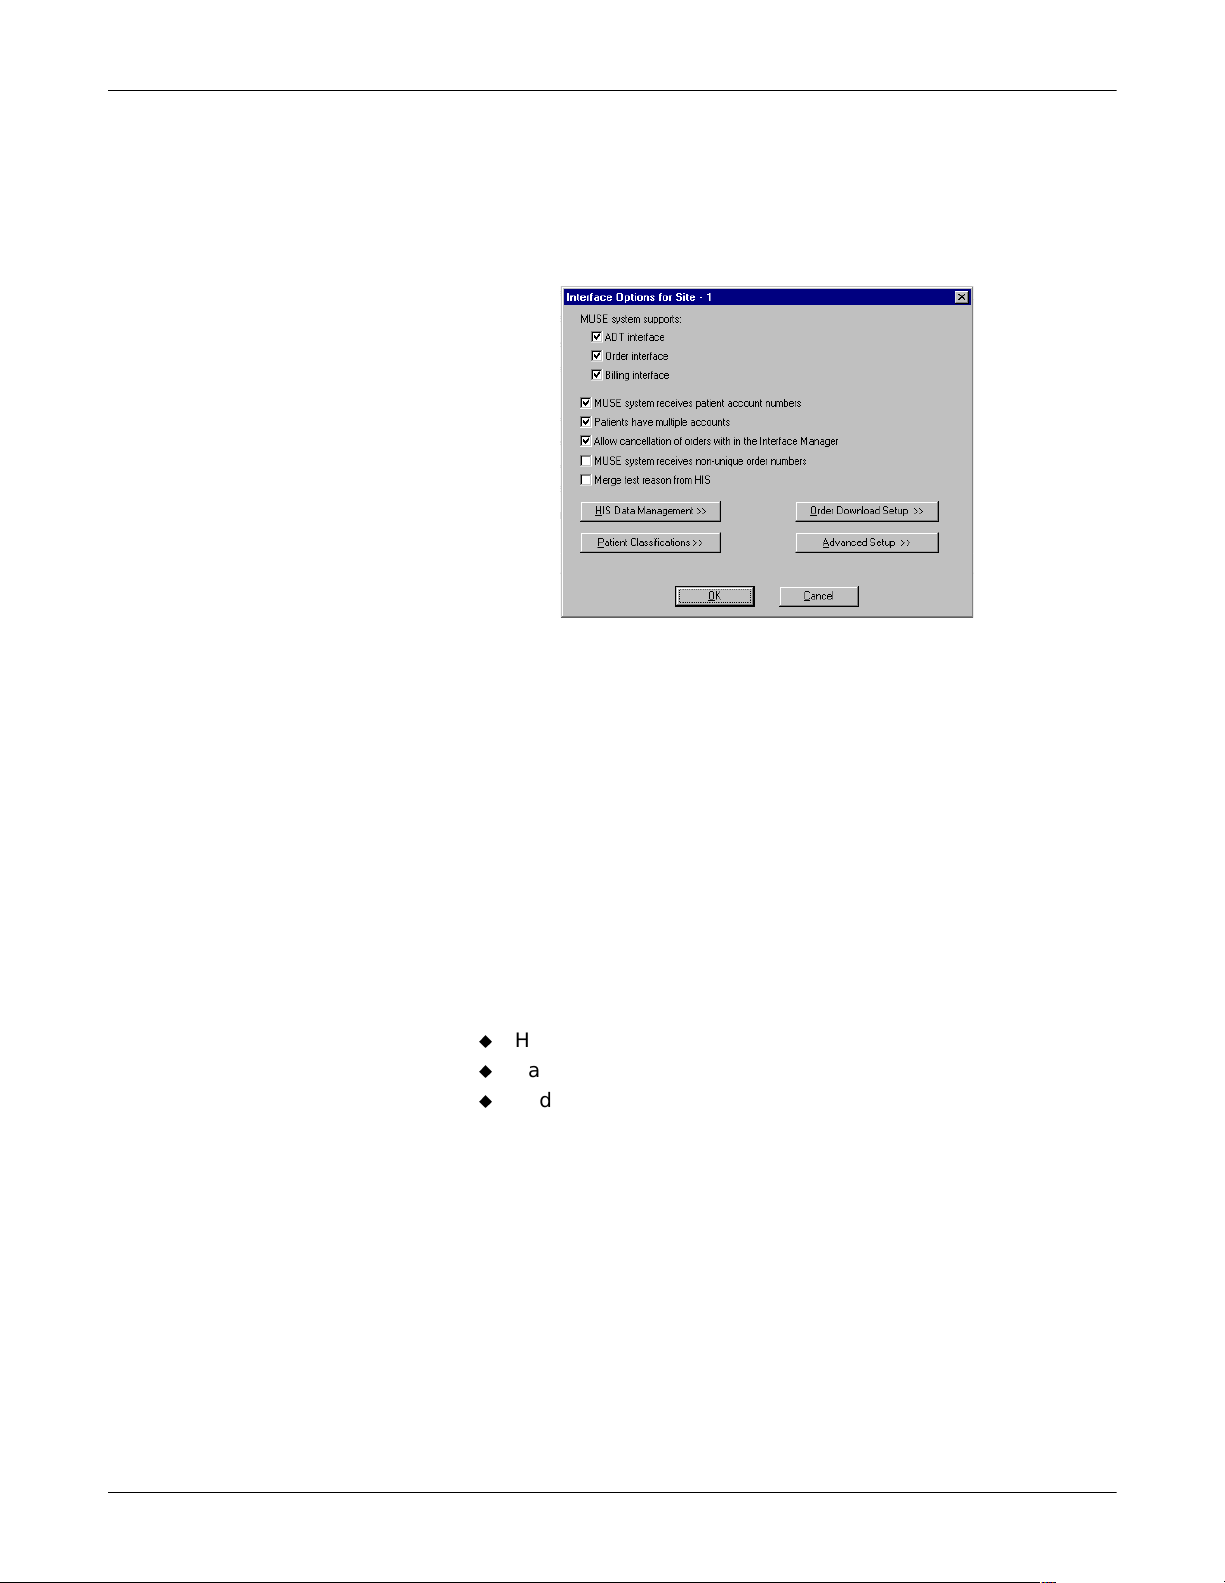
If the ADT, Orders and/or Financial options have been purchased, these
options must be configured for each site. Click the HIS Interface Setup
button. The Interface Options window is displaye d as sh ow n below . No te
that display of some items on this screen is dependent on options
purchased. All items shown below may not appear on your screen.
MD1334-019B
Completion of this screen is a three-step process:
1. Under the MUSE system supports: heading, ensure that a check box
is selected for each interface option purchased for the particular site
being configured.
2. Located below the interface option selections are the following four
check boxes:
127(To configure these items, refer to the completed “GE Medical
Systems Information Technologies HL7 Interface
Pre-Installation Guide.” See “ADT” in the Information
Systems Department portio n of the survey.
3. When the check box selections are complete, the following options
must be configured as explained on the pages that follow:
HIS Data Management
Patient Classifications
Order Download Setup
2-16 HL7 Interface Professional Toolkit Revision A
2020285-028

Configure the HL7 Test Environment: Configure MUSE CV System on the Interface Workstation
HIS Data Management Setup
MD1334-020A
127(This option is not used when the interface is configured to
process only result or financial transactions.
When the HIS Database Management option is installed, a HIS database
management task is run daily on the MUSE CV system. This program
checks the status of each ADT record in the database against the current
patient status. The MUSE CV system site must be configured to indicate
how long patient ADT or Order records will be maintained in the MUSE
CV system following pa ti ent di scha rge . The si te mus t also be configured
to schedule execution of this HIS database management task.
This information was gathered in the “G E Medical Systems Information
Technologies HL7 Interface Pre-Installation Guide.” See “Retaining
Records” in the Cardiology Department portion of the guide.
Click OK to save your changes and return to the HIS Interface Options
setup screen.
Revision A HL7 Interface Professional Toolkit 2-17
2020285-028
Configure the HL7 Test Environment: Configure MUSE CV System on the Interface Workstation
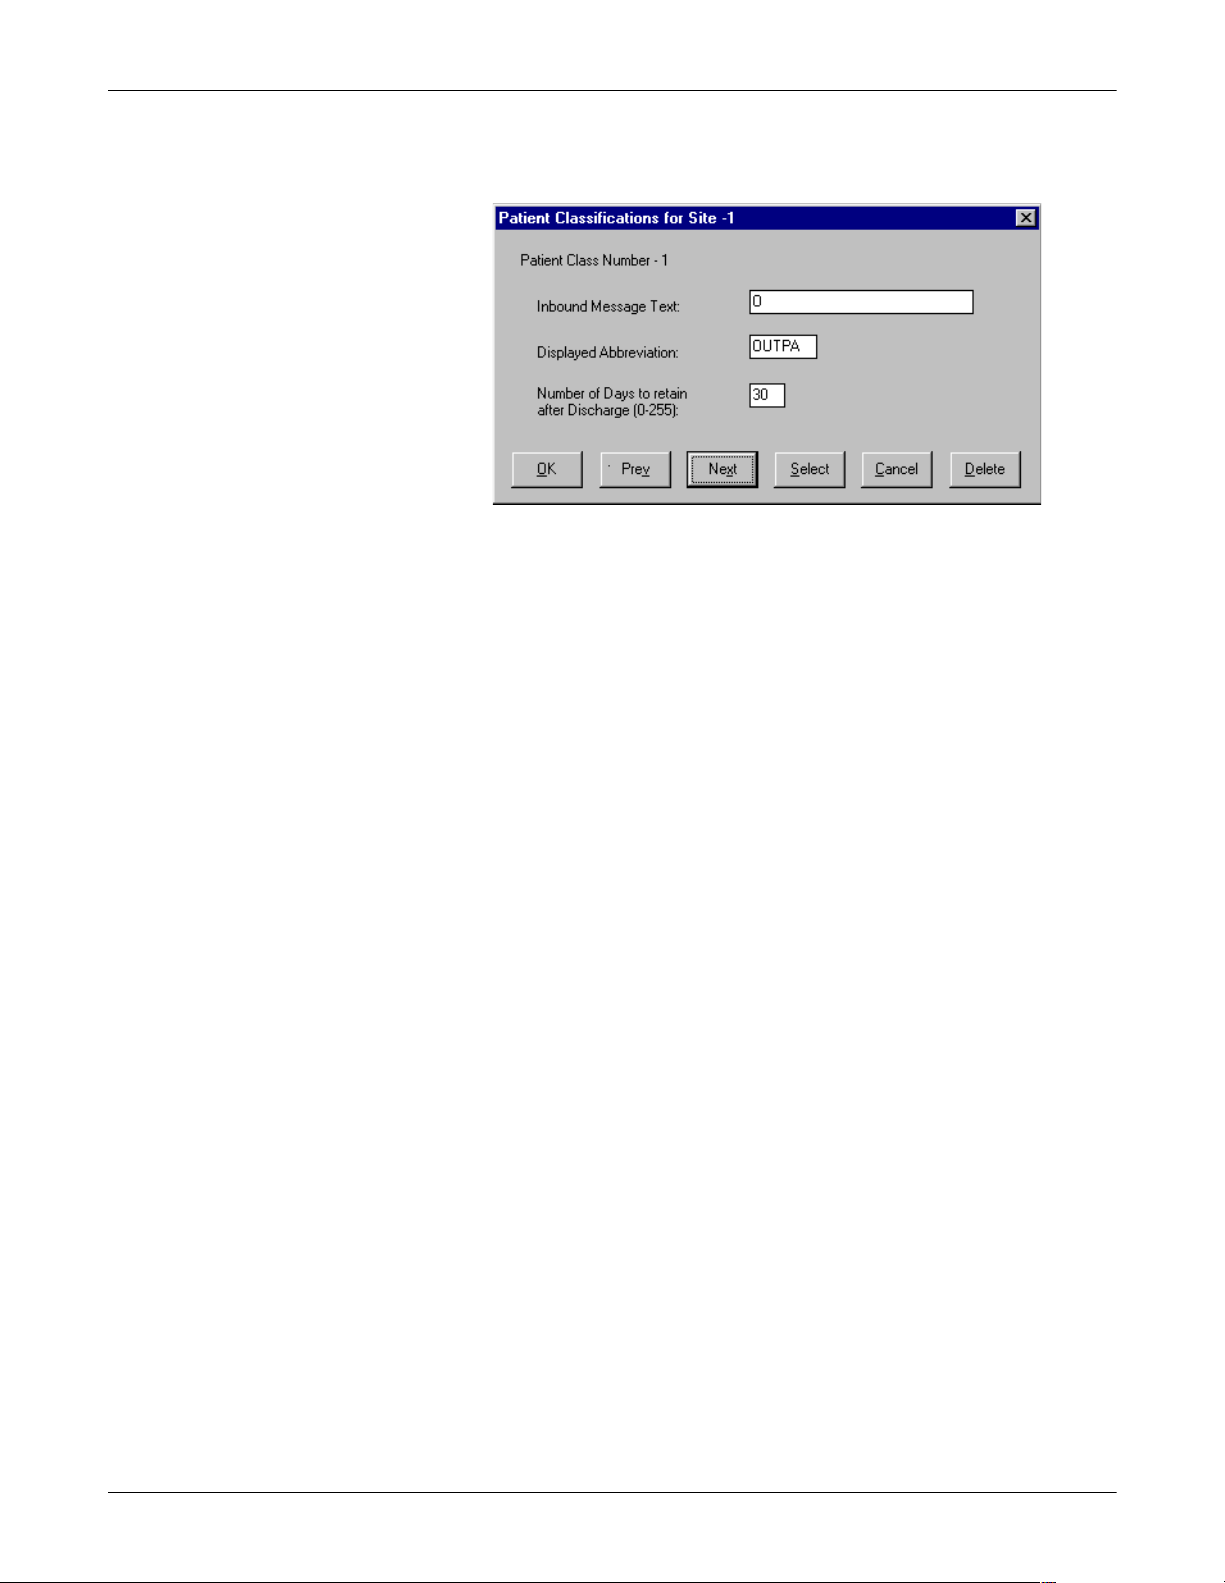
Patient Classifications Setup
If the Patient Classification field is to be used for ADT transactions, or
ADT with Orders, the Patient Classifications setup window is used to
configure the Inbound Message Text, Displayed Abbreviation and
Number of Days to retain [records] after Discharge for each classification.
MD1334-021A
This information was gathered in the “G E Medical Systems Information
Technologies HL7 Inter face Pre-Installation Guide.” See “ADT” in the
Information Systems Department portion of the guide.
Click OK to save your changes and return to the HIS Interface Options
setup screen.
2-18 HL7 Interface Professional Toolkit Revision A
2020285-028

Configure the HL7 Test Environment: Configure MUSE CV System on the Interface Workstation
Order Download Setup
If you have purchased the Order Download option, the Order Download
window is used to set the range (in hours) for display of open orders in
the List of Open Orders on the MUSE CV system.
MD1334-022A
This information was gathered in the “G E Medical Systems Information
Technologies HL7 Interface Pre-Installation Guide.” See “Displaying and
Using Information” in the Cardiology Department portion of the guide.
Click OK to save your changes and return to the Interface Options setup
screen.
Click OK to exit the Interface Options setup screen and return to the Site
Information window.
Revision A HL7 Interface Professional Toolkit 2-19
2020285-028

Configure the HL7 Test Environment: Configure MUSE CV System on the Interface Workstation
Configure Locations for Testing
During the Pre-Configuration Survey (earlier in this manual) you
determined which locations must be configured for testing. Those
locations will now be configured on the interface workstation.
1. From the main menu bar, select System Setup. If the Locations
window does not appear in System Setup, select Locations from the
Select List menu.
217B
2. From the printed list of locations, configure the matching locations
by entering the same Location Name and Location Name
Abbreviation in the Locations window on the interface workstation.
Remember, you only need to set up the locations you’ll be testing.
Click OK after each entry.
,03257$17DO NOT enter or change any information in the
Serial Comparison Setup or Data Reduction Setup areas of
the Locations window. These fields are not applicable for
testing.
2-20 HL7 Interface Professional Toolkit Revision A
2020285-028

Configure the HL7 Test Environment: Configure MUSE CV System on the Interface Workstation
B
Mapping of MUSE CV System Locations
In the Interface Manager application, the system default is to display
HIS locations in lists such as List of Orders and List of Accounts. This is
often preferred since there ar e fre que ntly ma ny mo re HIS l o cati ons than
MUSE CV system locations. However, the interface can be configured to
display MUSE CV system locations in these lists instead, if desired.
127(This option is not used when the interface is configured to
process only result or financial transactions.
This option is REQUIRED for ADT to Monitoring and Orders
Interfac e application.
This information was gathered and recorded in the “GE Medical Systems
Information Technologies HL7 Interface Pre-Installation Guide.” See
“Displaying and Using Information” in the Cardiology Department
portion of the guide.
To configure MUSE CV system l ocations, proceed as follows:
1. From the System menu, select System Setup.
2. From the Select List menu, select HIS Locations.
1B
7
Revision A HL7 Interface Professional Toolkit 2-21
2020285-028

Configure the HL7 Test Environment: Configure MUSE CV System on the Interface Workstation
3. When HIS Locations is selected, the HIS Interface Locations screen
is displayed as shown below:
4. To map a HIS location to a MUSE CV system location, enter the HIS
Location Abbreviated name and the full HIS Location Name in the
appropriate boxes at t he top of the window.
MD1334-008B
Choose the desired MUSE CV system location from the MUSE
Location Abbreviated pull-down list. The MUSE Location Name will
be filled in automatically as shown in the example below.
MD1334-009B
5. Click OK to save your selection.
6. Click Next or Previous to map another location.
2-22 HL7 Interface Professional Toolkit Revision A
2020285-028

Configure the HL7 Test Environment: Configure MUSE CV System on the Interface Workstation
7. Click Select to see a list of loc ations already mapped as shown be low.
MD1334-010A
Revision A HL7 Interface Professional Toolkit 2-23
2020285-028

Configure the HL7 Test Environment: Configure MUSE CV System on the Interface Workstation
A
Mapping Monitor Locations
After you have set up the HIS locations, you will need to complete the
MUSE Monitor Location Setup for the ADT to monitor interface.
To configure MUSE CV system l ocations, proceed as follows:
1. From the System menu, select System Setup.
1B
2. From the Select List menu, select Monitor Locations.
When Monitor Locations is selected, the Monitor Locations screen is
displayed.
127(
The first time you select Monitor Location, the screen will appear
blank as shown below. Once information has been populated, the
Monitor Locations will display data during future use.
The ADT Monitor Communications option can only retrieve data
from the MUSE Site 1 ADT database.
214
2-24 HL7 Interface Professional Toolkit Revision A
2020285-028

Configure the HL7 Test Environment: Configure MUSE CV System on the Interface Workstation
A
A
3. Select the HIS Location Abbreviated pull down menu, which will
appear blank as follows.
220
4. Use the up arrow button on the list to select an existing HIS location
for mapping to the monitor location.
221
The Monitor Location Abbreviated is the exact value that is
configured on the monitor for care unit name.
Revision A HL7 Interface Professional Toolkit 2-25
2020285-028

Configure the HL7 Test Environment: Configure MUSE CV System on the Interface Workstation
127(
A separate entry is required for each care unit name existing on the
monitoring network. When a monitoring request for patient data is
made, the monitor location abbreviation is translated to the
corresponding HIS location using this table. The lookup key consists
of the translated HIS location along with the room and bed, which is
used to search f or the patient data in the MUSE ADT database.
This populates the HIS Location field.
5. Enter the corresponding Monitor Location and Abbreviation in the
table.
6. Select OK to save your changes.
127(
It is not possible to have more than one monitor location abbreviation
map to a single HIS location abbreviation.
Continue Configuring All Monitor Locations
7. Select Next for a new mapping.
8. Use the HIS Location Abbreviated field to select the HIS location and
enter the corresponding Monitor Location and Abbreviation.
9. Select OK to save each addition.
10. When monitor location mapping is complete, exit Setup.
11. The Before Proceeding... window is displayed. Select Yes to Save
Current Changes?.
225A
2-26 HL7 Interface Professional Toolkit Revision A
2020285-028

Configure the HL7 Test Environment: Configure MUSE CV System on the Interface Workstation
Configure Devices for Testing
The MUSE CV system allows for configuration of additional “devices”.
Normally a d evice on the MUSE CV system is either a printer or fax
machine. However, for MUSE CV system test results to be formatted in
the HL7 format and sent to the HIS, we treat the HIS as a “device.”
Configure the HIS as device type HL7 in MUSE CV system setup:
1. On the interface workstation, log into the MUSE CV system and
select System Setup from the System menu.
MD1334-001A
2. From the Select List menu, select Devices.
3. The Device setup window is displayed:
MD1334-011A
12B
Revision A HL7 Interface Professional Toolkit 2-27
2020285-028

Configure the HL7 Test Environment: Configure MUSE CV System on the Interface Workstation
4. Before a device can be configured, a device number must be selected.
In the Device setup window, click the Select button to display the
Device selection list.
127(It is a common practice to configure device number 100 for
interface devices. Select device 100 (if unassigned), or choose
any available device number.
33B
5. Select a Device number to be configured and click OK to retu rn to th e
Device setup window.
12B
2-28 HL7 Interface Professional Toolkit Revision A
2020285-028
Configure the HL7 Test Environment: Configure MUSE CV System on the Interface Workstation
6. After the device number has been selected, enter the following
parameters in the Device setup window
Device Name: HIS Results
Device Abbreviation:HIS
Type:HL7
Station:1
Port:COM7
All other values: Use the default values
7. Click on Advanced. In the Additional Device Settings window, enter
the following parameters.
TCP/IP Device
Transport Layer: Sockets
Function:Output
All other values: Use the default values
File Copy
Transport Layer: Filecopy
Function:Output
All other values: Use the default values*
*
**
Drive Mapping
Transport Layer: Net File Transfer
Function:Output
Xfer Option: Mapped Drive
All other values: Use the default values*
FTP Device
Transport Layer: Net File Transfer
Function:Output
Xfer Option: FTP Client
All other values: Use the default values*
8. When finished, click OK to close the Additional Device Settings
window. Click OK to save the settings in the Device setup window.
9. Repeat steps 4 – 8 for a billing device, if applicable.
* These values do not apply to testing the interface workstation.
** These values do not apply to te sting the interface workstation.
Revision A HL7 Interface Professional Toolkit 2-29
2020285-028

Configure the HL7 Test Environment: Configure MUSE CV System on the Interface Workstation
Configure Users for Testing
For testin g results, it will be necessa ry to set up at least one user as an
Overreading Physician for the purpose of confirming reports.
1. From the System menu, select System Setup.
2. From the Select List menu, select Users.
1B
3. The window for User: 1 appears:
31B
32C
2-30 HL7 Interface Professional Toolkit Revision A
2020285-028
Configure the HL7 Test Environment: Configure MUSE CV System on the Interface Workstation
4. Click on the Next button to display the screen for User: 2.
5. Enter the Last Name, First Name, and Medicare Provider ID for the
overreading physician to be used for testing.
This information was gathered during the “Pre-Configuration
Survey” earlier in this manual.
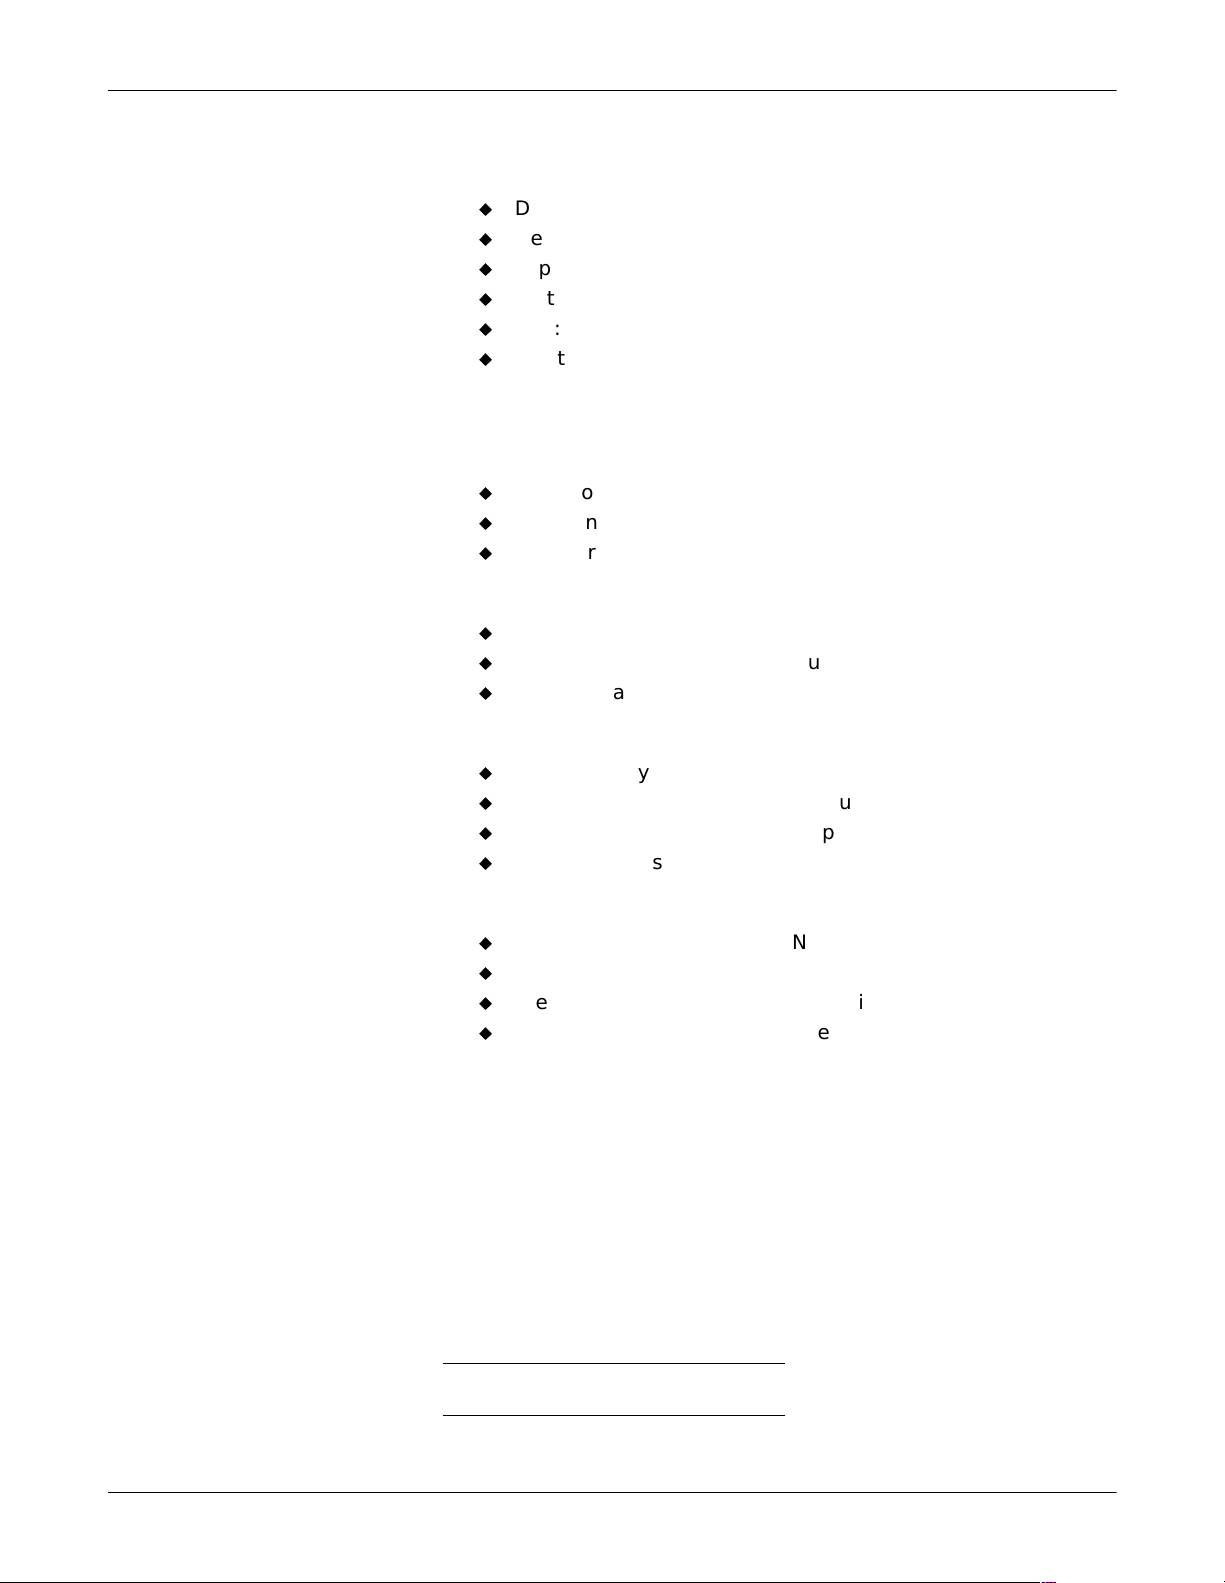
6. Click the Advanced button. The Editor Options screen will be
displayed:
MD1334-054A
7. In the Options list, select Next Report (F7) Chooses ...
In the Choices list, select Always return to Edit List.
Click OK when finis h ed .
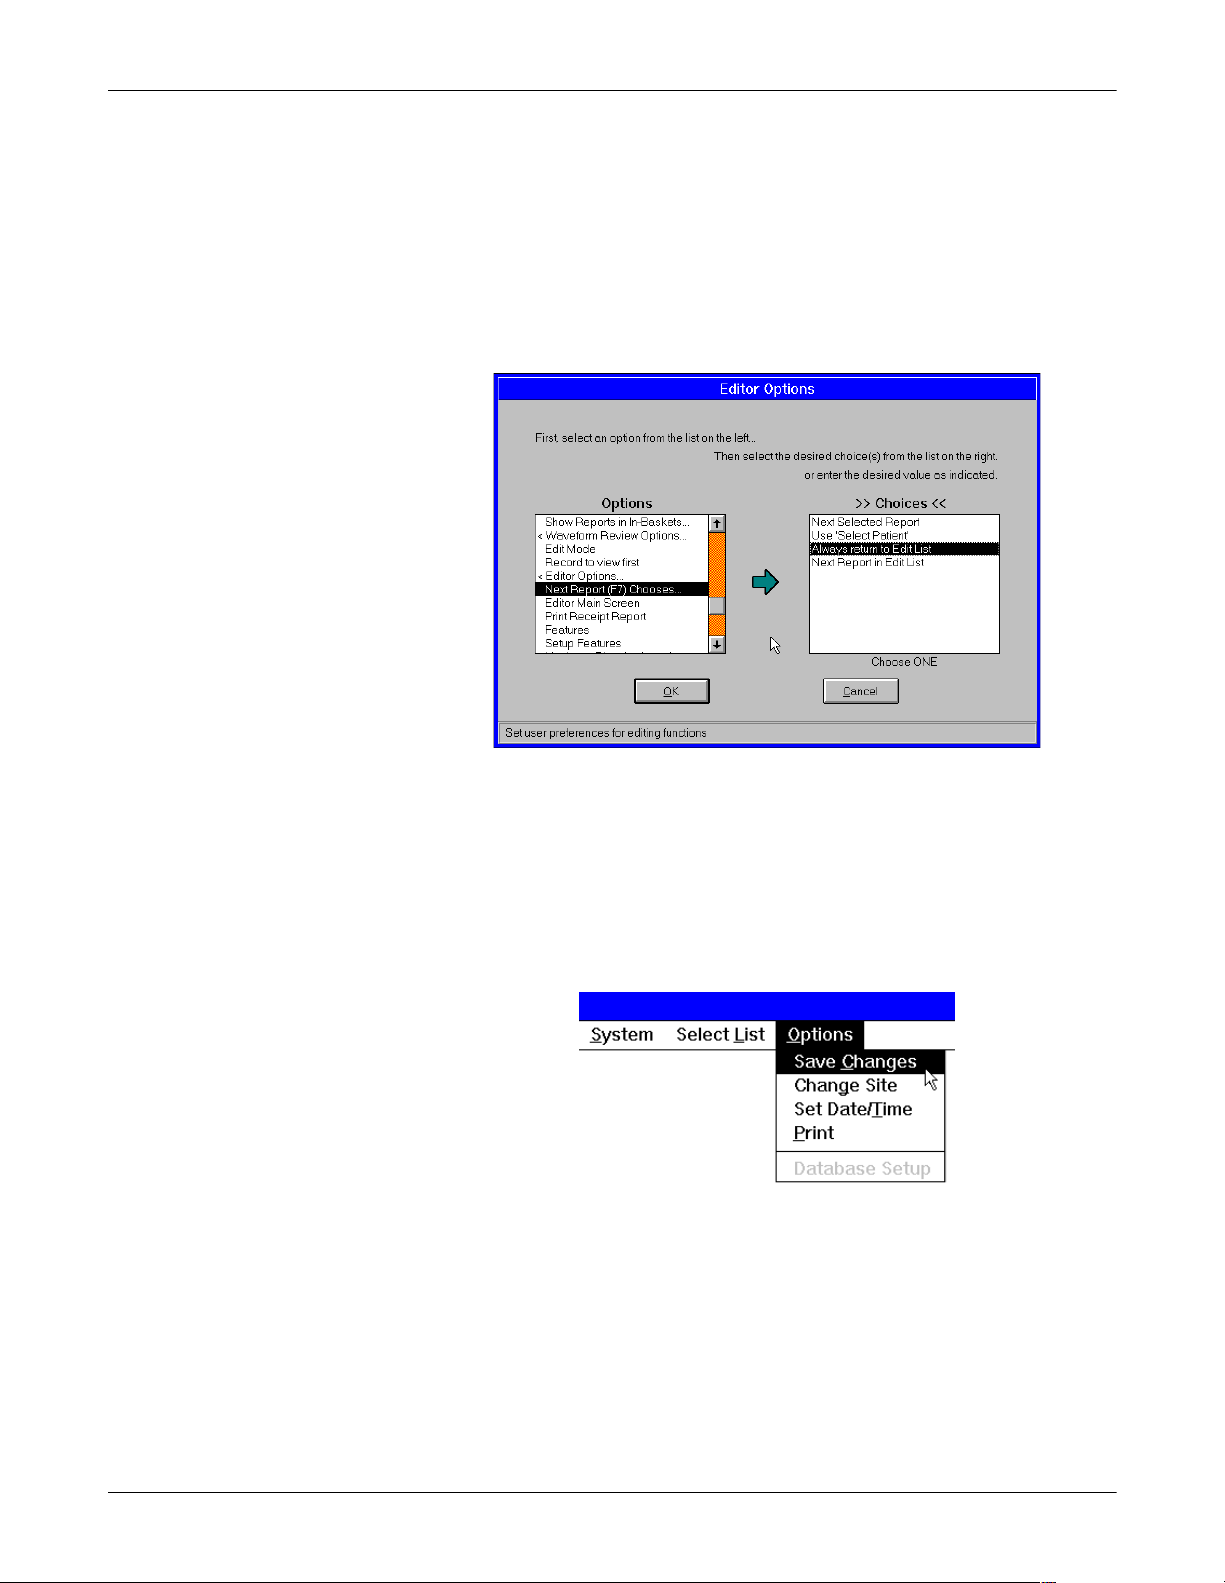
8. When returned to the User setup window, click OK, then select Save
Changes from the Options menu on the menu bar:
MD1334-055A
9. Click OK to save your changes. Click Next to configure another user,
if desired. Repeat steps 6 through 8 for all users configured for
testing.
Revision A HL7 Interface Professional Toolkit 2-31
2020285-028

Configure the HL7 Test Environment: Configure MUSE CV System on the Interface Workstation
Configure Report Distribution for Testing
The Report Distribution feature allows you to set up automatic printing
of reports when they are acquired by the system and when they are
confirmed. This system can be used to route the results and financial
transactions through the HL7 interface to the HIS, provided that the
HL7 interface is defined as a device in the MUSE CV system, and this
device is added to the routing configuration for each report type.
Each location separates report distribution activities into four cases:
Normal Unconfirmed
Abnormal Unconfirmed
Normal Confirmed
Abnormal Confirmed
Normal Unconfirmed and Abnormal Unconfirmed reports
Under normal circumstances, unconfirmed reports can be sent to the HIS
automatically with Report Distribution entries. However, for testing
purposes, these preliminary result messages will be manually generated
through the manual “print” function. Automatic distribution of
preliminary result messages will not be configured at this time.
Normal Confirmed and Abnormal Confirmed reports
Confirmed reports can be sent to the HIS automatically with Report
Distribution entries. The following procedures provide instructions for
configuring confirmed reports.
Also, for testing purposes we will only configure Report Distribution for
printing from the system’s Default location. Additional locations will be
configured when the interfa ce is integrated into the production MUSE
CV system after the testing is completed.
Each case contains its own set of actions which determines where reports
are sent.
1. From the System menu, select System Setup.
1B
2-32 HL7 Interface Professional Toolkit Revision A
2020285-028

Configure the HL7 Test Environment: Configure MUSE CV System on the Interface Workstation
2. From the Select List menu, select Report Distribution.
3. In the window titled Select Report Distribution to Configure, select
Resting ECG and click OK.
14B
15B
4. The window titled: Report Distribution for Location: Default Case:
Normal Unconfirmed will be displayed.
Click the Next Case button twice to bypass the windows for the
unconfirmed cases and display the window for Case: Normal
Confirmed.
Revision A HL7 Interface Professional Toolkit 2-33
2020285-028

Configure the HL7 Test Environment: Configure MUSE CV System on the Interface Workstation
5. Click the Add button to add a new stateme nt to th e Actions port ion of
the window.
MD1334-016A
6. In the Define an Action... portion of the window, modify the new
statement by selecting the following variables from the pull-down
lists:
1 copy
Current Record
HL7
HIS Result 1
ASAP
When complete, the new statement should read:
“When you process a report for this case, send 1 copy of the Current
Record to HL7 in HIS Result 1, ASAP.”
7. Click OK when co mp l et e.
8. Click the Next Case button. The title at the top of the window should
change to Case: Abnormal Confirmed.
9. Repeat steps 5 through 8 for the Abnormal Confirmed case type.
2-34 HL7 Interface Professional Toolkit Revision A
2020285-028

Configure the HL7 Test Environment: Configure MUSE CV System on the Interface Workstation
If the system is configured for batch formatting, which is usually used f or
financial transactions of normal/abnormal confirmed reports, click the
Previous Case button to display the Normal Confirmed window.
10. Click the Add button to add a new statem ent to the Actions portion of
the window.
MD1334-211A
11. In the Define an Action... portion of the wi ndow, modify the new
statement by selecting the following variables from the pull-down
lists:
1 copy
Current Record
HISBIL
HIS Billing 1
Batch
When complete, the new statement should read:
“When you process a report for this case, send 1 copy of the Current
Record to HISBIL in HIS Billing 1, to the Batch file.”
12. Click OK when comp l et e.
13. Click the Next Case button. The title at the top of the window should
change to Case: Abnormal Confirmed. Repeat step 11.
14. Repeat steps 11 and 12 for all other test types that will be supported
by the HL7 financial interface.
Revision A HL7 Interface Professional Toolkit 2-35
2020285-028

Configure the HL7 Test Environment: Configure MUSE CV System on the Interface Workstation
B
Configuring Additional Sites for Testing
If it has been determined that more than one site must be configured for
testing purposes, configure any additional sites as follows:
1. From the System menu, select System Setup.
2. From the Select List menu, select Sites.
1
17B
2-36 HL7 Interface Professional Toolkit Revision A
2020285-028

Configure the HL7 Test Environment: Configure MUSE CV System on the Interface Workstation
3. The Site Information window for Site Number 1 is displayed.
161C
4. Click on the Next button. The Site Number changes to Site Number 2,
and the Site Name and Site Name Abbreviation fields are emptied.
4-C
5. Enter the new Site Name and Site Name Abbreviation, and click OK.
Revision A HL7 Interface Professional Toolkit 2-37
2020285-028

Configure the HL7 Test Environment: Configure MUSE CV System on the Interface Workstation
A
6. From the System menu, select Exit.
7. When the Authorization screen appears, log in with the new Site
Number, then proceed to step 8.
Authorization
User ID:
MD1334-039A
Password:
Site Number:
OK Cancel
MD1267-046
8. It will now be necessary to configure locations, users and report
distribution for the new site.
127(It is not necess ary to re-configure d evices for additional sites.
Each device configuration is applicable to all sites.
2-38 HL7 Interface Professional Toolkit Revision A
2020285-028

3 Testing the HL7
Interface
Revision A HL7 Interface Professional Toolkit 3-1
2020285-028

For your notes
3-2 HL7 Interface Professional Toolkit Revision A
2020285-028

Introduction
Test Goals
Testing the HL7 Interface: Introduction
Now that we have configured the MUSE CV system application on the
interface workstation as a duplicate of your production MUSE CV
system, we can use the interface workstation as a “stand-alone” test
environment. This will allow you to test all aspects of the HL7 software
in a simulated production environment without affecting or
compromising the existing MUSE CV system.
After verifying the HL7 interface is operating correctly in this test
environment, we’ll then connect it to the MUSE CV system production
network.
To completely exercise your system in the test environment you should
test all of the interface options and features purchased for your
institution, such as ADT, Orders, Results, and Financial.
In addition, you should test your system under two different conditions:
single transaction (functional) tests, and a multiple transaction (load)
tests.
Single Transaction Tests
Load Tests
Under the single transaction condition, you will initiate individual
transactions and follow them through the test environment to ensure
that all functions of the sys te m are work ing prope r ly. Thes e test s shou ld
include all transaction types and all available sites and options. All
outcomes should arrive in the expected content, format and time frame.
After the functional test is completed, you’ll then perform a load test in
which a large volume of transactions will be sent at one time to verify
that the HL7 interface is functioning properly in a simulated production
environment. The outc omes should be the same as the functional tests,
and there should be no significant delays in the processing or
transmission of the data.
Revision A HL7 Interface Professional Toolkit 3-3
2020285-028

TCP/IP Monitor
Testing the HL7 Interface: Introduction
TCP/IP Monitor is an application included in the HL7 Interface program
group. This application allows you to view the TCP/IP message activity
between the MUSE CV system and your HIS in “real time.” You can
monitor one TCP/IP conn ectio n a t a ti me. Eit her an ou tboun d d evi ce or a
specific inbound parser can be selected. If you wish to monitor multiple
devices, this application may be run multiple times.
1. From the Windows Start menu. Select Programs==>HL7 Interface
==>TCP/IP Monitor. The application requests the device as shown
below.
2. Once a device or parser has been identified, the TCP/IP
Communications Monitor window is displayed. The current connect
status for your selection is displayed in the title bar. The window will
present all messages and acknowledgments in “real time.”
MD1334-158A
MD1334-151A
3-4 HL7 Interface Professional Toolkit Revision A
2020285-028

Testing the HL7 Interface: Introduction
3. To change to a different device or parser, select the Monitored Device
menu. Then choose Select MUSE Device.
MD1334-152A
Troubleshooting
Test Procedures
Test Sequence
127(For troubleshooting purpo ses, it is reco mmende d that a shortcu t
to this application be added to the desktop.
If errors or problems are encountered during testing, refer to
Appendix A-Troubleshooting.
The following is a suggested test plan. It is important to test all aspects
of your HL7 interface software. Be sure to create examples of each
transaction and event type, and provide data that will test all of the
options and features you have purchased.
These tests should be performed for each site configured on the interface
workstation.
The recommended sequence for the test procedures is:
Test all ADT transactions that will be supported for each site.
Test all Order transactions that will be supported for each site.
Test all Results transactions that will be supported fo r each site.
Test the ability of the system to successfully recover from any
shutdown that may occur during transaction processing.
Revision A HL7 Interface Professional Toolkit 3-5
2020285-028

Testing the HL7 Interface: Testing ADT Transactions
Testing ADT Transactions
The GE Medical Systems Information Technologies HL7 interface
accepts unsolicited messages for ADT transactions from the HIS. These
messages must include data for only one patient. When processing ADT
transactions, the HL7 interface will respond with an application level
acknowledgment. This acknowledgment indicates that the message was
received and processed. Once the transaction messages are processed on
the MUSE CV system, the entries are stored in th e MUSE CV system
databases and MUSE CV system users can access the data.
127(The Information Technologies HL7 interface does not support
batch processing of ADT transaction messages.
To simplify testing and verification of the ADT transaction processing,
we will separate the tests into four groups:
Transactions that add patient data
Transactions that change patient data
Transactions that merge patient data
Transactions that delete patient data
3-6 HL7 Interface Professional Toolkit Revision A
2020285-028

Testing the HL7 Interface: Testing ADT Transactions
Test Transactions that Add Patient Data
The transactions that add patient data are described in the following
table. Refer to the “Functional Description of HIS Interface” (P/N
408542-007) for further explanations of these transactions and their
affects on the various p atient databases.
Table 3. ADT Transactions that Add Patient Data
Types Transaction Results
A01 Admit a Patient A new record is added to the MUSE CV system database
A04 Register a Patient A new record is added to the MUSE CV system database
A05 Pre-admit a Patient A new record is added to the MUSE CV system database
A13 Cancel Discharge A deleted record is reinstated in the MUSE CV system database
These transactions primarily affect patient identification data, and can
be verified on the List of Patients and the Patient Information screens.
1. Using the test data, begin by sending a single Admit transaction
from the HIS to the interface workstation.
2. To verify succes sful process ing of this transa ction , log i nto the MUSE
CV system on the interface workstation.
3. From the System menu, select Interface Manager.
MD1334-088A
Revision A HL7 Interface Professional Toolkit 3-7
2020285-028

Testing the HL7 Interface: Testing ADT Transactions
A
4. The List of Patients should be displayed as shown below.
MD1334-034A
If the List of Patients screen is currently displayed, proceed to
step 6 .
If the List of open orders screen is displayed, perform step 5 to
display the List of Patients screen.
5. To display the List of Patients, select Show Patients from the Options
menu.
MD1334-31
6. Verify that the patient from your test transaction appears in the List
of Patients.
7. To view detailed patient information, choose Show Open Accounts
from the Select List menu.
MD1334-080A
3-8 HL7 Interface Professional Toolkit Revision A
2020285-028

Testing the HL7 Interface: Testing ADT Transactions
A
8. The List of Open Accounts is displayed, showing the account number
and classification for this patient..
MD1334-089A
127(If Accounts are not su pported on your syst em, the Patie nt ID
number will be used for the account number
9. From the List of Open Accounts screen highlight the desired entry
and then click on the View button. The Patient Information and
Account Information windows will be displayed as shown below:
MD1334-085
Revision A HL7 Interface Professional Toolkit 3-9
2020285-028

Testing the HL7 Interface: Testing ADT Transactions
B
10. Verify that all information from your test transaction is properly
displayed in the applicable windows.
11. After verifying that all data for the Admit transaction has been
processed correctly, send another transaction that adds patient data
and check the List of Patients and the other applicable information
screens for successful processing.
12. Continue testing until all the transactions that add patient data
supported on this particular site have been tested and verified.
86
3-10 HL7 Interface Professional Toolkit Revision A
2020285-028

Testing the HL7 Interface: Testing ADT Transactions
Test Transactions that Change Patient Data
The transactions that change patient data are described in the following
table.
Table 4. ADT Transactions that Change Patient Data
Type Transaction Results
A02 Transfer a Patient The patient record is changed to reflect the new location information.
A06 Transfer Outpatient to Inpatient The patient record is changed to reflect the new patient classification.
A07 Transfer Inpatient to Outpatient The patient record is changed to reflect the new patient classification.
A08 Update Patient Information The patient record is changed to reflect the new information.
A12 Cancel Transfer A patient transfer is canceled. The patient record is changed to show the
location prior to the transfer.
A17 Swap Patients Used when two patients will exchange beds. Both patient records are
changed to reflect the location changes.
Test these transactions as follows:
1. If a patient does not exist in the database, begin by admitting a
patient.
2. Send a Patient Transfer transaction from the HIS to the interface
workstation.
3. Verify that the patient appears on the List of Patients screen.
4. Select Show Open Accounts from the Select List menu. The List of
Open Accounts is displayed.
127(If Accounts are not su pported on your syst em, the Patie nt ID
number will be used for the account number.
5. From the List of Open Accounts screen highlight the desired entry
and then click on the View button. The Patient Information and
Account Information windows will be displayed.
6. Verify that all information from your test transaction is properly
changed in these windows.
7. After verifyi ng that all data for the Transfer Patient transaction has
been processed correctly, send another of the Transfer or Swap
transactions and check the appropriate screens for successful
processing.
8. Continue testing until all the “change” transactions supported on
this particular site have been tested and verified.
Revision A HL7 Interface Professional Toolkit 3-11
2020285-028

Testing the HL7 Interface: Testing ADT Transactions
Test Transactions that Merge Patient Data
The transactions that merge patient data are described in the following
table.
Table 5. ADT Transactions that Merge Patient Data
Type Transaction Results
A18 Merge Patient Information Moves all information in the system to a different Patient ID
A34 Merge Patient Information
(Patient ID only)
A35 * Merge Patient Information
(Account number only)
A36 * Merge Patient Information
(Patient ID & Account number)
* Only on systems that support account information
Test these transactions as follows:
1. Be sure there are at least two patients in your patient database.
2. Begin by sending a Patient Merge transaction from the HIS to the
interface workstation.
3. Verify successful processing of the transaction as outlined in the
previous tests.
4. Continue testing until all the transactions that merge patient data
supported on this particular site have been tested and verified.
Moves all information in the system to a different Patient ID (same as A18)
Changes all prior patient Account data to new patient Account number
Changes all information for prior Patient ID and Account number to new
Patient ID and Account number
3-12 HL7 Interface Professional Toolkit Revision A
2020285-028

Testing the HL7 Interface: Testing ADT Transactions
Test Transactions that Delete Patient Data
The transactions that delete patient data are described in the following
table.
Table 6. ADT Transactions that Delete Patient Data
Type Transaction Results
A03 Discharge a Patient Patient record (account) status changes from Open to Closed.
A11 Cancel Admit Patient record (account) status changes from Open to Closed.
A23 Delete a Patient Record Deletes specific patient information.
Test these transactions as follows:
1. If a patient does not exist in the database, begin by admitting a
patient.
2. Send a patient discharge transaction from the HIS to the interface
workstation for one of the patients that was previously admitted.
3. Verify successful processing of the transaction as outlined in the
previous tests.
4. Continue testing until all the transactions that delete patient data
have been tested and verified. It may be necessary to re-admit
deleted patient records.
Revision A HL7 Interface Professional Toolkit 3-13
2020285-028

Testing the HL7 Interface: Testing Order Transactions
Testing Order Transac tions
The Information Technologies HL7 interface accepts unsolicited
messages for Order transactions from the HIS. These messages must
include data for only one patient. When processing Order transactions,
the HL7 interface will respond with an application level
acknowledgment. This acknowledgment indicates that the message was
received and processed. Once the transaction messages are processed on
the MUSE CV system, the entries are stored in th e MUSE CV system
databases and MUSE CV system users can access the data.
127(The Information Technologies HL7 interface does not support
batch processing of Order transaction messages.
The following order transactions are supported by the HL7 interface:
Table 7. Order Transactions
Type Transaction Results
NW New Order Adds an new order to the database.
CA Cancel Order Request An existing order is cancelled.
DC Discontinue Order Request An existing order is discontinued.
XO Change Order Request An existing order is changed.
127(Be sure to test order transactions for every test type supported
by your system. These are i denti fi ed in the “G E Me dical Systems
Information Technologies HL7 Interface Pre-Installation Guide.”
Test the Order transactions as follows:
1. Using the test data, send a single new order transaction from the
HIS to the interface workstation.
2. Verify successful processing of this tra nsaction at the HIS and the
MUSE CV system.
3. Log into MUSE CV system on the interface workstation.
4. From the System menu, select Interface Manager. The first window
to appear is the List of open orders for the site you entered at the
Authorization window.
3-14 HL7 Interface Professional Toolkit Revision A
2020285-028

Testing the HL7 Interface: Testing Order Transactions
The List of open orders is a list of all orders which have been requested
but have not yet been processed by the MUSE CV system. A sample List
of open orders is shown below.
MD1334-081A
At this time, we will be mainly concerned with the View button, and the
various screens that it provides access to.
The View button on the List of open orders allows you to look at all the
order information and all the patient information for a particular
requisition number. Because there may be a large amount of data
associated with a given order, the information is presented in five
windows:
Order Information
Supplemental Order Information
Patient Information
Account Information
Supplemental Account Information
Revision A HL7 Interface Professional Toolkit 3-15
2020285-028

Testing the HL7 Interface: Testing Order Transactions
A
When you first choose View, the order information, account information
and patient informati on windows are presented. The supplemental
information windows may be ope ned by selecting from th e Window menu
or by using the buttons along the top of the screen.
ABC
DE F
Table 8. View Button Bar
Item Description
A Select to return to the list of orders.
B Select to view Order Information window*
C Select to view Supplemental order information window*
D Select to view Patient Information window*
E Select to view Account Information window*
F Select to view S upplemental account information window*
G Select for on-line Help.
* All five windows may be opened and closed independently, and may
be positioned anywhere on the screen by clicking and dragging on
the title bar of the window.
G
MD1334-162
Examples of these windows are shown on the following pages.
3-16 HL7 Interface Professional Toolkit Revision A
2020285-028

Testing the HL7 Interface: Testing Order Transactions
A
A
Order Information Window
A typical Order Information window is shown in the figure below.
Supplemental Order Information Window
A typical Supplemental Order Information window is shown in the figure
below.
MD1334-083
MD1334-084
Revision A HL7 Interface Professional Toolkit 3-17
2020285-028

Testing the HL7 Interface: Testing Order Transactions
A
B
Patient Information Window
A typical Patient Inform ation window is shown in the figure below.
Account Information Window
A typical Account Information window is shown in the figure below.
MD1334-085
086
3-18 HL7 Interface Professional Toolkit Revision A
2020285-028

Testing the HL7 Interface: Testing Order Transactions
A
Supplemental Account Information Window
A typical Supplemental Account Information window is shown in the
figure below.
MD1334-087
5. Verify that all information from your test transaction is properly
displayed in these windows.
6. After verifying that all data for the New Order transaction has been
processed correctly, send a Change Order transaction for the same
requisition and check the various screens to verify that the
appropriate data has changed.
7. Follow the same procedures to test the Discontinue Order Request
and the Cancel Order Request. Verify that the order has been
discontinued or canceled.
8. Continue testing until Order transactions for all test types supported
on this particular site have been tested and verified.
Revision A HL7 Interface Professional Toolkit 3-19
2020285-028

Testing the HL7 Interface: Testing Results Transactions
Testing Results Transactions
The purpose of this section is to test the ability of the Information
Technologies HL7 interface to successfully process and send preliminary,
final and corrected result messages from the MUSE CV system to the
HIS.
Test Data
The system must be tested using input data of known content that will
allow for proper evaluation of the expected outcomes. We have supplied
the following data for use in this testing:
A diskette (p/n 421128-001) containing a collection of patient test
data has been supplied with the interface workstation. This data
includes a variety of tests such as ECG, Stress, Holter and Hi-Res.
Each patient test on the diskette is identified with a patient name
and a sequential patient ID number (1, 2, 3, etc.).
The Sample ADT Test Plan provided in this document provides a
sample list of patient dem o graphics. The patient nam e s in this list
are the same names used for th e tests supplied on the diskette. You
can enter this information into yo ur test environment , or you can use
your own existing patient demographics (real or fictitious).
If you use your own existing patient demographics, the Patient
Names and Patient ID Numbers on the Information Technologiessupplied patient tests mu st be modified to match your demographic
choices.
3-20 HL7 Interface Professional Toolkit Revision A
2020285-028

Testing the HL7 Interface: Testing Results Transactions
Acquisition of Patient Test Data
Before the testing can begin, the patient test data must be acquired into
the interface workstation.
The following procedures outline how to acquire data from diskettes
using the Data Acquisition window.
1. Choose Acquisition from the System menu.
MD1334-203A
127(You don’t need to log into the MUSE CV system application
to access the System menu. The System menu is accessible
from the MUSE CV system Authorization wind o w .
2. When you select the Acquisition command in any of the MUSE CV
system applications, the Data Acquisition window opens, allowing
you to acquire files from a 3-1/2” diskette.
MD1334-164A
To prevent deletion of the records from the diskette as they are
acquired by the system, be sure you lock the diskette.
This is recommended for the test data diskette, since you may need
to acquire this data several times during these test procedures.
Revision A HL7 Interface Professional Toolkit 3-21
2020285-028

Testing the HL7 Interface: Testing Results Transactions
A
To lock the diskett e, slid e the wri te-pr otect tab so that the s mall h ole
through the diskette is exposed as shown below:
Unlocked
Locked
MD1334-163
If the diskette is not locked before acquisition, all records on the
diskette will be deleted from the diskette as they are acquired by the
MUSE CV system.
3. Insert the diskette and select Diskette in the Data Acquisition
window. The Records Transferred message starts counting to
indicate how many records are being transferred to the MUSE CV
system.
4. Select OK to close the window. Once a cquire d, th e files will appear in
the MUSE CV system Edit List.
3-22 HL7 Interface Professional Toolkit Revision A
2020285-028

Test Procedures
Testing the HL7 Interface: Testing Results Transactions
The test procedures for result transactions are divided into five separate
sets of instructions:
Systems with no inbound-to-MUSE CV system interface (such as
ADT or orders)
Systems with an inbound-to-MUSE CV system interface supporting
ADT transactions only
Systems supporting ADT and order transactions only
Systems supporting ADT transactions with account information only
Systems supporting ADT transactions with account information and
orders
Proceed to the instructions applicable to your system.
Revision A HL7 Interface Professional Toolkit 3-23
2020285-028

Testing the HL7 Interface: Testing Results Transactions
Testing Result Transactions on Systems With No Inbound Message Interface
These procedures are for testing result messages on systems that have
no inbound-to-MUSE CV system interface. On these systems the HIS
does not send ADT or Order messages to the MUSE CV system.
We will begin testing Result Messages by sending preliminary
(unconfirmed) result messages to the HIS. This will be followed by
sending final (confirmed) result messages to the HIS. If you will not be
sending preliminary result messages, proceed to the section for sending
final (confirmed) result messages.
Sending Preliminary Result Messages
Preliminary (unconfirmed) result messages are normally generated
automatically when the patient tests are acquired into the MUSE CV
system. For the purposes of testing, this automatic process will be
simulated by manually “printing” the unconfirmed report to the HL7
device. To manually print a report to the HL7 device, proceed as follows:
Display the Edit List
After the appropriat e patient tests have been acquired, the tests will
appear in the Edit List. This will be the starting point for all message
generation procedures. Display the Edit List as follows:
1. Log into the MUSE CV system on the interface workstation. See
“Logging Into the MUSE CV System” on page 1-11.
2. The Edit List should be displayed when MUSE CV system starts. If
the Edit List is not displayed, select Edit/Retrieve from the System
menu.
MD1334-093A
3-24 HL7 Interface Professional Toolkit Revision A
2020285-028

Testing the HL7 Interface: Testing Results Transactions
A typical Edit List screen is shown below.
23B
Since there is no ADT interface, it is not required that the Patient
Names and Patient ID Numbers for the sample tests in the Edit List
match the patient demographics on the HIS for successful result
testing. However, for consistency, it may be desire d th a t th e nam e s
on these tests match your test data.
If the Patient Names and Patient ID Numbers in the Edit List
already match the test demographi cs on the HIS, or if th ere is no
requirement for these names to match, proceed to step 8 .
If the Patient Names and PatientID Numbers in the Edit List DO
NOT match the test demographics on the HI S, and you would
like to change Patient Names and Patient ID Numbers in the Edit
List proceed as follows:
Revision A HL7 Interface Professional Toolkit 3-25
2020285-028

Testing the HL7 Interface: Testing Results Transactions
A
Update Patient Demographics (optional)
3. Highlight a test in the Edit List and click on the Edit button at the
lower left corner of the Edit List window.
MD1334-042
4. The ECG Report window is displayed, along with the Select
Overreader window.
The name displayed in the window is the currently selected
overreader. This name must match the name of the physician that
was set up on the interfa ce workstation as a user with overreading
privileges.
MD1334-212A
Enter the Number or Name of an appropriate overreader. You can
also Search for an available Overreader on the system. Click OK
when finished. The Select Overreader window closes.
5. When you are returned to the ECG Report window, click on the
Patient ID box. A dialog box will be displayed. Enter the appropriate
patient ID number in the box and click OK.
3-26 HL7 Interface Professional Toolkit Revision A
2020285-028
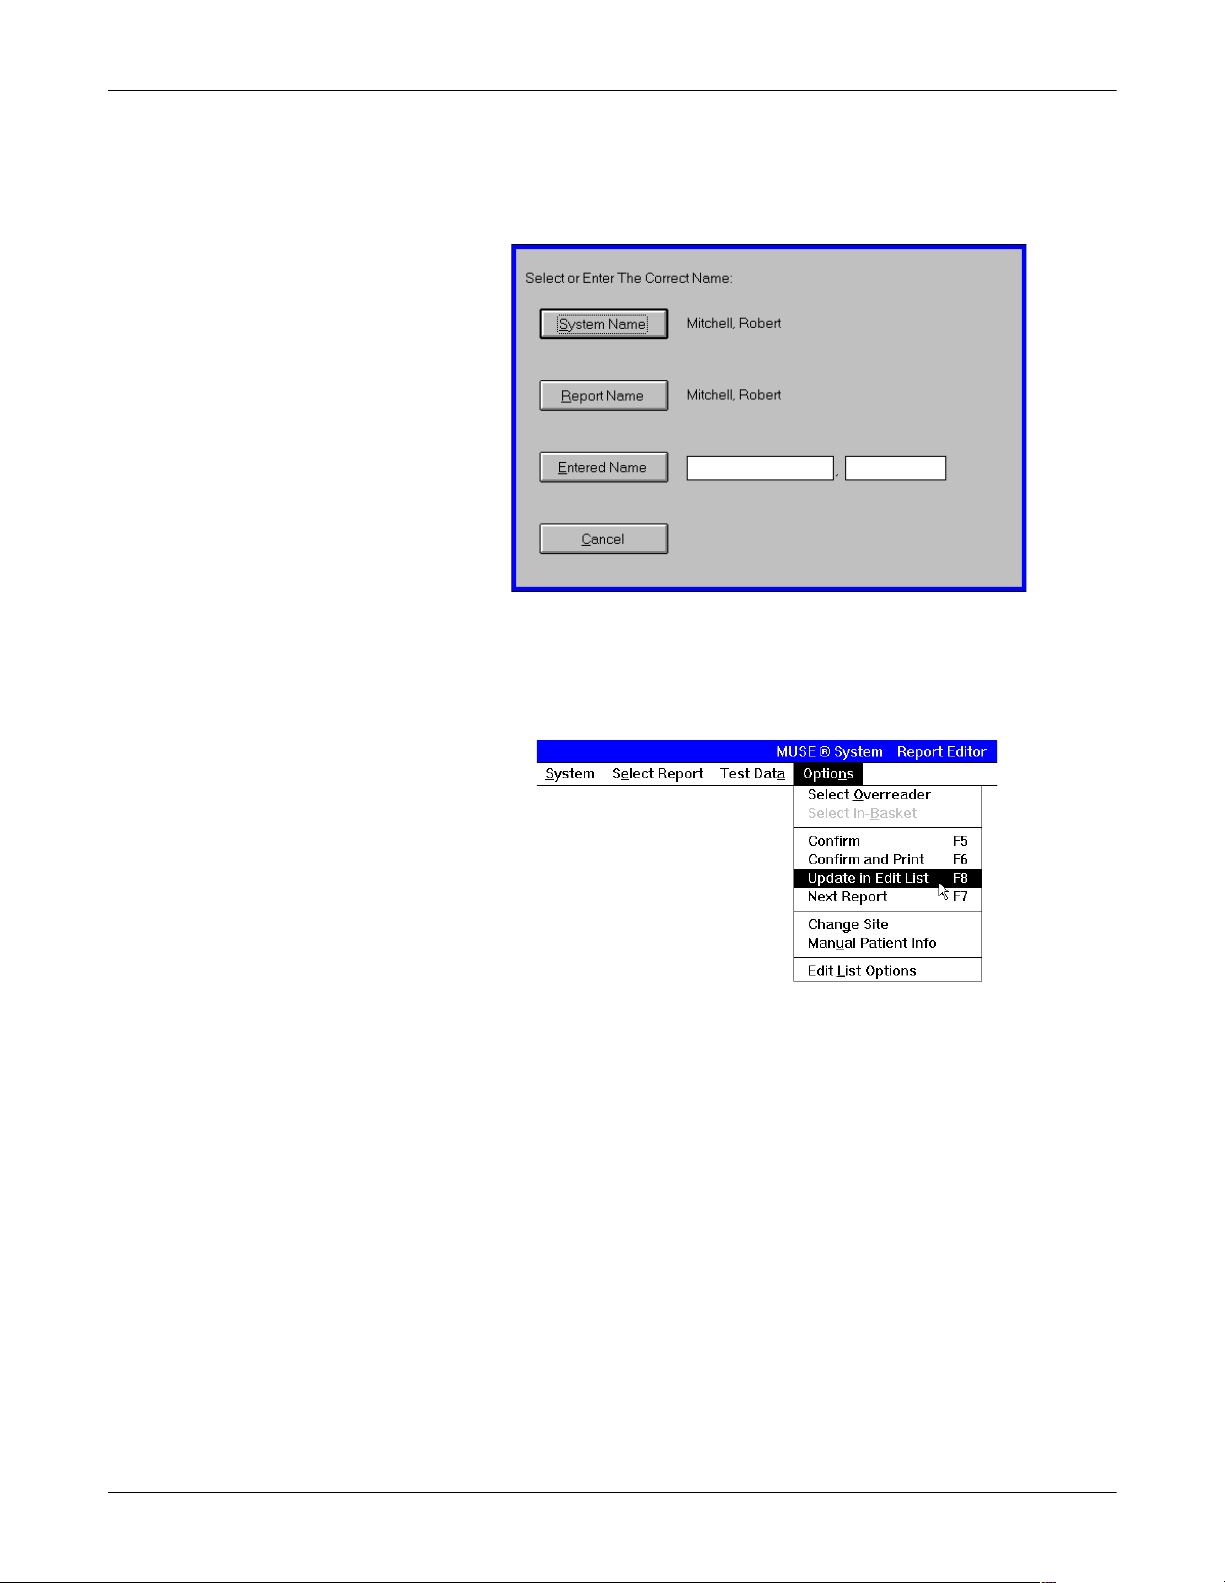
Testing the HL7 Interface: Testing Results Transactions
6. When returned to the ECG Report window, click on the box
displaying the Patient Name. A dialog box will be displayed. Enter
the appropriate pa tient name in the Entered Name box.
7. When the Patient Name and Patient ID Number have been updated
in the ECG Report window, select Update in Edit List from the
Options menu in the menu bar:
MD1334-045A
MD1334-056A
Revision A HL7 Interface Professional Toolkit 3-27
2020285-028

Testing the HL7 Interface: Testing Results Transactions
Generate the Preliminary Report
8. When the Edit List is displayed, highlight the appropriate test and
click on the Print button at the lower left corner of the Edit Li st
window.
23B
9. When the Send Report To... window is displayed, select the HL7
device from the pull-do wn list of Devices Defined in System Setup and
click OK. The report will be sent through the HL7 interface to the
HIS.
94B
10. Verify that all data has arrived at the HIS in the expected format.
3-28 HL7 Interface Professional Toolkit Revision A
2020285-028

Testing the HL7 Interface: Testing Results Transactions
A
Sending Final Result Messages
When sending final (conf irmed) results to the HIS, there a re two possi ble
scenarios:
A preliminary (unconfirmed) result message has already been
generated for this test
No preliminary (unconfirmed) result message was generated for this
test
If a preliminary (unconfirmed) result message has already been
generated for this test, proceed as fo llows:
Select the test in the Edit List and click on the Confirm button at the
bottom of the Edit List screen. Then “Print” the test to the HL7
device defined in System Setup.
Verify that all data has arrived at the HIS in the expected format.
If no preliminary (unconfirmed) result message was generated for this
test, and no change of Patient Name or Patient ID Number is required,
proceed as follows:
1. Perform steps 1 through 7 in the procedures for sending preliminary
(unconfirmed) result messages.
2. When the Patient Names and Patient ID Number have been updated
in the ECG Report window, select Confirm and Print from the
Options menu in the menu bar:
3. Verify that all data has arrived at the HIS in the expected format.
Sending Corrected Result Messages
This procedur e tests the ability of the system to successfully process and
send the corrected version of a previously-confirmed report.
1. Log into the MUSE CV system on the interface workstation. See
“Logging Into the MUSE CV System” on page 1-11 in Chapter 1.
MD1334-057
2. The Edit List should be displ ayed when the MUSE C V sys tem st arts .
If the Edit List is not displayed, select Edit/Retrieve from the System
menu.
Revision A HL7 Interface Professional Toolkit 3-29
2020285-028

Testing the HL7 Interface: Testing Results Transactions
A
The Edit List screen is shown below.
3. Select Retrieval from the Select Report menu on the menu bar.
MD1334-023A
4. The Retrieval window is displayed:
MD1334-058A
MD1334-059
3-30 HL7 Interface Professional Toolkit Revision A
2020285-028

Testing the HL7 Interface: Testing Results Transactions
A
A
5. You can retrieve a test by Patient ID, Patient Name or Test Date (in
day, month, year format). Enter the appropriate information and
click OK. The Test Directory window is displayed:
MD1334-060
6. In the box t itled St ored Information fo r <Patient Name> is a list of all
tests for that patient. Highlight the appropriate test and click on the
Edit button. The ECG Report window will be displayed:
MD1334-042
Revision A HL7 Interface Professional Toolkit 3-31
2020285-028

Testing the HL7 Interface: Testing Results Transactions
A
7. Edit the test information as necessary. When finished editing, select
Confirm and Print from the Options menu on the menu bar.
8. Verify that all data from the corrected report appears at the HIS in
the expected format.
MD1334-057
3-32 HL7 Interface Professional Toolkit Revision A
2020285-028

Testing the HL7 Interface: Testing Results Transactions
Testing Result Transactions on Systems Supporting ADT Only
These procedures are for testing result messages on systems that have
an inbound-to-MUSE CV system interface supporting ADT transactions
only. The HIS does not support Account information or send Orders to
the MUSE CV system.
We will begin testing Result Messages by sending preliminary
(unconfirmed) result messages to the HIS. This will be followed by
sending final (confirmed) result messages to the HIS. If you will not be
sending preliminary result messages, proceed to the section for sending
final (confirmed) result messages.
Sending Preliminary Result Messages
Preliminary (unconfirmed) result messages are normally generated
automatically when the patient tests are acquired into the MUSE CV
system. For the purposes of testing, this automatic process will be
simulated by manually “printing” the unconfirmed report to the HL7
device. To manually print a report to the HL7 device, proceed as follows:
Display the Edit List
After the appropriat e patient tests have been acquired, the tests will
appear in the Edit List. This will be the starting point for all message
generation procedures. Display the Edit List as follows:
1. Log into the MUSE CV system on the interface workstation. See
“Logging Into the MUSE CV System” on page 1-11 in Chapter 1.
2. The Edit List should be displ ayed when the MUSE C V sys tem st arts .
If the Edit List is not displayed, select Edit/Retrieve from the System
menu.
MD1334-093A
Revision A HL7 Interface Professional Toolkit 3-33
2020285-028

Testing the HL7 Interface: Testing Results Transactions
A typical Edit List screen is shown below.
3. Before sending the result transaction to the HIS, the Patient Names
and Patient ID Numbers on the sample tests in the Edit List must
match the test demographics on the HIS.
023B
If the Patient Names and Patient ID Numbers on the sample tests
already match the test demographi cs on the HIS, pro ceed t o step
10 .
If the Patient Names and Patient ID Numbers on the sample tests
DO NOT match the test demographics on the HIS, proceed as
follows:
4. Highlight a test in the Edit List and click on the Edit button at the
lower left corner of the Edit List window.
5. The ECG Report window is displayed, along with the Select
Overreader window.
MD1334-212A
The name displayed in the window is the currently selected
overreader. This name must match the name of the physician that
3-34 HL7 Interface Professional Toolkit Revision A
2020285-028

Testing the HL7 Interface: Testing Results Transactions
A
was set up on the interfa ce workstation as a user with overreading
privileges.
Enter the Number or Name of an appropriate overreader. You can
also Search for an available Overreader on the system. Click OK
when finished. The Select Overreader window closes.
6. When you are returned to the ECG Report window, click on the
Patient ID box. A dialog box will be displayed. Enter the appropriate
patient ID number in the box and click OK.
An error message may be displayed indicating th at a n ame mism atch
exists due to the ID number change.
MD1334-051A
Click OK and proceed to the next step.
7. When returned to the ECG Report window, note the PID/Name
Mismatch indication.
MD1334-052
Revision A HL7 Interface Professional Toolkit 3-35
2020285-028

Testing the HL7 Interface: Testing Results Transactions
A
A
8. Click on the box disp laying the patient name. A dialog box will be
displayed as shown:
9. Click on the Admitting Name button. You will be returned to the
ECG Report window. Note that the PID/Name Mismatch indication
has cleared.
MD1334-046
10. When the Patient Names and Patient ID Number have been updated
in the ECG Report window, select Update in Edit List from the
Options menu:
MD1334-056
3-36 HL7 Interface Professional Toolkit Revision A
2020285-028

Testing the HL7 Interface: Testing Results Transactions
11. Send the report to the HIS as follows:
When the Edit List is displayed, highlight the appropriate test and
click on the Print button at the lower left corner of the Edit Li st
window.
23B
Revision A HL7 Interface Professional Toolkit 3-37
2020285-028
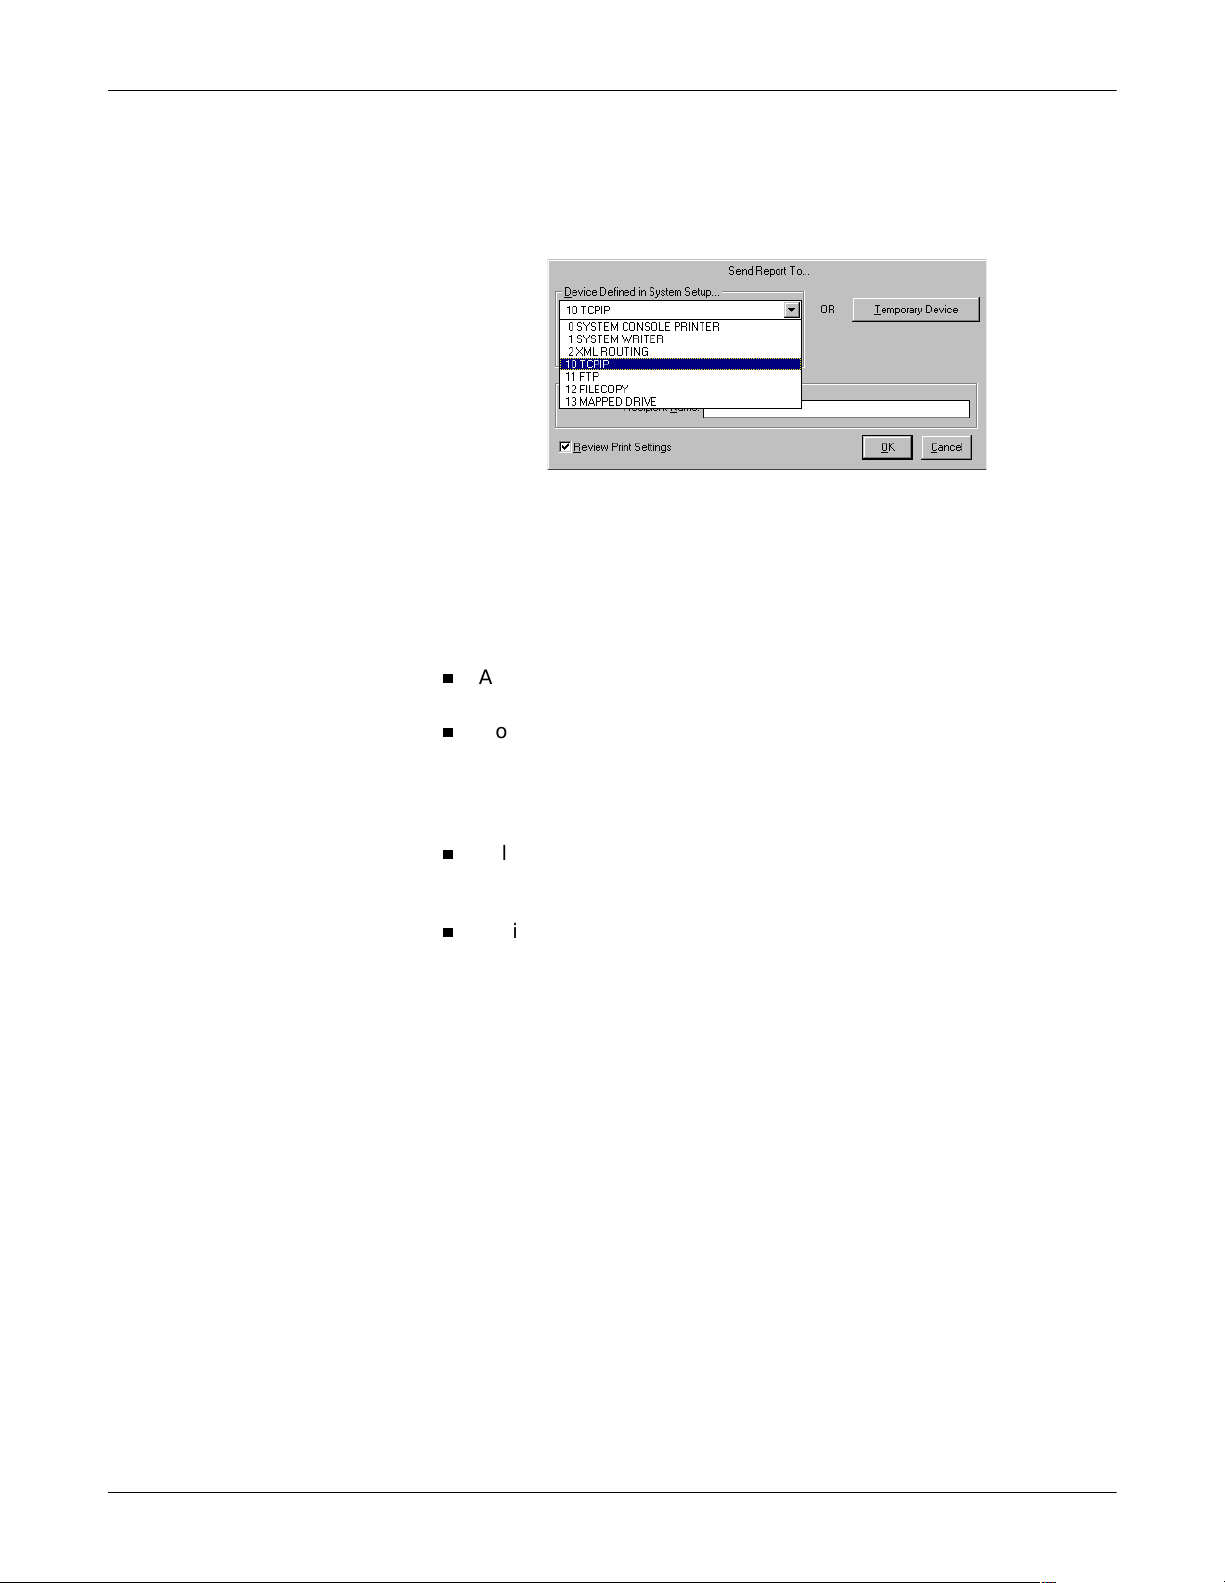
Testing the HL7 Interface: Testing Results Transactions
12. When the Send Report To... window is displayed, select the HL7
device from the pull-do wn list of Devices Defined in System Setup and
click OK. The report will be sent through the HL7 interface to the
HIS.
13. Verify that all data has arrived at the HIS in the expected format.
Sending Final Result Messages
When sending final (conf irmed) results to the HIS, there a re two possi ble
scenarios:
A preliminary (unconfirmed) result message has already been
generated for this test
No preliminary (unconfirmed) result message was generated for this
test
94B
If a preliminary (unconfirmed) result message has already been
generated for this test, proceed as fo llows:
Select the test in the Edit List and click on the Confirm button at the
bottom of the Edit List screen. Then “Print” the test to the HL7
device defined in System Setup.
Verify that all data has arrived at the HIS in the expected format.
If no preliminary (unconfirmed) result message was generated for this
test, proceed as follows:
1. Perform steps 1 through 9 in the procedures for sending preliminary
(unconfirmed) result messages.
3-38 HL7 Interface Professional Toolkit Revision A
2020285-028
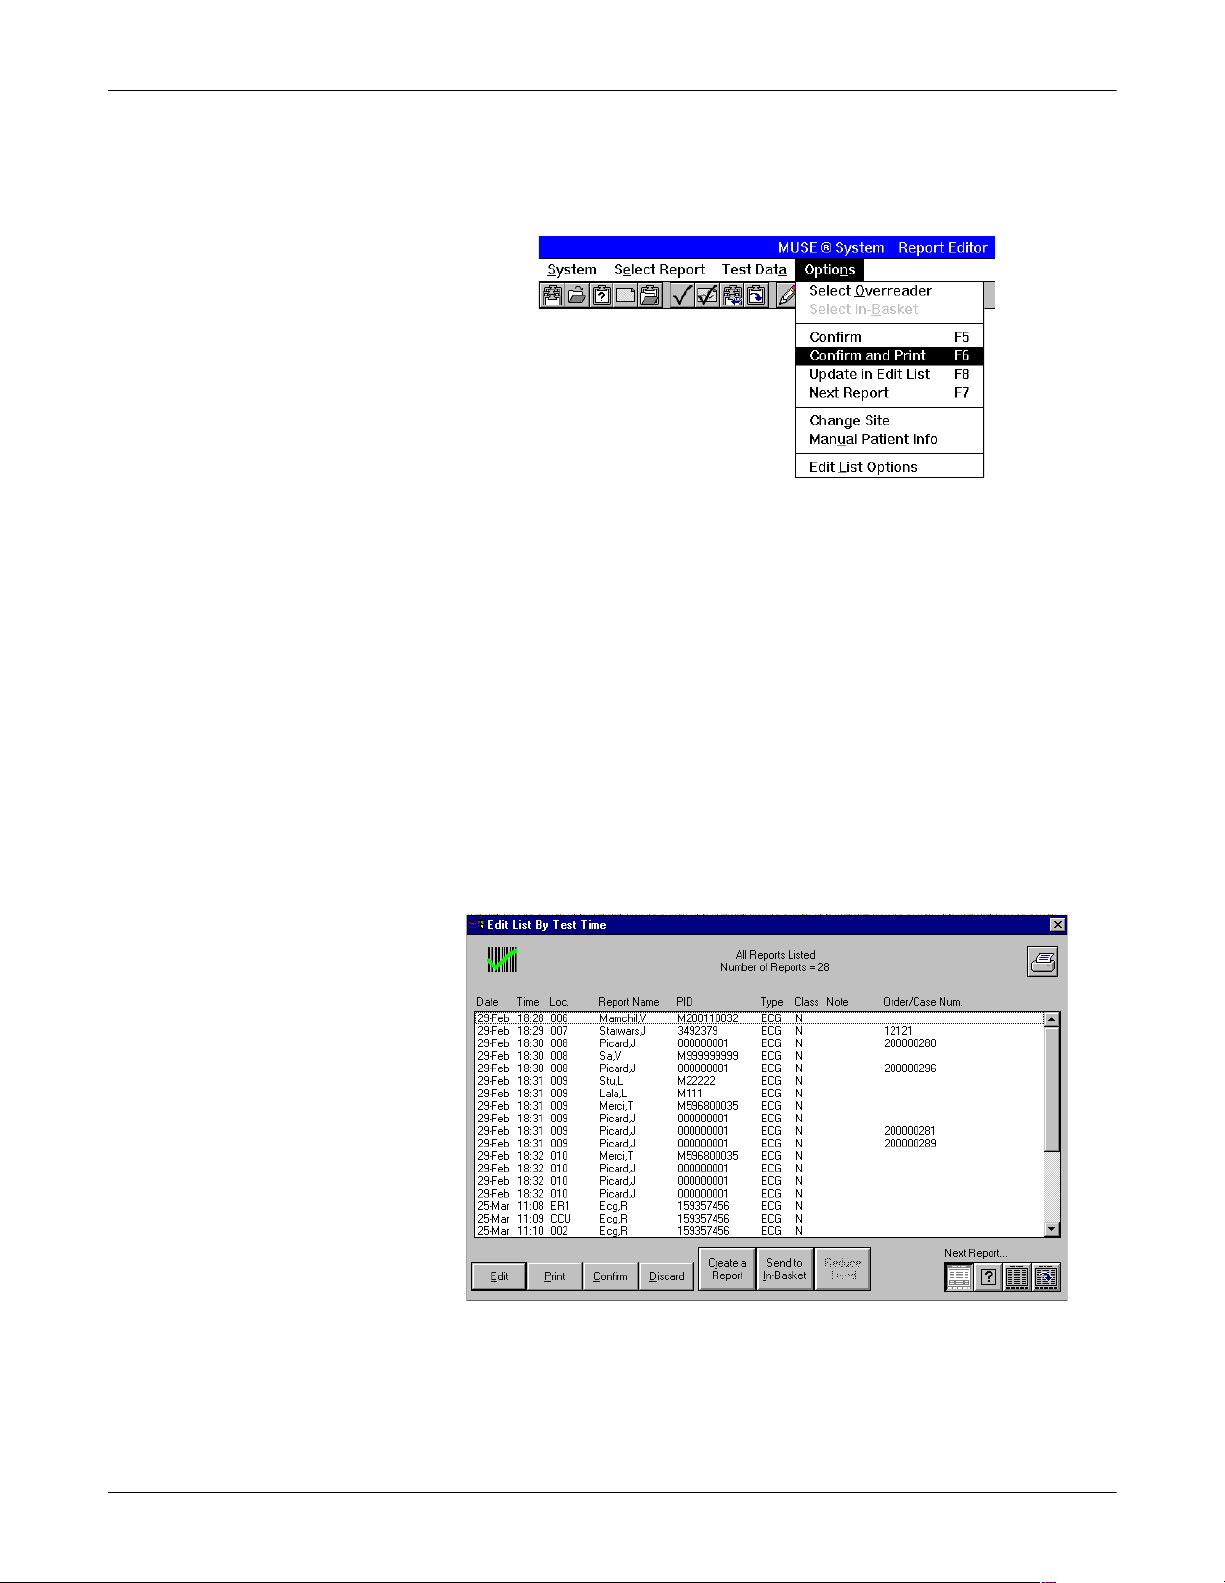
Testing the HL7 Interface: Testing Results Transactions
A
2. After the appropriate account number or order number has been
matched to the patient test in the ECG Rep ort window, select
Confirm and Print from the Options menu in the menu bar:
3. Verify that all data has arrived at the HIS in the expected format.
Sending Corrected Result Messages
MD1334-057
This procedur e tests the ability of the system to successfully process and
send the corrected version of a previously-confirmed report.
1. Log into the MUSE CV system on the interface workstation. See
“Logging Into the MUSE CV System” on page 1-11 in Chapter 1.
2. The Edit List should be displayed when MUSE CV system starts. If
the Edit List is not displayed, select Edit/Retrieve from the System
menu.
The Edit List screen is shown below.
23B
Revision A HL7 Interface Professional Toolkit 3-39
2020285-028

Testing the HL7 Interface: Testing Results Transactions
A
A
3. Select Retrieval from the Select Report menu on the menu bar.
4. The Retrieval window is displayed:
MD1334-058A
MD1334-059
5. You can retrieve a test by Patient ID, Patient Name or Test Date (in
day, month, year format). Enter the appropriate information and
click OK. The Test Directory window is displayed:
MD1334-060
3-40 HL7 Interface Professional Toolkit Revision A
2020285-028

Testing the HL7 Interface: Testing Results Transactions
A
A
6. In the box t itled St ored Information fo r <Patient Name> is a list of all
tests for that patient. Highlight the appropriate test and click on the
Edit button. The ECG Report window will be displayed:
MD1334-042
7. Edit the test information as necessary. When finished editing, select
Confirm and Print from the Options menu on the menu bar.
MD1334-057
8. Verify that all data from the corrected report appears at the HIS in
the expected format.
Revision A HL7 Interface Professional Toolkit 3-41
2020285-028

Testing the HL7 Interface: Testing Results Transactions
Testing Result Transactions on Systems Supporting ADT with Accounts
These procedures are for testing result messages on systems that have
an inbound-to-MUSE CV system interface supporting ADT with
Accounts only (no Order support).
We will begin testing Result Messages by sending preliminary
(unconfirmed) result messages to the HIS. This will be followed by
sending final (confirmed) result messages to the HIS. If you will not be
sending preliminary result messages, proceed to the section for sending
final (confirmed) result messages.
Sending Preliminary Result Messages
Preliminary (unconfirmed) result messages are normally generated
automatically when the patient tests are acquired into the MUSE CV
system. For the purposes of testing, this automatic process will be
simulated by manually “printing” the unconfirmed report to the HL7
device. To manually print a report to the HL7 device, proceed as follows:
Display the Edit List
After the appropriat e patient tests have been acquired, the tests will
appear in the Edit List. This will be the starting point for all message
generation procedures. Display the Edit List as follows:
1. Log into the MUSE CV system on the interface workstation. See
“Logging Into the MUSE CV System” on page 1-11 in Chapter 1.
2. The Edit List should be displayed when MUSE CV system starts. If
the Edit List is not displayed, select Edit/Retrieve from the System
menu.
MD1334-093A
3-42 HL7 Interface Professional Toolkit Revision A
2020285-028
 Loading...