

Page 1

iBORESCOPE4
USER’S MANUAL
DCiS4
99 Washington Street
Melrose, MA 02176
Phone 781-665-1400
Toll Free 1-800-517-8431
Visit us at www.TestEquipmentDepot.com
Please read this manual carefully and thoroughly before using this product.
Page 2

TABLE OF CONTENTS
Introduction . . . . . . . . . . . . . . . . . . . . . . . . . . . . . . . . . . . . . . . . . . 3
Key Features . . . . . . . . . . . . . . . . . . . . . . . . . . . . . . . . . . . . . . 3 –4
Safety Instructions . . . . . . . . . . . . . . . . . . . . . . . . . . . . . . . . . . . . . 4
What’s in the Case . . . . . . . . . . . . . . . . . . . . . . . . . . . . . . . . . . . . . 4
Product Overview . . . . . . . . . . . . . . . . . . . . . . . . . . . . . . . . . . . 4 –5
Setup Instructions . . . . . . . . . . . . . . . . . . . . . . . . . . . . . . . . . . . . . 5
Install Batteries . . . . . . . . . . . . . . . . . . . . . . . . . . . . . . . . . . . 5
Download the App (Apple iOS and Android Devices) . . . . . . . 6
Operating Instructions—Apple iOS Platform . . . . . . . . . . . . . 7 – 10
Viewing Live Video . . . . . . . . . . . . . . . . . . . . . . . . . . . . . . 7 –8
Taking and Viewing Photos. . . . . . . . . . . . . . . . . . . . . . . . . . . 8
Recording and Playing Back Videos. . . . . . . . . . . . . . . . . 8 –9
Advanced Settings . . . . . . . . . . . . . . . . . . . . . . . . . . . . . . . . 10
Operating Instructions—Android Platform . . . . . . . . . . . . . . 10 – 17
Viewing Live Video . . . . . . . . . . . . . . . . . . . . . . . . . . . . 10 – 11
Taking and Viewing Photos. . . . . . . . . . . . . . . . . . . . . . 12 – 13
Recording and Playing Back Videos. . . . . . . . . . . . . . . 13 – 15
Advanced Settings . . . . . . . . . . . . . . . . . . . . . . . . . . . . 15 – 17
Using the Probe. . . . . . . . . . . . . . . . . . . . . . . . . . . . . . . . . . . . . . . 17
Installing Accessories. . . . . . . . . . . . . . . . . . . . . . . . . . . . . . . . . . 18
Specifications . . . . . . . . . . . . . . . . . . . . . . . . . . . . . . . . . . . 18 – 19
Operating & Maintenance Tips . . . . . . . . . . . . . . . . . . . . . . . . . . . 19
Warranty Information . . . . . . . . . . . . . . . . . . . . . . . . . . . . . . . . . . 20
Return for Repair Policy . . . . . . . . . . . . . . . . . . . . . . . . . . . . . . . . 20
Guide de L'Utilisateur . . . . . . . . . . . . . . . . . . . . . . . . . . . . . . 31 – 40
Manual del Usuario. . . . . . . . . . . . . . . . . . . . . . . . . . . . . . . . 41 – 60
2
Page 3

INTRODUCTION
Thank you for purchasing a General Tools & Instruments’ DCiS4 iBorescope4.
Please read this manual carefully and thoroughly before using the instrument.
Applications for this instrument include inspections of hard-to-reach or
hard-to-see areas typical of crowded engine compartments, equipment
enclosures, behind walls, under structures or inside ductwork.
The iBorescope4 is a unique inspection instrument that along with a free
®
downloadable app enables an Apple
iOS or Android™smartphone or tablet
device to be used as the video monitor.
To receive the video, a free app called iSNAKESCOPE must be downloaded and
installed on the smartphone or tablet. The free Apple iOS app is downloadable
®
from the iTunes
App Store and the free Android app is downloadable from
the Google Play Store. iBorescope4 will then be able to stream high-quality
video captured by the camera at the tip of its long probe to the screen of the
app-enabled smartphone or tablet via a wireless, self-generated WiFi hotspot.
Soft buttons on each app allow the user to record inspection video clips and
also take snapshots of the video stream and store them on the enabled device.
A saved clip or snapshot can then be shared immediately by attaching it to an
e-mail or a text message, or via the Skype
™
application.
KEY FEATURES
• Generates ad hoc WiFi network (without Internet access) for transmitting
probe video to app-enabled iPhone/iPad or Android-based smartphone or
tablet
• 36 in. (914mm) long, 8mm (0.32 in.) diameter fixed (non-interchangeable),
flexible-obedient probe captures VGA (640 x 480 pixel) resolution video
• App’s and soft buttons capture .mov video clips and .jpg still images
of live video stream and save files within the app and to the Photos folder of
an Phone/iPad or the SD card folder of an Android device. Video clips and still
photos can be viewed immediately, shared immediately by text, or shared
later by e-mail or Skype.
• Thumbwheel on pistol grip controls camera lighting
iPad®, iPhone®and iTunes®are trademarks of Apple Inc., registered in the U.S. and other countries.
Android™is a trademark of Google Inc. Skype™is a trademark of Skype Limited.
3
Page 4
• Both apps allow you to change password and adjust video resolution and
brightness range
• Includes a smartphone holder and three useful probe tip accessories
(45° mirror, pickup hook, magnetic pickup)
• Powered by (4) “AA” batteries (not included)
• 1-year limited warranty
SAFETY INSTRUCTIONS
• WARNING! •
Do not use iBorescope4 to inspect spaces or enclosures known or suspected to
contain live electrical wiring.
WHAT’S IN THE CASE
iBorescope4 comes in a protective hard plastic case along with a smartphone
holder, three probe tip accessories and this user’s manual.
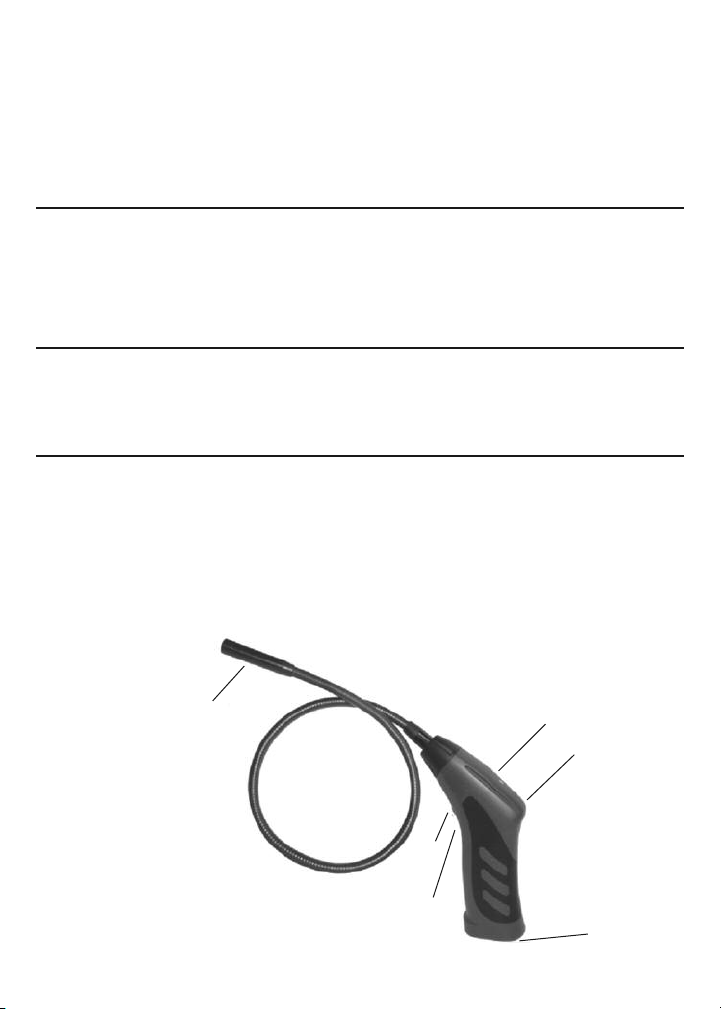
PRODUCT OVERVIEW
Fig. 1 below and on the next page shows the controls, indicators, physical
features and probe-tip accessories included with iBorescope4. Familiarize
yourself with the names and functions of all components before moving on to
the Setup Instructions and Operating Instructions.
4
Fig. 1. iBorescope4’s controls,
indicators, physical features
and included probe-tip accessories
4
1
5
2
6
3
Page 5
1. WiFi status light:
Green light on and steady = Preparing hot spot
Green light flashing slowly = Hot spot ready, device(s) not connected
Green light flashing quickly = Hot spot ready, device(s) connected
Green and red light on and steady = Low battery
2. Power switch/brightness thumbwheel
3. Battery compartment 4. Camera head
5. Threaded hole for attaching included smartphone holder or mounting
iBorescope4 upside down on tripod
6. Reset button. Press with end of pin or needle and hold for 10 seconds to
reset iBorescope4’s WiFi Service Set Identifier (SSID) and password to the
factory defaults of “iSNAKESCOPE” and “12345678”, respectively.
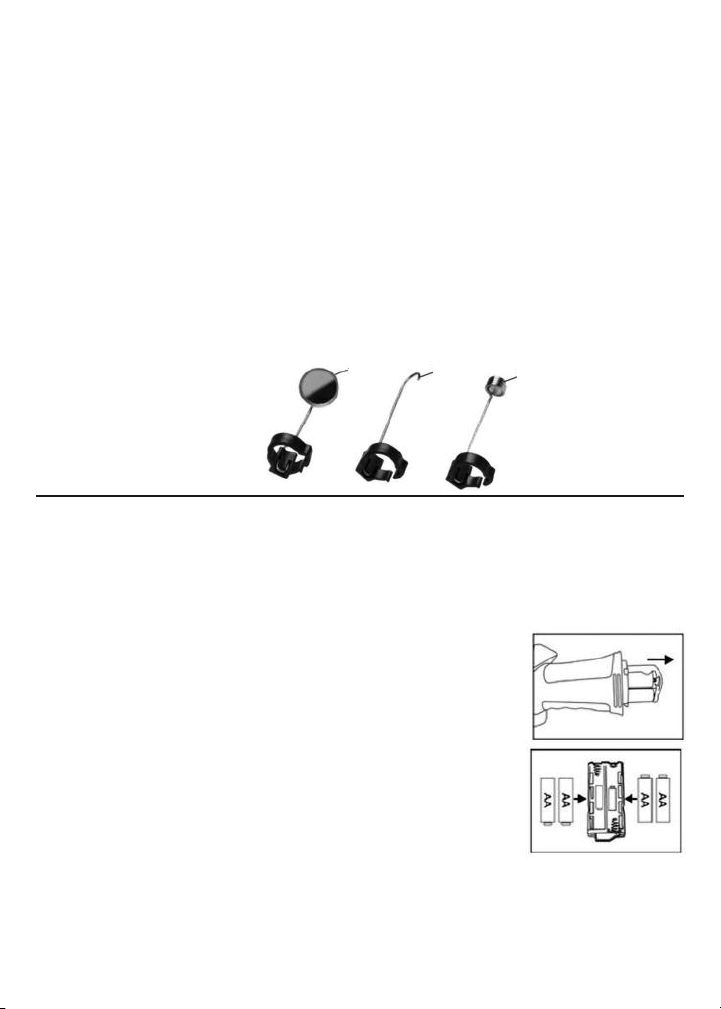
7. Magnetic pickup
8
9
7
8. 45° mirror
9. Pickup hook
SETUP INSTRUCTIONS
INSTALL BATTERIES
iBorescope4’s battery compartment is accessible from the bottom of the pistol
grip.
To install batteries,
1. Slide the battery compartment cover in the direction of
the arrow marked on it.
2. Extract the battery magazine from the grip by pulling on
the tab at its end (see upper figure at right).
3. Load four “AA” batteries into the magazine, using the
polarity markings within it as a guide (see lower figure
at right).
4. Push the loaded magazine back into the grip (it fits only
one way).
5. Replace the battery compartment cover, pushing it forward until it
snaps shut.
5
Page 6

DOWNLOAD THE APP (APPLE IOS AND ANDROID DEVICES)
To download the free Apple app that enables iBorescope4, first make sure
that your iPhone or iPad is connected to the Internet. Then touch the App Store
icon to visit the Apple App Store. Then enter “iSNAKESCOPE” in the Search box.
When iSNAKESCOPE’S landing page appears, touch the Free App link at the
upper left of the page.
You will be prompted to sign in to the iTunes Store using your Apple ID and
password. If you do not have an Apple ID, you can create one now.
Before downloading the app, you will be shown Apple’s Privacy Policy page.
Select the box indicating that “I have read and agree to these terms and
conditions.” Then touch Agree. Doing so will return you to the landing page of
the iSNAKESCOPE app and begin downloading it.
To download the free Android app that enables iBorescope4:
1. Make sure that your device is connected to the Internet.
2. Go to the Google Play Store and enter “iSNAKESCOPE” in the Search box at
the top of the store’s home page.
3. On the APPS screen that appears next, touch the iSNAKESCOPE Teamforce
icon.
4. On the iSNAKESCOPE app’s landing page that appears next, touch the Install
button at upper right.
5. On the next screen, touch the “Accept & download” button.
6. While the app downloads, on the following screen check the “Allow
automatic updating” box
The installation should take less than a minute. Installation is complete when
you receive a notification that “iSNAKESCOPE [has been] “Successfully
installed.”
To activate the iSNAKESCOPE app and begin displaying inspection video on
your Apple iOS or Android device, you must disconnect from the Internet and
establish connectivity between your device and iBorescope4’s ad hoc WiFi
network by following the Operating Instructions for your platform in the next
section.
6
Page 7

OPERATING INSTRUCTIONS—
APPLE IOS PLATFORM
VIEWING LIVE VIDEO
1. Turn on iBorescope4 by rolling the power switch/brightness thumbwheel
(Fig. 1, Callout 2) backward until you feel and hear a click. Note that moving
the thumbwheel adjusts the brightness of the four LEDs in the camera head
(Fig. 1, Callout 4). The WiFi status light on the top of the grip will glow solid
green for 30 seconds or more while iBorescope4 prepares to generate an ad
hoc hot spot (without Internet connectivity).
2. When the green light begins to flash slowly, the WiFi hot spot is available to
connect to one or more mobile devices. Power on your device and touch the
Settings icon to open your Settings screen. Your next step is enabling your
device for wireless access to available WiFi networks.
3. Touch the WiFi row to enter the WiFi Networks screen. The iSNAKESCOPE hot
spot should appear in the list of available networks. Touching the
iSNAKESCOPE row connects the instrument to the network, enabling wireless
transmission of probe video to any nearby iPhone or iPad running the
iSNAKESCOPE app.
When a connection has been established, a check mark will appear in the
iSNAKESCOPE row. Be aware that while you are connected to the ad hoc
iSNAKESCOPE WiFi network, your iPhone/iPad will not have Internet connectivity.
The first time you try to connect to the hot spot, you will be prompted to enter
the app’s password (the default password is 12345678). Thereafter, you will not
be asked for a password; the iSNAKESCOPE row will already have a check mark.
4. Touch the button on your iPhone/iPad to back out of the WiFi Networks and
Settings screens.
5. Locate the
iSNAKESCOPE icon
among your apps
and touch it. The
WiFi status light will
begin flashing more
quickly to signal
that your device is
now connected to
the hot spot.
7
Page 8

Simultaneously, the app’s splash screen will appear, showing live video in the
center and four soft buttons on the right side (see photo at bottom of
previous page).
TAKING AND VIEWING PHOTOS
To save a still image (also called a screen grab) of live video or paused video,
touch the soft button on the right side of the screen. The familiar sound of a
camera shutter confirms that a picture was taken. Pictures are stored as .jpg
files in the Camera Roll subfolder of the Photos folder of your iPhone/iPad.
To view your photos, touch the button on your device to back out of the
iSNAKESCOPE app. Locate your Photos icon and select it. By default, all of the
photos you take with iBorescope4 are stored in the Camera Roll subfolder with
a thumbnail view. Touch any thumbnail to expand the image to fill the screen of
your iPhone/iPad using your preferred photo viewing app.
While your iPhone/iPad is connected to the iSNAKESCOPE ad hoc WiFi network,
your mobile device will not have Internet access. So if you want to share any
snapshots immediately, you must do so by attaching them to text messages
you send over your cellular network. After you have disconnected your device
from the iSNAKESCOPE network, you can connect to another WiFi network with
Internet access and share your pictures using e-mail or Skype.
RECORDING AND PLAYING BACK VIDEOS
To record a clip of live probe video appearing on your iPhone/iPad screen,
touch the soft button on the right side of the app window. Pressing the
button 1) changes the button label to , 2) starts a running clock indicating the
clip’s duration so far in the upper left corner of the window, and 3) begins to
store a temporary .mov file in the app.
To permanently store
the clip in the Camera
Roll subfolder of your
iPad/iPhone’s Photos
folder, see the
instructions below for
exporting video clips.
To stop recording a
video clip, touch the
button.
8
Page 9

To prepare to play back a video clip, touch the soft button. The following
screen will appear, listing all recorded video clips by name, size and date.
To play back a video clip, touch its line.
To delete a video clip, highlight its line and touch the Delete button.
To delete all stored video clips, touch the Clear button. To confirm that you
wish to proceed, touch Yes on the pop-up Warning screen.
As mentioned earlier, video clips recorded using iOS devices are temporarily
saved as .mov files within the iSNAKESCOPE app. If you wish to view any clip
after closing the app, share the clip with someone, or view the clip on another
device later, you must “export” it before closing the app. The process of
exporting a clip permanently saves it to the Camera Roll subfolder of your
iPad/iPhone’s Photos folder. Video icons are attached to exported video clips to
distinguish them from stored images.
To export a video clip, touch the Export button on the Playback screen and
select the clip by touching its listing.
To attach an exported video clip to an e-mail message, you must first exit
the iSNAKESCOPE app and disconnect from its ad hoc WiFi spot. Only then can
you connect to a conventional WiFi hot spot with Internet connectivity, or a
cellular network.
9
Page 10

ADVANCED SETTINGS
To change the iSNAKESCOPE iOS app’s settings, touch the button at the
upper right of the app window. The following screen will appear.
As the screen shot shows, you can
choose to store video clips at 320 x
240 pixel (QVGA) or 640 x 480 pixel
(VGA) resolution as well as adjust
their brightness.
The Wifi settings button at the
bottom of the Settings screen
allows you to change iBorescope4’s
WiFi Service Set Identifier (SSID)
and/or password. The default WiFi
SSID for the unit is iSNAKESCOPE.
The default WiFi password is
12345678. You can change either value to any combination of letters and
numbers that is at least eight digits long.
Finally, the Restore factory settings button on the Settings screen should be
self-explanatory. Touching it restores the SSID and password and resolution
and brightness settings to their original values. Another way to restore all
default factory settings is to use the tip of a pin or needle to press the Reset
button, which is located just below the power switch/brightness thumbwheel
(Fig. 1, Callout 6) on the iBorescope4 pistol grip.
OPERATING INSTRUCTIONS—
ANDROID DEVICES
VIEWING LIVE VIDEO
1. Turn on iBorescope4 by rolling the power switch/brightness adjustment
thumbwheel (Fig. 1, Callout 2) to the right until you hear and feel a click. Note
that moving the thumbwheel adjusts the brightness of the four LEDs in the
camera head (Fig. 1, Callout 4). The WiFi status light on the top of the grip
will glow solid green for 30 seconds or more while iBorescope4 prepares to
generate an ad hoc hot spot (without Internet connectivity).
2. When the green light begins to flash slowly, the WiFi hot spot is available to
connect to one or more mobile devices. Power on your device and touch the
(Menu) button at lower left, followed by the System settings line.
10
Page 11

3. Touch the ON soft button on the right side of the Wi-Fi row to enable WiFi
connectivity.
4. Touch the left side of the Wi-Fi row to enter the Wi-Fi Networks screen. The
iSNAKESCOPE hot spot should appear in the list of available networks. Touch
the iSNAKESCOPE row, and then the Connect soft button at the right of the
next screen. When “Connected” appears in the iSNAKESCOPE row, your
Android device is ready to receive wireless transmissions of probe video. Be
aware that while you are connected to the ad hoc iSNAKESCOPE WiFi
network, your device will not have Internet connectivity.
The first time you try to connect to the hot spot, you will be prompted to
enter the app’s password (the default password is 12345678). Thereafter,
you will not be asked for a password; the iSNAKESCOPE row will already
have a check mark.
5. Touch the (Home) or button on your device to exit the Wi-Fi networks
screen.
6. Locate the iSNAKESCOPE icon among your apps and touch it. The WiFi status
light will begin flashing more quickly to signal that your device is now
connected to the hot spot. Simultaneously, the following screen will appear,
with live video in the main viewing area. Note the four soft buttons on the
right side of the app window.
11
Page 12
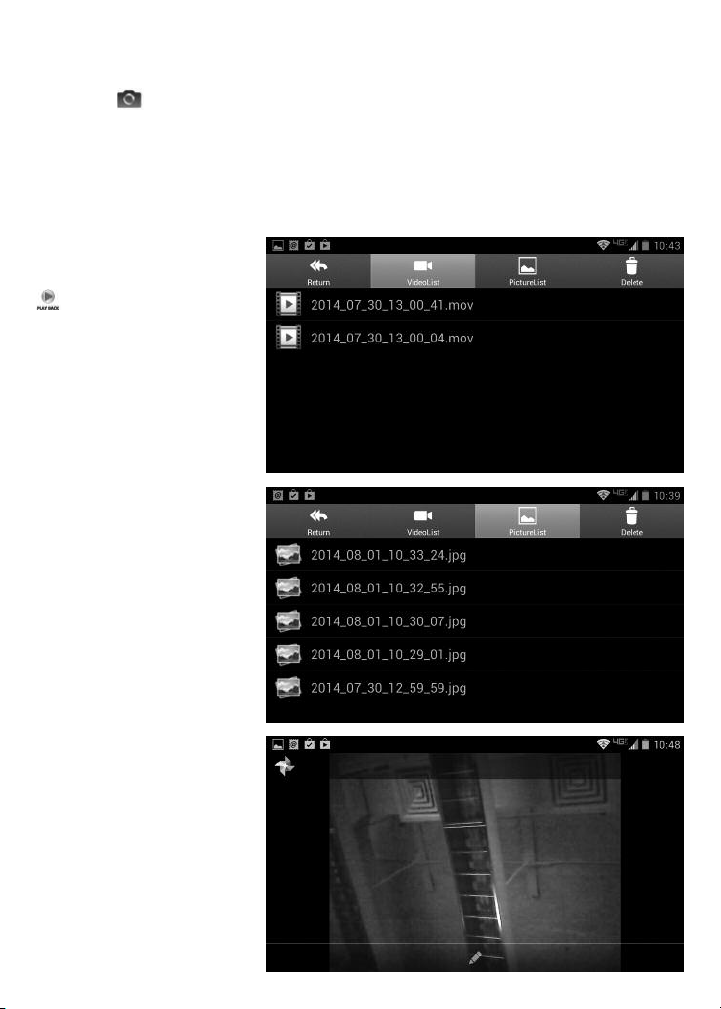
TAKING AND VIEWING PHOTOS
To save a still image (also called a screen grab) of live video or paused video,
touch the soft button. The familiar sound of a camera shutter and the
overlay text OK confirm that a picture was taken. All photos you take are
immediately and permanently stored as .jpg files in a dedicated
“iSNAKESCOPE” subfolder of the “sdcard” folder of your Android device. Any
photos you take will be saved to this folder even if no SD card is installed in
your device, or if an SD card is installed and it is full.
To view your pictures,
begin by touching the
button to call up the
screen at right.
Touch the PictureList
button to switch to
displaying stored photos.
To view any photo, touch
its line. Note the Photo icon
at the upper left of the
screen shot at right. Use
pinch and spread motions
to shrink or expand any
displayed image as desired.
12
Page 13

To return to the screen, touch the button on your Android device. To
resume showing live video, touch the Return button at the upper left of the
screen.
To delete any photo,
return to the screen
and touch the Delete
button at upper right. This
will produce the screen at
right.
To delete any photo,
touch its line with the trash
can icon showing at right.
RECORDING AND PLAYING BACK VIDEOS
To record a clip of live probe video appearing on the screen of your Android
device, touch the soft button on the right side of the app window. Touching
the button 1) changes the
button’s label to ,
2) starts a running clock
indicating the clip’s
duration so far in the upper
left corner of the window,
3) adds a red dot at the
bottom left of the app
window and overlays the
text Start Recording on the
live video, and 4) begins to
store an .mov video clip in the RecordVideo subfolder of the sdcard folder of
your Android device (even if no SD card is installed in your device, or if an SD
card is installed and it is full.)
To stop recording the video clip, touch the button. This will 1) change the
button’s label back to , 2) produce a Stop recording overlay in the middle of
the video window, and 3) cause the red dot and running clock to disappear
(see screen shot at top of next page).
13
Page 14
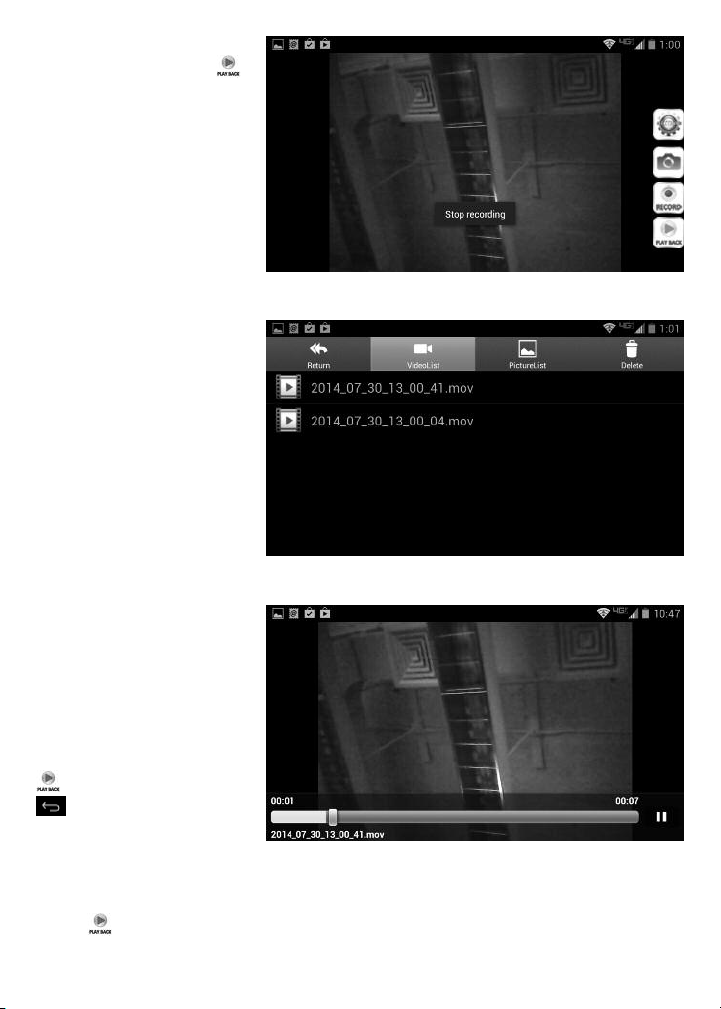
To view your video clips,
begin by touching the
button to call up the middle
screen shot on this page.
To play back a video clip,
touch its row. This will
cause the clip to begin
playing above a progress
bar. The clip’s duration and
current playback position
are shown above the bar,
with its date/time stamp
below it (see screen shot
at bottom of page).
To pause playback of a
video clip, touch the
button. Pausing playback
will change
To stop playback of a
clip and return to the
screen, touch the
button on your
Android device. To
resume showing live
video, touch the Return
button at the upper left
of the screen.
14
II
II
to 왘.
Page 15

To delete a video clip,
touch the Delete icon at
the upper right of the
screen with the VideoList
tab highlighted. This will
produce the screen
at right.
To delete any video clip, touch its line with the trash icon showing at right.
To attach a stored video clip to an e-mail message, you must first exit the
iSNAKESCOPE app and disconnect from the instrument’s ad hoc WiFi spot. Only
then will you be able to connect to a conventional WiFi hot spot with Internet
connectivity, or a cellular network.
ADVANCED SETTINGS
To change the iSNAKESCOPE Android app’s settings, touch the button at the
upper right of the app window. The screen immediately below will appear.
There are two rows not
shown below the
Brightness Setting row;
they can be viewed only
by scrolling down (see
instructions at the end of
this section).
Touching the Wi-Fi Setting
row produces the screen
at right.
Using this screen, you can
change the default WiFi
Service Set Identifier (SSID)
and/or default password of
15
Page 16
12345678 to any string of at least eight numbers and letters. If you make a
change, remember to touch the OK button to save the setting.
To return to the Setting screen, touch Cancel or the button on your device.
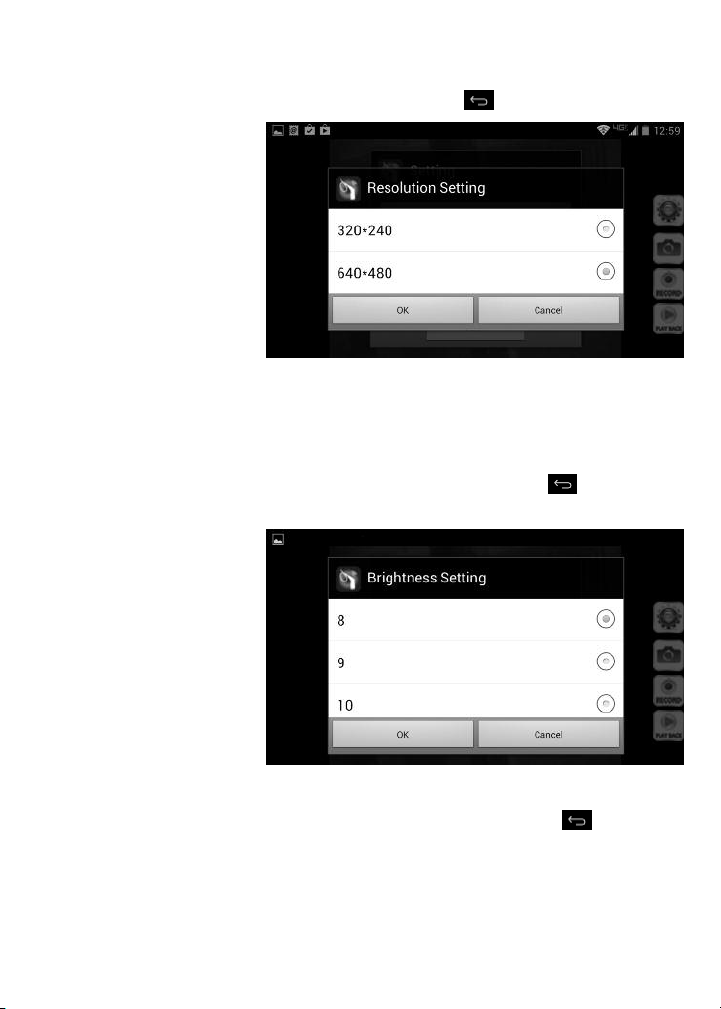
Touching the Resolution
Setting row of the Setting
screen produces the
screen at right.
Note that although the
app’s default video
recording resolution is
QVGA (320 x 240 pixels),
you have the option to
increase the resolution to
VGA (640 x 480 pixels). The only reason to record video clips at the lower, QVGA
resolution is to produce smaller clips that require less memory space to store
and less bandwidth to share via e-mail. If you make a change, remember to
touch the OK button to save the setting.
As before, to return to the Setting screen, touch Cancel or the button on
your device.
Touching the Brightness
Setting row of the Setting
screen produces the
screen at right.
Increasing the brightness
setting from 8 to 9 or 10
will result in a slight
increase in the brightness
of video clips and photos
during playback. If you
make a change, remember to touch the OK button to save the setting.
Once again, to return to the Setting screen, touch Cancel or the button on
your device.
16
Page 17

As mentioned earlier, there
are two options not visible
on the Setting screen when
it launches. If you scroll
down, you will see them:
Reset to Default and
About. Touching the Reset
to Default button on the
Setting screen produces
the screen at right.
Touch OK to restore all factory defaults and reboot iSnakescope. Otherwise,
touch Cancel to return to the Setting screen.
Touching the About button
produces the Setting
screen shown below—
including the important
Version number and
release date of the app.
USING THE PROBE
If you are unfamiliar with video borescopes, be aware that professional users
like contractors and technicians typically insert a borescope probe into an
orifice (a hole in a wall or an engine’s cylinder, for example) or into an
inaccessible or hazardous area (the back or an equipment rack or an engine
compartment, for example) to view components or environments that would
otherwise be invisible. Use the brightness adjustment thumbwheel (Fig. 1,
Callout 2) to match the intensity of camera lighting to the application
environment.
In practice, professionals usually insert flexible-obedient probes like the one
that comes with iBorescope4 head-on into an orifice or area as a first step.
They then pull the probe out and adjust its bend one or more times until the
camera in the tip is pointing directly at the target or area of interest. With the
probe inserted, you can twirl it until video appears right-side up, but in many
cases you cannot change the probe’s angle of approach very much.
17
Page 18

INSTALLING ACCESSORIES
iBorescope4 comes with three accessories (see photos below) in a Ziploc bag
that attach to the camera-tipped end of the probe. Each accessory has a
specific purpose:
• The 45° mirror lets the probe see around corners.
• The pickup hook lets you retrieve otherwise
inaccessible items seen by the probe—for example, a
wedding ring accidentally dropped down a sink drain.
• The magnetic hook lets you retrieve lost or dropped
metal objects—nuts and bolts, for example—located
by the probe.
To attach an accessory:
1. Hold its metal stem with your thumb and index finger.
2. Slide the accessory—plastic clasp first—past the camera head at the probe
tip until the clasp is in the channel 1/4 in. from the end of the probe.
3. Squeeze the clasp until you hear a click (see right photos on previous page),
indicating that the two halves have joined.
To detach an accessory:
1. Use the nail of your index finger to unhook the clasp, opening it up.
2. Hold the accessory’s metal stem with your thumb and index finger and slide
the accessory and clasp past the camera head.
3. Put the accessory back in the Ziploc bag it came in.
SPECIFICATIONS
Compatible with iPad, iPad2, “iPad3”, iPhone3GS, Phone 4S,
iPhone5/5S/5C, iPod touch (3rd, 4th,
5th generation) running iOS4.1 or later;
any device running Android 2.2 or higher
Security WiFi (WEP) password
Video Resolution 640 x 480 pixels (VGA)
Frame Rate 30 frames per second (fps)
Streaming Video Format MJPG
WiFi Range 60 ft. (18m), max (unobstructed)
Camera Lighting 4 white LEDs
18
Page 19

Camera Head Diameter 8mm (0.32 in.)
Camera Depth of Field 1.2 in. to 10 ft. (30mm to 3m)
Camera Field of View 54°
Probe Length 36 in. (914mm)
Probe Minimum Bending Radius 1.77 in. (45mm)
Dust & Water Resistance Rating IP67
(Probe & Camera Head only)
Operating Temperature 32° to 113°F (0° to 45°C)@15 to 85%RH,
non-condensing
Dimensions of Grip 7.25 x 3.75 x 1.4 in. (184 x 95 x 36mm)
Weight of Grip (without batteries), 9.6 oz. (272g)
Probe and Probe-Tip Accessories
Power Source (4) “AA” batteries (not included)
Life of Full Battery Charge 3 hours, typical
OPERATING & MAINTENANCE TIPS
Never insert the probe into a fuel tank or a flammable liquid or gas such as
unleaded gasoline, diesel fuel, machine oil, DOT 4 brake fluid or transmission
fluid.
The probe contains thin wires running along its entire length. Accordingly,
handle it with care:
• Do not bend it more than 90° anywhere along its length.
• Do not bend the probe more than 70° within 1.2 in. (30mm) of its camera tip.
• Do not bundle the probe into a tight circle to store it.
• Never use the camera end to clear its own path of debris.
To clean the camera lens and LEDs, use a cotton swab and a small amount of
mild detergent.
The grip requires no routine maintenance other than periodic cleaning with a
soft, dry cloth. Never use a wet cloth, corrosive liquids, solvents or water. Avoid
getting the grip wet.
Store iBorescope4 only in a cool (under 122°F or 50°C), dry, well-ventilated
place. Avoid exposing the unit to sunlight for long periods of time.
iBorescope4 is designed for industrial and environmental use only. Never use it
for human or any other biological inspection.
19
Page 20

General Tools & Instruments
GeneralToolsNYC
WARRANTY INFORMATION
In the U.S, General warrants its instruments and accessories against defects in material
or workmanship for one year from the date of purchase. General will replace or repair
the defective unit, at its option, subject to verification of the defect.
This warranty does not apply to defects resulting from abuse, neglect, accident,
unauthorized repair, alteration, or unreasonable use of the product.
Any implied warranties arising from the sale of a General product, including but not
limited to implied warranties of merchantability and fitness for a particular purpose, are
limited to the above. General shall not be liable for loss of use of the product or other
incidental or consequential damages, expenses, or economic loss, or for any claim of
such damage, expenses, or economic loss.
State laws vary. The above limitations or exclusions may not apply to you.
We encourage you to register your product online. General will extend your warranty an
additional 60 days if you register at www.generaltools.com/ProductRegistry.
RETURN FOR REPAIR POLICY
Every effort has been made to provide you with a reliable product of superior quality.
However, in the event your instrument requires repair, please contact our Customer
Service to obtain an RGA (Return Goods Authorization) number before forwarding the
unit via prepaid freight to the attention of our Service Center at this address:
General Tools & Instruments
• 80 White Street • New York, NY 10013 • 212-431-6100 •
Remember to include a copy of your proof of purchase, your return address, and your
phone number and/or e-mail address.
20
99 Washington Street
Melrose, MA 02176
Phone 781-665-1400
Toll Free 1-800-517-8431
Visit us at www.TestEquipmentDepot.com
Specifications subject to change without notice
©2014 GENERAL TOOLS & INSTRUMENTS
NOTICE - WE ARE NOT RESPONSIBLE FOR TYPOGRAPHICAL ERRORS.
MAN# DCiS4
9/10/14
 Loading...