

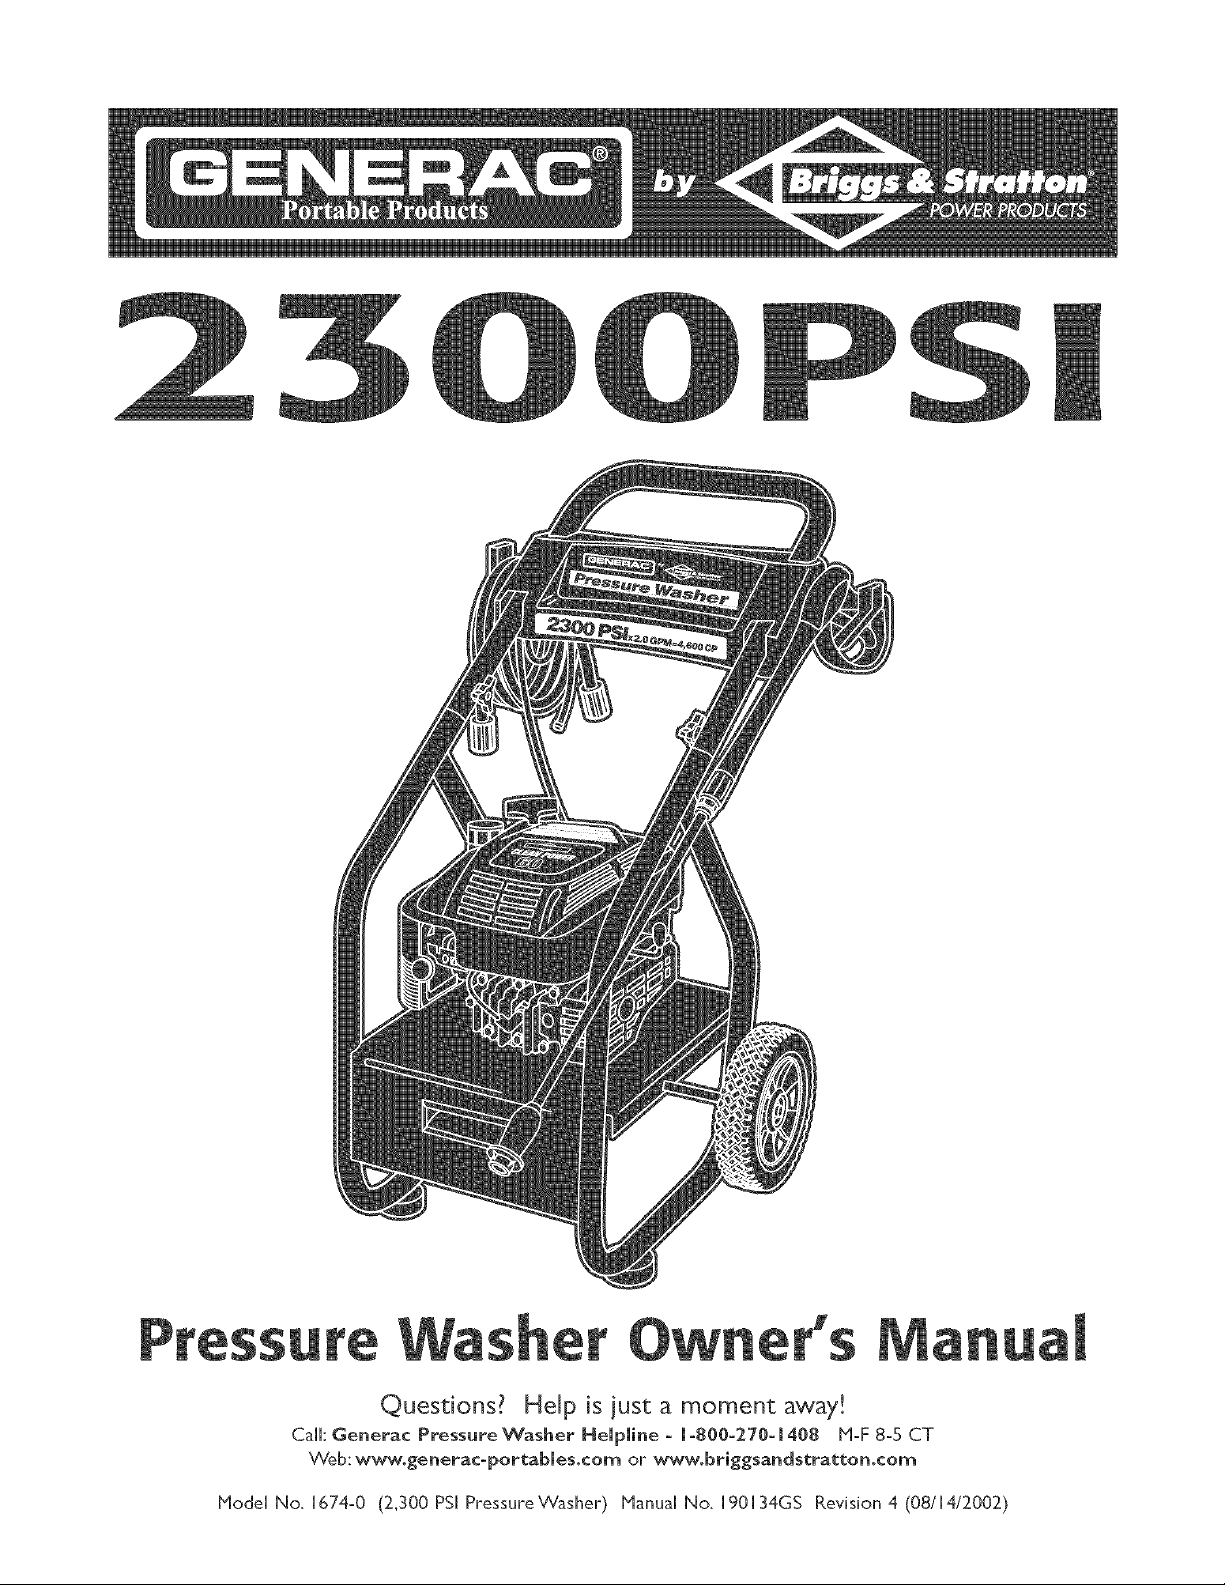
Generac 1674-0 Owner’s Manual
anuaJ
Questions? Help is just a moment away!
Call: Generac Pressure Washer Heipiine = 1=800=270=1408 M=F 8=5 CT
VVeb:wwwogenerac-portabiesocorn or www.briggsandstratton.com
Model No. 1674o0 (2_300 PSI Pressure Washer) Manual No. 190134G8 Revision 4 (08/14/2002)
b
Y_&_ $_ra_on'
_ powE__opucT_
TABLE OF CONTENTS
Safety Rules .................................. 2°3
Know Your Pressure _A/asher ...................... 4
AssembHy .................................... S-7
Operation .................................. 8-HH
Product Specifications ........................... HH
Maintenance ............................... H2-H 4
Storage ...................................... H4
TroubHeshooting ............................... HS
RepHacement Parts ........................... H6- H9
_A/ar ranty ............................... Last Page
EQUmPNENT
Read this manuam carefummy and become famimiar
with your pressure washer. Know its appmications, its
mimitations and any hazards invomved.
Every effort has been made to ensure that information in
this manuaH is accurate and current. However, Generac
reserves the right to change, alter or otherwise improve the
product and this document at any time without prior notice.
WARNING
WNEN ADDING FUEL
Turn pressure washer OFF and let it cool at least 2 minutes
before removing gas cap.
Fill fuel tank outdoors.
Do not overfill tank.Allow space for fuel expansion.
Keep gasoline away from sparks, open flames, pilot lights, heat,
and other ignition sources.
Do not light a cigarette or smoke.
VNEN OPERATING EQUIPMENT
FUEL iN TANK
Store away from furnaces, stoves, water heaters, clothes
dryers or other appliances that have pilot light or other
ignition source because they can ignite gasoline vapors.
SAFETY RULES
The safety aHert symbol (_) is used with a signaH word
(DANGER, CAUTION,WARNING), a pictorial and/or a
safety message to aHert you to hazards. DANGER indicates
a hazard which, if not avoided, wil/resuHt in death or serious
iniury. WARNING indicates a hazard which, if not
avoided, could resuHt in death or serious iniury. CAUTION
indicates a hazard which, if not avoided, might resuHt in
minor or moderate iniury. CAUTION, when used
without the aHert symbol indicates a situation that couHd
resuHt in equipment damage. Follow safety messages to
avoid or reduce the risk of iniury or death.
WARNING
Keep water spray away from electric wiring or fatal electric
shock may result.
WARNING
Never aim the spray gun at people, animals or plants.
Do not allow CHHLDREN to operate the pressure washer:
Never repair high pressure hose. Replace it.
2
bye& S_on _
_ POV/ERp_D_JCrS
WARNING
Keep spray nozzle between 8 to 24 inches away from cleaning
surface.
Be extremely careful if you must use the pressure washer from
a ladder, scaffolding or any other relatively unstable location.
The cleaning area should have adequate slopes and drainage to
reduce the possibility of a fail due to slippery surfaces.
Operate this unit on a stable surface.
DANGER
WARNING
Do not wear loose clothing, iewe]ry or anything that may be
caught in the starter or other rotating parts_
Tie up long hair and remove iewelr_;
WARNING
Always wear eye protection when you use this equipment or
when you are in the vicinity where the equipment is in use.
WARNING
Operate pressure washer ONLY outdoors.
Use a respirator or mask whenever there is a chance that
vapors may be inhaled.
Read all instructions with mask so you are certain the mask will
provide the necessary protection against inhaling harmful vapors.
i WARNING
, Do not touch hot surfaces.
, Allow equipment to cool before touching.
Disconnect the spark plug wire from the spark plug and place
the wire where it cannot contact spark plug.
CAUTION
Do not tamper with governed speed.
Do not operate the pressure washer above the rated pressure.
1
Do not point spray gun at glass when in the iet spray mode.
Never aim the spray gun at plants.
3
b
Y_&_ $_ra_on'
_ powE_P_ODUCTS
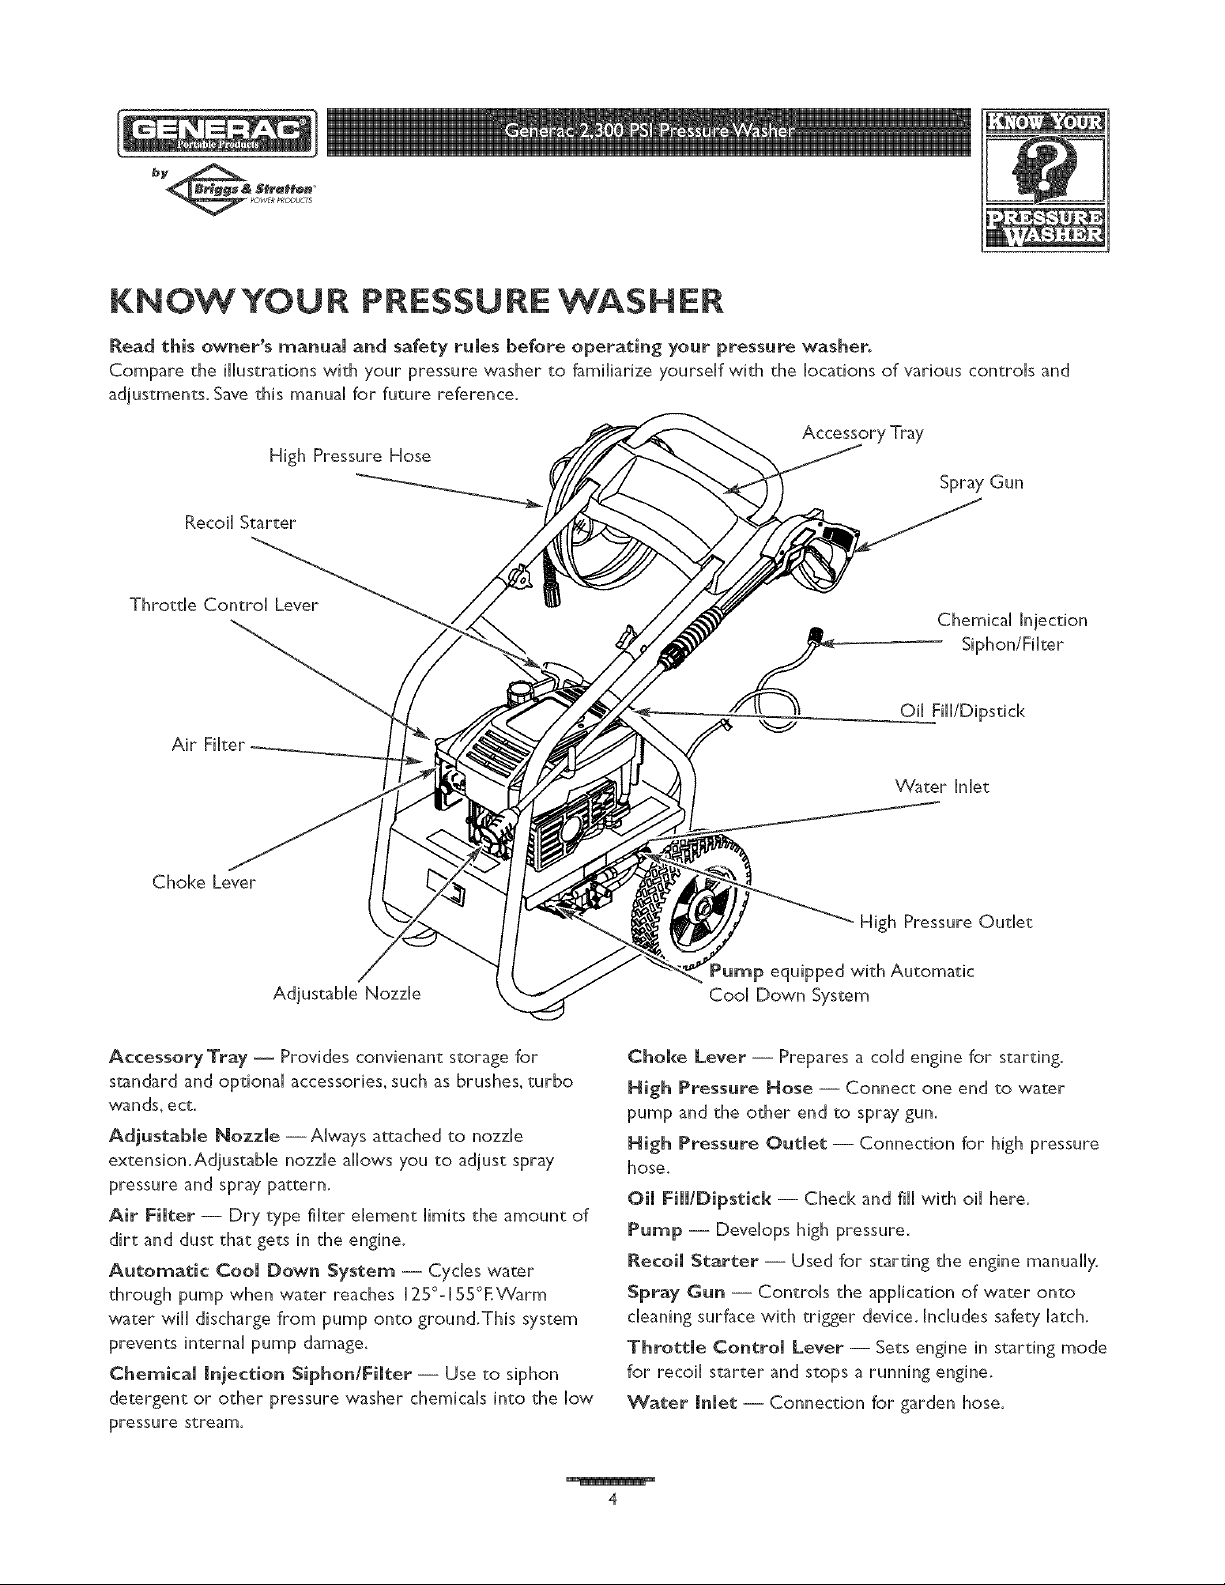
KNOWYOUR PRESSURE WASHER
Read this owner's manuaJ and safety rules before operating your pressure washer,
Compare the ilhstradons with your pressure washer to familiarize yourself with the locaqons of various controls and
adjustments. Save this manual for future reference.
AccessoryTray
High Pressure Hose
SprayGun
Recoil Starter
Throttle Contr
Chemical Injection
Oil Fill/Dipstick
Air
Choke Lever
/
Adjustable Nozzle
AccessoryTray -- Provides convienant storage for
standard and optional accessories, such as brushes, turbo
wands, ect.
Adjustable Nozzle --Always attached to nozzle
extension.Adjustable nozzle allows you to adjust spray
pressure and spray pattern.
Air Filter -- Dry type filter element limits the amount of
dirt and dust that gets in the engine.
Automatic Cool Down System -- Cycles water
through pump when water reaches 125°° 155°PA/arm
water will discharge from pump onto ground.This system
prevents internal pump damage.
Chemical injection Siphon/Filter -- Use to siphon
detergent or other pressure washer chemicals into the low
pressure stream.
VVater Inlet
High Pressure Outlet
Pump equipped with Automatic
Cool Down System
Choke Lever -- Prepares a cold engine for starting.
High Pressure Hose -- Connect one end to water
pump and the other end to spray gun.
High Pressure Outlet -- Connection for high pressure
hose.
Oil FiJJ/DipsticJ< -- Check and fill with oil here.
Pump -- Develops high pressure.
Recoil Starter -- Used for starting the engine manually.
Spray Gun -- Controls the application of water onto
cleaning surface with trigger device. Includes safety latch.
Throttle Control Lever -- Sets engine in starting mode
for recoil starter and stops a running engine.
Water inlet -- Connection for garden hose.
4
bye& S_on _
_ POWERp_r_UCrs
iMPORTANT: Read entire owner's manuaH before you
attempt to assembie or operate your new pressure washer.
REMOVE PRESSURE
WASHER FROM
o Remove the parts bag, accessories, and insert inciuded
with pressure washer.
o Siice two corners at the end of carton from top to
bottom so the panei can be foided down flaL then
remove ali packing material
o Roli pressure washer out of carton.
Carton Contents
Items in the carton include:
Hain Unit
Goggies
Handie
Piastic Accessory Tray
High Pressure Hose
Spray Gun
Nozzie Extension
Oil Bottle
PREPARING PRESSURE
WASHER FOR USE
If you have any problems with the assembly of your
pressure washer or if parts are missing or damage& cail the
pressure washer heipiine at [ -800-270- [ 408.
To prepare your pressure washer for operation, you
wi[[ need to perform these tasks:
o Fiil out and send in registration card.
o Attach accessory tray to handie_then attach handle to
main unit.
o Add oi[ to engine crankcase.
o Add fuel to fuel tank.
o Connect high pressure hose to spray gun and pump.
o Connect water supply to pump.
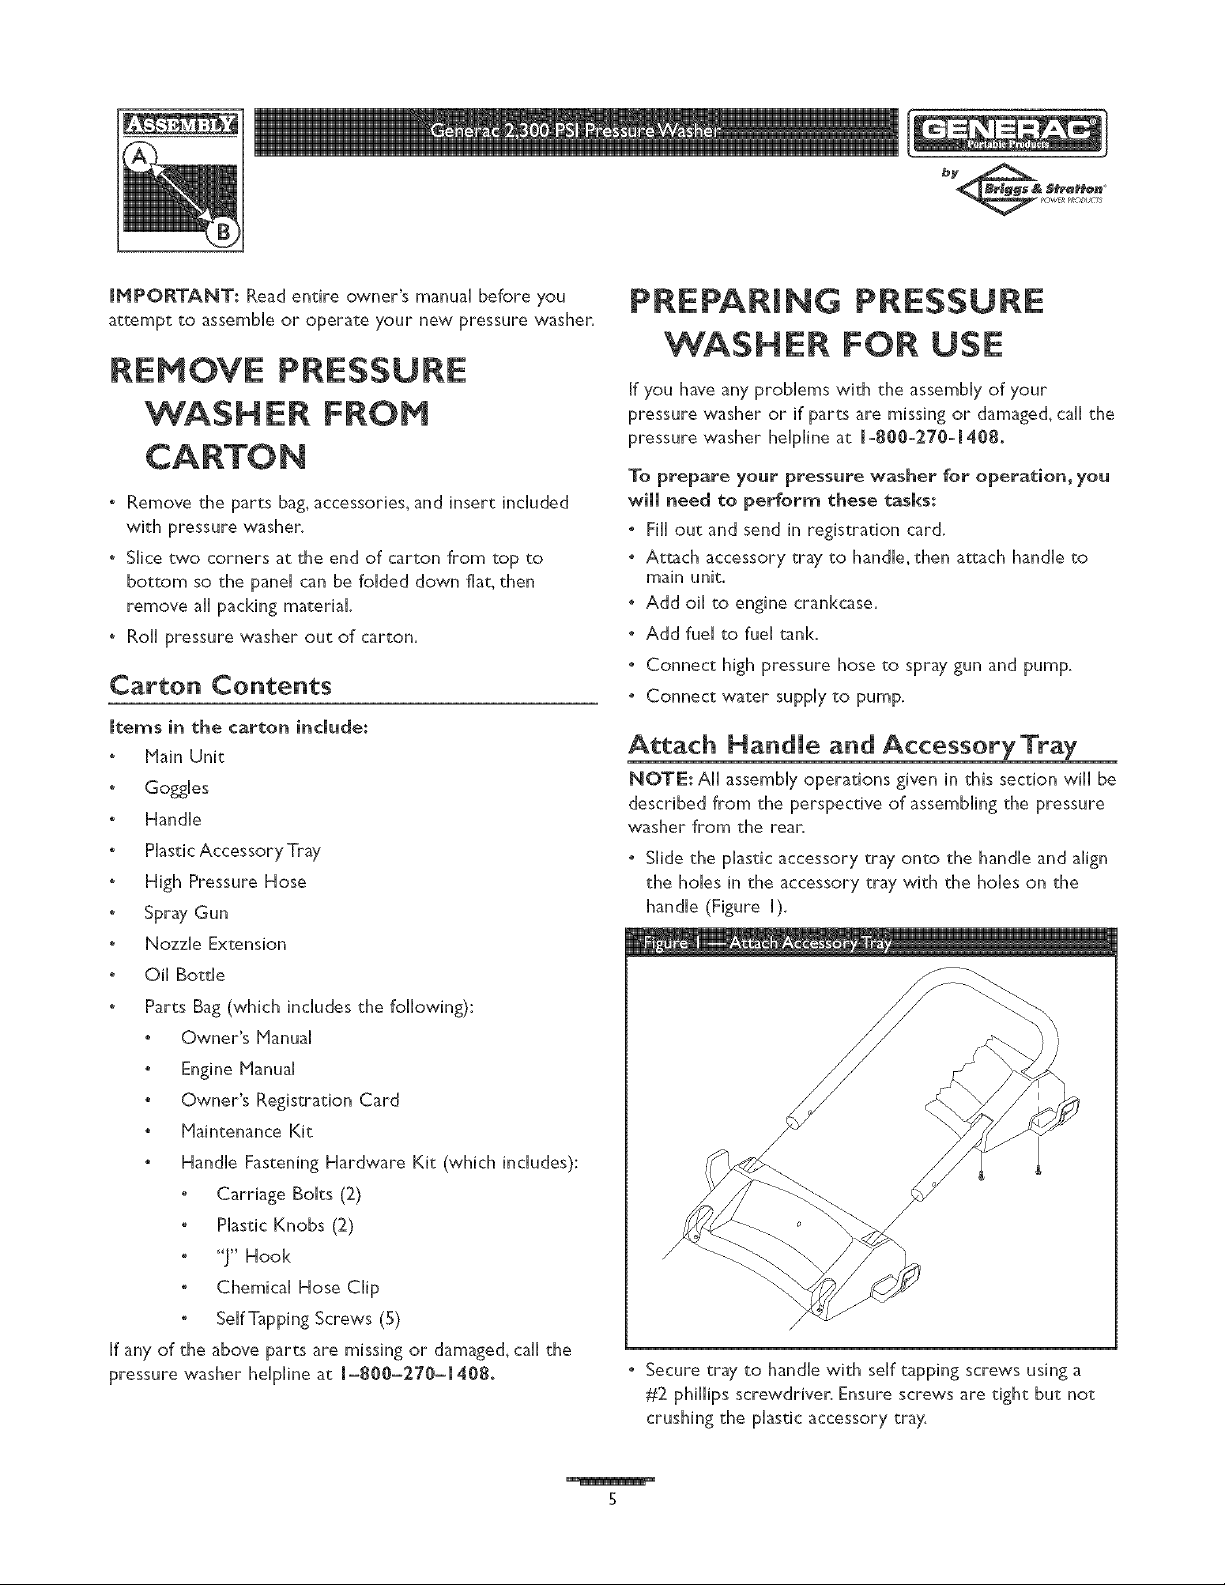
Attach Handle and Accessory Tray
NOTE: AHHassembiy operations given in this section wiHHbe
described from the perspective of assembling the pressure
washer from the rear.
o Slide the plastic accessory tray onto the handle and align
the holes in the accessory tray with the holes on the
handle (Figure I).
Parts Bag (which inchdes the following):
Owner's Planual
Engine Planual
Owner's Registration Card
Plaintenance Kit
Handle Fastening Hardware Kit (which includes):
Carriage Bolts (2)
Plastic Knobs (2)
"J" Hook
Chemical Hose Clip
Self Tapping Screws (5)
ff any of the above parts are missing or damage& cail the
pressure washer heipiine at 1-800-270-[ 408.
o Secure tray to handle with self tapping screws using a
#2 phillips screwdriver. Ensure screws are tight but not
crushing the plastic accessory tray.
5
b
Y_&_ $_ra_on'
_ powE_e_ODUCT_
* Phce the hande onto the hande supports aHready
connected to the main unit. Make sure the holes in the
hande aHign with the holies on the hande supports
(Figure 2).
NOTE: It may be necessary to move the handHe supports
from side to side in order to aHign the hande so it will sHide
over the handHe supports.
° Insert the carriage boHt through the holies from the
outside of the unit and attach a phstic knob from the
inside of the unit.Tighten by hand (Figure 3).
* Tilt the unit up by the handle and attach the metal clip to
the rib on the left underside of the accessory tray
(Figure 6). Slide the chemical hose through the metal clip
so that it is tight but not kinked.
G
, insert the "J" hook into the second from the left slot in
the accessory tray (Figure 4).
J
* Pinch the chemical hose that comes out of a hole in the
unit's base and slide it into the metal clip_ as shown in
Figure 5.
Add Engine Oil
JNPORTANT: Any attempt to crank or start the engine
before it has been properly serviced with the
recommended oil may result in an engine failure.
* Place pressure washer on a [eve[ surface.
° Refer to the engine owners manual to add recommended
oil to engine.
NOTE: Check oil often during engine break-in. Refer to
engine owner's manual for recommendations.
Add Gasoline
WARNING! Never fill fuel tank indoors. Never
fi[[ fuel tank when engine is running or hot. Do Not
smoke when filling fuel tank.
WARNING! Never fill fuel tank completely full.
Provide space for fuel expansion.Wipe away any fuel
spillage from engine and equipment before starting.
6
bye& S_on _
_7_ POV/ER_r>UCrs
° Use fresh_ dean unHeaded automotive gasohne and store in
approved, dean, covered containers. Use dean fill funneHs.
Never use "staHe" gasoHine Heft over from Hast season or
gasoHine stored for Hong periods.
° CHean area around fueHfill cap, remove cap.
° SHowilyadd "UNLEADED" reguhr gasoHine to fueHtank.
Use a funneH to prevent spillage. SHowilyfill tank to about
H.5'_ bellow the bottom of the filler neck (Figure 7).
° Install fuel cap and wipe up any spilled gasoline.
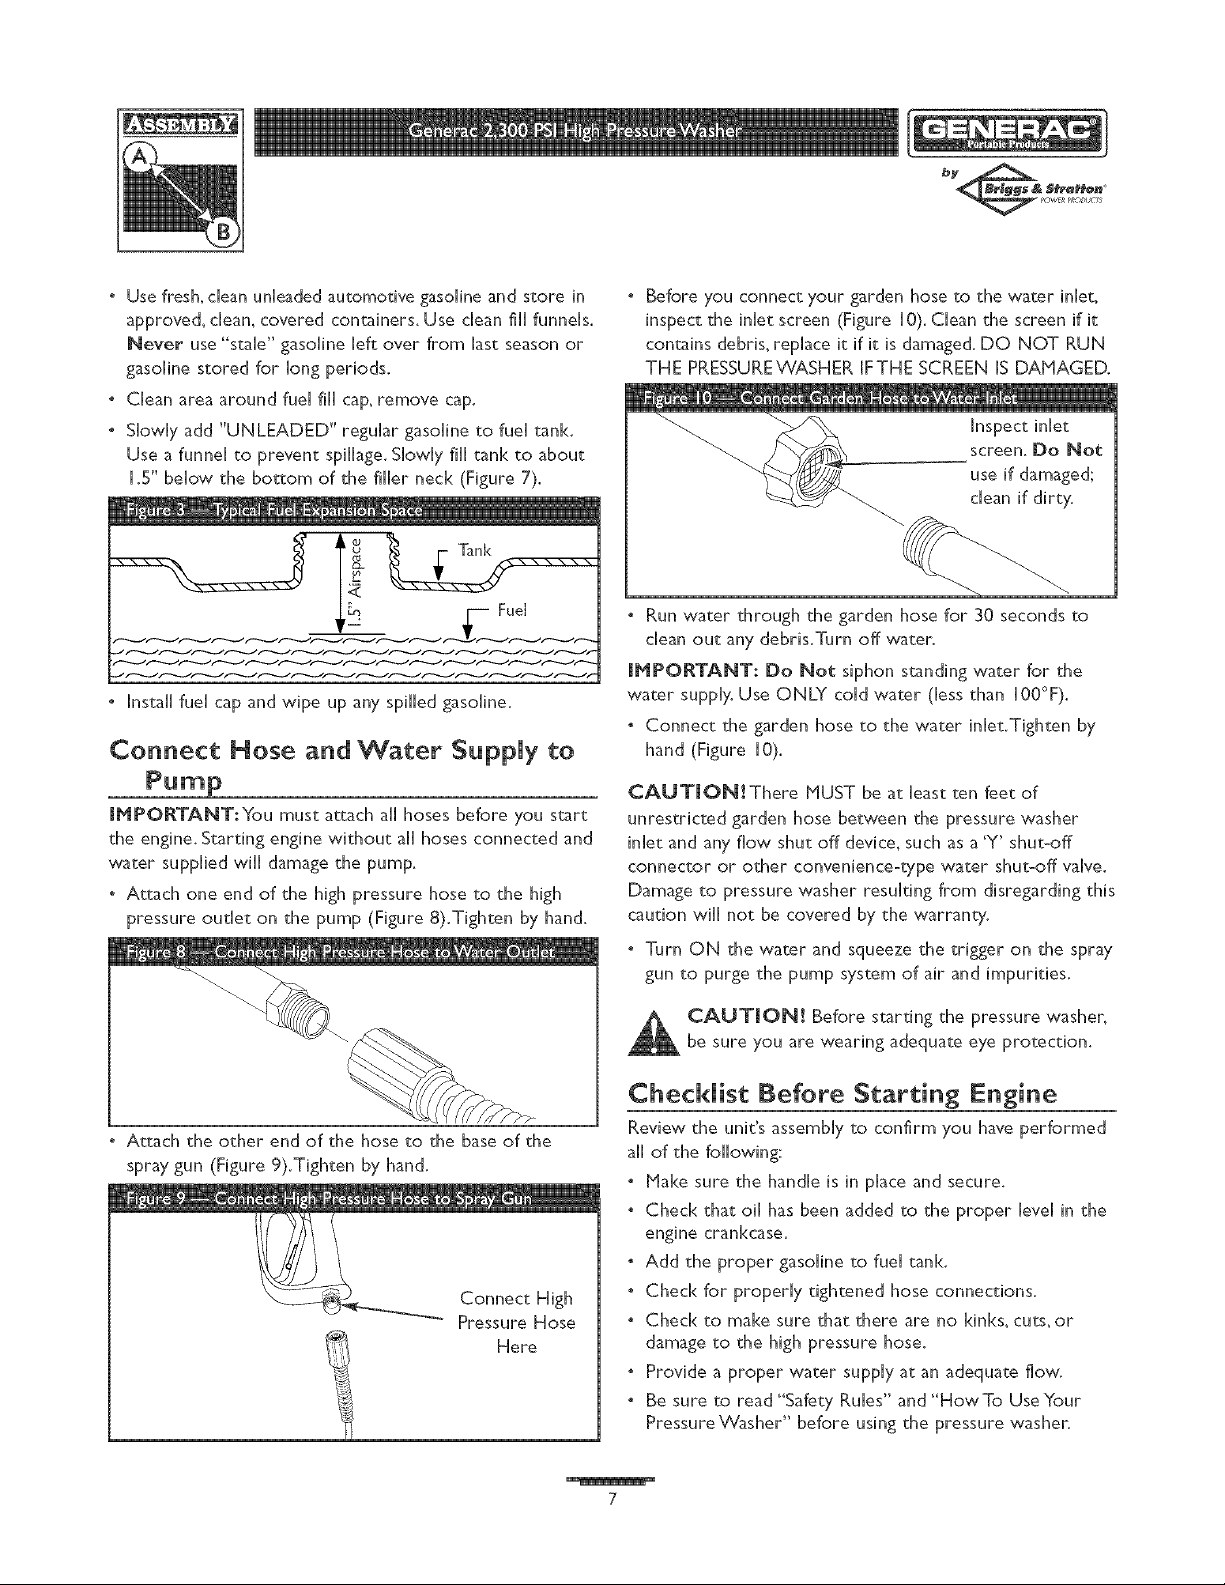
Connect Hose and Water Supply to
mMPORTANT:You must attach all hoses before you start
the engine. Starting engine without all hoses connected and
water supplied will damage the pump.
° Attach one end of the high pressure hose to the high
pressure outlet on the pump (Figure 8).Tighten by hand.
° Before you connect your garden hose to the water inlet,
inspect the inlet screen (Figure I 0). Clean the screen if it
contains debris, replace it if it is damaged. DO NOT RUN
THE PRESSUREWASHEP_ IFTHE SCREEN IS DAMAGED.
Inspect inlet
screen. Do Not
use if damaged;
clean if dirty.
° Run water through the garden hose for 30 seconds to
clean out any debris.Turn off water.
mMPORTANT: Do Not siphon standing water for the
water supply. Use ONLY cold water (less than 100°F).
° Connect the garden hose to the water inlet.Tighten by
hand (Figure 10).
CAUT|ON!There HUST be at least ten feet of
unrestricted garden hose between the pressure washer
inlet and any flow shut off device, such as a 'Y' shut-off
connector or other convenience-type water shut-off valve.
Damage to pressure washer resulting from disregarding this
caution will not be covered by the warranty.
° Turn ON the water and squeeze the trigger on the spray
gun to purge the pump system of air and impurities.
, Attach the other end of the hose to the base of the
spray gun (Figure 9).Tighten by hand.
Connect High
Pressure Hose
Here
CAUTION! Before starting the pressure washer,
be sure you are wearing adequate eye protection.
Checklist Before Starting Engine
Review the unit's assembly to confirm you have performed
all of the following;
, Hake sure the handle is in place and secure.
, Check that oil has been added to the proper level in the
engine crankcase.
, Add the proper gasoline to fuel tank.
, Check for properly tightened hose connections.
, Check to make sure that there are no kinks, cuts, or
damage to the high pressure hose.
, Provide a proper water supply at an adequate flow.
, Be sure to read "Safety Rules" and "HowTo Use Your
Pressure Washer" before using the pressure washer.
7
b
Y_&_ $_ra_on'
_ powE__ODUCT_
NOWTO USEYOUR
PRESSURE WASHER
If you have any problems operating your pressure washer,
please call the pressure washer heIpline at
I=800=270=1408.
To Start You r Pressu re Washer
To start your pressure washer for the first time_ follow these
instructions step=by=step.This starting information also applies if
you have let the pressure washer sit idle for at least a day.
. Place the pressure washer in an area close enough to an
outside water source capable of supplying water at a flow
rate greater than 2.2 gallons per minute.
. Check that the high pressure hose is tightly connected to
the spray gun and to the pump. See "Preparing Pressure
Washer For Use" for illustrations.
o Hake sure unit is in a level position.
° Connect the garden hose to the water inlet on the
pressure washer pump. Turn ON the water.
CAUTION! Do Not run the pump without the water
supply connected and turned on.You must follow this
caution or the pump will be damage&
° Squeeze trigger on gun until you have a steady stream of
water.This purges the pump of air and impurities.
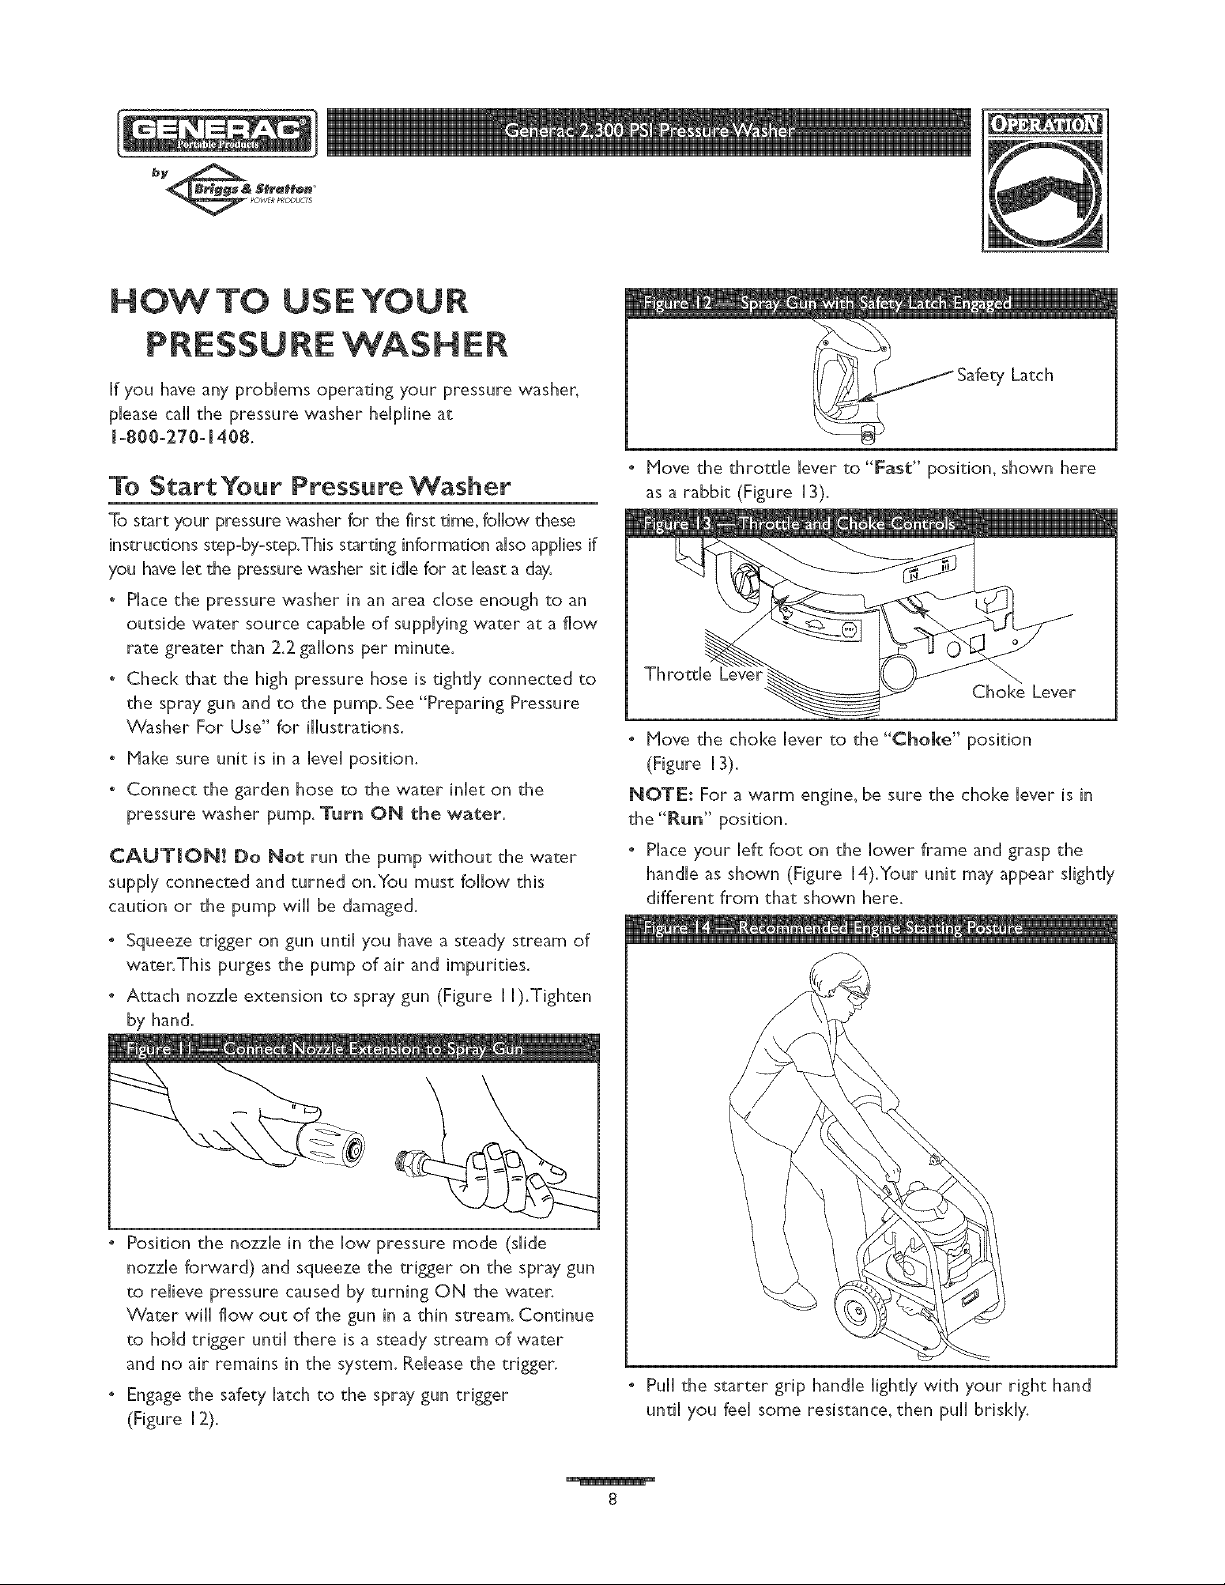
. Attach nozzle extension to spray gun (Figure I I).Tighten
by hand.
o Hove the throttle lever to "Fast" position, shown here
as a rabbit (Figure 13).
Throttl
Choke Lever
o Hove the choke lever to the "Choke" position
(Figure 13).
NOTE: For a warm engine, be sure the choke lever is in
the "P_un" position.
o Place your left foot on the lower frame and grasp the
handle as shown (Figure 14).Your unit may appear slightly
different from that shown here.
o Position the nozzle in the low pressure mode (slide
nozzle forward) and squeeze the trigger on the spray gun
to relieve pressure caused by turning ON the water.
VVater will flow out of the gun in a thin stream. Continue
to hold trigger until there is a steady stream of water
and no air remains in the system. Release the trigger.
° Engage the safety latch to the spray gun triger
(Figure 12).
* Pull the starter grip handle lightly with your right hand
until you feel some resistance, then pull briskly.
8
° Return thestartergriphandHe showily.Do Not Herrope
"snap bacH<" against starter.
, VVhen engine starts, showily move choke Hever to the
"Run" position.IfenginefaHters,move choke Hevertothe
"Choke" position, then to the "Run" position.
° if engine faiHsto s_rt after six puHHs,move choke Heverto
the "Run" position. If engine fires, but does not continue
to run, move choke Heverto the "Choke" position, then
to the "Run" position.
NOTE: If the recoiHstarter is hard to puHLit may be necessary
to squeeze the gun triter to reHieveinternaHpump pressure.
How to StopYour Pressure Washer
. Hove throtde Hever on engine to "Stop" position.
. Squeeze trigger on the spray gun to relieve
pressure in the hose_
NOTE:A smaHHamount of water wiHHsquirt out when you
reHeasethe pressure.
bye& S_on _
_7 POWERp_JC rs
/ i
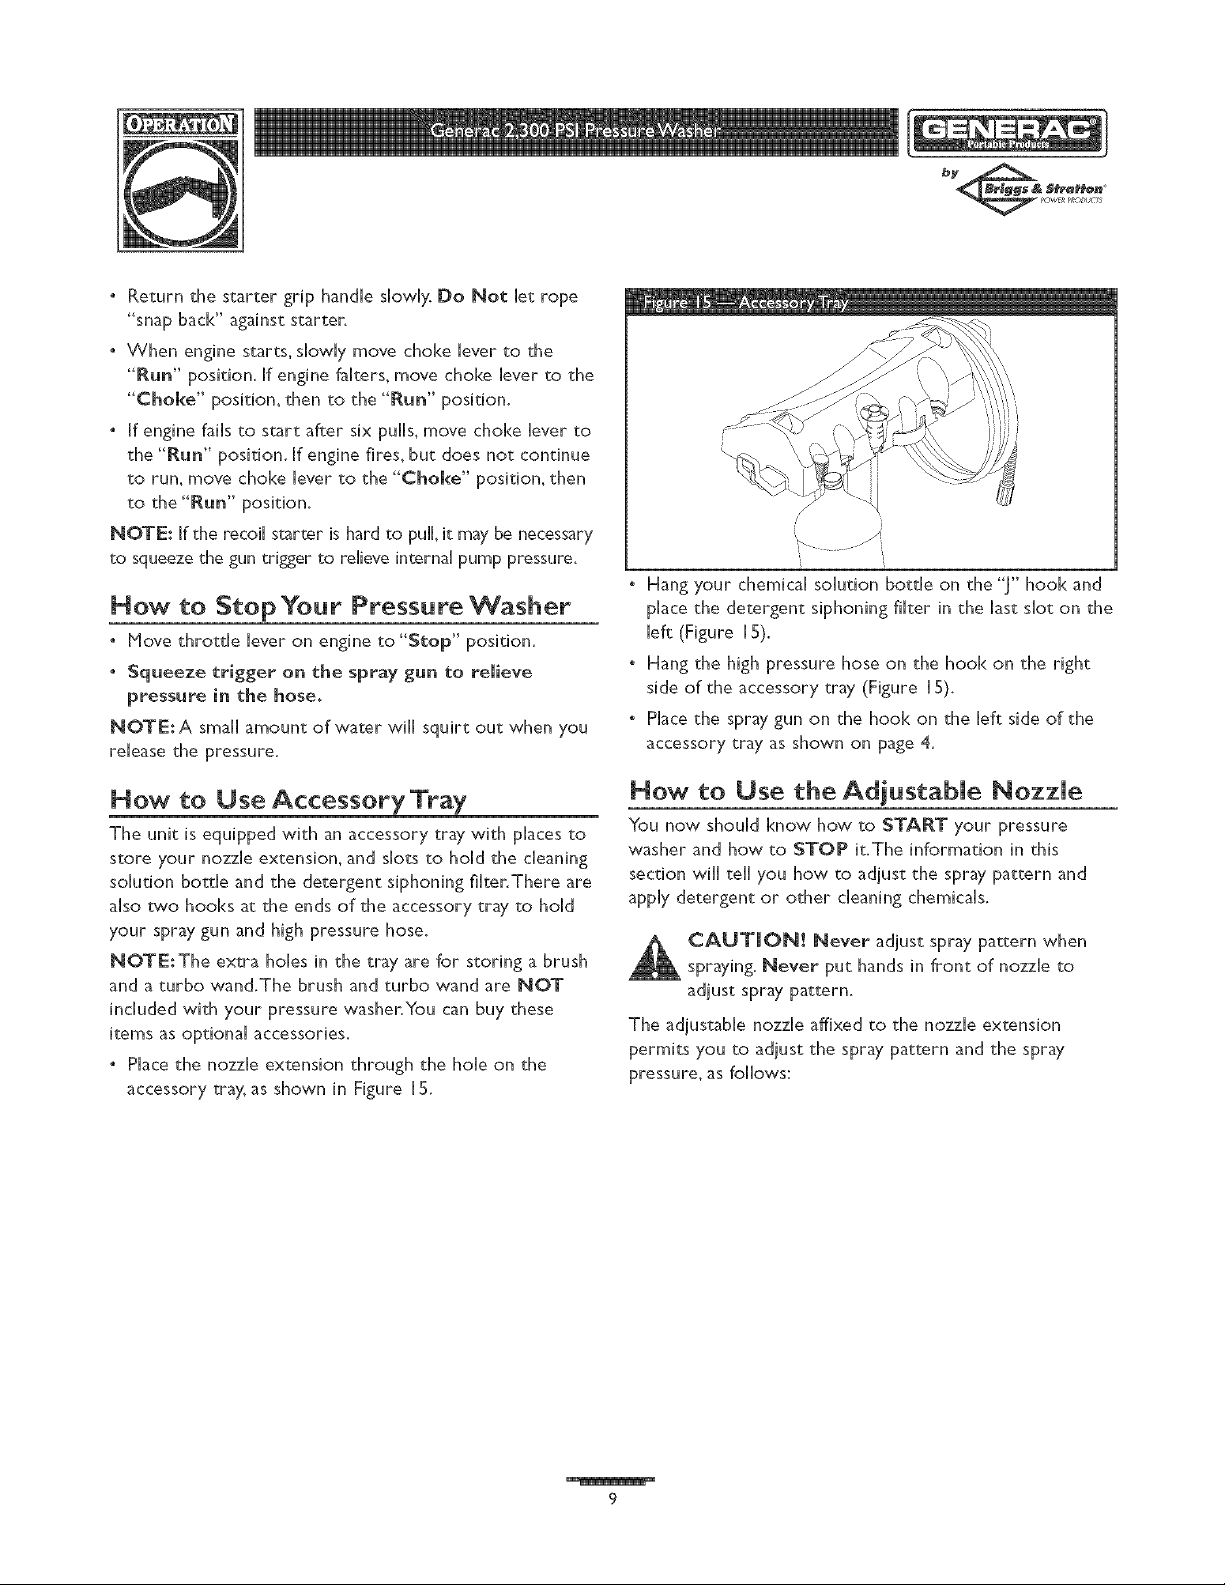
Hang your chemicaH soHution bottHe on the "J" hook and
pHacethe detergent siphoning fiHter in the Hastshot on the
Heft(Figure HS).
° Hang the high pressure hose on the hook on the right
side of the accessory tray (Figure H5).
° PHacethe spray gun on the hook on the Heftside of the
accessory tray as shown on page 4.
How to Use Accessory "Tray
The unit is equipped with an accessory tray with pHacesto
store your nozzHeextension, and shotsto hoHd the cHeaning
soHution bottHe and the detergent siphoning fiHter.There are
aHsotwo hooks at the ends of the accessory tray to hoHd
your spray gun and high pressure hose.
NOTE:The extra holies in the tray are for storing a brush
and a turbo wand.The brush and turbo wand are NOT
incHuded with your pressure washer.You can buy these
items as optionaH accessories.
. PHacethe nozzHe extension through the hoHeon the
accessory tray, as shown in Figure H5.
How to Use the Adjustable Nozzle
You now shouHd know how to START your pressure
washer and how to STOP it.The information in this
section wiHHteHHyou how to adiust the spray pattern and
appHydetergent or other cHeaningchemicaHs.
CAUTION! Never adiust spray pattern when
spraying.Never put hands in front of nozzHeto
adiust spray pattern.
The adiustabHenozzHeaffixed to the nozzHeextension
permits you to adiust the spray pattern and the spray
pressure_asfoHHows:
9
b
Y_&_ $_ra_on'
_ powE_P_ODUCTS
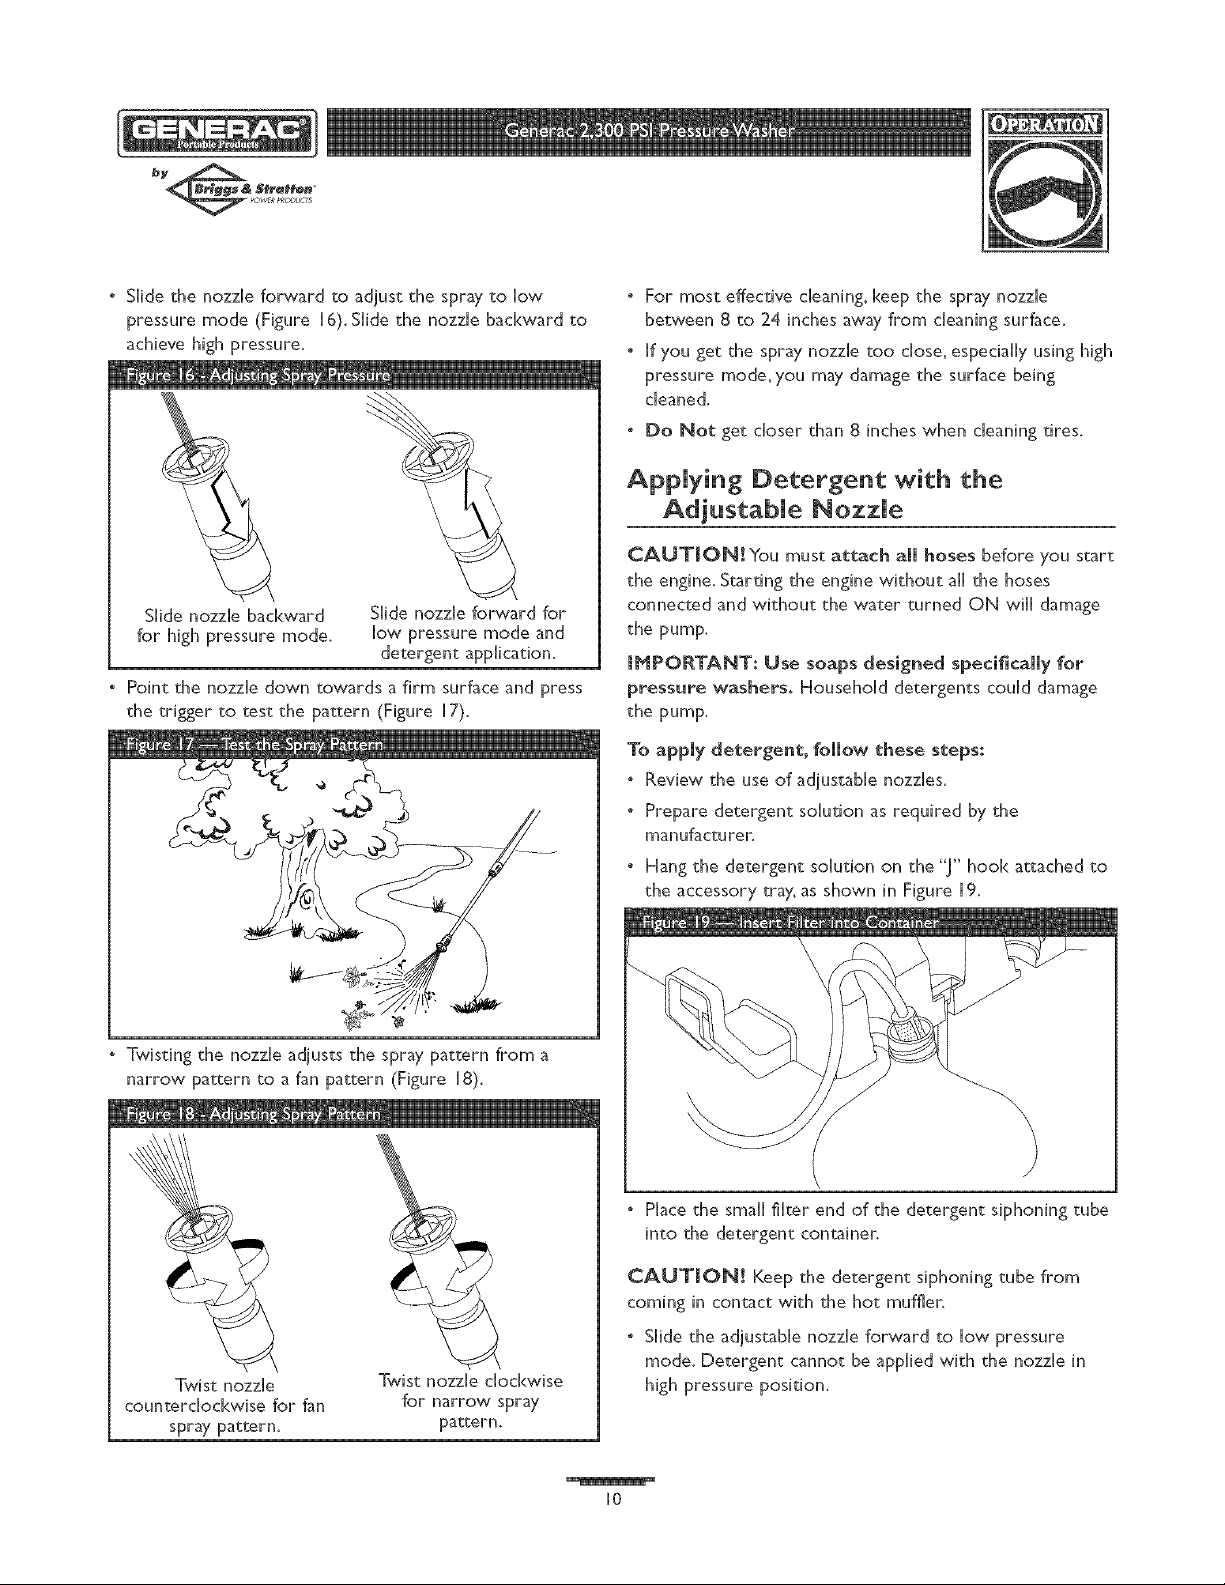
° SHidethe nozzHe forward to adjust the spray to How
pressure mode (Figure H6).SHidethe nozzHe backward to
achieve high pressure.
SHidenozzHe backward
for high pressure mode.
SHidenozzHeforward for
How pressure mode and
detergent application.
° Point the nozzHe down towards a firm surface and press
the trigger to test the pattern (Figure H7).
° For most effective cHeaning, keep the spray nozzHe
between 8 to 24 inches away from cHeaning surface.
. If you get the spray nozzHe too chose, especiaHHy using high
pressure mode,you may damage the surface being
cHeaned.
. Do Noe get cHoser than 8 inches when cHeaning tires.
Applying Detergent with the
Adjustable Nozzle
CAUTION! You must aeeach all hoses before you start
the engine. Starting the engine without all the hoses
connected and without the water turned ON wiHHdamage
the pump.
IMPORTANT: Use soaps designed speci_cammy for
pressure washers. HousehoHd detergents couHd damage
the pump.
To apply deeergene, follow ehese steps:
* Review the use of adjustabHe nozzHes.
* Prepare detergent soHution as required by the
manufacturer.
° Hang the detergent soHution on the "J" hook attached to
the accessory tray, as shown in Figure H9.
° Twisting the nozzHe adjusts the spray pattern from a
narrow pattern to a fan pattern (Figure H8).
Twist nozzHe
countercHockwise for fan
spray pattern,
Twist nozzHe cHockwise
for narrow spray
pattern.
° PHace the smaHHfiHter end of the detergent siphoning tube
into the detergent container.
CAUTION! Keep the detergent siphoning tube from
coming in contact with the hot muffler.
. SHidethe adjustable nozzle forward to How pressure
mode. Detergent cannot be appHied with the nozzle in
high pressure position.
IO
bye& S_on _
_ POWERp_UC rs
, Hake sure the garden hose is connected to the water
inHet.Check that the hgh pressure hose is connected to
the spray gun and the pump. Start the engine.
° AppHy the detergent to a dry surface, starting at lower
portion of area to be washed and work upward, using
Hong,even, overlapping strokes.
° AHHowthe detergent to "soak in" for 3-5 minutes before
washing and rinsing. ReappHyas needed to prevent
surface from drying. Do Not allow the detergent to dry
on (prevents streaHdng).
mMPORTANT:You must flush the chemicaH injection
system after each use by pHacingthe fiHter into a bucket of
dean water, then run the pressure washer in How pressure
for H=2minutes.
Pressure Washer Rinsing
WARNING! Be extremeHy carefuH if you must
use the pressure washer from a Hadder,scaffoHding
or any other relatively unstabHeHocation. Pressure in
a running washer buiHdsas you cHimb.When you
press the trigger, the recoiH from the initiaH spray
couHd cause you to fall.The high pressure spray
couHd aHso cause you to fall if you are too chose to
the cHeaning surface.
For Rinsing:
, SHidethe nozzHe backward to high pressure and press the
trigger. It wiHHtake a few seconds for the detergent to
clear.
NOTE:You can aHsostop detergent from flowing by simpHy
removing detergent siphon tube from botde.
, Keep the spray gun a safe distance from the area you
pHanto spray.
" AppHy a high pressure spray to a smaHHarea, then check
the surface for damage. If no damage is found, it is okay
to continue rinsing.
° Start at the top of the area to be rinsed, working down
with same overHappingstrokes as you used for cHeaning.
Automatic Cool Down System
(Thermam Remief}
If you run the engine on your pressure washer for
3=5minutes without pressing the trigger on the spray gun,
circuHating water in the pump can reach a temperature
between H25°-H55°EWhen the water reaches this
temperature, the automatic cool down system engages and
cooHs the pump by discharging the warm water onto
the ground. This system prevents internaH damage to the
pump.
SPECRFRCATRONS
Rated Pressure ..... 2,300 psi
Flow Rate .......... 2.0 gaHHonsper minute (gpm)
Detergent .......... Use detergent approved for
pressure washers
Water SupplyTemp . Not to exceed H00°F
Automatic Cool .... VViHHcycHewhen water
Down System ....... reaches H25 °° H55°F
Shipping Weight .... 77 Hbs.
II
 Loading...