

Generac 1642-1 Owner’s Manual
Portable Generator Owner's Manual
A his is the safety alert symbol. It is usedto alert you to potential personal injury hazards.Obey all safety messagesthat follow this symbol to avoid possible injury or death.
Questions? Help is just a moment away!
Call:Generac Generator Helpline - 1-800-270-1408 M-F 8-5 CT
Web: www.generac-portables.com or www.briggsandstratton.com
Model No. 1642-1 (5,500Watt AC Generator) Manual No. 189438 Revision 2 (02/I 1/2002)
TABLE OF CONTENTS
SafetyRules.................................. 2-3
Know Your Generator ........................... 4
Assembly.................................... 5-6
Operation ................................... 7-9
Product Specifications / Maintenance ............... l0
Storage...................................... I 1
Troubleshooting ............................... 12
Notes ....................................... 13
Schematic/V_iring Diagram .................... 14-15
Replacement Parts........................... 16-19
Warranty ............................... Last Page
injury.WARNING indicatesa hazardwhich,if not avoided,
couldresult in death or serious injury.CAUTION
indicates a hazard which, if not avoided,might result in
minor or moderate injury.CAUTION, when used
without the alert symbol, indicates a situation that could
result in equipment damage.Follow safety messagesto
avoid or reduce the risk of injuryor death.
DANGER
EQUIPMENT
DESCRIPTION
Read this manual carefully and become familiar
with your generator set. Know its applications, its
limitations and any hazards involved.
This generator is anengine-driven, revolving field,alternating
current (AC) generator. It was designedto supply electrical
power for operating compatible electrical lighting, appliance,
tool and motor loads.Thegenerator's revolving field is
driven at about 3,600rpm by asingte<ylinder engine.
CAUTION! Do Not exceed the generator's
wattage/amperage capacity.See"Don't Overload the
Generator" on page9.
Everyeffort hasbeen madeto ensure that informationin
this manual isaccurateand current. However, Generac
reservesthe right to change,alter or otherwise improvethe
product andthis document at anytime without prior notice.
The EmissionControl Systemfor this generator iswarranted
for standardsset by the EnvironmentalProtection Agency.For
warranty informationrefer to the engineowner's manual.
WARNING
The engine exhaust from this product contains I
chemicals known to the State of California to cause
cancer, b rth defects, or other reproduct ve harm.
SAFETY RULES
The safety alert symbol (_.) is usedwith asignal word
(DANGER, CAUTION,WARNING), a pictorial and/or a
safety messageto alert you to hazards.DANGER indicates
a hazard which, ifnot avoided,will result in death or serious
Operate generator ONLY outdoors.
Keep at least 2 feet of clearance on all sidesof generator for
adaquateventilation.
Do not operate generator insideany building or enclosure,
includingthe generator compartment of a recreational vehicle
(RV).
WARNING
WHEN ADDING FUEL
Turn generator OFF and let it cool at [east2 minutes before
removing gascap.Loosen cap slowly to relieve pressure in tank_
Fillfuel tank outdoors.
Do not overfill tank.Allow spacefor fuel expansion.
Keep gasoline awayfrom sparks,open flames,pilot lights,heat,
and other ignitionsources.
Do not lightacigarette or smoke.
_/HEN OPERATING EQUIPMENT
Do not tip engine or equipment at anglewhich causes
gasolineto spill
'HEN TRANSPORTING OR REPAIRING EQUIPMENT
Transport/repair with fuel tank EMPTY or with fuel shutoff
valve OFE
Disconnect spark plug wire.
eVHEN STORING GASOLINE OR EQUIPMENT WITH
FUEL IN TANK
Store away from furnaces,stoves, water heaters, clothes
dryers or other appliancesthat have pilot lightor other
ignitionsource becausethey can ignitegasolinevapors.
/
2
, WARNING
When usinggenerator for backup power, notify utility
company.Use approved transfer equipment to isolate
generator from electric utility.
National Electric Code requires generator to be properly
grounded to an approved earth ground. Call an electrician for
localgrounding requirements.
Use aground circuit fault interrupter (GFCt) in anydamp or
highly conductive area,such asmetal decking or steel work.
Do not touch bare wires or receptacles.
Do not use generator with electrical cords which are worn,
frayed,bare or otherwise damaged.
Do not operate generator in the rain.
Do not handlegenerator or electrical cords while standingin
water, while barefoot, or while handsor feet are wet.
Do not allow unqualified persons or children to operate or
service generator.
, WARNING
Do not touch hot surfaces.
Allow equipment to cool before touching.
CAUTION
Do not tamper with governed speed.Generator supplies
correct rated frequency and voltage when running at governed
speed.
Do not modify generator in any way.
CAUTION
See"Don't Overload Your Generator" on page9.
Start generator and let engine stabilize before connecting
electrical loads.
Connect electrical loads in OFF position, then turn ON for
operation.
Turn electrical loads OFF and disconnect from generator
before stopping generator.
DANGER
Do not allow any openflame, spark, heat,or lit cigarette
during and for several minutes after charging a battery.
Wear protective goggles,rubber apron, and rubber gloves.
CAUTION
Use generator only for intended uses.
tf you have questions about intended use,askdealer or call
the Generac generator helpline at 1-800-270-1408.
Operate generator only on level surfaces.
Do not expose generator to excessive moisture, dust, dirt, or
corrosive vapors.
Do not insert any objects through cooling slots.
tf connected devices overheat, turn them off and disconnect
them from generato_
Shut off generator if.'
-electrical output is lost;
-equipment sparks, smokes,or emits flames;
-unit vibrates excessively.
/
3
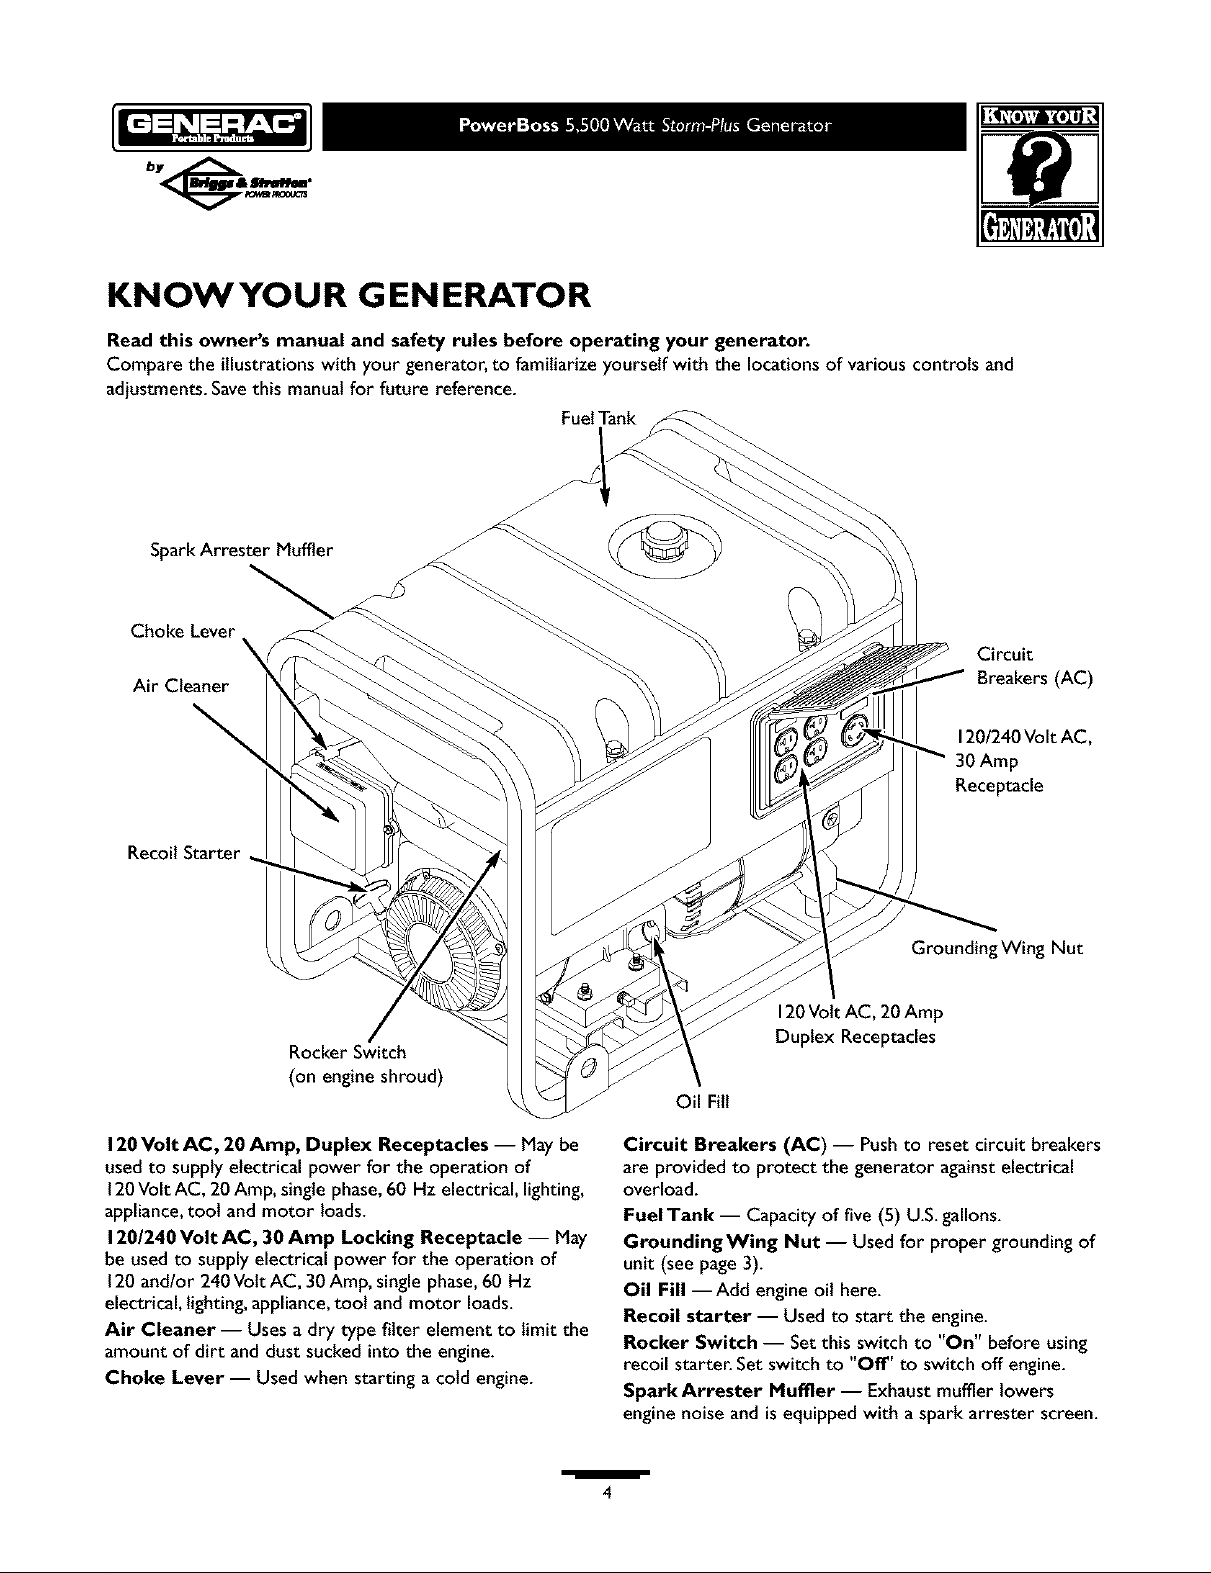
KNOWYOUR GENERATOR
Read this owner's manual and safety rules before operating your generator.
Comparethe illustrationswith your generator,to familiarize yourself with the locationsof variouscontrots and
adjustments.Savethis manualfor future reference.
FuelTank
SparkArrester Muffler
Choke Lever
Circuit
Air Cleaner
Recoil Starter
Breakers (AC)
120/240Volt AC,
30 Amp
Receptacle
Rocker Switch
(on engine shroud)
120Volt AC, 20 Amp, Duplex Receptacles -- May be
usedto supply electrical power for the operation of
120Volt AC, 20 Amp, single phase,60 Hz electrical, lighting,
appliance,toot and motor loads.
120/240 Volt AC, 30 Amp Locking Receptacle -- May
be usedto supply electrical power for the operation of
120and/or 240Volt AC, 30Amp, singlephase,60 Hz
electrical, lighting,appliance,tool and motor loads.
Air Cleaner -- Uses a dry type filter element to limit the
amount of dirt and dust suckedinto the engine.
Choke Lever -- Usedwhen starting a cold engine.
/
Grounding Wing Nut
120Volt AC, 20 Amp
Duplex Receptacles
Oil Fill
Circuit Breakers (AC) -- Pushto reset circuit breakers
are provided to protect the generator againstelectrical
overload.
Fuel Tank -- Capacity of five (5) U.S.gallons.
GroundingWing Nut -- Usedfor proper grounding of
unit (seepage 3).
Oil Fill --Add engine oil here.
Recoil starter -- Used to start the engine.
Rocker Switch -- Set this switch to "On" before using
recoil starter. Set switch to "Off" to switch off engine.
Spark Arrester Muffler -- Exhaust muffler lowers
engine noise and is equipped with a spark arrester screen.
4
Yourgeneratorrequiressomeassemblyandisreadyfor
useafterit hasbeenproperlyservicedwiththe
recommendedoilandfuel.
If you have any problems with the assembly of your
generator, please call the generator helpline at
1-800-270-1408.
IMPORTANT: Any attempt to run the unit before it has
been serviced with the recommended oil will result in an
engine failure.
CARTON CONTENTS
Check all contents. If anyparts aremissingor damaged,call
the generator helpline at 1-800-270-1408.
• The generator
• Generator and engine owner's manuals
• Locking 30Amp plug
• Engineoil
• Wheel kit
REMOVE G EN ERATOR
FROM CARTON
• Set the carton on arigid flat surfacewith "This SideUp"
arrows pointing upward.
• Carefully open the top flaps of the shippingcarton.
• Cut down corners at one end of carton from top to
bottom and laythat side of carton down flat
• Removeall packingmaterial, carton fillers, etc.
• Removethe generator from the shipping carton.
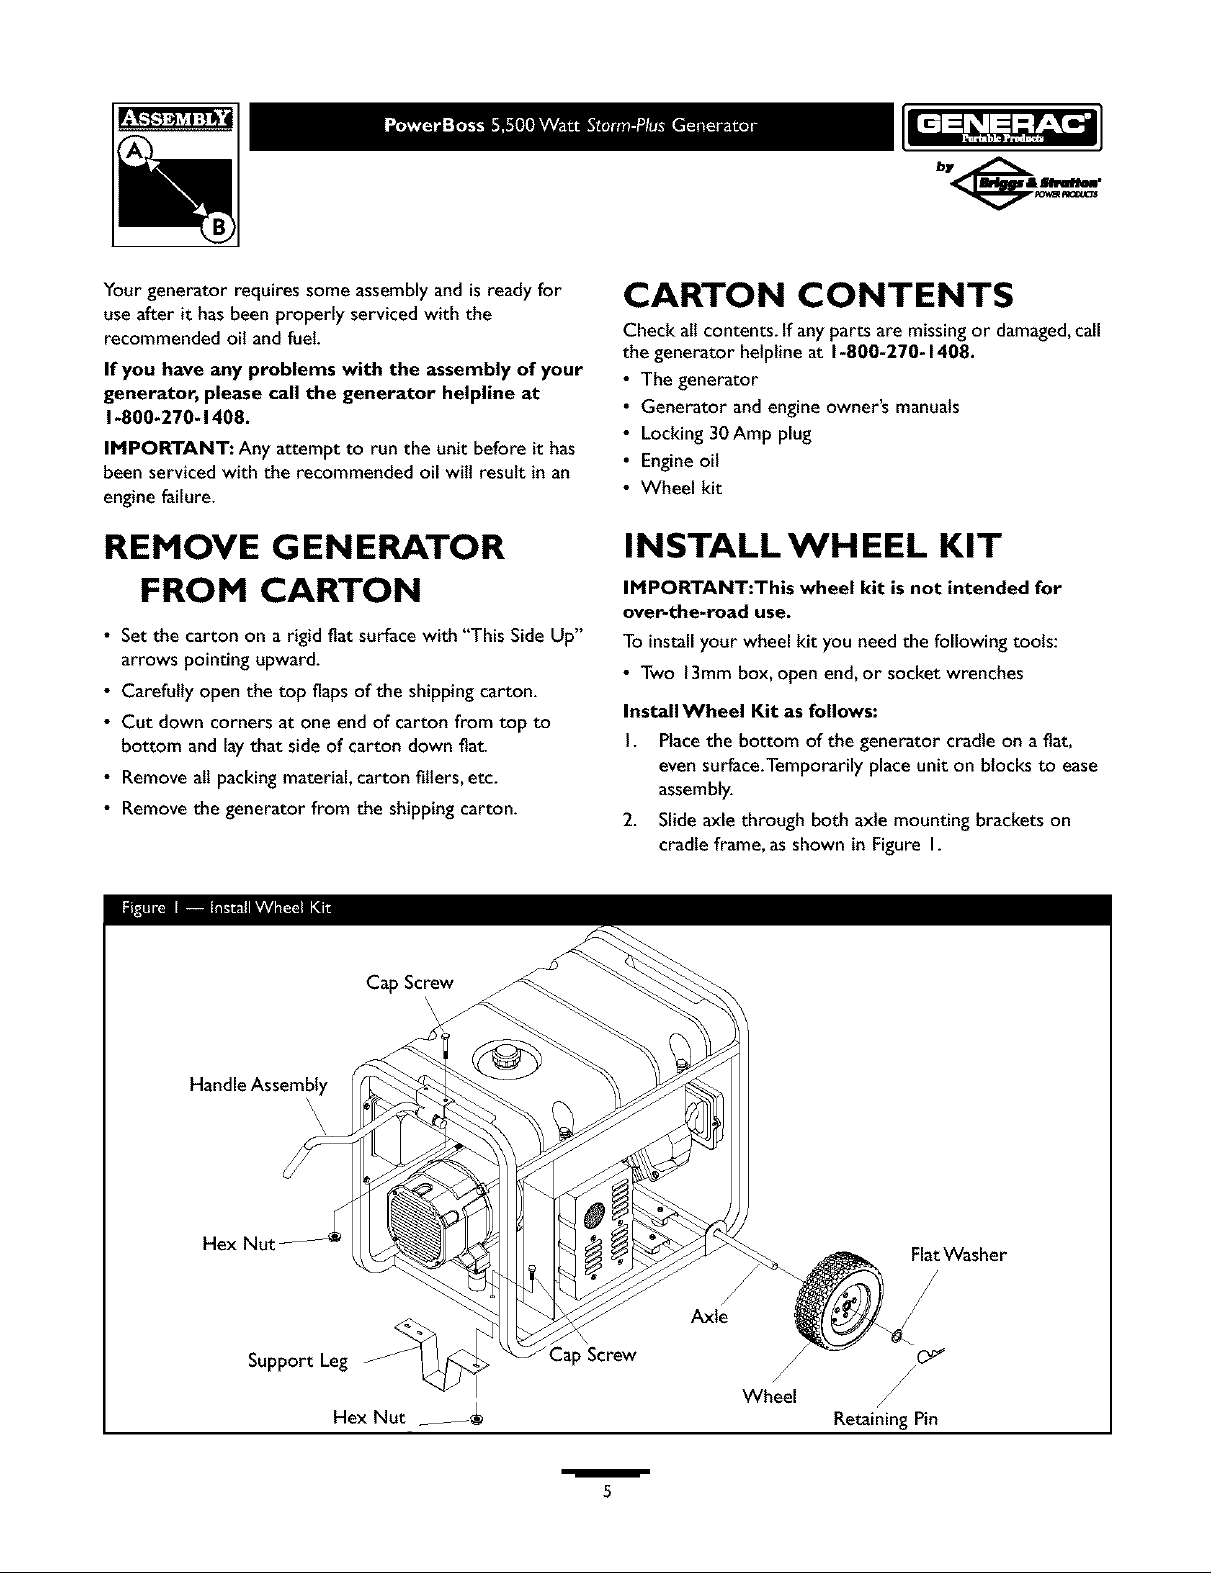
INSTALL WHEEL KIT
IMPORTANT:This wheel kit is not intended for
over-the-road use.
To installyour wheel kit you need the followingtools:
• Two 13mm box, openend, or socket wrenches
Install Wheel Kit as follows:
I. Placethe bottom of the generator cradle on a flat,
even surface.Temporarily place uniton blocks to ease
assembly.
2. Slide axle through both axle mounting brackets on
cradle frame, as shown in Figure I.
Hex Nut
Support Leg
Hex Nut _
/
Screw
5
Axle
Wheel
FlatWasher
j/
Retaining Pin
3. Slideawheel over the axle.
NOTE: Be sure to installboth wheelswith the air
pressure valve on the outboard side.
4. Retain wheel on axle with the retaining pin.You may
acidthe fiat washer if desired.
5. Repeat step 3 and 4 to secure second wheel.
6. Removethe temporary blocks.
7. To aid support leg assembly,rest generator on cradle,
engine end down.Attach the support leg with two
M8x 16mm cap screws and two locking hex nuts as
shown.
8. Use two 13mm wrenches to tighten leghardware.
Restgenerator on wheels and support leg.
9. Center the handle bracket on generator frame at
support leg end of cradle, asshown.
10. Attach handle bracket with two M8 x 45mm cap
screws and two locking hex nuts.
I I. Check that all fasteners are tight and the tires are
inflatedbetween 15-40 PSI.
BEFORE STARTING THE
ENGINE
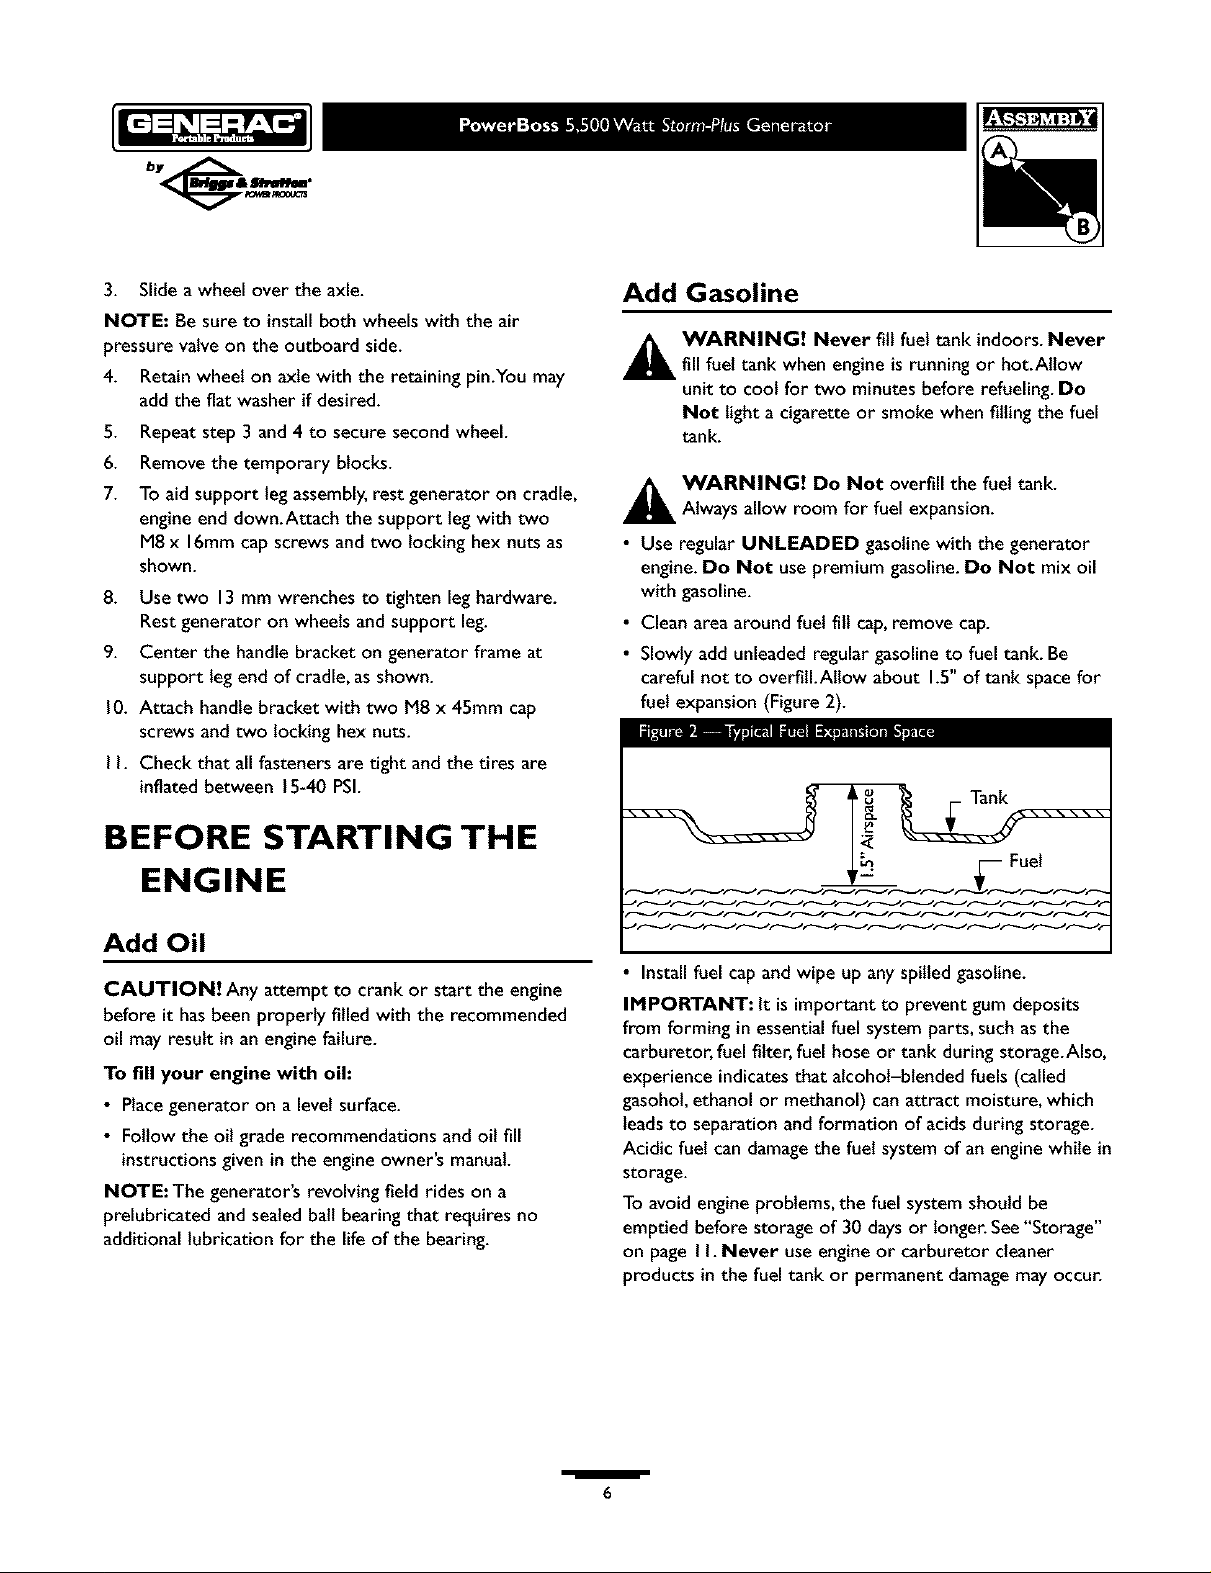
Add Gasoline
_ ARNING! Never fill fuel tank indoors.Never
fill fuel tank when engine isrunning or hot.Allow
unit to cool for two minutes before refueling. Do
Not lighta cigarette or smoke when filling the fuel
tank.
_ WARNING! Do Not overfill the fuel tank.
Always allow room for fuel expansion.
• Use regular UNLEADED gasoline with the generator
engine. Do Not use premium gasoline. Do Not mix oil
with gasoline.
• Clean area around fuel fill cap, remove cap.
• Slowly add unleaded regular gasoline to fuel tank. Be
careful not to overfill.Allow about 1.5" of tank space for
fuel expansion (Figure 2).
Fuel
......
Add Oil
CAUTION! Any attempt to crank or start the engine
before it hasbeen properly filled with the recommended
oil may result in an engine failure.
To fill your engine with oil:
• Placegenerator on alevel surface.
• Follow the oil grade recommendations and oil fill
instructionsgiven in the engine owner's manual.
NOTE:The generator's revolving field rides on a
prelubricated and sealedbali bearing that requires no
additional lubrication for the life of the bearing.
• Install fuel cap and wipe up any spilled gasoline.
IMPORTANT: It is important to prevent gum deposits
from forming in essential fuel system parts, such as the
carburetor, fuel filter, fuel hose or tank during storage.Also,
experience indicates that alcohol-blended fuels (called
gasohol, ethanol or methanol) can attract moisture, which
leads to separation and formation of acids during storage.
Acidic fuel can damage the fuel system of an engine while in
storage.
To avoid engine problems, the fuel system should be
emptied before storage of 30 clays or longer. See "Storage"
on page I I. Never use engine or carburetor cleaner
products in the fuel tank or permanent damage may occur.
/
6
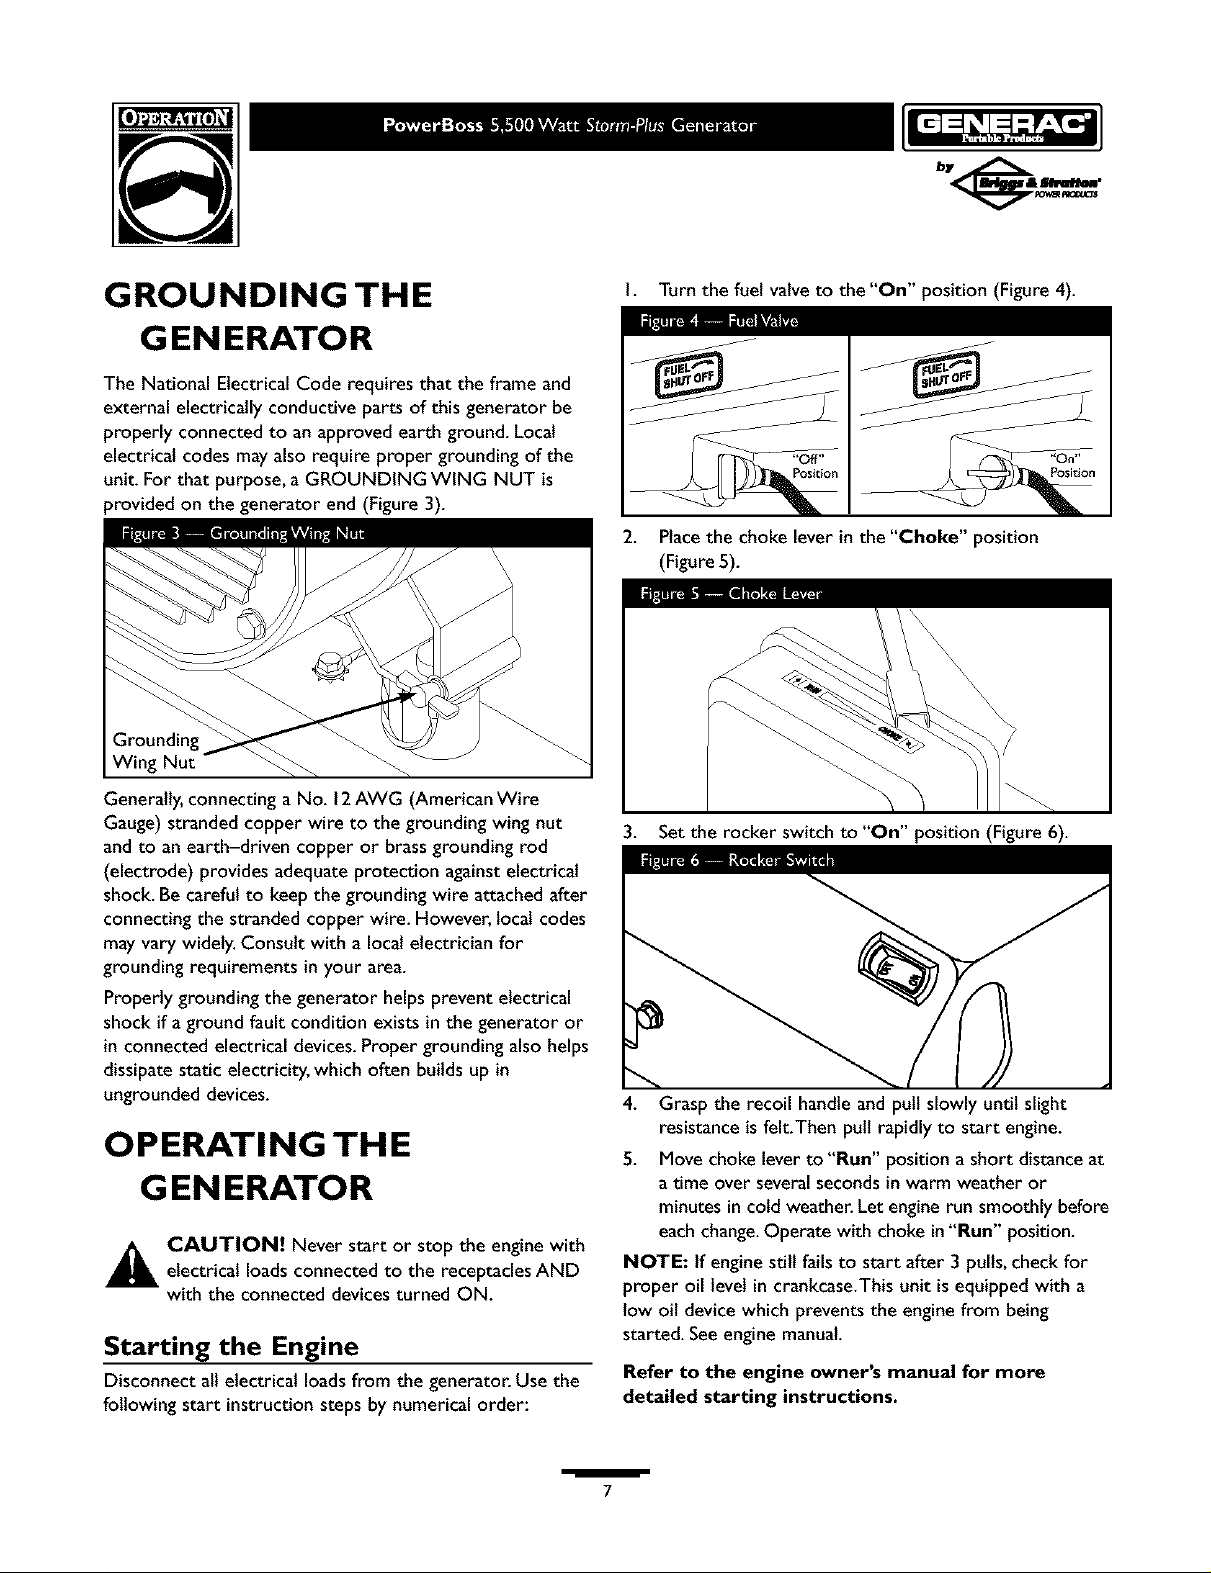
GROUNDING THE
G EN ERATO R
The National Electrical Code requires that the frame and
external electrically conductive parts of this generator be
properly connected to an approved earth ground. Local
electrical codes mayalso require proper grounding of the
unit. For that purpose, a GROUNDING WING NUT is
provided on the generator end (Figure 3).
Wing Nut
Generally,connecting a No. 12AWG (American Wire
Gauge) stranded copper wire to the grounding wingnut
and to an earth-driven copper or brass grounding rod
(electrode) provides adequate protection against electrical
shock. Be careful to keepthe grounding wire attached after
connecting the stranded copper wire. However, local codes
may vary widely.Consult with a local electrician for
grounding requirements in your area.
Properly grounding the generator helps prevent electrical
shock if aground fault condition exists in the generator or
in connected electrical devices.Proper grounding also helps
dissipate static electricity, which often builds up in
ungrounded devices.
OPERATING THE
G EN ERATO R
_ AUTION! Never start or stop the engine with
Starting the Engine
Disconnect alt electrical loadsfrom the generator. Use the
following start instruction steps by numerical order:
electrical loadsconnected to the receptaclesAND
with the connected devices turned ON.
I*
Turn the fuel valve to the "On" position (Figure 4).
Place the choke lever in the "Choke" position
(Figure 5).
3. Set the rocker switch to "On" position (Figure 6).
4. Grasp the recoil handle and pull slowly untilslight
resistance is felt.Then pull rapidly to start engine.
5. Move choke lever to "Run" position ashort distanceat
a time over severalsecondsin warm weather or
minutes in cold weather. Let engine run smoothly before
eachchange.Operate with choke in"Run" position.
NOTE: If enginestill fails to start after 3 pulls,check for
proper oil level in crankcase.This unit is equipped with a
low oil device which prevents the engine from being
started. Seeengine manual.
Refer to the engine owner's manual for more
detailed starting instructions.
/
7
Connecting Electrical Loads
• Let engine stabilize and warm up for a few minutes after
starting.
• Plugin and turn on the desired 120and/or 240 VottAC,
single phase,60 Hz electrical loads.
• Do Not connect 240Volt loads to the 120Volt duplex
receptacles.
• Do Not connect 3_hase loadsto the generator.
• Do Not connect 50 Hz loads to the generator.
• DO NOT OVERLOADTHE GENERATOR. See
"Don't Overload the Generator" on page9.
Stopping the Engine
• Unplug all electrical loads from generator panel
receptacles.Never start or stop engine with electrical
devices plugged in and turned ON.
• Let engine run at no-load for several minutes to stabilize
the internal temperatures of engine and generator.
• Move rocker switch to "Off' position.
• Movethe fuel valve to the "Off' position.
RECEPTACLES
This receptacle powers 120/240Volt AC, 60 Hz, single
phaseloads requiring up to 5,500 watts of power (5.5 kW)
at 30 Amps for 120Volts or 240Volts.The outlet is
protected by a push-to-reset circuit breaker.
_ CAUTION! Although this outlet states it hasa
120/240Volt 30 Amp rating (up to 7,200 watts), the
generator isonly rated for 5,500 watts. Powering
loadsthat exceed the wattage/amperage capacity of
the generator can damageit or causeserious
injuries.
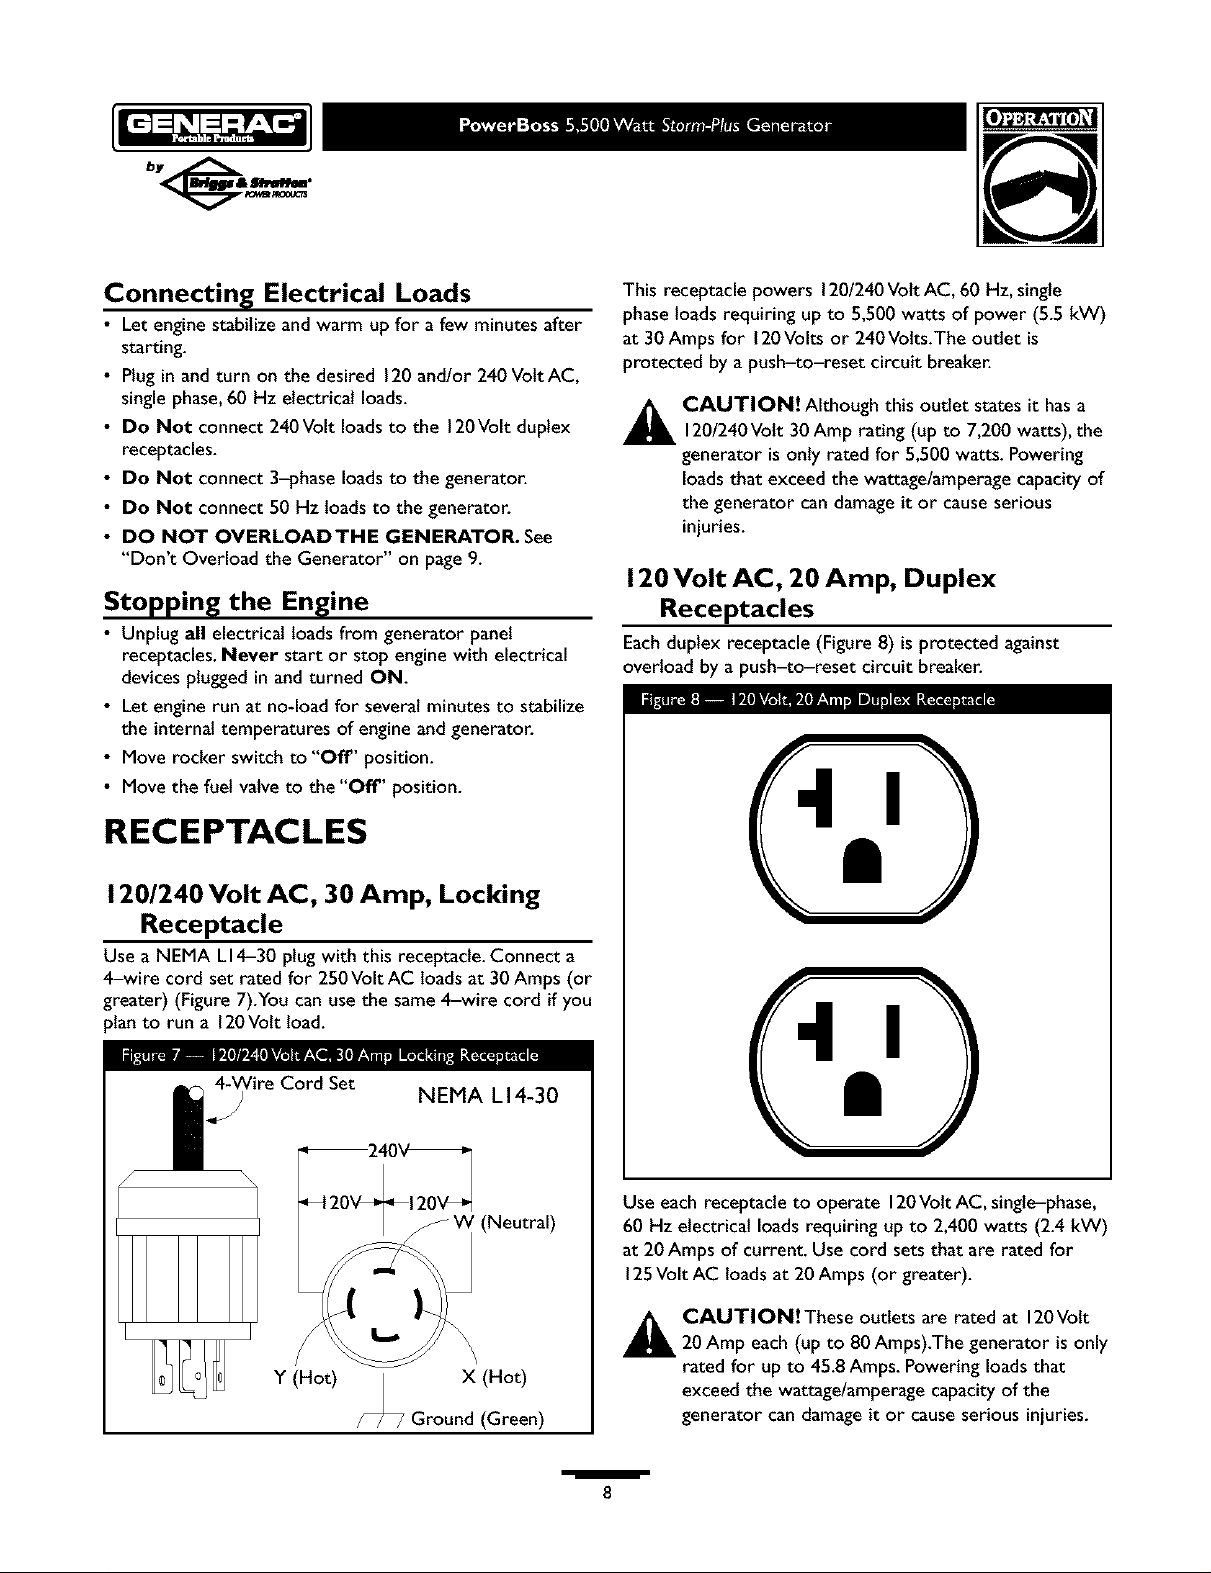
120 Volt AC, 20 Amp, Duplex
Receptacles
Eachduplex receptacle (Figure 8) isprotected against
overload by a push-to-reset circuit breaker.
I
120/240 Volt AC, 30 Amp, Locking
Receptacle
Use a NEMA LI4-30 plug with this receptacle.Connect a
4-wire cord set rated for 250Volt AC loads at 30 Amps (or
greater) (Figure 7).You can usethe same 4-wire cord if you
_lanto run a 120Volt load.
NEMA LI4-30
' (Neutral)
Y (Hot) | X (Hot)
/
77_ Ground (Green)
/
I
Use each receptacle to operate 120Volt AC, single-phase,
60 Hz electrical loadsrequiring up to 2,400 watts (2.4 kW)
at 20Amps of current. Use cord sets that are rated for
125Volt AC loads at 20Amps (or greater).
_ CAUTION!These outlets are rated at 120Volt
20 Amp each (up to 80 Amps).The generator is only
rated for up to 45.8 Amps. Powering loads that
exceed the wattage/amperage capacity of the
generator can damageit or causeserious injuries.
8
DON'T OVERLOAD YOUR
G EN ERATO R
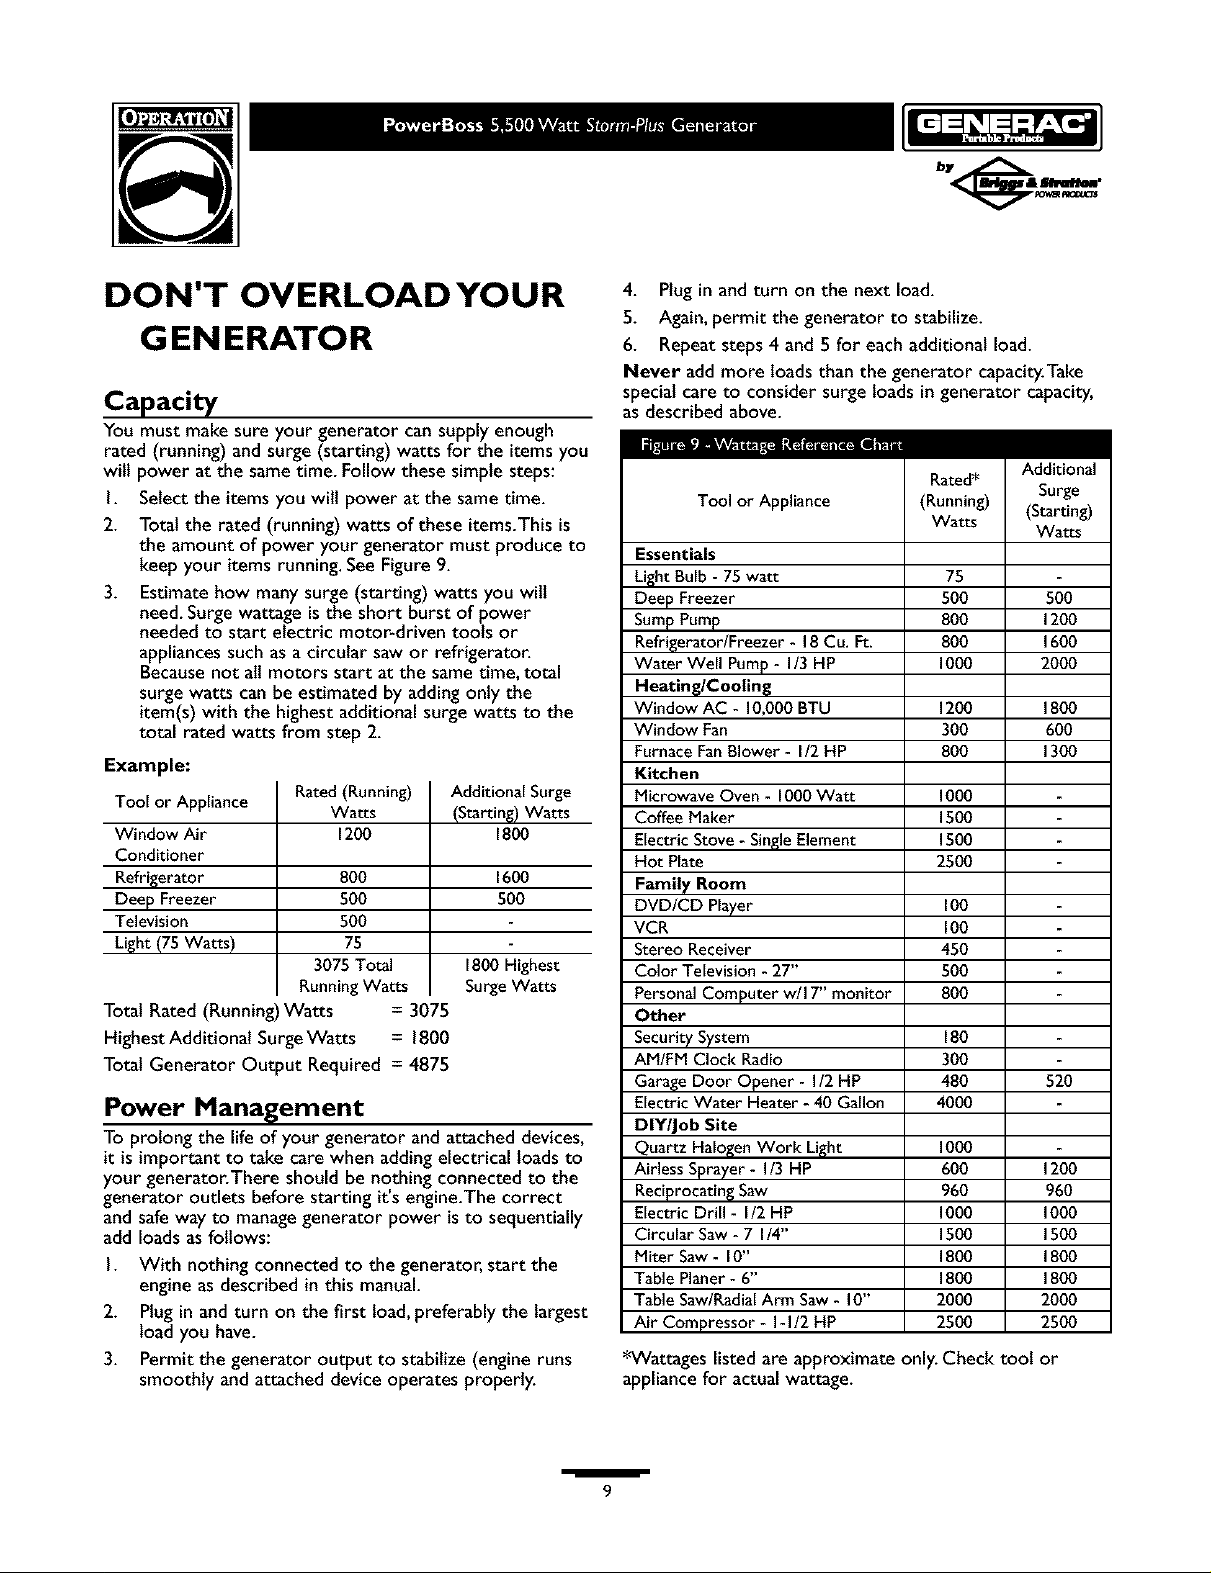
Capacity
You must make sure your generator cansupply enough
rated (running) and surge (starting) watts for the items you
will power at the sametime. Follow these simple steps:
I. Select the itemsyou wilt power at the same time.
2. Total the rated (running) watts of these items.Thisis
the amount of power your generator must produce to
keep your itemsrunning. SeeFigure 9.
3. Estimate how many surge (starting) watts you wilt
need.Surge wattage isthe short burst of power
needed to start electric motor-driven tools or
appliancessuch as a circular saw or refrigerator.
Becausenot all motors start at the sametime, total
surge watts can be estimated by addingonly the
item(s)with the highest additional surge watts to the
total rated watts from step 2.
Example:
Tool or Appliance
Window Air
Conditioner
Refrigerator
Deep Freezer
Television
Light (75 Watts)
Total Rated (Running)Watts = 3075
Highest Additional SurgeWatts = 1800
Total Generator Output Required = 4875
Rated (Running)
Watts
1200
800
50O
500
75
3075 Total
Running Watts
Power Management
To prolong the lifeof your generator and attached devices,
it is important to take care when addingelectrical loadsto
your generator.There should be nothing connected to the
generator outlets before starting it's engine.The correct
and safeway to managegenerator power isto sequentially
add loadsasfollows:
I. With nothingconnected to the generator, start the
engine as described inthis manual.
2. Plugin and turn on the first load,preferably the largest
loadyou have.
3. Permit the generator output to stabilize (engine runs
smoothly and attached device operates properly.
Additional Surge
(Starting)Watts
1800
1600
5O0
1800 Highest
SurgeWatts
4. Plug in and turn on the next load.
5. Again, permit the generator to stabilize.
6. Repeat steps 4 and 5 for each additional load.
Never add more loadsthan the generator capacity.Take
specialcare to consider surge loadsin generator capacity,
asdescribed above.
Rated*
Tool or Appliance
Essentials
LightBulb - 75 watt
Deep Freezer
SumpPump
Refrigerator/Freezer - 18Cu. Ft.
Water Well Pump- I/3 HP
Heating/Cooling
Window AC - 10,000BTU
Window Fan
FurnaceFanBlower - I/2 HP
Kitchen
Microwave Oven - 1000Watt
Coffee Maker
Electric Stove - SingleElement
Hot Plate
Family Room
DVD/CD Player
VCR
Stereo Receiver
Color Television - 27"
Personal Computer w/I 7" monitor
Other
SecuritySystem
AM/FM Clock Radio
GarageDoor Opener - I/2 HP
Electric Water Heater - 40 Gallon
DIY/Job Site
Quartz Halogen Work Light
Airless Sprayer - I/3 HP
Reciprocatin_ Saw
Electric Drill - I/2 HP
Circular Saw- 7 I/4"
Miter Saw- I0"
Table Planer - 6"
Table Saw/RadialArm Saw- I0"
Air Compressor - I-I/2 HP
*Wattages listed are approximate only. Check toot or
appliance for actual wattage.
(Running)
Watts
75
500
8O0
8O0
1000
12O0
3OO
8O0
1000
1500
1500
25O0
100
100
450
5o0
8o0
18o
3O0
480 520
40O0
1000
600 1200
960 960
1000 1000
1500 1500
1800 1800
1800 1800
2000 2000
2500 2500
Additional
Surge
(Starting)
Watts
500
1200
1600
20O0
1800
6O0
1300
/
9

SPECIFICATIONS
Maximum SurgeWatts ................. 8,500 watts
Continuous Wattage Capacity ........... 5,500 watts
Power Factor .............................. 1.0
Rated Maximum Continuous AC LoadCurrent:
At 120Volts ....................... 45.8Amps
At 240 Volts ....................... 22.9Amps
Phase................................. I-phase
Rated Frequency ....................... 60 Hertz
FuelTank Capacity................... 5 U.S.gallons
ShippingWeight ......................... 148 Ibs.
GENERAL MAINTENANCE
RECOMMENDATIONS
The Owner/Operator is responsible for making sure that
all periodic maintenance tasks are completed on atimely
basis;that all discrepancies are corrected; and that the unit
is kept clean and properly stored. Never operate a
damaged or defective generator.
Engine Maintenance
See engine owner's manual for instructions.
If you need service for your engine, you need to determine
the engine identification number.To do so, remove the
rocker arm cover hood, item number 55 shown on
page 16, by removing the four nuts and washers holding it
in place.The engine model-type-trim number is stamped on
the side of the inner cover attached to the engine. Have
this number in hand when you call the engine service
center for assistance.
Generator Maintenance
Generator maintenance consists of keeping the unit clean
and dry. Operate and store the unit in a clean dry
environment where it will not be exposed to excessive
dust, dirt, moisture or any corrosive vapors. Cooling air
slots in the generator must not become clogged with snow,
leaves or any other foreign material.
NOTE: Do Not use a garden hose to clean generator.
Water can enter engine fuel system and cause problems. In
addition, if water enters generator through cooling air slots,
some of the water wilt be retained in voids and cracks of
the rotor and stator winding insulation.Water and dirt
buildup on the generator internal windings will eventually
decrease the insulation resistance of these windings.
To Clean the Generator
_i AUTION! Never insert anyobject or tool
through the air cooling slots, even ifthe engine is
not running.
• Use a damp cloth to wipe exterior surfaces clean.
• A soft bristle brush may be used to loosen caked on dirt
or oil.
• A vacuum cleaner may be used to pick up loose dirt and
debris.
• Low pressure air (not to exceed 25 psi) may be used to
blow awaydirt. Inspect cooling air slots and opening on
generator.These openings must be kept clean and
unobstructed.
_i AUTION! Avoid prolonged or repeated skincontact with used motor oil. Used motor oil has
been shown to causeskin cancer in certain
laboratory animals.Thoroughly wash exposed areas
with soap and water.
KEEPOUT OF REACH OF CHILDREN. DON'T
POLLUTE.CONSERVE RESOURCES.RETURN
USED OIL TO COLLECTION CENTERS.
/
10
 Loading...