

Page 1
GEN RAC °]
Portable Products
Pressure Washer Owner's Manual
I
Questions? Help is just a moment away!
Preguntas? La ayuda es justa un momento lejos!
Call: Generac Pressure Washer Helpline / Ltame:Linea Oirecta del
Lavador a Presi6n de Generac - 1-800-270-1408 M-F 8-5 CT
Web: www.generac-portables.com or www.briggsandstratton.com
Model No. 1539-0 (3,000 PSiHighPressure Washer) ManualNo. 187701 Revision 7 (09/19/2002)
Page 2
GeneracPortableProducts3000PSIPressureWasher
TABLE OF CONTENTS
SafetyRules.................................. 2-3
Know Your PressureWasher ...................... 4
Assembly.................................... 5-7
Operation .................................. 8- I0
Product Specifications........................... I I
Maintenance ............................... I I- 13
Storage...................................... 14
Troubleshooting ............................... 15
Replacement Parts........................... 16-21
Warranty ............................... Last Page
EQUIPMENT
DESCRIPTION
Read this manual carefully and become familiar
with your pressure washer. Know its applications,
its limitations and any hazards involved.
Everyeffort has been madeto ensure that informationin
this manual is accurate and current However, Generac
reservesthe right to change,alter or otherwise improve the
product andthis document at anytime without prior notice.
WARNING
The engine exhaust from this product contains
chemicals known to the State of California to cause
cancer, birth defects, or other reproductive harm.
the State of California a spark arrester is required by law
Section 4442 of the California PublicResourcesCode).
)ther states may havesimilar laws.Federal lawsapplyon
Federallands.If you equip the muffler with aspark arrestel
t must be maintained ineffective working order.
WARNING
WHEN ADDING FUEL
Turnpressurewasher OFF and let it cool at [east2 minutes
before removing gascap.
Fillfuel tank outdoors.
Do not overfill tank. Allow spacefor fuel expansion.
Keep gasoline away from sparks, open flames, pilot lights, heat,
and other ignitionsources.
Do not lightacigarette or smoke.
eVHEN OPERATING EQUIPMENT
Do not tip engine or equipment at anglewhich causes
gasolineto spill
Do not sprayflammable liquids.
'HEN TRANSPORTING OR REPAIRING EQUIPMENT
Transport/repair with fuel tank EMPTY or with fuel shutoff
valve OrE
eVHEN STORING GASOLINE OR EQUIPMENT WITH
FUEL IN TANK
Store away from furnaces, stoves,water heaters, clothes
dryers or other appliancesthat havepilot lightor other
ignitionsource becausethey can ignite gasolinevapors.
WARNING
SAFETY RULES
The safety alert symbol (_.) isusedwith a signalword
(DANGER, CAUTION, WARNING), a pictorial and/or a
safety messageto alert you to hazards. DANGER
indicates a hazard which, ifnot avoided, will result in death
or serious injury.WARNING indicatesa hazardwhich, if
not avoided, couldresult in death or serious injury.
CAUTION indicates a hazard which, if not avoided, might
result in minor or moderate injury.CAUTION, when
used without the alert symbol, indicates a situation that
could result in equipment damage.Follow safety messages
to avoid or reduce the risk of injuryor death.
/
Keepwater sprayawayfromelectricwiringor fatalelectric
shockmayresult.
WARNING
Never aim the spray gun at people, animalsor plants.
Do not allow CHILDREN to operate the pressure washer.
Never repair high pressure hose. Replace it.
2
Page 3
Generac Portable Products 3000 PSIPressureWasher
,_ WARNING
Keepspray nozzle between 8 to 24 inches away from cleaning
surface.
Beextremely careful if you must use the pressure washer from
a ladder,scaffolding or any other relatively unstable location.
The cleaning area should haveadequateslopes and drainageto
reduce the possibility of afall due to slippery surfaces.
Operate this unit on a stable surface.
,_ DANGER
,_ WARNING
Do not wear loose clothing, jewelry or anything that may be
caught in the starter or other rotating parts.
Tie up long hair and remove jewelry.
,_ WARNING
Always wear eye protection when you usethis equipment or
when you are in the vicinity where the equipment is in use.
,_ WARNING
Operate pressure washer ONLY outdoors.
Use a respirator or mask whenever there is a chance that
vapors may be inhaled.
Readall instructions with mask so you are certain the maskwill
provide the necessaryprotection againstinhaling harmful vapors.
,_ WARNING
Do not touch hot surfaces.
Allow equipment to cool before touching.
/
Disconnect the spark plug wire from the spark plug and place
the wire where it cannot contact spark plug.
,_ CAUTION
Do not tamper with governed speed.
Do not operate the pressure washer above the rated pressure.
CAUTION
Do not point spray gun at glasswhen in the jet spray mode.
Never aim the spraygun at plants.
3
Page 4
Generac Portable Products 3000 PSIPressureWasher
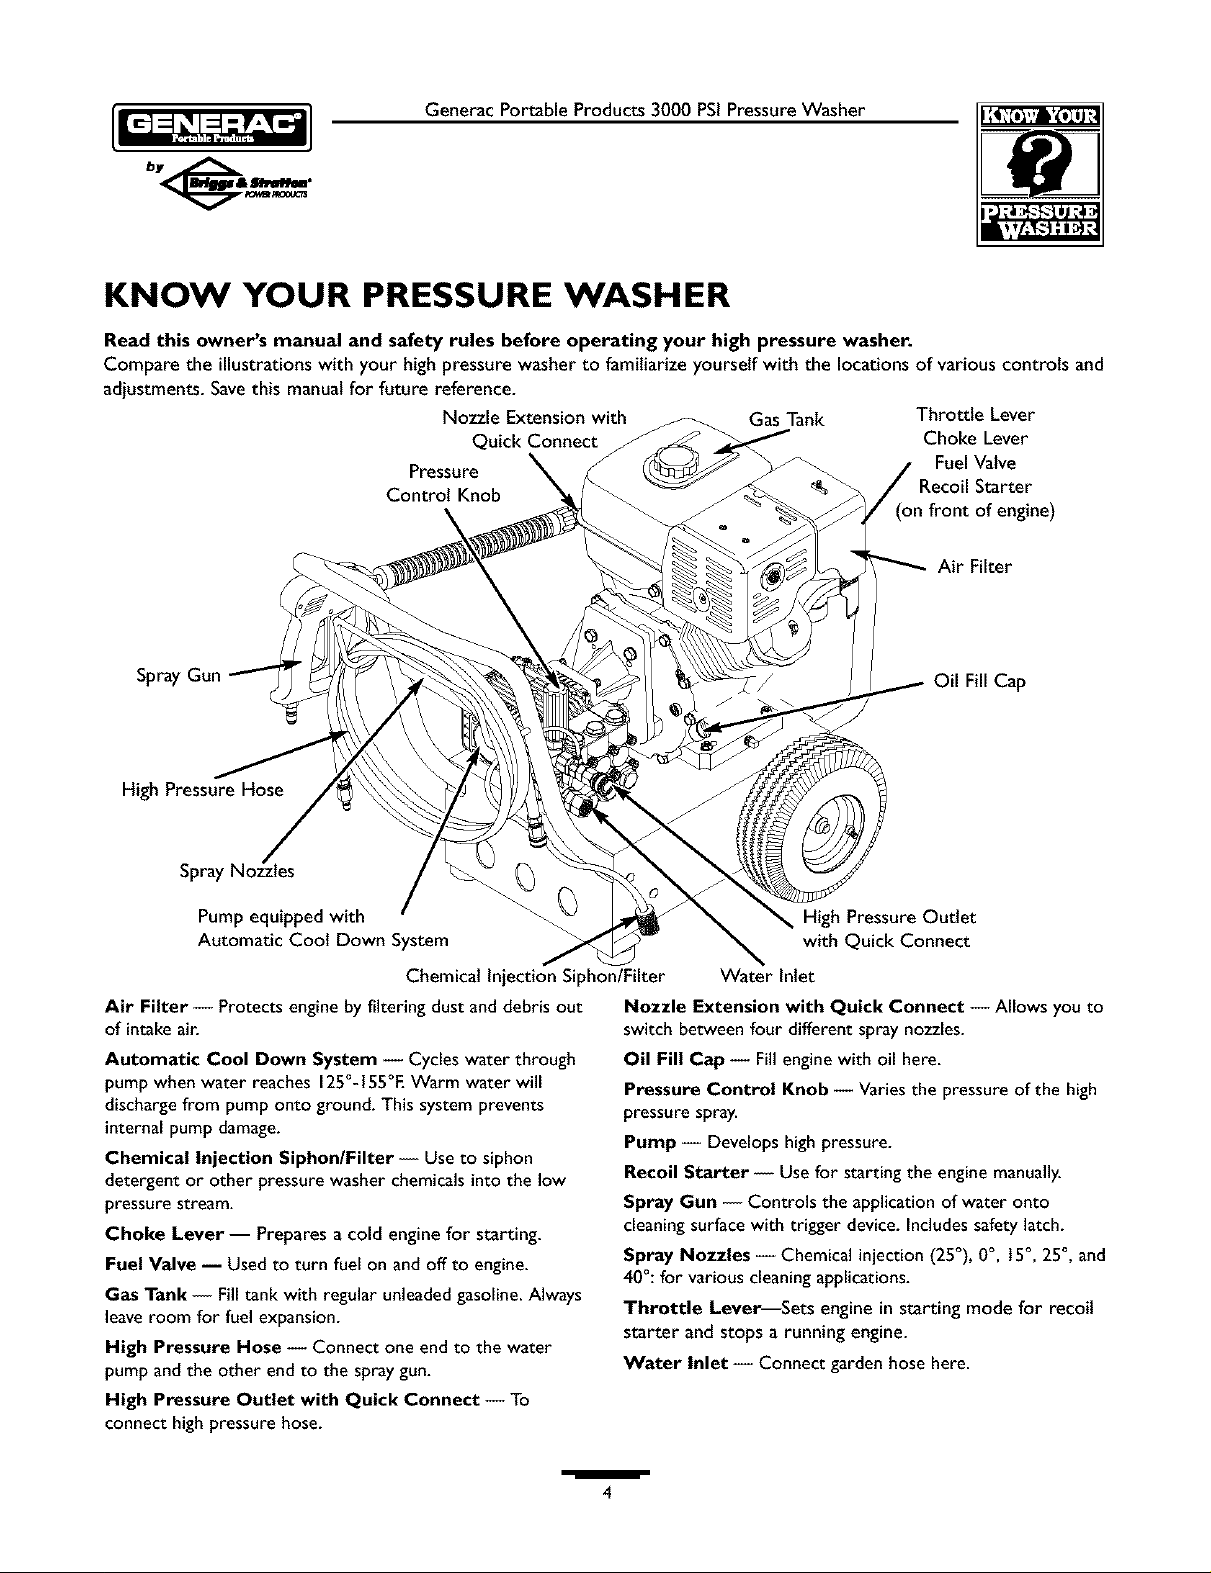
KNOW YOUR PRESSURE WASHER
Read this owner's manual and safety rules before operating your high pressure washer.
Compare the illustrations with your high pressure washer to familiarize yourself with the locations of various controls and
adjustments. Savethis manual for future reference.
Nozzle Extension with GasTank Throttle Lever
Quick Connect Choke Lever
Pressure _ FuelValve
Control Knob \. Starter
(on front of engine)
Air Filter
Spray
High Pressure Hose
Pump equipped with
Automatic Coot Down System
Chemical Injection Siphon/Filter
Air Filter -- Protects engine by filtering dust and debris out
of intake air.
Automatic Cool Down System -- Cycles water through
pump when water reaches 125°-155°F. Warm water will
discharge from pump onto ground. This system prevents
internal pump damage.
Chemical Injection Siphon/Filter -- Use to siphon
detergent or other pressure washer chemicals into the low
pressure stream.
Choke Lever -- Prepares a cold engine for starting.
Fuel Valve -- Used to turn fuel on and off to engine.
Gas Tank -- Fill tank with regular unleaded gasoline. Always
leave room for fuel expansion.
High Pressure Hose -- Connect one end to the water
pump and the other end to the spray gun.
High Pressure Outlet with Quick Connect -- To
connect high pressure hose.
Oil Fill Cap
High Pressure Outlet
with Quick Connect
Water Inlet
Nozzle Extension with Quick Connect -- Allows you to
switch between four different spray nozzles.
Oil Fill Cap -- Fill engine with oil here.
Pressure Control Knob -- Varies the pressure of the high
pressure spray.
Pump -- Develops high pressure.
Recoil Starter -- Use for starting the engine manually.
Spray Gun -- Controls the application of water onto
cleaning surface with trigger device. Includes safety latch.
Spray Nozzles -- Chemical injection (25°), 0°, t5°, 25°, and
40°: for various cleaning applications.
Throttle Lever--Sets engine in starting mode for recoil
starter and stops a running engine.
Water Inlet -- Connect garden hose here.
/
4
Page 5
Generac Portable Products 3000 PSIPressureWasher
IMPORTANT: Read entire owner's manual before you PREPARING PRESSURE
attemptto assembleor operateyournew pressurewasher,
WASHER FOR USE
REMOVE PRESSURE
If you haveany problems with the assemblyof your
WASHER FROM
pressure washer or if parts are missingor damaged,call the
pressure washer helpllne at 1-800-270-1408.
CARTON
To prepare your pressure washer for operation, you
• Removethe high pressure hose, handle,and parts box
inctuded with pressure washer.
• Slicetwo corners at the end of carton from top to
bottom so the panelcan be folded down fiat, then
remove all packing material.
• Roll pressure w_her out of carton.
Carton Contents
Items in the carton include:
• Main unit
• High pressure hose
• Handle
• Pump oil dipstick (hanging on pump)
• Accessory box (includes the following):
(2) bottles of engineoil
Owner's registration card
Safetygoggles
Bagcontaining 5 multi-colored quick connect nozzles
Maintenancekit
Owner's manual
Enginemanual
Enginewarranty card
Emissionscontrol warranty card
Spark arrestor screen
Spraygun with quick connect fitting
Nozzle extension with quick connect fitting
Handle hardware, including 4 carriage bolts and
4 flange nuts
If any of the above parts are missing or damaged,call the
pressure washer helpline at 1-800-270-1408.
will need to perform these tasks:
• Fill out and send in the registration card.
• Attach the handle to the main unit.
• Add oil to the engine.
• Add fuel to the fuel tank.
• Connect the high pressure hoseto the spray gun and the
pump.
• Connect the water supply to the pump.
• Connect nozzle extension to spray gun.
• Selectand installdesired nozzle.
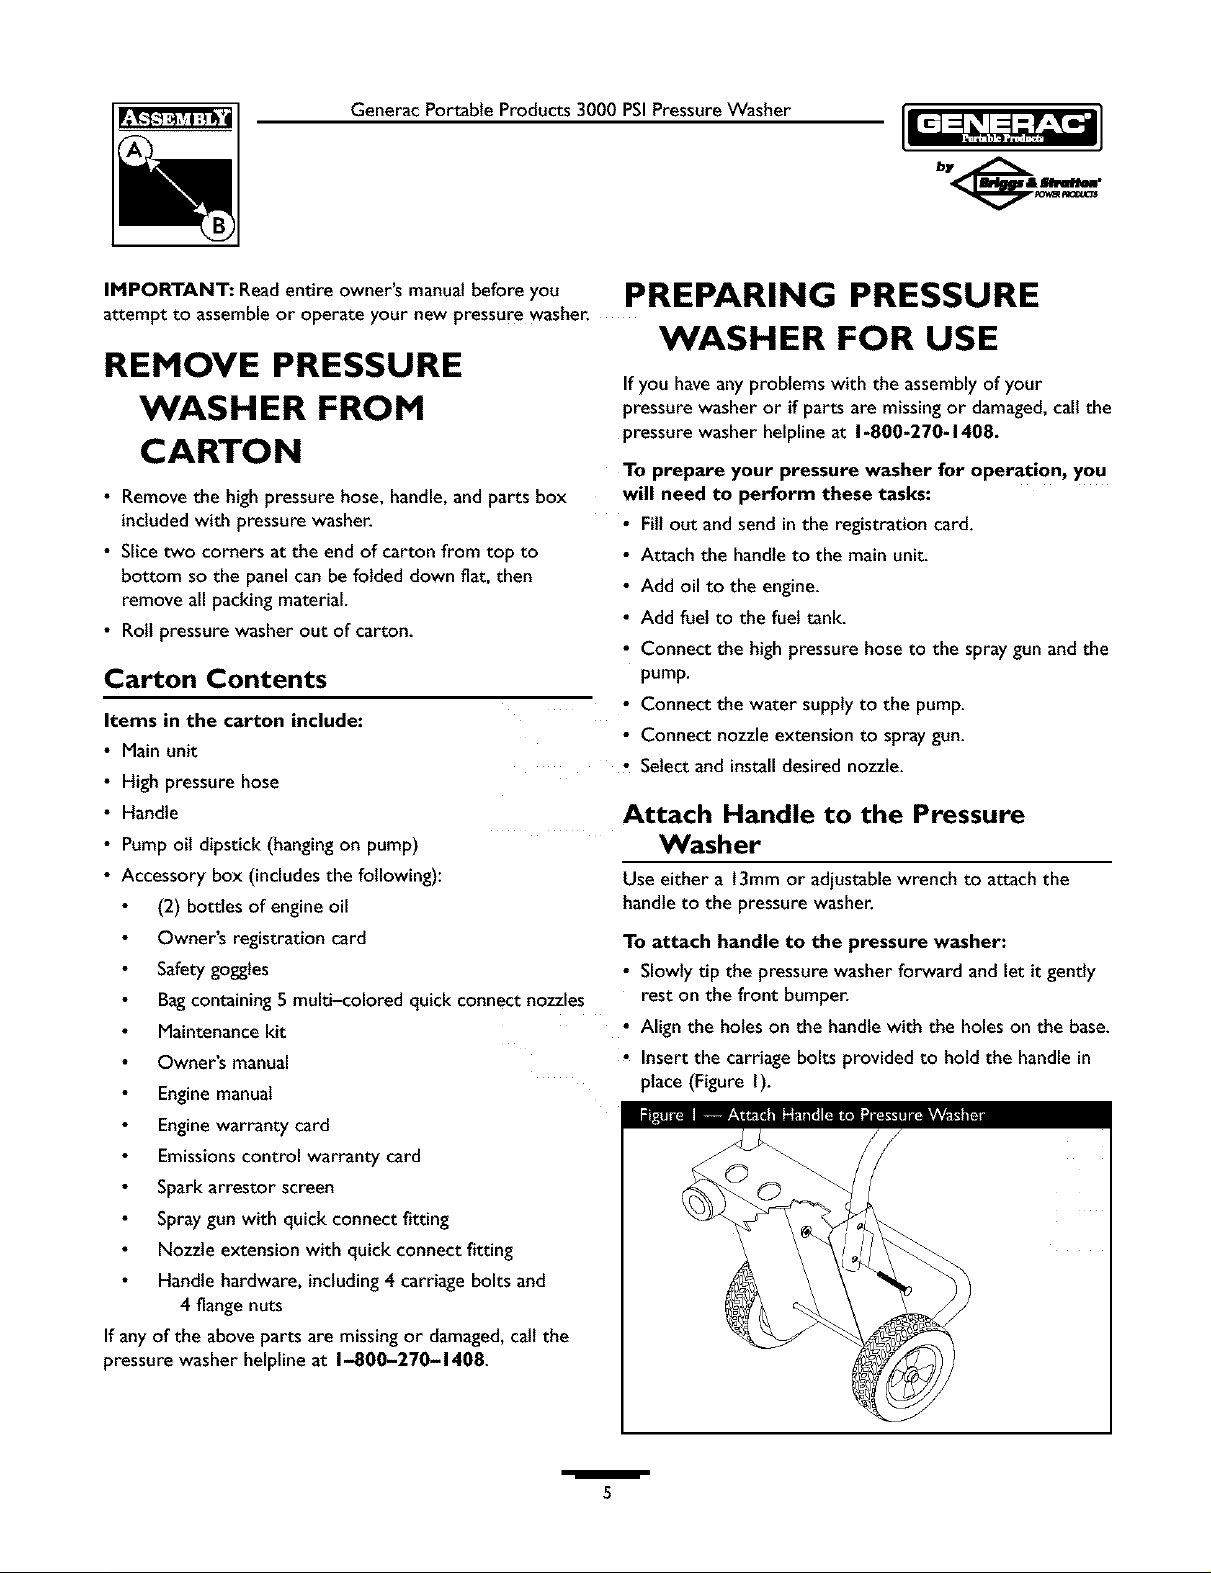
Attach Handle to the Pressure
Washer
Use either a 13ramor adjustable wrench to attach the
handle to the pressure washer.
To attach handle to the pressure washer:
• Slowly tip the pressure washer forward and let it gently
rest on the front bumper.
• Align the holes on the handle with the holes on the base.
• Insert the carriage bolts provided to hold the handlein
place (Figure I).
/
5
Page 6
GeneracPortableProducts3000PSIPressureWasher
• Securehandletothepressurewasherusingthefour
providedflangenuts.
• Slowlytipthepressurewasherbackinplaceandinsert
themulti-colorednozzlesinthespacesprovidedinthe
handle.
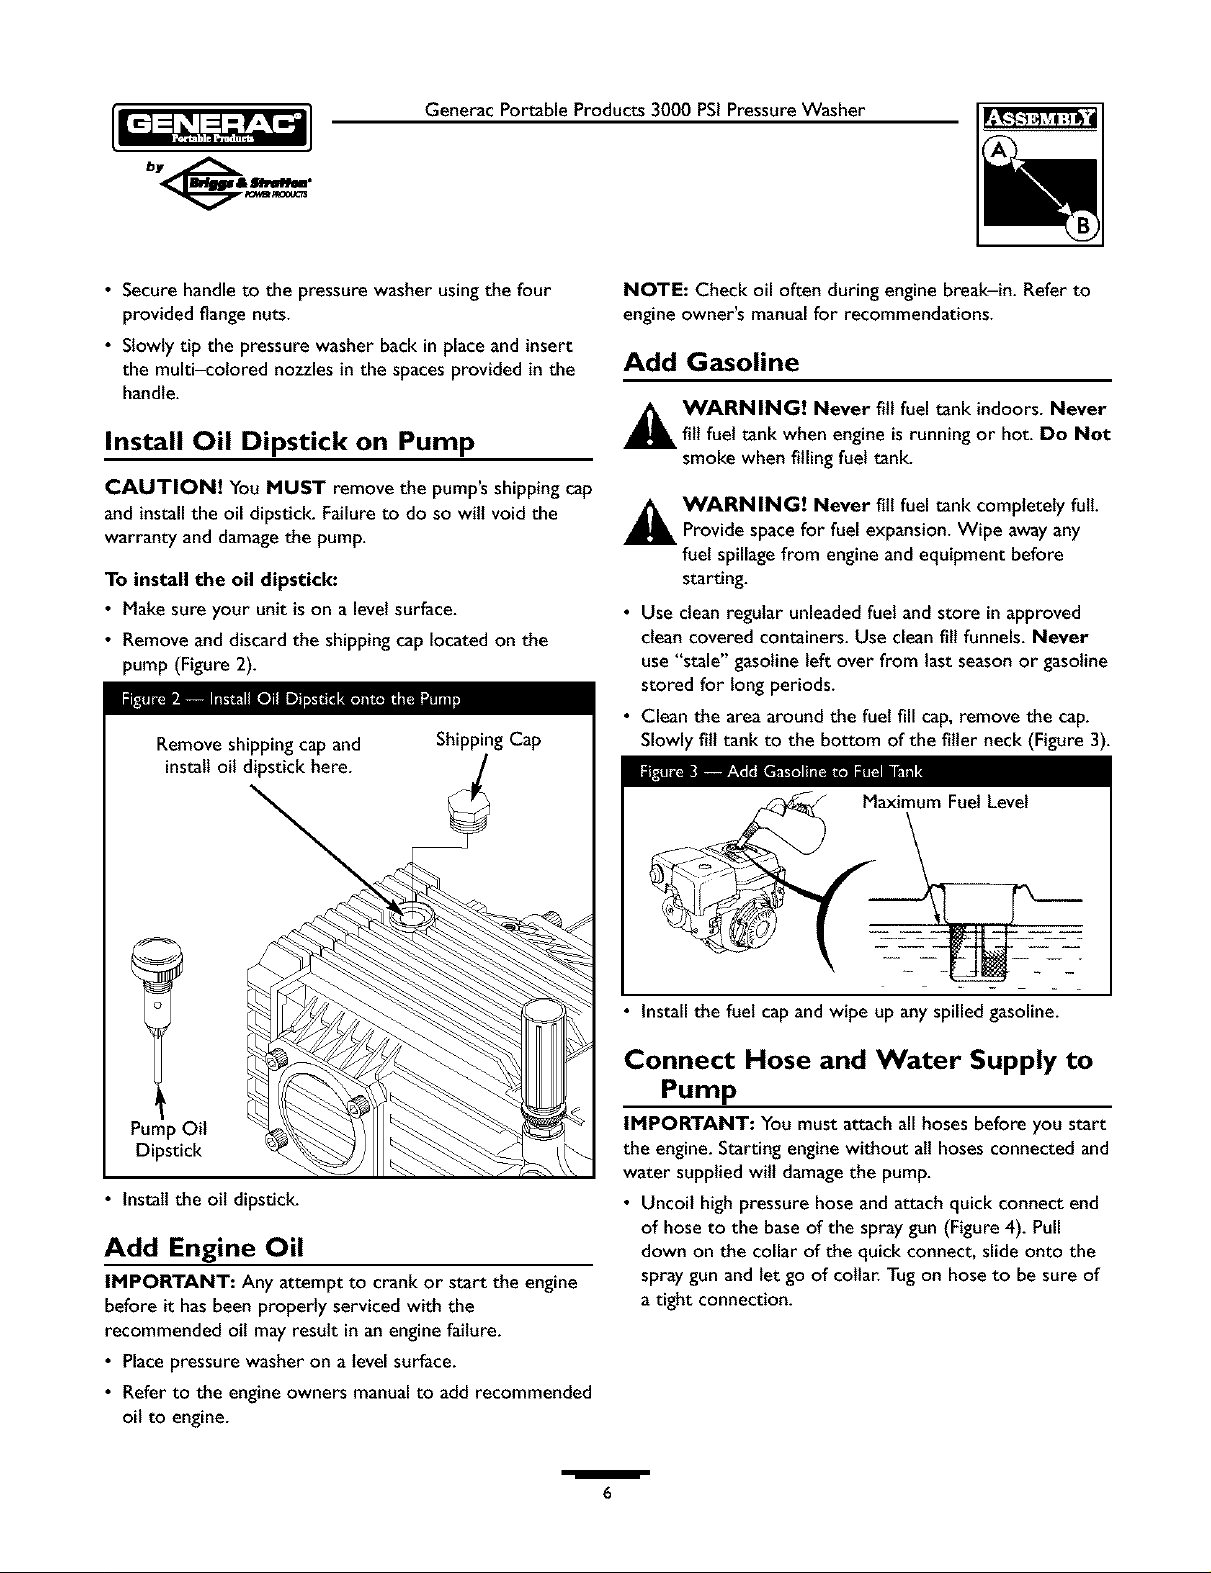
Install Oil Dipstick on Pump
CAUTION! You MUST remove the pump'sshipping cap
and installthe oil dipstick. Failure to do so will void the
warranty and damagethe pump.
To install the oil dipstick:
• Make sure your unit is on a level surface.
• Remove and discard the shipping cap located on the
pump (Figure 2).
NOTE: Check oil often during engine break-in. Refer to
engine owner's manual for recommendations.
Add Gasoline
_IL WARNING! Never fill fuel tank indoors. Never
fill fuel tank when engine is running or hot. Do Not
smoke when filling fuel tank.
_IL ARNING! Never fill fuel tank completely full.
Provide spacefor fuel expansion. Wipe awayany
fuel spillagefrom engine and equipment before
starting.
• Use clean regular unleadedfuel and store inapproved
clean covered containers. Use cleanfill funnels. Never
use "stale" gasoline left over from last season or gasoline
stored for long periods.
• Clean the area around the fuel fill cap, remove the cap.
Slowly fill tank to the bottom of the filler neck (Figure 3).
__ Maximum Fuel Level
Pump Oil
Dipstick
• Install the oil dipstick.
Add Engine Oil
IMPORTANT: Any attempt to crankor start the engine
before it hasbeen properly serviced with the
recommended oil may result in anengine failure.
• Placepressure washer on a levelsurface.
• Refer to the engine owners manual to add recommended
oil to engine.
/
Install the fuel cap and wipe up any spilled gasoline.
Connect Hose and Water Supply to
Pump
IMPORTANT: Youmust attach all hoses before you start
the engine. Starting engine without all hoses connected and
water supplied willdamage the pump.
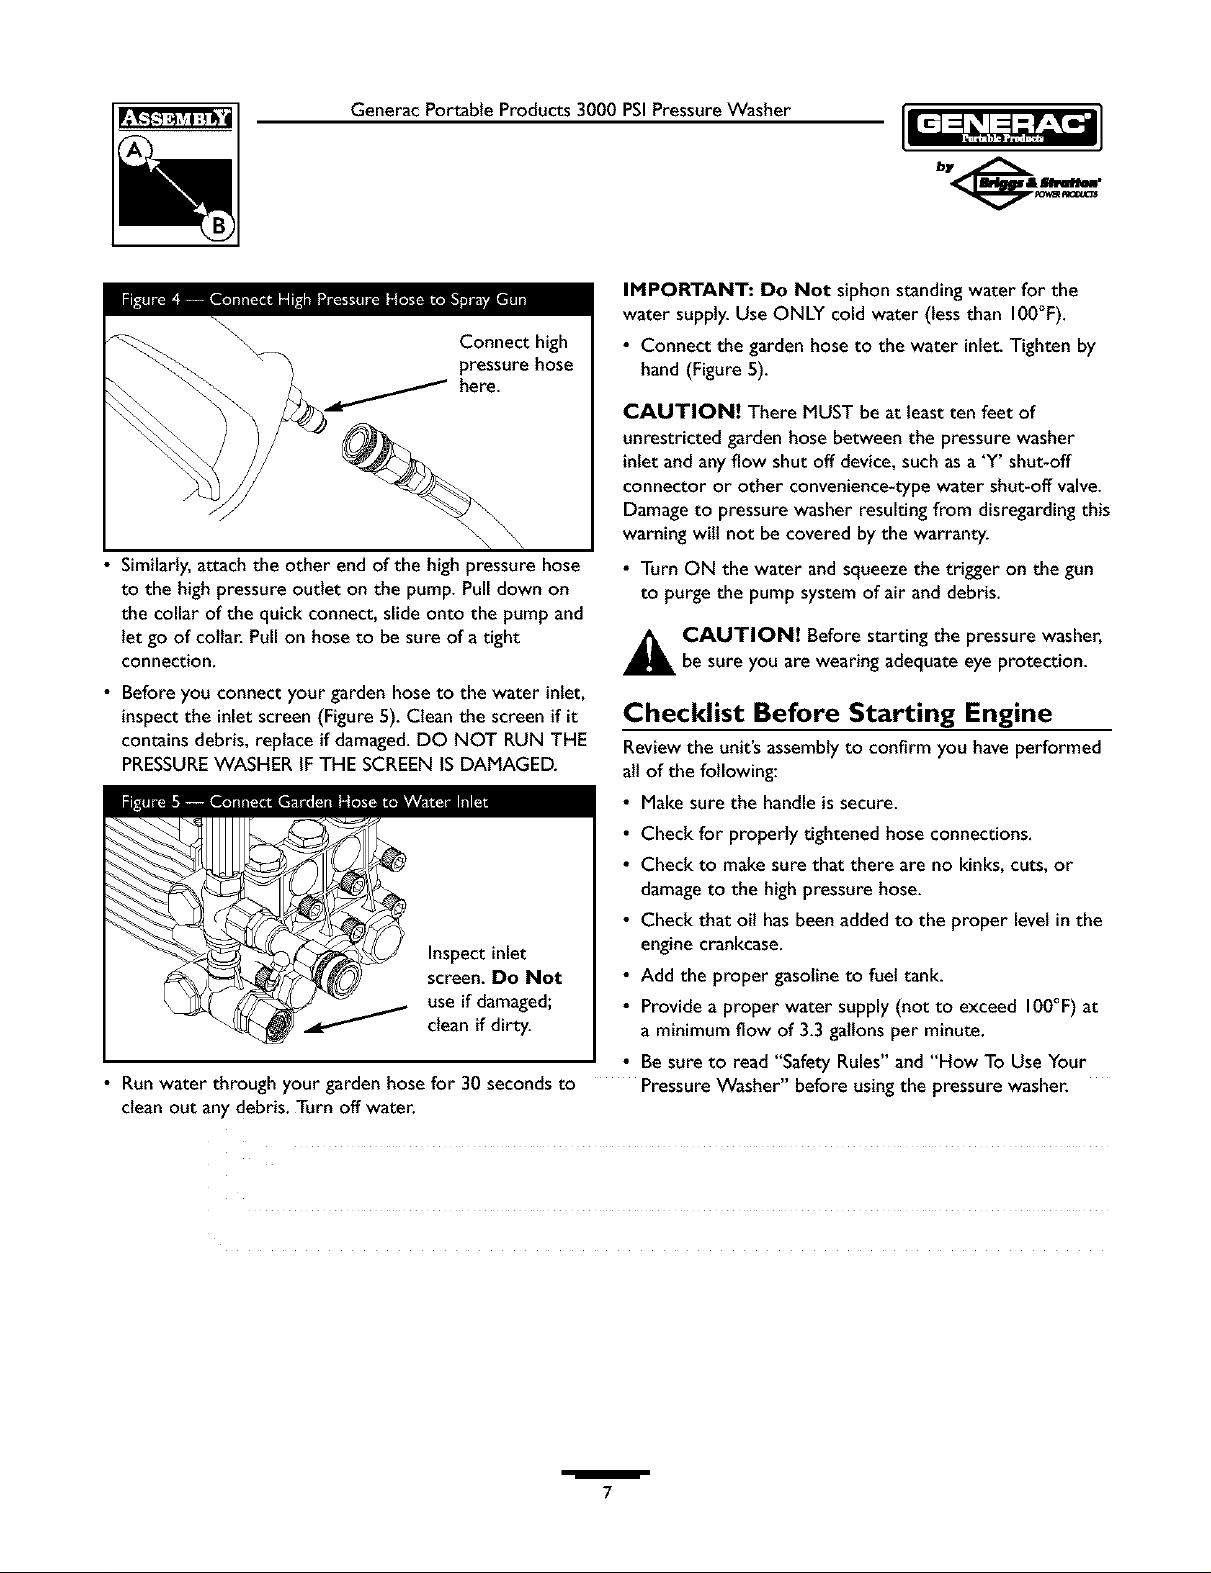
• Uncoil high pressure hose and attach quick connect end
of hose to the baseof the spraygun (Figure 4). Pull
down on the collar of the quick connect, slide onto the
spray gun and let go of collar. Tug on hoseto be sure of
a tight connection.
6
Page 7
GeneracPortableProducts3000PSIPressureWasher
IMPORTANT: Do Not siphon standing water for the
water supply.Use ONLY coldwater (tessthan 100°F).
• Connect the garden hose to the water inlet.Tighten by
hand (Figure 5).
_ here.
• Similarly, attach the other end of the high pressure hose
to the high pressure outlet on the pump. Pull clown on
the collar of the quick connect, slide onto the pump and
let go of collar. Pull on hose to be sure of a tight
connection.
• Before you connect your garden hoseto the water inlet,
inspect the inlet screen (Figure 5). Clean the screen if it
contains debris, replace if damaged.DO NOT RUN THE
PRESSUREWASHER IFTHE SCREENIS DAMAGED.
Inspectinlet
screen. Do Not
useif damaged;
cleanif dirty.
• Runwater through your garden hose for 30 seconds to PressureWasher" before usingthe pressure washer.
clean out anydebris. Turn off water.
CAUTION! There MUST be at leastten feet of
unrestricted garden hose between the pressure washer
inletand any flow shut off device,such as a'Y' shut-off
connector or other convenience-type water shut-o_ valve.
Damage to pressurewasher resulting from disregarding this
warning wilt not becovered by the warranty.
• Turn ON the water and squeezethe trigger on the gun
to purge the pump system of air and debris.
_ AUTION! Before starting the pressure washer,
be sure you are wearing adequate eyeprotection.
Checklist Before Starting Engine
Review the unit's assemblyto confirm you have performed
all of the following:
• Makesure the handle is secure.
• Check for properly tightened hose connections.
• Check to make sure that there are no kinks, cuts, or
damageto the high pressure hose.
• Check that oil hasbeen added to the proper level in the
engine crankcase.
• Add the proper gasoline to fuel tank.
• Provide a proper water supply (not to exceed 100°F)at
a minimum flow of 3.3 gallons per minute.
• Besure to read "Safety Rules" and "How To Use Your
/
7
Page 8
Generac Portable Products 3000 PSIPressureWasher
HOW TO USE YOUR
PRESSURE WASH ER
If you have any problems operating your pressure washer,
pleasecall the pressure washer helpline at
1-800-270-1408.
Off
How to Start Your Engine
The best way to start your pressure washer for the first
time isto follow these instructionsstep-by-step. This
starting informationalso appliesif havelet the pressure
washer sit idlefor at least a day.
• Placethe pressure washer in anarea close enough to an
outside water source that can flow at a rate of
3.3 gallons per minute or more.
• Make sure the unit isin a level position.
• Check that the high pressure hose is connected to the
spray gun and to the pump. See"Preparing Pressure
Washer for Use" on page5.
• Connect the garden hose to the water inlet on the
pressure washer pump and turn on the water.
CAUTION! Do Not run the pump without the water
supply connected and turned on. You must follow this
caution or the pump will be damaged.
• Squeezethe trigger on the spray gunto relieve the air
pressure caused by turning ON the water. Water will
discharge from the spray gun in a thin stream. Hold the
trigger until a steady stream of water appears. This will
make it easier to putl start the engine. Releasethe
trigger.
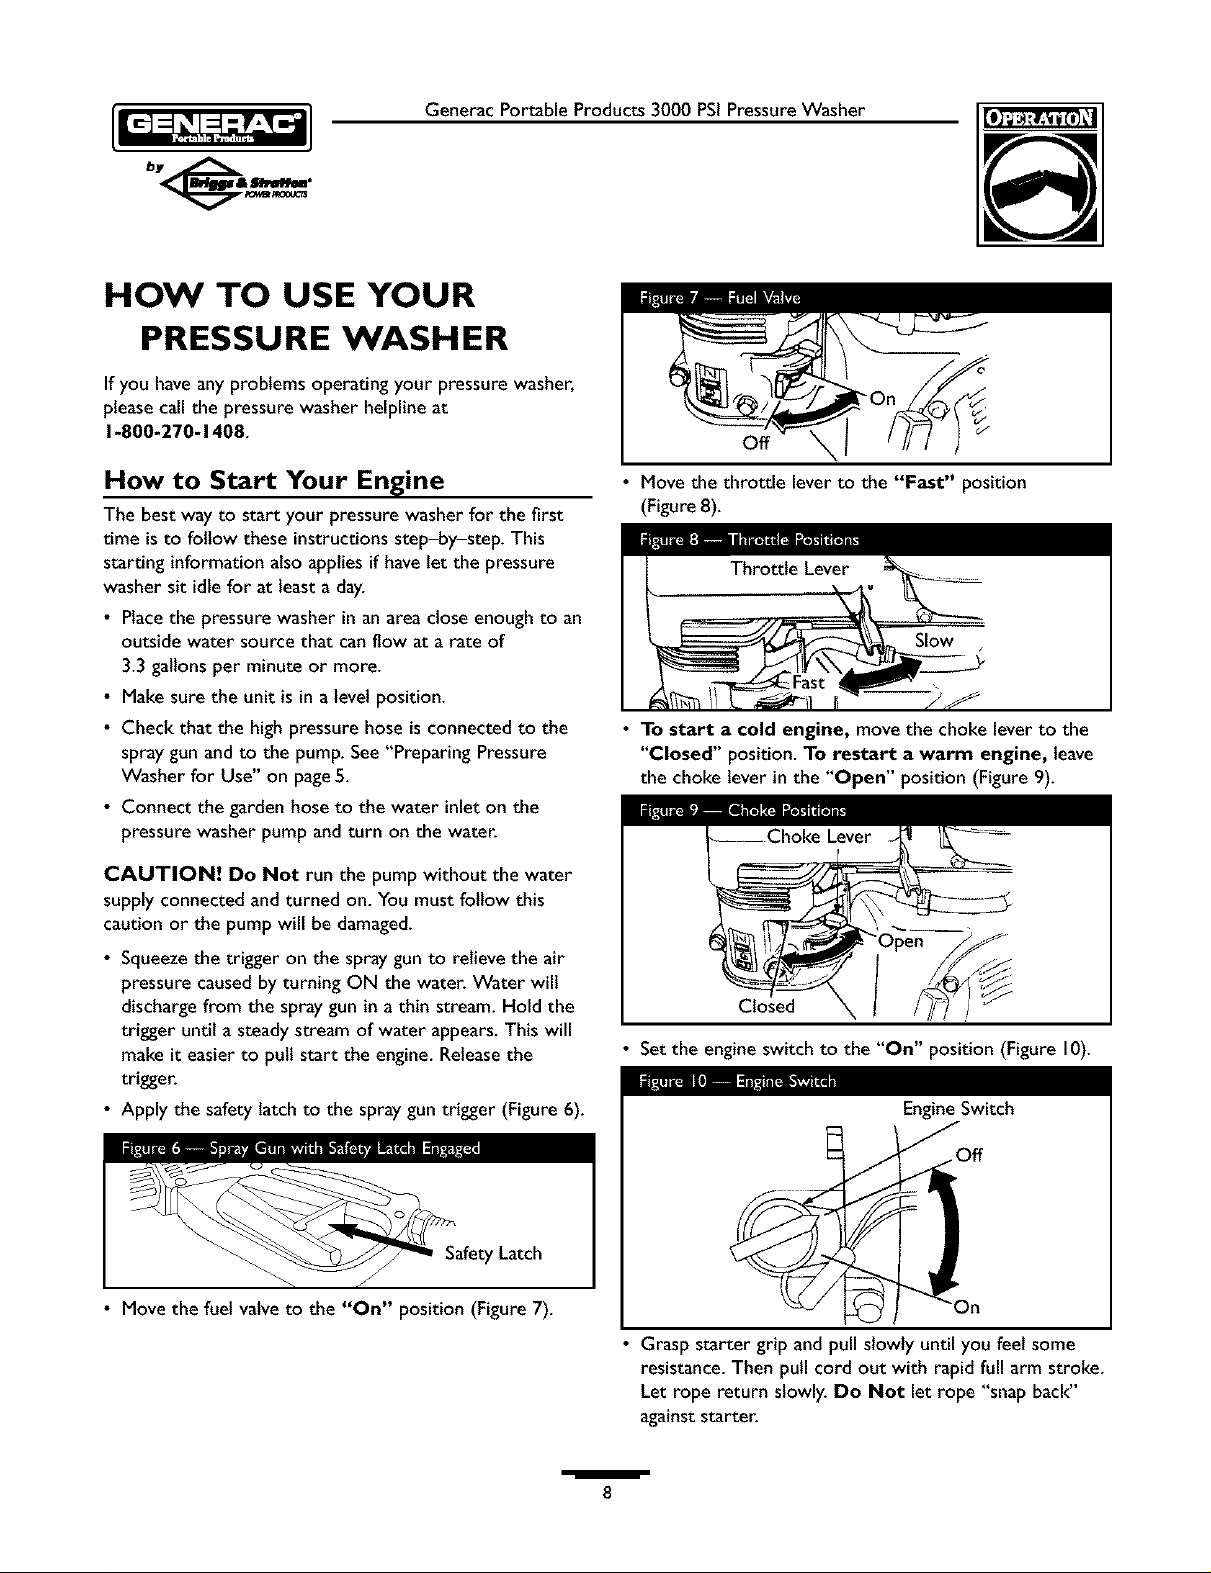
• Apply the safety latch to the spray gun trigger (Figure 6).
• Move the throttle leverto the "Fast" position
(Figure8).
• To start a cold engine, move the choke leverto the
"Closed" position. To restart a warm engine, leave
the choke lever in the "Open" position (Figure9).
Closed
• Setthe engine switch to the "On" position (Figure 10).
EngineSwitch
J
• Move the fuel valve to the "On" position (Figure 7).
Grasp starter grip and pull slowly until you feel some
resistance. Then pull cord out with rapid full arm stroke.
Let rope return slowly. Do Not let rope "snap back"
against starter.
/
8
Page 9
Generac Portable Products 3000 PSIPressureWasher
• Ifthe choke lever has been moved to the "Closed"
position to start the engine,gradually move it to the
"Open" position as the enginewarms up.
• Attach the nozzle extension to the spray gun.Tighten by
hand (Figure I I).
• Selectthe desired quick connect nozzle and insert it into
the end of the nozzle extension (see "How To Use the
Nozzles").
• Disengagethe safety latch on the spraygun.
How to Stop Your Pressure Washer
• Move the throttle lever to the "Slow" position.
• Move the fuel valve to the "Off" position.
• Wait for the engine to idledown.
• Move the engineswitch to the "Off" position.
• Simplyshutting off the engine will not release pressure in
the system. Squeeze trigger on the spray gun to
relieve pressure in the hose.
Flow to Use the Nozzles
_ CAUTION! Never exchange nozzleswithout
lockingthe safety latchon the trigger.
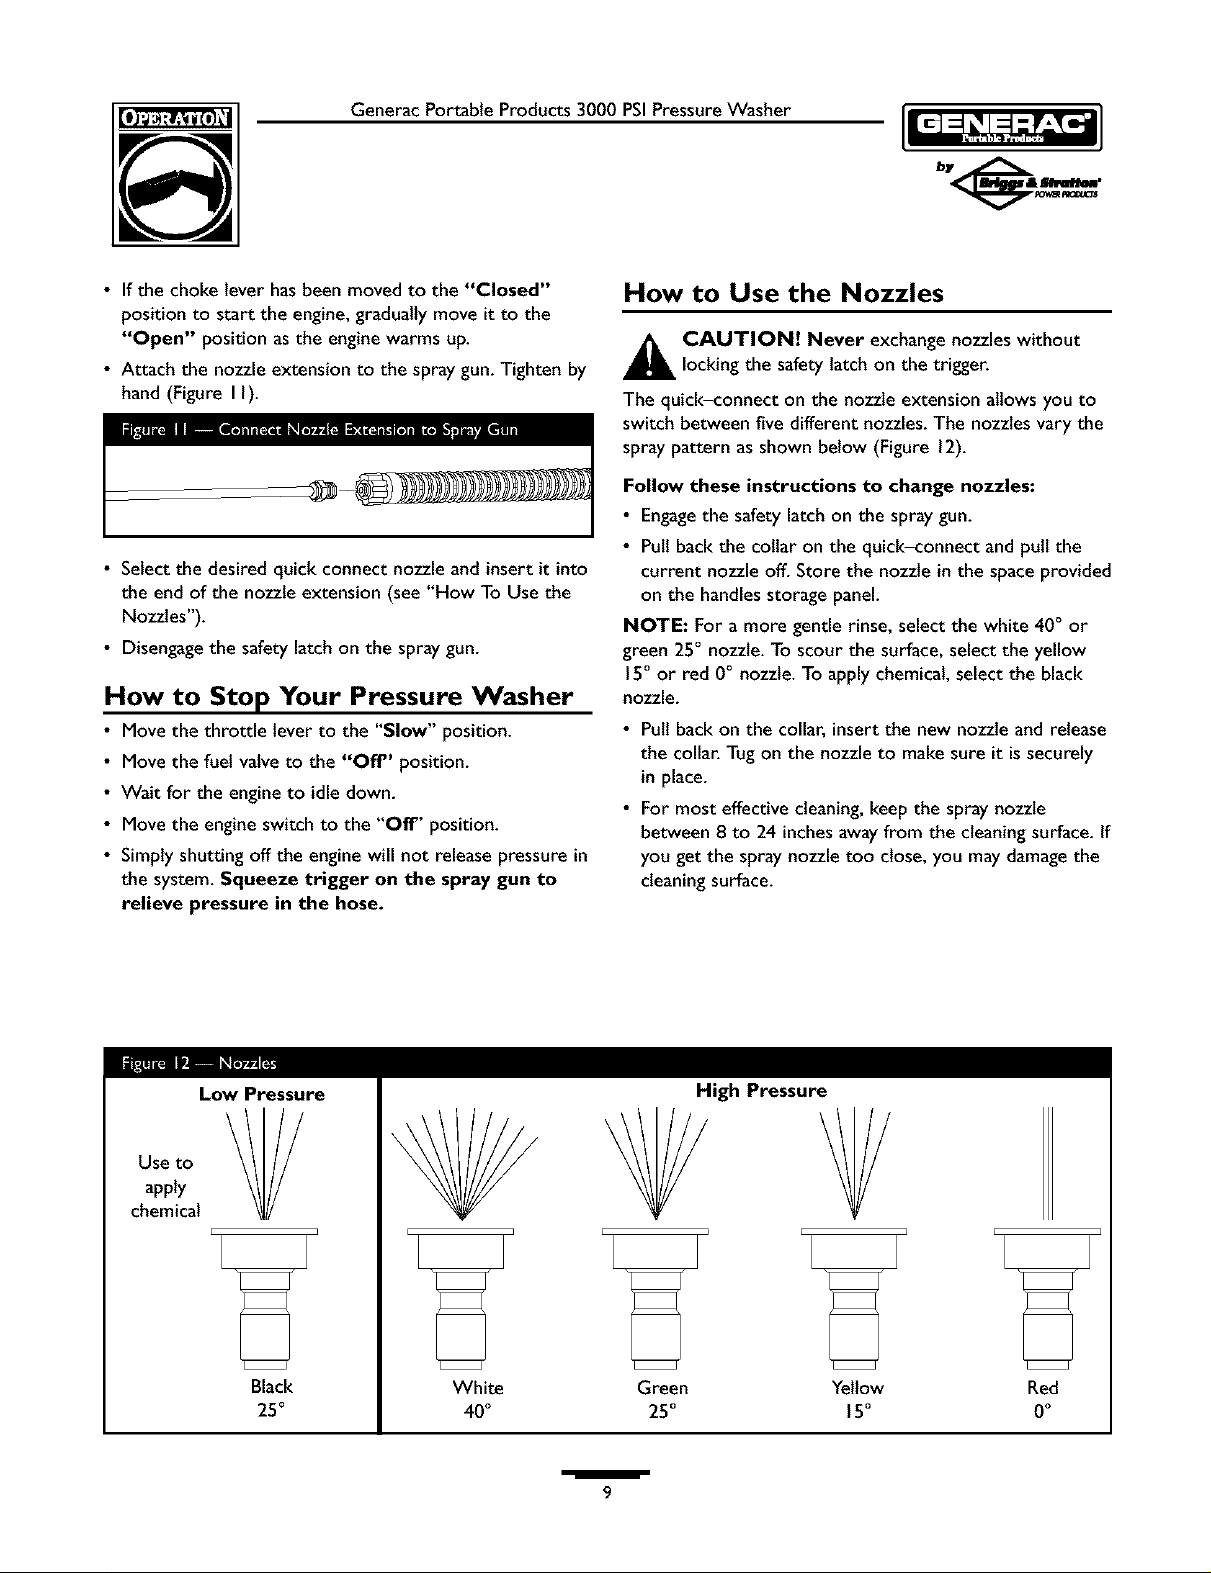
The quick-connect on the nozzle extension allows you to
switch between five different nozzles.The nozzles vary the
spray pattern asshown below (Figure 12).
Follow these instructions to change nozzles:
• Engagethe safety latch on the spray gun.
•Putl backthe collar on the quick-connect and pult the
current nozzle off. Store the nozzle in the space provided
on the handlesstorage panel.
NOTE: For a more gentle rinse, select the white 40° or
green 25° nozzle. To scour the surface, select the yellow
15° or red 0° nozzle. To applychemical, select the black
nozzle.
•Putl backon the collar, insert the new nozzle and release
the collar. Tug on the nozzle to make sure it is securely
in place.
• For most effective cleaning,keep the spray nozzle
between B to 24 inchesawayfrom the cleaningsurface. If
you get the spray nozzle too close, you maydamage the
cleaningsurface.
apply
chemical
Low Pressure
Black
25 °
High Pressure
White Green Yellow Red
40° 25° 15° 0°
/
9
Page 10
Generac Portable Products 3000 PSIPressureWasher
Cleaning and Applying Chemical
CAUTION! You must attach all hoses before you
start the engine. Starting the enginewithout all the hoses
connected and without the water turned ON wilt damage
the pump.
IMPORTANT: Use soaps designed specifically for
pressure washers. Household detergents could damage
the pump.
To apply detergent follow these steps:
• Reviewthe useof the nozzles.
• Preparethe detergent solution as required by the
manufacturer.
• Placethe chemical injectionsiphon/fitter into the
detergent container.
CAUTION! Keep the chemical injection tube from
coming in contact with the hot muffler.
• Make sure the black nozzle is installed.
NOTE: Detergent cannotbe appliedwith the high
pressure nozzles (White, Green, Yellow, or Red).
• Makesure the garden hose isconnected to the water
inlet.Check that the high pressure hose isconnected to
the spraygun and the pump and start the engine.
• Apply the detergent to adry surface, starting at lower
portion of area to be washed and work upward, using
long,even, overlapping strokes. Do Not allow the
detergent to dry on (prevents streaking).
• Allow the detergent to soak in between 3-5 minutes
before washing and rinsing. Reapplyas needed to prevent
surface from drying.
After you have applied detergent, scour the surface
and rinse it clean as follows:
• Apply safety latch to spray gun.
• Remove the black chemical nozzle from the nozzle
extension.
• Select and installthe desired high pressure nozzle
following the instructions"How to Use the Nozzles" on
page9.
• Keepthe spray gun a safedistance from the area you
plan to spray.
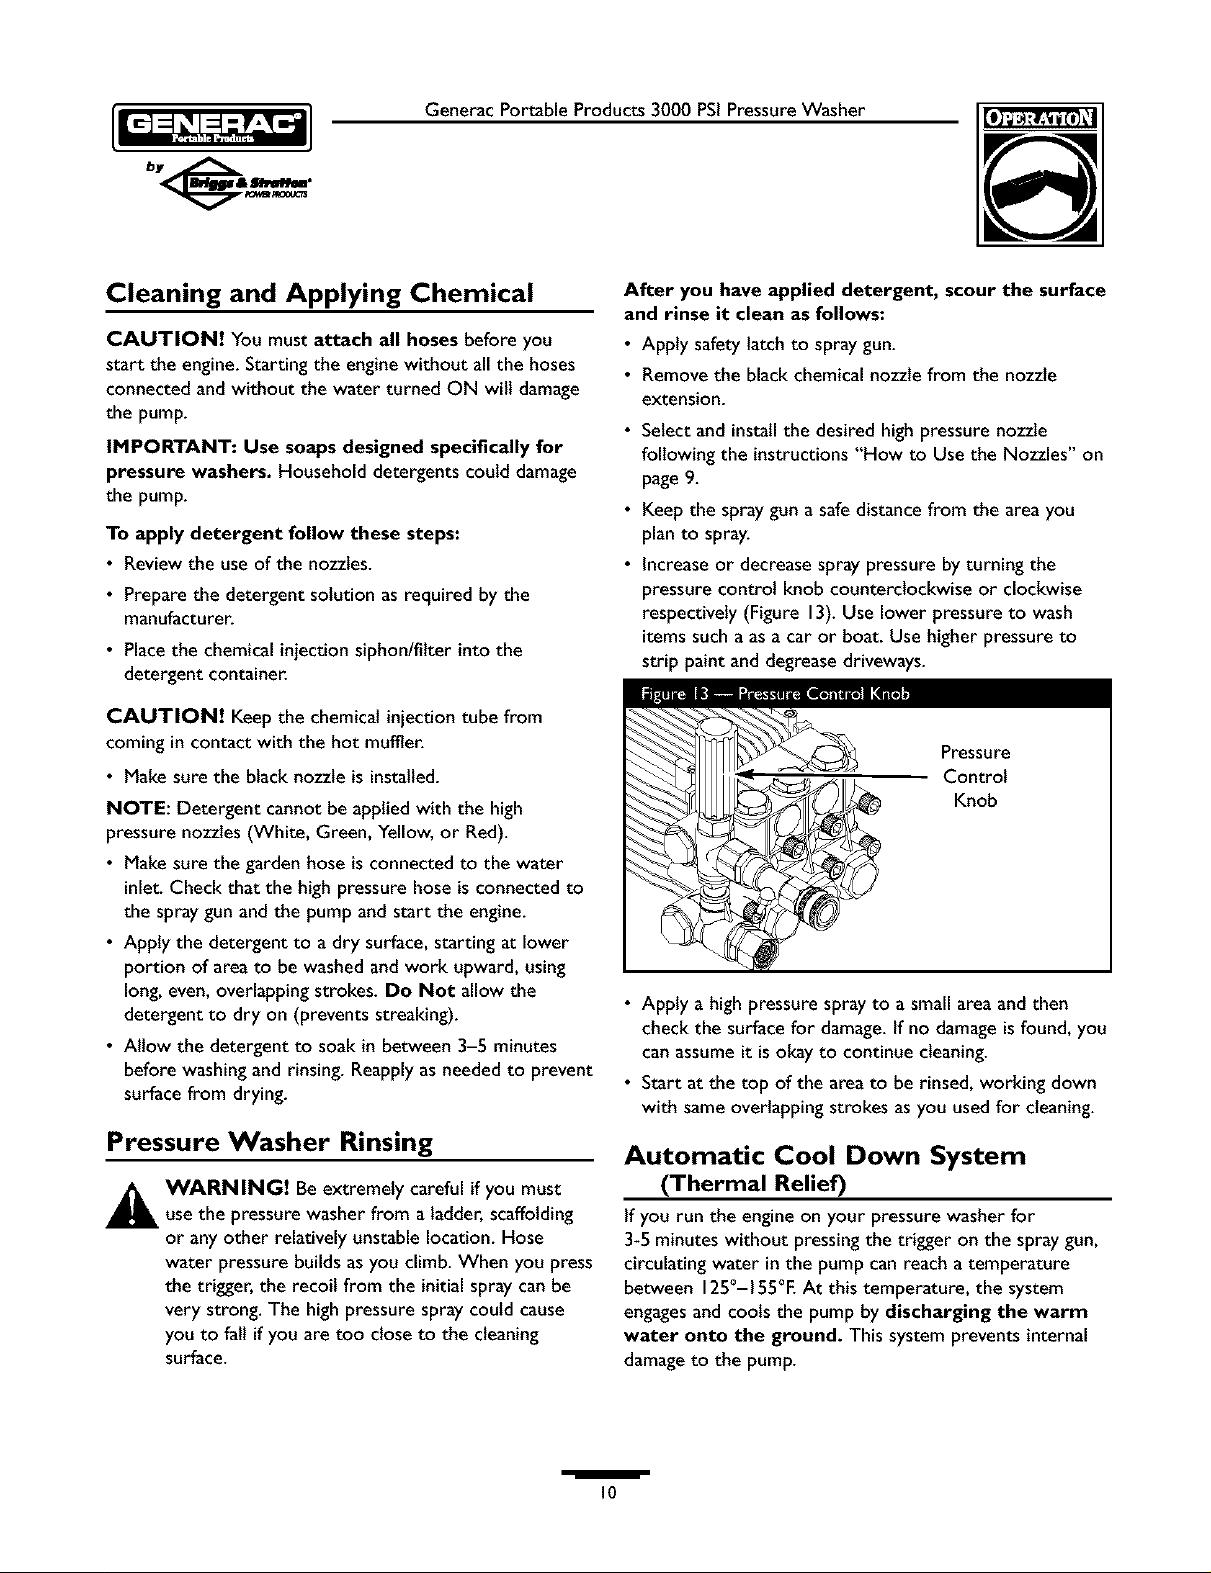
• Increaseor decreasespray pressureby turning the
pressure control knob counterclockwise or clockwise
respectively (Figure 13).Use lower pressureto wash
itemssuch a as a car or boat. Use higher pressure to
strip paint anddegreasedriveways.
• Apply a high pressure spray to a smallarea andthen
check the surface for damage.If no damageisfound, you
can assumeit isokay to continue cleaning.
• Start at the top of the area to be rinsed, working down
with sameoverlapping strokes asyou usedfor cleaning.
Pressure Washer Rinsing
_ ARNING! Be extremely careful ifyou must
use the pressure washer from aladder,scaffolding
or anyother relatively unstable location.Hose
water pressure builds asyou climb. When you press
the trigger, the recoil from the initial spray canbe
very strong. The highpressure spraycould cause
you to falt if you are too close to the cleaning
surface.
Automatic Cool Down System
(Thermal Relief)
If you run the engine on your pressure washer for
3-5 minutes without pressingthe trigger on the spray gun,
circulating water in the pump can reach a temperature
between 125°-155°E At this temperature, the system
engagesand cools the pump by discharging the warm
water onto the ground. This system prevents internal
damageto the pump.
/
10
Page 11

SPECIFICATIONS
PRESSURE WASHER
Rated Pressure ..... 3,000 PSI
Flow Rate .......... 3.0 gallonsper minute (gpm)
Detergent .......... Use detergent approved for
pressure washers
Water Supply
Temperature ....... Not to exceed 100°F
Automatic Cool .... Will cyclewhen water
Down System reaches 125°-155°F
Shipping Weight .... 142lbs.
GENERAL MAINTENANCE
RECOMMENDATIONS
The pressure washer warranty does not cover items that
have been subjected to operator abuse or negligence. To
receive full value from the warranty, the operator must
maintain the high pressure washer as instructed in this
manual.
• Some adjustments will need to be made periodically to
properly maintain your high pressure washer.
• All maintenance in this manualand the engine owner's
manual should be made at leastonce eachseason.
• Once a year you should cleanor replace the spark plug,
clean or replacethe air filter and check the spraygun and
nozzle extension assemblyfor wear. A new spark plug
and clean air filter assureproper fuebair mixture and
help your engine run better and lastlonger.Pleaserefer
to your engine owner's manualfor more details.
Before Each Use
Check engineoil level.
Check water inletscreen for damage.
Check in-line filter for damage.
Check high pressure hose for leaks.
Check detergent siphoning tube and filter for damage.
Check spraygun, nozzle extension, and nozzles for leaks.
Rinseout garden hoseto flush out debris.
MAINTENANCE
Check and Clean Inlet Screen
Examinethe screen on the water inlet.Clean it if the
screen is clogged or replace it if screen is damaged.
Check High Pressure Hose
The high pressure hose candevelop leaksfrom wear,
kinking, or abuse. Inspect the hose eachtime before using
it. Check for cuts, leaks,abrasions or bulgingof cover,
damageor movement of couplings. If any of these
conditions exist, replace the hose immediately.
_ ARNING! Never repair a high pressure hose.
Replace it with another hose that exceedsthe
maximum pressure rating of your pressure washer.
Check Detergent Siphoning Tube
Examinethe filter on the detergent tube and clean if
clogged. The tube should fit tightly on the barbed fitting.
Examinethe tube for leaksor tears. Replacethe filter or
tube ifeither is damaged.
Cleaning Detergent Siphoning Tube
If you used the detergent siphoning tube, you must flush it
with clean water before stopping the engine.
• Placethe chemical injectionsiphon/fitter in a bucket full
of clean water.
• Attach the black low pressure nozzle.
• Flush for I-2 minutes.
• Shut off the engine.
IMPORTANT: Simply shutting OFF engine wilt not
release pressure in the system. When the engine has
shut down, squeeze the trigger on the spray gun to
relieve the pressure in the hose.
/
II
Page 12

Generac Portable Products 3000 PSIPressureWasher
Check Gun and Nozzle Extension
Examine the hose connection to the spray gun and make
sure it is secure.Test the trigger by pressingit and making
sure it springs back into place when you release it. Put the
safety latch in the on position and test the trigger. You
should not be ableto pressthe trigger.
Check In-Line Filter
Refer to Figure 14and service the in-linefilter if it
becomes clogged,asfollows:
Nozzle Extension
I. Detach spray gunand nozzle extension from high
pressure hose. Detach nozzle extension from spray
gun and remove o-ring and screen from nozzle
extension. Flush the screen, spray gun, and adjustable
nozzle extension with clean water to clear debris.
2. Ifthe screen is damaged,the o-ring kit contains a
replacement in-line filter screen andan o-ring. If
undamaged,reusescreen.
3. Placethe in-line filter screen into the threaded end of
the nozzle extension. Direction does not matter. Push
the screen inwith the eraser end of a pencil until it
rests fiat at the bottom of the opening. Takecare to
not bend the screen.
4. Placethe o-ring intothe recess. Pushthe o-ring snugly
against the in-linefilter screen.
5. Assemble the nozzle extension to the spray gun, as
described earlier in this manual.
Purge Pump of Air and
Contaminants
To remove air from the pump, follow these steps:
• Set up the pressure washer asdescribed in "Preparing
PressureWasher For Use". Connect the water supply
and turn water on.
To remove contaminants from the pump, follow
these steps:
• Set up the pressure washer as described in "Preparing
PressureWasher For Use". Connect the water supply
and turn water on.
• Start the engineaccording to instructionsin "To Start
Your PressureWasher".
• Remove nozzleextension from spray gun.
• Squeezethe trigger on the spray gun and hold.
• When the water supply is steady and constant, engage
the safety latch and reattach the nozzle extension.
Nozzle Maintenance
A pulsing sensation felt while squeezingthe spray gun
trigger may becaused by excessivepump pressure. The
principal causeof excessivepump pressure isa nozzle
clogged or restricted with foreign materials, such as dirt,
etc. To correct the problem, immediatelycleanthe nozzle
usingthe tools includedwith your pressure washer and
follow these instructions:
I. Shut off the engine and turn off the water supply.
2. Removethe nozzle from the end of the nozzle
extension (Figure 15).
Use wire here /._/
t° drebmi°ve_
3.
Remove the in-line filter from the other end of the
nozzle extension.
4.
Use the wire included in the kit (or a small paper clip)
to free anyforeign material clogging or restricting the
nozzle (Figure 15).
5.
Using a garden hose, remove additional debris by back
flushing water through the nozzle extension
(Figure 16).Back flush between 30 to 60 seconds.
• Pullthe trigger on the spraygun and hold.
• When the water supply issteady and constant, engage
the safety latch.
/
12
Page 13

Generac Portable Products 3000 PSIPressureWasher
6. Reinstall the nozzle and in-line filter into the nozzle
extension. Do Not overtighten the nozzle with the
allen wrench.
7. Reconnect the nozzle extension to the spray gun.
8. Reconnect the water supply, turn on the water, and
start the engine.
9. Test the pressure washer by operating with each of the
Quick Connect nozzles.
O-Ring Maintenance
Through the normal operation of your pressure washer,
o-rings, which keep the connections of the hoses andspray
gun tight and leak-free, may become worn or damaged.
An O-Ring MaintenanceKit is provided with your pressure
washer which includes replacement o-rings, rubber washer
and water inlet filter. Refer to the instruction sheet
provided in the kit to service your unit's o-rings. Note that
not all of the parts in the kit will be used on your unit.
To remove a worn or damaged o-ring:
• Use a small flathead screwdriver to get underneath the
o-ring and pry it off.
Pump Maintenance
Changing Pump Oil
Change oil after first SO hours of operation and then every
200 hours or 3 months, whichever occurs first.
NOTE: When changingpump oil, use only high quality
nondetergent 30 weight oil Use no special additives.
Change pump oil as follows:
• Clean area around brass oil drain plug at the bottom of
the pump.
• Remove oil drain plug. Drain oil completely into an
approved container.
• When oil has completely drained, install oil drain plug
and tighten firmly.
• Clean area around pump oil dipstick. Remove dipstick
and fill pump with recommended oil to the "Full" mark
on the dipstick.
• Install the pump oil dipstick.
• Wipe up any spilled oil.
ENGINE MAINTENANCE
See the engine owner's manual for instructions on how to
properly maintain the engine.
A AUTION! Avoid prolonged or repeated skincontact with used motor oil. Used motor oil has
been shown to causeskin cancer in certain
laboratory animals.Thoroughly wash exposed areas
with soapand water. KEEPOUT OF REACH OF
CHILDREN. DON'T POLLUTE. CONSERVE
RESOURCES.RETURN USED OIL TO
COLLECTION CENTERS.
/
13
Page 14

GeneracPortableProducts3000PSIPressureWasher
PREPARING THE UNIT
FOR STORAGE
Water should not remain in the unit for long periods of
time. Sedimentsor minerals can deposit on pump parts and
"freeze" pump action. Ifyou do not plan to use the
pressure washer for more than 30 days,follow this
procedure:
I. Flushdetergent siphoningtube by placing the filter into
a pail of clean water while running pressure washer in
low pressure mode. Flushfor one to two minutes.
2. Shut off the engine and let it cool, then remove all
hoses. Disconnect spark plug wire from spark plug.
3. Emptythe pump of all pumped liquids by pulling the
recoil handle about 6 times. This should remove most
of the liquid in the pump.
4. Use Generac brand pump saverto prevent corrosion
build up and freezing of pump.
5. Store unit in a clean,dry area.
Protecting the Pump
To protect the pump from damagecaused by mineral
deposits or freezing, use the Generac PumpSaverto treat
pump. This prevents freeze damage and lubricates pistons
and seals.
NOTE: Generac PumpSaverisavailableasan optional
accessory.It is not includedwith the pressurewasher.
CAUTION! You must protect your unit from freezing
temperatures. Failure to do so will permanently damage
your pump and render your unit inoperable. Freezedamage
is not covered under warranty.
_ CAUTION! Readand follow all cautions and
warningson the PumpSavercan label.Always wear
eye protection when using PumpSaver.
To use PumpSaver, make sure the pressure washer is
turned off and disconnected from supply water. Read and
follow all instructions and warnings given on the PumpSaver
container.
NOTE: PumpSaverwill drip from pump after treatment
and will stain wood and concrete.
NOTE: If PumpSaveris not available,draw RVantifreeze
(non-alcohol) into the pump by pouring the solution into a
3-foot section of gardenhose connected to inlet adapter
and pulling recoil handle twice.
STORING THE ENGINE
See the engine owner's manual for instructions on how to
properly prepare the engine for storage.
I
14
Page 15

Generac Portable Products 3000 PSIPressureWasher
TROUBLESHOOTING
Problem
Pump has following
problems: failure to produce
pressure, erratic pressure,
chattering, loss of pressure,
low water volume.
spray.
Engine runs good at no-load
but "bogs" when load is
added.
Engine will not start; or
starts and runs rough.
Engine shuts down during
operation.
Engine lacks power.
Engine "hunts" or falters.
Cause
I. Low pressure nozzle installed.
2. Water inletisblocked.
3. Inadequatewater supply.
4. Inlet hose is kinked or leaking.
5. Clogged inlet hose strainer.
6. Water supply isover 100°F.
7. High pressure hose is blocked
or leaks.
8. Gun leaks.
9. Nozzle is obstructed.
10. Pump isfaulty.
I. Detergent siphoning tube is not
submerged.
2. Chemical filter is clogged.Detergent fails to mix with
3. Dirty in-linefilter.
4. High pressure nozzle installed.
Enginespeed istoo slow.
I. Low oil level.
2. Dirty air cleaner.
3. Out of gasoline.
4. Stalegasoline.
5. Sparkplug wire not connected
to spark plug.
6. Badspark plug.
7. Water ingasoline.
8. Overchoking.
9. Excessivelyrich fuel mixture.
10. Intake valvestuck open or
closed.
I I. Enginehaslost compression.
I. Out of gasoline.
2. Low oil level.
Dirty air filter.
Choke is opened too soon.
Correction
I. Replacenozzle with high pressure nozzle.
2. Clear inlet.
3. Provide adequatewater flow.
4. Straighten inlet hose, patch leak.
5. Check and clean inlet hose strainer.
6. Provide cooler water supply.
7. Clear blocks inoutlet hose.
8. Replacegun.
9. Clean nozzle.
10. Contact Generac service facility.
I. Insert detergent siphoning tube into
detergent.
2. Clean or replacefitter/detergent
siphoning tube.
3. See"Check In-Line Filter" on page 12.
4. Replacenozzle with low pressure nozzle.
Move throttle control to FAST position. If
engine still "bogs down", contact Honda
service facility.
I. Fillcrankcaseto proper level.
2. Clean or replace air cleaner.
3. Fill fuel tank.
4. Drain gastank; fill with fresh fuel.
5. Connect wire to sparkplug.
6. Replacespark plug.
7. Drain gastank; fill with fresh fuel.
8. Open choke fully and crank engine.
9. Contact Honda service facility.
10. Contact Honda service facility.
I I. Contact Honda service facility.
I. Fillfuel tank.
2. Fill crankcaseto proper level.
Replaceair filter.
Move choke to halfwayposition until engine
runs smoothly.
/
15
Page 16

GeneracPortableProducts3000PSIPressureWasher
EXPLODED VIEW --- UNIT
FRDNT VIEW
OF HANDLE
46_
\
2 ¸
_rs
33_
\
\
\
\
17_
\
J
38 _
/
16
Page 17

Generac Portable Products 3000 PSIPressureWasher
2 ¸
_rs
PARTS LIST--- UNIT
Item Part# Qty. Description
I NSP I ENGINE
2 B2043GS 4 BOLT,Carriage
3 B190548GS I BASE
4 CB3861CGS I HANDLE
5 B4160GS I DECAL, Instructions
6 99583GS 5 NUT
7 B2150GS I HOOK, Square Neck
8 B2516GS 2 CAP, Vinyl
9 CB4105GS I BUMPER
10 30809GS 5 GROMMET
II 187974AGS I DECAL, 5 QD Nozzles
12 187735GS I DECAL, Unit
13 88521GS 2 ASSY,Wheel
14 190146GS 2 PUSHNUT
15 48031GGS I CLAMP, Hose
16 AI040DGS I HOSE, Chemical Inject
17 AI041GS I FILTER,Chemical Hose
18 B4805GS I HOSE
19 87815GS I GOGGLES, Safety
20 BI436BGS I GUN, with Molded Grip
21 23645GS 4 SCREW
22 22237GS 4 WASHER, Lock
23 187701GS I MANUAL, Owners
24 B3858GS I ASSY,Wand Ext. with QD
25 B1464GS I MANUAL, Engine
26 BB3061BGS 2 BOTTLE, Oil
28 190862GS I KIT, Maintenance
29 188194GS 2 RIVET,Blind
31 191413GS 2 VIBE MOUNT, with Washer
33 B2126AGS I ASSY,Pump (see pages 18-21)
34 64416GS 4 BOLT
35 52859GS 4 NUT, Lock
36 B4224GS SCREEN,Gun Inlet
37 186839GS INLET, Garden Hose
38 97837GS O-RING, High Pressure Hose
39 95458GS CONNECT, Quick
40 B1554GS VALVE,Thermal Relief
41 186301GS KIT, Nozzles QD
42 63281GS KEY
43 187952GS DECAL, Cool Down System
44 187918GS DECAL, Quick Reference
45 B4196GS KIT, Handle Hardware
46 11287628PGS DIPSTICK, Pump
/
17
Page 18

Generac Portable Products 3000 PSIPressureWasher
EXPLODED VIEW 1 PUMP
2
33
34
35_
3&
38
414
40
2 ¸
_r3
6
14
13 15
16
36
32
31
29
30
28
45 46
26
25
17
24 23
/
18
Page 19

Generac Portable Products 3000 PSIPressureWasher
2 ¸
_rs
PARTS LIST-- PUMP
Item Part #
I
IIOB2126GS
2
10887628PGS
3
112B2126GS
4
113B2126GS
5
109B2126GS
6
11287628PGS
7
11087822PGS
8
11187822PGS
9
123B2126GS
I0
11687628PGS
II
11587628PGS
12
115B2126GS
13
120B2126GS
14
119B2126GS
15
118B2126GS
16
117B2126GS
17
116B2126GS
18
12687628PGS
19
12587628PGS
20
149B2126GS
21
155B2327GS
22
152B2126GS
23
63281GS
Service Kits:
Qty Description
Cap
Circtip
SnapRing
Bearing
Pump Body
Oil Cap/Dipstick
3 Nut
3 Piston Washer
3 Piston
3 Spacer Disc
3 O-Ring
3 Piston Pin
3 Guiding Piston
3 Con Rod
I Complete Rear Cover
6 Screw
I O-Ring
I SnapRing
I Bearing
I Hollow Shaft
4 Screw
I Grub Screw
I Key
Item Part # Qty Description
24 150B2126GS I Gas EngineFlange
25 22237GS 4 Washer, Lock
26 23645GS 4 Screw
27 151B2126GS I Bushing
28 12187822PGS I Seal
29 B1554GS I Valve,Thrmal Relief
30 10487628PGS 2 Plug
31 137B2126GS 8 Washer
32 10087822PGS 8 Screw
33 102B2126GS 6 Plug
34 10187822PGS 6 O-Ring
35 10287822PGS 6 Complete Valve
36 10387822PGS 6 O-Ring
37 11193360PGS I Plug
38 136B2126GS I Head
39 10387628PGS 2 O-Ring
40 106B2126GS 3 Support Ring
41 10587822PGS 3 Gasket
42 108B2126GS 3 Piston Guide
43 10393360PGS 3 Gasket
44 10493360PGS 3 O-Ring
45 131B2126GS 3 Rear Piston Guide
46 16593360PGS 3 Seal
A
500-87628PGS
Valve Kit
Item Qty.
35 6
36 6
B
201-B2126GS
Piston Kit
Item Qty.
8 3
C
202-B2126GS
Oil Seat Kit
Item Qty.
I 1
17 I 40 3
D
203-B2126GS
Water SeatKit
Item Qty.
41 3
44 3
E
204-B2126GS
Support Ring
Kit
Item Qty.
46 3
/
19
Page 20

GeneracPortableProducts3000PSIPressureWasher
EXPLODED VIEW i UNLOADER
2 ¸
_r3
43
41
42
/
38
39
/
4O
/
20
Page 21

Generac Portable Products 3000 PSIPressureWasher
2 ¸
_r3
PARTS LIST ---- UNLOADER
Item Part#
0 153B2126GS
I AI041GS
2 AI04ODGS
3 48031GGS
4 210B2327GS
5 95458GS
6 231B2327GS
7 211B2327GS
8 212B2327GS
9 186833GS
I0 215B2327GS
II 137B2327GS
12 216B2327GS
13 217B2327GS
14 218B2327GS
15 220B2327GS
16 221B2327GS
17 222B2327GS
18 219B2327GS
19 223B2327GS
20 224B2327GS
21 225B2327GS
Service Kits:
Qty Description
0 Complete Unloader
I Filter, Chem
I Hose, Chem
I Clamp, Hose band
I Hose Tail
I Qulc Disconnect
3 O-Ring
StainlessBall
Spring
Injection Body
Injector Nut
O-Ring
Spring
Plunger
O-Ring
Spacer Plate
Spring
Spring, SpacerPlate
Upper Piston
Pin
Ring
O-Ring
Item Part#
22 228B2327GS
23 227B2327GS
24 226B2327GS
25 248B2327GS
26 155B2327GS
27 246B2327GS
28 245B2327GS
29 243B2327GS
30 244B2327GS
31 242B2327GS
32 229B2327GS
33 232B2327GS
34 234B2327GS
35 233B2327GS
36 235B2327GS
37 238B2327GS
38 236B2327GS
39 237B2327GS
40 239B2327GS
41 95320GS
42 230B2327GS
43 28739GS
Qty Description
ValveHousing
Washer
Inlet Bolt
Plug
Screw
Nut
Knob
Housing
Pin
Spring Guide
Ring
Lower Piston
O-Ring
Piston Guide
O-Ring
BypassFitting
Inlet Bolt
Washer
Washer
Corm, Gdn Hse
Washer
Wrap, Tie
250-B2327GS
Item Qty. Item Qty. Item Qty.
6 3 21 I 36 I
8 I 23 I 39 I
15 I 32 2 40 I
20 I 34 I 42 I
/
21
Page 22

Lavadorade Presi6n 3,000 PSIde Generac
TABLA DE CONTENIDOS
ReglasDe Seguridad .............................. 22-23
Conozca Su Generador .............................. 24
Ensamblaje...................................... 25-27
Funcionamiento .................................. 28-30
EspecificacionesDel Producto ......................... 31
Mantenimiento ................................... 31-33
AImacenamiento .................................... 33
Diagnosticos De Averias.............................. 34
PiezasDe Recambio .............................. 16-21
Garantia .......................................... 35
DESCRIPCION DEL EQUIPO
Lea este manual de manera cuidadosa y familiaricese con
su generador. Conozca sus usos, suslimitaciones y
cualquier peligro relacionado con el mismo.
Se ha hecho cada esfuerzo posible para asegurarseque la
informacibnque aparece en este manual es exacta y se encuentra
actualizada.Sin embargo, Generac se reserva el derecho a
cambiar, alterar o de otra manera mejorar, el producto y este
documento en cualquier momento, sin previo aviso.
El escape del motor de este producto contiene
elementos quimicos reconocidos en el Estado de
California pot producir c_ncer, defectos de nacimiento
Enel estado de California es obligatorio, seg0nla ley,el uso de I
_agachispas (Secci6n 4442 del C6digo de Recursos P0blicos de
_alifornia). Otros estados pueden tener leyessimilares. Lasleyes [
_ederalesse aplicanen tierras federales. Si equipa el silenciador [
:on un apagachispas,este deberg ser mantenido en buenas
:ondicionesde trabaio.
ADVERTENCIA u
otros da_os de tipo reproductivo.
ADVERTENCIA
CUANDO AI_IADA COMBUSTIBLE
Apagueel generador (posicibn OFF)y d_jelo enfriar al menos por
2 minutos antes de remover la tap_ de lagasolina.
Llene el tanque al aire libre.
No Ilene demasiado el t_nque_ Permita al menos espacio para la
expansibn del combustible.
Mantenga la gasolinaaleiada de chispas,llamas abiertas, pilotos, calor
y otras fuentes de ignicibn.
No encienda un cigarrillo o fume.
:UANDO OPERE EL EQUIPO
No inclineel motor o el equipo, de tal manera que la gasolina se
pueda derrama_
No rode llquidos inflamables.
:UANDO TRANSPORTE O BEPARE EL EQUIPO
Transporte o repare el equipo con el tanque de combustible vaclo, o
con la v_Ivula para apagar el combustible, apagada (posici6n OFF).
'UANDO ALMACENE O GUARDE EL EQUIPO CON
COMBUSTIBLE EN EL TANQUE
Almacene aleiadode calderas,estufas,calentadores de agua,
secadoras de ropn u otros aparatos electrodom_sticosque posean
pilotos u otras fuentes de ignici6n, porque ellos pueden encender los
vapores de la gasolina.
ADVERTENCIA
INSTRUCCIONES DE SEGURIDAD
Elsimbolo de alerta de seguridad (_.) es usado con una palabra
(PELIGRO,ADVERTENCIA, PRECAUCI6N), un mensaje por
escrito o una ilustracibn,para alertarlo acerca de cualquier
situacibn de peligro que pueda existir. PELIGRO indicaun riesgo
el cual, si no se evita, causar_la muerte o una herida grave.
AOVERTENClA indicaun riesgo el cual, si no seevita, puede
causar la muerte o una herida grave.PRECAUCl6N indicaun
riesgo, el cual, si no se evita,puede causar heridas menores o
moderadas. PRECAUCl6N, cuando se usasin el simbolo de
alerta, indicauna situacibn que podria resultar en el daho del
equipo. Sigalos mensajes de seguridad para evitar o reducir los
riesgos de heridas e inclusivela muerte.
i
Mantenga el chorro del agua alejado de alambrados el_ctricos, de Io
contrario podrlan ocurrir descargas el_ctricas fatales,
ADVERTENCIA
Nunca apunte la pistola a la gente, animales o plantas.
No permita en ningOn momento que NlixlOS operen la m_quina
lavadora a presi6n,
Nunca repare la manguera de aita presi6n. Remplacela.
22
Page 23

Lavadorade Presibn 3,000 PSIde Generac
ADVERTENCIA
Manteng_ la boquill_ de rociado de 8 a 24 pulgadasde la superficie de
limpieza,
Sea extremadamente cuidadoso si usa I_ m_quin_ lavadora a presibn
desde una escalera,andamio o cualquier superficie rel_tivamente
inestable,
Elgrea de limpiezadeber_ tenet inclinaciones y drenajesadecu_dos
para disminuir la posibilidad de caidas debido a superficies resbalosas,
Opere y almacene esta unidad sobre una superficie estable.
PELIGRO
ADVERTENCIA
No use ropa suelta, ioyas o elementos que puedan quedar atr_pados
en el arranque o en otras partes rotatorias.
Ate para arriba el pelo largo y quite la joyeria.
ADVERTENCIA
Siempre use protecci6n para los ojos cuando utilice este equipo o
cuando est_ cerca de donde se est_ usando el equipo.
ADVERTENCIA
Opere el lavadorade presi6nSOLAMENTEalaire libre.
Utilice un respirador o m_scara siempre que exista la
posibilidad de inhalar vapores.
Leatodas las instrucciones de la mgscarapara asegurarsede
que le brindar_ la protecci6n necesaria contra la inhalaci6n de
vapores nocivos.
ADVERTENCIA
No toque las superficies calientes.
Permita que el equipo se enfrle antes de tocarlo.
i
Siempre desconecte el alambre de la buiia y col6quelo donde no
pueda entrar en contacto con la bujia.
PRECAUCION
No apunte la pistola de rociado al vidrio ¢uando est_ en el modo de
rociado a chorro.
Nunca apunte la pistola a plantas.
PRECAUCION
No juegue con partes que puedan aumentar o disminuir la veloddad
de mando.
No opere la m_quina lavadoraa presi6n con un valor de presi6n
superior a su clasificaci6n de presi6n.
23
Page 24

LavadoradePresi6n3,000PSIdeGenerac
CONOZCA SU MAQUINA LAVADORA DE ALTA PRESION
Lea el manual del propietario y las reglas de seguridad antes de poner en marcha su ma_quina lavadora a presi6n.
Compare las ilustraciones con su m_quina lavadora a presi6n para familiarizarse con las ubicaciones de los diferentes controles y aiustes.
Guarde este manual para referencias futuras.
Extensi6n para Boquillas con
Conexi6n R_pida _
Presione la Perilla
del Control
El Tanque del Gasolina
Perilla del Cebador
Palancade laV_Ivula de
Regulaci6n
Arrancador de Retroceso
Abastezca de combustible
V_lvula
(en la frente de motor)
Pistola de Rociado
Manguera de Alta Presi6n
Boquillas de Rociado
Bomba equipado con
Autom_tico seEnfrlaSistema
Filtro y Tubo para
Recolecci6n de Detergente
Abastezca de combustible Vglvula - Est_ acostumbrado a
prende el combustible y lejos al motor.
Arrancador de Retroeeso - Usado para arrancar el motor
manualmente.
Automgtico se Enfria Sistema - Los ciclos regan por bomba
cuando aguaalcanza 125°- 155°EEntibiar aguadescargar_de la
bomba en el suelo. Este sistema previene el daho interno de
bomba.
Bomba - Desarrolla alta presi6n de agua.
Boquillas de Rociado - lnyecci6n de quimicos (25°), 0°, 15°,
25°, 40°: para diferentes aplicaciones de limpieza.
El Tanque del Gasolina - Llene eltanque con gasolinaregular
sin contenido de plomo en este punto.
Entrada de Agua - Conexi6n para la manguera de iardin.
Extensi6n para Boquillas con Conexi6n Rgpida - Le
permite usarcuatro boquillas de rociado diferentes.
Filtro de Aire - El elemento de filtro tipo seco limita la cantidad
de suciedad y polvo que se introduce en el motor.
Filtro de Aire
Tapa del
Dep6sito del
Aceite
Toma de Alta Presi6n
con Conexi6n R_pida
Entradade Agua
Fi|tro y Tubo para Recolecci6n de Detergente - Usado
para succionar detergente de la botella de qulmicos a la corriente
de agua de baja presi6n.
Manguera de Alta Presi6n - Conecte un extremo a la pistola
de rociado y el otro extremo a la toma de alta presi6n.
Patanca de Control de la Vglvula de Regulaci6n - Coloca el
motor en modo de arranque para el arrancador de retroceso y
detiene el motor en funcionamiento.
Perilla del Cebador - Usada para arranque de motores frtos.
Pistola de Rociado - Controla la aplicaci6n de aguasobre la
superficie de limpieza con el gatillo. Incluye cerrojo de seguridad.
Presione la Perilla del Control - Varla la presi6n del rocto alto
de la presi6n.
Tapa del Dep6sito del Aceite - Llene el motor con aceite
aqui.Siempre habitaci6nde hoia para la expansi6n del combustible.
Toma de Alta Presi6n con Conexi6n Rgpida- Conexi6n
para la manguera de alta presi6n.
I
24
Page 25

ir_ Lavadorade Presi6n 3,000 PSIde Generac
IMPORTANTE: Lea totalmente el manual del propietario antes
que intente ensamblar u operar su lavador a alta presi6n.
REMUEVA EL LAVADOR A
ALTA PRESION DEL
EMPAQUE
Remuevala manguera aalta presi6n y la cajacon las piezas,
incluidascon el lavador de alta presi6n.
Corte dos esquinas en los extremos del cart6n desde la parte
superior hastala parte inferior, de tal manera que el p_nel
_uedaser doblado en forma plana,luego quite todo el
material de embalaje.
Ruedeel lavador a alta presi6n fuera de la caja.
Contenido de la caja
Los articulos que se encuentran en la caja son:
Unidad principal
Manguera de alta presi6n
Manecilla
Varilla para el aceite de labomba (Guindando en la bomba)
Cajade accesorios (incluye Io siguiente):
(2) botellas de aceite para motor
Tarjeta de registro del propietario
Gafasde seguridad
Bolsa con 5 lanzasde conexiones r_pidas multicolores
Juego de mantenimiento
Manual del propietario
Manual del motor
Tarjeta de garantta del motor
Tarjeta de garantta de control de emisiones
Pantalla del parachispas
Pistola rociadora con laspiezasde conexi6n r6pida
Extensi6n de la lanza con las piezasde conexi6n r_pida
Piezaspara lamanecilla, incluyendocuatro pernos y
cuatro tuercas de reborde
Si una de las partes que se mencionan arriba se encuentran
dafladas o hacenfalta, Ilamea laIfnea directa del lavador a alta
presi6n,al 1-800-270-1408.
PREPARANDO EL
LAVADOR A ALTA
PRESION PARA SU USO
Si usted tiene un problemaal ensamblar la unidad o si hacen falta
algunaspiezaso se encuentran dafiadas, Ilamea la lineadirecta del
lavador a alta presi6n, al 1-800-270-1408.
A prepara su arandela de la presi6n para la operaci6n,
usted necesitarg a realiza estas tareas:
Llene y mande en la tarjeta de matricula.
Conecte la manecillaa la unidad principal.
Afiada aceiteal motor.
Afiada gasolinaal tanque de combustible.
Conecte la manguera aalta presi6n a la pistola rociadora y a
la bomba.
Conecte el suministro de aguaa la bomba.
Conecte la extensi6n de la lanza ala pistola rociadora.
Seleccione e instale la lanzaque desee.
Coloque la Manecilla al Lavador a
Presi6n
Use bien sea,una Ilavede 13mm o ajustable para conectar la
manecilla al lavador a presi6n.
Para conectar la manecilla al lavador a presi6n:
Lentamente incline el lavador a presi6n hacia adelante y deje
que descanseen el amortiguador frontal.
Alinee los hoyos en la manecilla con los hoyos en la base.
Inserte los pernos provistos para aguantar la manecilla en su
lugar (Figura 17).
/
25
Page 26

Lavadorade Presi6n 3,000 PSIde Generac
Asegure la manecillaal lavador a presi6n, usando lascuatros
tuercas provistas.
Lentamente incline el lavador a presibn asu lugar original e
inserte las lanzasmulticolores en los espacios provistos en la
manecilla.
Instale la Varilla del Aceite en la
Bomba
|PRECAUCI(_N! Usted debe remover la tapa para el
transporte e instalelavarilla para el aceite. Si usted no Io hace
anulara lagarantia y dahar_la bomba.
Para instalar la varilla para el aeeite:
Aseg_rese de que la unidadse encuentra en una superficie
plana.
Remuevay deseche la tapa para el transporte que se
encuentra en labomba (Figura 18).
A ada Gasolina
_k ADVERTENCIA! Nunca Ilene el tanque decombustible en recintos cerrados. Nunca Ileneel tanque
de combustible cuando el motor est_ funcionando o est_
caliente. No fume cuando est_ Ilenando el tanque de
combustible.
_k iADVERTENCIA! Nunea Ilene por completo eltanque de combustible. Deje espacio para la expansibn del
combustible.Limpie cualquierderrame de combustibledel
motor y del equipo antes de darle arranque a la unidad.
Use combustible limpio y almac_nelo en recipientes cubiertos,
limpios y aprobados. Utilice embudos limpios. Nunca utilice
gasolina"vieja" dejada de la estacibn anterior o gasolina
almacenadapor periodos de tiempo prolongados.
Limpie el _rea cercanaa la tapa del combustible, remueva la
tapa. Lentamente, Ilene eltanque hasta la parte baja del cuello
del Ilenador (Figura 19).
Nivel m_ximo del combustible
Instalela varilla para el aceite.
Agregar Aceite al Motor
IMPORTANTE: Cualquier intento para arancar el motor antes
de haberle proporcionado el mantenimiento apropiado con el
aceite recomendado, podria ocasionar la falladel motor.
Coloque la lavadoraa presi6n sobre una superficie nivelada.
Consulte el manual del propietario del motor para a_adir al
motor el aceite recomendado.
NOTA: Verifique el aceite del motor de manera frecuente
cuando _ste se esfuerce demasiado. Consulte el manualdel
propietario del motor para conocer cugles son las
recomendaciones al respecto.
Instale la tapa del tanque de combustible y limpie la gasolina
que se haya derramado.
Conecte la Manguera y el Suministro
de Agua a la Bomba
IMPORTANTE: Usted deber_ armar la extensi6n para boquillas
y conectar todas las manguerasantes de darle arranque al motor.
La bomba resultar_ daffadasi arranca el motor sin tener todas las
manguerasconectadas y el suministro aguaabierto.
Retroceda la manguera a alta presi6n y conecte el extremo de
la conexi6n r_pida de lamanguera a la basede la pistola
rociadora (Figura 20). Hale el collar de la conexi6n r_pida,
deslicelo en la pistola rociadora y suelte el collar. Hglelo en la
manguera para asegurarse de que este conectado firmemente.
/
26
Page 27

Lavadorade Presibn 3,000 PSIde Generac
presi6n.
De la misma manera, conecte el otro extremo de la manguera
a alta presi6n, a la salida de alta presi6n de la bomba. Hale el
collar de la conexi6n r_pida, deslfcelo en la bombay suelte el
collar. Hale la manguera para asegurarse que esta bien
conectada.
Antes de que conecte la manguera de jardtn a la entrada de
agua, inspeccione el colador de la entrada (Figura 21). Limpie
el colador si tiene residuos o solicite su remplazo si est_
da_ado. No haga funcionar la mgquina lavadora a
presi6n si el colador de la entrada estg da_ado.
Lista de Revision Previa al Arranque
del Motor
Revisela unidad para asegurarse que ha Ilevado a cabo los
siguientes procedimientos:
Cerci6rese el manecilla es seguro.
Reviseque hayasido depositado aceite y est_ al nivel correcto
en la cajadel cigLie_aldel motor.
Deposite lagasolinaadecuadaen eltanquedel combustible.
Reviseque todas las conexiones de las mangueras(alta
presi6n y suministro de agua) est_n apretadas correctamente
y que no existan dobleces, cortes o dafio de la manguera de
alta presi6n.
Proporcione el suministro de aguaadecuado (que no exceda
los IO0°F).
Aseg_rese de leer las secciones "Reglasde Seguridad"y
"C6mo Darle Arranque a su M_quina Lavadora a Presi6n"
antes de usar la m_quina lavadora a presi6n.
COMO USAR SU
Inspeccione la
rejilla de entrada.
No lause si est_
da_ada,limpiela si
se encuentra sucia.
Hagacorrer el aguaa tray,s de la manguera de su iardin por
30 segundos para limpiar cualquier escombro que se
encuentre en ella.Desconecte el agua.
INPOErANTE: Hace no aguade parar de siphon para el
abastecimiento de agua.Use aguaSOLO fria (menos que 100°F).
Conecte la manguera de jardin a la entrada del agua.Apriete
con la mano (Figura 21).
|PRECAUCI(_N! DEBEhaber por Io menosdiez piesde
manguerade iardin libreentre la entradade aguade la lavadoraa
presi6n y cualquierdispositivo de control de fluio de agua,seael caso
de un conector 'Y' o de cualquier otro tipo de v_lvula.Elda_o ala
lavadoraa presi6n, resultado de ladesatenci6na estaadvertencia, no
ser_cubierto por lagarantia.
ABRA el suministo del aguay abra la v_lvula de suministro
para purgar la sistema de bomba de aire y impureza.
_il PRECAUCI(_N! Antes de darle arranque a la m_quinalavadoraa presi6n, aseg_resede usar protecci6n adecuada
para los ojos.
MAQUINA LAVADORA
A PRESION
Si tiene problemas operando su mgquina lavadora a presi6n, por
favor flame a la linea de ayuda para m_quinas lavadoras a presi6n
al 1-800-270-1408.
C6mo Darle Arranque a su M quina
Lavadora a Presi6n
Para darle arranque a su m_quina lavadora a presi6n movida a
motor pot primera vez, siga estas instrucciones paso a paso. Esta
informaci6n acerca del arranque inicial tambi_n se aplica cuando
vaya a darle arranque al motor despu_s de haber dejado de la
m_quina lavadora a presi6n fuera de uso por al menos un dia.
Coloque la m_quina lavadoraa presi6n en un _rea cercana a una
suministro de agua exterior capaz de abastecer agua a un volumen
mayor de 3.3 galones por minuto.
Aseg_rese que la unidad est_ nivelada.
Revise que la manguera de aita presi6n se encuentre
conectada flrmemente a la pistola de rociado y a la bomba.
Vea "Preparando el Lavador a Alta Presi6n Para su Uso".
Conecte la manguera de jardln a la entrada del agua. Aprietela
con la mano. Abra el suministro de agua.
iPRECAUCI(_N! No haga funcionar la bomba si no tiene el
suministro conectado y abierto. Deberg cumplir con esta
precauci6n, de otra forma la bomba resultar_ dahada.
/
27
Page 28

Lavadorade Presi6n 3,000 PSIde Generac
Apriete firmemente el gatillo de la pistola para purgar de aire
e impurezas el sistema de bombeo.
Coloque el pasador de seguridad al gatillo de la pistola
rociadora (Figura 22).
Mueva la vglvula del combustible a la posici6n de "Encendido"
("On") (Figura 23).
Cerrado
Ponga el interruptor del motor en la posici6n de "Encendido"
("On") (Figura 26).
j_]'.'ll rilllnll,_J]ll II ii lll'?_i
Interruptor del Motor
///
Encendido
Mueva la palancareguladora a la posici6n de "R_pido"
("Fast") (Figura 24).
PalancaReguladora
Lento ,
Para encender un motor frio, mueva la palancade la bobina a
la posici6n de "Cerrado" ("Closed"). Para encender de nuevo
un motor caliente, deje la palancade la bobina en la posici6n
de "Abierto" ("Open") (Figura 25).
Agarre el gancho del est_rter y hale lentamente hasta que
sienta un poco de resistencia. Luego hale la cuerda
r_pidamente con toda su fuerza. Deje que la cuerda regrese
lentamente. No deie que la cuerda salte de regreso en contra
del est_rter.
Si la palancade la bobina ha sido movida a la posici6n de
"Cerrado" ("Closed") para comenzar el motor, mu_vala
gradualmente a la posici6n de "Abierto" ("Open"), a medida
que el motor se calienta.
Conecte la extensi6n de la lanza ala pistola rociadora.
Apri_tela con las manos (Figura27).
Seleccione la lanza de conexi6n r_pida que usted desee e
ins_rtela en el extremo de la extensi6n de la lanza (Vea
"Como usar las Boquillas").
Disengage el picaporte de la seguridad en el fusil del roclo.
I
28
Page 29

Lavadorade Presibn 3,000 PSIde Generac
C6mo Parar su Lavador a Presi6n
Mueva la palancaa la posici6nde "Lento" ("Slow").
Mueva la vglvula del combustible a la posicibn de "Apagado"
(,,Off,).
Espereque el motor descanse.
Muevael interruptor del motor a la posici6nde"Apagado"("OFF').
El apagarel motor, simplemente no soltar_ la presibn en el
sistema. Apriete el gatiUo en la pistola rociadora para
soltar la presibn en la manguera.
C6mo Usar las Boquillas
_IL PRECAUCI_N! Nunca intercambieboquillas sin
haber aseguradoel cerrojo de seguridad del gatillo.
La conexibn r_pida de la extensibn para boquillas le permite usar
cuatro boquillas diferentes. Las boquillas tienen diferentes
patrones de rociado como se ilustraa continuacic')n(Figura 28).
Para cambiar las boquillas:
Engancheelcerrojo de seguridad de la pistola de rociado.
Mueva haciaatr_s el collar de laconexibn r_pida y saque la
boquilla instalada.Almacene le boquilla en el espacio
suministrado en el panelde control.
NOTA: Paraun enjuague mgssuave, seleccione la boquilla blanca
de 40° o verde de 25°. Parafregar la superficie, seleccione la
boquilla roja de 0° o la amarilla de 15°-.Paraaplicar el qufmico,
seleccione laboquilla negra de baja presibn.
Mueva el collar hacia atr_s, inserte le boquilla nueva y suelte el
collar. Hale la boquilla paraasegurarsede que est_ conectada
firmemente.
Para una limpieza m_s efectiva, mantenga la boquilla de rociado
de 8 a 24 pulgadas de la superficie de limpieza. Si coloca la
boquilla muy cerca, podrla dahar la superficie que est_
limpiando.
Limpieza y Aplicaci6n del Quimico
iPRECAUCI_N! Usted deber_ conectar todas las mangueras
antes de darle arranque al motor. Arrancar el motor sin tener
todas las manguerasconectadas y sin el suministro de agua
ABIERTO (ON) causar_el daho de la bomba.
IMPORTANTE: Utilice quimicos dise_ados
especificamente para mgquinas lavadoras a presi6n. Los
detergentes caseros podrian da_ar la bomba.
Para aplicar el detergente, siga los siguientes pasos:
Revise el uso de las boquillas.
Prepare la solucibn detergente siguiendo las instrucciones del
fabricante.
Coloque el filtro pequeffo del tubo de inyeccibn de qulmicos
en el recipiente del detergente.
iPRECAUCI_N! Eviteque el tubo de inyeccibnde quimicos
entre en contacto con el silenciadorcaliente.Siesto sucede,el
tubo de inyeccibnde quimicos resultar_ dahado.Cuando coloque
el filtro en la botella del qufmico, coloque el tubo de manera que
no entre en contacto accidentalmente con el silenciador caliente.
La Presi6n Baja
Usada para _;
aplicar
quimicos _
25_
Negra
La Presi6n Alta
400- 25_° 150- 0_
Blanca Verde Amarilla Roja
/
29
Page 30

Lavadorade Presi6n 3,000 PSIde Generac
Aseg_rese de que la boquilla negra est_ instalada en la
extensi6n para boquillas.
NOTA: No se puede aplicar detergente con las boquillas de alta
presi6n (Blanca, Verde, Amarilla o Roja).
Aseg_rese que la manguera de jardin est_ conectada a la
entrada del agua. Revise que la manguera de alta presibn est_
conectada a la pistola de rociado y a la bomba. Dele arranque
al motor.
Aplique el detergente sobre la superficie seca, comenzando en
la parte inferior del _rea y dirigi_ndose hacia arriba, utilizando
movimientos largos, parejos y superpuestos. No permita que
el detergente se seque. Si permite que el detergente se seque,
la superficie podria quedar con manchas.
Permita que el detergente penetre de 3 a 5 minutos antes de
enjuagar. Vuelva a aplicar cuando sea necesario para evitar que
la superficie se seque.
Enjuage de la M quina Lavadora a
Presi6n
Aplique un rociado de alta presi6n en un _rea peque_a,
despu_s revise si la superficie presenta da_os. Si no encuentra
dahos, puede continuar con el trabajo de limpieza.
Comience en la parte superior del _rea que va a enjuagar,
dirigi_ndose hacia abajo con los mismos movimientos
superpuestos que utiliz6 para la limpieza.
Sistema de Enfriamiento
_ ADVERTENCIA! Seaextremadamente cuidadoso si
usala mgquina lavadora a presi6n desde una escalera,
andamio o cualquier superficie relativamente inestable.La
presi6n de unam_quina lavadoraen funcionamiento se
acumula a medida que usted sube. Cuando oprima el
gatillo, la fuerza de reacci6n del rociado inicialpodria
hacerlo caer.El rociado de laalta presi6n podria hacerlo
caer si est_muy cerca de la superficie que est_ limpiando.
Despu_s de haber aplicado el detergente, refriegue la
superficie y enjuagela de la siguiente manera:
Coloque el cerroio de seguridad a la pistola de rociado.
Retire la boquilla negra para quimicos de la extensibn para
boquillas.
Seleccione e instalela boquilla de alta presi6n que desee
siguiendo las instruccionesde "C6mo Usar las Boquillas" de la
p_gina29.
Mantengala pistola de rociado a una distancia segura del _rea
que planearociar.
Disminuyao aumente la presi6n de rociado al darle vuelta a la
perilla en la direcci6n de lasmanecillasdel reloi o en direcci6n
opuesta, respectivamente (Figura 29). Use unapresi6n m_s
bajapara lavar cosascomo carros o botes. Use una presi6n
ragsalta para eliminar pintura y la grasa de las calzadas.
Automgtico (Alivio T rmico)
Elaguaque circula dentro de la bomba puede alcanzar
temperaturas entre los 125°-155°Fsi hacefuncionar el motor de
su m_quinalavadora a presi6n de 3 a5 minutos sin oprimir el
gatillo de la pistola de rociado. Cuando el agua alcanzadicha
temperatura, el sistema de enfriamiento autom_tico seactiva y
enfrta la bomba descargando agua caliente en el piso. Este
sistemaevita el da_o interno de la bomba.
ESPECIFICACIONES
Presi6n de Salida ...... 3,000 PSI
Promedio de Flujo .... 3.0 galones por minuto (gpm)
Detergente ........... Use el detergente adecuado para
lavadoresa presi6n
Temperatura del Suministro
de Agua .............. Que no pasede IO0OF
Sistema de ........... Funcionar_ cuando el agua alcance de
Enfriamiento .......... 125°- 155°F
Automgtico
Peso que Embarca ..... 142 Ibs.
/
30
Page 31

Lavadorade Presibn 3,000 PSIde Generac
RECOMENDACIONES
G EN ERALES
La garantta de la m_quina lavadora a presi6n no cubre los
elementos que bansido sujetos a abuso o negligencia por parte
del operador. Para hacer v_lida lacobertura total de la garantia, el
operador deber_ mantener la lavadora de presi6n tal y como se
indica en el manual.
Algunos ajustes tendr_n que hacerse peribdicamente para
mantener adecuadamentesu m_quina lavadora a presi6n.
Toda conservacibn en este manual, en la hoja de informacibn
de bomba, yen el dueho de motor manualsse debe hacer
por Io menos una vez cada temporada.
Una vezal a_o, usted deber_ limpiar o remplazar la bujfay el
filtro de aire. Una bujla nuevay un flltro de aire limpio
garantizan una mezcla de combustible-aire adecuaday le ayuda
a su motor a funcionar mejor y a tener una vida _til m_s
prolongada. Por favor, para mayores detalles, consulte el
manual del propietario del motor.
Antes de Cada Uso
Reviseel nivel de aceite del motor.
Revisesi existen da_os en el colador de la entrada de agua.
Revisesi existen da_os en el filtro en Ifnea.
Revisesi existen fugas en la manguera de alta presi6n.
Revisesi existen da_os en los flltros de qufmicos.
Revisesi existen fugas en el conjunto de la extensibn para
boquillas y pistola.
Elimine el aire y los contaminantes de la bomba.
MANTENIMIENTO DE LA
MAQUINA LAVADORA A
PRESION
_k ADVERTENCIA! Nunca repare la manguera de alta
presi6n.Remplacelacon una mangueraque cumpla con la
capacidadminima de presibn de su m_quina lavadoraa
presibn.
Chequee el Tubo de Sif6n del
Detergente
Examineel flltro en el tubo del detergente y Ifmpielo si se
encuentra sucio. Eltubo deberla quedar apretado en la pieza.
Examine el tubo para ver si existe cualquier tipo de goteo o est_
roto. Reemplaceel filtro o el tubo si alguno de ellos se encuentra
dahado.
Limpiando el Tubo
Si usted us6 el tubo, usted debe lavarlo con agualimpia antes de
parar el motor.
Coloque el filtro y la inyecci6nquimica en un balde Ileno de
agualimpia.
Conecte la lanza negra de baja presibn.
Lavede I a 2 minutos.
Apague el motor.
IMPORTANTE: Apagando el motor, simplemente no soltar_ la
presibn en el sistema. Cuando el motor se ha apagado,
apriete el gatillo en la pistola rociadora para deshacerse
de la presi6n en la manguera_
Revise la Pistola y la Extensi6n para
Boquillas
Examinela conexi6n de la mangueraa la pistola y cerciorese de
que est_ en buen estado. Pruebe el gatillo oprimi_ndolo y
asegur_ndosede que se devuelve a su sitio cuando Io suelte.
Coloque el cerrojo de seguridad y pruebe el gatillo. Usted no
debe ser capaz de oprimir el gatillo. Remplace la pistola
inmediatamentesi fallacualquiera de estas pruebas.
Revise y Limpie el Colador de
Entrada
Examineel colador de entrada de la manguera de jardin. Limpielo
si est_ tapado o remplacelo si est_ roto.
Revise la Manguera de Alta Presi6n
Las manguerasde alta presi6n pueden desarrollar fugasdebido al
desgaste,dobleces o abuso. Revise la manguera antes de cada uso.
Revisesi existen cortes, fugas,abrasiones, levantamiento de la
cubierta, daho o movimiento de los acoplamientos. Si existe
cualquiera de estas condiciones, remplace la manguera
inmediatamente.
/
Revise el Filtro en Linea
Consulte la Figura 30 y suministre servicio al filtro en linea si se
tapa siguiendo estos pasos:
Extensi6n de la Boquilla
31
Anillo 'O'
Page 32

Lavadorade Presi6n 3,000 PSIde Generac
Retire lapistola y la extensi6n para boquillas de la manguera
de alta presibn. Retire laextensi6n para boquillas de la
pistola y retire el anillo 'o' y el colador de laextensibn para
boquillas. Laveel colador, pistola y extensi6n para boquillas
con agua limpiapara eliminar toda clase de residuos.
2.
Si el colador est_ dahado, encontrar_ un colador para el
filtro en linea y un anillo 'o' de repuesto en el iuego de
anillos 'o'. Si no esui da_ado, vuelva a usarlo.
3.
Coloque el colador del filtro en linea en el extremo con
rosca de la extensi6n para boquillas. Su direcci6n no
importa. Coloque el colador ejerciendo presi6n con el
borrador de un Igpiz hasta que se asiente por completo en el
rondo de la abertura. Tenga cuidado de no doblar el colador.
4.
Coloque el anillo 'o' en la ranura respectiva. Empuie el anillo 'o'
hasta que quede aiustado contra el colador del filtro en Itnea.
5.
Conecte la extensi6n para boquillas a la pistola de rociado de
la manera descrJt_ anteriormente en este manual.
Elimine el Aire y los Contaminantes
de la Bomba
Para retirar el aire de la bomba, siga los siguientes
paso$:
Instalela m_quina lavadora a presi6n como est_ descrito en
"Preparandoel lavador a alta presi6n para su uso". Conecte el
abastecimiento de agua y prenda agua.
Estire el disparador en el fusil del rocio y el asidero.
Cu_ndo el aguaes constante y constante, compromete el
picaporte de la seguridad.
Para retirar los contaminantes de la bomba, siga los
siguientes pasos:
Instalela m_quina lavadora a presi6n como est_ descrito en
"Preparandoel lavador a alta presi6n para su uso". Conecte el
abastecimiento de agua y prenda agua.
Pongaen marcha el motor de acuerdo alas instruccionesde
"C6mo Darle Arranque a su M_quina Lavadora a Presi6n".
Quite boquilla la extensi6n del fusil del rocto.
Hale el gatillo de lapistola y mant_ngalo apretado.
Cuando el suministro de aguasea uniforme y constante,
enganche el cerroio de seguridad y vuelva aaiustar la
extensi6n para boquillas.
Mantenimiento de la Boquilla
Si siente una sensaci6n pulsante al momento de apretar el gatillo
de la pistola rociadora, puede que seacausadapor la presi6n
excesiva en la bomba. La causaprincipal de la presi6n excesiva en
la bomba es cuando la boquilla seencuentra atascadao tapada
con materiales extra_os, tales como tierra, etc. Para corregir el
problema, limpie inmediatamentelaboquilla usando las
herramientas incluidascon su lavador a presi6n y sigalas
instruccionessiguientes:
I. Apagueel motor y apagueel suministro de agua.
2. Remuevala boquilla del extremo de laextensi6n de la boquilla
(Figura 3I).
Use el alambre
aqui para eliminar
losresiduos.
3. Quite el en el flltro de [aI[nea de[ otro fin de la extensi6n de
boquilla.
4. Use el alambreincluido en el juego(o un pequeffo sujeta
papeles)para liberar cualquier material extraho que est_
tapando la boquilla (Figura31).
5. Usando unamanguera de jardtn, remueva cualquier desecho
adicional, poniendo aguaen la extensi6n de la boquilla
(Figura 32). Haga _sto de 30 a 60 segundos.
6. [nstale de nuevo la boquilla yen el filtro en-linea en la
extensi6n. No la apriete demasiado con la IlaveAllen.
7. Conecte de nuevo la extensi6n de la boquilla a la pistola
rociadora.
8. Conecte de nuevo el suministro de agua,prenda el agua,y
enciendael motor.
9. Pruebe el lavador a presi6n al hacer funcionar con cada una de
las boquillas de Conexiones r_pidas que viene con el lavador a
presi6n.
Mantenimiento de los Anillos '0'
Durante la operaci6n normal de su m_quina lavadora a presi6n
los anillos 'o' mantienen apretadas y libres de fugaslas conexiones
de las manguerasy la pistola, ellos pueden desgastarseo daharse
con el uso.
Su m_quina lavadora a presi6n viene con un Juego de Mantenimiento
para anillos 'O', el cual contiene anillos'o',arandela de caucho y un
colador de repuesto parala entrada de lamanguerade jardtn.La
nota que no todas laspartes en el juego seusar_nen su unidad.
Para retirar un anillo 'O' desgastado o daffado:
Utilice un destornillador de cabeza plana pequeffo, col6quelo
por debajo del anillo 'o' y s_quelo haciendo palanca.
/
32
Page 33

Lavadorade Presi6n 3,000 PSIde Generac
Mantenimiento de Bomba
Cambio del Aceite de la Bomba
Cambie elaceitedespu_sde [asprimerasSOhorasde funcionamiento
y luego,cada200 horas o 3 meses,Io que sucedaantes.
NOTA: AI cambiar el aceite de la bomba, use exclusivamente
aceite no detergente de alta calidad de viscosidad 30. No utilice
aditivos especiales.
Cambie el aceite como se indica a continuaci6n:
Limpie la zona de alrededor del tap6n de vaciado de aceite de
lat6n que se encuentra en la parte inferior de la bomba.
Retire el tap6n de vaciado de aceite. Vactetodo el aceite de la
bomba en un recipiente homologado.
Cuando la bomba se hayavaciado completamente de aceite,
vuelva a colocar el tapbn de vaciado y apri_telo firmemente.
Limpie la zona de alrededor de la varilla de nivel de aceite de
la bomba. Extraiga la varilla de nivel y Ilene la bomba con el
aceite recomendado hastaque el nivel Ileguea la marca "Full"
(Lleno) de la varilla.
Vuelvaa porter la varilla de nivel de aceite de la bomba en su
lugar.
Limpie el aceite que se haya podido derramar.
MANTENIMIENTO DEL
I. Vacie el tubo de detergente, colocando el fiItro en un envase
IIeno de agualimpia mientras est_ corriendo el aguaa baja
presi_)n.Lave pot I o 2 minutos.
2. Apagueel motor y d_jelo enfriar, luego quite todas las
mangueras.Desconecte el alambre de la bujta.
3. Vacietodos los liquidos presentes en la bomba, haIando la
manecilIa de retroceso hasta seis veces. Esto deberia
remover la mayor parte de los Ifquidos presentes en la
bomba.
4. EIsalvador de la bomba de la marca del uso Generac a
previene lacorrosibn construye y helado de bomba.
5. AImacenela unidad en un lugar limpio y seco.
Proteger la Bomba
A protege al PumpSaverde uso de bomba Generac a previene
congelar el da_o y lubrica _mbolos y selIos.
NOTA: El PumpSaverde Generac es_n disponible sblo como un
accesorio opcional. No es incluido con laarandela de la presi6n.
iPRECAUCI_N! Usted deber_ proteger suunidad de las
temperaturasde congelamiento.SiNo Io hace,dafiar_
permanentemente la bomba y la unidadNo podr_ funcionar. La
garanttano cubre el da_o de la unidad ocasionado pot
congelamiento.
MOTOR
Consulte e{ manual del propietario del motor para las
instruccionesde cbmo mantener adecuadamente e{ motor.
_L iPRECAUCI_N! Evite elcontacto prolongado o
repetido de piel con aceite usado de motor. EI aceite
usado del motor ha sido mostrado al cancer de la piel de
la causaen ciertos animales del laboratorio.
CompIetamente lavado expuso greas con el jabbn y el
agua.MANTENGA FUERADE ALCANCE DE NIl, lOS.
No CONTAMtNE. CONSERVE los RECURSOS.VUELVA
ACEtTE USADO A la COLECCION CENTRA.
PREPARANDO LA
UNIDAD PARA SU
ALMACENAMIENTO
EIaguano debe permanecer en la unidad por un largo periodo de
tiempo. Los sedimentos o minerales se pueden depositar en las
piezas de la bombay "congelar" la accibn de la bomba. Si usted no
piensa usar el lavador a presi6n por mas de 30 dfas,siga este
procedimiento:
/
_L iPRECAUCI_N! Lea y siga todo advierte y las
advertencias en el PumpSaver pueden marcar. Siempre
protecci6n de oio de uso cuando se usa PumpSaver.
AI uso PumpSaver,cerci6rese la arandeIa de la presibn se apagay
desconecta del aguadel suministro. Leay siga todas instrucciones
y lasadvertencias dadasen el contenedor de PumpSaver.
NOTA: PumpSavergotear_ de la bomba despu_s queel
tratamiento y manchar_ madera y cemento.
NOTA: Si el PumpSaver no es_ disponible, ponga anticongeIante
RV (que no contenga alcohol) en la bomba, en una secci6n de
3 pies de la mangueradel jardfn conectada a un adaptador y
halando la maneciIla dos veces.
ALMACENANDO EL
MOTOR
Consulte e{ manual del propietario del motor para las
instruccionesde cbmo preparar adecuadamente e{ motor para su
aImacenamiento.
33
Page 34

Lavadorade Presi6n 3,000 PSIde Generac
REPARACION DE DAI IOS
Problema Causa
I. Est_usandola boquilla de baja presi6n
(negra).
2. La entrada de aguaest_ bloqueada.
3. Suministro de aguainadecuado.
4. La manguera de entrada est_doblada o
La bomba presenta los
siguientes problemas: no
produce presi6n, produce una
presi6n errada, traqueteo,
p_rdida de presi6n, bajo
volumen de agua.
presenta fugas.
5. Elcolador de la manguera de entrada
est_ tapado.
6. Elsuministro de aguaest_ pot encima
de los 100°_F.
7. La manguera de alta presi6n est_
bloqueadao presenta fugas.
8. La pistola presenta fugas.
9. La boquilla est_ obstruida.
10. Bomba defectuosa.
I. Eltubo de succi6n dedetergente no
est_ sumergido.
El detergente no se mezc|a con
el rociado.
El motor funciona bien cuando La velocidad del motor es demasiado lenta. Mueva el control de la vglvula de regulaci6n a
no tiene cargas, pero funciona la posici6n FAST (RAPIDO). Siel motor
"mal" cuando se conecta una continua funcionando real, p6ngase en contacto
carga, con el centro de servicio Honda.
2. Elfiltro de qufmicos est_ tapado.
3. Sucio en el filtro de la linea.
4. Est_ usando la boquilla de alta presi6n.
I. Depurador de aire sucio. I.
2. Sin gasolina. 2.
3. Gasolina vieia. 3.
4. Elalambre de la bujia no est_ conectado
a la bujia.
5. Bujtamala.
El motor no arranca; o arranca
y funciona mal.
El motor se apaga durante la Sin gasolina. Uene el tanque de combustible.
operaci6n.
El motor no tiene fuerza. Filtro de aire sucio.
El motor intenta estabilizarse o
su funcionamiento no es
constante.
6. Agua en la gasolina.
7. Estrangulaci6n excesiva.
8. Humo blanco en el escape.
9. V_lvula de entrada trabada en la
posicibn abierta o cerrada.
10. El motor ha perdido compresibn.
Cebador abierto demasiado r_pido.
Soluci6n
I. Cambie laboquilla auna de lastres
boquillas de alta presi6n.
2. Limpie la entrada.
3. Proporcioneflujo de aguaadecuado.
4. Remplacela manguera.
5. Revisey limpieel colador de lamanguera
deentrada.
6. Proporcione suministro de aguam_sfria.
7. Retire lasobstrucciones de lamanguera
de salida.
8. Remplacela pistola.
9. Limpie la boquilla.
10. P6ngaseen contacto con el centro de
servicio Generac.
I. Coloque el tubo de succi6n de detergente
en el detergente.
2. Limpie o remplace el filtro/tubo de
succi6n de detergente.
3. Vea"Cheque En el Filtro de la Ltnea" en la
p_gina34.
4. Use la boquilla de baiapresi6n (negra).
Limpie o remplace el depurador de aire.
Llene el tanque de combustible.
Drene el tanque de gasolina; 116nelocon
combustible fresco.
4.
Conecte el alambre a la bujia.
5. Remplacela bujta.
6. Drene el tanque de gasolina;II_nelo con
combustible fresco.
7. Abra el cebador por completo y haga
girar el motor.
8. P6ngaseen contacto con el centro de
servicio Honda.
9. P6ngaseen contacto con el centro de
servicio Honda.
10. P6ngaseen contacto con el centro de
servicio Honda.
Remplaceel filtro de aire.
Mueva el cebador a la posici6n intermedia
hastaque el motor funcione normalmente.
i
34
Page 35

GARANT|A LIMITADA
P(_LIZA DE GARANTtA PARA LOS PROPIETARIOS DE PRODUCTOS PORTATILES GENERAC Efectiva desde el I ro de Octubre, 2001
GARANTIA LIMITADA
"Los productos portdtilesGenerac, LLC reparar_ o reemplazarg, sin costo a[guno, cualcluier p_rte o partes de[ equipo que est_n defectuosas en materiales o
mano de obra, o ambos. Los cargos pot concepto de transporte en las partes sometidas a reparaciOn o reemplazo bajo estagarantla deben set cubiertos por el
comprador. Estagarantia esefectiv_ por un cierto periodo de tiempo y est_ sujeta a las condiciones provistas en la pOliza. Parael servicio de g_rantla, consigael
concesionario autorizado m_s cercano en nuestro mapa Iocalizador de concesionarios en www.generac-portables.com o Ilame al 1-877-544-0982. NO EXISTE
OTRA GARANTIA EXPRESA. LAS GARANTLA5 IMPLiCITA5, INCLUYENDO AQUELLAS DE MERCANTIBILIDAD O CAPACIDAD PAPA UN PROP(351TO
PARTICULAR, ESTAN LIMITADA5 AL PERIODO DE TIEMPO ESPECIFICADO. O HASTA EL LiMITE PERMITIDO POR LA LEY,TODAY CUALQUIER
GARANTiA IMPLiCITA ESTI_.EXCLUIDA. RESPONSABILIDAD POR DAi_OS CONSECUENTES BAJO CUALQUIER Y TODA5 LAS GAPANTiAS, EsT_,N
EXCLUIDAS HASTA EL LiMITE DE EXCLUSI(SN PERMITIDO POR LA LEY.Algunos estados no permiten limitaciones en cu_nto y cu_n implicadas, lasgarantlas
pueden set y algunos estados no permiten la exclusion o limitation de dafios incidentales o consecuentes, por Io cluelaslimitaciones y exclusiones arriba
mencionadas, es posible,que no se apliquen a usted.Esta garantia le proporciona derechos legalesespecificos yes posibleque usted tenga otros derechos los
cuales puedenvariar de estado aestado y de palsa pals."
PERIODO DE GARANT|A*
PRODUCTOS**
Generador port,all
V_lvula lateral con motor)
Generador port_til
Motor de v_lvula superior)
Lavador el_ctrico a presi6n
Lavadorde gasolinaa presi6n
* El periodo de garantia comienza en la fecha de compra hecha por el primer consumidor al detal o usuario comercial, 7 continua por el periodo de tiempo clue
aparece en la tabla arriba mencionada. "Para uso del consumidor" significa, uso residential por un consumidor al detal. "Para uso comercial" significa, todos los otros
casos, incluyendo el uso comercial, para generar un ingreso o pot propOsitos de alquiler. Una vez que el equipo ha sido usado comercialmente, deberla ser
considerado como de uso comercial para las finalidades de esta garantla. El equipo usado, el equipo de demostraciOn y el equipo usado como energla primaria en
lugares donde las utilidades p_iblicas no est_n garantizados. Los accesorios tales como pistolas, mangueras, varillas y boquillas est_n excluidos de la garantia del
producto.
** El motor a gasolina y las baterlas para el encendido, est_n garantizados por el fabricnnte de esos productos.
PARA USO DEL CONSUMIDOR
I afio
2 afios
(el segundo afio solamente para las partes)
I afio
I afio
PAPA USO COMERCIAL
90 dtas
I afio
ninRuno
90 dias
EL REGISTRO DE LA GARANTiA NO ES NECESARIO PARA OBTENER LA GARANTJA EN LOS EQUIPOS PORTATILES DE GENERAC.
GUARDE SU RECIBO DE COMPRA. SI USTED NO PROVEE LA PRUEBA DE LA FECHA DE LA COHPRA INICIAL, AL HOMENTO EN
QUE SE REQUIERA USAR LA GARANTiA, LA FECHA DE LA FABRICACI(_N DEL EQUIPO SERA USADA PARA DETERHINAR EL
PERIODO DE GARANTiA.
Acerca de la seguridad de su equipo:
Los Productos Port'tiles Generac, reciben las reparaciones bajo la garantla y le pide disculpas por cualquier inconveniencia causada. Cualquier Concesionario de
Servicio Autorizado puede llevar a cabo reparaciones baio la garantla. Ln mayorla de las reparaciones baio la garanti_ son maneiadas normalmente, pero algunas
veces la solicitud del servicio de garantia es posible clue no sea apropiada. Pot eiemplo, la garantla no serg vdlida si el dafio al equipo ocurri6 debido al real uso, falta
de mantenimiento adecuado, maneio, envio, almacenamiento o una instalaciOn inadecuada. Similarmente, la garantla es anulada si el n6mero de serial del equipo ha
sido removido o el ecluipo ha sido altarado o modificado.
Si un diente no est_ de acuerdo con la decision hecha pot el Concesionario de Servicio, se llevarg a cabo una investigaciOn para determinar si la garantla se puede
aplicar. Pida al Concesionario de Servicio que entregue todos los hechos que soportan su decision a su Distribuidor, para clue _ste los revise. Si el Distribuidor
decide que el reclamo es iustificado, al cliente se le reembolsarg completamenta pot todos esos artlculos que est_n defectuosos. Para evitar un malentendido que
pueda ocurrir entre el Concesionario y el cliente, _baio aparecen algunos de las razones pot las cuales el equipo puede fallar, y clue la garantia no cubre:
Oesgaste normal:
Equipo el_ctrico al aire libre, como todos los aparatos mecgnicos, necesita partes, servicio y reemplazo, periOdicamente, para que funcione bien, Esta g_rantia
no cubre la reparaci6n cuando el uso normal ha acabado con la vida de una parte en particular o del equipo,
Instalacibn y mantenimiento:
Esta garantla no se aplica al equipo o parte que ha estado sujeta a una instalaciOn inadecuada, que no haya sido autorizada o a cualquier tipo de alteraciOn, el
real uso, negligencia, accidentes, sobrecarga, velocidad excesiva, mantenimiento inadecuado, reparaciOn o almacenamiento, que seg_in la opinion de los
Productos Port'tiles Generac, ban afectado desfavorablemente su rendimiento y flabilidad. Esta garantla tambi_n no cubre el mantenimiento normal tales como
_justes, limpieza del sistema de combustion y la obstrucciOn (debido a materias Clulmicas, suciedad, carbon o cal, etc.)
Otras exclusiones:
Tambi_n se encuentran excluidos de est_ gnrantla, el desgaste de los artlculos tales como, conectadores, medidores de aceite, correas, anillos O, filtros,
empaque de la bomba, etc. las bombas clue se hagan funcionar o trabaiar sin agua, o dafios y malfuncionamientos que resulten de accidentes, _busos,
modificaciones, altaraciones, un servicio inadecuado, congelamiento o deterioro cluimico.
La garantfa se encuentra disponible solamente a tray,s de los concesionarios de servicios autorizados por los Productos Port,tiles Generac.
Esta garantfa no se aplica al servicio proveniente de cualquier otra entidad.
Usted puede ubicar su Concesionario de Servicio Autorizado de los Productos Port, tiles de Generac mds cercano, en nuestro mapa
Iocalizador de concesionarios en www.generac-portables.com o flame al 1-877-544-0982.
Los Productos Port,tiles de Generac est_n fabricados bajo una o m_s de las siguientes patentes: (Otras patantes estgn pendientes)
5902094 5823752 5718255 5890413
Generac Portable Products, LLC
Jefferson, Wisconsin U.S.A.
Page 36

LIMITED WARRANTY
GENERAC PORTABLE PRODUCTS OWNER WARRANTY POLICY Effective October I, 2001
LIMITED WARRANTY
"Generac Portable Products, LLC will repair or replace, free of charge, any part, or parts of the equipment that are defective in material or
workmanship or both. Transportation charges on parts submitted for repair or replacement under this Warranty must be borne by purchaser.
This warranty is effective for the time periods and subject to the conditions provided for in this policy. For warranty service, find the nearest
Authorized Service Dealer in our dealer Iocator map at www.generac-portables.com or call 1-877-544-0982. THERE iS NO OTHER EXPRESS
WARRANT'fi iMPLtED WARRANTIES, iNCLUDING THOSE OF MERCHANTABILITY AND FITNESS FOR A PARTICULAR PURPOSE, ARE
LIMtTED TO THE TIME PERtOD SPECIFIED, OR TO THE EXTENT PERMITTED BY LAW ANY AND ALL IMPLIED WARRANTIES ARE
EXCLUDED. LIABILITY FOR CONSEQUENTIAL DAMAGES UNDER ANY AND ALL WARRANTIES ARE EXCLUDED TO THE EXTENT
EXCLUSION IS PERMITTED BY LAW. Some states do not allow limitations on how long an implied warranty lasts, and some states do not
allow the exclusion or limitation of incidental or consequential damages, so the above limitation and exclusion may not apply to you. This
warranty gives you specific legal rights and you may also have other rights which vary from state to state and country to country."
WARRANTY PERIOD*
PRODUCTS**
Portable Generator
CONSUMER USE
I year
COMMERCIAL USE
90 days
Side Valve EnginePowered)
Portable Generator
(Overhead Valve EnginePowered)
Electric Powered PressureWasher
Gasoline Powered Pressure Washer
* The warranty period begins on the date of purchase by the first retail consumer or commercial end user, and continues for the period of time
stated in the table above. "Consumer use" means personal residential household use by a retail consume_ "Commercial use" means all other
uses, including use for commercial, income producing or rental purposes. Once equipment has been used commercially, it shall thereafter be
considered to be in commercial use for purposes of this warranty. Used equipment, demonstration equipment and equipment used for prime
power in place of a utility are not warranted. Accessory parts such as guns, hoses, wands and nozzles are excluded from the product warranty.
** The gasoline engine and starting batteries are warranted solely by the manufacturers of those products.
WARRANTY REGISTRATION IS NOT NECESSARY TO OBTAIN WARRANTY ON GENERAC PORTABLE PRODUCTS
EQUIPMENT. SAVE YOUR PROOF OF PURCHASE RECEIPT. IF YOU DO NOT PROVIDE PROOF OF THE INITIAL
PURCHASE DATE AT THE TIME WARRANTY SERVICE IS REQUESTED, THE MANUFACTURING DATE OF THE
EQUIPMENT WILL BE USED TO DETERMINE THE WARRANTY PERIOD.
2 years
(2rid year parts only)
I year
I year
I year
None
90 days
About your equipment warranty:
Generac Portable Products welcomes warranty repair and apologizesto you for beinginconvenienced.Any Authorized ServiceDealer may perform
warranty repairs. Most warranty repairs are handled routinely, but sometimes requests for warranty service maynot beappropriate. For example,
warranty would not apply if equipment damageoccurred becauseof misuse,lack of routine maintenance,shipping,handling,warehousing or
improper installation. Similarly,warranty isvoid if the serialnumber of the equipment hasbeen removed or the equipment hasbeen altered or
modified.
If a customer differs with the decision of the Service Dealer, an investigation will be made to determine whether the warranty applies.Ask the
Service Dealer to submit all supporting facts to its Distributor for review, tf the Distributor decides that the claim is justified, the customer will
be fully reimbursed for those items that are defective. To avoid misunderstandings that might occur between the customer and the Dealer, listed
below are some of the causesof equipment failure that the warranty does not cover:
Normal wear:
Outdoor Power Equipment, like all mechanical devices, needs periodic parts, service and replacement to perform well. This warranty
does not cover repair when normal use has exhausted the life of a part or the equipment.
Installation and Maintenance:
This warranty does not apply to equipment or parts that havebeen subjected to improper or unauthorized installation or alteration,
misuse, negligence,accident, overloading, overspeeding, improper maintenance, repair or storage so as,in Generac Portable Products'
judgment, to adversely affect its performance andreliability. This warranty also does not cover normal maintenance such asadiustments,
fuel system cleaningand obstruction (due to chemical, dirt, carbon or lime, etc.).
Other Exclusions:
Also excluded from this warranty are wear items such as quick couplers, oil gauges,belts, o-rings, filters, pump packing, etc., pumps
which havebeen run without water supplied or damageor malfunctions resulting from accidents,abuse,modifications, alterations, or
improper servicing or freezing or chemical deterioration.
Warranty is available only through service dealers authorized by Generac Portable Products. This warranty does not apply to
service by any other entity.
You may locate your nearest Authorized Generac Portable Product Service Dealer in our dealer Iocator map at
www.generac-portables.com or call 1-877-544-0982.
Generac Portable Products Are Made Under One Or More Of The FollowingPatents: (Other Patents Pending)
5902094 5823752 5718255 5890413
Generac Portable Products, LLC
Jefferson, Wisconsin U.S.A.
 Loading...