

Generac 1537-1 Owner’s Manual
GEN RAC °]
Portable Products
High Pressure Washer Owner's Manual
/
Model No. 1537-1 (2,400 PSIHigh Pressure Washer) Manual No. 187944 Revision 3 (07/02/2001)
Visit our Generac website: www.generac-portables.com
A This is the safety alert symbol. It isusedto alert you to potential personal injury hazards.
Obey all safety messagesthat follow this symbol to avoidpossible injury or death.
Generac Portable Products 2,400 PSIHigh PressureWasher
EQUIPMENT
DESCRIPTION
CONGRATULATIONS on your purchase of a
GENERAC high pressure washer. It has been designed,
engineered and manufactured to giveyou the best possible
dependability and performance.
This manual contains information for a high pressure
washer that operates at 2,400 PSIat a flow rate of
2.2gallons per minute. This highquality residential system
features 10" wheels, axial campump with stainlesssteel
pistons, automatic cool down system, chemical injection
system, adjustable spray nozzle. Includes safetygoggles,
heavy duty 25' hose, and more.
Pleaseread and retain this manual.The instructions will
enable you to assembleyour unit without tools, and
maintain your high pressure washer properly.
Every effort hasbeen made to ensure that the information
in this manualis both accurate and current. However,
Generac reserves the right to change,alter or otherwise
improve the product and its documentation at any time
without prior notice.
Should you experience any problem you cannot easily
remedy,call the pressurewasher helpline at
1-800-270-1408.
SAFETY RULES
_, AUTION! When setting up,transporting,
adjusting or making repairs to your high pressure
washer,alwaysdisconnect the spark plug wire from
the spark plug and place the wire where it cannot
contact spark plug.
_, DANGER! Engineexhaust gasescontain DEADLY
carbon monoxide gas.This dangerousgas,if
breathed insufficient concentrations, can cause
unconsciousness or even death. OperatJ_ this
equipment only in the open air where adequate
ventilation isavailable.
_, WARNING! Gasoline ishighly FLAMMABLE and
itsvapors are EXPLOSIVE.Do Not permit
smoking, open flames, sparks or heat inthe vicinity
while handlinggasoline. Avoid spilling gasolineon a
hot engine.Allow unit to cool for 2 minutes before
refueling. Comply with all lawsregulatingstorage
and handlingof gasoline.
Read this manual carefully and become familiar
with your pressure washer. Know its applications,
its limitations, and any hazards involved.
CUSTOMER
RESPONSIBILITIES
• Readand observe the safetyrules.
• Follow regular schedule in maintaining, caring for and
usingyour high pressure washer.
• Foroff-season storage, review "Preparing the Unit for
Storage" on page 14.
Locate this pressure washer in areasawayfrom
combustible materials, combustible fumes or dust.
The high pressure equipment is designedto be used with
Generac authorized parts only. Ifyou use this equipment
with parts that do not comply with minimum
specifications, the user assumesall risks and liabilities.
Some chemicals or detergents may be harmful if inhaled
or ingested,causingsevere nausea,fainting or poisoning.
The harmful elements maycause property damageor
severe injury.
Do Not allow CHILDREN to operate the pressure
washer at any time.
/
2
Generac Portable Products 2,400 PSIHigh PressureWasher
• Operate engine only at governed speed.Runningthe
engine at excessive speeds increasesthe hazardof
personal injury. Do Not tamper with parts which may
increase or decreasethe governed speed.
• Do Not wear loose clothing, jewelry or anythingthat
may be caught in the starter or other rotating parts.
• Beforestarting the pressurewasher in cold weather,
check all parts of the equipment and be sure ice has not
formed there.
• Never useaspraygunwhichdoesnot havea trigger lock
or trigger guard in placeandin working order.
• Keepthe hose connected to machine or the spraygun
while the system is pressurized. Disconnecting the hose
while the unit is pressurized is dangerous.
• Never operate units with broken or missingparts, or
without protective housing or covers.
• Operate and store this unit on astable surface.
• Check the fuel system for leaksor signs of deterioration,
such as chafed or spongy hose, loose or missing clamps,
or damagedtank or cap. Correct alldefects before
operating the pressurewasher.
• Do Not spray flammableliquids.
• Do Not secure the spraygun in the open position.
• Use a respirator or maskwhenever there isachance
that vaporsmaybe inhaled.Read all instructionswith
mask so you are certain the mask will provide the
necessary protection againstinhalingharmful vapors.
• Never aim the spray gun at people, animals or plants.
The high pressure stream of water that this equipment
produces can pierce skin and its underlying tissues,
leading to serious injury and possible amputation.
• Never allow any part of the body to come in contact
with the fluid stream. Do Not come in contact with a
fluidstream created by a leakin the high pressure hose.
• Always wear eye protection when you usethis
equipment or when you are in the vicinitywhere the
equipment is in use.
• Highpressure spraycan causepaint chipsor other
particles to become airborne.
• Do Not operate the pressurewasher above the rated
pressure.
• Never move the machine by pulling on the highpressure
hose. Use the handle provided on the unit.
• Always becertain the spraygun, nozzles andaccessories
are correctly attached.
• High pressure spray maydamagefragile items including
glass.Do Not point spraygun at glasswhen in the jet
spray mode.
• Hold the spraygun firmly inyour hand before you start
the unit. Failureto do so could result in an injuryfrom a
whipping spray gun. Do Not leavethe spray gun
unattended while the machine is running,
• The cleaningareashould haveadequate slopes and
drainage to reduce the possibility of a fall due to slippery
surfaces.
• Keepwater spray awayfrom electric wiring or fatal
electric shock may result.
• Do Not by-passany safety deviceon this machine.
• The muffler andengineheat up during operation and
remain hot immediatelyafter shutting it down. Avoid
contact with a hot muffler or engine asyou could be
severely burned.
• High pressure hose can develop leaks from wear, kinking,
abuse, etc. Water sprayingfrom a leak is capable of
injectingmaterial into skin. Inspect hose eachtime before
usingit. Check all hosesfor cuts, leaks, abrasions or
bulgingof cover, or damageor movement of couplings. If
any of these conditions exist, replace hose immediately.
Never repair high pressure hose. Replace it with
another hose that exceeds maximum pressure rating of
your unit.
• The muffler andair cleaner must be installedandin good
condition before operating the pressurewasher.These
components act as spark arresters if the engine backfires.
In the State of California a spark arrester is required by law
(Section 4442 of the California Public Resources Code).
Other states may have similar laws.Federal laws applyon
federal lands.
NOTE: If you equip the muffler with a spark arrester, it
must be maintained in effective working order. You can
order a spark arrester through your authorized Honda
service dealer.
/
3
GeneracPortableProducts2,400PSIHighPressureWasher
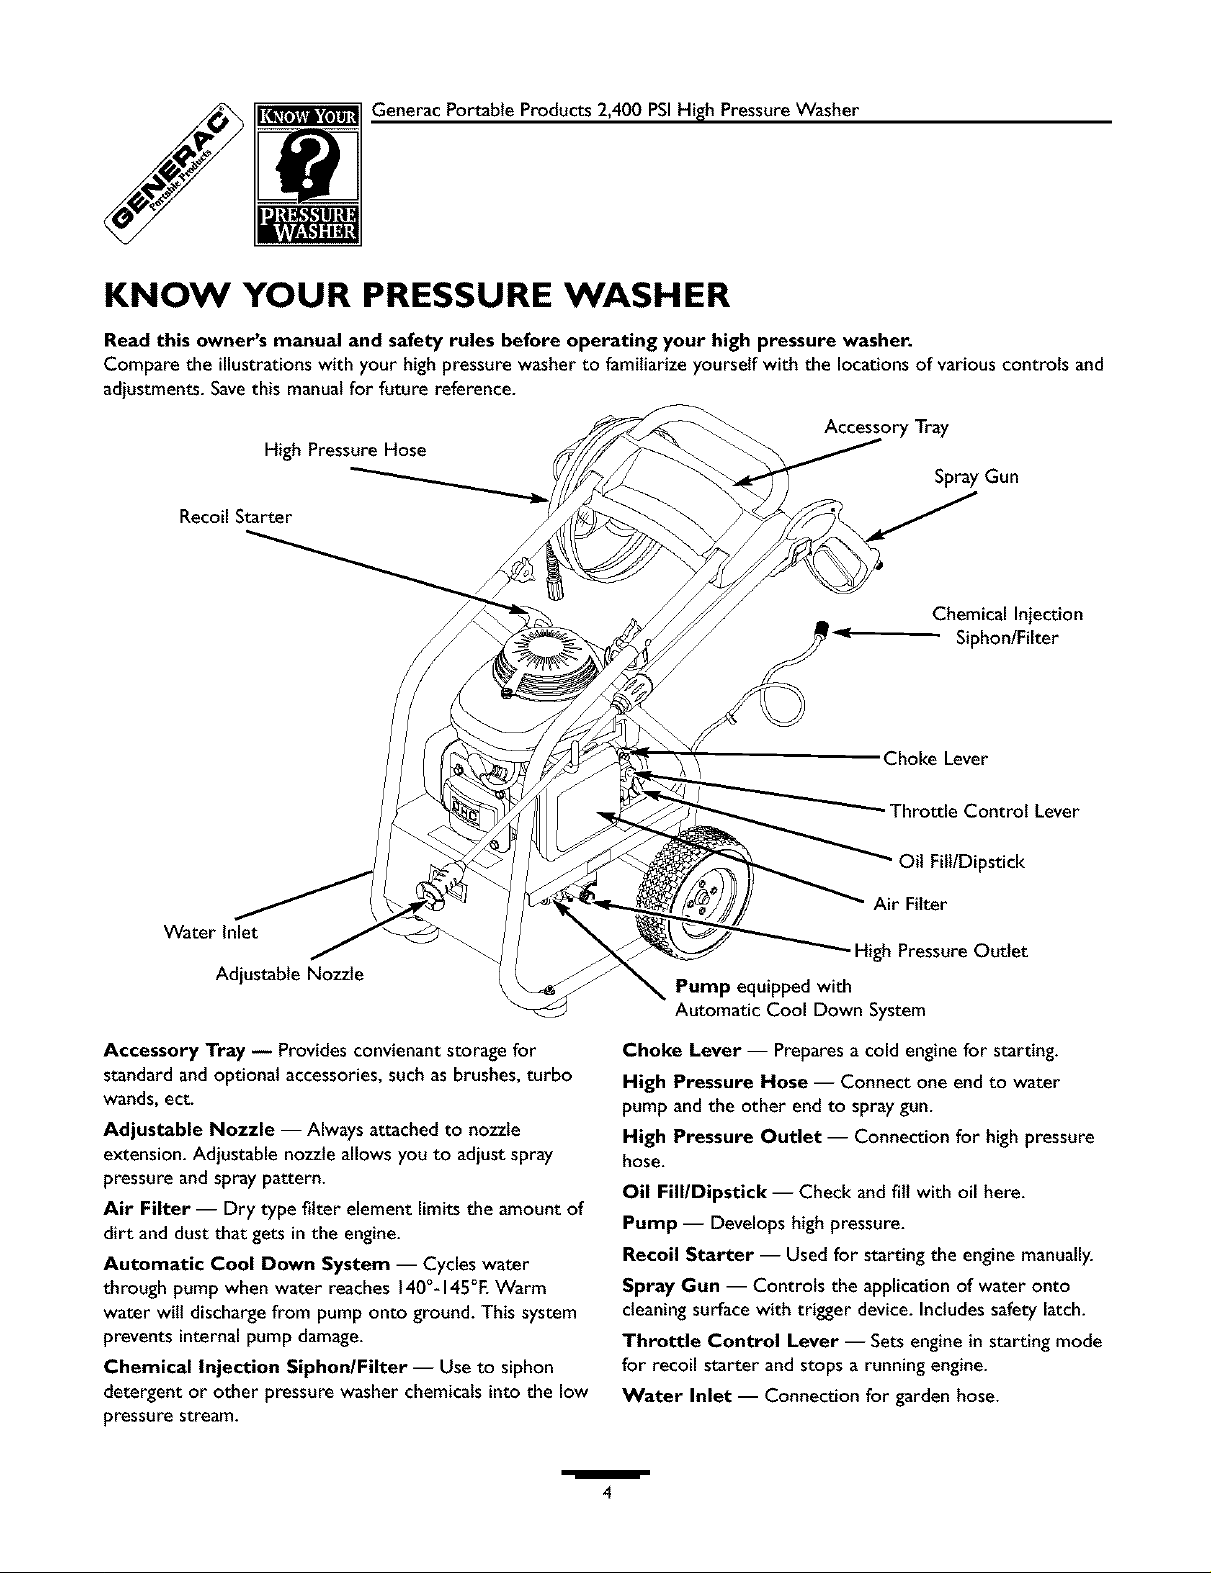
KNOW YOUR PRESSURE WASHER
Read this owner's manual and safety rules before operating your high pressure washer.
Compare the illustrations with your high pressure washer to familiarize yourself with the locations of various controls and
adjustments. Save this manual for future reference.
Accessory Tray
High Pressure Hose
SprayGun
Recoil Starter
Chemical Injection
Siphon/Filter
Water Inlet
Adjustable Nozzle
Accessory Tray _ Provides convienant storage for
standard and optional accessories, suchasbrushes, turbo
wands, ect.
Adjustable Nozzle -- Always attached to nozzle
extension.Adjustable nozzle allows you to adjust spray
pressure and spray pattern.
Air Filter -- Dry type filter element limits the amount of
dirt and dust that gets in the engine.
Automatic Cool Down System -- Cycles water
through pump when water reaches 140°-145°F.Warm
water will dischargefrom pump onto ground. This system
prevents internal pump damage.
Chemical Injection Siphon/Filter -- Use to siphon
detergent or other pressure washer chemicals into the low
pressure stream.
Choke Lever
T'hrottle Control Lever
Oil Fill/Dipstick
Air Filter
- High Pressure Outlet
Pump equipped with
Automatic Cool Down System
Choke Lever -- Preparesa cold enginefor starting.
High Pressure Hose -- Connect one end to water
pump and the other end to spray gun.
High Pressure Outlet -- Connection for high pressure
hose.
Oil Fill/Dipstick -- Check and fill with oil here.
Pump -- Develops high pressure.
Recoil Starter -- Used for starting the engine manually.
Spray Gun -- Controls the application of water onto
cleaningsurface with trigger device. Includes safety latch.
Throttle Control Lever -- Sets engine in starting mode
for recoil starter and stops a running engine.
Water Inlet -- Connection for garden hose.
/
4
GeneracPortableProducts2,400PSIHighPressureWasher
IMPORTANT: Readentire owner's manualbefore you
attempt to assembleor operate your new pressure washer.
REMOVE PRESSURE
WASHER FROM
CARTON
• Removethe parts box includedwith pressure washer.
• Slicetwo corners at the end of carton from top to
bottom so the panel can be folded down fiat, then
remove all packing material.
• Roll pressure washer out of carton.
Carton Contents
Items in the carton include:
Main Unit
Parts Box (which includesthe following):
Goggles
Handle Assembly
PlasticAccessory Tray
Handle FasteningHardware (which includes):
Carriage Bolts (2)
PlasticKnobs (2)
"J" Hook
Chemical Hose Clip
SelfTappingScrews(5)
Nozzle Cleaning Kit
High Pressure Hose
Quick Connect
Owner's Manual
EngineManual
Owner's Registration Card
SprayGun
Nozzle Extension
Oit Bottle
O-Ring MaintenanceKit
If any of the above parts are missingor damaged,call the
pressure washer helpline at 1-800-270-1408.
PREPARING PRESSURE
WASHER FOR USE
If you have any problems with the assemblyof your
pressure washer or if parts are missingor damaged,call the
pressure washer helpline at 1-800-270-1408.
To prepare your pressure washer for operation, you
will need to perform these tasks:
• Fitlout and sendin registration card.
• Attach accessorytray to handle, then attach handle to
main unit.
• Add oil to engine crankcase.
• Add fuel to fuel tank.
• Connect high pressure hoseto spraygun and pump.
• Connect water supply to pump.
Attach Handle and Accessory Tray
NOTE: Alt assemblyoperations given in this section will
be described from the perspective of assemblingthe
pressure washer from the rear.
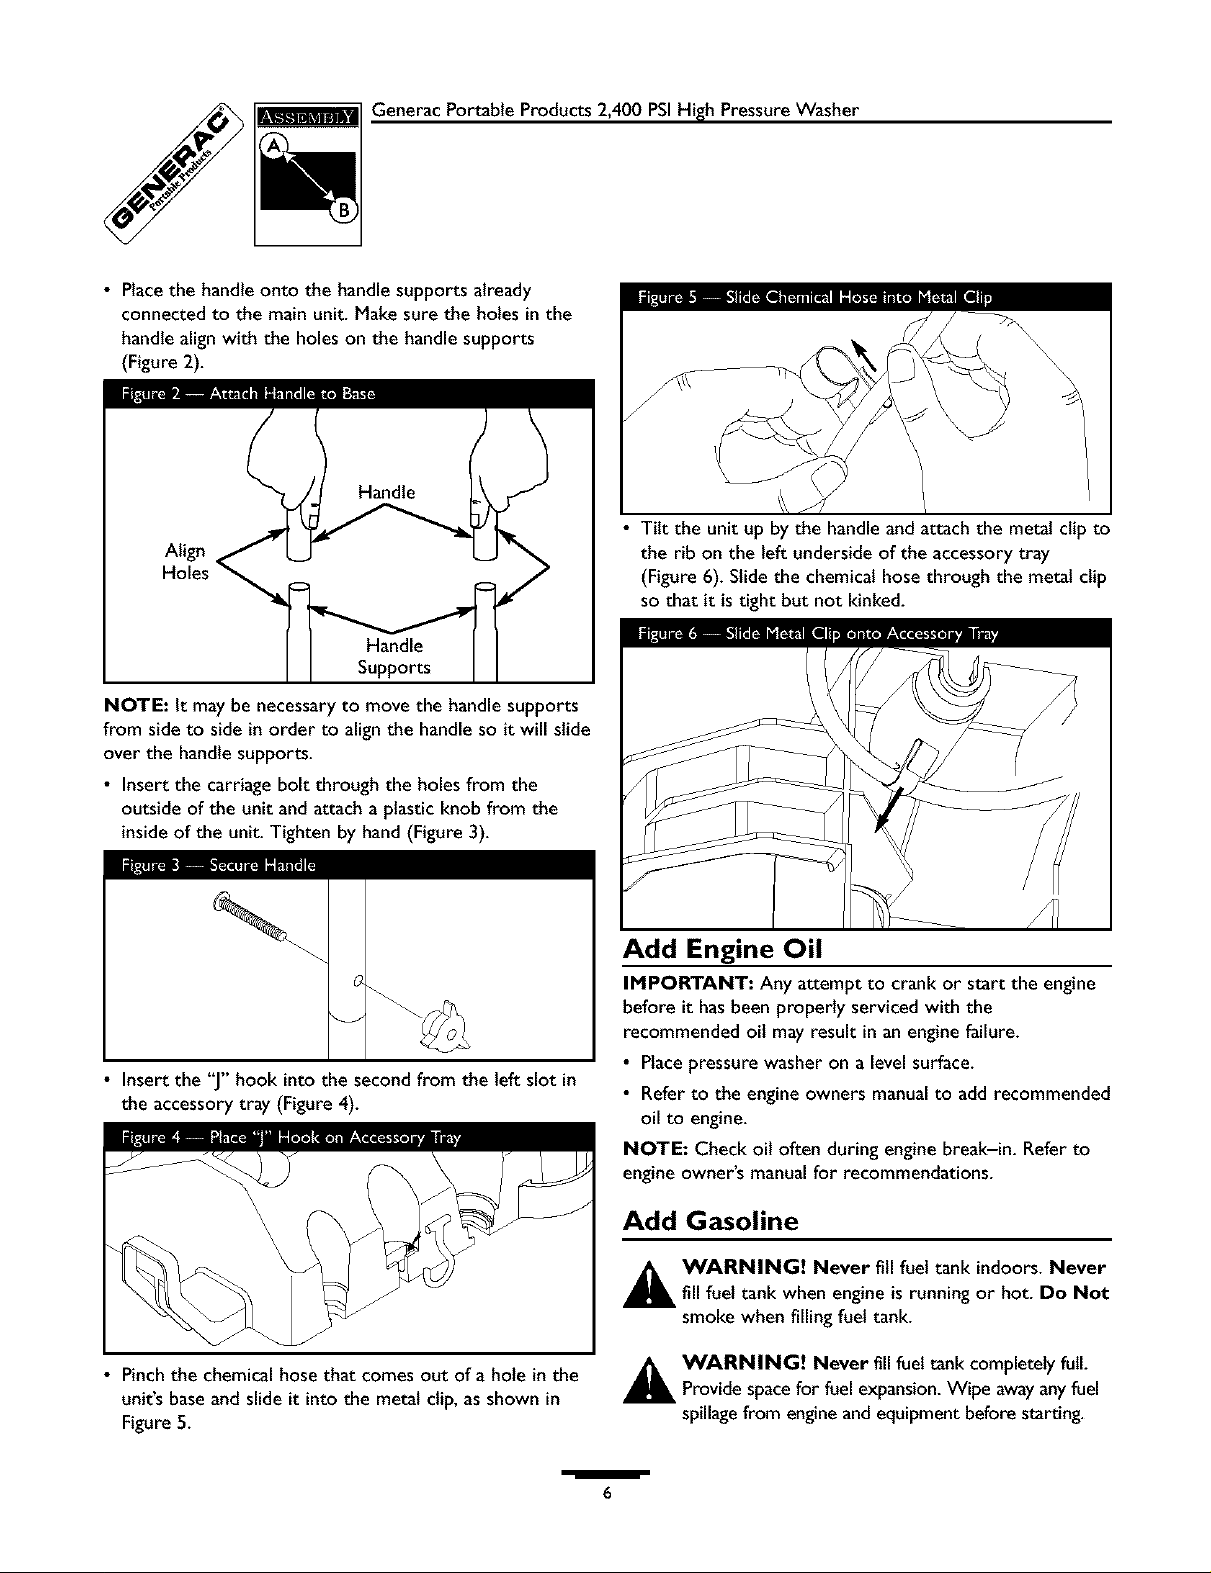
• Slidethe plastic accessory tray onto the handle and align
the holes inthe accessory tray with the holes on the
handle (Figure I).
• Securetray to handle with self tapping screws usinga
#2 phillips screwdriver. Ensure screws are tight but not
crushing the plastic accessorytray.
/
5
GeneracPortableProducts2,400PSIHighPressureWasher
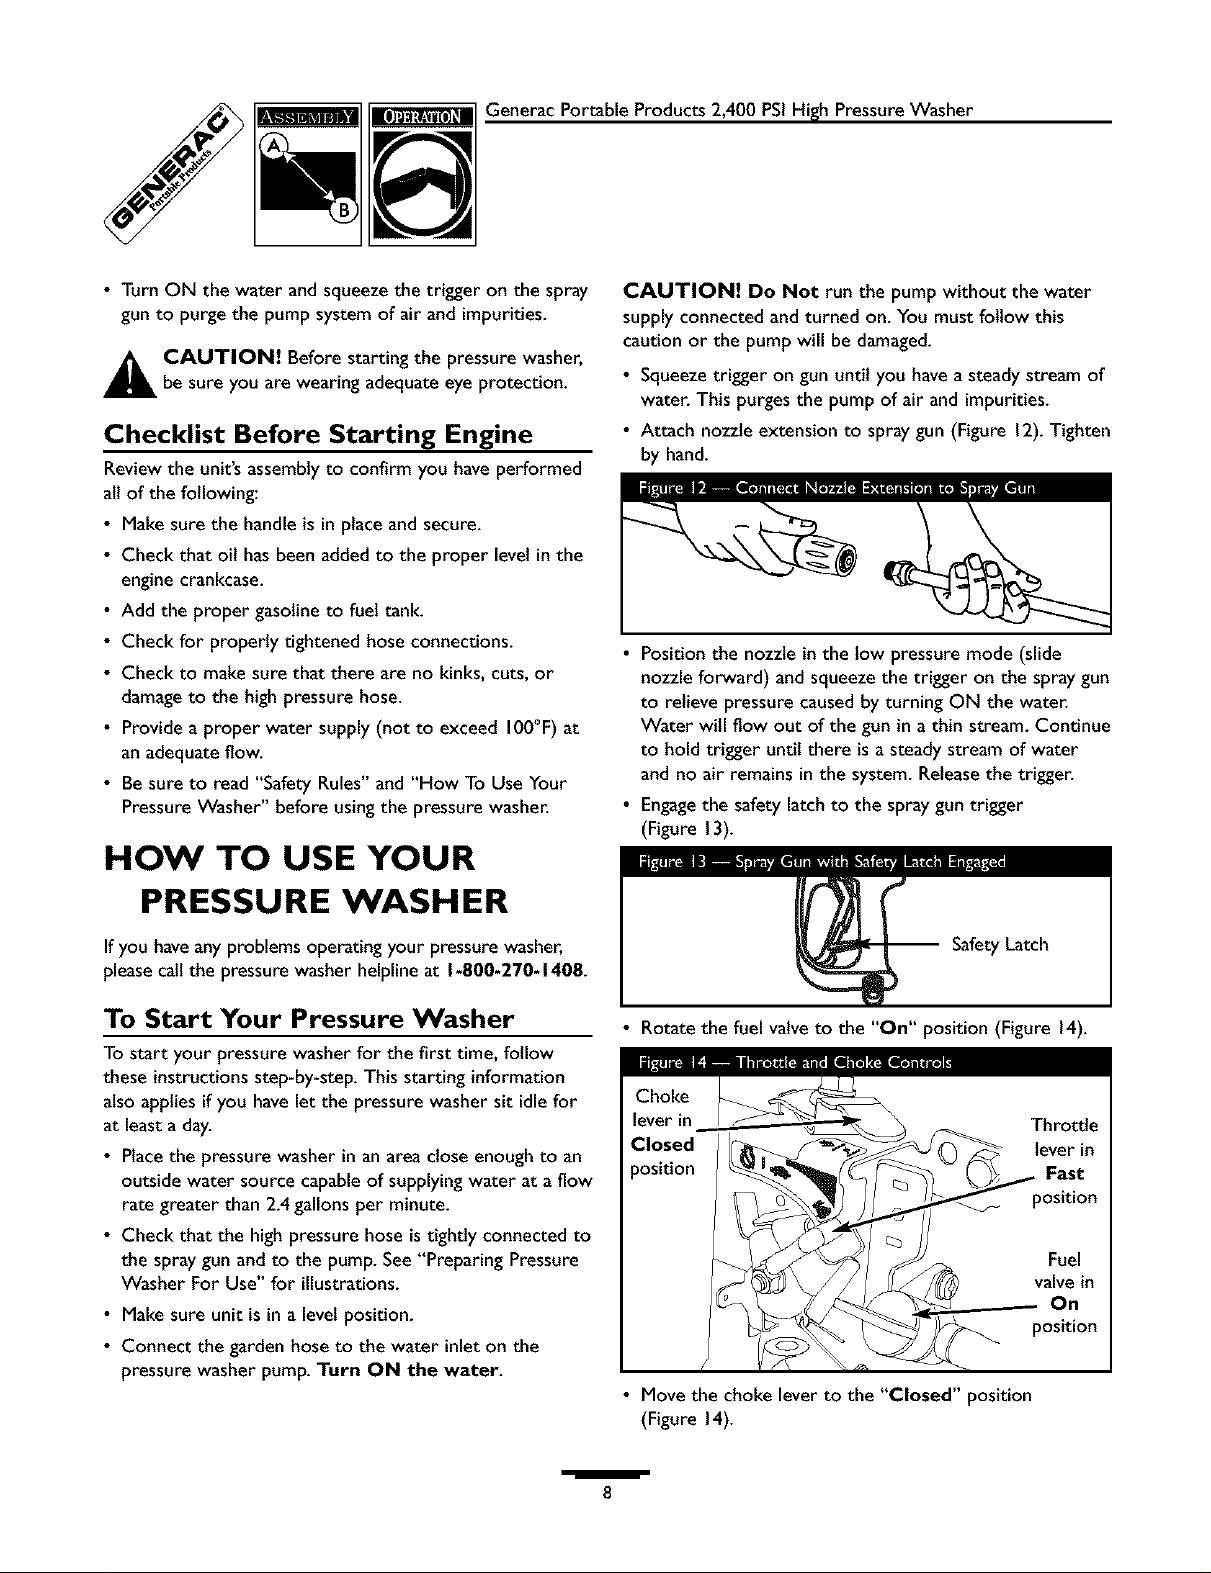
• Placethehandleontothehandlesupportsalready
connectedto themainunit.Makesuretheholesinthe
handlealignwiththeholesonthehandlesupports
(Figure2).
Align
Hol_
Handle
Supports
• Tilt the unit up by the handle and attach the metal clip to
the rib on the left underside of the accessory tray
(Figure 6). Slide the chemical hose through the metal clip
so that it is tight but not kinked.
NOTE: It may be necessaryto move the handle supports
from sideto side in order to align the handle so it will slide
over the handle supports.
• Insert the carriage bolt through the holes from the
outside of the unit and attach a plastic knob from the
inside of the unit. Tighten by hand (Figure 3).
Q
• Insert the "J"hook into the second from the left slot in
the accessorytray (Figure 4).
Add Engine Oil
IMPORTANT: Any attempt to crank or start the engine
before it hasbeen properly serviced with the
recommended oil may result in anengine failure.
• Placepressure washer on a levelsurface.
• Refer to the engine owners manual to add recommended
oil to engine.
NOTE: Check oil often during engine break-in. Refer to
engine owner's manual for recommendations.
Add Gasoline
• Pinchthe chemical hose that comes out of a hole in the
unit's baseand slide it into the metal clip, as shown in
Figure5.
/
_hL WARNING! Never fill fuel tank indoors. Never
fill fuel tank when engine is running or hot. Do Not
smoke when filling fuel tank.
_hL WARNING! Never fill fuel tank completely full.
Provide space for fuel expansion. Wipe away any fuel
spillage from engine and equipment before starting.
6

GeneracPortableProducts2,400PSIHighPressureWasher
• Usefresh,cleanunleadedautomotive gasolineand store in
approved, clean, covered containers. Use cleanfill
funnels. Never use"stale" gasoline left over from last
season or gasolinestored for long periods.
• Clean areaaround fuel fill cap,remove cap.
• Slowly add gasoline to fuel tank. Use a funnel to prevent
spillage. Fill tank to "Fuel Level Mark" (Figure 7).
_MAX_ / _
_ _.- i_ FUEL L_WL
• Attach the hose to the baseof the spray gun (Figure 10).
Tighten by hand.
Connect High Pressure
Hose Here
• Install fuel cap and wipe up any spilled gasoline.
Connect Hose and Water Supply to
Pump
IMPORTANT: Youmust attach all hosesbefore you start
the engine.Starting enginewithout all hoses connectedand
water supplied will damagethe pump.
NOTE: Your pressure washer comes with a quick connect
that you can use to attach the high pressure hose to either
the pump or spraygun.
• Uncoil the high pressure hose and attach the female
quick connect to one end of the hose. Attach the male
quick connect to the high pressurefitting on the pump
(Figure 8).
Attach the other end of the highpressure hose to the
high pressure outlet on the pump (Figure 9). Pull down
on the collar of the quick connect,slide onto the pump
and let go of collar. Pull on hose to be sure of a tight
connection.
• Before you connectyour garden hoseto the water inlet,
inspectthe inlet screen (Figure I I). Clean the screen if it
containsdebris, replace it if it is damaged.DO NOT RUN
THE PRESSUREWASHER IFTHE SCREENIS DAMAGED.
NEVERSIPHON INLET WATER.
• Run water through the garden hosefor 30 secondsto
cleanout any debris. Turn off water.
• Connect the garden hose to the water inlet. Tighten by
hand (Figure II).
CAUTION! There MUST be at least ten feet of
unrestricted garden hose between the pressure washer
inlet and any flow shut off device, such as a 'Y' shut-off
connector or other convenience-type water shut-off valve.
Damageto pressure washer resulting from disregarding this
caution will not be covered by the warranty.
/
7
Generac Portable Products 2,400 PSIHigh PressureWasher
• Turn ON the water and squeezethe trigger on the spray
gun to purge the pump system of air and impurities.
A AUTION! Before starting the pressure washer,
be sure you are wearing adequate eye protection.
Checklist Before Starting Engine
Reviewthe unit's assemblyto confirm you have performed
all of the following:
• Make sure the handle is in place and secure.
• Check that oil hasbeen addedto the proper level in the
engine crankcase.
• Add the proper gasolineto fuel tank.
• Check for properly tightened hose connections.
• Check to make sure that there are no kinks, cuts, or
damageto the high pressure hose.
• Provide a proper water supply(not to exceed 100°F)at
an adequate flow.
• Be sure to read "Safety Rules" and "How To Use Your
PressureWasher" before usingthe pressure washer.
HOW TO USE YOUR
CAUTION! Do Not run the pump without the water
supply connected and turned on. You must follow this
caution or the pump will be damaged.
• Squeezetrigger on gun until you have a steady stream of
water. This purges the pump of air and impurities.
• Attach nozzle extension to spray gun (Figure 12).Tighten
by hand.
• Position the nozzle inthe tow pressure mode (slide
nozzle forward) and squeezethe trigger on the spray gun
to relieve pressure causedby turning ON the water.
Water will flow out of the gun in a thin stream. Continue
to hold trigger until there is a steady stream of water
and no air remains in the system. Releasethe trigger.
• Engagethe safety latch to the spray guntrigger
(Figure 13).
PRESSURE WASH ER
If you haveanyproblems operating your pressurewasher,
pleasecall the pressure washer helpline at 1-800-270-1408.
To Start Your Pressure Washer
To start your pressure washer for the first time, follow
these instructions step-by-step. This starting information
also applies if you havelet the pressure washer sit idle for
at least a day.
• Placethe pressure washer in an area close enough to an
outside water source capableof supplying water at a flow
rate greater than 2.4gallons per minute.
• Check that the high pressure hose is tightly connected to
the spraygun and to the pump. See"Preparing Pressure
Washer For Use" for illustrations.
• Make sure unit isin a level position.
• Connect the garden hose to the water inleton the
pressure washer pump. Turn ON the water.
/
SafetyLatch
• Rotate the fuel valveto the "On" position (Figure 14).
• Move the choke lever to the "Closed" position
(Figure 14).
8
GeneracPortableProducts2,400PSIHighPressureWasher
NOTE: For a warm engine, be sure the choke lever isin
the "Open" position.
• Move the throttle leverto the "Fast" position, shown
on the engine as a rabbit (Figure 14).
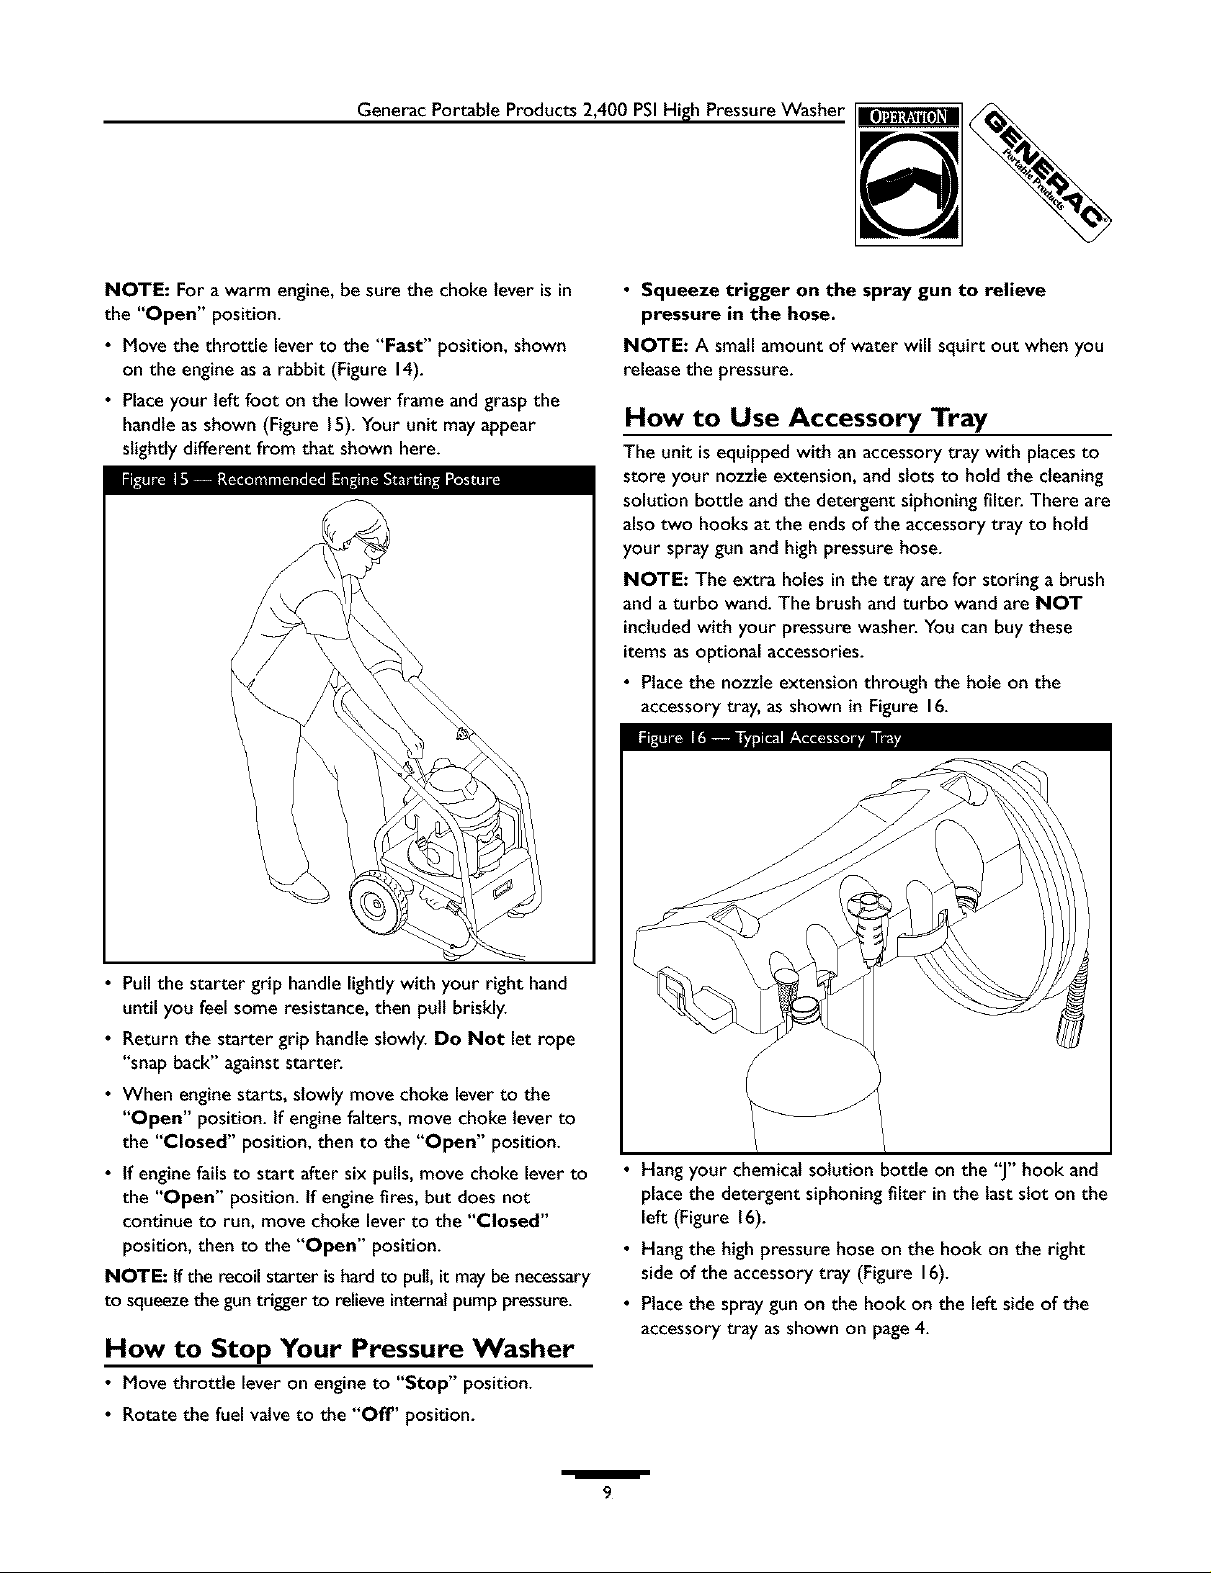
• Placeyour left foot on the lower frame andgrasp the
handle as shown (Figure 15).Your unit mayappear
slightly different from that shown here.
• Squeeze trigger on the spray gun to relieve
pressure in the hose.
NOTE: A small amount of water will squirt out when you
releasethe pressure.
How to Use Accessory Tray
The unit isequipped with an accessorytray with placesto
store your nozzle extension, and slots to hold the cleaning
solution bottle and the detergent siphoning filter. There are
also two hooks at the ends of the accessory tray to hold
your spray gunand highpressure hose.
NOTE: The extra holes in the tray are for storing abrush
and a turbo wand. The brush and turbo wand are NOT
included with your pressure washer. You can buy these
items asoptional accessories.
• Placethe nozzle extension through the hole on the
accessory tray, asshown in Figure 16.
• Pullthe starter grip handle lightly with your right hand
untilyou feel some resistance,then pull briskly.
• Return the starter grip handle slowly. Do Not let rope
"snap back" againststarter.
• When engine starts, slowly move choke lever to the
"Open" position. If enginefalters, move choke lever to
the "Closed" position, then to the "Open" position.
• If engine failsto start after six pulls, move choke lever to
the "Open" position. If engine fires, but does not
continue to run, move choke leverto the "Closed"
position, then to the "Open" position.
NOTE: If the recoil starter is hard to pull,it maybe necessary
to squeezethe gun trigger to relieveinternalpump pressure.
How to Stop Your Pressure Washer
• Move throttle lever on engine to "Stop" position.
• Rotate the fuel valveto the "Off" position.
/
Hang your chemical solution bottle on the "J" hook and
place the detergent siphoning filter in the last slot on the
left (Figure 16).
• Hang the high pressure hose on the hook on the right
side of the accessory tray (Figure 16).
• Placethe spray gun on the hook on the left side of the
accessory tray as shown on page4.
9
Generac Portable Products 2,400 PSIHigh PressureWasher
How to Use the Adjustable Nozzle
You now should know how to START your pressure
washer and how to STOP it. The informationin this
section will tell you how to adjust the spray pattern and
apply detergent or other cleaning chemicals.
A AUTION! Never adjust spray pattern when
spraying.Never put handsin front of nozzle to
adjust spray pattern.
The adjustable nozzle affixed to the nozzle extension
permits you to adjust the spray pattern and the spray
pressure, asfollows:
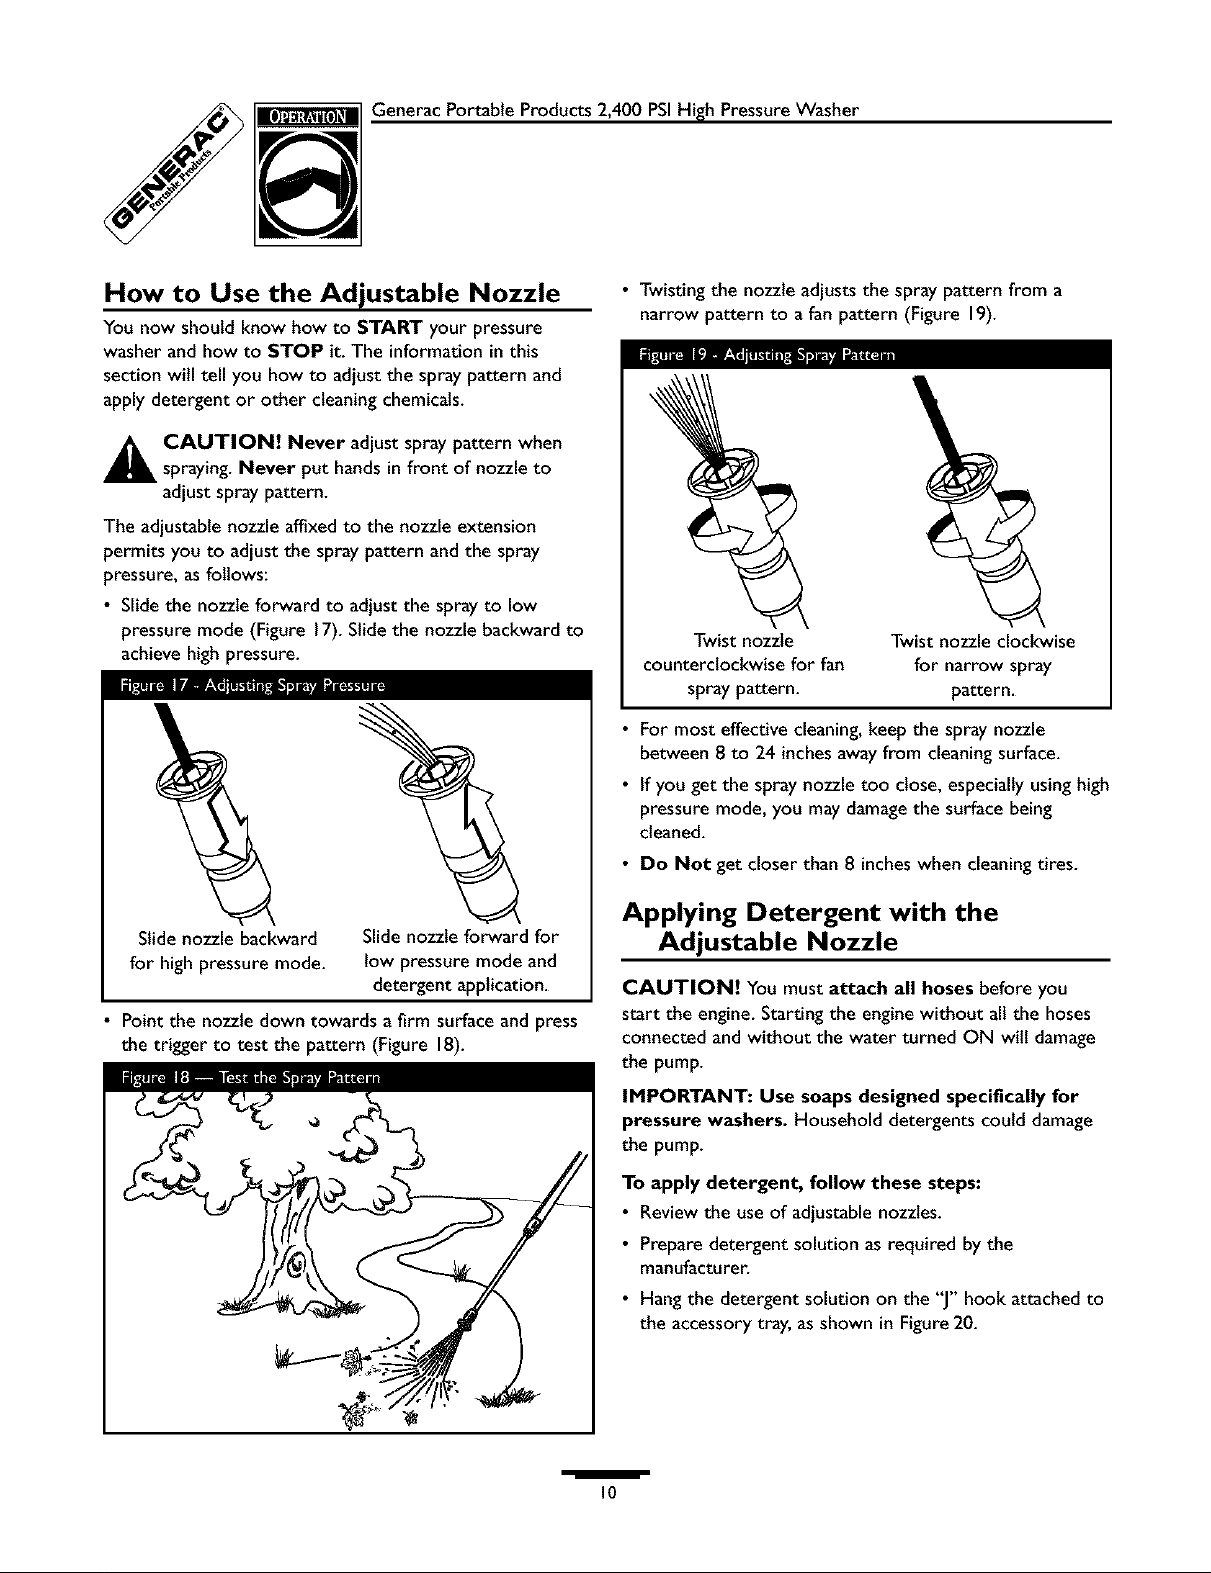
• Slidethe nozzle forward to adjust the sprayto low
pressure mode (Figure 17).Slidethe nozzle backward to
achieve high pressure.
i ilfB_-_/lU
• Twisting the nozzle adjusts the spray pattern from a
narrow pattern to afan pattern (Figure 19).
Twist nozzle
counterclockwisefor fan
spray pattern.
• For most effective cleaning, keep the spray nozzle
between 8 to 24 inchesaway from cleaningsurface.
• Ifyou get the spray nozzle too close, especially usinghigh
pressure mode, you may damagethe surface being
cleaned.
• Do Not get closer than 8 inches when cleaning tires.
Twist nozzle clockwise
for narrow spray
pattern.
Slide nozzle backward
for high pressure mode.
• Point the nozzle down towards a firm surface and press
the trigger to test the pattern (Figure 18).
Slide nozzle forward for
low pressure mode and
detergent application.
i
Applying Detergent with the
Adjustable Nozzle
CAUTION! You must attach all hoses before you
start the engine. Starting the enginewithout all the hoses
connected and without the water turned ON will damage
the pump.
IMPORTANT: Use soaps designed specifically for
pressure washers. Household detergentscould damage
the pump.
To apply detergent, follow these steps:
• Reviewthe useof adjustable nozzles.
• Preparedetergent solution asrequired by the
manufacturer.
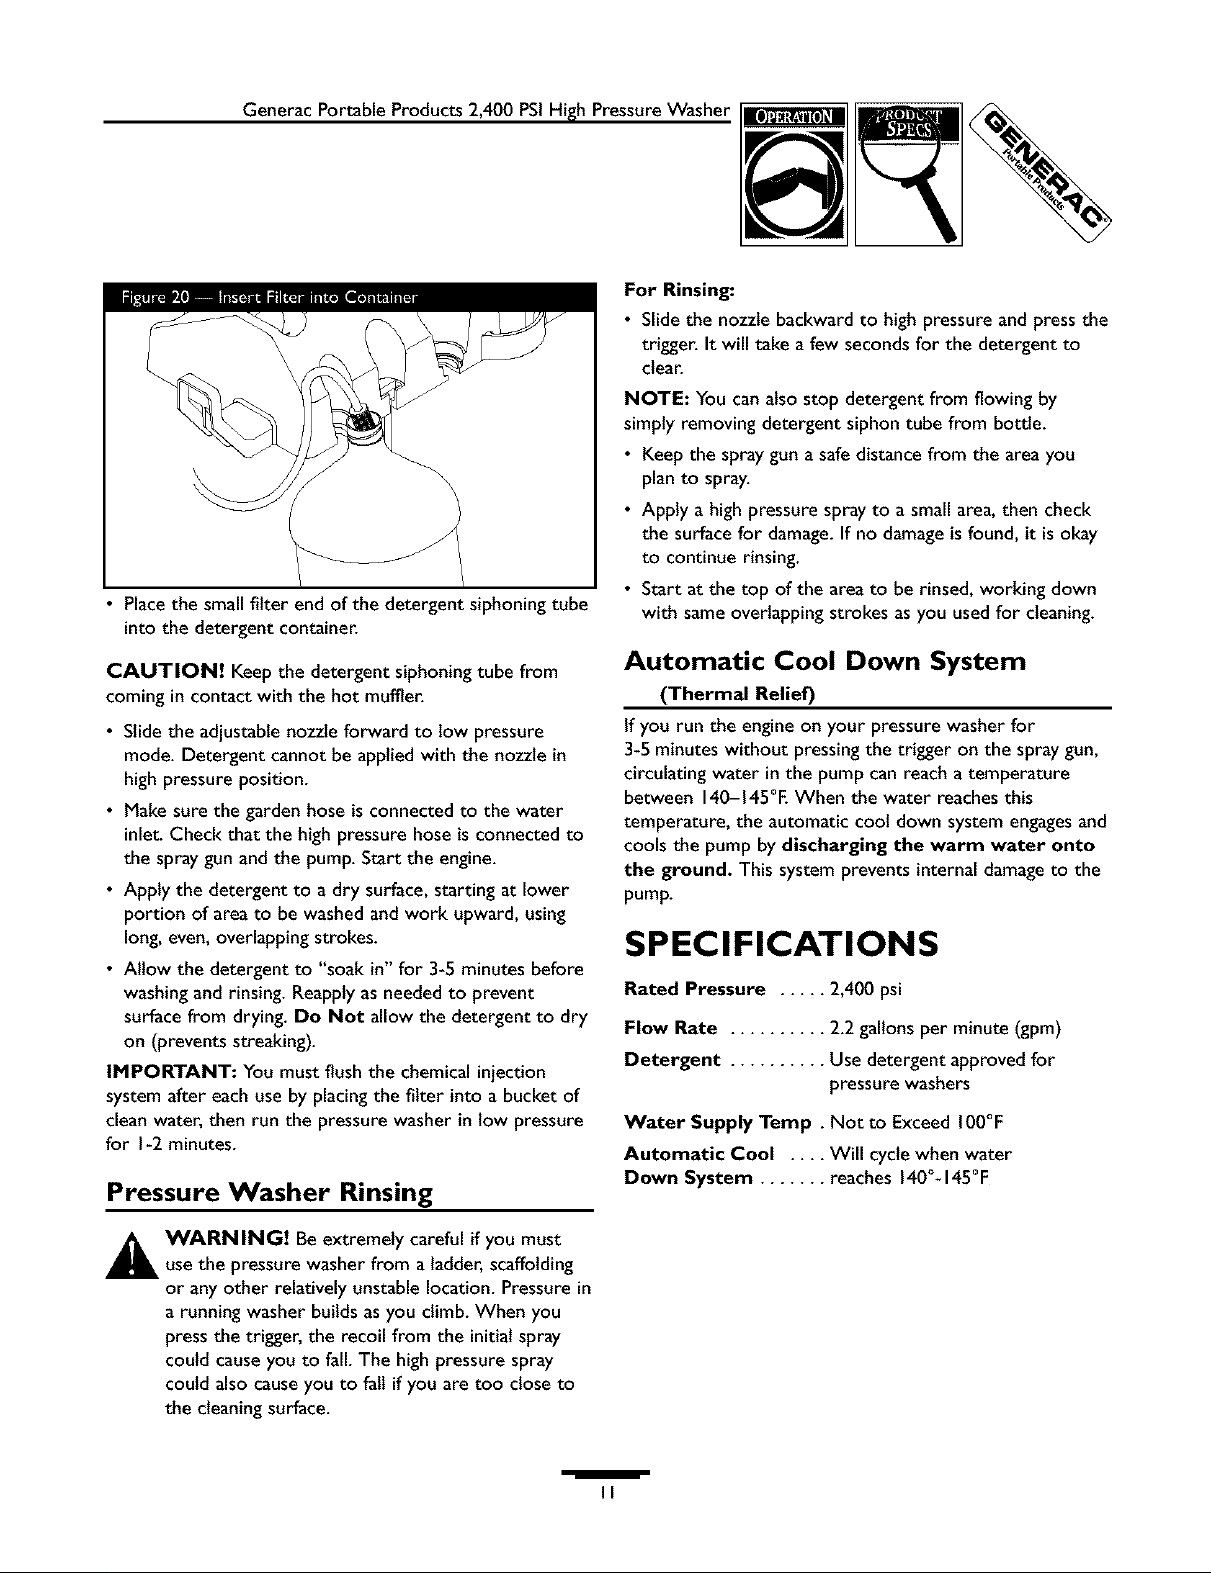
• Hangthe detergent solution on the "J" hook attached to
the accessory tray, asshown in Figure20.
10
Generac Portable Products 2,400 PSIHigh PressureWasher
• Placethe small filter end of the detergent siphoning tube
into the detergent container.
For Rinsing:
• Slide the nozzle backward to high pressure and press the
trigger. It will take afew secondsfor the detergent to
clear.
NOTE: You canalso stop detergent from flowing by
simply removing detergent siphon tube from bottle.
• Keepthe spray gun a safedistance from the area you
plan to spray.
• Apply a high pressure spray to a smallarea,then check
the surface for damage. If no damageis found, it isokay
to continuerinsing.
• Start at the top of the area to be rinsed, working down
with same overlapping strokes asyou usedfor cleaning.
CAUTION! Keep the detergent siphoning tube from
coming in contact with the hot muffler.
• Slide the adjustable nozzleforward to low pressure
mode. Detergent cannot be applied with the nozzle in
high pressure position.
• Makesure the garden hose isconnected to the water
inlet.Check that the high pressure hose isconnected to
the spraygun and the pump. Start the engine.
• Apply the detergent to a dry surface, starting at lower
portion of area to be washed and work upward, using
long, even, overlapping strokes.
• Allow the detergent to "soak in" for 3-5 minutes before
washing and rinsing. Reapplyasneeded to prevent
surface from drying. Do Not allow the detergent to dry
on (prevents streaking).
IMPORTANT: You must flush the chemical injection
system after each use by placing the filter into a bucket of
clean water, then run the pressurewasher in low pressure
for I-2 minutes.
Pressure Washer Rinsing
Automatic Cool Down System
(Thermal Relief)
If you run the engine on your pressure washer for
3-5 minutes without pressingthe trigger on the spray gun,
circulating water in the pump can reach a temperature
between 140-145°E When the water reachesthis
temperature, the automatic cool down system engagesand
cools the pump by discharging the warm water onto
the ground. This system prevents internal damageto the
pump.
SPECIFICATIONS
Rated Pressure ..... 2,400 psi
Flow Rate .......... 2.2 gallons per minute (gpm)
Detergent .......... Use detergent approved for
pressure washers
Water Supply Ternp. Not to Exceed 100°F
Automatic Cool .... Will cycle when water
Down System ....... reaches 140°- 145°F
_, ARNING! Be extremely careful if you must
use the pressure washer from a ladder, scaffolding
or anyother relatively unstable location. Pressure in
a running washer builds as you climb. When you
press the trigger, the recoil from the initialspray
could causeyou to fall. The high pressure spray
could alsocauseyou to fall ifyou are too close to
the cleaningsurface.
mm_m
II
 Loading...