

Page 1
GENERAC _
0
erator'sIVianual
I
Page 2

introduction.............................................................1
Safety Rules...........................................................1
SafetySymbols and Meanings.......................................1
Generalinformation................................................4
KnowYourPowerWasher.........................................................4
ProductSpecifications..............................................................5
EmissionsInformation..............................................................5
HighAltitudeOperation..............................................................5
Unpacking.................................................................................6
Set-up.....................................................................6
Assembly..................................................................................6
Add EngineOil..........................................................................7
Add Fuel...................................................................................7
ConnectHoseand WaterSupplyto Pump.................................8
How to Use Nozzles..................................................................9
CleaningandApplying Detergent..................................10
PowerWasherRinsing.................................................11
CleaningDetergentSiphoningTube...............................11
Operation..............................................................12
Operation................................................................................12
PowerWasherLocation..........................................................12
ChecklistBefore StartingEngine..............................................12
How to Start YourPowerWasher............................................12
AutomaticCoolDown System (ThermalRelief).......................14
How to Stop YourPowerWasher.............................................14
Maintenance.........................................................14
MaintenanceRecommendations..............................................14
MaintenanceSchedule............................................................15
PumpOil.................................................................................15
EmissionsControl...................................................................15
PowerWasherMaintenance....................................................15
Checkand CleanInletScreen..................................................15
CheckHigh PressureHoses....................................................15
CheckDetergentSiphoningTube.............................................15
CheckSpray Gun....................................................................15
NozzleMaintenance................................................................15
EngineMaintenance................................................................16
EngineOil Recommendations..................................................16
CheckOil Level............................................................17
AddingEngineOil.........................................................17
ChangingEngineOil.....................................................17
ServiceAir Cleaner.................................................................18
ServiceSparkPlug..................................................................18
InspectMufflerand SparkArrestor..........................................18
RemoveSparkArresterScreen.....................................18
After EachUse........................................................................19
WinterStorage........................................................................19
LongTermStorage..................................................................20
ProtectFuelSystem.....................................................20
ProtectEngine..............................................................20
ChangeOil...................................................................20
Protectingthe Pump.....................................................20
OtherStorageInstructions.......................................................20
Transporting/Tippingofthe Unit..............................................20
Troubleshooting....................................................21
TroubleshootingGuide.............................................................21
Manueldel propietario..........................................23
Manueld'entretien................................................47
Page 3
iNTRODUCTION
Thank you for purchasing this power washer manufactured by
GeneracPower Systems, Inc.This modelis a high performance,
air-cooled, engine-driven power washer that operates between
2500 and 3100 psi dependingon which model you purchased.
The units feature custom designed wheels, axial cam pump
with stainless steel pistons, automatic cool down system, quick
connect nozzles,high pressure hose, detergentsiphoning hose
and chemicaltank(s) dependingon unit model.
Commonsenseandstrictcompliancewiththespecialinstructions
are essentialto preventingaccidents. The operatormust read
this manual and thoroughly understand all of the instructions
and warnings before usingthe equipment.If any portion of the
manualis not understood,contact the nearestAuthorizedDealer
for starting, operating and servicing procedures.The owner is
responsiblefor properandsafe use of the equipment.
Thepowerwashercanoperatesafely,efficientlyandreliablyonly if
it is properlylocated,operatedand maintained. Beforeoperating,
servicingor storing:
• Studyall warnings in this manualand on the productcarefully.
• Becomefamiliar with this manual andthe unit beforeuse.
• Referto theAssemblysection of the manualfor instructionson
final assembly procedures.Followthe instructions completely.
Themanufacturercannot anticipateevery possible circumstance
that might involvea hazard.The warnings in this manual,and on
tags and decals affixedto the unit are,therefore,not all inclusive.
If usingaprocedure,workmethodoroperatingtechniquethat the
manufacturerdoes not specifically recommend,ensurethat it is
safe for others. Also makesure the procedure,work methodor
operatingtechnique utilized does not renderthe power washer
unsafe.
THE INFORMATIONCONTAINEDHEREIN WAS BASED ON
MACHINESIN PRODUCTIONAT THE TIME OF PUBLICATION.
GENERACRESERVESTHERIGHTTO MODIFYTHIS MANUALAT
ANYTIME.
Save these instructionsfor future reference. If you loan this
device to someone,ALWAYSloan these instructionsAND the
Owner's Manualto the individualas well.
WHERETOFiNDUS
You can contact GeneracCustomerService by phoneat 1-888-
436-3722, or on the internet at www.generac.com.Record the
important information of the unit in the following chart for future
referenceand/orservice inquiries.
SAFETYRULES
Throughout this publication, and on tags and decals affixed to
the power washer, DANGER,WARNING,CAUTIONand NOTE
blocks are used to alert personnelto special instructions about
a particular operation that may be hazardous if performed
incorrectly or carelessly.Observethemcarefully.Theirdefinitions
areas follows:
Indicatesa hazardoussituationor action which,if notavoided,
will resultin death or seriousinjury.
Indicatesa hazardoussituationor actionwhich, if not avoided,
couldresultin deathor seriousinjury.
ACAUTION!
Indicatesa hazardoussituationor actionwhich, if not avoided,
couldresultin minoror moderateinjury.
NOTE:
Notescontainadditional informationimportanttoa procedure
and will be found withinthe regulartextbody of thismanual.
These safety warnings cannot eliminate the hazardsthat they
indicate. Common sense and strict compliancewith the special
instructionswhile performingtheaction or serviceareessentialto
preventingaccidents.
SAFETYSYMBOLSANDMEAN/NGS
ToxicFumes Kickback ElectricalShock
Slippery Surface Fall Fluid injection
D
Fire
Explosion Operator's Manual
ModelNumber
Serial Number
DatePurchased
MovingParts
Flying Objects Hot Surface
Page 4

,_ DANGER:CarbonmonoxideproducedduringuseCANKiLL
inminutes.NEVERuseindoors,ina vehicle,orinother
shelteredareas,EVENiFdoorsandwindowsareopen.Only
useOUTSIDEandfarawayfrom windows,doorsandvents.
Somechemicalsor detergents may beharmfulif inhaled
oringested,causingseverenausea, fainting, or poisoning.
• Operatepower washer ONLYoutdoors.
• A runningenginegivesoff carbon monoxide.
• Carbonmonoxideis an odorless,colorless, poisonousgas.
Breathingcarbonmonoxidecan causeheadache,fatigue,
dizziness,vomiting, confusion,seizures,nausea,fainting
or death.If you start experiencingany of these symptoms,
IMMEDIATELYmoveto fresh air. Seekmedicalattention.
• Keep exhaustgasfrom enteringa confined areathrough
windows, doors, ventilationintakes,or other openings.Warnany
occupantsinside aboutthe symptoms of carbon monoxideso
they know to move to fresh air if they beginto feel ill.
• The use of a carbon monoxidedetector insideany occupied
premisesbetweenthe powerwasher andthe occupant is
recommended.
• NEVERstart or run engineindoors,in a vehicle, or in an
enclosedarea, EVENIFwindows anddoors are open.
• Use a respiratoror maskwheneverthere is a chancethat
harmful gas or vapors may beinhaled.
• Readall instructions with respiratoror mask so you arecertain
the respiratoror mask will providethe necessaryprotection
againstinhalingharmful gasor vapors. Ifyou beginto
experienceany ofthe COsymptoms listedabove,IMMEDIATELY
moveto fresh air.
,_DANGER: spray gun people, or
electrical devices. Serious injury or deathwill result.
ALWAYSpointspraygunin safedirection, squeezespraygun
trigger to release highpressure,every time you stopengine.
Engagetrigger lockwhen not inuse.
,_ produces cancut through skin andits underlyingtissues,leadingto serious injury,possible amputationor death.
• NEVERallow CHILDRENto operatepowerwasher or playnearby.
This is NOTa toy.
• NEVERrepairhigh pressure hose. Replaceit.
• NEVERrepairleaking connectionswith sealantof any kind.
Replaceo-ring or seal.
• NEVERconnecthigh pressurehoseto nozzleextension.
• Keep high pressurehose connectedto pump andspray gun
while system is pressurized.
• NEVERsecurespray gun in openposition.
• NEVERleavespraygun unattendedwhile machineis running.
• NEVERusea spray gun which does not haveatrigger lock or
triggerguard in placeandin working order.
• ALWAYSbe certain spraygun, nozzlesand accessoriesare
correctly attached.
NEVERaim at
• The highpressurestream ofwater that this equipment
Spray guntraps high water pressure,EVENWHENengine
is stoppedandwater is disconnected,which can cause
injury.
animals,
,_WARNING: Riskofelectrocution.
burn.
'_ Contactwithpowersourcecancauseelectricshockor
• NEVERspraynearpower source.
,_WARNING: Contactwith muffler area can result in serious
burns. Exhaustheat/gasescanignitecombustibles,
structuresor damage fuel tank causing a fire.
• DONOTtouch hot parts and AVOIDhot exhaustgases.
• Allow equipmentto cool beforetouching.
• Keepat leastfive (5) feet (152 cm) of clearanceon all
sidesof powerwasherincluding overhead.
• It is a violation of CaliforniaPublicResourceCode,Section
4442, to use or operatethe engineon anyforest-covered,
brush-covered,or grass-coveredland unlessthe exhaust
systemis equippedwith aspark arrester,as definedin
Section4442, maintainedin effectiveworking order.Other
statesor federaljurisdictions may havesimilar laws.
Contactthe original equipmentmanufacturer,retailer,or dealerto
obtaina sparkarrester designedfor the exhaustsystem installed
onthis engine.
• Replacementparts must bethe same and installedin the same
position as the originalparts.
,_ WARNING:Fuel and its vaporsare extremelyflammable and
explosive. Fire or explosion cancausesevere burns or death.
WHENADDINGDR DRAININGFUEL
• Turnpower washerOFFand let it cool atleast two (2)
minutes beforeremovingfuel cap. Loosencap slowly to
relievepressurein tank.
_j_ • Fill ordrainfuel tank outdoors.
WHENSTARTINGEQUIPMENT
WHENOPERATINGEQUIPMENT
WHENTRANSPORTINGORREPAIRINGEQUIPMENT
WHENSTORINGFUELDREQUIPMENTWITH FUELiN TANK
• DONOToverfill tank. Allow spacefor fuel expansion.
• If fuel spills, wait until it evaporatesbeforestarting
engine.
• Keepfuel awayfrom sparks, openflames,pilot lights, heat, and
other ignitionsources.
• DONOTfighta cigaretteor smoke.
• Ensuresparkplug, muffler,fuel cap, andair cleanerare in place.
• DONOTcrank enginewith spark plug removed.
• DONOTtip engineor equipment at anglewhich causesfuel to
spill.
• DONOTsprayflammable liquids.
• Transport/repairwith fuel tank EMPTYor withfuel shutoff valve
OFF.
• Disconnect sparkplug wire.
• Store away from furnaces, stoves,water heaters,clothes dryers,
or otherappliancesthat havepilot light or otherignition source
becausetheycan ignitefuel vapors.
Page 5

_ll WARNING:Useofpowerwashercancreatepuddlesand
slipperysurfaces.Kickbackfromsprayguncancauseyouto
fall.
Useonly on a levelsurface.
The cleaning area should have adequate slopes and
drainageto reducethe possibility of afall due to slippery
surfaces.
Donot useon elevatedsurfaceswhere chanceof kickback
could resultin a seriousfall.
®
Firmlygrasp spraygun with both handswhen using high
pressure spray to avoid injury when spray gun kicks
back.
,AWARNING: Starter and otherrotatingpartscan
entangle hands,hair,clothing,or accessories.
or covers.
• NEVERoperatepowerwasherwithoutprotectivehousing
• DONOTwearlooseclothing,jewelryoranythingthat
maybecaughtinthestarterorotherrotatingparts.
• Tieuplonghairandremovejewelry.
_ll ARNING:Starter cordkickback(rapid retraction) can result
in bodilyinjury.Kickbackwill pull handand arm toward
engine faster than you can let go. Brokenbones,fractures,
bruises,or sprains couldresult.
• NEVERpull starter cord withoutfirst relievingspraygun
_. pressure.
• To relievetrappedpressure, point gunin safe directionand
releasepressureby pulling/actuatingtrigger on spraygun.
• Whenstarting engine, pull cord slowly until resistanceis felt and
then pull rapidlyto avoidkickback.
• After eachstarting attempt,where enginefails to run, always
pointspray gun in safedirection, and squeezespray gun trigger
to releasehigh pressure.
• Firmly grasp spraygun with both handswhen using high
pressuresprayto avoid injurywhen spraygunkicks back.
_ll ARNING:Unintentionalsparking canresult in fire or electric
shock.
WHENADJUSTINGORMAKINGREPAIRSTO YOURPOWER
WASHER.
• Disconnectthe sparkplug wire from the spark plug and
place the wire whereit cannotcontact sparkplug.
• Useapprovedsparkplug tester.
_$ WHENTESTINGFORENGINESPARK
• DONOTcheck for spark with spark plug removed.
,,I_WARNING: The engine exhaust from this productcontains
chemicalsknownto the State ofCaliforniato causecancer,
birthdefects, or otherreproductive harm.
,,I_WARNING: This containslead and lead
knownto the State of Californiato causebirth defects or
otherreproductive harm.Wash your handsafter handlingthis
product.
product compounds,
NOTE:
Highpressurespraymay damage fragile itemsincluding
glass.
DO NOTpoint spray gun at glasswhen using red (0°) MAX
nozzle.
NEVERaim spray gun at people,animals,electricaldevicesor
plants.
NOTE:
Impropertreatmentof powerwashercan damageit and
shortenits life.
• If you havequestionsaboutintendeduse,ask dealeror contact
qualifiedservice center.
• NEVERoperateunits with brokenor missing parts, or without
protectivehousingor covers.
• DONOTby-passanysafetydeviceonthismachine.
• DONOToperatepowerwasheraboveratedpressure.
• DONOTmodify power washerin anyway.
• Beforestartingpowerwasherincold weather,checkallparts of
the equipmentto be sure icehas notformed there.
• NEVERmovemachinebypullingon hoses.Usehandleprovided
on unit.
• Checkfuel system for leaksor signsof deterioration,such as
chafed or spongy hose, looseormissing clamps, or damaged
tank or cap. Correctall defectsbefore operatingpowerwasher.
• Thisequipmentisdesignedto be usedwith Generacauthorized
parts ONLY.If equipment is used with parts that DO NOT
comply with minimum specifications, user assumes all risks
and liabilities.
CALIFORNIAPROPOSiTiON55 WARNING
Engineexhaustandsomeof its constituentsareknown
to the Stateof Californiato causecancer,birth defects
andotherreproductiveharm.
,A WARNING:Risk of eye injury.Spray cansplash backor
propelobjects.
0 • Always wearsafetygoggleswhen using this equipmentor
•. in vicinity of where equipmentis in use.
• Beforestartingthepower washer,be sureyou are
wearing adequatesafetygoggles.
• NEVERsubstitute safety glassesfor safety goggles.
CAUFORNIAPROPOSITION55 WARNING
This productcontainsor emits chemicalsknown tothe
Stateof Californiato causecancer,birth defectsand
otherreproductiveharm.
Page 6
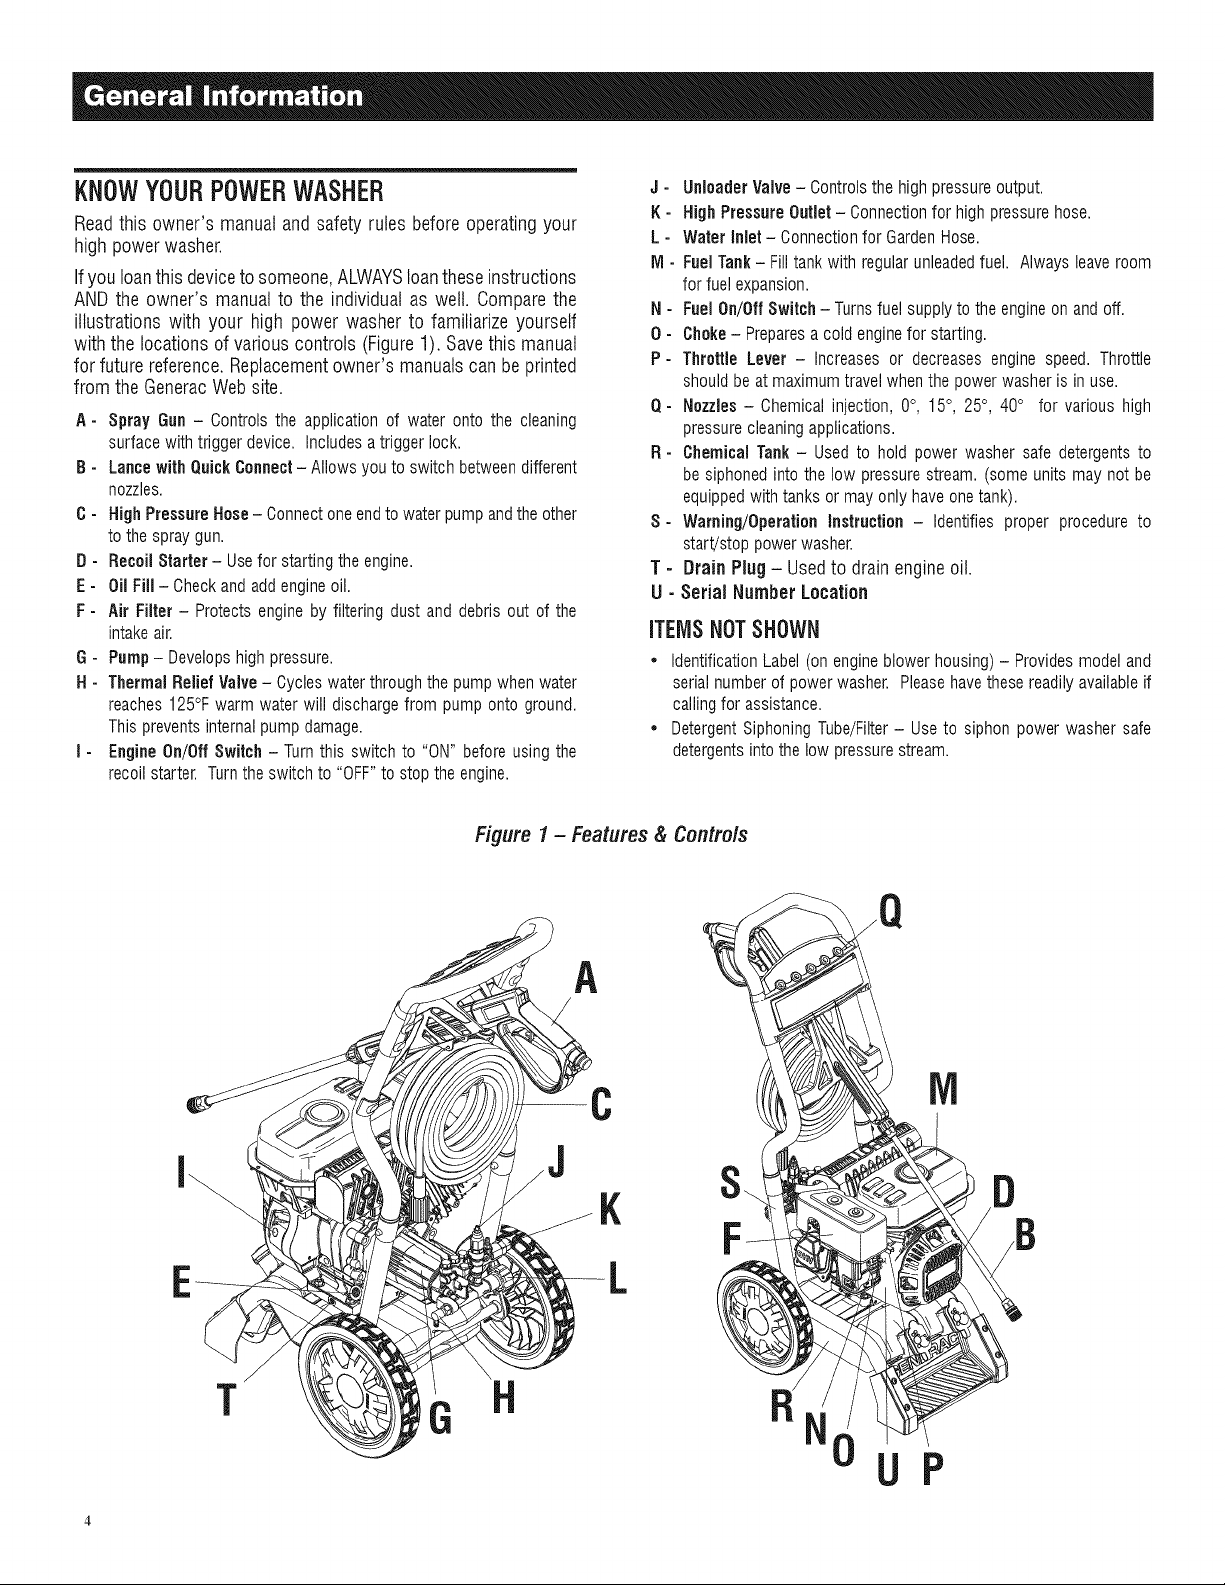
KNOWYOURPOWERWASHER
Readthis owner's manualand safety rules beforeoperatingyour
high powerwasher.
Ifyou loanthis deviceto someone,ALWAYSloantheseinstructions
ANDthe owner's manualto the individualas well. Comparethe
illustrations with your high power washer to familiarize yourself
with the locations of variouscontrols (Figure1). Savethismanual
for future reference.Replacementowner's manualscan beprinted
from the GeneracWebsite.
A- Spray Gun- Controls the application of water onto the cleaning
surface withtrigger device. Includesatrigger lock.
B- LancewithQuickConnect- Allows you to switch betweendifferent
nozzles.
C- HighPressure Hose - Connectone endto waterpumpandthe other
to the spraygun.
D - Recoil Starter - Usefor starting the engine.
E- Oil Fill - Checkand add engineoil.
F - Air Filter - Protects engine by filtering dust and debris out of the
intakeair.
G - Pump- Developshigh pressure.
H - Thermal Relief Valve- Cycleswater through the pump when water
reaches125°F warm water will dischargefrom pump onto ground.
This preventsinternal pump damage.
I - Engine On/Off Switch - Turnthis switch to "ON" before using the
recoil starter. Turn theswitch to "OFF"to stop the engine.
J - UnloaderValve- Controlsthe highpressureoutput.
K- High Pressure Outlet- Connectionfor high pressure hose.
L - Water Inlet - Connectionfor GardenHose.
M - FuelTank- Filltankwith regularunleadedfuel. Always leaveroom
forfuel expansion.
N - Fuel On/OffSwitch - Turnsfuel supply to the engineon and off.
O - Choke- Preparesacold enginefor starting.
P- Throttle Lever - Increases or decreases engine speed. Throttle
shouldbe at maximumtravel whenthe powerwasher is inuse.
Q- Nozzles - Chemical injection, 0°, 15°, 25°, 40° for various high
pressurecleaningapplications.
R- Chemical Tank- Used to hold power washer safe detergents to
be siphonedinto the low pressurestream. (some units may not be
equippedwith tanks or may only have onetank).
S- Warning/OperationInstruction - Identifies proper procedure to
start!stop powerwasher.
T - Brain Plug - Used to drain engine oil.
U - Serial Number Location
ITEMSNOTSHOWN
• IdentificationLabel (on engineblower housing)- Providesmodel and
serial numberof power washer. Pleasehavethese readilyavailableif
callingfor assistance.
• DetergentSiphoning Tube/Filter- Use to siphon power washer safe
detergentsinto the low pressurestream.
T
Figure1- Features& Controls
A
C
D
/
R
U
P
Page 7
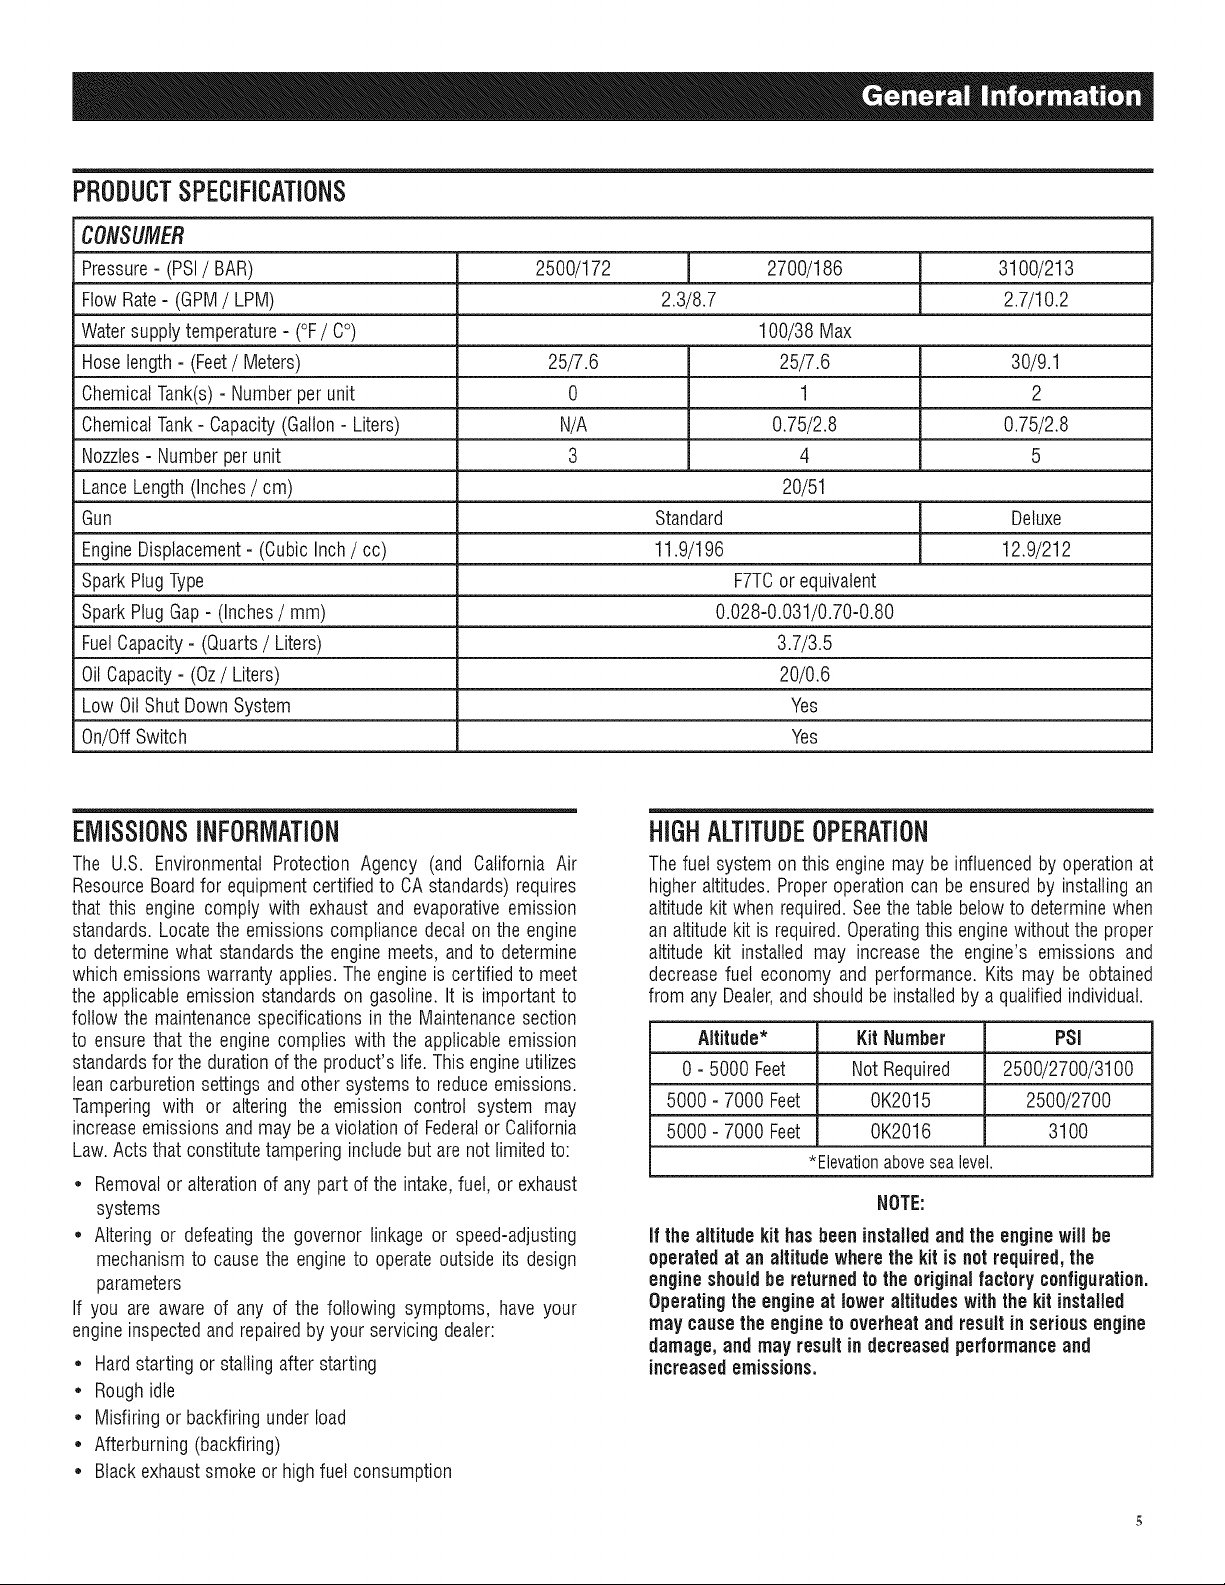
PRODUCTSPECiFiCATiONS
CONSUMER
Pressure- (PSI/ BAR) 2500/172 2700/186 3100/213
FlowRate- (GPM/ LPM) 2.3/8.7 2.7/10.2
Watersupplytemperature- (°F/ C°) 100/38 Max
Hoselength- (Feet/Meters) 25/7.6 25/7.6 30/9.1
ChemicalTank(s)- Numberper unit 0 1 2
ChemicalTank- Capacity(Gallon- Liters) N/A 0.75/2.8 0.75/2.8
Nozzles- Numberperunit 3 4 5
LanceLength (Inches/ cm) 20/51
Gun Standard Deluxe
EngineDisplacement- (Cubic Inch/ cc) 11.9/196 12.9/212
SparkPlugType F7TCorequivalent
SparkPlugGap- (Inches/ mm) 0.028-0.031/0.70-0.80
FuelCapacity- (Quarts/ Liters) 3.7/3.5
OilCapacity- (Oz/ Liters) 20/0.6
Low OilShut Down System Yes
On/OffSwitch Yes
EMISSIONSINFORMATION
The U.S. EnvironmentalProtection Agency (and California Air
ResourceBoardfor equipmentcertifiedto CAstandards) requires
that this engine comply with exhaust and evaporative emission
standards.Locate the emissions compliance decalon the engine
to determinewhat standards the enginemeets, and to determine
which emissions warrantyapplies.The engineis certified to meet
the applicable emission standards on gasoline.It is important to
follow the maintenancespecificationsin the Maintenancesection
to ensurethat the enginecomplies with the applicableemission
standardsfor theduration ofthe product's life. Thisengineutilizes
leancarburetionsettings and other systemsto reduceemissions.
Tampering with or altering the emission control system may
increaseemissionsand may be a violation of Federalor California
Law.Acts that constitutetampering includebut are notlimited to:
• Removalor alterationof anypart of the intake,fuel, or exhaust
systems
• Altering or defeatingthe governor linkage or speed-adjusting
mechanismto causethe engineto operate outside its design
parameters
If you are aware of any of the following symptoms, have your
engineinspectedand repairedby your servicing dealer:
• Hardstartingor stallingafter starting
• Roughidle
• Misfiring or backfiringunderload
• Afterburning(backfiring)
• Blackexhaustsmoke or highfuel consumption
HIGHALTITUDEOPERATION
Thefuel systemonthis enginemay be influencedby operationat
higher altitudes.Properoperationcan be ensuredby installing an
altitudekit when required.Seethetable belowto determinewhen
an altitudekit is required.Operatingthis enginewithoutthe proper
altitude kit installed may increase the engine's emissions and
decreasefuel economy and performance. Kits may be obtained
from anyDealer,and shouldbeinstalledby a qualifiedindividual.
Altitude* Kit Number PSI
0 - 5000 Feet NotRequired 2500/2700/3100
5000 - 7000 Feet 0K2015 2500/2700
5000 - 7000 Feet 0K2016 31O0
*Elevationabovesealevel.
NOTE:
If thealtitude kit hasbeen installedandthe enginewill be
operated at an altitudewherethe kit is notrequired, the
engineshould be returned tothe original factory configuration.
Operatingthe engineat loweraltitudes with the kit installed
may causethe engineto overheat andresult in seriousengine
damage, and may result in decreased performanceand
increasedemissions.
Page 8
UNPACKING
1. Removethe parts bag, accessories,andinserts includedwith
powerwasher.
2. Opencarton completely by cutting each corner from top to
bottom.
3. Ensureyou haveall includeditems priorto assembly.
• MainUnit
• HandleAssembly
• HighPressureHose
• SiphonHose&Filter
• SprayGun
• LancewithQuickConnectFitting
• OilBottle
• HoseHookWireform
• PartsBag(whichincludesthefollowing):
- ChemicalTankCapwith hole if model is equippedwith a
ChemicalTank
- Operator'sManual
- Owner'sRegistrationCard
- BagcontainingColor-codedNozzles
4. If you are missing any items from your carton, pleasecall
GeneracCustomerServiceat 1-888-436-3722. Whencalling
for assistance,pleasehavethe modeland serial numberfrom
the datatag available.
5. Fill out and send in registrationcard. Write Modet number,
Serialnumber & dateof purchasein the table locatedin the
"Whereto FindUs" section.
ASSEMBLY
Readentireoperator'smanualbeforeyouattempttoassembleorIf
you haveany problemswith the assemblyof your powerwasher,
pleasecall GeneracCustomerServiceat 1-888-436-3722. When
calling for assistance, pleasehavethe model and serial number
from the data tag available.
1. Place handle (A) onto handle supports (B). Push in latch
buttonsand allow handleto slide intoposition(C).Buttonwill
lock handleintoplace (Figure2).
NOTE:
it may benecessaryto move the handlesupportsfrom sideto
sidein order to alignthe handle so it will slideover the handle
supports.
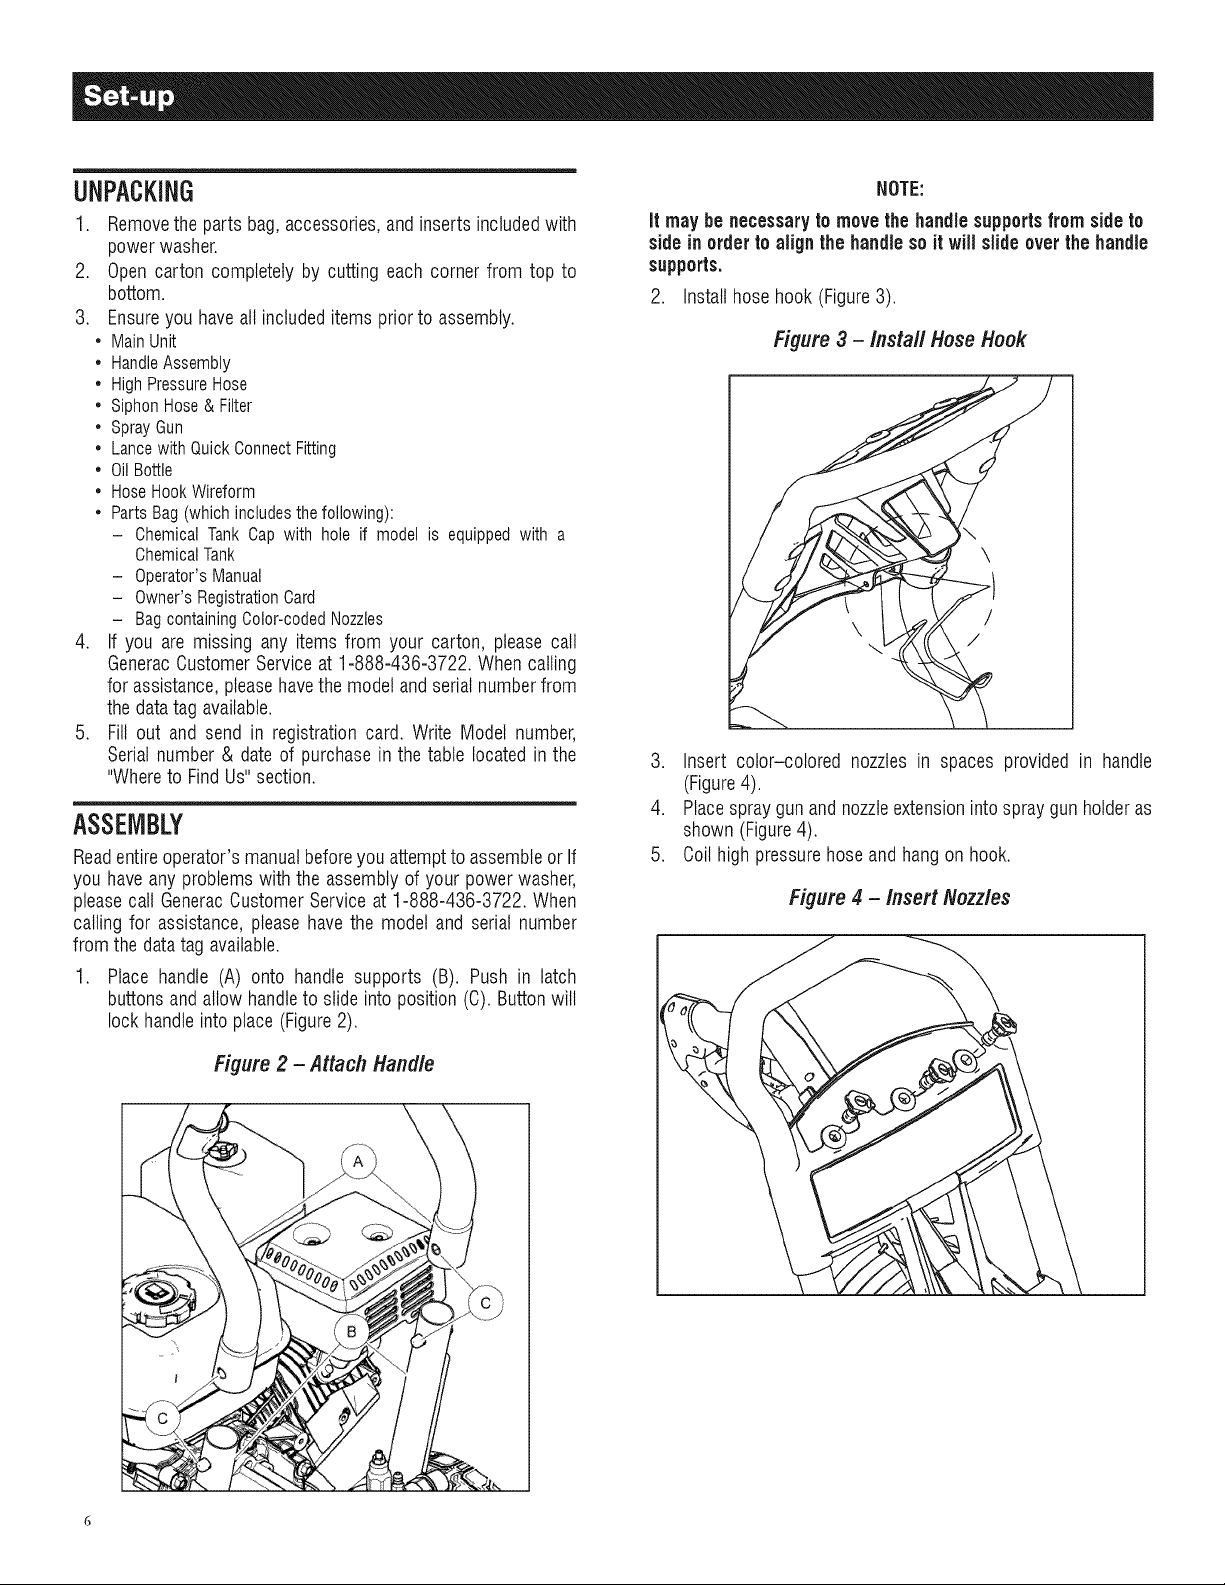
2. Installhose hook (Figure3).
Figure3 - Install HoseHook
/
\
/
f
3. Insert color-colored nozzles in spaces provided in handle
(Figure4).
4. Placespraygun andnozzleextensionintospraygun holderas
shown (Figure4).
5. Coilhigh pressurehose andhang on hook.
Figure4 - InsertNozzles
Figure 2- Attach Handle
Page 9
.
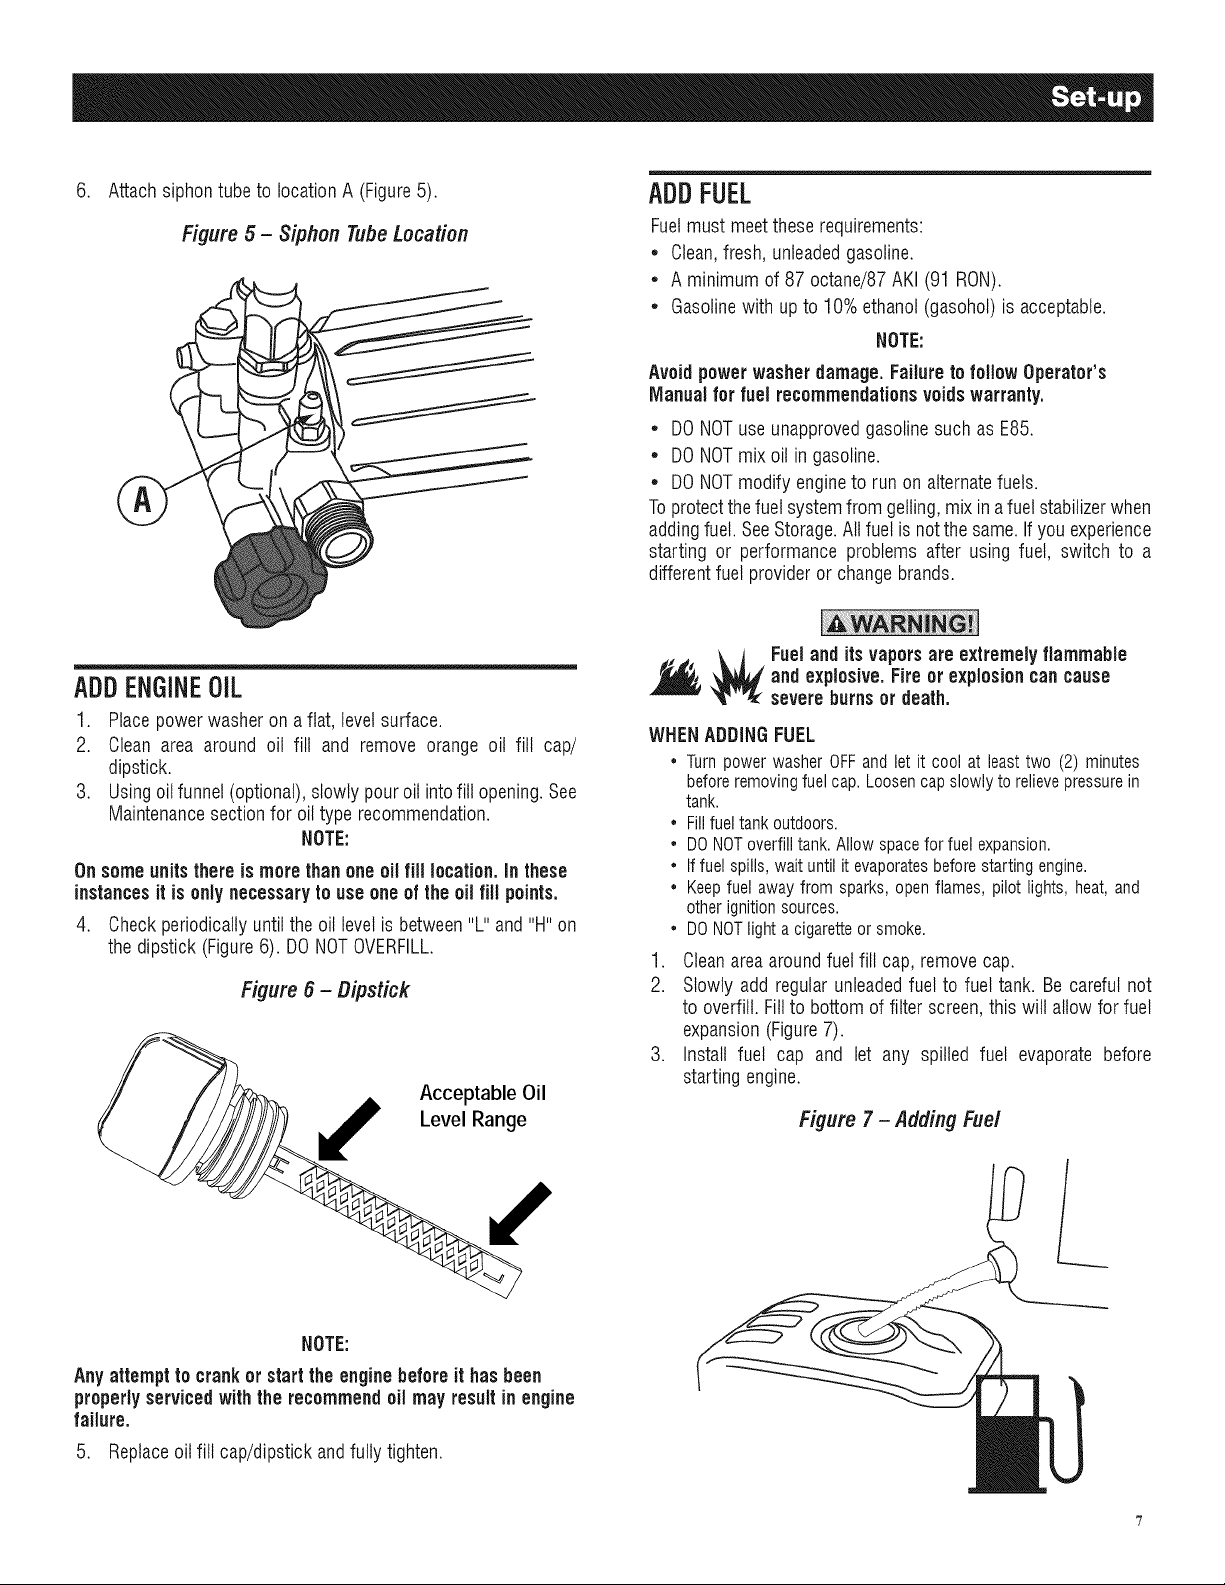
Attachsiphontube to location A (Figure5).
Figure 5 - Siphon TubeLocation
.===_
ADDFUEL
Fuelmust meettheserequirements:
* Clean,fresh, unleadedgasoline.
* A minimum of 87 octane/87AKI (91 RON).
* Gasolinewith up to 10% ethanol(gasohol)is acceptable.
NOTE:
Avoid powerwasherdamage. Failureto follow Operator's
Manualfor fuel recommendationsvoidswarranty.
* DONOTuse unapprovedgasolinesuch asE85.
* DONOTmix oil ingasoline.
* DONOTmodify engineto runonalternatefuels.
Toprotectthefuel systemfrom gelling,mix in afuelstabilizerwhen
addingfuel. SeeStorage.All fuel isnotthe same.If youexperience
starting or performance problems after using fuel, switch to a
differentfuel provideror changebrands.
ADDENGINEOIL
1. Placepowerwasher on a flat, level surface.
2. Clean area around oil fill and remove orange oil fill cap/
dipstick.
3. Usingoilfunnel(optional),slowly pouroil intofill opening.See
Maintenancesectionfor oil type recommendation.
NOTE:
Onsomeunits there is morethan one oil fill location,inthese
instancesitis only necessaryto use one of theoil fill points.
4. Checkperiodicallyuntil the oil levelis between"L" and "H"on
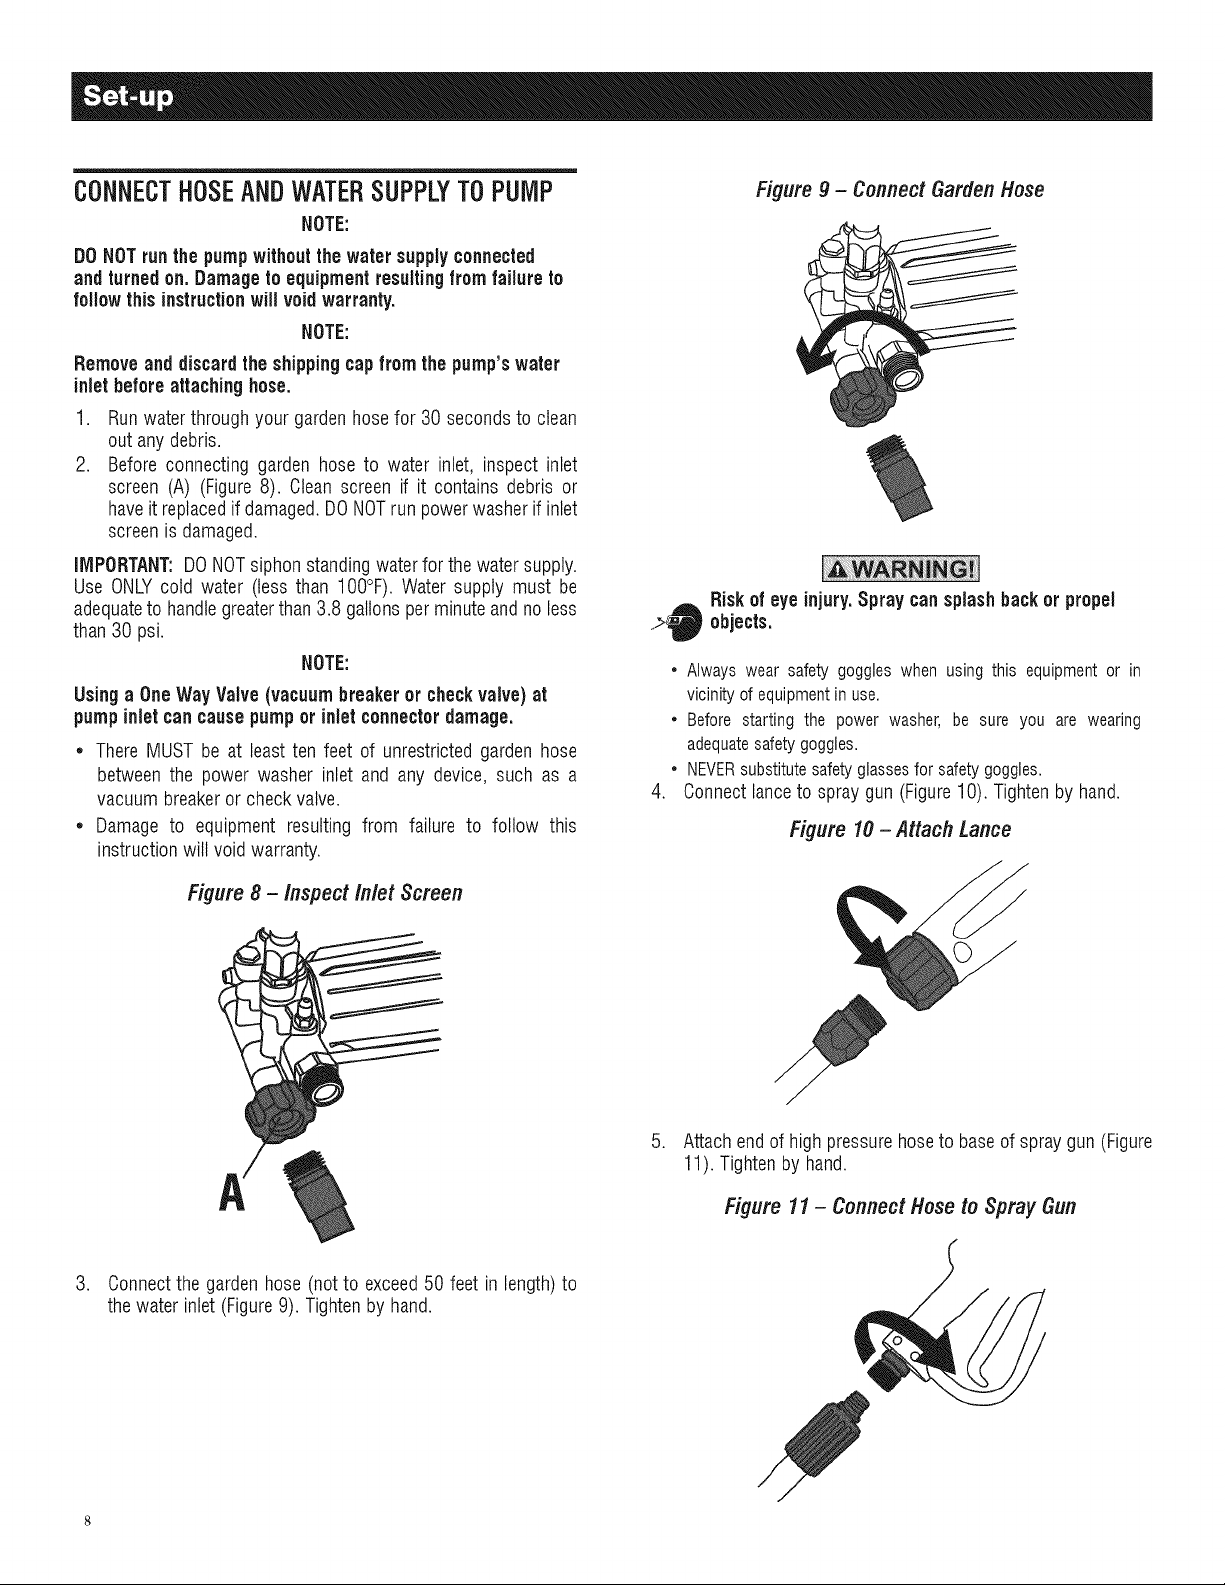
thedipstick (Figure6). DONOTOVERFILL.
Figure6 - Dipstick
Acceptable Oil
Level Range
and explosive.Fire or explosion cancause
Fueland itsvaporsare extremelyflammable
severe burns or death.
WHEN ADDING FUEL
* Turnpower washer OFFand let it cool at least two (2) minutes
beforeremovingfuel cap. Loosen capslowly to relievepressurein
tank.
* Fillfuel tankoutdoors.
* DONOToverfill tank.Allow spacefor fuel expansion.
* Iffuel spills,wait until it evaporatesbeforestarting engine.
* Keepfuel away from sparks, open flames, pilot lights, heat, and
other ignitionsources.
* DONOTlight a cigaretteor smoke.
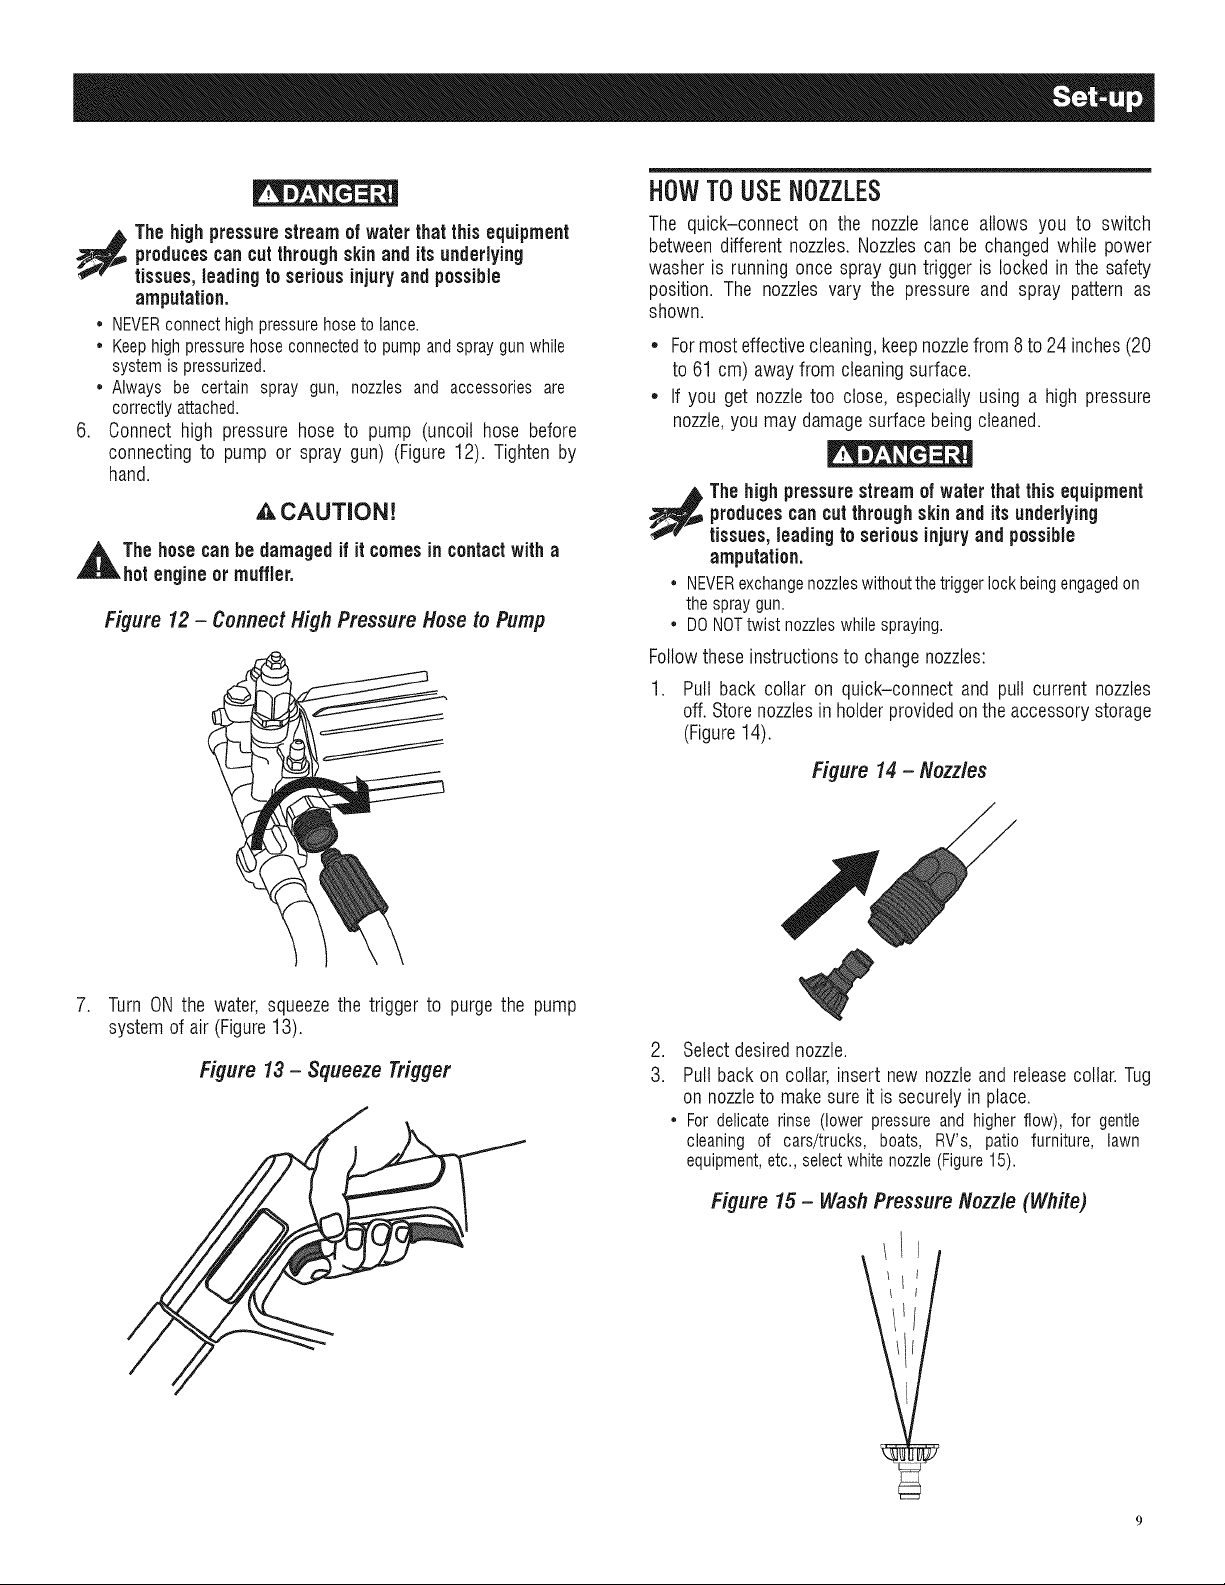
1. Clean area around fuel fill cap, remove cap.
2. Slowly add regular unleaded fuel to fuel tank. Be careful not
to overfill. Fill to bottom of filter screen, this will allow for fuel
expansion (Figure 7).
3. Install fuel cap and let any spilled fuel evaporate before
starting engine.
Figure 7- Adding Fuel
NOTE:
Anyattempt to crankor start the engine before ithas been
properlyserviced with the recommendoil mayresultin engine
failure.
5. Replaceoil fill cap/dipstickandfully tighten.
/
Page 10
CONNECTHOSEANDWATERSUPPLYTOPUMP
NOTE:
DONOTrunthe pumpwithoutthe water supplyconnected
andturnedon. Damageto equipmentresultingfrom failureto
followthisinstructionwill voidwarranty.
NOTE:
Removeand discardthe shippingcap from the pump'swater
inletbefore attachinghose.
1. Runwater through your gardenhose for 30 secondsto clean
outany debris.
2. Before connecting garden hose to water inlet, inspect inlet
screen (A) (Figure8). Clean screen if it contains debris or
haveit replacedif damaged.DONOTrun powerwasherif inlet
screenis damaged.
IMPORTANT:DONOTsiphonstandingwaterfor the watersupply.
Use ONLYcold water (less than 100°F). Water supply must be
adequateto handlegreaterthan 3.8 gallons perminuteandno less
than 30 psi.
NOTE:
Using a OneWayValve(vacuum breaker or checkvalve) at
pumpinletcancause pumpor inlet connectordamage.
• ThereMUST be at least ten feet of unrestricted garden hose
betweenthe power washer inlet and any device, such as a
vacuum breakeror checkvalve.
• Damage to equipment resulting from failure to follow this
instructionwill voidwarranty.
Figure9 - ConnectGardenHose
Riskof eyeinjury.Spray cansplashback or propel
..>d_ objects.
• Always wear safety goggles when using this equipment or in
vicinity of equipment in use.
• Before starting the power washer, be sure you are wearing
adequatesafety goggles.
• NEVERsubstitutesafety glassesfor safety goggles.
.
Connect lance to spray gun (Figure 10). Tighten by hand.
Figure10 - Attach Lance
Figure 8 - Inspect Inlet Screen
3. Connectthe gardenhose (not to exceed50 feet in length)to
the water inlet (Figure9). Tightenby hand.
/
.
Attachendof high pressurehoseto baseof spray gun (Figure
11).Tightenby hand.
figure11 - Connect Hose toSpray Gun
Page 11
producescancutthroughskinand its underlying
The highpressurestreamof waterthat this equipment
tissues,leadingto seriousinjuryand possible
amputation.
• NEVERconnecthighpressurehosetolance.
• Keephighpressurehoseconnectedto pumpandspraygunwhile
systemispressurized.
• Alwaysbe certain spray gun, nozzlesand accessoriesare
correctlyattached.
6. Connect high pressure hose to pump (uncoil hose before
connecting to pump or spray gun) (Figure12). Tighten by
hand.
HOW TOUSENOZZLES
The quick-connect on the nozzle lance allows you to switch
between differentnozzles. Nozzlescan be changedwhile power
washer is runningonce spray gun trigger is lockedin the safety
position. The nozzles vary the pressure and spray pattern as
shown.
• Formosteffectivecleaning,keepnozzlefrom 8 to 24inches(20
to 61 cm) awayfrom cleaningsurface.
• If you get nozzletoo close, especiallyusing a high pressure
nozzle,you may damagesurfacebeingcleaned.
,ACAUTiON!
,_The hosecanbe damagedif it comesin contactwith a
hot engineor muffler.
Figure12 - ConnectHighPressureHoseto Pump
.
Turn ON the water, squeezethe trigger to purgethe pump
systemof air (Figure13).
Figure 13-Squeeze Trigger
producescancutthrough skinand its underlying
The highpressurestreamof waterthat this equipment
tissues,leadingto serious injury and possible
amputation.
• NEVERexchangenozzleswithoutthetriggerlockbeingengagedon
thespraygun.
• DONOTtwistnozzleswhilespraying.
Followtheseinstructionsto changenozzles:
1. Pull back collar on quick-connect and pull current nozzles
off. Storenozzlesin holderprovidedonthe accessory storage
(Figure14).
Figure 14- Nozzles
.
Selectdesirednozzle.
3.
Pull back on collar, insert new nozzleand releasecollar.Tug
on nozzleto makesure it is securelyin place.
• Fordelicaterinse (lowerpressureandhigherflow), for gentle
cleaningof cars/trucks, boats, RV's, patio furniture, lawn
equipment,etc.,selectwhitenozzle(Figure15).
Figure 15 - Wash Pressure Nozzle (White)
/
Page 12
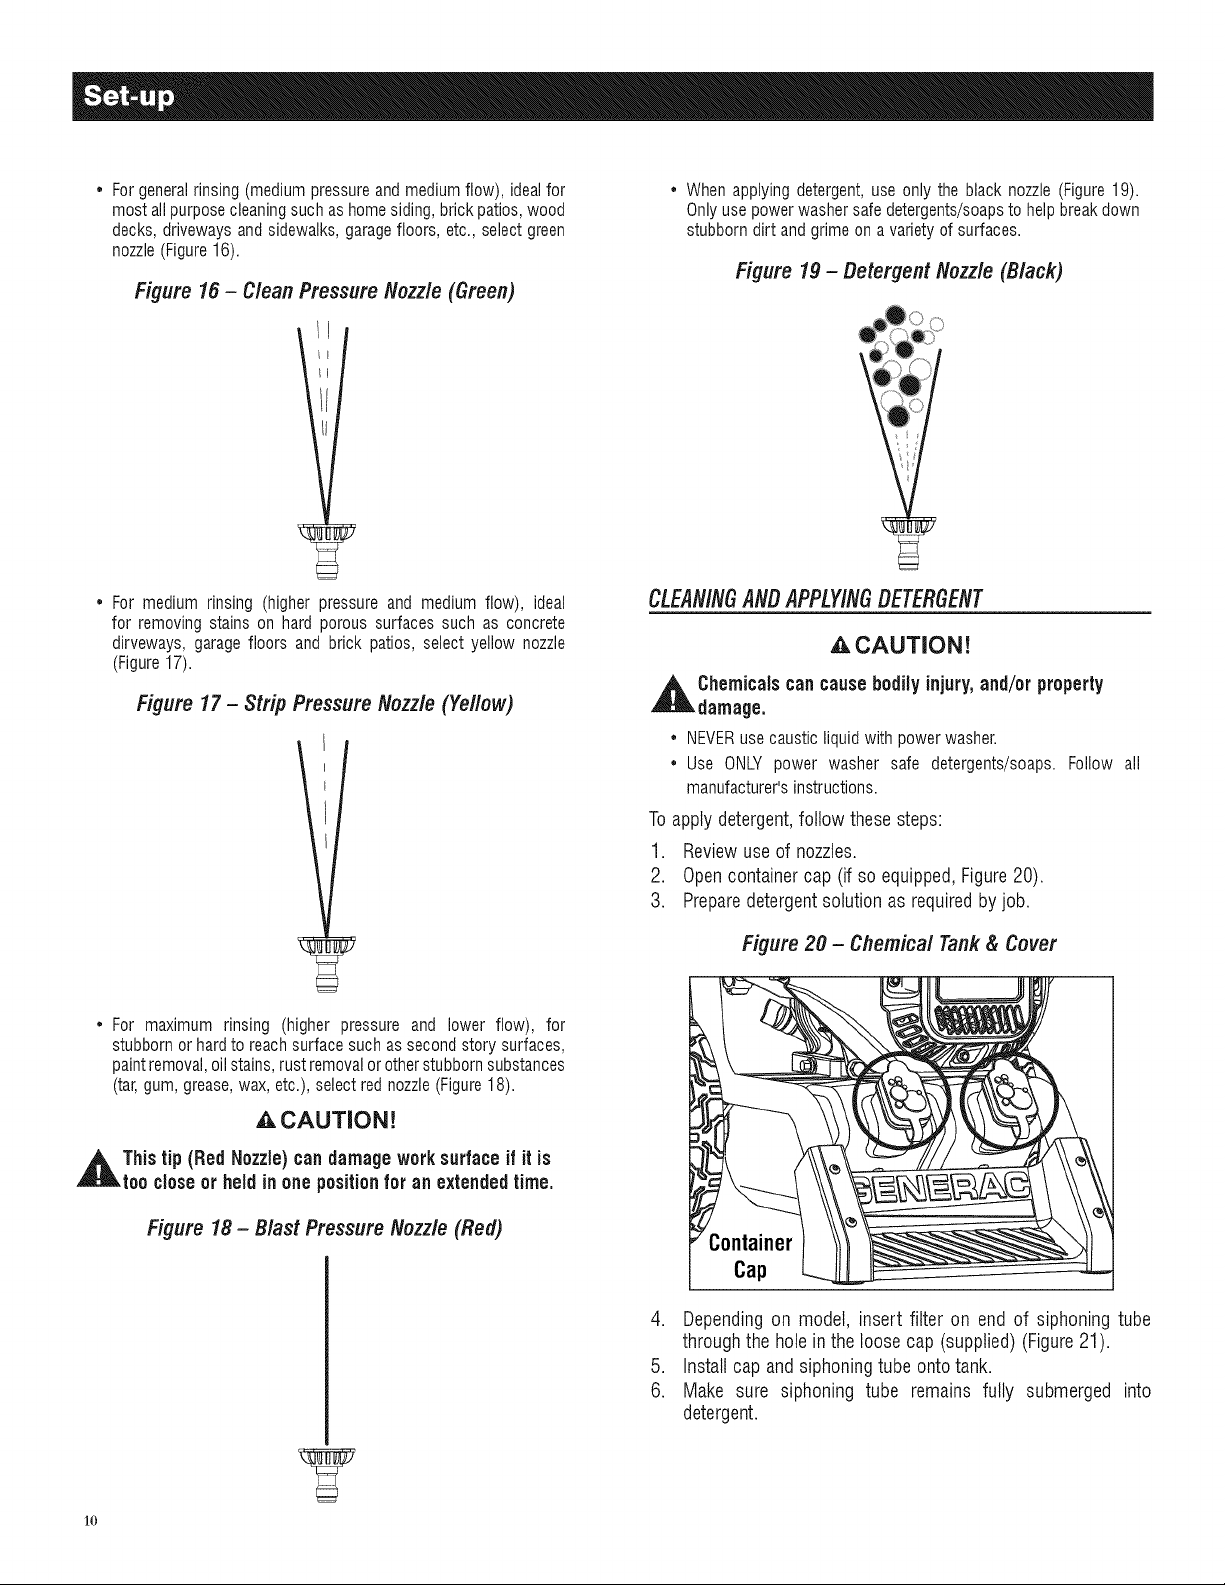
• Forgeneralrinsing (medium pressureandmedium flow), idealfor
mostall purposecleaningsuch as homesiding, brickpatios,wood
decks, driveways and sidewalks,garagefloors, etc., select green
nozzle(Figure16).
Figure 16 - Clean Pressure Nozzle (Green)
,, Whenapplying detergent,use only the black nozzle (Figure19).
Onlyuse powerwasher safe detergents/soapsto helpbreakdown
stubborn dirt andgrime on avariety of surfaces.
Figure lg - Detergent Nozzle (Black)
• For medium rinsing (higher pressure and medium flow), ideal
for removing stains on hard porous surfaces such as concrete
dirveways, garage floors and brick patios, select yellow nozzle
(Figure17).
Figure 17- Strip Pressure Nozzle (Yellow)
• For maximum rinsing (higher pressure and lower flow), for
stubborn or hardto reach surface such assecond story surfaces,
paintremoval,oil stains,rustremovalor otherstubbornsubstances
(tar, gum,grease,wax, etc.), select red nozzle(Figure18).
,A CAUTION!
,_This tip (RedNozzle) candamage worksurfaceif it is
too closeor held in one positionfor an extendedtime.
CLEANINGANDAPPLYINGDETERGENT
,A CAUTION!
,_ Chemicals cancause bodilyinjury,and/orproperty
damage.
• NEVERusecausticliquidwithpowerwasher.
• Use ONLYpower washer safe detergents/soaps.Follow all
manufacturer'sinstructions.
Toapply detergent,followthese steps:
1. Reviewuse of nozzles.
2. Opencontainercap (if so equipped,Figure20).
3. Preparedetergentsolutionas requiredby job.
Figure 20 - Chemical Tank & Cover
Figure 18- Blast Pressure Nozzle (Red)
Container
Cap
4. Dependingon model, insert filter on end of siphoning tube
throughthe hole in theloose cap (supplied)(Figure21).
5. Installcap andsiphoningtube ontotank.
6. Make sure siphoning tube remains fully submerged into
detergent.
1o
Page 13
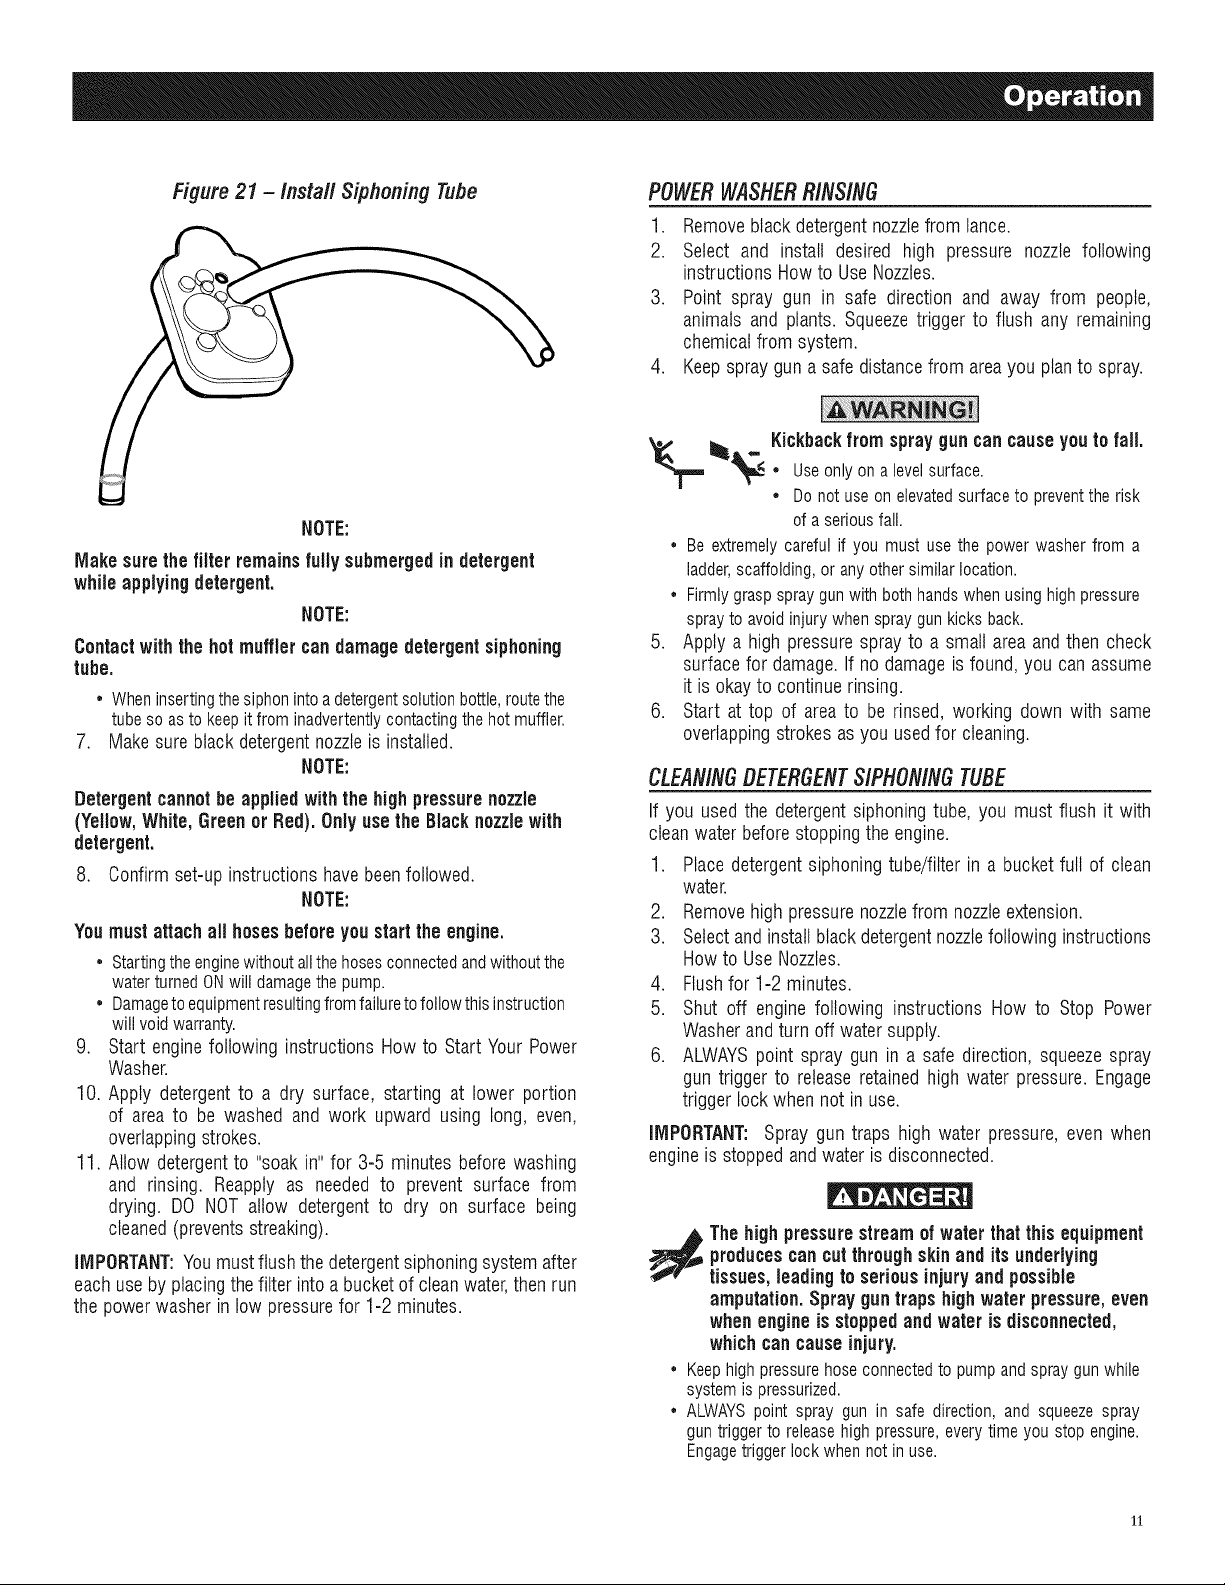
Figure 21 -/nsta//Siphoning Tube
NOTE:
Makesurethe filter remainsfully submergedin detergent
while applying detergent.
NOTE:
Contactwith the hotmuffler candamagedetergentsiphoning
tube.
• Wheninsertingthesiphonintoadetergentsolutionbottle,routethe
tubeso asto keepitfrominadvertentlycontactingthe hotmuffler.
.
Makesure blackdetergentnozzleis installed.
NOTE:
Detergentcannotbe appliedwiththe highpressurenozzle
(Yellow,White,Greenor Bed). Only usethe Black nozzlewith
detergent.
8. Confirmset-up instructions havebeenfollowed.
NOTE:
Youmustattachall hosesbefore youstart the engine.
= Startingtheenginewithoutallthehosesconnectedandwithoutthe
waterturnedONwilldamagethe pump.
• Damagetoequipmentresultingfromfailuretofollowthisinstruction
willvoidwarranty.
9. Start enginefollowing instructions Howto Start Your Power
Washer.
10. Apply detergentto a dry surface, starting at lower portion
of area to be washed and work upward using long, even,
overlappingstrokes.
11. Allow detergentto "soak in" for 3-5 minutes before washing
and rinsing. Reapply as needed to prevent surface from
drying. DO NOT allow detergent to dry on surface being
cleaned(preventsstreaking).
IMPORTANT:Youmustflush the detergentsiphoningsystem after
eachuse byplacing thefilter into a bucketof cleanwater,then run
the powerwasher in low pressurefor 1-2 minutes.
POWERWASHERR/NS/NG
1. Removeblackdetergentnozzlefrom lance.
2. Select and install desired high pressure nozzle following
instructions Howto UseNozzles.
3. Point spray gun in safe direction and away from people,
animals and plants. Squeezetrigger to flush any remaining
chemicalfrom system.
4. Keepspraygun a safe distancefrom areayou planto spray.
"_ Im_,_ Kickback fromspraygun cancauseyouto fall.• Useonlyonalevelsurface.
• Donotuseonelevatedsurfaceto preventthe risk
ofa seriousfall.
• Beextremelycarefulif youmustusethepowerwasherfrom a
ladder,scaffolding,or anyothersimilarlocation.
• Firmlygraspspraygunwithbothhandswhenusinghighpressure
sprayto avoidinjurywhenspraygunkicksback.
5. Apply a highpressurespray to a small area andthen check
surfacefor damage.If no damageis found, you can assume
it is okay to continuerinsing.
6. Start at top of areato be rinsed, working down with same
overlappingstrokesas you usedfor cleaning.
CLEANINGDETERGENTSIPHONINGTUBE
If you used the detergentsiphoningtube, you must flush it with
cleanwater beforestoppingthe engine.
1. Placedetergentsiphoning tube/filter in a bucketfull of clean
water.
2. Removehigh pressurenozzlefrom nozzleextension.
3. Selectandinstall blackdetergentnozzlefollowing instructions
How to Use Nozzles.
4. Flushfor 1-2 minutes.
5. Shut off engine following instructions How to Stop Power
Washerand turn off water supply.
6. ALWAYSpoint spray gun in a safedirection, squeezespray
gun trigger to release retainedhigh water pressure. Engage
triggerlock when not inuse.
IMPORTANT: Spray gun traps high water pressure, evenwhen
engineis stoppedandwater is disconnected.
producescancutthroughskinand its underlying
The highpressurestreamof waterthat this equipment
tissues,leadingto seriousinjuryand possible
amputation.Spray guntrapshighwaterpressure,even
whenengine isstoppedandwater is disconnected,
whichcan causeinjury.
• Keephighpressurehoseconnectedto pumpandspraygunwhile
systemispressurized.
• ALWAYSpointspraygun in safe direction,andsqueezespray
guntriggerto releasehighpressure,everytimeyou stopengine.
Engagetriggerlockwhennotin use.
11
Page 14
OPERATION
If you haveanyproblemsoperatingyour powerwasher,pleasecall
Generaccustomerservice at 1-888-436-3722.
POWERWASHERLOCATION
ClearancesandAir Movement
Runningenginegivesoff carbonmonoxide,an
odorless, colorless,poisonousgas. Breathing carbon
monoxidecancauseheadache,fatigue, dizziness,
vomiting,confusion, seizures,nausea,fainting or
death. Formore information,referencethe CO
warnings in the SafetyRules section.
Placepower washer outdoors in an areathat will not accumulate
deadly exhaust gas. NEVERplace power washer where exhaust
gas could accumulate and enter inside or be drawn into a
potentially occupied building. Ensureexhaust gas is kept away
from any windows, doors, ventilation intakes, or other openings
that canallow exhaustgasto collect in a confinedarea. Prevailing
winds and air currents should betaken into considerationwhen
positioningpowerwasher (Figure22).
• OperatepowerwasherONLYoutdoors.
• Keepexhaustgasfromenteringaconfinedareathroughwindows,
doors,ventilationintakes,orotheropenings.
• NEVERstartor runengineindoors,in avehicleorinan enclosed
area,EVENIFwindowsanddoorsareopen.
CHECKLISTBEFORESTARTINGENGINE
1. Be sure to read and understandthe OperatorSafety section
and Operationsectionbeforeusing powerwasher.
2. Checkthatoil is atthe properlevelintheenginecrankcaseand
thatfuel has been addedto the fuel tank.
3. Reviewthe unit's assembly and ensure fitting are properly
securedandmakesurethere areno kinks,cuts, or damageto
high pressurehose.
4. Provide a proper water supply at an adequateflow, clear
screensof debris,andconfirmthatthe system ispurgedof air.
5. Confirm unit is secureon levelground and surroundingwork
areais clear.
HOWTOSTARTYOURPOWERWASHER
NOTE:
DONOTrun the pumpwithout the watersupplyconnected
andturned on. Damage to equipmentresultingfrom failure to
follow this instructionwill voidwarranty.
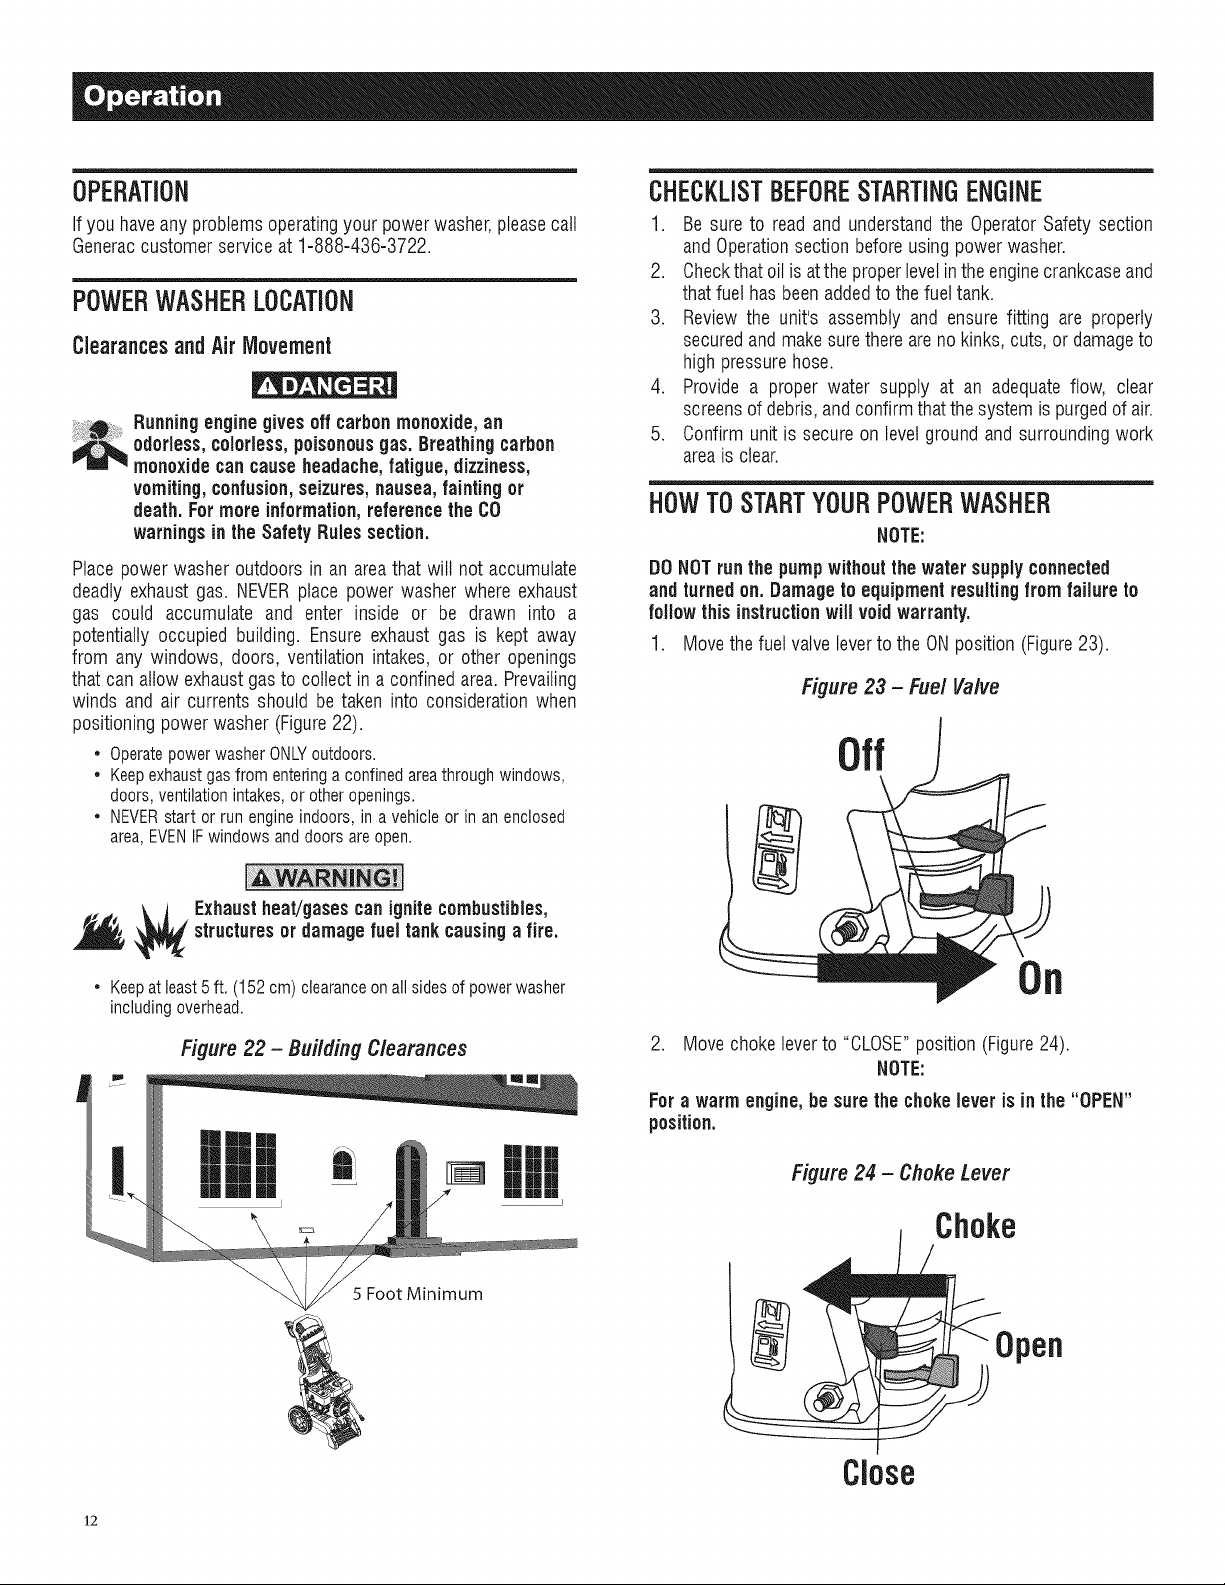
1. Movethefuel valve leverto theONposition (Figure23).
Figure 23 - Fuel Valve
Off
_ Exhaustheat/gasescanignitecombustibles,
Keepatleast 5ft. (152cm) clearanceon allsidesof power washer
includingoverhead.
structuresor damage fuel tankcausinga fire.
Figure22 - Building Clearances
5 Foot Minimum
2. Move chokeleverto "CLOSE"position (Figure24).
NOTE:
For a warm engine,be surethe chokeleveris inthe "OPEN"
position.
Figure 24 - Choke Lever
Choke
Open
Close
12
Page 15
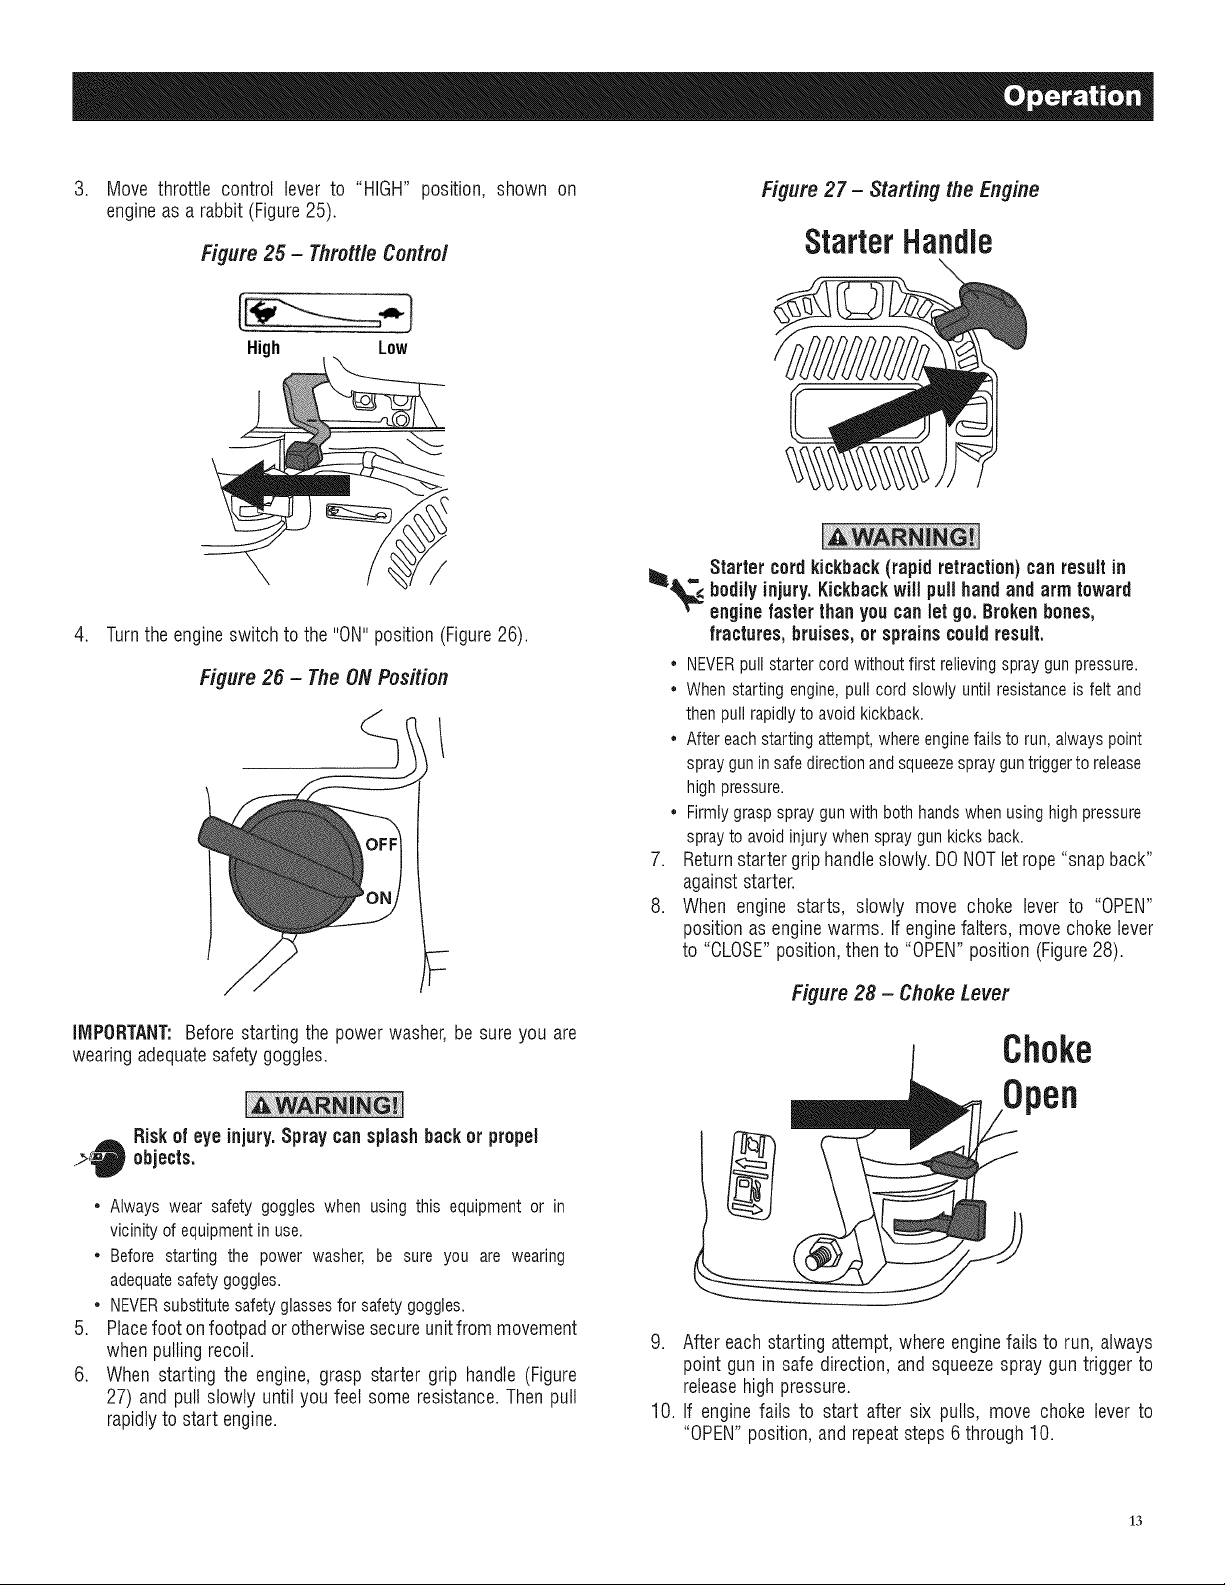
.
Move throttle control lever to "HIGH" position, shown on
engineasa rabbit (Figure25).
Figure 25 - Thrott/e Contro/
High Low
.
Turnthe engineswitch to the "ON"position (Figure26).
Figure26 - TheONPosition
Figure27- Starting the Engine
Starter Handle
Starter cordkickback(rapid retraction)canresultin
,_. bodilyinjury.Kickbackwill pullhandand arm toward
engine faster thanyoucanlet go.Brokenbones,
fractures,bruises,or sprainscouldresult.
* NEVERpullstartercordwithoutfirstrelievingspraygunpressure.
* Whenstartingengine,pullcord slowlyuntilresistanceis felt and
thenpullrapidlyto avoidkickback.
* Aftereachstartingattempt,whereenginefailsto run,alwayspoint
sprayguninsafedirectionandsqueezesprayguntriggertorelease
highpressure.
* Firmlygraspspraygunwithbothhandswhenusinghighpressure
sprayto avoidinjurywhenspraygunkicksback.
7. Returnstartergrip handleslowly.DONOTletrope"snapback"
againststarter.
8. When engine starts, slowly move choke lever to "OPEN"
position asenginewarms. Ifenginefalters, move chokelever
to "CLOSE"position,thento "OPEN"position (Figure28).
IMPORTANT:Beforestarting the powerwasher, be sure you are
wearingadequatesafetygoggles.
Riskof eye injury.Spray cansplashbackorpropel
objects.
* Alwayswearsafetygoggleswhenusingthis equipmentor in
vicinityof equipmentin use.
* Beforestartingthe powerwasher,be sure you are wearing
adequatesafetygoggles.
* NEVERsubstitutesafetyglassesforsafetygoggles.
.
Placefoot onfootpador otherwise secureunitfrom movement
whenpulling recoil.
6.
When starting the engine,grasp starter grip handle (Figure
27) and pull slowly until you feel some resistance.Then pull
rapidlyto start engine.
Figure28 - Choke Lever
Choke
9. After eachstarting attempt,where enginefails to run, always
point gun insafe direction,and squeezespray gun triggerto
releasehigh pressure.
10. If enginefails to start after six pulls, move choke leverto
"OPEN"position,and repeatsteps 6 through 10.
13
Page 16
producescancutthroughskinand its underlying
The highpressurestreamof waterthat this equipment
tissues,leadingto seriousinjuryand possible
amputation.Spray guntrapshighwaterpressure,even
whenengineis stoppedandwater is disconnected,
whichcan causeinjury.
• DONOTallow CHILDRENto operatepowerwasher or play nearby.
• Keephigh pressure hose connectedto pumpand spray gunwhile
systemis pressurized.
• NEVERaim spray gun at people, animals or electrical devices.
Seriousinjury will result.
• DONOTsecure spray gunin openposition.
• DONOTleavespray gun unattendedwhile machine is running.
• NEVERuse a spray gun which does not have a trigger lock or
trigger guard in placeandin working order.
• Always be certain spray gun, nozzles and accessories are
correctly attached.
Contactwith muffler area canresultin seriousburns.Exhaustheat/gasescanignite
combustibles,structuresor damage fuel tank
causinga fire.
• DONOTtouchhotpartsandAVOIDhotexhaustgases.
• Allowequipmenttocoolbeforetouching.
• Keepatleast5feet(152cm)of clearanceonallsidesof power
washerincludingoverhead.
• Itisaviolationof CaliforniaPublicResourceCode,Section4442,
touseoroperatetheengineonanyforest-covered,brush-covered,
orgrass-coveredlandunlesstheexhaustsystemisequippedwith
asparkarrester,asdefinedinSection4442,maintainedineffective
workingorder.Otherstatesor federaljurisdictionsmay have
similarlaws.
• Replacementpartsmustbethe sameandinstalledinthesame
positionastheoriginalparts.
AUTOMATICCOOLDOWNSYSTEM(THERMAL
RELIEF)
If you run the engine on your power washer for 3-5 minutes
without pressing the trigger on the spray gun, circulating water
in the pump can reach temperatures above 125°E The system
engages to cool the pump by discharging the warm water onto
the ground.
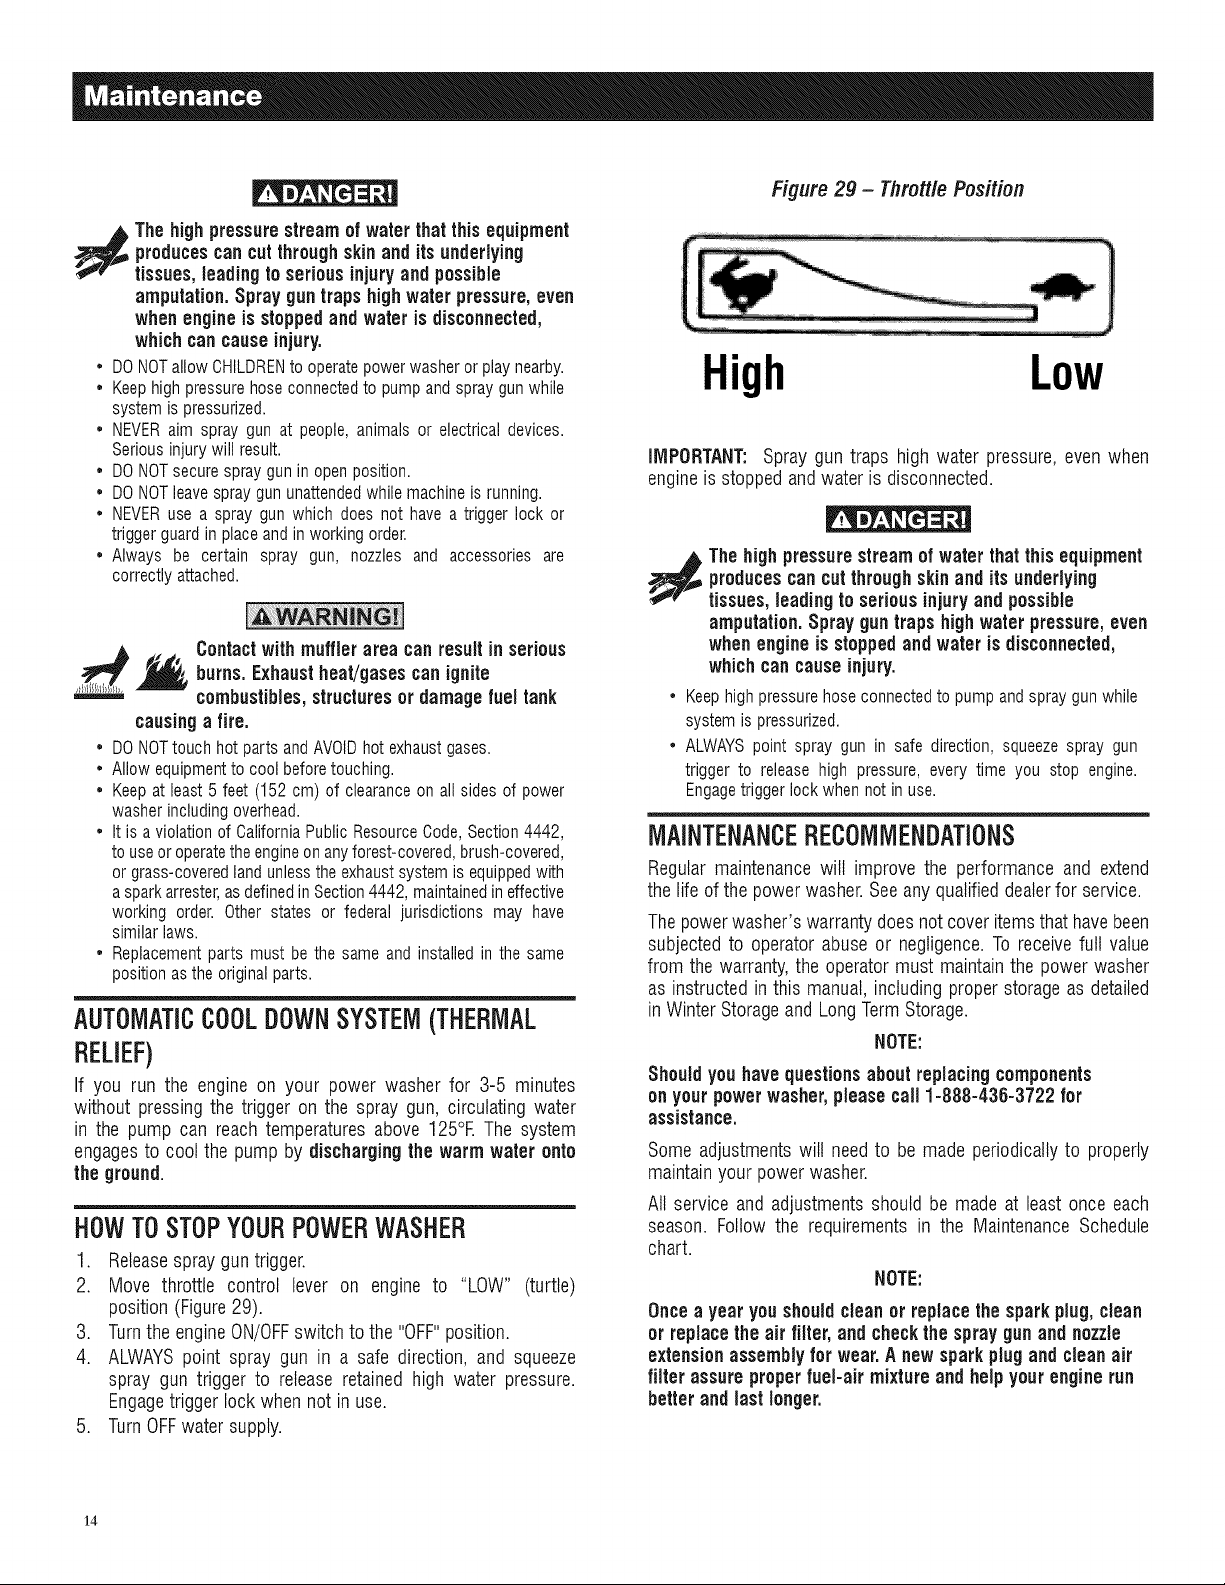
HOWTOSTOPYOURPOWERWASHER
1. Release spray gun trigger.
2. Move throttle control lever on engine to "LOW" (turtle)
position (Figure 29).
3. Turn the engine ON/OFF switch to the "OFF" position.
4. ALWAYS point spray gun in a safe direction, and squeeze
spray gun trigger to release retained high water pressure.
Engage trigger lock when not in use.
5. Turn OFFwater supply.
Figure 2g- Throttle Position
High Low
IMPORTANT:Spray gun traps high water pressure, evenwhen
engineis stopped andwater is disconnected.
producescancut through skinandits underlying
Thehighpressurestream of water that this equipment
tissues, leadingto seriousinjuryand possible
amputation.Spray gun traps highwaterpressure,even
when engineis stoppedand water isdisconnected,
which cancauseinjury.
• Keephigh pressurehose connectedto pump andspray gunwhile
system is pressurized.
• ALWAYSpoint spray gun in safe direction, squeeze spray gun
trigger to release high pressure, every time you stop engine.
Engagetriggerlock when not in use.
MAINTENANCERECOMMENDATIONS
Regular maintenance wilt improve the performance and extend
the life of the power washer. See any qualified dealer for service.
The power washer's warranty does not cover items that have been
subjected to operator abuse or negligence. To receive full value
from the warranty, the operator must maintain the power washer
as instructed in this manual, including proper storage as detailed
in Winter Storage and Long Term Storage.
NOTE:
Shouldyouhavequestions aboutreplacingcomponents
on yourpowerwasher,pleasecall 1-888-435-3722 for
assistance.
Someadjustments will needto be made periodicallyto properly
maintainyour power washer.
All service andadjustmentsshould be made at least once each
season. Follow the requirementsin the MaintenanceSchedule
chart.
NOTE:
Oncea yearyoushouldcleanor replacethe sparkplug,clean
or replacethe air filter, and checkthe spraygun and nozzle
extensionassembly for wear. Anew sparkplugand cleanair
filter assure properfuel-air mixture andhelp yourenginerun
better and lastlonger.
I[4
Page 17
MAINTENANCESCHEDULE
Follow the hourly or calendar intervals, whichever occurs first.
More frequent service is required when operating in adverse
conditions.
Changeengineoil
Check!cleanwaterinletscreen*
Checkhighpressurehose
Checkdetergentsiphoninghose/filter
Checkspraygunandassemblyforleaks
Cleandebris
Checkengineoil level
Changeengineoil**
Check/cleanaircleanerfilter**
Inspectmufflerandspark arrester*
Servicesparkplug
* Cleanif clogged.Replace ifperforated or torn.
** Service more often under dirty or dusty conditions.
PUlVIPOIL
DONOTattemptany oil maintenanceonthis pump. The pump is
pre-lubricatedandsealedfrom the factory, requiringnoadditional
maintenancefor the life of the pump.
NOTE:
impropertreatment of powerwasher candamageit and
shortenits life.
• DONOTinsertanyobjectsthroughcooling slots.
• Usea soft bristlebrushto loosencakedon dirt, oil,etc.
• Usea vacuumcleanerto pickuploosedirt anddebris.
CHECKANDCLEANINLETSCREEN
Examinethe screenonthe pump'swater inlet.Cleanit if the screen
is clogged or replaceit if screenis damaged.
CHECKHiGHPRESSUREHOSES
Thehighpressurehosescan developleaksfrom wear,kinking, or
abuse.Inspectthe hoses eachtime beforeusing them.Check for
cuts, leaks,abrasionsor bulgingof cover,damageor movement
of couplings. If any of these conditions exist, replacethe hose
immediately.
producescancut throughskinand its underlying
Thehighpressurestreamof waterthat thisequipment
tissues,leadingto seriousinjuryand possible
amputation.
• NEVERrepair highpressurehose. Replaceit.
• Replacement hose rating MUST meet or exceed maximum
pressureratingof unit.
CHECKDETERGENTSIPHONINGTUBE
Examinethe filter on the detergenttube and cleanif clogged.The
tube shouldfit tightly on the barbedfitting. Examinethe tube for
leaksor tears. Replacethefilter or tube if eitheris damaged.
EMISSIONSCONTROL
Maintenance,replacement,or repair of the emissionscontrol
devicesandsystemsmay be performedbyanynon-roadengine
repair establishmentor individual. However, to obtain "no
charge" emissions control service, the work must beperformed
by a factory authorizeddealer.Seethe EmissionsWarranty.
POWERWASHERMAINTENANCE
CleanDebris
Daily or before use, clean accumulated debris from cleaning
system. Keep linkage, spring and controls clean. Keep area
around and behind muffler free from any combustible debris.
Inspectcoolingair slots andopeningsonthe powerwasher.These
openingsmust be kept cleanandunobstructed.
Power washer parts should be kept clean to reducethe risk of
overheatingand ignitionof accumulateddebris.
• Use a dampcloth to wipe exteriorsurfacesclean.
CHECKSPRAYGUN
Examinethe hoseconnectionto the spraygun and makesureit is
secure.Testthe trigger by pressingthe trigger,it "springs back"
into place when you releaseit. Replacespraygun immediatelyif
itfails to "spring back".
NOZZLEMAINTENANCE
A pulsing sensationfelt while squeezingthe spray gun trigger
may be causedby excessivepump pressure.Theprincipal cause
of excessive pump pressure is a nozzle clogged or restricted
with foreign materials, such as dirt, etc. To correct the problem,
immediatelycleanthe nozzlefollowing these instructions:
1. Shutoff engineandturn off water supply.
2. ALWAYSpoint spray gun in a safe direction, squeezespray
guntriggerto releaseretainedhigh water pressure.
15
Page 18
producescancutthroughskinand its underlying
The highpressurestreamof waterthat this equipment
tissues,leadingto seriousinjuryand possible
amputation.Spray guntrapshighwaterpressure,even
whenengineisstoppedandwater is disconnected,
whichcan causeinjury.
* Keephighpressurehoseconnectedtopumpandspraygunwhile
systemispressurized.
* ALWAYSpointsprayguninsafedirection,andsqueezespraygun
triggertoreleasehighpressureeverytimeyoustopengine.Engage
triggerlockwhennotinuse.
3. Removenozzlefrom endof nozzleextension.
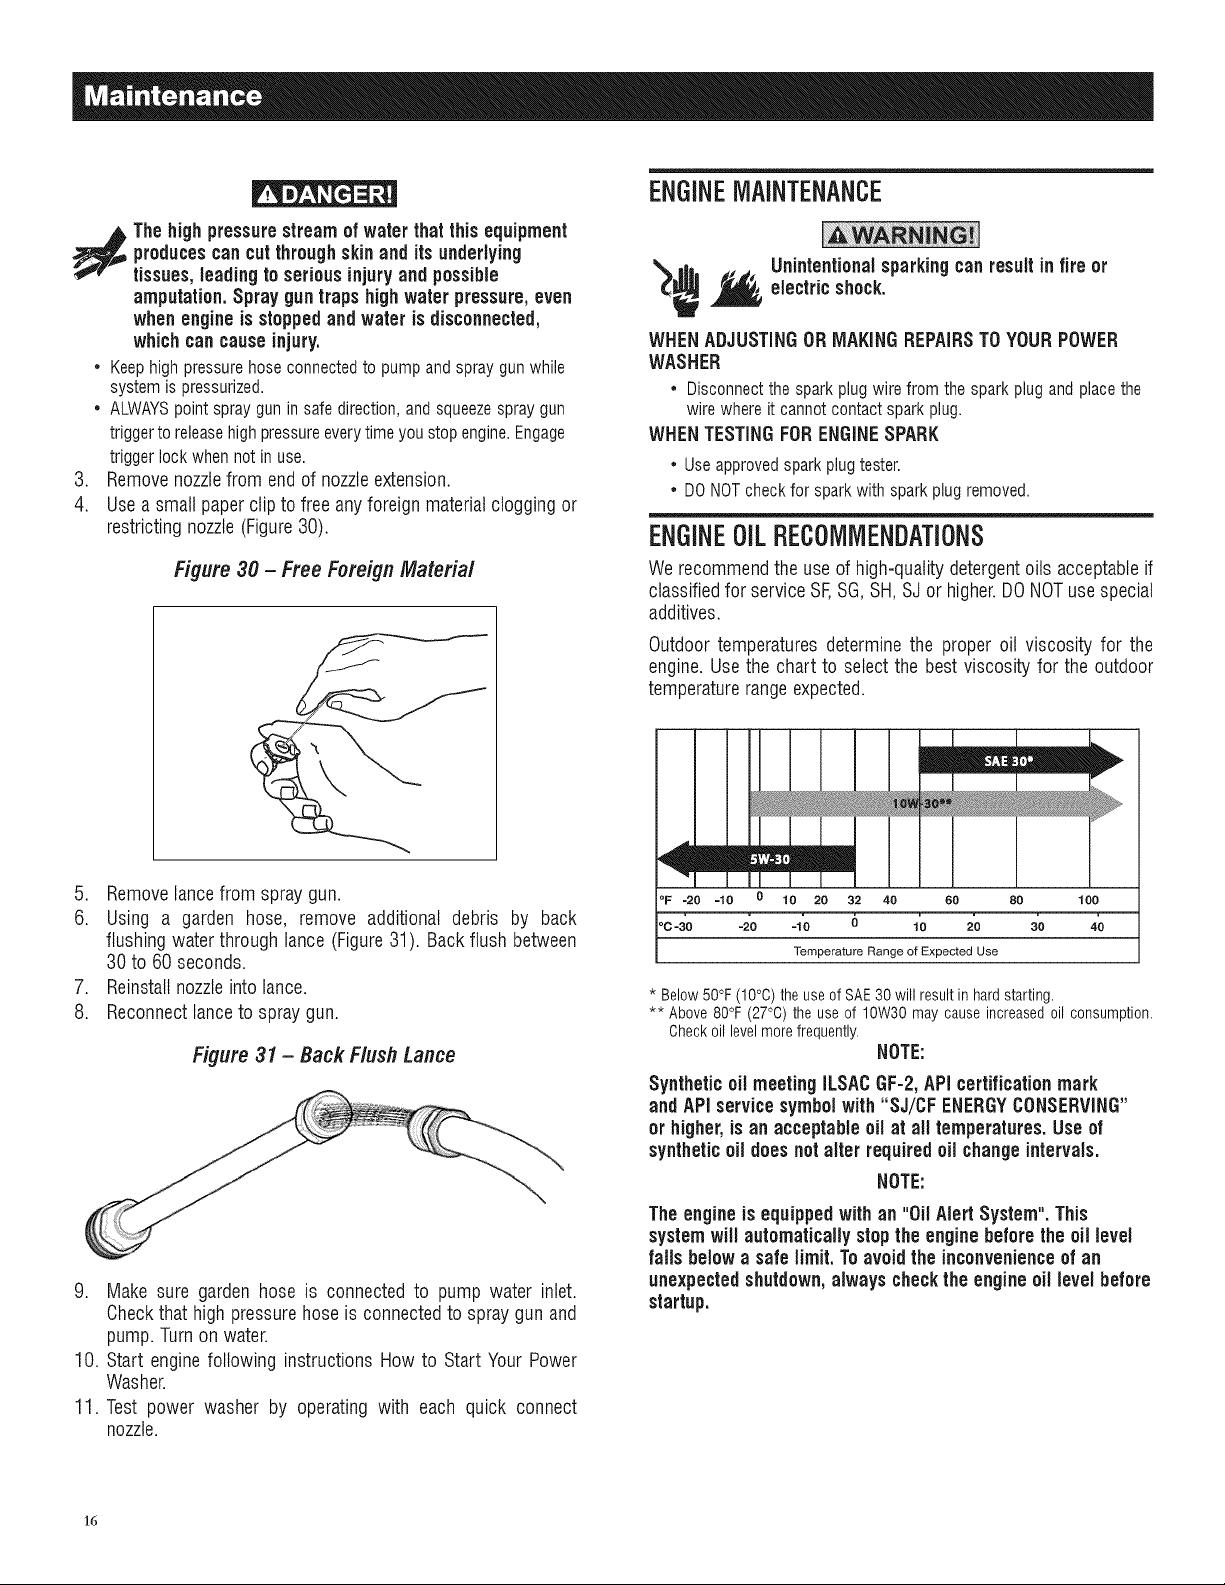
4. Usea small paperclip to freeanyforeignmaterialcloggingor
restricting nozzle(Figure30).
ENGINEMAINTENANCE
'_/f Unintentional sparkingcanresultin fire or
WHENADJUSTINGORMAKINGREPAIRSTOYOURPOWER
WASHER
* Disconnectthesparkplugwirefromthe sparkplugandplacethe
wirewhereit cannotcontactsparkplug.
WHENTESTINGFORENGINESPARK
* Useapprovedsparkplugtester.
* DONOTcheckfor sparkwithsparkplugremoved.
electric shock.
ENGINEOILRECOMMENDATIONS
Figure30 - Free ForeignMaterial
5. Removelancefrom spray gun.
6. Using a garden hose, remove additional debris by back
flushing waterthrough lance (Figure31). Backflush between
30 to 60seconds.
7. Reinstallnozzleinto lance.
8. Reconnectlanceto spray gun.
Figure31 - Back FlushLance
Werecommendthe use of high=qualitydetergentoils acceptableif
classifiedfor service SF,SG,SH,SJor higher.DO NOTusespecial
additives.
Outdoortemperatures determinethe proper oil viscosity for the
engine.Usethe chart to select the best viscosity for the outdoor
temperaturerangeexpected.
mEm
lm| zmm
°F =20 =10 0 10 20 32 40 60
oc/o -2'o -1'o 6 lo 2'o
Temperature Range of Expected Use
* Below 50°F (10°C) the use of SAE 30 will result in hard starting.
** Above 80°F (27°C) the use of 10W30 may cause increased oil consumption.
Checkoil levelmore frequently.
NOTE:
Synthetic oil meeting &SAC GF-2,API certificationmark
and API servicesymbolwith "SJ/CFENERGYCONSERVING"
or higher,is an acceptable oil at all temperatures.Use of
syntheticoil doesnotalter requiredoil changeintervals.
NOTE:
9. Make sure gardenhose is connectedto pump water inlet.
Checkthat high pressurehose is connectedto spray gun and
pump. Turnon water.
10. Start enginefollowing instructions How to StartYour Power
Washer.
11. Test power washer by operating with each quick connect
nozzle.
16
Theengine is equipped withan "OilAlert System". This
systemwill automatically stopthe engine beforethe oil level
fails below a safe limit.Toavoidtheinconvenienceof an
unexpectedshutdown,always checkthe engine oil levelbefore
startup.
Page 19
CHECKOILLEVEL
CHANGINGENGINEOIL
Oil level should be checkedprior to each use or at least every 8
hoursof operation.Keepoil levelmaintained.
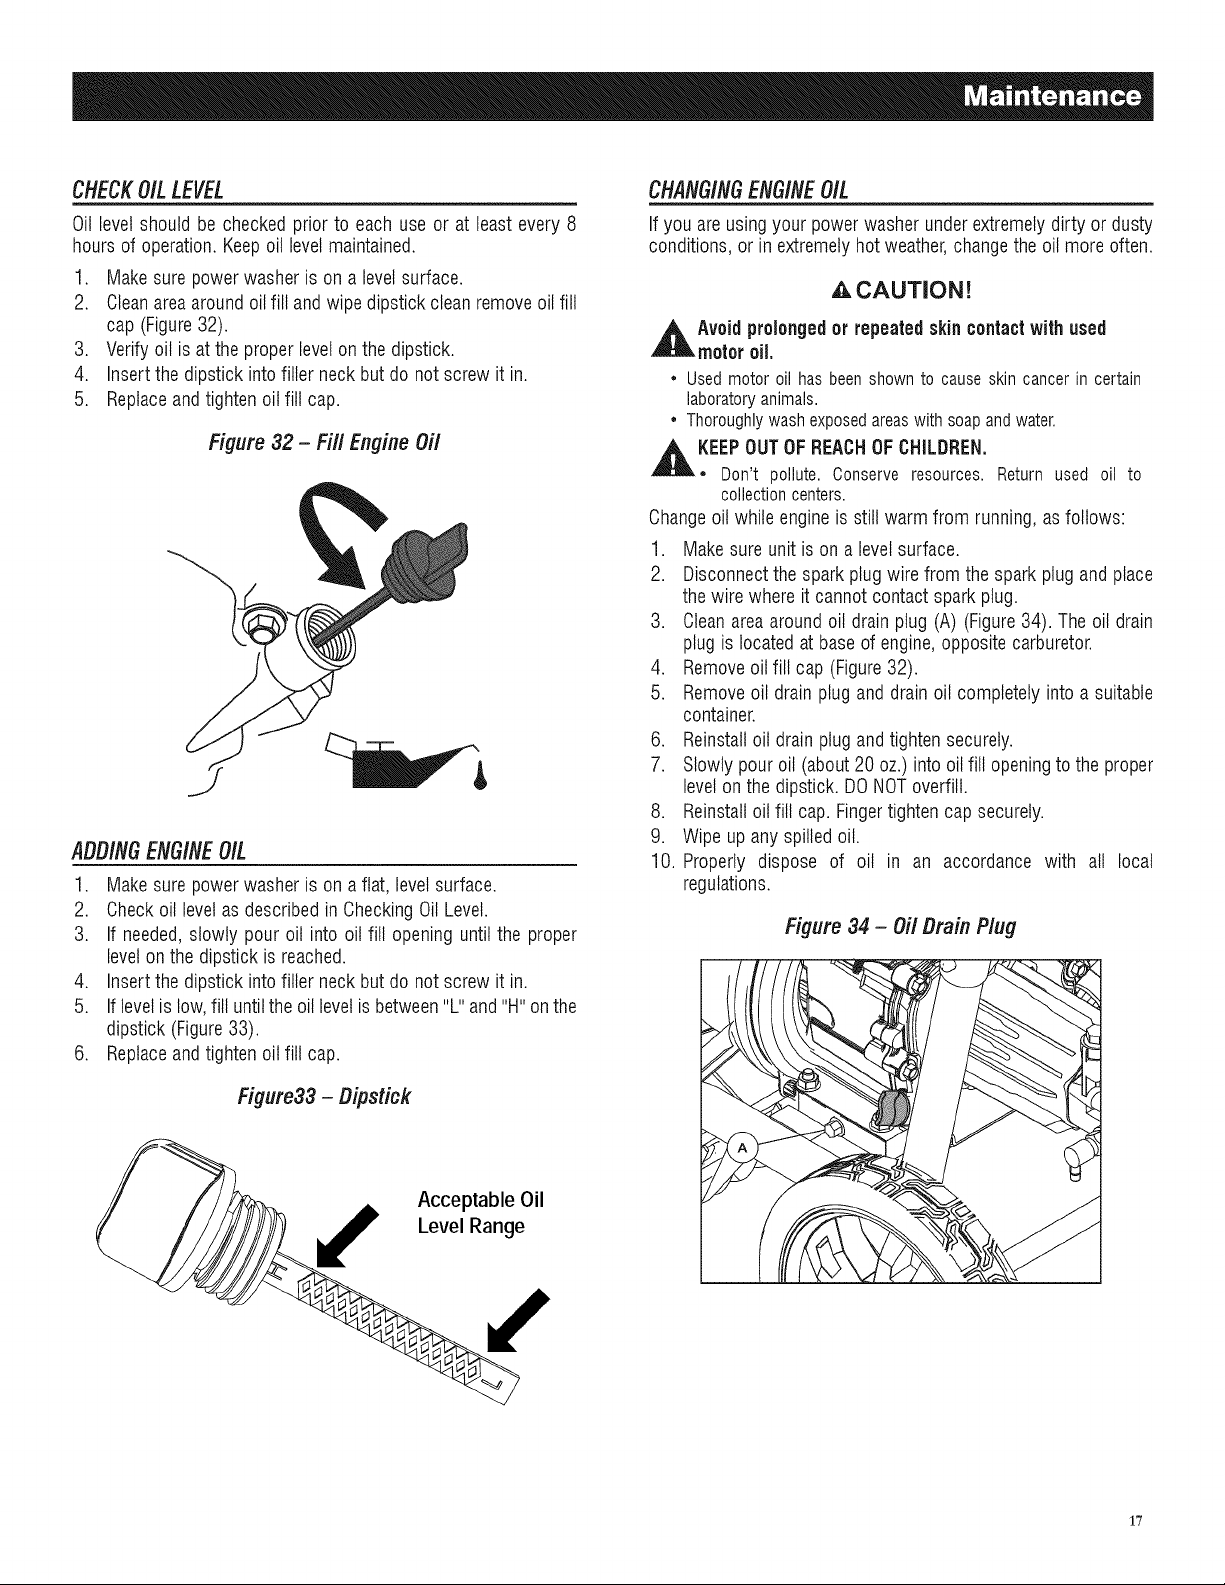
1. Makesure powerwasher is on alevelsurface.
2. Cleanareaaroundoil fill and wipedipstickcleanremoveoil fill
cap (Figure32).
3. Verifyoil is atthe properlevelonthe dipstick.
4. Insertthe dipstick intofiller neck butdo not screw it in.
5. Replaceandtighten oil fill cap.
Figure32- Fill EngineOil
ADDINGENGINEOIL
1. Makesure powerwasher is on aflat, levelsurface.
2. Checkoil levelasdescribedin CheckingOil Level.
3. If needed,slowly pour oil into oil fill openinguntilthe proper
levelonthe dipstick is reached.
4. Insertthe dipstick intofiller neck butdo not screw it in.
5. If levelis low,fill untiltheoillevelisbetween"L"and "H"onthe
dipstick (Figure33).
6. Replaceandtighten oil fill cap.
If you are usingyour power washer underextremelydirty or dusty
conditions,or in extremelyhot weather,changethe oil moreoften.
,ACAUTION!
,_ Avoidprolongedor repeatedskin contactwith used
motoroil.
• Usedmotoroil hasbeenshownto causeskincancerin certain
laboratoryanimals.
• Thoroughlywashexposedareaswithsoapandwater.
,_ KEEPOUTOF REACHOF CHILDREN.
• Don't pollute. Conserveresources.Return used oil to
collectioncenters.
Changeoil while engineis still warmfrom running,asfollows:
1. Makesure unit is on a levelsurface.
2. Disconnectthe sparkplug wirefrom the spark plugand place
thewire whereit cannot contactspark plug.
3. Cleanareaaround oil drain plug (A)(Figure34). The oil drain
plug is locatedat baseof engine,oppositecarburetor.
4. Removeoil fill cap (Figure32).
5. Removeoil drainplug anddrain oil completelyinto a suitable
container.
6. Reinstalloil drain plug andtighten securely.
7. Slowly pour oil (about20 oz.) into oilfill openingto the proper
levelonthe dipstick. DONOToverfill.
8. Reinstalloil fill cap. Fingertightencap securely.
9. Wipeup any spilledoil.
10. Properly dispose of oil in an accordance with all local
regulations.
Figure 34 - Oil Drain Plug
Figure33 - Dipstick
i_' Level Range
Acceptable Oil
1"7
Page 20
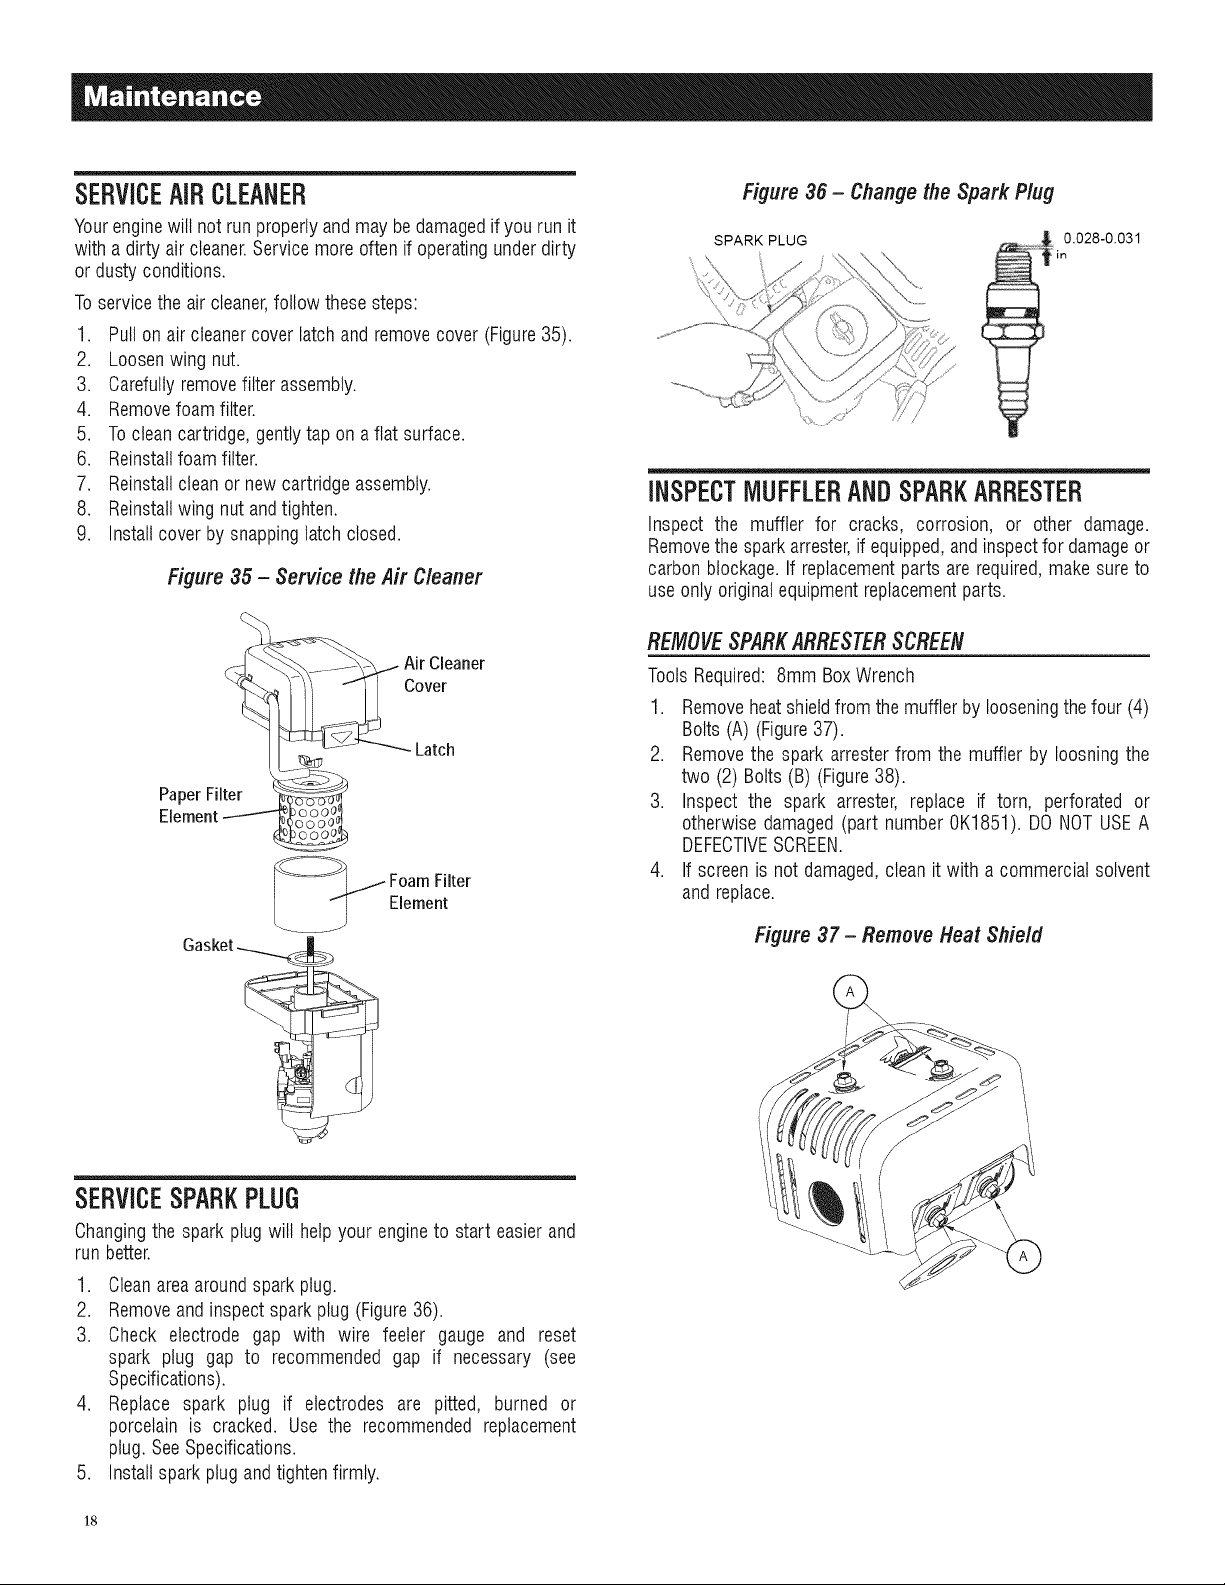
SERVICEAiRCLEANER
Yourenginewill notrun properlyandmay be damagedif you run it
with a dirty air cleaner.Servicemoreoftenif operatingunderdirty
or dustyconditions.
Toservicethe air cleaner,follow these steps:
1. Pull on air cleanercover latch and removecover (Figure35).
2. Loosenwing nut.
3. Carefullyremovefilter assembly.
4. Removefoamfilter.
5. Toclean cartridge,gentlytap on aflat surface.
6. Reinstallfoamfilter.
7. Reinstallclean or new cartridgeassembly.
8. Reinstallwing nutandtighten.
9. Installcover by snappinglatchclosed.
Figure 35 - Service the Air Cleaner
Figure 36- Change the Spark Plug
SPARK PLUG
_o_ m0.028-0.031
iNSPECTMUFFLERANDSPARKARRESTER
Inspect the muffler for cracks, corrosion, or other damage.
Removethespark arrester,if equipped,andinspectfor damageor
carbonblockage. If replacementparts arerequired,makesureto
useonly originalequipmentreplacementparts.
_-__- -__/Air Cleaner
Paper Filter
Element
_06ooo_
£--__ oamFilter
Element
SERVICESPARKPLUG
Changingthe spark plug will helpyour engineto start easier and
run better.
1. Cleanareaaroundspark plug.
2. Removeandinspect sparkplug (Figure36).
3. Check electrode gap with wire feeler gauge and reset
spark plug gap to recommended gap if necessary (see
Specifications).
4. Replace spark plug if electrodes are pitted, burned or
porcelain is cracked. Use the recommended replacement
plug. SeeSpecifications.
5. Installspark plugand tightenfirmly.
REMOVESPARKARRESTERSCREEN
Tools Required: 8mm BoxWrench
1. Removeheatshieldfrom the muffler by looseningthe four (4)
Bolts (A) (Figure37).
2. Removethe spark arresterfrom the muffler by Ioosningthe
two (2) Bolts (B) (Figure38).
3. Inspect the spark arrester, replace if torn, perforated or
otherwisedamaged (part number0K1851). DO NOTUSEA
DEFECTIVESCREEN.
4. If screen is not damaged,clean it with a commercial solvent
and replace.
Figure 37 - Remove Heat Shield
18
Page 21

Figure 38 - Remove Spark Arrester
:_ f_, Contact with muffler area can result in seriousburns. Exhaustheat/gasescan ignite
combustibles,structures or damagefuel tank
causinga fire.
* DONOTtouch hot parts and AVOIDhot exhaustgases.
* Allow equipmentto cool beforetouching.
* Keepat least 5 feet (152 cm) of clearance on all sides of power
washerincludingoverhead.
* It is a violation of CaliforniaPublic ResourceCode,Section 4442,
to useor operatethe engineon anyforest-covered,brush-covered,
or grass-coveredland unlessthe exhaustsystemis equippedwith
aspark arrester,asdefinedin Section4442, maintainedin effective
workingorder.Otherstatesorfederaljurisdictions mayhavesimilar
laws.
Contactthe original equipmentmanufacturer,retailer,or dealerto
obtain a spark arrester designedfor the exhaustsystem installed
on this engine.
* Replacementparts must be the same and installed in the same
positionas the originalparts.
AFTEREACHUSE
Water should not remain in the unit for long periods of time.
Sedimentsormineralscan depositon pumpparts andfreezepump
action. Followthese proceduresafter every use:
1. Shut off engine,turn off water supply, point gun in a safe
direction,andsqueezetriggerto relievetrappedpressure,and
let enginecool.
ALWAYSpointspraygun in safe directionand squeezespray
guntrigger,to releasehighpressure,everytimeyoustopengine.
Engagetriggerlockwhennotin use.
.
Disconnecthosesfrom spray gunandhighpressureoutleton
pump. Drainwater from hoses,spray gun, and lance. Usea
ragto wipeoff the hose.
.
Emptypump of all pumpedliquids. Checkthatthe engineON/
OFFswitch andfuel valvearein theOFFposition.Thenpullthe
recoil handleabout six times. Thisshould removemost liquid
in pump.
.
Storeunit in a clean,dry area.
5.
If storing for morethan 30 days, see the LongTerm Storage
section.
Fueland itsvaporsare extremelyflammable
and explosive. Fireor explosioncan cause
severeburnsor death.
WHENSTORINGFUELOREQUIPMENTWiTHFUELiN TANK
* Storeawayfromfurnaces,stoves,waterheaters,clothesdryers,
or otherappliancesthathavepilotlightor otherignitionsource
becausetheycanignitefuelvapors.
WINTERSTORAGE
NOTE:
Youmustprotectyourunitfrom freezing temperatures.
, Failureto do sowill permanentlydamageyourpumpandrender
yourunitinoperable.
* Freezedamageisnotcoveredunderwarranty.
Toprotectthe unit from freezingtemperatures:
1. Followsteps1-3 inthe previoussectionAfter Each Use.
2. Usepumpsaverto treatpump. This minimizesfreezedamage
and lubricatespistons and seals.
3. If pump saver is not available, connect a 3-foot section
of garden hose to water inlet adapter. Pour RV-antifreeze
(antifreezewithoutalcohol) intohose.Pullrecoilhandletwice.
Disconnect3-foot hose.
4. Storeunit in a clean,dry area.
producescancutthroughskinand its underlying
The highpressurestreamof waterthat this equipment
tissues,leadingto seriousinjuryand possible
amputation.Spray guntrapshighwaterpressure,even
whenengineisstoppedandwater is disconnected,
whichcan causeinjury.
* Keephighpressurehoseconnectedtopumpandspraygunwhile
systemispressurized.
19
Page 22
LONGTERMSTORAGE
If you do not planto usethe power washerfor more than30 days,
you must preparethe engineandpump for longterm storage.
PROTECTFUELSYSTEM
Fuelcan becomestalewhenstoredover30 days.Stalefuelcauses
acid and gum depositsto form in the fuel system or on essential
carburetorparts. To keepfuel fresh, usea fuel stabilizer,available
as a liquid additiveor adrip concentratecartridge.
Thereis no needto draingasolinefrom theengineif afuel stabilizer
is addedaccordingto instructions. Runthe enginefor 2minutesto
circulatethe stabilizerthroughoutthe fuel system. The engineand
fuelcan then be storedup to 24 months.
If gasolinein the enginehasnot beentreatedwith a fuel stabilizer,
it must be drainedinto anapprovedcontainer.Runthe engineuntil
it stops from lack of fuel.Theuse of afuel stabilizerin the storage
containeris recommendedto maintainfreshness.
PROTECTENG/NE
1. Changeengineoil.
2. Removespark plug.
3. Pour a tablespoon (5-10cc) of clean engine oil into the
cylinder.
4. Pull the starter rope severaltimes to distributethe oil in the
cylinder.
5. Reinstallthe spark plug.
6. Pull the starter rope slowly until resistanceis felt. This will
closethe valves so moisture cannotenterthe enginecylinder.
Returnthe starter ropegently.
CHANGEO/L
While engine is still warm, drain oil from crankcase. Refill
with recommended grade. See Changing Engine Oil in Engine
Maintenance.
_,CAUTION!
PROTECtiNGTHEPUMP
Toprotect the pump from damagecaused by mineraldepositsor
freezing,use PumpSaveror RV-antifreezeto treat the pump.This
preventsfreezedamageand lubricatespistons and seals.
* Failureto doso will permanentlydamageyour pumpandrender
your unit inoperable.
* Freezedamageis not coveredunderwarranty.
Toprotectthe unit from freezingtemperatures:
1. Followsteps1-3 inthe previoussectionAfter Each Use.
2. Usepumpsaverto treatpump. This minimizesfreezedamage
and lubricatespistons and seals.
3. If pump saver is not available, connect a 3-foot section
of garden hose to water inlet adapter. Pour RV-antifreeze
(antifreezewithoutalcohol) intohose.Pullrecoilhandletwice.
Disconnect3-foot hose.
4. Storeunit in a clean,dry area.
OTHERSTORAGEINSTRUCTIONS
1. DONOTstore fuel from one seasonto anotherunless it has
beentreated asdescribedin ProtectFuelSystem.
2. Replacefuel containerif it startsto rust. Rustand/ordirt infuel
can causeproblemsif it's usedwith this unit.
3. Coverunitwith asuitableprotectivecoverthat does notretain
moisture.
Storage coverscan beflammable.
*DONOTplaceastoragecoveroverahotpowerwasher.
*Let equipmentcool for a sufficienttime beforeplacingthe
coverontheequipment.
.
Storeunit in a cleananddry area.
TRANSPORTING/TIPPINGOFTHEUNIT
Do not operate,storeor transport the unitat an anglegreaterthan
15 degrees.
,_Hot oil may causeburns.Allow engineto coolbefore
draining oil. Avoid prolongedor repeatedskin exposure
with usedoil. Thoroughlywash exposedareaswith soap.
2O
Page 23

TBOUBLESHOOTiNGGUIDE
1. Low pressurenozzleinstalled. 1. Replacewith high pressurenozzle.
2. Water inletis blocked. 2. Clearinlet.
3. Inadequatewater supply.
Pumphasfollowingproblems:
failuretoproducepressure,erratic
pressure,chattering,lossofpres-
sure,lowwatervolume.
Detergent fails to mix with spray, cracked.
Engineruns well at no-load but 1. Enginespeedis too slow. 1. Move throttlecontrol to FASTposition.If engine
"bogs" when load isadded, still "bogs down", contact local servicefacility.
4. Inlet hose is kinked or leaking.
5. Cloggedinlet hosescreen.
6. Water supplyis over lO0°E
7. High pressurehose is blockedor leaks.
8. Spray gun leaks.
9. Nozzleis obstructed.
10. Pumpis faulty.
1. Detergentsiphoning tubeis not submerged. 1. Insert detergentsiphoningtubeinto detergent.
2. Detergentsiphoning tube/filteris cloggedor 2. Cleanor replacefilter/detergentsiphoningtube.
3. High pressurenozzleinstalled. 3. Replacewith low pressurenozzle.
! I
3. Provideadequatewaterflow.
4. Straighteninlethose,patch leak.
5. Checkand cleaninlet hose screen.
6. Providecoolerwater supply.
7. Clearblocks in outlet hoseor replacehose.
8. Replacespraygun.
9. Cleannozzle.
10. Contactlocal servicefacility.
1. Low oil level,"OilAlert System".
2. Dirty air cleaner.
3. Outof fuel.
Enginewill notstart;orstartsand
runsrough.
Engineshutsdownduring 1. Outof fuel. 1. Fillfuel tank.
operation.
Enginelacks power. 1. Dirty air filter. 1. Replaceairfilter.
4. Stalefuel.
5. Sparkplug wire not connectedto spark plug.
6. Bad sparkplug.
7. Water infuel.
8. Excessivelyrich fuel mixture.
J !
1. Fill crankcaseto proper level.
2. Cleanor replaceair cleaner.
3. Fillfuel tank.
4. Drainfuel tank; fill with fresh fuel.
5. Connectwire to spark plug.
6. Replacesparkplug.
7. Drainfuel tank; fill with fresh fuel.
8. Contact localservice facility.
21
Page 24

Manual PartNo. 0K1393 RevisionA (10/30/12) Printedin U.S.A.
Page 25

GENERAC _
IVianualdelProietario
I
23
Page 26

Introducci6n..........................................................25
Dondenos encuentran.................................................25
ReglasdeSeguridad............................................25
Simbolosde seguridady su significado........................25
Informaci6n general..............................................28
Conozcasu hidrolavadora.......................................................28
Articulos que no se muestran.......................................28
Especificacionesdet producto.................................................29
Informaci6nsobreemisiones..................................................29
Funcionamientoa granaltitud..................................................29
Desempaque...........................................................................30
Ensarnbiar.............................................................30
Ensambtar...............................................................................30
Agregueaceitepara motor......................................................31
Agregadode combustible........................................................31
Conectelamangueray etsuministrodeaguaalabomba.........32
Como usarlas boquillas..........................................................33
Limpiezay aplicacionde detergente.............................34
Enjuaguede la hidrolavadora........................................35
Limpiezadeltubo de descargade detergente...............35
Operaci6n.............................................................36
Operaci6n...............................................................................36
Localizaci6nde la hidrolavadora..............................................36
Lista de verificacionantesde encenderet motor.....................36
C6mo arrancarsu hidrolavadora.............................................36
Sistemade enfriamientoautom_,tico(aliviotermico)................38
Como apagarsu hidrolavadora................................................38
lVlantenirniento......................................................39
Recomendacionesde mantenimiento......................................39
Conogramade mantenimiento.................................................39
Bombade aceite.....................................................................39
Controlde emisiones..............................................................39
Mantenimientode la hidrolavadora..........................................39
Verifiqueel estadoy limpieetfiltro de latoma.........................39
Verifiqueet estadode las manguerasde alta presion...............39
Verifiqueet estadodel tubo de descargade detergente............40
Verifiqueet estadode la pistolarociadora................................40
Mantenimientode la boquilla...................................................40
Mantenimientodelmotor.........................................................40
Recomendacionessobreet aceitedel motor............................40
Verificaci6ndet nivelde aceite......................................41
C6moagregaraceiteal motor ......................................41
Cambiodel aceitede motor..........................................41
Serviciodetfiltro deaire..........................................................42
Servicioa la bujia...................................................................42
Inspecciondel silenciadory delsupresor dechispas .............42
Retireel tamizdet supresorde chispas.........................42
Luegode cadauso .................................................................43
Almacenamientoen invierno...................................................43
Almacenamientoa largo plazo.................................................44
Protecci6ndel sistemade combustible.........................44
Protecciondet motor....................................................44
Cambiode aceite.........................................................44
Protecci6nde la bomba................................................44
Otrascondicionesde almacenamiento....................................44
Transportee inctinaci6nde la unidad......................................44
Locaiizaci6ny correcci6nde fallas ......................45
Guiade Iocalizaci6ny correcci6ndefaltas..............................45
24
Page 27

INTRODUCCION
Gracias por comprar esta hidrolavadorafabricada por Generac
PowerSystems, Inc. Estemodetoesunahidrolavadoraimpulsada
por motor enfriada por aire, de alto rendimiento que opera
entre 2500 y 3100 psi, dependiendo de que modeto haya
comprado.Lasunidadescuentancon ruedasdisehadasa medida,
bomba de excentrica axial con pistones de acero inoxidable,
sistemaautomaticode enfriamiento,boquillasde conexionrapida,
manguerade alta presion,manguerade succion de detergentey
tanque(s) para sustanciasquimicas,dependiendodetmodelo de
la unidad.
EIsentidocomunyelcumpiimientoestricto deestasinstrucciones
especialessonesencialesparapreveniraccidentes.Eloperador
debeleerestemanualy entenderendetalletodas lasinstrucciones
y advertenciasantesde usar el equipo.Sicualquierpartedeeste
manual no se entiende,contacte al DistribuidorAutorizadomas
cercano para obtener informacion sobre los procedimientosde
arranque,operaciony mantenimiento.Eloperadores responsable
detuso apropiadoy segurodel equipo.
La hidrolavadora puede operar de forma segura, eficiente y
confiablesolamentesi se situa, opera y mantienecorrectamente.
Antesde operar,usar o guardar:
* Estudiecuidadosamentetodas las advertencias de seguridad
en estemanualyen etproducto.
* Familiaricesecon estemanualy con la unidadantesde usarla.
* Consulte la seccion Montaje de este manual para obtener
instrucciones acercade los procedimientosde montaje.Siga
todas lasinstrucciones.
Etfabricante no puede anticipar cada circunstancia posible que
pueda implicar un riesgo. Las advertenciasen este manual, y
en las etiquetasy calcomaniasen la unidadson, porIo tanto, no
exhaustivas.Si usaunprocedimiento,m_tododetrabajo otecnica
de operacion que el fabricante no recomiende especificamente,
segurese de que es seguro para otros. Tambienasegurese de
que et procedimiento,m_todo de trabajo o tecnica de operacion
utilizadano hagaque la hidrolavadoraseainsegura.
LA INFORMACIONINCLUIDAENELPRESENTESEBASAENLAS
MAQUINASEN PRODUCCIONA LA HORADELA PUBLICACION.
GENERACSE RESERVAEL DERECHODE MODIFICARESTE
MANUALENCUALQUIERMOMENTO.
Conserve estas instruccionespara futuras referencias. Si
prestaeste dispositivo a alguien,siempreentreguetambiena la
personaestas instruccionesy el Manualdel Propietario.
REGLASDESEGURIDAD
En toda esta publicacion, en los rotulos yen las etiquetas
adhesivasfijadas en la hidrolavadora,los bloques de PELIGRO,
ADVERTENCIA,PRECAUCIONy NOTAse usan para alertar al
personalsobre instruccionesespecialesacerca de una operacion
en particular que puede ser peligrosa si se efectua de manera
incorrecta o imprudente. Observelos cuidadosamente. Sus
definicionesson lassiguientes:
Indica una situacionoaccion peligrosaque,si no se evita,
puedeocasionar la muerte o una lesiongrave.
Indica una situacionoaccion peligrosaque,si no se evita,
podriaocasionar la muerte o una lesiongrave.
_. CUIDADO
Indicauna situacionoaccion peligrosaque, si nose evita,
podriaocasionar una lesionmenoro moderada.
NOTA:
LasNotas contieneninformacionadicional importantepara
un procedimientoy se incluyendentro del cuerpodeltextode
este manual.
Estasadvertenciasde seguridadno puedeneliminar los peligros
que indican. El sentido comun y etestricto cumplimiento con las
instrucciones especiales mientras realizala accion o el servicio
son esencialesparala prevencionde accidentes.
SiMBOLOSDESEGUR/DADYSU SlGN/F/CADO
Gases tSxicos Retroceso Shock electrico
Superficie resbaladiza Caida lnyecci6n de liquido
DONDE NOS ENCUENTRAN
Puede comunicarse con el Servicio at Cliente de Generac al
1-888-436-3722, o enInterneten www.generac.com.Registrela
informacion importante de la unidad en el siguiente cuadro para
futuras referenciasy/o solicitudes deservicio.
Numerode modelo
Numerode serie
Fechadecompra
Fuego Explosi6n Manual del Propietario
Partes m6viles
Objetos voladores Superficie caliente
25
Page 28

,_ PELIGRO:Elmoo6xidodecarboooquasegeneradurante
el usepuedematarenminutes.NUNCAusareninteriores,
enunvehiculo,oareascubierlas,INCLUSOSIventanasy
puerlasasianabierlas.UsarSOLOal aire fibre,y lejosde
ventanas,puertasyventilaciones.
AIgunosproductosquimicosodetergentespuedenser
_ erjudicialessiseinhalano ingieren,causandonauseas,
desmayosoenvenenamiento.
• Operarla hidrolavadoraSOLOal aire libre.
• Un motor enfuncionamientoliberamonoxide decarbono.
• Elmonoxidedecarbonoes ungasvenenososin colorniaroma.
Respirarelmonoxidedecarbonopuedecausardolordecabeza,
fatiga,mareos,vomitos,confusion,convulsiones,nauseas,
desmayos,o lamuerte.Siexperimentaestossintomas,retiresea un
lugarconairefrescoINMEDtATAMENTE.Busqueasistenciamedica.
• Evite quelos gases de escapeentrena un a.reacerradaatraves
de ventanas,puertas,tomas deventilacionu otras aberturas.
Expliquealas personas quese encuentrenen el interioracerca
de los sintomas del monoxidede carbono,para que se retirenal
airefresco si sientenlos sintomas.
• Se recomiendael use de un detectorde monoxidede carbono
dentrode cualquierlugar entrela hidrolavadoray el ocupante.
• Nunca enciendael motoren espacios cerrados, en unvehiculo,
incluso si hay ventanasy puertasabiertas.
• Siempre sedebeusar unequipo derespiracion o ma_scara
cuando existalaposibilidad de inhalacionde gasestoxicos.
• Leatodas las instrucciones del respiradoro mascara, de
manerade asegurarsequeproporcionara.nla proteccion
adecuadacontrala inhalacionde gasesy vaporestoxicos. Si
comienzaa sentir cualquieradelos sintomas delmonoxidede
carbono enumeradosantes,retiresea un lugarcon aire fresco
INIViEDtATAIViENTE.
,_ PELIGRO:NUNCAapuntelapisloladerociadoapersonas,
animales,dispositivoselectricoso plantas.Puedecausar
heridasgravesolamuerle.SIEMPREdirija lapistola
pulverizadoraenunadirecci6nseguray aprieteelgalillo
paradescargarlapresi6n,carlavezquapareel motor.Trabe
elsegurodelgatillocuandonoesteenuse.
* Lacorrientede agua a altapresion que generaeste
i_ equipo puedecortar la piely tejidos subyacentes,causandolesiones graves,posibleamputaciono muerte.
* NUNCApermitaque losNINOSoperenla hidrolavadorao jueguen
cercade ella. NOes un juguete.
* NUNCAreparela mangueradealta preston.Reemplacela.
* NUNCArepararunafuga en las conexionescon ninguntipo de
sellador.Reemplacela juntao el sello.
* NUNCAconectelamangueradealtaprestona laextensi6npara
boquillas.
* IVlantengala manguerade altapreston conectadaala bomba
y a la pistola pulverizadoramientrasel sistema seencuentra
presurizado.
* NUNCAasegurela pistola pulverizadoraen la posicion abierta.
* NUNCAabandonelapistola pulverizadoracuandola ma.quina
estafuncionando.
* NUNCAuseuna pistola pulverizadoraque notieneel seguro
delgatillo o proteccionpara gatilloen su lugary enbuenas
condiciones.
* SIEMPREdebeasegurarsede que la pistola pulverizadora,las
boquillasy dema.saccesoriosesta.ncorrectamentecolocados.
26
Lapistola pulverizadoracontieneaguaaalta presion,
incluso con el motor paradoy el aguadesconectada,que
puede causarlesiones.
,_ADVERTENCIA: Riesgode electrocuci6n.
electroshockoquemaduras.
_ l centactocanla fuentede energiapuedecausar
• NUNCApulvericecerca dela fuente de energia.
,_ AOVERTENCIA:El contactoconla zonadelsilenciadorpuede
resultar enquemadurasgraves.El taler de los gasesde escape
puedeencendercombustibles,estructuraso dafiar eltanque de
combustible,causandoun incendio.
• NOtoque las superficies calientesy EVITElos gasesde
escape.
• Dejeque elequipo se enfrie antesdetocarlo.
• Dejeal menos 5 pies (152 cm) deespaciofibre hacia
todos los lades, incluida la partesuperior.
• EsunaviolacionalCodigodeRecursos%blicosdeCalifornia,
Seccion4442, utilizaru operarelmotorencualquierarea
cubiertade basques,matorraleso hierba,a menosqueel
sistemade escapeesteequipadocon un apagachispas,tal
comese defineenla Seccion4442,mantenidoenbuenas
condicionesde operacion.Otrosestadosojurisdicciones
federalespuedentenerleyessimilares.
Pongaseen contacto con el fabricantede equiposoriginales,
vendedoro distribuidor paraobtenerun supresorde chispas
disefiadopara el sistemade escapeinstaladoeneste motor.
Los repuestosdeben serigualesy estar instaladosen lamisma
posicion quelas piezasoriginales.
ADVERTENCIA:El combustibley sus vaporesson
extremadamenteinflamablesy explosives.Unincendioo
explosi6npuedencausarquemadurasgravesola muerte.
ALAGREGAR0 DRENARELCOMBUSTIBLE
* Apaguela hidrolavadoray dejelaenfriar al menos 2
minutes antesderetirar eltapon decombustible.Afloje
eltapon lentamenteparaaliviarla prestonen eltanque.
* Lianao vacieel tanquedecombustibleai airelibra.
* NOsobrelleneel tanque.Dejeespaciopara la dilatacion
delcombustible.
* Si sederramancombustible, esperehastaque se
evaporeantesde encenderel motor.
* Mantengael combustible alejadode chispas, llamas,luces
pilate, calory otras fuentesdeignicion.
* NOenciendaun cigarrillo ni fume.
ARRANQUEDELEQUiPO
* Aseguresedeque la bujia,el silenciador,el tapon de
combustibley el limpiador de aireestan en su lugar.
* NOarranqueel motor sin la bujia instalada.
OPERARELEQUiPO
* NOincline el motor oel equipo demaneraque pueda
derramarsecombustible.
* NOpulvericeliquidos inflamables.
TRANSPORTAR0 REPARARELEQUIPO
* Debetransportar/repararel equipo con eltanquede combustible
vacio con la vD.Ivulade combustiblecerrada.
* Desconecteel cablede la bujia.
ALMACENARCOMBUSTIBLE0 EQUIPOSCONCOMBUSTIBLEENEL
TANQUE
* Almacenaralejadodecalderas, estufas, calentadoresde agua,
secadorasde ropau otros aparatoselectrodomesticosque
poseanluzpiloto u otras fuentesde ignicion, ya que pueden
encenderlos vapores del combustible.
Page 29

_ ADVERTENCIA:Lahidrelavadorapuedecrearcharcesy
superficies resbalosasmientrasestaen use.Elretrecesedela
pislolapulverizadorapuedeprovocarunacaida.
i_* Utilizarunicamentesobreunasuperficieplana.
,_ • El a_reade limpieza debera_tener inclinacionesy drenajes
adecuados parareducirla posibilidadde caidas debido a
superficies resbalosas.
contragolpepodfiadarlugara unagravecaida.
, NoIouseensuperficieselevadas,dondelaposibilidadde un
• Sujete firmemente la pistola pulverizadoracon ambas
manes cuando utilice pulverizado a alta presion para
evitarlesiones cuando lapistolaretroceda.
,_ ADVERTENCIA: El escapedel motor de este producto
contienesustancias quimicas queen el Estadode California
se sabe quecausanc;incer,defectos de nacimientou ntros
da_osreproduciivos.
,_ ADVERTENCIA: Esteproduciocontieneplemey compuestos
de plomn,queen el Estadode California se sabeque pueden
causardefectos de nacimientou otrosda_es reprnduciivos.
Laveselas manos luego de manejar este producto.
NOTA:
,_ADVERTENCIA: Elarrancadory otraspiezasquereranpueden
enredarInsmanes, cabello,ropao acceseries.
protectora.
= NUNCAoperelahidrolavadorasin lacarcasao cubierta
• NOuseropa suelta,joyas o elementosque puedan
quedaratrapadosenel arranqueo enotras partes de
rotacion.
• Ateel pelolargo y retire las joyas.
,I_ADVERTENCIA: Elretrocesodelcablede arranque(repliegue
rapido) puedecausarlesionoscerperaies.El rotrecesotirarade
Jamaney eJbrazehaciaeJmotormasrapidode Jeque ustedpodra
seitaflo. Puedetenorcomeconsecuenciahuesesrotes, fracturas,
meretenesy desgarres.
_t, • NUNCAtiredel cabledearranquesin antesliberarlapresion
, de lapistolapulverizadora.
• Paradescargarla presion,apuntelapistolahaciauna
direcci6nseguraytiredel gatillo.
• Cuandoarranqueel motor,tire lentamentedel cablehasta sentir
unaresistenciay luegotire rapidamenteparaevitarsu retroceso.
• Despuesde cada intentode arranqueen queel motor no
encienda,dirija la pistola pulverizadorahacia unadireccion
seguray aprieteel gatiNoparaNberarla presion alta.
• Sujetefirmemente lapistola pulverizadoracon ambasmanes
cuando utiNcepulverizadoaalta presion para evitarlesiones
cuando lapistola retroceda.
,_ADVERTENCIA: Las chispasnointencienalespuedenrosultar en
un chequeelectrice.
ALHACERAJUSTESOREPARACIONESA SUHIDROLAVADORA
* Desconecteel cabledela bujiay col6quelodondenopuede
hacercontactoconlabujia.
ALPROBARSI HAYCHiSPASENELMOTOR
, Useun probadoraprobadopara bujias., NOrealice la
prueba sin labujia conectada.
El rociar dealta presionpuededa_ar articulos fr;igiles come
elvidrio,
NOapunte la pistolade rociadoavidrio cuandousala boquilla
MAXroja (0°).
NUNCAapunte la pistola de rociado a personas, animales,
dispositivoselectricos o plantas.
NOTA:
Eluse inadecuadode la hidrolavadorapuededa_arlay cortar
suvida util.
• Si tiene preguntas acerca del use previsto, consulte con su
proveedoro contacteaun centre de servicio calificado
• NUNCAopere unidadesdar_adaso con partes faltantes,o sin
cubierta protector&
• NOomitaningt]ndispositivodeseguridaden estamaquina.
• NOoperela hidrolavadoraperencimade la presion nominal.
• NOmodifiquela hidrolavadoradeningunamanera.
• Antesdeutilizarla hidrolavadoraen climasfries, verifiquetodas
laspartes delequipoparaasegurarsedequeno se haformado
hielo.
• NUNCAmueva la maquinatirando de las mangueras.Use la
manija queviene en la unidad.
• Verifique el sistema de combustible en busca de fugas o
signos dedeterioro,come manguerasdesgastadaso porosas,
abrazaderasflojas o ausentes, o tanqueo tapa dar_ada.Corrija
todos los defectosantesdeoperarlalavadora.
• Este equipo esta dise_ado para usarse ONICAMENTEcon
partes Generacautorizadas.Si el equipose utilizacon partes
que NOcumplencon lasespecificacionesminimas, el usuario
asumetodos los riesgosy responsabilidades.
,_ ADVERTENCIA: Riesge de lesienesen losojos. El agua
reciada puedesalpicar o lanzarnbjetos.
•. cerca de equiposenfuncionamiento.
• Siempre use gafasde seguridadal usar esteequipoo
• Antes de encenderlahidrolavadora,aseguresede estar
usando lasgafas de seguridad.
• NUNCAsustituyagafas per gafas de seguridad.
2"7
Page 30

CONOZCASU HiDROLAVADORA
Lea este manual del propietario y las reglas de seguridad antes de
operarsu hidrolavadoradealta presion.
Si presta este dispositivo a alguien, SlEMPREentreguetambien a la
persona estas instrucciones y el Manual del Propietario.Compare las
ilustraciones con su lavadora a alta presion para familiarizarse con la
ubicacion de los variados controles (Figura 1). Conserve este manual
parafuturas referencias. En el sitio web de Generacse puedenimprimir
manualesdel propietarioderemplazo.
A- Pistola pulverizadora- Controla la aplicacion de agua sobre la
superficie a limpiar mediante un dispositivo con gatillo. El gatillo
incluye unseguro.
B- Lanza conconectorr_ipido- Permitecambiarentre boquillas.
C- Manguera de alia ptesiou- Conectaun extremecon labomba de
aguay el otro a la pistolapulverizadora.
D - Arraucador de retroceso- Seutiliza paraencenderel motor.
E- Llenado de aceite - Verifiquey agregueaceite.
F - FUtredeaire - Protegeel motoralfiltrar polvo y suciedadde latoma
de aire.
G - Bomba - Desarrollalaalta presion.
H - V_ilvulade alivio termite - Hacecircular aguaa travesdela bomba.
Cuandoel agua alcanzalos 125°I, la bomba descargaaguatibia al
suelo. Estoimpide dahosinternes a la bomba.
i- Interruptor de encendido/apagado del motos - Ponga este
interrupter en la posicion "ON" antes de usar el arrancador de
retroceso. Paradetener el motor, ponga el interrupter en posicion
"OFF".
J - V_ilvulade descarga - Controlala presion alta de salida.
K- Salida de alia presi6u - Conexionparalamangueradealtapresion.
L - Tomade agua- Conexionparala mangueradejardin.
M- Tanque de combustible - Tanque para Ilenado de combustible
regular sin plume. Siempre deje espacio para la dilatacion del
combustible.
N - Interruptorde combustible encendido/apagado - Enciendey apaga
el suministro decombustible al motor.
O - Estrangulader - Preparaal motorfrio para el arranque.
P- Palanca de admisioa de gases - Aumentaodisminuyela velocidad
del motor.Elregulador de gasesdebe estaren su recorrido ma.ximo
cuando lahidrolavadoraestaen use.
Q- Boquillas - RRR- Tanquede quimicos- Seusa paraalmacenarlos
detergentesquese enviarana la corriente de baja presion.(algunas
unidadespueden notener tanque,otener uno solo).
S-Precaucion/Instruccienes de eperacion -Identifica los
procedimientos adecuados de encendido/apagado de la
hidrolavadora.
T- Taponde drenaje- Seusa paradrenar aceitedel motor.
U - Ubicacion del numerode serie
ARTICULOSQUENOSEiVIUESTRAN
* Etiqueta de identificacion (en la carcasa del ventilador del motor) -
Indicael modeloy el numerode seriede la hidrolavadora. Tengalosa
mane si llama parasolicitar asistencia.
* Tubo/filtrodedescargadedetergente- Seusa paraenviareldetergente
de la hidrolavadoraa la corriente de bajapresion.
T
Figura1- Funcionesy Controles
A
C
K
F
H
IVl
D
UP
28
Page 31

ESPECIFiCACIONESDELPRODUCTO
CONSUMIOOR
Preston- (PSI/ BAR) 2500/172 2700/186 3100/213
Tasadeflujo - (GPM/ LPM) 2.3/8.7 2.7/10.2
Temperaturadel aguade entrada- (°F/ C°) 100/38 IVla.x.
Longituddela manguera- (pies/metros) 25/7.6 25/7.6 30/9.1
Tanque(s)de productos quimicos- Numeropor unidad 0 1 2
Tanquede productos quimicos - Capacidad(galones-litros) N/A 0.75/2.8 0.75/2.8
Boquillas- Numeropor unidad 3 4 5
Longituddela lanza(pulgadas/ cm) 20/51
Pistola Esta.ndar Deluxe
Desplazamientodelmotor- (pulgadascubicas/ cc) 11.9/196 12.9/212
Bujiatipo F7TCo equivalente
Espaciamientodela bujia - (pulgadas/ mm) 0.028-0.031/0.70-0.80
Capacidadtotal - (cuartos/ litros) 3.7/3.5
Capacidadde aceite- (onzas/ litros) 20/0.6
Sistemadeapagadoporbajo nivel deaceite Si
InterruptorOn/Off: Si
INFORIV]ACIONSOBREElVllSIONES
La Agenciade Protecci6nAmbientalde los EE.UU. (EPA)(y laJunta de
Recursos del Aire de California [CARB] para los equipos certificados
conforme alas normas deCalifornia) requierenque este motor cumpla
las normas de emisiones de escapey evaporacion.Localice la etiqueta
adhesivasobrecumplimientodelas normasreferidasaemisionescolocada
sobre el motor para determinarque normas satisface el generador,y
para determinar que garantia de emisiones corresponde.El motor esta_
certificado parasatisfacer las normas de emisiones correspondientesa
las gasolinas.Esimportanteseguir lasespecificacionesde mantenimiento
indicadas en la seccion Mantenimiento para asegurar que el producto
cumpla con las normasde emisionesaplicables durantetoda su vida util.
Estemotorusaajustesde carburacionempobreciday otrossistemas para
reducirlas emisiones.Lamanipulacionindebidao laalteraciondel sistema
de control deemisionespuedenaumentarlasemisionesy constituyeuna
infraccion delaleyfederalo la deCalifornia.Las accionesque constituyen
manipulacionindebidaincluyen, entre otras:
• Retiro o alteraci6n de cualquier parte de los sistemas de admision,
combustibleo escape.
• Alteraci6n o anulacion del varillaje del regulador o el mecanismo
de ajuste de velocidad a fin de que el motor funcione fuera de sus
para_metrosde diseho
Si observa alguno de los siguientes sintomas, pida alconcesionario de
servicio queinspeccione o reparesu motor:
• Dificultadpara arrancar ocalada despuesdel arranque
• Ralentiirregular
• Fallode encendidoo contraexplosionesbajo carga
• Postcombustion(contraexplosiones)
• Humode escapenegroo alto consumo decombustible
FUNOiONAlVllENTOAGRANALTiTUD
El sistema de combustible de este motor puede verse afectado
por el funcionamiento en altitudes ma_selevadas. Para garantizar el
funcionamientocorrecto, puede instalarseun kit paraaltitud cuando sea
necesario.Vealatabla a continuacionparadeterminarcuandose requiere
un kit para altitud. El uso de este motor sinel kit paraaltitud apropiado
puede aumentar las emisiones del motor y disminuir la economia de
combustible y el rendimiento. Los kits pueden obtenerse en cualquier
concesionario,y debenser instaladospor unapersonacualificada.
Intervalode aititud* N0mero de kit psi
0 - 5000 pies Nose requiere 2500/2700/3100
5000 - 7000 pies 0K2015 2500/2700
5000 - 7000 pies 0K2016 3100
*Elevacionsobre el niveldel mar.
NOTA:
Si se ha instalado el kit para aititud y el motor se utilizaraa una
altitud en la que no se requiere el kit, el motor se debevolver a
ajustar a la coofiguraci6nde f;ibrica. Elusode un motor en altitudes
re;is bolas cooel kitiostalado puedecausarel sobrecaleotamieoto
del motor y ocasiooardodosgraves al motor,y puedeocasiooarun
menor rendimientoy mayores emisiooes.
29
Page 32

DESEIVIPAQUE
1. Retirelasbolsasde las partes,accesoriose insertos quese incluyen
con la hidrolavadora.
2. Abra lacajade cart6n cortando las esquinasde arribaa abajo.
3. Aseguresedequeestan todoslos articulos que seincluyen antesdel
montaje.
• Unidadprincipal
• Montajede la agarradera
• Mangueradealta presi6n
• Mangueradesucci6n yfiltro
• Pistolapulverizadora
• Lanzacon juntade conexionrapida
• Botelladeaceite
• Ganchopara manguera
• Bolsade partes (que incluyeIo siguiente):
- Tapa del tanque de productos quimicos con orificio, si el
modelo cuentacon unaTanqueparaproductos quimicos
- Manualdel Usuario
- Tarjetade registrodel propietario
- Bolsaconteniendoboquillascodificadas por color
4. Sifaltara algunarticulo de su caja, contacteal Servicio alClientede
Generacal 1-888-436-3722. CuandoNameparasoNcitarasistencia,
tenga amano los numeros de modelo y de serie que seencuentran
enla etiquetadedatos.
5. Completey envielatarjetade registro Escribael numero demodelo,
numero de serie y fecha de compra en la tabla queaparece en la
seccion"Dondeencontrarnos".
ENSAMBLAB
Leatodo el manualdel propietarioantes de realizarel montaje o si tiene
problemas con el montaje de su hidrolavadora, contacte al Servicio
al Cliente de Generacal 1-888-436-3722. Cuando Ilame para solicitar
asistencia, tenga a mano los numeros de modelo y de serie que se
encuentranenla etiquetadedatos
,
Coloquela agarradera(A) sobre los soportes parala agarradera(B).
Presionelosbotonesde enganchey dejeque laagarraderasedeslice
asu posici6n (C). El boron bloquearala agarraderaen su posici6n
(Figura2).
NOTA:
Puedeset necesariomover de ladoa ladolos soporles para la
agarradera, demanera de alinear la agarradera y que deslice
correctamealesobre lossoporles.
2. Instaleel gancho paralamanguera(Figura3).
Figura3 - lnstalar el ganchoparala manguera
/
/
\
i
3. Inserte las boquillas codificadas con colores en los espacios
dispuestospara elloen la agarradera(Figura4).
4. Coloquepistola pulverizadoray la boquiNadeextensionenel soporte
parala pistolacomo se muestra (Figura4).
Figura4 - lnserfelasbequillas
/
Figura2 - Engancharla agarradera
5. Enrollela manguerade latapresion y cuelguelaen el gancho.
30
Page 33

Sujeteeltubo de succion en elpunto A (Figura5).
Figure 5 - Ubicaci6n del tube de sif6n
AGREGUEELCOMBUSTIBLE
El combustibledebecumplir con los siguientesrequisitos:
• Gasolinalimpia,fresca y sin plomo.
• Unoctanajeminimo de 87/87 AKI (RON91).
• Esaceptablela gasolinacon hasta un 10%de etanol.
NOTA:
Evitedafiosa la hidrolavadora.No seguir las recomendaciones
acerca del combustiblequeaparecen en el IVianualdel Usuario
anular;i la garantia.
* NOuse gasolina no aprobada,como la E85.
* NOmezcleaceite en lagasolina.
, NOmodifiqueelmotor paraquefuncioneconcombustiblesalternativos.
Para proteger al sistema de combustible de la gelificacion, mezcle un
estabilizanteal agregar el combustible.Vea Almacenamiento No todos
los combustibles son iguales. Si tiene problemas con el arranqueo de
desempeho luego de usar un combustible, cambie aun proveedor o
marca diferente.
AGREGUEACEITEPARAMOTOR
1. Coloquela hidrolavadoraenuna superficie lisa.
2. Limpieel area alrededordela.readeIlenadode aceitey retirela tapa
anaranjada!varilla
3. Con un embudo para aceite (opcional) vierta lentamente aceite
en la abertura de Ilenado.Vea la seccion Mantenimientopara la
recomendacionsobre el tipo de aceite.
NOTA:
Enaigunas unidadeshayre;is de un puntopara Ilenadode aceite. En
estos casos,solo es necesariousarunode los pnntospara Ilenado
de aceite.
4. Oompruebeperiodicamentehasta queel nivel deaceiteesteentre"L"
y "H" enlavarilla de medicion (Figura6). NOLLENEENEXCESO.
Figura 6- Varilla de medici6n
Aceite aceptable
Rango de nivel
extremadamenteinfiamablesyexpiosivos.Un
EIcombustibley sus vaporesson
incendioo explosi6npuedencausar
quemaduras graves o la muerte.
AL AGREGARCOMBUSTIBLE
* Apague la hidrolavadoray dejela enfriar al menos (2) minutos
antesderetirareltapon decombustible.Afloje eltapon lentamente
paraaliviar la presioneneltanque.
* Lleneeltanquede combustibleal aire libre.
. NO sobrellene el tanque. Deje espacio para la dilatacion del
combustible.
* Si sederramancombustible,esperehastaque seevaporeantesde
encenderel motor.
* Mantengael combustible alejadode chispas, llamas, lucespiloto,
calory otrasfuentesde ignicion.
* NOenciendaun cigarrillo ni fume.
1. Limpieel areaalrededordeltapon de combustible, retireeltapon.
2. Agreguecombustible regularsin plomo en el tanquede combustible
lentamente.Tengacuidado de no sobrellenarloLlenehasta la parte
inferiordel filtro, estopermitira,la expansiondel combustible (Figura
7).
3. Coloque el tapon de combustible y deje que se evapore el
combustiblederramadoantes dearrancarel motor.
Figura 7 - Agregado de combustible
NOTA:
Cualquierintento de arrancar el motorantes de que se le haya dado
servicio apropiado conel aoeite recomendadopnedetraer como
resultadounafalla del motor.
5. Reemplacelatapa/varillade la bocaparaIlenadodeaceitey apretar.
31
Page 34

CONECTELAMANGUEBAYELSUMINISTRODE
AGUAALABOMBA
NOTA:
NOencienda la bombasi el suministrnde agua noest_iconectadoy
encendido. Losda_osa consecuenciadelincumplimientode estas
instruccionesanular;i la garantia.
NOTA:
Retirey desechela tapa de embarquede la entrada de agua de la
bombaantes de conectarla manguera.
,
Deje correr agua por su manguera de jardin durante al menos
30 segundosparalimpiar restosde suciedad.
2.
Antes de conectar la manguera de jardin a la toma de entrada,
inspeccione el filtro de toma (A) (Figure 8). Limpie la pantalla si
contiene suciedad,o reemplacelasi esta_dahada. NOenciendala
hidrolavadorasi elfiltro de toma estadahado.
IMPORTANTE:NOsuccioneaguaestancadaparasuministraragua.SOLO
useaguafria (menos deIO0°F). Elsuministrodeagua debeser adecuado
paramanejarma.sde 3.8 galonesporminuto y no menos de30 psi.
NOTA:
El usodeannv_ilvulade unavia (interrupterde vacino v_ilvulade
retencion)en la toma de la bomba puedecausar darns en la bomba
oen el conectordeentrada.
* DEBEhaber al menos diezpies de manguerade jardin libre entre la
toma de agua de la hidrolavadoray cualquier dispositivo, como un
interruptor devacio o va.lvuladeretencbn.
* Los dahos a consecuenciadel incumplimientode estas instrucciones
anulara,la garantia
Figura8 - lnspecdone el filtrodela toma
Figura g - Cenectar la manguera de jardin
Riesgode lesiones en Ins ojos.El agua rociadapnede
.._ salpicar olanzar objetos.
= Siempre use gafas de seguridadal usar este equipo o cerca de
equiposen funcionamiento.
* Antesdeencenderla hidrolavadora,aseguresedeestarusandolas
gafasde seguridad.
= NUNCAsustituyagafas porgafas de seguridad.
,
Conecte la lanza a la pistola pulverizadora (Figura 10). Ajustela
manualmente
Figura 10 - Enganchar la lanza
3. Conectarla mangueradejardin (queno excedaIns50 pies delargo)
ala toma de agua(Figura9). Ajustelo manualmente
32
5. Engancheel extremode lamanguerade altapresion a la base de la
pistola pulverizadora(Figura11). Ajustelamanualmente.
Figura 11 - Cenecte la manguera a la pistola redadera
f
Page 35

puedecertarla pielytejidossubyacentes, ¢ausandolesiones
La corrientede agua a aita presi6nquegenera este equipo
gravesy posibleamputaci6m
* NUNCAconectela manguerade alta presiona la lanza
* Mantenga ia manguera de alta presion conectada a ia bomba
y a ia pistola puiverizadoramientras el sistema se encuentra
presurizado.
* Siempre debe asegurarsede que la pistola pulverizadora,las
boquillasy demas accesorios estancorrectamentecolocados.
6. Conecte la manguera de alta presion a la bomba (desenrolle la
mangueraantesdeconectarlaa la bombao ala pistolapuiverizadora)
(Figura12). Ajustelamanualmente
A CUIDADO
Lamanguerapnedeset dadadnsi se entraencontactoconel
motorcalienteo el silenciador.
Figura12 - Conectela mangueradeaRapresion a
la flomfla
COMOUSARLASBOQUiLLAS
La conexionrapida sobre lalanzade la boquilla le permite cambiarentre
distintasboquillas. Sepuedecambiarde boquillamientrasla hidrolavadora
estafuncionando,si sea trabado el gatillodela pistola pulverizadoraenla
posicionsegura. Lasboquillasmodifican la presiony elpatronderociado
como se muestra.
®
Paraobtenerunalimpiezamas efectiva,mantengalaboquillade8 a24
pulgadas(20 a 61 cm) dela superficie alimpiar.
®
Si mantieneia boquilla muy cerca, especiaimentesi setrata de una
boquillade altapresion, puededaharla superficie a limpiar.
puedecertar la pielytejidossubyacentes, causando lesiones
La corrientede agua a alia presi6nque genera este equipo
graves y posibleamputaciom
* NUNCAintercambieboquillassin que el gatillo este bloqueadoen
ia pistolapulverizadora.
NOtuerza laboquilla mientraseste rociando
Sigaestas instruccionespara cambiar iasboquillas:
1. Tire del anillo de conexion rapida y retire la boquilla. Guarde las
boquillasen el soporte provisto paralos accesorios (Figura14).
Figura 14 - Boqui#as
Encienda el suministro de agua, aprete el gatillo para purgar el
sistemade bombeode aire(Figura13).
Figura 13 - Apriete el gati//o
.
Seleccionelaboquilla deseada.
3.
Tire del anillo, inserte ia nuevaboquillay suelteel anillo. Tire de la
boquillaparaasegurarsede que esta_bienmontada.
Para enjuagues delicados (presion ma_sbaja y mayor flujo),
limpiezade autos/camiones, botes, caravanas,mueblesde patio,
equipoparacesped,etc.,seleccionala boquillablanca (Figura15).
Figura 15 - Boqui#a depresion para lavade (blanca)
33
Page 36

• Paralavado general(demedia presiony caudal medio),ideal para
todo tipo delimpiezas,comofachadas, patiosdeladrillo,cubiertas
de madera, entradas,aceras, pisos de garaje,etc., seleccione la
boquillaverde (Figura16).
Figura 16- Boqui//adepresi6npara limpieza(verde)
Figura18- Boqui//ademaximapresi6n (roja)
• Cuandoapliquedetergente,solo usela boquillanegra(Figura19).
Solo use detergentes/jabonesseguros para lahidrolavadora,para
ayudarcon laeliminacionde suciedady mugrede unavariedadde
superficies.
,, Paraenjuaguemedio (presionma_saltay caudalmedio),idealpara
quitar manchas en superficiesduras porosas como caminos de
acceso,pisos de garajesy patios deladrillos (Figura17).
Figura 17 - Boqui//a de presion para rajas (amari//a)
" Para enjuague profundo (presion mas alta y flujo mas bajo),
para superficies rebeldes o de dificil acceso como superficies
en segundo piso, remocion de pintura, manchas de aceite,
eliminaci6nde oxido u otras sustanciasdificiles (alquitran,resina,
grasa, cera,etc.), seleccionela boquillaroja (Figura18).
,A CUIDADO
,_ Esta punta(boquillaroja) puededafiar la supetficiedetrabajo
si se coloca muy cerca de la misma o sise mantiene en la
misma posici6npot mucho tiempo.
Figura 19- Boqui//a de detergente (Black)
LIMPIEZAYAPLICACIONBEBETERGENTE
,A CUIDADO
,_Los productosquimicos puedencausarlesionesen el cuerpo
y/o a la ptopiedad.
• NUNCAuse liquido causticocon la hidrolavadora.
• SOLOuse detergentes/jabonesseguros para hidrolavadora.Siga
todas las instrucciones de losfabricantes.
Paraaplicardetergente,siga estos pasos:
1. Lealnuevamentecomo usar las boquillas.
2. Abralatapadel contenedor(si corresponde,Figura20).
3. Preparelacantidaddesolucionde detergentequerequieraeltrabajo.
34
Page 37

Figura20 - Tanquey cubierta para pmductos quimices
Tapondel
recipiente
• Encenderel motor sin que estentodas las boquillasconectadasy
sin el suministro de aguaencendidopuededafiar la bomba.
• Los dafios a consecuencia del incumplimiento de estas
instruccionesanularala garantia
9. Enciendael motor siguiendo las instrucciones O6mo encendersu
hidrolavadora.
10. Aplique el detergentesobre la superficie seca, comenzandoen la
parte inferior de la misma y dirigiendose hacia arriba utilizando
movimientoslargos, parejosy superpuestos.
11. Permita que el detergente "penetre" de 3 a 5 minutos antes de
enjuagar.Apliquenuevamentesegunseanecesarioparaimpedir que
la superficiese seque.NOpermita queel detergenteseseque sobre
la superficiea limpiar (podriaquedarcon manchas).
IMPORTANTE: Usteddeberalavar el sistemade inyeccion dedetergente
despues de cada uso colocandoel filtro en un balde de agua limpia y
haciendofuncionar la hidrolavadoraabaja preston durante1-2 minutos.
4. Dependiendodelmodelo, inserte el filtro en el extremo del tubo de
succion a traves del orificio en la tapa suelta (quese suministra)
(Figura21).
5. Instaleeltap6n y el tubo dedescargaen el tanque.
6. Aseguresedequeeltubo dedescargaestecompletamentesumergido
en el detergente.
Figure 21 - instate el tube de descarga
NOTA:
Aseguresedequefiltropermanececompletamentesumergidoenel
detergentedurantesuaplicaci6n.
NOTA:
Elcontactocon el silenciadorcalientepuededa_ar el tube de
descargade detergente.
• AI colocar el tubo en la botella dela solucionde detergente,dirija
el tubo demaneraque no toque el silenciadorcaliente.
7. Asegurese de que la boquilla negra de detergente se encuentra
instalada.
NOTA:
Eldetergenteno se puedeapiicar conla boquilla dealia presi6n
(amarilla, blanca, verde o roja).Solo debe usarla boquilla negra con
el detergente.
8. Aseguresedeseguir todas las instrucciones.
NOTA:
Debe colocartodaslas mangueras antes deencender el motor.
ENJUA6UEDE LA H/DROLAVADORA
1. Quitelaboquilla negradedetergentede la lanza.
2. Elija e instale la boquilla de alta presi6n deseada siguiendo las
instrucciones enOomousar las boquillas
3. Dirija la pistola pulverizadora en una direccion segura y lejos de
personas,animalesy plantas. Presioneel gatillopara quese elimine
cualquierresto de producto quimico del sistema.
4. Mantenga la pistola pulverizadora a una distancia segura de la
superficie quedeseapulverizar.
__,_. l retrocesodela pistola pulverizadorapuede
• Tengamuchocuidadosi tieneque usarlahidrolavadoradesdeuna
escalera,un andamiou otro lugarsimilar.
• Sujete firmemente la pistola pulverizadora con ambas manos
cuandoutiliceel rociadoaaltapreston paraevitarlesionescuando
la pistolaretroceda.
5. Apliqueun rociado de alta preston en un area pequefia, despues
revisesi lasuperficie sufrio dafios. Si no haydafios, puede asumir
quees seguro continuarcon el lavado.
6. Comiencepor la parte superior de la superficie que va a enjuagar,
dirigiendosehacia abajocon los mismos movimientos superpuestos
queutilizo para la limpieza.
provocarunacaida.
• Utilizarunicamentesobre una superficie plana.
• No utilizar sobre superficies elevadaspara prevenirelriesgo
de una caidaseria.
UIVlPIEZADELTUBODEDESCAR6ADEDETER6EflTE
Si uso el tubo de descargade detergente,debe lavarlocon agua limpia
antesde parar elmotor.
1. Coloque el tubo de descarga de detergente/filtroen un balde con
agualimpia.
2. Quitelaboquilla de altaprestonde la extensionparaboquilla.
3. Elija e instale la boquilla negra de alta preston siguiendo las
instrucciones en06mo usar las boquillas
4. Enjuaguedurante1 a 2 minutos.
5. Apague el motor siguiendo las instrucciones 06mo detener la
hidrolavadoray corte del suministro de agua.
6. SlEIVlPREdirija la pistola pulverizadora en una direccion segura,
aprieteelgatillo paradescargarelaguaaaltapreston.Trabeelseguro
del gatillocuando no este enuso.
35
Page 38

IMPORTANTE: La pistola pulverizadora contiene agua a alta presion,
incluso con el motor parado y el aguadesconectada.
poedecortar la piely tejidos subyacentes, causando lesiooes
La corrieotede agua a alia presiooque generaeste equipo
gravesy posibleamputaci6n. La pislolapulverizadora
cooliene agua a aita presion,inclusocon el motor parado y
el agua desconectada, que puedecausar lesiooes.
• Mantengala mangueradealtapresion conectadaa labombay ala
pistolapulverizadoramientrasel sistemase encuentrapresurizado.
• SIEMPREdirija la pistola pulverizadoraen una direccion seguray
aprieteel gatillo para descargarla presion, cada vez quepare el
motor.Trabeel seguro del gatillocuando no este enuso.
OPERAOION
Si tiene problemas durante la operacion de su hidrolavadora,Nameal
Serviciode AtencionalClientede Generacal 1-888-436-3722.
LOOALIZAOIONDE LAHIDROLAVADOBA
Espacioslibresymovimientodedire
Ei motoren marcha producemonoxido de carbono,un gas
inodoro,incoloro,venenoso.Respirar el monoxido de
carbonopuedecausardolorde cabeza,falJga, mareos,
vomitos,confusion,convulsiones,n;iuseas,desmayos,o la
muerte. Pard obtenerre;is information,consultelos
precaucionesacercadel monoxido de carbonoen la seccion
Reglas de Seguridad.
Coloque la hidrolavadoraal aire libre, en una zona en la que no se
acumulenlos gases de escapetoxicos. NUNCAcoloquela hidrolavadora
enun lugaren quelos gasesdeescapesepuedanacumularo entraren un
edificio que puedaestar ocupado.Aseguresede quelos gases de escape
se mantienenlejos de ventanas,puertas,tomas deaire de ventilacionu
otrasaberturasque puedepermitirque losgases deescapese acumulen
en unespaciocerrado. Los vientosy las corrientes deaire sedebetomar
en cuentaen la posicionde lahidrolavadora(Figura22).
• Operarla hidrolavadoraSOLOal aire libre.
• Eviteque los gasesdeescape entrena un areacerradaatravesde
ventanas,puertas,tomas de ventilacionu otrasaberturas.
• NUNCAarranque o haga funcionar el motor en interiores, en un
vehiculo o en una zona cerrada, A0N SI las ventanas y puertas
esta.nabiertas.
Figura 22- Espacios libres
Minimo 5 pies
LISTADEVERIFICACIONANTESDEARRANQUE
DELMOTOR
1. Aseguresedeleer y comprender laseccion Seguridaddel Usuarioy
la seccionOperacionantesde usar su hidrolavadora.
2. Reviseque el aceiteesta enel nivel adecuadoenel carterdel motor
y queel combustible seha agregadoaltanque de combustible.
3. Reviseel montaje de la unidad y aseg0rese de que las juntas se
fijan correctamentey que no existen dobleces,cortes o dahos a la
mangueradealta presion.
4. Proporcioneel suministro deagua adecuadocon el flujo adecuado,
quitelasuciedaddelosfiltros y verifiquelapurgadel airedel sistema.
5. Aseguresedeque launidadesta.seguraanivel delsueloy que ela.rea
detrabajo esta.despejada.
COIViOSEARRANOASUHIDROLAVADORA
NOTA:
NOencienda la bomba si el suministrode agua noesta conectadoy
encendido. Losda_os a consecuenciadel incumplimiento de estas
instrucciones anular;i la garantia
1. Lleve la palanca de la va.lvulade combustible a la posicion ON
(Figura 23).
Figura 23 - Valvula de combustible
,_EI colorde los gases de escape puedeencender
Mantengaal menos5 pies. (152 cm) de espaciolibre entodos los
lados dela hidrolavadora,incluidala parte superior.
36
combustibles,estrucluras oda_ar ellanque de
combustible,causandounincendio.
Apa
En Marcha
Page 39

2. IVluevala palancadel obturadora la posicion"CERRADO"(Figura24).
NOTA:
Si elmotorest_icalieote,aseg0resedequelapalaocadelobturador
esteenlaposici6n"ABIERTO'.
Figura24 - Pa/ancade/obturador
Ahogador
Abierto 6
Cerrado
,
Muevala palancade controldelobturadora laposicion "AIta",que se
muestraen el motor come un conejo (Figura25).
Figura25 - Centre/de/obturador
IMPORTANTE:Antes deencender la hidrolavadora,aseguresede estar
usando lasgafas de seguridad.
Riesgodelesionesenlosojos.Elaguarociadapuede
salpicaro lanzarobjetos.
®
Siempreuse gafas de seguridad al usar este equipo o cerca de
equiposen funcionamiento.
®
Antesde encenderlahidrolavadora,aseguresedeestarusandolas
galas de seguridad.
e
NUNCAsustituyagafasper gafasde seguridad.
Coloqueel pieen la baseo asegurela unidaddeotra maneradurante
el retroceso.
5.
AI encender el motor, sostenga la palancade arranque (Figura27)
y tire lentamente hasta que sienta cierta resistencia. Luego, tire
ra.pidamentepara encenderel motor.
Figura27 - Arranque de/motor
Manijadearranque
Alto Bajo
,
Gireel interrupterdelmotor a la posicion"ON" (Figura26).
Figure26 - PositionON
_, El retrocesodel cable de arranque (repliegue r;ipido)puede
,_ causarlesiones corporales. El retrocesotirar;ide la mane y
el braze haciael motor m_isr_ipidede Io que ustedpodra
soitarlo.Puedetenor comecoosecuenciahuesosrotes,
fracturas, moretones y desgarres.
* NUNCAtiredel cablede arranquesinantes liberar lapresion dela
pistola pulverizadora.
* Cuandoarranqueel motor, tire lentamentedel cable hasta sentir
unaresistenciay luego tire rapidamenteparaevitar suretroceso.
* Despuesdecada intentodearranqueenqueel motor noencienda,
dirija la pistola pulverizadorahacia unadireccion seguray apriete
el gatillo paraliberarlapresion alta.
* Sujete firmemente la pistola pulverizadora con ambas manes
cuandoutiliceel rociado aaltapresion paraevitar lesionescuando
la pistolaretroceda.
7. Regreselamanija dearranquelentamentea su posicion original. NO
permitaque la cuerdaregresebruscamentehacia delarrancador.
8. Cuando arranque el motor, mueva lentamente la palanca del
obturadorala posicion "ABIERTO"a medidaqueel motor secalienta.
Si elmotorfalla, mueva la palancaa laposicion"CERRADO",y luego
a la posicion "ABtERTO"(Figura28).
3"7
Page 40

Figura 28 - Pa/anca de/obturador
SISTEMADEENFRIAMIENTOAUTOMATICO
Ahogador
abierto
9. Despuesde cada intento de arranqueen que el motor no encienda,
dirija la pistola pulverizadorahaciaunadireccion seguray aprieteel
gatillo paraliberar laprestonalta.
10. Si elmotor no arranca despuesdesets intentos, muevala palanca
ala posicion "ABtERTO"y repita lospasos6 a 10.
peede cortarla piely tejidos subyacentes,causaedo
La corrieete de ague a alta presi6eque genera este equipo
lesioeesgraves y posibleamputaci6e. La pistola
pelverizadoracoetieeeague a alia presi6e,inclusocooel
motor paradey el ague descoeectada,que peedecauser
lesioees.
* NOpermitaque losnifios operanla hidrolavadoraojueguencerca
de ella.
* Mantenga la manguera de alta presi6n conectada ala bomba
y ala pistola pulverizadoramientras el sistema se encuentra
presurizado.
* NUNCA apunte la pistola de rociado a personas, animales,
dispositivoselectricos o plantas. Puederesultaren graves.
* NOasegurela pistola pulverizadoraen la posicion abierta.
* NO abandonela pistola pulverizadoracuando la ma.quinaestD.
funcionando.
* NUNCAuse una pistola pulverizadoraque no tiene el seguro
del gatillo o proteccion para gatillo en su lugar yen buenas
condiciones.
* Siempre debe asegurarsede que la pistola pulverizadora,las
boquillasy dema.saccesorios esta.ncorrectamentecolocados.
El contacleconla zonedel silenciador puede
resultar en quemaduras graves.El calorde los
gasesde escapepuedeencendercombustibles,
estrucluras o da_arel tanque de combustible,
causandoun incendio.
* NOtoque las superficiescalientesy evitelos gases de escape.
* Dejeque el equipo sesequeantesdetocarlo.
, Dejeal menos 5 pies (152 cm) de espacio libre hacia todos los
lades,incluida la parte superior.
, Es una violacion al Oodigo de Recursos Publicosde Oalifornia,
Seccion4442, utilizaru operarelmotor en cualquierareacubierta
de bosques, matorrales o hierba, a menos que el sistema de
escapeesteequipadoconun apagachispas,tal come sedefine en
la Seccion4442, mantenidoen buenascondicionesde operaci6n.
Otros estados o jurisdicciones federales pueden tener leyes
similares.
* Los repuestosdeben ser igualesy estar instaladasen la misma
posicionque las piezasoriginales.
38
(ALIVIOTI RlVllCO)
Si enciende el motor de su hidrolavadora durante 3 a 5 minutes sin
presionarel gatillo dela pistola pulverizadora,el agua que circula en la
bombapuedealcanzartemperaturassuperioresa 125°E Elsistemaenfria
la bombadescargandoague calienteen el suelo.
COMOAPAGABSUHIDBOLAVADOBA
1. Libereel gatillo dela pistolapulverizadora.
2. Lleve la palanca de control del obturador a la posicion "BAJO"
(tortuga) (Figura29).
Fi#ura20 - Positionde/obturader
Alto Bajo
3. Pongael interrupter deON/OFFdelgeneradoren la posicion"OFF".
4. SIEMPREdirija la pistola pulverizadora en una direcci6n segura,
aprieteel gatillo para descargar el agua a alta preston. Trabe el
segurodel gatillo cuandono este en use.
5. Apagueel suministrode agua.
IMPORTANTE:La pistola pulverizadoracontiene agua a alta preston,
inclusocon el motor paradey el aguadesconectada.
peedecotter la piel y tejidos subyacentes, causando
La corrientede ague a aita presi6nque generaesteequipo
lesiones gravesy posibleamputaei6n. La pistola
pulverizadoracontieneague a aita presi6n,inclusoconel
motor paradey el ague descenectada,que puedecauser
lesiones.
* Mantengala manguera de alta presi6n conectada a la bomba
y ala pistola pulverizadora mientras el sistema se encuentra
presurizado.
. SlEMPREdirijala pistola pulverizadoraen una direccion segura y
aprieteel gatillo paradescargar la preston, cadavez que pare el
motor.Trabeel seguro delgatillo cuando no esteen use.
Page 41

RFCOMENDACIONESDEMANTENIMIENTO
El mantenimientoregularmejorara el desempehoy extenderala vida util
de su hidrolavadora. Concurra a cualquier distribuidor calificador para
realizarelservicio.
La garantia de la hidrolavadora no cubre los articulos que han sido
sometidos a abuso o negligenciapor parte del usuario. Pararecibir el
valor total de la garantia,el usuario debera mantener la hidrolavadora
como se indica en este manual, incluido el almacenamientoadecuado
segunse detallaen Almacenamientoeninviernoy a largo plazo.
NOTA:
Si tiene preguntasacerca de cuingreemplazar componentesde su
hidrolavadora,flame al 1-888-436-3722 para obtenerasistencia.
Son necesariosalgunosajustesperbdicos paramanteneradecuadamente
su hidrolavadora.
Todos los servicios y ajustes deberan hacerse al menus una vez por
estacbn. Sigalosrequisitos enel cuadro Cronogramademantenimiento.
NOTA:
Una vezal aBo, usteddeber;ilimpiar o reemplazarla bujia, limpiar o
reemplazar el filtro de aire y comprobarquela pistolapulverizadura
y el montaje de extensi6n paraboquillas noesten desgastados.Una
bujia nuevay unfiltro de aire limpio aseguran la mezcla adecuada
de combustibley aire y ayudan a que su motorfuncione mejor y dure
mas tiempo.
CRONOGRAMADEMANTENIIVlIENTO
Sigalos intervalosdehoraso dias,Io quesuceda primero.Serequiereun
servicio ma.sfrecuentesi se operanen condiciones adversas.
Oambiodeaceite delmotor
BOMBADEACEITE
NOintentehacermantenimientodeaceitea esta bomba.Estebombaesta
prelubricaday sellada de fabrica, por Io que no requieremantenimiento
adicionaldurantesu vida util.
CONTROLDEEMISIONES
El mantenimiento, la sustitucion o reparacion de los dispositivos y
sistemas de controlde emisiones puedenser realizadusper cualquier
centrede reparacion de motores o personalmente.Gin embargo, para
obtenerservicio de control de emisiones"sin cargo", el trabajo debe ser
realizadoporun distribuidorautorizado.ConsultelaGarantiadeemisiones
MANTENIMIENTODELAHIDROLAVADORA
Limpiezadesuciedad
Limpie la suciedadacumulada en el sistema de limpieza una vez al dia
o antes del uso. Mantengalos enlaces, resortes y controles limpios.
Mantengala zona alrededor y detras del silenciador fibre de suciedad
de combustible. Revise las ranurasy aberturas del aire de enfriamiento
de la hidrolavadora. Estas aberturas se deben mantenerlimpias y sin
obstrucciones.
Laspartes dela hidrolavadorase debenmantenerlimpias parareducir el
riesgode sobrecalentamientoe ignicion de suciedadacumulada.
* Utiliceunpatiohumedoparalimpiarlassuperficiesexteriores.
NOTA:
Eluso inadecuadode la hidrolavadorapuededaEarlay acortar su
vidagill.
* NOinserteobjetosa travesdelas ranurasdeenfriamientodela unidad.
* Utiliceun cepillo decerdassuaves pararetirarla suciedadendurecida,
aceite,etc.
* Utiliceuna aspiradorapara retirarla basura y la suciedadsueltas.
Verificar/limpiar el filtro de toma*
Verificar el estado de la manguera de alta presbn
Verificarel estadode la manguera/filtrode descargade detergente
Verificarque no hayfugas enla pistola pulverizadorao en elmontaje
Limpiezadesuciedad
Verificarel nivel de aceiteen el motor
Oambiodeaceite delmotor**
Verificar/limpiar el filtro de aire**
Inspecci6n del silenciador y el supresor de chispas*
Servicio a la bujia
* Umpiarsi esta obstruido.Reemplazarsiestfi perforadoo rasgado.
** Realizarelserviciomilsa menudosi seoperanbajocondicionesdemucha
suciedado polvo.
VERIFIQUEELESTADOYLIMPIEELFILTRODE
LATOIVlA
Examineelfiltro en la toma de agua de la bomba. Limpie el filtro si se
encuentraobstruido, o reempla.celosi esta.dahado.
VERIFIQUEELESTADODE LASMANGUERASDE
ALTAPRESiON
Las manguerasde altapresion puedendesarrollarfugas por el desgaste,
dobleces o mal uso. Inspeccione las mangueras antes de usarlas.
Busque cortes, fugas, abrasiones, levantamientode la cubierta, daho
o movimiento de los acoplamientos. Si encuentra alguna de estas
condiciones,reemplacela manguerade inmediato.
puedecortar la piel y tejidossubyacentes, causando
La corrientede agua a aita presi6nque genera este equipo
lesiones graves yposible amputaci6n.
* NUNCAreparela manguerade alta presion. Reemplacela.
* Elrangode la manguerade reemplazoDEBEcumplir o excederel
rangoma.ximode presion de la unidad.
39
Page 42

VERIFIQUEELESTADODELTUBODEDESCARGA
DEDETERGENTE
Examine el filtro del tubo de detergente y limpielo si se encuentra
obstruido. Eltubo debeajustarbien en lajunta. Examineeltubo enbusca
defugas o rasgaduras.Reemplaceelfiltro o tubo si esta.ndahados.
VERIFIQUEELESTADODELAPISTOLA
PULVERIZADORA
Verifique que la conexbn entre la pistola y la manguera es correcta.
Presioneel gatilloparaprobarsi funciona correctamente;debevolver asu
lugarcuando Io suelta. Reemplacelapistola de inmediatosi no Iohace.
MANTENIMIENTODELABOQUELA
Una sensacbn pulsante cuando aprieta el gatillo de la pistola puede
ser causada por presion excesiva en la bomba. La principal causa de
presbn excesivaen la bomba esuna boquilla obstruidao restringida por
materialesextrahos,comosuciedad,etc. Paracorregir elproblema, limpie
la boquillainmediatamentesiguiendoestas instrucciones:
1. Apagueel motor y corte elsuministro deagua.
2. SlEMPREdirija la pistola pulverizadoraen una direccbn segura,
aprieteel gatillo paradescargar elaguaa altapresion.
puedecortar la piel ytejidossubyacentes, causando lesiones
:_La corrientede agua a alia presionquegenera este equipo
gravesy posibleamputaciom La pistolapulverizadnra
contieneagua a alia presion,inclusoconel motor paradoy
el agua desconectada,que puedecausar lesiones.
• Mantengalamangueradealtapresionconectadaa la bombay ala
pistolapulverizadoramientrasel sistemase encuentrapresurizado.
• SlEMPREdirija la pistola pulverizadoraen unadireccion segura y
aprieteel gatillo para descargarla presion, cada vez quepare el
motor.Trabeel seguro del gatillocuando no este enuso.
3. Retirela boquillade laextension.
4. Useun pequehosujetapapelespara retirarcualquier materialextraho
queestetapandola boquilla (Figura30).
Figura 30 - Retire los materiales extra#os
Figura 31 - Enjuague de la lanza
7. Vuelvaa instalarla boquillaenla lanza.
8. Vuelvaa conectarla lanzaala pistola pulverizadora.
9. Aseguresede que la manguerade jardin esta_conectada a la toma
de aguadela bomba.Verifiquequela manguerade altapresion esta_
conectadaala pistolapulverizadoray a la bomba. Enciendael agua.
10. Enciendael motor siguiendo las instrucciones Como encendersu
hidrolavadora.
11. Pruebela hidrolavadoraponiendolaen operacioncon cadaunadelas
boquillasde conexionra.pida.
MANTENIMIENTODELMOTOR
%_f Laschispasnointencionalespuedenresullarenun
ALHACERAJUSTES0 REPARACIONESASUHIDROLAVADORA
• Desconecteel cabledelabujiay cobquelodondenopuedehacer
contactoconlabujia.
ALPROBARSIHAYCHISPASENELMOTOR
• Useun probador aprobadopara bujias.
• NOrealicela prueba sinla bujiaconectada.
RECOMENDACIONESSOBREELACEITEDELMOTOR
Se recomienda el uso de aceites detergentes de alta calidad con
clasificacbn de servicio SF,SG, SH, SJ o superior. NO use aditivos
especiales.
Lastemperaturasexterioresdeterminanlaviscosidad adecuadadelaceite
para el motor. Use la tabla para seleccionarla mejor viscosidad para el
rangodetemperaturaexterior previsto.
choqueelectrico.
5. Retirela lanzade la pistola pulverizadora.
6. Usando una manguera de jardin, quite la suciedad remanente
enjuagando la lanza con agua a contracorriente. (Figura 31).
Enjuaguea contracorrientedurante30 a 60 segundos.
4O
lm| zmm
oF-2o-io o 1o 20 32 40 6o 66
°c/6 -2'o -io 6 Io 2'o
Rango de ternperaturas de uso esperado
* Por debajo de 50°F(10°C) el uso deaceite SAE30 daralugaraun arranque dificil.
** Por encimade80°F (27°C)el uso de aceite10W30 puedeaumentar elconsumo
deaceite. Compruebeel nivel deaceite mas frecuentemente.
Page 43

NOTA:
Unaceitesinteticoquecumplacon ILSACGF-2,conmarcade
oertifioacionAPIy el simbolodeservicioAPIcon"CONSEBVACION
DEENEBGJASJ/CF"o superior,esunaceiteaceptableatodaslas
temperaturas.Elusodeaceitessinteticosnoalteralosintervalos
entrecambios.
NOTA:
El motor esta equipado conun "Sistema de Alerta de Aceite". Este
sistema detendr;i automaticamente el motor antesde que el nivelde
aoeite sea inferioral valor seguro. Para evitar lasmolestias de una
paradainesperada,compruebesiempre el nivel de aceite delmotor
antesde empezar.
VERIFICACiONDELNIVELDEACEITE
El nivelde aceite se debeverificar antes de cadauso o al menoscada 8
horas deoperacion. Mantengael nivelde aceite.
1. Coloqueel hidrolavadorasobre una superficieplana.
2. Limpieel areaalrededorde la boca de Ilenadode aceite y limpie la
varillade aceiteal quitareltapon de Ilenado(Figura32).
3. Compruebequeel nivel deaceite esel adecuadoen la varilla.
4. Insertela varilla enel cuello de Ilenado,pero no la atornille.
5. Reemplacey ajuste eltapon de la boca deIlenadode aceite.
Figura32 - Llenadode aceite
CAMBiODELACEITEDELMOTOR
Si usa su hidrolavadora bajo condiciones extremas de suciedad, o en
climas muy calurosos, cambie el aceitema.sa menudo.
_, CUIDADO
,_l Evite el contactoprolongadoo repetido de la piel conel aceite
usadodel motor.
* Seha demostradoque el aceite demotor usado causa ca.ncerde
pielen algunosanimalesde laboratorio.
. Lavelas areasexpuestascon aguay jabon.
,_ IMIANTENERALEJADODELALCANCEDELOSNiNOS.
• No contamine. Conserve los recursos. Lleveel aceite usado a
centros de recoleccion.
Cambie el aceite mientras el motor esta.caliente, como se indica a
continuacion:
1. Coloqueel hidrolavadorasobre una superficieplana.
2. Desconecteel cable de la bujia y coloquelo donde no puede hacer
contacto con labujia.
3. Limpie el a_reaalrededordel tapon de drenajede aceite (A) (Figura
34). Eltaponde drenajede aceitese encuentraen labase delmotor,
en el lado opuestoal carburador.
4. Retireel tapon dela boca de Ilenadodeaceite(Figura32).
5. Retireel tapon de drenajede aceitey drene el aceitecompletamente
en un recipienteadecuado.
6. Coloquenuevamenteel tapon y ajustelo.
7. Vierta lentamenteel aceite (cerca de 20 oz.) en la boca de Ilenado
hastaalcanzarel niveladecuadoenla varilla. NOsobrellene
8. Coloquenuevamenteel tapon. Ajustelobien.
9. Limpieel aceitederramado.
10. Desha.gasedel aceitesegunlas regulacioneslocales.
COMO AGREGARACEITEALMOTOR
1. Aseguresede que la hidrolavadoraeste en una superficie plana y
nivelada.
2. Compruebeel nivel de aceite como se describe en Verificacion del
nivelde aceite.
3. Deser necesario, vierta aceite lentamenteen la boca de Ilenado de
aceitehastaque se alcanceel nivel adecuadoenla varilla.
4. Insertela varilla enel cuello de Ilenado,pero no la atornille.
5. Siel nivel es bajo, Ilenehastaque el nivel de aceiteeste entre "L" y
"H"en lavarilla de medicion (Figura33).
6. Reemplacey ajuste eltapon de la boca deIlenadode aceite.
Figura33 - Varilla de medidon
Aceite aceptableRangede nivel
Figura 34 - Tapon de drenaje de aceite
41
Page 44

SEBViCiODELFILTBODEAIRE
8u motor nofuncionara correctamentey puedesufrir dafios si seutiiiza
con un filtro de aire sucio. ** Realizarel servicio ma.sa menudo si se
operabajo condiciones demucha suciedado polvo.
Pararealizarel servicio allimpiador de aire,siga los siguientespasos:
1. Tire del pestillo de la cubierta del filtro de aire y retire la cubierta
(Figura35)
2. Sueltelatuerca mariposa.
3. Retirecuidadosamenteelconjunto defiltro.
4. Retireel filtro de espuma.
5. Paralimpiar el filtro, golpee levementeen forma repetidasobre una
superficie plana.
6. Vuelvaa instalar elfiltro de espuma.
7. Vuelvaa instalar unconjunto defiltro limpio o nuevo.
8. Vuelvaa instalary aprietelatuerca mariposa.
9. Instalela cubiertatrabando el pestillo cerrado.
Figura35 - Serviciode/limpiador de aire
Figura 36 - Cambio de la bujia
SPARK PLUG
0.028-0.031
iNSPECCIONDELSILENCIADOBY ELSUPBESOB
DECHISPAS
Inspeccioneel silenciadoren busca de grietas,corrosion u otros daffos.
Retireel supresor de chispas, de tenerla, e inspeccione en busca de
daffoso bloqueode carbon. Si necesitapartes de reemplazo,asegurese
deusar solamenterepuestosoriginales.
Cubierta del
filtro de aire
Pestillo
Filtro de
papel
_ iltrode
espuma
SEBVICIOALABUJIA
Oambiarla bujia hara.que su motor enciendama.sfa.cilmentey funcione
mejor.
1. Limpieel areaalrededorde la bujia
2. Retiree inspeccionela bujia (Figura36).
3. Oompruebela separacion entre electrodos con un calibrador de
alambrey restablezcaloa la medida recomendadasi es necesario
(ver especificaciones).
4. Cambie la bujia si los electrodos estan picados o quemados o si
la porcelana esta_rota. Use la bujia de reemplazo recomendada.
Oonsultelas especificaciones.
5,
Instalela bujiay ajustela.
42
RETIREELTAMIZOELSUPRESORDECH/SPAS
Herramientasrequeridas:Llavecerrada de8 mm
1. Retireel protector de calor del silenciador aflojando los cuatro (4)
pernos(A) (Figura37).
2. Retireel supresor de chispas del silenciadoraflojando los dos (2)
pemos (A) (Figura38).
3. Inspeccioneel supresor de chispas, sustituyalo siesta desgarrado,
perforadoodaSadode algunaotraforma (numerodepiezaOK1851).
NOUSEuntamiz defectuoso.
4. Si el tamiz no se encuentradahado, limpielo con algun solvente
comercialy vuelvaa colocarlo.
Figura 37 - Retire del protector de calor
Page 45

Figura 38 - Retire del supresor de chispas
.;_ 4_, Elconlacloconla zonadel sUenciadorpnede
• NOtoque las superficies calientesy evitelosgases de escape.
• Dejequeel equipose enfrie antesdetocaflo.
• Deje al menos 5 pies (152 cm) de espacio libre hacia todos los
lades,incluida ]aparte superior.
• Es una violaci6n al Oodigo de Recursos Publicos de Oalifornia,
Seccion4442, utilizaru operar elmotor en cualquier areacubierta
de bosques, matorrales o hierba, a menos que el sistema de
escapeeste equipadocon un apagachispas,tal come se defineen
la Seccion4442, mantenidoen buenascondicionesde operaci6n.
Otros estados o jurisdicciones federales pueden tener leyes
similares.
Pongase en contacto con el fabricante de equipos originales,
vendedor o distribuidor para obtener un supresor de chispas
disefiadopara el sistemade escapeinstalado enestemotor.
• Los repuestosdeben ser igualesy estarinstalados en la misma
posicionque las piezasoriginales.
resullar en quemaduras graves.El calorde losgases
de escape puedeencender combustibles,estrucluras
o da_ar ellanque de combustible,causandoun
incendio.
LUEGODECADAUSO
El aguano debepermanecer enlaunidadper periodosprolongados. Los
sedimentosy mineralespueden depositarseen partes de la bombay no
permitir su accion. Sigaestos procedimientosluego de cadause:
1. Apagueelmotor,corte elsuministro de agua,apuntela pistolaen una
direcci6n segura y aprieteel gatillo para descargarla presion; deje
enfriarel motor.
®
Mantengala mangueradealtapresion conectadaa labombay a la
pistolapulverizadoramientrasel sistemase encuentrapresurizado.
®
SIEMPREdirija la pistola pulverizadoraenuna direccion segura y
aprieteel gating para descargarla presion, cadavez que pare el
motor.Trabeel seguro del gatillocuando no este enuse.
,
Desconectelas manguerasde la pistola y de salida de alta presion
en la bomba. Dreneel agua de Ins mangueras,la pistolay lalanza.
Utiliceun trapo para limpiarla manguera.
,
Vaciela bomba detodo liquid& Verifiqueque el interrupter ON/OFF
del motor y la valvulaestanenposici6n OFF.A continuaci6n,tirar de
la manija de retroceso cerca de seis veces. Esto deberiaeliminarla
mayor partedel liquido dela bomba.
,
Guardela unidad enun arealimpia y seca.
5.
Si no la vaa usar per mas de 30 dias, consulte la seccion
Almacenamientoa largoplazo.
El combustibley sus vaporesson exlremadamente
inflamablesyexplosives.Un incendioo explosion
puedencausarquemadurasgraves o la muerte.
AL ALMACENARCOMBUSTIBLEO EQUIPOSCONCOMBUSTIBLEEN
ELTANQUE
• Almacenar alejado de calderas, estufas, calentadores de agua,
secadoras de ropa u otros aparatos electrodomesticos que
posean luz piloto u otras fuentes de ignicion, ya que pueden
encender los vaporesdel combustible.
ALMAOENAMiENTOENINViERNO
NOTA:
Debe protegersu unidadde temperaturas bajo cero.
• Si no Iohace,la bombase dahara,irreparablementey la unidad no
funcionaramas.
• El dahoper congelamientono esta cubierto enla garantia.
Paraprotegerla unidaddetemperaturasbajo cero:
1. Signlos pasos 1 a 3 de la seccion previa Luegode cada use.
2. Use un protector de bomba. Esto minimiza el riesgo de dafios y
lubricapistonesy sellos.
3. Si no tiene un protector de bomba, conecte un trozo de 3 pies
de manguera de jardin al adaptadorde la toma de agua. Vierta
anticongelante(sin alcohol) en la manguera. Tire dos veces de la
manijade retroceso. Desconectela manguerade 3 pies.
4. Guardela unidad enun arealimpia y seca.
pnedecertar la pielytejidos subyacentes, causandolesiones
La corrienlede agua a aita presionquegenera este equipo
graves y posibleamputacibn. La pislolapulverizadora
conlieneagua aaita presion,inclusoconel motorparade y
el agua desconectada,que pnedecausar lesiones.
43
Page 46

ALMA(;ENAMIENTOA LARGOPLAZO
Si no va a usar la hidrolavadorapor ma_sde 30 dias, debe prepararel
motor y la bomba parasu almacenamientoa largo plazo.
PROTECC/ONDELSlSTEMADECOMBUST/BLE
El combustible puede echarse a perder si se Io almacena por mas de
30 dias. El combustibleen mal estadohace quese formen depositos de
acido y goma en el sistema de combustible o en partes esencialesdel
carburador.Paramantenerel combustiblefresco, utilice un estabilizante
de combustible, disponible como un aditivo liquido o un cartucho de
goteo concentrado.
No es necesario drenar el combustible del motor si se ha utilizado un
estabilizantede combustible de acuerdo con las instrucciones. Ponga
el motor enfuncionamiento durante2 minutos para que el estabilizante
circule pot todo el sistema de combustible.El motor y el combustible se
puedenalmacenarhastapor 24 meses.
Si no se uso estabilizantede combustible, debe drenarsela gasolina y
almacenarseen un recipienteadecuado.Mantenga el motor encendido
hasta que se apague por falta de combustible. Para mantener el
combustible en buen estado, se recomienda colocar estabilizantede
combustible enel recipientede almacenamiento.
PROTEJAELMOTOR
1. Cambieel aceitedemotor.
2. Retirelabujia.
3. Viertaunacuchara sopera(5-10 cm3) de aceitede motor limpioenel
cilindro.
4. Tirede la cuerdadearranquevarias vecesparadistribuirel aceiteen
el cilindro.
5. Vuelvaa instalarla bujia.
6. Tiredela cuerdade arranquelentamentehastaquesientaresistencia.
Estocerrara_lasvalvulasdemaneraquelahumedadnopuedaingresar
en el cilindrodel motor.Devuelvasuavementelacuerdadearranque.
CAMBIODEACEITE
Mientras el motor todavia esta caliente, drene el aceite del ca,rter del
motor. Reemplacecon el grado recomendado.Consulte:Como cambiar
el aceiteen Mantenimientodel motor.
PROTECC/ONDELABOMBA
Paraprotegerla bomba contradahos causados pordepositos minerales
ocongelaci6n,use PumpSavero RV-antifreezeparatratarla bomba. Esto
evitadahopor congelaciony lubrica lospistonesy juntas.
• Nohacerlodaharapermanentementesubomba y pondra,su unidaden
condici6n deinoperable.
• Eldaho pot congelaci6nno esta cubierto pot la garantia.
Paraprotegerla unidad delas temperaturasde congelacion:
1. Sigalos pasos 1-3 de la seccionanterior,Despuesde cadauso.
2. Useprotector para bombasparatratar la bomba. Estominimiza los
dahospot congelaciony lubricalos pistonesy juntas.
3. Sinohay protectorparabombas disponible,conecteunaseccion de
manguerade jardin de 3 pies en eladaptadorde entradade agua.
Vierta RV-antifreeze(anticongelantesin alcohol) en la manguera.
Tiredos vecesde la manija dela cuerdade arranque.Desconectela
manguerade3 pies.
4. Almacenela unidad enuna zonalimpiay seca.
OTRASCONDICiONESDEALMACENAMiENTO
1. NOguarde combustible de una temporada para otra, a menos que
haya sido tratado como se describe en la seccion Protecci6n del
Sistemade combustible.
2. Cambieel recipientedecombustible si comienzaaoxidarse.Eloxido
y/o la suciedad en el combustible puedencausar problemas si se
utilizanen estaunidad.
3. Cubra la unidad con una cubierta protectora adecuada que no
retengahumedad.
Lascubiertasparaalmacenamientopuedenset inflamables.
• NO cubra una hidrolavadoracaliente con una cubierta para
almacenamiento.
• Dejeenfriarelequipo duranteeltiempo suficienteantesdecolocar
la cubierta.
.
Guardela unidaden un a,reaNmpiay seca.
TRANSPORTEE IN(;LINA(;IONDELAUNIDAD
No hagafuncionar,almaceneo transporte launidadcon un a.ngulomayor
que15 grados.
ACUIDADO
_k l aceite caliente puede causar quemaduras.
Permita que el motor enfrfe antes de drenar el
aceite. Evite una exposici6n prolongada o repetida
de la piel con el aceite usado. Lave completamente
las _reas expuestas con jab6n.
44
Page 47

GUIADELOCALIZACI6NY CORRECCI6NDEFALLAS
1. Boquillade baja presioninstalada.
2. Latoma de aguaesta_bloqueada.
3. Suministroinadecuadodeagua.
4. La manguerade entradaesta.dobladao tiene
Labombatione lossiguientes
problemas:Nodesarrollapresioo,
presionvariable,traqueteo,perdida
depresioo,bajovolumendeagua.
Eldotergentenosemezclacon
el aerosol.
El motor funciona bien sin cargo 1. Lavelocidad del motor es muy baja. 1. Muevael control delobturador a laposicbn
pore "funciona real", agrego RAPIDA.Si el motor siguefuncionandomal,
cuandoeshicargado, contactealcentro local de servicio.
EJ motor oo arraooa_ o arraooa y
funciona real.
perdidas.
5. Filtrodemanguerade entradaobstruido.
6. Elsuministro de aguaesta.por encimade lO0°E
7. La manguerade altapresion esta.bloqueadao
tieneperdidas.
8. La pistolapulverizadoratienefugas.
9. La boquilla estaobstruida.
10. La bombaesta.fallando.
1. Eltubo de descargade detergenteno est#.
sumergido.
2. Eltubo/filtro dedescarga de detergenteesta.
obstruido oquebrado.
3. Boquillade altapresion instalada.
. ,
1. Niveldeaceite bajo, "Sistemade alertade aceite". 1. Lleneelca.rterhastael niveladecuado.
2. Limpiadorde aire sucio. 2. Limpieo reemplaceel limpiador deaire.
3. Sin combustible.
4. Combustibleen malestado.
5. Cablede la bujia no conectado.
6. Bujiaen mal estado.
7. Agua enel combustible.
8. Mezclamuy rica encombustible.
1. Reemplacelacon la boquilla de altopresbn.
2. Limpie latoma.
3. Suministreel flujo de aguaadecuado.
4. Refuercelamanguerade entrada,emparchela
perdida.
5. Verifiqueelestadoy limpieel filtro dela toma.
6. Proporcioneun suministro de aguaa temperatura
ma_sbaja.
7. Retirelas obstruccionesen lamanguerade
salida o sustituyala manguera.
8. Reemplacelapistola pulverizadora.
9. Limpie laboquilla.
10. Oontacteal centro localde servicio.
1. Ooloqueel tubo de descargade detergentedentro
deldetergente.
2. Limpie oreemplaceel tubo/filtro dedescargade
detergente.
3. Reempla.celacon la boquillade bajapresion.
3. Lleneeltanque decombustible.
4. Vacieel tanquede combustibley Ilenelocon
combustiblenuevo.
5. Conecteel cable a labujia.
6. Remplacela bujia.
7. Vacieel tanquede combustibley Ilenelocon
combustiblenuevo.
8. Oontactealcentro local de servicio.
El motor se apagamientras eshi 1. Sincombustible. 1. Lleneel tanquedecombustible.
funcionando.
AI motor le folio potencia. 1. Filtrode airesucio. 1. Reemplaceelfiltro deaire.
45
Page 48

NOdeparte del Manual.0K1393 RevisionA (30/10/12) Impreso en EE.UU.
Page 49

I
Laveusea pression
®
[]
4'7
Page 50

introduction...........................................................49
O_ noustrouver...........................................................49
Reglesde securite................................................49
Symbolesde securite et leurs signification...................49
Inforrnationsgenerale...........................................52
ConnaitreVotre NettoyeurHautePression...............................52
Specificationsdu produit.........................................................53
Informationsrelativesaux emissions.......................................53
Fonctionnementa hautealtitude..............................................53
Deballage................................................................................54
Configuration........................................................54
Assemblage............................................................................54
AjouterI'huilea moteur............................................................55
Ajouterdu carburant...............................................................55
Brancherle tuyauet I'approvisionnementd'eauala pompe......56
Commentutiliser lesbuses.....................................................57
Nettoyeret utiliser du detergent....................................58
Rin(}agede la laveusea pression..................................59
Nettoyerletuyau a siphonde detergent........................59
Fonctionnernent....................................................60
Fonctionnement......................................................................60
Emplacementde la laveuseapression....................................60
Listede contr(_leavantde demarrerle moteur.........................60
Commentdemarrervotre laveusea pression...........................60
Systemede refroidissementautomatique(Suppression
thermique)..............................................................................62
Commentarr_tervotre laveusea pression...............................62
Entretien...............................................................63
Recommandationsd'entretien.................................................63
Programmed'entretien............................................................63
Huilea pompe.........................................................................63
Contr(_ledes emissions...........................................................63
Entretiende la laveusea pression...........................................63
Verifieret nettoyerle filtred'entreedeI'eau..............................63
Verifierles tuyauxa haute pression.........................................63
Verifierle tuyau a siphon de d6tergent.....................................64
Verifierle pistolet de putverisation...........................................64
Entretiende la buse.................................................................64
Entretiendu moteur.................................................................64
Recommandationsd'huiledemoteur.......................................64
Verifierle niveaud'huile................................................65
AjouterI'huitea moteur.................................................65
ChangerI'huilea moteur...............................................65
Entretiendufiltre a air.............................................................66
Entretiende la bougied'allumage............................................66
Verifierle pot d'echappementet le pare-etincettes....................66
Deposede I'_cranpare-etincettes.................................66
Apreschaque utilisation..........................................................67
Entreposaged'hiver.................................................................68
Entreposagea tongterme .......................................................68
Protegerlesysteme d'atimentationen carburant...........68
Protectiondu moteur....................................................68
Changerd'huile............................................................68
Protegerla pompe........................................................68
Autresinstructionsd'entreposage............................................68
Transport/inctinaisonde I'appareil............................................68
Depannage............................................................69
Guidede Depannage...............................................................69
48
Page 51

INTRODUCTION
Merci d'avoir achete cette laveuse a pression fabriquee par Generac
PowerSystems, Inc.Ce modele estune laveusea pression entraTn6epar
moteur,a_hauteperformance,refroidiea_I'air,quifonctionne entre2500 et
3100 psi selon le modele achet& Les appareils comprennentdes roues
personnalisees,une pompe axiale a cames avec des pistons en acier
inoxydable, un systeme de refroidissement automatique, des buses
raccordement rapide,un tuyau a haute pression,un tuyau siphon pour
detergentetdesreservoirsdeproduits chimiquesselonle modeleunitaire.
Le sons commun et le respect strict des instructionsspeciales sent
essentiels pour eviter los accidents. L'operateur dolt liFe ce manuel
et comprendre completementtoutes les instructions avant d'utiliser cet
equipement.Encas d'incomprehensiond'unepattie du manuel,contacter
le depositaire agree le plus proche pour conna;tre les procedures
de demarrage, de fonctionnement et d'entretien. Le proprietaire est
responsablede I'utilisationcorrecteet s0rede I'equipement.
Lalaveusea.pressionpeut fonctionnerentoute securite,defa£onefficace
et defa£onfiable uniquementsi elleest correctementinstallee,utilisee et
entretenue.Avantd'utiliser,entretenirou entreposerlalaveusea.
pression :
• LiFeattentivementtousles avertissementsdesecuritefigurant dunsce
manuelet sur le produit.
• Sefamiliariseravec ce manuelet I'uniteavantde I'utiliser.
• ConsulterlasectionAssemblagedumanuelpourlesinstructions surles
proceduresd'assemblagefinal. Suivreles instructions compietement.
Le fabricant ne peut pas anticiper toutes les situations possibles qui
peuventimpliquer undanger.Lesavertissementsdece manueletfigurant
sur ]esetiquetteset ]esautocoliantsapposessur ]'unitenesent, toutefois,
pus exhaustifs. Si vous suivezune procedure,unemethodedetravail ou
unetechnique defonctionnementque lefabricant nerecommandepas en
particulier,assurez-vousqu'elieest sansdangerpourles autres.S'assurer
quela procedure,la methodedetravailou latechniquedefonctionnement
choisie nerende pus la laveusea_pressiondangereuse.
LES INFORMATIONSCONTENUESDAMS LE PRE_SENTMANUEL SE
BASENTSUR LES MACHINESEN PRODUCTIONAU MOMENTDE LA
PUBLICATION. GENERACSE RESERVELE DROIT DE MODIFIERCE
MANUEL_,TOUTMOMENT.
Conservezcesinstructionspourreferencefuture.Si vouspr6tezcet
appareil a quelqu'un,pr_tez-luiTOUJOURSces instructionsET le
IVianuelduproprietaireaussi.
ooflous TROUVER
BEGLESDESI CUBITI
Des encarts DANGER,AVERTISSEMENT,ATTENTIONet REMARQUE
apparaissent ponctueliement duns cette publication ainsi que sur les
etiquettes et autocoliants fixes a la laveuse a pression pour attirer
I'attentiondu personnelsur des consignespropresa certaines operations
pouvantpresenterdesrisquessielles sentrealiseesde maniereincorrecte
ou attentive.Respectez-lesa.la lettre.Voici leurdefinition:
Indiqueunesituation ou uneaction dangereusequi, si elle n'est pus
evitee, entrainera la mort oudes blessures graves.
Indiqueunesituationou une action dangereusequi, si elle n'est pus
evitee, pourraitentrainer la mort oudes blessures graves.
,A ATTENTION
Indiqueunesituation ou uneaction dangereuse qui, si elle n'est pus
evitee, entrainera desblessures legeres ou moderees.
REMARQUE:
Lesremarquescontiennentdes informatienssuppiementaires
importantesrelatives a une procedureet se trouvent dunsle corps de
texte regulier de ce manuel.
Cesavertissementsdesecuritene peuventpaseliminerlesdangers qu'ils
signalent. Lesens commun etlerespect strict desinstructions speciales
Iorsde I'actionou I'entretiensont essentielspour eviter lesaccidents.
SYMBOLESDESECURITEETLEURSSIGNIFICATION
Fum6es toxiques Effet rebond Choc 61ectrique
Surface glissante Chute Injection de liquide
Vous pouvezcontacter le Servicea_la clientelede Generacpar telephone
au 1-888-436-3722, ou sur I'lnternet a_www.generac.com Ecrivez les
informations importantes de I'unite dansle tableau ci-dessous pour une
referencefuture et/ ou demandesde service.
Nurnerede rnedele
Nurneredeserie
Date d'aehat
Feu
Pieces amovibles
Explosion Manuel d'instructions
Objets volants Surface chaude
49
Page 52

,_ DANGER: Lernonoxydede carboneproduitIorsdeJ'utiJisation
PEUTTUERenqueJquesminutes.HEJAIVlAISutiiiser^aI'interieur=
dansunvehicule,ou dansd'autreszonesabriteesIVIEIVIESi
los portesetlosfen_tressent ouvertes.Utiliseruniquernent
L'EXTERIEURetJoindesfen_tres,porteset 6vents.
Certains produits chirniques ou detergents peuvent _}tre
_ angereux et, s'iis sent inhales ou inger6s, provoquer des
,_ DANGER: HEJAMAISdirigerJepistoiotdepuJverisationverslos
nauseos irnportantes, des 6vanouissernents ou des
ernpoisonnernents.
* Utiliser le nettoyeur EXCLUSIVEMENTen exterieur.
,, Un moteur en marche emet du monoxyde de carbone.
,, Le monoxyde decarbone est un gaztoxique, inodore et invisible.
Respirer du monoxyde de carbone peutcauser des cephalees,fatigue,
vertiges, vomissements, confusion, une attaque, des nausees,
d'evanouissements ou la mort. Si vous commencez a eprouver un de
ces sympt6mes, passez IMMEDIATEMENTa un endroit avec de I'air
frais. Consulter un medecin.
,, Emp_cherles gazd'echappementd'entrerdans unespaceconfine parles
fen_tres, losportes,les entreesd'airoud'autres ouvertures.Avertiraux
occupantsa I'interieursur lessympt6mes dumonoxyde decarbone pour
qu'ils savent qu'ils doivent se deplacer a un endroit avec de I'airfrais
s'ils commencent a se sentir mal.
,, L'utilisation d'un detecteur de monoxyde decarbone a I'interieur d'un
local occupe entre la laveuse a pressionet I'occupant est recommande.
,, NEJAMAIS demarrer ou faire fonctionner le moteur dans un espace
clos ou a Ifnterieur,dans un vehicule, MEMESlles portes et los
fen_tres sent ouvertes.
,, S'il y a un risque dlnhalation de vapeurs, utiliser un appareilou un
masque respiratoire.
,, Lire soigneusement les instructions d'emploi du masque ou du
respirateur afin d'etre certain qu'il protege efficacement centre
Ifnhalation de vapeurs dangereuses. Si vous commencez
eprouver un des sympt6mes du monoxyde de carbone, passez
IMMEDIATEMENTa un endroit avec de I'air frais.
personnes,losanirnauxoulosdispositifselectriques.Desblessures
s6rieusesoula mortsurviendront.TOUJOURSdirigerle pistoJetde
pulverisationdansunedirectionsecuritaire,presserla g_chettedu
pistoJetdepulverisationpoutreJ_cherla hautepressionchaquefois
quevousarr_tezlernoteur.Engagerleverroudela g_chetteIorsqu'i
n'estpasutilise
* Lejet d'eaub.hautepressionproduitparcet appareilpeut
desblessuresserieuses,unepossibleamputationou lamort.
percerlapeauetsestissussous-jacents,pouvantmenera.
Lepisto[etdepulverisationretiennentla hautepressionde
I'eau,MEMELORSQUElemoteurestarr_t6etI'eauest
debranch6e,cequi peutcauserdesblessures.
* NEJAMAISlaisserlesENFANTSutiliserla laveusea.pressionoujouer
_tproximiteCetoutiln'estPASunjouet.
* NEJAMAIStenterdereparerletuyaua.hautepression.Leremplacer.
* NeJAMAISreparerlesconnexionsquifuientavecunmastic
d'etancbeite.Remplacerlejointtoriqueoule joint.
* NEJAMAISbrancherletuyau a.hautepressiona.la rallongede buse.
* Toujoursgarderle tuyaua.hautepressionraccordea.la pompeetau
pistoletdepulverisationIorsquelesystemeestsouspression.
* NEJAMAISsecuriserle pistoletdepulverisationa.lapositionouverte.
* NEJAMAISlaisserlepistoletdepulverisationsanssurveillance
IorsqueI'appareilest enfonctionnement.
* NEJAMAISutiliserun pistoletdepulverisationqui n'apasde
verrouillagedeg_.chetteouuneprotectiondeg_.chetteenplaceet en
etatdefonctionnement.
* TOUJOURSs'assurerque lepistoletdepulverisation,lesbuseset les
accessoiressentbienfixes.
,_AVERTISSEIVIENT• Risqued'electrocutiou.
'_ Lecoutactavecunesourced'alimentatio,poutprovoqueru_chocelectriqueoudesbrQlures.
• NEJAMAISpulveriserpresd'unesourced'alimentation.
AVERTISSEIVIEHT: contactavec zone potd'echappernent
poutprovoquerdesbiossuresserieuses.Lachaiour/iesgaz
d'echappernentpeuventenflarnrnerloscombustibles,des
structuresou endornrnagerle reservoir decarburantprovoquant
unincendie.
,, NEPAStoucherlespi_ceschaudesetEVlTERlesgaz
,, _ ,, LaisserI'equipementrefroidiravantd'ytoucher.
d'echappementchauds.
,, Conserverund_battementd'aumoins152cmautourdu
nettoyeurhautepression,y comprisau-dessusdunettoyeur.
L'utilisationou lefonctionnement du moteursurtout terraincouvert
defor_t, broussaillesou herbes,est uneviolation du Codede
ressourcespubliquesdeI'Etatde la Californie,Section4442,
moins que lesystemed'echappementest equiped'un pare-
etincelles,tel que definidansla Section4442, maintenu enben etal
defonctionnement.D'autresEtats ou juridictionsfederalespeuvent
avoir des lois similaires.
Contacter le fabricant de I'appareil d'origine, le distributeur ou le
depositaire afin d'obtenir un pare-etincelles con9u pour le systeme
d'echappement installe sur ce moteur.
,, Les pi_ces de rechange doivent _tre les m_mes et installeedans la
m_me position que les pieces originelles.
,_ AVERTISSEMENT:Lecarburantetsosvapeurssentextr_rnernent
inflarnrnablesetexplosives.Unincendieou uneexplosionpout
prevequerdesbr_luresgraveseulamort.
AUIVlOIVlEIITD'AJOUTEROUVIDE9LECARBURAHT
* l_teindrela laveusea.hautepressionetlaisserrefroidirau
moins2 minutesavantde retirerlecapuchonducarburant.
Devissezle capuchonpour libererlapressiondureservoir.
._ ,, Remplir ou vider le reservoir de carburant a I'exterieur.
LORSQUEVOUS DI_IV1ARREZL'APPAREIL
UTILISATIONDEL'EQUIPEIVIENT
TRANSPORTET RI_PARATIONDE L'I_QUIPEMENT
ENTREPOSAGED'ESSENCEOU D'UN I_QUIPEMENTDONTLERI_SERVOIR
CONTIENTDE L'ESSENCE.
* NE PAStrop remplir le reservoir. Laisser de la place pour
I'expansiondu carburant.
,, S'il y a des fuites de carburant, attendez qu'elles s'evaporent
avant de demarrer lemoteur.
,, Gardezle carburant eloigne des etincelles, des flammes, d'une lumiere
pilote, la chaleur et de toute autre source de combustion.
,, NEPASallumer de cigarettes, ni fumer.
,, Assurez-vous que la bougie, le pot d'echappement,le capuchon du
carburant et le filtre a air sent en place.
,, NEPAS demarrer le moteur avec la bougie d'allumageenlevee.
,, NEJAMAIS incliner le moteur ni I'equipementau point que I'essence se
mette a couler.
,, NEPASvaporiser deliquides inflammables.
,, VlDERle reservoir et FERMERle robinet d'essence pour transporter et
reparer I'equipement.
,, Debrancher le fil de la bougie d'allumage.
* NE PAS entreposer a proximite defours, po_les, chauffe-eau, seche-
linge ou d'autres appareils susceptibles de comporter uneveilleuse ou
une source potentielle d'inflammation des vapeurs d'essence.
Le la du
_o
Page 53

_IL AVERTISSIEMENT• L'ulilisationdela laveuse
creerdesflaquesel lessurfacesglissanles.Lerebonddu
pressicnpeul
pisloletdepulverisationpeulvcusfairetcmber.
• Utiliseruniquementsur une surfaceequilibr6e.
• Lapente et le drainagede I'airede nettoyagedoiventetre
suffisants pour reduirele risque de chute accru sur des
surfaces glissantes.
• Nepas utiliser sur une surfaceeleveeou les probabilites
d'un effet rebond pourraiententra;nerd'unechute grave.
• Tenezfermement lepistoletde pulverisationa deuxmains
Iors de I'utilisationdu jet a hautepressionpour eviterdes
blessuresquandle pistoletde pulverisationfait un effetde
rebond.
_IL VERTISSEIViENT: Le demarreur el les aulres pieces
en rotation peuvenlattraper les mains, les cheveux, les
v_tementsou les accessoires.
ou de ies couverciesprotecteurs.
• NEJAMAISutiliser une laveusea pression sansle capot
• NEPASporter de vetements amples,de bijouxni
d'autres effetsquipourraientetre happespar le demarreur
ou les autrespieces en rotation.
• Retenirlescheveux longsen chignonet retirerles bijoux.
_1 VERTISSEMENT L'effelde rebond de lacorde du
demarreur (retroactioa rapide) peulealraiaer des blessures
corporelles. Lereboad va liter la maia el le bras vers le
moleur plus rapidemealquece quevcus pourrezlaisser
aller.Vouspouvezsouffrir desfractures, desbleusou des
enlorses.
• NEJAMAIStirer sur lecordon de demarragesansreiever
_&C premierementla pressiondu pistoletde pulverisation.
• Pourrel_cherla pressionretenue,pointerle pistolet une
direction sans dangeret rel_cherla pressionentirant /
actionnantla g_chettedu pistolet de pulverisation.
•Lors du demarragedu moteur,tirer lentementsur la cordejusqu'a
sentirune resistance,putsliter rapidementafin d'eviterI'effetde
recul.
• Apreschaquetentativede demarrage,Iorsquelemoteur ne
demarrepus,toujours pointer le pistoletdunsune direction sans
dangeretappuyersur la detentepour libererla hautepression
d'eau.
• Tenezfermement lepistoletde pulverisationa deuxmains lots
de I'utilisationdujet a hautepressionpour eviler des blessures
quandlepistolet depulverisationfait un effetde rebond.
_IL AVERTISSEIVlENT: La involoataired'elincelles
peulprovoquerunincendieuuuneeleclruculion.
production
POURBEGLEBOU BEPABEBLENETTOYEUBHAUTE
PBESSION.
• Debrancherle fil de bougied'allumageet I'ecarterde sorte
qu'il nepuissetoucherla bougie.
LOBSDESESSAISD'ALLUMAGE
• Utiliserun testeur de bougied'allumageapprouv&
• NEPASverifierI'etincelleavecla bougie d'allumage
enlevee.
_IL VERTISSEIViENT: Bisque de blessure aux yeux.Le jet peul
eclabousseroupropulserdes objets.
• Toujoursporter des lunettesde securiteIors de I'utilisation
de ce materielou dans la zoneou ce materielest utilis&
• Avant de demurrerlenettoyeurhaute pression,veiller a.
porter deslunettesde securite adaptees.
• NEJAMAISsubstituerlesverresde securitespar des lunettesde
securit&
_IL VEBTISSEIVlENT: D'apresI'ElatdeCalifornie,I'echappemenl
du moteurde ceproduilconlienldessubstanceschimiques
susceptiblesd'etrecancerigenes,decauserdesanomalies
congenilalesoud'aulresproblemesreproduclifs.
_IL AVEBTISSEMENT: D'apres I'l_tatde Californie, ce prcduil
contientdu plumbel des melanges deplumbsusceplibles de
causer desanomalies congenitales uu d'aulresproblemes
reproductifs. Laversoigneusement vos mains apres avoir
manipule ce produiL
BEMARQUE •
Lejet a hautepressionpeulendommagerlesobjelsfragilescomme
leverre.
®
NE PAS pointer ie pistolet de pulverisation vers le verre Iors de
I'utilisation dela buserouge MAX(0 °).
®
NEJAMAISdiriger le pistolet de pulverisationvers lespersonnes, les
animaux,les dispositifs electriquesou lesplantes.
BEMABQUE :
Unlrailemenlinadequatdela laveuseapressionpeulI'endommager
el reduiresadureedevie utile.
• Si vous avez des questions concernant les utilisations prevues,
demandezau depositaireou contactezun centrede servicesqualifie.
• Ne JAMAIS utiliser un appareil dont des pieces sont cassees,
manquantes ou non munies de leur caput ou de leurs couvercles
protecteurs.
• NEneutraliserAUCUNdispositif de securitede cettemachine.
• NEPASfaire fonctionner le nettoyeur a.une pression superieurea.la
pression nominale.
• NEIVIODtFIEZPASen aucunefa£on, lalaveusea pression.
• Partemps froid, avantdedemurrerlenettoyeura.hautepression,verifier
tous seselements pourverifier I'absencede gel.
• NeJAMAIS utiliser le tuyau a haute pression comme poigneepour
deplacerI'appareil.Toujoursutiliserpour celala poigneede I'appareil.
• Verifier lapresencede fuites ou de signesde deteriorationducircuitde
carburant, comme un tuyau use ou spongieux,des brides deserrage
desserrees ou manquantes, ou un reservoir ou un capuchon en
dommag& R@arertoutes les defectuosites avant d'utiliserla laveuse
a.pression.
• Oetappareil est con(}u pour etre utilise avec les pieces autorisees
de GeneracSEULEMENT.Si I'equipementest utiiise avec des pieces
qui NEsont PASconformes auxcaracteristiquesminimales, tous les
risques etresponsabilitesincomberont a.I'utilisateur.
J
Page 54

CONNAiTREVOTRELAVEUSEAPRESSION
Lisez ce manuel d'instructions et les regles de s6curite avant d'utiliser
votrelaveusea.hautepression.
Si vous pr_tez cet appareil a quelqu'un, pr_tez-lui TOUJOURSces
instructionsETle Manueldu proprietaireaussi.Oomparezlesillustrations
avec votre laveuse a haute pression afin de vous familiariser avec
I'emplacementdes differentscontr61es(Figure1). Gardezce manuelpour
consultationfuture. Les manuelsduproprietairede remplacementpeuvent
_treimprimes a.partir du site Webde Generac.
A- PistoJetde pulverisatien- Contr61eI'applicationd'eausurla surface
nettoyeravecla gD.chettea.vapeur. Comprendun blocagepour la
g__chettea vapeur.
B- Lance avec raccordrapide - Vous permet de changer entre les
differentesbuses.
C- Tuyaua haute pression- Branchezune extremitea.la pompe d'eau
et I'autreau pistolet de pulverisation.
D - Lanceur a rappel - Pourmettrele moteur en marche.
E- Reservoir d'huile - Verifiezetajoutez de I'huilea.moteur
F - Filtre a air - Protegele moteur en filtrant la poussiere et les debris
de I'aird'admission.
6 - Pompe- Developpela hautepression.
H- Soupape de suppression thermique - Possedeun cycle d'eau a.
traversla pompe ; quandI'eauatteint 125° F,I'eause dechargedela
pompesur le terrain. Ceci empeche des dommagesinternes de la
pompe.
I - InterrupteurOn/Off(IVlarche/Arr_t)dumeteur- MettezI'interrupteur
D.la position ,, ON , avant d'utiliser le lanceur a rappel. Mettez
I'interrupteurD.laposition,, OFF>,pourarr_ter lemoteur.
J - Soupapede marchea vide- Oontrelela sortie de hautepression.
K- Sortie haute pression- Raccordpour le tuyaua_hautepression.
L - Entree d'eau- Raccordpour le tuyau d'arrosage.
IVI- Reservoir de carburant- Remplissezlereservoir avecde I'essence
sans plomb. Toujours laisser de la place pour I'expansion du
carburant.
N - InterrupteurOn/Off(IVlarche/Arr_t)ducarburant- MetI'alimentation
en carburantvers le moteuren marche ou en arr_t.
0 - f:trangleur - Prepareun moteurfroid pour le demarrage.
P- Levier de regulateur- Augmenteou diminue la vitesse du moteur.
L'accelerateurdolt _treaumaximumIorsquelalaveusea.pressionest
utilisee.
Q- Buses -Injection de produits chimiques, 0 °, 15 °, 25 °, 40 ° pour
les diversesnettoyagesahautepression.
R- Reservoir de preduits chimiques - Utilise pour contenir les
detergentssecuritairesde la laveusea_pression qui sent siphonnes
dartslejet a bassepression.(certainesappareilspeuventnepasetre
equipesde reservoirsou peuventavoir un reservoir).
S- instructions de fonctionnement/avertissement- Identifie la
procedureapproprieepourdemarrer/ arr_terla laveuseapression.
T - Capuchendevidange - Utilisepour drainerI'huilea.moteur.
U - Emplacementdunumerode serie
ARTICLESNONIVIONTRES
• Etiquette d'identification (sur le boitier de ventilateur du moteur) -
Foumitle modeleet le numerode serie dela laveusea.pression.Tenir
cesrenseignementsa dispositionlots d'un appel pour assistance.
• Filtre/Tuyaua siphon pour detergent - LJtilisepour siphonner les
detergentssecuritaires de la laveuse D.pressiondans le jet D.basse
pression.
T
Figure 1- Caraeteristiques et centr61es
A
C
D
K
F
H
UP
52
Page 55

r
SPECiFiCATiONSDUPBODUIT
CONSOMMATEUR
Pression- (PSI/ BAR) 2500/172 2700/186 3100/213
Debit- (GPIVl/LPM) 2.3/8.7 2.7/10.2
Temperaturede I'eau- (°F/ C°) 100/38 Max.
Longueurdutuyau - (Pieds/Metres) 25/7.6 25/7.6 30/9.1
Reservoir(s)deproduits chimiques- Nombrepar appareil 0 1 2
Reservoirde produitschimiques - Capacite(Gal/Litres) S/O 0.75/2.8 0.75/2.8
Buses - Nombre parappareil 3 4 5
Longueurdela lance (pouces/cm) 20/51
Pistolet Standard Deluxe
Deplacementdu moteur - (pouce cube/cc) 11.9/196 12.9/212
Bougied'allumagede type F7TCou equivalent
Ecartementdebougie d'allumage- (Pouces/mm) 0,028-0,031/0,70-0,80
Capacitede carburant - (Quarts/Litres) 3.7/3.5
Capacitede carburant - (Onces/Litres) 20/0.6
Systemed'arr_td'huilebasse Oui
Interrupteurmarche/arr_t Oui
INFOBIVIATiONSRELATIVESAUXI:'lViiSSIONS
L'Agence de protection de I'environnementdes Etats-Unis (et le Oomite
des ressources de Pairde la Californiepour I'equipementcertifie selon
les normes CA) exige quece moteur respecte les normes d'emissions
d'echappementet par evaporation. ReperezI'etiquettesur la conformite
aux normes d'emissions apposee sur le moteur pour determiner les
normes respectees par le moteur eta quelles emissions la garantie
s'applique.Cemoteur est certifie pour lesnormes d'emissionapplicables
sur I'essence.II est important de respecter les specifications d'entretien
decrites danslasection Entretienafin que le moteur continuea respecter
les normes d'emission applicablespendanttoute la duree de sa vie. Oe
moteur utiliseles parametresd'une carburation pauvreainsi qued'autres
systemes permettant de reduire les emissions. Toute manipulation ou
alteration du systeme de contr61edes emissions risque d'augmenter
ces dernieres et de constituer une infraction aux lois fed6rales ou de
la Californie. Ce qui suit constitue une liste non exhaustive des actions
assimileesa des manipulations:
• depose ou alteration de toute piece des systemes d'admission,
d'echappementoude carburant
• I'alteration ou la defaillance de la tringlerie du regulateur ou du
mecanismede regulationdevitessequiprovoqueraitlefonctionnement
du moteurhors des parametrespour lesquelsil est con£u
Si vous avezconnaissancede Pundessympt6mes suivants,faitesverifier
et reparervotre moteurparvotre centredereparation:
• demarragedifficile ou calageapres le demarrage
• ralentiirregulier
• ratesd'allumageou effets deretour deflamme en charge
• postcombustion(retour deflamme)
• fumeed'echappementnoireouimportanteconsommationde carburant
FONOTIONNEIVIENTAHAUTEALTITUDE
Le systeme de carburant de ce moteur peut etre sensible a un
fonctionnement a haute altitude. Vous pouvez garantir son bon
fonctionnement en installant une trousse pour utilisation en altitude
Iorsque cela est necessaire. Oonsultez le tableau suivant pour savoir
quandunetrousse pour utilisationen altitudeestnecessaire.Sila trousse
d'altitudeadapteen'est pasinstallee,le fonctionnementde ce moteurpeut
augmenterlesemissions du moteuretreduireles economiesde carburant
et les performances. Les les trousses peuvent etre acheteesaupres de
toutconcessionnaire etdoivent_tre installeespar unepersonnequalifiee.
*Plage des altitudes trousse PSI
0 - 1523 m
(0- 5 000 pi)
1523- 2 133 m
(5 000 - 7 000 pi)
1523- 2 133 m
(5 000 - 7 000 pi)
*Hauteurau-dessusdu niveau de lamer.
Si la trnussed'aititude dolt _tre instaileeet que le moteur dolt
fonctinnner a une altitude ou celui-ci n'est pas requis,il est
necessaire de remettre le moteur dartssa configurationd'origine. Le
fair de faire fonctionner le mnteur a desaltitudes inferieuresIorsque
la trnusse est installeepoutprovoquersa surchauffe et serieusement
I'endommager; cela pent egalement reduire les performanceset
augmenter les emissions.
Reference de
Inutile 2500/2700/3100
0K2015 2500/2700
0K2016 3100
REMARQUE :
53
Page 56

DEBALLAGE
1. Sortirtousles accessoireset composants livres avec la laveuse a.
pression.
2. Ouvrezla bo;tecompletementen coupanttousles coins du hautvers
le bas.
3. Assurez-vousd'avoir tousles piecesinclues avantI'assemblage.
• Uniteprincipale
• Assemblagedela manette
• Tuyaua_haute pression
• Filtreettuyau a.siphon
• Pistoletde pulverisation
• Lanceavec raccord rapide
• Bouteilled'huile
• Armaturede crochet du tuyau
• Sac a_pieces (comprend lespieces suivantes:
- Capuchon du reservoir de produits chimiques avec trou sile
modele est 6quiped'un reservoir deproduits chimiques
- Manueld'instructions
- Carte d'enregistrementdu proprietaire
- Sac contenantlesbuses a code de couleur
4. S'ilvous manqueun article devotre bo;te,veuillezappelerle Service
a.la clientelede Generacau 1-888-436-3722. Quandvous appelez,
veuillez avoir le modele et le numero de serie de I'etiquette de
donnees.
5. Completezet envoyezlafiche d'enregistrement.I_crivezle numerode
modele,le numero de serie etla date d'achatdartsle tableau qui se
trouve a.la section,<Ot_noustrouver >>.
ASSEMBLAGE
Lisez tout le manuel d'instructions avant d'essayer d'assembler ou, si
vous avezdes problemesavec I'assemblagedevotre laveusea_pression,
veuillezappelerle Service a la clientelede Generacau 1-888-436-3722.
Quand vous appelez,veuillez avoir le modele et le numero de serie de
I'etiquettede donnees.
.
Placerla poignee(A) dartsles supports de la poignee(B). Appuyez
surlesboutonsdeverrouillageetpermettezalapoigneede seglisser
a.la position (0). Les boutons vont verrouiller la poignee en place
(Figure2).
REMARQUE :
II peut _Ire necessairededeplacerles supports d'unc6tea I'autre de
fa£on a aligner la poigneepourqu elle glisse au dessusdessupports.
2. Installezle crochet du tuyau (Figure3).
Figure 3 - Installer le crochet flu tuyau
/
\
3. Inserezlesbuses a.couleurdans lesespacesfournis dansla poignee
(Figure4).
4. Placer le pistolet de pulverisation et la rallonge des buses darts le
porte-pistolet,comme illustre (Figure4).
/
Figure 4 - lnserer les buses
figure 2 - Attacher la poignee
5. Enroulezle tuyauxa pression etaccrochez-lesur lecrochet.
6. Attachezletuyau a.siphon a.I'emplacementA (Figure5).
54
Page 57

Figure5 - Emplacementdutuyaua siphon
q
AJOUTERL'HUILEAMOTEUR
1. Mettezlalaveusea.pression sur unesurfacesolide et plane.
2. Nettoyerle secteur situe autour du reservoir d'huile et enleverle la
jauge/lecapuchondu reservoir d'huile.
3. AI'aided'un entonnoira huile(enoption), versezlentementI'huilepar
I'orifice de remplissage. Pourconna;treles recommandations surle
type d'huilea.utiliser,consultezla sectionEntretien.
REIVlARQUE:
Danscertainesunites, ily a plusd'un emplacement de remplissage
d'huile.Danscescas, il faut simplement utiliserI'undespointsde
remplissaged'huile.
4. Verifiez periodiquement si I'huile atteint un niveau situe entre les
marques Let H de la jauge (figure 6). NEREMPLISSEZPASTROP
LERESERVOIR.
Figure5 - Jauge
__/ cceptable Gamme
de niveau d'huile
AJOUTERDUCARBURANT
Le carburantdolt se conformer auxexigencessuivantes:
• Oarburantpropre,frais, sans plomb.
• Unminimum de87 octanes/87AKI (91 IOR).
• L'essence contenant jusqu'a. 10% d'ethanol (essence-alcool) est
acceptable.
REIVlARQUE:
f:viter toutdommage a lalaveuse a pression.Lenun-respect du
manuel d'utilisationa proposdes recommandationsducarburant
annule la garantie.
* NEPASutiliserde I'essencenonapprouveecomme E85.
* Ne PASmelangerde I'huiledans I'essence.
* NEPASmodifier lemoteur pourfonctionneravec d'autrescarburants.
Pourprotegerle systemede carburantd'unegelification,melangeravec un
stabilisateurdecarburantIorsquevousajoutezducarburant.VoirEntreposage
Touslescarburantsnesont paslem_me.Si vousrencontrezdesproblemes
deperformanceou dedemarrageapresI'utilisationd'uncarburant,changeza.
unfournisseurdecarburantdifferentouchangezlesmarques.
inflammableset explosives.Unincendieouune
Lecarburantetsosvapeurssontextr_mement
explosionpeutprovoquerdesbrOluresgravesou
lamort.
AU IVIOMENT D'AJOUTE DU CARBURAIIT
* Eteindrela laveusea hautepression et laisser refroidir au moins
deux (2) minutes avant de retirer le capuchon du carburant.
Devissezle capuchonpour libererla pressiondu reservoir.
* Remplirle reservoirde carburanta I'exterieur.
* NE PAS trop remplir le reservoir. Laisser de la place pour
I'expansiondu carburant.
* S'ily a desfuites de carburant,attendezqu'elles s'evaporentavant
de demarrerlemoteur.
* Gardezle carburant eloigne des etincelles, des flammes, d'une
lumiere pilote,la chaleuret detoute autresource de combustion.
= NEPASallumerune cigaretteou ne pasfumer.
1. Nettoyer le secteur situe autour du capuchon de remplissage de
carburant,enleverlecapuchon.
2. Ajouterlentementde I'essencesansplomb aureservoirdecarburant.
Attentiona ne pastrop remplir.Rempliraubas dela grillefiltrante, ce
qui permettraI'expansiondu carburant(Figure7).
3. Installer le capuchon de carburant et laisserevaporerles fuites de
carburantavantde demarrerle moteur.
REIVlARQUE:
Toutetentativedefairetuurneroudedemarrerlemoteuravaflt
qu'ilair erecorrectemententretenuavecI'huilerecommandeepout
entrainerunepannedumoteur.
5. Remplacezla jauge/lecapuchonde remplissaged'huileet serrez
completement.
Figure7 - Ajouterducarburant
Page 58

BRANCHERLETUYAUETL'APPROVISiONNEMENT
D'EAUA LAPOMPE
REiVIARQUE•
NEPASfakefonctionoerlapompesi I'aiimeotatiooeoeauo'estpas
raccordeeetouverte.Lagaraotieseraaoouleesi I'equipemeotest
eodommageparsuiteduooo-respectdecetteiostructioo.
REIVIARQUE:
Retirezet jetez le capuchoode traosportde I'eotreed'eaude la
pompeavaot d'attacherle tuyau.
1. LaissercoulerI'eauavecvotretuyau d'arrosagependant30secondes
pour nettoyertousles debris.
2. Avantde brancherletuyaud'arrosagea I'entreed'eau,verifierle filtre
d'entree(A) (Figure8). Nettoyer lefiltre s'il contient desdebris ou
remplacers'il est endommage.NEPASfaire fonctionner la laveusea.
pressionsi lefiltre d'entreeest endommage.
IMPORTANT : NE PAS siphonner de I'eau stagnante pour
I'approvisionnementd'eau.UtilisezSEULEMENTdeI'eaufroide (moinsde
100°F). L'approvisionnementd'eaudoit 6tre suffisantepourtraiter plus de
3,8 gallonspar minuteet pas moins de 30 psi.
REMARQUE •
L'utilisatiood'uoesoupape uoidirectioooelle(brise-vide onclapet
aotiretour) a I'eotreede la pompepenteotraioer desdommagesa la
pompeonau coooecteur d'eotree.
* II DOITy avoir aumoins dix pieds detuyau d'arrosagesansrestriction
entre I'entreede la laveuse a.pression ettout autre appareil,comme
unebrise-vide ou un clapet antiretour.
* La garantiesera annuleesi I'equipementest endommagepar suite du
non-respect de cetteinstruction.
Figure9 - Brancher le tuyaud'armsage
Risque de blessure auxyeux. Lejet penteclaboosseron
propnlserdes objets.
* Toujoursporter deslunettesde securiteIors de I'utilisation
de cematerielou dans la zoneouce materielest utilis&
* Avant de demarrer la laveuse a. pression, veiller a. porter des
lunettesde securiteadaptees.
* NEJAMAIS substituerles verres de securites pardes lunettes de
securite.
,
Brancherla lanceau pistolet de pulverisation(Figure10). Serrer a.la
main.
Figure 10 - Attacher la lance
Figure 8 - lnstafler le filtre d'entree
3. Brancher le tuyau d'arrosage (a,ne pas d@asser 50 pieds de
Iongueur)a,I'entreed'eau (Figure9). Serrer a,lamain.
5,
BrancherI'extremitedu tuyau a hautepression a.la base du pistolet
de pulverisation(Figure11). Serrera.la main.
Figure11- Brancher /e tuyauaupistelet de
pu/verisatien
Page 59

percerlapeauetsestissussous-jacents,pouvantmener
Lejet d'eaua hautepressionproduitparcetappareilpeut
desblessuresserieuseset unepossibleamputation.
* NEJAMAISbrancherle tuyau a hautepression ala lance.
* Toujoursgarderle tuyau a hautepression raccorde a la pompeet
au pistolet depulverisationIorsquele systemeest sous pression.
* Toujourss'assurerque le pistoletdepulverisation,lesbuses et les
accessoiressent bienfixes.
Brancherle tuyau a haute pression a la pompe (derouler le tuyau
avantdebranchera_la pompeou au pistolet depulverisation)(Figure
12). Serrera.lamain.
A ATTENTION
Le tuyau peut_tre endommageesi elle entreen contact avec
un moteur chaudoule silencieux.
Figure12- Brancher le tuyaua hautepression a la
pompe
COMMENTUTILISERLESBUSES
Le raccord rapidesur la lance debuse vous permet de changerentreles
differentesbuses. Les buses peuvent_tre modifieesIorsque la laveuse
pression est en fonctionnement,une fois quela g&chettedu pistolet de
pulverisationestverrouilleea la positionde securit6. Lesbuses modifient
la pressionet lejet, comme indique.
* Pourun nettoyageplus efficace,garder la busede 8 a.24 pouces (20
61 cm) eloign6edela surface anettoyer.
* Sivous avezla busetrop pres,surtout avecunebusea hautepression,
vous risquezd'endommagerla surface quevous nettoyez.
percerla peauet ses tissus sous-jacents, pouvantmener
Le jet d'eau a hautepressionproduitparcet appareil peut
des blessures serieuses et une possibleamputation.
* NE JAMAIS echanger les buses sans engager le verrou de la
g_chettedu pistolet de pulverisation.
. NEPAStordre les busespendantla pulverisation.
Utiliserles instructions suivantespour changerles buses '
1. Retirerle colliersur le raccord rapideet ensuiteles buses. Garder
les buses darts le support fourni sur le rangement d'accessoires
(Figure14).
Figure14 - Buses
Mettezen MARCHEI'eau,appuyezsur la g_.chetteafinde purgerI'air
dansle systeme dela pompe(Figure13).
Figure 13 - Appuyer sur la g_chette
,
Ohoisissezlabuse desiree.
3.
Tirersur le collier, insererlanouvelle buseet rel_cherle collier.Tirez
sur la busepourvous assurer qu'elle est bienen place.
Pour un rin(}agedelicat (pressionfaibleet debitplus eleve), pour
le nettoyagedoux des voitures/camions, bateaux, vehicules de
camping, mobilier de jardin, equipement d'entretiende pelouse,
etc., selectionnezla buse blanche (Figure15).
Figure 15- Buse a pression de lavage (blanc)
57
Page 60

• Pourunrin(_ageg6nerale(pressionmoyenneet debitmoyen), ideal
pour la plupart des nettoyagestout usagecomme les entrees,les
patio en brique, es terrasses en bois, les entrees de cour et les
trottoirs, les planchersdes garages,etc., selectionnezlabuse vert
(Figure16).
Figure 16 - Buse a pression de flettoyage (vert)
Figure 18 - Buse apression maximale (rouge)
Lorsquevous appliquezdu detergent,utilisez uniquementla buse
noire (Figure 19). Utiliser uniquement des savons/detergents
securitairesde la laveusea pressionpour aidera.diminer la salete
tenace sur unevari6tede surfaces.
• Pour effectuer un rin£age moyen (pression plus 6leveeet debit
moyen), ideal pour eliminer les taches sur des surfaces dures
comme les allees en beton, les sols de garage et les patios de
brique,choisissezla buse jaune(figure 17).
Figure 17- Buse a pression ciblee (jaune)
!
• Pourunrin(}agemaximale(pression plus 6leveeetdebitplus bas),
pour les surfaces plus rebelles ou difficiles a atteindrecomme
les surfaces du deuxieme etage, I'enlevementde peinture, les
taches d'huile, I'eliminationde la rouille ou d'autres substances
tenaces (du goudron, dela gomme, dela graisse, dela cire,etc.),
selectionnezla buse rouge(Figure18).
,_ ATTENTION
,t_lk Cetteextremite (Buserouge)pentendomrnagerla surfacede
travail si elle est trop procheontenue darts la m_me position
pendantune periodeprolongee.
Figure 19 - Buse pour detergent (notre)
tVETTOYERETUTIL/SERBU B_'TERGENT
,A ATTENTION
,_Les produitschimiquespeuventcauserdes blessures
corporellesel / on des dommagesmateriels.
• NEJAMAISutiliserdu liquidecaustiqueavecla laveuseapression
• Utiliser UNIQUEIViENTdes savons/detergentssecuritaires de la
laveusea.pression.Suivretoutes les instructions dufabricant.
Pourappliquerle detergent,suivezles etapessuivantes:
1. RevoirI'utilisationdes buses.
2. Ouvrirle capuchondu recipient (s'il yen a un, Figure20).
3. Preparezla solution dedetergent commerequis pour letravail.
58
Page 61

Figure20 - Couverture et reservoirdepreduits
chimiques
;apuchon
durecipienl
4. Selonle modele, insererle filtre sur I'extremit6du tuyau a_siphon #.
traversletrou dansle bouchonample (fourni) (Figure21).
5. Installezle capuchonet letuyau a_siphondartsle reservoir.
6. S'assurerque le tuyau a siphon reste totalement immerge darts le
detergent.
Figure21 - lnstaflerle tuyaua siphon
• Lapompe seraendommageesile moteurest demarr6enI'absence
destuyauxbrancheset I'alimentationd'eau.
• La garantiesera annuleesi I'equipementest endommageparsuite
du non-respectde cetteinstruction.
9. Demurrerle moteur en suivant les instructions Commentdemurrer
votrelaveusea pression.
10. Appliquer le detergentsur une surface seche, a partir de la partie
inferieurede la zonea _trelavee ettravaillervers la partie superieur
en utilisantdes mouvementslongs, uniformes,se chevauchant.
11. Laissezle detergent,<tremper >,de 3 a 5 minutes avant de laver et
rincer.Rappliquezsi necessairepourne paspermettrequela surface
seseche. NEPASlaisserledetergentsechersurla surface quevous
nettoyer (poureviter lesmarques).
IMPORTANT: Vous devezvider le systemea.siphondu detergentapres
chaque utilisation en pla9ant le filtre darts un seau d'eau propre, puis
demarrezla laveusea.bassepression pendant1-2 minutes.
_A6E BE LALAVEUSEJiPRESSlON
1. Retirerlabuse de detergentnoire de la lance.
2. Selectionneret installerla buse ;_hautepression souhaitee suivant
les instructions Commentutiliserles buses.
3. Dirigerlepistoletdepulverisationdansunedirectionsecuritaireetjamais
vers lespersonnes,les animauxet les plants.Appuyersur lag&chette
afin depurger des produits chimiques restantsduns le systeme.
4. Tenirle pistolet depulverisationa unedistance securitairede la zone
quevous desirezpulveriser.
REMARQUE:
S'assurerquelefiltrerestetotalemeatimmergedaasledetergeut
quaudvousutilisezledetergeot.
REIVlARQUE:
Le coota¢l avec le potd'echappemeatchaudpeuleadommager le
tuyau a siphoo du detergeut.
• Lorsque vous inserez le siphon dans une bouteille de solution
de detergente, acheminez le tuyau afin de prevenir un contact
malencontreusementavecle pot d'echappementchaud.
7. Assurez-vousque la busede detergentnoire estinstallee.
REMARQUE:
Le detergeot ae peutpusetre applique avec la buse a hautepressioo
(jaune, blaoche, verte ou rouge).Uliliser uniquementla buse noire
avec dudetergeut.
8. Confirmerqueles instructions de configurationont ete suivies.
REIVlARQUE:
Avaatdedemarrerlemoteu_ilestimperatif deraocordertousles
tuyaux.
_T== _, _ Lerebood du pistoletde pulverisatioopeut vous
= Soyez extremement prudent si vous devez utiNserla laveuse ;_
pression ;_ partir d'une echeNe,un echafaudage,ou tout autre
endroitsimilaire.
• Tenezfermement le pistolet de pulverisation;_deuxmains lots de
I'utiNsationdujet ahautepressionpour eviter desblessuresquand
lepistolet de pulverisationfair un effetde rebond.
5. Appliquerunjet &hautepression sur une petitesurface, puis verifier
la surface en casde dommages. S'il n'y a pasde dommages,vous
pouvezconsidererqu'il est acceptablede continuer;_rincer.
6. Commencerenhautdelazone;_rinceret continuerverslebusenfaisant
chevaucherles passes,commevous avezfait pour le nettoyage.
loire tomber.
• Utiliseruniquementsur une surface equilibree.
= Nepasutiliser sur unesurfaceeleveepour prevenir
le risqued'unechutegrave.
flETTOYERLETIJYiiIJ/4SIPHONDE#ETER6ENT
Si vous avezutilise le tuyau a_siphon de detergent,vous devez le rincer
avecde I'eaupropre avantd'arreter le moteur.
1. Placer le filtre/tuyau de siphon de detergentdarts un seau rempli
d'eaupropre.
2. Retirerlabuse ;_hautepression de larallonge debuse.
3. Selectionner et installer la buse de detergent noire suivant les
instructions CommentutiNserlesbuses.
4. RincerpendantI a 2 minutes.
5. Arr6terle moteursuivant instructions Commentarreter lalaveuse
pression eteteindreI'approvisionnementd'eau.
6. TOUJOURSdiriger le pistolet de pulverisation duns une direction
securitaire,appuyersur lag__chettedu pistoletde pulverisationpour
rel&cherla haute pression de I'eauretenue. Engagerleverrou de la
g_chetteIorsqu'iln'estpas utiNs&
59
Page 62

iMPORTANT: Le pistoletdepulverisation retiennentla hautepression de
I'eau,memeIorsque le moteur est arret6 et I'eauest d6branchee,ce qui
peutcauserdes blessures.
percerla peauet sostissus sous-jacents, peuvantmener
Le jet d'eau a haatepressionprodaitpar cet appareil peat
des blessares serieases et abe possibleamputation. Le
pistoletde palverisationretiennent la hautepressionde I'eau,
meme Iorsqaele motear est arrete et I'eauest debranchee,
ce qai peat causerdes blessares.
= Toujoursgarderle tuyaua hautepression raccordea la pompe et
au pistolet depulverisationIorsquele systeme est sous pression.
• TOUJOURSdiriger le pistolet de pulverisationdans une direction
securitaire, presser la g_chette du pistolet de pulverisation pour
rel&cherlahautepression chaquefois quevous arr_tezle moteur.
Engagerleverrou dela g_,chetteIorsqu'iln'est pas utilise
FONCTIONNEIVIENT
Si vous avez des problemes avec le fonctionnement de votre laveuse
pression, veuillez contacter le Service a. la clientele de Generac au
1-888-436-3722.
EMPLACEMENTDELALAVEUSEA PRESSION
Degagementetcirculationd'air
Unmotearenmarcheemetdamonoxydedecarbone,angaz
toxiqae,inodoreet invisible.Respirerdamonoxydede
vJM_"qcarbonepeatcauserdescephalees,fatigue,vertigos,
vomissements,confusion,abeattaqae,desnaasees,
d'evanoaissementsoala mort.Pourplusd'information,
consulterlosavertissementsat le monoxydedecarbonea la
sectionBoglesdesecurit&
Placeria iaveusea pression a i'exterieur dans une zone qui n'accumule
pas des gaz d'echappementmortels. NE JAMAIS placer la laveuse
pression ia ou ie gaz d'echappementpourrait s'accumuler et entrer
I'interieurou 6tre tire dans un edificequi pourrait _tre occup& Assurez-
vous que ie gazd'echappementest tenu a i'ecart de toutes iesfen6tres,
les portes, ies entreesd'air ou d'autresouvertures qui peuventpermettre
auxgazd'echappementd'etrecollectesdansunendroit restreint.Les vents
dominantset descourants d'airdoivent _treprisen considerationIorsque
vous positionnezla laveusea,pression (Figure22).
• Fairefonctionnerla laveuseapression UNIQUEMENTa I'exterieur.
• Emp_cheriesgazd'echappementd'entrerdans un espaceconfine
pariesfenetres,ies portes,ies entreesd'airou d'autresouvertures.
• NEJAMAISdemarrernifaire tournerle moteura I'interieur,dans un
vehiculeou un espaceferme, MEM/Esiles fen_tres et les portes
sont ouvertes.
Figure22 - Degagementsdeconstruction
5 pieds minimum
LISTEDECONTROLEAVANTDEDEMARRERLE
MOTEUR
1. Assurez-vous de fire et de comprendre ia section S6curite de
I'utilisateuret la section Fonctionnementavant d'utiliser la laveusea,
pression.
2. Verifierque I'huileest au niveauappropriedarts iecarter du moteuret
quele carburanta ete ajouteau reservoirde carburant.
3. Revoir I'assemblagede I'unite et s'assurer que les raccords sont
correctementsecurises. Assurez-vousqu'iln'yapasdedeformations,
de coupures,ou de dommagesautuyau a hautepression.
4. Fournirun approvisionnementd'eauappropriea un debitapproprie,
nettoyerlesfiitres dedebrisetconfirmer queiesysteme estlibred'air.
5. Confirmerquei'unite est solide au niveau du sol et que I'escapede
travailenvironnantest propre.
C01VI ENTDE ARRERVOTRELAVEUSEA
PRESSION
REMARQUE•
NEPASfairefonctionnerla pempesi I'alimentationeneaan'estpus
raccordeeet oaverte.Lagarantieseraannaleesi I'eqaipementest
endommageparsuitedanon-respectdecetteinstruction.
1. Placerlelevierderobineta,carburanta,lapositionON(Figure23).
Figure 23 - Rebinet a carburant
Off(Ar!
,._La chaleur/lesgazd'echappementpeaventenflammer
• Garderau moins 5 pieds (152 cm) de degagementsur tousles
c6tes de lalaveusea,pression,y compris la partie superieure.
60
loscombustibles,desstructuresoaendommagerle
reservoirdecarburantprovoqaantanincendie.
On(Marche)
Page 63

2. Positionnerlelevierd'etrangleura laposition,<CLOSE>>(Figure24).
REIVlARQUE•
Pourunmotearchaud,verifiezquele levierd'etrangleurest ala
position<<OPEN>>.
Figure24 - Levierd'etrangleur
r
Etrangleur
Ouvert
IMPORTANT• Avant de demarrerla laveuseD.haute pression, s'assurer
de porter deslunettes des6curite adaptees.
Risquedeblessureaaxyeux.Lejetpouteclabousserou
propulserdesobjets.
®
Toujoursporter des lunettes de s6curite Iors de I'utilisation de ce
materielou dansla zone ou ce materielest utilis&
®
Avant de demarrer la laveuse D.pression, veiller D.porter des
lunettesde s6curiteadaptees.
®
NEJAMAISsubstituer les verres de s6curites pardes lunettesde
securit&
5,
Placer le pied sur le repose-pieds ou autrement assurer I'unite du
mouvementIorsquevous reculez.
6.
Lorsquevous demarrezle moteur,saisissezlapoigneedu demarreur
(Figure27) et tirez doucement jusqu'D,ce que vous sentiez une
resistance.Ensuitetirezrapidementpour mettre enmarchele moteur.
Ferme
,
Deplacerle levierde commandedu regulateura la position,<HIGH>>,
figurantsur le moteurcomme unlapin (Figure25).
Figure25 - Commandedu regulateur
Haut Bas
/
,
PlacerI'interrupteurdu moteurD.la position ,<ON>>(o) (Figure26).
Fi#ure26 - La position ON
Figure 27 - Mettre le moteur en marche
Poign6edud6marreur
L'effetde rebondde la corde da demarrear(retroaction
'_= raplde) peatentramer des blessures corporelles. Le rebofld
va tirer la main et le bras vers le moteur plusrapidementque
ce que voaspourrezlaisser after.Vouspouvezsouffrir des
fractures,des bleus oudes entorses.
* NE JAMAIS tirer sur le cordon de demarrage sans relever
premierementla pressiondu pistoletde pulverisation.
* Lorsque vous demarrezle moteur,tirez sur le cordon jusqu'D,ce
quevous sentiezune resistance et ensuite tirez rapidement pour
eviterI'effetde rebond.
* Apres chaque tentative de demarrage, Iorsque le moteur ne
fonctionne pas, toujours diriger le pistolet de pulverisation darts
une direction securitaire et presser la g_chette du pistolet de
pulverisationpourrel_cherla haute pression.
* Tenezfermement le pistoletde pulverisationa deux mains lots de
I'utilisationdujet D.hautepression pour eviterdes blessuresquand
le pistoletde pulverisationfait un effetde rebond.
7. Retoumer la poignee du demarreur lentement. NE PAS laisser la
cordefaire un ,<effetrebond>>contre le demarreur.
61
Page 64

Lorsquele moteur demarre,d@lacer lentementle levierd'etrangleur
la position,<OPEN>>pendantle chauffagedu moteur.Sile moteur
hesite,d@lacer lelevier d'etrangleura.la position ,<OLOSE>>,puis
<<OPEN>>(Figure28).
Figure 28 - Levier d'etrangleur
i trangleur
ouvert
• L'utilisation oule fonctionnement du moteur sur tout terrain
couvert de for_t, broussailles ou herbes, est une violation du
Oode de ressources publiques de I'Etatde la Oalifornie, Section
4442, a moins que le systeme d'echappement est equipe d'un
pare-etincelles,tel que defini darts la Section4442, maintenuen
bonetat defonctionnement.D'autresl_tatsou juridictions federales
peuventavoir deslois similaires.
•Les piecesderechangedoivent_trelesm_mes etinstalleedartsla
m_me position que les piecesoriginelles.
SYSTF:MEDEREFROIBISSEMENTAUTOMATIQUE
(SUPPRESSIONTHERMIQUE)
Si vousfaites fonctionner le moteur de votre laveusea.pressionpendant
3-5 minutes sans appuyersur la g&chettedu pistolet de pulverisation,
circulation d'eau dans la pompe peut atteindre des temperatures
superieuresa 125 ° F. Le systeme s'engagea. refroidir la pompe en
evacuantI'eau chaudesur le sol.
9. Apreschaquetentativededemarrage,Iorsquele moteurnefonctionne
pas,toujoursdirigerle pistoletdansunedirectionsecuritaireet presser
la g_chettedu pistoletdepulverisationpour reBcherla hautepression.
10. Sile moteur ne demarre pas au bout de six tentatives, d@lacer le
leviera.la position ,<OPEN>>,et r@eterles etapes6 a.10.
percerla peau et sos tissus sous-jacents, pouvantmonet
Le jet d'eau a hautepressionproduitparcet appareil pout
des blessuresserieuses et une possibleamputation. Le
pistoletde pulverisationretiennent la haute pressionde
I'eau, memo Iorsque le moteur est arr_te el I'eau est
debranchee,ce qui peutcauser desblessures.
• NEPASlaisserles ENFANTSutiliser lalaveusea.pressionoujouer
a.proximite
• Toujoursgarderle tuyau a hautepression raccordea_la pompe et
au pistolet depulverisationIorsquele systemeest sous pression.
• NEJAMAISdiriger le pistoletde pulverisationvers les personnes,
les animauxoules dispositifs electriques.Desblessuresserieuses
surviendront.
• NEPASsecuriserle pistolet de pulverisationa laposition ouverte.
• NE PAS laisser le pistolet de pulverisation sans surveillance
IorsqueI'appareilest enfonctionnement.
• NE JAMAIS utiliser un pistolet de pulverisation qui n'a pas de
verrouillagede g_chetteou une protectionde g_.chetteen place et
enetat de fonctionnement.
• Toujourss'assurer quele pistoletde pulverisation,les busesetles
accessoiressont bienfixes.
COMMENTARR[:TERVOTRELAVEUSEA
PRESSION
1. ReBcherlag_chette dupistoletde pulverisation.
2. Placerle levierde commande du regulateura.la position ,<LOW >>
(tortue) (Figure29).
Figure 29 - Positionduregulateur
Eleve Bas
3. PlacerI'interrupteur ON/OFF(Marche/Arr@ du moteur a.la position
,<Arr_t ,.
4. TOUJOURSdiriger le pistolet de pulverisation dans une direction
securitaireetappuyersur la g&chettedupistoletde pulverisationpour
reBcher la haute pressionde I'eau retenue.Engagerle verrou de la
g_chetteIorsqu'il n'estpas utilise
5. FERMERI'alimentationd'eau.
IMPORTANT• Le pistolet depulverisationretiennentla hautepression de
I'eau,memeIorsque le moteur est arrete et I'eauest debranchee,ce qui
peutcauserdes blessures.
prnvoquerdesblessures serieuses.La chaleur/les
Le contactavec la zone du potd'echappementpeut
gaz d'echappement peuventenflammer los
combustibles,desstructures nuendommagerle
reservoir decarburantprnvoquantunincendie.
* NE PAS toucher les pieces chaudes et EVtTER les gaz
d'echappementchauds.
. Laisserrefroidir I'appareilavantdetoucher.
. Garderau moins 5 pieds(152 cm) de degagementsur tous les
c6tes de la laveusea.pression,y compris la partie superieure.
62
percerla peauet sos tissussous-jacents, pouvantmonet
Le jet d'eau a hautepressionproduitpar cet appareil pout
desbiessuresserieuses et unepossibleamputation. Le
pistoletde pulverisationretiennentla hautepressionde
I'eau,memo Iorsque le moteur est arrete et I'eau est
debranchee,cequi peatcauserdes blessures.
* Toujoursgarderle tuyau a hautepression raccorde a lapompe et
au pistolet de pulverisationIorsquele systeme est sous pression.
. TOUJOURSdiriger le pistolet de pulverisation dans une direction
securitaire, presser la g_chettedu pistolet de pulverisation pour
reBcher la haute pressionchaquefois que vous arr_tezle moteur.
Engagerleverrou de la g_.chetteIorsqu'iln'est pasutilis&
Page 65

RECOIVlMANDATiONSD'ENTRETiEN
Un entretienregulieramelioreralesperformancesetprolongerala vie dela
laveusea pression.Voir un depositairequalifie pourtout service.
La garantiede la laveuse a pression ne couvre pas les articles qui ont
et6 sujets a une mauvaiseutilisation ou unenegligence.Pourrecevoirla
contrepartietotale de la garantie,I'utilisateur dolt entretenirI'outil comme
demontr6 dans ce manuel, y compris un entreposageapproprietel que
decrit a.lasection Entreposaged'hiver et Entreposagea.longterme.
REIVIARQUE:
Si vousavezdesquestiona proposle remplacemeutdescomposa,ts
devotrelaveusea pressiou,veuillezappelerau1-888-436-3722pour
avoirdeI'assistance.
Certains reglages devront etre faits periodiquement pour entretenir
correctementvotrelaveuse a.pression.
Tousles servicesetles reglagesdevraientetreeffectuesaumoinsunefois
par saison. Suivreles exigencesdartsle tableauProgrammed'entretien.
REIVIARQUE:
Unefoisparan,vousdeveznettoyerou remplacerlabougie,nettoyer
ouremplacerle filtrea air,etverifier le pistoletde pulverisation
et I'assemblagedela rallo,gedebusepourI'usure.Unenouvelle
bougieetfiltrea air propreassurentunbo, mela,ged'air-carbura,t
et aidentaumoteura mieuxfonctiouueretadurerplusIougtemps.
PROGRAMMED'ENTRETIEN
Respecter les intervalles ou horaires du calendaire, selon la premiere
occurrence. Un entretien plus frequent est necessaire Iorsque I'appareil
fonctionne dartsdesconditions defavorables.
OhangezI'huilea moteur
Verifier/nettoyerle filtre d'entreede I'eau*
Verifierle tuyau a.hautepression
Verifierle filtre/tuyaua.siphonde detergent
Verifierle pistolet de pulverisationetI'assemblagepour desfuites
Nettoyezle debris
Verifierle niveau d'huiledu moteur
Changez I'huile a moteur_
Verifier/nettoyer le filtrea air de la laveuse _
Verifier le pot d'echappement et le pare-etincelles _
HUILEA POIVlPE
NEPASessayer aucun entretiende I'huiledans cette pompe. La pompe
est prdubrifiee et scellee a. I'usine, ne necessitant aucun entretien
supplementairepour la vie de lapompe.
CONTROLEDESEMISSIONS
L'entretieu, le remplacement ou la reparation des dispositifs et
systemes antipollution peuvent _tre executes par route entreprise
de reparation de moteurs non routiers ou tout individu. Toutefois,
pour obtenir le service de contr61edes emissions <<gratuitement >>,le
travail dolt etre effectue par un un depositaire autorise.Voir la garantie
d'emissions.
ENTRETIENDELALAVEUSEAPRESSION
Nettoyerledebris
Parjour ou avant I'utilisation,nettoyer le debris accumule du systeme
de nettoyage. Garder la tringlerie, les freins et les contr61espropres.
Gardezlazone autouret derrierele pot d'echappementfibredetout debris
combustibles.Verifiezlesfentes et lesouvertures d'airde refroidissement
sur lalaveuseapression.Oesouverturesdoiventetremaintenuespropres
etsans obstructions.
Les pieces de la laveuse a pression doivent etre gardeespropres pour
reduireles risquesde surchauffeet d'inflammationdu debris accumule.
* Employezun tissu humidepour essuyer les surfacesexterieures.
REIVIARQUE:
Un traitement inadequatde la laveuse apressionpeutI'endommager
et reduire sa duree de vie utile.
* NEPASinserer aucunobjet atravers lesfentes de refroidissement.
* Utiliserunebrossea.soies,doux pourenleverI'accumulationde salete,
deI'huile,etc.
* Utiliserunaspirateurpourramasserla saletesuperficielleet lesdebris.
WRIFIERETNETTOYERLETAMISDEFILTRAGE
D'ENTRftE
Contr61erle filtre a I'entreed'eaude la pompe. Nettoyerle tamis s'il est
colmate, leremplacers'il estendommage.
WRIFIERLESTUYAUXAHAUTEPRESSiON
Le tuyau a.hautepression peutfuir en raison de I'usure,de pincements
ou d'une mauvaise utilisation. Verifier le bon etat des tuyaux avant
chaqueutilisation.Verifier I'absencedecoupures, defuites,d'usureou de
renflementdu revetement,de deterioration et de jeu darts les raccords.
Remplacerle tuyauimmediatementau moindresigne de deterioration.
Service pour la bougie d'allumage
* Nettoyers'il y a uneobstruction.Remplacers'il y a uneperforationou est
dechire.
** Serviceplussouventdansunmilieusaleoupoussiereux.
percerla peau et ses tissus sous-jacents, pouvantmener
Le jet d'eau a hautepressionproduitparcet appareil peut
des blessures serieuses et une possibleamputation.
• NE JAIVlAIStenter de reparer le tuyau a. haute pression. Le
remplacer.
• Le tuyau de remplacement DOITavoir ou depasser la pression
maximumde I'appareil
63
Page 66

VERiFiERLETUYAUASIPHONDEDETERGENT
Contr61erlefiltre du tuyau de detergentet le nettoyer si necessaire. Le
tuyau dolt _tre fixe solidement sur le raccord crant& Contr61erI'absence
de fuites et de dechirures. Lecas ech6ant,remplacer lefiltre ou letuyau
endommag&
VI RIFIERLEPISTOLETDEPULVl RISATION
Examinerle raccordementdutuyau au pistoletet s'assurerde sa solidite.
Oontr61erle fonctionnement de la g&chette en la manoeuvrant et en
s'assurant qu'elle revient en position derepos. Remplacer le pistolet de
pulverisationimmediatements'il nefait pas <<I'effetrebond >>.
ENTRETIENDELABUSE
Unesensationd'impulsiontout en appuyantsur la g_chettedu pistoletde
pulverisationpeut etre causee parune pression excessive de la pompe.
Cetexcesde pression dansla pompe est souventdQa I'engorgementou
au blocaged'une busepar des corps etrangers,tels que de la poussiere,
etc. Pourremedier le probleme, nettoyer immediatementla buse suivant
les instructions ci-dessous :
1. Arr6terle moteuret couperI'alimentationeneau.
2. TOUJOURSdiriger le pistolet de pulverisation darts une direction
securitaire,appuyersur la g&chettedu pistolet de pulverisationpour
rel_.cherla hautepression de I'eauretenue.
perceria peauet ses tissussous-jacents, peuvantmener
Le jet d'eaua hautepressionproduitpar cet appareil peut
des blessures serieuses et une possibleamputation. Le
pisteletde pulverisationretiennentla haute pressionde I'eau,
m_me Iorsque le moteur est arr_te et I'eau est debranchee,
ce qui peut causerdes blessures.
* Toujoursgarderle tuyau a hautepression raccordea la pompeet
au pistolet depulverisationIorsquele systemeest sous pression.
* TOUJOURSdiriger le pistolet de pulverisationdans une direction
securitaire, presser la g_chette du pistolet de pulverisation pour
rel_.cherla hautepression chaquefois que vous arr_tezle moteur.
Engagerleverrou dela g_chetteIorsqu'il n'estpas utilise
3. Retirerlabuse de I'extremitede larallonge debuse.
4. Utiliserun trombone pour liberertout materieletrangerobstruant ou
limitantla buse (Figure30).
Figure30 - Enlever le materieletranger
Figure31 - Lancea centre-debit
7. Reinstallerla busedans la lance.
8. Rebrancherla lanceau pistoletde pulverisation.
9. Assurez-vousque le tuyau d'arrosage est branche a I'entree d'eau
de la pompe. Verifier que le tuyau a haute pression est branche au
pistoletde pulverisationeta la pompe.OuvrezI'eau.
10. Demarrerle moteur en suivant les instructions Comment demarrer
votrelaveusea pression.
11. Contr61erla laveuse a.pression en utilisant chaquebuse a.raccord
rapide.
ENTRETIENDUMOTEUR
'_!_ La productioninvolontaired'etincellespeut
POURR_:GLEROUR_:PARERLENETTOYEURHAUTEPRESSION
* Debrancherlefil debougie d'allumageet I'ecarterde sorte qu'il ne
puissetoucher la bougie.
LORSDESESSAISD'ALLUIVIAGE
* Utiliserun testeur de bougied'allumage approuve.
* NEPASverifier I'allumageIorsquela bougieest retiree.
provoquerun incendieouune electrocution.
RECOMMANDATIONSD'HUILEDEMOTEUR
Nous vous recommandons d'utiliser des huiles detergentes de haute
qualiteacceptablesi elles sentclassifiees pour le serviceSF,SG,SH, SJ
ou superieur.NEPASutiliser aucunadditif special.
Latemperatureexterieuredeterminelaviscosite deI'huileapproprieepour
le moteur.Utiliserle tableau pour selectionnerla meilleureviscosite pour
I'intervalledetemperatureattendu.
5,
Enleverla lancedu pistoletde pulverisation.
6.
En utilisant un tuyau d'arrosage, enlever le debris additionnel en
ringanta centre-debit avecde I'eauatravers de la lance (Figure31).
Effectuerceringage a.centre-debit pendant30 a.60 secondes.
64
lm| zmm
o_-2o-lo o 1o 2o 32 4o 6o 6o
°c-3'o -2'o -1"o 6 1'o 2'0
Intervalle de temperature d'utilisation prevue
* En dessous de 50 °F (10 °C), I'utilisation de SAE 30 entrafneraun demarrage
difficile.
** En dessus de 80 °F(27 °C) I'utilisation d'une huile 10W30 peut entrafnerune
augmentation de la consommation d'huile. Verifier le niveau de I'huile plus
frequemment.
Page 67

REIVlARQUE•
L'huilesynthetiquesatisfaisantlesspecificaticns&SACGF-2,la
marquedecertificationAPIet IcsymboledeserviceAPIavec,,SJ
/ CFENERGYCONSERVATION,cuplus,estunehuileacceptable
routeslestemperatures.L'utilisaticnd'huilessynthetiquesnemcdifie
paslesintervallesdechangementd'huile.
REMARQUE:
Le mcteur est equiped'un ,,Systeme d'alerte d'huile ,. Le systeme
va autcmatiquement arreter le mcteur avant quele niveau
d'huiledescende en desscus d'unelimite securitaire. Pour eviter
I'inccnvenientd'un arretimprevu,toujcurs verifier le niveau d'huiledu
mcteur avant le demarrage.
VER/F/ERLEN/VEAUD'HU/LE
Le niveau d'huile dolt etre verifie avant chaque utilisation ou au moins
toutes les 8heures defonctionnement.Garderle niveaud'huilemaintenu.
1. S'assurerque la laveusea pressionest sur unesurface 6quilibree.
2. Nettoyerle secteursitue autourdu reservoird'huile,essuyerla jauge,
nettoyeret enleverle capuchondu reservoird'huile (Figure32).
3. Verifierque I'huileest au niveauappropriedarts lajauge.
4. Insererlajaugedartsle col deremplissagemais ne pas la visser.
5. Remplaceret serrerle capuchondu reservoir d'huile.
Figure 32 - Remplir I'hufle a moteur
Figure 33 - Jauge
AcceptableGamme
de niveaud'huile
CHANGERL'HUILE,4MOTEUR
Si vcusutilisez votrelaveuseapressicndartsdesconditions extremement
salescu poussiereuses,cu dartsdes conditions climatiquesextr_mement
chaudes,changezI'huileplus souvent.
,A ATTENTION
,tA F:vitezdes contacts de peau prclcngeescurepetees avec de
I'huile de mcteur usagee.
• II a ete demcntre queI'huilea moteur peut causer du cancer dela
peauchezcertains animauxde laboratoire.
• Lavezcompletementlesendroitsexposesavecdu savonetde I'eau.
AJOUTERL'HUILEA MOTEUR
1. Verifiezque lalaveusea.pressionest poseesur une surface planeet
de niveau.
2. Verifierle niveaud'huile commedecrit a.la section Verifier leniveau
d'huile.
3. Si necessaire, verser lentement I'huile dans I'orifice du reservoir
d'huilejusqu'a ceque le niveauapproprie dartslajauge estatteint.
4. Insererlajaugedartsle col deremplissagemais ne pas la visser.
5. Sile niveau d'huileest has, remplissezle reservcirjusqu'a,atteindre
le niveaudela jauge situeentreLet H (figure 33).
6. Remplaceret serrerle capuchondu reservoir d'huile.
,_ GARDEZHOBSDEPORTF:EDESENFANT&
• Ne polluezpas. Conservezles ressources. DeposerI'huile usagee
dansun centrede collecte.
ChangerI'huileIorsquele moteur est encorechaud du fonctionnement,de
lamanieresuivante:
1. S'assurerque I'uniteest sur une surfaceequilibree.
2. Debrancherle fil de bougie d'allumage et I'ecarter de sorte qu'il ne
puissetoucher la bougie.
3. Nettoyerlesecteur situeautourducapuchon devidangedeI'huile(A)
(Figure34). Le capuchcn devidangede I'huileest situe a.la basedu
moteur,enface du carburateur.
4. Enleverlecapuchon du reservcird'huile (Figure32).
5. Retirerlecapuchon devidange deI'huileet vidertoute 'huiledartsun
recipientappropri&
6. Reinstallerle capuchonde vidangede I'huileetserrersoigneusement.
Figure34 - Capuchonde vidange deI'huile
65
Page 68

7. VerserlentementI'huile(environ20 onces) dansI'orifice du reservoir
d'huilejusqu'auniveauappropriedartsla jauge.NEPAStrop remplir.
8. Reinstaller le capuchon du reservoir d'huile Serrer le capuchon
solidementa.lamain.
9. Nettoyertoute eclaboussured'huile.
10. JeterI'huileadequatementselon tousles reglementsIocaux.
ENTRETIENDUFILTREAAiR
Votremoteur ne fonctionnerapas correctementet peut _tre endommage
si vous le faites fonctionner avec un filtre a air sale. L'entretenir plus
souventsi I'appareilfonctionneen conditions poussiereusesou sales.
Pourentretenirlefiltre a air,suivezles etapessuivantes:
1. Tirezsur le Ioquetdu carter de la laveusepour le retirer(figure 35).
2. DesserrezI'ecroua oreilles.
3. Retirezddicatement I'ensemblefiltrant.
4. Retirezlefiltre en mousse.
5. Pour nettoyer la cartouche, tapotez-la delicatement sur une
surface plate.
6. Reinstallezunfiltre de mousse.
7. Installezune cartouche propre ou neuve.
8. RemettezI'ecroua.oreilleset serrez-le.
9. Installezle couvercle enfermant le Ioquet.
Figure 35 - Entretenir /e fi/tre a air
ENTRETIENDELABOUGIED'ALLUIVlAGE
Le changement de la bougie aidera votre moteur a. demarrer plus
facilementeta. mieux fonctionner.
1. Nettoyerle secteursitue autourde labougied'allumage.
2. Enleveretverifier la bougie (Figure36).
3. Verifier I'ecartementdes electrodesa I'aided'une jauge d'epaisseur
a. ills et reinitialiser I'ecartement de bougie selon I'ecartement
recommandesi necessaire (voirles specifications).
4. Remplacerla bougie si les electrodessent piquees,brOleesou si la
porcelaineestfissur& Utiliserla bougiede rechangerecommandee.
Voir lesspecifications.
5. Installerlabougieet serrerfermement.
Figure36 - Changerla beugie d'allumage
SPARK PLUG
, i0.028-0.031
Element
fiitrant
de papier
Joint
d'etanch6it6
du fiitre
a air
_ ouvercle
Loquet
_ EI6mentfiitrant de
mousse
VERiFiERLEPOTD'ECHAPPEMENTETLE
PARE-I_TINCELLES
Verifier le pot d'echappementpour toute fissure, corrosion ou d'autres
dommages.Retirerle pare-etinceNes,le cas 6cheant, etverifier pour tout
dommage ou obstruction de carbone. Si des pieces de remplacement
sont necessaires, assurez-vous d'utiNseruniquement des pieces de
remplacementoriginellesdeI'appareil.
Dr-POSEDEL't-CRANPARbt-flNCELLES
Outilsnecessaires :016polygonalede 8mm
1. Retirezlebouclierthermiquedu silencieuxendevissantlesquatre(4)
boulons (A) (figure37).
2. Retirezle pare-etincellesdu silencieux en desserrant les deux (2)
boulons (B) (figure38).
3. Inspectezle pare-etincelles,remplacez-les'il est dechir6,perfore ou
ab_m6(nopiece0K1851). N'UTILISEZJAMAISUN ECRANABIIViE.
4. SiI'ecrann'estpas ab;m6,nettoyez-leavecun solvant commercialet
remettez-leenplace.
66
Page 69

Figure 37 - Bepose du bouclier thermique
Figure 38 - Bepose du pare-etincelles
APRESCHAQUEUTILISATION
IIn'est pas conseillede laisserdeI'eaudartsI'appareilpendantdeIongues
periodes. Des sediments ou des mineraux peuvent se deposer sur les
pieces de la pompeet la rendreinoperante.Suivezces proceduresapres
chaqueutilisation:
1. Arr_ter le moteur, eteindre I'approvisionnement d'eau, diriger le
pistoletdartsunedirection securitaireet appuyersur la g_,chettepour
rel_,cherla hautepression etlaisser refroidir le moteur.
percerla peauet ses tissussous-jacents, pouvantmener
Le jet d'eau a hautepressionproduitparcet appareil peut
des biessuresserieuses el une possibleamputation. Le
pistoletde pulverisationretiennentla haute pressionde I'eau,
meme Iorsque le moteur est arrete et I'eau est debranchee,
ce qui peutcauserdes biessures.
* Toujoursgarderle tuyau a hautepression raccordea la pompeet
au pistolet depulverisationIorsquele systemeest sous pression.
* TOUJOURSdiriger le pistolet de pulverisationdarts une direction
securitaire, presser la g_chette du pistolet de pulverisation pour
rel_,cherla hautepression chaquefois que vous arr_tezle moteur.
Engagerleverrou dela g_chetteIorsqu'il n'estpas utilis&
2. Debrancherles tuyaux du pistolet de pulverisationet de la sortie de
haute pression sur la pompe. Vider I'eau destuyaux, du pistolet de
pulverisationetde la lance. Utiliserun chiffonpour essuyer letuyau.
3. Viderla pompedetousles liquidespompes.Verifier queI'interrupteur
ON/OFFdu moteur et que le robinet de carburant sent a la position
OFREnsuite,tirez la poigneeenvironsixfois. Oeladevraiteliminerla
plupartdes liquides dartsla pompe.
4. OonservezI'unitedarts un endroitpropre etsec.
5. Sielleest entreposeependantplus de30 jours, consultezla section
EntreposagedeIongueduree.
_ f_, Le contactavec la zonedu potd'echappementpeut
* NEPAStoucherlespieceschaudesetEVITERlesgazd'echappement
chauds.
, Laisserrefroidir I'appareilavantdetoucher.
, Garderau moins 5 pieds (152 cm) de degagementsur tousles
c6tes de la laveusea,pression,y compris la partie superieure.
, L'utilisation ou le fonctionnement du moteur sur tout terrain
couvert de for_t, broussailles ou herbes, est une violation du
(:;odede ressources publiques de I'Etat de la Oalifornie,Section
4442, a moins que le systeme d'echappementest 6quipe d'un
pare-etincelles,tel que defini darts la Section 4442, maintenuen
benetatde fonctionnement.D'autresFttatsoujuridictions fed6rales
peuventavoir des lois similaires.
Oontacterle fabricant de I'appareil d'origine, le distributeurou le
depositaireafind'obtenirun pare-etincellescon(_upour lesysteme
d'echappementinstallesur cemoteur.
, Lespieces derechangedoivent_treles m_meset installeedartsla
m_me positionque lespiecesoriginelles.
provoquerdes blessures serieuses. Lachaleur/les
gaz d'echappemenl peuvenlenfiammer les
combustibles,des structures ou endommagerle
reservoir de carburanlprovequanlunincendie.
Le carburantet ses vapeurssent extremement
inflammableset explosives.Un incendieou une
explosionpeutprovoquerdesbrOluresgravesou la
mort.
ENTREPOSAGE D'ESSENCEOU D'UNI:QUIPEIVIENTDONT LE
RESERVOIRCONTIENTDE L'ESSENCE.
NE PAS entreposer a proximite de fours, poeles, chauffe-eau,
seche-linge ou d'autres equipementssusceptibles de comporter
uneveilleuseou unesource potentielled'inflammationdesvapeurs
d'essence.
6G
Page 70

ENTREPOSAGED'HiVER
REiVIARQUE:
Vous devezprolegervolre appareil conlreleslemperatures de
congelation.
• Le fait de ne pas effectuer ceci peut provoquer des dommages
permanentesa la pompeet rendrevotre appareilinutilisable.
• Les dommages provoques par congelationne sont pas couverts
par la garantie.
PourprotegerI'appareilcontre lestemperaturesde congelation:
1. Suivre les etapes 1-3 dans la section precGdenteapres chaque
utilisation.
2. Utiliserle protecteurde pompe pourtraiter lapompe. Celaminimise
les dommagespour congelationet lubrifieles pistons et les joints.
3. Sileprotecteurde pompen'estpas disponible,brancher unesection
de 3 pieds du tuyau d'arrosagea I'adaptateurd'entreed'eau.Verser
I'antigelpourvehiculesrGcreatifs(antigelsansalcool) dans letuyau.
Tirezla poigneedeuxfois. Debrancherletuyau de 3 pieds.
4. ConservezI'unitedans un endroit propreet sec.
ENTREPOSAGEA LONGTERME
Si vous ne prevoyez pas utiliser la laveusea. pression pour plus de 30
jours, vous devezpreparerle moteur et la pompe pour I'entreposagea.
long terme.
PROTEGERLESYSTEMED'ALIMENTATiONENCARBURANT
Le carburantpeut _tre vicie apres un entreposagede plus de 30 jours.
L'essence vicie provoque des depGts d'acide et de gomme dans le
systeme de carburantou surles pieces essentiellesdu carburateur.Pour
garder lecarburantfrais, utiliser un stabilisateur de carburant,disponible
sous forme d'additifliquideou unecartouche de gouttes concentrees.
IIn'est pas necessairede vider le carburantdu moteur si un stabilisateur
de carburantest ajouteconformement auxinstructions. Fairefonctionner
le moteur pendant 2 minutes pour faire circuler le stabilisateur dans
le systeme de carburant. Le moteur et le carburant peuvent ainsi _tre
conservesjusqu'a 24 mois.
Si I'essence dans le moteur n'a pas 6te traitee avec un stabilisateur
de carburant, erie dolt _tre versee dans un contenant approuve. Faire
fonctionner le moteurjusqu'a ce qu'il s'arr_te a cause de la manque de
carburant. L'utilisationd'un stabilisateurde carburantdans le recipient de
rangementest recommandepour conserver lafraicheur.
CHANGERD'HUILE
Tandis que le moteur est encore chaud, evacuezI'huile du carter du
moteur. Rechargezavec le degre recommande.Voir la section Changer
I'huiledumoteur dans I'Entretiendumoteur.
,_ ATTENTION!
_k e I'huile chaude peut entra_'ner des br{31ures.
Laisser le moteur refroidir avant de vidanger I'huile.
I_viter un contact prolong_ ou r_p_t_ de la peau
avec de I'huile usag_e. Laver minutieusement les
zones expos_es avec du savon.
PROTEGERLAPOMPE
Pourprotegerla pompedes deg§_tscausespar les depCtsminerauxou le
gel, utilisezde I'antigelPumpSaverou RVpour traiterla pompe,eviterles
dommagesdus augel etlubrifier les pistons etles joints.
• L'absence d'antigel risque d'endommager irremediablement votre
pompeet derendreI'appareilinutilisable.
• Lesdcg&tsdus au gel ne sont pas couvertspar la garantie.
PourprotegerI'appareilcontre legel :
1. Apres chaque utilisation, suivez les etapes 1 a. 3 de la section
prccedente.
2. Traitezla pompeavec du PumpSaverpoureviter les dommagesdus
au gelet lubrifier lespistons et lesjoints.
3. Sivous n'enavezpas, branchezunesectionde 1 metre (3 pieds) de
tuyau d'arrosageala prise d'eau.VersezdeI'antigelRV(sansalcool)
dansletuyau. Tirez deuxfois sur le demarreura.rappel.Debranchez
letuyau de 1 metre(3 pieds).
4. RangezI'appareildansun endroitsec et propre.
AUTRESiNSTRUCTiONSD'ENTREPOSAGE
1. NEPASentreposerle carburant d'unesaison a I'autrea moins qu'il
n'ait et6traite comme decrit a.la section Protection du systeme de
carburant.
2. Remplacer le reservoir de carburant s'il commence a rouiller. La
rouilleet / ou la saletedans le carburantpeutcauser des problemes
s'il est utilise avec cetappareil.
3. CouvrirI'appareilavec unecouverture deprotection adequatequi ne
retientpas I'humidite.
PROTECTIONDU MOTEUR
1. ChangezI'huile du moteur.
2. Retirezlabougie.
3. Versezune cuillerea.table (5 a.10 cc) d'huilea.moteur propredans
le cylindre.
4. Tirezplusieursfois lecD.bledu demarrer pour repartirI'huile dansle
cylindre.
5. Replacezlabougie.
6. Tirez doucement sur le c_ble du demarreur jusqu'a sentir une
resistance. De cette maniere, vous fermez les soupapes afin que
I'humidite ne puisse pas pcnetrer dans le cylindre du moteur.
RelD.chezdoucementlec_.bledu demarreur.
68
Lescouverturesderangementpeuvent_tre inflammables.
• NEPASplacerune couverture derangementsur une laveuse
pression chaude.
• Laisserrefroidir I'appareilpendantuntemps suffisantavantde
placerlacouverture sur I'appareil.
4. ConservezI'unitedans un endroit propre etsec.
TRANSPORT/INOUNAISONDEL'APPAREIL
Ne faites pas fonctionner, ne rangez pas et ne transportez pas
I'appareil a un angle sup(_rieur a 15 degres.
Page 71

GUIDEDEDI PANNAGE
La pomperenconlre lesproblemes
suivanls: impossiblede monleren
pression,pressioninlermillente,
coupsdepression,(aible debil
d'eau.
1. Busea basse pressioninstallee.
2. Entreed'eauobstruee.
3. Alimentationen eauinadequate.
4. Pincementou fuite sur letuyau d'entree.
5. Filtred'entreedutuyau obstru&
6. Temperatured'eau superieurea 35 °C.
7. Colmatageoufuite dutuyau a_hautepression.
8. Fuitedu pistoletde pulverisation.
9. La buseest obstruee.
10. Pompedefectueuse.
1. Remplacerparune buse a.pression elevee
2. NettoyerI'entree.
3. Fournirun debit d'eauadequat.
4. Eliminerlepincement, reparerla fuite.
5. Verifieretnettoyer lefiltre d'entreedutuyau.
6. Fournirunealimentationd'eauplus froide.
7. Supprimerlesobstruction darts letuyau de sortie
ou remplacerletuyau.
8. Remplacerle pistoletdepulverisation.
9. Nettoyerla buse.
10. Contacterun centre de servicelocal.
I I
1. Tuyauasiphon non immergedans le detergent. 1. Faireplongerletuyau a.siphon dartsle detergeant
Le detergent ne se melange pas 2. Lefiltre/tuyau a.siphon dedetergentest obstrue 2. Nettoyerou remplacer lefiltre ou letuyaua.siphon
avec le jet d'eau, ou brise, de detergent.
3. Busea.pressioneleveeinstallee. 3. Remplacerpar une busea bassepression.
i I I
. =
1. Regimemoteurtrop faible. 1. Deplacerla commande deregulateurenposition
Le moteurtourne bien avide mais FAST(rapide). Silemoteurcontinue a fonctionner
a des rates en charge. <<incorrectement>>,contacterle centre deservice
local.
Le moteurne demarre pas;
oudemarre maisfonclionne
irregulierement.
1. Niveaubasd'huile, <<Systemed'alerted'huile>>
2. Filtrea air sale.
3. Plusde carburant.
4. Oarburantvici&
5. Lefil de labougie n'est pas branchea.labougie
d'allumage.
6. Bougied'allumagedefectueuse.
7. Eaudansle carburant.
8. Melangede carburanttrop fiche.
1. Remplir lecarter du moteurau niveauappropri&
2. Nettoyerou remplacerlefiltre a air.
3. Remplir lereservoirde carburant.
4. Viderle reservoir decarburant; remplir avec du
carburantneuf.
5. Brancherlefil ala bougie d'allumage.
6. Remplacezla bougied'allumage.
7. Viderle reservoir decarburant; remplir avec du
carburantneuf.
8. Contacterun centre deservice local.
i
Le moteurs'arrete inopinement. 1. Plusde carburant. 1. Remplir lereservoirde carburant.
I
Manque de puissance. 1. Filtrea.air sale. 1. Remplacezle filtre a.air.
69
Page 72

N° de piece du manual0K1393 RevisionA (30/10/12) Imprimeaux Fttats-Unis
 Loading...