

Page 1

1
ClassComm VirtualG-Pad
User Guide
Revision 1.2
September 2011
Page 2

2
Contents
CD Contents: ................................................................................................................................... 3
Minimum System Requirements: ................................................................................................... 3
Step 1 – Software Setup ...................................................................................................................... 4
Step 2 – Mapping a PowerPoint Presentation using Slide Mapper .................................................... 5
Step 3 - Adding a mapped presentation into ClassComm Resources ............................................... 11
Step 4 – Create a class ...................................................................................................................... 13
Step 5 – Setting up the Virtual G-pad session ................................................................................... 23
Step 6 – Virtual G-Pad – Participant Virtual handset ........................................................................ 30
Step 7 – Viewing Reports and Charts in ClassComm ........................................................................ 38
FAQ .................................................................................................................................................... 41
1 – I have forgotten/lost my license details. What can I do?....................................................... 41
2 – Which browsers can I use to run the Virtual G-Pad? .............................................................. 41
3 – Where do I get the Virtual G-Pad app from? .......................................................................... 41
4 – How do I transfer a mapped presentation between computers without re-mapping? ......... 41
5 – How do I backup and restore in ClassComm ........................................................................... 41
6 - Can I install and run ClassComm from a Server across a network? ......................................... 42
Page 3

3
CD Contents:
ClassComm 5.exe – Main Software
Sample Content – Includes UK content for Genee Pads, IQ Pads and Pebble Pads.
PowerPoint Plug-in – Plug-in that adds the Slide Mapper module to MS PowerPoint. You
can then map your quizzes/presentation directly within MS PowerPoint ready for use in
ClassComm.
Backup/Restore tool For existing customers upgrading from an older version of ClassComm.
Quick Start Guide
Minimum System Requirements:
Processor: Pentium III 450 MHz processor (1 gigahertz (GHz) Pentium processor
recommended)
Memory: 256 MB (512 MB or above recommended)
Display: 800 x 600, 256 colours (Recommended: 1024 x 768 high colour, 32-bit)
CDROM Drive: 4x or faster
HDD: 300MB free hard drive space for basic installation – 500 MB hard drive space required
for curriculum sample content
Microsoft.Net Framework 4.0 (included in installer)
Microsoft® PowerPoint 2003 or above (2007 or 2010 recommended)
Adobe Flash player version 9 (included in installer)
Operating System: Windows XP, Windows Vista and Windows 7 Compatible (Please contact
technical@geneeworld.com for information on 64bit OS compatibility
Page 4

4
Step 1 – Software Setup
1 – Insert the disk and double-click ClassComm.exe. This will open the ClassComm installation menu
screen:
2 – Click the “ClassComm Installation” option to install the main application. Follow on screen
instructions to complete the installation.
3 – Click “Sample Content” to select and install the required sample educational content which
contains fully mapped PowerPoint presentations. (Optional)
4 – Install the “Power Point Plug-in” module. This will add the Slide Mapper to MS PowerPoint
allowing for presentation mapping.
5 – The “Backup and Restore” option allows users to take a Backup from older ClassComm
installations and then restore these settings into the latest ClassComm software. (Optional Step).
6 – Launch ClassComm from the Desktop icon...
Page 5

5
Step 2 – Mapping a PowerPoint Presentation using Slide Mapper
The process of mapping presentations associates each slide in your PowerPoint resource with one of
the following slide mapping options:
1. INFORMATION – Information slides have no question data associated with them. They are used
for informational purposes only.
2. TRUE/FALSE – Use for True or False type question slides.
3. YES/NO – Use for Yes or No type question slides.
4. MULTIPLE MARK – Use this option for multiple choice questions that have more than one
correct answer. With multiple mark slides, the answer options from the slide must be specified
so that they can be displayed within the student Virtual G-Pad correctly.
5. MULTIPLE CHOICE – Multiple choice slides can have the choices set as text or numeric with a
single correct answer. With multiple choice slides, the answer options from the slide must be
specified so that they can be displayed within the student Virtual G-Pad correctly.
6. SEQUENCE – Sequence slides are used when you have a slide that has a number of phrases,
words or numbers that need to be put into the correct order by participants.
7. NUMERIC – Numeric answer question slides.
8. TEXT - Text answer questions.
9. LIKERT SCALE – The Likert scale slide type is used when there is no right or wrong answer. They
can be used gather opinion/views on a subject and as a type of survey research tool. Choose the
default scale or create up to 5 custom likert scales. Also, a Text(essay) option is available for
opinion type questions.
10. E-Vote – Voting slide that accepts 3 responses only – YES, NO or ABSTAIN.
Page 6
6
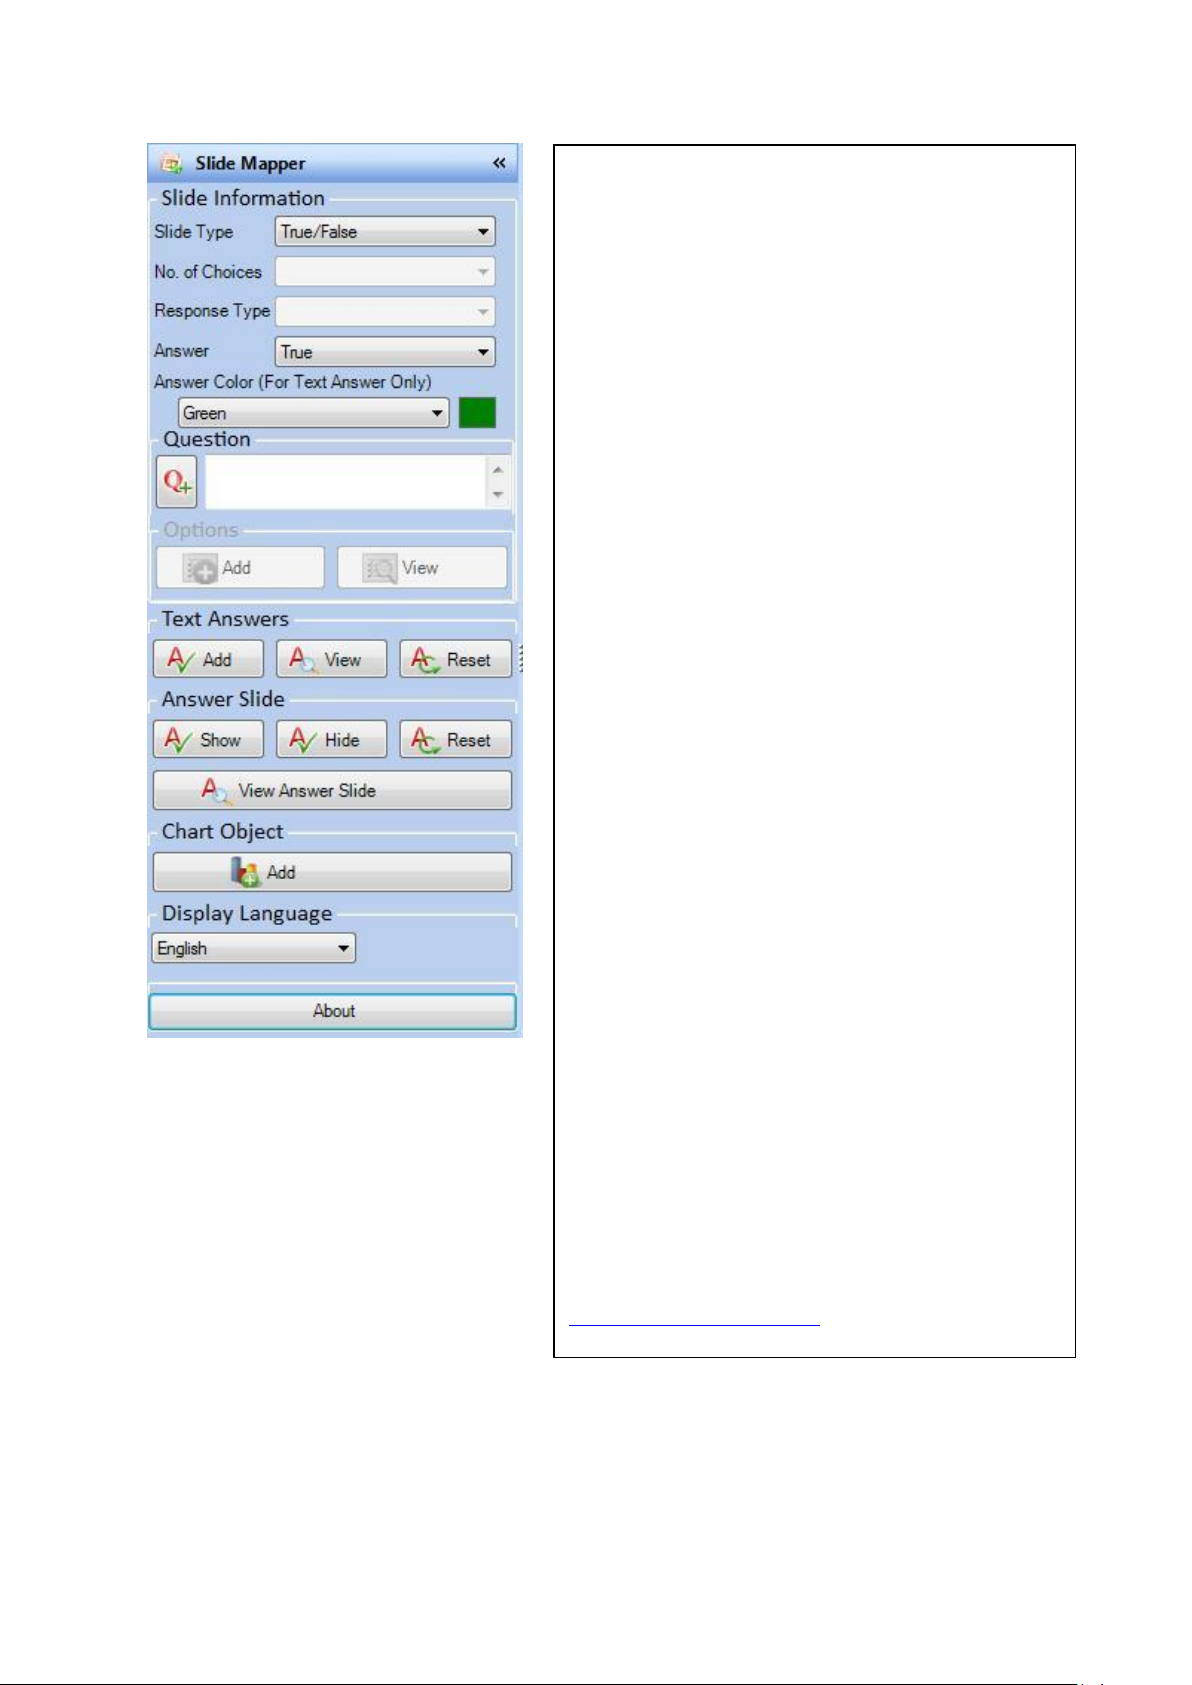
The slide Mapper is a simple way to map your slides
within PowerPoint ready for use with the VirtualG-Pad
software. Follow the steps below to map a
presentation slide:
1. Select the Slide Type.
2. Select the No. Of Choices if the slide Type is
Multiple Choice/Mark or Sequence. For other
slide types this option will not be available or
set by default in the case of Likert Scale.
3. Select Response Type – Option available for
Multiple Choice/Mark and Sequence. Select
Text to label choices with alpha characters and
Numeric to label choices as numbers. (Max 6
choices available i.e. A-F or 1-6).
4. Enter the correct answer
5. Highlight the question text from the
PowerPoint slide and click the Q+ button to
add the question. This will then appear on the
reports in ClassComm.
6. Options –This will be enabled for Multiple
Choice, Multiple Mark and Sequence slides.
Highlight the answer choices from the
PowerPoint slide and click the ADD button. To
confirm that the correct choices have been
set, click VIEW.
Repeat the above steps for all the question slides in
the presentation and SAVE the PowerPoint file.
Note: The following Slide Mapper features are not
required for Virtual G-Pad presentations – Text
answers, answer slide and chart object – They are for
the Genee World hardware response systems (Genee
Pads, IQ Pad and Pebble Pad) Contact
technical@geneeworld.com for further information.
Page 7
7
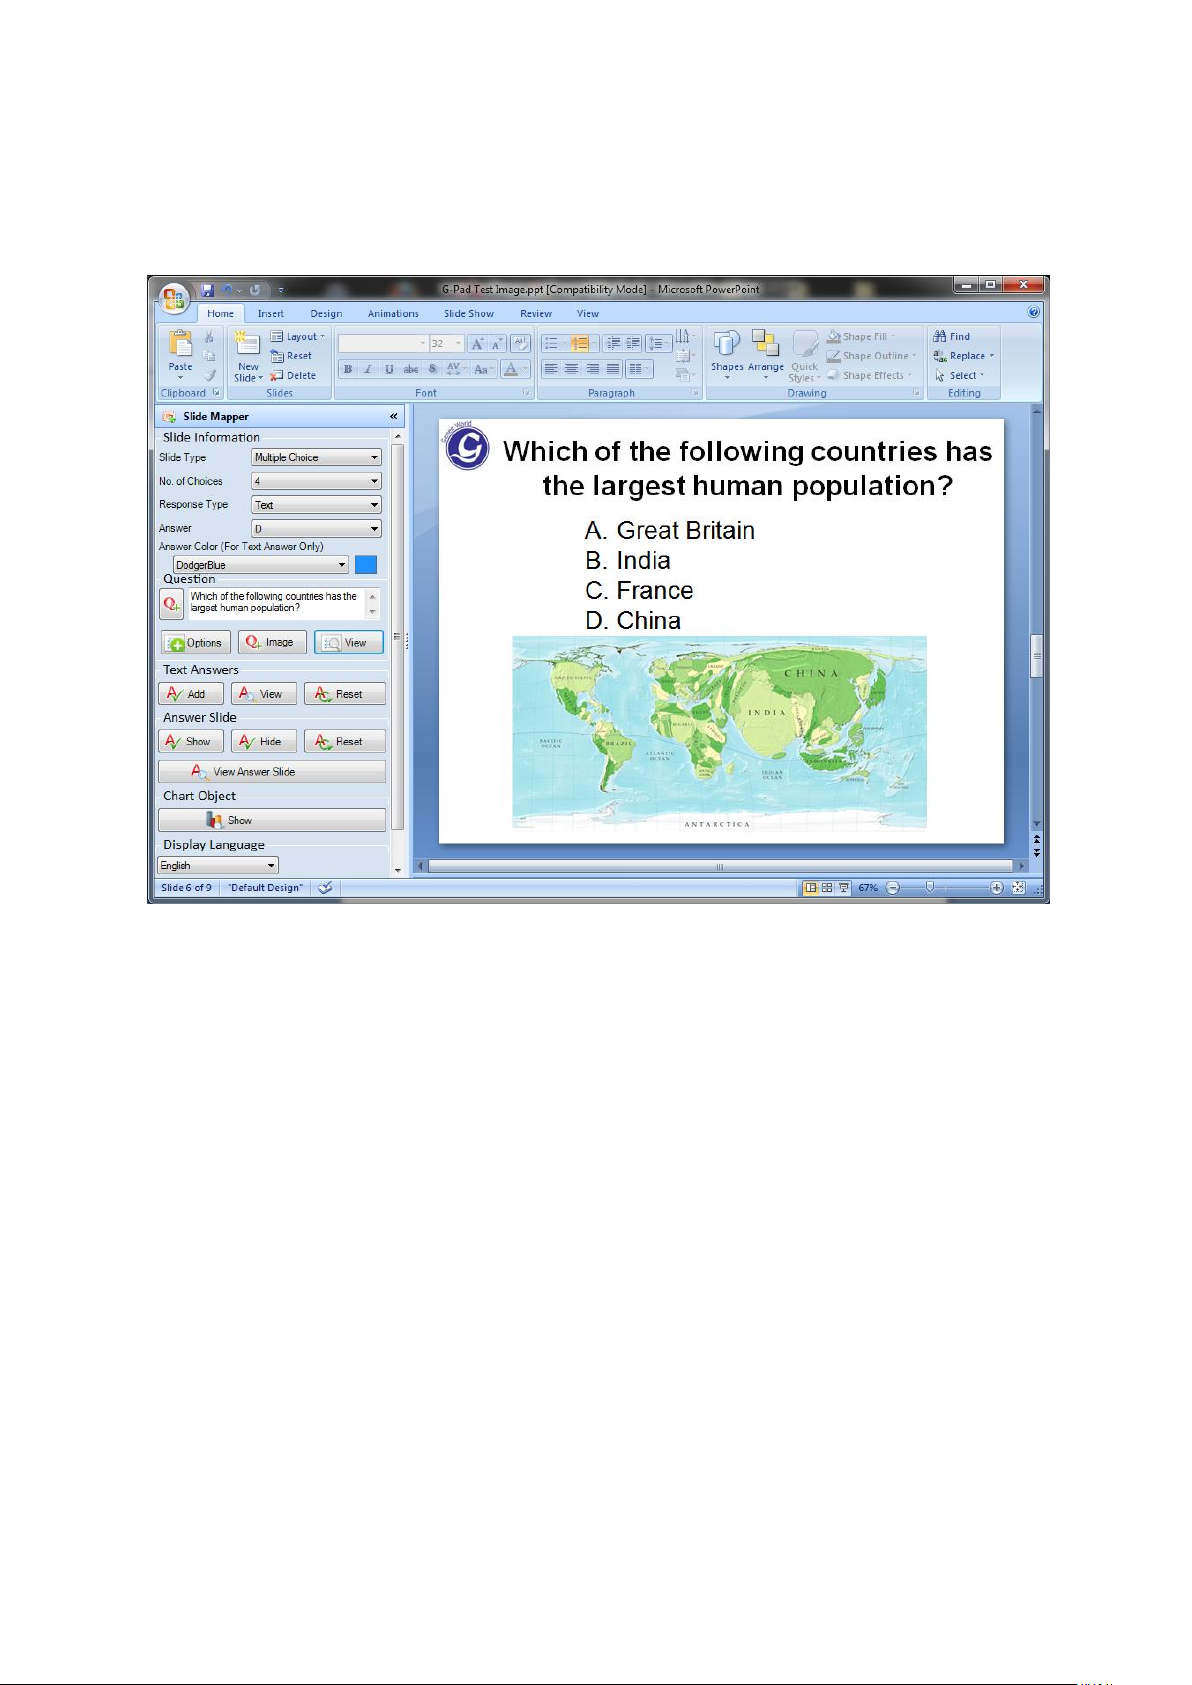
Example of a Mapped multiple choice slide
Below is a simple Multiple Choice slide with 4 answer options...
To map this slide correctly using the Slide Mapper, follow these steps:
1. Slide Type is “Multiple Choice”
2. No. of Choices is set to “4”
3. Response Type is “TEXT” (since options are labelled A-D. If they were labelled 1-4, Numeric
would need to be selected)
4. Answer is “4” from the drop-down since D-China is the correct answer (at the time of
writing).
5. Answer Colour (not necessary for Virtual G-Pad but keep as default Green)
6. Question – Highlight the question text from the slide “Which of the following countries has
the largest human population?” and then click the Q+ button on the slide mapper. Click YES
on the confirmation message and the text will be added to the Question box.
Page 8
8
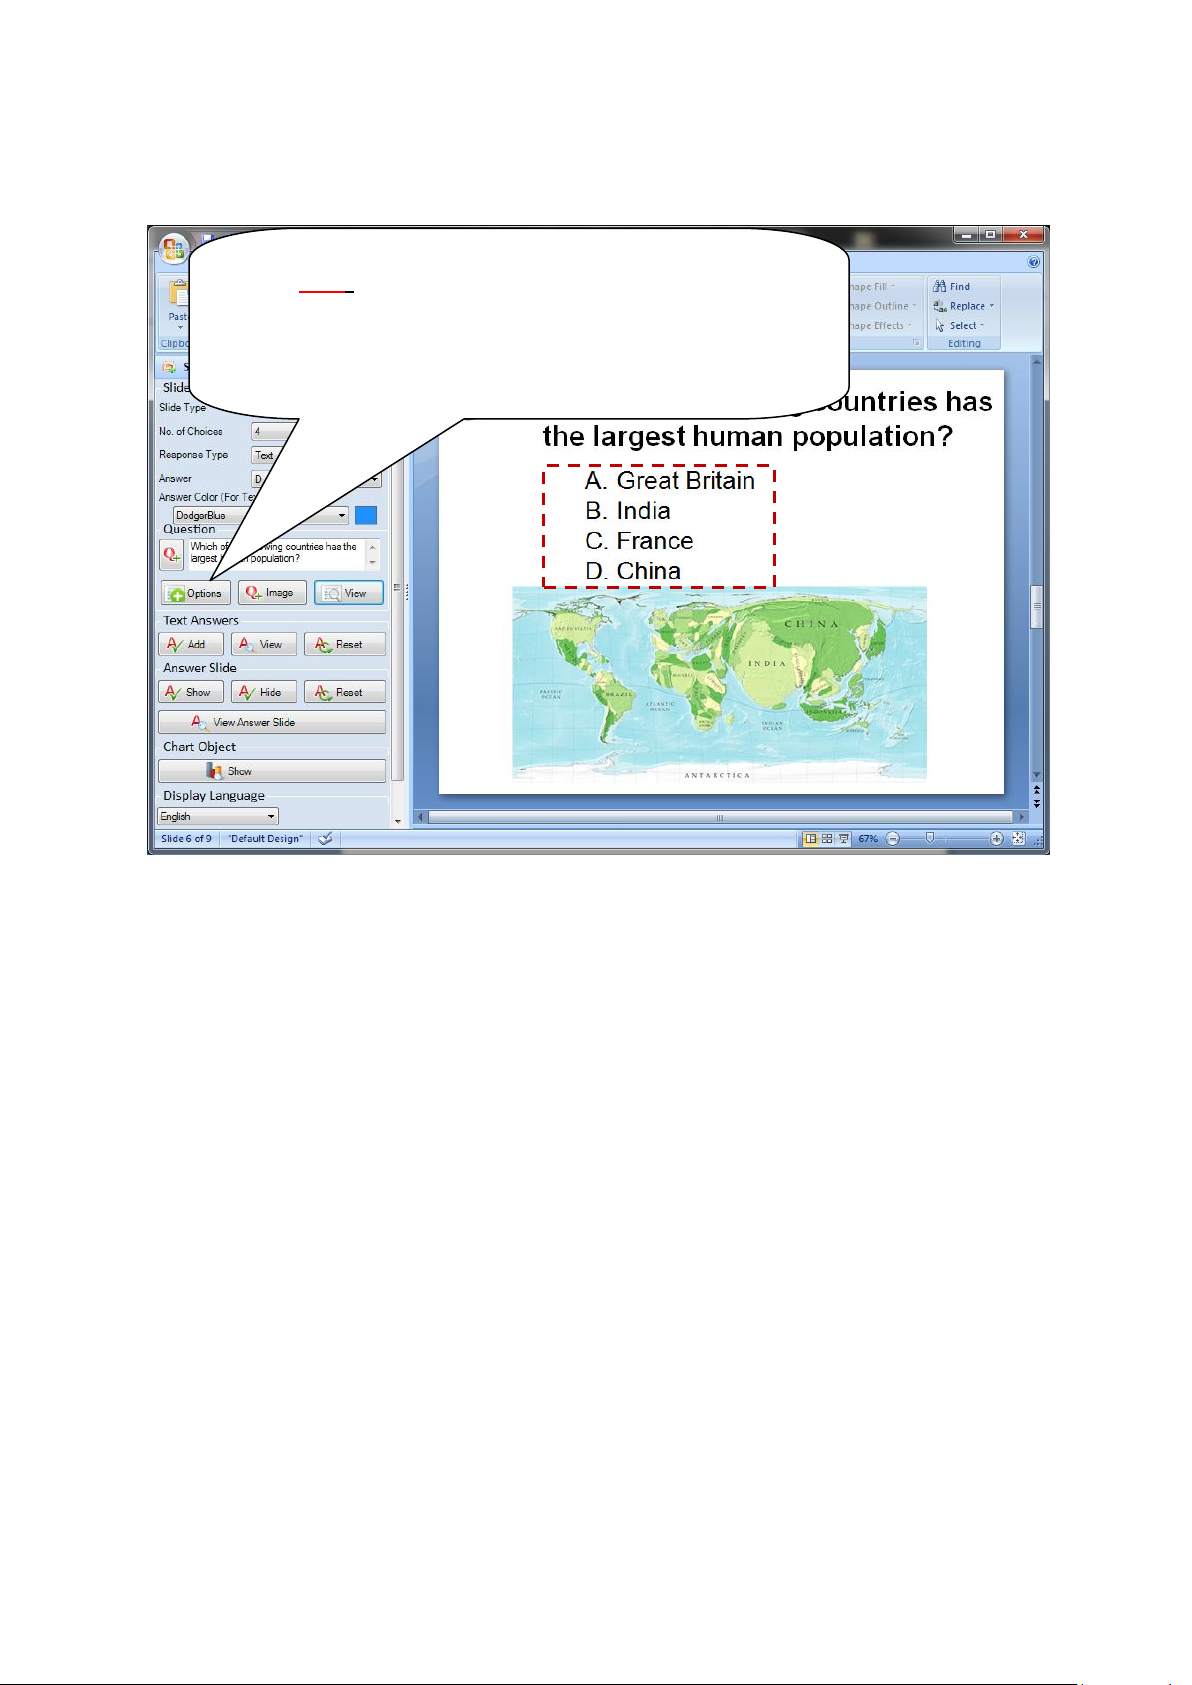
Select the answer options text from the slide and click the ADD
button. Note: Use the PowerPoint Numbering Library/bullet point
options to create the Text/Numeric labels for answer options on the
slide. This will ensure correct display within the Virtual G-Pad
browser/mobile device.
7. Options – Select/highlight the answer options from the slide and click the ADD button in the
Options area of the slide Mapper. Click on VIEW to confirm the answer options...
8. Images related to questions can be displayed on the Virtual G-Pad to enhance the
presentation. To do this, the image must first be added to the power point slide and can be
no larger than 500KB. In this example, a map of the world has been added to the power
point slide. Select it so it is highlighted and then click on the “Image” button:
Page 9

9
Highlight the image from the slide and
click the IMAGE button. Note that
the image size is limited to 500KB
9. To Preview what the final Virtual G-Pad will look like within a browser or on a mobile device,
click the “View” button:
Page 10
10
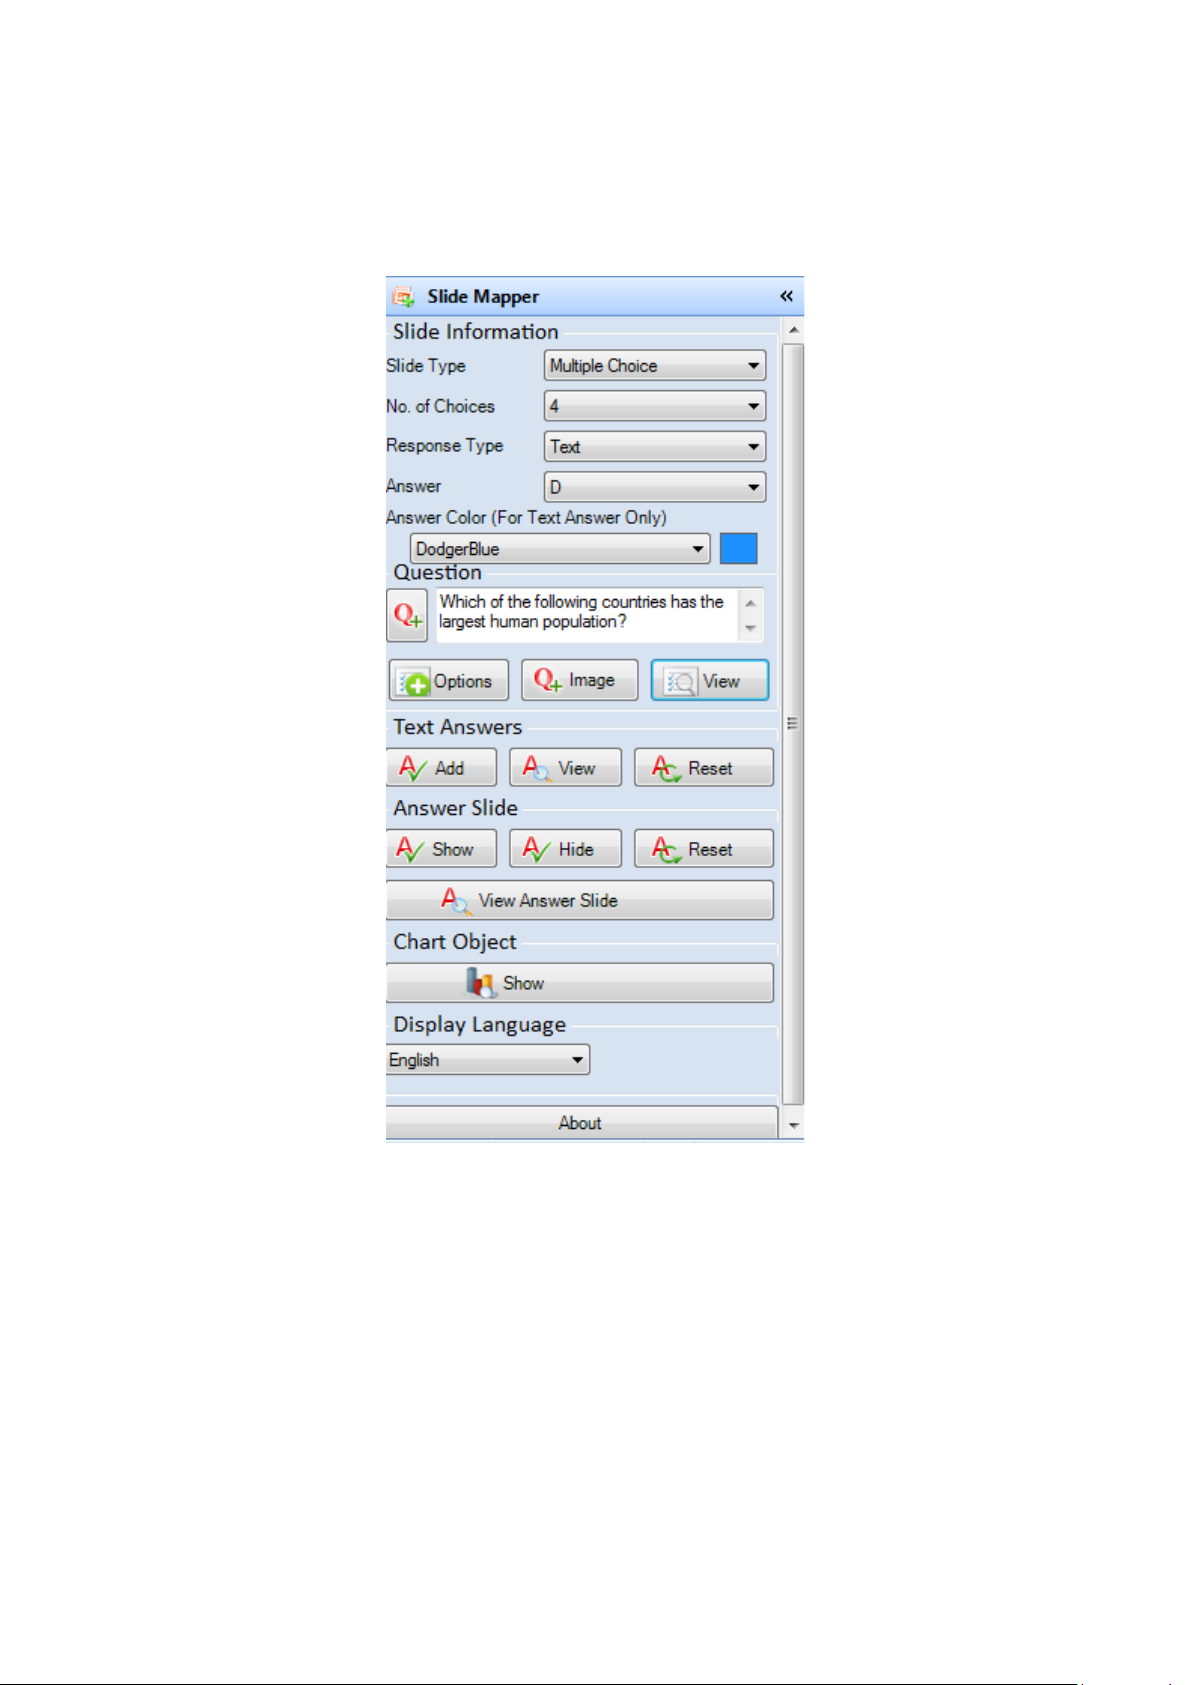
10. That’s it. The slide has been mapped ready for use within ClassComm with Virtual G-pads.
The completed slide mapper for this presentation slide will look as follows...
Repeat the above steps for additional questions in your presentation and then save. Note that when
the mapped presentation is saved, there will be an additional XML file created in the same location
with same name e.g. Test1.ppt will have Test1.xml created in the same location. The xml file
contains the mapping data and it is important to keep both files together to retain the mapping
data.
Page 11
11
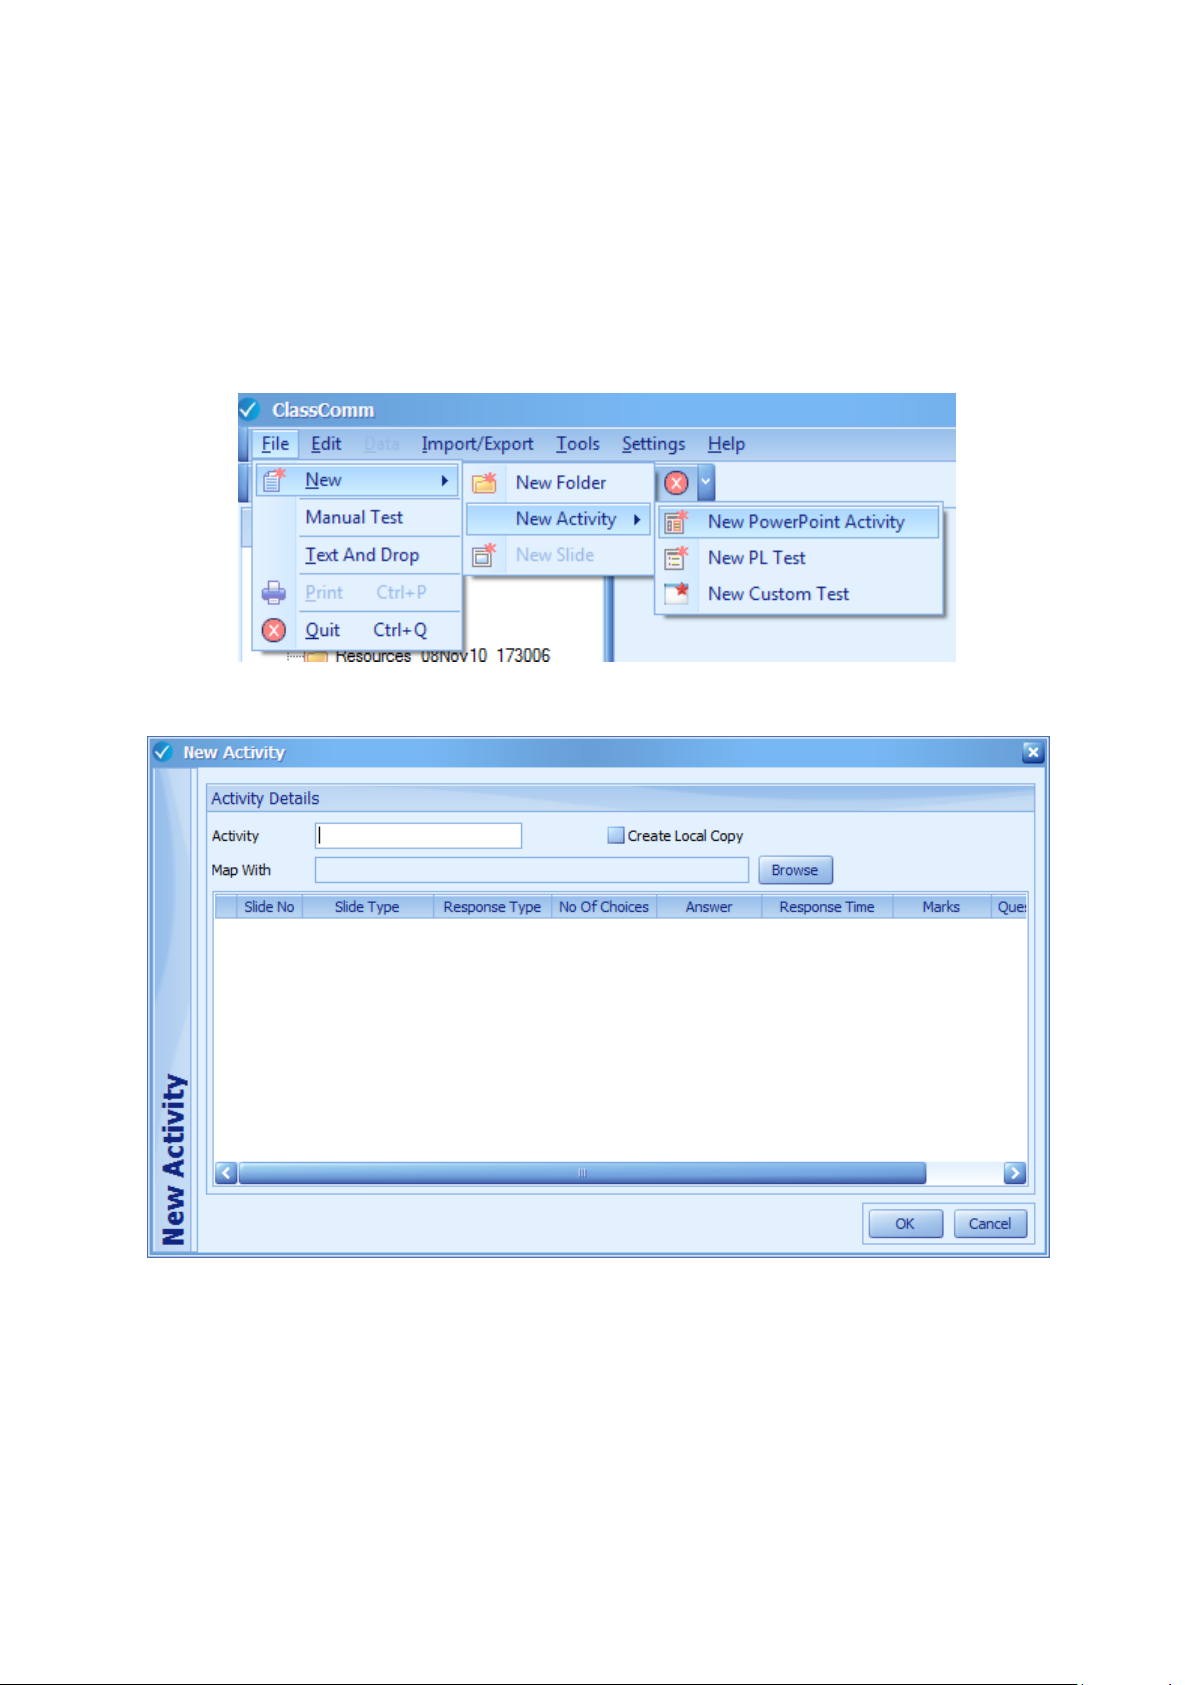
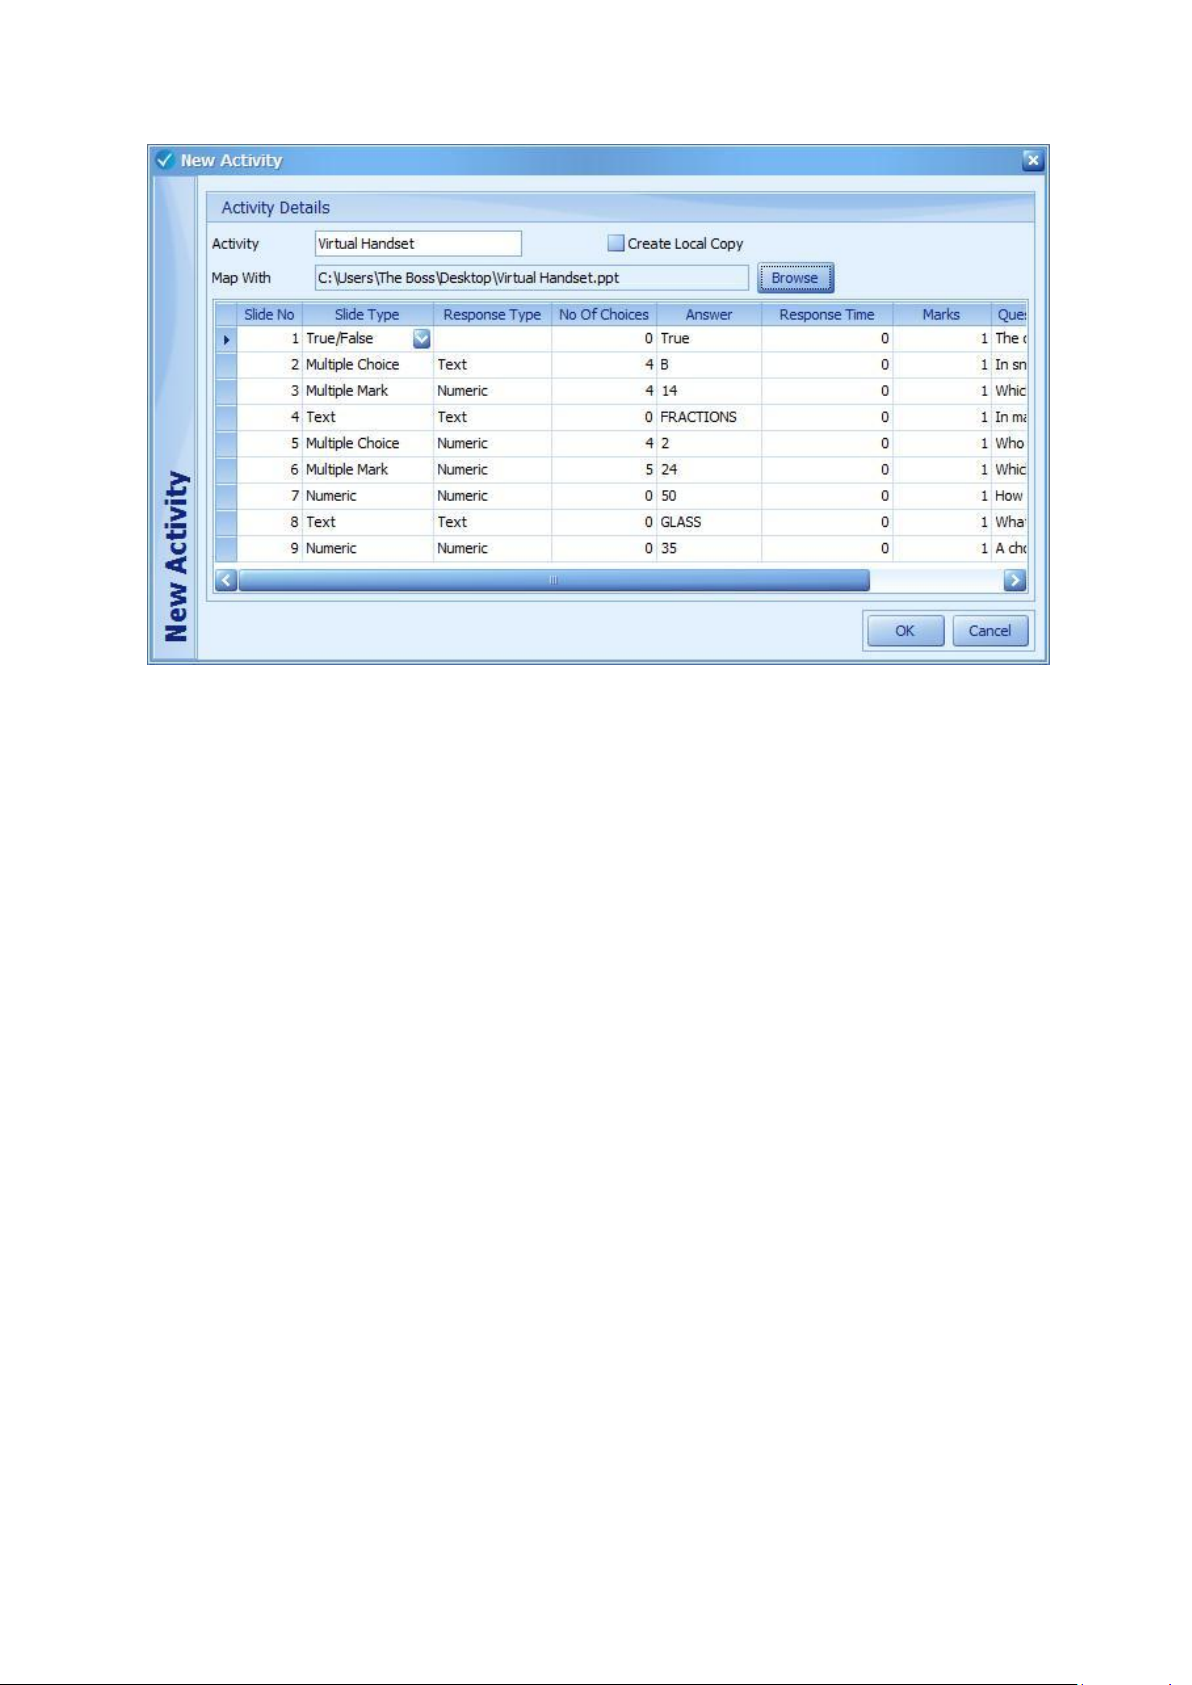
Step 3 - Adding a mapped presentation into ClassComm Resources
From within the ClassComm application, follow these steps to add the mapped presentation created
in the previous step.
1. Enter the RESOURCES area of ClassComm
2. Go to File > New > New Activity > New PowerPoint Activity.
3. The New Activity window will open.
4. Click on the Browse button and browse to the mapped, saved PowerPoint file. The file
mapping will be displayed in the New Activity window. Here is an example....
Page 12
12
5. Click OK. ClassComm will add the presentation into the Resources tree directory.
Page 13
13
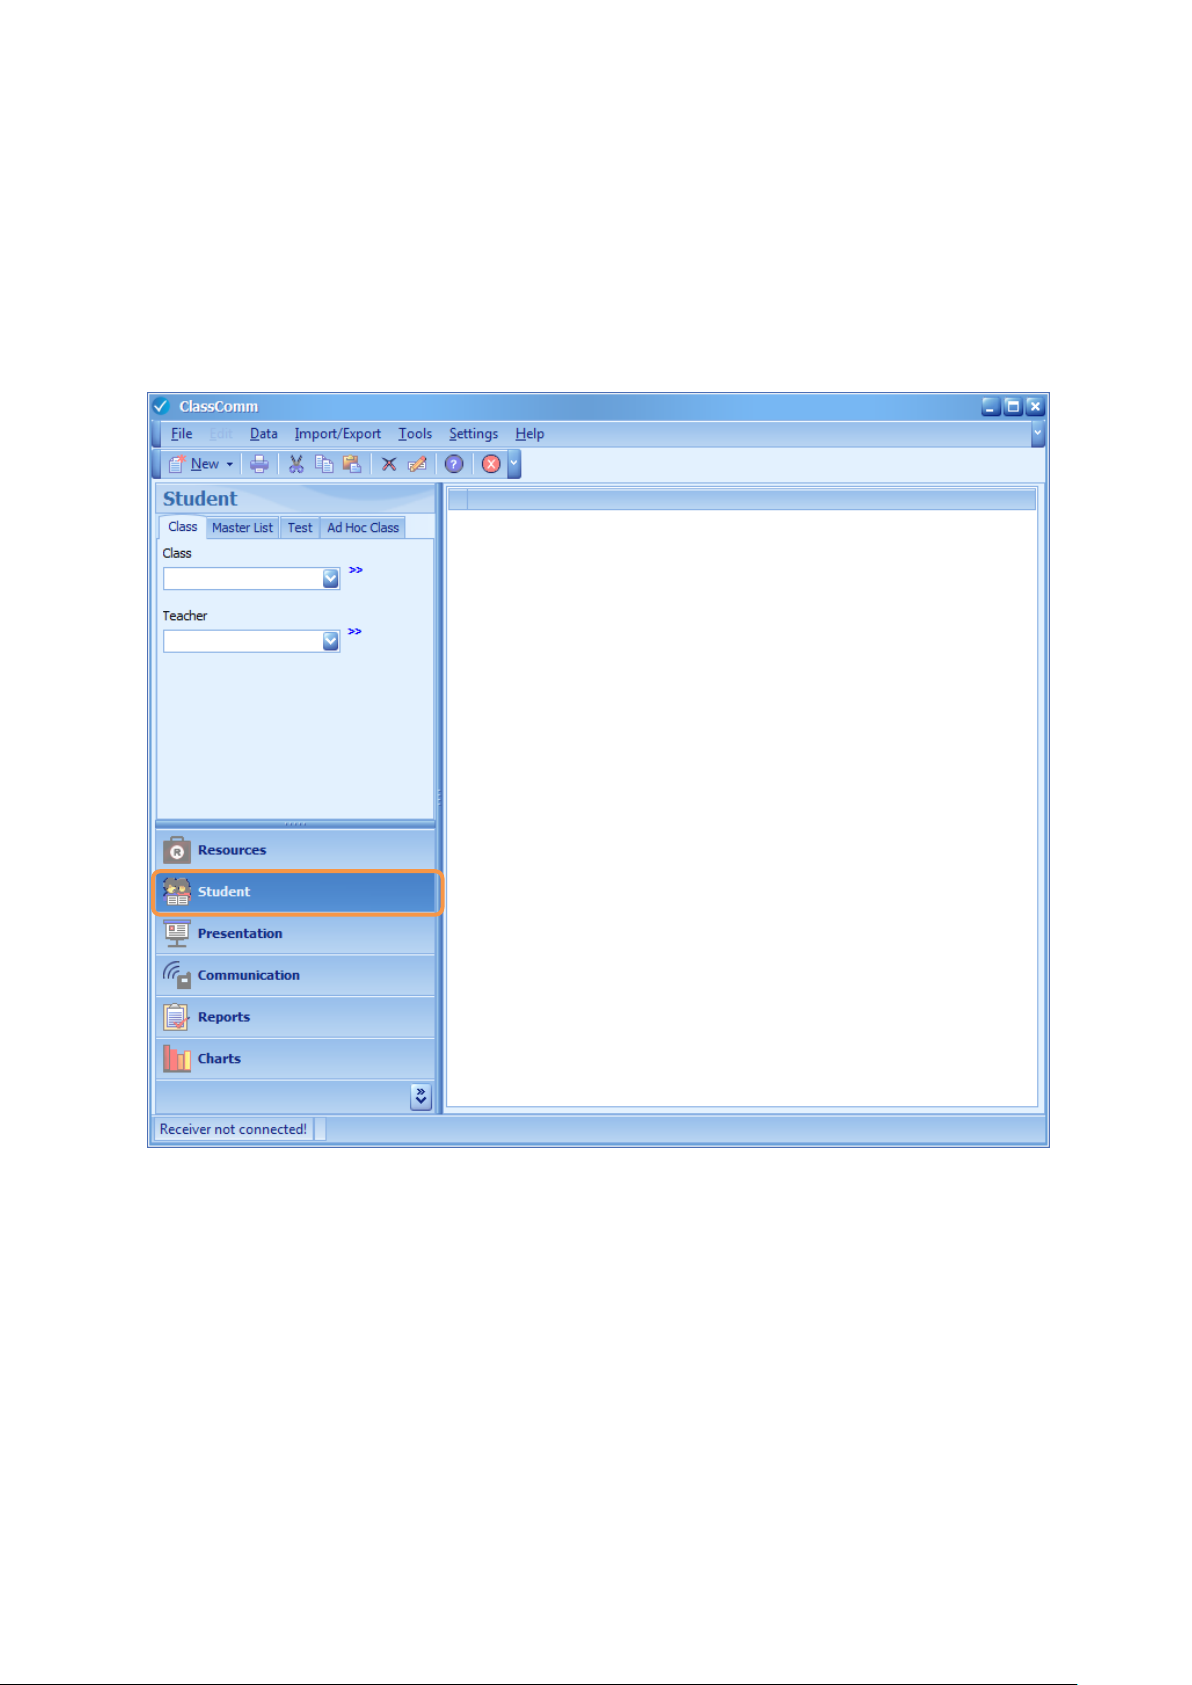
Step 4 – Create a class
Before running a Virtual G-Pad presentation, the students must be added into the ClassComm
software. This can be done either by data entry or via import of a CSV or excel file.
Method 1 – Manually Enter New Students
1. Enter the STUDENT area of ClassComm. The following screen will appear:
2. Create a new teacher by clicking the >> symbol next to the teacher drop-down box. From
the pop-up menu, select Add Teacher.
Page 14

14
3. Enter the new teacher details and press the SAVE button. At this point, the Cancel button
will change to a CLOSE button which will exit out of the Add Teacher window.
4. Create a new Class by clicking on the >> next to the Class drop-down box and select Add
Class.
Page 15

15
5. Enter the new class details in the Add Class window that appears and Press SAVE followed by
CLOSE. Note that the only mandatory fields are Class Name and teacher.
6. To add new students into the class, select the class from the drop-down box, click >> and
select Add Student from the pop-up menu.
Page 16

16
7. From the Search Student window that appears, click the NEW button.
8. Enter the new student details in the Add Student Details window that appears. Note that it
is important to include an email address as this will form part of the Virtual G-Pad Login
process. The only other mandatory fields are forename, surname and Handset ID. Press
SAVE and then ADD to enter further new students to the class. Once all student details have
been entered and saved, press CLOSE.
Page 17

17
Method 2 – Import from CSV/Excel
To import via CSV/Excel, we need to ensure that ClassComm can recognise the fields of the
spreadsheet and import them accordingly into the application database. Here is a sample excel
spreadsheet with 5 columns – Forename, Surname, Handset ID, Gender and Email. These are the
minimum requirements for use with the ClassComm Virtual G-Pad system
To import the above spreadsheet into ClassComm, here are the steps to follow:
1. Enter the STUDENT area of ClassComm.
2. Go to IMPORT/EXPORT > IMPORT > CSV/EXCEL
Page 18

18
3. The Import from CSV window will open. Select the Import source type that matches the file
that holds the student details (CSV or Excel) and click the Browse button. Locate the Import
Source file.
Page 19

19
4. Select “First row is data header” if the source file has column headings. Check the “Also
import into class” option and select the class from the drop-down menu. Note that classes
must be pre-created when using this option. If de-selected, the students will be imported
into the MASTER LIST and can be allocated to classes as required from within the Student
section of ClassComm.
Page 20

20
1 2 3 4 5
5. The Field names in the CSV/Excel file need to be matched to an index number so that they
will be recognised and imported correctly into the ClassComm software. From the sample
spreadsheet below, it can be seen that the FORENAME field is the first column hence it is
index 1; SURNAME is index 2 and so on.
Page 21

21
Select Forename from the Field Name is CSV/Excel dropdown box and then select 1 from the Field
Index in CSV/Excel dropdown list. Click the Add button. The data will be displayed in the table as
shown in the images below:
Page 22

22
6. When the fields have been indexed correctly, the List of selected Fields table will look as
follows:
7. Click the IMPORT button. After a short time, the following message will appear. Click OK to
proceed and then CLOSE on the Import from CSV window.
8. The student’s have now been added to the Class selected during the import process or if no
class was selected, they will be viewable in the Master List ready for addition to a class or
classes.
Page 23

23
Step 5 – Setting up the Virtual G-pad session
To work with Virtual G-pads, the controller/teacher must first create a session to which student’s
can join via their web browsers.
1. From within ClassComm, enter the PRESENTATION area.
2. From the top-menu, go to Settings > Application Preferences > Use Virtual G-Pad. Check this
option. This will add the “Virtual G-Pads” menu option to the top menu bar.
Page 24

24
3. Go to Virtual G-Pad> License Details from the top menu bar. This will bring up the “License
for Virtual G-Pad” login box as shown below. Enter your presenter email id and password
here (these credentials will have been provided when the system was purchased).
4. The License details window will be displayed. Create a “Handset Password” that will be used
by all students to login to the session. Click OK.
5. Check the “Present with Virtual G-Pad” option in the presentation area as shown in image
below:
Page 25

25
6. Select a previously created Class from the “Select Class” area (bottom-right pane) within the
Presentation section of ClassComm. Ensure that students in the class have been assigned
email ids from within the student area of ClassComm (See Step 4 – Create a Class). Check
the Virtual G-pads check box option next to the students that will participate in the Virtual
Handset session.
Page 26

26
7. Click on the Create Session button. A message stating “Do you want to create a Virtual G-
Pad session?” will appear. Click YES on the message box. Re-enter presenter credentials
(email ID and Password) when prompted and click OK. A “Session created” message will
appear – click OK.
Page 27

27
8. Select the Communication settings as required:
a. Login by ID – Not needed with Virtual G-pads – hardware response systems only.
b. Anonymous Login – This is a special type of login option. Selecting this option will
require you to create a new Anonymous class (in the right-pane) and save it. This
class can then used to present an activity anonymously. Students only need to know
the password set by the teacher to log on to the Virtual G-pad – no email id is
necessary.
c. Single response per handset – accepts first answer only if checked.
d. Student Feedback – Informs student whether they answered correctly/incorrectly
with a tick/cross appearing on the Virtual G-pad when an answer has been sent.
Also, when the presentation ends, the results page on the virtual handset will show
whether each response sent by students is correct/incorrect on the results grid.
e. Auto-response taken – as soon as question appears on the Virtual G-pad, the
student will be able to send response. With this option de-selected, the presenter
must first “play” the question before response’ will be accepted.
f. Show if threshold is below: if the percentage of correct responses falls below the
threshold set, the presenter will be shown a “Below Threshold” message.
9. Select the activity/resource that will be presented from the Select Activity area (top-left) and
click on the Present Activity button. At this point, ClassComm will minimise and the
PowerPoint Presentation will open with the response bar and Presentation toolbar ready to
take responses from virtual G-Pads.
Page 28

28
Response Bar
Presentations
Toolbar
1 - Presentation Toolbar – This is used to control the presentation, view/hide answers, show charts
and so on. Below are two images of the presentation tool bar – on the left is the initial state of the
toolbar when it is in recording mode – at this point, the participant’s are able to respond via the
handsets and the response bar cells will light up orange to indicate that a valid response has been
recorded. It is important to note that the 5th button down on the presentation toolbar is a RED STOP
button. This indicates that the software is in recording mode (i.e. ready to accept Virtual G-pad
responses). If it is a GREEN PLAY button, no responses’ will be taken until it is pressed – The green
play button will only be available when the “Auto Response Taken” option is de-selected from
within the Presentation settings area prior to running the activity.
Note that in Information type slides, only the “Next” button is available as no responses are
expected for Information questions.
Page 29

29
PICK STUDENT
VIEW RESULTS SUMMARY CHARTS
REPLAY QUESTION
VIEW GAME
VIEW REGISTER
START/STOP TAKING RESPONSES
SHOW/HIDE ANSWERS
NAVIGATE SLIDES
END PRESENTATION
Question Type
Responses
Received
Question No.
Response
Type
Active
Hardware
Handsets
Cells light up when a valid response is
sent. Click on individual cells to view
responses
The response bar gives the presenter a snapshot of the responses received from the Virtual G-pads.
It can be manually re-sized and also docked to different sides of the screen by dragging it to the
edges of the screen.
10. Once Presentation is completed, presenter will return to the presentation area of
ClassComm. Here the session can be closed by clicking “Stop Session”. Once session is
stopped, participants will no longer be able to review the feedback charts on their Virtual GPad.
Page 30

30
Step 6 – Virtual G-Pad – Participant Virtual handset
Participants will need to navigate to http://www.virtualg-pad.co.uk/ from a web browser (It is
recommended that you use the latest version of your chosen browser) Disable all pop-up blockers
or enable pop-ups for this URL. The following Login page will be displayed:
Alternatively, download the Virtual G-Pad app, free from the iTunes app store and use an iPhone,
iTouch or iPad to login to the session:
Page 31

31
Page 32

32
1. Enter username in email format as entered in the student/participant area of ClassComm.
Enter the Handset Password. This will have been set by the teacher/Presenter. If
prompted, enable pop-ups from this site when using web browsers. NOTE: If running an
Anonymous login presentation, only the password is required.
2. The Virtual G-Pad will appear ready for use:
iPad Login Screen
Page 33

33
Answer Options will be
displayed in the bottom
half of the Virtual G-Pad.
Username, Test name and date are
displayed at the top of the Virtual
G-Pad.
Note: When answering questions only certain questions will require the
“send” button to be pressed. Text, Numeric, Multiple Mark and
Sequence type questions will require the send button to be pressed.
True/False, Yes/No, Single Multiple choice, Likert scale and e-vote will
not require the send button to be pressed as the selected answer will
be transmitted in real time.
Page 34

34
Click on Show Image to toggle
between the image and question.
Right/Wrong feedback
will be displayed here if
enabled by the
Presenter.
Sent response is
displayed here.
To change/modify your response: Use
the Clear button for Text, Numeric,
Multiple Mark and Sequence type
questions and then re-enter your answer
and press Send.
For all other question types, simply click
on the answer option that you wish to
change to.
3. If an image has been mapped, use the “Show Image” button to toggle between the image
and the question. Press the relevant answer option to send your response:
Page 35

35
1 Group Results – A score ordered table of results (%).
Active participant will be highlighted in grey colour for
easy identification of their position within the group.
4. Once a presentation has been successfully completed, Participants will have an opportunity
to review their individual results and the group standing using 3 feedback options. Note:
These review charts are only available whilst the session is open. Once the presenter stops
the session from within ClassComm, a “Session is Closed” message will appear.
Page 36

36
2 - Your Response – A table showing each
question, active participants’ response
and the correct answer.
Page 37

37
3 - Ranking – Shows a bar chart with % score of the top 5
performers in the group. Use the show/hide legend
button to display graph full screen or with the legend
showing.
Participants can log out
once presentation is
complete.
Page 38

38
Select/de-select the charts you wish to show/hide on the
Virtual G-Pads.
IMPORTANT: You can select whether or not to display the Group Results and/or Top 5 Ranking chart
on the Virtual G-Pads. To do this go to Settings > Application Preferences > Virtual G-Pad:
Step 7 – Viewing Reports and Charts in ClassComm
To view reports, go to the REPORTS section of ClassComm. On the left-hand side of the interface is
the report settings panel – see following image.
Page 39

39
REPORT SETTINGS
From the report settings panel, you can
select the presentation and report type for
any saved record assessment presentations.
By default, the last completed/saved
presentation details will be input in the
report settings. Simply click on “Generate
Report” to view the reports.
1 – “Report For” area - From here select
whether the report you wish to view is from
a Standard (existing class) presentation, Ad
Hoc class presentation or Anonymous Class
Presentation. Under each of these class
types, it is possible to perform a
spontaneous presentation. If it is a
spontaneous presentation you wish to view,
select the Class type from standard, Ad hoc,
anonymous and then check the spontaneous
box as well.
2 – “Select Report Type” – Currently
ClassComm offers 6 Reports as shown.
Simply check the option for the report you
wish to view.
3 – “Report Settings” - Select the Class,
Teacher and Test from the drop-down boxes.
The Student option is only available when
the report selected is either Student Report
A or Student Report B as these are individual
student reports.
4 – Once the above options have been
selected, click “Generate Report” to view the
report.
The report will open in the right-hand pane
of the interface. Note that all of the reports
can be exported into one or more of the
following formats by clicking the downarrow on this icon:
Export formats:
PDF
HTML
MHT
RTF
Excel
CSV
1 2 3
4
Page 40

40
CHART SETTINGS
From the chart settings panel, you can select
the presentation and report type for any
saved record assessment presentations.
1 – “Chart For” From here select whether
the chart you wish to view is from a
Standard (existing class) presentation, Ad
Hoc class presentation or Anonymous Class
Presentation. Under each of these class
types, it is possible to perform a
spontaneous presentation. If it is a
spontaneous presentation chart you wish to
view, select the Class type from standard, Ad
hoc, anonymous and then check the
spontaneous box as well.
2 – “Chart Type” – Currently ClassComm
offers 5 charts as shown. Simply check the
option for the chart you wish to view.
3 – “Chart Settings” - Firstly select either a
Class Chart or Student Chart. Then select
the Class, Teacher and Test from the dropdown boxes. .
4 – Once the above options have been
selected, click “Show Chart” to view the
chart.
1 2 3
4
Page 41

41
FAQ
1 – I have forgotten/lost my license details. What can I do?
Please contact technical@geneeworld.com with details of date of purchase, school name, contact
name and telephone number.
2 – Which browsers can I use to run the Virtual G-Pad?
Currently, testing has been done with Internet Explorer, Mozilla Firefox, Google Chrome, Safari and
Opera.
3 – Where do I get the Virtual G-Pad app from?
Currently, the Virtual G-Pad app is freely available from the iTunes app store and is compatible with
iTouch, iPhone and the iPad. Simply search for “Virtual G-Pad”. Android and blackberry apps are in
development and will be available soon. Contact technical@geneeworld.com for the latest update
on app development.
4 – How do I transfer a mapped presentation between computers without re-mapping?
When you map a PowerPoint Presentation and save it, an associated XML file will also be created
and saved to the same location as the original PowerPoint file. The XML file contains all the mapping
data. When transferring mapped presentations, both the PowerPoint file and the XML must be
transferred together to retain mapping data.
A quick way to transfer mapped, PowerPoint activities is to use ClassComm’s built in Import/Export
Feature. When in resources area of ClassComm, select the presentation/s or yellow folder you wish
to export and go to Import/Export from the top menu bar. Select the presentation to export from
the new window that opens and choose the location to save the exported file to. The file will export
in a zipped file format. This zipped file can then be imported into ClassComm on other computers.
5 – How do I backup and restore in ClassComm
The backup and restore utility allows you to take a snapshot of your ClassComm setup (activities,
test results, students etc) and then restore these onto an alternative ClassComm installation.
Backup
Go to Tools > Backup. This will open the backup/restore utility. From here you can choose to
backup Resources and/or Student Data. Resources are the PowerPoint activities and Student data
includes reports, charts, students and classes. Once the backup options have been set, browse to a
location to save the backup file to and then click OK on the utility interface. The backup will start
and when completed, the backup/restore utility will close.
Restore
Go to Tools > Restore. ClassComm will close and the backup/restore utility will open. Select the
restore options and browse to the location of a saved ClassComm_Bkup_[datestamp].zip file. Click
OK and the restore will begin. NOTE: A restore OVERWRITES current ClassComm resources/student
data with the contents of the backup file.
Page 42

42
6 - Can I install and run ClassComm from a Server across a network?
Currently, ClassComm is a desktop application designed to be installed and run from a
Teacher/presenter PC. It cannot be run centrally from a server. An MSI version of ClassComm is
available for easy deployment across a network. Please contact technical@geneeworld.com for
further details.
 Loading...