

Page 1

All In One
User Manual
Please retain this manual properly for future reference
d
l
r
o
W
e
e
n
e
G
Page 2

Table Of Contents
Chapter 1 Introduction ......................................................................................................................3
Chapter 2 Each part of the navigation .........................................................................................4
2.1 Front View ......................................................................................................................4
2.2 Back View ........................................................................................................................4
2.3 Under View ....................................................................................................................4
2.4 Connect Machine .......................................................................................................4
Chapter 3 Getting Started ...............................................................................................................7
3.1 Connect the AC adapter ..........................................................................................7
3.2 Power On ........................................................................................................................7
3.3 Install operating system...... ......................................................................................7
Chapter 4 Touch screen instructions ............................................................................................9
4.1 Calibration......................................................................................................................9
4.2 Touch screen gestures Description ....................................................................10
4.3 Cautions of Using Touch screen............................................................................10
Chapter 5 Troubleshooting.............................................................................................................11
2
Page 3

Chapter 1 Introduction
Thank you for your choice of purchase. Please read this user manual before using
your product and refer to this or a professional technician for any queries related to
the product.
Disclaimer
1. This product has been tested in accordance with the provisions of FCC Rules
Part 15 and complied with Class B digital device regulations. The purpose
of these provisions is to provide reasonable protection against harmful
interference in domestic use.
2. This product may not be fully adaptable with other products and not suited for
other environments which aren’t mentioned in this user manual and related
product material. Therefore the warranty will only cover issues with the G Touch
Pro product alone.
3. Because of technical or other external factors which leads to changes on
product design and specications, the company will not give a separate notice.
Warnings and Precautions
This machine is a high voltage, do not open the cabinet in order to avoid an electric
shock. Maintenance should be entrusted to professionals.
Incorrect methods of operation may cause electric shock or re incidents. To ensure
your safety and the lifespan of the machine, please read the following instructions
carefully before using this machine. All operation must comply with all instructions.
• Do not use the accessory equipment which is not recommended by the
manufacturer.
• Please use the machines with the supplied power adapter. Also please check
AC power adapter specication, if you are not sure whether it ts your local
electricity condition, contact your distributor or manufacturer.
• Do not try to try to manually x or alter the supplied power adapter . Damaged
power cord can cause electric shock or re.
• Do not try to repair the machine without professional guidance, as the high
voltage machine could result in the hazard of human body or the machine
itself. Be sure the machine is repaired or maintained by professional technician.
• Do not attempt any actions which conict with this manual. Improper
adjustment of components which hasn’t been mentioned in the instructions
could damage the machine.
• Clean the machine before plugging in the power. Please use the slightly damp
cloth to clean the machine and don’t use liquid cleaning detergent or spray
cleaner. Unplug the power if the machine hasn’t been used for a long time.
3
Page 4
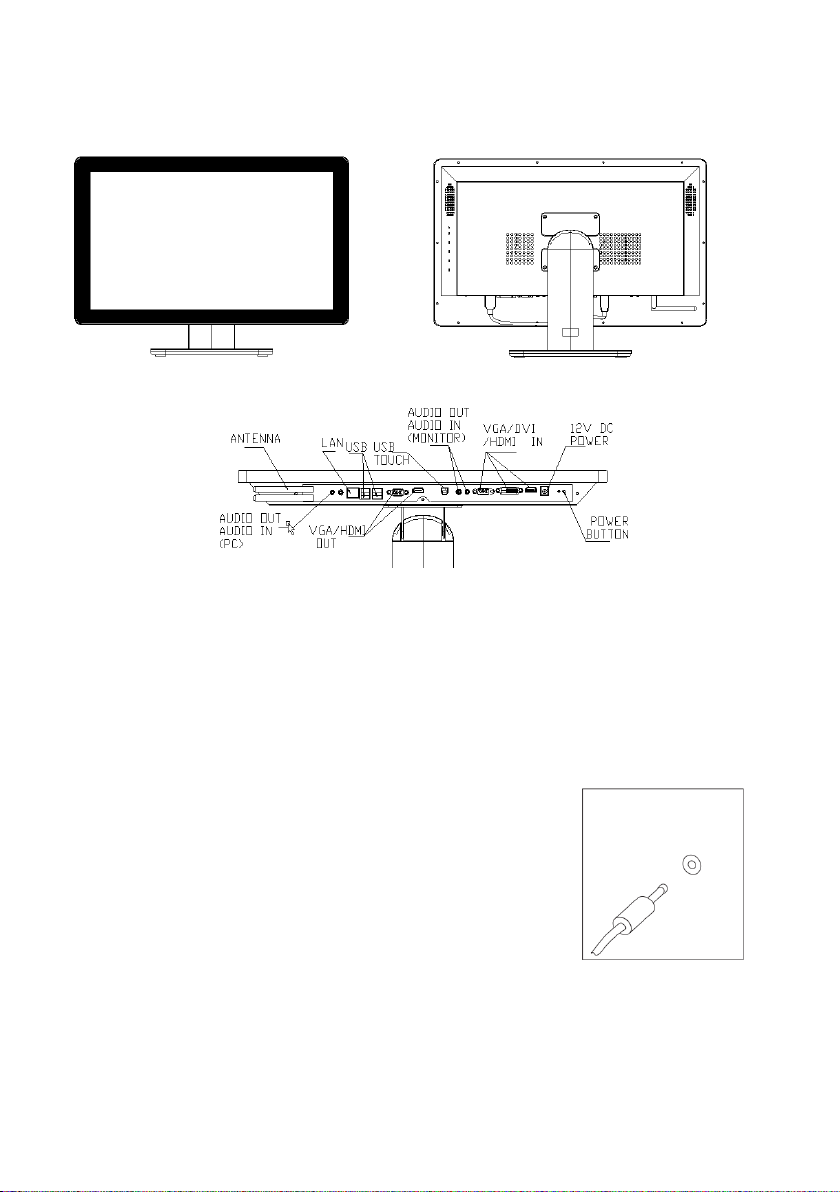
Chapter 2 Each part of the navigation
2.1 Front View
2.2 Back View
2.3 Under View
2.4 Connect Machine
When connecting the machine, please apply the following information
• In the back of the machine, please nd the interface of small icons that match
the interface and icon.
• Connect the cables with connector interface of the same colour together.
Warning: The following may not be specic to your model of machine.
2.4.1 Power Connection
1. Connect the adapter to the corresponding interface on
back of the machine
2. Connect the adapter to power socket
2.4.2 Keyboard and Mouse Connection (USB Port)
The keyboard and mouse are connected to the USB port
4
Page 5

2.4.3 Display adjustable angle
When conguring the bracket, you can tilt the angle to suit your viewing angle
This model can be mounted on the wall
This model can be mounted on the wall, please purchase a standard wall bracket
(please select VESA of 100mm * 100mm, M4 screw holes for standard bracket), and
mount the machine on the wall through bracket
2.4.4 If you have an audio device, please use the following
instructions to connect (the interfaces of your machine may not
be the same as follows)
1. Microphone
The interface for microphone.
2. Headphone
The interface located in the front or side of the machine is for headphone
connection.
5
Page 6

2.4.4 Connect to any other existing equipment
HDMI Port
This interface is for HDMI connection
VGA Port
This interface is for VGA connection
LAN Port
This interface is for LAN connection
2.4.5 If you want to use the machine as “All in One PC”,
please connect the cables as follows:
2.4.6 If you want to use the machine as “Touch Monitor”,
please connect the cables as follows:
6
Page 7

Chapter 3 Getting Started
3.1 Connect the AC adapter
The power adapter is an international universal power adapter, power supply input
voltage ranges from 100V ` 240V.
The following is the correct installation steps:
• Connect the power cord to the AC adapter
• Connect the power cord to the power socket
• Plug the adapter DC connector to the DC port of machine
3.2 Power On
Press and hold the power button for 1-2 seconds, then release. The computer will
automatically execute the boot self test (POST).
Warnings: When the computer crashes, press the power button for 4-6 seconds
to turn o the computer.
3.3 Install Operating System
These products are shipped without installation of the operating system, users
need to install the operating system themselves.
3.3.1 Enter the BIOS settings
1. During the power-on self test, Press F2 into the BIOS settings.
2. Use the arrow keys to select the “boot”
3. Set up your system installation disk as rst priority on boot
7
Page 8

4. Use the arrow keys to select the “Exit”, select “Exit Saving Changes”.
3.3.2 Follow the prompts to install the operating system
3.3.3 Driver Installation
The driver should be properly installed on the operation.
8
Page 9

Detailed installation steps are as follows:
• Open the Driver File
• Gradually install all drivers (such as chipset, VGA, Sound, Lan).
• Click “Install”
Chapter 4 Touch screen instructions
Touch screen is an accessory of computer like a mouse. The user can manually
deliver information to the computer via the touch screen. With this feature, the
computer can be used via touch.
4.1 Calibration
Do calibration before using it.
• Open the Driver File, select “HidCalib”
9
Page 10

• Double Click “HidCalib”
• Press red cross on the screen followed by clicking
• Click “OK’ button to complete the calibration
4.2 Touch screen gestures Description
The touch screen can support single-point or multi-point touch (depending on the
model), it can support click, double click, right click, rotate, zoom in and out.
4.3 Cautions of Using Touch Screen
1. It is important to note when using do not use anything sharp or hard on the
screen which can cause damage
2. Keep the touch screen surface clean and dry, and ensure that the ngers are
dry, clean. Dirt on screen could aect the normal use of touch screen
3. When cleaning the screen, in order to protect the screen, please use soft cloth
to wipe the screen after the shutdown and keep the screen out of power. Do
not use any type of wet cloth on the screen
4. Avoid water and dust in the glass and cracks of the chasis frame when cleaning
5. Keep the screen clear of dusty, high temperature or moisture environment. A
severe environment could eect the normal operation of the screen
10
Page 11

Chapter 5 Troubleshooting
Failure Possible Reasons
Power cannot be turned on
No images or sound • Check whether the model is power
The image isn’t displayed completely • Enter menu and select “automatic
Image Distortion
Image is too bright, while image
distortion on bright regions
PC unable to display image • Check whether the resolution of PC
No image after installation of operation
system
• Check whether all cables are
connected correctly and the power
socket is turned on
• You can use another equipment
connecting with power socket to
check whether the power is on
on (indicator light should be blue)
• Check other signal inputs to check
whether there’s a problem with
signal inputs
• Check whether cables are
connected correctly
• Check whether you set mute mode
adjustment”
• To check whether aspect ratio of
image has been set correctly
• Lower contrast rate
• Turn up the brightness
• Check whether the brightness
grade is too high
has been set too high, higher than
resolution ceiling supported
• Restart the PC and press F8 to
enter “advanced boot”. Select and
enter the mode which is supported
VGA
No image after installation of graphics
drivers
• Restart the PC, enter the system
after 1-2 min or enter “Win+P” to
choose display mode
11
Page 12

d
Leaders In Learning Technology
l
r
o
W
e
e
n
e
G
Libra House,
Upper Zoar Street,
Wolverhampton,
12
West Midlands WV3 0LA
Tel: +44(0) 1902 390878
Fax: +44(0) 870 405 0188
Email: enquiries@geneeworld.com
Web: www.geneeworld.com
 Loading...