

Page 1

User Manual
1. Scope of Supply ............................................................................................................................................ 3
2. Electronic Stylus Usage ................................................................................................................................ 4
3. Stylus Hotkey................................................................................................................................................ 4
4. Genee Sense Connection .............................................................................................................................. 5
5. Genee Sense Software Installation ............................................................................................................... 6
6. Genee Sense Driver ...................................................................................................................................... 7
7. Wireless Setting ............................................................................................................................................ 7
8. Calibration ................................................................................................................................................... 7
9. User profile ................................................................................................................................................... 8
10. Hotkey Setting ............................................................................................................................................ 8
11.Settings......................................................................................................................................................... 9
12. Language select........................................................................................................................................... 9
Auto Run....................................................................................................................................................... 9
13.Genee Sense Software Operation (for Vista & Windows-7 )................................................................... 10
Page 2

!Genee!Sense User!Manual
Page 2 of 28
14. Handwriting recognition ........................................................................................................................... 10
15. Genee Sense Software - Version 5.0 ....................................................................................................... 13
(b) Whiteboard Mode.................................................................................................................................. 13
Sub-Menu: .................................................................................................................................................. 14
16. File management....................................................................................................................................... 14
17. Editing tools.............................................................................................................................................. 15
18. Annotation Features.................................................................................................................................. 16
19. Sub menu .................................................................................................................................................. 17
19.1 Full screen toolbar ............................................................................................................................. 18
19.2 Library ............................................................................................................................................... 18
19.3 Edit.................................................................................................................................................... 18
19.3.1 Edit Object ................................................................................................................................. 19
19.3.2 Hyperlink ..................................................................................................................................... 20
19.3.3 Hyperlink setting......................................................................................................................... 20
19.3.4 Link to website............................................................................................................................. 20
19.3.5 Link to a Page ............................................................................................................................. 21
19.3.6 Link to local file.......................................................................................................................... 21
19.3.7 Handwriting recognition .............................................................................................................. 21
20. Pull Down Menu for Additional Functions .............................................................................................. 22
20.1 Video player....................................................................................................................................... 22
20.2 Screen capture.................................................................................................................................... 22
20.3 Screen record ...................................................................................................................................... 22
20.4 Ruler, Compass and Protractor .......................................................................................................... 23
20.5 Timer................................................................................................................................................... 23
20.6 Curtain ............................................................................................................................................... 24
20.7 Spotlight.............................................................................................................................................. 24
20.8 Magnifier ........................................................................................................................................... 24
20.9 Document camera .............................................................................................................................. 25
21. Quick Menu is available for setting on slide format................................................................................. 25
21.1 Rename Slide or Page No. .................................................................................................................. 26
22. File function.......................................................................................................................................... 26
22.1 Import document............................................................................................................................. 26
22.2 Save as template.............................................................................................................................. 27
22.3 Send Email.................................................................................................................................. 27
23. Lite version ............................................................................................................................................... 27
Page 3

!Genee!Sense User!Manual
Page 3 of 28
1. Scope of Supply
After unpacking, please make sure all of the following parts (subject to your purchase) are present
BASIC SYSTEM
Item
Description
Quantity
1
Genee Sense Sensor
1
2
Electronic Stylus (excludes battery)
1
3
Software CD-ROM
1
Page 4
!Genee!Sense User!Manual
Page 4 of 28
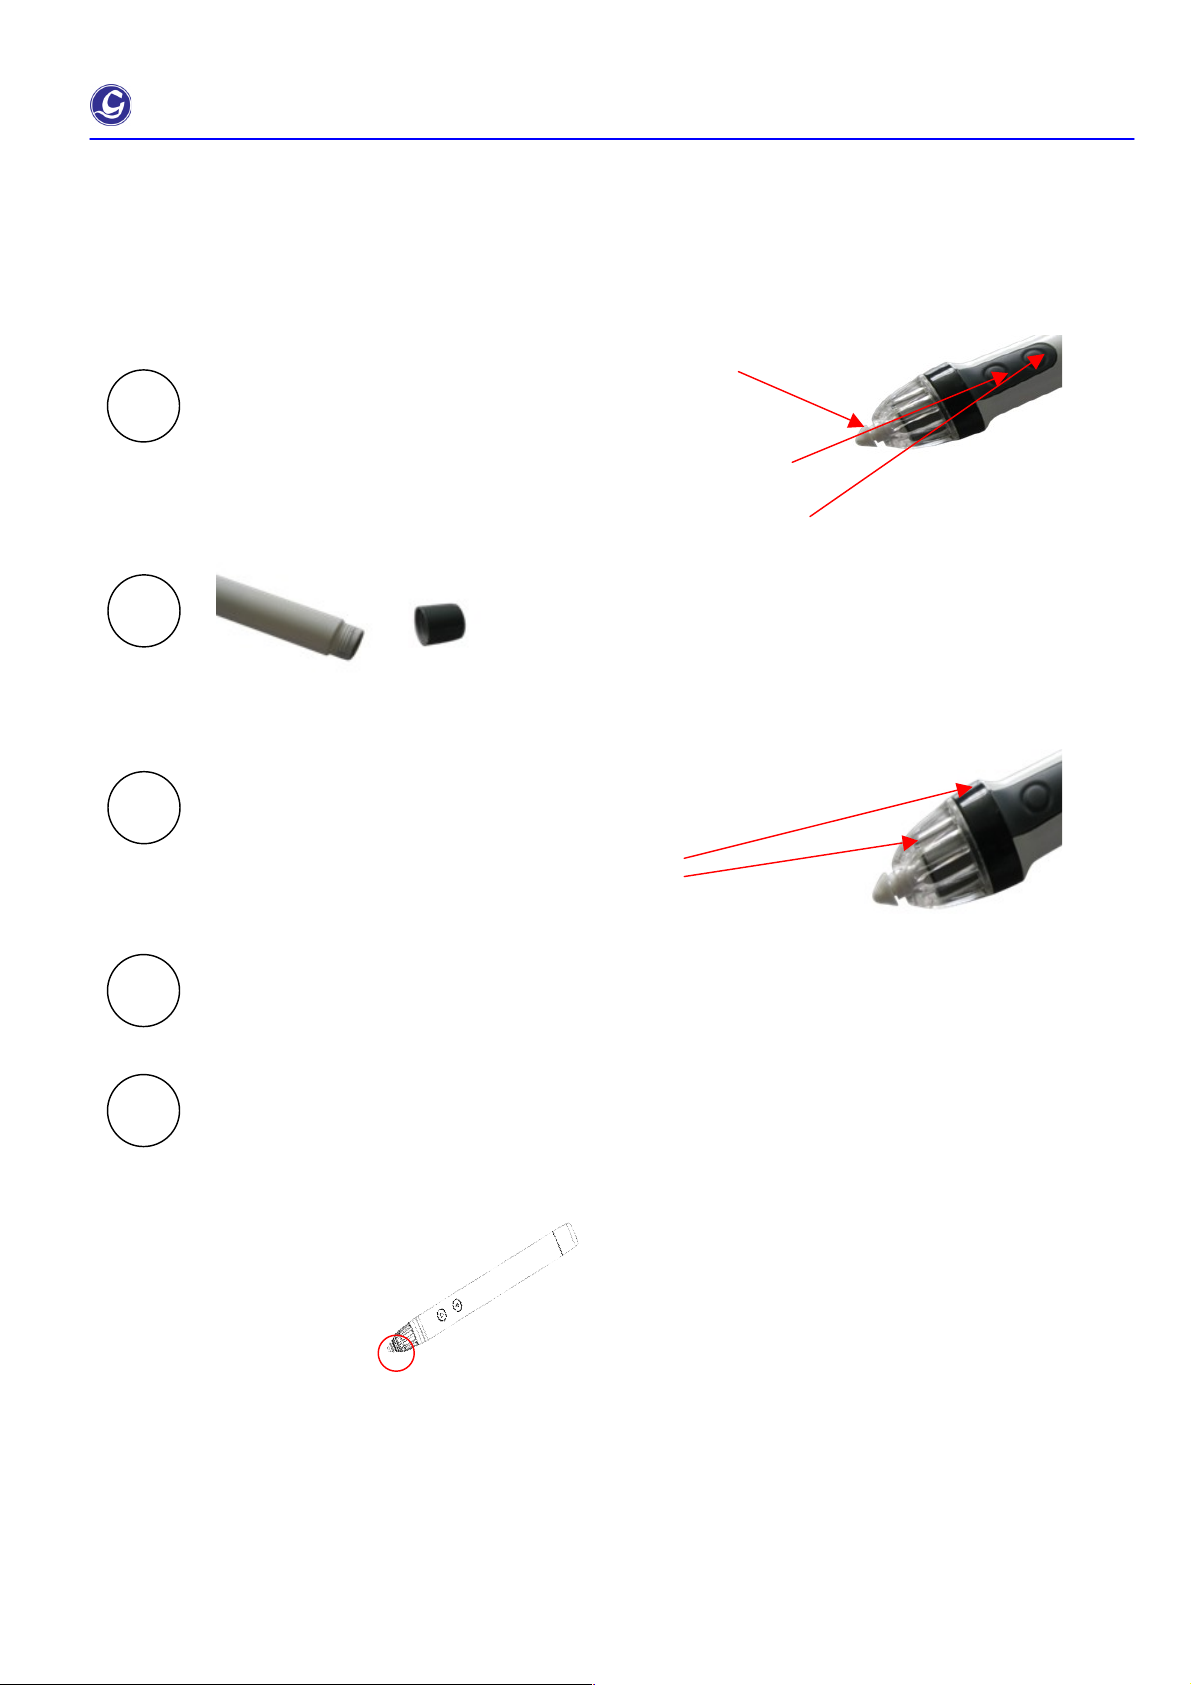
2. Electronic Stylus Usage
Item
Description
Pen Tip = Left Click of mouse
Pen Button L = Mouse Left Click
Pen Button R = Mouse Right Click
Open the battery cover and insert one piece of alkaline
battery. Make sure the positive (+) and negative (-)
terminals of battery are properly oriented.
Do not cover the transmitter with your hand when using.
Press down firmly with the tip of the electronic stylus on the screen until you hear a slight
buzzing sound and then move it slowly. However, do not press down the tip too much
strongly.
Do not use two pieces of electronic stylus at the same time.
3. Stylus Hotkey
1. Perform of mouse right click, press the button of Stylus and hold down 3 seconds
2. Perform of keyboard Page: Up / Down / Forward / Backward
3.Flick pen-tip from left to right, right to left, up to down and down to up to act as keyboard Page up, Down, Previous
Page / Next Page.
1
2 3 4
5
Pen Tip
Pen Button L
Pen Button R
Transmitter
Page 5
!Genee!Sense User!Manual
Page 5 of 28
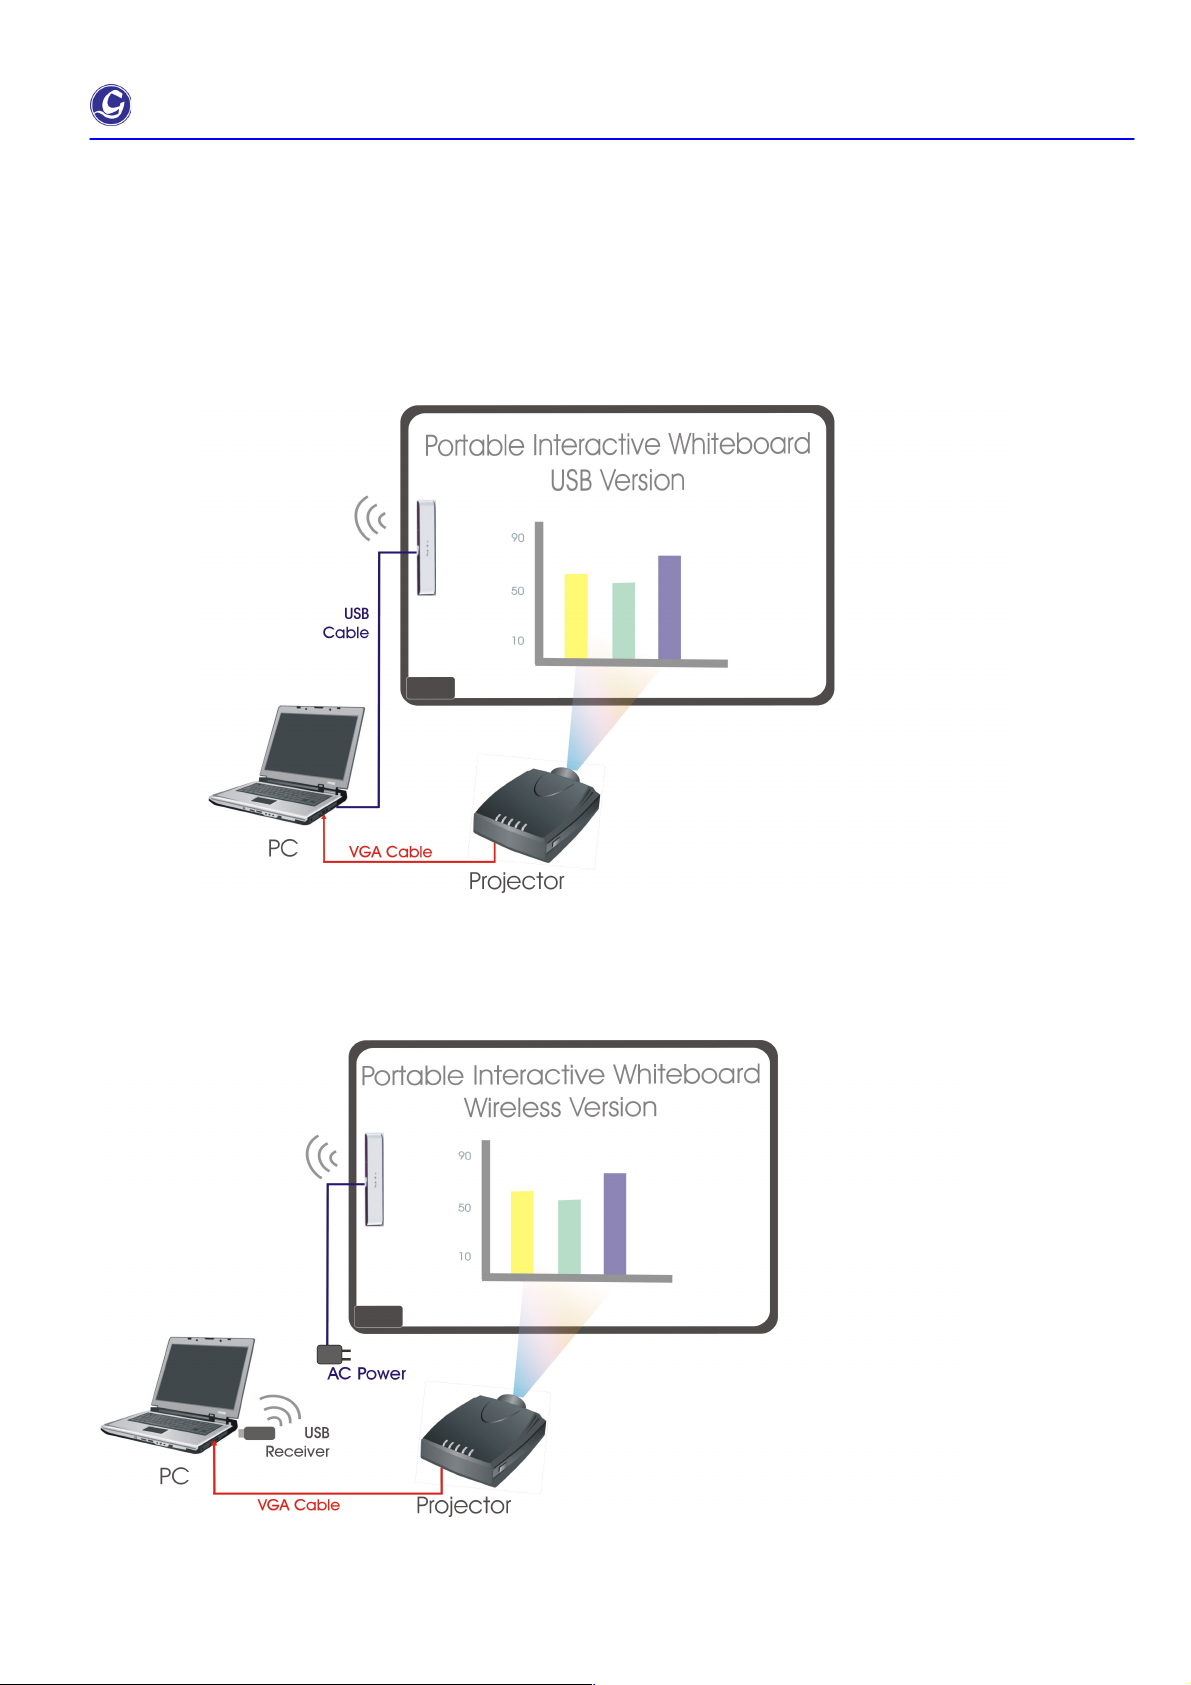
4. Genee Sense Connection
User must have PC, projector, Genee Sense USB or Genee Sense Wireless Receiver and connect them as shown in
the figure below.
Genee Sense USB Model Connection Diagram
Genee Sense Wireless Model Connection Diagram
Upon the connection is completed, adjust the position of the video projector until the projected Windows screen on the
board is within the whiteboard working area.
Page 6
!Genee!Sense User!Manual
Page 6 of 28
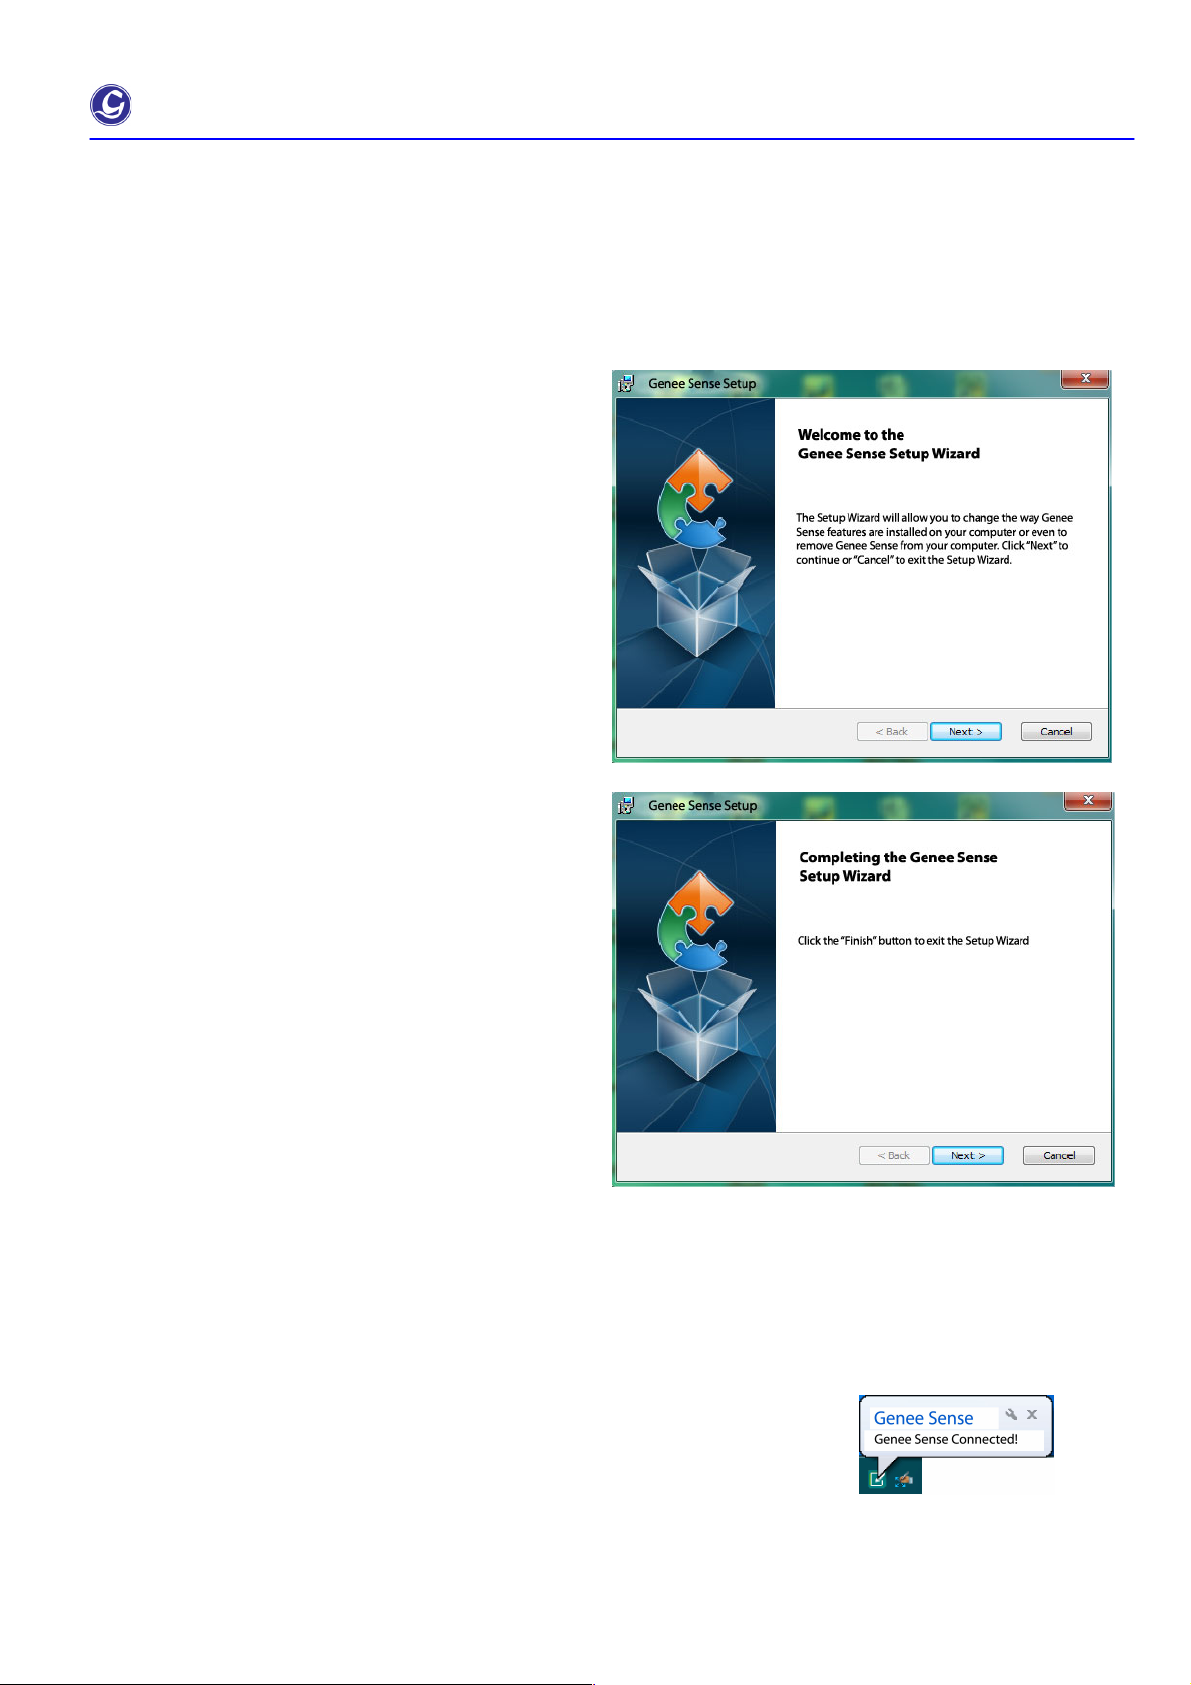
5. Genee Sense Software Installation
Install Genee Sense software
1) To run the Installation Program, double-click
File name “install.exe”
Click “Next” to install the software
2) Choose destination location and
Click “Next” to continue.
3) Click “Finish” to exit upon the Genee Sense
has been successfully installed.
4) Plug the other end of USB cable / USB Wireless Receiver into computer USB port.
5) Genee Sense or USB -Wireless Receiver has been detected and ready
to use upon the following dialogue shown.
Page 7
!Genee!Sense User!Manual
Page 7 of 28
6. Genee Sense Driver
After installed Genee Sense software, double click the icon of
“Genee Sense” (on the desktop)
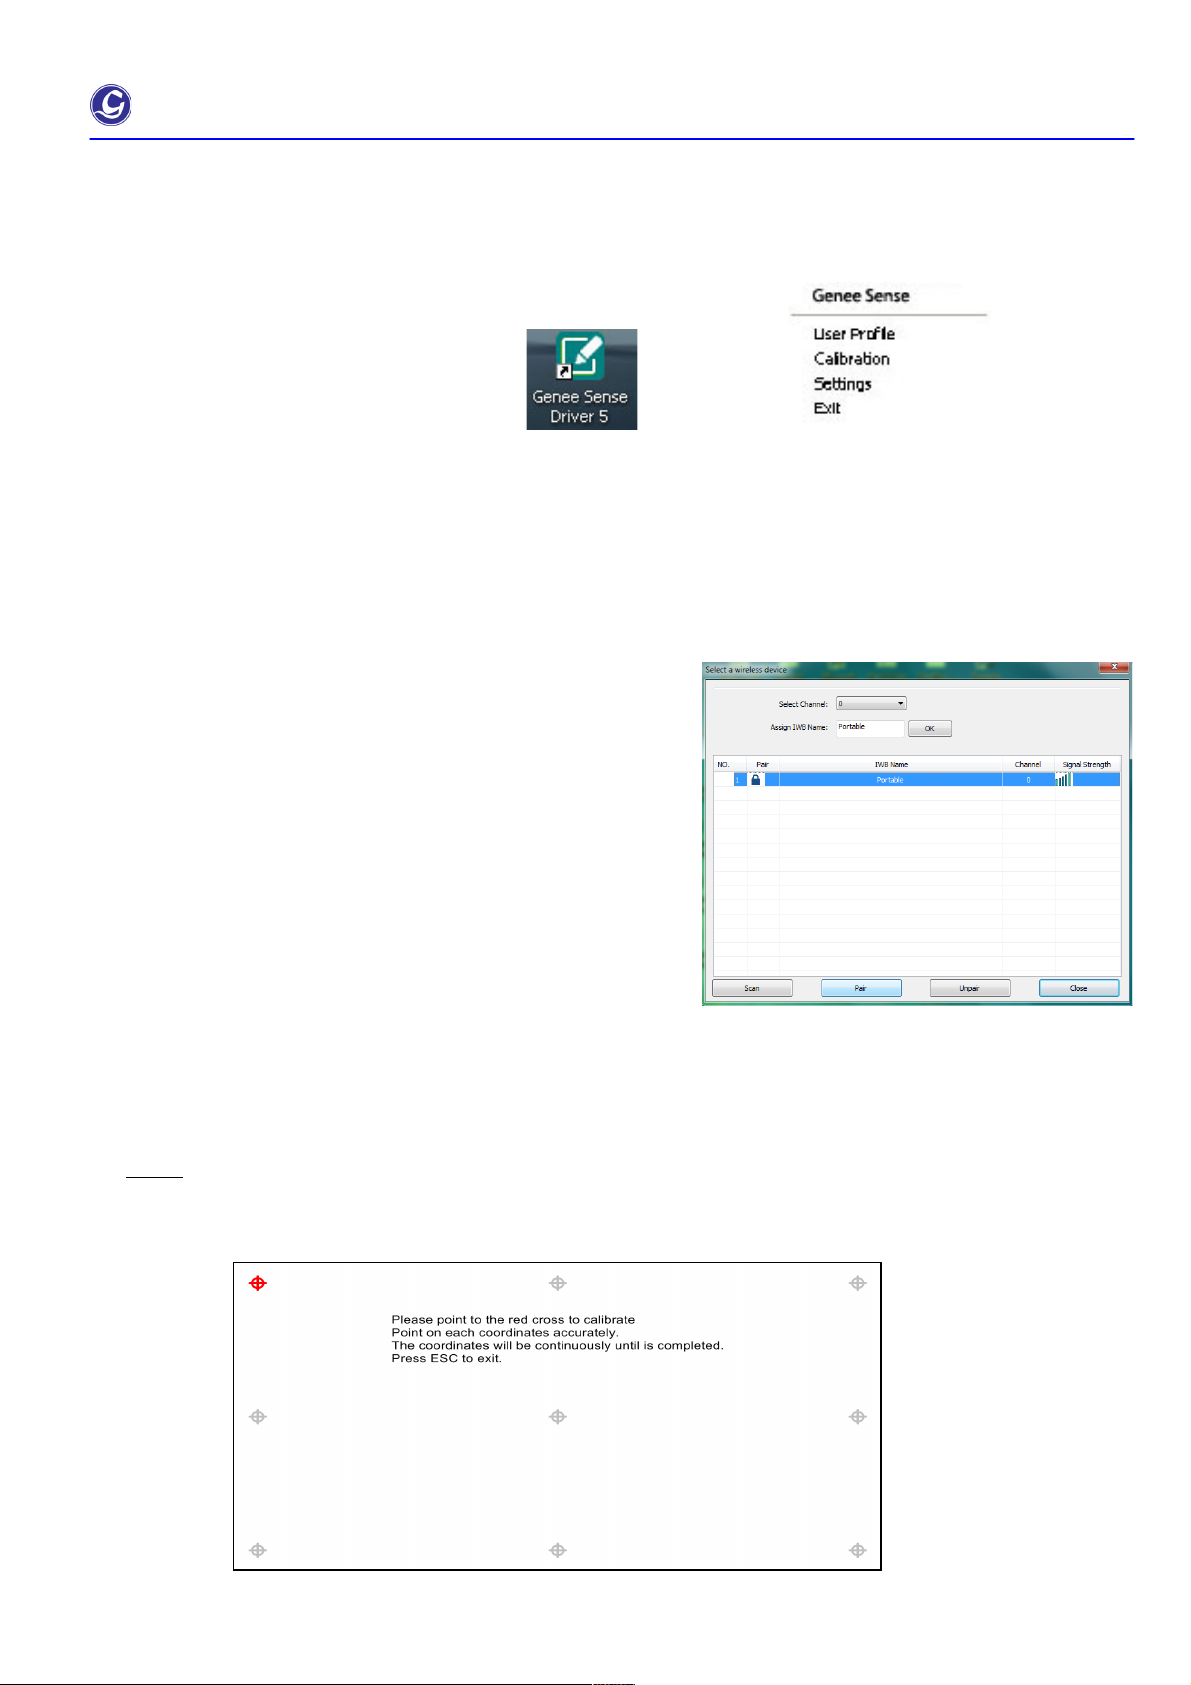
7. Wireless Setting
8. Calibration
Calibration for Genee Sense after first time installation or projector size and projector’s position has changed.
Step 1
Click the flashing cross to calibrate, press ESC to exit. Point on each coordinates accurately. The coordinates will
be moved continually until the calibration is completed.
30 wireless channels are available for selection.
To change channel or pairing your Touch eBoard,
click “scan“ then the detected sensors will show onto the
table.
Select the “IWB Name” onto the list and click “Pair” to make
pairing for the Receiver and Sensor. This is recommended
to rename for the Sensor unit after you made pairing so as
not to mix up with other sensors those installed nearby.
Click “Un-pair” to release channel lock.
Make sure to click “Un-pair” and re-do pairing if Sensor Unit
or Wireless Receiver has been changed.
*IWB = Interactive White Board
Page 8
!Genee!Sense User!Manual
Page 8 of 28
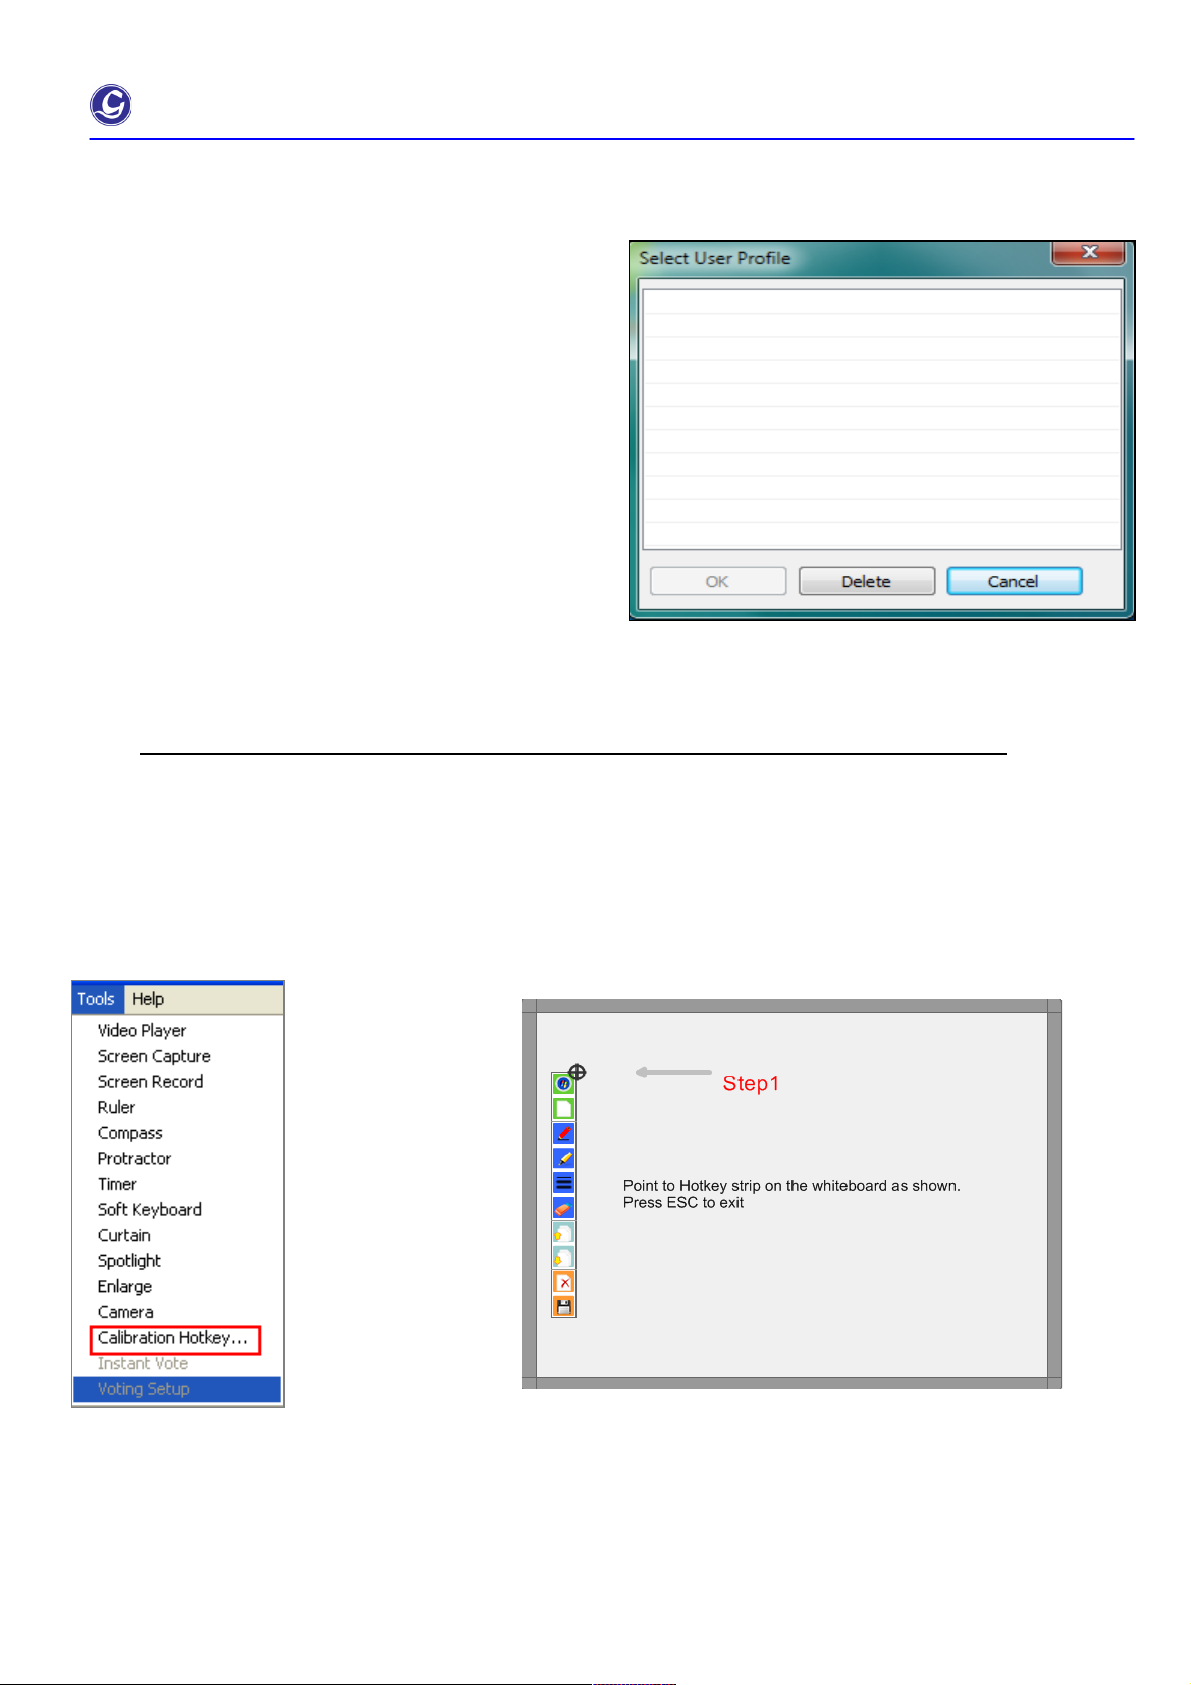
9. User profile
When Calibration records on the computer, this is not
necessary to re-do at the same room with same computer.
User just simply selects the calibration profile from the
record.
10. Hotkey Setting
20 hotkey features is available for user to setup.
2
User can select location profile when using eBoard in the same location next time.
1. Click Tools and Calibration Hotkey to call up the calibration window.
2. Click the first hotkey on the right top corner of the strip to finish first hotkey calibration
3. Click the last hotkey on edge of the left to finish the last hotkey calibration.
Page 9
!Genee!Sense User!Manual
Page 9 of 28
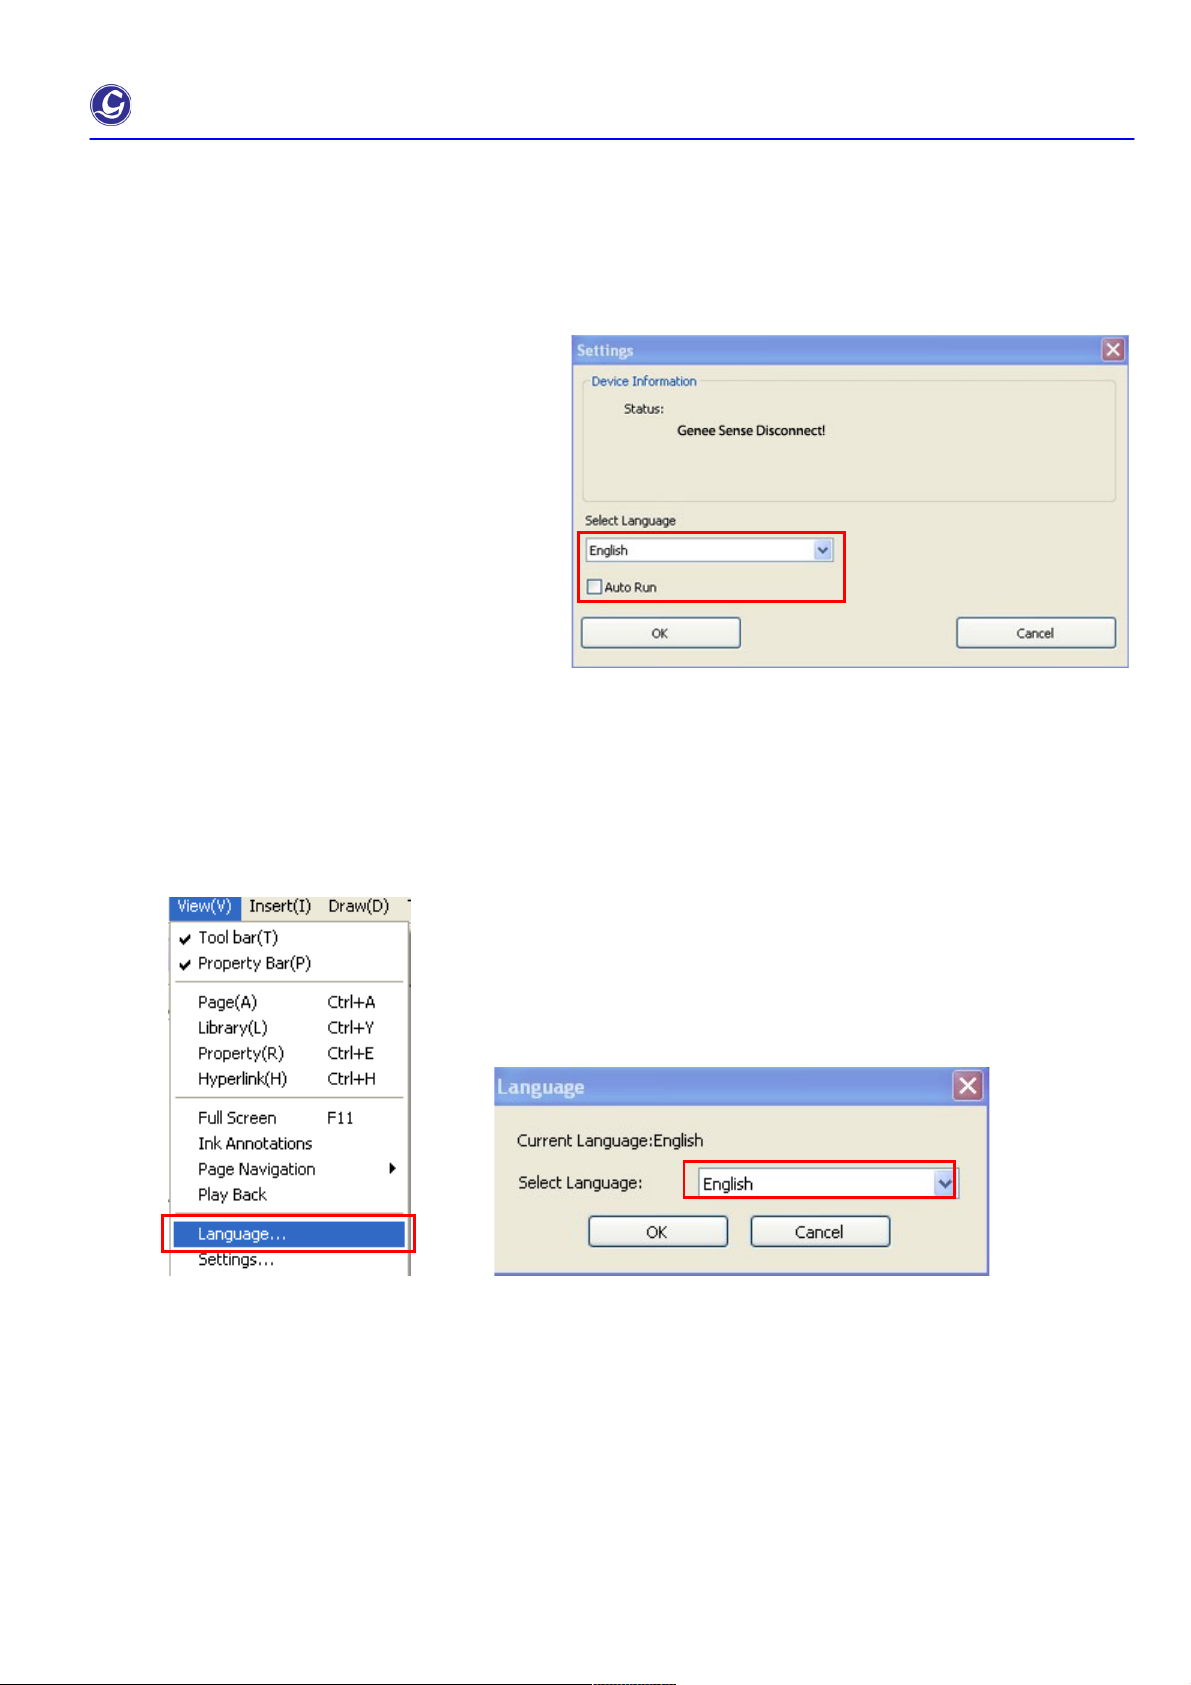
11.Settings
Device Information
When successfully connected computer with
whiteboard system, device information such as
wireless or USB version and firmware version info
will be shown.
12. Language select
1. User can change driver’s language in Settings.
2. Software language change
Steps: click Tools in View and select Language
Auto Run
User once enable the auto run, the touch board driver will automate start in each restart windows.
If touch board is not every day to use can choose to disable auto run.
Page 10

!Genee!Sense User!Manual
Page 10 of 28
13.Genee Sense Software Operation (for Vista & Windows-7 )
Microsoft office Annotations toolbar will be appeared upon the Dual-Touch Genee Sense connected with the your PC
Under Microsoft office Annotations tools user can use the annotations directly
on the top of Power Point, MS Words and Excel.
Page 11

!Genee!Sense User!Manual
Page 11 of 28
14. Handwriting recognition
2. Click Yes to continue installation, it will configure Windows installer automatically.
3. Click “Next” to continue installation.
1. Double click software icon, if user haven’t installed the
handwriting recognition Table PC will pop up to remind
user of installing Handwriting recognition.
Page 12

!Genee!Sense User!Manual
Page 12 of 28
4. Accept the term in license agreement and click Next to continue installation.
5. Select the Setup Type, and click Next to continue installation.
6. Click Install to continue installation. And it will install automatically and it will take a few minutes to
finish installation.
Page 13

!Genee!Sense User!Manual
Page 13 of 28
15. Genee Sense Software - Version 5.0
9.1) Genee Sense software allows user to run / operate even no hardware connected.
Note: some features will be disable automatically if no hardware connected with the PC / Laptop
9.2) Dual touch board includes multi feature. While two fingers will be “selection” and five fingers will be “Eraser”.
9.3) Genee Sense Software allows you to annotate your computer desktop. Touch Board Software System and
the projector connect to your computer. The projector displays your computer desktop onto the whiteboard and
the Genee Sense Software detects when you touch the board
9.4)There are 2 modes available for Genee Sense Software.
a) Windows Mode …… allowing user to use finger to control their computer desktop onto the whiteboard
b) Whiteboard Mode ……. useful features for user to prepare presentation / teaching material or
9.5) when writing words, each letter will be grouped automatically in 5 seconds, if user want to select one of the
letters, they need to ungroup to words by clicking icons on the right top corner.
(b) Whiteboard Mode
To turn to Windows Mode, click this “minimize”.
Page 14

!Genee!Sense User!Manual
Page 14 of 28
Sub-Menu:
Right click to call up the quick
menu of slide show.
(refer 11.1 for details)
Library (please refer to 10.2)
Fill in color and line setting
please refer to 10.3
To set hyperlink for objects,
please refer to 10.3.2
Slides Show will be displayed.
Add page
Previous page
Next page
Delete All
Change direction
Google search
Page 15

!Genee!Sense User!Manual
Page 15 of 28
16. File management
Icon
Functions
Description
New Document
Create New Document
Open Document
Open Touch Board Document (*.tbd)
Save Document
Save Document, document can be saved in dual-touch file format &
jpq, bmp, wmf, html, pdf…
17. Editing tools
Icon
Functions
Description
Undo
Allow user to undo
Redo
Allow user to redo
Cut
Cut lines ,objects, or selected object…
Copy
Copy written line, words, pictures, or objects…
Paste
Paste written line, text, pictures or objects…
Delete selection
Delete the selected object
Select object
Select object / Resize /Rotate
Scroll
Scroll move pages
Input text
Insert text
Insert image
Insert Image from local file
clear all
Clear all in the page
Page 16

!Genee!Sense User!Manual
Page 16 of 28
18. Annotation Features
Icon
Functions
Description
Full screen
Switch to full screen model
Lite version
Switch to a lite version whiteboard
Curtain
Hide / Unhide a portion of presentation to draw the audience’s
attention.
Icon
Functions
Description
Spotlight
Brightness and size of spotlight can be adjusted by users’ preference.
Video Player
Users can open a media file.
User can capture video and drawing over the video
Screen Capture
Screen capture
Web Cam /
Document
camera
Capture picture via connected camera
Tools
IWB tools Including video player/screen capture /screen record
/ruler/compass/protractor/timer/soft keyboard/curtain/spotlight/
Library
Library including images, background and template
Hyperlink
Hyperlink management, Hyperlink can Link to a web page or local
files ,or page in document
Color & Line
Setting
Property of object, such as line color, size…
Icon
Functions
Description
Page list
Show page list, user can switch to the page they link.
Add Page
Add a blank page in the existing document.
Previous Page
Switch to previous page.
Next Page
Switch to next page
Page 17

!Genee!Sense User!Manual
Page 17 of 28
19. Sub menu
Full screen Library Edit Hyperlink Tools
Full screen
Toolbar
Icon
Functions
Description
Minimize
Minimize tool bar
Windows
Switch between windows and Genee Sense
Windows
Switch between toolbar and full screen
Clear al
Clear the whole pages words, objects
White
background
White background
Scroll
Scroll move pages
Select
Select object / Resize /Rotate
Marker
Draw lines and write words
Eraser
Select erase (shape and size)to erase object
Capture
User can capture drawing anywhere you like.
Play Back
Playback content for entire page
Previous
Page
Switch to previous page
Next page
Zoom out whole page
Page 18

!Genee!Sense User!Manual
Page 18 of 28
19.1 Full screen toolbar
Click it will switch to full screen mode.
19.2 Library
19.3 Edit
Edit tools allow user to edit the line type, thickness and colour, and fill the background colour and object
colour. In addition; user can adjust the transparency of the object, or set the object properties.
Rectangle is covered by triangle Triangle become transparent
Select the object and slide the transparent button.
Library includes images, flash video, template and background
covering subject of mathematics, chemistry physics and sports.
When using library, just drag or drop objects.
Library database can be expanded by adding additional
image/flash files.
Page 19

!Genee!Sense User!Manual
Page 19 of 28
19.3.1 Edit Object
1) Select object then click right top quick menu button to select the features
2) User can edit photos by clicking the icons on the left top corner.
Page 20

!Genee!Sense User!Manual
Page 20 of 28
19.3.2 Hyperlink
Hyperlink can be changed by clicking edit, click “to object”, it will switch to object from website.
19.3.3 Hyperlink setting
Hyperlink management, Hyperlink can Link to a web page or local files, or page in document.
19.3.4 Link to website
Page list
Show launch type
Step 1: select object, click quick menu at
right top of the object then select
hyperlink.
Step 2: input website.
Step 3: choose launch type.
Step 4: click ok.
Page 21

!Genee!Sense User!Manual
Page 21 of 28
19.3.5 Link to a Page
1) select hyperlink and click “page”
2) select the page you want to link
3) select type of launch type
4) click “ok”
19.3.6 Link to local file
1) select hyperlink, and click” local file”
2) Select file you want to link.
3) Choose launch type.
4) Click “ok”
Note:
User can select different launch Type.
If user selects Conner Icon, User should click
Conner to do Hyperlink. If user object type,
User can only click object, the hyperlink will come out.
19.3.7 Handwriting recognition
There is Handwriting Recognition function
on the right top corner. Words can be
recognized by clicking this function.
Page 22

!Genee!Sense User!Manual
Page 22 of 28
20. Pull Down Menu for Additional Functions
Some useful tools for annotation are available from the pull-down menu. Functions include Screen Recorder, Ruler,
Compass, Protractor, Timer (stopper) and Soft Keyboard. Simply click the icon of pull-down menu , the
following menu will be pop up.
20.1 Video player
Open video player, click “open media document” to insert video.
Click start to play video.
User can set voice by click voice switch.
Video can be set fast forward or backward.
20.2 Screen capture
20.3 Screen record
Play
Stop
Exit
Accelerator
Settings
Audio record
Switch
Screen recorder records screen as well as audio. File will be saved as *avi format.
Three options of screen capture are available. It may screen capture by
area or for full screen.
Page 23

!Genee!Sense User!Manual
Page 23 of 28
20.4 Ruler, Compass and Protractor
Icon
Functions
Description
Setting &
Exit
Set the unit, transparency of the ruler or exit ruler.
Rotation
Rotate ruler
Ruler
Measure
Measure size
Icon
Functions
Description
Zoom in
Change size
Exit
Exit protractor
Zoom out
Change size
Rotation
Rotate protractor
Protractor
Angle
Capture the degree of protractor
20.5 Timer
Select “time counting (= stop watch)” or “count down” then input time and click “OK” to start.
Start
1) Touch the top of compass to resize compass (enlarge & reduce).
2) Touch the right arm of compass to adjust radius of circle to be drawn.
3) Touch the “pen-tip” area then move, circle will be drawn.
Page 24

!Genee!Sense User!Manual
Page 24 of 28
20.6 Curtain
20.7 Spotlight
Drag to resize spotlight size.
Click to change the shape of spotlight.
20.8 Magnifier
Icon
Functions
Description
Rectangle
Magnifier
To change magnifier to rectangle
Transparency
Adjust the transparency of the background
Ellipse Magnifier
To change magnifier to ellipse
Zoom in / Zoom
out
Zoom in or zoom out magnifier
Drag or to make curtain up or down.
Page 25

!Genee!Sense User!Manual
Page 25 of 28
20.9 Document camera
Before using camera, insure you have connected camera or computer equipped with camera.
21. Quick Menu is available for setting on slide format.
Right click
Page 26

!Genee!Sense User!Manual
Page 26 of 28
21.1 Rename Slide or Page No.
Right click slide, click” rename”.
Then input the name.
22. File function
22.1 Import document
Click File and select “Import Document” or use short-cut key “ “Ctrl +I” then the following table will pop-up.
User can import document from different type of file format.
Genee Sense software supports *doc, docx, pptx, xlsx, ppt and pdf format.
File imported will be set as background.
In File function user can finish document function,
also Template function, Print function, and Email
function.
Page 27

!Genee!Sense User!Manual
Page 27 of 28
22.2 Save as template
By saving as template, user can expand or enlarge the library database. Just
input the images then
save it as template, user can recall the file directly from Genee Sense software.
22.3 Send Email
Before send out the email, user should save the file.
File can be save at different kinds of format include
hsiwb,pdf,doc,tiff,html,jpg,bmp,png.avi,wmv,epeg,swf,flv.
If user have installed Outlook Express, email table will pop-up
automatically.
23. Lite version
After installation there will be an icon on
the desk top. Click this icon to show the
Lite version of whiteboard
Page 28

!Genee!Sense User!Manual
Page 28 of 28
Icon
Functions
Description
Minimize
Switch to windows
Windows
marker
Windows
Clear whole page words, objects..,
Clear all
Line thinckness
Scroll
eraser
Select
Chose color
Eraser
Zoom out page and objects
Capture
Zoom in page and objects
Play Back
Page 2
Previous
page
Page 1
 Loading...