

Page 1

OPERATIONS MANUAL
BEDIENUNGSHANDBUCH
MANUAL DEL OPERADOR
MANUEL D’INSTRUCTIONS
SA-2400
HIGH-TORQUE DIRECT-DRIVE
PROFESSIONAL TURNTABLE
PROFESSIONELLER PLATTENSPIELER MIT
DREHMOMENTSTARKEM DIREKTANTRIEB
GIRADISCOS PROFESIONAL DE ACCIONAMIENTO DIRECTO Y
DE ALTO PAR MOTOR
PLATINE VINYLE PROFESSIONNELLE HI-TORQUE À
ENTRAÎNEMENT DIRECT PILOTÉE PAR QUARTZ
GIRADISCHI PROFESSIONALE A COMANDO DIRETTO ED A
AL TA COPPIA MOTRICE
MULTI LANGUAGE INSTRUCTIONS:
English.....................................................................................................Page 4
Deutsch...................................................................................................Page 7
Español..................................................................................................Page 10
Francais................................................................................................Page 13
Italiano..................................................................................................Page 16
Page 1
Page 2

Figure 1
8
11
15
1314
12 19
10
26 25
24
29
20E
20D
9
1
2
6
20C
20B
20 20A
7
20F
23
21
22
5
4
18
3030A
3
17162827
Page 2
Page 3
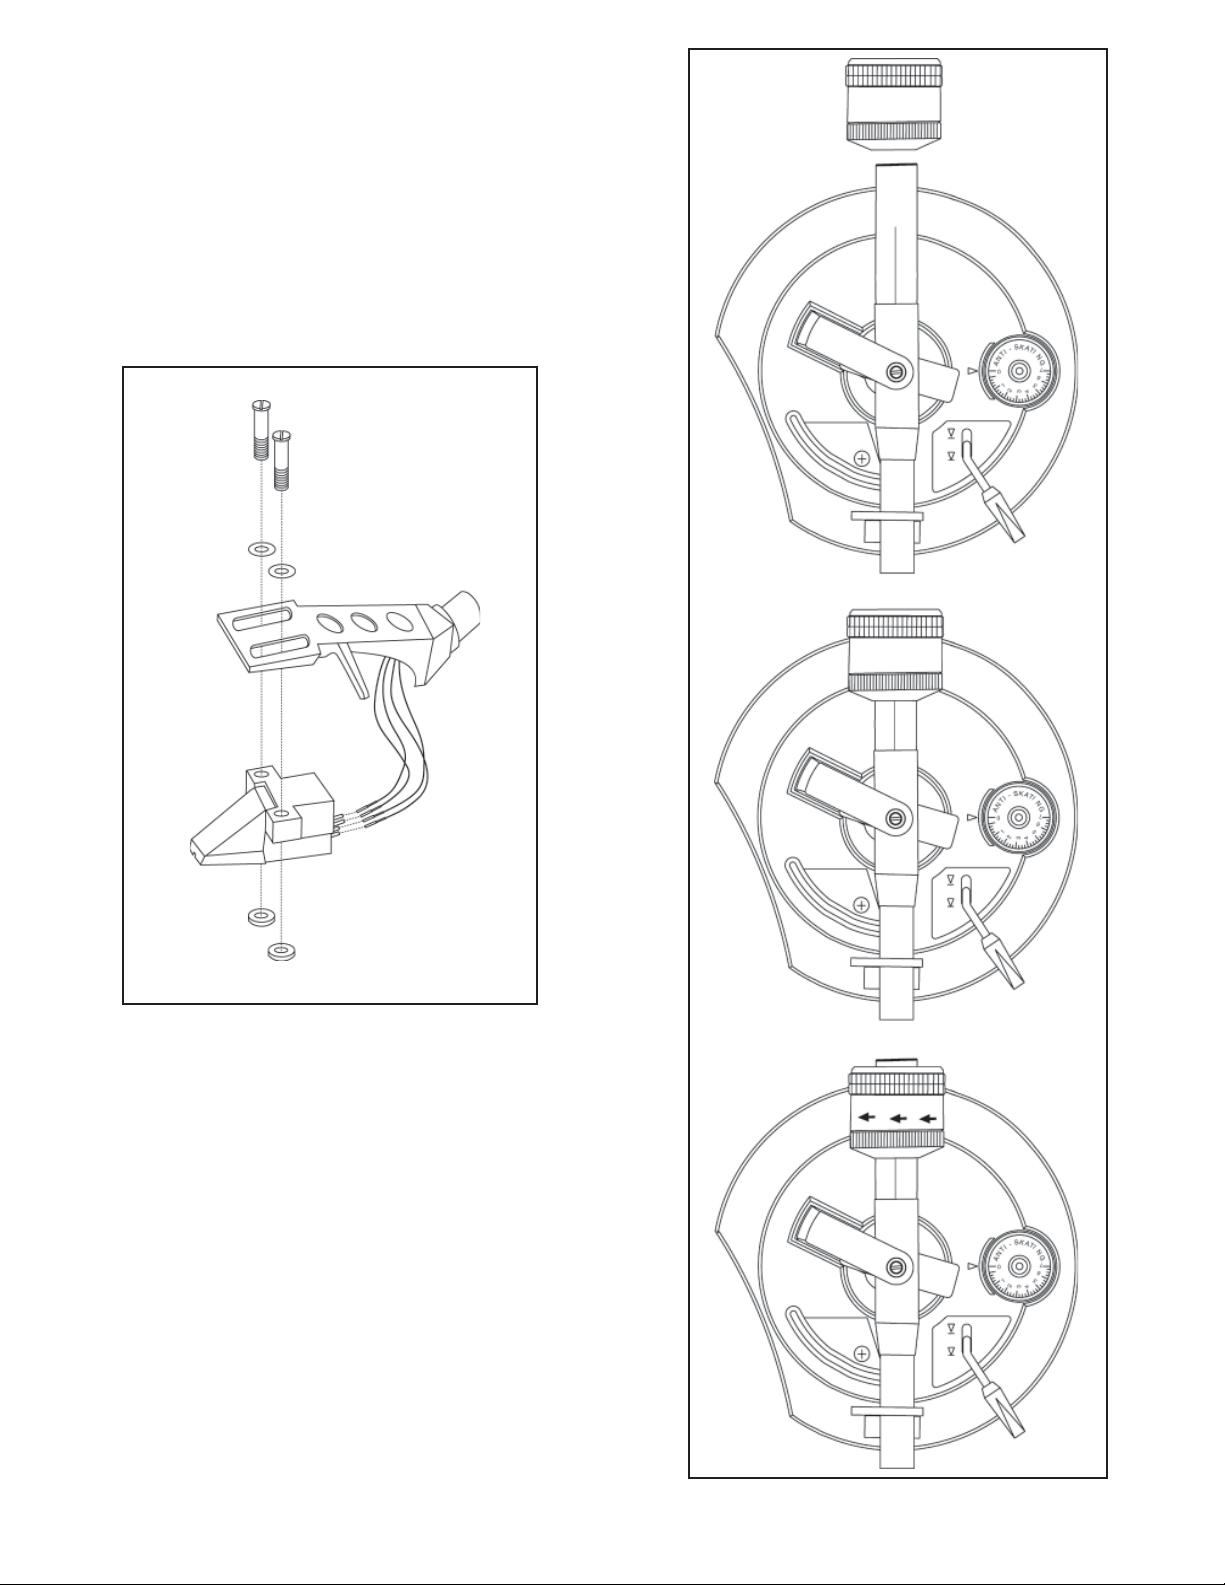
Figure 2
Figure 3
Page 3
Page 4

Introduction
Congratulations on purchasing a Gemini SA-2400 high-torque direct drive
professional turntable. This state of the art turntable includes the latest
features in modern direct drive turntable technology. Prior to use, we
suggest that you carefully read all the instructions.
Features
• Quartz locked speed
• +/- 10% Pitch control
• Fully electronic braking
• Strobe illuminator
• Soft-touch start/stop switch
• Platter Reverse
• Digital Display
Precautions
1. Read all operating instructions before using this equipment.
2. The apparatus should not be exposed to dripping or splashing and no
objects filled with liquids such as vases should be placed on the
apparatus.
3. To reduce the risk of electrical shock, do not open the unit. There are
NO USER REPLACEABLE PARTS INSIDE. Please contact the Gemini
Service Department or your authorized dealer to speak to a qualified
service technician.
In the U.S.A., if you have any problems with this unit, call
1-732-969-9000 for customer service. Do not return
equipment to your dealer.
4. Tone arm bearings are factory set and sealed. Any attempt at adjustment will void the warranty.
5. Be sure that all AC power is OFF while making connections.
6. Cables should be low capacitance, shielded and of proper length. Make
sure that all plugs and jacks are tight and properly connected.
7. Always begin with the audio level faders/volume controls set at
minimum and the speaker volume control(s) set to OFF. Wait 8 to 10
seconds prior to turning up the speaker volume to prevent the transient
“POP” that could result in speaker/crossover damage.
8. DO NOT EXPOSE THIS UNIT TO RAIN OR MOISTURE.
9. DO NOT USE ANY SPRAY CLEANER OR LUBRICANT ON ANY
CONTROLS OR SWITCHES.
Parts Checklist
Turntable unit.................................................................................1
Dust cover hinge............................................................................2
Turntable platter.............................................................................1
45 RPM adapter...............................................................................1
Neoprene mat....................................................................................1
Counter balance.............................................................................1
Dust cover......................................................................................1
Headshell.......................................................................................1
Assembly and Set-Up
NOTE: SEE FIG. 1 (PAGE 1) FOR PART NUMBERS AND
LOCATIONS.
TURNT ABLE INST ALLATION:
1. Set the TURNTABLE BASE (1) on a flat, level surface free of vibration.
Try to place the unit as far away from the speakers as possible. Keep
the unit away from direct exposure to the sun, heat, moisture or dirt.
Keep the unit well ventilated. Use the turntable feet to horizontally
stabilize the unit.
2. Make sure that the VOLTAGE SELECTOR (3) switch (located on the
TURNTABLE BASE) is set to the correct voltage. WARNING: If you try
to operate the turntable with the incorrect voltage setting, it can damage
your turntable.
3. After checking to ensure that all packing materials have been removed,
gently place the PLATTER (2) on the center spindle of the TURNTABLE
BASE (1).
4. Put the NEOPRENE MAT (4) on the PLATTER (2).
CARTRIDGE INSTALLATION: (SEE FIG. 2)
Because all cartridges have their own designs, please refer to your
particular cartridge’s instructions to insure proper installation.
1. Connect the lead wires to the cartridge terminals. For your convenience,
the terminals of most cartridges are color coded. Connect each lead
wire to the terminal of the same color.
White (L+).............................................Left Channel +
Blue (L-)...............................................Left Channel -
Red (R+)................................................Right Channel +
Green (R-).............................................Right Channel -
2. Mount the cartridge in the HEADSHELL (5) and tighten it with the
screws included with the cartridge.
HEADSHELL INST ALLA TION:
Insert the HEADSHELL (5) into the front of the tubular TONE ARM (6).
While holding the HEADSHELL firmly in a horizontal position, turn the
LOCKING NUT (7) counter clockwise until the HEADSHELL is locked in
place. The Gemini angled headshell was designed to be used with a
straight tone arm. Any type of cartridge can be mounted in the Gemini
angled headshell.
USING A STRAIGHT TONE ARM:
When using a straight tone arm with a banana stylus or a cartridge
mounted in a standard headshell, you should always use a conical type of
needle. If you use an elliptical needle, the needle will sit in the groove of the
record properly, but one channel will be louder than the other channel.
The Gemini straight tone arm has been designed so that it will line up with
markings on LPs you have made when using a turntable with an S-shaped
tone arm.
COUNTERWEIGHT INSTALLATION: (SEE FIG. 3)
1. Slide the COUNTERWEIGHT (8) onto the rear of the TONE ARM (6)
with the numbered stylus gauge facing forward.
2. Twist the COUNTERWEIGHT (8) lightly counter clockwise, to screw it
onto the rear of the TONE ARM (6)
.
ADJUSTING HORIZONT AL ZERO (0) BALANCE AND
STYLUS PRESSURE:
1. Without touching the stylus tip, remove the stylus protector (if your
cartridge has a detachable one).
2. Release the ARM CLAMP (9) and lift the TONE ARM (6) off the ARM
REST (10).
3. Counter clockwise advancement of the COUNTERWEIGHT (8) will
cause the cartridge side of the TONE ARM (6) to be lowered. Clockwise
will cause the opposite. Turn the COUNTERWEIGHT clockwise or
counter clockwise as needed until the TONE ARM is balanced horizon-
tally. You can easily tell this by watching for the point where the TONE
ARM “floats” freely.
4. Place TONE ARM (6) on ARM REST (10) and lock it in place with the
ARM CLAMP (9).
5. With the TONE ARM (6) locked on the ARM REST (10), hold the
COUNTERWEIGHT (8) steady with one hand while rotating the
STYLUS PRESSURE RING (11) until the numeral “0” on the ring aligns
with the center line on the TONE ARM rear shaft. The horizontal zero
(0) balance should be completed.
6. Refloat the TONE ARM to ensure horizontal zero (0) balance. If zero
balance has not been maintained, repeat counterweight steps 3 - 5.
Page 4
Page 5
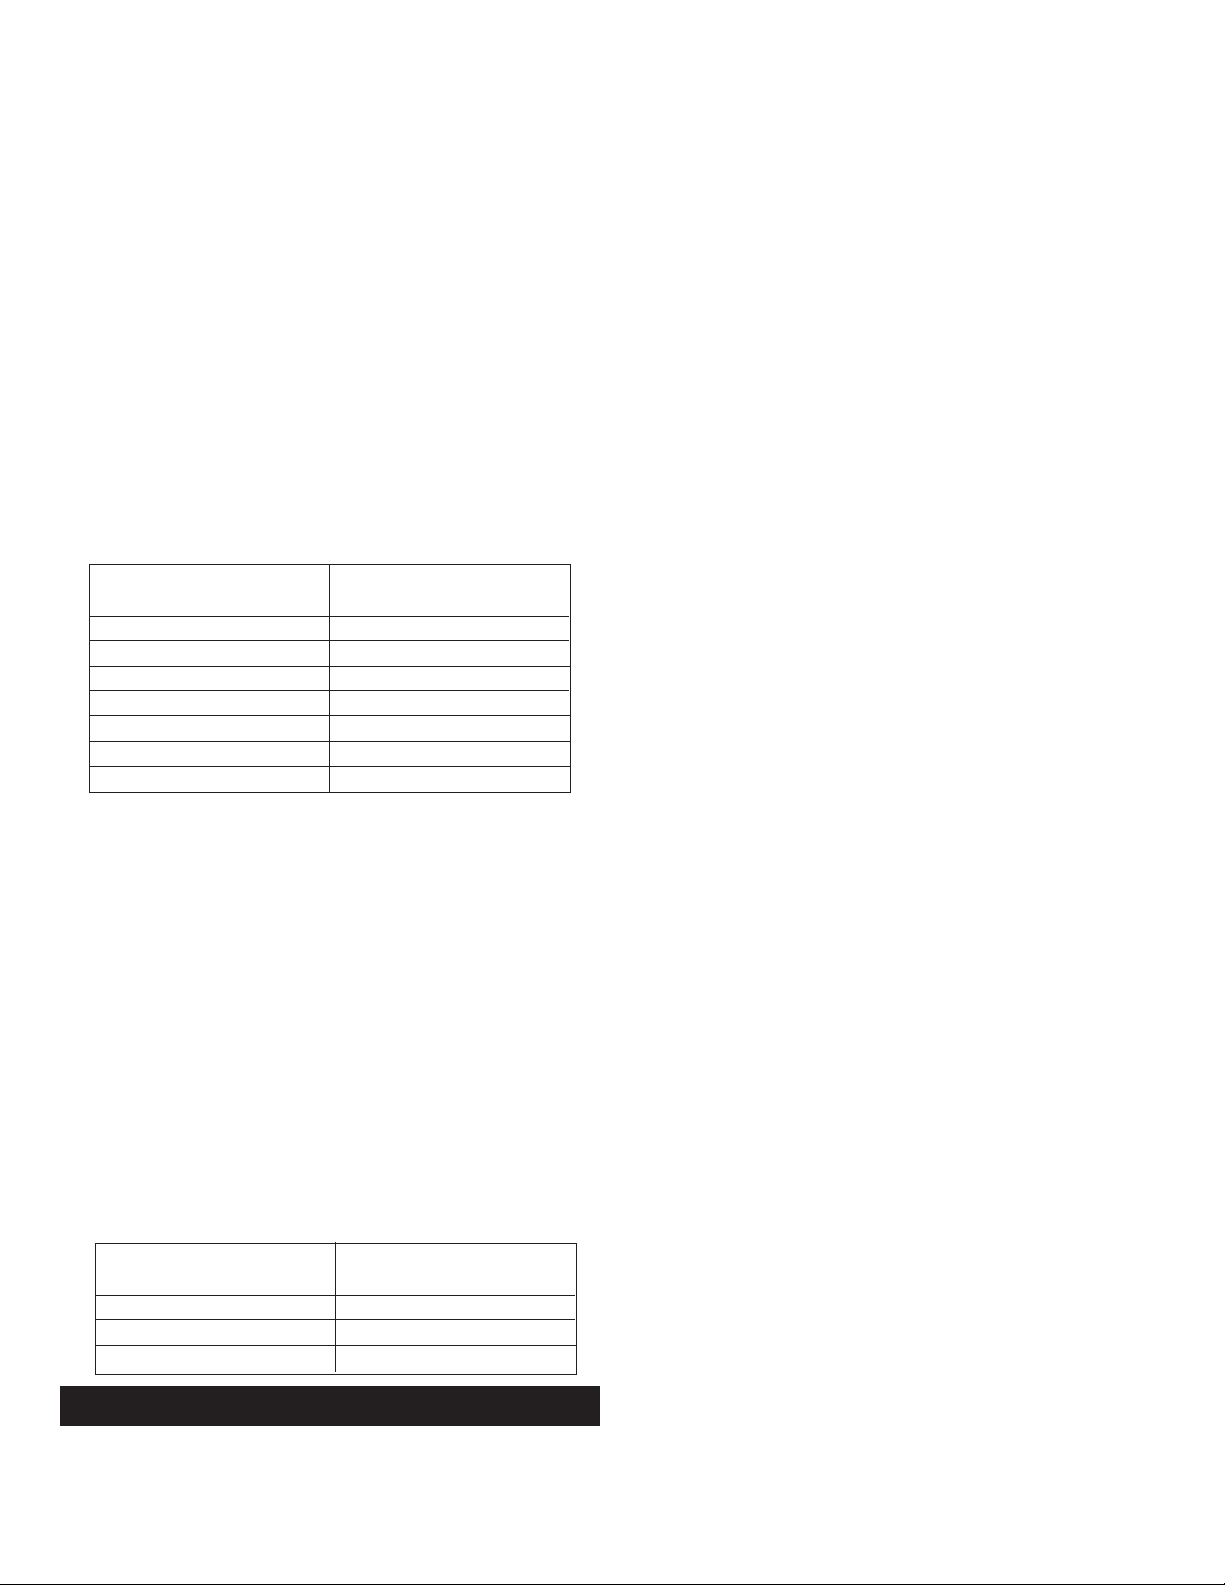
7. After adjusting the horizontal zero (0) balance, turn the balanced
COUNTERWEIGHT (8) counter clockwise until the cartridge
manufacturer’s recommend stylus pressure appears on the STYLUS
PRESSURE RING (11) where it meets the center line of the TONE ARM
(6) rear shaft.
ADJUSTING THE ANTI-SKA TING CONTROL:
Set the ANTI-SKATING CONTROL (12) to the same value as the stylus
pressure.
ADJUSTING TONE ARM HEIGHT:
The tone arm height is adjustable between 0 and 6 mm. A HEIGHT
SCALE (14) (in 0.5 mm increments) is provided to aid in an accurate
setting.
1. Unlock the tone arm by turning the ARM LOCK (15) knob away from the
lock position.
2. Look up the cartridge height on Table A and find its corresponding
height scale reading.
3. Turn the ARM HEIGHT ADJUSTMENT RING (13) until the reference
line on the ring is positioned at the correct scale reading.
4. Lock the tone arm by turning the ARM LOCK (15) knob clockwise until
it reaches the lock position.
TABLE A
CARTRIDGE HEIGHT
(mm)
15
16
17
18
19
20
21
For example, if the height of the cartridge is 18.5 mm, the ARM HEIGHT
ADJUSTMENT RING (13) reference line should be positioned between 3
and 4 on the HEIGHT SCALE (14).
SCALE READING
0
1
2
3
4
5
6
INST ALLING THE DUSTCOVER:
1. Mount the hinges onto the dustcover.
2. Hold the dustcover in position, directly above the turntable, and slide the
hinge bases into the holders mounted on the rear panel.
3. Always raise the dustcover before removal.
4. Avoid opening and closing the dustcover during play. Undesirable
vibration and stylus skipping can result.
CONNECTIONS:
1. Plug the AC power plug into an appropriate outlet.
2. See Table A for proper connection of the output RCA plugs and ground
connector. Make sure that all the plugs are firmly plugged into the
appropriate jacks (phono inputs). To reduce hum, make sure the ground
lug is firmly connected to the ground screw.
TABLE B
OUTPUT CONNECTORS
L (WHITE)
R (RED)
GND (Spade Lug)
MIXER OR
RECEIVER
PHONO L CHANNEL
PHONO R CHANNEL
GND Screw
Operating Instructions
BASIC OPERA TION:
1. Place a record on the NEOPRENE MAT (4) which sits on the
PLATTER (2) .
2. Select the desired speed by depressing the 33 or 45 SPEED
SELECTOR (18) button. Press both the 33 and 45 SPEED SELECTOR
buttons at the same time for 78 RPM.
3. Turn the POWER (16) switch to the “ON” position, at which point the
strobe illuminator (built into the POWER switch and the speed indicator
(for the selected speed) will illuminate.
4. Remove the stylus protector (if applicable to your cartridge).
5. Release the ARM CLAMP (9) found on the ARM REST (10).
6. Push the START STOP (17) button. The turntable PLATTER (2) will
start to spin.
7. Push the CUE LEVER (19) to the “UP” position.
8. Position the tone arm over the desired position on the record and push
the CUE LEVER to the “DOWN” position. The TONE ARM (6) will
slowly lower onto the record at which time play will begin.
9. When play is over, raise the TONE ARM (6), move it to the ARM REST
(10), and secure it with the ARM CLAMP (9).
10.You now have the option of turning off the power by turning the POWER
(16) switch to the “OFF” position, or stopping the PLATTER (2) by
pushing the START STOP (17) button and engaging the electronic
brake.
INTERRUPTING PLA Y:
1. Pushing the CUE LEVER (19) to the “UP” position will cause the TONE
ARM (6) to lift, stopping play.
2. Pushing the CUE LEVER (19) to the “DOWN” position will cause the
TONE ARM (6) to slowly lower onto the record at the point where play
was interrupted.
PLAYING 45 RPM RECORDS:
1. When playing a 45 RPM record with a large center hole, first place the
45 ADAPTER on the center spindle.
2. Be sure that the 45 SPEED SELECTOR (18) button is pushed and the
45 speed indicator is illuminated.
T ARGET LIGHT :
1. Push the TARGET LIGHT SWITCH (21) firmly and the TARGET LIGHT
(22) will raise into position and illuminate the stylus tip.
2. To lower the TARGET LIGHT, push down on it until it locks in the
casing.
3. When not being used, the TARGET LIGHT should be kept in the
lowered position.
ADJUSTING THE PITCH CONTROL:
1. The SA-2400 is equipped with PITCH CONTROL (24) and QUARTZ
LOCK (26). When the QUARTZ LOCK is activated, the QUARTZ LOCK
LED (25) lights GREEN, and the speed will be exactly 33 1/3, 45 or 78
RPM depending on which speed has been selected regardless of the
position of the pitch control. PITCH CONTROL automatically
disengages when QUARTZ LOCK is activated.
2. When the QUARTZ LOCK is off, you can adjust the PITCH CONTROL
(24). When you move PITCH CONTROL (24) off center, the pitch can
vary +/- 10% depending on the position of the PITCH CONTROL.
3. Push the QUARTZ LOCK (26) button to bring the speed back to exactly
33 1/3, 45 or 78 RPM when the PITCH CONTROL (24) is positioned off
center. Disengaging the QUARTZ LOCK will bring the platter speed
back to the original pitch setting.
4. The PLATTER (2) is equipped with a STROBE RPM INDICATOR
STRIP (27) and the POWER (16) switch contains built in STROBE
LIGHTS (28). When the PLATTER is spinning, the STROBE LIGHTS
illuminate the STROBE RPM INDICATOR STRIP. The bottom row of
dots will appear to be stationary when the pitch is -3.3%. The second
row of dots from the bottom will appear to be stationary when the speed
is exactly 33 1/3, 45 or 78 RPM depending on which SPEED
SELECTOR (18) buttons are pushed. The third row of dots from the
bottom will appear to be stationary when the pitch is +3.3%. The top row
of dots will appear to be stationary when the pitch is +7.2%.
Page 5
Page 6

PITCH BEND:
1. Pushing the PITCH BEND (23) buttons will temporarily raise or lower
the pitch without changing the slide setting. Releasing the buttons will
return the pitch to the slide setting.
USING THE REVERSE BUTTON:
1. Press the REVERSE (30) button to reverse the rotation of the PLATTER
(2) (the REVERSE LED (30A) will light while in reverse mode). Press
the REVERSE button a second time to return to normal play.
DIGIT AL DISPLAY :
1. The DIGITAL DISPLAY (20) indicates SPEED (20A), PITCH SLIDE
ACTIVATION (20B), PLAY (20C), PAUSE (20D), REVERSE (20E) and
PITCH PERCENTAGE (20F).
ARM-LIFT HEIGHT ADJUSTMENT :
If the pre-adjusted distance that the CUE LEVER (19) raises the stylus off
the record surface is inadequate, it can be adjusted by turning the ARM-
LIFT HEIGHT ADJUSTMENT SCREW (29) while simultaneously pushing
down on the TONE ARM (6). Clockwise rotation of the screw will decrease
the distance and counterclockwise rotation will increase the distance.
Specifications
TURNTABLE SECTION:
Type...................................................Quartz Direct Drive Manual Turntable
Drive Method................................................................................Direct Drive
Motor......................................................................Brushless DC Motor 18V
Platter............................................Aluminum Diecast 13” (332mm) Dia.
Speed...............................................................................33 1/3, 45 or 78 RPM
Starting Torque..............................................................................2.2 kg/cm
Build-up Characteristics...........................0.6 sec. standstill to 33 1/3 RPM
Braking System....................................................................Electronic Brake
Wow and Flutter.....................................................................0.01% WRMS*
* This rating refers to the turntable assembly and platter only and excludes
effects of records, cartridges or tonearms.
Rumble........................................................................78 dB (IEC 98A WTD)
TONEARM SECTION:
Type...........................................................Universal Straight Tubular Arm
Effective Length.............................................................9 1/16” (231.5 mm)
Arm Height Adjust Range...............................................................0 - 6 mm
Overhang............................................................................19/32" (15.1 mm)
Effective Mass..............................................................9 g (Without Cartridge)
Offset Angle...............................................................................................22°
Friction..................................................Less Than 7 mg (Lateral, Vertical)
Tracking Error Angle............Within 2°32' at the outer groove and within
Stylus Pressure Adjust Range..........................................................0 - 5 g
Applicable Cartridge Weight Range.................................................6 - 10 g
Headshell Weight.................................................................................9 g
GENERAL:
Power Supply...............................................................1 15V~60Hz/230V~50Hz
Power Consumption..........................................................................15 Watts
Dimensions......................................................................17 3/4” x 6" x 14"
Weight......................................................................................27 lbs. (12.3 kg)
Specifications are subject to change without notice. The weight and dimensions
shown are approximate.
0°32' at the inner groove of a 30 cm (12") record
450mm x 152mm x 352 mm
Page 6
Page 7

Einleitung
Wir gratulieren Ihnen zum Kauf eines drehmomentstarken Gemini SA-2400
Plattenspielers. Dieser moderne Plattenspieler enthält die neuesten
Funktionen, die die Plattenspielertechnik mit Direktantrieb zu bieten hat.
Vor Anwendung des Plattenspielers lesen Sie bitte alle Anweisungen
sorgfältig durch.
Leistungsmerkmale
• Quartzgesteuerte Drehzahl
• +/- 10% Drehzahlregulierung (Pitch)
• Elektronische Bremsvorrichtung
• Strobelicht
• Start-/Stop-Funktionstaste
• Rückwärtslauf
• Digitalanzeige
Vorsichtsmaßnahmen
1. Vor Anwendung dieses Geräts bitten alle Anweisungen sorgfältig
durchlesen.
2. Das Gerät vor Tropfen und Spritzern schützen, und es dürfen keine mit
Flüssigkeit gefüllte Behälter wie Vasen darauf gestellt werden.
3. Das Gerät nicht öffnen, um das Risiko elektrischen Schocks zu
vermeiden. Es enthält KEINE VOM ANWENDER ERSETZBAREN
TEILE. Die Wartung darf nur von ausgebildeten Servicetechnikern
durchgeführt werden.
4. Die Tonarmlager sind werkseingestellt und abgedichtet. Jegliche
Änderungsversuche führen zum Erlöschen der Garantie.
5. Darauf achten, daß beim Anschluß die Netzspannung abgeschaltet ist.
6. Nur kapazitätsarme, abgeschirmte Kabel vorschriftsmäßiger Länge
benutzen. Darauf achten, daß alle Stecker und Buchsen fest
angeschraubt und richtig angeschlossen sind.
7. Zu Beginn müssen die Überblendregler und Lautstärkeregler Ihres
Verstärkers auf Minimum eingestellt und die Lautsprecherschalter in
OFF-Position geschaltet sein. Vor dem Lauterstellen 8 bis 10 Sekunden
warten, um den durch Einschwingung erzeugten Schroteffekt zu
vermeiden, welches zu Lautsprecher- und Frequenzweichenschäden
führen könnte.
8. Dieses Gerät nicht Regen oder Feuchtigkeit aussetzen.
9. An den Reglern oder Schaltern keine Spray-Reinigungsmittel oder
Schmiermittel benutzen.
2. Den SPANNUNGSWAHLER - VOLTAGE SELECTOR (3) (befindet sich
auf dem PLATTENSPIELERCHASSIS) auf die richtige Spannung (230
Volt) überprüfen. WARNUNG: Schalten Sie den PLATTENSPIELER mit
einer falschen Spannung (115 Volt) ein, kann der Plattenspieler
beschädigt werden.
3. Nachdem Sie überprüft haben, da das Verpackungsmaterial
vollkommen entfernt worden ist, setzen Sie den PLATTENTELLER -
PLATTER (2) vorsichtig auf die mittige Spindel des
PLATTENSPIELERCHASSIS - TURNTABLE BASE (1).
4. Die NEOPRENAUFLAGE - NEOPRENE MAT (4) auf den
PLATTENTELLER - PLATTER (2) legen.
EINBAU DES TONABNEHMERS: (SIEHE ABBILDUNG 2)
Weil alle Tonabnehmer individuell ausgeführt sind, siehe jeweilige
Anweisungen für Tonabnehmer, um einen richtigen Einbau sicherzustellen.
1. Die Zuleitungsdrähte an den Tonabnehmerstiften anschließen. Um den
Anschluß zu erleichtern, sind die meisten Tonabnehmerstifte
farbkodiert. Die Zuleitungsdrähte an den Stiften der jeweiligen
Farbkennzeichnung anschließen.
Weiß (L+)...................linker Kanal +
Blau (L-)....................linker Kanal -
Rot (R+)........................rechter Kanal +
Grün (R-)....................rechter Kanal -
2. Den Tonabnehmer in den TONKOPF/ SYSTEMTRÄGER -
HEADSHELL (5) einbauen und mit den dem Tonabnehmer beigefügten
Schrauben befestigen.
EINBAU DES TONKOPFES:
Den TONKOPF - HEADSHELL (5) an der Vorderseite des röhrenförmigen
TONARMS - TONE ARM (6) einstecken. Beim Halten des TONKOPFES in
horizontaler Position die SICHERUNGSMUTTER - LOCKING NUT (7)
gegen den Uhrzeigersinn drehen, bis der TONKOPF festgeschraubt ist.
Der winkelige Gemini-Tonkopf wurde zum Gebrauch mit einem geraden
Tonarm konstruiert. Jede Art von Tonabnehmer kann in den winkeligen
Gemini-Tonkopf montiert werden.
BENUTZUNG EINES GERADEN TONARMS:
Bei Benutzung eines geraden Tonarms mit einer in einem Standardtonkopf
installiertenAbtastnadel oder einem kompletten Bananen-System sollten
Sie immer eine sphärische Nadel benutzen. Wenn Sie eine elliptische
Nadel benutzen, wird die Nadel zwar in der Plattenrille sitzen, jedoch wird
ein Kanal lauter sein als der andere.
Der gerade Gemini-Tonarm wurde so konstruiert, damit er mit den
Markierungen fluchtet, die Sie bei Benutzung eines S-förmigen Tonarms
auf den LPs gemacht haben.
Teile-Lieferumfang
Plattenspieler.................................................................................1
Plattenteller....................................................................................1
Neoprenauflage.............................................................................1
Abdeckhaube.................................................................................1
Abdeckhaubenscharniere..............................................................2
45-U/min-Adapter..........................................................................1
Balancegewicht..............................................................................1
Tonkopf (Systemträger)..................................................................1
Zusammenbau und Aufstellung
HINWEIS: SIEHE ABBILDUNG 1 (SEITE 1) FüR TEILENUMMERN UND
POSITIONEN.
EINBAU DES PLA TTENSPIELERS:
1. Setzen Sie das PLATTENSPIELERCHASSIS - TURNTABLE BASE (1)
auf eine flache, ebene Fläche ohne Vibration. Das Gerät so weit wie
möglich von den Lautsprechern entfernt aufstellen. Das Gerät von
direktem Sonnenlicht, Wärme, Feuchtigkeit oder Schmutz fernhalten.
Das Gerät in gut belüfteter Umgebung aufstellen. Es mit den
Plattentellerfüen horizontal lagefest machen.
EINBAU DES BALANCEGEWICHTS: (SIEHE ABBILDUNG 3)
1. Das BALANCEGEWICHT - COUNTERWEIGHT (8) auf den hinteren
Teil des TONARMS - TONE ARM (6) schieben, wobei die numerierte
Skala nach vorne gerichtet sein muss.
2. Das BALANCEGEWICHT - COUNTERWEIGHT (8) gering im
Gegenuhrzeigersinn ziehen, um es auf den hinteren Teil des TONARMS
- TONE ARM (6) zu schrauben.
HORIZONT ALER NULLPUNKTABGLEICH UND
REGULIERUNG DES AUFLAGEDRUCKS:
1. Ohne die Nadelspitze zu berühren, entfernen Sie den Nadelschutz (falls
Ihr Tonabnehmer einen abnehmbaren Nadelschutz hat).
2. Die TONARM-KLEMMSCHELLE - ARM CLAMP (9) lösen und den
TONARM - TONE ARM (6) von der TONARMAUFLAGE - ARM REST
(10) abheben.
3. Durch das Verdrehen gegen den Uhrzeigersinn des
BALANCEGEWICHTS - COUNTERWEIGHT (8) wird die
Tonabnehmerseite des TONARMS - TONE ARM (6) gesenkt. Beim
Drehen im Uhrzeigersinn geschieht das Gegenteil. Das
BALANCEGEWICHT je nach Bedarf im oder gegen den Uhrzeigersinn
drehen, bis der TONARM horizontal ausbalanciert ist. Dies läßt sich
leicht feststellen, indem man die Stelle beobachtet, wo der TONARM
unbehindert “schwimmt”.
Page 7
Page 8

4. Den TONARM - TONE ARM (6) auf die TONARMAUFLAGE - ARM
REST (10) setzen und ihn mit der TONARM-KLEMMSCHELLE - ARM
CLAMP (9) festklemmen.
5. Indem der TONARM - TONE ARM (6) auf der TONARMAUFLAGE ARM REST (10) festgeklemmt ist, halten Sie das
BALANCEGEWICHTS - COUNTERWEIGHT (8) ruhig mit der Hand,
während Sie den AUFLAGEDRUCKRING - STYLUS PRESSURE RING
(11) rotieren, bis sich die Ziffer “0” auf dem Ring mit der Mittellinie an
dem hinteren Rohr des TONARMS ausrichtet. Der horizontale
Nullpunktabgleich (0) ist nun abgeschlossen.
6. Den TONARM erneut schwimmen lassen, um sicherzustellen, daß der
horizontale Nullpunktabgleich (0) gleich geblieben ist. Wurde er nicht
beibehalten, wiederholen Sie die Schritte 3 - 5.
7. Nach dem horizontalen NULLPUNKTABGLEICH das abgeglichene
BALANCEGEWICHT - COUNTERWEIGHT (8) gegen den
Uhrzeigersinn drehen, bis der vom Tonabnehmerhersteller empfohlene
Auflagedruck auf dem AUFLAGEDRUCKRING - STYLUS PRESSURE
RING (11) erscheint, wo er mit der Mittellinie des TONARMS - TONE
ARM (6) zusammentrifft.
REGULIERUNG DER ANTISKA TING-VORRICHTUNG:
Die ANTISKA TING-VORRICHTUNG - ANTI-SKATING CONTROL (12) auf
den gleichen Wert wie den Auflagedruck einstellen.
REGULIERUNG DER TONARMHÖHE:
Die Tonarmhöhe ist zwischen 0 und 6 mm einstellbar. Eine HÖHENSKALA
- HEIGHT SCALE (14) (in Unterteilungen von 0,5 mm) wird mitgeliefert, um
bei Einstellung den genauen Skalenwert zu gewähren.
1. Den Tonarm lösen, indem Sie den Knopf der TONARMARRETIERUNG
- ARM LOCK (15) entgegen die Arretierposition drehen.
2. In Tabelle A finden Sie die Höhe des Tonabnehmers und auch ihren
entsprechenden Skalenwert.
3. Den HÖHENJUSTIERRING - ARM HEIGHT ADJUSTMENT RING (13)
drehen, bis die Referenzlinie auf dem Ring am korrekten Skalenwert
eingestellt ist.
4. Arretieren Sie den Tonarm, indem Sie den Knopf der
ARMARRETIERUNG - ARM LOCK (15) im Uhrzeigersinn drehen, bis er
die Arretierposition erreicht.
TABELLE A
Tonabnehmernhöhe
(mm)
15
16
17
18
19
20
21
Zum Beispiel: wenn der Tonabnehmer eine Höhe von 18,5 mm hat, sollte
die Referenzlinie des ARMHÖHENJUSTIERRINGS - ARM HEIGHT
ADJUSTMENT RING (13) zwischen 3 und 4 an der HÖHENSKALA HEIGHT SCALE (14) eingestellt sein.
Skalenwert
0
1
2
3
4
5
6
2. Siehe Tabelle A für vorschriftsmä ige Anschlüsse der Ausgangs-RCAStecker und des Erdungssteckers. Achten Sie darauf, da alle Stecker
an den richtigen Buchsen fest angeschlossen sind (Phono-Eingänge).
Um Brummtöne zu vermeiden, ist darauf zu achten, da die Erdungsöse
fest an der Erdungsschraube angeschlossen ist.
TABELLE B
AUSGANGSANSCHLUSS
L ( WEIß)
R (ROT)
ERDUNG (Flachöse)
MIXER ODER RECEIVER
PHONO- L KANAL
PHONO- R KANAL
Erdungsschraube
Bedienungsanweisungen
GRUNDBETRIEB:
1. Die Platte auf die NEOPRENAUFLAGE - NEOPRENE MAT (4) legen,
die auf dem PLATTENTELLER - PLATTER (2) sitzt.
2. Die gewünschte Drehzahl auswählen, indem Sie an der
DREHZAHLTASTE - SPEED SELECTOR (18) entweder 33 oder 45
auswählen. Für die 78 U/min Drehzahl, beide DREHZAHLTASTEN 33
und 45 gleichzeitig auswählen.
3. Den NETZSCHALTER - POWER (16) in die “ON”-Position schalten,
woraufhin das (in den NETZSCHALTER eingebaute) Strobelicht und die
Drehzahlanzeige (für die ausgewählte Drehzahl) aufleuchten wird.
4. Den Nadelschutz abnehmen (falls an Ihrem Tonabnehmer vorhanden).
5. Die TONARM-KLEMMSCHELLE - ARM CLAMP (9) an der
TONARMAUFLAGE - ARM REST (10) lösen.
6. Die START STOP (17) taste drücken. Der PLATTENTELLER -
PLATTER (2) wird anfangen zu drehen.
7. Den TONARMLIFT-HEBEL - CUE LEVER (19) in die “UP”-Position
schieben.
8. Den Tonarm über die gewünschte Rille auf der Platte positionieren, und
den TONARMLIFT-HEBEL in die “DOWN”-Position schieben. Der
TONARM - TONE ARM (6) wird sich langsam auf die Platte senken,
woraufhin die Platte zu spielen beginnt.
9. Bei Beendigung des Spielens heben Sie den TONARM - TONE ARM
(6), schieben ihn auf die TONARMAUFLAGE - ARM REST (10) und
befestigen ihn mit der TONARM-KLEMMSCHELLE - ARM CLAMP (9).
10.Nun haben Sie die Option, den Strom abzuschalten, indem Sie den
NETZSCHALTER - POWER (16) in die “OFF”-Position schalten, oder
den PLATTENTELLER - PLATTER (2) zu stoppen, indem Sie die
START STOP (17) taste drücken und die elektronische Bremse
aktivieren.
SPIELUNTERBRECHUNG:
1. Durch das Anheben des TONARMLIFT-HEBELS - CUE LEVER (19) in
die “UP”-Position wird der TONARM - TONE ARM (6) angehoben und
unterbricht das Spielen.
2. Das Senken des TONARMLIFT-HEBELS in die “DOWN”-Position wird
den TONARM - TONE ARM (6) langsam an der Stelle auf die Platte
setzen, wo das Spielen unterbrochen wurde.
EINBAU DER ABDECKHAUBE:
1. Die Scharniere an der Abdeckhaube anbringen.
2. Halten Sie die Abdeckhaube direkt über dem Plattenspieler in Position
und schieben die Scharniersockel in die Halterungen, die in die
Rückwand montiert sind.
3. Vor dem Entfernen immer die Abdeckhaube anheben.
4. Es sollte vermieden werden, die Abdeckhaube während des Spielens zu
öffnen und zu schließen. Dies könnte zu unerwünschten Vibrationen
und Nadelspringen führen.
ANSCHLÜSSE:
1. Den Netzstecker an einer entsprechenden Steckdose anschließen.
DAS SPIELEN VON 45-U/MIN-PLATTEN:
1. Wenn Sie eine 45-U/min-Platte spielen, die ein großes Mittelloch hat
(z.B. Singles), setzen Sie zunächst einen ADAPTER auf die Spindel.
2. Darauf achten, daß die 45-U/min-DREHZAHLWÄHLTASTE - SPEED
SELECTOR (18) gedrückt ist und die 45-U/min-Drehzahlanzeige
aufleuchtet.
NADELBELEUCHTUNG:
1. Fest auf den LAMPENSCHALTER - TARGET LIGHT SWITCH (21)
drücken, wodurch die NADELBELEUCHTUNG - TARGET LIGHT (22)
so weit herausgefahren wird, um die Nadelspitze zu beleuchten.
2. Um die NADELBELEUCHTUNG zu versenken, drücken Sie so lange
auf die Lampe, bis diese im Gehäuse arretiert.
Page 8
Page 9

3. Bei Nichtgebrauch sollte die NADELBELEUCHTUNG in versenkter
Position gehalten werden.
REGULIERUNG DER GESCHWINDIGKEIT :
1. Der SA-2400 ist mit einem GESCHWINDIGKEITSREGLER - PITCH
CONTROL (24) und QUARTZSPERRE - QUARTZ LOCK (26)
ausgerüstet. Wenn die QUARTZSPERRE aktiviert ist, leuchtet die
grüne PITCH LED - QUARTZ LOCK LED (25) und die Drehzahl wird
genau 33 1/3 , 45 und 78 U/min sein, je nachdem welche
DREHZAHLWAHLTASTE - SPEED SELECTOR (18) gedrückt wird
ohne Rücksicht auf die Reglerstellung. Der
GESCHWINDIGKEITSREGLER schaltet sich automatisch aus wenn
die QUARTZSPERRE aktiviert ist.
2. Wenn die QUARTZSPERRE ausgeschaltet ist, können Sie den
GESCHWINDIGKEITSREGLER nachjustieren. Wenn Sie den
GESCHWINDIGKEITSREGLER außerhalb der Mittenposition schieben,
kann die Tonhöhe zwischen +/- 10% eingestellt werden, abhängig von
der Position des GESCHWINDIGKEITSREGLERS.
3. Drücken Sie Taste der QUARTZSPERRE, um die Drehzahl wieder
genau auf 33 1/3, 45 oder 78 U/min zu bringen, wenn der
GESCHWINDIGKEITSREGLER außerhalb der Mittenposition steht.
Das Ausschalten der QUARTZSPERRE wird die Geschwindigkeit des
Plattentellers auf die ursprüngliche Einstellung des
Geschwindigkeitsreglers zurückführen.
4. Der PLATTENTELLER - PLATTER (2) ist mit einem STROBELICHT-U/
MIN-ANZEIGESTREIFEN - STROBE RPM INDICATOR STRIP (27)
ausgerüstet, und der NETZSCHALTER - POWER (16) enthält
eingebaute STROBELICHTER - STROBE LIGHTS (28). Wenn sich der
PLATTENTELLER - PLATTER (2) dreht, erleuchten die
STROBELICHTER - STROBE LIGHTS (28) den STROBELICHT-U/
MIN-ANZEIGESTREIFEN - STROBE RPM INDICATOR STRIP (27).
Die untere Punktereihe wird feststehend erscheinen, wenn die Tonhöhe
-3,3% ist. Die zweite Punktereihe von unten wird feststehend
erscheinen wenn die Drehzahl genau 33 1/3, 45 oder 78 U/min ist, je
nachdem welche DREHZAHLWÄHLTASTE - SPEED SELECTOR (18)
gedrückt wird. Die dritte Punktereihe von unten wird feststehend
erscheinen wenn die Tonhöhe +3,3% ist. Die oberste Punktereihe wird
feststehend erscheinen wenn die Tonhöhe +7,2% ist.
PITCH BEND-T ASTEN:
1. Wenn die PITCH BEND (23) Tasten (Beschleunigung / Abbremsung)
gedrückt werden, wird die Geschwindigkeit automatisch angehoben
oder gesenkt, ohne die Reglereinstellung zu verändern. Wenn die
Tasten freigegeben werden, kehrt die Geschwindigkeit zur
Reglereinstellung zurück. Sie können diese Funktion benutzen, um die
Geschwindigkeitsunterschiede beim Mischen von einem Titel zum
anderen anzupassen.
BENUTZUNG DER RÜCKWÄRTSLAUF-T ASTE:
1. Die REVERSE (30) (RÜCKWÄRTSLAUF) Taste drücken um den
PLATTENTELLER - PLATTER (2) in die entgegengesetzte Richtung zu
drehen (die REVERSE LED (30A) leuchtet auf ). Die REVERSE Taste
nochmals drücken um den Plattenteller zur normalen Drehrichtung
zurückzubringen.
REGULIERUNG DER ARMLIFTHÖHE:
1. Wenn der voreingestellte Abstand, bei dem der CUEING-HEBEL - CUE
LEVER (19) die Nadel von der Plattenfläche hebt, nicht weit genug ist,
kann dieser reguliert werden, indem man die ARMLIFTHÖHENJUSTIERSCHRAUBE - ARM-LIFT HEIGHT ADJUSTMENT SCREW
(29) durch Drehen und gleichzeitiges Drücken auf den TONARM -
TONE ARM (6) nachjustiert. Das Drehen der Schraube im
Uhrzeigersinn wird den Abstand verringern, und das Drehen gegen den
Uhrzeigersinn wird ihn verlängern.
Spezifikationen
PLATTENSPIELER:
Typ.........................................Manueller Plattenspieler mit Quartzdirektantrieb
Antriebsmethode...........................................................................Direktantrieb
Motor........................................................Bürstenloser 18-V-Gleichstrommotor
Plattenteller...................................................Druckguß 332 mm Durchmesser
Drehzahl....................................................................33 1/3, 45 oder 78 U/min
Anlaufmoment...................................................................................2,2 Kg/cm
Hochlaufzeit..............................................0,6 sec. Stillstand bis 33 1/3 U/min
Bremssystem..................................................................Elektronische Bremse
Gleichlaufschwankungen...............................0,01% WRMS*
* Dieser Nennwert bezieht sich nur auf das Laufwerk inklusive Plattenteller,
ausschließlich Auswirkungen der Platten, Tonabnehmer oder Tonarme.
Rumpeln........................................................................78 dB (IEC 98A WTD)
TONARM:
Typ..................................................Gerader röhrenförmiger Universaltonarm
Nutzlänge...........................................................................231,5 mm (9 1/16”)
Armhöhen-Einstellbereich...................................................................0 - 6 mm
Überhang.............................................................................15,1 mm (19/32")
Effektive Masse........................................................9 g (ohne Tonabnehmer)
Reibungswinkel.........................................................................................22°
Reibung.....................................................Wenige als 7 mg (seitlich, vertikal)
Abtastfehlerwinkel.......................Innerhalb 2°32‘ an der Außenrille und
innerhalb 0°32" an der Innenrille einer 30-cm-Platte
Auflagedruck-Einstellbereich.............................................................0 - 5 g
Anwendbarer Tonabnehmern-Gewichtsbereich..............................6 - 10 g
Tonkopfgewicht.....................................................................................9 g
ALLGEMEINES:
Stromversorgung.....................................................115V~60Hz/230V~50Hz
Leistungsaufnahme................................................................................15W
Abmessungen...............................................................450 x 152 x 352 mm
Gewicht..............................................................................................12.3 kg
Technische Änderungen vorbehalten. Gewichtsangaben und Abmessungen
sind annähernd.
DIGIT ALANZEIGE:
1. Die DIGITALANZEIGE - DIGITAL DISPLAY (20) zeigt DREHZAHL SPEED (20A), FADERAKTIVIERUNG - PITCH SLIDE ACTIVATION
(20B), ABSPIELEN - PLAY (20C), PAUSE (20D), RÜCKWÄRTSLAUF REVERSE (20E) und DREHZAHL IN PROZENT- PITCH PERCENTAGE (20F) an.
Page 9
Page 10

Introducción
Felicitaciones por su compra del giradiscos profesional de accionamiento
directo y de alto par motor Gemini SA-2400. Este giradiscos ultramoderno
está dotado de las características más avanzadas de tecnología de
giradiscos de accionamiento directo. Antes de usarlo, le sugerimos leer
cuidadosamente todas las instrucciones.
Características
• Velocidad regulada por cuarzo
• Regulación del tono de ±10%
• Frenado plenamente electrónico
• Iluminador estroboscópico
• Interruptor táctil de arranque/parada
• Reverse
• Pantalla Numérica
Precauciones
1. Deberán leerse todas las instrucciones de operación antes de usar el
equipo.
2. Este aparato no debería estar expuesto al goteo o a las salpicaduras y
ningun objeto llenado de líquido, tal como floreros, no debería estar
colocado sobre del aparato.
3. Para reducir el riesgo de shock eléctrico, no abra la unidad. NO
CONTIENE PIEZAS REEMPLAZABLES POR EL USUARIO. Sírvase
comunicarse con el Departamento de Servicio Gemini o su distribuidor
autorizado y hablar con un técnico de servicio calificado.
4. Los cojinetes del brazo de fonocaptor están ajustados y sellados en
fábrica. Cualquier intento de ajuste dejará sin efecto la garantía.
5. Cerciórese de que toda la corriente CA esté APAGADA para efectuar
las conexiones.
6. Los cables deberán ser de baja capacidad, reguardados, y de
apropiada longitud. Cerciórese de que todos los enchufes y jacks estén
apretados y debidamente conectados.
7. Comience siempre con los atenuadores de nivel de audio/control de
volumen fijados en el nivel mínimo y el control de volumen de los
altavoces fijados en APAGADO. Espere 8 a 10 segundos antes de
aumentar el volumen de los altavoces para evitar el “chasquido”
transitorio que podría ocasionar daños a los altavoces/de cruce.
8. No deje esta unidad expuesta a lluvia o humedad.
9. No use ningun limpiador de rocío o lubricante en cuaquiera de los
controles o interruptores.
Lista de comprobación de piezas
exposición directa del Sol, calor, humedad o suciedad. Mantenga la
unidad bien ventilada. Use la patas del tocadisco para estabilizar la
unidad en sentido horizontal.
2. Cerciórese de que el SELECTOR DE VOLTAJE - VOLTAGE SELEC-
TOR (3) (colocado en la BASE DEL TOCADISCO) esté ajustado para el
voltaje correcto. ADVERTENCIA: Si trata de hacer funcionar el
tocadisco con el voltaje incorrecto, corre el riesgo de dañarlo.
3. Después de comprobar que se hayan quitado todos los materiales de
embalaje, coloque el PLATO - PLATTER (2) suavemente en el huso
central de la BASE DEL TOCADISCO - TURNT ABLE BASE (1).
4. Coloque la ESTERA DE NEOPRENO - NEOPRENE MAT (4) sobre el
PLAT O - PLATTER (2).
INST ALACIÓN DEL CARTUCHO: (VÉASE LA FIG. 2)
Debido a que todos los cartuchos son de diseño distinto, sírvase referirse a
las instrucciones de su cartucho específico, para garantizar la instalación
correcta.
1. Conecte los cables conductores a los terminales del cartucho. Para su
conveniencia, los terminales de la mayoría de los cartuchos están
codificados por colores. Conecte cada cable conductor al terminal del
mismo color.
Blanco (I+)....................Canal izquierdo +
Azul (I-).......................Canal izquierdo -
Rojo (D+)....................Canal derecho +
Verde (D-)...................Canal derecho -
2. Monte el cartucho dentro del PORTACÁPSULAS - HEADSHELL (5) y
apriételo con los tornillos incluidos con el cartucho.
INST ALACIÓN DEL POR TACÁPSULAS:
Inserte el PORTACÁPSULAS – HEADSHELL (5) en la parte delantera del
BRAZO DE FONOCAPTOR – TONE ARM (6) tubular. Sosteniendo el
PORTACÁPSULAS firmemente en posición horizontal, gire la TUERCA
FIADORA – LOCKING NUT (7) hacia la izquierda hasta que el
PORTACÁPSULAS se haya asegurado en posición. El portacápsulas
angular de Gemini fue diseñado para el uso con el brazo de fonocaptor
recto. Es posible instalar cualquier tipo de cartucho en el portacápsulas
angular de Gemini.
USO DEL BRAZO DE FONOCAPTOR RECTO:
Cuando se usa el brazo de fonocaptor recto con aguja tipo banana o un
cartucho montado en un portacápsulas estándar, siempre se debería
utilizar agujas del tipo cónico. Si se usa aguja elíptica, la aguja se
posicionará correctamente en la ranura del disco pero un canal será más
fuerte que el otro.
El brazo de fonocaptor recto de Gemini ha sido diseñado para que se
alinee con las marcaciones en los discos LP cuando se usa un giradiscos
con brazo de fonocaptor en forma de S.
Unidad de tocadisco.......................................................................1
Plato del tocadisco.........................................................................1
Estera de neopreno.............................................................................1
Tapa contra polvo..........................................................................1
Bisagra de tapa contra polvo..........................................................2
Adaptador de 45 RPM......................................................................1
Contrapeso...................................................................................1
Portacápsulas...............................................................................1
Montaje y configuración
NOTA: VÉASE LA FIG. 1 (PÁGINA 1) PARA NÚMEROS DE PIEZA Y
UBICACIONES.
INST ALACIÓN DEL TOCADISCO:
1. Ponga la BASE DEL TOCADISCO - TURNTABLE BASE (1) sobre una
superficie plana y nivelada sin vibraciones. Trate de colocar la unidad lo
mas alejado posible de los altavoces. Mantenga la unidad alejada de la
INST ALACIÓN DEL CONTRAPESO: (VÉASE LA FIG. 3)
1. Deslice el CONTRAPESO - COUNTERWEIGHT (8) sobre la parte
posterior del BRAZO DEL FONOCAPTOR - TONE ARM (6) con la
medida de la aguja numerada hacia el frente.
2. Gire el CONTRAPESO - COUNTERWEIGHT (8) ligeramente hacia la
izquierda para enroscarlo en la parte posterior del BRAZO DE
FONOCAPTOR - TONE ARM (6).
AJUSTE DEL EQUILIBRIO CERO (0) HORIZONT AL Y
PRESIÓN DE LA AGUJA:
1. Sin tocar la punta de la aguja, quite el protector de aguja (si el de su
cartucho es reemplazable).
2. Suelte el SUJETABRAZO - ARM CLAMP (9) y levante el BRAZO DE
FONOCAPTOR - TONE ARM (6) del DESCANSILLO - ARM REST
(10).
3. Si el CONTRAPESO - COUNTERWEIGHT (8) se avanza hacia la
izquierda, se bajará el lado del cartucho del BRAZO DE FONOCAPTOR
- TONE ARM (6). Si el CONTRAPESO se avanza hacia la derecha
ocurrirá lo contrario. Gire el CONTRAPESO hacia la derecha o la
izquierda según sea necesario hasta que el BRAZO DE FONOCAPTOR
Page 10
Page 11

esté horizontalmente equilibrado. Ese equilibrio es fácil de determinar;
espere el punto en que el BRAZO DE FONOCAPTOR “flote”
libremente.
4. Coloque el BRAZO DE FONOCAPTOR - TONE ARM (6) sobre el
DESCANSILLO - ARM REST (10) y asegurelo en posición con el
SUJETABRAZO - ARM CLAMP (9).
5. Con el BRAZO FONOCAPTOR - TONE ARM (6) enganchado en el
PORTABRAZO - ARM REST (10), sostenga el CONTRAPESO COUNTERWEIGHT (8) en una mano y gire el ANILLO DE PRESIÓN
DEL ESTILETE - STYLUS PRESSURE RING (11) hasta que el número
“0” en el anillo se alinee con la línea central del eje trasero del BRAZO
FONOCAPTOR. El equilibrio horizontal en cero (0) deberá quedar
completo.
6. Flote de nuevo el BRAZO FONOCAPTOR para asegurarse que se haya
obtenido el equilibro horizontal en cero (0). Si no se ha mantenido este
equilibrio, repita los pasos de contrapeso 3 al 5.
7. Después de ajustar el equilibrio cero (0) horizontal, gire el
CONTRAPESO - COUNTERWEIGHT (8) equilibrado hacia la izquierda
hasta que aparezca en el ARO DE PRESIÓN DE AGUJA - STYLUS
PRESSURE RING (11) la presión de aguja recomendada del fabricante
del cartucho en el punto donde coincide con la línea central del eje
posterior del BRAZO DE FONOCAPTOR - TONE ARM (6).
AJUSTE DEL CONTROL ANTIDESLIZANTE:
Fije el CONTROL ANTIDESLIZANTE - ANTI-SKATING CONTROL (12) al
mismo valor que la presión de la aguja.
AJUSTE DE LA ALTURA DEL BRAZO DE FONOCAPTOR:
La altura del brazo de fonocaptor es ajustable entre 0 y 6 mm. Se incluye
una ESCALA DE ALTURA - HEIGHT SCALE (14) (en incrementos de
0,5mm) para ayudar a lograr un ajuste preciso.
1. Desenganche el brazo de fonocaptor, girando la perilla de ENGANCHE
DE BRAZO - ARM LOCK (15) en sentido contrario a la posición de
enganche.
2. Busque la altura del cartucho en el Cuadro A y determine su valor
correspondiente en la escala de alturas.
3. Gire el ARO DE AJUSTE DE ALTURA - ARM HEIGHT ADJUSTMENT
RING (13) hasta que la línea de referencia en el aro esté situada en la
lectura correcta de la escala.
4. Enganche el brazo de fonocaptor en posición, girando la perilla de
ENGANCHE DE BRAZO - ARM LOCK (15) hacia la derecha hasta que
llegue a la posición asegurada.
CUADRO A
Altura del cartucho
(mm)
15
16
17
18
19
20
21
Por ejemplo, si el cartucho tiene una altura de 18,5mm, la línea de
referencia del ARO DE AJUSTE DE ALTURA DEL BRAZO - ARM HEIGHT
ADJUSTMENT RING (13) deberá situarse entre 3 y 4 en la ESCALA DE
ALTURAS - HEIGHT SCALE (14).
Lectura de la escala
0
1
2
3
4
5
6
INST ALACIÓN DE LA TAP A CONTRA POLVOS:
1. Instale las bisagras en la cubierta.
2. Sostenga la tapa contra polvos en posición directamente arriba del
tocadisco y deslice las bases de las bisagras en los portabisagras
montados en el panel posterior.
3. Siempre levante la tapa contra polvos antes de quitarla.
4. Evite abrir y cerrar la tapa contra polvos cuando el tocadisco está en
funcionamiento, ya que podría ocurrir vibración indeseable y saltos de
la aguja.
CONEXIONES:
1. Conecte el enchufe CA en una toma de corriente apropiada.
2. Véase el Cuadro A para las conexiones apropiadas de los enchufes de
salida RCA y el conector a tierra. Cerciórese de que todos los enchufes
estén firmemente conectados en los jack apropiados (entradas
fonográficas). Para reducir el zumbido, cerciórese de que la toma de
tierra esté firmemente conectada al tornillo de tierra.
CUADRO B
CONECTORES
DE SALIDA
I (BLANCO)
D (ROJO)
TIERRA (Orejeta de paleta)
MEZCLADOR O RECEPTOR
I CANAL DEL FONÓGRAFO
D CANAL DEL FONÓGRAFO
T ornillo de TIERRA
Instrucciones de operación
OPERACIÓN BÁSICA:
1. Ponga un disco sobre la ESTERA DE NEOPRENO - NEOPRENE MAT
(4) que descansa sobre el PLATO - PLATTER (2).
2. Seleccione la velocidad deseada oprimiendo el BOTÓN SELECTOR
DE VELOCIDAD - SPEED SELECTOR (18) de 33 ó 45. Para obtener la
velocidad de 78, oprima a la vez ambos BOTONES SELECTORES DE
VELOCIDAD de 33 y 45.
3. Ponga el ALIMENTACIÓN - POWER (16) en la posición de
“ENCENDIDO”, en cuyo momento se encenderán el iluminador
estroboscópico (incorporado en el ALIMENTACIÓN y el indicador de
velocidad (para la velocidad seleccionada).
4. Quite el protector de aguja (si se aplica a su cartucho).
5. Suelte el SUJETABRAZO - ARM CLAMP (9) que se encuentra en el
DESCANSILLO - ARM REST (10).
6. Oprima el BOTÓN DE ARRANQUE/PARADA - START STOP (17). El
PLATO - PLATTER (2) del tocadisco empezará a girar.
7. Oprima la PALANCA DE INDICACION - CUE LEVER (19) en la
posición de “ARRIBA”.
8. Sitúe el brazo de fonocaptor arriba del surco deseado en el disco y
ponga la PALANCA DE INDICACION en la posición de “ABAJO”. El
BRAZO DE FONOCAPTOR - TONE ARM (6) se bajará lentamente
sobre el disco en cuyo momento empezará a reproducir.
9. Una vez que haya terminado de reproducir, levante el BRAZO DE
FONOCAPTOR - TONE ARM (6), MUEVALO hacia el DESCANSILLO -
ARM REST (10) y fíjelo con el SUJETABRAZO - ARM CLAMP (9).
10.Ahora tiene la opción de apagar la unidad, pasando el ALIMENTACIÓN
- POWER (16) a la posición de “APAGADO” o de detener el PLATO PLATTER (2), oprimiendo el BOTÓN DE ARRANQUE/PARADA START STOP (17) y enganchando el freno electrónico.
INTERRUPCIÓN DE LA REPRODUCCIÓN:
1. Oprimiendo la PALANCA DE INDICACION - CUE LEVER (19) a la
posición de “ARRIBA”, causara que el BRAZO DE FONOCAPTOR -
TONE ARM (6) se levantará y se detengá la reproducción.
2. Oprimiendo la PALANCA DE INDICACION - CUE LEVER (19) a la
posición de “ABAJO” causara que el BRAZO DE FONOCAPTOR -
TONE ARM (6) se baje lentamente sobre el disco en el lugar donde se
interrumpió la reproducción.
REPRODUCCIÓN DE DISCOS DE 45 RPM:
1. Para reproducir un disco de 45 RPM con un agujero central más
grande, ponga primero el ADAPTADOR DE 45 en el huso central.
2. Cerciórese de que se haya oprimido el BOTÓN SELECTOR DE
VELOCIDAD - SPEED SELECTOR (18) 45 y que esté iluminado el
indicador de velocidad 45.
Page 11
Page 12

LUZ DE POSICIÓN:
1. Al oprimir firmemente el INTERRUPTOR DE LUZ DE POSICIÓN TARGET LIGHT SWITCH (21), la LUZ DE POSICIÓN - TARGET LIGHT
(22) subirá a su posición e iluminará la punta de la aguja.
2. Para bajar la LUZ DE POSICIÓN, presiónela hacia abajo hasta que se
enganche en su caja.
3. Cuando no esté en uso, la LUZ DE POSICIÓN deberá mantenerse en
la posición de abajo.
AJUSTE DEL CONTROL DE TONO:
1. El tocadiscos SA-2400 está dotado de un CONTROL DE TONO PITCH CONTROL (24) y de un REGULADOR DE CUARZO - QUARTZ
LOCK (26). Cuando el REGULADOR DE CUARZO está activado, la
LED del TONO - QUARTZ LOCK LED (25) se pone VERDE y la
velocidad será exactamente 33 1/3, 45 ó 78 RPM según la velocidad
que se haya escogido sin tener cuenta de la posición del control de
tono. El CONTROL DE TONO se desactiva automáticamente cuando
se active el REGULADOR DE CUARZO.
2. Cuando el REGULADOR DE CUARZO está desactivado, se puede
ajustar el CONTROL DE TONO. Cuando el CONTROL DE TONO se
mueve en una posición descentrada, el tono podrá variar en + 10%
según la posición del CONTROL DE TONO.
3. Oprima el botón del CONTROL DE TONO para restablecer la velocidad
a precisamente 33 1/3, 45 ó 78 RPM cuando el CONTROL DE TONO
esté descentrada. La desactivación del REGULADOR DE CUARZO
llevará la velocidad del plato de nuevo al ajuste original del tono.
4. El PLATO - PLATTER (2) está dotado de una TIRA INDICADORA DE
RPM ESTROBOSCÓPICA - STROBE RPM INDICATOR STRIP (27) y
el INTERRUPTOR DE ENERGÍA - POWER (16) contiene LUCES
ESTROBOSCÓPICAS - STROBE LIGHTS (28) incorporadas. Cuando
el PLATO - PLATTER (2) gira, las LUCES ESTROBOSCÓPICAS
iluminan la TIRA INDICADORA DE RPM ESTROBOSCÓPICA. La fila
inferior de puntos parecerá estar estacionaria cuando el tono sea 3,3%. La segunda fila de puntos del fondo parecerá estar estacionaria
cuando la velocidad sea exactamente 33 1/3, 45 ó 78 RPM según el
BOTON SELECTOR DE VELOCIDAD - SPEED SELECTOR (18) que
se haya oprimido. La tercera fila de puntos del fondo parecerá estar
estacionaria cuando el tono sea +3,3%. La fila de puntos superior
parecerá estacionaria cuando el tono sea +7,2%.
PITCH BEND BUTTONS (BOTONES DE AFINACIÓN DEL
TONO):
1. El hecho de apretar los botones PITCH BEND (23) alza o baja
automáticamente el tono sin cambiar la posición de la llave corrediza.
Soltando los botones, se vuelve el tono a la graduación de la llave
corrediza. Se puede utilizar esta función para igualar la afinación del
tono cuando se mezclan canciones.
AJUSTE DE ALTURA DEL ALZABRAZO:
1. Si la distancia preajustada que la PALANCA DE INDICACION - CUE
LEVER (19) levanta la aguja arriba del disco no resulta adecuada,
podrá ajustarse girando el TORNILLO DE AJUSTE DE ALTURA DEL
ALZABRAZO - ARM-LIFT HEIGHT ADJUSTMENT SCREW (29) y
presionando simultáneamente hacia abajo sobre el BRAZO DE
FONOCAPTOR - TONE ARM (6). La rotación hacia la derecha del
tornillo disminuirá la distancia, y la rotación hacia la izquierda la
aumentará.
Especificaciones
SECCIÓN DE TOCADISCO:
Tipo..............................Tocadisco manual de transmisión directa de cuarzo
Método de transmisión..................................................Transmisión directa
Motor.........................................................Motor de 18 V CC sin escobillas
Plato................................Troquelado de aluminio, 13p” (332mm) de diám.
Velocidad..........................................................................33 1/3, 45, 78 RPM
Par motor de arranque.................................................2,2 Kg/cm (1.3 lb/in)
Características de cebado.........................0.6 sec. standstill to 33 1/3 RPM
Sistema de frenado............................................................ Freno electrónico
Gimoteo y tremolación...............................................................0.01% WRMS*
*Este valor se refiere al conjunto de tocadisco y plato solamente, y excluye
los efectos de los discos, cartuchos o brazos de fonocaptor.
Rumor sordo..............................................................78 dB (IEC 98A WTD)
SECCIÓN DE BRAZO DE FONOCAPTOR:
Tipo...............................................................Brazo tubular recto universal
Largo efectivo................................................................9 1/16' (231.5 mm)
Gama de ajuste de altura del brazo...............................................0 - 6 mm
Proyección...........................................................................19/32" (15.1 mm)
Masa efectiva.................................................................9 g (Sin cartucho)
Ángulo del fonocaptor...............................................................................22°
Fricción..................................................Menos de 7 mg (lateral, vertical)
Ángulo de error de seguimiento...............Dentro de 232" en el surco exterior
y dentro de 032" en el surco interior de un disco de 30 cm (12")
Gama de ajuste de presión de la aguja...........................................0 - 5 g
Gama aplicable de peso de cartucho...............................................6 - 10 g
Peso del portafonocaptor...........................................................................9 g
GENERALIDADES:
Fuente de alimentación.............................................115V~60Hz/230V~50Hz
Consumo de energía.......................................................................15 vatios
Dimensiones....................................................................450 x 152 x 352 mm
Peso...................................................................................................12.3 kg
Las especificaciones están sujetas a cambio sin previo aviso. El peso y las
dimensiones indicados son aproximaciones.
EMPLEO DEL PULSADOR REVERSE
1. Apriete el pulsador REVERSE (30) para invertir la dirección de marcha
del PLATO - PLATTER (2) (el REVERSE DEL - REVERSE LED (30A)
se encenderá durante la marcha inversa). Apriete el pulsador RE-
VERSE otra vez para volver a la marcha normal.
P ANTALLA NUMÉRICA:
1. La PANTALLA NUMÉRICA - DIGITAL DISPLAY (20) indica la
VELOCIDAD - SPEED (20A), la ACTIVACIÓN PITCH SLIDE - PITCH
SLIDE ACTIVATION (20B), la REPRODUCCIÓN - PLAY (20C), la
PAUSA - PAUSE (20D), INVERSO - REVERSE (20E) y el
PORCENTAJE DEL PITCH - PITCH PERCENTAGE (20F).
Page 12
Page 13

Introduction
Nos félicitations à l’occasion de votre achat de la platine vinyle
professionnelle Hi-Torque à entraînement direct pilotée par quartz SA-2400
de Gemini. Cette platine vinyle très moderne inclut les dernières
caractéristiques de la technologie de platines vinyles à entraînement direct.
Avant son emploi, nous vous recommandons de lire soigneusement les
instructions.
Caractéristiques
• Vitesse contrôlée par quartz
• Réglage de vitesse +/-10%
• Freinage entièrement électronique
• Source lumineuse stroboscopique
• Commutateur marche/arrêt
• Reverse
• Affichage Numérique
Précautions
1. Toutes les instructions de fonctionnement doivent être lues avant de
vous servir de cet appareil.
2. Cet appareil ne devrait pas être exposé aux égouttements ou aux
éclaboussures et aucun objet rempli de liquide, p.e. vases, ne devrait
être placé sur l’appareil.
3. Afin réduire tout risque de chocs électriques, vous êtes prié de ne pas
ouvrir l’appareil. Ce dernier ne contient pas DE PIÈCES À
REMPLACER PAR L’UTILISATEUR À L’INTÉRIEUR. En cas de
problème, merci de contacter le service technique de Gemini ou votre
revendeur habituel.
4. Les roulements du bras de lecture ont été ajustés et scellés à l’usine.
Toute tentative d’ajustement ou de réglage par l’utilisateur annulera la
garantie.
5. Avant d’effectuer les branchements, vérifiez que l’appareil n’est pas
sous tension.
6. Le câblage doit avoir une faible capacité; il doit être blindé et avoir la
bonne longueur. Tous les connecteurs RCA et fiches doivent être bien
serrés et convenablement branchés.
7. Commencez toujours vos réglages en ayant le volume réglé au
minimum et la (les) commande(s) du volume des haut-parleurs sur OFF
(arrêt). Attendez 8 à 10 secondes avant d’augmenter le volume des
haut-parleurs afin de prévenir le “bruit” transitoire qui pourrait
endommager des haut-parleurs.
8. Protégez cet appareil de la pluie et l’humidité.
9. N’utilisez aucun produit de nettoyage ou lubrifiant (spray)sur les
commandes ou interrupteurs de l’appareil.
l’appareil aussi loin que possible des haut-parleurs. Protégez l’appareil
contre les rayons directs du soleil, la chaleur, l’humidité et les saletés.
Assurez une bonne ventilation pour l’appareil. Utilisez les pieds pour
stabiliser l’appareil horizontalement.
2. Assurez-vous que le SELECTEUR DE LA TENSION - VOLTAGE
SELECTOR (3) (situé sur la PLATINE VINYLE) soit correctement règlé.
AVERTISSEMENT: Si vous essayez de faire fonctionner la platine vinyle
avec une tension incorrecte, vous risquez de l’endommager.
3. Après avoir retiré tout l’emballage, positionnez soignneusement le
PLATEAU DE LECTURE - PLATTER (2) sur l’axe central de la
PLATINE VINYLE - TURNTABLE BASE (1).
4. Placez la FEUTRINE EN NEOPRENE - NEOPRENE MAT (4) sur le
PLATEAU DE LECTURE - PLATTER (2).
INST ALLATION DE LA CELLULE DE LECTURE:
(VOIR LA FIGURE 2)
Etant donné que toutes les cellules de lecture ont leurs propres
particularités, consultez les instructions de votre cellule de lecture pour
vous assurer d’une bonne installation.
1. Branchez les fils aux bornes de la cellule de lecture. Pour vous faciliter
la tâche, les bornes de la plupart des cellules de lecture sont codées
par couleurs. Branchez chaque fil à la borne de la même couleur.
Blanc (L+).............................Canal gauche +
Bleu (L-)................................Canal gauche -
Rouge (R+)................................Canal droit +
Vert (R-)....................................Canal droit -
2. Installez la cellule de lecture sur LE PORTE-CELLULE - HEADSHELL
(5) et serrez-la bien avec les vis fournies avec la cellule de lecture.
INST ALLATION DU PORTE-CELLULE:
Introduisez le PORTE-CELLULE – HEADSHELL (5) sur le devant du
BRAS DE LECTURE – TONE ARM (6) tubulaire. Tout en tenant le PORTE-
CELLULE fermement dans la position horizontale, tournez l’ECROU DE
BLOCAGE – LOCKING NUT (7) dans le sens contraire des aiguilles d’une
montre jusqu’à ce que le PORTE-CELLULE soit verrouillé. Le porte-cellule
en biais de Gemini a été conçu pour l’emploi avec un bras de lecture droit.
Il est possible de monter tout type de cellule de lecture sur ce dernier.
UTILISA TION DU BRAS DE LECTURE DROIT:
Lorsqu’un bras de lecture droit s’utilise avec une cellule de lecture de type
banane (concorde) ou avec une cellule,de lecture montée sur un portecellule traditionnel, il faudrait toujours utiliser une aiguille du type conique.
Si vous utilisez une cellule de lecture équipée d’un diamant elliptique, la
cellule de lecture se positionnera correctement dans le sillon du disque,
mais une voie aura un niveau sonore plus élevé que l’autre.
Le bras de lecture droit de Gemini a été conçu afin de s’aligner avec les
repères des disques LP que vous avez faits lorsque vous utilisez une
platine vinyle équipée d’un bras de lecture en S.
Liste des pièces
Platine vinyle............................................................................1
Plateau de lecture............................................................1
Feutrine néoprène.....................................................................1
Capot anti-poussière..............................................................1
Charnière du capot anti-poussière........................................2
Adaptateur 45 RPM........................................................................1
Contrepoids...................................................................................1
Porte-cellule pour cellule de lecture................................................1
Montage et configuration
NOTA: VOIR LA FIGURE 1 (PAGE 1) POUR LES NUMEROS DES
PIECES ET LES EMPLACEMENTS.
INST ALLATION DE LA PLA TINE VINYLE:
1. Placez l’EMBASE DE LA PLA TINE VINYLE - TURNTABLE BASE (1)
sur une surface plane et équilibrée sans vibrations. Essayez de placer
INST ALLATION DU CONTREPOIDS: (VOIR LA FIGURE 3)
1. Glissez le CONTREPOIDS - COUNTERWEIGHT (8) (COUNTERWEIGHT) sur l’extrémité arrière du BRAS DE LECTURE - TONE ARM
(6), la jauge de l’aiguille numérotée étant tournée vers l’avant.
2. Tournez le CONTREPOIDS - COUNTERWEIGHT (8) légèrement dans
le sens contraire des aiguilles d’une montre afin de le visser sur
l’extrémité arrière du BRAS DE LECTURE - TONE ARM (6).
REGLAGE DE L ’EQUILIBRE ZERO (0) HORIZONTAL ET
DE LA PRESSION DE LA CELLULE DE LECTURE:
1. Sans toucher le diamant de la cellule de lecture, enlevez la protection
du diamant de lecture
2. Desserrez le SERRE-BRAS - ARM CLAMP (9) et soulevez le BRAS DE
LECTURE - TONE ARM (6) du PORTE-BRAS - ARM REST (10).
3. Lorsque vous tournez le CONTREPOIDS - COUNTERWEIGHT (8)
dans le sens inverse des aiguilles d’une montre, la cellule de lecture
montée sur le BRAS DE LECTURE - TONE ARM (6) descendra.
Lorsque vous tournez le contrepoids dans le sens inverse, la cellule de
lecture remontera. Tournez le CONTREPOIDS dans le sens horaire ou
Page 13
Page 14

dans le sens inverse des aiguilles d’une montre selon le besoin, jusqu’à
ce que le BRAS DE LECTURE soit équilibré horizontalement. Lorsque
ce moment se produit, et vous le verrez facilement, le BRAS DE
LECTURE “flotte” librement.
4. Placez le BRAS DE LECTURE - TONE ARM (6) sur le PORTE-BRAS -
ARM REST (10) bloquez-le en place avec le SERRE-BRAS - ARM
CLAMP (9).
5. Le BRAS DE LECTURE - TONE ARM (6) étant verrouillé sur le
PORTE-BRAS - ARM REST (10), stabilisez le CONTREPOIDS COUNTERWEIGHT (8) avec une main tout en tournant l’ANNEAU DE
PRESSION DE L’AIGUILLE - STYLUS PRESSURE RING (11) jusqu’à
ce que le numéro “0” sur l’anneau s’aligne avec la ligne médiane sur
l’arbre arrière du BRAS DE LECTURE. L’équilibre zéro horizontal (0)
devrait être complété.
6. Faites flotter le BRAS DE LECTURE de nouveau pour vous assurer de
l’équilibre zéro horizontal (0). Si l’équilibre zéro n’est pas maintenu,
répétez les étapes 3-5 du contrepoids.
7. Après le réglage de l’équilibre zéro (0) horizontal, tournez le
CONTREPOIDS - COUNTERWEIGHT (8) équilibré dans le sens
inverse des aguilles d’une montre jusqu’à ce que la pression de la
cellule de lecture recommandée par le fabricant apparaisse sur la
BAGUE DE PRESSION DE L’AIGUILLE - STYLUS PRESSURE RING
(11) là où elle rencontre la ligne médiane de l’arbre arrière du BRAS DE
LECTURE - TONE ARM (6).
REGLAGE DE L ’ANTI-SKATING:
Mettez la COMMANDE ANTI-DERAPAGE - ANTI-SKATING CONTROL
(12) à la même valeur que celle de la pression de l’aiguille.
REGLAGE DE LA HAUTEUR DU BRAS DE LECTURE:
La hauteur du bras de lecture est réglable entre 0 et 6 mm. Une ECHELLE
DE HAUTEUR - HEIGHT SCALE (14) (incréments par pas de 0,5 mm) est
fournie pour vous permettre un réglage précis.
1. Dévissez le bras de lecture en tournant le bouton BLOCAGE DU BRAS
- ARM LOCK (15) dans le sens opposé de la position verrouillée.
2 Consultez la hauteur de la cellule de lecture sur le Tableau A et trouvez
la lecture de l’échelle de hauteur correspondante.
3. Tournez la BAGUE DE REGLAGE DE LA HAUTEUR - ARM HEIGHT
ADJUSTMENT RING (13) jusqu’à ce que la ligne de référence sur la
bague corresponde à la lecture de l’échellle correcte.
4. Bloquez le bras de lecture en tournant le bouton BLOCAGE DU BRAS -
ARM LOCK (15) dans le sens horaire jusqu’à ce qu’il soit verrouillé.
TABLEAU A
Hauteur de la cartouche
(mm)
15
16
17
18
19
20
21
Par exemple, si la hauteur de la cartouche est égale à 18,5 mm, la ligne de
référence de la BAGUE DE REGLAGE DE LA HAUTEUR DU BRAS -
ARM HEIGHT ADJUSTMENT RING (13) doit être positionnée entre 3 et 4
sur l’ECHELLE DE LA HAUTEUR - HEIGHT SCALE (14).
Lecture de l’échelle
0
1
2
3
4
5
6
INST ALLATION DU CAPOT ANTI-POUSSIERE:
1. Montez les charnières sur le capot anti-poussière.
2. Tenez le capot anti-poussière en position, directement au-dessus du
plateau de lecture, et glissez les bases des articulations dans les portearticulations se trouvant sur le panneau arrière.
3. Soulevez toujours le capot anti-poussière avant de l’enlèver.
4. N’ouvrez et ne fermez pas le capot durant le fonctionnement de la
platine vinyle. Ceci pourrait produire des vibrations indésirées et le
dérapage de l’aiguille.
CONNEXIONS:
1. Branchez la fiche à courant alternatif à une prise adéquate.
2. Voir le Tableau B afin d’effectuer correctement les connexions des
fiches RCA de sortie et du connecteur de mise à la terre. Assurez-vous
que toutes les fiches soient solidement raccordées dans les RCA
prévus à cet effet (entrées phono). Pour réduire les problèmes de
masse (ronronnement), assurez-vous que la mise à la terre de la platine
ait été réalisé correctement.
TABLEAU B
CONNECTEURS DE SORTIE
L (BLANC)
R (ROUGE)
Masse (Oeillet)
MELANGEUR OU
RECEPTEUR
L CANAL PHONO
R CANAL PHONO
Vis de mise à la masse
Mode d’emploi
FONCTIONNEMENT DE BASE:
1. Placez un disque sur la FEUTRINE EN NEOPRENE - NEOPRENE MAT
(4) se trouvant sur le PLATEAU DE LECTURE - PLATTER (2).
2. Choisissez la vitesse désirée en appuyant sur le SÉLECTEUR DE
VITESSE - SPEED SELECTOR (18) 33 ou 45. Appuyez sur les deux
SÉLECTEURS DE VITESSE 33 et 45 à la fois pour sélectionner 78
tours par minute.
3. Mettez l’INTERRUPTEUR DE MISE SOUS TENSION - POWER (16)
sur la position “ON” (Sous tension); à ce moment, la source lumineuse
stroboscopique (intégrée à l’INTERRUPTEUR DE MISE SOUS
TENSION et l’indicateur de vitesse (pour la vitesse choisie)
s’allumeront.
4. Enlevez la protection de la cellule de lecture (si elle fait partie de votre
cellule de lecture).
5. Libérez le SERRE-BRAS - ARM CLAMP (9) qui se trouve sur le
PORTE-BRAS - ARM REST (10).
6. Appuyez sur le BOUTON MARCHE/ARRET - START STOP (17). Le
PLATEAU - PLATTER (2) de la platine vinyle commencera à tourner.
7. Poussez le LEVIER DE COMMANDE - CUE LEVER (19) vers la
position “UP” (haut).
8. Positionnez le bras de lecture au-dessus du sillon désiré du disque et
poussez le LEVIER DE COMMANDE vers la position “DOWN” (Bas).
Le BRAS DE LECTURE - TONE ARM (6) descendra lentement et
déposera la cellule de lecture sur le disque; à ce moment, vous
entendrez l’enregistrement.
9. Une fois l’enregistrement terminé, soulevez le BRAS DE LECTURE -
TONE ARM (6), guidez-le vers le PORTE-BRAS - ARM REST (10) et
bloquez-le à l’aide du SERRE-BRAS - ARM CLAMP (9).
10.Maintenant, vous avez le choix de mettre l’appareil hors tension en
tournant l’INTERRUPTEUR - POWER (16) sur la position “OFF” (hors
tension) ou d’arrêter le PLATEAU DE LECTURE - PLATTER (2) en
appuyant sur le BOUTON MARCHE/ARRET - START STOP (17) pour
activer le frein électronique.
ARRET DE LA LECTURE:
1. Lorsque vous poussez le LEVIER DE COMMANDE - CUE LEVER (19)
vers la position “UP” (haut), le BRAS DE LECTURE - TONE ARM (6)
montera et la lecture de l’enregistrement s’arrêtera.
2. Lorsque vous poussez le LEVIER DE COMMANDE vers la position
“DOWN” (bas), le BRAS DE LECTURE - TONE ARM (6) descendra
lentement et déposera la cellule de lecture sur le disque au point où la
lecture avait été interrompue.
DISQUES DE 45 T/MN:
1. Lorsque vous jouez un disque de 45 t/mn, placez d’abord
l’ADAPTATEUR 45 t/mn sur l’axe central.
2. Assurez-vous d’appuyer sur le SELECTEUR DE VITESSE - SPEED
SELECTOR (18) 45 et que l’indicateur de vitesse 45t/mn soit allumé.
Page 14
Page 15

ECLAIRAGE DE LA TETE DE LECTURE:
1. Lorsque vous appuyez bien sur l’INTERRUPTEUR D’ECLAIRAGE DE
LA TETE DE LECTURE - TARGET LIGHT SWITCH (21), celle-ci monte
et s’allume automatiquement afin d’éclairer la cellule de lecture.
2. Pour faire descendre l’ECLAIRAGE DE LA TETE DE LECTURE
LUMIERE CIBLE - TARGET LIGHT (22), appuyez sur celle-ci jusqu’à
ce qu’elle se bloque dans le socle de la platine.
3. Gardez l’ECLAIRAGE DE LA TETE DE LECTURE en position basse si
vous ne souhaitez pas l’utiliser.
REGLAGE DE VITESSE P AR PITCH LINEAIRE:
1. La platine vinyle SA-2400 est équipée d’une COMMANDE DE
REGLAGE DE VITESSE - PITCH CONTROL (24) et d’un
RÉGULATEUR PILOTE PAR QUARTZ - QUARTZ LOCK (26). Lorsque
le RÉGULATEUR est activé, la LED DU REGLAGE DE VITESSE PAR
QUARTZ - QUARTZ LOCK LED (25) s’allume en VERT et la vitesse
sera exactement de 33 1/3, 45 ou 78 tours par minute selon la vitesse
choisie sans tenir compte de la position du pitch. Celle-ci sera
désactivée automatiquement dès l’activation du REGULATEUR PILOTE
PAR QUARTZ.
2. Lorsque le RÉGULATEUR PAR QUARTZ est désactivé, vous pouvez
ajuster le REGLAGE DE VITESSE. Lorsque cette commande est
décentrée, la hauteur tonale peut varier de +/- 10% selon la position
occupée par la COMMANDE DE REGLAGE DE VITESSE.
3. Appuyez sur le bouton du RÉGULATEUR PAR QUARTZ pour ramener
la vitesse à exactement 33 1/3, 45 ou 78 tours par minute lorsque la
COMMANDE DE REGLAGE DE VITESSE est décentrée. La
désactivation du RÉGULATEUR PAR QUARTZ remettra la vitesse du
plateau sur le réglage original de la vitesse.
4. Le PLATEAU DE LECTURE - PLATTER (2) est équipé d’une BANDE
INDICATRICE RPM - STROBE RPM INDICATOR STRIP (27) et
l’INTERRUPTEUR DE MISE SOUS TENSION - POWER (16) incorpore
des LUMIERES STROBOSCOPIQUES - STROBE LIGHTS (28).
Lorsque le PLATEAU DE LECTURE - PLATTER (2) tourne, les
LUMIÈRES illumineront la BANDE INDICATRICE RPM. La rangée de
points inférieure apparaîtra stationnaire lorsque le réglage de vitesse
indique -3,3%. La seconde rangée de points à partir du fond apparaîtra
stationnaire quand la vitesse sera exactement de 33 1/3, 45 ou 78 tours
par minute selon le SELECTEUR DE VITESSE - SPEED SELECTOR
(18) enclenché. La troisième rangée de points à partir du fond
apparaîtra stationnaire quand le réglage de vitesse indique +3,3%. La
rangée de points supérieure apparaîtra stationnaire quand le réglage de
vitesse indique +7,2%.
PITCH BEND BUTTONS (TOUCHES DE RATTRAPAGE):
1. Le fait d’appuyer sur les PITCH BEND (23) (touches de rattrapage)
augmentera ou réduira automatiquement la vitesse de lecture sans
changer le réglage de la tonalité. Le fait de relâcher les touches permet
de retrouver instantanément le réglage initial de la COMMANDE DE
REGLAGE DE VITESSE. Vous pouvez utiliser cette fonction afin de
synchroniser le disque que vous êtes en train de mixer.
REGLAGE DE LA HAUTEUR DE MONTEE DU BRAS:
1. Si la distance préréglée du LEVIER DE COMMANDE - CUE LEVER
(19) ne permet pas à la cellule de lecture d’atteindre le disque, c’est que
ce réglage est inadéquate. Ce réglage peut être ajusté en tournant la
VISSE DE REGLAGE DE LA HAUTEUR DE MONTEE DU BRAS ARM-LIFT HEIGHT ADJUSTMENT SCREW (29) tout en poussant
simultanément en bas sur le BRAS DE LECTURE - TONE ARM (6). La
rotation dans le sens horaire de la visse réduira la hauteur de réglage
du bras de lecture et la rotation dans le sens inverse des aiguilles d’une
montre augmentera la hauteur de réglage du bras de lecture.
Caractéristiques Techniques
PLATINE VINYLE:
Type...........platine vinyle manuelle à transmission directe piloté par quartz
Type d’entraînement...................................................Transmission directe
Moteur..........................................Moteur courant continu 18V sans balais
Plateau de lecture.................................Moulé par injection, en aluminium,
de 332 mm (13 pouces) de diamètre
Vitesse..........................................................................33 1/3, 45 ou 78 t/mn
Couple de démarrage....................................................2,2 kg/cm (1,3 liv./po.)
Caractéristiques d’accélération....................................33 1/3 t/mn en 0,6 sec
Système de freinage.........................................................Frein électronique
Pleurage et scintillement.........................................................0,01% WRMS*
*Cette valeur ne correspond qu’à la platine vinyle et au plateau de lecture, à
l’exception des effets produits par les disques, la cellule ou le bras de lecture.
Ronflement...................................................................78 dB (IEC 98A WTD)
BRAS DE LECTURE:
Type.................................................................Bras tubulaire droit universel
Longueur réelle..............................................................231.5 mm (9 1/16")
Plage de réglage de la hauteur du bras.......................................de 0 à 6 mm
Surplomb.......................................................................15,1 mm (19/32 po.)
Poids réel.....................................................................9 g (sans cartouche)
Déplacement angulaire...............................................................................22°
Friction....................................................moins de 7 mg (latérale, verticale)
Angle d’erreur de sillon.......................à 2 32' près du sillon externe et à 0°32'
près du sillon interne d’un disque de 30 cm
Réglage de la pression de la cellule de lecture.............................de 0 à 5 g
Gamme du poids de la cellule de lecture........................................de 6 à 10 g
Poids de la coquille................................................................................9 g
GENERALITES:
Alimentation électrique...........................................115V~60 Hz/230V~50 Hz
Consommation..................................................................................15 watts
Dimensions...................................................................450 x 152 x 352 mm
Poids...................................................................................................12,3 kg
Les spécifications peuvent changer sans préavis. Le poids et les dimensions indiqués sont approximatifs.
UTILISA TION DE LA T OUCHE REVERSE
1. Appuyez sur la touche REVERSE (30) pour inverser le sens de rotation
du PLATEAU DE LECTURE - PLATTER (2) (la REVERSE LED (30A)
s’allumera durant la marche en sens inverse). Appuyez sur la touche
REVERSE une seconde fois pour revenir à la marche normale.
AFFICHAGE NUMÉRIQUE:
1. L’AFFICHAGE NUMÉRIQUE - DIGITAL DISPLAY (20) indique la
VITESSE - SPEED (20A), l’ACTIVATION PITCH (COMMANDE DE
REGLAGE DE VITESSE) - PITCH SLIDE ACTIVATION (20B), le mode
LECTURE - PLAY (20C), le mode PAUSE (20D), le mode lecture
ARRIÈRE - REVERSE (20E) et le POURCENTAGE DE REGLAGE DE
VITESSE - PITCH PERCENTAGE (20F).
Page 15
Page 16

Introduzione
Complimenti per l’acquisto di questo giradischi professionale a comando
diretto ed a alta coppia motrice Gemini SA-2400. Questo giradischi
d’avanguardia ha incorporato i componenti più recenti nella tecnologia dei
giradischi a trazione diretta. Prima dell’uso leggere attentamente tutte le
istruzioni.
AVVERTENZA: Se si tenta di far funzionare il GIRADISCHI con il
voltaggio scorretto, il giradischi potrà dannegiarsi.
3. Dopo aver rimosso l’imballaggio, posizionare con cura il PIATTO
PORTADISCHI - PLATTER (2) sul centro dell’asse della BASE DEL
GIRADISCHI - TURNTABLE BASE (1).
4. Collocare il TAPPETINO DI NEOPRENE - NEOPRENE MAT (4) sul
PIATT O PORTADISCO - PLATTER (2).
Caratteristiche principali
• Velocità controllata al quarzo
• Controllo pitch +/- 10%
• Arresto completamente elettronico
• Spia stroboscopio
• Interruttore soft-touch start/stop
• Reverse
• Display Digitale
Precauzioni
1. Leggere attentamente queste istruzioni prima di usare il giradischi.
2. L’apparecchiatura non va esposta a infiltrazioni o spruzzi. Non
appoggiare alcun oggetto contenente liquidi sull’apparecchiatura.
3. Per evitare scosse elettriche non aprire l’unità. INTERNAMENTE NON
CI SONO COMPONENTI SOSTITUIBILI DALL’UTENTE. Per le
riparazioni rivolgersi al Reparto assistenza della Gemini o al rivenditore
autorizzato e consultare un tecnico qualificato.
4. I cuscinetti del braccio sono montati e sigillati dalla fabbrica. Qualsiasi
tentativo di regolazione invaliderà la garanzia.
5. Non inserire la spina prima, di effettuare i collegamenti.
6. I cavi dovrebbero essere a bassa capacità, schermati e di lunghezza
adeguata. Accertarsi che tutte le spine e i jack siano ben fissati e
correttamente collegati.
7. Iniziare sempre con i controlli del livello del volume/fader impostati al
minimo e il controllo/i del volume dell’altoparlante su OFF. Attendere 8/
10 secondi prima di alzare il volume dell’altoparlante per evitare “POP”
transitori che potrebbero causare un danno al crossover/altoparlante.
8. Evitare di esporre l’unità alla pioggia o all’umidità.
9. Non usare detergenti spray o lubrificanti su qualsiasi comando e
interruttore.
Lista dei componenti
Unità giradischi..............................................................................1
Piatto portadisco............................................................................1
Tappetino di neoprene....................................................................1
Cappa.....................................................................................................1
Perni parapolvere..........................................................................2
Adattatore 45 giri..........................................................................1
Contrappeso...................................................................................1
Fonorivelatore................................................................................1
Montaggio e regolazione
NOTA: VEDERE FIG. 1 (PAGINA 1) PER I NUMERI DEI COMPONENTI E
LA DISPOSIZIONE.
INST ALLAZIONE PORT ADISCHI:
1. Mettere la BASE DEL GIRADISCHI - TURNTABLE BASE (1) su di una
superficie piana e stabile senza vibrazione. Cercare di installare l’unità il
più distante possibile dagli altoparlanti. Tenere l’unità distante dalla luce
solare diretta, da fonti di calore, dall’umidità o dalla sporcizia.
Consentire una buona circolazione d’aria. Usare i piedini del giradischi
per stabilizzarlo orizzontalmente.
2. Regolare il SELETTORE VOLTAGGIO - VOLTAGE SELECTOR (3)
(collocato nella BASE DEL GIRADISCHI) nel voltaggio corretto.
INST ALLAZIONE CAR TUCCIA: (VEDERE FIG. 2)
Dal momento che tutte le cartucce hanno un proprio design, per una
corretta installazione si consiglia di far riferimento alle relative istruzioni.
1. Collegare i conduttori ai terminali della cartuccia. Per praticità, i
terminali della maggior parte delle cartucce hanno colori codificati.
Collegate ciascun conduttore con il terminale del medesimo colore.
Bianco (L+)...............................Canale sinistro+
Blu (L-)..................................Canale sinistro-
Rosso (R+).............................Canale destro+
Verde (R-)................................Canale destro-
2. Montate la cartuccia nel FONORIVELATORE - HEADSHELL (5) e
fissatela con le viti in dotazione con la cartuccia.
INST ALLAZIONE DEL FONORIVELA T ORE:
Inserire il FONORIVELATORE - HEADSHELL (5) nella parte anteriore del
BRACCIO - TONE ARM (6) tubolare. Mentre si tiene saldamente il
FONORIVELATORE in posizione orizzontale, girare in senso antiorario il
CONTRODADO - LOCKING NUT (7) finché il FONORIVELATORE è
posizionato. Il fonorivelatore angolato Gemini va usato con un braccio
dritto. Su questo fonorivelatore Gemini si può montare qualsiasi cartuccia.
USO DEL BRACCIO DRITTO:
Quando si usa un braccio dritto con una punta a banana o una cartuccia
montata su un fonorivelatore standard, usare sempre un ago di tipo conico.
Se si usa un ago ellittico, esso appoggerà correttamente sul solco del disco
ma un canale risulterà più sonoro dell’altro.
Il braccio dritto Gemini è stato progettato in modo da allinearsi con i segni
sull’LPs fatti utilizzando un giradischi con braccio a S.
INST ALLAZIONE CONTRAPPESO: (VEDERE FIG. 3)
1. Far scivolare il CONTRAPESO - COUNTERWEIGHT (8) sulla parte
posteriore del BRACCIO - TONE ARM (6), con il calibro numerato della
puntina di fronte.
2. Girare un poco il CONTRAPPESO - COUNTERWEIGHT (8) in senso
antiorario, per avvitarlo sulla parte posteriore del BRACCIO - TONE
ARM (6).
REGOLAZIONE BILANCIAMENTO ZERO (0)
ORIZZONT ALE E PRESSIONE DELLA PUNTINA:
1. Senza toccare la puntina, rimuovere la protezione della puntina (se la
cartuccia ne ha una staccabile).
2. Rilasciare il FERMA-BRACCIO - ARM CLAMP (9) e mettere fuori il
BRACCIO - LOCKING NUT (7) dal PORTABRACCIO - ARM REST
(10).
3. Spostando in senso antiorario il CONTRAPPESO - COUNTERWEIGHT
(8) il BRACCIO - TONE ARM (6) si abbasserà e in senso orario si avrà
un movimento opposto. Girare in senso orario o antiorario il
CONTRAPPESO fino ad avere il bilanciamento orizzontale del
BRACCIO. Questo può essere facilmente evidenziato osservando il
punto in cui il BRACCIO “fluttua” liberamente.
4. Posizionare il BRACCIO - TONE ARM (6) sul PORTABRACCIO - ARM
REST (10) e bloccarlo in posizione con il FERMA-BRACCIO - ARM
CLAMP (9).
5. Con il BRACCIO - TONE ARM (6) bloccato sui PORTABRACCIO - ARM
REST (10) tenere saldamente con una mano il CONTRAPPESO COUNTERWEIGHT (8) mentre si ruota l’ANELLO DI PRESSIONE
DELLA PUNTINA - STYLUS PRESSURE RING (11) finché il numero
“0” sull’anello é allineato con la linea centrale dell’asta posteriore del
BRACCIO. In questo modo si é effettuato la regolazione del
bilanciamento zero (0) orizzontale.
Page 16
Page 17

6. Sospendere di nuovo il braccio per ottenere il bilanciamento zero (0)
orizzontale. Se non é stato mantenuto il bilanciamento zero (0)
orizzontale ripetere i punti 3-5 del contrappeso.
7. Dopo aver regolato il bilanciamento zero (0) orizzontale, girare in senso
antiorario il CONTRAPPESO - COUNTERWEIGHT (8) che è stato
bilanciato finché sull’ANELLO DI PRESSIONE DELLA PUNTINA -
STYLUS PRESSURE RING (11) appare il valore della pressione
consigliata dal fabbricante allineata con la linea centrale dell’asta del
BRACCIO - TONE ARM (6).
REGOLAZIONE DEL CONTROLLO ANTISKA TING:
Impostare il CONTROLLO ANTI-SKATING - ANTI-SKATING CONTROL
(12) sullo stesso valore impostato per la pressione della puntina.
REGOLAZIONE DELL ’ELEVAZIONE DEL BRACCIO:
L’elevazione del braccio è regolabile tra 0 e 6 mm. Per una accurata
regolazione viene fornita una SCALA DI ALTEZZA - HEIGHT SCALE (14)
(con incrementi di 0.5mm).
1. Sbloccare il braccio spostando la manopola di BLOCCAGGIO - ARM
LOCK (15) all’esteraso.
2. Sulla Tavola A cercare l’elevazione della cartuccia e trovare la relativa
scala di lettura.
3. Girare l’ANELLO DI REGOLAZIONE DELL’ELEVAZIONE - ARM
HEIGHT ADJUSTMENT RING (13) finché la linea di riferimento
sull’anello è posizionata sulla corretta scala di lettura.
4. Bloccare il braccio girando in senso orario la manopola di
BLOCCAGGIO - ARM LOCK (15) fino a ottenere il bloccaggio.
TAVOLA A
Elevazione cartuccia
(mm)
15
16
17
18
19
20
21
Per esempio, se l’elevazione della cartuccia è di 18.5mmm, la linea di
riferimento dell’ANELLO DI REGOLAZIONE DELL’ELEVAZIONE DEL
BRACCIO - ARM HEIGHT ADJUSTMENT RING (13) dovrebbe essere
posizionata fra 3 e 4 della SCALA DI ELEVAZIONE - HEIGHT SCALE
(14).
Scala di lettura
0
1
2
3
4
5
6
INST ALLAZIONE DELLA CAPP A:
1. Colloca i cardini nella coperta o spolverina.
2. Tenere in posizione la cappa, direttamente sopra il giradischi e far
scivolare i perni nei sostegni installati sul retro del pannello.
3. Sollevare sempre la cappa prima di rimuoverlo.
4. Evitare di aprire e chiudere la cappa quando il giradischi è in funzione.
Questo può determinare vibrazioni e salti della puntina.
COLLEGAMENTI:
1. Collegare la spina di alimentazione ad una presa appropriata.
2. Consultare la Tavola A per i corretti collegamenti alle spine di uscita
RCA e alla presa di terra. Assicurarsi che tutte le spine siano ben
inserite nei jack appropriati (ingressi phono). Per ridurre il ronzio,
assicurarsi che il capocorda sia ben collegato alla vite di terra.
TAVOLA B
CONNETTOR USCIT A
L (BIANCO)
R (ROSSO)
GND (Capocorda)
MIXER O RICEVITORI
PHONO CANALE L
PHONO CANALE R
Vite GND
Istruzioni per il funzionamento
OPERAZIONI PRINCIP ALI:
1. Mettere un disco sul TAPPETINO DI NEOPRENE - NEOPRENE MAT
(4) che poggia sul PIATT O PORTADISCO - PLATTER (2).
2. Selezionare la velocità desiderata abbassando il PULSANTE
SELETTORE DI VELOCITÀ - SPEED SELECTOR (18) su 33 o 45 giri.
Per la velocità di 78 giri, premere ambi PULSANTE SELETTORI DI
VELOCITÀ su 33 ed 45 giri.
3. Portare su ‘ON’ l’INTERRUTTORE - POWER (16); si illuminano la spia
dello stroboscopio (incorporato nell’INTERRUTTORE e l’indicatore di
velocita’ (per la velocità selezionata).
4. Rimuovere la protezione della cartuccia (se la cartuccia è protetta).
5. Rilasciare il FERMA-BRACCIO - ARM CLAMP (9) che si trova sul
PORTABRACCIO - ARM REST (10).
6. Spingere il PULSANTE START STOP (17). Il PIATTO PORTADISCO -
PLATTER (2) inizierà a girare.
7. Portare la LEVETTA ALZABRACCIO - CUE LEVER (19) su “UP”.
8. Posizionare il braccio sopra la pista desiderata e spingere la LEVETTA
ALZABRACCIO - CUE LEVER (19) su “DOWN”. Il BRACCIO - TONE
ARM (6) si abbasserà lentamente sul disco e inizierà la riproduzione.
9. Alla fine della riproduzione, sollevare il BRACCIO - TONE ARM (6),
rimetterlo sul PORTABRACCIO - ARM REST (10) e fissarlo con il
FERMA-BRACCIO - ARM CLAMP (9).
10.Se si desidera si può spegnere l’alimentazione portando
l’INTERRUTTORE - POWER (16) su “OFF” o fermare il PIATTO
PORTADISCO - PLATTER (2) spingendo il PULSANTE START ST OP
(17) usando l’arresto elettronico.
ARRESTO DELLA RIPRODUZIONE:
1. Spingendo la LEVETTA ALZABRACCIO - CUE LEVER (19) su “UP” il
BRACCIO - TONE ARM (6) si alzerà e si arresterà la riproduzione.
2. Spingendo la LEVETTA ALZABRACCIO su “DOWN” il BRACCIO TONE ARM (6) si abbasserà lentamente sul disco nel punto in cui la
riproduzione è stata interrotta.
RIPRODUZIONE A 45 GIRI AL MINUTO:
1. Quando si riproducono dischi a 45 giri con un foro centrale grande,
posizionare prima l’ADATTAT ORE 45 sul centro dell’asse.
2. Assicurarsi che il PULSANTE SELETTORE DI VELOCITA’ - SPEED
SELECTOR (18) 45 sia premuto e che la spia della velocità a 45 giri sia
illuminata.
INDICATORI:
1. Premere l’INTERRUTTORE INDICATORI - TARGET LIGHT SWITCH
(21) così che l’INDICATORE - TARGET LIGHT (22) si metta in
posizione e illumini la puntina.
2. Per abbassare l’INDICATORE premerlo finché si arresta
nell’alloggiamento.
3. Quando non si usa, l’INDICATORE dovrebbe essere tenuto in posizione
abbassata.
REGOLAZIONE DEL CONTROLLO PITCH:
1. L’unità SA-2400 è dotada di un CONTROLLO PITCH - PITCH CONTROL (24) con CONTROLLO AL QUARZO - QUARTZ LOCK (26).
Quand il CONTROLLO AL QUARZO è attivato, il indicatore LED QUARTZ LOCK LED (25) diventa VERDI e la velocità sarà esattamente
di 33 1/3, 45 o 78 giri a seconda la velocità scelta senza riguardo della
posizione del controllo pitch. Quando si attiva il CONTROLLO AL
QUARZO, il CONTROLLO PITCH viene automaticamente disattivato.
2. Quando il CONTROLLO AL QUARZO è disattivato, è possibile regolare
il CONTROLLO PITCH. Quando il CONTROLLO PITCH non è in
posizione centrale, il pitch può variare da +/-10% a seconda della
posizione del CONTROLLO PITCH.
Page 17
Page 18

3. Spingere il pulsante CONTROLLO AL QUARZO per ripristinare la
velocità esattamente a 33 1/3, 45 o 78 giri quando il CONTROLLO
PITCH non è in posizione centrale. Disattivando il CONTROLLO PITCH
verrà di nuovo ripristinata l’impostazione iniziale della velocità del piatto
portadisco.
4. Il PIATTO PORTADISCO - PLATTER (2) è dotado di UNA RIGA DI
INDICATORI STROBOSCOPIO RPM - STROBE RPM INDICATOR
STRIP (27) (giri al minuto) e l’INTERRUTTORE - POWER (16) ha
incorporato le LUCI STROBOSCOPICHE - STROBE LIGHTS (28).
Quando il PIATTO PORTADISCO - PLATTER (2) gira le LUCI
STROBOSCOPICHE illuminano la RIGA DI INDICATORI
STROBOSCOPIO RPM. La riga inferiore di puntini apparirà ferma
quando il pitch è -3,3%. La seconda riga a partire dal basso apparirà
ferma quando la velocità è esattamente 33 1/3, 45 o 78 giri a seconda
del PULSANTE SELETTORE DE VELOCITÀ - SPEED SELECTOR
(18) spinto. La terzera riga di puntini a partire dal basso apparirà ferma
quando il pitch è +3,3%. La riga superiore di puntini apparirà ferma
quando il pitch è +7,2%.
PITCH BEND:
1. Premendo i PITCH BEND (23) il tono diventerà più alto o più basso
senza cambiare la posizione della guida. Liberando i tasti, il tono
diventerà di nuovo quello indicato dalla posizione della guida.
USO DEL PULSANTE REVERSE
1. Premete il pulsante REVERSE (30) per far girare il PIATTO - PLATTER
(2) in senso inverso (il REVERSE DEL - REVERSE LED (30A) sarà
illuminato durante la marcia in senso inverso). Premete il pulsante
REVERSA una seconda volta per ritornare alla marcia normale.
DISPLA Y DIGIT ALE:
1. Il DISPLAY DIGITALE - DIGITAL DISPLAY (20) indica VELOCITÀ SPEED (20A), A TTIVAZIONE - PITCH SLIDE ACTIVATION (20B),
SONARE - PLAY (20C), PAUSA - PAUSE (20D), INDIETRO - REVERSE (20E) ed PERCENTUALE PITCH - PITCH PERCENT AGE
(20F).
REGOLAZIONE DELL ’ELEVAZIONE DEL BRACCIO:
1. Se la distanza pre-regolata con cui la LEVETTA ALZABRACCIO - CUE
LEVER (19) solleva la puntina dalla superficie del disco è inadeguata,
può essere regolata girando la VITE DI REGOLAZIONE
DELL’ELEVAZIONE DEL BRACCIO - ARM-LIFT HEIGHT ADJUSTMENT SCREW (29) mentre simultaneamente si spinge in giù il
BRACCIO - TONE ARM (6). La rotazione in senso orario della vite
diminuirà la distanza mentre una rotazione in senso anti-orario
l’accrescerà.
Specifiche Tecniche
GIRADISCHI:
Tipo.........................................................Manuale, Trazione al Quartzo
Sistema di trasmissione........................................................Trazione diretta
Motore..................................................................Motore 18V CD brushless
Piattoportadisco......................................Alluminio pressofuso 332 mm Dia.
Velocità...............................................................33 1/3, 45 o 78 giri al minuto
Coppia d’avviamento.....................................................................2.2 Kg/cm
Caratteristich incorporate..................................0.6 sec., arresto a 33 1/3 giri
Sistema d’arresto.............................................................Arresto elettronico
Wow e flutter...........................................................................0.01% WRMS*
* Questi valori si riferiscono solo all’insieme del giradischi e del piatto portadisco
e non includono quindi il carico dei dischi, della cartuccia e del braccio.
Rapporto segnale rumore..............................................78 dB (IEC 98A WTD)
BRACCIO:
Tipo...........................................................Braccio universale tubolare dritto
Lunghezza effettiva.......................................................................231.5 mm
Campo regolazione elevazione braccio.........................................0 - 6 mm
Sporgenza........................................................................................15.1 mm
Mass. effettiva...............................................................9 g (senza cartuccia)
Angolo di deviazione.................................................................................22°
Frizione.......................................................Meno di 7 mg (laterale, verticale)
Errore dell’angolo di tracciamento..............entro i 232' sulla pista esterna e
entro 032' sulla pista interna di un disco di 30 cm (12")
Campo regolazione pressione puntina...............................................0 - 5 g
Campo applicabile peso cartuccia......................................................6 - 10 g
Peso fonorivelatore................................................................................9 g
CARATTERISTICHE:
Alimentazione...............................................................................230V~50Hz
Consumo...........................................................................................15 Watts
Dimensioni...........................................................450mm x 152mm x 352 mm
Peso......................................................................................................12.3 kg
Le specifiche sono soggette a cambiamenti senza preavviso. Il peso e le
dimensioni sono indicativi.
Page 18
Page 19

NOTES:
Gemini Sound Products Corp.
120 Clover Place P.O. Box 6928
Edison, NJ 08818-6928
732-738-9003 (Phone) • 732-738-9006 (Fax)
Page 19
Page 20

In the USA: If you experience problems with this unit,
call 1-732-738-9003 for Gemini Customer Service.
Do not attempt to return this equipment to your dealer.
Parts of the design of this product may be protected by worldwide
patents.
Information in this manual is subject to change without notice and does
not represent a commitment on the part of the vendor. Gemini Sound
Products Corp. shall not be liable for any loss or damage whatsoever
arising from the use of information or any error contained in this
manual.
No part of this manual may be reproduced, stored in a retrieval system or
transmitted, in any form or by any means, electronic, electrical, mechanical, optical, chemical, including photocopying and recording, for any
purpose without the express written permission of Gemini Sound
Products Corp.
It is recommended that all maintenance and service on this product is
performed by Gemini Sound Products Corp. or its authorized agents.
Gemini Sound Products Corp. will not accept liability for loss or damage
caused by maintenance or repair performed by unauthorized personnel.
Worldwide Headquarters • 120 Clover Place, Edison, NJ 08837 • USA
T el: (732) 738-9003 • Fax: (732) 738-9006
France • G.S.L. France • 11, A venue Leon Harmel, Z.I. Antony, 92160 Antony, France
Tel: + 33 (0) 1 55 59 04 70 • Fax: + 33 (0) 1 55 59 04 80
Germany • Gemini Sound Products GmbH • Ottostrasse 6, 85757 Karlsfeld, Germany
UK • Gemini Sound Products • Unit C4 Hazleton Industrial Estate, Waterlooville, UK P08 9JU
Spain • Gemini Sound Products S.A. • Rosello, 516, Barcelona, Spain, 08026
© Gemini Sound Products Corp. 2002 All Rights Reserved
Tel: 08131 - 39171-0 • Fax: 08131 - 39171-9
Tel: 087 087 00880 • Fax: 087 087 00990
Tel: 349-3435-0814 • Fax: 3493-347-6961
Page 20
 Loading...