

Microwave Data Systems Inc.
MDS T ransNET OEM
Transceiver Model EL806
™
Spread Spectrum Data Transceiver
Including Instructions for
03-4053A01 Evaluation Development Kit
OEM Integration Guide
Installation & Operation Guide
MDS 05-3946A01, Rev. A
APRIL 2003

QUICK START GUIDE
The steps below contain the essential information needed to place the OEM transceiver in service. Because the transceiver is designed for use in other pieces of
equipment, these steps assume that prior testing and evaluation have been
conducted with the host device. If not, please refer to Section 3.0, Benchtop Setup
and Evaluation for proper interface wiring and configuration.
1. Mount the transceiver module using the four holes provided.
• If possible, select a mounting location that allo ws vie wing the status LEDs and
provides ready access to the antenna connector.
• Use standoff hardware to secure the board to the host device.
• When mounting the board, use care to align the transceiver’s 16-pin header
connector with the mating pins in the host device.
2. Connect the antenna system to the transceiver
• Use only with antenna/feedline assemblies that have been expressly tested
and approved for such service by Microwave Data Systems Inc.
• Use an MMCX-type male connector to attach the antenna to the transceiver.
• For best performance, antennas should be mounted in the clear, with an
unobstructed path in the direction of desired transmission/reception.
3. Apply power and observe the LEDs for proper operation. The LED
command must be set to ON (LEDS ON).
After 16 seconds...
• The GP lamp should be lit continuously
• The DCD lamp should be lit continuously—if synchronization with another unit
has been achieved
• The Remote radio(s) should be transmitting data (TXD) and receiving data
(RXD) with its associated station
LED Indicator Descriptions
LED Name Description
RXD (CR3)
Receive Data
TXD (CR4)
Transmit Data
DCD (CR5)
Data Carrier Detect
GP (CR6)
General Purpose
Serial receive data activity. Payload data from connected device.
Serial transmit data activity. Payload data to connected device.
Continuous—Radio is receiving/sending synchronization frames
On within 10 seconds of power-up under normal
conditions
• Continuous—Power is applied to the radio; no
problems detected
• Flashing (5 times-per-second)—Fault indication.
See “TROUBLESHOOTING” on Page 52
• Off—Radio is unpowered or in Sleep mode
RXD
TXD
DCD
GP

CONTENTS
1.0 ABOUT THIS MANUAL..........................................................1
2.0 PRODUCT DESCRIPTION....................................................1
2.1 Transceiver Features .......................................................2
2.2 Model Configuration Codes ............................................2
2.3 Spread Spectrum Transmission ......................................3
2.4 Typical Applications .........................................................3
Multiple Address Systems (MAS)....................................3
Point-to-Point System ......................................................4
Tail-End Link to an Existing Network ...............................5
Store-and-Forward Repeater...........................................5
2.5 Transceiver Accessories .................................................6
3.0 BENCHTOP SETUP & EVALUATION....................................7
3.1 Evaluation Development Kit (P/N 03-4053A01) ..............7
Evaluation Board .............................................................8
Connecting the Eval. Board & Transceiver (Figure 8)......9
3.2 Cable Connections for Benchtop Testing ........................10
Antenna Connection (J200 on the transceiver module)...10
Diagnostic Connection (J4)..............................................11
Data Connector (J5) ........................................................12
DC Power Connector (J3)................................................14
Jumper Block J1 (DC Power Configuration) ....................15
3.3 Initial Power-Up & Configuration .....................................15
Configuration Settings .....................................................16
LED Indicators.................................................................17
4.0 EVALUATION BOARD DOCUMENTATION ...........................18
4.1 Assembly Drawing ..........................................................18
4.2 Parts List .........................................................................18
4.3 Evaluation Board Fuse Replacement .............................20
5.0 TRANSCEIVER MOUNTING.................................................21
MDS 05-3946A01, Rev. A TransNET OEM Integration Guide i

5.1 Mounting Dimensions .....................................................21
5.2 Antennas & Feedlines ....................................................21
Feedlines.........................................................................22
6.0 OPTIMIZING PERFORMANCE.............................................23
6.1 Antenna Aiming .............................................................. 23
6.2 Antenna SWR Check ..................................................... 23
6.3 Data Buffer Setting ......................................................... 23
6.4 Hoptime Setting ..............................................................23
6.5 Operation at 115200 bps ................................................24
6.6 Baud Rate Setting ..........................................................24
6.7 Radio Interference Checks .............................................24
6.8 RF Output Setting ...........................................................24
7.0 OPERATING PRINCIPLES & SPECIAL
CONFIGURATIONS ......................................................................25
7.1 How Remotes Acquire Synchronization ......................... 25
7.2 Establishing a Tail-End Link ............................................ 25
7.3 Store & Forward (SAF) Operation with Extension Radios 26
Simple Extended SAF Network.......................................26
Extended SAF Network...................................................27
Retransmission and ARQ operation................................28
Synchronization in SAF Networks...................................28
Configuration Parameters for Store-and Forward Services29
7.4 Sleep Mode Operation (Remote units only) ...................31
Sleep Mode Example...................................................... 32
8.0 DEALING WITH INTERFERENCE........................................32
9.0 PROGRAMMING REFERENCE ...........................................34
9.1 Programming Methods ................................................... 34
Terminal Interface Mode..................................................34
PC-Based Configuration Software..................................34
9.2 User Commands ............................................................ 34
Entering Commands ....................................................... 35
9.3 Detailed Command Descriptions ....................................40
ADDR [1–65000]............................................................. 40
AMASK [0000 0000–FFFF FFFF]................................... 41
ii TransNET OEM Integration Guide MDS 05-3946A01, Rev. A

ASENSE [HI/LO]..............................................................41
BAUD [xxxxx abc]............................................................41
BUFF [ON, OFF]..............................................................41
CODE [NONE, 1…255] ...................................................42
CTS [0–255].....................................................................42
CTSHOLD [0–60000].......................................................43
DEVICE [DCE, CTS KEY] ..............................................43
DLINK [xxxxx/ON/OFF]....................................................43
DKEY...............................................................................44
DTYPE [NODE/ROOT]....................................................44
FEC [ON, OFF]................................................................44
HOPTIME [7, 28] .............................................................44
INIT..................................................................................44
HREV...............................................................................45
KEY..................................................................................45
LEDS [ON, OFF]..............................................................45
MODE [M, R, X]...............................................................45
OWM [xxxxx]....................................................................45
OWN [xxxxx]....................................................................45
PORT [RS232, RS485]....................................................45
PWR [20–30] ...................................................................46
REPEAT [0–10]................................................................47
RETRY [0–10]..................................................................47
RSSI ................................................................................47
RTU [ON, OFF, 0-80].......................................................48
RX [xxxx]..........................................................................48
RXTOT [NONE, 0–1440] .................................................48
SAF [ON, OFF]................................................................48
SETUP.............................................................................48
SER .................................................................................49
SHOW PWR....................................................................49
SHOW SYNC...................................................................49
SKIP [NONE, 1...8]..........................................................49
SLEEP [ON, OFF]............................................................50
SREV...............................................................................50
STAT ................................................................................50
TEMP...............................................................................50
TX [xxxx]..........................................................................50
UNIT [10000–65000] .......................................................50
MDS 05-3946A01, Rev. A TransNET OEM Integration Guide iii

XADDR [0–31].................................................................51
XMAP [00000000-FFFFFFFF]........................................51
XPRI [0–31].....................................................................51
XRSSI [NONE, –40...–120]............................................. 51
ZONE CLEAR.................................................................51
ZONE DATA..................................................................... 51
10.0 TROUBLESHOOTING......................................................... 52
10.1 Alarm Codes .................................................................53
Checking for Alarms—STAT command ...........................53
Major Alarms vs. Minor Alarms.......................................53
Alarm Code Definitions ................................................... 53
10.2 LED Indicators ..............................................................54
10.3 Troubleshooting Chart ..................................................54
10.4 Network-Wide Remote Diagnostics ..............................55
11.0 FIRMWARE UPGRADES....................................................57
11.1 Obtaining new firmware ................................................57
Saving a Web-site firmware file to your PC.....................57
11.2 Installing firmware in your radio ....................................57
12.0 Security ...............................................................................57
13.0 Product Specifications.........................................................58
13.1 Detailed Pin Descriptions .............................................59
14.0 dBm-Watts-Volts Conversion Chart.....................................66
To Our Customers
We appreciate your patronage. You are our business. We promise to serve and anticipate your
needs. We strive to give you solutions that are cost effective, innovative, reliable and of the
highest quality possible. We promise to build a relationship that is forthright and ethical, one that
builds confidence and trust.
Copyright Notice
This Installation and Operation Guide and all software described herein are Copyright 2003 by
Microwave Data Systems Inc. All rights reserved. Microwave Data Systems Inc. reserves its
right to correct any errors and omissions in this manual.
iv T r ansNET OEM Integration Guide MDS 05-3946A01, Rev. A

RF Exposure Notice
RF EXPOSURE
The radio equipment described in this guide emits radio frequency energy. Although
the power level is low, the concentrated energy from a directional antenna may pose
a health hazard.
outdoor mounted, must be installed to provide a separation distance of at
least 23 cm (9 inches) from all persons, and must not be co-located or operating in conjunction with any other antenna or transmitter.
In mobile applications (vehicle mounted) the above separation distance must be
maintained at all times. More information on RF exposure is availab le on the Internet
at www.fcc.gov/oet/info/documents/bulletins.
All antenna(s) used with this transmitter, whether indoor or
FCC Part 15 Notice
This equipment has been tested and found to comply with the limits for a Class A digital device,
pursuant to part 15 of the FCC Rules.These limits are designed to provide reasonable protection
against harmful interference when the equipment is operated in a commercial environment. This
equipment generates, uses, and can radiate radio frequency energy and, if not installed and used
in accordance with the instruction manual, may cause harmful interference to radio
communications. Operation of this equipment in a residential area is likely to cause harmful
interference in which case the user will be required to correct the interference at his own expense.
FCC Modular Approval Notice
This device is offered as an FCC Part 15 Unlicensed Modular Transmitter. This Modular Transmitter is approved for use only with specific antenna, cable and output power configurations that
have been tested and approved by the manufacturer (Microwave Data Systems Inc.). Modifications to the radio, the antenna system, or power output, that have not been explicitly specified by
the manufacturer are not permitted, and may render the radio non-compliant with applicable regulatory authorities. Refer to Table 7 on Page 24 for more detailed information.
This device employs a unique connector at all connections between the module and the antenna,
including the cable. Consult MDS for approved antenna/cable assemblies in our product offering.
When this device is placed inside an enclosure, a durable label must be affixed to the outside of
that enclosure which includes this module’s FCC ID Number.
Changes or modifications not expressly approved by the party responsible for compliance
could void the user’s authority to operate the equipment.
ISO 9001 Registration
Microwave Data Systems adheres to the internationally-accepted ISO 9001 quality system standard.
Manual Revision and Accuracy
While every reasonable effort has been made to ensure the accuracy of this manual, product
improvements may result in minor differences between the manual and the product shipped to
you. If you have additional questions or need an exact specification for a product, please contact
our Customer Service Team using the information at the back of this guide. In addition, manual
updates can often be found on the MDS Web site at www.microwavedata.com.
MDS 05-3946A01, Rev. A TransNET OEM Integration Guide v

vi T r ansNET OEM Integration Guide MDS 05-3946A01, Rev. A
1.0 ABOUT THIS MANUAL
This manual is intended to guide technical personnel in the integration of
MDS TransNET OEM™ transceivers into existing electronic equipment. The
OEM transceiver is designed for use inside Remote Terminal Units (RTUs),
Programmable Logic Controllers (PLCs) and other equipment associated
with remote data collection, telemetry and control.
The manual provides instructions for interface connections, hardware
mounting, and programming commands. Following integration of the
transceiver, it is recommended that a copy of this manual be retained for
future reference by technical personnel.
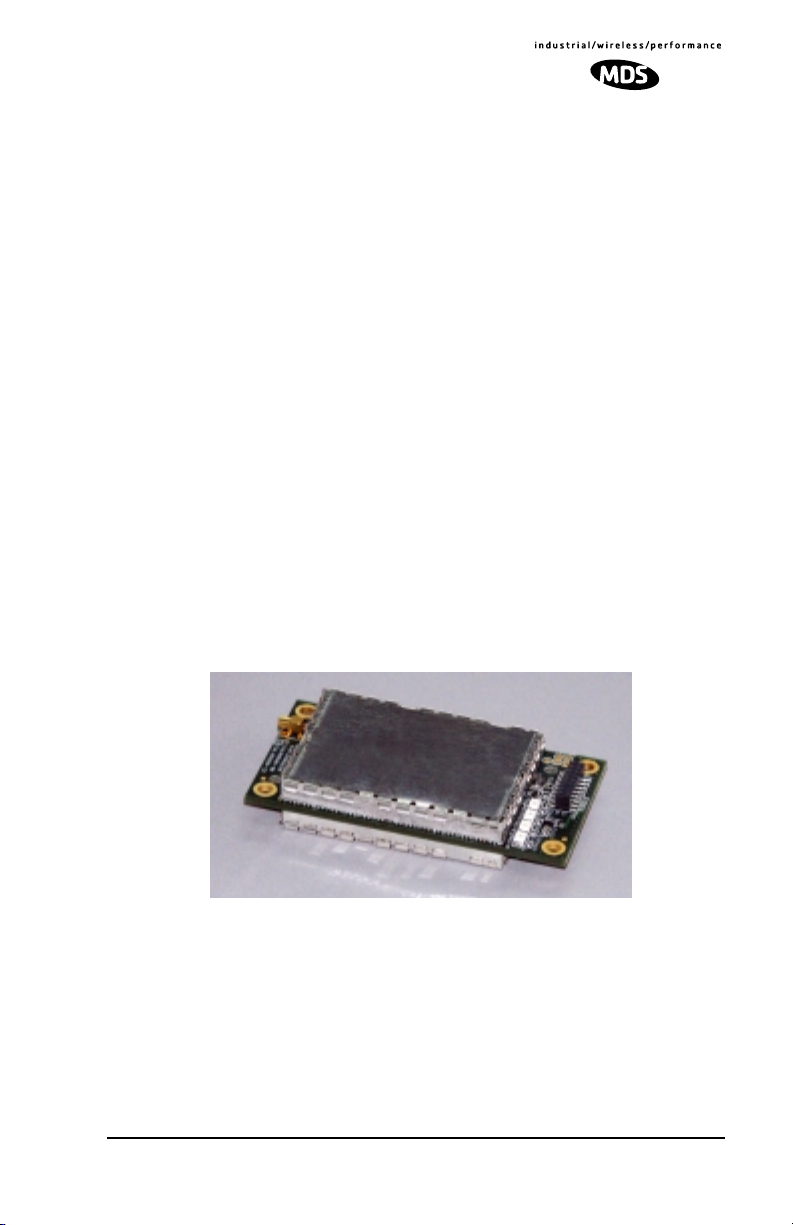
2.0 PRODUCT DESCRIPTION
The OEM transceiver, (Figure 1), is a compact, spread spectrum wireless
module designed for license-free operation in the 902-928 MHz frequency
range. It is contained on one double-sided circuit board with all necessary
components and RF shielding included. It need only be protected from direct
exposure to the weather and is designed for rugged service in extreme
temperature environments. The transceiver has full over-the-air compatibility
with standard (non-OEM) TransNET 900TM transceivers manufactured by
MDS.
All transceiver programming is performed via a connected PC terminal. No
jumper settings or manual adjustments are used to configure the transceiver
for operation.
Invisible place holder
Figure 1. TransNET OEM™ Transceiver
The transceiver employs Digital Signal Processing (DSP) technology for
highly reliable data communications, even in the presence of weak or
interfering signals. DSP techniques also make it possible to obtain
information about the radio’s operation and troubleshoot problems, often
eliminating the need for site visits.
Using appropriate software at the master station, diagnostic data can be
retrieved for any radio in the system, even while payload data is being
transmitted. (See “Network-Wide Remote Diagnostics” on Page 55.)
MDS 05-3946A01, Rev. A TransNET OEM Integration Guide 1

2.1 Transceiver Features
The OEM transceiver is designed for easy installation and flexibility in a wide
range of wireless applications. Listed below are several key features of the
transceiver which are described in more detail later in this guide.
• 128 frequencies over 902–928 MHz, subdivided into eight frequency
zones
• Configurable operating zones to omit frequencies with constant
interference
• 65,000 available network addresses to enhance communications
security
• Network-wide configuration from the master station; eliminates most
trips to remote sites
• Data transparency–ensures compatibility with virtually all
asynchronous data terminals
• Peak-hold RSSI, averaged over eight hop cycles
• Operation at up to 115,200 bps continuous data flow
• Store-and-Forward repeater operation
• Data latency typically less than 10 ms
• Same hardware for master or remote configuration
• Supports RS/EIA-232 or RS/EIA-485 interfaces (factory configured)
• Low current consumption—nominal 8 mA in “sleep” mode. Ideal for
solar/battery powered applications.
NOTE:
Some features may not be available on all units, based on the options purchased and the regulatory constraints for the region in which the radio will operate.
2.2 Model Configuration Codes
The model number code is printed on the radio module, and provides key
information about how it was configured when it left the factory. See Figure 2
for an explanation of the model number codes. (Note: This information is
subject to change and should not be used for ordering additional products.
Your factory representative can assist you with product ordering.)
2 TransNET OEM Integr ation Guide MDS 05-3946A01, Rev. A

OPERATION
(X) Remote/Master
BAND
(9) 900 MHz
EL806
ENCLOSURE
(0) Modular-no enclosure
INTERFACE SIGNALING & INPUT POWER OPTIONS
(0) Payload RS-232/485; Diagnostics RS-232; DC Input +3.3 Vdc
(1) Payload TTL; Diagnostic RS-232; DC Input +3.3 Vdc
(2) Payload TTL; Diagnostic TTL; DC Input 3.3 Vdc
(3) Payload RS-232/485; Diagnostic RS-232; DC Input +5-25 Vdc
(4) Payload TTL; Diagnostic RS-232; Input +5-25 Vdc
(5) Payload TTL, Diagnostic TTL; DC Input +5-25 Vdc
AGENCY
(N) None
(F) FCC/IC
09N
RESERVED
(N) None
INTERFACE MODE
(0) EIA/RS-232
(1) EIA/RS-485
(2) TTL
0
0X
SAFETY CERT.
(N) N/A
W
RESERVED
(N) None
SPARE
(N) None
DIAGNOSTICS
(N) None
(W) Network-wide
Figure 2. Model Number Configuration Codes
2.3 Spread Spectrum Transmission
The transceiver “hops” from channel to channel many times per second using
a specific hop pattern applied to all radios in the network. A distinct hopping
pattern is provided for each of the 65,000 available network addresses,
thereby minimizing the chance of interference with other spread spectrum
systems.
In the USA, and certain other countries, no license is required to install and
operate this type of radio device, provided RF power and antenna gain
restrictions are observed. In the USA and Canada, a maximum of 36 dBm
Effective Isotropic Radiated Power (EIRP) is allowed. The factory offers a set
of approved antennas with special connectors for this radio. Substitutions that
would void the compliance of the device are not permitted.
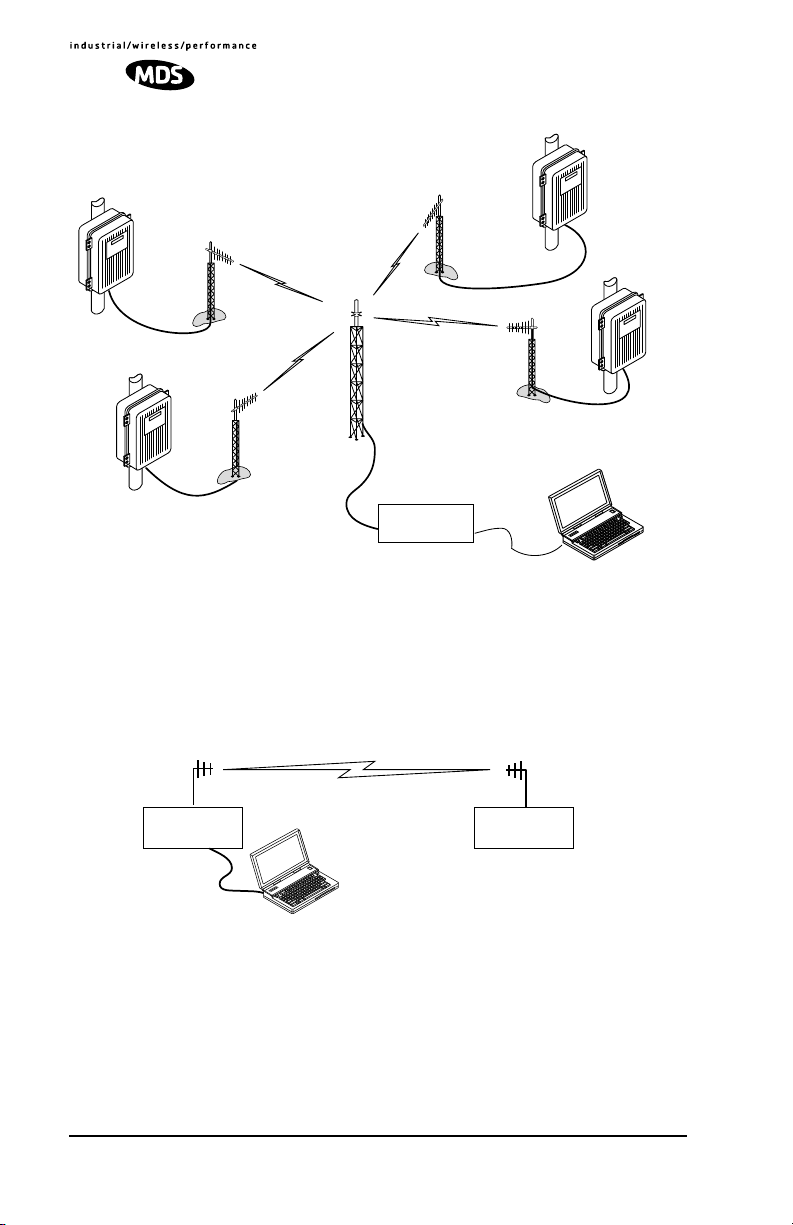
2.4 Typical Applications
Multiple Address Systems (MAS)
This is the most common application of the transceiver. It consists of a central
control station (master) and two or more associated remote units, as shown in
Figure 3. This type of network provides communications between a central
host computer and remote terminal units (RTUs) or other data collection
devices. The operation of the radio system is transparent to the computer
equipment. This application provides a practical alternative to traditional
(licensed) MAS radio systems.
MDS 05-3946A01, Rev. A TransNET OEM Integration Guide 3
RTU/PLC WITH
TRANSCEIVER
INSTALLED
Invisible place holder
RTU/PLC WITH
TRANSCEIVER
INSTALLED
RTU/PLC WITH
TRANSCEIVER
INSTALLED
MASTER SITE
RTU/PLC WITH
TRANSCEIVER
INSTALLED
DATA
TRANSCEIVER
Figure 3. Typical MAS Network
Point-to-Point System
A point-to-point configuration (Figure 4) is a simple arrangement consisting
of just two radios—a master and a remote. This provides a half-duplex
communications link for the transfer of data between two locations.
Invisible place holder
Master Site Remote Site
DATA
TRANSCEIVER
Host System
Figure 4. Typical Point-to-Point Link
DATA
TRANSCEIVER
4 TransNET OEM Integr ation Guide MDS 05-3946A01, Rev. A
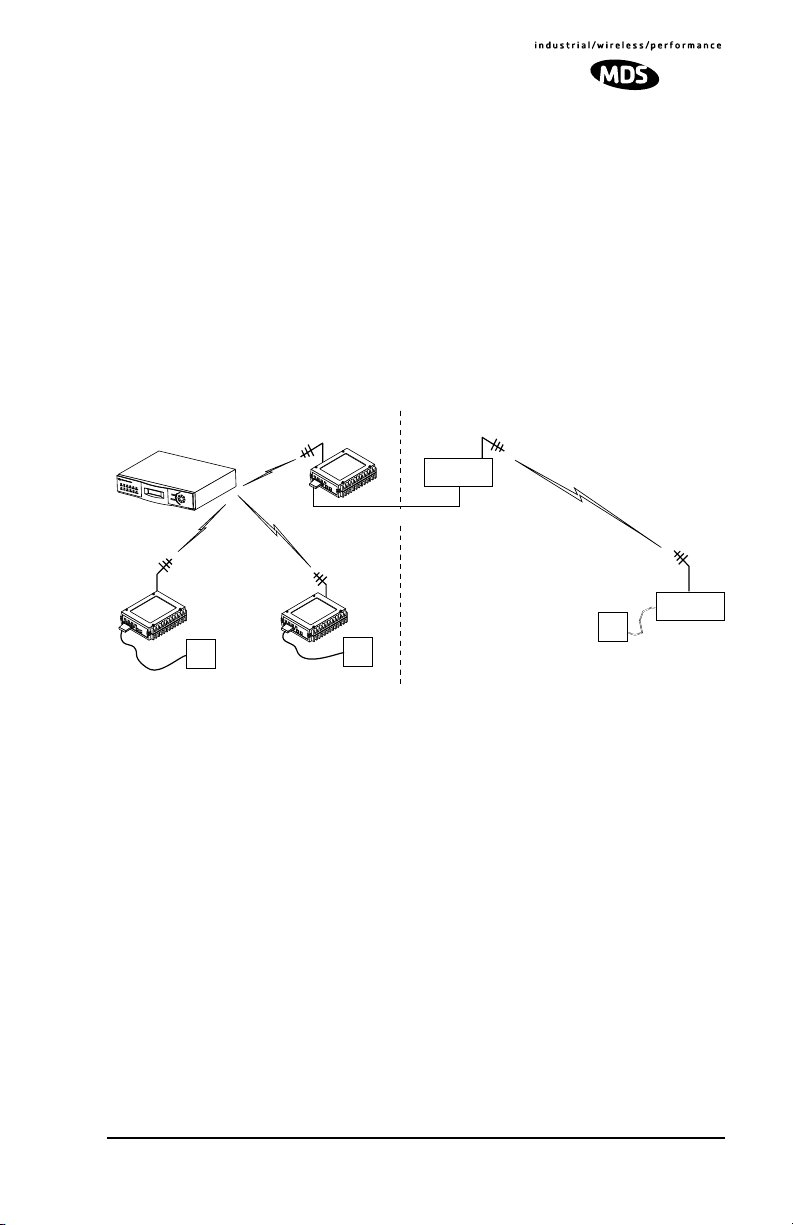
Tail-End Link to an Existing Network
A tail-end link is often used to extend the range of a traditional (licensed)
MAS system without adding another licensed radio. This might be required
if an outlying site is blocked from the MAS master station by a natural or
man-made obstruction. In this arrangement, a spread spectrum transceiver
links the outlying remote site into the rest of the system by sending data from
that site to an associated transceiver installed at one of the licensed remote
sites—usually the one closest to the outlying facility. (See Figure 5).
As the data from the outlying site is received at the associated transceiver, it
is transferred to the co-located licensed radio (via a data crossover cable) and
is transmitted to the MAS master station over the licensed channel.
Additional details for tail-end links are given in Section 7.2 (Page 25).
Invisible place holder
REPEATER STATION
Remote
Radio
Remote Radio
Null-Modem Cable
RTU
S
P
R
E
A
T
DATA
TRANSCEIVER
O
O
LICENSE-FREE SPREAD SPECTRUM SYSTEM
D
S
P
U
E
C
T
L
T
Y
R
I
U
N
M
G
S
L
I
I
N
T
E
K
DATA
TRANSCEIVER
RTU
OUTLYING
REMOTE SITE
Master Station
A
C
T
I
V
E
S
T
B
Y
A
L
A
R
M
R
X
A
L
R
T
X
A
L
R
A
C
T
L
I
I
N
V
E
E
S
T
B
Y
A
L
A
R
M
R
X
A
L
R
T
X
A
L
R
L
I
N
E
E
N
T
E
R
E
S
C
A
P
E
Remote
Radio
RTU
MAS SYSTEM (LICENSED OR UNLICENSED)
Figure 5. Typical Tail-End Link Arrangement
Store-and-Forward Repeater
Similar to a Tail-End Link, Store-and-Forward (SAF) offers a way to
physically extend the range of a network, but in a simplified and economical
manner. SAF operates by storing up the data received from one site, and then
retransmitting it a short time later. Figure 6 shows a typical SAF repeater
arrangement.
SAF operates by dividing a network into a vertical hierarchy of two or more
sub-networks. Extension radios (designated as
MODE X
) serve as single-radio
repeaters that link adjacent sub-networks, and move data from one
sub-network to the next. Additional information on SAF mode is provided in
“Store & Forward (SAF) Operation with Extension Radios” on Page 26.
MDS 05-3946A01, Rev. A TransNET OEM Integration Guide 5

Programmed as
MODE M
DATA
TRANSCEIVER
STORE & FORWARD REPEATER STATION
Invisible place holder
S
P
R
E
A
T
O
RTU
DATA
TRANSCEIVER
Programmed as
MODE X
O
D
S
P
U
E
C
T
L
T
Y
R
I
U
N
M
G
S
L
I
I
N
T
E
K
Programmed as
MODE R
DATA
TRANSCEIVER
Programmed as
MODE R
RTU
DATA
TRANSCEIVER
RTU
Programmed as
MODE R
RTU
DATA
TRANSCEIVER
OUTLYING
REMOTE SITE
Figure 6. Store-and-Forward Repeater Network
2.5 Transceiver Accessories
One or more of the accessories listed in Table 1 may be used with the OEM
transceiver. Contact your factory representative for availability and ordering
details.
Table 1. OEM Transceiver Accessories
Accessory Description Part No.
AC Power Adapter
TransNET Support Package CD
TNC Male-to-N
Male Coax Cable
Assy.
TNC Male-to-N
Male Coax Cable
Assy.
TNC male-to-N
Female Adapter
RJ-11-to-DB9
Adapter Cable
Fuse (for Evaluation Board)
InSite Diagnostic
Software
Omnidirectional
Antennas
Small power supply designed for continuous op-
01-3862A02
eration of the transceiver. UL approved. Input:
120/220; Output: 12 Vdc.
Programming, diagnostic and support files on a
03-2708A01
CD ROM. Includes electronic copy of this guide
(PDF format).
3 ft/1 meter shielded antenna cable 97-1677A159
6 ft/1.8 meter shielded antenna cable 97-1677A160
One-piece RF adaptor plug 97-1677A161
Short cable assembly that converts RJ-11 to
03-3246A01
DB9 connector type
2A SMF Slo-Blo (plugs into FH1 on Evaluation
29-1784A03
Board)
PC-based diagnostic software for MDS radios.
03-3533A01
Supplied on CD.
Rugged antennas suitable for use at Master
Various
stations.
6 TransNET OEM Integr ation Guide MDS 05-3946A01, Rev. A

Table 1. OEM Transceiver Accessories
(Continued)
Yagi Antenna Rugged directional antennas suitable for use at
Whip Antennas Short, flexible antennas suitable for short-range
Bandpass Filter Antenna system filter to aid in eliminating inter-
Evaluation Development Kit
Remote stations.
applications. Available with and without coaxial
feedlines.
ference from high power transmitters, such as
those used in paging systems.
Kit containing two OEM Transceiver modules,
whip antennas, two Evaluation Boards, support
software on CD, cables, power supplies and other accessories needed to operate the transceiver in a benchtop setting.
Various
Various
20-2822A01
32-4051A01
3.0 BENCHTOP SETUP & EVALUATION
As an Integrator, your first task is to verify that the OEM module will function
as intended with the host equipment. This section describes how to test the
unit for operation with host devices such as RTUs, PLCs and similar gear. It
covers the steps for making interface connections, powering up the
transceiver, and setting configuration parameters using a connected PC.
Evaluation of the module is best performed in a controlled environment, such
as a shop or lab facility where you can readily test various hardware and
programming configurations and observe the effects of these changes before
final installation.
Once you are satisfied that the transceiver module operates properly on the
bench, you can plan the installation of the module inside the host device and
be assured of proper operation in the field.
3.1 Evaluation Development Kit (P/N 03-4053A01)
The Evaluation Development Kit is designed to assist integrators who will be
working with the transceiver in a benchtop setting. The kit contains the
following:
• Two OEM Transceiver modules (configured for TTL, or RS-232/485
operation, as requested)
• Two Evaluation Development boards (P/N 03-4051A01)
• Interface Cables
• Two whip antennas
• Two 12 Vdc power supplies
• TransNET Support CD containing software for programming &
diagnostics
MDS 05-3946A01, Rev. A TransNET OEM Integration Guide 7
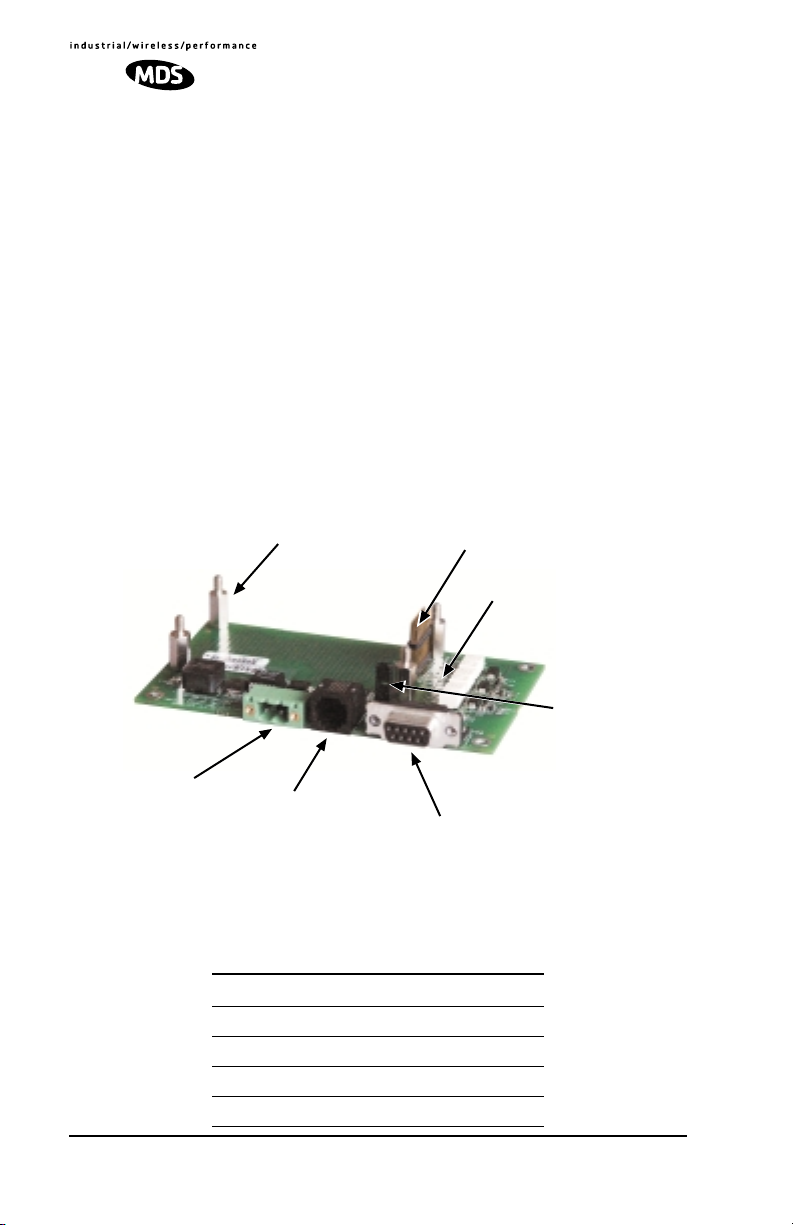
Evaluation Board
A key part of the Evaluation Development Kit is the Evaluation Board shown
in Figure 7. It contains a 16-pin header connector (J2) that mates with female
connector J3 the OEM transceiver board. It carries all signals (except RF)
onto the Evaluation Board. Table 2 lists the basic pin functions of J2. For
more detailed pinout information, including the differences between TTL and
RS-232/485 configured radios, refer to Section 13.1 on Page 59.
The Evaluation Board provides convenient connection points for diagnostics,
payload data, and DC power. Each of these connectors are discussed in this
section. The board also includes a series of test probe points to the left of J2.
These may be used for monitoring logic signal activity with a multimeter or
oscilloscope. The probe points are identified by printed markings on the
board.
The transceiver board’s RF/Antenna connection is
not
brought onto the
Evaluation Board by the 16-pin header. The antenna connection is always
made at J200 on the transceiver module using a male MMCX-type connector.
DC POWER
(5-25 VDC)
Figure 7. OEM Evaluation Board (P/N 03-4051A01)
STANDOFF SPACERS (4)
DIAGNOSTIC
COMMUNICATIONS
(RJ-11)
DATA CONNECTOR
16-PIN HEADER
TEST PROBE
POINTS
JUMPER BLOCK
J1
(DB-9)
Table 2. Basic Pin Functions of J2 (16-Pin Header Connector)
Pin No. Pin Function
1 Ground
2 Diagnostic TXD
3 Alarm Condition
4 Diagnostic RXD
8 TransNET OEM Integr ation Guide MDS 05-3946A01, Rev. A
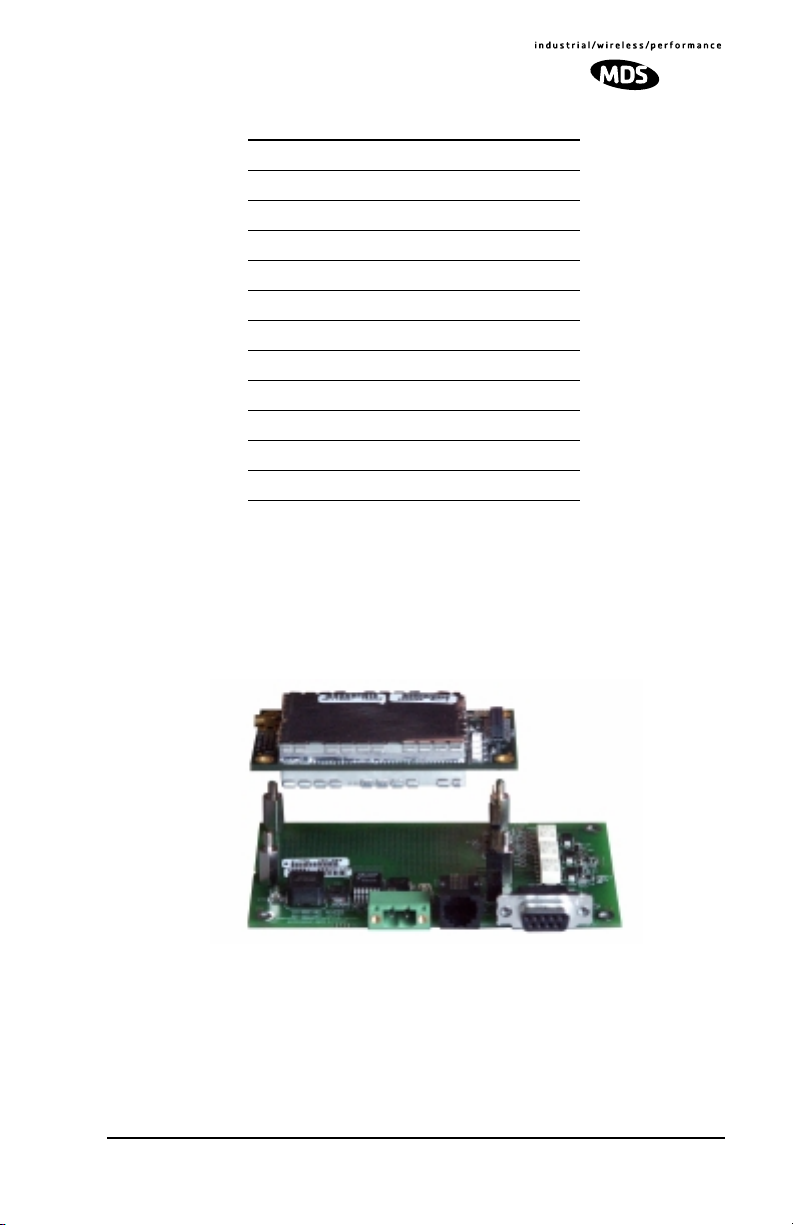
Table 2. Basic Pin Functions of J2 (16-Pin Header Connector)
5 DC Input
6 Sleep Mode Input
7 Data Carrier Detect (DCD)
8 Power Supply Shutdown Control
9 Reserved—Do not connect.
10 Transmitted Payload Data (TXD)
11 DC Input
12 Request to Send (RTS)
13 Reserved—Do not connect.
14 Received Payload Data (RXD)
15 Ground
16 Clear to Send (CTS)
Connecting the Evaluation Board & Transceiver (Figure 8)
To connect the Evaluation Board to the radio, carefully align the pins of the
16-pin header with J3 on the transceiver module and press down firmly. The
radio PC board should seat solidly on the four standoff spacers. Use nuts to
secure the board to the standoffs.
Invisible place holder
Figure 8. Connecting the Evaluation Board and Transceiver Together
CAUTION:
Take care to avoid short-circuiting the underside of the Evaluation PC
board. The bottom of the board is
objects on the work surface could cause damage to the board or connected equipment.
not
insulated, and contact with metallic
MDS 05-3946A01, Rev. A TransNET OEM Integration Guide 9
3.2 Cable Connections for Benchtop Testing
There are four basic requirements for operating the transceiver and evaluation
board in a benchtop test environment. They are:
• Adequate and stable primary power
• A proper antenna system or RF load (50 Ohms)
• The correct interface wiring between the transceiver and the connected
DTE device (RTU, PLC, etc.)
• A connected PC terminal to read/set transceiver parameters.
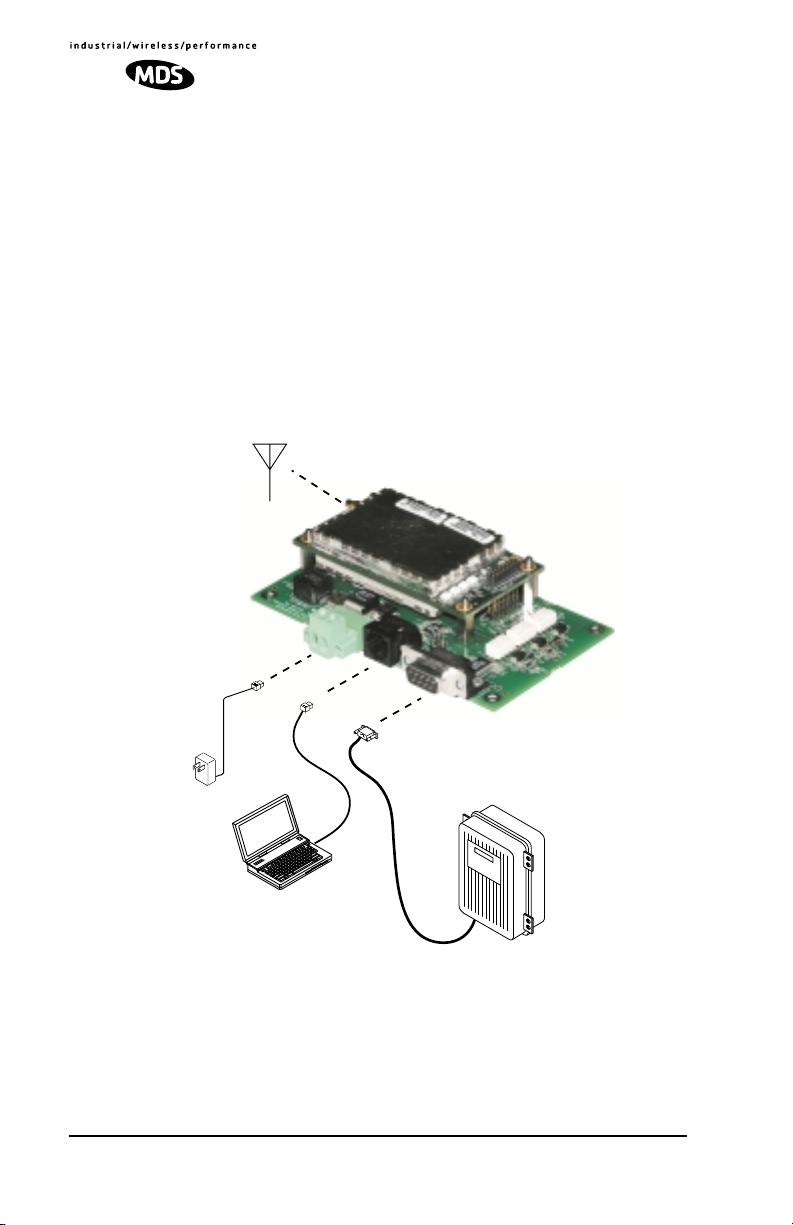
Figure 9 shows a typical setup for bench testing an OEM Transceiver. Two
such setups will be required if you intend to establish over-the-air
communications with another OEM transceiver.
Invisible place holder
ANTENNA
(OR 50-OHM RF LOAD)
OEM Transceiver
and Evaluation Board
Power Supply
13.6 VDC @
500 mA (min.)
PC TERMINAL
Figure 9. Typical Test Setup
DATA TERMINAL
EQUIPMENT
Antenna Connection (J200 on the transceiver module)
The Antenna connector is located at the upper left corner of the transceiver
module and is a female MMCX-type coaxial connector. Connect an antenna
or other suitable RF load to this connector. Only approved antenna/cable
assemblies may be used with the radio
10 TransNET OEM Integration Guide MDS 05-3946A01, Rev. A
CAUTION
POSSIBLE
EQUIPMENT
DAMAGE
Do not apply DC power to the transceiver without first
attaching a proper RF load, or the transceiver may be
damaged.
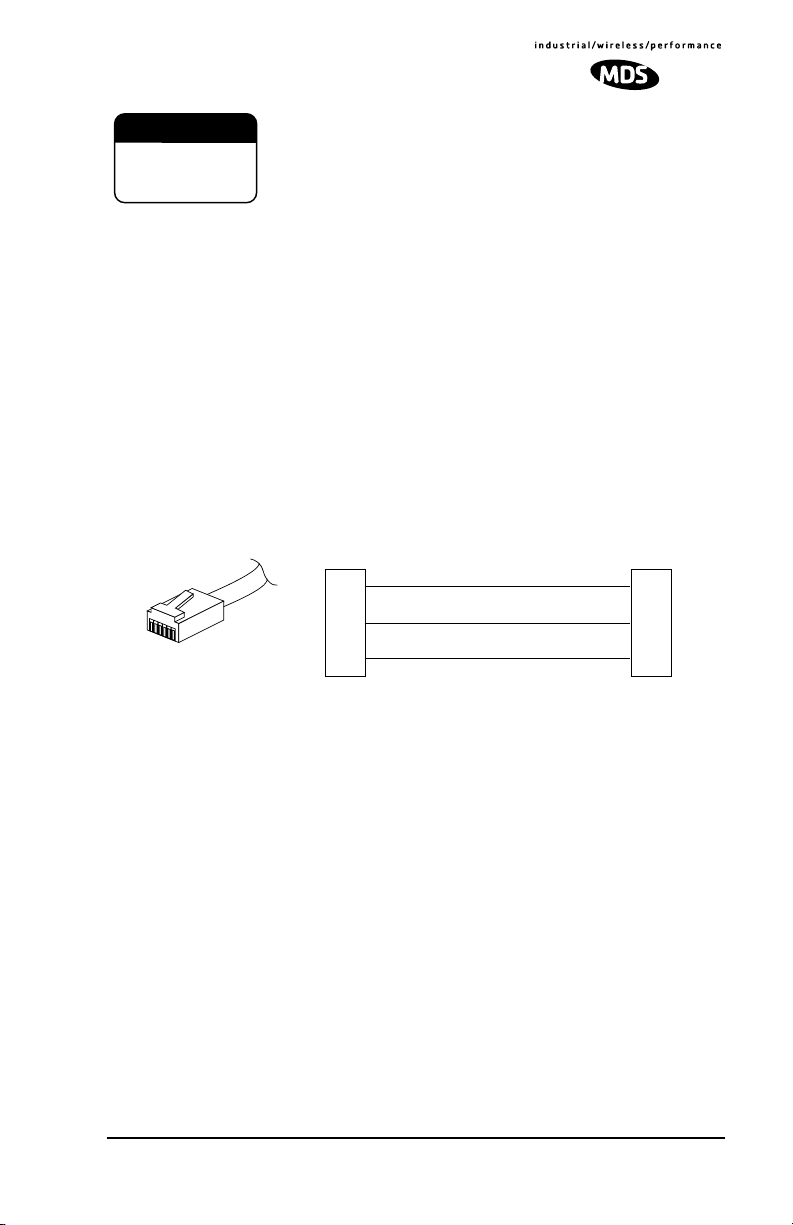
Diagnostic Connection (J4)
J4 is an RJ-11-6 modular connector used to connect the evaluation
board/transceiver to a PC terminal for programming and interrogation. An
RJ-11 to DB-9 Adapter Cable (Part No. 03-3246A01) is required for this
connection. If desired, an cable may be constructed for this purpose as shown
in Figure 10. Only Pins 4, 5, and 6 of the RJ-11 connector should be used.
Pins 1, 2, and 3 are reserved for factory test purposes.)
The data parameters of the diagnostics port are as follows: 8 data bits, 1 stop
bit, and no parity. It automatically configures itself to function at 1200, 2400,
4800, 9600, 19200, 38400, 57600, and 115200 bps, as required.
Invisible place holder
RJ-11 PLUG
(TO TRANSCEIVER)
DB-9 FEMALE
(TO COMPUTER)
RXD
TXD
GND
2
3
5
1
6
RJ-11 PIN LAYOUT
4
TXD
5
RXD
6
GND
Figure 10. RJ-11 to DB-9 Diagnostic Cable—Wiring Details
(A pre-constructed cable is also available, Part No. 03-3246A01)
Diagnostic Communication Modes
Two methods may be used to communicate with the radio’s diagnostic port:
•
Terminal Interface
—The PC is used in its basic terminal emulation
mode, (i.e., HyperTerminal session) and commands are issued as simple
text strings.
•
Radio Configuration Software
—Proprietary software from MDS that
runs under the Windows operating system. It provides a graphical user
interface with “point and click” functionality. The program is included
on the
TransNET Support Package
CD shipped with every radio order.
Both of these control methods are described in more detail in the section titled
“PROGRAMMING REFERENCE” on Page 34. This section also includes a
chart listing all commands for the OEM transceiver.
MDS 05-3946A01, Rev. A TransNET OEM Integration Guide 11

Data Connector (J5)
J5 on the Evaluation Board (Figure 11) is the data interface for the
transceiver. It is used to connect the transceiver to an external DTE terminal
that supports the EIA/RS-232 or EIA/RS-485 format, depending on how the
radio hardware was configured at the factory. The data connector supports
interface data rates of 1200, 2400, 4800, 9600, 19200, 38400, 57600, and
115200 bps (asynchronous only). The connector mates with a standard DB-9
plug available from many electronics parts suppliers.
Data Wiring Connections
The connections made to J5 will depend on the requirements of the DTE
device being used with the transceiver, and the operating functions that you
require. Only the required pins for the application should be used. Do not use
a straight through “computer” type cable that is wired pin-for-pin.
Typical RS/EIA-232 applications require the use of Pin 2 (receive
data—RXD) and Pin 3 (transmit data—TXD). Additionally, some systems
may require the use of Pin 7 (Request-to-send—RTS). If hardware flow
control is desired, Pin 7 (RTS) and Pin 8 (CTS) may also need connection.
Table 3 gives pin details for radios configured for RS/EIA-232 service.
Table 4 gives details for radios configured for RS/EIA-485 service.
NOTE:
from the Evaluation Board.
Radios equipped with a payload TTL interface are presented as RS-232 mode
5
1
96
Figure 11. DATA Connector (DB-9F)
As viewed from outside the device
12 TransNET OEM Integration Guide MDS 05-3946A01, Rev. A

Pin Descriptions—RS/EIA-232 Mode
Table 3 lists the
DATA
connector pin functions for radios configured to
operate in RS/EIA-232 mode.
Table 3. J5 DATA Connector Pinouts—RS/EIA-232
Pin
Number
1 OUT
2 OUT
3IN
4IN
5IN
6 OUT
7IN
8 OUT
9 -- Reserved—Do not connect.
Input/
Output Pin Description
Data Carrier Detect (DCD)—
chronization has been achieved.
Received Data (RXD)—
the connected device.
Transmitted Data (TXD)—
connected device.
Sleep Mode Input—
cuits in a remote radio. This allows for greatly reduced power consumption, yet preserves the radio’s ability to be
brought quickly back on line. See “Sleep Mode Operation
(Remote units only)” on Page 31 for details.
Ground—
Alarm condition—
indicates an alarm. (See ASENSE [HI/LO] command for
more information.)
Request to Send (RTS)—
the programmed CTS delay time has elapsed (DCE).
Clear to Send (CTS)—
CTS delay time has elapsed (DCE), or keys an attached radio when RF data arrives (CTS KEY).
Connects to ground (negative supply potential).
A low indicates hopping syn-
Supplies received payload data to
Accepts payload data from the
A ground on this pin turns off most cir-
A low indicates normal operation. A high
A high causes CTS to follow after
Goes high after the programmed
Pin Descriptions—RS/EIA-422/485 Mode
Table 4 on the following page lists the
DATA
connector pin functions for
radios configured to operate in RS/EIA-422/485 mode. See Figure 12 for
wiring schemes.
NOTE:
Radios equipped with a payload RS-232/485 interface can select
for RS/EIA-485 mode.
PORT RS485
MDS 05-3946A01, Rev. A TransNET OEM Integration Guide 13
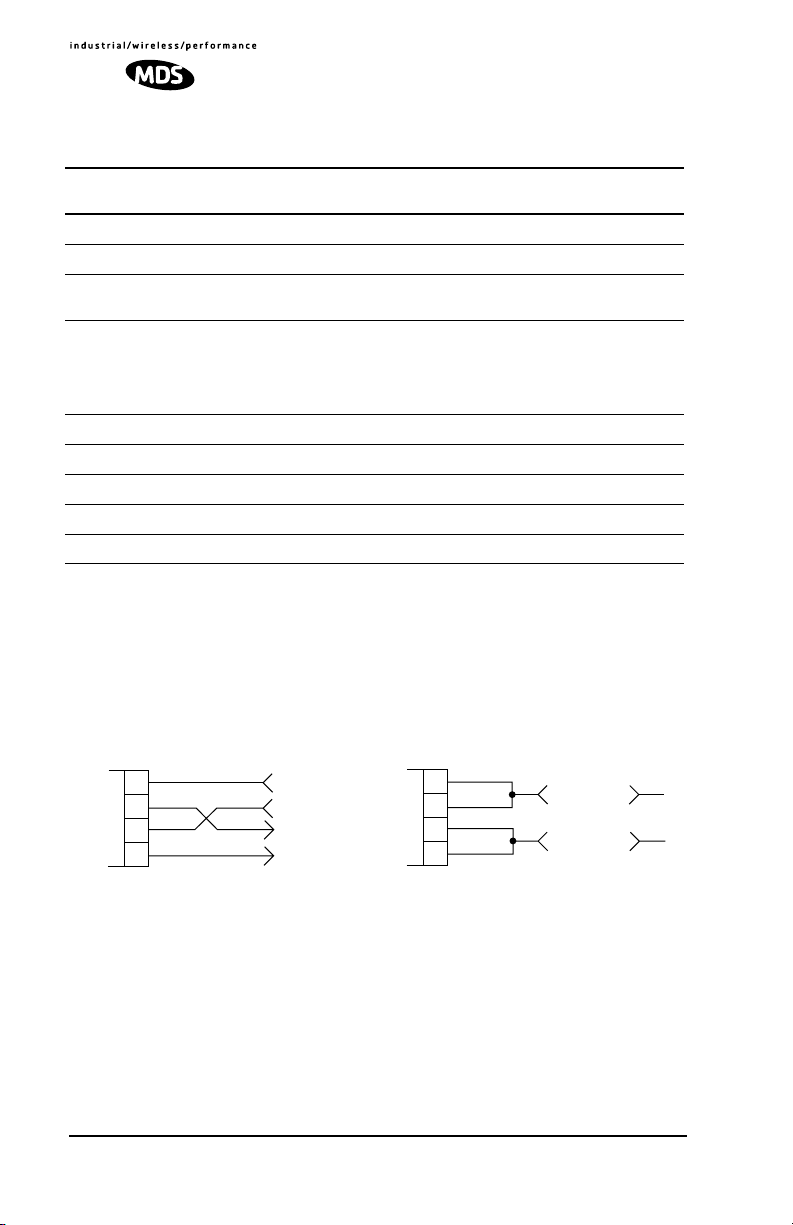
Table 4. DATA connector pin descriptions—RS/EIA-485 Mode
Pin
Number
1 — Reserved—Do not connect.
2 OUT
3IN
4IN
5IN
6 -- Reserved—Do not connect.
7IN
8 OUT
9 -- Reserved—Do not connect.
Input/
Output Pin Description
TXD+/TXA (Received Data +)—
RXD+/RXA (Transmitted Data +)—
input.
Sleep Mode Input—
cuits in a remote radio. This allows for greatly reduced power
consumption, yet preserves the radio’s ability to be brought
quickly back on line. See “Sleep Mode Operation (Remote
units only)” on Page 31 for details.
Ground—
RXD–/RXB (Transmitted Data –) —
TXD–/TXB (Received Data –) —
Connects to ground (negative supply potential).
Non-inverting driver output.
Non-inverting receiver
A ground on this pin turns off most cir-
Inverting receiver input.
Inverting driver output.
Table 4 Notes:
• RXD+/RXA and RXD–/RXB are data sent into the radio to be transmitted out
• RXD+/RXA is positive with respect to RXD–/RXB when the line input is a “0”
• TXD+/TXA and TXD–/TXB are data received by the radio and sent to the connected
device
• TXD+/TXA is positive with respect to TXD–/TXB when the line output is a “0”
Invisible place holder
4-WIRE CONNECTIONS
2
3
7
8
DATA CONNECTOR
RXD +
RXD –
TXD +
TXD –
2-WIRE CONNECTIONS
2
3
7
8
DATA CONNECTOR
RXD+/TXD+
RXD–/TXD–
Figure 12. EIA-422/485 Wiring Schemes
(Left: EIA-422, Right: EIA-485)
DC Power Connector (J3)
This connector accepts 12 Vdc operating power for the transceiver. A
wall-style AC adapter (Part No. 01-3862A02) is recommended for this
service.
DC connection is made with a 2-pin polarized plug, MDS Part No.
73-1194A39. Be sure to observe proper polarity.
positive (+) and the right is negative (-)
. (See Figure 13).
The left terminal is
14 TransNET OEM Integration Guide MDS 05-3946A01, Rev. A

CAUTION
POSSIBLE
EQUIPMENT
DAMAGE
The transceiver must be used only with negative-g round
systems. Make certain that the polarity of the power
source is correct.
Wire Ports (2)
(Polarity: Left +, Right –)
Figure 13. DC Power Connector (P/N 73-1194A39)
Invisible place holder
Lead
Binding
Screws (2)
Retaining
Screws (2)
NOTE:
resembles those used by some earlier MDS transceivers, such as the MDS
9810 and x710 family, the connectors are
plug will provide unreliable connections. Only the power connector shown in
Figure 13 with screw terminals and two retainer screws should be used with
the OEM Evaluation Board.
Although the power connector used on the OEM Evaluation Board
not
equal and the use of the wrong
Jumper Block J1 (DC Power Configuration)
Jumper J1 does not normally require any change by the user.
The jumper is
used to configure the board for the proper voltage level applied to the
transceiver module.
Both
jumper plugs are normally installed on J1. The plug connecting Pins 3
and 4 may be temporarily removed to insert an ammeter in series with the DC
power line going to the transceiver. This provides a convenient way to
measure the transceiver’s current draw during bench testing.
3.3 Initial Power-Up & Configuration
When all of the cable connections described in Section 3.2 have been made,
the transceiver is ready for initial power-up. Operation begins as soon as
power is applied, and there are no manual adjustments or settings required.
To place the transceiver into operation:
1. Ensure that all cable connections are properly wired and secure. Verify
that no metallic objects are touching the underside of the evaluation board
which might cause a short-circuit.
2. Apply DC power. The GP indicator (CR6) on the transceiver board
should light continuously.
MDS 05-3946A01, Rev. A TransNET OEM Integration Guide 15

3. Using a connected PC terminal, configure the unit with the proper mode
(master or remote), network address and data parameters. See
Configuration Settings
below for programming details.
4. Observe the transceiver’s LED indicators for proper operation. Table 5 on
Page 17 shows the functions and normal indications of the LEDs.
5. Verify that the transceiver is transmitting and recei ving data (TXD, RXD)
in response to the master station and/or connected terminal device.
Configuration Settings
This section explains how to set the essential operating parameters of the
transceiver. For more information on connecting a PC terminal and preparing
it for use, refer to Section see “PROGRAMMING REFERENCE” on Page
34.
The three essential settings for the transceiver are as follows:
Mode—
Network Address—
Data Interface Parameters—
Master, Remote, or Extension
a unique number from 1–65000
bps, data bits, parity, stop bits
Follow these steps to program the transceiver:
1. Set the Mode using the
MODE M
(Master), MODE R (Remote), or MODE X
(Extension) command. (Note: There can be only one master radio in a
system.)
For Extension (SAF) radios only: If any MODE X radios are used in the
network, SAF must be turned on at the Master station. The MODE X radio
must be programmed with an Extended Address (XADDR). Units that
need to hear the MODE X radio must be programmed with an appropriate
XPRI and/or XMAP value. (See “Simple Extended SAF Network” on
Page 26 for more information.)
2. Set a unique Network Address (1–65000) using ADDR command. Each
radio in the system must have the same network address. Tip: Use the last
four digits of the master station’s serial number to help avoid conflicts
with other users.
3. Set the baud rate/data interface parameters. Default setting is 9600 bps, 8
data bits, no parity, 1 stop bit. If changes are required, use the B A UD xxxxx
abc command where xxxxx equals the data speed (1200–115200 bps) and
abc equals the communication parameters as follows:
a = Data bits (7 or 8)
b = Parity (N for None, O for Odd, E for Even)
c = Stop bits (1 or 2)
NOTE:
7N1, 8E2 and 8O2 are invalid interface parameters.
16 TransNET OEM Integration Guide MDS 05-3946A01, Rev. A

Configuring Multiple Remote Units
In most installations, the Remote radios will be programmed with virtually
the same set of parameters. This process can be streamlined by testing key
pieces of equipment—such as the Master, Remote, and any Extensions—on
a benchtop setup prior to installation. This allows you to test various
configurations in a controlled environment.
Once the evaluation network is working satisfactorily, you can save the
configuration of each unit in a data file on your PC’s hard drive through the
use of TransNET Configuration Software. You can then open the Remote
configuration file and install it in the next Remote radio. The software
prevents you from overwriting unit or other mode-specific parameters.
LED Indicators
The LED indicators are located to the right of the transceiver’s shield cover
(near J3) and show important information about status of the module. The
functions of LEDs are explained in Table 5 below.
NOTE: For the LEDs to function, they must be enabled using the LEDS ON command.
Within 16 seconds of power-up, the following indications will be seen if the
unit has been properly configured and is communicating with another
transceiver:
• GP lamp lit continuously
• DCD lamp lit continuously (if unit is synchronized with another station)
• Remote radio(s) transmitting data (TXD) and receiving data (RXD) with
another station.
Table 5. LED indicator descriptions
LED Name Description
RXD
TXD
DCD
GP
RXD (CR3)
Receive Data
TXD (CR4)
Transmit Data
DCD (CR5)
Data Carrier Detect
GP (CR6)
General Purpose
Serial receive data activity. Payload data from connected device.
Serial transmit data activity. Payload data to connected device.
Continuous—Radio is receiving/sending synchronization frames
On within 10 seconds of power-up under normal
conditions
• Continuous—Power is applied to the radio; no
problems detected
• Flashing (5 times-per-second)—Fault indication.
See “TROUBLESHOOTING” on Page 52
• Off—Radio is unpowered or in Sleep mode
MDS 05-3946A01, Rev. A TransNET OEM Integration Guide 17
4.0 EVALUATION BOARD DOCUMENTATION
This section contains an assembly drawing and parts list for the OEM
Evaluation Board. Also, a foldout schematic diagram of the Board is included
at the back of this manual. This documentation is provided to assist
integrators who need to create compatible interface circuitry between the
OEM transceiver and host equipment.
NOTE: The foldout schematic may also be accessed from the TransNET Support
Package CD, or from our website at: www.microwavedata.com.
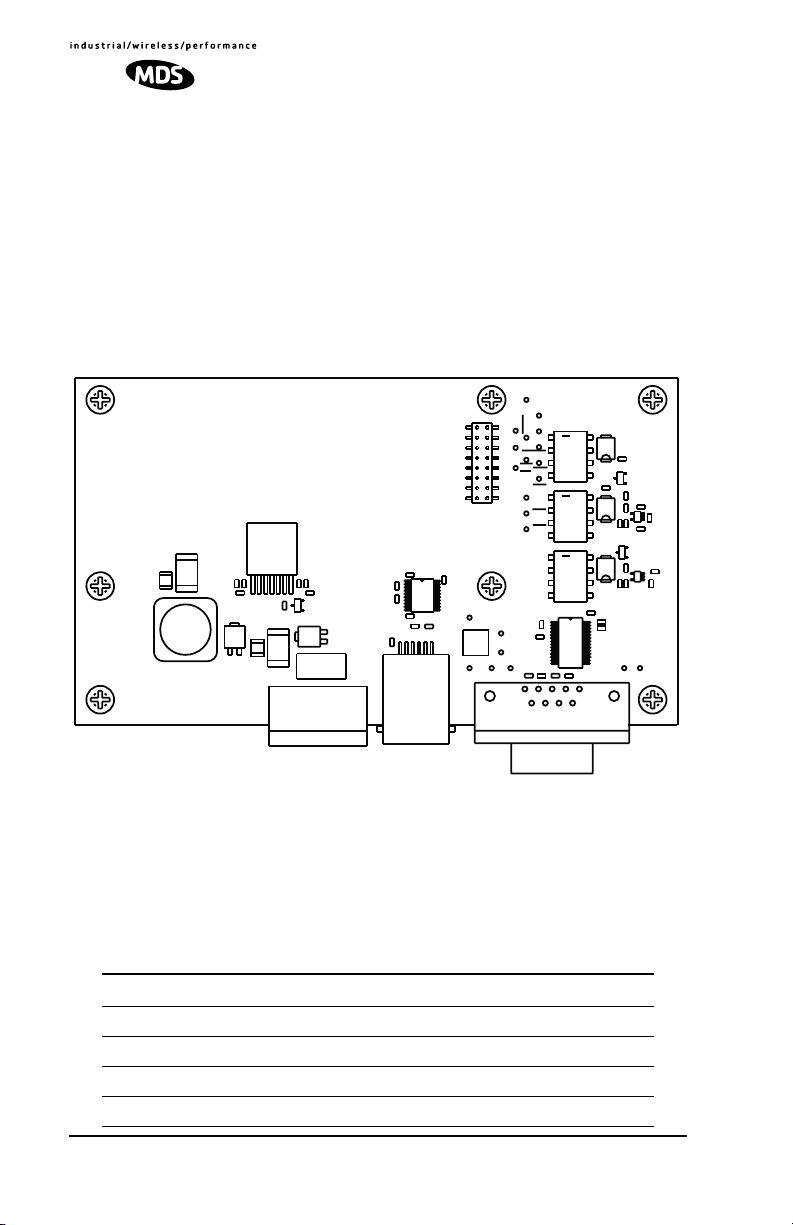
4.1 Assembly Drawing
Invisible place holder
GND
2
16
J2
U2
o
1
C13
C12
C15
+
C14
R10
L1
CR2
R13
R14
R11
C
NA
C8
A
CR1
+
CR3
C30
C16
FH1
1
J3
C19
o
C17
C18
C20
C31
C21
U3
J1
C7
C6
2
6
1
J4
Figure 14. Evaluation Board Assembly Diagram
DIAG_TXD
1
ALARM
DIAG_RXD
SLEEP
SHUTDN
DCD
UNREG_PWR
RXD
LED
CTS
GND
15
REG_PWR
RTS
TXD
C2
C4
1
C29
51
9
CR6
K3
R15
CR5
K2
C23
CR4
K1
C22
C1
C3
o
28
C5
U1
C11
C10
C9
6
J5
C24
<
C
E
Q2
B
R9
R8
5
<
C26
R5
C
E
Q1
B
R7
5
<
U4
C25
R12
R6
1
U5
R3
1
R4
4.2 Parts List
Table 6 lists the electronic components used on the Evaluation Board.
Table 6. OEM Evaluation Board Parts List
Ref. Desig. Part Description
CR1 DIODE, SOT23 SMALL SIG 914 5D
CR4 CR5 CR6 RECTIFIER, 30V B13
CR2 CR3 DIODE, SCHOTTKY POWER, SMT, SNGL, UPS840
Q1 Q2 TRANSISTOR, SOT23 NPN 6429 M1LR
18 TransNET OEM Integration Guide MDS 05-3946A01, Rev. A

Table 6. OEM Evaluation Board Parts List (Continued)
U4 U5 IC, LINEAR SC70-5 COMPARATOR SNGLE LMV33
U1 IC, IN'FACE SSOP28 RS-232 TXVR SP3238E
U3 IC, IN'FCE 20PIN TSSOP DRIVER SP3222
U2 IC, SWITCHING REG'R ADJ.4.5A LT1374HVIR
K1 K2 K3 RELAY, DPDT
R10 RESISTOR, CHIP 0603 1/16W 5% 2.2K
R4 R5 R13 R14 RESISTOR, CHIP 0603 1/10W 1% 10K
R12 RESISTOR, CHIP O603 1/10W 1% 100K
R7 R9 RESISTOR, CHIP 0603 1/10W 1% 1.5K
R11 RESISTOR, CHIP O603 1/10W 1% 1.82K
R3 RESISTOR, CHIP 0603 1/10W 1% 22.6K
R15 RESISTOR, CHIP O603 1/10W 1% 31.6K
R8 RESISTOR, CHIP 0603 1/10W 1% 470 OHM
R6 RESISTOR, CHIP O603 1/10W 1% 6.81K
C12 CAP, TANT 7343 20% 10V 100uf
C6 C7 C9 C10
C11 C29 C31
C1 C2 C3 C4 C5
C17 C18 C19
C20 C21 C22
C23 C24 C25
C26 C8
C13 CAP, CHIP 0603 X7R 10% 470 pf
C14 CAP, CHIP 0603 X7R 10% 4700pF
C15 Capacitor, Low ESR Chip Ceramic, 1210 22uF
C16 Capacitor, Low ESR Chip Ceramic, 1210 4.7
L1 INDUCTOR, SWITCHING, 20%, 10uH
J1 CONN, HEADER, .100 DUAL STR 4-PIN
P/O J1 1-2, P/O
J1 3-4
FH1 FUSE HOLDER, PCB SMT W/2A SLO-BLO FUSE
CAP, CHIP 0603 50V NPO 5% 100pf
CAP, CHIP 0603 X7R 10% 0.1uF
CONN, JUMPER
MDS 05-3946A01, Rev. A TransNET OEM Integration Guide 19

Table 6. OEM Evaluation Board Parts List (Continued)
J2 CONN, HEADER, PC MOUNT .078, DUAL, 16 PIN
J3 CONN, TERM STRIP, 5MM PCB
J4 CONN, TELE JACK 6POS 6CON RT A SMT W/F
J5 CONN, D-SUB, PCB RCPT 90 DEGREE, 9 PIN
Samtec TW Series, Part No: ASP 103812-01
(Mates with J3 on the OEM radio transceiver)
4.3 Evaluation Board Fuse Replacement
The Evaluation Board is protected by a 2 ampere fuse. The fuse can be blown
by an over-current condition caused by an internal failure or over-voltage.
Follow the procedure below to remove and replace the fuse:
1. Disconnect the primary power cable and all other connections to the
Evaluation Board.
2. Locate the fuse holder assembly , FH1, behind the green power connector,
J3.
3. Loosen the fuse from the holder using a very small screwdriver, then use
a small pair of needle-nose pliers to pull the fuse straight up and out of
the holder.
4. Use an ohmmeter or other continuity tester to verify that the fuse is open.
5. Install a new fuse in the holder. Replacement fuse information: Littelfuse
#0454002; 452 Series, 2 Amp SMF Slo-Blo fuse (MDS Part No.
29-1784A03).
20 TransNET OEM Integration Guide MDS 05-3946A01, Rev. A

5.0 TRANSCEIVER MOUNTING
This section provides details for mounting the OEM transceiver in a host
device. The module need only be protected from direct exposure to the
weather. No additional RF shielding is required.
5.1 Mounting Dimensions
Figure 15 shows the dimensions of the transceiver board and its mounting
holes. If possible, choose a mounting location that provides an unobstructed
view of the radio’s LED status indicators when viewing the board from
outside the host device.
Mount the transceiver module to a stable surface using the four mounting
holes at the corners of the PC board. Standoff spacers should be used to
maintain adequate clearance between the bottom of the circuit board and the
mounting surface. (Fasteners/anchors are not normally supplied.)
3.45”
(87.5 mm)
1.81˝
(46 mm)
T
3.11”
(7.9 cm)
Side View
w
ie
V
p
o
1.49˝
(3.8 cm)
(16 mm)
0.63”
Figure 15. Transceiver Mounting Dimensions
5.2 Antennas & Feedlines
A number of omnidirectional and directional antennas are available for use
with the radio. Contact your factory representative for specific
recommendations on antenna types and hardware sources. In general, an
omnidirectional antenna (Figure 16) is used at master station sites in order to
provide equal coverage to all of the remote units.
MDS 05-3946A01, Rev. A TransNET OEM Integration Guide 21

At remote sites and in many point-to-point systems, a directional Yagi
antenna (Figure 17) is generally recommended to minimize interference to
and from other users and to maximize range.
For systems operating in a very short range environment, small, flexible whip
antennas may also be supplied. Such antennas are available for direct
connection to the transceiver module, or for exterior mounting with various
lengths of feedline.
Figure 16.
Omnidirectional Antenna
(shown mounted to mast)
Invisible place holder
Figure 17. Typical Yagi Antenna (shown mounted to mast)
Feedlines
The feedline supplied with the antenna was carefully selected to minimize RF
loss and ensure regulatory compliance with the antenna being used. Do not
make substitutions or change the lengths of the antenna system feedline. If
you require a different length of feedline for your installation, contact your
factory representative for assistance.
NOTE: Strong fields near the antenna can interfere with the operation of the low level
22 TransNET OEM Integration Guide MDS 05-3946A01, Rev. A
RTU circuits and change the reported values of the data being monitored. If interference is experienced, it may be necessary to re-orient the antenna with respect to the radio, RTU, sensors or other components of the system.

6.0 OPTIMIZING PERFORMANCE
After the basic operation of the radio has been checked, you may wish to
optimize its performance using some of the suggestions given here. The
effectiveness of these techniques will vary with the design of your system and
the format of the data being sent.
Complete instructions for using the commands referenced in this manual are
provided in “PROGRAMMING REFERENCE” on Page 34.
6.1 Antenna Aiming
For optimum performance of directional antennas (yagis), they must be
accurately aimed in the direction of desired transmission. The easiest way to
do this is to point the antenna in the approximate direction, then use the
remote radio’s RSSI command (Received Signal Strength Indicator) to further
refine the heading for maximum received signal strength.
In an MAS system, RSSI readings are only meaningful when initiated from a
remote station. This is because the master station typically receives signals
from several remote sites, and the RSSI would be continually changing as the
master receives from each remote in turn.
6.2 Antenna SWR Check
It is necessary to briefly key the transmitter for this check by placing the radio
in the SETUP mode (Page 48) and using the KEY command. (To unkey the
radio, enter DKEY; to disable the SETUP mode and return the radio to normal
operation, enter Q or QUIT.)
The SWR of the antenna system should be checked before the radio is put into
regular service. For accurate readings, a wattmeter suited for 1000 MHz is
required. One unit meeting this criteria is the Bird Model 43 directional
wattmeter with a 5J element installed.
The reflected power should be less than 10% of the forward power (≈2:1
SWR). Higher readings usually indicate problems with the antenna, feedline
or coaxial connectors.
6.3 Data Buffer Setting
The default setting for the data buffer is OFF. This allows the radio to operate
with the lowest possible latency and improves channel efficiency. MODBUS
and its derivatives are the only protocols that should require the buffer to be
turned on. See “BUFF [ON, OFF]” on Page 41 for details.
6.4 Hoptime Setting
The default hop-time setting is 7 (7 ms). An alternate setting of 28 is used to
increase throughput, but at the cost of increased latency. A detailed
explanation of the HOPTIME command can be found on Page 44.
MDS 05-3946A01, Rev. A TransNET OEM Integration Guide 23

6.5 Operation at 115200 bps
Burst throughput at 115200 bps is supported at all settings. The radio will
always buffer at least 500 characters. Sustained throughput at 115200bps is
only possible when the data path is nearly error free and the operating settings
have been properly selected. For sustained operation at 115200 bps, use the
following settings: SAF OFF, FEC OFF, REPEAT 0, RETRY 0, HOPTIME 28.
6.6 Baud Rate Setting
The default baud rate setting is 19200 bps to accommodate most systems. If
your system will use a different data rate, you should change the radio’s data
interface speed using the BAUD xxxxx abc command (Page 41). It should be
set to the highest speed that can be sent by the data equipment in the system.
(The transceiver supports 1200 to 115200 bps.)
6.7 Radio Interference Checks
The radio operates in eight frequency zones. If interference is found in one or
more of these zones, the SKIP command (Page 49) can be used to omit them
from the hop pattern. You should also review 8.0 DEALING WITH
INTERFERENCE, when interference problems are encountered.
6.8 RF Output Setting
OEM Transceivers are shipped from the factory with a compliant power
setting for the antenna system to be used. This setting limits the maximum
effective isotropic radiated power (EIRP) from the antenna to +36 dBm. For
compliance with FCC and Industry Canada rules, the power level must be
adjusted in accordance with Table 7 below.
NOTE: In some regions, the maximum allowable RF output may differ from those stat-
ed above. Be sure to check for and comply with the requirements for your area
before placing the transceiver in service.
Table 7. Power Setting vs. Antenna System Gain
Required to maintain FCC/IC maximum +36 dBm EIRP
Antenna
(Model No.)
1/2 Wave Whip
Dipole (Z1527)
Omni-directional
Base Station
(Z1526)
Yagi Directional
(Z1523A, B, or C)
Gain
Power Setting
(dBi)
2.1 30 30 18-inch/0.46 meter
7.1 29 29 10 feet/3.05 meters of
8.1 28 28 10 feet/3.05 meters of
(dBm)
Max. Power
(dBm)
Minimum Length of
Feedline Cable
LMR 100A cable assembly
RG-213 cable
with 18-inch/0.46 meter
LMR 100A cable assembly
LMR 400 cable
with 18-inch/0.46 meter
LMR 100A cable assembly
24 TransNET OEM Integration Guide MDS 05-3946A01, Rev. A

7.0 OPERATING PRINCIPLES & SPECIAL CONFIGURATIONS
7.1 How Remotes Acquire Synchronization
Remotes acquire synchronization and configuration information via SYNC
messages sent from the Master (the MODE M unit) or from any valid
Extension (MODE X unit).
The Master will always transmit SYNC messages. An Extension will only
start sending SYNC messages after synchronization is achieved with its
Master.
The ability to synchronize to a given radio is further qualified by the sender’s
Extended Address (XADDR) and by receiver’s Synchronization Qualifiers
(XMAP, XPRI, and XRSSI).
When a primary is specified (XPRI is 0...31), a radio will always attempt to
find the primary first. If 30 seconds elapses and the primary is not found, then
the radio will attempt to synchronize with any non-primary radio in the
list.
Once every 30 minutes, if a primary is defined, the radio will check its
synchronization source. If the radio is synchronized to a unit other than the
primary, then the current RSSI value is compared to the XRSSI value. If RSSI
is less than XRSSI (or if XRSSI is NONE) the radio will force a
loss-of-synchronization, and hunt for the primary again (as described in the
previous paragraph).
By default, Extensions (and the Master) begin with XADDR 0.
Synchronization qualifiers are set to XMAP 0, XPRI 0, and XRSSI NONE,
respectively. This default configuration allows any radio to hear the Master.
When an Extension is added, the extended address of the Extension must be
set to a unique value. All remotes that need to hear that extension can specify
this either by designating the extension as the primary (XPRI), or by including
it in their list of valid synchronization sources (XMAP).
XMAP
7.2 Establishing a Tail-End Link
A tail-end link can be used to bring an outlying remote site into the rest of an
MAS network. Figure 5 on Page 5 shows a diagram of this type of system.
A tail-end link is established by connecting an OEM transceiver
“back-to-back” with another unit such as a licensed MDS x710 Series
transceiver. The wiring connections between the two radios must be made as
shown in Figure 18. In addition, the DEVICE CTS KEY command must be
asserted at the OEM radio.
MDS 05-3946A01, Rev. A TransNET OEM Integration Guide 25

DCE
DB-25
3
RXD
TXD
2
GND
7
RTS
MDS x710 Series
Remote T ransceiver
(or device requiring keyline)
Figure 18. Data Crossover Cable for Tail-End Links
4
If required.
DCE
16-pin header (J3)
10
TXD
RXD
14
5
GND
16
CTS
TransNET OEM
(DEVICE CTS KEY)
Remote T ransceiver
7.3 Store & Forward (SAF) Operation with Extension Radios
The Store-and-Forward (SAF) capability allows individual radios to act as
data repeaters. SAF operates by dividing a network into a vertical hierarchy
of two or more sub-networks. (See Figure 6 on Page 6.) Adjacent
sub-networks are connected via Extension radios operating in “MODE X”
which move data from one sub-network to the next one.
The Store-and-Forward implementation adheres to the general polling
principles used in most multiple-address systems (MAS). Polls originate from
the Master station, broadcast to all radios within the network, and travel
hierarchically downward. All Remotes will hear the same message, but only
one Remote will respond. Messages within a hierarchy only travel in one
direction at a time.
Using SAF will cut the overall data throughput in half, however, multiple
networks can be inter-connected with no additional loss in network
throughput.
Simple Extended SAF Network
Figure 19 depicts a two-level network utilizing a single Master (M) and an
Extension (X) radio. In this network, messages directed to Remotes in the
“K” sub-network, will be relayed through Extension radio X
to the
j,k
K-Remotes. Any response from a Remote in sub-network “K” will pass back
through Extension radio X
to the Master Mj. Radios in sub-network “J”
j,k
operate on the same set of frequencies and sub-network “K” but with a
different radio-frequency hopping pattern.
26 TransNET OEM Integration Guide MDS 05-3946A01, Rev. A

Invisible place holder
M
J
Sub-Network J
R
R
J
X
J
J,K
R
J
Sub-Network K
KK
Figure 19. Simple Extended SAF Network
R
Networks: J and K
RR
K
In the SAF operation, the Extension radios are set to MODE X
(Details page 45) and operate with a “dual personality”—50% of the time
they serve as a Remote station and 50% of the time as a Master for
sub-network Remotes.
Extended SAF Network
Below is an example of a multilevel network utilizing two repeaters—X
and X
. The example demonstrates the extensibility of the network. In this
K,L
J,K
case, messages directed to Remotes in the sub-network L will be relayed
through Extension radios X
J,K
and X
. As in the previous example, the
K,L
Extension radios will split their operating time equally between their Master
and Remote personalities. This multi-layered network can be extended
indefinitely without degrading system throughput beyond that initially
incurred by placing the network in the SAF mode.
MDS 05-3946A01, Rev. A TransNET OEM Integration Guide 27

Invisible place holder
M
J
Sub-Network J
R
R
J
X
J
J,K
R
J
Sub-Network K
X
K,L
R
K
R
K
Sub-Network L
R
R
L
Figure 20. Extended SAF Network
R
L
L
Networks: J, K, L
Retransmission and ARQ operation
Functionally, the sub-network side of an Extension behaves like a
corresponding connection between a master and a remote.
When an Extension is using its “master personality” it sends
acknowledgments and performs unconditional retransmissions based on its
REPEAT count.
When an Extension is using its “Remote personality”, acknowledgments are
processed and retransmissions occur as needed, up to the number of times
specified by the
RETRY count value.
If new data arrives—from a new source—prior to completion of
retransmissions, then this is considered a violation of the polling model
protocol. The new data takes precedence over the old data and the old data is
lost. In such a situation, new data is likely to be corrupt as it will have some
old data mixed in with it.
Synchronization in SAF Networks
The Master controls the synchronization for a given network for all modes.
Setting the Master to “SAF ON” broadcasts a command from the Master to all
radio units in the associated network either directly or through an Extension
radio. This command puts all radios in the entire system in a special
time-division duplexing mode that alternates between two timeslots. One
time slot for data communications upstream and another for downstream
communications.
28 TransNET OEM Integration Guide MDS 05-3946A01, Rev. A

The Extensions are single radios which serve as bridges between adjacent
sub-network levels. Extensions will undertake a “remote” personality in one
timeslot, and a “master” personality in the alternate timeslot and provide
communications with associated Remotes downstream. Extensions behave
like two radios with their data ports tied together, first synchronizing with
their upstream Master during their Remote personality period, and then
providing synchronization signals to dependent Remotes downstream during
its Master personality period.
All Remotes synchronize to a corresponding Master. This can be the “real
master” (the MODE M unit), or it can be a repeater “Extension” that derives
synchronization from the “real master.”
Payload polls/packets broadcast from the network Master will be repeated to
all levels of the network, either directly to Remotes, or through network
repeaters—the Extensions station. The targeted Remote will respond to the
poll following the same path back to the Master.
Configuration Parameters for Store-and Forward Services
The installation and configuration of a network with an Extension using SAF
is straight-forward with only a few unique parameters that need to be
considered and set at each unit.
In every network there can be only one Master station. It will serve as the sole
gateway to the outside world. The following three tables detail the parameters
that will need to be set on each type of radio in the network.
• Network Master Radio—Table 8 on Page 29
• Extension Radio(s)—Table 9 on Page 30
• Remote Radio(s)—Table 10 on Page 31
Table 8. Configuration Parameters for SAF Services
Network Master Radio
Parameter Command Description
Operating Mode
Network Address
MODE M
Details page 45
ADDR
Details page 40
Set the radio to serve as a
Master
A number between 1 and
65,000 that will serve as a
common network address.
All radios in the network
use the same number.
MDS 05-3946A01, Rev. A TransNET OEM Integration Guide 29

Table 8. Configuration Parameters for SAF Services
Network Master Radio (Continued)
Parameter Command Description
Extended Address
Store and Forward
Mode
XADDR
Details page 51
SAF ON
Details page 48
A number between 0 and
31 that will serve as a
common address for radios that synchronize directly to this master.
Typically, the Master is
set to zero (0).
Enables store and forward capability in the network.
Table 9. Configuration Parameters for SAF Services
Extension Radio(s)
Parameter Command Description
Operating Mode
Network Address
Extended Address
Primary Extended
Address
Extension Map
Extension
Received Signal
Strength Indicator
MODE X
Details page 45
ADDR
Details page 40
XADDR
Details page 51
XPRI
Details page 51
XMAP
Details page 51
XRSSI
Details page 51
Set the radio to serve as an
Extension
A number between 1 and
65,000 that will serve as a
common network address.
All radios in the network use
the same number.
A number between 0 and 31
that will serve as a common
address for radios that synchronize directly to this Extension radio serving as
master for associated
sub-network units.
We recommend using zero
(0) for the Master station.
XADDR number of the primary or preferred radio with
which this radio will synchronize.
Functional list of all XADDR
values with which this radio
can synchronize, excluding
XPRI address
the
The minimum RSSI level re-
quired to preserve synchronization with a non-primary
radio. (Ineffective when
XPRI is NONE)
30 TransNET OEM Integration Guide MDS 05-3946A01, Rev. A

Table 10. Configuration Parameters for SAF Services
Remote Radio(s)
Parameter Command Description
Operating Mode
Network Address
Primary Extended
Address
Extension Map
Extension
Received Signal
Strength Indicator
MODE R
Details page 45
ADDR
Details page 40
XPRI
Details page 51
XMAP
Details page 51
XRSSI
Details page 51
Set the radio to serve
as a Remote station
A number between 1
and 65,000 that will
serve as a common
network address or
name.
Same number for all
units in the same network.
XADDR number of the
primary or preferred
radio with which this
radio will synchronize.
A list of all XADDR values with which this radio can synchronize,
excluding the
address
The minimum RSSI
level required to preserve synchronization
with a non-primary radio. (Ineffective when
XPRI is NONE)
XPRI
7.4 Sleep Mode Operation (Remote units only)
In some installations, such as at solar-powered sites, it may be necessary to
keep the transceiver’s power consumption to an absolute minimum. This can
be accomplished using the radio’s Sleep Mode feature. In this mode, power
consumption is reduced to about 8 mA.
Sleep Mode can be enabled under RTU control by asserting a ground (on Pin
6 of J3, the radio’s header connector. The radio stays in Sleep Mode until the
low is removed, and all normal functions are suspended.
The radio can be “awakened” by your RTU every minute or so to verify
synchronization with the master station. When the ground is removed, the
radio will be ready to receive data within 75 milliseconds.
NOTE: The SLEEP function must be set to ON; otherwise a ground on the Sleep Mode
MDS 05-3946A01, Rev. A TransNET OEM Integration Guide 31
pin will be ignored.

It is important to note that power consumption will increase somewhat as
communication from the master station degrades. This is because the radio
will spend a greater period of time “awake” looking for synchronization
messages from the master radio.
In order for the radio to be controlled by the Sleep Mode pin, the radio must
be set to SLEEP ON. See “SLEEP [ON, OFF]” on Page 50 for more
information.
Sleep Mode Example
The following example describes Sleep Mode implementation in a typical
system. Using this information, you should be able to configure a system that
meets your own particular needs.
Suppose you need communications to each remote site only once per hour.
Program the RTU to raise an EIA/RS-232 line once each hour (DTR for
example) and wait for a poll and response before lowering it again. Connect
this line to Pin 6 of the radio’s header connector. This will allow each RTU
to be polled once per hour, with a significant savings in power consumption.
8.0 DEALING WITH INTERFERENCE
The transceiver shares the frequency spectrum with other services and other
Part 15 (unlicensed) devices in the USA. As such, near 100% error free
communications may not be achieved in a given location, and some level of
interference should be expected. However, the radio’s flexible design and
hopping techniques should allow adequate performance as long as care is
taken in choosing a suitable location and in configuring the radio’s operating
parameters.
In general, keep the following points in mind when setting up your
communications network:
1. Systems installed in rural areas are least likely to encounter interference;
those in suburban and urban environments are more likely to be affected
by other devices operating in the license-free frequency band and by
adjacent licensed services.
2. If possible, use a directional antenna at remote sites. They confine the
transmission and reception pattern to a narrow lobe, which minimizes
interference to (and from) stations located outside the pattern.
3. If interference is suspected from a nearby licensed system (such as a
paging transmitter), it may be helpful to use horizontal polarization of all
antennas in the network. Because most other services typically use
vertical polarization in this band, an additional 20 dB of attenuation to
interference can be achieved by using the horizontal plane.
4. Multiple spread spectrum systems can co-exist in close proximity to each
other with only minor interference, provided they are each assigned a
unique network address. Each network address has a different hop pattern
associated with it.
32 TransNET OEM Integration Guide MDS 05-3946A01, Rev. A

5. If constant interference is present in a particular frequency zone, it may
be necessary to “lock out” that zone from the radio’s hopping pattern.
The radio includes built-in tools to help users do this. Refer to the
discussion of the SKIP command (Page 49) for more information. In the
USA, a maximum of four zones may be skipped, per FCC rules. Check
the regulatory requirements for your region.
6. Interference can also come from out-of-band RF sources such as paging
systems. Installation of a bandpass filter, such as Part No. 20-2822A02 in
the antenna system may provide relief from this type of interference.
7. Proper use of the RETRY and REPEAT commands may be helpful in areas
with heavy interference.
The RETRY command sets the maximum number of times (1 to 10) that a
radio will re-transmit upstream data over the air. Values greater than 1
successively improve the chances of a message getting through when
interference is a problem.
The REPEAT command sets a fixed number of unconditional
retransmissions for downstream data.
8. The RF power output of all radios in a system should be set for the lowest
level necessary for reliable communications. This lessens the chance of
causing unnecessary interference to nearby systems and keeps power
consumption to a minimum.
MDS 05-3946A01, Rev. A TransNET OEM Integration Guide 33

9.0 PROGRAMMING REFERENCE
All programming and control of the transceiver is performed through a PC
terminal connected to the radio or the Evaluation Board DIAG connector.
There are no manual adjustments or jumper settings used for configuration.
This section explains how to establish terminal communication, and provides
a complete list of user commands.
9.1 Programming Methods
Terminal Interface Mode
A PC may be used by operating it in a basic terminal mode (e.g., a
HyperTerminal session) and entering the radio commands listed in the tables
contained in this section. The PC must be connected to the radio via its 16-pin
header connector, or, if using the Evaluation Board, via the modular
diagnostics connector. In the latter case, an RJ-11 to DB-9 Adapter Cable
(Part No. 03-3246A01) is required. A cable of this type may be constructed
using the information shown in Figure 10 on Page 11.
Once a PC terminal is connected, communication (baud rate) is automatically
established through the command interface. To access the command
interface, press the ESCAPE key, followed by one or more ENTER keystrokes
(delivered at about half-second intervals), until the “>” prompt is displayed.
NOTE: The diagnostic interface uses 8 data bits, 1 stop bit, and no parity. It automati-
cally configures itself to function at 1200, 2400, 4800, 9600, 19200, 38400,
57600, and 115200 bps.
If the DLINK setting is ON, the interface will start out in Diagnostic Link mode.
This is a special protocol used to support Network-Wide Diagnostics. The process described in the paragraph above causes the radio to exit diagnostic link
mode and enter command mode. If there is no input in command mode for 5
minutes, the interface will revert back to diagnostic link mode.
PC-Based Configuration Software
The Windows™-based TransNET Configuration Software
(P/N 06-4059A01) is designed for use with the OEM Transceiver. This
software provides access to all of the radio’s capabilities with the benefit of
context-sensitive help. The program is shipped as part of the TransNET
Support Package CD included with every order.
9.2 User Commands
A series of tables begin on the next page listing the various user commands
for the OEM transceiver. The tables provide abbreviated command
descriptions. Complete descriptions follow in Section 9.3.
34 TransNET OEM Integration Guide MDS 05-3946A01, Rev. A

Entering Commands
The proper procedure for entering commands is to type the command,
followed by an keystroke. For programming commands, the
command is followed by , the appropriate information or values, and
ENTER
then .
ENTER
SPACE
Table 11. Network Configuration—Master Station
COMMAND DESCRIPTION
BUFF [ON, OFF]
Details, page 41
FEC [ON, OFF]
Details, page 44
HOPTIME [7, 28]
Details, page 44
REPEAT [0–10]
Details, page 47
RETRY [0–10]
Details, page 47
SAF [ON, OFF]
Details, page 48
SKIP [NONE, 1...8]
Details, page 49
ON = Seamless data
OFF = Fast byte throughput.
Sets/disables FEC
(Forward Error Correction) setting.
Displays hop-time or sets it to 7 or 28 ms.
Sets/displays the fixed downstream re-send
count.
Sets/displays the maximum upstream re-send
count for ARQ (Automatic Repeat Request)
operation
Enables/disables the store-and-forward func-
tion for the network controlled by this Master
unit.
Skip one or more frequency zones
Table 12. Network-Wide Diagnostics
Command Description
DLINK [xxxxx/ON/OFF]
Details, page 43
DTYPE [NODE/ROOT]
Details, page 44
Controls operation of diagnostic link function.
Set radio’s operational characteristics for net-
work-wide diagnostics
MDS 05-3946A01, Rev. A TransNET OEM Integration Guide 35

Table 13. Operational Configuration—Set/Program
Command Description
ADDR [1–65000]
Details, page 40
AMASK [0000 0000–FFFF FFFF]
Details, page 41
ASENSE [HI/LO]
Details, page 41
BAUD [xxxxx abc]
Details, page 41
CODE [NONE, 1…255]
Details, page 42
CTS [0–255]
Details, page 42
CTSHOLD [0–60000]
Details, page 43
DEVICE [DCE, CTS KEY]
Details, page 43
LEDS [ON, OFF]
Details, page 45
MODE [M, R, X]
Details, page 45
OWM [xxxxx]
Details, page 45
OWN [xxxxx]
Details, page 45
PORT [RS232, RS485]
Details, page 45
PWR
Details page 47
REPEAT [0–10]
Details, page 47
RXTOT [NONE, 0–1440]
Details, page 48
RTU [ON, OFF, 0-80]
Details, page 48
Program network address
Sets alarm response.
Default: FFFF FFFF
Sense of the radio’s alarm output in the
EIA-232 mode. Default: Alarm present = HI.
Data communication parameters
Select the security/encryption setting in the
radio.
CTS delay in milliseconds.
(A value of 0 returns CTS immediately)
“Hold time” that CTS is present following last
character from DATA port.
Device behavior:
DCE (normal) or CTS Key
Enables/disables transceiver LEDs
Operating mode:
where M = Master, R = Remote
Owner’s message, or alternate message (30
characters maximum)
Owner’s name, or alternate message
(30 characters maximum)
Data port (DATA connector) interface signaling mode: RS232 or RS485
Forward power-output setting in dBm
Forward power output in dBm.
Maximum duration (in minutes) before
time-out alarm. Default is OFF.
Enable or Disable unit’s built-in RTU simula-
tor. Default is OFF. Set RTU address between
zero and 80.
36 TransNET OEM Integration Guide MDS 05-3946A01, Rev. A

Table 13. Operational Configuration—Set/Program (Continued)
Command Description
SLEEP [ON, OFF]
Details, page 50
UNIT [10000–65000]
Details, page 50
XADDR [0–31]
Details, page 51
XPRI [0–31]
Details, page 51
XMAP [00000000-FFFFFFFF]
Details, page 51
XRSSI [NONE, –40...–120]
Details, page 51
ZONE CLEAR
Details, page 51
Enable or Disable the radio’s Sleep mode
function.
Unit address used for network-wide diagnostics. (Unique within associated network.)
This unit’s Extended address
Typically, the Master is set to zero (0).
Address of the primary Extended radio unit
(Extension).
Included Extended units in MODE X. (Extensions and Remotes only).
Minimum RSSI level required to preserve synchronization with a non-primary radio.
(Only meaningful when XPRI is not NONE)
Reset zone data statistics
Table 14. Operating Status—Display Only
Command Description
ADDR
Details page 40
AMASK
Details page 41
ASENSE
Details page 41
BAUD
Details page 41
BUFF
Details page 41
CODE
Details page 42
CTS
Details page 42
CTSHOLD
Details page 43
Network address
Alarm mask (response)
Current sense of the alarm output.
Data communication parameters. Example:
BAUD 9600 8N1
Data buffering mode: ON = seamless data,
OFF = fast byte throughput
Security/encryption operational status.
“NONE” (Inactive), or “ACTIVE”
CTS delay in milliseconds (0–255 ms)
“Hold time” that CTS is present following last
character from DATA port.
MDS 05-3946A01, Rev. A TransNET OEM Integration Guide 37

Table 14. Operating Status—Display Only (Continued)
Command Description
DEVICE
Details page 43
HOPTIME
Details page 44
HREV
Details, page 45
LEDS [ON, OFF]
Details, page 45
MODE
Details page 45
OWM
Details page 45
OWN
Details page 45
PORT
Details page 45
PWR
Details page 47
REPEAT
Details page 47
RETRY
Details page 47
SAF
Details page 48
SKIP
Details page 49
RSSI
Details page 47
RXTOT
Details page 48
RTU
Details page 48
Device behavior
Alternatives: DCE and CTS KEY
Hop-time value in milliseconds (ms).
Hardware revision level
Enables/disables transceiver LEDs
Current operating mode:
M = Master
R = Remote
X = Extension (Repeater)
Owner’s message or site name
Owner’s name or system name
Current data port (DATA connector) interface
signaling mode: RS232 or RS485
Show forward power-output setting in dBm
The fixed downstream re-send count.
The maximum upstream re-send count for
ARQ (Automatic Repeat Request) operation.
The store-and-forward function status.
Table of frequency zones programmed to be
skipped
Received signal strength indicator (dBm).
Unavailable at Master unless SETUP is
enabled.
The amount of time (in seconds) to wait before
issuing a time-out alarm.
RTU simulator’s operational status (ON/OFF)
38 TransNET OEM Integration Guide MDS 05-3946A01, Rev. A

Table 14. Operating Status—Display Only (Continued)
Command Description
SAF
Details page 48
SER
Details page 49
SHOW PWR
Details page 49
SHOW SYNC
Details page 49
SKIP
Details page 49
SLEEP
Details page 50
SREV
Details page 50
STAT
Details page 50
TEMP
Details page 50
UNIT
Details page 50
XADDR
Details page 51
XPRI
Details page 51
XMAP
Details page 51
XRSSI
Details page 51
Store-and-forward mode status in this unit.
(ON/OFF)
Serial number of radio
Show measured RF output power in dBm
Information on synchronization source and
depth
Frequency zones that are skipped
Radio’s Sleep Mode setting.
(At Remotes Only)
Transceiver firmware revision level
Current alarm status
Transceiver’s internal temperature (°C)
Programmed unit address for
network-wide diagnostics
This unit’s Extended address
Address of the primary Extended radio unit
(Extension).
Included Extended units in MODE X. (Exten-
sions and Remotes only).
Minimum RSSI level required to preserve syn-
chronization with a non-primary radio. (Only
meaningful when XPRI is not NONE)
Table 15. Diagnostic and Test Functions
Command Description
KEY
Details, page 45
DKEY
Details, page 44
Enables the transmitter test.
(Radio must be in Setup mode.)
Turns off the transmitter test.
(Radio must be in Setup mode.)
MDS 05-3946A01, Rev. A TransNET OEM Integration Guide 39

Table 15. Diagnostic and Test Functions (Continued)
Command Description
TX [xxxx]
Details, page 50
RX [xxxx]
Details, page 48
SETUP
Details, page 48
ZONE DATA
Details, page 51
ZONE CLEAR
Details, page 51
Set/display transmit test frequency.
(Radio must be in Setup mode.)
Set/display receive test frequency.
(Radio must be in Setup mode.)
Enables Setup mode. Times out after 10 minutes. Press “Q” to quit.
Zone data statistics
Clears the Zone Data log
9.3 Detailed Command Descriptions
The essential commands for most applications are Network Address (ADDR),
Mode (MODE), and Baud Rate (BAUD). However, proper use of the additional
commands allows you to tailor the transceiver for a specific use, or to conduct
basic diagnostics on the radio. This section gives more detailed information
for the commands listed above in section 9.2.
Most of the commands below can be used in two ways. First, you can type
only the command name (for example, ADDR) to view the currently
programmed data. Second, you can set or change the existing data by typing
the command, followed by a space, and then the desired entry (for example,
ADDR 1234). In the list below, allowable programming variables, if any, are
shown in brackets [ ] following the command name.
ADDR [1–65000]
This command sets or displays the radio’s network address. The network
address can range from 1 to 65000.
A network address must be programmed at the time of installation and must
be common across each radio in a given network. Radios are typically
shipped with the network address unprogrammed, causing the address to
display as NONE. If the address is not set (or is set to a wrong value) it leaves
the system in an invalid state, preventing operation and generating an alarm.
NOTE: It is recommended that the last four digits of the master radio’s serial number
be used for the network address. This helps avoid conflicts with other users.
40 TransNET OEM Integration Guide MDS 05-3946A01, Rev. A

AMASK [0000 0000–FFFF FFFF]
This command sets the alarm bits that cause the alarm output signal to be
triggered. The PWR LED will still flash for all alarms, but the alarm output
signal will only be activated for those alarms that have the corresponding
mask bit set. The hex value for the mask aligns directly with the hex value for
the ALARM command. The default is FFFF FFFF. Through proper use of the
AMASK command, it is possible to tailor the alarm response of the radio.
Contact the factory for more information on configuring the alarm mask.
ASENSE [HI/LO]
This command is used to set the sense of the radio’s alarm output at Pin 3 of
the 16-pin header connector. The default setting is HI which means an alarm
exists when an RS-232 high is on Pin 3.
BAUD [xxxxx abc]
This command sets or displays the communication attributes for the normal
payload communications through the DATA port. The command has no effect
on the RJ-11 DIAG(NOSTICS) port.
The first parameter (xxxxx) is baud rate. Baud rate is specified in
bits-per-second and must be one of the following speeds: 1200, 2400, 4800,
9600, 19200, 38400, 57600, or 115200. At baud rates of 19200 bps or less,
the radio can support unlimited continuous data transmission at any hop rate.
The second parameter of the
BAUD command (abc) is a 3-character block
indicating how the data is encoded. The following is a breakdown of each
character’s meaning:
a = Data bits (7 or 8)
b = Parity (N for None, O for Odd, E for Even)
c = Stop bits (1 or 2)
The factory default setting is 9600 baud, 8 data bits, no parity, 1 stop bit
(Example: 19200 8N1).
NOTE: 7N1, 8O2, and 8E2 are invalid communication settings and are not supported
by the transceiver.
BUFF [ON, OFF]
This command sets or displays the received data handling mode of the radio.
The command parameter is either ON or OFF. (The default is OFF.) The
setting of this parameter affects the timing of received data sent out the DATA
connector. Data transmitted over the air by the radio is unaffected by the
BUFF setting.
If data buffering is set to OFF, the radio will operate with the lowest possible
average latency. Data bytes are sent out the DATA port as soon as an incoming
RF data frame is processed. Average and typical latency will both be below
10 ms, but idle character gaps may be introduced into the outgoing data flow.
MDS 05-3946A01, Rev. A TransNET OEM Integration Guide 41

If data buffering is ON, the radio will operate in a seamless mode. That is, data
bytes will be sent over the air as quickly as possible, but the receiver will
buffer the data until the entire packet has been collected. The delay introduced
by data buffering is variable and depends on message size and the number of
retransmissions required, but the radio will not create any gaps in the output
data stream. This mode of operation is required for protocols such as
MODBUS™ that do not allow gaps in their data transmission.
Seamless mode (BUFF ON) is intended only for applications where the
message size is 256 characters or less. Enforcement of this rule is left up to
the user. If more than 256 characters are transmitted data delivery will not be
seamless and data may be lost.
Changes to the BUFF setting may only be made at the master radio. This is
because the master radio broadcasts the buffer setting for the entire network.
At remote radios, the buffer setting may be read when the radio is in
synchronization with the master, but it may not be changed.
CODE [NONE, 1…255]
The CODE command is used to select or display the security/encryption
setting in the radio.
The default is CODE NONE. Setting CODE to a value other than NONE
provides an extra level security beyond that provided by the Network Address
(ADDR). The disadvantage is increased complexity in managing the network.
The CODE command takes an argument 1…255, or “NONE”. Entering CODE
without an argument will display either “NONE” or “ACTIVE”. ACTIVE
means that security/encryption has been enabled, but the radio will not
display the security argument.
When a CODE value is active, all radios in the system must use the same code
value. If the code value is not properly programmed, a remote radio will not
synchronize with the master.
CAUTION: Record the CODE value and store it in a safe place. If the code is
later forgotten, and a unit is to be added to the system, all radios in the
network must be set to NONE and then reprogrammed to a new value.
CTS [0–255]
The CTS (clear-to-send) command sets or displays the timer value associated
with the CTS line response. The command parameter ranges from 0 to 255
milliseconds.
For DCE operation, the timer specifies how long to wait after the RTS line
goes high before asserting the CTS line. A timer value of zero means that the
CTS line will be asserted immediately following the assertion of RTS.
For CTS Key operation (see the DEVICE command), the timer specifies how
long to wait after asserting the CTS line before sending data out the DATA
port. A timer value of zero means that data will be sent out the data port
without imposing a key-up delay. (Other delays may be in effect from other
radio operating parameters.)
42 TransNET OEM Integration Guide MDS 05-3946A01, Rev. A

CTSHOLD [0–60000]
Used in DEVICE CTS KEY mode, this command sets the amount of time in
milliseconds that CTS remains present following transmission of the last
character out the RXD pin of the DATA port. This “hold time” can be used to
prevent squelch tail data corruption when communicating with other radios.
The CTSHOLD setting can range from 0 to 60000 (i.e., 60 seconds). The
default value is 0, which means that CTS will drop immediately after the last
character is transmitted. If the command is entered when the radio is in
DEVICE DCE mode, the response CTSHOLD N/A will be displayed.
DEVICE [DCE, CTS KEY]
The DEVICE command sets or displays the device behavior of the radio. The
command parameter is either DCE or CTS KEY.
The default selection is DCE. In this mode, CTS will go high following RTS,
subject to the CTS programmable delay time. Keying is stimulated by the
input of characters at the data port. Hardware flow control is implemented by
dropping the CTS line if data arrives faster than it can be transmitted.
If CTS KEY is selected, the radio is assumed to be controlling another radio,
such as in a repeater or tail-end link system. The RTS line is ignored and the
CTS line is used as a keyline control for the other radio. CTS is asserted
immediately after the receipt of RF data, but data will not be sent out the DATA
port until after the CTS programmable delay time has expired. (This gives the
other radio time to key.)
Following transmission of the last byte of data, CTS will remain asserted for
the duration specified by the CTSHOLD command. CTSHOLD should be set
sufficiently high.
DLINK [xxxxx/ON/OFF]
DLINK ON enables use of Diagnostic Link mode and establishes it as the
default protocol on the RJ-11 DIAG port. Diagnostic Link mode is a special
protocol used to support Network-Wide Diagnostics. DLINK must be set to
ON to support connection to InSite or to support chained diagnostics between
radio networks. DLINK OFF disables this feature. The default setting is ON.
The following DLINK baud rates selections are allowed:
• 1200 • 4800 • 9600 • 19200 (default)
• 38400 • 57600 • 115200
Example: DLINK 4800 sets the RJ-11 DIAG port to operate at 4800 bps when
diagnostics is “closed”. This setting will not affect the port’s autobaud
operation. Use only of DLINK ON, will enable the use 19200 or the most
recently programmed value. The default is DLINK 19200 and DLINK ON.
NOTE: The same baud rate must be entered into the InSite Equipment List’s BAUD
MDS 05-3946A01, Rev. A TransNET OEM Integration Guide 43
field.

NOTE: The DLINK rate must match the rate of any connected device to the diagnostic
port. This may be either another radio’s diagnostic port, the InSite computer, or
another data link device that eventually connects to the InSite computer.
DKEY
Disables the transmitter when it is keyed. See also KEY command.
DTYPE [NODE/ROOT]
The DTYPE command specifies the radio’s operational characteristics for
network-wide diagnostics. The transceiver uses the following types:
• NODE–The most common setting, and the default. This is the basic
system radio device-type. Typically, the radio network is comprised of
nodes and one root. Intrusive diagnostics can originate from any node.
However, non-intrusive diagnostics can only be conducted from the
root node.
• ROOT–Always one, and only one, per network (including units
associated through Extension units.) The root is the focal point of
network-wide diagnostics information. Intrusive diagnostics can
originate from any radio, including the root. However, the root is the
only radio through which non-intrusive diagnostics can be conducted.
FEC [ON, OFF]
This command is used to view the FEC setting, or turn it on or off. The default
setting is FEC ON. (It needs to be turned off when throughputs exceed
57,600 bps.) FEC is set at the master and is automatically passed on to all of
the remotes in a network.
Setting FEC to ON improves sensitivity at the cost of reduced throughput.
Typical SCADA/telemetry applications use low data rates and, as such, the
FEC setting is normally transparent to them.
HOPTIME [7, 28]
The HOPTIME command is used to set or display the hop-time setting. The
command is a digit corresponding to the hop-time setting in milliseconds. The
default HOPTIME setting is 7. A setting of 28 must be used when throughputs
exceed 57,600 bps.
Changes to the HOPTIME setting may only be made at the master radio. (This
is because the Master radio establishes the hop-time setting for the entire
network.) At remote radios, the hop-time setting may be read when the radio
is in synchronization with the master, but it may not be changed.
INIT
The INIT command is used to reset the radio’s operating parameters to the
factory defaults listed in Table 16 on Page 46. This may be helpful when
trying to resolve configuration problems that resulted from the entry of one
or more improper command settings. If you are unsure of which command
setting caused the problem, this command allows you to get back to a known
working state.
44 TransNET OEM Integration Guide MDS 05-3946A01, Rev. A

NOTE: Caution should be exercised when using the INIT command on radios in a sys-
tem employing the Store-and-Forward feature. Settings relating to the use of
Extension services will be lost and will need to be re-entered. Inventory and
record the settings for XADDR, XPRI and XMAP before using the INIT command.
SPECIAL NOTE: Installing firmware of Revision 2.0 or later into a radio with Revi-
sions 1.x firmware will preserve the radio’s compatibility with other radios running Revision 1.x firmware. If updating the radio’s firmware is part of a
system-wide upgrade, the last step should be to use the INIT command at the
Master station. Use of the
Table 16 on Page 46 to be applied
INIT command causes the changes shown in
HREV
Shows the Hardware revision of the radio.
KEY
Enables the transmitter. (Radio must be in Setup mode.) See also DKEY
command.
LEDS [ON, OFF]
This command is used to view the LED setting, or to enable/disable LED
operation. In power-critical applications (battery/solar powered sites, for
example), it may be desirable to turn off the LEDs.
MODE [M, R, X]
The MODE command sets or displays the operating mode of the radio. A
master radio is set by MODE M; a remote set by MODE R, and an Extension is
set by MODE X.
All units default to remotes; other modes must be specifically programmed
with the MODE command.
If MODE X is used, the MODE X radio should be programmed with an
Extended Address (XADDR). Units that need to hear this MODE X radio must
be programmed with an appropriate XPRI and/or XMAP value.
OWM [xxxxx]
The OWM command sets or displays an optional owner’s message, such as the
system name. The entry can contain up to 30 characters.
OWN [xxxxx]
The OWN command sets or displays an optional owner’s name, such as the
site name. The entry can contain up to 30 characters.
PORT [RS232, RS485]
Select or identify the current data interface signaling mode: RS232 or RS485.
This is the port though which the payload data will pass. Pin descriptions for
EIA-232 are on Page13 and EIA-485 can be found on Page13. Note: This
command will always show TTL if the radio is only equipped for TTL
service—see model number configuration code on Page 3.
MDS 05-3946A01, Rev. A TransNET OEM Integration Guide 45

PWR [20–30]
This command displays or sets the desired RF forward output power setting
of the radio. The PWR command parameter is specified in dBm and can range
from 20 dBm through 30 in 1 dBm steps. The default setting is 30 dBm (1
watt). To read the actual (measured) power output of the radio, use the SHOW
PWR command.
In the USA, maximum allowable power is governed by FCC limits on
Effective Isotropic Radiated Power output (EIRP). The EIRP limit of
+36 dBm means that any user with a net antenna gain greater than 6 dBi must
decrease the PWR setting accordingly.
Table 16. INIT Command Generated Defaults
Corresponding
Parameter Default Setting
For all radios
Device operation DCE DEVICE DCE
CTS delay 0
CTS hold-time 0 CTSHOLD 0
DATA Interface port • 9600 baud
Alarm Mask FFFF FFFF AMASK
Alarm Output Sense RS-232 High (+5.0 Vdc) ASENSE
RX Time-out-Timer None/Disable RXTOT
Transmitter
test frequency
Receiver
test frequency
Sleep Enable OFF SLEEP OFF
Data Port Setting RS/EIA-232 PORT RS232
Primary Extension
Radio Address
Synchronization
Source Map
Extended Address 0 XADDR 0
(CTS is continuously asserted)
• 8 data bits
• none (no parity)
• 1 stop bit
915.000 MHz TX xxx
915.000 MHz RX xxx
0 (Master) XPRI 0
None XMAP 0
Command
CTS 0
BAUD 9600 8N1
For MASTER radios
Skipped frequencies None (radio will hop across all
Hop-time 7 ms HOPTIME 7
Buffer mode OFF BUFF OFF
frequencies)
SKIP NONE
46 TransNET OEM Integration Guide MDS 05-3946A01, Rev. A

Table 16. INIT Command Generated Defaults (Continued)
Corresponding
Parameter Default Setting
Retry Count 10 (max. 10 repeats for ARQ) RETRY 10
Repeat Count 3 (downstream repeats) REPEAT 3
Forward Error
Correction
ON FEC ON
Command
REPEAT [0–10]
The REPEAT command affects “downstream” data. The command causes a
Master or Extension to always repeat transmissions for the specified number
of times (range is 0 to 10; default selection is 3). Unlike the RETRY command,
there is no acknowledgment that a message has been received. To display the
current setting, use the REPEAT command without entering a value.
RETRY [0–10]
The RETRY command affects upstream data. The command selects, or
displays, the maximum number of times (0 to 10) that a remote radio will
re-transmit data. The default setting is 10.
This command is associated with ARQ (Automatic Repeat Request)
operation of the radio and is intended for use in areas with heavy radio
interference.
When the RETRY command is issued without parameters, the maximum
retransmission count is shown. A value of 0 represents no retries, while
values of 1 or greater successively improve the chance of data delivery in
spectrally harsh environments (at the expense of possibly increased latency).
The RETRY value is only settable at the Master. It is readable by a
synchronized Remote.
RSSI
This command displays the radio’s Received Signal Strength Indication in
dBm (decibels relative to 1 mW). The output can range from –40 dBm to
–120 dBm. Command availability and results depend on the mode of
operation (master or remote). The closer to 0 dBm, the stronger the signal,
thus a reading of –70 dBm is stronger than –80 dBm.
For a remote radio, under normal operation, RSSI is based on the average
signal strength of the SYNC message received in each of the eight frequency
zones. (RSSI is sampled each time a SYNC message is received.) When using
the RSSI reading to align a directional antenna, it is important to make
changes slowly so that the RSSI reading will provide meaningful results. It
will take several seconds to indicate a change in signal level. The radio stays
in RSSI mode until is pressed.
MDS 05-3946A01, Rev. A TransNET OEM Integration Guide 47
ENTER

For a master radio, under normal operation, entering the RSSI command
causes the response NOT A VAILABLE to be returned. This is because a master
is normally receiving signals from several remote stations and an RSSI
reading would be continually changing. The only exception is when the
SETUP command has been asserted. This disables hopping and allows
reading a “raw” RSSI signal level in real time from a master or remote radio.
NOTE: RSSI readings will not indicate signals stronger than –40 dBm.
RTU [ON, OFF, 0-80]
This command re-enables or disables the radio’s internal RTU simulator,
which runs with proprietary polling programs such as poll.exe and rsim.exe.
The internal RTU simulator is available whenever a radio has diagnostics
enabled. This command also sets the RTU address that the radio will respond
to.
The internal RTU can be used for testing system payload data or pseudo bit
error rate (BER) testing. It can be helpful in isolating a problem to either the
external RTU or the radio. The default RTU setting is OFF.
RX [xxxx]
This command sets or displays the test receive frequency used in place of
hopping when the radio is in SETUP mode. The test receive frequency can be
reprogrammed to any value between 902.200 MHz and 927.800 MHz,
inclusive. The factory default setting is 915.000 MHz.
RXTOT [NONE, 0–1440]
This command sets or displays the amount of time (in minutes) to wait for the
next received data packet before issuing a receiver time-out alarm. The
default setting is NONE.
SAF [ON, OFF]
This command enables/disables the operation of the Store-and-Forward
services. It can be set only at the network’s Master station, but will effect all
radios in the associated network. The default setting is OFF. See related
commands: “XADDR [0–31]” on Page 51, “XPRI [0–31]” on Page 51, and
“XMAP [00000000-FFFFFFFF]” on Page 51.
SETUP
This command sets up the transceiver for checking antenna SWR or transmitter power with external measuring equipment. Do not use this mode
during normal operation.
When the SETUP command is entered, the prompt changes to SETUP>, and:
• Hopping is disabled.
• Synthesizer frequencies are reset to the test frequencies specified by the
TX and RX commands described earlier.
48 TransNET OEM Integration Guide MDS 05-3946A01, Rev. A

• The radio can be keyed using the KEY command. DKEY is used to unkey
the radio. (If the radio is left in a keyed state it is automatically unkeyed
after several minutes.)
• The RSSI is sampled in a raw, continuous fashion regardless of whether
the unit is a master or a remote.
Entering Q or QUIT returns the system to normal operation.
A timer keeps the Setup mode from accidentally leaving the system disabled.
After 10 minutes the system behaves as if Q or QUIT had been entered,
returning to normal operation.
SER
Displays the Serial Number of the radio.
SHOW PWR
The SHOW PWR command displays the actual (measured) RF power output
in dBm. Unlike the PWR command, this command shows the actual level
being measured, not the programmed RF power setting.
SHOW SYNC
When used at a Remote station, this command will display Extended Address
and Unit Address of the Master or Extension radio to which the Remote is
synchronized. The network depth at the remote, defined as the number of
downstream links from the Master, is displayed in parentheses.
SKIP [NONE, 1...8]
This command sets or displays which, if any, of the eight 3.2 MHz-wide
zones will be skipped from the radio’s hopping sequence. Skipping zones is
one way of dealing with constant interference on one or more frequencies.
See “DEALING WITH INTERFERENCE” on Page 32 for more information
on dealing with interference.
Table 17 shows the frequency range covered by each zone. The command
parameter is either the keyword NONE or an undelimited string of up to four
digits where each digit 1...8 represents a corresponding zone to skip. (For
zone parameter input, the digits can appear in any order and can be optionally
separated by a blank space.) The SKIP command is display-only at remote
radios. (Remotes must be synchronized with the master radio to display the
skip status.)
In the USA, a maximum of four zones may be skipped, per FCC rules. Check
the regulatory requirements for your region.
Table 17. Frequency Zones
ZONE 1 ZONE 2 ZONE 3 ZONE 4 ZONE 5 ZONE 6 ZONE 7 ZONE 8
902.200
905.200
905.400
to
908.400
908.600
to
to
911.600
911.800
to
914.800
915.000
to
918.000
918.200
to
921.200
921.400
to
924.400
924.600
to
927.600
MDS 05-3946A01, Rev. A TransNET OEM Integration Guide 49

SLEEP [ON, OFF]
This command is used to set or display the radio’s Sleep Mode setting. The
default setting is SLEEP OFF. When this mode is enabled (ON), a ground or
logic low on Pin 6 of the 16-pin header connector (J3) suspends all normal
radio functions, and power consumption is reduced to approximately 8 mA.
The radio remains in this state until the low is removed. This function cannot
be turned on for a Master or Extension radio.
SREV
This command displays the version of the firmware currently loaded into the
transceiver.
A display of 06-4040A01, 2.0.0 is an example of the firmware version
identifier—part number followed by release/version number.
STAT
This command is used to check the alarm status of the radio. If no alarms
exist, the message NO ALARMS PRESENT is returned.
If an alarm does exist, a two-digit alarm code (00–31) is displayed and the
event is identified as a “Major” or “Minor” alarm. A brief description of the
event is also given.
If more than one alarm exists, the word MORE appears, and additional alarms
may be viewed by pressing the key. Detailed descriptions of the
ENTER
alarm codes are provided in Table 18 on Page 53.
TEMP
This command displays the internal temperature of the transceiver in degrees
Celsius. (Note that the radio is specified to operate in an environment between
–30 C° and +60 C°). This internal reading may be higher than the outside
temperature by several degrees.
TX [xxxx]
This command sets or displays the test transmit frequency used in place of
hopping whenever the radio is in Setup mode. The test transmit frequency can
be reprogrammed to any value between 902.200 MHz and 927.800 MHz,
inclusive. The factory default setting is 915.000 MHz.
UNIT [10000–65000]
This command sets the unit addressing for network-wide diagnostics. The
unit address is factory programmed to the last four digits of the serial number.
If re-programmed in the field, the entry must consist of five digits between
10000 and 65000.
50 TransNET OEM Integration Guide MDS 05-3946A01, Rev. A

XADDR [0–31]
Display or program the Extended Address of this radio that will serve as a
common address for the sub-network synchronized to this Master or
Extension. This value can be listed in the XPRI parameter of associated
Extension or Remote radios to allow them to synchronize to this radio. We
recommend setting the Master to zero (0). It is easy to remember, and is the
default address when the INIT command is used. (Programmed only in
Master and Extension radios.)
XMAP [00000000-FFFFFFFF]
XMAP is a 32-bit hex entry where the least significant bit represents XADDR
0 and the most significant bit represents XADDR 31. The full 32-bit hex
value represents the entire list of extensions with which the radio will be
allowed to communicate. (Remotes and Extensions only.)
This parameter is easily programmed through the TransNET Configuration
Software’s
Store and Forward Settings panel.
XPRI [0–31]
Display or program the extended address of a primary radio with which this
radio will attempt to synchronize and communicate. A setting of NONE will
allow the unit to synchronize with any Master or Extension in the XMAP list.
(Parameter only meaningful for a Remote or Extension.)
XRSSI [NONE, –40...–120]
The XRSSI command is used to set the RSSI minimum signal level required
to preserve synchronization with a non-primary Extension radio. This
parameter will be ignored if XPRI is set to NONE.
ZONE CLEAR
The ZONE CLEAR command clears the zone data for all zones in the Zone
Data Log, resetting the count to 0. (Zone data is also cleared automatically
upon reboot.)
ZONE DATA
The transceiver divides its frequency operating spectrum into eight
3.2 MHz-wide zones. (These are the same zones referenced by the SKIP
command described earlier.) Data frame statistics are maintained for each
zone to indicate the transmission quality of data through the network. This
information is useful for identifying zones where significant interference
exists.
Zone quality information can be accessed using the ZONE DATA command.
For each zone (1–8), it shows you the number of data frames sent, the number
received, and the number received with errors. If an excessive number of
errors are seen in one or more frequency zones, it may indicate interference,
and you should consider “skipping” those zones using the SKIP command.
Note: If a frequency zone has been skipped, all counts for that zone will be
zeros.
MDS 05-3946A01, Rev. A TransNET OEM Integration Guide 51

The ZONE DATA format is displayed as follows:
1:TX TO TAL 00000000
1:RX TO TAL 00000000
1:RX ERROR 00000000
x:
x:
x:
8:TX TO TAL 00000000
8:RX TO TAL 00000000
8:RX ERROR 00000000
All data is based on payload packets. Incoming network data may be divided
up into multiple packets for over-the-air transfers. The number before the
colon represents the zone. TX TOT AL is the transmit packet total. RX TO TAL is
the receive packet total. RX ERROR is the total number of received packets
with CRC errors. All zone data is reset with the ZONE CLEAR command.
10.0 TROUBLESHOOTING
Successful troubleshooting of the radio system is not difficult, but requires a
logical approach. It is best to begin troubleshooting at the master station, as
the rest of the system depends on the master for polling instructions and
synchronization data. If the master station has problems, the operation of the
entire network will be affected.
When communication problems are found, it is good practice to begin by
checking the simple things. All radios in the network must meet these basic
requirements:
• Adequate and stable primary power
• An efficient and properly aligned antenna system
• Secure connections (RF, data & power)
• Proper programming of the radio’s operating parameters, especially
Mode selection (
Rate (BAUD)
• The correct interface between the radio and the connected data
equipment (proper cable wiring, data format and timing).
• In store-and-forward systems there are several areas that must be
carefully evaluated:
• Duplicate XADDR values on MODE M and MODE X radios will cause
failures unless the radios are far enough apart to not hear each other .
• Errors in the synchronization qualifiers, XPRI and XMAP, on
corresponding Remote radios.
• SAF must be enabled at the Master
MODE), Network Address (ADDR), and interface Baud
52 TransNET OEM Integration Guide MDS 05-3946A01, Rev. A

10.1 Alarm Codes
When an alarm condition exists, the transceiver creates an alarm code. These
codes can be very helpful in resolving many system difficulties.
Checking for Alarms—STAT command
To check for the presence of alarms, enter STAT. If no alarms exist, the
message NO ALARMS PRESENT appears at the top of the display.
If an alarm does exist, a two-digit alarm code (00–31) is displayed, and it is
identified as a major or minor alarm. A brief description of the alarm is also
given. Alarm codes and their meanings are listed in Table 18.
If more than one alarm exists, the word MORE appears at the bottom of the
screen; additional alarms can be viewed by pressing .
Major Alarms vs. Minor Alarms
Major alarms report serious conditions that generally indicate a hardware
failure, or other abnormal condition that will prevent (or seriously hamper)
further operation of the transceiver.
With the exception of alarm code 00 (network address not programmed),
major alarms generally indicate the need for factory repair. Contact your
factory representative for further assistance.
Minor alarms report conditions which, under most circumstances, will not
prevent transceiver operation. This includes out-of-tolerance conditions,
baud rate mismatches, etc. The cause of these alarms should be investigated
and corrected to prevent system failure.
ENTER
Alarm Code Definitions
Table 18 contains a listing of all event codes that may be reported by the
transceiver.Additional alarm codes may be used in future firmware releases
or are used by the factory.
Table 18. Alarm Codes
Alarm
Code
00 Major The network address is not programmed.
01 Major Improper firmware detected for this radio model.
04 Major One or more of the programmable synthesizer loops is reporting
08 Major The system is reporting that it has not been calibrated. Factory
10 Major The DSP was unable to properly program the system to the ap-
12 Major Receiver time-out alarm.
16 Minor The unit address is not programmed.
Alarm
Type Description
an out-of-lock condition.
calibration is required for proper radio operation.
propriate defaults. A hardware problem may exist.
MDS 05-3946A01, Rev. A TransNET OEM Integration Guide 53

Table 18. Alarm Codes (Continued)
Alarm
Code
17 Minor A data parity fault has been detected on the DATA connector.
18 Minor A data framing error has been detected on the DATA connector.
29 Minor RF output power fault detected. (Power differs by more than 2
30 Minor The system is reporting an RSSI reading below –105 dBm.
31 Minor The transceiver’s internal temperature is approaching an
Alarm
Type Description
This usually indicates a parity setting mismatch between the radio and the RTU.
This may indicate a baud rate mismatch between the radio and
the RTU.
dB from set level.) Often caused by high antenna system SWR.
Check antenna, feedline and connectors.
out-of-tolerance condition. If the temperature drifts outside of
the recommended operating range, system operation may fail.
10.2 LED Indicators
The LED indicators on the transceiver board (CR3, CR-4, CR-5 and CR-6)
are an important troubleshooting tool and should be checked whenever a
problem is suspected. Table 19 describes the function of each status LED.
Table 19. LED indicator descriptions
LED Name Description
RXD
TXD
DCD
GP
RXD (CR3)
Receive Data
TXD (CR4)
Transmit Data
DCD (CR5)
Data Carrier Detect
GP (CR6)
General Purpose
Serial receive data activity. Payload data from connected device.
Serial transmit data activity. Payload data to connected device.
Continuous—Radio is receiving/sending synchronization frames
On within 10 seconds of power-up under normal
conditions
• Continuous—Power is applied to the radio; no
problems detected
• Flashing (5 times-per-second)—Fault indication.
See “TROUBLESHOOTING” on Page 52
• Off—Radio is unpowered or in Sleep mode
10.3 Troubleshooting Chart
Table 20 provides suggestions for resolving system difficulties that may be
experienced in the radio system. If problems persist, contact the factory for
further assistance. Refer to the inside back cover of this guide for contact
information.
54 TransNET OEM Integration Guide MDS 05-3946A01, Rev. A

Table 20. Troubleshooting chart
Difficulty Recommended System Checks
Unit is
inoperative.
Interference is
suspected.
No synchronization with master,
or poor overall
performance.
BER is too high.
Data throughput
is spotty.
Latency is too
high.
a.Check for the proper supply voltage at the transceiver, J3 Pins
5 and11.
b.If using the Evaluation Board, the surface mount fuse may have
opened. Refer to Section 4.3 below for replacement instructions.
a.Verify that the system has a unique network address. Nearby
systems with the same address will cause interference.
b.Check for interference and lockout any affected zone(s) using
the SKIP command (Page 49).
c.If omnidirectional antennas are used on remote stations, con-
sider changing to directional antennas. This will often limit interference to and from other stations.
a.Check for secure interface connections at the radio and the
connected device.
b.Check the antenna, feedline and connectors. Reflected power
should be less than 10% of the forward power reading
(SWR ≈ 2:1 or lower).
c.If the remote radio is in synchronization, but performance is
poor, check the received signal strength using the RSSI command (Page 47). If RSSI is low, it may indicate antenna problems, or misalignment of directional antenna headings.
d.Verify proper programming of system parameters: mode, net-
work address, data interface baud rate, transmitter power, CTS
delay, etc. For store-and-forward applications, also verify the
following: SAF is ON; extended address is properly pro-
grammed at each extension; remotes are using the proper values for XPRI and XMAP.
e.Check for alarms using the STAT command (Page 50)
a.The RETRY and REPEAT commands may be increased to
deal with interference, or decreased to increase throughput
and reduce latency.
b.Try turning on FEC. FEC on gives some coding gain, but
comes at the cost of reduced throughput.
a.Reduce the REPEAT count.
b.Turn BUFF OFF. BUFF ON insures that no gaps occur in the
data, but this comes at the cost of increased latency.
c.Make sure HOPTIME is set to 7.
10.4 Network-Wide Remote Diagnostics
Diagnostics data from a remote radio can be obtained by connecting a laptop
or personal computer running InSite diagnostics software (V6.6 or later) at
any radio in the network.
MDS 05-3946A01, Rev. A TransNET OEM Integration Guide 55

NOTE: The diagnostics feature may not be available in all radios. The ability to query
and configure a radio via Network-wide Diagnostics is based on the feature options purchased in the radio being polled.
If a PC is connected to any radio in the network, intrusive polling (polling
which briefly interrupts payload data transmission) can be performed. To
perform diagnostics without interrupting payload data transmission, connect
the PC to a radio defined as the “root” radio. A radio is defined as a root radio
using the DTYPE ROOT command locally, at the radio.
A complete explanation of remote diagnostics can be found in the
Network-Wide Diagnostics System Handbook (Part No. 05-3467A01).
Table 21. Network-Wide Diagnostics Commands
Command Description
DLINK [xxxxx/ON/OFF]
Details, page 43
DTYPE [NODE/ROOT]
Details, page 44
1. Program one radio in the network as the root radio by entering the
DTYPE ROOT command at the radio.
2. At the root radio, use the DLINK ON and DLINK [baud rate] commands to
configure the diagnostic link protocol on the RJ-11 port.
3. Program all other radios in the network as nodes by entering the
DTYPE NODE command at each radio.
4. Use the DLINK ON and DLINK [baud rate] commands to configure the
diagnostic link protocol on the RJ-11 port of each node radio.
5. Connect a PC on which InSite software is installed to the root radio, or to
one of the nodes, at the radio’s diagnostics port.
To connect a PC to the radio’s DIAG port, an RJ-11 to DB-9 adapter (Part
No. 03-3246A01) is required. If desired, an adapter cable may be
constructed from scratch, using the information shown in Figure 10 on
Page 11.
6. Launch the InSite program at the PC. (Refer to the InSite user’s manual
for details.)
Set baud rate of diagnostics link
Set radio’s operational characteristics for network-wide diagnostics
56 TransNET OEM Integration Guide MDS 05-3946A01, Rev. A

11.0 FIRMWARE UPGRADES
From time to time, the factory releases new firmware for its radio products.
An upgraded file can be installed in existing radios to take advantage of
engineering improvements or additional features.
11.1 Obtaining new firmware
The latest firmware for each radio type may be obtained free of charge from
our website: www.microwavedata.com/service/technical/support/downloads/.
Firmware is also available on disks from the factory that are bundled with an
installation utility (Radio Software Upgrade—upgrade.exe) for transferring
the firmware file on the disk to the radio.
Saving a Web-site firmware file to your PC
Firmware upgrades are distributed as a plain-text (ASCII) file with a “.S28”
extension. Browse to find the desired “.S28” file for your radio on the factory
website at www.microwavedata.com. After finding your selection, use the
right mouse button to select a path on your computer on which to save the file.
(If this isn’t done, your browser may display the firmware file contents as text
on the screen instead of downloading it to your local hard drive.)
After the “.S28” file has been saved to your computer, you may use either
TransNET Configuration Software or Radio Software Upgrade programs to
install this firmware in your radios.
11.2 Installing firmware in your radio
1. Connect a PC to radio’s diagnostic interface.
2. Start the TransNET Configuration Software. Open diagnostics port to the
radio. The program will automatically read the radio’s profile.
3. From the File menu select Radio Firmware Upgrade and follow the prompts
to install the new firmware into the radio. Do not press the Cancel button
once the installation has started or it will leave the radio without any
code. When the installation is complete, another radio may be connected
to your PC and programmed.
NOTE: If a firmware installation fails, the radio is left unprogrammed and inoperative.
This is indicated by the PWR LED flashing slowly (1 second on/1 second off).
This condition is only likely to occur if there is a power failure to the computer
or radio during the installation process. The installation should be attempted
again.
12.0 Security
Today, the operation and management of an enterprise is becoming
increasing dependent on electronic information flow. An accompanying
concern becomes the security of the communication infrastructure and the
security of the data itself. We take this matter seriously, and provide several
means for protecting the data carried over our wireless products.
MDS 05-3946A01, Rev. A TransNET OEM Integration Guide 57

Our radios address this issue primarily through the use of the following items:
1) A proprietary modem/data link layer—Data signals are processed using
code and hardware specifically designed by the manufacturer.
2) A unique Network Address—This provides a unique identifier for each
radio in a network. A radio is not addressable unless this unique code is
included in the data string.
3) An optional encryption value (code)—Setting an encryption code
requires the use of the CODE command. This command scrambles the
radio’s hop pattern and encrypts payload data content. A radio requires
the correct Network Address (ADDR) and CODE value in order to
synchronize.
When the CODE command is used, the same value must
be programmed into all radios in the network. See “CODE [NONE,
1…255]” on Page 42 for more details.
The effectiv e combination of CODE and ADDR discourage the use of an
exhaustive search to gain access to a system.
The items described above provide sufficient security for most systems. For
highly-sensitive applications, system designers should consider employing
application level encryption into their polling protocols to further protect their
systems. Third party software tools are available for adding encryption, and
these should be considered as part of any advanced encryption scheme.
13.0 Product Specifications
GENERAL
Frequency Hopping Range: Up to 128 frequencies within
Hop Pattern: Based on network address
Frequency Stability: ±1.5 ppm
Half-Duplex Operation: ±1.6 MHz TX/RX split
Network Addresses: 65,000
Temperature Range: –40° C to +70° C
Humidity: <95% at +40° C; non-condensing
Primary Power: 13.8 Vdc (6–30 Vdc range)
Current Draw (typical):
Transmit: 510 mA @ 13.8 Vdc
Receive: 115 mA @ 13.8 Vdc
Sleep Mode: 8 mA @ 13.8 Vdc
Physical Dimensions: 1.81"W x 3.45"L x 0.63"H
Agency Approvals: • FCC Part 15.247 (E5MDS-EL806)
58 TransNET OEM Integration Guide MDS 05-3946A01, Rev. A
902–928 MHz,
configurable in 3.2 MHz zones
(46 x 87.5 x 16 mm)
• FCC Modular Approval
• Industry Canada RSS-210 and RSS-139
(CAN 3738A-MDSEL806)

DATA CHARACTERISTICS
Data Interface: RS-232/422/485
Interface Connector: 16 pin header, female
Data Rate: 1200, 2400, 4800, 9600, 19200, 38400,
Data Latency: 7 ms (typical)
Byte Length: 10 or 11 bits
Maximum Data Transmission: Continuous up to 115200 bps
57600, 115200 bps asynchronous
RF CHARACTERISTICS
TRANSMITTER:
Power Output
(at antenna connector): 1.0 Watt (+30 dBm) Max.
Duty Cycle: Continuous
Modulation Type: Binary CPFSK
Output Impedance: 50 Ohms
Spurious: –60 dBc
Harmonics: –55 dBc
RECEIVER:
Type: Double conversion superheterodyne
Sensitivity: –110 dBm
Intermodulation: 54 dB minimum (EIA)
Desensitization: 75 dB
Spurious: 70 dB minimum
Bandwidth: 200 kHz
Interference Ratio
(SINAD degraded by 3dB): Co-channel:–10 dB
Time Required to Synchronize
with Master Radio: 0.5 seconds (typical)
:
Reference Table 7 on Page 24
Adjacent channel:+30 dB
Two channels away:+40 dB
Three channels away:+48 dB
13.1 Detailed Pin Descriptions
:
The tables in this section give detailed pin functions for the transceiver’s
16-pin header connector, J3 (see Figure 21). The tables are organized
according to the available signaling configurations of the OEM transceiver.
(Figure 2 on Page 3 may be used to determine which configuration you have.)
Signaling configuration is hardware fixed at the time of manufacture and will
be one of the following:
• TTL signaling for both Payload and Diagnostic data
• Payload data TTL; Diagnostic data RS-232
• Payload data RS-232/RS-485 selectable; Diagnostic data RS-232
MDS 05-3946A01, Rev. A TransNET OEM Integration Guide 59

2
1
34
13
15
5
Figure 21. 16-pin Header Connector
(J3) on OEM Transceiver Board
9
(See parts list (Page18) for information on
matching connector)
6
87
10
12 11
14
16
Table 22. Transceiver Connector J3 Pinouts
(Payload data TTL; Diagnostic data TTL)
Pin No.
Input/
Output
1IN --Ground—Connects to ground (negative supply
2 OUT TTL, 3 Vdc Diagnostic TXD—Supplies received diagnos-
3 OUT TTL, 3 Vdc Alarm condition—A low indicates normal opera-
4 IN TTL, 3 Vdc Diagnostic RXD—Accepts diagnostic/adminis-
5 IN -- FCC 5-25 Vdc version: DC Input (5-25 Vdc)—
6 IN TTL, 3 Vdc Sleep Mode Input—A ground on this pin turns off
7 OUT TTL, 3 Vdc Data Carrier Detect (DCD)—A low indicates hop-
8 IN TTL, 3 Vdc Power Supply Shutdown Control—A ground on
9 -- -- Non-FCC 3 Vdc version: DC Input (Regulated
Signal
Type
Name/Description
potential).
tic/administrative data to the connected device.
tion. A high indicates an alarm. (See ASENSE
[HI/LO] command for more information.)
trative data from the connected device.
Supply Source must be capable of furnishing at
least 7.5 watts.
Non-FCC 3 Vdc version: Do not connect
most circuits in a remote radio. This allows for
greatly reduced power consumption, yet preserves the radio’s ability to be brought quickly
back on line. See “Sleep Mode Operation (Re-
mote units only)” on Page 31 for details.
ping synchronization has been achieved.
this pin causes the OEM module’s power supply
to shut down.
3.3 Vdc)—Supply Source must be capable of furnishing at least 7.5 watts.
FCC 5-25 Vdc version: Do not connect
60 TransNET OEM Integration Guide MDS 05-3946A01, Rev. A

Table 22. Transceiver Connector J3 Pinouts
(Payload data TTL; Diagnostic data TTL) (Continued)
10 IN TTL, 3 Vdc Transmitted Data (TXD)—Accepts payload data
11 IN -- FCC 5-25 Vdc version: DC Input (5-25 Vdc)—
12 IN TTL, 3 Vdc Request to Send (RTS)—A high causes CTS to
13 -- -- Reserved—Do not connect.
14 OUT TTL, 3 Vdc Received Data (RXD)—Supplies received pay-
15 IN -- Ground—Connects to ground (negative supply
16 OUT TTL, 3 Vdc Clear to Send (CTS)—Goes high after the pro-
from the connected device.
Supply Source must be capable of furnishing at
least 7.5 watts.
Non-FCC 3 Vdc version: Do not connect
follow after the programmed CTS delay time has
elapsed (DCE).
load data to the connected device.
potential).
grammed CTS delay time has elapsed (DCE), or
keys an attached radio when RF data arrives
(CTS KEY).
Table 23. Transceiver Connector J3 Pinouts
(Payload data TTL; Diagnostic data RS-232)
Pin No.
Input/
Output
1IN --Ground—Connects to ground (negative supply
2 OUT RS-232 Diagnostic TXD—Supplies received diagnos-
3 OUT TTL, 3 Vdc Alarm condition—A low indicates normal opera-
4 IN RS-232 Diagnostic RXD—Accepts diagnostic/adminis-
5 IN -- FCC 5-25 Vdc version: DC Input (5-25 Vdc)—
Signal
Type
Name/Description
potential).
tic/administrative data to the connected device.
tion. A high indicates an alarm. (See ASENSE
[HI/LO] command for more information.)
trative data from the connected device.
Supply Source must be capable of furnishing at
least 7.5 watts.
Non-FCC 3 Vdc version: Do not connect
MDS 05-3946A01, Rev. A TransNET OEM Integration Guide 61

Table 23. Transceiver Connector J3 Pinouts
(Payload data TTL; Diagnostic data RS-232) (Continued)
6 IN TTL, 3 Vdc Sleep Mode Input—A ground on this pin turns off
7 OUT TTL, 3 Vdc Data Carrier Detect (DCD)—A low indicates hop-
8 IN TTL, 3 Vdc Power Supply Shutdown Control—A ground on
9 -- -- Reserved—Do not connect.
10 IN TTL, 3 Vdc Transmitted Data (TXD)—Accepts payload data
11 IN -- FCC 5-25 Vdc version: DC Input (5-25 Vdc)—
12 IN TTL, 3 Vdc Request to Send (RTS)—A high causes CTS to
13 -- -- Reserved—Do not connect.
14 OUT TTL, 3 Vdc Received Data (RXD)—Supplies received pay-
15 IN -- Ground—Connects to ground (negative supply
16 OUT TTL, 3 Vdc Clear to Send (CTS)—Goes high after the pro-
most circuits in a remote radio. This allows for
greatly reduced power consumption, yet preserves the radio’s ability to be brought quickly
back on line. See “Sleep Mode Operation (Re-
mote units only)” on Page 31 for details.
ping synchronization has been achieved.
this pin causes the OEM module’s power supply
to shut down.
from the connected device.
Supply Source must be capable of furnishing at
least 7.5 watts.
Non-FCC 3 Vdc version: Do not connect
follow after the programmed CTS delay time has
elapsed (DCE).
load data to the connected device.
potential).
grammed CTS delay time has elapsed (DCE), or
keys an attached radio when RF data arrives
(CTS KEY).
62 TransNET OEM Integration Guide MDS 05-3946A01, Rev. A

Table 24. Transceiver Connector J3 Pinouts
(Payload data RS-232; Diagnostic data RS-232)
Pin No.
Input/
Output
1IN --Ground—Connects to ground (negative supply
2 OUT RS-232 Diagnostic TXD—Supplies received diagnos-
3 OUT TTL, 3 Vdc Alarm condition—A low indicates normal opera-
4 IN RS-232 Diagnostic RXD—Accepts diagnostic/adminis-
5 IN -- FCC 5-25 Vdc version: DC Input (5-25 Vdc)—
6 IN TTL, 3 Vdc Sleep Mode Input—A ground on this pin turns off
7 OUT TTL, 3 Vdc Data Carrier Detect (DCD)—A low indicates hop-
8 IN TTL, 3 Vdc Power Supply Shutdown Control—A ground on
9 -- -- Reserved—Do not connect.
10 IN RS-232,
11 IN -- FCC 5-25 Vdc version: DC Input (5-25 Vdc)—
12 IN RS-232,
Signal
Type
+/- 5 Vdc
+/- 5 Vdc
Name/Description
potential).
tic/administrative data to the connected device.
tion. A high indicates an alarm. (See ASENSE
[HI/LO] command for more information.)
trative data from the connected device.
Supply Source must be capable of furnishing at
least 7.5 watts.
Non-FCC 3 Vdc version: Do not connect
most circuits in a remote radio. This allows for
greatly reduced power consumption, yet preserves the radio’s ability to be brought quickly
back on line. See “Sleep Mode Operation (Re-
mote units only)” on Page 31 for details.
ping synchronization has been achieved.
this pin causes the OEM module’s power supply
to shut down.
Transmitted Data (TXD)—Accepts payload data
from the connected device.
Supply Source must be capable of furnishing at
least 7.5 watts.
Non-FCC 3 Vdc version: Do not connect
Request to Send (RTS)—A high causes CTS to
follow after the programmed CTS delay time has
elapsed (DCE).
MDS 05-3946A01, Rev. A TransNET OEM Integration Guide 63

Table 24. Transceiver Connector J3 Pinouts
(Payload data RS-232; Diagnostic data RS-232) (Continued)
13 -- -- Reserved—Do not connect.
14 OUT RS-232,
+/- 5 Vdc
15 IN -- Ground—Connects to ground (negative supply
16 OUT RS-232,
+/- 5 Vdc
Received Data (RXD)—Supplies received payload data to the connected device.
potential).
Clear to Send (CTS)—Goes high after the pro-
grammed CTS delay time has elapsed (DCE), or
keys an attached radio when RF data arrives
(CTS KEY).
Table 25. Transceiver Connector J3 Pinouts
(Payload data RS-485; Diagnostic data RS-232)
Pin No.
Input/
Output
1IN -- Ground—Connects to ground (negative supply
2 OUT RS-232 Diagnostic TXD—Supplies received diagnos-
3 OUT TTL, 3 Vdc Alarm condition—A low indicates normal opera-
4 IN RS-232 Diagnostic RXD—Accepts diagnostic/adminis-
5 IN -- FCC 5-25 Vdc version: DC Input (5-25 Vdc)—
6 IN TTL, 3 Vdc Sleep Mode Input—A ground on this pin turns off
7 OUT TTL, 3 Vdc Data Carrier Detect (DCD)—A low indicates hop-
8 IN TTL, 3 Vdc Power Supply Shutdown Control—A ground on
9 -- -- Reserved—Do not connect.
Signal
Type
Name/Description
potential).
tic/administrative data to the connected device.
tion. A high indicates an alarm. (See ASENSE
[HI/LO] command for more information.)
trative data from the connected device.
Supply Source must be capable of furnishing at
least 7.5 watts.
Non-FCC 3 Vdc version: Do not connect
most circuits in a remote radio. This allows for
greatly reduced power consumption, yet preserves the radio’s ability to be brought quickly
back on line. See “Sleep Mode Operation (Re-
mote units only)” on Page 31 for details.
ping synchronization has been achieved.
this pin causes the OEM module’s power supply
to shut down.
64 TransNET OEM Integration Guide MDS 05-3946A01, Rev. A

Table 25. Transceiver Connector J3 Pinouts
(Payload data RS-485; Diagnostic data RS-232) (Continued)
10 IN Differential RXD+/RXA (Transmitted Data+)—Non-inverting
11 IN -- FCC 5-25 Vdc version: DC Input (5-25 Vdc)—
12 IN Differential RXD-/RXA (Transmitted Data-)—Inverting re-
13 -- -- Reserved—Do not connect.
14 OUT Differential TXD+/TXA (Received Data+)—Non-inverting
15 IN -- Ground—Connects to ground (negative supply
16 OUT Differential TXD-/TXA (Received Data-)—Inverting driver
receiver input. Accepts payload data from the
connected device.
Supply Source must be capable of furnishing at
least 7.5 watts.
Non-FCC 3 Vdc version: Do not connect
ceiver input.
driver output. Supplies received payload data to
the connected device.
potential).
output.
MDS 05-3946A01, Rev. A TransNET OEM Integration Guide 65

14.0 dBm-Watts-Volts Conversion Chart
Table 26 is provided as a convenience for determining the equivalent voltage
or wattage of an RF power expressed in dBm with 50 Ohms load.
Table 26. dBm-Watts-Volts Conversion Chart
dBm V Po
+53 100.0 200W
+50 70.7 100W
+49 64.0 80W
+48 58.0 64W
+47 50.0 50W
+46 44.5 40W
+45 40.0 32W
+44 32.5 25W
+43 32.0 20W
+42 28.0 16W
+41 26.2 12.5W
+40 22.5 10W
+39 20.0 8W
+38 18.0 6.4W
+37 16.0 5W
+36 14.1 4W
+35 12.5 3.2W
+34 11.5 2.5W
+33 10.0 2W
+32 9.0 1.6W
+31 8.0 1.25W
+30 7.10 1.0W
+29 6.40 800mW
+28 5.80 640mW
+27 5.00 500mW
+26 4.45 400mW
+25 4.00 320mW
+24 3.55 250mW
+23 3.20 200mW
+22 2.80 160mW
+21 2.52 125mW
+20 2.25 100mW
+19 2.00 80mW
+18 1.80 64mW
+17 1.60 50mW
+16 1.41 40mW
+15 1.25 32mW
+14 1.15 25mW
+13 1.00 20mW
+12 .90 16mW
+11 .80 12.5mW
+10 .71 10mW
+9 .64 8mW
+8 .58 6.4mW
+7 .500 5mW
+6 .445 4mW
+5 .400 3.2mW
+4 .355 2.5mW
+3 .320 2.0mW
+2 .280 1.6mW
+1 .252 1.25mW
dBm V Po
0 .225 1.0mW
-1 .200 .80mW
-2 .180 .64mW
-3 .160 .50mW
-4 .141 .40mW
-5 .125 .32mW
-6 .115 .25mW
-7 .100 .20mW
-8 .090 .16mW
-9 .080 .125mW
-10 .071 .10mW
-11 .064
-12 .058
-13 .050
-14 .045
-15 .040
-16 .0355
dBm mV Po
-17 31.5
-18 28.5
-19 25.1
-20 22.5 .01mW
-21 20.0
-22 17.9
-23 15.9
-24 14.1
-25 12.8
-26 11.5
-27 10.0
-28 8.9
-29 8.0
-30 7.1 .001mW
-31 6.25
-32 5.8
-33 5.0
-34 4.5
-35 4.0
-36 3.5
-37 3.2
-38 2.85
-39 2.5
-40 2.25 .1µW
-41 2.0
-42 1.8
-43 1.6
-44 1.4
-45 1.25
-46 1.18
-47 1.00
-48 0.90
dBm mV Po
-49 0.80
-50 0.71 .01µW
-51 0.64
-52 0.57
-53 0.50
-54 0.45
-55 0.40
-56 0.351
-57 0.32
-58 0.286
-59 0.251
-60 0.225 .001µW
-61 0.200
-62 0.180
-63 0.160
-64 0.141
dBm µV Po
-65 128
-66 115
-67 100
-68 90
-69 80
-70 71 .1nW
-71 65
-72 58
-73 50
-74 45
-75 40
-76 35
-77 32
-78 29
-79 25
-80 22.5 .01nW
-81 20.0
-82 18.0
-83 16.0
-84 11.1
-85 12.9
-86 11.5
-87 10.0
-88 9.0
-89 8.0
-90 7.1 .001nW
-91 6.1
-92 5.75
-93 5.0
-94 4.5
-95 4.0
-96 3.51
-97 3.2
dBm µV Po
-98 2.9
-99 2.51
-100 2.25 .1pW
-101 2.0
-102 1.8
-103 1.6
-104 1.41
-105 1.27
-106 1.18
dBm nV Po
-107 1000
-108 900
-109 800
-110 710 .01pW
-111 640
-112 580
-113 500
-114 450
-115 400
-116 355
-117 325
-118 285
-119 251
-120 225
.001pW
-121 200
-122 180
-123 160
-124 141
-125 128
-126 117
-127 100
-128 90
-129 80 .1ƒW
-130 71
-131 61
-132 58
-133 50
-134 45
-135 40
-136 35
-137 33
-138 29
-139 25
-140 23 .01ƒW
66 TransNET OEM Integration Guide MDS 05-3946A01, Rev. A

GLOSSARY
Antenna System Gain—A figure, normally expressed in dB, representing
the power increase resulting from the use of a gain-type antenna. System
losses (from the feedline and coaxial connectors, for example) are subtracted
from this figure to calculate the total antenna system gain.
ARQ—Automatic Repeat Request. An error-correction technique whereby
flawed data packets are detected and a request for re-transmission is issued.
Bit—The smallest unit of digital data, often represented by a one or a zero.
Eight bits (plus start, stop, and parity bits) usually comprise a byte.
Bits-per-second—See BPS.
BPS—Bits-per-second. A measure of the information transfer rate of digital
data across a communication channel.
Byte—A string of digital data usually made up of eight data bits and start,
stop, and parity bits.
Decibel (dB)—A measure of the ratio between two signal levels. Frequently
used to express the gain (or loss) of a system.
Data Circuit-terminating Equipment—See DCE.
Data Communications Equipment—See DCE.
Data Terminal Equipment—See DTE.
dBi—Decibels referenced to an “ideal” isotropic radiator in free space.
Frequently used to express antenna gain.
dBm—Decibels referenced to one milliwatt. An absolute unit used to
measure signal power, as in transmitter power output, or received signal
strength.
DCE—Data Circuit-terminating Equipment (or Data Communications
Equipment). In data communications terminology, this is the “modem” side
of a computer-to-modem connection. By default, MDS transceivers are set as
DCE devices.
Digital Signal Processing—See DSP.
DSP—Digital Signal Processing. DSP circuitry is responsible for the most
critical real-time tasks; primarily modulation, demodulation, and servicing of
the data port.
DTE—Data Terminal Equipment. A device that provides data in the form of
digital signals at its output. Connects to the DCE device.
Equalization—The process of reducing the effects of amplitude, frequency
or phase distortion with compensating networks.
Extended Address—A user-selectable number between 0 and 31 that
identifies a group of transceivers that are part of a common sub-network. It is
recommended the Master be assigned XADDR 0 and the values of 1-31
assigned to Extension radios.
MDS 05-3946A01, Rev. A TransNET OEM Integration Guide G-1

Extension Radio—A radio in a TransNET spread-spectrum network that
serves as a gateway between vertically adjacent sub-networks. See
Store-and-Forward.
Fade Margin—The greatest tolerable reduction in average received signal
strength that will be anticipated under most conditions. Provides an
allowance for reduced signal strength due to multipath, slight antenna
movement or changing atmospheric losses. A fade margin of 20 to 30 dB is
usually sufficient in most systems.
Frame—A segment of data that adheres to a specific data protocol and
contains definite start and end points. It provides a method of synchronizing
transmissions.
Frequency Hopping—The spread spectrum technique used by the
transceiver, wherein two or more associated radios change their operating
frequencies several times per second using a set pattern. Since the pattern
appears to jump around, it is said to “hop” from one frequency to another.
Frequency Zone—The transceivers use up to 128 discrete channels in the
902 to 928 MHz spectrums. A group of 16 channels is referred to as a zone.
The transceivers use five to eight frequency zones.
Hardware Flow Control—A transceiver feature used to prevent data buffer
overruns when handling high-speed data from the RTU or PLC. When the
buffer approaches overflow, the radio drops the clear-to-send (CTS) line,
which instructs the RTU or PLC to delay further transmission until CTS again
returns to the high state.
Host Computer—The computer installed at the master station site, which
controls the collection of data from one or more remote sites.
Latency—The delay (usually expressed in milliseconds) between when data
is applied to TXD (Pin 2) at one radio, until it appears at RXD (Pin 3) at the
other radio.
MAS—Multiple Address System. A radio system where a central master
station communicates with several remote stations for the purpose of
gathering telemetry data.
Master (Station)—The one radio transceiver in a spread spectrum network
that automatically provides synchronization information to one or more
associated remote transceivers. A radio may be programmed for either master
or remote mode using software commands.
Multiple Address System (MAS)—See Point-Multipoint System.
Network Address—User-selectable number between 1 and 65000 that is
used to identify a group of transceivers that form a communications network.
The master and all remotes within a given system must have the same
network address.
Point-Multipoint System—A radio communications network or system
designed with a central control station that exchanges data with a number of
remote locations equipped with terminal equipment.
G-2 Tr ansNET OEM Integration Guide MDS 05-3946A01, Rev. A

Poll—A request for data issued from the host computer (or master PLC) to a
remote radio.
PLC—Programmable Logic Controller. A dedicated microprocessor
configured for a specific application with discrete inputs and outputs. It can
serve as a host or as an RTU.
Remote Radio—A radio in a spread spectrum network that communicates
with an associated master station. A radio may be programmed for either
master or remote mode using software commands.
Remote Terminal Unit—See RTU.
Repeater—A radio that receives RF data and retransmits it. See
Store-and-Forward.
RTU—Remote Terminal Unit. A data collection device installed at a remote
radio site.
SCADA—Supervisory Control And Data Acquisition. An overall term for
the functions commonly provided through an MAS radio system.
Standing Wave Ratio—See SWR.
Sub-Network—A group of transceivers and the corresponding radio that
they are directly synchronized to. A sub-network can be identified by
Extended Address. See Store-and-Forward.
Store-and-Forward—A radio that receives RF data and retransmits it. In the
TransNET product line, store and forward is defined as a network that
consists of vertically adjacent sub-networks that alternate communicating
upstream and downstream. The transceiver performs store and forward at the
internal data frame level (not the user data level) which allows the equipment
to stream data with minimal latency through each Extension/Repeater radio
station.
SWR—Standing Wave Ratio. A parameter related to the ratio between
forward transmitter power and the reflected power from the antenna system.
As a general guideline, reflected power should not exceed 10% of the forward
power (≈ 2:1 SWR).
TTL—Transistor-Transistor Logic. A form of digital switching that utilizes
bipolar transistors to sense “high” and “low” logic levels (1 and 0,
respectively).
Zone—See Frequency Zone.
MDS 05-3946A01, Rev. A TransNET OEM Integration Guide G-3

G-4 Tr ansNET OEM Integration Guide MDS 05-3946A01, Rev. A

INDEX
A
Accessories (table) 6
ADDR command (set/display radio
network address) 40
Alarm
checking for 53
code definitions 53
codes 53
codes, table 53
major vs. minor 53
receiver timeout (RXTOT
command) 48
reset output signal 41
set/display output sense (ASENSE
command) 41
status (STAT command) 50
ALARM command (superseded; see
STAT command) 50
AMASK command (configure alarm
output signal) 41
Antenna
performance optimization 23
selection 21
SWR check 23
Yagi, illustrated 22
ASENSE command (set/display alarm
output sense) 41
B
BAUD command (set/display data
interface port attributes) 41
Baud rate
setting 24
setting for RJ-11 DIAG port (DLINK
command) 56
Benchtop Setup & Evaluation 7–??
BUFF command (set/display received
data handling mode) 41
C
Cable
data equipment to DATA
INTERFACE connector 21, 34
data interface wiring for tail-end
links 26
feedlines 22
maximum length, recommended 13,
14
CODE command (display/set
encryption value) 42
Commands
ADDR (set/display radio network
address) 40
AMASK (configure alarm output
signal) 41
ASENSE (set/display alarm output
sense) 41
BAUD (set/display data interface
port attributes) 41
BUFF (set/display received data
handling mode) 41
CODE (set/display encryption
value) 42
CTS (set/display CTS line response
timer) 42
CTSHOLD (set/display CTS hold
timer) 43
detailed descriptions 40–51
DEVICE (set/display DCE or CTS
Key behavior) 43
display operating status 36
DKEY (disable transmitter) 44
DTYPE (set radio’s diagnostics
type) 44
FEC (Forward Error Correction) 44
HOPTIME (set/display hoptime
setting) 44
how used 40
INIT (restore factory default
settings) 44
MODE (display/set radio mode as
master, remote, or extension) 45
most often used commands 40
network configuration 35
OWM (set/display optional owner’s
message) 45
OWN (set/display optional owner’s
name) 45
PORT (display/set current data
port) 45
PWR (set/display RF forward output
power) 46, 47
RSSI (display received signal
strength) 47
RTU (enable/disable internal
RTU) 48
RX (set/display test receive
MDS 05-3946A01, Rev. A TransNET OEM Integration Guide I-1

frequency) 48
RXTOT (set/display received data
timeout value) 48
SAF (store-and-forward) 48
SETUP (enter testing and setup
mode) 48
SHOW (display measured power
output) 49
SKIP (set/display frequency zone to
skip) 49
SLEEP (display/set radio’s sleep
mode setting) 50
SREV (display transceiver software
version) 50
STAT (list alarms) 50
TEMP (display internal
temperature) 50
XADDR (display or program
extended address) 51
XMAP (32-bit hex list of
extensions) 51
XPRI (display/program primary
radio’s extended address) 51
XRSSI (sets minimum signal level
for sync. with non-primary
extension unit) 51
D
Data buffer setting 23, 41
DATA INTERFACE
connector pin descriptions, table 13
Data interface
cable wiring for tail-end links,
illustrated 26
Default settings
data interface baud rate 24
factory settings reset by INIT
command (table) 46
restoring (INIT command) 44
See also individual command
descriptions
DEVICE command (set/display DCE or
CTS Key behavior) 43
Diagnostics
setup mode (SETUP command) 48
using InSite software for
network-wide 55
Display
alarm output sense (ASENSE
command) 41
alarms (STAT command) 50
CTS hold timer value (CTSHOLD
command) 43
CTS line response timer value (CTS
command) 42
data interface baud rate (BAUD
command) 41
device behavior (DEVICE
command) 43
hoptime setting (HOPTIME
command) 44
network address (ADDR
command) 40
operating status commands 36
owner’s message (OWM
command) 45
owner’s name (OWN command) 45
received data handling mode (BUFF
command) 41
received data timeout value (RXT OT
command) 48
received signal strength (RSSI
command) 47
RF forward output power (PWR
command) 46, 47
RF power output, actual measured
(SHOW command) 49
skipped frequency zones (SKIP
command) 49
software version, transceiver (SREV
command) 50
temperature, internal (TEMP
command) 50
test receive frequency (RX
command) 48
display/set radio mode as master,
remote, or extension (see MODE
command) 45
DKEY command (disable
transmitter) 23, 44, 49
DLINK command (set/display baud
rate of diagnostics link) 56
DSP (digital signal processing) 53
DTYPE command (set radio’s
diagnostics type) 44, 56
E
Enable
internal RTU (RTU command) 48
network-wide diagnostics,
I-2 TransNET OEM Integration Guide MDS 05-3946A01, Rev. A

procedures 56
Setup mode (SETUP command) 48
skipped zone (SKIP command) 49
Encryption. See CODE command
Equipment List 43
Evaluation Board
Documentation 18–20
Extension radio. See
Store-and-Forward (SAF)
command) 43
transmitter, for antenna SWR
check 23
KEY command (key transmitter) 23,
49
L
LED status indicators
table 17, 54
F
Feedline
selection 21, 22
G
Gate (radio diagnostics type) 44
H
Hoptime
setting 23, 24
HOPTIME command (set/display
hoptime setting) 44
I
Illustrations
antenna, Y agi 22
data interface cable wiring for
tail-end links 26
model configuration code 3
point-to-point link 4
remote station arrangement 10
tail-end link 5
typical MAS network 4
INIT command (restore factory default
settings) 44
InSite software 55
Installation 21–32
connecting transceiver to data
equipment 21, 34
feedline selection 22
performance optimization 23
tail-end links 25
Interference
about 32
checks 24
troubleshooting 55
K
Key
set to CTS keying (DEVICE
M
Master Station
default settings 46
MODE command (display/set radio
mode as master, remote, or
extension) 45
MODE command (display/set radio’s
operating mode as master, remote, or
extension) 45
Model configuration code, illustrated 3
Mounting instructions/dimensions 21
Multiple Address System (MAS)
network, illustrated 4
N
Network configuration commands 35
Node (radio diagnostics type) 44
O
Operating Commands 34–52
OWM command (set/display optional
owner’s message) 45
OWN command (set/display optional
owner’s name) 45
P
PC
connecting to radio’s diagnostic
port 56
launching InSite application at 56
Peer (radio diagnostics type) 44
Performance optimization 23
Pins, DATA INTERFACE connector
descriptions (table) 13
Point-to-point system
link, illustrated 4
PORT command (set/display current
data port) 45
Power (RF)
how much can be used 24
MDS 05-3946A01, Rev. A TransNET OEM Integration Guide I-3

Measurement 49
set/display RF forward output (PWR
command) 46, 47
Procedures
antenna aiming 23
antenna and feedline selection 21
antenna SWR check 23
connecting data equipment to DATA
INTERFACE connector 21, 34
connecting PC and radios for
network-wide diagnostics 56
installation 21–32
interference check 24
mounting the transceiver 21
performance optimization 23
programming radio for network-wide
diagnostics 56
troubleshooting 52–55
Programming 34–52
Programming radio
as root or node 56
PWR command (set/display RF forward
output power) 46, 47
R
Radio
inoperative (troubleshooting
chart) 55
no synchronization with master
(troubleshooting chart) 55
poor performance (troubleshooting
chart) 55
Remote radio
default settings 46
Remote station
typical arrangement, illustrated 10
Repeater Operation. See
Store-and-Forward (SAF)
Root (radio diagnostics type) 44
RSSI command (display received signal
strength) 47
RTU command (enable/disable internal
RTU) 48
RX command (set/display test receive
frequency) 48
RXTOT command (set/display recei ved
data timeout value) 48
S
SAF command (store-and-forward) 48
See also Encryption 42
Set
alarm output sense (ASENSE
command) 41
alarm output signal (AMASK
command) 41
CTS hold timer (CTSHOLD
command) 43
CTS line response timer (CTS
command) 42
data interface baud rate (BAUD
command) 41
DCE or CTS Key device behavior
(DEVICE command) 43
frequency zone to skip (SKIP
command) 49
hoptime (HOPTIME command) 44
network address (ADDR
command) 40
owner’s message (OWM
command) 45
owner’s name (OWN command) 45
radio mode (see MODE
command) 45
received data handling mode (BUFF
command) 41
received data timeout value (RXT OT
command) 48
test receive frequency (RX
command) 48
testing mode (SETUP command) 48
SETUP command (enter testing and
setup mode) 48
SHOW command (display power
output) 49
SKIP command (set/display frequency
zone to skip) 49
SLEEP command (display/set radio’s
sleep setting) 50
Spread spectrum, basic principles of 3
SREV command (display transceiver
software version) 50
STAT command (list alarms) 50
Store-and-Forward (SAF) 5, 26, 29, 35,
38, 39, 45, 48, 52
SWR (Standing Wave Ratio)
performance optimization 23
Synchronization qualifiers 25, 52
I-4 TransNET OEM Integration Guide MDS 05-3946A01, Rev. A

T
Tables
accessories 6
alarm codes 53
DATA INTERFACE connector pin
descriptions 13
LED status indicators 17, 54
troubleshooting 55
Tail-end link
cable wiring for, illustrated 26
illustrated 5
installation 25
Technical specifications 58–59
TEMP command (display internal
temperature) 50
Temperature, display internal (TEMP
command) 50
Transceiver
connecting to data equipment 21, 34
default settings 46
mounting
instructions/dimensions 21
performance optimization 23
Troubleshooting 52–55
table 55
X
XADDR (extended address
command) 16, 25, 30, 39, 45, 46, 51,
52
XMAP command (32-bit hex entry) 51
XPRI command (display/set extended
address) 51
XRSSI command (sets minimum RSSI
level to maintain sync. w/non-primary
extension radio) 51
MDS 05-3946A01, Rev. A TransNET OEM Integration Guide I-5

I-6 TransNET OEM Integration Guide MDS 05-3946A01, Rev. A

IN CASE OF DIFFICULTY...
MDS products are designed for long life and trouble-free operation. However,
this equipment, as with all electronic equipment, may have an occasional
component failure. The following information will assist you in the event that
servicing becomes necessary.
CUSTOMER ASSISTANCE
Assistance for MDS products is available from our Customer Support Team
during business hours (8:00 A.M.–5:30 P.M. Eastern Time). When calling,
please give the complete model number of the radio, along with a description of
the trouble/symptom(s) that you are experiencing. In many cases, problems can
be resolved over the telephone, without the need for returning the unit to the
factory. Please use one of the following means for product assistance:
Phone: 585 241-5510 E-Mail: techsupport@microwavedata.com
FAX: 585 242-8369 Web: www.microwavedata.com
FACTORY SERVICE
Component level repair of radio equipment is not recommended in the field.
Many components are installed using surface mount technology, which requires
specialized training and equipment for proper servicing. For this reason, the
equipment should be returned to the factory for any PC board repairs. The
factory is best equipped to diagnose, repair and align your radio to its proper
operating specifications.
If return of the equipment is necessary, you will be issued a Service Request
Order (SRO) number. The SRO number will help expedite the repair so that the
equipment can be repaired and returned to you as quickly as possible. Please be
sure to include the SRO number on the outside of the shipping box, and on any
correspondence relating to the repair. No equipment will be accepted for repair
without an SRO number.
A statement should accompany the radio describing, in detail, the trouble
symptom(s), and a description of any associated equipment normally connected
to the radio. It is also important to include the name and telephone number of a
person in your organization who can be contacted if additional information is
required.
The radio must be properly packed for return to the factory. The original shipping container and packaging materials should be used whenever possible. All
factory returns should be addressed to:
Microwave Data Systems
Product Service Department
(SRO No. XXXX)
175 Science Parkway
Rochester, NY 14620 USA
When repairs have been completed, the equipment will be returned to you by
the same shipping method used to send it to the factory. Please specify if you
wish to make different shipping arrangements. To inquire about an in-process
repair, you may contact our Product Services Group at 585-241-5540 (FAX:
585-242-8400), or via e-mail at ProductServices@microwavedata.com.

Microwave Data Systems Inc.
175 Science Parkway
Rochester, NY 14620
General Business: +1 585 242-9600
FAX: +1 585 242-9620
Web: www.microwavedata.com
A product of Microwave Data Systems Inc.
 Loading...