

Page 1

w
w
w
w
w
w
EXT-HD-DSM
P
er
an
ua
M
®
l
.gefen.com
Page 2

ASKING FOR ASSISTANC
E
T
t
0
0
0
T
:
8
e
:
Gef
C
c/o C
e
0600
C
1
gef
e
Gef
C
ademarks
cou
©
d
R
A4
echnical Suppor
Telephone (818) 772-910
(800) 545-690
Fax (818) 772-912
echnical Support Hours
:00 AM to 5:00 PM Monday through Friday, Pacifi c Tim
Write To
en, LL
ustomer Servic
2
Nordhoff St
hatsworth, CA 9131
ds@gefen.com
www.
en.com
Notic
en, LLC reserves the right to make changes in the hard ware, packaging and
any accompanying doc u men ta tion without prior written notice.
Hi-Def Digital Signage Media Player is a trademark of Gefen, LL
DMI, the HDMI logo, and
igh-Defi nition Multimedia Interface are tr
or registered trademarks of HDMI Licensing in the United States and other
ntries.
2011 Gefen, LLC, All Rights Reserve
All trademarks are the property of their respective owners.
ev
Page 3

CONTENT
S
oduction
3
t
5
6
t
8
t
9
n
u
e
e
e
e
e
e
e
k
t
t
t
t
30
e
3
e
30
30
e
3
3
e
3
t
38
e
3
e
e
e
y
5
e
57 S
5
y
1 Intr
2 Operation Notes
Features
4 Front Panel Layou
Front Panel Descriptions
Back Panel Layou
7 Back Panel Descriptions
IR Remote Layou
IR Remote Descriptions
10 IR Remote Installatio
11 Connecting the Hi-Def Digital Signage Media Player
11 Wiring Diagram
12 Operating the Hi-Def Digital Signage Media Player
12 Powering the Hi-Def Digital Signage Media Player
13 Accessing the Main Men
15 Safely Removing the USB Storage Devic
17 How the Hi-Def Digital Signage Media Player works
17 Directory and File Nomenclatur
18 Renaming Files and Directories
19 Operating Modes
20 Stand-Alone Mod
20 Using Stand-Alone Mod
22 Viewing the Schedule Fil
24 Editing the Playlist Fil
25 Viewing the Settings.xml fi l
25 Checking Our Wor
27 Adding More Video Content to the Playlis
27 Changing the Playlist Order
28 Scheduling Conten
29 The Default Even
28 Understanding the Default Even
Network Mod
0 Using Network Mod
The FTP Client and FTP Server
Push Mod
1 Confi guration using the OSD
4 Confi guration using the Settings.xml fi l
5 Confi guring the FTP Clien
Pull Mod
8 Confi guration using the OSD
41 Confi guration using the Settings.xml fi l
44 Confi guring the FTP Server
45 The Settings.xml fi l
45 Understanding the Settings.xml fi l
47 Settings.xml Summar
5 Firmware Updat
pecifi cations
8 Warrant
Page 4

INTRODUCTIO
N
Cong
G
Gef
Gef
sy
T
y
c
e
f
Signag
g
c
fi
e
s
c
g
y
fi
f
c
ratulations on your purchase of the Hi-Def Digital Signage Media Player.
Your complete satisfaction is very important to us.
efen
en delivers innovative, progressive computer and electronics add-on solutions
that harness integration, extension, distribution and conversion technologies.
en’s reliable, plug-and-play products supplement cross-platform computer
stems, professional audio/video environments and HDTV systems of all sizes
with hard-working solutions that are easy to implement and simple to operate.
he Gefen Hi-Def Digital Signage Media Player
The Hi-Def Digital Signage Media Player provides an effective means to playback
and schedule digital signage content on both digital and analog connections. B
onnecting the Hi-Def Digital Signage Media Player to a network, content can
be pushed to the box using a computer and FTP client program. When a more
laborate setup is required, a number of units can be installed to pull content
rom a local or external FTP server based on a schedule. The Hi-Def Digital
e Media Player acts as both an FTP client and server with live loggin
of various important statistics, such as playback, system status, and uploaded
ontent. For precise time synchronization, the Hi-Def Digital Signage Media
Player can be set up to access an external NTP server. Many audio and video
le formats are supported with NTSC and PAL output resolutions up to 1080p
Full HD. HDMI, Composite, and Component outputs with separate analog and
digital audio outputs provide fl exibility when connecting to various displays.
Two USB 2.0 ports provide connection to the included USB fl ash drive or to an
xternal hard drive. The Hi-Def Digital Signage Media Player enclosure features
integrated mounting brackets for a secure installation on any fl at surface or
directly to the back of the display. For complete management of multiple devices
in multiple locations, Gefen provides a CMS (Content Management Software)
olution which can be run in a virtual environment. The Gefen CMS will allow you
to easily manage all of your units in the fi eld from any compatible browser with
access to logs, schedules, content, and playlists.
How It Works
The Hi-Def Digital Signage Media Player can connect to a display using either
analog or digital video connectors. Connect an HDMI, Component, or Composite
able between the Hi-Def Digital Signage Media Player and the display. If usin
the networking capabilities of the Hi-Def Digital Signage Media Player, connect
our network cable to the Ethernet port. Optionally, the digital or analog audio
output connector can be used to connect the Hi-Def Digital Signage Media Player
to an external audio processor or ampli
to the rear panel o
onnect the AC power cord to an available electrical outlet.
the unit. Connect the 12 V DC power supply to the unit and
er. Connect the included USB fl ash drive
Page 5

OPERATION NOTE
S
2
s
:
S
location:
before
(C
:
:
C
SC/
)
C
)
:
SC/
)
:
p
f
g
pag
READ THESE NOTES BEFORE INSTALLING OR
OPERATING THE HI-DEF DIGITAL SIGNAGE MEDIA PLAYER
• This unit DOES NOTcontain any internal memory. Memory must be
upplied by the user in the form of a USB 2.0 fl ash drive.
The following fi le systems are compatible with this player
NTF
The main settings, schedules, playlists, and subdirectories will be located on
the attached USB device. The default directories and settings fi le (settings.
xml) can be downloaded and placed into the root directory of the USB
device. These fi les can be downloaded from the Gefen Web site at this
www.gefen.com/downloads
• Power must be disconnected from the Hi-Def Digital Signage Media Player
the USB drive is attached.
• The Gefen Hi-Def Digital Signage Media Player has both analog
omponent and composite) and Digital (HDMI) connectors. The following
output resolutions are available
Analog Connectors
omposite: 480i and 576i (NT
omponent: 720p, 1080i, and 1080p (NTSC / PAL
PAL
Digital Connectors
DMI: 720p, 1080i, and 1080p (NT
The Gefen Hi-Def Digital Signage Media Player can operate in two modes
• Stand-Alone Mode - This is the default mode. In this mode the unit sup-
orts all scheduling and playlist features but cannot be updated remotely via
the FTP server or client. For more information on operating the Media Player
in Stand-Alone mode, see page 20.
• Network Mode - In this mode all scheduling and playlist features available.
emote management is possible by utilizing the FTP server and client that
are built into the Hi-De
on operatin
e 30.
the Media Player in one of the two Network Modes, refer to
Digital Signage Media Player. For more information
PAL
Page 6

3
FEATURE
S
S
y
*
OGG
y
n
t
n
ge
OSD
S
t
P
(1)
(1)
)
(1) US
e
(1)
t
(1)
y
(1) Q
e
*C
f
Software User Manual
fo
Features
•
upports resolutions up to 1080p Full HD
DMI, Component, and Composite A/V outputs active simultaneousl
•
• Text-based scheduling and playlist using a text editor
• CMS for multiple units
• Supports MPEG 1/2/4, DivX 3/4/5/6, XVid, and H.264/AVC video codecs
• Supports MP3, MPEG, WMA, PCM, LPCM, ADPCM, FLAC, WAV, AAC,
, and MKA audio formats
• Wall-mountable enclosure for excellent heat dissipation and durabilit
• Integrated OSD Menu for device confi guratio
• Built-in FTP server and client to push and pull conten
• Full media scheduling and accounting logs
• NTP client for time synchronizatio
•
• Programmable PIN code prevents unauthorized access to
• Compatible fi le systems: NTF
• IR remote control uni
and schedules
B 2.0 ports used for stora
ackage Includes
Hi-Def Digital Signage Media Player
6 ft. Locking HDMI cable (M-M
B 2.0 fl ash driv
IR Remote Control Uni
12V / 3A DC Power Suppl
uick-Start Guid
ontent Management Software (CMS) allows you to manage content, playlists,
or multiple units on a network. See the
r more information.
ontent Management
Page 7
4
FRONT PANEL LAYOU
T
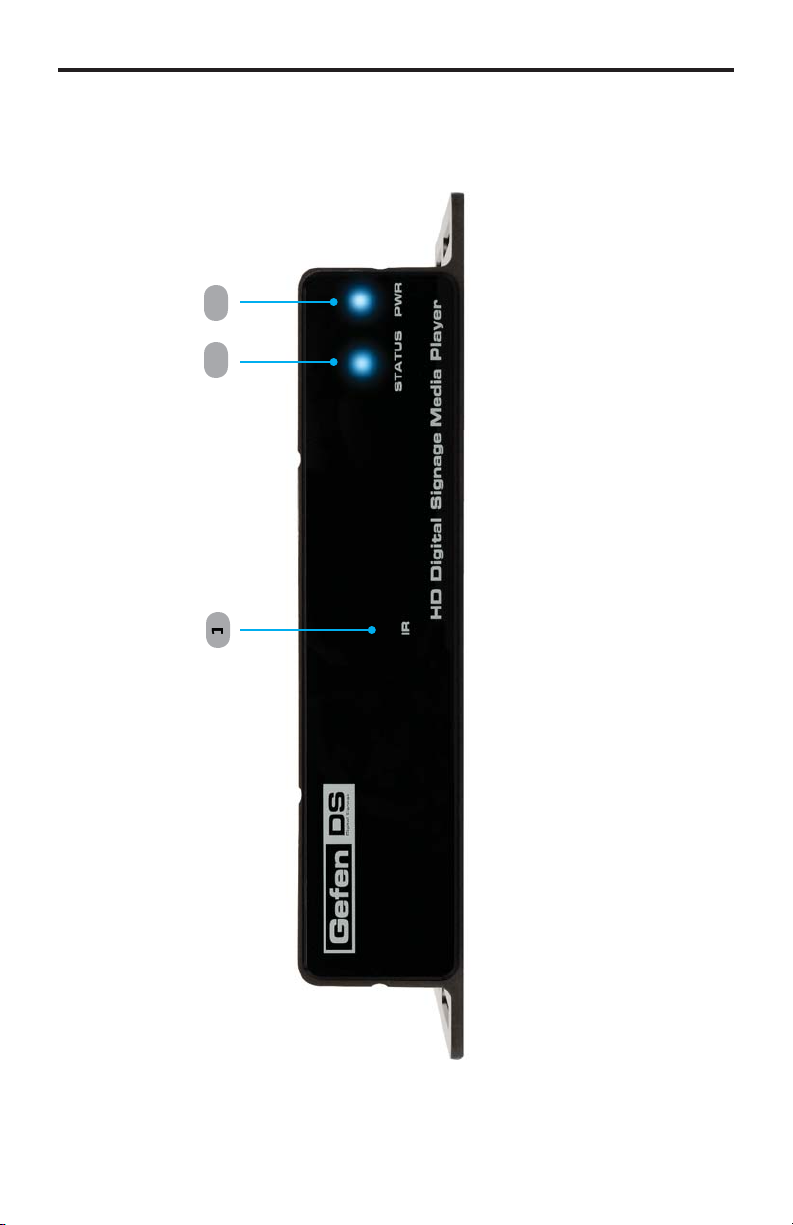
Front Panel
Page 8

FRONT PANEL DESCRIPTION
S
2
S
R
g
Front Panel
This IR window receives signals from the IR Remote Control Unit.
STATU
This LED indicator will fl ash bright blue to indicate network traffi c when the
edia Player is connected to a network.
W
Power LED indicator. When power is applied to the unit, this LED will glow
bright blue. When no USB device is connected, the LED will alternate blue and
ed. When the Media Player is booting, this LED will fl ash red when accessin
the USB drive.
5
Page 9
BACK PANEL LAYOU
T
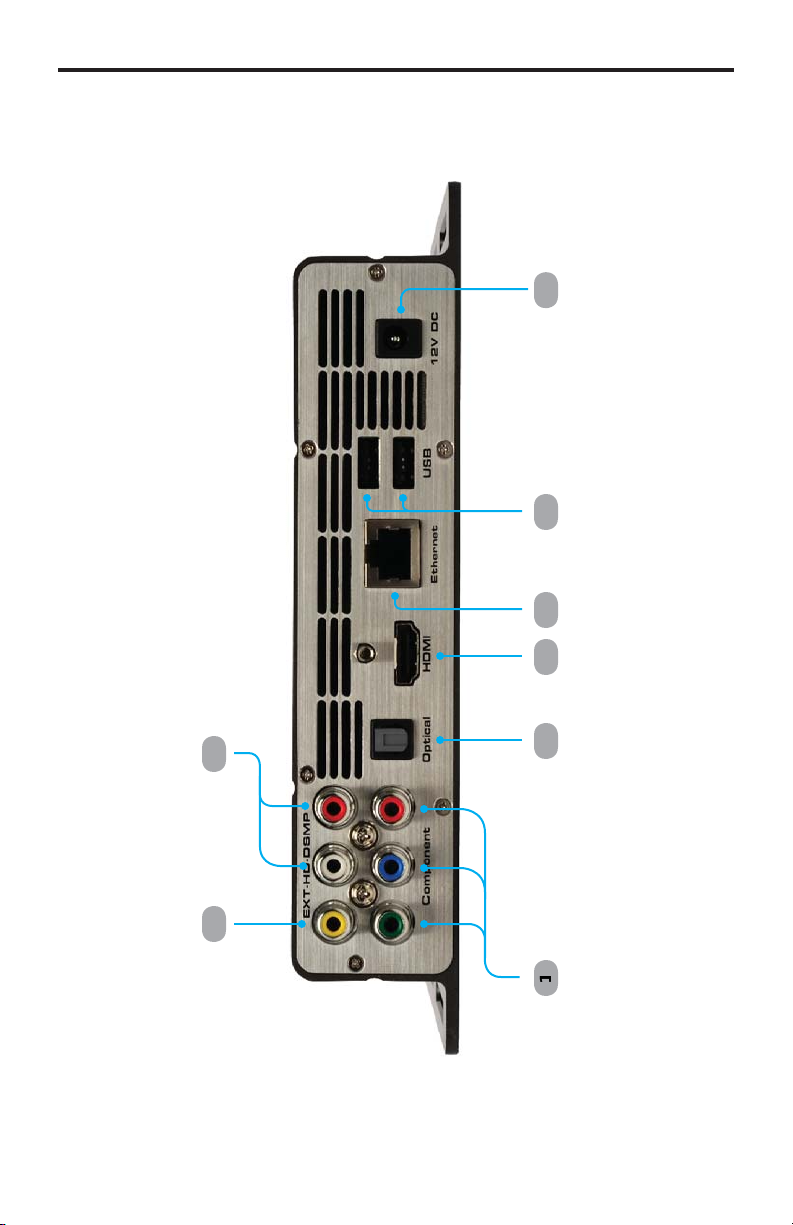
Back Panel
5
7
Page 10

BACK PANEL DESCRIPTION
S
t
t
C
t
t
omponen
onnect three (3) RCA cables from the Green, Blue, and Red outputs to the
omponent video input of a display or other video output device.
Optical
TOSLINK audio ouput connector. Connect an optical cable from this connector
to an audio output device.
HDMI
onnect an HDTV display to this port using the included locking HDMI cable.
Etherne
onnects the Hi-Def Digital Signage Media Player to a network using 10/100
bps Ethernet cable.
USB
B 2.0 output ports. Connect up to two (2) USB devices to these ports.
2V D
onnect the included 12 V DC power supply to this power receptacle.
Analog Audio Outpu
onnect a L/R RCA stereo pair from these outputs to an L/R RCA stereo input
air on an audio output device.
omponent Outpu
onnect a single RCA cable from this output to the component video input of a
display or other video output device.
7
Page 11

IR REMOTE LAYOU
T
4
3
1
t
XT-HD-DSMP-IR Remote Control Uni
15
1
5
7
1
12
1
10
Page 12

IR REMOTE DESCRIPTION
S
r
)
k
t
d
3
)
)
ess
decrease values
K
t
)
n
y
owe
This button will toggle between the ON and ST ANDBY power states. A RED
LED will be active when the unit is in Standby power state. The Power LED will
low bright blue when the Media Player is powered ON.
umeric Keypad (0 - 9
sed to enter values when using the Menu System.
Press this button to increase the volume level of the audio output.
Bac
Press this button to move up one level in the Menu System or return from a
menu.
Press this button to decrease the volume level of the audio output.
Aspec
hanges the aspect ratio between 16:9, 16:10, Pan Scan 4:3, an
Letter Box 4:
◄ (Cursor Left
Press this button to move (to the left) between fi elds in the Main Menu.
▼ (Cursor Down
Pr
this button to move the selection cursor down or to
the Main Menu.
within
O
► (Cursor Right)
Press this button to move (to the right) between fi elds in the Main Menu.
Outpu
2
Press this button to move the selection cursor up or to increase values withi
the Main Menu.
Eject button
Press this button to eject the USB drive, before removing the USB drive.
Home
Press this button to displa
Press this button to mute the output signal.
onfi rms the current setting.
elects the output resolution.
(Cursor Up
ute
the Input PIN Code screen.
Page 13
IR REMOTE INSTALLATIO
N
y
.
f
t
)
R
e
t
d
:
_
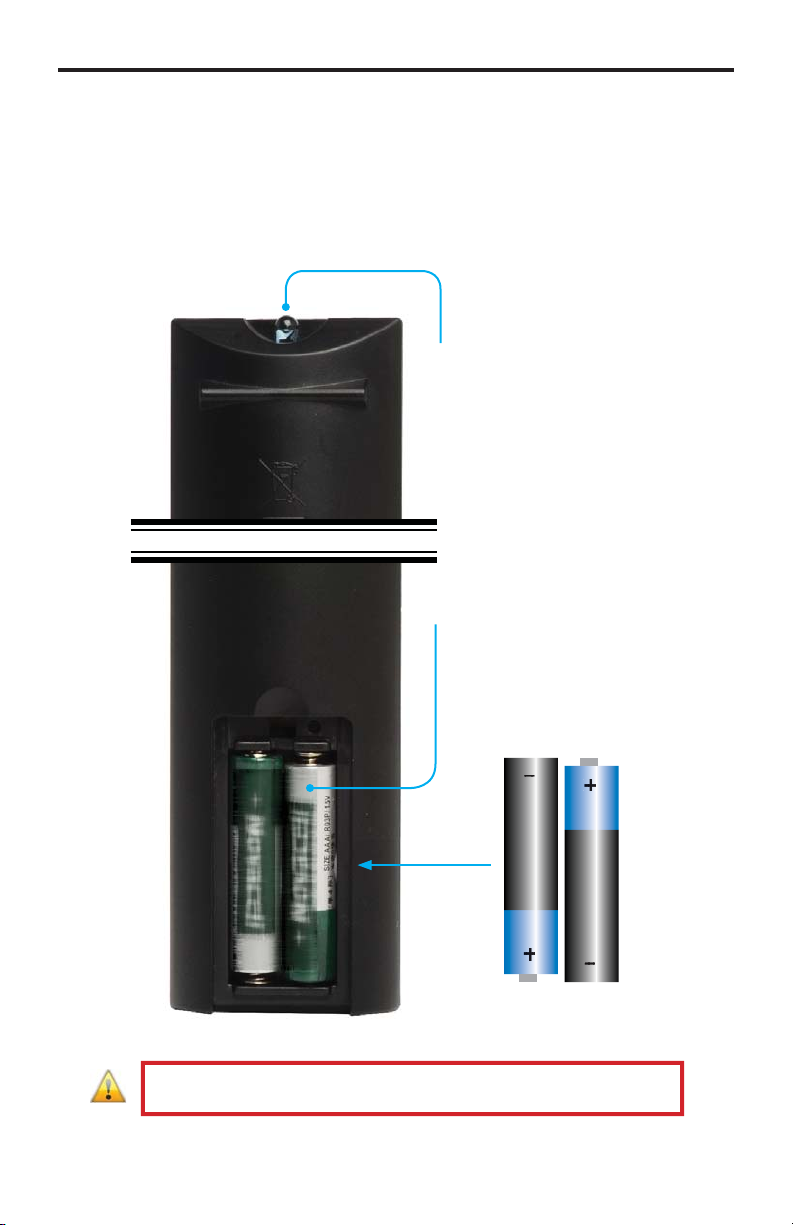
Installing the Batteries
1.
emove the battery cover on the back of the IR Remote Control Unit.
2. Insert the included AA batteries into the open batter
.
eplace the battery cover
IR emitter
Transmits the I
mmands to th
edia Player
Battery Slo
shown with batteries
slot.
Battery alignmen
The batteries shoul
installed in the
ollowing position
WARNING: Risk of explosion if battery is replaced by an incorrect type.
Dispose o
used batteries according to the instructions.
10
Page 14
1
CONNECTING THE HI-DEF DIGITAL SIGNAGE MEDIA PLAYER
uded
cable
t
socke
g
How to Connect the Hi-Def Digital Signage Media Player
onnect Hi-Def Digital Signage Media Player to the display using the
incl
2.
.
the USB port located on the rear panel of the Hi-Def Digital Signage Media
Player unit.
4.
of the Hi-Def Digital Signage Media Player and an available electrical outlet.
HDMI
.
NOTE: If using the Hi-Def Digital Signage Media Player with an analo
display, then connect the Hi-Def Digital Signage Media Player to the
display using user-supplied composite or component video cables.
PTIONAL: Connect the analog or digital audio outputs of the Hi-Def Digital
ignage Media Player to an audio receiver/processor using RCA (analog) or
ptical (digital) cables.
onnect the included USB 2.0 fl ash drive (or external USB 2.0 hard drive) to
IMPORTANT: The USB drive must always be connected to the Media
Player
re power is applied.
onnect the included 12V DC power adapter between the power inpu
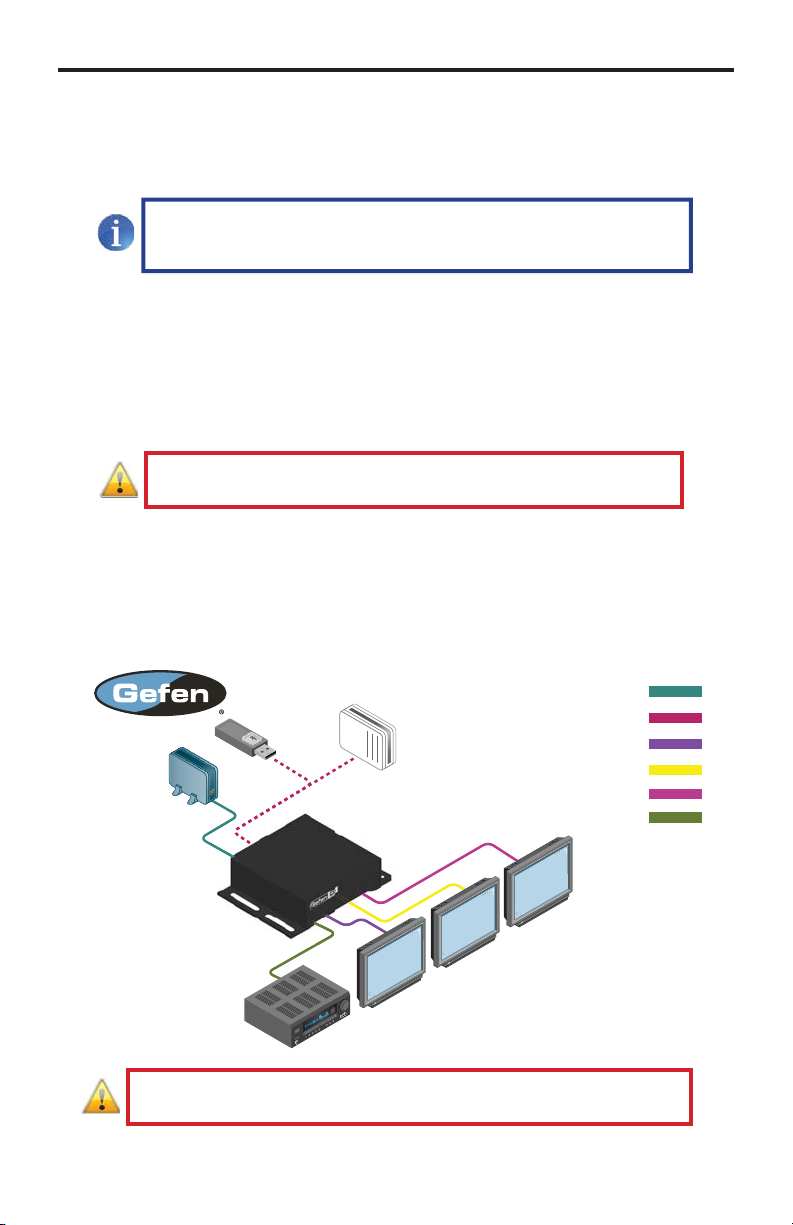
Wiring Diagram for the Hi-Def Digital Signage Media Player
CAT-5 / ETHERNET
Router
USB Flash Drive
or
USB External HDD
Audio Receiver
Display using Composite
Display using HDMI
EXT-HD-DSMP
USB CABLE
HDMI CABLE
COMPOSITE CABLE
COMPONENT CABLE
TOSLINK
Display using Component
ATTENTION: This product should always be connected to a grounded
lectrical
t.
1
Page 15

OPERATING THE HI-DEF DIGITAL SIGNAGE MEDIA PLAYER
f
g
f
g:
e
owering the Hi-Def Digital Signage Media Player
nce power has been connected to the Hi-Def Digital Signage Media Player,
the
ollowing screen will be displayed while the unit completes the bootin
.
ter the boot process has been completed, any schedules, playlists, and
2. A
ontent will be automatically begin playin
If no content has been scheduled, then the PIN code screen will b
displayed. See next page for details on using the PIN code screen.
12
Page 16
3
OPERATING THE HI-DEF DIGITAL SIGNAGE MEDIA PLAYER
y
0000
code
y
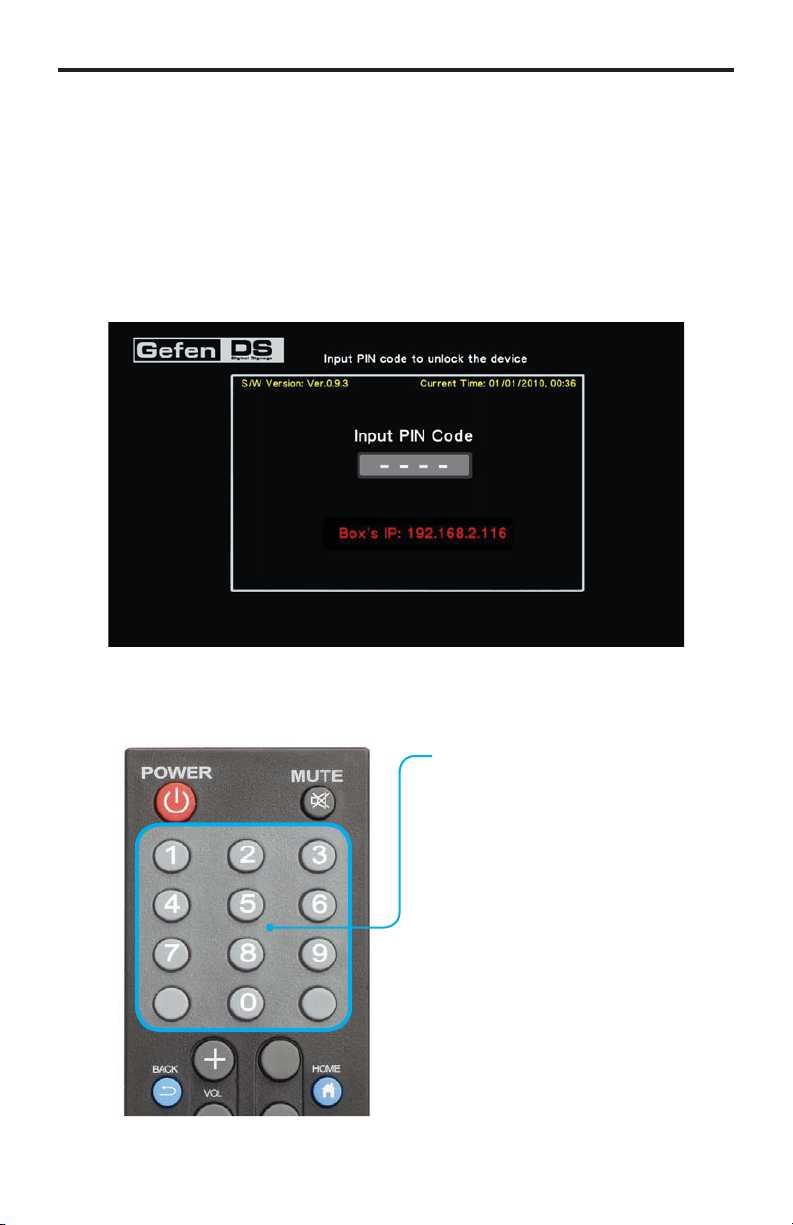
Accessing the Main Menu
If no media is scheduled to play after the Media Player has fi nished booting, then
the PIN code screen will be displayed. The PIN code screen provides a secure
ateway to the Main Menu. The PIN code screen can be displayed at any time
pressing the Home button on the IR Remote Control.
b
1. Press the Home button on the IR Remote Control.
2. The Input PIN code screen will be displayed.
.
se the numeric keypad on the included IR Remote Control to enter the PIN
ode. The default PIN code is:
.
Numeric Keypad
se the numeric keypad on the
IR Remote Control to enter the
PIN
The Main Menu will automaticall
be displayed if the correct PIN
.
is entered.
1
Page 17
4
OPERATING THE HI-DEF DIGITAL SIGNAGE MEDIA PLAYER
A
code has been disabled
e
R
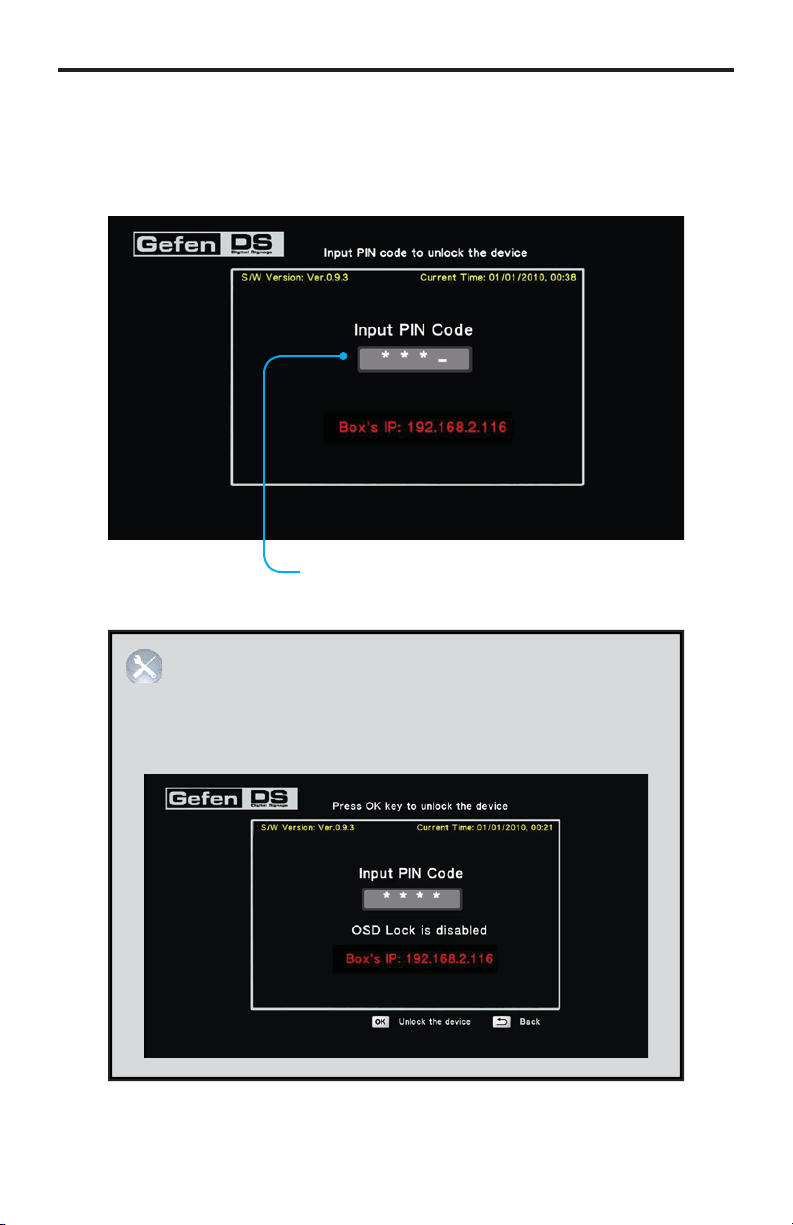
As the PIN code is entered, each of the numbers will be masked for security
urposes. Although not required, a PIN code is recommended to prevent
nauthorized access to the Main Menu. The PIN code can be disabled (see
age 48).
PIN code is always masked
during entry.
DVANCED: If the PIN
ettings.xml fi le, then pressing the HOME button on the I
emote Control will access the Input PIN Code screen (see page 48
or more information on enabling / disabling and setting the PIN code).
From the Input PIN Code screen, press the OK button to access the
in Menu.
within th
1
Page 18
OPERATING THE HI-DEF DIGITAL SIGNAGE MEDIA PLAYER
y
e
e
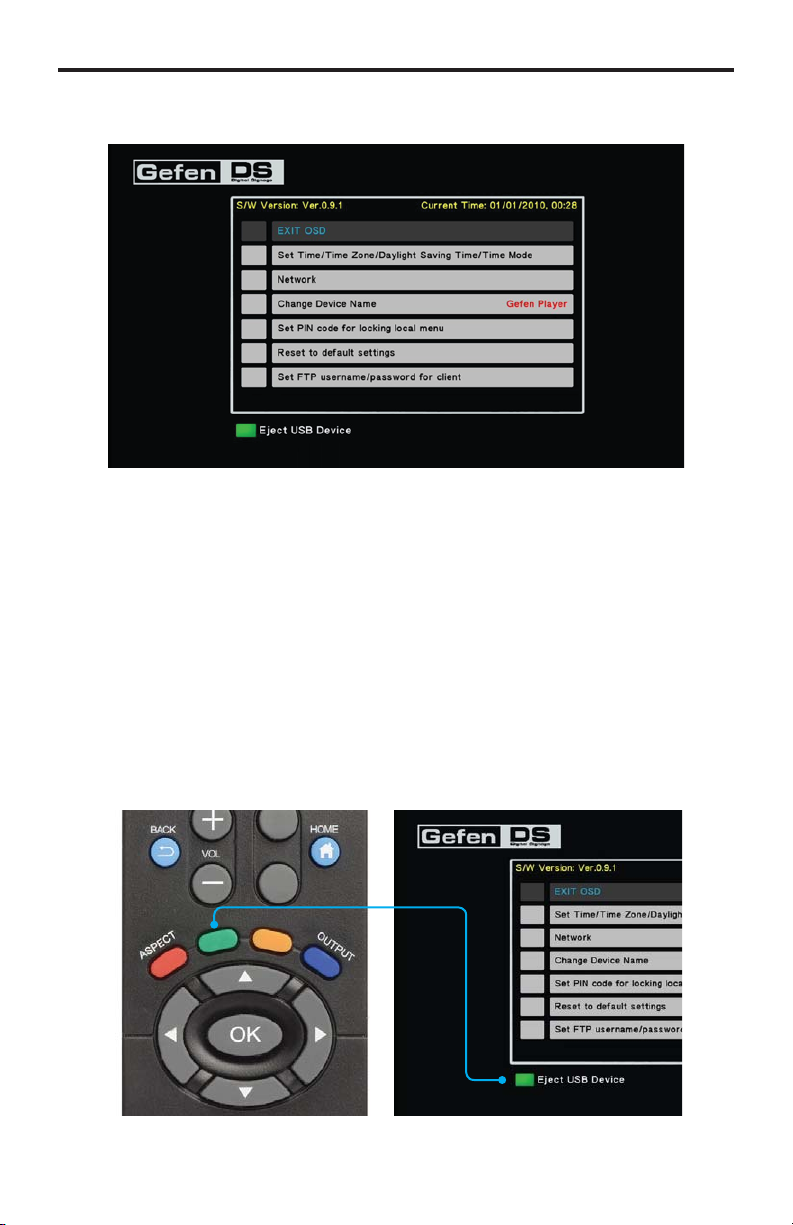
4. After entering the correct PIN code, the Main Menu will be displayed.
Removing the USB Storage Devic
Safel
In Stand-Alone Mode, it will be necessary to remove the USB
torage device from the Media Player in order to update schedule fi les,
laylist fi les, and content. To safely remove the USB storage device, use the
EJECT button on the IR Remote Control Unit.
1. Access the Main Menu in order to stop the playback of all content.
2. Press the EJECT button on the IR Remote Control Unit. Note that th
bottom portion of the Main Menu also identifi es the EJECT button on the IR
emote Control Unit.
15
Page 19
6
OPERATING THE HI-DEF DIGITAL SIGNAGE MEDIA PLAYER
e
g
:
:
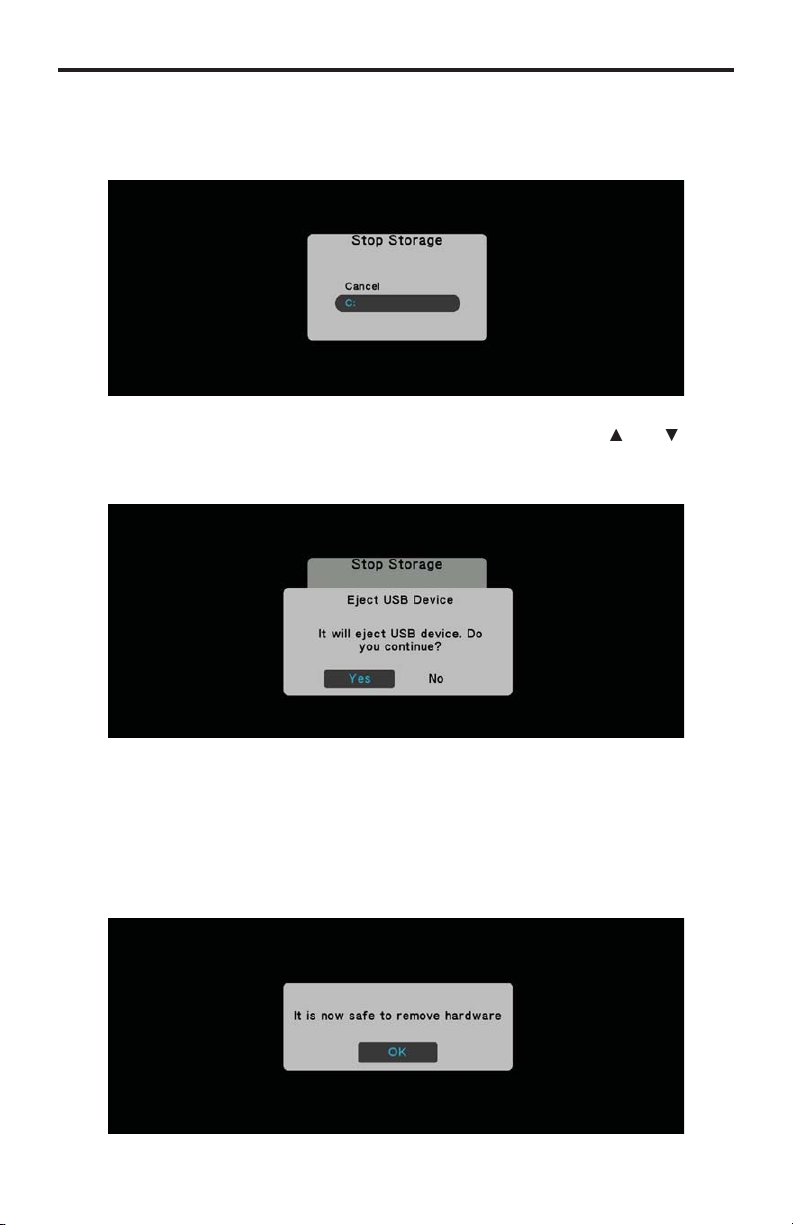
. The Media Player will prompt you to select which device to stop. In th
xample below, only one USB device is connected to the Media Player.
Additional stora
e would be identifi ed as D, E, F, etc.
ighlight the USB device you wish to stop and eject, using the
4.
buttons on the IR Remote Control, then press the OK button. The Media Player
will prompt you to confi rm the operation
elect Yes to confi rm the operation. Select No to cancel and return to the
in Menu.
. If you select Yes, then the following screen will be displayed, indicating that
ou may now remove the USB device from the back of the Media Player
and
1
Page 20

HOW THE HI-DEF DIGITAL SIGNAGE MEDIA PLAYER WORK
S
e
e
g
:
h
gpl
l
:
a
s
s
e
y
y
e
y
)
ecuted
l
y
>
g>
ue=
/>
g>
g>
/>
/>
>
/>
...
...
t>
>
>
>
e>
>
edia>
>
>
edia>
>
>
edia>
>
>
irectory and File Nomenclatur
The Hi-Def Digital Signage Media Player uses directories to organiz
chedules, playlists, and media content. A major part of how the Media Player
behaves is
The local USB drive also contains three (3) directories
The illustration below provides a summary of each of the three fi les, the location
of the fi le on the USB drive, and how the relate to one another.
overned by a set of three fi les
chedule.gs
laylist.
ettings.xm
medi
laylist
schedule
settings
<devConfi
<name val
</devConfi
<ipConfi
<ipMode value=”manual”
<automatic
<manual
<ip value=”192.168.2.238”
”Gefen Player”
schedule.gsh
ocation: /schedules director
ontains the name of the Playlist(s
r media fi les to be ex
m
FileName>/media/2.mov</FileName
media
m
FileName>/media/7.mp4</FileName
media
m
FileName>/media/8.mp4</FileName
media
Th
media directory is used to store your Digital Signage content.
,
An additional director
Logs, is automatically created by the Media Player.
settings.xml
ocation: Root director
This fi le contains the name of th
active Schedule fi le to be executed.
DefaultEven
DayOfWeek>1,1,1,1,1,1,1</DayOfWeek
EventStart>00:00:00</EventStart
EventEnd>23:59:59</EventEnd
FileName>/playlists/playlist.gpl</File-
.
m
DefaultEvent
laylist.gp
ocation: /playlists director
Each playlist fi le contains a list of the
media fi le(s) to be played.
These log fi les provide a record of all events which have transpired and can be
sed to provide information during troubleshooting.
17
Page 21

8
HOW THE HI-DEF DIGITAL SIGNAGE MEDIA PLAYER WORK
S
(3)
a
s
.
p
:
/>
eSchedule
:
/>
p
t
(or playlists), as follows:
>
h
eference
playlist
directory name:
>
e
ust
er
be renamed, moved,
Renaming Files and Directories
As mentioned earlier, three
B drive at all times: /medi
The
ettings.xml fi le must always reside in the root directory.
directories must reside in the root directory of the
laylists, and
schedule
The names given to each of the fi les and directories are provided as a guide
and are by no means static. However, each of the fi les will reference a specifi c
directory name. Therefore, if a directory name is changed, then the fi le which
eferences that directory must also be changed to refl ect the new information
The
ettings.xml fi le references the active schedule fi le, like so
activeSchedule value=”/schedules/schedule.gsh”
If the
schedules directory is renamed to
value within the
ettings.xml fi le, must be changed to
foo, then the
v
activeSchedule value=”/foo/schedule.gsh”
The
chedule.gsh fi le may reference aplaylis
FileName>/playlists/playlist2.gpl</FileName
If the
le must be edited to r
laylists directory is renamed to
the correct
foo2, then the
chedule.gs
FileName>/foo2/playlist2.gpl</FileName
The fl exibility of renaming directories and fi les allows you to provide more
eaningful names to the directory structure. The only exception is th
ettings.xml fi le.
IMPORTANT: The
r deleted.
ettings.xml fi le m
nev
1
Page 22

f
e
e
y
p
d
to the Media Player from an FTP client.
e
HOW THE HI-DEF DIGITAL SIGNAGE MEDIA PLAYER WORK
S
Operating Modes
The Hi-De
tand-alone Mode and Network Mode.
Stand-Alone Mod
se this mode if you want content played locally from the USB fl ash drive on the
edia Player.
Network Modes
•
•
When the Media Player is in Stand-Alone Mode, all content and operational
information is taken from the USB drive. When the Media Player is in Network
ode, all fi les are located on an FTP server on the network.
We will cover both Stand-Alone and Network Mode for the Hi-Def Digital Signage
edia Player. In the next section, we will begin with Stand-Alone Mode.
Digital Signage Media Player can operate in one of two modes:
ush Mod
ontent is manuall
ull Mod
Pulls content from an FTP server (based on a schedule) to the Media Player.
ushe
19
Page 23

STAND-ALONE MOD
E
e
e
y
:
sing Stand-Alone Mod
1.
onnect the Hi-Def Digital Signage Media Player according to th
instructions on page 11.
STOP: Make sure the USB storage device is connected to the Media
Player
re power is connected.
The Media Pla
er comes pre-loaded with a demo playlist, schedule,
and content. After the Hi-Def Digital Signage Media Player has fi nished
booting, the pre-loaded content will begin playing.
2. Press the HOME button on the IR Remote Control to stop the playback of
the content and access the Input PIN Code screen.
NOTE: You can also simply enter the PIN code from the IR Remote
ontrol while content is playing, to display the Input PIN Code screen.
Press the OK button to display the Main Menu.
. Type in the PIN code
4. From the Main Menu, press the Eject button on the IR Remote Control. This
button will safely eject the USB device before removal.
WARNING: Removing the USB device without ejecting may cause the
torage device to become unreadable, resulting in the loss or corruption
content and related fi les.
0
Page 24
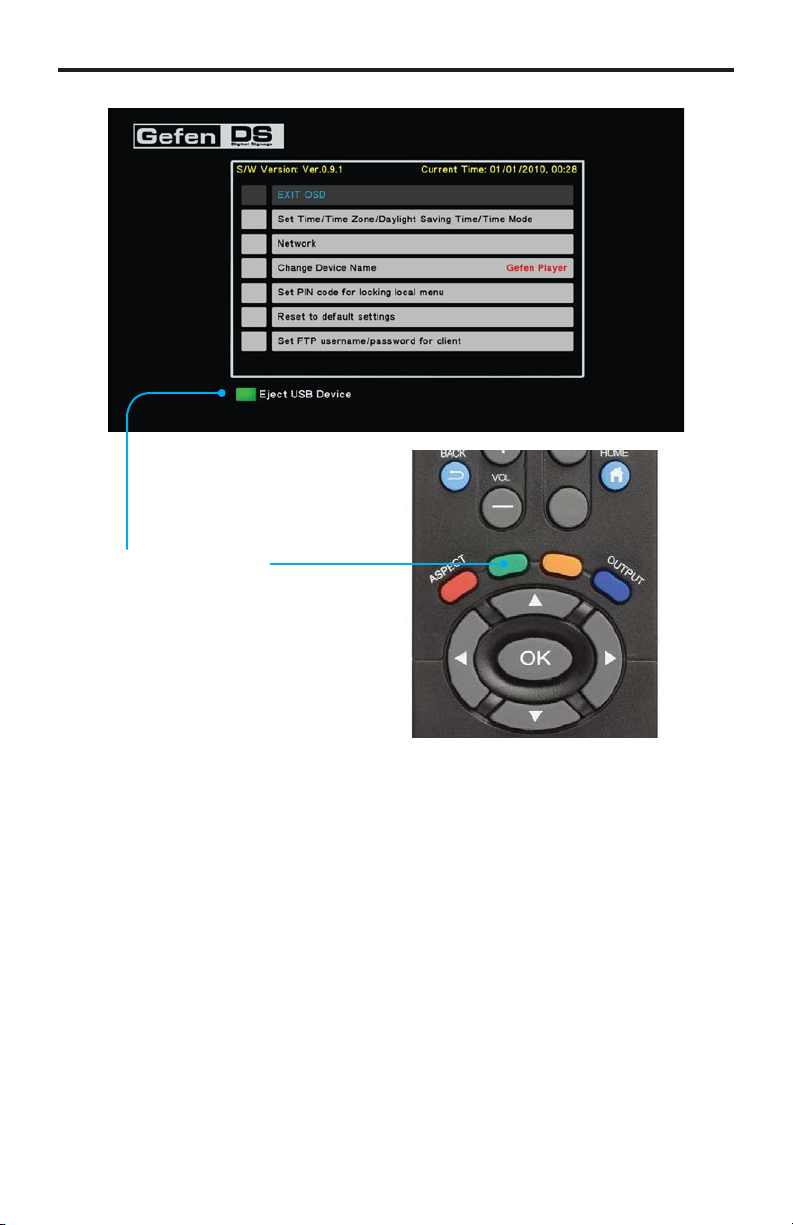
STAND-ALONE MOD
E
s
e
safe removal of
e
ect USB Devic
Indicates that the green button
on the IR Remote Control is
for
B device.
th
efer to page 15 for details on ejecting the USB drive from the Media Player.
.
emove the USB device from the back of the Media Player and connect it to
our computer.
.
n the USB drive, locate the
chedule.gsh fi le under theschedule
directory.
Next, we will edit the Schedule fi le in order to change what is displayed on
the screen.
Page 25

STAND-ALONE MOD
E
V
e
y
ocate
e
:
playlist
ecuted o
e
:
playlist
will be executed on each day.
g
t
on the weekends (Saturday and
:
>
tStart>
:
t>
>
>
>
>
>
>
>
>
iewing the Schedule Fil
pen the schedule.gsh fi le, located in the
schedules directory. An
lain text editor can be used (such as Windows® Notepad, etc).
IMPORTANT: Do not use a word processing program to edit the Schedule
le, as this may introduce unwanted invisible control characters into the
le.
2. L
the
The
DefaultEvent>
DefaultEvent> tag at the top of the fi le.
ndDefaultEvent> tags must be present in
thechedule.gsh fi le. At minimum, the four tags between th
DefaultEvent> tags must also be present
DefaultEven
<DayOfWeek>.........</DayOfWeek
<EventStart>........</EventStart
<EventEnd>..........</EventEnd
<FileName>..........</FileName
DefaultEvent
. The fi rst thing we want to do is make sure that the
very day of the week. So, the
DayOfWeek> tag should contain th
ollowing information
DayOfWeek>1,1,1,1,1,1,1</DayOfWeek
is ex
n
The number one (“1”) means that the
Each day of the week is represented between the
nd
DayOfWeek> closing tags (e.g. Monday, Tuesday, Wednesday, etc.).
se the number zero (“0”) to skip certain days. For example, if you wanted
the playlist to be executed every dayxcep
unday), you would type
DayOfWeek>1,1,1,1,1,0,0</DayOfWeek
4. Next, we want theplaylist to be executed between the hours of 00:00:00
12:00:00 midnight) and 23:59:59 (11:59:59 pm). This will
nsure that the video content is played constantly without interruption.
Therefore,
EventStart>00:00:00</EventStart
EventEnd>11:59:59</EventEnd
Even
DayOfWeek> openin
andEventEnd> tags should appear like this
2
Page 26

STAND-ALONE MOD
E
edule fi le
>
>
gpl
g
e:
contain a default
t
gpl
>
t>
>
>
>
>
>
. Next, theplaylist fi le will be specifi ed. Make sure to use the leading forward-
lash in the path when specifying the full path to the
FileName>/playlists/playlist.gpl</FileName
FileName>/playlists/playlist.gpl</FileName
FileName>playlists/playlist.gpl</FileName
h
As mentioned earlier, the
laylist.
fi le can be renamed to somethin
more meaningful, if you like. For now, the important thing to note is that both
the fi lename and directory path are spelled correctly.
Let’s look at what we have in our existingchedule.gsh fi l
DefaultEven
<DayOfWeek>1,1,1,1,1,1,1</DayOfWeek
<EventStart>00:00:00</EventStart
<EventEnd>23:59:59</EventEnd
<FileName>/playlists/playlist.gpl</FileName
DefaultEvent
This is our
vent, using the
age 29 for more information on the
lt event Thechedule.gsh fi le
DefaultEvent> andDefaultEvent> tags. See
lt even
. We did not make any changes to this fi le, so just close the fi le.
Next, we will edit the
laylist.
fi le, and substitute the existing media
with your own.
NOTE: Refer to the supported fi le formats and make sure that the media
le(s) you are using is supported by the Media Player.
Page 27

e
gpl
ocate
edia>
edia>
>
>
g:
>
edia>
:
edia>
>
>
edia>
>
>
edia>
>
>
edia>
>
STAND-ALONE MOD
E
diting the Playlist Fil
pen the playlist.
2. L
the
m
fi le, located in the
tag at the top of the fi le. The
laylists directory.
m
and
media
tags must surround each instance of video content.
m
<FileName>........</FileName
media
. Type the full path (make sure to include a forward slash at the beginning of
the path) to the video content, between the
FileName> opening tag and
theFileName> closing ta
FileName>/media/my_movie.mp4</FileName
In this example, we only want to loop a single video fi le. However, if you
eed to play multiple video fi les, then each video fi le must be contained
within its own
m
andmedia> tags.
Example of multiple media fi les in a playlist
m
<FileName>/media/my_movie1.mov</FileName
media
m
<FileName>/media/movies/blockbuster.avi</FileName
media
m
<FileName>/media/bumper.mp4</FileName
media
Page 28

V
e
l
e
l
l
edule
:
ocate
edule>
n
e:
/>
e
eSchedule>
e
:
/>
:
eference
edule fi le
edule fi le
eference
gpl
ocated
play
4
gpl
e
edule>
>
STAND-ALONE MOD
E
iewing the Settings.xml Fil
Finally, we’re going to take a quick look at the
ettings.xm
fi le contains all the information on how the Hi-Def Digital
ignage Media Player operates. Within the
h
1.
2. L
.
4.
must be specifi ed
pen the
the fi l
h
<activeSchedule value=”................”
schedule
ke sure that th
ollowing information
activeSchedule value=”/schedules/schedule.gsh”
Double-quotes must surround the full path to the schedule fi le.
lose the
ettings.xml fi le, located in the root directory of the USB drive.
the
h
ettings.xml fi le.
and
v
Checking our Work
schedule> tags, near the bottom portio
ettings.xm
ettings.xm
tag contains th
fi le. Th
fi le, the active
Before inserting the USB drive into the USB port of the Hi-Def Digital Signage
edia Player, let’s check to make sure everything is in order
1. Theettings.xml fi le should be in the root directory of the USB drive and
hould r
2. Thechedule.gsh fi le should be in the
h
. Thelaylist.
list fi le should reference the media fi le you are going to play.
In our example, we used
4. The media fi le (y_movie1.mp4
hould be placed in the
the
should r
tive sch
thelaylist.gpl
fi le should be l
y_movie1.mp
media directory.
chedule.gsh.
schedules directory. The
in thelaylist directory. The
specifi ed in the
le.
laylist.
5
fi l
Page 29

:
g
media File folder
playlists File folder
schedules
ile folde
.
STAND-ALONE MOD
E
. The root directory of the USB drive should look something like this
ename Filesize Filetype
F
settings.xml 2,472 XML Doc..
. After you have verifi ed everything, eject the USB drive from your computer
before removing it. If the USB drive is removed without ejecting it, data loss
and/or data corruption may occur.
7. Disconnect power from the Media Player. Never connect the USB drive
while the Media Player is powered.
After the Media Player has fi nished booting, the media content will begin to
lay.
r
ongratulations! You have just created your fi rst Digital Signage application using the Hi-Def Digital Signage Media Player. However, this is just the
beginning and is only a very simple example. The Hi-Def Digital Signage
edia Player has several more features which we will cover in the followin
tions.
To stop the playback of the video, press the HOME button and enter the PIN
ode. Pressing the HOME button and entering the correct PIN code will
always take you to the Main Menu.
Page 30

t
f
:
gpl
edia>
:
edia>
>
>
gpl
gpl
y
gpl
t
:
edia>
>
>
edia>
>
>
edia>
>
>
edia>
o
edia>
.
STAND-ALONE MOD
E
Adding More Video Content to the Playlis
unning only one selection of video content may not always be what you want to
do. The Hi-Def Digital Signage Media Player is capable of playing several pieces
video content. Here’s how to add more than one fi le to the playlist
o
1.
afely eject and remove the USB drive from the Media Player, then plus the
B drive into an available USB port on your computer.
2.
pen the playlist.
.
reate an additional
pecify the next piece of video content
m
<FileName>/media/my_movie.mp4</FileName
media
m
<FileName>/media/movie2.mp4</FileName
media
fi le, located in the
m
tag below the fi rst set of <media> tags, and
laylist directory.
4.
NOTE: Always create a separate
be played. Only one media fi le can be specifi ed within the
nd
media> tags
ave the
laylist.
fi le to the
m
tag for each media fi le t
laylists directory.
m
Changing the Playlist Order
When the
laylist.
fi le is read by the Hi-Def Digital Signage Media
Player, the fi le is read from top to bottom. So, in the example above,
ovie2.mp4 will be played
ovie2.mp4
rey_movie.mp4, edit the
ter
y_movie.mp4
If you want to pla
laylist.
fi le so i
appears like this
m
<FileName>/media/movie2.mp4</FileName
media
m
<FileName>/media/my_movie.mp4</FileName
media
7
Page 31

t
d
n
/yyyy
format:
>
>
tStart>
n
:
>
>
:
t>
>
>
< <
>
>
>
oduced
ate>
ate>
e
gpl
STAND-ALONE MOD
E
>
>
Scheduling Conten
We’ve already seen how we can play one or more media fi les and loop them.
owever, we can also specify a when the playback will begin and end.
pen the schedule.gsh fi le, located in the
1.
2. Insert the following two lines between the
schedules directory.
DefaultEvent> an
DefaultEvent> tags. Make sure that the current date is entered i
d
StartDate>6/23/2011</StartDate
EndDate>6/23/2011</EndDate
For this example, the range of dates will only be one day.
. Next, add the time frame in which you want the video content to play.
We’ve already seen the
our fi rst example. Specify the time in
EventStart>13:00:00</EventStart
EventEnd>13:30:00</EventEnd
Even
and
EventStart> tags i
H:MM:SS format
In the example above, we’ve set the video content to play from
1:00 pm - 1:30 pm in the afternoon. Note that you can specify the time
ange within an accuracy of 1 second, if so desired.
ur
chedule.gsh fi le should now look something like this
DefaultEven
<DayOfWeek>1,1,1,1,1,1,1</DayOfWeek
<StartDate>6/23/2011</StartDate
EndDate>6/23/2011</EndDate
EventStart>13:00:00</EventStart
<EventEnd>13:30:00</EventEnd
<FileName>/playlists/playlist.gpl</FileName
DefaultEvent
The only difference between this example and our fi rst example (page 23) is
that we’ve intr
the
rtD
andEndD
tags to specify the
eriod of days in which to run the video content. The content specifi ed in th
laylist.
NOTE: If two video events overlap one another, the Media Player will
top playback of the current media fi le and begin playback of the next
edia fi le according to the schedule.
fi le will still loop but will only be presented for 30 minutes.
Page 32

HE DEFAULT EVEN
T
t
ge
should display media content when other content is
p
:
e
will be used to “fi ll in the gap” when our store is closed.
e
will begin at 6:00 pm each night, and will end at 8:59:59 each morn-
t>
>
t
ate>
ate>
t>
>
g
y
>
>
>
>
>
>
>
>
>
>
nderstanding the Default Even
As mentioned earlier, the
chedule.gsh fi le must always contain a
lt
vent The important thing to remember when using Digital Signage is that
omething (some media) should be displayed at all times. A Digital Signa
application with nothing displayed defeats the whole purpose of the application.
Therefore, the
ot scheduled to be played.
Let’s say we have a Digital Signage application in a retail store. Our store hours
are from 9 - 6 everyday. We want Digital Signage playing during store hours and
after store hours. However, we want different signage played after hours. Here’s
one way of setting this up
When our store is closed, our main Digital Signage will no longer be displayed,
th
ince we want this played every day of the week, we would set the information
tween theDayOfWeek> opening and closing tags to:
1,1,1,1,1,1 Th
ing.
DefaultEven
<DayOfWeek>1,1,1,1,1,1,1</DayOfWeek
<EventStart>18:00:00</EventStart
<EventEnd>08:59:59</EventEnd
<FileName>/playlists/closed.gpl</FileName
DefaultEvent
After that time, our normal content would be played. Our normal content would
then begin at 9:00 am and continue until 5:59:59 pm. Note that the
not contain the
rtD
andEndD
opening and closing tags.
ince we want this event to play this event all the time, no matter what day it is, it
is unnecessary to specify the dates.
Even
<StartDate>10/1/2011</StartDate
<EndDate>10/31/2011</EndDate
<DayOfWeek>1,1,1,1,1,1,1</DayOfWeek
<EventStart>09:00:00</EventStart
<EventEnd>17:59:59</EventEnd
<FileName>/playlists/open.gpl</FileName
Event
This is only one example of using the
lt event One example of extendin
the fl exibility of this Digital Signage application might be to add events that would
be played on Saturdays and Sundays.
onl
9
lt even
Page 33

NETWORK MODE / PUSH MOD
E
e
:
y
)
e
ode
efe
ode
e
g
ode
e
h
gpl
sectio
sing Network Mod
se Network Mode when the Digital Signage requirement are
• Playback and looping of media fi les
•
cheduling and playlist capabilit
•
emote content management using the built-in FTP client / server
push / pull mode
NOTE: You should already be familiar with the
chedule.
r to the
on pages 17 and 18.
, and
ettings.xml fi les and how they work. If not,
chedule.gs
n
he FTP Client and FTP Server
The Hi-Def Digital Signage Media Player contains a built-in FTP server and an
FTP client. To use the FTP functionality of the Hi-Def Digital Signage Media
Player, you will fi rst need to install and confi gure an FTP server and client on the
omputer that will connect to the unit. There are many programs that can be
downloaded from the Internet that will serve this purpose.
ush Mod
In this fi rst section, we will discuss
h M
When we r
r to
h M
we are describing a process whereby content is (manually) “pushed to” th
i-Def Digital Signage Media Player using an FTP client. In this confi guration,
the Hi-Def Digital Signage Media Player becomes the FTP server.
onfi gurin
h M
on the Hi-Def Digital Signage Media Player can be
hanged through the OSD or can be changed, directly, from within th
ettings.xml fi le. Both methods will be presented.
STOP: Before making any changes to the Hi-Def Digital Signage Media
Player, through the OSD, the USB drive must be connected to the unit.
0
Page 34

USH MOD
E
.
ess
ess
ethod 1: Confi guration using the OSD
pen the OSD and select the Network option
2.
elect either
rom the pool. The FIX IP (MANUAL) option will require you to provide the
orrect IP address, Subnet mask, Default Gateway, and DNS server ad-
r
.
HCP IP (AUTO)whichautomatically assigns the IP address
. Pr
the OK button on the IR Remote to accept the changes.
Page 35

USH MOD
E
:
ess
4.
elect the Set FTP username / password for client option.
. Enter the desired user name and password in the respective fi elds
. Pr
the OK button on the IR Remote to accept the changes. Select the
Back button to return to the main menu of the OSD.
2
Page 36

E
7.
option. Press the
ode
elect the
.
elect the
IR Remote Control until it is set to
the IR Remote Control.
nable / Disable FTP server / client option.
USH MOD
OK button on the
nable, then press the Back button on
ince we’re not using the FTP client (on the Hi-Def Digital Signage Media
Player), the
This will not affect the functionality of
. Press the OK button on the IR Remote to accept the changes.
nable / Disable FTP Client option can be set to either state.
h M
Page 37

USH MOD
E
ocate
section:
ue=
/>
g>
:
o
atic
e
ge
:
g>
/>
g>
/>
/>
>
238
/>
subnet value=
/>
/>
ue=
/>
ue=
/>
>
g>
g>
/>
/>
e>
userName value=
/>
userPass value=
ass
/>
/>
>
g>
fi le, it is recommended
ethod 2: Confi guration using the settings.xml fi le
ADVANCED: Before editing the
that you are familiar with XML (eXtended Markup Language). If you
are unfamiliar with XML, you should review pages 45 and 46 before
ontinuing.
pen the
1.
Confi
<ipMode value=manual”
<automatic
<manual
<ip value=192.168.2.
<
<gateway value=.0.0.0”
<dns1 val
<dns2 val
</manual
ipConfi
osdConfi
ettings.xml fi le and l
name val
”Gefen Player”
”manual”
”192.168.2.238”
”255.255.255.0”
55.255.255.0”
”0.0.0.0”
”4.2.2.2”
4.2.2.2”
”8.8.8.8”
.8.8.8”
”
the
Confi g>
2. DHCP or a static IP address can be used
a) If DHCP is being used, then set the
m
Any information under the
b) If a static IP is being used, then the
Mode value> tag t
manual> tag will be ignored.
Mode value> tag should b
set to the IP address that will be assigned to the Hi-Def Digital Signa
Media Player. In addition, Subnet, Gateway, and DNS server values will
need to be specifi ed.
. Next, locate the
ushConfi g> tags
timeConfi
ushConfi
<pushMode value=nable”
<disable
<enabl
<
<
<port value=1”
</enable
ushConfi
ullMode value=”enable”
”enable”
”User”
”Pass”
P
”21”
r”
”
Page 38

USH MOD
E
d
Pass
t
ge
4.
et the
ortvalue should be set to 21.
.
ave the fi le to the USB drive.
1. In the FTP client on your computer (or on the dedicated FTP server), enter
the IP address of the Hi-Def Digital Signage Media Player in the host name
eld.
ushMode attribute to enable. Then, set the
r
attributes to the desired values. For most scenarios, the
STOP: Before inserting the USB drive back in the Hi-Def Digital Signa
edia Player, make sure you disconnect the power to the unit. The USB
drive must be connected to the Hi-Def Digital Signage Media Player
before power-up, in order for the new settings to take effect.
rName an
Confi guring the FTP Clien
IP address of Hi-Def Digital
ignage Media Player
5
Page 39

USH MOD
E
g:
y:
e
assword
i
edia
ile folde
playlists File folder
schedules
ile folde
.
sda
ile folder
2. Enter the user name and password that were created on page 32.
ser nam
P
.
onnect to the Hi-Def Digital Signage Media Player using your FTP client.
nce connected, you should see a directory listing similar to the followin
ename Filesize Filetype
1 F
4. To see the contents of the Hi-Def Digital Signage Media Player storage
device, change to the
ename Filesize Filetype
sda1 director
Logs F
m
F
F
settings.xml 2,472 XML Doc..
le folder
r
r
Page 40

USH MOD
E
y
e
effec
..
Logs
media
playlists
schedules
settings.xml
)
ace content
e
oot
. To make changes to the current schedule or playlist, make changes locall
on your computer, then upload the new fi les to their respective directories.
edia fi les can also be added. Any changes will automatically take place
once the Hi-Def Digital Signage Media Player fi nishes executing the current
chedule and/or playlist.
NOTE: If the settings.xml fi le has been changed, then the Hi-Def Digital
ignage Media Player must be power-cycled for the new changes to
take
nce the FTP client (or dedicated FTP server) has been confi gured and can
see” the Hi-Def Digital Signage Media Player on the network, fi les can b
ploaded to the directory.
ake sure that the following directory structure is observed. If you change
the directory names, make sure that the schedule fi les and playlist fi les point
to the correct directory path.
he (default) directory structure as viewed from the FTP server
be created automatically,
t.
A
ogs directory will
ontaining log fi les.
Pl
in this folder
chedule fi les (.gsh
o under this folder
Playlist (.gpl) fi les
o under this folder
The settings.xml fi l
must reside in the r
7
lder
Page 41

ULL MOD
E
e
ode
efe
ode
g
f
ode
y
ode
ods
.
)
ull Mod
In this next section, we will discuss
are describin
FTP server to the Hi-De
i-Def Digital Signage Media Player becomes the FTP client.
desirable when managing multiple units on a network: Instead of uploading new
ontent manually to each box, Pull Mode can be used to schedule the transfer of
ew / updated content on a daily or hourly basis.
onfi guringll M
hanged through the OSD or from within the
will be presented here.
1.
pen the OSD and select the Network option
a process whereby content is (automatically) “pulled from” an
Digital Signage Media Player. In this confi guration, the
on the Hi-Def Digital Signage Media Player can be
STOP: Before making any changes to the Hi-Def Digital Signage Media
Player, through the OSD, make sure that the USB drive is connected to
the Media Player.
ethod 1: Confi guration using the OSD
ll M
When we r
ettings.xml fi le. Both meth
r toll M
ll M
is highl
, we
2.
elect either DHCP IP (automatically assigns the IP address from the pool
or FIX IP. The FIX IP option will require you to provide the correct IP
address, Subnet mask, Default Gateway, and DNS server address.
Page 42

ULL MOD
E
option.
d
fi elds may be left blank.
ess
f
use
s
(@,#,&, etc) when creating a
ode if
are used
. Press the OK button to accept the changes.
elect the
. Enter the desired user name and password in the respective fi elds. If no
ser name of password currently exists, the
wor
urrent Username andurrent
. Pr
IMPORTANT: Do not
assword. The Media Player will be unable to connect to the server while
in Pull M
the OK button on the IR Remote to accept the changes. Select the
pecial character
Back button to return to the main menu o
.
the OSD.
9
Page 43

E
7.
option. Press the
elect the
.
elect the
IR Remote Control until it is set to
the IR Remote Control.
nable / Disable FTP server / client option.
ULL MOD
OK button on the
nable, then press the Back button on
. Press the OK button on the IR Remote to accept the changes.
0
Page 44

ULL MOD
E
ocate
section:
ue=
/>
g>
:
o
atic
e
ge
:
g>
/>
/>
>
238
/>
subnet value=
/>
/>
ue=
/>
ue=
/>
>
g>
llConfi g>
/>
/>
e>
/>
/>
/>
/>
/>
/>
... ...
fi le, it is recommended
ethod 2: Confi guration using the settings.xml fi le
ADVANCED: Before editing the
that you are familiar with XML (eXtended Markup Language). If you
are unfamiliar with XML, you should review pages 45 and 46 before
ontinuing.
pen the
1.
<name val
Confi
<ipMode value=manual”
<automatic
<manual
<ip value=192.168.2.
<
<gateway value=.0.0.0”
<dns1 val
<dns2 val
</manual
ipConfi
osdConfi
ettings.xml fi le and l
”Gefen Player”
”manual”
”192.168.2.238”
”255.255.255.0”
55.255.255.0”
”0.0.0.0”
”4.2.2.2”
4.2.2.2”
”8.8.8.8”
.8.8.8”
”
the
Confi g>
2. DHCP or a static IP address can be used
a) If DHCP is being used, then set the
m
Any information under the
b) If a static IP is being used, then the
Mode value> tag t
manual> tag will be ignored.
Mode value> tag should b
set to the IP address that will be assigned to the Hi-Def Digital Signa
Media Player. In addition, Subnet, Gateway, and DNS server values
must be specifi ed.
. Next, locate the
u
<pullMode value=”enable”
<disable
<enabl
<pullURL value=”192.168.2.70”
<settingPull value=”192.168.2.70”
<schedulePull value=”192.168.2.70/schedules”
<playlistPull value=”192.168.2.70/playlists”
<contentPull value=”192.168.2.70/media”
<pullLogUpload value=”192.168.2.70”
ullConfi g> tags
Page 45

ULL MOD
E
e
e
:
ues fo
edulePull
d
sectio
Pass
desired values
ese
g>
llMod
/>
<pullMode value=”enable” />
/>
e>
... ...
g>
/>
/>
e>
...
...
/>
/>
/>
/>
/>
/>
...
...
/>
<userName value=”User” />
/>
/>
<port value=”21” />
>
... ...
4.
et the
<pu
<disable
<enabl
. Next, set the IP address of the server used to hold the content for th
ollowing attributes
<pullMode value=”enable”
<disable
<enabl
<pullURL value=”192.168.2.70”
<settingPull value=”192.168.2.70”
<schedulePull value=”192.168.2.70/schedules”
<playlistPull value=”192.168.2.70/playlists”
<contentPull value=”192.168.2.70/media”
<pullLogUpload value=”192.168.2.70”
ullMode attribute tonabl
ullConfi
e value=”enable”
ullConfi
Note that the attribute val
ntentPull contain a path to a directory. These directories will be set up
n the FTP server which we will cover in this
. Enter the
rName and
values will also be used by the FTP server. For most scenarios, the value of
theort attribute should be set to 21.
<userName value=”User”
<userPass value=”Pass”
<port value=”21”
</enable
r
h
r
attributes to the
2
laylistPull, an
n.
. Th
Page 46

ULL MOD
E
set
f
...
/>
/>
y>
/>
y>
y>
y>
>
g>
/>
7.
nder the
toourly or
I
the
daily> tag to the time which the Hi-Def Digital Signage Media Player will
onnect to the FTP server and retrieve updated content.
ullSchedule tag, the
aily, or
See page 52 for more information.
ullRepeat attribute is set to
ullRepeat attribute value can be
aily, set the
me value under the
If theullRepeat attribute is set to
ourly, set the time interval, under the
hourly>tag, in which the Hi-Def Digital Signage Media Player will connect
to the FTP server and retrieve updated content. The minimum time interval
is one minute (:01 when the
<pullSchedule>
<pullRepeat value=”hourly”
<none
<dail
<time value=”20:00”
</dail
<hourl
<time value=”00:01”
</hourl
</pullSchedule
ullConfi
NOTE: If the time interval is set to
ttribute is set toourly, then the update process will not occur.
When set todaily”, the time value can be set to
orresponds to 12 am midnight.
ullRepeat attribute is set to
:00 when theullRepeat
:00” which
hourly”
Page 47

ULL MOD
E
dedicated
g:
0
:
g>
/>
/>
e>
...
...
/>
/>
/>
/>
/>
/>
Logs File folder
edia
ile folde
playli
schedules
ile folde
settings.xml 2,472 XML Doc...
Confi guring the FTP Server
The following covers the confi guration process for the FTP server. This process
applies whether you are running FTP server software on a PC on a network or
ve a
1. The fi rst step is to create the path and permissions to the directory which the
i-Def Digital Signage Media Player will be accessing. In our example from
theettings.xml fi le, we specifi ed the followin
ullConfi
<pullMode value=”enable”
<disable
<enabl
<pullURL value=”192.168.2.70”
<settingPull value=”192.168.2.70”
<schedulePull value=”192.168.2.70/schedules”
<playlistPull value=”192.168.2.70/playlists”
<contentPull value=”192.168.2.70/media”
<pullLogUpload value=”192.168.2.70”
FTP server.
In the example above, the IP address of the FTP server is
2.
reate a local directory structure on the FTP server. The directory structure
t be
dentical to the directory structure on the USB drive.
The
ettings.xml fi le must exist in the root directory, as shown below
ename Filesize Filetype
m
F
sts File folder
F
.
onfi gure the FTP server to point to the above directory structure. Only the
arent directory should be specifi ed.
For example, if you create a parent directory called
laylists, and
directory.
schedules directory should reside under the
foo, the
.168.2.7
r
r
media
foo
Page 48

e
t
:
>
g>
ue=
/>
g>
g>
/>
/>
>
/>
subnet value=
/>
/>
ue=
/>
ue=
/>
>
g>
g>
osdLoc
ue=
/>
/>
e>
g>
/>
g>
>
g>
g>
HE SETTINGS.XML FIL
E
Logs File folder
media File folder
playlists File folder
schedules
ile folde
.
nderstanding the SETTINGS.XML fi l
Theettings.xml contains all the settings used by Hi-Def Digital Signage
edia Player. This fi le can be edited directly, allowing you to set the outpu
esolution, the active schedule, in addition to several other options such as NTP
erver assignment, push mode and pull mode
be modifi ed using the built-in menu system.
Theettings.xml fi le is located in the root directory of the USB drive and can
be edited using any standard text editor.
ename Filesize Filetype
Many of these settings can also
F
settings.xml 2,472 XML Doc..
A portion of the
settings
<devConfi
<name val
</devConfi
<ipConfi
<ipMode value=”manual”
<automatic
<manual
<ip value=”192.168.2.238”
<
<gateway value=”0.0.0.0”
<dns1 val
<dns2 val
</manual
</ipConfi
<osdConfi
<
<disable
<enabl
<pinConfi
<pin value=”0000”
</pinConfi
</enable
</osdConfi
<timeConfi
ettings.xml fi le is shown below
”Gefen Player”
”255.255.255.0”
”4.2.2.2”
”8.8.8.8”
k val
”enable”
r
5
Page 49

HE SETTINGS.XML FIL
E
:
declaratio
>
:
>
>
>
er
change the Attribute Name. An example of a XML attribute would be:
/>
g
e
e
e
ue
ot
modify the Attribute Name. Changing the Attribute
esu
desirable results
The
ettings.xml is constructed as a typical XML fi le
The beginning of the
?xml version=”1.0” encoding=”UTF-8” ?
The XML declaration is followed by a
ntains asettings>nd-tag
ettings.xml fi le begins with an XML
settings>art-tag
All other tags and attributes are contained
n
The end of the fi le
within these two tags, creating the following structure
?xml version=”1.0” encoding=”UTF-8” ?
settings
settings
An XML attribute is a markup containing both a name and a value, which can be
dited to change the behavior of the Hi-Def Digital Signage Media Player. When
odifying the
ettings.xml fi le, only the Attribute Value should be changed--
v
output value=”NTSC1080P”
Attribut
Nam
Attribut
Val
WARNING: Do n
Name will r
lt in errors or un
.
The Attribute Value must always be surrounded by double quotes. The beginnin
of an XML Attribute must be prefi xed with a less-than symbol ( and must end
with a forward slash ( followed by a greater-than symbol (.
The next section provides a summary of each section of the
nd the attributes.
ettings.xml fi le
Page 50

SETTINGS.XML SUMMARY
e
g>
e
g>
e
subnet
y
s1
s2
e
n
e
atic
g>
/>
/>
>
/>
subnet value=
/>
/>
dns
ue=
/>
ue=
/>
>
g>
g>
ue=
/>
g>
evice Nam
ag Name:
escription: Allows you to change the name of the device.
Attributes:
xampl
ag Name:
escription: Allows you to specify automatic (DHCP) or manual (FIXED IP)
confi guration of the Hi-Def Digital Signage Media Player.
Attributes:
gatewa
dn
dn
xampl
devConfi
devConfi
<name val
devConfi
Confi
Mod
Confi
<ipMode value=”manual”
<automatic
<manual
<ip value=”192.168.2.238”
<
<gateway value=”0.0.0.0”
<
<dns2 val
</manual
ipConfi
”Gefen Player”
IP Confi guration
”255.255.255.0”
1 val
”4.2.2.2”
”8.8.8.8”
Notes: In the example above, manual confi guration has bee
selected. If DHCP is used, the
should be set to
manual> tag will be ignored.
m
Mode value attribut
”
Any information under the
7
Page 51

SETTINGS.XML SUMMARY
e
e
g>
ock
pin
e
e
g>
e
y
gs
ode
p
1
p
2
e
g>
osdLoc
ue=
/>
/>
e>
g>
/>
g>
>
g>
g>
ue=
/>
/>
ode value=
/>
/>
>
/>
/>
>
g>
OSD PIN Cod
ag Nam
escription: Allows you to change or disable the PIN code for the OSD.
Attributes:
xampl
Notes:
must be power-cycled after inserting the USB drive.
ag Name:
escription: Allows you to set the time zone and mode.
osdConfi
L
osdConfi
<
<disable
<enabl
<pinConfi
<pin value=”0000”
</pinConfi
</enable
osdConfi
nce the PIN code has been changed in th
ettings.xml fi le, the Hi-Def Digital Signage Media Player
timeConfi
k val
ime Confi guration
”enable”
Attributes:
da
timeM
nt
nt
xampl
meZon
Savin
Serv
Serv
timeConfi
<timeZone val
<daySavings value=”yes”
<timeM
<internal
<external
<ntpServ1 value=”0.pool.ntp.org”
<ntpServ2 value=”1.pool.ntp.org”
</external
timeConfi
”-8”
”external”
Page 52

SETTINGS.XML SUMMARY
y
g>
e
e
userName
userPass
t
e
g>
/>
/>
e>
userName value=
/>
userPass value=
/>
/>
>
g>
ecuted a
Notes:
nce the time zone or time mode has been changed using the
ettings.xml fi le, the Hi-Def Digital Signage Media Player
must be power-c
WARNING: When using schedules, it is highly recommended that an
NTP server be used to maintain all time settings. If the Hi-Def Digital
ignage Media Player experiences a power loss after setting the time
manually, the clock will reset, causing any schedules and playlists to be
x
t the incorrect time.
cled after inserting the USB drive.
ush Mode Confi guration
ag Name:
ushConfi
escription: Allows confi guration of push mode and setting of user nam
and password.
Attributes:
ushMod
por
xampl
ushConfi
<pushMode value=”disable”
<disable
<enabl
<
<
”User”
”Pass”
<port value=”21”
</enable
ushConfi
9
Page 53

SETTINGS.XML SUMMARY
e
g>
ode
e
L
edulePu
l
l
userName
userPass
t
y
y
t
y
e
e
/>
/>
e>
/>
/>
edulePu
ue=
/>
/>
ue=
/>
/>
userName value=
/>
userPass value=
/>
/>
/>
/>
/>
>
... ... ...
g>
ull Mode Confi guration
ag Nam
escription: Allows you to modify
Attributes:
pullUR
sch
playlistPul
contentPul
pullLogUpload
por
s
s
s
xampl
<pullMode value=”enable”
<disable
<enabl
<pullURL value=”192.168.2.70”
<settingPull value=”192.168.2.70”
<sch
<playlistPull value=”192.168.2.70
<contentPull val
<pullLogUpload value=”192.168.2.70”
<
<
<port value=”21”
<syncMedia value=”disable”
<syncPlaylist value=”disable”
<syncSchedule value=”disable”
</enable
ullConfi
ullMod
ll
ncMedia
ncPlaylis
ncSchedul
ll val
ll M
”192.168.2.70
”192.168.2.70
”User”
”Pass”
settings in network mode.
schedules”
laylists”
media”
ullConfi
50
Page 54

1
SETTINGS.XML SUMMARY
f
f
g
on
f
fi
h
e new fi les
>
)
)
>
)
)
ot
recommended that you change the schedule
edule fi le is referenced
l
edule fi lename
Notes: ThencMedia attribute enables / disables the syncing o
media
below illustrate the difference between disabling and enablin
thencMedia attribute. Note that when thencMedia
attribute is enabled, the Media player will receive the new
content and erase the current content from the Media Player.
rom the server to the Media Player. The two examples
syncMedia value=”disable”
edia Player
before sync
y_movie1.mov
y_movie2.mp4
Server
y_movie1.mov
y_movie2.mp4
movie10.mp4
movie12.mov
edia Player
after sync
y_movie1.mov
y_movie2.mp4
movie10.mp4
movie12.mov
syncMedia value=”enable”
edia Player
before sync
y_movie1.mov
y_movie2.mp4
Server
y_movie1.mov
y_movie2.mp4
movie10.mp4
movie12.mov
ThencSchedule and
ncPlaylist attributes functi
edia Player
after sync
movie10.mp4
movie12.mov
in the same manner as the syncMedia attribute. If either o
these attributes are enabled, then the new Schedule fi le and/or
Playlist(s) will be updated from the server to the Media Player.
The current schedule
th
.
le and playlist(s) will be replaced wit
WARNING: It isn
lename. The sch
If the schedule fi lename is changed, then the
be modifi ed, manually, to refl ect the new schedule fi lename.
ThencSchedule does not automatically update the
le with a new sch
within theettings.xml fi le.
ettings.xml fi le must
.
ettings.xm
5
Page 55

SETTINGS.XML SUMMARY
e
>
ocated
g
g
t
i
i
e
e
ue
t
e
o
f
n
ues are based on a
o
g>
...
...
...
p
>
p
/>
/>
y>
ue=
/>
/
y>
y>
ue=
/>
/
y>
>
g>
ull Schedule Confi guration
ag Nam
escription: L
ta
pulled on a daily or hourly basis.
Attributes:
t
t
xampl
ullSchedule
within theullSchedule> opening and closin
s. This section allows you to specify when content is
ullRepea
me (daily)
me (hourly)
ullConfi
<
<
<none
<dail
<time val
<
<hourl
<time val
<
</pullSchedule
ullConfi
ullSchedule
ullRepeat value=”hourly”
”10:00”
dail
”00:20”
hourl
under thedaily> tag. Conversely, if you want to pull
content on an hourly basis, then set the
In the example above, the
This value can be changed by 1-minute increments.
I
the Media Player would pull content each day at 10:00
am. Note that
24-hour clock.
To disable Pull mode, set the
If you want to only pull content on a daily basis, then set th
ullRepeat attribute to
ttribute to
hourly> tag.
hourly” and will pull from the server every 20 minutes.
the
none”
hourly” and set the
ullRepeat value was set todaily”, the
daily” time val
daily” then set the
ullRepea
me value under th
ullRepeat value is set t
ullRepeat value t
me val
52
Page 56

3
SETTINGS.XML SUMMARY
e
edule>
S
eSchedule
e
y>
S
t
ideoReduceSize
e
t
e
educeSize
S
educeSize
o
y
edule>
activeSchedule value=
/>
>
y>
/>
/>
/>
/>
/>
/>
/>
ideoReduceSize value=
/>
/>
/>
y>
Setting the Active Schedul
ag Name:
escription:
Attributes:
xampl
ag Name:
escription:
Attributes:
v
xampl
h
ets the active schedule.
v
h
<
schedule.gsh”
schedule
displa
ets the output resolution and enables / disables underscan.
utpu
displa
<output value=”NTSC1080I”
<NTSC720P
<NTSC1080I
<NTSC1080P
<PAL720P
<PAL1080I
<PAL1080P
<v
<disable
<enable
displa
”/schedules/
isplay Confi guration
”enable”
Notes: In the example above, 1080i is the output resolution. All
available output resolutions are listed below the
attribute. Both NTSC and PAL formats are supported.
Th
underscan mode. In this example, underscan is enabled.
b
R
et the
pass underscan mode.
R
attribute enables / disables
attribute to
5
utpu
le” t
Page 57

4
SETTINGS.XML SUMMARY
e
g>
t
e
e
e
edule
ebootTime
e
g>
/>
/>
e>
/>
>
g>
Reboot Confi guration
ag Nam
escription: This option can be used in rare cases when the Media Player
has exhibited abnormal behavior and performing a reboo
return the Media Player to normal operation. The reboot tim
should be set when content is not scheduled to play. After th
reboot procedure is executed, the Media Player will continu
with the current sch
Attributes:
r
xampl
rebootConfi
.
rebootConfi
<reboot value=”enable”
<disable
<enabl
<rebootTime value=”03:00”
</enable
rebootConfi
5
Page 58

E
e
1.
S
f
opy the
FIRMWARE UPDAT
pdating the Firmwar
nstall.img fi le to the root directory of the USB drive.
2. Insert the U
Player.
. Enter the OSD and select
4. Press the OK button on the IR Remote.
After the OK button has been pressed, the following screen will be displayed.
lick the OK button to proceed with the fi rmware update process.
B drive into the USB port on the Hi-Def Digital Signage Media
anual fi rmware update via USB
I
both the fi rmware version on the USB drive and the Media Player are the
ame, then the Media Player will not perform the update process.
55
Page 59

6
FIRMWARE UPDAT
E
:
n
ot
disconnect power or remove the USB drive during
WARNING: Don
the fi rmware update process. Doing so may cause the unit to function
improperly or lock up in an unrecoverable state.
. The following set of screens will be displayed as the update process
is taking place
. After the update process has completed successfully, the following scree
will be displayed. The Hi-Def Digital Signage Media Player will then return to
the Input PIN Code screen.
5
Page 60

SPECIFICATION
S
z
e
K
d
)
°C
H
aximum Pixel Clock............................................................................... 225 MH
Video Output Connectors........ (1) HDMI Type A 19-pin, female, (1) Component,
A-type, (1) Composite, RCA-type, (1) L/R, RCA-typ
Audio Output Connector......................................................................(1) TOSLIN
Ethernet Connector........................................................................ RJ-45, Shielde
B Output Connectors........................................................... (2) USB 2.0, type A
Power Supply....................................................................................... 12V DC, 3A
Power Consumption............................................................................ 10 W (max.
perating Temperature............................................................................ 0 ~ 40
Dimensions........................................................................ 8.4” W x 5.1” D x 1.6”
hipping Weight............................................................................................. 4 lbs.
57
Page 61

8
efen warrants the equipment it manufactures to be free from defects in material
f
N
.
and workmanship.
I
equipment fails because of such defects and Gefen is notifi ed within two (2)
ears from the date of shipment, Gefen will, at its option, repair or replace the
quipment, provided that the equipment has not been subjected to mechanical,
lectrical, or other abuse or modifi cations. Equipment that fails under conditions
other than those covered will be repaired at the current price of parts and labor in
ect at the time of repair. Such repairs are warranted for ninety (90) days from
the day of reshipment to the Buyer.
This warranty is in lieu of all other warranties expressed or implied, including
without limitation, any implied warranty or merchantability or fi tness for any
articular purpose, all of which are expressly disclaimed.
1. Proof of sale may be required in order to claim warranty.
2.
ustomers outside the US are responsible for shipping charges to and from
efen.
.
opper cables are limited to a 30 day warranty and cables must be in their
original condition.
The information in this manual has been carefully checked and is believed to
be accurate. However, Gefen assumes no responsibility for any inaccuracies
that may be contained in this manual. In no event will Gefen be liable for
direct, indirect, special, incidental, or consequential damages resulting from
any defect or omission in this manual, even if advised of the possibility of such
damages. The technical information contained herein regarding the features and
pecifi cations is subject to change without notice.
For the latest warranty coverage information, refer to the Warranty and Return
Policy under the Support section of the Gefen Web site at www.gefen.com.
RODUCT REGISTRATIO
lease register your product online by visiting the Register Product page
nder the Support section of the Gefen Web site
5
Page 62

Page 63

ev
A4
1
800-545-6900
0
m
1-
This product uses UL listed power supplies.
Nordhoff St., Chatsworth CA 9131
818-772-9100 fax: 818-772-912
www.gefen.com ds@gefen.co
Pb
 Loading...