

Page 1
1 2 3
User Manual
Viso5 –MSF (UK)
!!! PLEASE REFER TO OUR WEBSITE: WWW.GEEMARC.COM
FOR AN UP TO DATE USER GUIDE, AS THERE MAY BE
IMPORTANT UPDATES AND CHANGES YOU NEED TO BE
AWARE OF !!!
1. Features
- Easy to Read and Understand Time display
- Perpetual Calendar Up to Year 2099
- 5 languages user selectable at the starting
- Day of the week, month, stage of the day modes
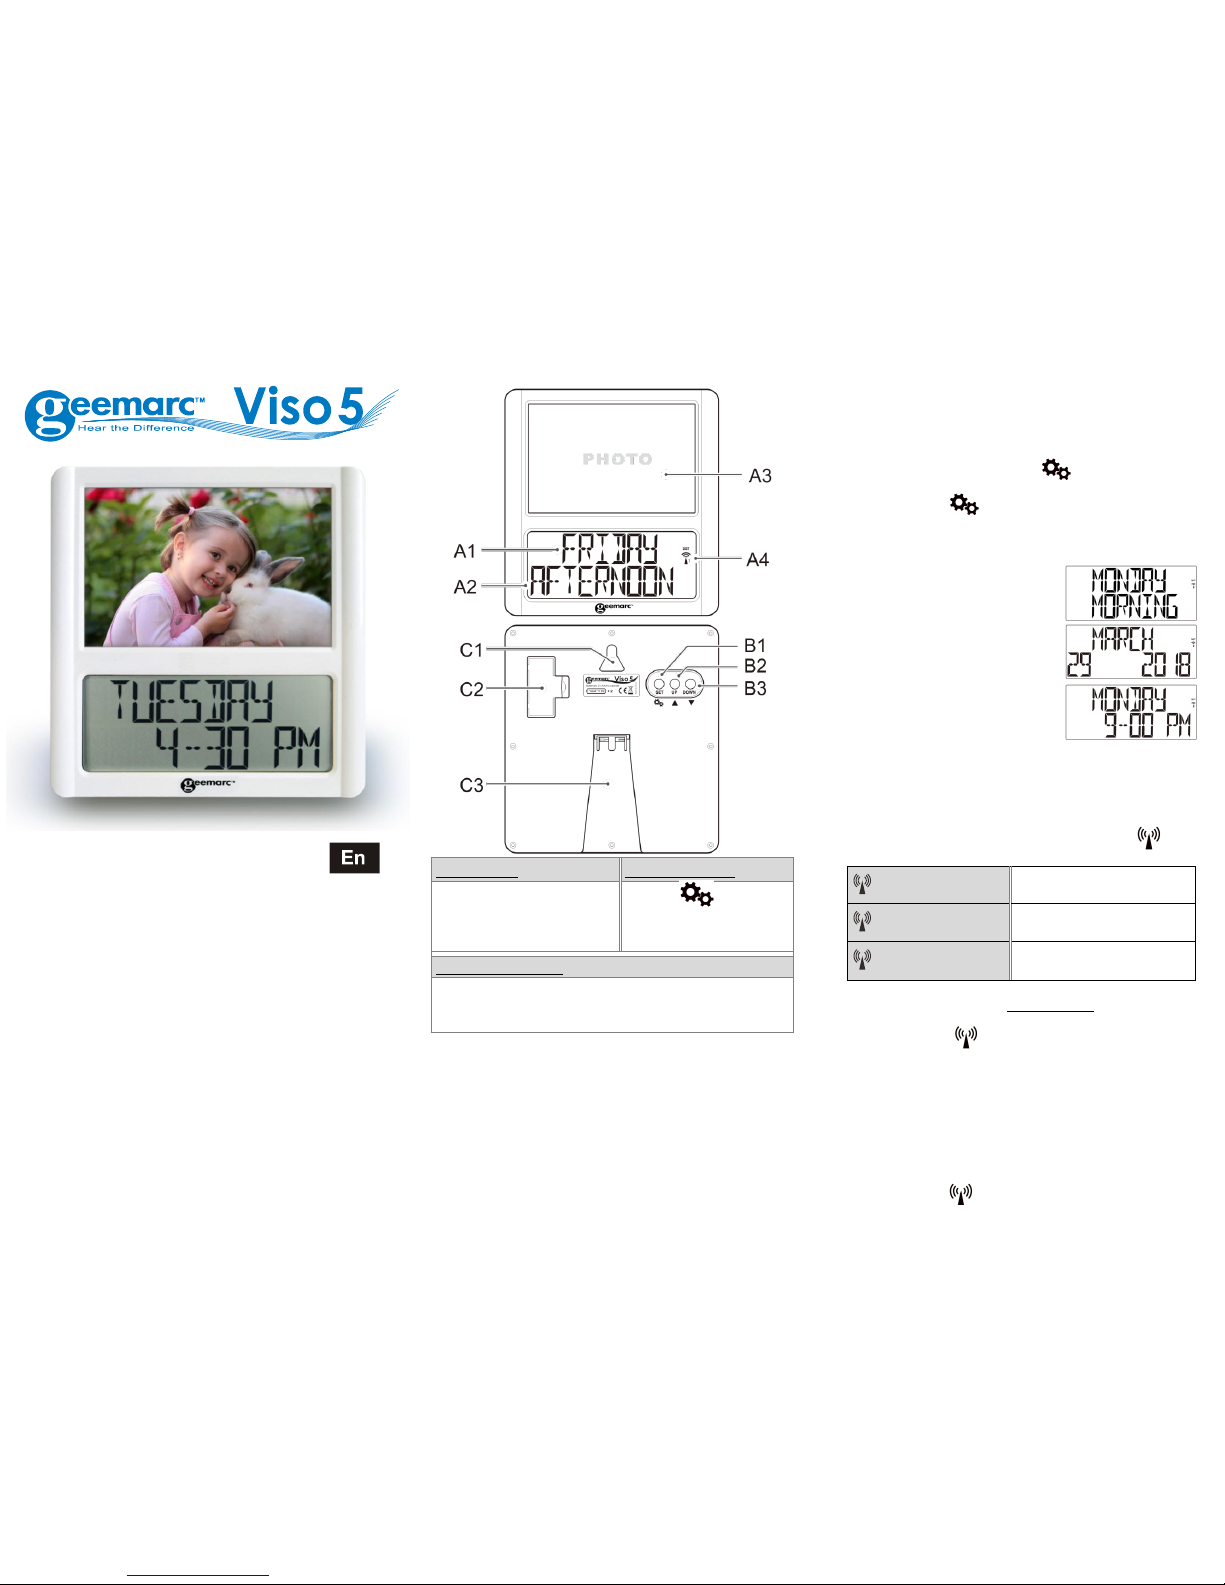
2. Unit Appearance
Part A-LCD
Part B-Button
A1: Day of Week or Month
A2: Stage of the day
A3: Photoframe
A4: Radio Control Icon
B1: “SET/ ”Button
B2: “▲” Button
B3: “▼” Button
Part C-Structure
C1: Hanging Hole
C2: Battery Door
C3: Stand
3. Insert a picture:
⚫ Remove the temporary picture with dry protection by
sliding upwards.
⚫ Insert your picture which needs to be 15x11cm and slide
down.
4. TO BEGIN:
⚫ Open the battery Cover (C2).
⚫ Insert 2 x AAA size batteries observing polarity [“+” and
“–“marks].
⚫ Replace battery compartment cover (C2).
4.1 First starting
To begin, you have 1 minute to arrange the first setting. The
clock displays English, press “▲” (B2) or ”▼” (B3) to select
your language and press “SET/ ” (B1) to validate,
Press ”▲” (B2) or ”▼” (B3) to choose the mode of display
set and press “SET/ ” (B1) to validate (see note).
If you don’t press any keys, after 1 minute the Viso5 will
launch the automatic clock setting.
Note: Place the VISO5 near a window for the clock to
automatically set.
-DP-1 displays the day of the week
and the 2nd line the part of the day.
-DP-2 displays the Month and the 2nd
line the date and the year.
-DP-3 displays the day of week and
the 2nd line the time.
-DP-4 rotates between all 3 displays and you can set the time
that each display is shown. See chapter 4.3.C for full
instructions.
4.2 Radio Controlled Time:
⚫ The clock automatically starts to scan the MSF time signal
in the first 10 minutes. (Radio Control Icon “ ” (A4)
flashes on LCD).
(A4) flashing
Indicates the MSF signal is
being received
(A4) Continuous flash
Indicates signal received
successfully
(A4) Icon disappears
Indicates signal reception
failed
⚫ The clock can be set to scan the radio signal manually by
holding “▼”(B3) button for 3 seconds. Each reception
takes around several minutes. If the reception fails,
scanning stops. (“ ”(A4) on LCD disappear) and repeats
again on next full hour. E.g. scanning failed at 8:20a.m. It
will scan again at 9:00a.m.
⚫ Summer and winter time change (and reverse) is set
automatically.
4.3 Time Setting
You must wait 10 min to check the clock is set automatically
(see chapter 4.2) before you proceed to the setting, press
and hold “▼”(B3) for 3 seconds to turn off the automatic
clock setting (icon (A4) disappears).
Page 2
4 5 6
(a) Date and Time Setting
Note that during the setting situation, long press “▼”or ”▲”
can accelerate.
⚫ In standby mode, press button “SET”(B1) to display the
time on the first line.
⚫ To change the time format, press “▼”(B3) to pass
between AM/PM or 24H display
⚫ Press button “SET” (B1) for 2 seconds to enter date and
time setting,
⚫ Set the TIME ZONE (2), press ”▲” (B2) or” ▼” (B3) to set
the time zone and press button “SET” (B1) to confirm.
⚫ Set the YEAR, press ”▲” (B2) or ”▼” (B3) to set the YEAR
and press button “SET” (B1) to confirm.
⚫ Set the MONTH, press ”▲” (B2) or ”▼” (B3) to set the
Month and press button “SET” (B1) to confirm.
⚫ Set the DAY, press ”▲” (B2) or ”▼” (B3) to set the Day and
press button “SET” (B1) to confirm.
⚫ Set the HOUR, press ”▲” (B2) or ”▼” (B3) to set the
Hour and press button “SET” (B1) to confirm.
⚫ Set the MINUTE, press ”▲”(B2) or ”▼”(B3) to set the
Minute and press button “SET” (B1) to confirm and exit.
Note:
(1) All Setting modes will automatically exit in around 15
seconds without any adjustment.
(2) For Time Zone: If you do not receive a RC-MSF frequency
signal, the time zone should be set to 0. Time Zone is used
in countries which can receive the MSF frequency signal but
the time zone is different from German Time (i.e. MT+1).
(b) Stage of the Day set
Note: Default time for stage of the day:
MORNING
7:01 – 12:00
AFTERNOON
12:01 – 17:00
EVENING
17:01 – 23:00
NIGHT
23:01 – 7:00
⚫ In standby mode, press button “SET”(B1) for 2 seconds to
enter stage of the day setting.
⚫ Set the hour of the MORNING and press ”▲”(B2) or ”▼”(B3)
to set the HOUR and press button “SET”(B1) to confirm.
⚫ Set the hour of the AFTERNOON and press “▲”(B2)
or ”▼”(B3) to set the HOUR and press button “SET”(B1)
to confirm.
⚫ Set the hour of the EVENING and press ”▲”(B2) or ”▼”(B3)
to set the HOUR and press button “SET” (B1) to confirm.
⚫ Set the hour of the NIGHT in press ”▲”(B2) or ”▼”(B3) to
set the HOUR and press button “SET” (B1) to confirm.
(c) Language set & Display set
In standby mode, press button “▲”(B2) for 2 seconds to
enter the language setting, press” ▲”(B2) or ” ▼”(B3) to
select your language (EN,DE,FR,IT or ES), press “SET”(B1)
to confirm.
⚫ After the language is confirmed, it will auto jump to display
mode. Press “▲”(B2) or ”▼”(B3) to select DP-1/DP-2/DP-3
or DP-4, press SET(B1) to confirm.
Note: For DP-4, user can set how many seconds rollup time.
When the display selection is blinking DP-4 long press button
“SET” (B1) for 2seconds to active and press ”▲”(B2)
or ”▼”(B3) to increase or decrease the seconds. Default
setting is 5 seconds, and it will be 5s as a unit maximum to
60s, which means you can set 05s,10s,15s,20s,...,60s only.
Press “SET” (B1) to confirm and exit.
⚫ different display methods
-DP-1 display day and stage of the day.
-DP-2 display Month, date and year.
-DP-3 display day and time
-DP-4 display day and time for XX seconds then display day
and stage of the day for XX seconds then display month, day
and year for XX seconds.
(XX seconds are settable, default for 5 seconds)
5. MOUNTING / POSITIONING
Make sure you have mounted or placed the device in a safe
position. If not the device may fall down and heavy damages
can occur for which the manufacturer is not liable.
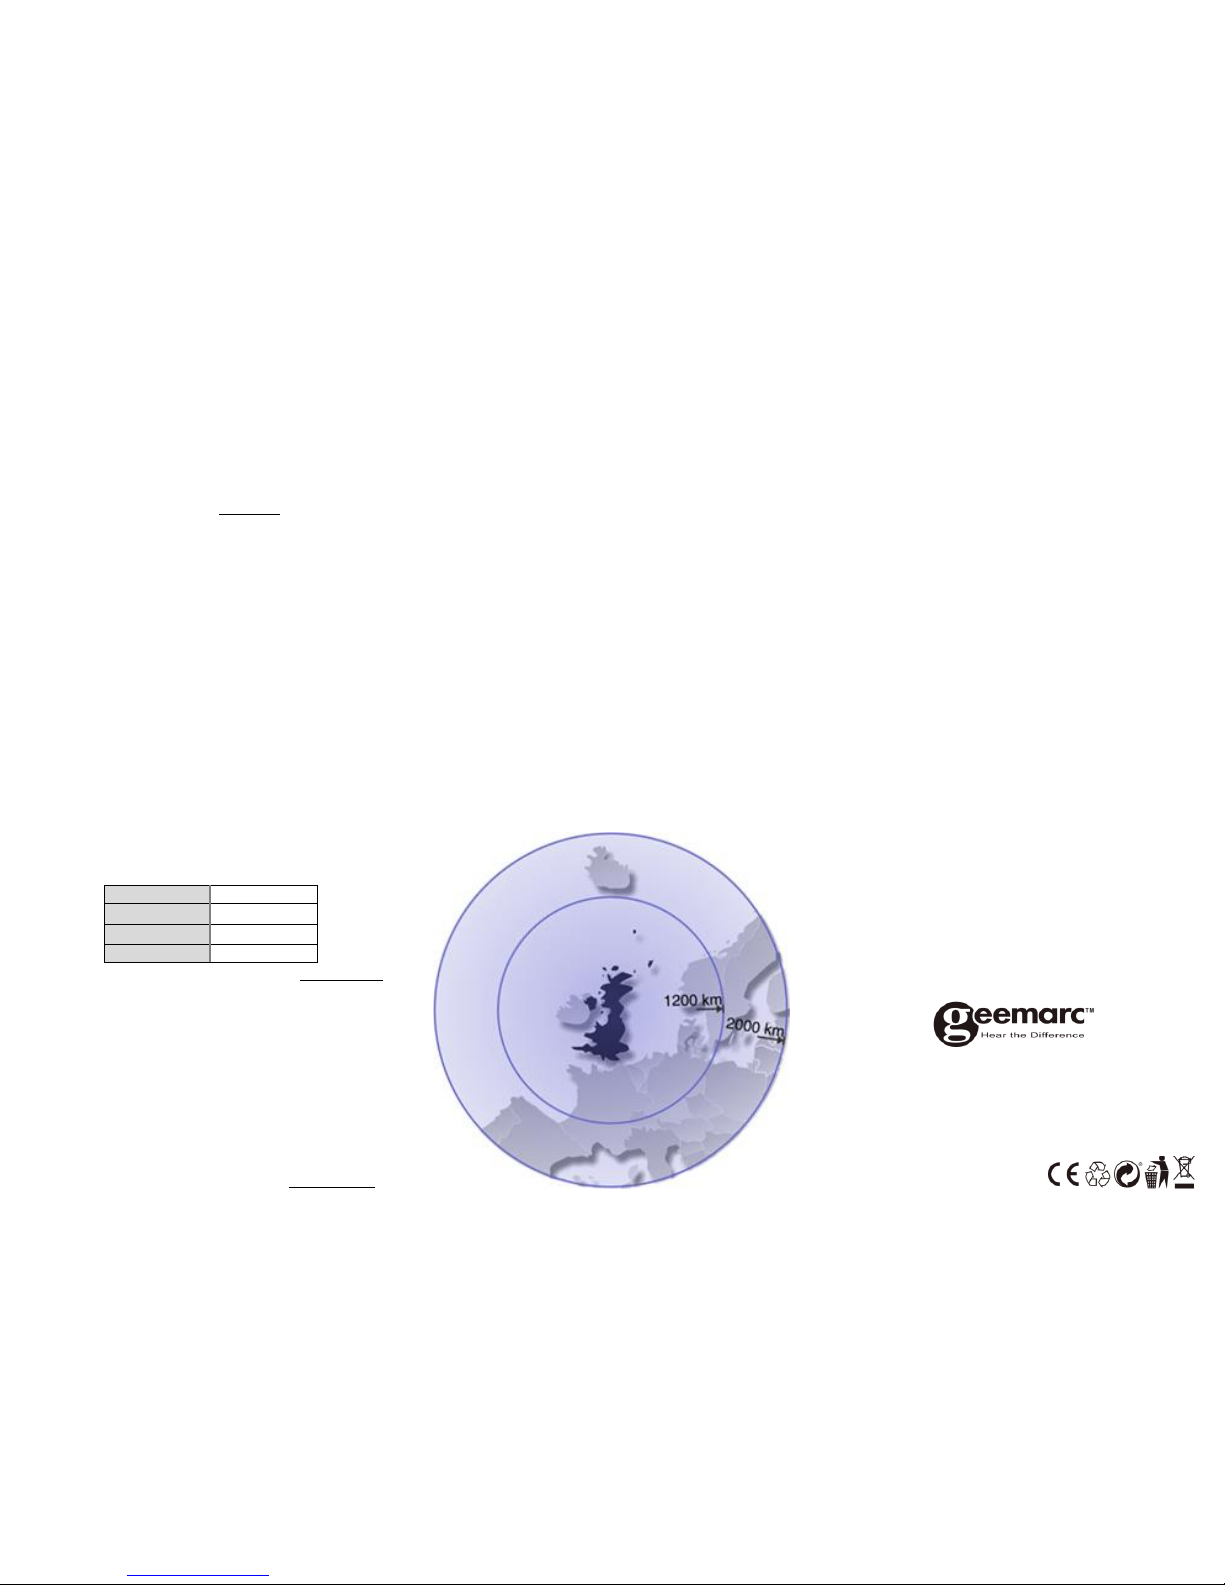
6. Radio controlled time reception range:
up to 1200km from MSF transmitter.
7. Guarantee
From the moment your Geemarc product is purchased,
Geemarc guarantee it for the period of two years. During this
time, all repairs or replacements (at our option) are free of
charge. Should you experience a problem then contact our
helpline or visit our website at www.geemarc.com. The
guarantee does not cover accidents, negligence or breakages
to any parts. The product must not be tampered with or taken
apart by anyone who is not an authorised Geemarc
representative. The Geemarc guarantee in no way limits your
legal rights.
IMPORTANT: YOUR RECEIPT IS PART OF YOUR GUARANTEE
AND MUST BE RETAINED AND PRODUCED IN THE EVENT OF
A WARRANTY CLAIM.
CE Declaration:
Hereby Geemarc Telecom SA declares that this product is in
compliance with the essential requirements and other
relevant provisions of the Radio and Telecommunications
Terminal Equipment Directive 2014/53/UE.
The declaration of conformity may be consulted at
www.geemarc.com
Caution: Radio frequency interference may cause discernible
sound on the unit. The sound will end when the interference
stops.
8. Recycling directives
The WEEE (Waste Electrical and Electronic Equipment) has
been put in place for the products in end of life are recycled
in the best way.
When this product is out of order, please do not put it in your
domestic waste bin.
Please use one of the following disposal options:
- Remove the batteries and deposit them in an appropriate
WEEE skip.
Deposit the product in in a appropriate WEEE skip.
- Or hand the old product to the retailer. If you purchase a
new one, they should accept it.
For product support and help visit our website at
www.geemarc.com
United Kingdom: 5B Swallow Court, Swallowfields, Welwyn
Garden City, Hertfordshire, AL7 1SB,UK
telephone 01707 387602 or fax 01707 832529
UGViso5_MSF(UK)_En_A4_V0.1
 Loading...