

Page 1

L I N E S I M I L A T O R
Tester
User manual p.1
Notice d’utilisation p.3
Installation :
- Plug the power cable into the power socket on the rear of the base.
- Plug the adaptor into the mains supply (*).
- Connect the first line cord plug to the line socket of the telephone 1.
(Only use the telephone line provided)
- Connect the other end of the line cord plug to the line socket 1 on the rear
of the Tester.
- Connect the second line cord plug to the line socket of the telephone 2.
- Connect the other end of the line cord plug to the line socket 2 on the rear
of the Tester.
Now your system is ready to be used.
Using :
With 2 telephones connected:
Lift one handset, now you have the following possibilities :
- Press the 1 button of the telephone to do the second telephone ring.
- Press the 2 button of the telephone to hear the busy tonality .
- Press the 3 button of the telephone to hear the audio input if connected.
- Press to do ringing alternatively the two telephones.
Note:
- You have also the possibility to plug just one telephone.
- To connect an audio input use a cable with a 3.5mm plug connected on the
“AUDIO IN” on the rear Tester. You can use a CD player or other any other
musical source.
(*) Classified “hazardus voltage” according to EN60950 standard
1
This Tester is designed to be used with the Geemarc CLEARSOUND
products. Some of other products can not fully works.
Ce T ester est prévu pour fonctionner avec les produits de la gamme
Geemarc CLEARSOUND. Certains autres téléphones peuvent ne pas
fonctionner.
Page 2
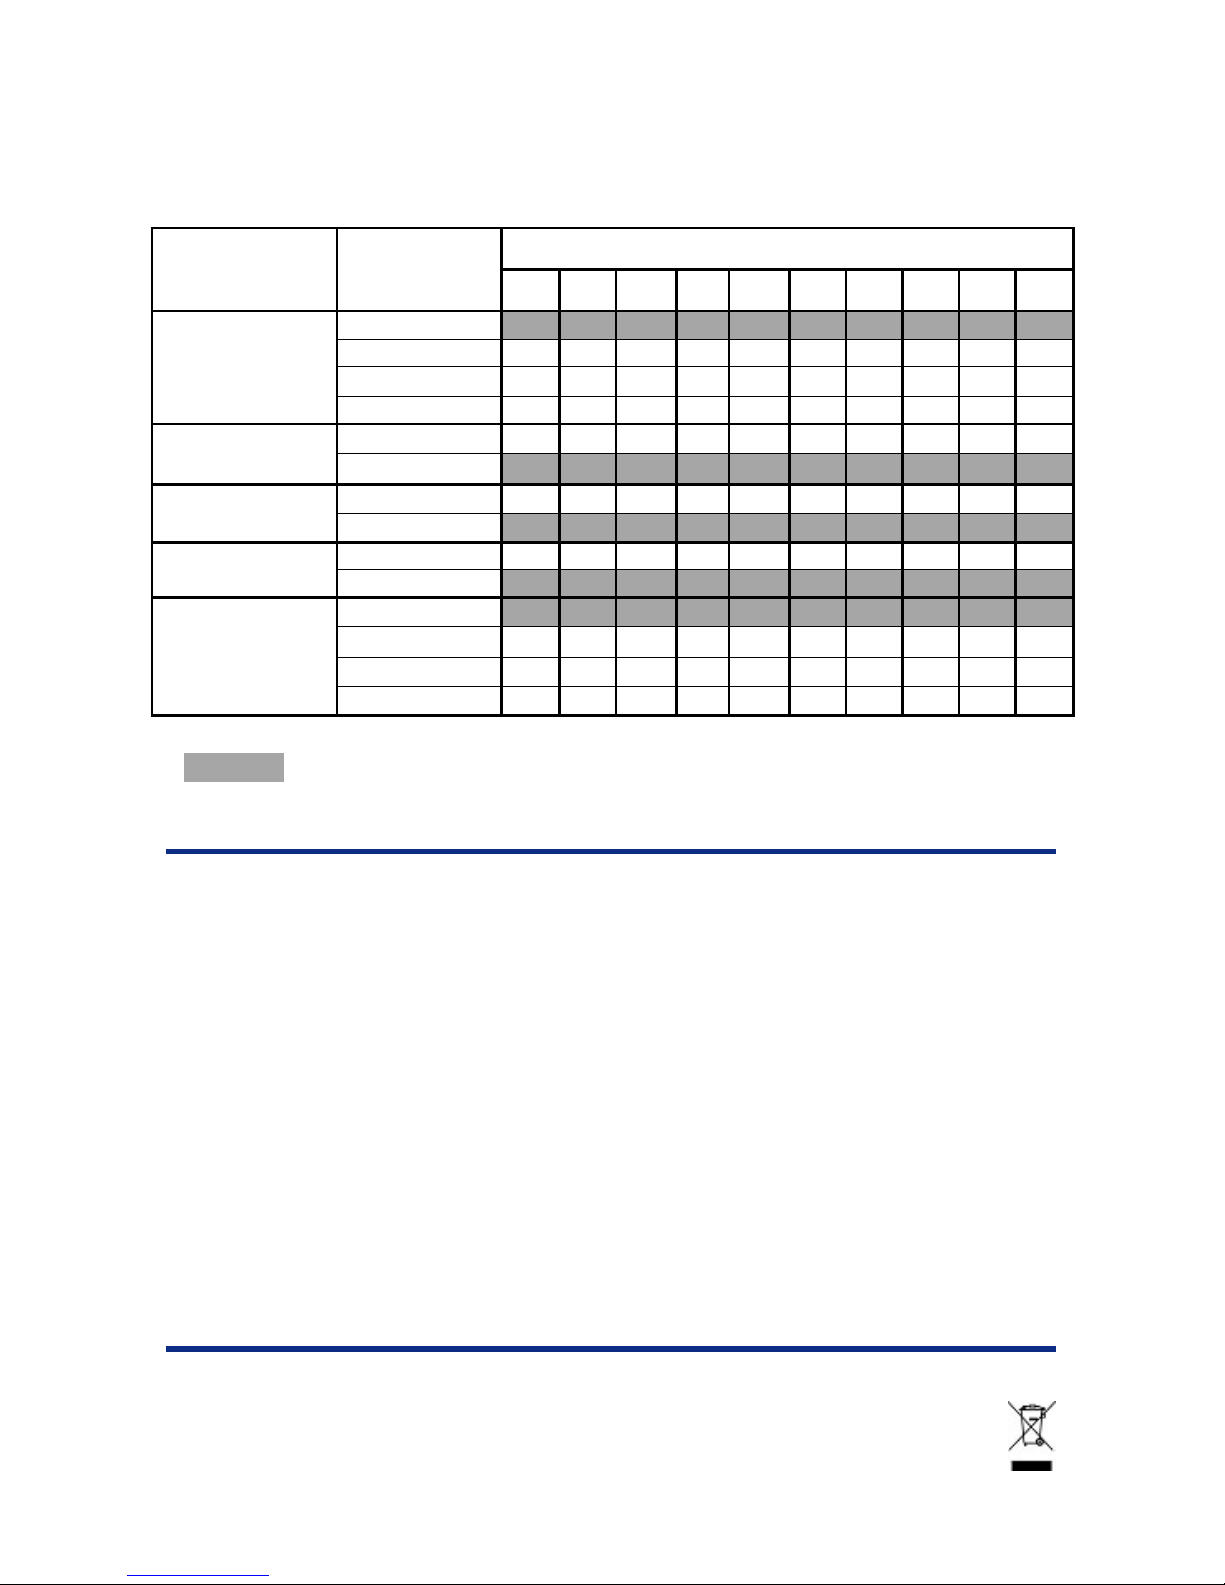
Normally your system is ready to be used in UK, in case of you need to use
it in an other country or change some settings, follow the following
spreadsheet:
: current setting in UK.
Guarantee
From the moment your Geemarc product is purchased, Geemarc guarantee it for the
period of one year. During this time, all repairs or replacements (at our option) are free of
charge.Should you experience a problem then contact our helpline or visit our website at
www.geemarc.com.The guarantee does not cover accidents, negligence or breakages to
any parts. The product must not be tampered with or taken apart by anyone who is not
an authorised Geemarc representative.The Geemarc guarantee in no way limits your legal
rights.
Please note: The guarantee applies to the United Kingdom only.
Declaration : Hereby Geemarc Telecom SA declares that this product is in compliance with
the essential requirements and other relevant provisions of the Radio and Telecommunications
T erminal Equipment Directive 1999/5/EEC and in particular article 3 section 1a, 1b and section
3.
Recycling directives WEEE (Waste Electrical and Electronic Equipment)
When this product is out of order, please do not put it in your domestic waste bin.
Deposit the product in in a appropriate WEEE skip.
For product support and help: 01707 384438
ON or OFF
Line attenuation
Line1&2
Current Line 1
Current Line 2
Ringer frequency
Ringer cadence
0db
-6db
-12db
18db
Short: 35mA
Long: 15mA
Short: 35mA
Long: 15mA
50 Hz
20 Hz
UK
France
European Std
US
Item Specification Switches setting (located on the rear of the T ester)
S1 S2 S3 S4 S5 S6 S7 S8 S9 S10
OFFOFFONON
OFFONOFFON
ONOFFONOFF
ONONOFFOFF
ON
OFF
ON
OFF
ON
OFF
ON
ON
OFF
OFF
ON
OFF
ON
OFF
2
Page 3

Installation :
- Branchez le cordon de l’adaptateur secteur à l’arrière du Tester.
- Branchez l’adaptateur secteur (*).
- Branchez le premier cordon PTT au téléphone 1.
(Utilisez uniquement le cordon de ligne fourni)
- Branchez l’autre extrémité de ce cordon dans la prise téléphone 1 à
l’arrière du T ester .
- Branchez le second cordon PTT au téléphone 2.
- Branchez l’autre extrémité de ce cordon dans la prise téléphone 2 à
l’arrière du T ester .
V otre ensemble est maintenant prêt à fonctionner .
Utilisation :
Avec 2 téléphones connectés:
Décrochez un combiné. Les fonctions suivantes sont maintenant
disponibles:
- Appuyez sur la touche 1 de votre téléphone pour faire sonner le second
téléphone.
- Appuyez sur la touche 2 de votre téléphone pour avoir la tonalité
d’occupation.
- Appuyez sur la touche 3 de votre téléphone pour écouter la source audio.
- Appuyez sur le bouton du T ester pour faire sonner alternativement les
deux téléphones.
Note:
- V ous avez la possibilité de brancher un seul téléphone.
- Pour connecter une source audio, utilisez un cable muni d’une prise jack
de 3,5mm, branchez-la à l’arrière du Tester. V ous pouvez utiliser un lecteur
CD ou toute autre source musicale compatible.
(*) Classé “tension dangeureuse” selon la norme EN60950
3
Page 4

Normalement votre Tester est configuré pour être utilisé en France, si vous
voulez l’utililser dans un autre pays ou changer certains paramètres,
reportez-vous au tableau ci-dessous pour le réglage :
: Réglage standard pour la France
Garantie
Cet appareil est garanti 1 an pièces et main-d'oeuvre. La date d'achat
figurant sur le ticket de caisse fera foi. Cette garantie s'exerce sous réserve
d'une utilisation normale de l'appareil. Les dommages occasionnés par les
surtensions électriques, la foudre ou par un choc sur l'appareil ne peuvent en
aucun cas être couverts par la garantie. En cas de problème fonctionnel
rapprochez-vous de votre point de vente.
Ce produit respecte les exigences de compatibilité électro-magnétique et
de sécurité électrique demandées par la directive européenne RTTE.
Recommandation pour le recyclage
La directive DEEE (Déchet d'Equipement Electrique et Electronique) a été
mise en place dans le but d'assurer la collecte sélective en vue de la valorisation, réutilisation ou recyclage des produits en fin de vie.
Lorsque votre produit ne fonctionne plus, ne le jeter pas dans votre poubelle
ménagère. Déposez-le dans un lieu de collecte approprié.
Tél. service après vente: 01707 384438
ON or OFF
UGLINESIMU ED01
4
Atténuation
des lignes1&2
Courant de ligne 1
Courant de ligne 2
Fréquence de
sonnerie
Cadence de
sonnerie
0db
-6db
-12db
18db
Courte: 35mA
Longue: 15mA
Courte: 35mA
Longue: 15mA
50 Hz
20 Hz
UK
France
Europe Std
US
Fontion Specification Réglage des interrupteurs (Situés à l’arrière du Tester)
S1 S2 S3 S4 S5 S6 S7 S8 S9 S10
OFFOFFONON
OFFONOFFON
ONOFFONOFF
ONONOFFOFF
ON
OFF
ON
OFF
ON
OFF
ON
ON
OFF
OFF
ON
OFF
ON
OFF
 Loading...