

Page 1

Ampli DECT300Ampli DECT300
Ampli DECT300
Ampli DECT300Ampli DECT300
GB
User guide p.2
F
Notice d’utilisation p.31
CAUTION:THIS TELEPHONE PRODUCT IS
SPECIFICALLY DESIGNED FOR PEOPLE WITH HEARING
DIFFICULTIES AND IS PROVIDED WITH A HANDSET
EARPIECE WITH VOLUME CONTROL FOR INDIVIDUAL
REQUIREMENTS. DUE CARE MUST BE TAKEN BY ALL
USERS THAT THE HANDSET EARPIECE VOLUME
CONTROL IS SET TO THE LOWEST LEVEL ACCEPTABLE
BY EACH RESPECTIVE USER. CARE SHOULD THEREFORE
BE EXERCISED TO ENSURE THAT ANY NEW USERS ARE
FAMILIAR WITH THIS REQUIREMENT.
ATTENTION: CE TELEPHONE PEUT ETRE DESTINE
AUX PERSONNES A Y ANT DES PROBLEMES D’AUDITION.
IL POSSEDE UN ECOUTEUR A VOLUME V ARIABLE. A
LA PREMIERE UTILISA TION, ASSUREZ VOUS QUE LE
BOUTON DE REGLAGE DU VOLUME SOIT POSITIONNE
SUR LA POSITION VOLUME MINIMUM. LES PERSONNES
MALENTENDANTES POURRONT PAR LA SUITE
AUGMENTER LE VOLUME POUR L’ADAPTER A LEUR
AUDITION.
1
Telephone
Page 2

GB
INDEX
PAGE
DESCRIPTION
- Handset and base unit controls 4
GENERAL SETTINGS
- How to connect the phone and set the batteries 8
- Charging the batteries 8
- Phone range 9
- Clean the phone 9
BASE SETTINGS
- Base ringer volume 10
HANDSET SETTINGS
- Menu access 11
- Settings icons displayed on the handset 11
- Handset registration 1 1
- Handset deregistration 1 1
- Handset ringer volume, melody and shaker 1 2
- Earpiece volume setting and tone adjust 1 2
- Network features, Flash time, Dial pause 1 3
USING THE PHONE
- Making a call 1 4
- Answering a call 1 4
- Use the call back features 1 5
- Delete stored names and numbers 1 5
- Paging the handset 1 5
- Timer 15
PHONE BOOK
- About the phone book 16
- Phone book handset ring tone settings 1 6
- Storing a number with a name 1 7
- Dialling using the phone book 1 8
- Modify a phone book entry 1 8
- Delete a phone book entry 1 8
- Transfer numbers and names into the phone book 1 9
2
Page 3

ANSWERING MACHINE
- Answering machine programming option 20
- How to use the answering machine 2 1
- Answering machine remote control 2 3
ADDITIONAL HANDSETS
- General settings 2 4
- Using several handsets ( registration ) 2 4
- Deregister all additional handsets from the base 2 5
- Internal calls 2 5
- Call transfer to another registered handset 2 6
- Headset- Neck loop option 2 6
ADDITIONAL BASE UNIT
- General settings 2 7
- How to add a base unit 2 7
TROUBLE SHOOTING 28
GUARANTEE - NORMS 30
3
Page 4
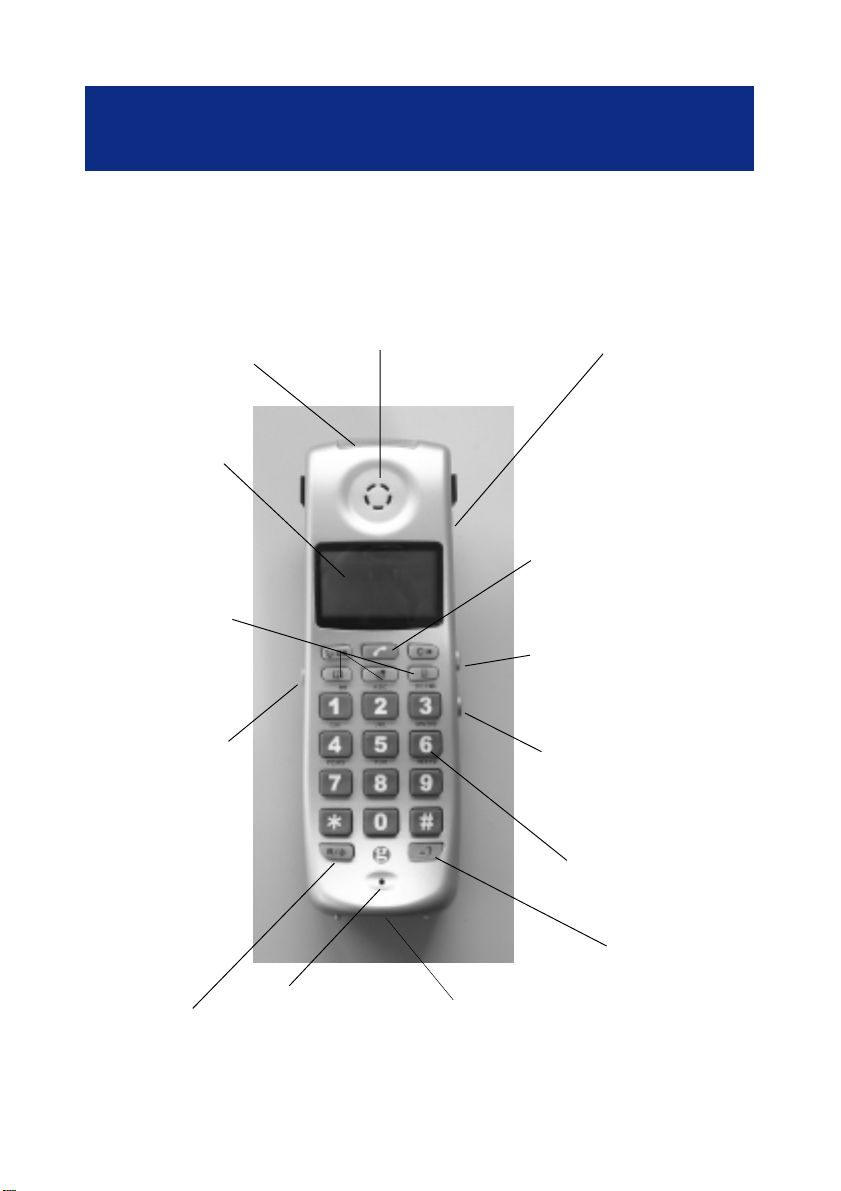
Ring/Messages light
indicator
Indicateur lumineux de
Sonnerie/Messages
LCD display
Afficheur LCD
Function and
phonebook keys
Touches de fonction et
de répertoire
DESCRIPTION
HANDSET DESCRIPTION
DESCRIPTION DU COMBINE
Speaker
Ecouteur
Answering machine key
T ouche répondeur téléphonique
Pick up and hang up key
Touche de décroché et de
Amplifier switch
Interrupteur ampli
raccroché
Tone adjustment
Réglage de la
tonalité
Flash Key
Touche flash
Microphone
Shaker switch
Interrupteur vibreur
Keypad
Clavier
Amplifier key
T ouche ampli
2.5mm socket
Prise jack 2.5mm
( CLA3 , CLA7 option )
4
Page 5
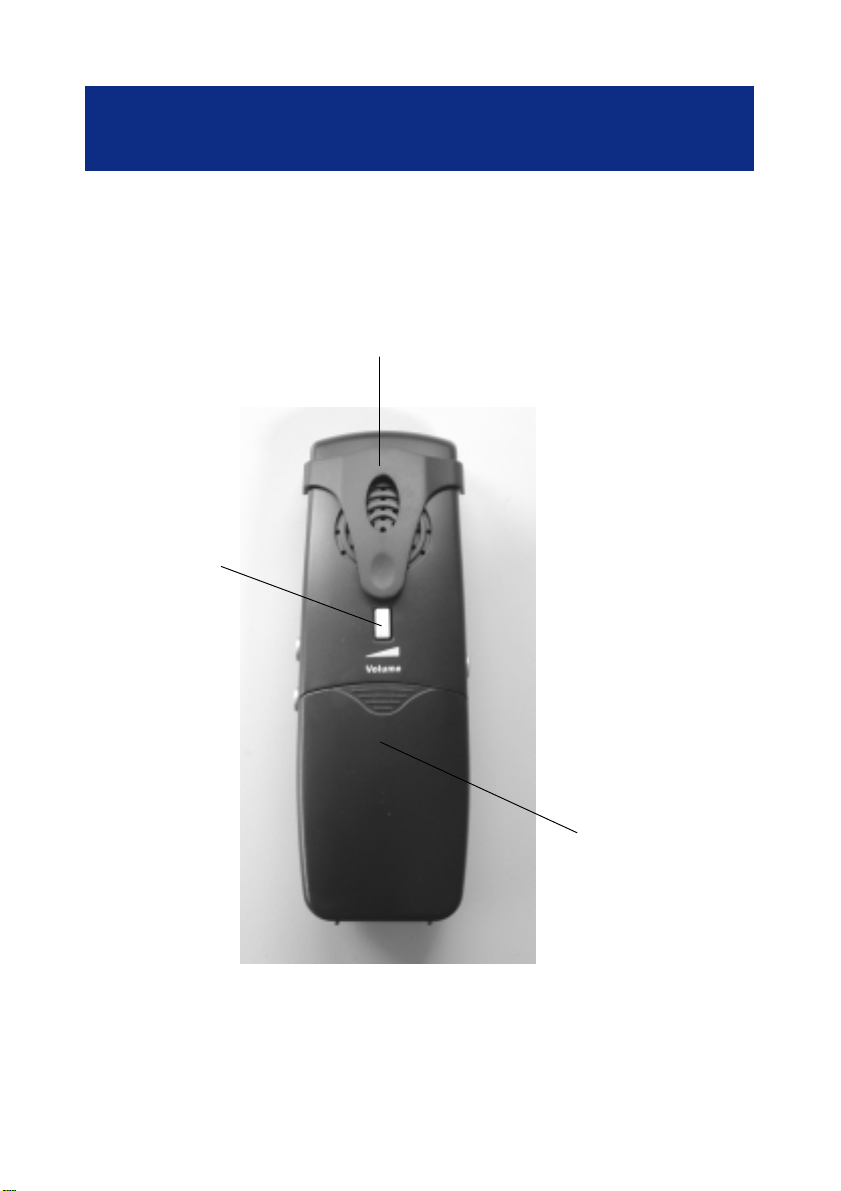
Amplifier volume
button adjustment
Bouton de réglage
volume ampli
DESCRIPTION
HANDSET DESCRIPTION
DESCRIPTION DU COMBINE
Belt clip
Clip ceinture
Batteries cover
Couvercle de batteries
5
Page 6
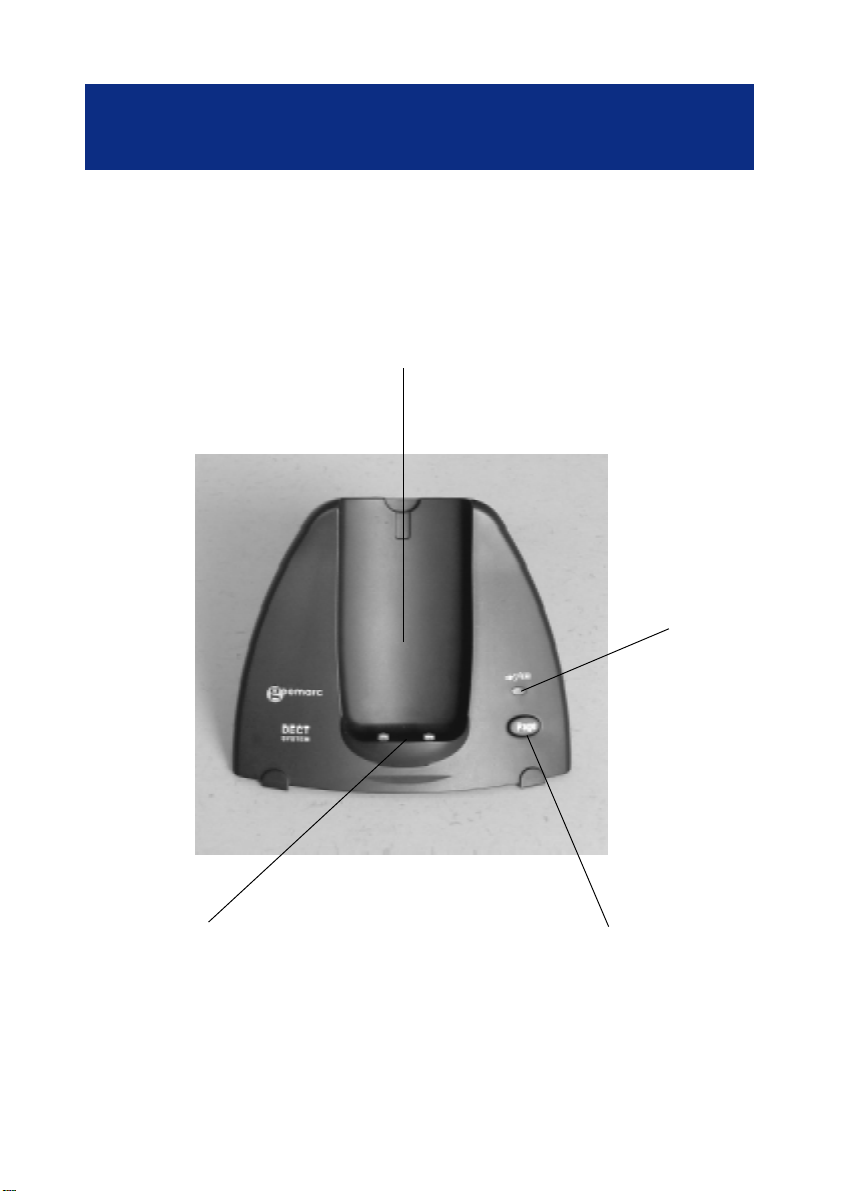
DESCRIPTION
BASE CONTROLS
CONTROLES SUR LA BASE
Handset cradle
Support combiné
Charging LED
Voyant de charge
Charge contacts
Contacts de charge
Page key
T ouche de pagination
6
Page 7
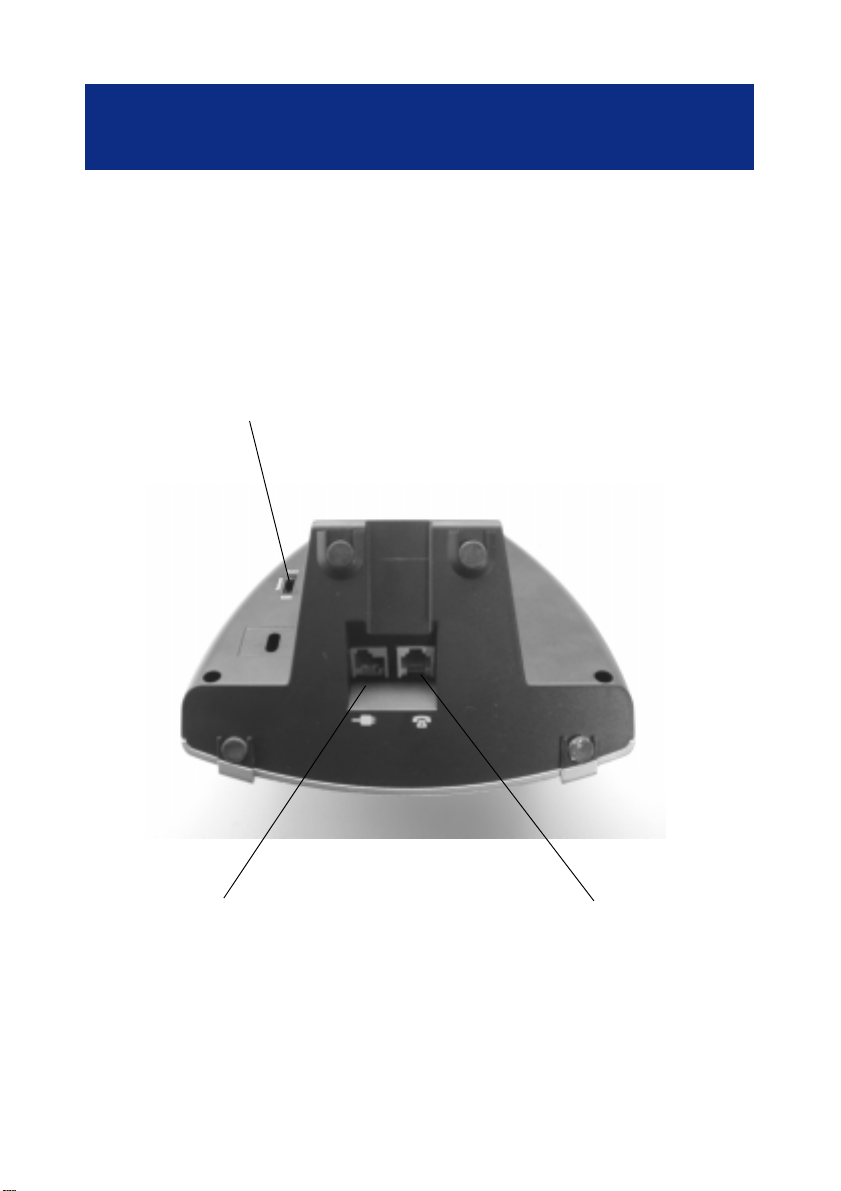
DESCRIPTION
BASE CONNECTIONS
CONNECTIONS SUR LA BASE
Ringer volume setting switch
Interrupteur de réglage sonnerie
* Power adaptor socket
* Connecteur adaptateur
secteur
(*) Classified “hazardous voltage” according to EN60950 standard.
Classé “tension dangereuse” selon la norme EN60950.
(**) Classified TNV-3 according to EN60950 standard.
Classée TNT-3 selon la norme EN60950
** Connecteur cordon de ligne
** Line socket
7
Page 8

GENERAL SETTINGS
1 - HOW TO CONNECT THE PHONE AND SET THE BATTERIES
1 - Plug the adaptor in the power wall socket and the power plug in
the base socket (*).
2 - Connect the line cord plug to the base socket (**).
3 - Connect the line cord to the PTT socket.
4 - Insert the batteries with the correct polarity into the batteries
compartment and replace the battery cover.
5 - Place the handset on the base unit then a short beep will be heard
and the battery symbol will flash on the display, except if the
batteries are totally empty.
NOTE: Do not expose the base to electric equipment like TV, radio, monitors,
sunlight, heat or other phones...to avoid any disturbances of your phone.
(**) Classified TNV -3 according to EN60950 standard.
(*) Classified “hazardous voltage” according to EN60950 standard
2 - CHARGING THE BA TTERIES
The phone is supplied with NiMH rechargeable batteries. In standby mode,
batteries are fully charged around 170 hours and talk time is around 8 hours.
The battery charge icon will flash as long as the phone is being charged
and will stop when the charging process is complete. The phone has an
automatic charging control to avoid excessive charging.
IMPORT ANT : Batteries must be charged during 24 hours before using
the phone for the first time.
Battery charge icon:
The handset display shows when the batteries are flat and when a warning
signal is heard. If the phone does not have enough power or is not completly
recharged, it switches itself off automatically until it is returned to the base
unit.
8
Page 9

GENERAL SETTINGS
3 - PHONE RANGE
The phone radio range can work up to 300 m and radio signal can be affected
by many factors like a wall, obstacles...The maximum range if there are no
obstacles between the phone and the base unit is around 300 m.
If the range is restricted by walls in a house or in the office, the base unit
should be in a slightly elevated position.
A warning signal (beep) will be heard when the handset is out of range, the call
will be stopped if the handset does not come nearer to the base unit.
4 - CLEAN THE PHONE
Clean the phone with a soft cloth. Keep the base and handset charging contacts
clean. Never use polishes or cleaning agents - they could damage the finish or
the electrics inside.
Note: We advise you to place the telephone on a table cloth or similar, as
rubber feet can mark some surfaces.
Thunderstorms: unplug your phone from the telephone socket during
thunderstorms because it could damage your phone. Your guarantee does
not cover thunderstorm damage.
9
Page 10

BASE SETTINGS
BASE RINGER VOLUME
The base ringer volume can be adjusted by using the slider switch located
on the base rear panel.
The following settings are available:
Symbol Function
Off
Low
Normal
High
For product support and help visit our website at
www.geemarc.com
telephone 01707 384438
or fax 01707 372529
10
Page 11
HANDSET SETTINGS
1 - MENU ACCESS
: To activate or deactivate the menu
: To move backward in the menu
: To move forward in the menu
: To confirm a selection
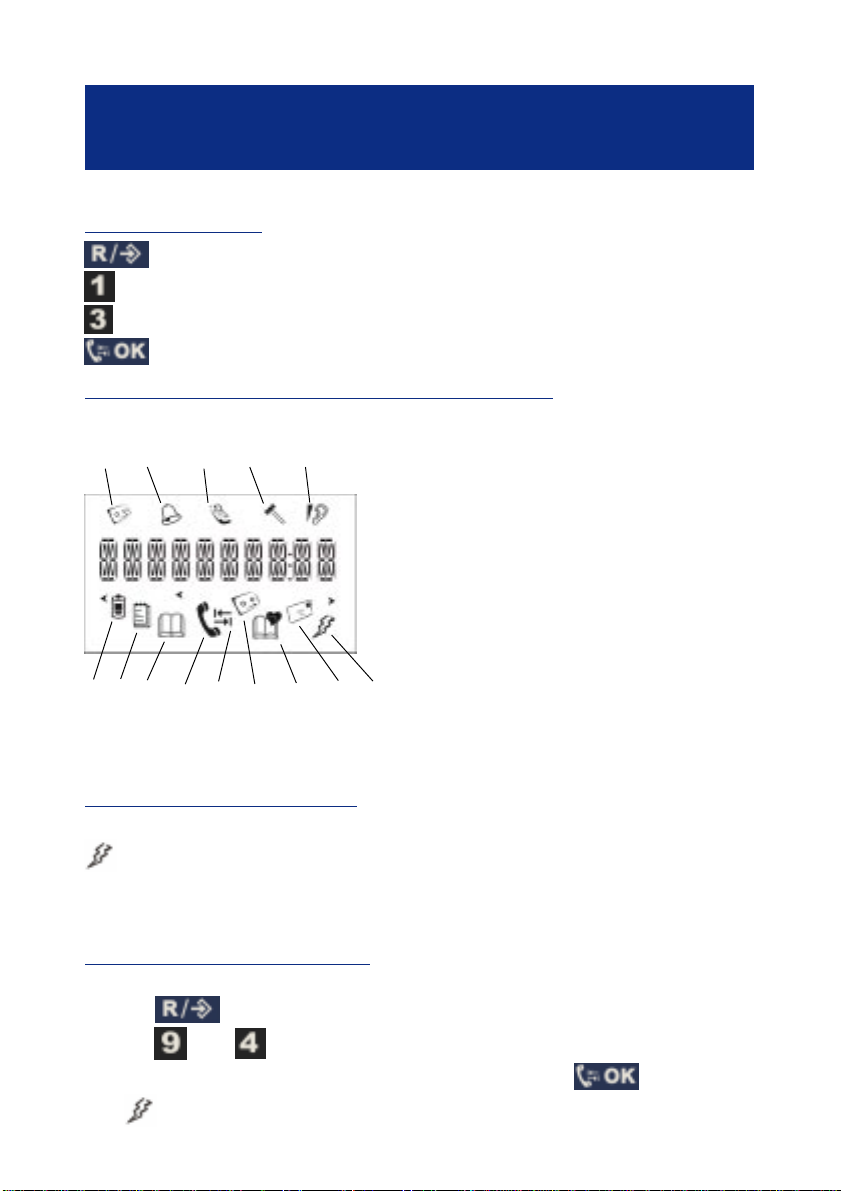
2 -SETTING ICONS DISPLA YED ON THE HANDSET
1 Answering Machine programmin
1 2 3 4 5
6 7 8 9 10 11 12 13 14
3 - HANDSET REGISTRA TION
The handset is already registered with the base ( factory setting) , the icon
must be fixed .
If this one flashes that means the handset is not linked with the base and must
be registered ( see P 24, “using several handset” )
2 Set ring volume and melod
3 Handset programming
4 Network, flash time and dial
pause settings
5 Earpiece volume adjust
6 Battery charge level
7 CID numbers
8 Phone book Nbr 1
9 ON/OFF line
10 Call transfer
1 1 Answering machine
12 Phone book Nbr 2
13 Incoming messag
14 Handset registered on the base
4-HANDSET DEREGISTRA TION
T o deregister the handset from the base unit :
- Press key
- Press then key
- Enter the PIN code ( factory setting 1 111 ), then press to confirm
The icon flashes , the handset is deregistered
11
Page 12
HANDSET SETTINGS
5 - HANDSET RINGER VOLUME, MELODY AND SHAKER
T o set the volume and melody please follow instructions below:
1 - Press the key.
2 - Press the or the key to select the icon
3 - Press the key to select
4 - Now you can select one of the possibilities below:
Press the to scroll through the menu. If you want to modify entries
press and keys.
1/4 ++++ for the Ringer volume.
2/4 for the Normal calls ringer melody .
3/4 for the Phone book ringer melody .
4/4 for the Phone book ringer melody .
5 - Press the key to confirm the settings and exit to the menu.
6 - If you want to exit to the menu press .
7- In addition to the ring, you can use the shaker function with the switch
set to the position ( on the handset right side ) .
Note : The different melodies will be active only if you have subscribed
to a caller ID service
6 - EARPIECE VOLUME SETTING AND TONE ADJUST
6-1 Answering machine mode
To set the hearing volume from the earpiece to listen your messages :
- Press the key
- Press the key or to select the icon
- Press the key to confirm
1/1 : from + to ++++ ( low to high )
Select the level with or key
- Press to confirm
- Press the key to exit
12
Page 13
HANDSET SETTINGS
6-2 Normal listening
Hearing volume can be adjusted in 4 steps on using the button on
the handset rear, press on it successively .
This will modify the setting done for the answering machine .
It also can be more amplified with the button ( on the right side ), set it on
, then press key: lit ( if not, you lose the amplification )
In both cases the button on the left side allows adjustment
to the tone Hi : treble , Lo : bass , but only for the earpiece.
7 - NETWORK FEA TURES, FLASH TIME, DIAL PAUSE
1 - Press the key.
2 - Press the or the key to select the icon
3 - Press the key to select
4 - You can choose from the menu below:
You can scroll into the menu by pressing the key. Press the or
the key to modify entries, press to confirm modification.
French menu UK menu Meaning
1/5 1/2 : 1 For UK, 2 for France (CID features).
2/5 Tone/Pulse for dialling must be set to Tone.
1/3 3/5 A,B,C,D (Telephone network settings; keep A)
2/3 4/5 Flash time (R key: *** for 100ms ; ****** for 300ms
3/3 5/5 Dial pause (*) : Yes/No
Flash time : France 300ms, other countries 100ms
(*) : To insert a 3 second pause after the first digit dialed ( Yes: activated ;
NO : de-activated ), then the rest is dialed normaly. Used when plugged in at
a private telephone exchange ( in an hotel, an office ...) .
5 - Press the key to exit the menu.
13
Page 14
USING THE PHONE
1 - MAKING A CALL
From the keypad :
- Dial the phone number you want to call, you can press the key to
cancel an incorrect entry.
- Press the , the number is automatically dialled.
- On completion of the call simply press the again to release the line or
put the handset on the base.
Y ou may first press the key then dial your number but the key
will be without effect .
From stored caller numbers :
Only if you subscrided to the “Caller ID” service
Y our telephone saves the 10 last numbers of incoming calls . When the
memory is full , the oldest number is replaced by the latest .
- Press the key
- Use the or key to select the wanted number ( or the name ), if
you
press you can see also the date/time of his call .
- Press the key , the number is dialed
You may exit before dialing : press key
2 - ANSWERING A CALL
When an incoming call is received proceed by:
- Press the key to take the line and speak.
- On completion of the call simply press the again to release the line
or put the handset on the base.
Caller ID display
If you subscrided to the “Caller ID” service, the caller number or name will be
displayed.
If you see ******** symbols, that means your caller doesn’t want to be identified
14
Page 15
USING THE PHONE
3 - USE THE CALL BACK FEA TURES
You can display the last 5 numbers you dialed
- Press the key and scroll through the list by pressing the or
keys until you select the number you want.
- Press the key to dial the number.
: Exit
: Delete the displayed entry
4 - DELETE STORED NAMES AND NUMBERS
Only if you subscrided to the “Caller ID” service, otherwise the list will be
empty .
- Press the key.
- Select the desired number to delete by pressing the or key. Two
short beeps will be heard when you reach the end of the list.
- Press the key to delete the entry , a short beep will be heard .
- Do it again from step 2 for deleting other entries, otherwise exit on
pressing the key .
5 - P AGING THE HANDSET
If you wish to locate your handset on making it ring, simply follow the
instructions below ( if it is in a valid receiving area )
- Press the key on the base unit located on the base front side, all
the registered handsets paged will ring.
- Press the twice on the located handset to stop the paging mode.
Pressing the key on the base unit has the same effect.
6- TIMER
A timer will be displayed on the screen af ter st arting the call. You can check
the call length by using this function.
15
Page 16

PHONE BOOK
(*) You must be subscrided to the “ Caller ID” service from your local
phone company to enjoy principal features of phone books.
1 - ABOUT THE PHONE BOOK
Names and phone numbers can be stored in both phone books. Each phone
number stored in the phone books can be called by pressing only few buttons.
The name and the number of the caller will be displayed (*) during the incoming
call. The caller name will be displayed if it has been stored in one of the phone
books.
Each phone book may contain 10 entries.
The entries in both phone books are sorted out by using an alphabetic list.
Each name can contain up to 10 characters and each phone number can have
up to 25 digits.
2 - PHONE BOOK MELODIES SETTINGS
It is possible by a different bell to identify which phone book is being used (*)
by the setting you have done Page 12 .
Non stored numbers : Melody 2/4
Calls from numbers and names in the phone book : Melody 3/4.
Calls from numbers and names in the phone book : Melody 4/4
IMPORT ANT :
Even if a caller is stored in a phone book, it can happen that only the normal
ring tone is triggered, in this case caller may have used his or her private
number function.
16
Page 17
PHONE BOOK
3 - STORING A NUMBER WITH A NAME
Follow instructions below to store new entries in the phone book:
- Enter the phone number you wish to set in the phone book.
- Select one of the two phone books by pressing the or key , a
beep will be heard and the phone book icon selected will flash.
- Enter the corresponding name and number by pressing the corresponding
number key once or twice to select the desired letter (see the table below).
Key Characters
1 [space] - 1
2 A B C 2
3 D E F 3
4 G H I 4
5 J K L 5
6 M N O 6
7 P Q R S 7
8 T U V 8
9 W X Y Z 9
00
* or # To confirm the key and go to another one
Example: for AB press A*B
- Press the key to store the entry then a beep will be heard to
confirm.
Note: To leave the menu press and hold the key .
17
Page 18
PHONE BOOK
4 - DIALLING USING THE PHONE BOOK
1 - Select the desired phone book by pressing the or .
2 - Select the desired entry in the list by using the or key .
3 - Press the key then the number will be automatically dialled.
Note: To leave the menu press the or key.
5 - MODIFY A PHONE BOOK ENTRY
1 - Select the desired phone book by pressing the or key.
2 - Select the desired number to modify by pressing the or keys.
3 - Press the key.
4 - The number will be displayed and can be deleted by pressing the
key.
5 - Enter the new number and press the key to store.
6 - DELETE A PHONE BOOK ENTRY
1 - Select the desired phone book by pressing the or key.
2 - Select the desired number to delete by pressing the or keys.
3 - Press the key.
4 - Press the key to delete the entry.
5 - Display will show OK?
5 - Press the to confirm then a beep will be heard, otherwise press
any key 0 to 9 to cancel.
6 - If OK press key or to exit .
18
Page 19

PHONE BOOK
7 - STORE NUMBERS AND NAMES INTO THE PHONE BOOK
Only available if you subscrided to the “Callaer ID” service from your local
phone company , otherwise the list will be empty
1 - Press the key.
2 - Select the desired number to store in the phone book by pressing the
or keys. Two short beeps will be heard if you reach the end of the list.
3 - Select the desired phone book in which you want to store the number by
pressing the or key.
4 - Store the name as described Page 17 “ Store a number with a name .
5 - Press the to confirm the storage in the phone book.
For product support and help visit our website at www.geemarc.com
telephone 01707 384438
or fax 01707 372529
19
Page 20

ANSWERING MACHINE
1 - ANSWERING MACHINE PROGRAMMING OPTIONS
To access to the menu press the key then press the key or
use the or keys to select . To set the answering machine
use the table below:
Function Programmable functions Select Default
Nbr
1/5 Modifies the system day List: 1 (Monday) to 7 1
(Sunday)
2/5 Modifies the system time Type value
(00:00 to 23:59) 00:00
3/5 Selects number of rings List: 2, 3, 4, 5, toll saver Toll
saver
4/5 Modifies remote control code Type value
(0000 to 9999) 1111
5/5 Modifies telephone answering List: ****A (top quality), A
machine recording quality ****B (standard quality)
Remote control code : confidential ID code to activate/deactivate the answering
machine or read your messasge from another phone.
T oll Saver: this option allows the machine to answer your call after 3 rings if
new messages have been received instead of 5 in case of no new messages
Answering Machine general icons displayed:
- Messages Answering Machine icon , it will be displayed when the
answering machine is on.
- Icoming message icon , it will flashes when you have a message.
20
Page 21

ANSWERING MACHINE
2 - HOW TO USE THE ANSWERING MACHINE
The answering machine is activated by default. The phone can record up to 4
mins and 40 secs for top quality messages or 7 minutes for standard quality
messages (see Programming options about explanation to change the telephone
answering machine recording quality). When you have a new message, the
light indicator will flashes.
On pressing the button ( handset rear ) you switch between earpiece
and speaker mode and vice-versa .
Accessing/Exit the Answering Machine:
Press the key on the handset right side to access the machine. The
number of messages, the day of the week and the time will be displayed. The
telephone will state the number of messages received and play the recorded
messages.
Press the key to stop
Press the key to exit
To activate or deactivate the Answering Machine follow this below:
- Press the key located on the right side of your phone.
- Press the to activate, the icon is shown
OR
- Press the key to deactivate, the icon disappears
- A tone will be heard for validation.
Record an Outgoing Message:
A standard outgoing message is factory set. You can listen this outgoing
message by pressing the . If you wish to record a new outgoing message
follow instructions below:
- Press the key to enter answering machine mode.
21
Page 22

ANSWERING MACHINE
- Press key and then , a tone will be heard.
- Record your outgoing messsage ( speak at 20/30cm from the microphone )
- Press the key to stop recording, a second tone will be heard, then your
outgoing message is repeated .
- Press key to exit.
Record an Incoming Message :
With this function, you can leave a local message to your family members
follow instructions below:
- Press the key to enter in answering machine mode.
- Press the key and then , a tone will be heard.
- Record your outgoing message.
- Press the key to stop recording, a second tone will be heard.
- Press the key to exit
Reading messages:
- Press the key the message reading starts.
When you press the key :
: Return to the beginning of the message reading
: Go to the next message
: Start again at the beginning
: Stop the reading
- Press the key to exit
Delete a message:
If you wish to delete a message, press the key during the message is
playing, a tone will be heard to confirm.
Delete all messages:
If you wish to delete all messages after reading, press and hold the key
during the answering machine announce the number of messages received,
00 will be displayed on the screen left and a tone will be heard to confirm.
22
Page 23

ANSWERING MACHINE
3 - ANSWERING MACHINE REMOTE CONTROL
Y ou can get access to your answering machine via a simple phone call.
The 4 digit remote access is factory set by default to “1111”. If you wish to
change this code, see programing options page 20.
To remotely activate the answering machine
Follow instructions below:
1 - Dial your phone number.
2 - After 9 rings press the key.
3 - Enter the remote code (111 1 or your new code).
4 - Press the 7 key on the phone to activate the answering machine.
To remotely deactivate the answering machine
Follow instructions below:
1 - Dial your phone number.
2 - During the outgoing message, press the key.
3 - Enter the RC code (1 1 11 or your secret code).
4 - Press the 9 key on the phone to deactivate the answering machine .
To remotely access to the answering machine
Follow instructions below :
1- Dial your phone number.
2 - During the outgoing message, press the key.
3 - Enter the remote access code (111 1 or your new code).
4 - The answering machine will announce the number of messages received
and read recorded messages. See Page 22 “ Reading messages” for keys
to use
5 - Hang up the phone when all your messages have been read.
When all messages have been read 2 tones will be heard
Y ou may stop when you want : Hang up
23
Page 24

ADDITIONAL HANDSETS
1 - GENERAL SETTINGS
With the DECT standard you have the possible settings below:
- Register up to 4 handsets to one base unit.
- Register up to 2 base units to each handset.
- Make internal call handset to handset and transfer call between handsets
registered to the same base unit.
- Y ou can increase the phone range by using 2 base units (move between
the phone coverage areas).
The additional handset will not be equiped with the answering machine
button, the function is only assigned to the main handset.
2 - USING SEVERAL HANDSETS ( Registration)
For practical applications and to make life easier, you can register several
handsets to the same base unit. Y ou will be able to answer a call anywhere at
any time because all handsets will ring at the same time. You can call others
registered handsets in different rooms.
Y ou can transfer an incoming call to another handset.
How to use several handsets
All handsets you wish to use in the base unit must be registered to this base
unit.T o add another handset please follow instructions below for each handset:
1 - Unplug the mains adaptor from the base unit for a few seconds.
2 - Replace the adaptor to the power socket.
3 - Press the key.
4 - Press the or the key to select the icon shown on the display.
then press key.
5 - Enter the base unit PIN code (factory setting to 1 1 1 1), then press
6 - The handset is now searching for the base unit to be registered.
The icon is shown fixed, the handset is ready to be used .
Note: to get the maximum efficiency and maximum range you must put the
handset near the base unit. The handset range will be the same for each
handset.
24
Page 25

ADDITIONAL HANDSETS
3 - DEREGISTER ALL ADDITIONAL HANDSETS FROM THE BASE
T o deregister all handset s from the base unit follow the instructions below:
1 - Take one handset.
2 - Press the key.
3 - Press the and the keys to enter number 1/1 0000 will be
displayed.
4 - Enter the base unit PIN code (factory setting to 111 1), then press
All additional handsets are deregistered from the base unit.
Note: handset used to deregister the additional handsets is not deregistered.
4 - INTERNAL CALLS
When you are using several handsets registered to the same base unit, you
can make internal calls handset to handset. T o make a call handset to handset
please follow instructions below:
1 - Press the key.
2 - All other handset s will ring.
3 - Press the key to answer the call.
A tone signal will be heard during a call when you receive an external call. To
answer the external call you must finish your internal call first.
25
Page 26

ADDITIONAL HANDSETS
5 - CALL TRANSFER TO ANOTHER REGISTERED HANDSET
External calls can be transfered to another registered handset from the
answering handset (both handsets must be registered to the same base unit).
During an incoming call:
1 - Press the key to answer the call.
2 - Press the key to transfer the call.
3 - All others handsets will ring.
4 - Press the key on the requested handsets to answer the call.
If you do not wish to come back to your call and do not wish to transfer the
call to other handsets simply press the key on your called handset.
Note : Y ou cannot transfer an external call to a handset which is not registered
to the same base station.
6 - HEADSET - NECK LOOP OPTION
If you wish you can connect a headset ref: HEADCL_BLK ( CLA3) or a neck
loop Ref : CLA7 to the socket located on the bottom of the handset , with
these options you can use all phone functions as described before. T o answer
a call simply press the to take the line and press a second time to
release the line.
26
Page 27

ADDITIONAL BASE UNIT
1 - GENERAL SETTINGS
A second base unit can be connected to the network in order to extend the
range of the handsets. When an other base unit is registered to a handset, it
can automatically search for the next base unit if you go outside the range of
the first base unit. The transfer between base units is handled automatically,
although this cannot be done whilst a call is in progress. Handset will keep its
connection with one of the base units until it loses connection due to having
moved out of range. In this case, the handset searches for a new base unit in
its registration list.
The base units coverage areas must overlap to ensure there are no gaps in the
coverage. Otherwise the radio connection will be lost.
2 - HOW TO ADD A BASE UNIT
1 - Connect the additional base on the network phone socket.
2 - Plug in the adaptor.
3 - Register the handset to the base unit as described before.
Remark: The first registered handset has priority on the first base. It will be
activated when the handset will move to the second base (move to the new
radio range).
T o check if your handset or all handsets registered to this base are registered
simply press the page button on the new base, all new handsets
registered to this base will ring.
IMPORTANT: If you connect several bases together, the handsets
registered to the additional bases will ring for a few seconds during an
incoming call even if you take the line with one of the first base handsets.
27
Page 28

TROUBLE SHOOTING
IF THE PHONE DOES NOT WORK
Generality:
Make sure that the phone line cord and adaptor are correctly plugged in and
are not damaged.
Make sure that the batteries are fully charged.
Connect another phone on your phone socket or move your phone to another
socket to check if the failure is coming from your phone or your PTT socket.
The phone does not work:
Make sure that the line cord and the power adaptor are correctly connected to
the base unit or to the PTT plug and wall power socket.
Check the right polarity of the batteries.
No tone when you press
Check that the batteries are charged ( icon )
The icon must be fixed ( not flashing ), otherwise see Page 24 ( registration)
A warning tone is heard during a call:
The batteries are empty and the handset needs to be replaced in the base
unit.
Y ou are over the base unit coverage area.
No number is displayed when the phone rings:
- Please contact your phone network provider to get the caller identification
service.
- When the caller does not want to show his or her number (private number),
the display will show ******. However, it could be a call from a PBX and caller
ID may not work properly if the phone is connected to a PBX.
The answering machine doesn’t work or you don’t receive messages
Check that the answering machine is activated
Check that you have an outgoing message ( see P.21 “recording an outgoing
message) recorded
28
Page 29

TROUBLE SHOOTING
Y ou lost some messages :
Your vocal box was full and the oldest messages have been cleaned
automaticaly to allow the recording of new messages .
Clean regularly your messages off.
Re-Initialize the phone
If you have got a problem, or lose your code for instance, you may retrieve
factory parameters, follow instructions :
- Remove one of the batteries
- Press key
- Put in the battery ( always pressing the key )
- Release key
- Hit the following code : # 7 3 3 7 #
Y our telephone retrieved the first parameters ( from the factory )
29
Page 30

GUARANTEE-NORMS
GUARANTEE
From the moment your Geemarc product is purchased, Geemarc guarantee
the product for one year. During this time, all rep airs or replacements (at our
option) are free of charge. Should you experience a problem then contact our
helpline or visit our website at www.geemarc.com. The guarantee does not
cover accidents, negligence or breakages to any parts. The product must not
be tampered with or taken apart by anyone who is not an authorised Geemarc
representative. The Geemarc guarantee in no way limits your legal rights.
IMPORT ANT : YOUR RECEIPT IS P ART OF YOUR GUARANTEE AND MUST
BE RET AINED AND PRODUCED IN THE EVENT OF A WARRANTY CLAIM
Please note: The guarantee applies to the United Kingdom only .
DECLARA TION: Geemarc Telecom SA hereby declares that this product is in
compliance with the essential requirements and other relevant provisions of
the Radio and T elecommunications T erminal Equipment Directive 1999/5/EEC
and in particular article 3 section 1a, 1b and section 3. The telephone does not
operate if the line current is lower than 18 mA.
Electrical connection : The apparatus is designed to operate from a 230V
50Hz supply only . (Classified as «hazardous voltage» according to EN60950
standard).
The apparatus does not incorporate an integral power on/off switch. To
disconnect the power, either switch off supply at the mains power socket or
unplug the AC adaptor . When inst alling the apparatus, ensure that the mains
power socket is readily accessible.
T elephone connection : Volt ages present on the telecommunication network
are classified TNV -3 (Telecommunication Network Voltage) according to the
EN60950 standard.
30
Page 31

SOMMAIRE
P AGE
DESCRIPTION
- Description du combiné et de la base 4
INST ALLA TION
- Raccordements du téléphone et mise en place des batteries 3 3
- Chargement des batteries 3 3
- Rayon d’action 3 4
- Entretien du téléphone 3 4
REGLAGE DE LA BASE
- Réglage du volume de sonnerie de la base 3 5
REGLAGE DU COMBINE
- Accès au menu, déplacement 3 6
- Présentation des symboles 3 6
- Enregistrement du combiné sur la base 3 6
- Annuler l’enregistrement d’un combiné de la base 3 7
- Volume, mélodie de la sonnerie et vibreur 3 7
- Réglage du volume et de la tonalité de l’écouteur 3 8
- Propiétés du réseau, touche R (Flash), insertion d’une Pause 3 9
UTILISATION DU TELEPHONE
- Appeler 40
- Répondre à un appel 41
- Rappeler le dernier numéro composé (BIS) 4 1
- Effacer un ou plusieurs numéro du journal d’appels 4 2
- Recherche du combiné (pagination) 42
- Minuterie (durée des appels) 4 2
REPERTOIRE
- Description 4 3
- Mélodie affectée au répertoire 43
- Enregistrement d’un numéro et d’un nom 4 4
- Appeler en utilisant le répertoire 4 5
31
Page 32

- Modifier un numéro du répertoire 45
- Effacer un numéro du répertoire et son numéro 4 5
- Transfert de numéros du journal d’appels vers le répertoire 46
REPONDEUR TELEPHONIQUE
- Programmation du répondeur 47
- Utilisation du répondeur 4 8
- Activer- désactiver le répondeur à distance 50
- Interroger votre répondeur à distance 51
COMBINES ADDITIONNELS
- Généralités 52
- Utilisation de plusieurs combinés 5 2
- Annuler l’enregistrement de tous les combinés de la base 5 3
- Communications internes 5 3
- Transfert d’appel 54
- Option casque- boucle magnétique 5 4
BASE ADDITIONNELLE
- Généralités 55
- Ajouter une base supplémentaire 5 5
EN CAS DE PROBLEME
- Problèmes de fonctionnement 56
GARANTIE - NORMES 58
32
Page 33

INST ALLATION
1 - RACCORDEMENT DU TELEPHONE ET MISE EN PLACE DES BA TTERIES
- Branchez l’adaptateur entre la prise secteur et la prise sous la base (*) voir
page 7.
- Raccordez le cordon téléphonique entre la prise France Télécom(**) et la
prise sous la base, voir page 7.
- Insérez les batteries dans le compartiment à piles du combiné en respectant
la polarité et replacez le couvercle, voir page 5.
- Placez le combiné sur la base, un bref signal retentit et l’affichage des
piles clignote sur l’écran sauf si les batteries sont totallement déchargées.
2 - CHARGEMENT DES BA TTERIES
Le téléphone est livré avec des batteries NiMH rechargeables. Lorsque cellesci sont chargées au maximum, la durée de veille s’élève à 170 heures environ.
La durée maximale de communication est de 8 heures. Lorsque le téléphone
est en chargement, le symbole clignote et s’arrête quand la charge est
terminée. Le téléphone dispose d’un système de chargement automatique,
limitant à la charge optimale .
IMPORTANT : Les batteries doivent être chargées pendant 24 heures
avant d’utiliser le téléphone pour la première fois.
Affichage du niveau de chargement de la batterie :
Le symbole s’affiche sur l’écran lorsque les batteries sont faibles et un
signal d’alarme retentit. Si le téléphone n’est pas assez rechargé, il se
déconnecte automatiquement jusqu’à ce qu’il soit replacé sur sa base.
Le symbole s’affiche indiquant un chargement optimal des batteries
33
Page 34

INST ALLATION
3 - RA YON D’ACTION
La portée du téléphone peut atteindre 300 m en champ libre. Celle-ci peut être
réduite à cause d’obstacles comme par exemple: arbres, mur , une structure
métallique...
La base doit être placée à un endroit légèrement plus élevé pour obtenir des
conditions optimales d’utilisation.
Un signal retentit quand le combiné est hors de portée et, la communication
sera interrompue après quelques bips sauf si on se rapproche de la base.
REMARQUE : Ne placez pas la base à proximité d’un téléviseur, d’un poste
de radio, d’écrans, d’autres téléphones... afin de réduire au minimum le
risque de parasites. Le soleil et les sources de chaleur sont également à
éviter.
4 - ENTRETIEN DU TELEPHONE
Nettoyez le téléphone à l’aide d’un linge doux et nettoyez régulièrement les
contacts de charge situés sur la base et le combiné avec une lime à ongles
par exemple. N’utilisez jamais de crèmes à polir ou de produits d’entretien car
cela pourrait endommager le plastique ou les circuits électriques intérieurs.
Remarque : Les pieds en caoutchouc du téléphone pourraient endommager
certaines surfaces, placez la base sur un tissu pour eviter tout problème.
Attention : Débranchez votre téléphone par temps orageux afin d’éviter tout
dommages électriques. Ce phénomène n’est pas couvert par la garantie tout
comme une chute de votre appareil.
34
Page 35

REGLAGE DE LA BASE
REGLAGE DU VOLUME DE SONNERIE
Le volume de sonnerie de la base peut être réglé avec l’interrupteur situé à
l’arrière de la base.
En positionnant l’interrupteur en face du symbole vous obtiendrez le niveau
décrit ci-dessous :
Symbole Niveau
Coupé
Faible
Normal
Fort
TEL. SERVICE APRES VENTE :
03 28 58 75 99
Pour tout renseignement technique ou toute
commande visitez notre site web sur
www.geemarc.com.
Parc de l’Etoile
2, rue Galilée
59760 Grande Synthe
35
Page 36

REGLAGE DU COMBINE
1 - ACCES AU MENU, DEPLACEMENT
: T ouche permett ant d’accéder au menu ou de le quitter
: Touche permettant de revenir en arrière dans le menu
: Touche permettant d’avancer dans le menu
: Validation des choix
2 - PRESENTA TION DES SYMBOLES
1 Programmation répondeur
1 2 3 4 5
6 7 8 9 10 11 12 13 14
2 Choix mélodie et volume
3 Programmation du combiné
4 Réglages réseaux, temps du
flash et de pause
5 Réglage du volume de l’écouteur
6 Témoin de charge de la batterie
7 Carnet des appels entrants
8 Répertoire N° 1
9 Prise de ligne
10 Transfert d’appel
1 1 Répondeur activé
12 Répertoire N° 2
13 Présence de message
14 Combiné enregistré sur la base
3 - ENREGISTREMENT DU COMBINE SUR LA BASE
Le combiné fourni avec la base est déjà pré-enregistré en usine. l’icône
doit être fixe, signifiant la liaison avec la base.
Si celle-ci clignote cela signifie que le combiné n’est pas en liaison avec la
base et doit être programmé : voir P53 “Utilisation de plusieurs combinés”
36
Page 37

REGLAGE DU COMBINE
4 - ANNULER L ’ENREGISTREMENT D’UN COMBINE SUR LA BASE
Pour déprogrammer un combiné de sa base procédez comme suit :
- Appuyez sir la touche
- Appuyez sur les touches et
- Entrez le code PIN de la base (1 1 11) , validez en appuyant sur
L’icône clignote, le combiné est dévalidé de la base
4 - VOLUME, MELODIE DE LA SONNERIE ET VIBREUR
Pour régler le volume et la mélodie, veuillez effectuer la démarche suivante :
1 - Appuyez sur la touche .
2 - Appuyez sur la touche ou la touche pour sélectionner l’icône
3 - Appuyez sur la touche pour valider.
4 - Vous pouvez alors sélectionner l’une des possiblilités suivantes :
Appuyez sur la touche pour vous déplacer dans le menu. Appuyez sur
les touches ou pour modifier les réglages puis appuyez sur la
touche pour confirmer
1/4 Volume de la sonnerie: + faible ; ++++ forte
2/4 Mélodie de la sonnerie correspondant aux appels généraux.
3/4 Mélodie de sonnerie pour le répertoire (8) , l’icône
correspondante clignote .
4/4 Mélodie de sonnerie pour le répertoire (12) l’icône
correspondante clignote .
6 - Quitter le menu: appuyez sur la touche .
7- Vous pouvez activer en complément de la sonnerie la fonction vibreur en
positionnant l’interrupteur situé sur le côté droit de votre téléphone
sur la position .
Note : Les mélodies affectées aux répertoires ne seront actives que si
vous êtes abonné au service “Présentation du numéro”
37
Page 38

REGLAGE DU COMBINE
5 - REGLAGE DU VOLUME DE L’ECOUTEUR ET DE LA TONALITE
5-1 Pour le mode Répondeur
En effectuant le réglage décrit ci-dessous, vous ajusterez le volume d’écoute
de vos messages ( uniquement par l’écouteur)
- Appuyez sur la touche
- Appuyez sur la touche ou la touche pour sélectionner l’icône
- Appuyez sur la touche pour valider.
1/1 : de + : faible, à ++++ : fort
Sélectionnez le niveau à l’aide des touches ou
Appuyez sur la touche pour valider
Appuyez sur la touche pour quitter
5-2 Pour la conversation
Le volume d’écoute peut être ajusté en 4 paliers, cela par appuis succésifs sur
la touche située au dos du combiné.
Cela modifiera le réglage fait pour le mode répondeur .
Il peut encore être amplifié grâce au bouton situé sur le côté droit du combiné:
Placez le bouton sur et appuyez sur la touche : allumée . Si éteinte
vous perdez le bénéfice de l’amplification suppléméntaire .
Lorsque la touche est allumée, le bouton situé sur le
côté gauche du combiné permet le réglage des graves ( Lo) et des aigus ( Hi),
mais n’agit pas sur le haut-parleur ( mode répondeur ) .
38
Page 39

REGLAGE DU COMBINE
6 - PROPRIETES DU RESEAU, TOUCHE R (FLASH), INSERTION D’UNE
PAUSE
1 - Appuyez sur la touche .
2 - Appuyez sur la touche ou la touche pour sélectionner l’icône .
3 - Appuyez sur la touche pour confirmer .
4 - Dans ce menu, 3 choix sont disponibles :
Pour passer d’un réglage à un autre, appuyez sur la touche .
Appuyez sur la touche ou la touche pour modifier les réglages
Appuyez sur la touche pour confirmer.
1/3 A/B/C/D (réglages réseaux , il est conseillé de garder A).
2/3 T emps flash, réglez la touche R avec : ****** ( 300ms) ;*** ( 100ms)
En France le temps est de 300ms
3/3 Pause pour insérer une pause dans la composition du numéro
(Yes: activé/No: désactivé), cela est utile lorsque votre DECT
est relié derrière un modèle ancien de P ABX ( mini-central). Après
l’envoi du 1er chiffre, une pause de 3sec est insérée avant l’envoi
du reste du numéro.
5 - Appuyez sur la touche pour quitter.
39
Page 40

UTILISATION DU TELEPHONE
1 - APPELER
Depuis le clavier :
- Composez le numéro de téléphone souhaité. En cas d’erreur, appuyez sur
la touche pour corriger le chiffre précédent.
- Appuyez sur la touche , le numéro se compose automatiquement.
- Pour terminer la communication, appuyez une nouvelle fois sur la touche
ou reposez le combiné sur la base.
Vous pouvez aussi d’abord appuyer sur la touche et composer votre
numéro, mais la touche sera inefficace.
Depuis le journal des appels :
Si vous êtes abonné au service “Présentation du numéro” chez votre
opérateur, vous avez la possibilité de rappeler un correspondant dont le numéro
est encore dans le journal des appels entrants.
Votre téléphone enregistre automatiquement les 10 derniers numéros d’appel
Quand le journal est plein, le numéro le plus ancien est remplacé par le numéro
le plus récent .
Pour rappeler un correspondant depuis le journal des appels :
- Appuyez sur la touche .
- Utilisez les touches et pour sélectionner le numéro ( ou le nom si
connu) .Un appui sur la touche permet de voir le numéro si le nom était
affiché, un 2ème appui permet de visualiser la date et l’heure de son appel. En
fin de liste 2 bip retentissent.
- Appuyez sur la touche , le numéro se compose
Pour quitter avant l’envoi : appuyez à nouveau sur la touche .
40
Page 41

UTILISA TION DU TELEPHONE
2 - REPONDRE A UN APPEL
Lorsque votre téléphone sonne, pour répondre :
- Appuyez sur la touche pour prendre la ligne et parler.
- En fin de communication, appuyez une nouvelle fois sur la touche
ou reposez le combiné sur la base.
Affichage du nom et du numéro
Si vous êtes abonné au service “Présentation du numéro” chez votre
opérateur, alors le numéro de votre correspondant s’affichera.
Deux cas peuvent encore se présenter :
1) Vous êtes aussi abonné au service “Présentation du nom”, celui-ci
s’affichera en premier .
2) Vous n’êtes p as abonné au service “Présentation du nom”, mais votre
correspondant est enregistré dans un des répertoires avec son nom, celui-ci
apparaitra aussi.
Remarque : Si vous apercevez les symboles ******** cela signifie que
l’appelant ne désire pas être identifié.
3 - RAPPELER LE DERNIER NUMERO COMPOSE (BIS)
Vous pouvez afficher les 5 derniers numéros de téléphone que vous avez
composé et les rappeler.
- Appuyez sur la touche et déplacez-vous jusqu’au numéro de
téléphone souhaité à l’aide des touches ou .
- Appuyez sur la touche et le numéro se composera automatiquement.
: Quitter la fonction
: Supprimer le numéro affiché
41
Page 42

UTILISA TION DU TELEPHONE
4- EFFACER UN OU PLUSIEURS NUMEROS DU JOURNAL D’APPELS
A condition d’être abonné chez votre opérateur au service “Présentation du
numéro”, sinon le journal sera vide.
- Appuyez sur la touche .
- Sélectionnez le numéro souhaité en appuyant sur la touche ou
Deux bips retentissent quand vous arrivez en fin ou début de liste.
- Utilisez la touche pour effacer l’enregistrement souhaité.
- Répétez l’opération à partir de 2- pour un autre effacement, sinon quittez
en appuyant à nouveau sur la touche .
5 - RECHERCHE DU COMBINE (P AGINA TION)
Si vous avez égaré votre combiné, vous pouvez le localiser en le faisant sonner
à partir de la base ( s’il se situe dans le rayon d’action) :
- Appuyez sur la touche située sur la face avant de la base: tous les
combinés enregistrés sont appelés et sonnent.
- Appuyez deux fois sur la touche du combiné localisé pour désactiver
le mode pagination.
Vous obtiendrez le même résult at en appuyant une fois de plus sur la touche
de la base.
6 - MINUTERIE (DUREE DES APPELS)
Peu après le début d’une conversation téléphonique, une minuterie s’affiche
sur l’écran. Vous pouvez contrôler la durée de l’appel grâce à cette fonction.
Ce temps s’effacera automatiquement quelques secondes après avoir
raccroché .
42
Page 43

UTILISATION DU REPERTOIRE
Vous devez être abonné au service “Présentation du numéro” chez
votre opérateur, pour bénéficier des princip ales fonctions du répertoire
: affichage du nom, du numéro, mélodie différente
1 - DESCRIPTION
Vous pouvez enregistrer dans les 2 répertoires disponibles des noms et des
numéros de téléphone.
Le nom de votre correspondant appelant s’affichera si celui-ci est mémorisé
dans un des répertoires.
Chaque répertoire comporte 10 entrées maximum. Les noms sont classés
par ordre alphabétique.
Chaque nom peut comporter jusqu’à 10 caractères et chaque numéro de
téléphone peut comporter jusqu’à 25 chiffres.
2 - MELODIE AFFECTEE AU REPERTOIRE
Suivant le réglage que vous avez effectué ( Page 38) la mélodie pourra être
différente lors d’appels de correspondants figurant dans l’un des répertoires
- Mélodie d’appels provenant de personnes enregistrées dans le premier
répertoire
- Mélodie d’appels provenant de personnes enregistrées dans le deuxième
répertoire
Pour les appels de personnes non répertoriées :
- Mélodie d’appels généraux
IMPORT ANT :
Il peut arriver qu’un abonné souhaite que son appel reste anonyme ( affichage
de ******* au lieu du nom). Dans ce cas, même si celui-ci est enregistré dans
un répertoire, il sera impossible de le différencier par la mélodie qui lui aura
été attribuée, c’est la mélodie correspondant aux appels généraux qui sera
activée.
43
Page 44

UTILISATION DU REPERTOIRE
3 - ENREGISTREMENT D’UN NUMERO ET D’UN NOM
Votre téléphone dispose de 2 répertoires qui vous permettront de dif férencier
des groupes de personnes lors de leurs appels ( mélodie différente ).
Pour enregistrer un numéro et un nom dans un des deux répertoires :
- Entrez le numéro de téléphone souhaité.
- Sélectionnez l’un des deux répertoires en appuyant sur la touche ou
- Entrez le nom correspondant au numéro. Appuyez sur la touche correspondant
à la lettre désirée une ou plusieurs fois jusqu’à ce que celle souhaitée
apparaisse. Utilisez le tableau suivant pour vous aider .
LE NOM EST OBLIGA TOIRE
Touche Lettre/symbole
1 [espace] - 1
2 A B C 2
3 D E F 3
4 G H I 4
5 J K L 5
6 M N O 6
7 P Q R S 7
8 T U V 8
9 W X Y Z 9
00
* ou # pour valider le caractère précédent et passer à un autre, ou
attendre 2 à 3 secondes.
Exemple: pour entrer A B tapez A * B
4 - Appuyez sur la touche pour enregistrer l’entrée.
Remarque : Pour sortir du menu, appuyez et maintenez la touche
jusqu’à disparition de l’icône clignotante.
.
44
Page 45

UTILISATION DU REPERTOIRE
4 - APPELER EN UTILISANT LE REPERTOIRE
Permet d’appeler votre correspondant à partir d’un nom et d’un numéro que
vous avez enregistré dans un des répertoires.
- Sélectionnez le répertoire en appuyant sur la touche ou .
- A l’aide des touches ou sélectionnez le nom dans la liste.
- Appuyez sur la touche : le numéro affecté au nom se compose.
Remarque : Pour quitter le répertoire avant l’envoi appuyez de nouveau sur
la touche ou .
5 - MODIFIER UN NUMERO DU REPERTOIRE
- Sélectionnez le répertoire en appuyant sur la touche ou .
- Sélectionnez le numéro à modifier en appuyant sur la touche ou .
- Appuyez sur la touche .
- Effacez le numéro en appuyant succéssivement sur la touche ,
pour annuler l’opération à tout moment, appuyez sur la touche .
- Entrez le nouveau numéro et appuyez sur la touche pour
enregistrer.
6 - EFFACER UN NOM DU REPERTOIRE ET SON NUMERO
- Sélectionnez le répertoire en appuyant sur la touche ou .
- Sélectionnez le nom en appuyant sur la touche ou .
- Appuyez sur la touche ( pour voir le numéro ).
- Appuyez sur la touche pour effacer l’inscription.
- OK ? : appuyez sur la touche pour valider, sinon appuyez sur
une touche de 0 à 9 pour annuler l’opération.
- Si OK ? validé appuyer à nouveau sur la touche ou . pour
quitter
45
Page 46

UTILISA TION DU REPERTOIRE
7 - TRANSFERT DE NUMEROS DU JOURNAL D’APPELS VERS LE
REPERTOIRE
- Appuyez sur la touche .
- Sélectionnez le numéro à transférer en appuyant sur la touche ou
deux bips brefs retentissent quand vous arrivez en fin de liste.
- Sélectionnez le répertoire dans lequel vous voulez enregistrer le numéro
en appuyant sur la touche ou .
- Entrez le nom correspondant (voir tableau d’explication page 45).
- Appuyez sur la touche pour confirmer l’enregistrement.
NOTE : Même si vous êtes abonné au service “Présentation du nom”, vous
devrez entrer à nouveau le nom manuellement.
TEL. SERVICE APRES VENTE :
03 28 58 75 99
Pour tout renseignement technique ou toute
commande visitez notre site web sur
www.geemarc.com.
Parc de l’Etoile
2, rue Galilée
59760 Grande Synthe
46
Page 47

REPONDEUR TELEPHONIQUE
1 - PROGRAMMATION DU REPONDEUR
Accédez au menu en appuyant sur la touche puis sur la touche
l’icône est affichée en haut à gauche Pour mettre à jour les paramètres
du répondeur, utilisez le t ableau suivant, appuyez sur la touche OK pour passer
d’une fonction à une autre, utilisez les touches ou pour la selection :
Numéro Fonctions programmables Sélection Par
Fonction Defaut
1/5 Modification du jour Liste : 1 (Lundi) à 7 1
(Dimanche)
2/5 Modification de l’heure de 00:00 à 23:59 00:00
3/5 Sélection nombre de Liste: 2,3,4,5, toll saver Toll
sonneries saver
4/5 Modification du code de 0000 à 9999 1111
de contrôle à distance
5/5 Modification de la qualité Liste:
d’enregistrement du ****A (Qualité élevée) A
répondeur ****B (Qualité standard)
Code de contrôle à distance : C’est un code confidentiel qui vous permettra
d’activer/desactiver le répondeur ou lire vos messages à partir d’un autre
téléphone distant.
T oll Saver : Lorsque vous consultez votre répondeur à distance, cette fonction
permet qu’il se déclenche après 3 sonneries au lieu de 5 dans le cas ou
vous avez reçu de nouveaux messages .
Présentation des icônes du répondeur:
- Icône du répondeur , elle est affichée a l’écran lorsqu’il est activé.
- Icône de message ou mémo , clignote lorsque vous avez reçu un
message .
47
Page 48

REPONDEUR TELEPHONIQUE
2 - UTILISATION DU REPONDEUR
Le téléphone peut enregistrer jusqu’à 4 mins et 40 secs de messages en
qualité élevée ou 7 minutes en qualité standard (voir la programmation du
répondeur pour changer la qualité d’enregistrement). Lorsque vous avez un
nouveau message ( non lu ), l’indicateur lumineux rouge clignote, ainsi que
l’icône message.
A TTENTION : Effacez périodiquement vos messages car une fois la boite
pleine les plus anciens seront effacés pour laisser place aux nouveaux
Des appuis succésifs sur la touche située derrière le combiné feront
passer du mode haut-parleur en mode écouteur et vice versa.
Note : Le contrôle de tonalité ne fonctionne qu’en mode écouteur
Accéder ou sortir du répondeur :
Appuyez sur la touche localisée sur le côté droit de votre téléphone pour
accéder au répondeur. Le nombre de messages, le jour de la semaine et
l’heure de réception seront affichés à l’écran. Le répondeur va prononcer le
nombre de nouveaux ou anciens messages reçus et les lire.
Appuyez sur la touche pour stopper la lecture.
Appuyez sur la touche pour quitter le mode répondeur .
Activer le répondeur :
- Appuyez sur la touche localisée sur le côté droit de votre téléphone.
- Appuyez sur la touche
- Appuyez sur la touche , l’icône apparait .
Desactiver le répondeur :
- Appuyez sur la touche localisée sur le côté droit de votre téléphone.
- Appuyez sur la touche
- Appuyez sur la touche , l’icône disparait .
48
Page 49

REPONDEUR TELEPHONIQUE
Enregistrer un message d’accueil :
Un message d’accueil standard est pré-enregistré en usine. Vous pouvez
l’écouter en appuyant sur la touche puis sur la touche . Si vous
désirez changer ( personnaliser ) ce message, procédez comme suit :
- Appuyez sur la touche ( mode répondeur )
- Appuyez sur la touche puis sur la touche , un bip sonore est émis.
- Enregistrez votre message ( max 2 minutes ) .
- Appuyez sur la touche pour stopper l’enregistrement, un second bip
est émis, votre annonnce est ensuite lue.
- Quittez le mode répondeur en appuyant à nouveau sur la touche
Enregistrer un mémo :
Cette fonction permet de laisser un message chez vous par le biais du
répondeur. Pour ce faire effectuez les opérations ci-dessous :
- Appuyez sur la touche ( mode répondeur ) .
- Appuyez sur la touche puis sur la touche , un bip sonore est émis.
- Enregistrez le message que vous desirez laisser ( max 2 minutes ) .
- Appuyez sur la touche pour stopper l’enregistrement, un second bip
est émis.
- Quittez le mode répondeur en appuyant à nouveau sur la touche
Lire les messages :
- Appuyez sur la touche , les messages sont lus ( le voyant rouge
s’éteindra en fin de lecture ).
- Appui sur la touche : Retour au début du message en cours de lecture
- Appui sur la touche : Accéder au début du message suivant
- Appui sur la touche : Retour au début du 1er message
- Appui sur la touche : Arrêt de la lecture
- Appuyez sur la touche pour quitter le mode répondeur .
49
Page 50

REPONDEUR TELEPHONIQUE
Effacer un message:
Pour effacer un message, appuyez sur la touche pendant sa lecture, un
bip sera émis pour confirmer l’effacement .
Effacer tous les messages:
Pour effacer tous les messages, appuyez et maintenez la touche
pendant que le répondeur annonce le nombre de messages reçus, 00 sera
affiché sur l’écran et un bip sonore sera émis pour confirmer .
3 - ACTIVER-DESACTIVER LE REPONDEUR A DIST ANCE
Il se peut que vous ayez oublié d’activer votre répondeur avant de partir, ou
alors de vouloir le désactiver. V ous pouvez accéder à votre répondeur à
distance par un simple appel téléphonique.
Le code d’accès (RC code) est pré-programmé en usine par défaut à “1 111”.
Pour changer ce code, reportez vous à “Programmation du répondeur” page 48
Activer le répondeur à distance:
Pour l’activer à distance à partir d’un autre poste de téléphone, procédez comme
ci-dessous :
- Composez votre numéro de téléphone.
- Après 9 sonneries, appuyez sur la touche .
- Entrez le code RC (1 1 1 1 ou votre nouveau code ).
- Appuyez sur la touche 7 : votre répondeur est activé .
Désactiver le répondeur à distance:
Pour désactiver votre répondeur à distance à partir d’ un autre téléphone,
procédez comme ci-dessous :
- Composez votre numéro de téléphone.
- Pendant la lecture du message d’accueil, appuyez sur la touche .
- Entrez le code RC (1 1 1 1 ou votre nouveau code ).
- Appuyez sur la touche 9 : votre répondeur est désactivé .
50
Page 51

REPONDEUR TELEPHONIQUE
4 - INTERROGER VOTRE REPONDEUR A DIST ANCE
Pour interroger à distance votre répondeur et écouter vos messages à partir
d’un autre téléphone procédez comme ci-après :
- Composez votre numéro de téléphone.
- Pendant la lecture du message d’accueil, appuyez sur la touche .
- Entrez le code RC (1 1 1 1 ou votre nouveau code) .
- Le répondeur annonce le nombre de messages reçus et les lit ( voir P50 : “lire
les messages” pour l’utilisation des touches de sélection des messages ).
Lorsque tous les messages ont été lus 2 “bip” retentissent .
- Pour quitter à tout moment , raccrochez le téléphone .
51
Page 52

COMBINES ADDITIONNELS
1 - GENERALITES
Avec le DECT 300 vous pouvez :
- Enregistrer jusqu’à 4 combinés sur une base.
- Enregistrer un combiné sur 2 bases au maximum.
- Réaliser des communications internes et transférer des communications
externes entre combinés enregistrés sur la même base.
- Augmenter le rayon d’action en utilisant 2 bases (transfert automatique vers
la prochaine station de base).
Le modèle de combiné additionnel sera sans la fonction répondeur, celle-ci
n’est opérationnelle que sur le combiné principal affecté à la base.
2 - UTILISA TION DE PLUSIEURS COMBINES ( enregistrements )
L’utilisation de plusieurs combinés vous permettra de ne pas toujours vous
déplacer avec le même , ceux-ci pouvant être disposés à des endroits bien
précis .
Vous pourrez réaliser des appels internes ( entre combinés ), transférer un
appel entrant à un autre combiné.
Tous les combinés que vous désirez utiliser doivent être enregistrés sur la
base, pour chaque combiné à enregistrer procédez comme ci-dessous :
- Débranchez la base du secteur pendant quelques secondes.
- Rebranchez.
Le symbole doit clignoter
- Appuyez sur la touche .
- Appuyez sur la touche ou pour sélectionner sur l’écran l’icône
, celle-ci clignote, appuyez alors sur la touche pour confirmer
la sélection.
- Entrez le code PIN de l’unité de base (réglage usine : 1 1 11) et appuyez sur
la touche .
- Le processus d’enregistrement est alors en cours.
Le symbole devient fixe, votre combiné est bien enregistré et utilisable .
52
Page 53

COMBINES ADDITIONNELS
Remarque : Si vous utilisez plusieurs combinés sur une base, il est préférable
que celle-ci soit placée au milieu de sorte que la zone de couverture soit à peu
près la même pour tous les combinés.
3 - ANNULER L ’ENREGISTREMENT DES COMBINES ADDITIONNELS DE
LA BASE
L’opération décrite ci-dessous entrainera la désactivation de tous les combinés
supplémentaires affectés à la base ( hormis le principal ) :
- Appuyez sur la touche .
- Utilisez les touches et
- Entrez le code PIN de l’unité de base (réglage usine : 1 1 11) et appuyez sur
la touche .
Vous pouvez vérifier en remarquant que sur chaque combiné le symbole a
disparu.
4 - COMMUNICA TIONS INTERNES
Des communications internes peuvent être réalisées entre les différents
combinés enregistrés sur une même base. Pour cela, procédez comme suit :
- Appuyez sur la touche .
- Tous les combinés sonnent.
- Appuyez sur la touche d’un des combinés pour répondre à l’appel.
Si un appel externe arrive pendant qu’une communication interne est en cours,
un signal retentit. Il vous faut interrompre la communication interne pour recevoir
l’appel externe.
Remarque : Vous ne pouvez pas transférer un appel externe vers un combiné
qui n’est pas enregistré sur la même base.
53
Page 54

COMBINES ADDITIONNELS
5 - TRANSFERT D’APPEL
Vous pouvez transférer des appels externes d’un combiné à un autre (les deux
combinés doivent être enregistrés sur la même base).
Lors d’un appel entrant :
- Appuyez sur la touche pour recevoir l’appel.
- Utilisez la touche pour transférer l’appel.
- Les autres combinés sonnent.
- Appuyez sur la touche du combiné désiré pour recevoir l’appel transféré.
T ant que celui qui a pris l’appel le premier n’appuie p as sur la touche
la communication reste établie en interne, pendant ce temps l’appelant entend
une mélodie d’attente .
Soit vous validez le transfert en appuyant sur la touche
(raccrochage) , soit vous reprenez la ligne en appuyant sur la touche
6 - OPTION CASQUE- BOUCLE MAGNETIQUE
Si vous le désirez, vous pouvez connecter un casque Ref: HEADCL_BLK
( CLA3) ou une boucle magnétique Ref : CLA7 sur la prise jack 2.5mm de
votre téléphone localisée sous le combiné ( Voir Pg 6 description) . A vec
ces accéssoires, vous pouvez utiliser les mêmes fonctions décrites dans la
notice.
Pour répondre à un appel, appuyez sur la touche pour prendre la
ligne et appuyez une seconde fois à la fin de la communication pour libérer
la ligne.
54
Page 55

BASE ADDITIONNELLE
1 - GENERALITES
Il est possible d’étendre le rayon d’action du téléphone en raccordant une
base suppléméntaire au système. Lorsqu’un combiné enregistré sur plusieurs
bases se trouve hors du rayon d’action de l’une d’entre elles, une recherche
automatique se fera pour trouver la base la plus proche et conserver le contact
téléphonique.
Le transfert d’une base à une autre se fait automatiquement mais ne fonctionne
pas pendant une communication en cours.
Les zones de couverture des bases doivent se recouper afin de garantir un
rayon d’action sans interruption, sinon le contact radio pourra être rompu.
2 - AJOUTER UNE BASE SUPPLEMENT AIRE
- Connectez le cordon de la base sur une deuxième prise PTT .
- Connectez l’adaptateur secteur .
- Procédez à l’enregistrement du combiné de la première base sur la seconde
base comme décrit dans le paragraphe “Utilisation de plusieurs combinés”
( P. 53) .
Remarque: le combiné de la première base reste prioritaire sur sa base
d’origine.
Le combiné deviendra actif sur la deuxième base lors du passage de la base
une vers la base deux et vice versa ( changement de rayon d’action).
Pour vérifier si les combinés sont bien enregistrés à la base, appuyez
simplement sur le bouton de la nouvelle base, tous les nouveaux
combinés enregistrés sur cette base sonneront dans leur rayon d’action
respectif.
IMPORTANT: Si vous connectez deux bases sur la même ligne, les
combinés enregistrés sur la base additionnelle continueront de sonner
pendant quelques secondes même si vous décrochez avec un combiné
de la première base.
55
Page 56

EN CAS DE PROBLEME
PROBLEMES DE FONCTIONNEMENT
Le téléphone ne fonctionne pas ( rien à l’écran )
Vérifiez que les batteries sont bien positionnées dans leur logement et dans le
bon sens, placer le combiné sur la base ( branchée ) , le symbole doit
clignoter indiquant la charge .
Pas de tonalité
- Assurez-vous que le câble du téléphone n’est pas endommagé et qu’il est
correctement enfiché, et que ce soit celui livré avec l’appareil .
- Assurez-vous que les batteries sont bien chargées ( symbole ) .
- Vérifiez que le symbole est fixe, sinon voir P .53 enregistrement des
combinés .
- Connectez un autre téléphone sur votre prise téléphonique ou branchez votre
téléphone sur une autre prise pour vérifier si la défaillance provient de votre
poste ou de votre prise “France Télécom”.
Emission d’un signal d’alarme pendant la conversation
- Les batteries sont déchargées et le combiné doit être replacé sur la base.
- Vous quittez le champ d’action de la base, s’en rapprocher .
Aucun numéro ne s’affiche lorsque le téléphone sonne
- Vous n’êtes pas abonné au service France Télécom : “Présentation du numéro”
- L’appelant ne souhaite p as être identifié ****** ( numéro masqué ) .
Le répondeur ne fonctionne pas ou vous ne recevez pas de messages
- Vérifiez que celui-ci est activé (voir P. 48 )
- Vérifiez que votre message d’accueil est bien présent ( voir P . 49)
V ous avez perdu des messages
Votre boite vocale ét ait pleine et ensuite vous avez reçu de nouveaux messages
Les messages les plus anciens ont été effacés automatiquement pour laisser
de la place.
Effacez périodiquement vos anciens messages
56
Page 57

EN CAS DE PROBLEME
REINITIALISER VOTRE DECT300 AUX P ARAMETRES USINE
Cela ne ré-initialise que les paramètres du combiné
Dans le cas de dysfonctionnement, ou si vous avez oubliez un code que vous
avez modifié, il est possible de ré-initialiser votre téléphone. Pour se faire :
- Retirer une batterie
- Appuyer sur la touche
- Remettre la batterie ( sans relacher la touche )
- Relâcher la touche
- Entrez le code : # 7 3 3 7 #
Votre téléphone a retrouvé ses p aramètres d’origine usine .
Vous percevez des parasites ou interférences pendant vos
communications:
Assurez vous que la base n’est pas située près d’un appareil qui rayonne
comme PC, TV, moniteurs, radio. Ecartez la de quelques mètres
57
Page 58

GARANTIE - NORMES
GARANTIE
Cet appareil est garanti 1 an pièces et main-d'oeuvre. La date d'achat figurant
sur le ticket de caisse fera foi. Cette garantie s'exerce sous réserve d'une
utilisation normale de l'appareil. Les dommages occasionnés par les surtensions électriques, la foudre ou par un choc sur l'appareil ne peuvent en aucun
cas être couverts par la garantie. En cas de problème fonctionnel et avant de
nous retourner votre appareil, contactez notre service après vente de : 8h30 à
12h30 et de 14h00 à 17h00 du Lundi au Jeudi et de 8h30 à 12h30 et de 14h00
à 16h30 le Vendredi.
TEL. SERVICE APRES VENTE :
03 28 58 75 99
Parc de l’Etoile
2, rue Galilée
59760 Grande Synthe
Raccordement électrique : l’appareil est prévu pour fonctionner uniquement
avec l’adaptateur secteur 230V 50Hz fourni. (Tension classée “dangereuse”
selon les critères de la norme EN60950).Par précaution en cas de danger, le
bloc alimentation secteur sert de dispositif de sectionnement de l’alimentation
230V . Il doit être installé à proximité du matériel et être aisément accessible.
Raccordement téléphonique : les tensions présentes sur ce réseau sont
classées TRT -3 (Tension de Réseau de Télécommunication) au sens de la
norme EN60950.
Ce produit respecte les exigences de compatibilité électro-magnétique et de
sécurité électrique demandées par la directive européenne RTTE.Par ailleurs,
il est compatible avec les différents réseaux téléphoniques européens (normes TBR21/37/38).Le fonctionnement de l’appareil n’est pas garanti si le courant de ligne est inférieur à 18 mA.
UGDECT300ED03
58
 Loading...