

Page 1
SCREENPHONE
English
Page 2

1
CONTENTS 1
INTRODUCTION 3
Unpacking the Telephone 4
DESCRIPTION 5
General Description 5
INSTALLATION 12
Connection/Setting Up 12
Wall Mounting 14
Desktop 14
SETTINGS 15
Ringer and Alert Setting 15
LCD Screen Settings 15
Amplify 16
MainText Font Size Adjustment 17
Message Waiting 18
USING THE TELEPHONE 19
Making a Call 20
Receiving a Call 23
Text Only Calls 26
Alernative Dialling 30
Call Time Counter 30
Last Number Redial 30
Mute Function 31
R, * and Hash Keys 31
Emergency Button 31
Receive Volume and Tone Adjustment 32
Standby Mode 34
ANSWERPHONE 35
Turning on the Answerphone 35
Viewing Answerphone Messages 36
CONTENTS
Page 3

2
Saving Answerphone Messages 37
Deleting Answerphone Messages 38
CALLER DISPLAY 39
Viewing the Call Log 41
Saving a Call Log Record 42
Deleting a Call Log Record 43
Dialling a Number from a Call Log Record 44
Store a Number from a Call Log Record 46
PHONEBOOK 50
Create a Quick Dial Entry 50
Create a Phonebook Entry 53
Edit a Quick Dial or Phonebook Entry 55
Delete a Quick Dial or Phonebook Entry 56
Dial a Quick Dial or Phonebook Entry 57
FACTORY DEFAULT 58
Restore to Factory Default 58
OPTIONAL ACCESSORIES 59
Headset Option 59
Keyboard 59
TROUBLESHOOTING 60
SAFETY INFORMATION 61
GUARANTEE 62
RECYCLING DIRECTIVES 63
WALL MOUNTING TEMPLATE 64
CONTENTS
Page 4

3
Congratulations on purchasing your Geemarc SCREENPHONE
telephone.
This telephone allows hard of hearing people to communicate with
other people via the telephone network with the assistance of a
Text Relay operator. You can use this phone to speak directly to
the other caller, while reading their response as text on the screen.
The telephone functions as a standard telephone with features such as a
phone book and caller display* together with extra features such as receive
amplification and tone adjustment to meet a range of hearing requirements.
It is important that you read the instructions below in order to use
your Geemarc telephone to its full potential. Keep this user guide
in a safe place for future reference.
This guide explains how to use the following telephone:
SCREENPHONE
*To use the caller display facility, you must subscribe to your
network provider’s caller display service.
INTRODUCTION
Page 5

4
Unpacking the Telephone
When unpacking the telephone, you should find the following in
the box:
• 1 SCREENPHONE unit
• 1 SCREENPHONE handset
• 1 handset curly cord
• 1 Telephone line cord
• 1 Mains power adaptor
• 1 User Guide
• 1 Quick Guide
NOTE: The telephone lead supplied must be used and the
ScreenPhone cannot be used with the 1571 service.
Action on Hearing Loss
1 Haddonbrook Business Centre
Fallodan Road
Orton Southgate
Peterborough
PE2 6YX
Telephone 01733 361199
Textphone 01733 238020
www.actiononhearingloss.org.uk/shop
solutions@hearingloss.org.uk
INTRODUCTION
Page 6
5
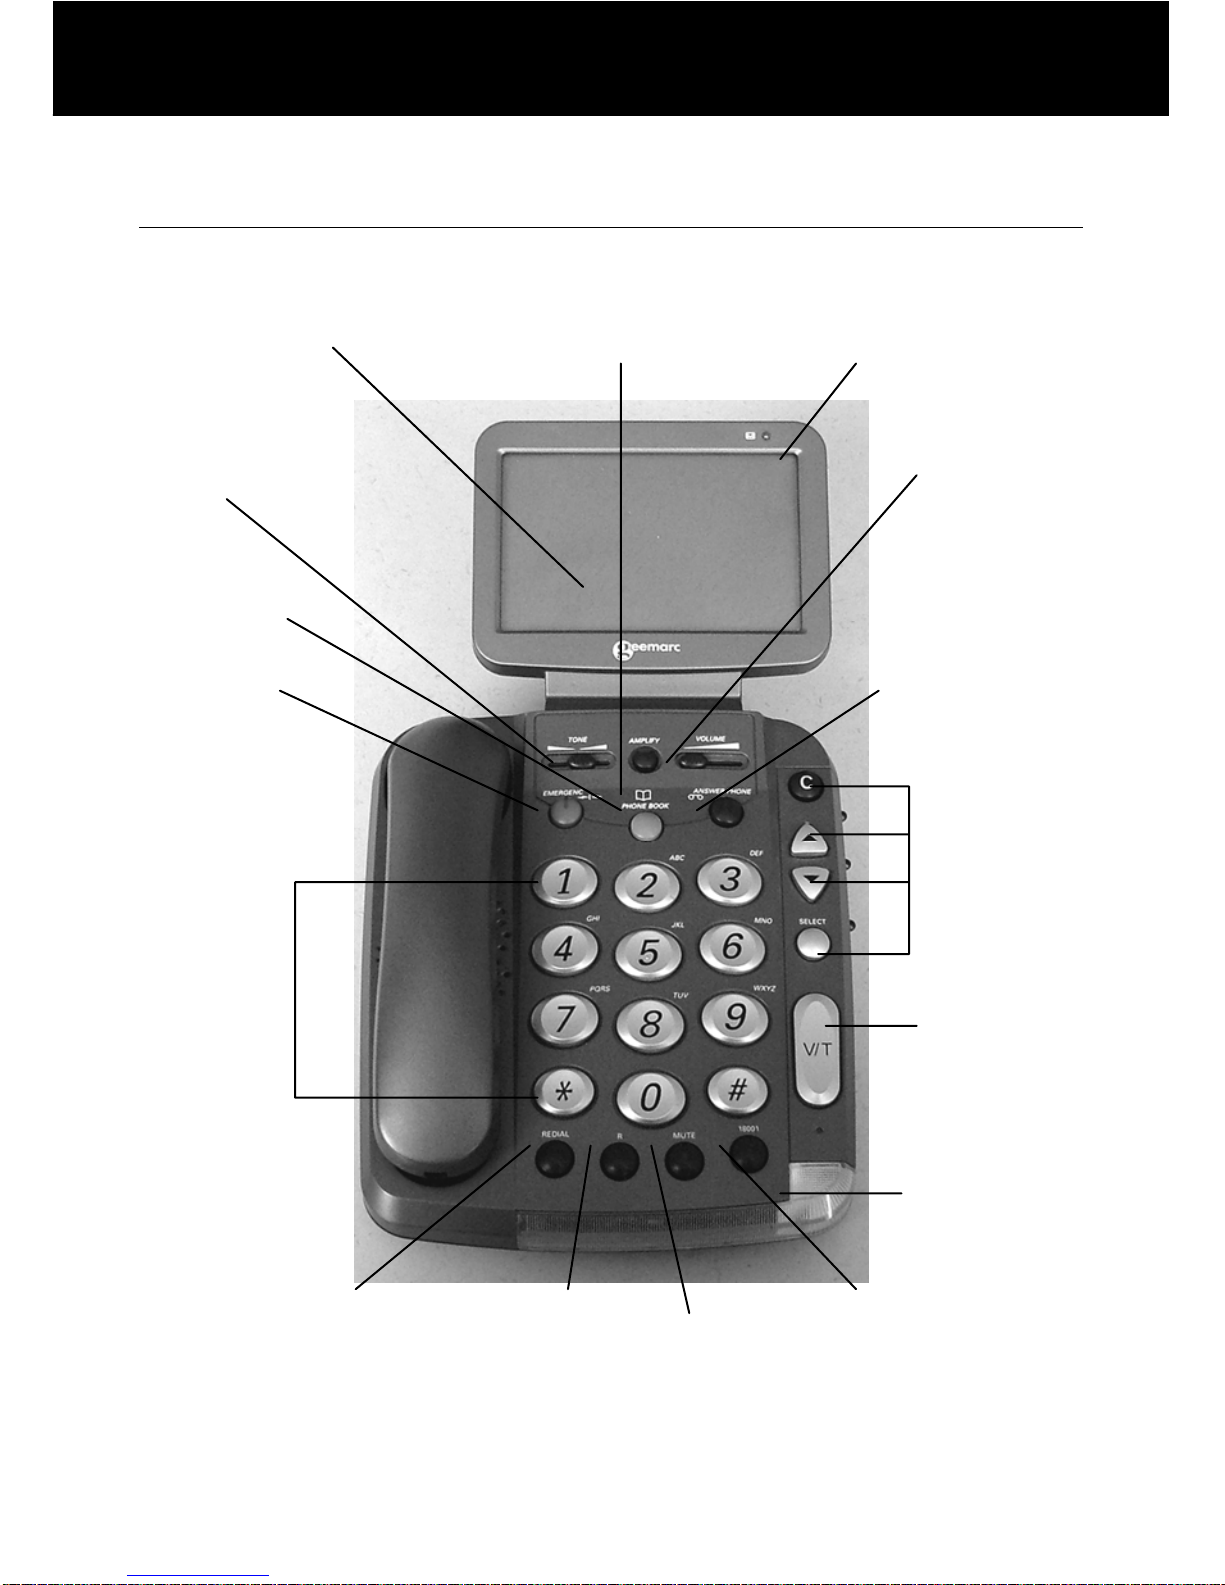
General Description
Front Description
Volume
Adjustment
for Incoming
Calls
Additional
Amp
lify Key
Phonebook
New Message
Indicator
Time Break
Recall
Mute
Quick Dial for
Typetalk
Service
Screen
Navigation
Keys
Mode Key
Voice/T ext
Flashing
Incoming Call
Indicator
(strobe light)
Tone
Adjustment
for Incoming
Calls
Emergency
Key
Last Number
Redial
Answer
Phone
Numerical
Keypad
LCD Display
DESCRIPTION
Page 7
6
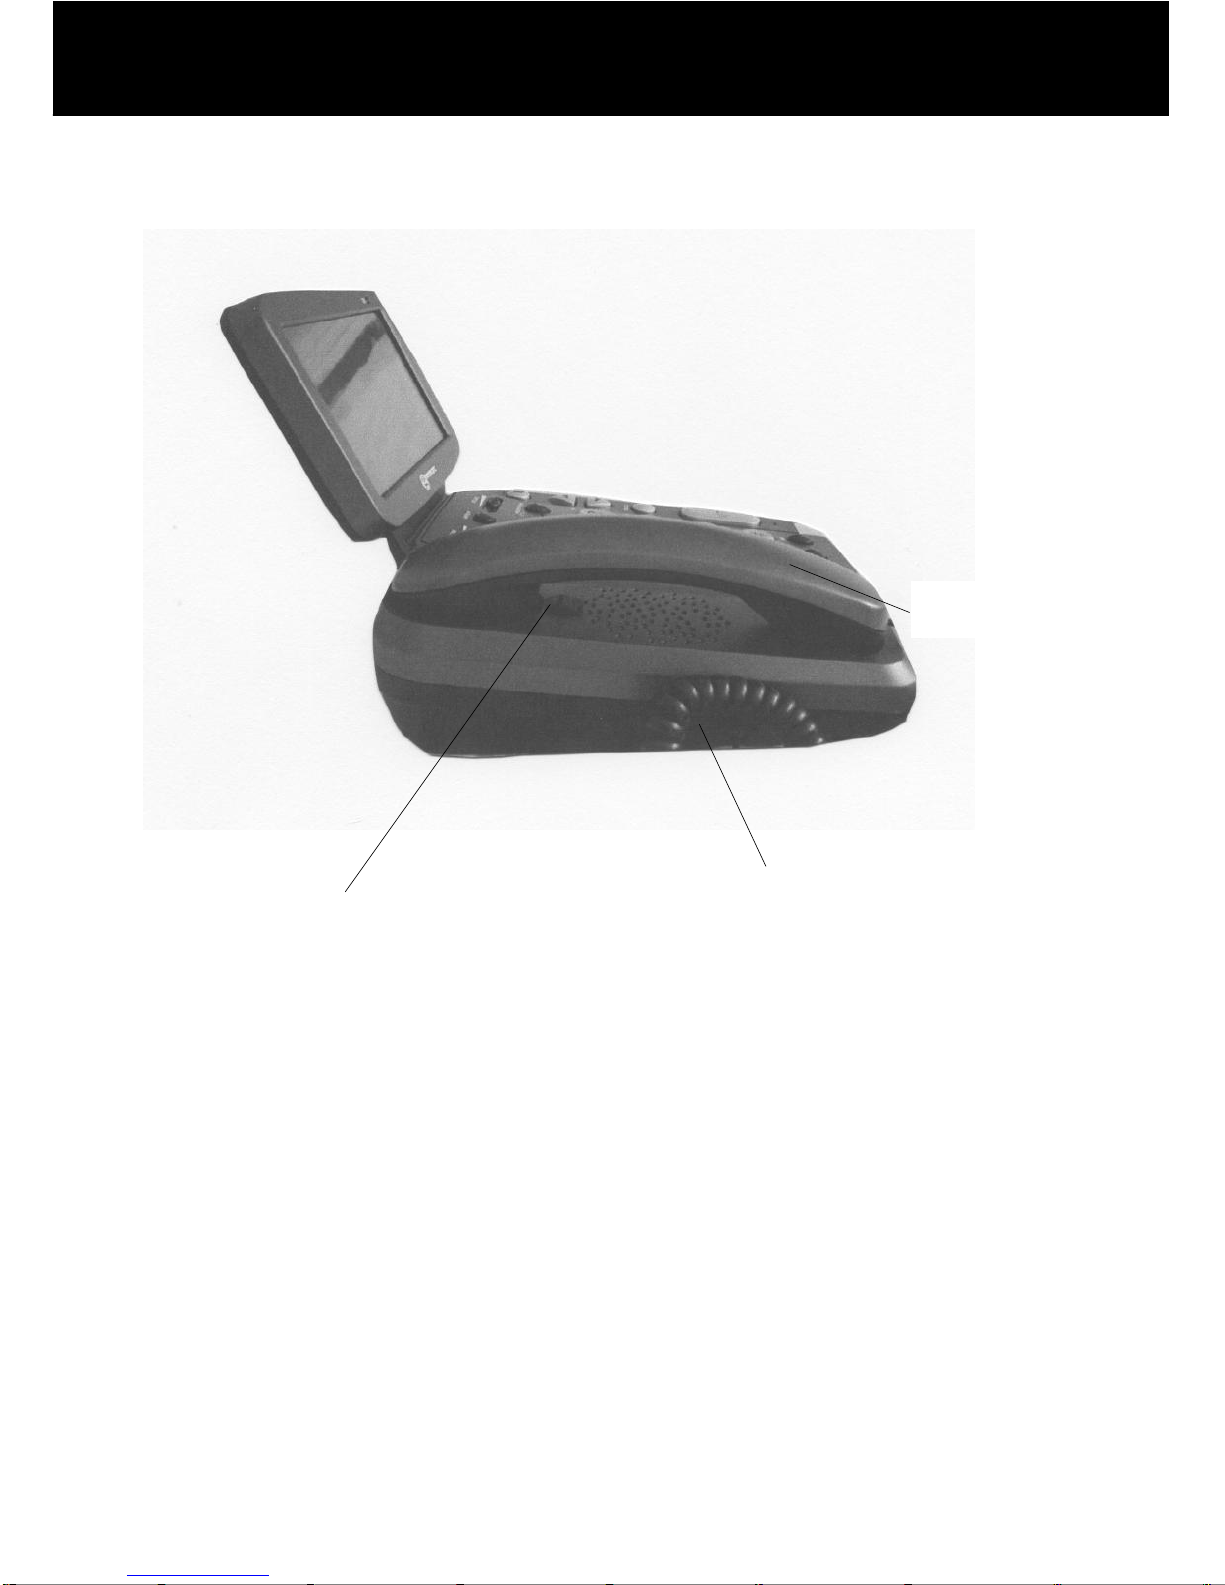
Left Side Description
Handset cord
Handset clip for
wall mounting
Handset cord
socket
DESCRIPTION
Page 8
7
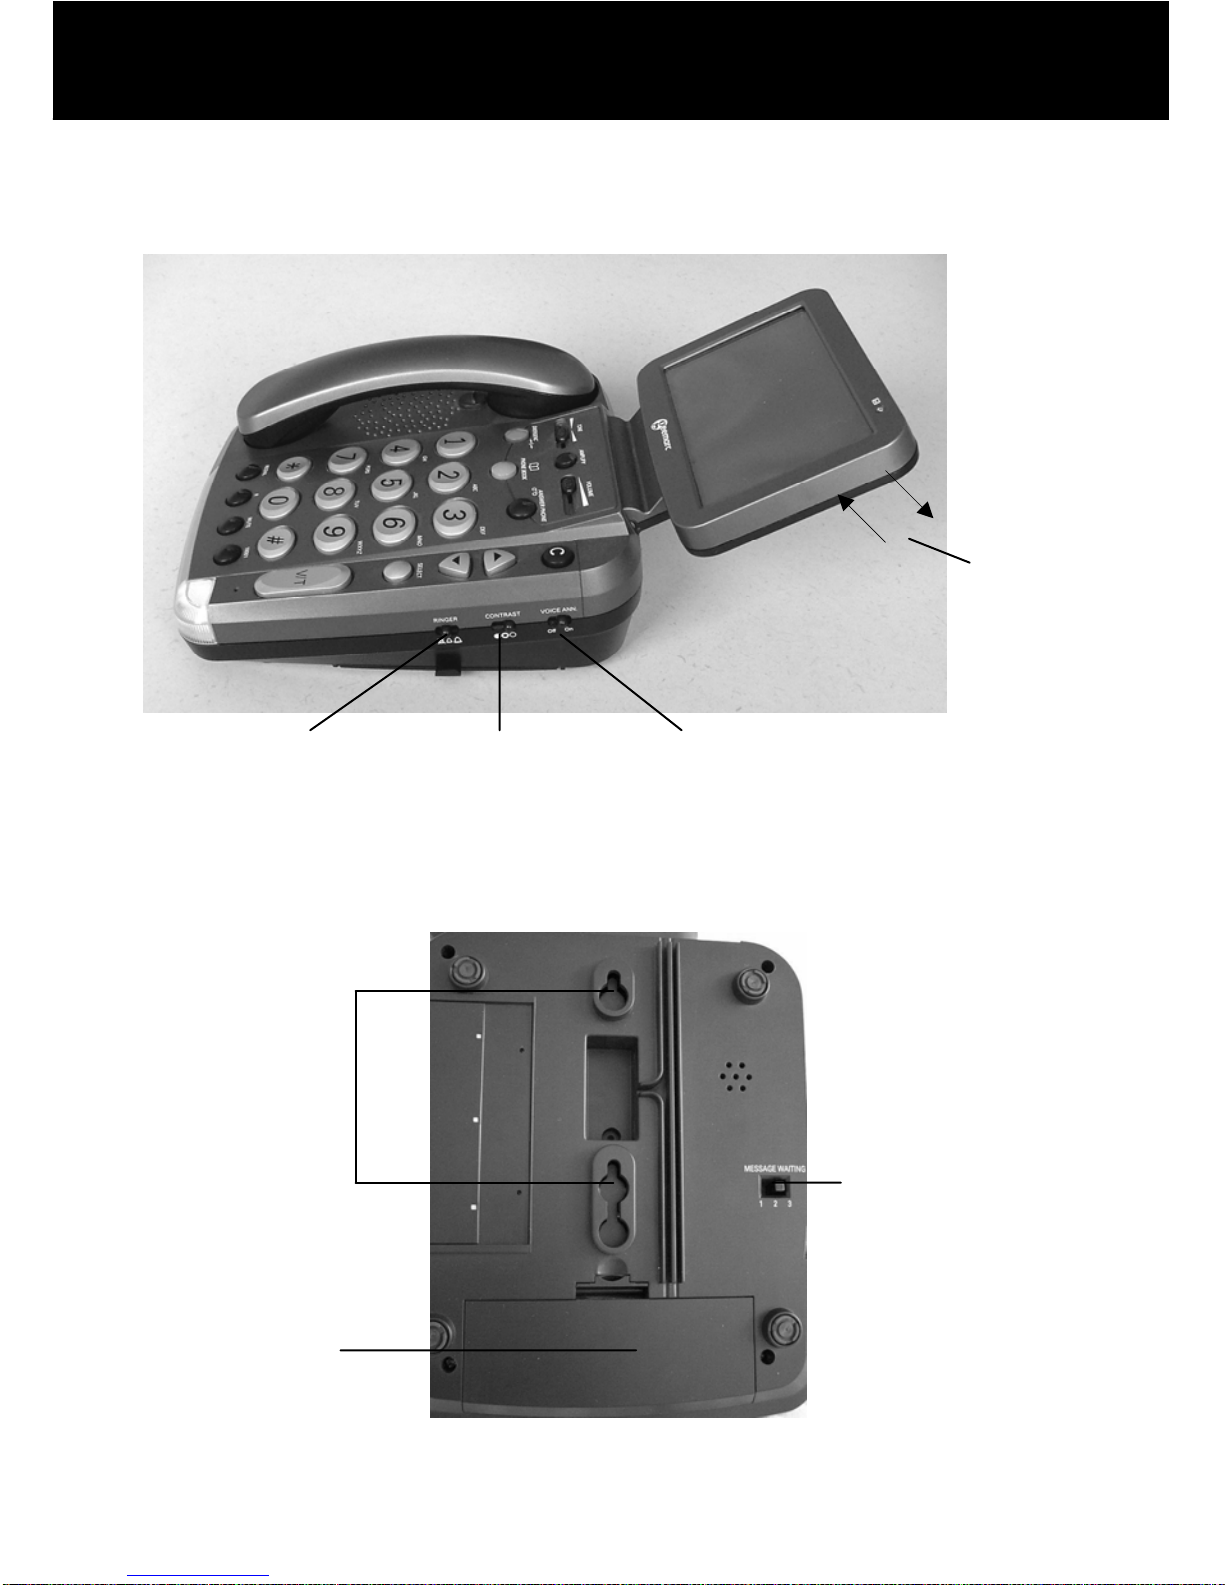
Right Side Description
Base Description
Validation Key
Ringer Level
Adj
ustment
Screen Contrast
Adj
ustment
V oice Announcement
Switch
Screen
Tilt
Message
Waiting
Setting
Battery
Compartment
Cover
Wall Mounting
Holes
DESCRIPTION
Page 9

8
Rear Description
* Classified TNV-3 according to EN60950 standard
** Classified “hazardous voltage” according to EN60950
standard
Keyboard
Socket
Headset Socket
Strobe
Switch
Amplify Switch
Mains Adaptor
Socket**
Line Cord
Socket*
DESCRIPTION
Page 10

9
LCD Screen Display
The LCD screen is divided into three areas, please see illustration
below:
The main area is for displaying text when the telephone is being
used in text mode. It is also used for displaying the following:
• number being dialled
• call log
• menu system
• phone book
• answer phone typed messages
The comment area displays help text to guide you through all
operations you may need to perform.
The icon area displays the various system icons.
Please be aware, the comment area font sizes and icon sizes are
fixed. However, the main area font size is fully adjustable.
Please refer to Main Text Font Size Adjustment in the SETTINGS
chapter.
Connecting
Press V/T to talk
TEXT
Hello it’s Tom, who is this
speaking? GA
OK, I will bring the books and I
will see you tomorrow
lunchtime at the restaurant.
GA
Main Area
Icon Area
Comment
Area
DESCRIPTION
Page 11
10
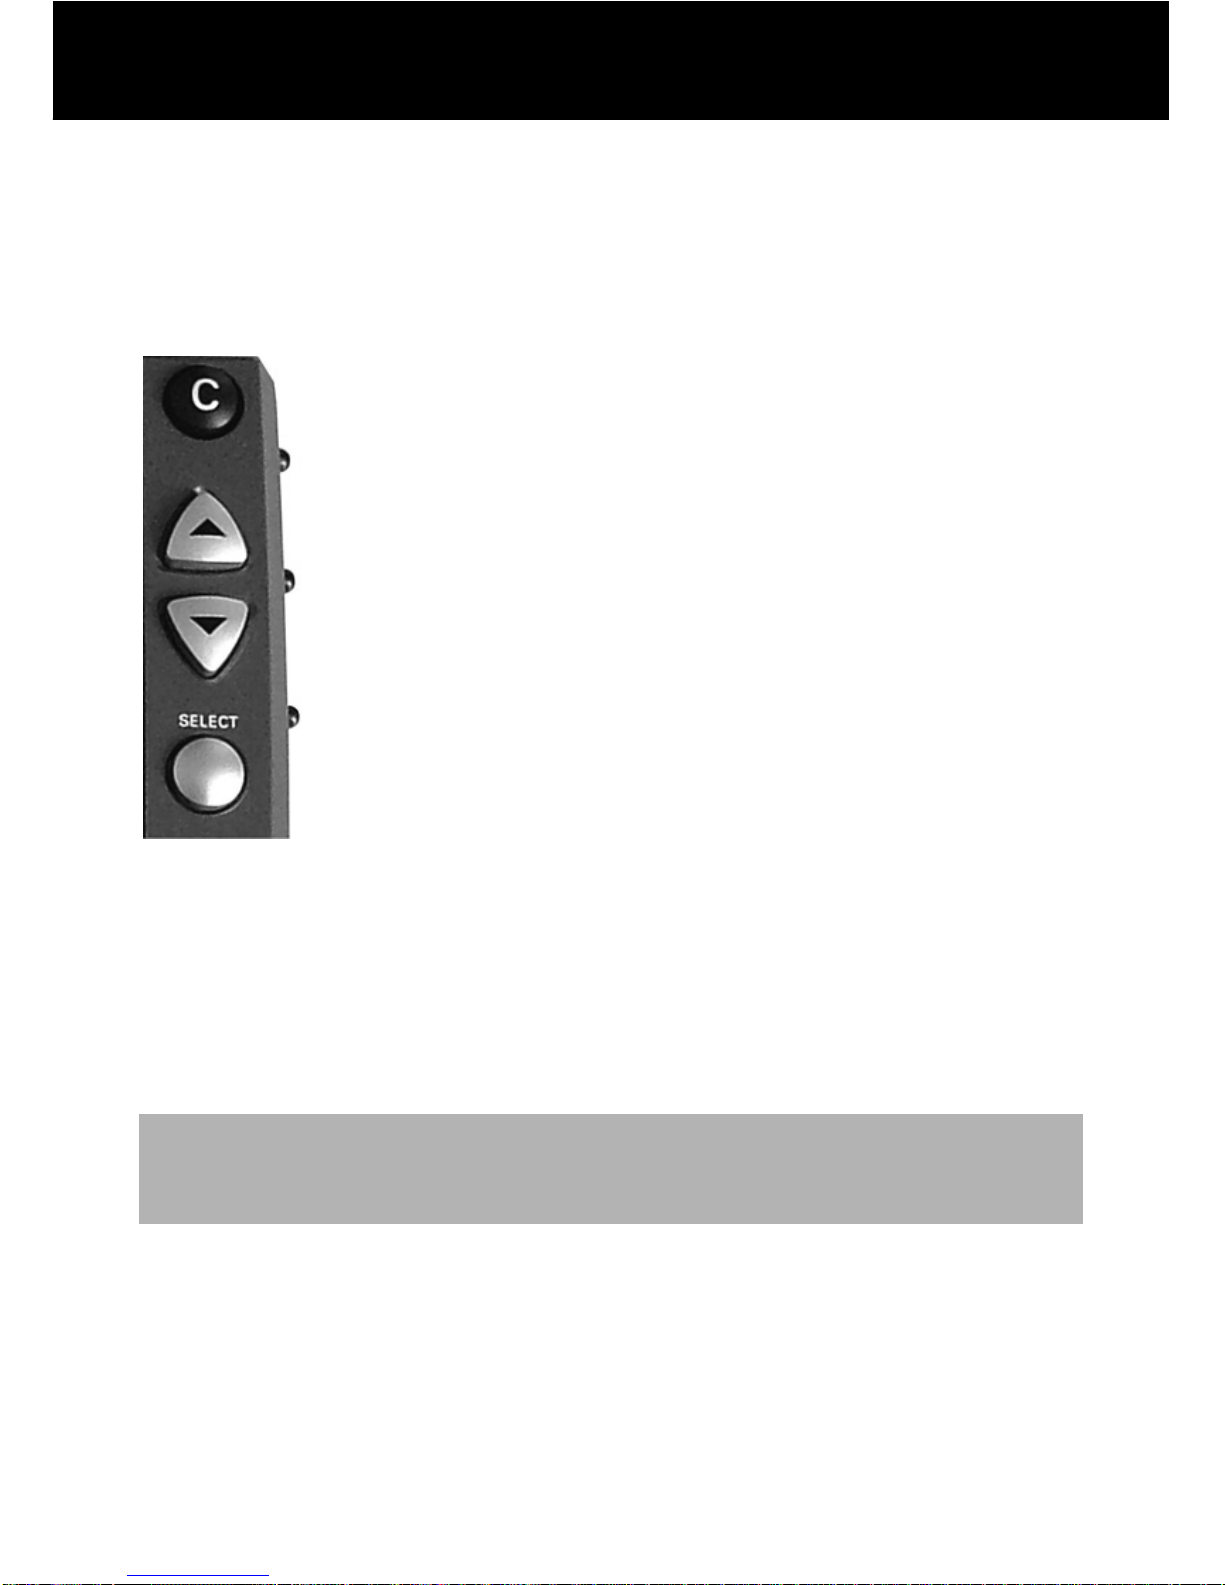
Screen Navigation
The buttons on the righthand side of the phone are
used to navigate through screen menus.
The S and T keys are used to scroll through the
menu.
S: move backward through the menu
T : move forward through the menu
The SELECT key is used to confirm an action or
select a menu item.
The C key is used to cancel an action/entry.
If you press C from any menu (except whilst in
number input mode), the telephone returns to the
previous screen.
If you press and hold C for 2 seconds from any menu (except
whilst in number input mode), the telephone returns to standby
mode.
The telephone will automatically return to standby mode from any
menu if no button is pressed for 30 seconds.
NOTE:
The SCREENPHONE menu system cannot be accessed during a
voice or text call
DESCRIPTION
Page 12

11
Icons on your screen display
All the icons below are displayed in the ‘Icon Area’ (bottom right
hand corner) on the screen.
TEXT
This shows that the the telephone is in text mode
VOICE
This shows that the the telephone is in voice mode
Note: The phone can only be in one mode at any time.
Mute is activated
One or more voice messages have been received (relayed to text).
When the telephone is operating under battery power, the full icon
is shown if the battery is full. If the battery is starting to run down,
only the outline and the lower square is shown. It will be soon be
time to install some new batteries
When the telephone is operating under AC power and the
batteries are flat or not installed, only the outline of the battery is
shown flashing. It is time to install some new batteries.
When the telephone is operating under AC power, with back up
batteries inserted, no battery icon will be displayed.
DESCRIPTION
Page 13
12
Connecting/Setting Up
Connect the handset cord. Insert one end of the cord into the
handset, the other into the telephone base – left side.
Open the battery compartment.
Insert 4 good quality alkaline batteries (AA size, 1.5V type, not
supplied) into the battery compartment located on the base of the
telephone.
Replace the battery cover.
Note: Do not use rechargeable batteries. Do not put batteries
into the household rubbish, pay attention to battery regulations
regarding battery disposal.
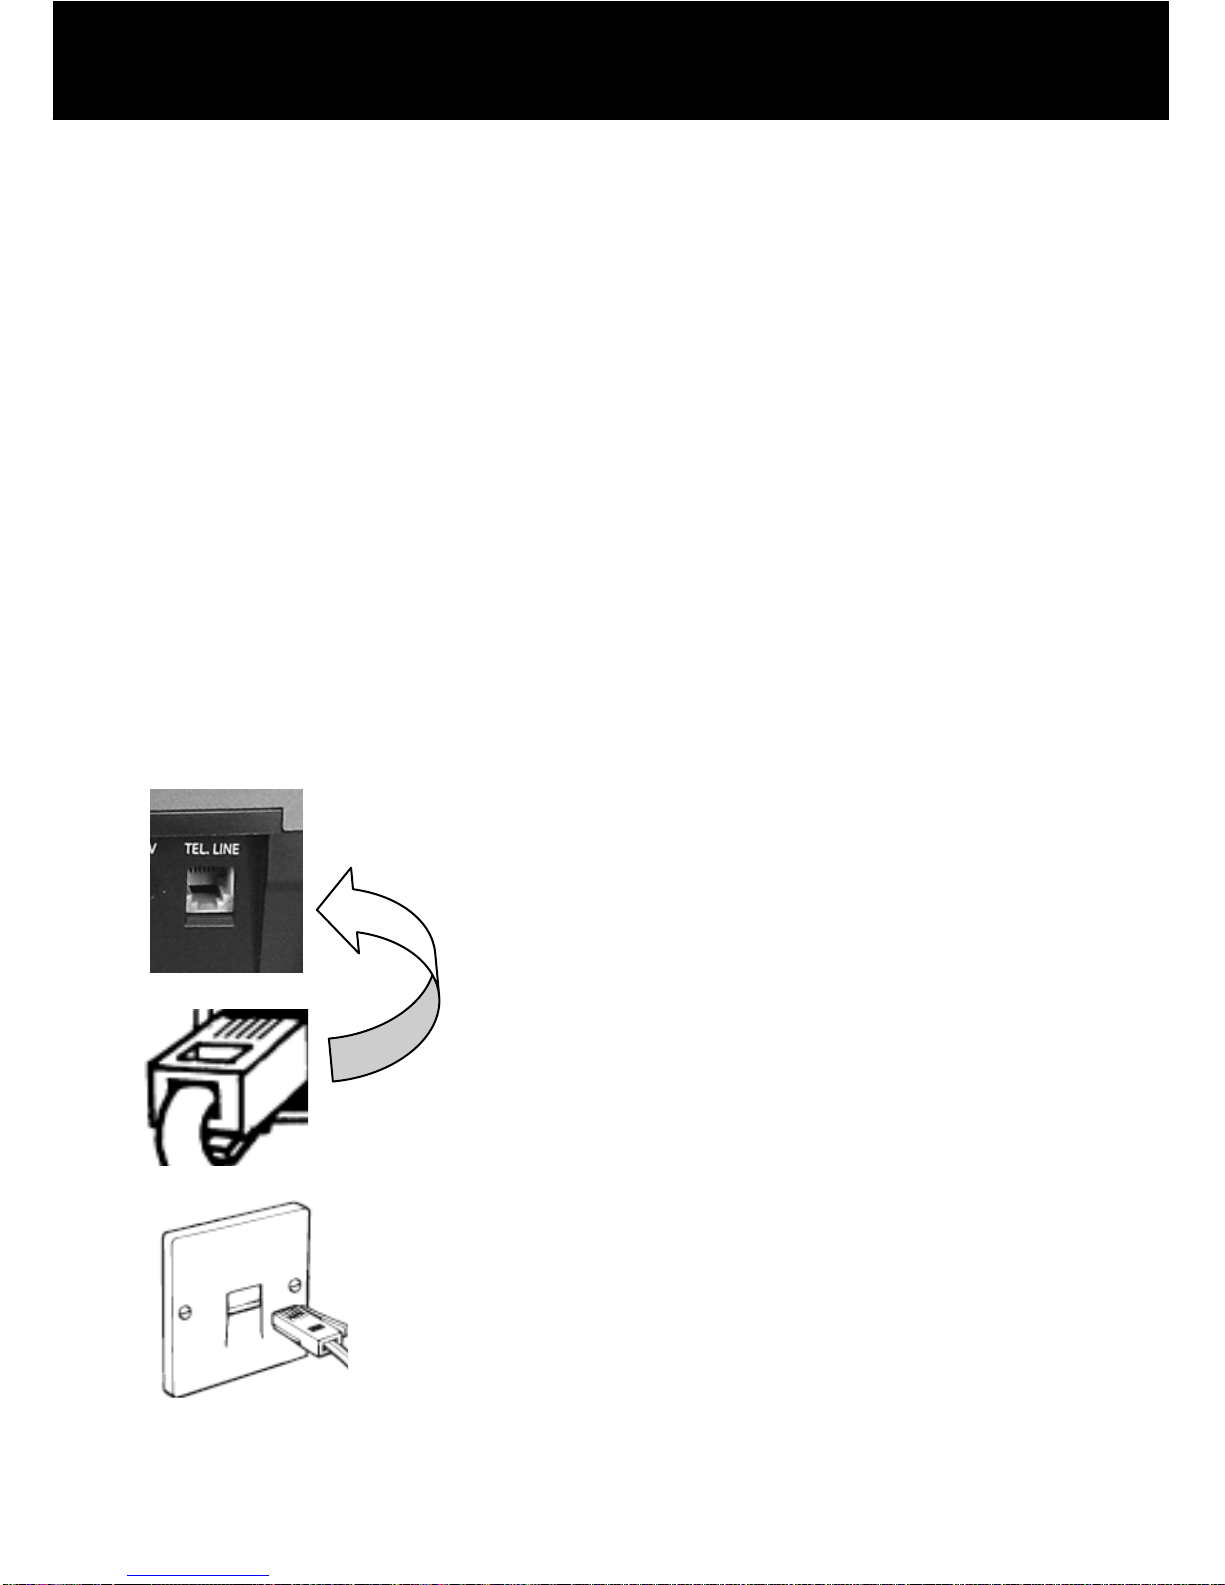
Insert the line cord into the socket located at the rear of telephone
.
then connect the plug at the the other end of the
cable into the wall socket
INSTALLATION
Page 14
13
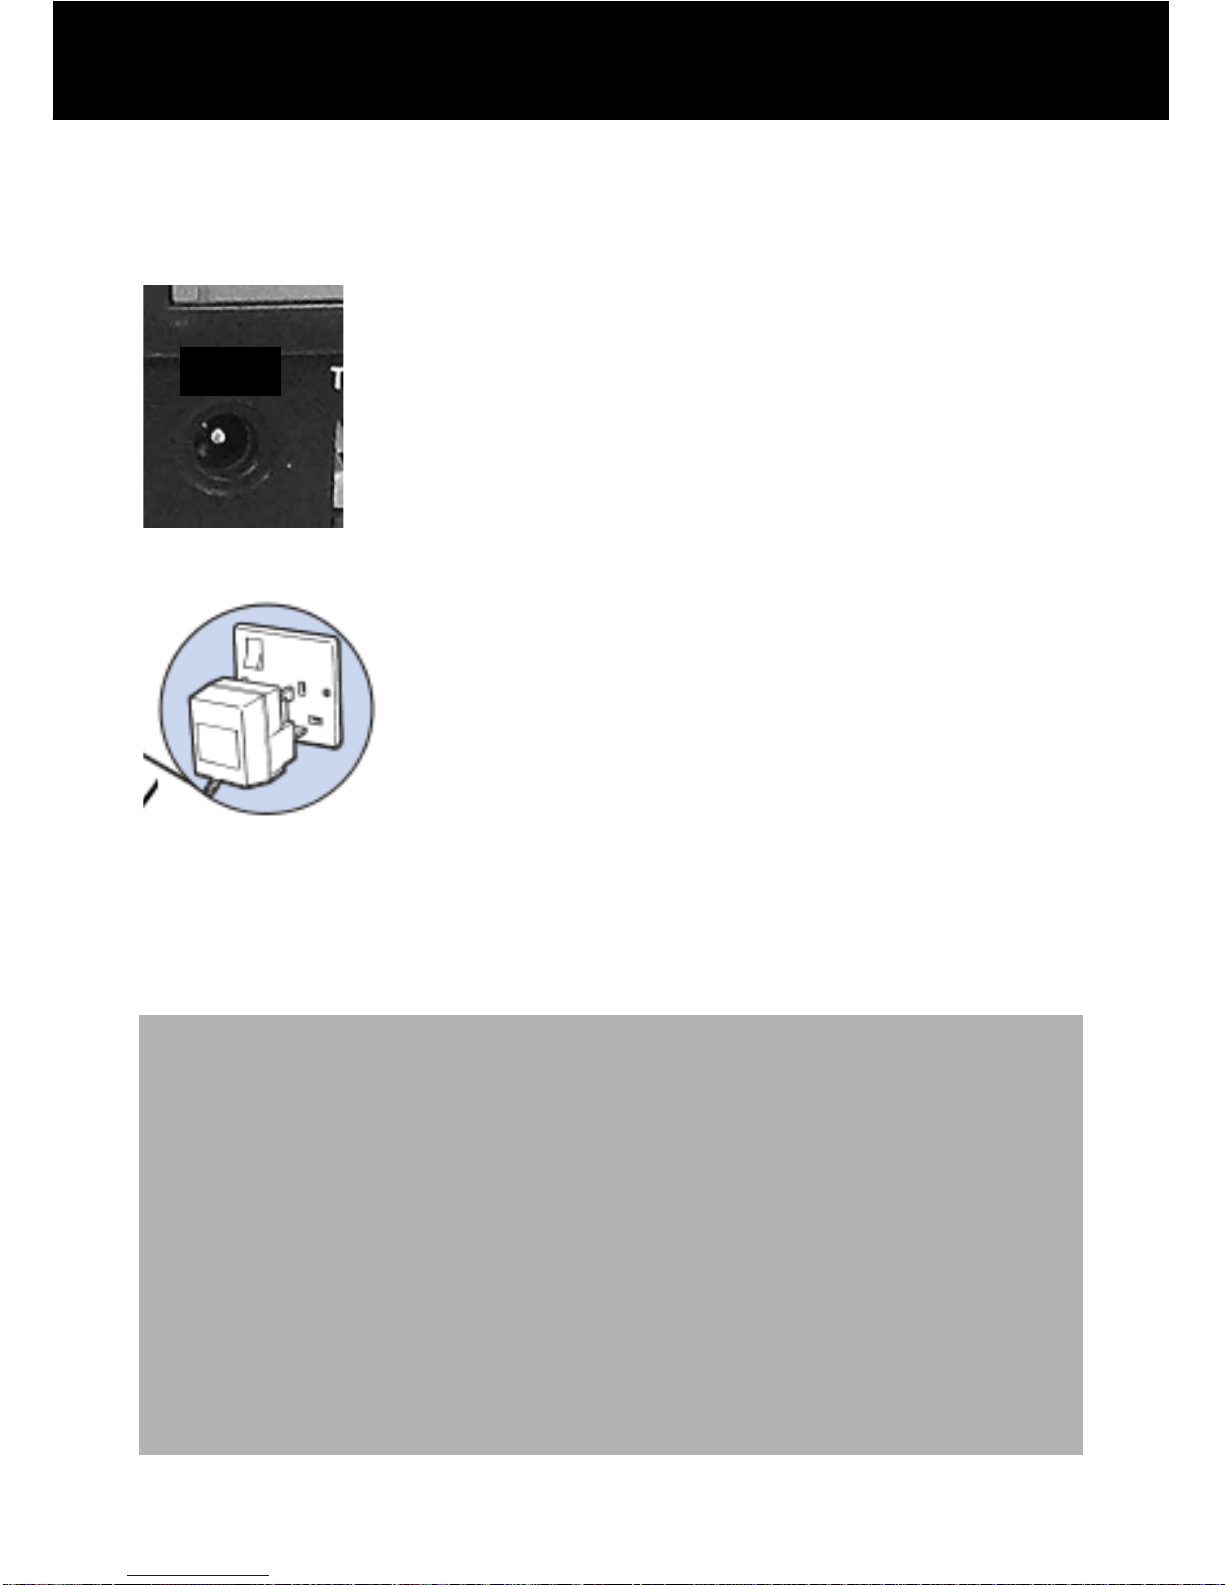
Insert the mains adaptor into the socket located at the rear of the
telephone
then plug the other end of the cable into a 13 amp wall socket.
Please choose a socket which is easily accessible and near to
your telephone socket. This means you can unplug the mains
power quickly in case of a problem.
NOTE:
Fit 4 x AA sized batteries in order to save and use stored numbers
in case of power failure. The telephone will retain all functions
when operating solely under battery power except:
The LCD backlight will be disabled
The flash strobe will be disabled
Without mains and batteries the telephone will not operate.
It is advisable to use mains power with the batteries inserted
as a means of backup in case of power failure.
DC 9V
INSTALLATION
Page 15

14
Wall Mounting
Make 2 holes in the wall, 80mm apart (use the wall mount template,
on page 64, as a guide). Insert the wall plugs and the wall
mounting screws.
The screws should protrude from the wall by 6-7mm.
Place the telephone onto the screw-heads and slide down to
secure.
Handset clip
To ensure that the handset stays firmly in position when the
telephone is mounted, slide out the clip, turn it around and slide it
back into the wall mounting position.
Desktop
The telephone has rubber pads on the base; therefore the
telephone can be placed directly onto a desktop or work surface.
INSTALLATION
Page 16
15
Ringer and Alert Settings
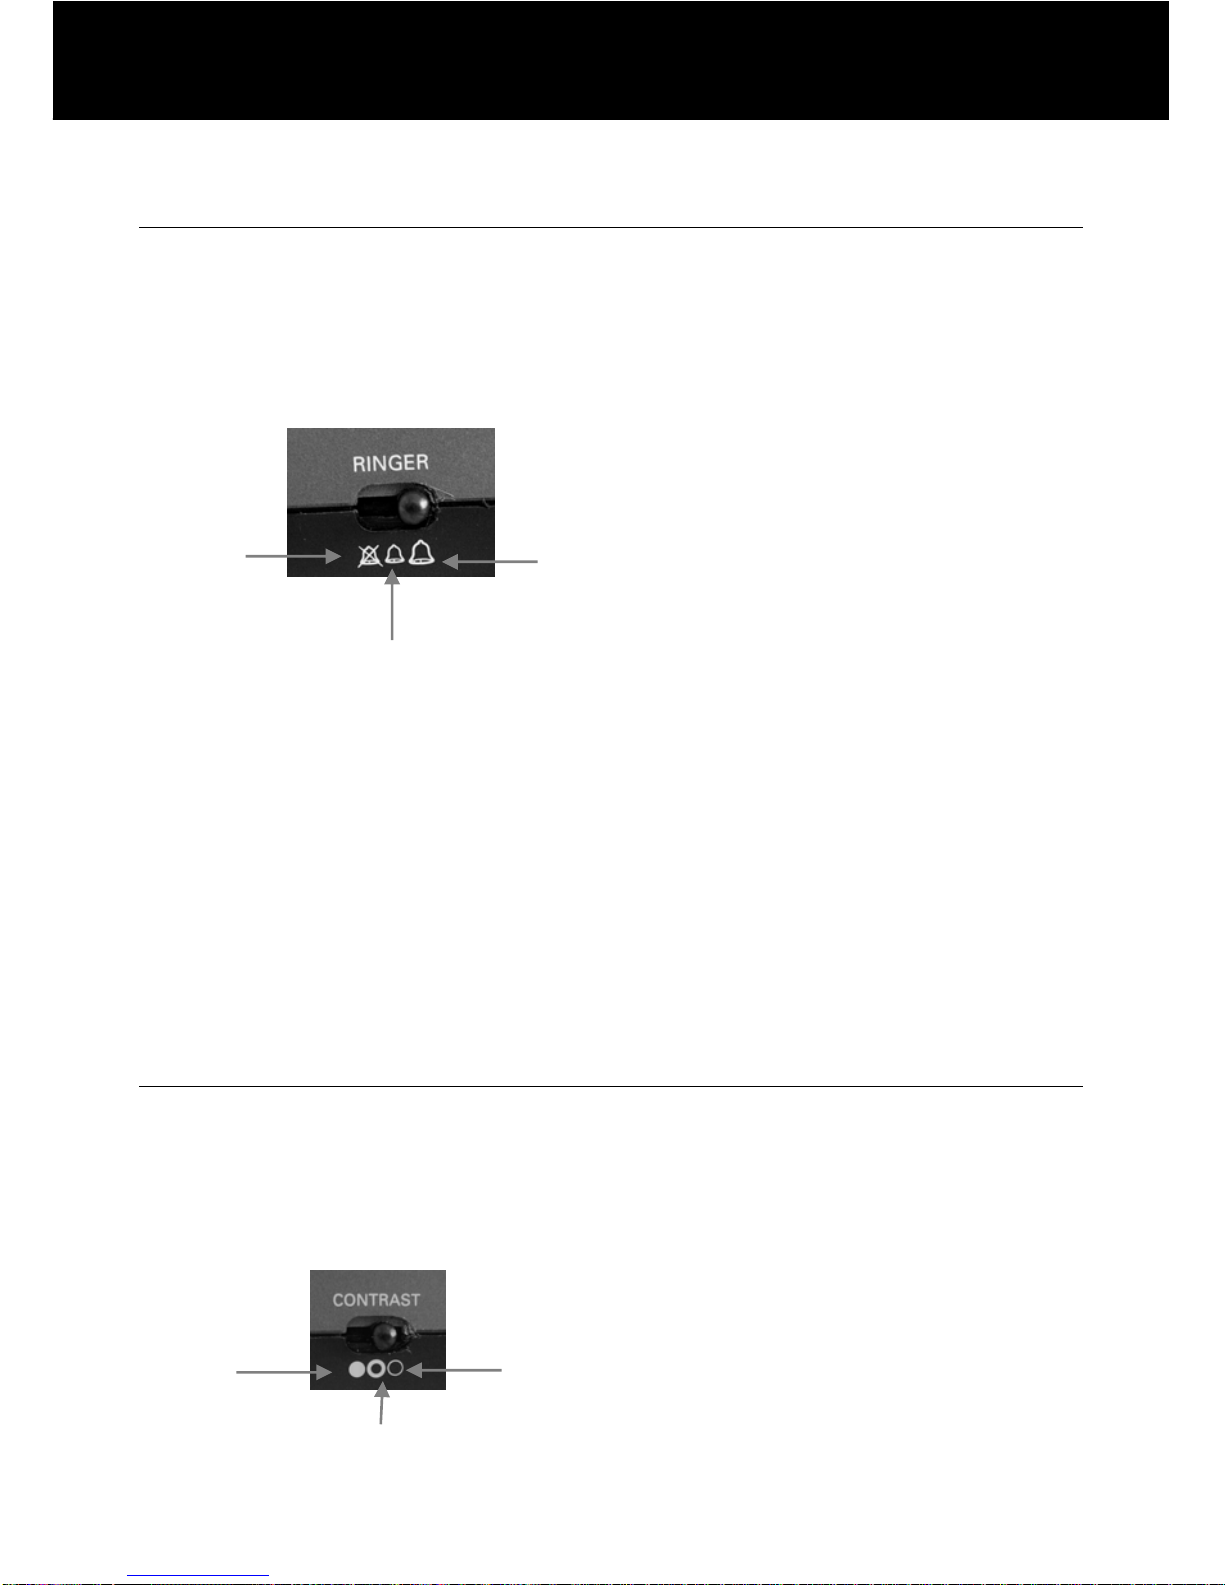
Ringer Volume
A switch located on right side allows the ringer to be switched OFF,
LOW or HIGH.
Your telephone is pre-set with the ringer switched to HIGH.
OFF HIGH
LOW
Strobe
A switch located at the rear allows the flash strobe to be switched
ON or OFF.
Your telephone is pre-set with the strobe switched to ON.
When switched ON, the bright strobe light flashes when you
receive a telephone call.
LCD Screen Contrast
A switch located on right side allows the screen contrast to be
altered.
This will alter the contrast between the text on screen against the
backlighting. There are three levels of contrast for selection.
LOW HIGH
MEDIUM
SETTINGS
Page 17

16
Amplify
A switch located at the rear allows the amplification facility to be
switched ON or OFF.
Your telephone is pre-set with the Amplify switch at the OFF
Postion.
Amplify Switch at ON Position
The additional amplification and tone controls are automatically
activated each time you use the telephone. The LED light next to
the amplify button will be lit. You can still turn the amplify feature
off at any time, simply press the amplify button on the front of the
telephone.
Amplify Switch at OFF Position
The additional amplification and tone controls are off by default
each time you use the telephone. The LED light next to the amplify
button will not be lit. You can still turn the amplify function on at
any time, simply press the amplify button on the front of the
telephone.
Your telephone is pre-set with amplification switched to OFF and
handset volume to Minimum. See Volume and Tone section in the
Using the Telephone chapter for more detail.
Voice Announcement
A switch located on the right side of the telephone allows the voice
announcement to be switched ON or OFF. The message is a
pre-set factory message; you are not able to change it.
When this function is “ON” the phone will inform people who are
calling on a standard voice telephone, without the 18002 prefix,
that you are using Voice Carry Over or a textphone. It will instruct
them to call again using the prefix 18002. The message is as
follows “ Please dial 18002 before number”.
If you are new to using Voice Carry Over or Text Relay, and will
not be using this telephone as a standard telephone, it is
recommended that this function is turned “ON”. If you are confident
that anyone who calls you will remember the 18002 prefix then this
can be turned ‘OFF’.
SETTINGS
Page 18
17
Main text font size adjustment
You can adjust the font size while the telephone is in standby
mode .
ACTIONS
ON SCREEN
DISPLAY
Press Select or Sor T
01 New Messages
02 New Calls
Use S and T to scroll through the
menu to select ‘Font size’
Messages
>Font size
Phonebook
Press Select
Use S and T to select size of text
S key –increases the main area font size
by 1mm each time it is pressed.
T key - decreases the main area font
size by 1mm each time it is pressed
The font size range is 5 – 12 mm.
Press Select to confirm
Press and hold C or do not touch the
keypad for 30 seconds to return to
standby
SETTINGS
Page 19

18
Message Waiting
A switch located on the base allows the telephone to be switched
between different networks to receive message waiting signals.
Position 1 and 2 are used with new services provided on hotel
networks.
1 – The new call light will light when a new call is received.
2 – When you receive a message, the message-waiting indicator
is lit to inform you that you have a message (e.g. from the hotel
switchboard)
3 – This is used when using BT or another network messaging
service. When you receive a message, the message-waiting
indicator is lit to inform you that you have a message
Note: Most users will only ever require Position 3
SETTINGS
Page 20
19
This telephone can operate in two modes:
• Text mode – the telephone can be used to send* and
receive typed messages
• Voice mode - the telephone functions as a standard voice
telephone allowing you to make voice calls to other voice
telephone users
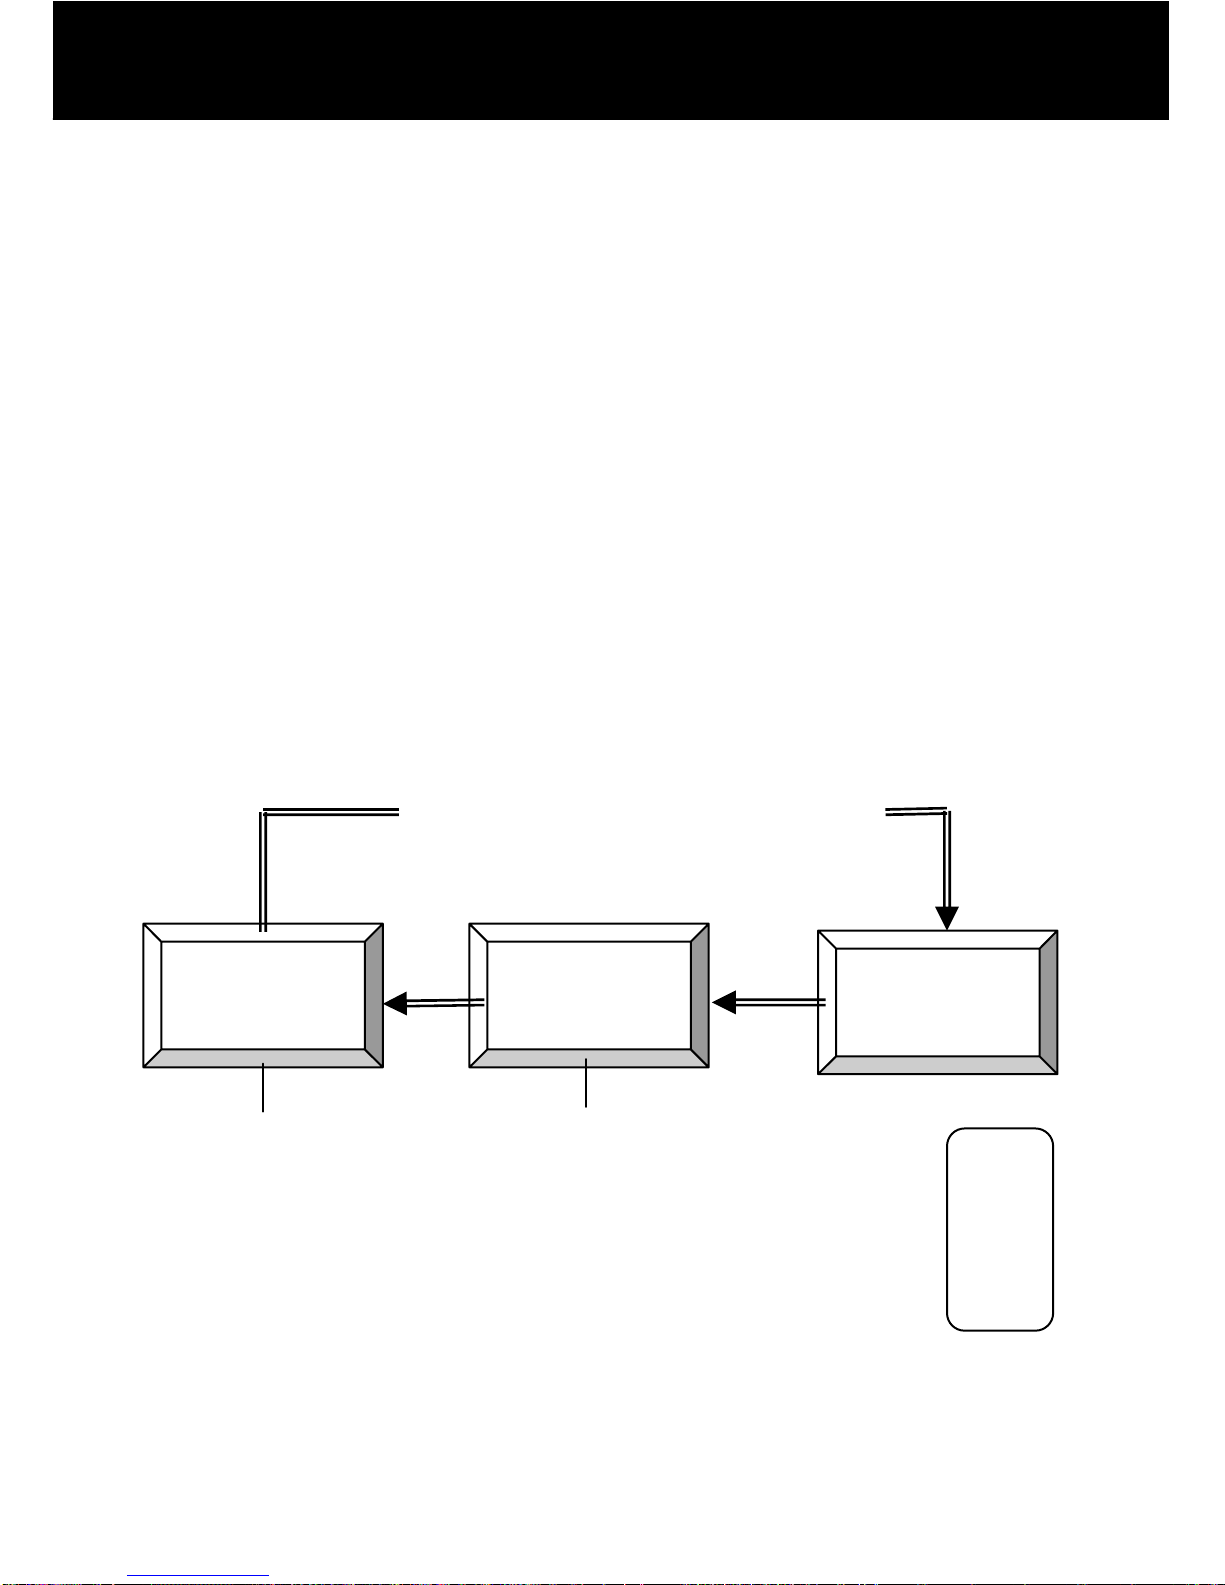
Using a combination of these modes together with the help of a
Text Relay operator, this telephone enables you to have two-way
communication with a mixture of text and voice.
Voice mode allows you to speak to the other caller, whilst text
mode allows you to read their response on the screen. The Text
Relay operator will type what the other caller is saying to you (see
summary diagram below).
Switching between modes is controlled by the V/T key.
It acts as a toggle between voice mode and text mode.
In the icon area of the screen it will state the current
mode i.e. VOICE or TEXT. This will help to remind you which
mode the telephone is currently working under.
* Requires optional keyboard
SCREENPHONE
Use
r
Text Relay
Operato
r
Caller X
Voice call from
SCREENPHONE user carried
Voice speech of Caller X
translated into text by operato
r
Typed message
read on screen
USING THE TELEPHONE
Page 21

20
Making a Call
Standard Voice Call
Pre-dial the Number, the number will appear on the
screen
Pick up the handset, the number will be dialled
automatically
To end the call simply replace the handset in the cradle
Combination of Voice and Text call
A Textphone user simply dials 18001 followed by the full telephone
number of the person they wish to call. Once the call is answered
by a hearing person, a Text Relay Operator will join the line to
relay the call. The text user can type* or speak their conversation
to the hearing person, the hearing person will speak their part of
the conversation and the Text Relay Operator will type exactly
what is being said. Please follow the instructions below to make a
combination of voice and text call.
* Requires optional keyboard
USING THE TELEPHONE
Page 22

21
ACTIONS
ON SCREEN
DISPLAY
Pre-dial the number, with the
handset in the cradle.
You must use the prefix 18001 if you
require the Text Relay operator.
This can be entered using one of the
following methods:
manually using the keypad
pressing the “18001” button on
the telephone base.
Pulling a number from the
phonebook with 18001 already
added.
The telephone number must include
full area code.
Lift the handset
The telephone automatically
switches to Text mode as 18001
has been dialled.
You will receive the following
messages in the main area:
TXD Ringing
TXD Ringing
TXD Connecting
Text Relay
Operator
TXD operator
Connected, please
wait
If someone answers and the Text
Relay operator has established
connection with Caller X.You will
Call Connected.
GA
21
USING THE TELEPHONE
Page 23

22
receive the following messages in
the main area:
Note: GA = Go Ahead
A
Press V/T key once you have
received GA on screen
B
Telephone is now in Voice mode.
You can speak directly to Caller X
using the handset. At the end of
the piece of conversation say GA,
this tells the Text Relay operator that
you have finished and that it is
Caller X’s turn to reply
C
Press V/T Mode key to return to
TEXT in order to receive a reply
from Caller
Repeat steps A, B, C each time you
wish to speak
At the end of the conversation, the
Operator sends the following
message to you:
SK = Stop Keying
SK
You can now end the call by
replacing the handset
Note: If you make an incorrect entry while pre-dialling the
telephone number, press C to clear the last digit and then enter the
correct number
USING THE TELEPHONE
Page 24

23
Receiving a Call
Standard Voice Call
When an incoming call is received the telephone rings and the
strobe light will flash (if set to flash). If the caller can be identified
(due to subscription to a Caller Display service), the caller’s
telephone number will be displayed.
Lift the handset and speak
To end the call simply replace the handset in the cradle
Combination of Voice and Text call
If a hearing person wishes to call a ScreenPhone user they would
dial 18002 followed by the full telephone number. Once the call is
answered by a Textphone, a Text Relay Operator will join the line
to relay the call. Please follow the instructions below to receive a
combination of voice and text call.
Note: For further information re using Text Relay services for
hearing users, Contact Text Relay Customer Services:
text: 18001 0800 500 888
voice: 0800 7 311 888
web: www.textrelay.org
NOTE:
The SCREENPHONE is not capable of determining the
difference between an incoming standard call and a Text
call. Therefore the telephone cannot indicate if it is a voice
or text call on the screen, with the ringer or the strobe. This
is because the telephone network masks all text calls and
voice calls to look the same to eliminate any possible
discrimination.
USING THE TELEPHONE
Page 25

24
ACTIONS
ON SCREEN DISPLAY
Caller X dials the SCREENPHONE
User telephone number. This
number must be prefixed with
18002.
The telephone number must
include full area code
The 18002 prefix calls the Text
Relay operator
The SCREENPHONE telephone
rings
The SCREENPHONE User picks up
handset
Press V/T key to enter TEXT mode
(if text support is need, if not skip
this and remaining steps)
SCREENPHONE user receives the
following messages in the main
area:
TXD Connecting
Text Relay
TXD Operator
Connected, please
wait
TXD Call
Connected GA
A
Press V/T key Once you have received GA
B
Telephone is now in VOICE mode.
The SCREENPHONE User can speak
directly to Caller X using the handset
USING THE TELEPHONE
Page 26

25
C
Press V/T key Once you have given
GA
D
Telephone is now in TEXT mode
SCREENPHONE User awaits
response. This will appear in the
form of a typed message on the
screen
Follow steps A, B, C, D each time
you wish to speak
At the end of the conversation, the
Operator sends the following
Message to the SCREENPHONE
User:
SK = Stop Keying
SK
SCREENPHONE User can now end
the call by replacing the handset
Note: When switching from “voice” mode to “text” mode there may
be a delay before the operator starts typing. You should avoid
returning to voice mode again before the operator says “GA” (go
ahead) – this indicates that the person you are calling has stopped
talking.
USING THE TELEPHONE
Page 27

26
Text Only Calls
You can also use this telephone to send typed messages (as well
as receive them) via the Text Relay operator with an optional
Geemarc keyboard.
This plugs into the keyboard socket at the rear of the telephone.
Making a Text Only Call
ACTIONS
ON SCREEN DISPLAY
Pre-dial the number, with the handset
in the cradle.
You must use the prefix 18001 if you
require the Text Relay operator. This
can be entered using one of the
following methods:
manually using the keypad
pressing the “18001” button on the
telephone base.
Pulling a number from the
phonebook with 18001 already added.
The telephone number must include
full area code.
Lift the handset
The telephone automatically switches
to Text mode as 18001 has been
dialled.
You will receive the following
messages in the main area:
TXD Ringing
TXD Ringing
TXD Connecting
Text Relay Operator
TXD operator
Connected, please
wait
USING THE TELEPHONE
Page 28

27
The Text Relay operator has established
connection with Caller X.You will receive
the following messages in the main
area:
Note: GA = Go Ahead
Call Connected.
GA
A
The SCREENPHONE User can type
text to the Operator once you have
received GA The Operator will relay the
text to speech for Caller X. When you
have finished type GA.
B
SCREENPHONE User awaits response.
This will appear in the form of a typed
message on the screen. At the end of
this
you will recieve GA on the screen
indicating
it’s you turn to reply.
GA
Repeat steps A, B, each time you wish
to communicate
At the end of the conversation, the
Operator sends the following message
to you:
SK = Stop Keying
SK
You can now end the call by replacing
the handset
USING THE TELEPHONE
Page 29

28
Receiving a Text Only Call
ACTIONS
ON SCREEN DISPLAY
Caller X dials the SCREENPHONE
User telephone number. This
number must be prefixed with
18002.
The telephone number must include
full area code
The 18002 prefix calls the Text
Relay operator
The SCREENPHONE telephone
rings
The SCREENPHONE User picks up
handset
Press V/T Mode key to enter TEXT
mode
SCREENPHONE user receives the
following messages in the main
area:
TXD Connecting
Text Relay
TXD Operator
Connected, please
wait
TXD Call
Connected GA
A
SCREENPHONE User can type text
to the Operator. Once you have
typed GA. the Operator will translate
the text to speech for Caller X
USING THE TELEPHONE
Page 30

29
B
SCREENPHONE User awaits
response. This will appear in the
form of a typed message on the
screen. When GA appears it is your
turn to type your response.
GA
Follow steps A, B, each time you
wish to communicate
At the end of the conversation, the
Operator sends the following
Message to the SCREENPHONE
User:
SK = Stop Keying
SK
Press V/T key
SCREENPHONE User can now end
the call by replacing the handset
USING THE TELEPHONE
Page 31

30
Alternative dialling
You can dial with the handset in an off-hook position, similar to a
standard telephone. This is not as reliable as pre-dialling, however,
it may be helpful to those used to dialling in this manner.
Pick up handset.
Dial the number on the keypad.
To end the call simply place the handset on the cradle
Call Time Counter
When making a call the call time counter will be displayed 20
seconds after the last digit is dialled.
When receiving a call, the call time counter starts 20 seconds after
the handset is picked up.
Last Number Redial
The last number dialled (up to 32 digits) may be redialled.
Pick up handset.
Press REDIAL to dial the previously dialled number
USING THE TELEPHONE
Page 32

31
Mute Function
If you wish, you can speak privately to someone else is the room
without your caller overhearing. You will still be able to hear the
caller but they cannot hear you during the mute operation.
During a call, press MUTE
The LCD display will show which indicates that your
voice is muted to the call and the caller cannot hear you
speaking
Press MUTE again to resume the conversation. The
symbol will disappear from the LCD display
R, * and Hash Keys
These are used with the new services provided on digital
exchanges. For details please contact your network operator.
Emergency Button
The red emergency button on the telephone base can be used to
access the 999 emergency services. You will get straight through
to an Emergency Services Operator. A Text Relay Operator will be
brought into the call as soon as the Emergency Services Operator
answers your call.
ACTIONS
ON SCREEN
DISPLAY
Pick up Handset
Press & Hold Emergency key for 2
seconds.
Hold key for
emergency
Emergency services called
automatically
This outgoing emergency call
continues as for outgoing combination
voice/text call or a text call
USING THE TELEPHONE
Page 33

32
Receiving Volume and Tone Adjustment
You can alter the receiving volume and tone according to your
hearing requirements.
Use the Volume slide switch on the telephone base to adjust the
level according to your hearing requirements.
The Amplify button on the telephone base provides additional
amplification and tone control in an ad hoc fashion. Use the Tone
slide switch on the telephone base to adjust the level according to
your hearing requirements. When the amplify function is
activated, the red light on the Amplify key is lit.
Setting a default for Amplification.
A switch located at the rear allows the amplification facility to be
switched ON or OFF as a default each time you use the telephone.
Amplify Switch at ON Position
The additional amplification and tone controls are automatically
activated each time you use the telephone. The LED light next to
the amplify button will be lit.
Pressing the Amplify button during a call will turn off the additional
amplification and tone controls. However, you can still adjust the
handset receive volume with the Volume slide bar.
Irrespective of how many times you press the amplify key
throughout a call, the next time you pick up the handset to make a
new call, these functions will be activated once again.
USING THE TELEPHONE
Page 34

33
VOLUME
(with amplify switched on)
15 db 30db
TONE
Bass Treble
+10db Max +10db max
Amplify Switch at OFF Position
The additional amplification and tone controls are turned off each
time you use the telephone. The LED light next to the amplify
button will be off.
Pressing the Amplify button once during a call will enable tone
control and additional amplification. The LED light next to the
amplify button will turn on to reflect this change. If you press the
amplify button once more, the additional amplification and tone
control features will be turned off once again. The LED light will
turn off to reflect this change.
Irrespective of how many times you press the amplify key
throughout a call, the next time you pick up the handset, these
functions will be turned off once again.
VOLUME
(with amplify switched on)
0 db 15db
USING THE TELEPHONE
Page 35

34
Standby Mode
When the telephone is idle, the display may show the following
type of information:
This informs you that there is one new answerphone message and
details of two unanswered calls. This information is held in the
call log.
See Answerphone chapter about accessing Answerphone
messages.
See Caller Display chapter about accessing call log records of
unanswered calls
NOTE: If you do not have called ID switched on your phoneline,
the screenPhone will not notify you of missed calls, Contact your
phoneline supplier for details.
01 New Message
02 New Calls
USING THE TELEPHONE
Page 36

35
If you are not available to answer a telephone call, the telephone
can receive and save a typed message from the caller (via the
Text Relay operator), provided they have used the 18002 prefix.
The answer phone will be activated if a call is not answered after 8
rings.
When someone leaves a message on your Answer phone, the
new message indicator will light up
and the New Message count seen in standby mode will increase
by one.
If you receive an unanswered call but the caller has not left a
message the message indicator will turn on.
Turning the Answerphone On
Press the Answer Phone key. When switched on, “ Ans On” will
appear in the comment area of the screen.
To turn the answer phone off, press the answer phone key once
again. The “Ans On” text will no longer be displayed on screen.
01 New Message
02 New Calls
ANSWERPHONE
Page 37

36
Viewing Answerphone Messages
ACTIONS
ON SCREEN DISPLAY
Press Select or Sor T
01 New Messages
02 New Calls
Use S and T to scroll through the
menu to select‘Messages’
> Messages
Font Size
Phonebook
Press Select
Message and call logs are held in
chronological order.
The most recent is at the top of the
list.
! indicates a message is new.
Use Sor T keys to scroll through the
missed calls in the message
inbox/call log
>!#01 Message
! #02 Missed Call
! #01 Missed Call
Press Select
The selected message is displayed
Use S to scroll up one line in the
message
Use Tto scroll down one line in the
message
Hi Lee, see you in
the bar tonight.
Remember the
book
ANSWERPHONE
Page 38

37
Saving Answerphone Messages
ACTIONS
ON SCREEN DISPLAY
Press Select or Sor T 01 New Messages
02 New Calls
Use S and T to scroll through the
menu to select‘Messages’
> Messages
Font Size
Phonebook
Press Select
Message and call logs are held in
chronological order.
The most recent is at the top of the list.
! indicates a message is new.
Use Sor T keys to scroll through the
missed calls in the message inbox/call
log
>!#01 Message
! #02 Missed Call
! #01 Missed Call
Press Select
The selected message is displayed
Use S to scroll up one line in the
message
Use Tto scroll down one line in the
message
Hi Lee, see you in
the bar tonight.
Remember the
book
Press Select or C
Use S and T to scroll through the
menu to select‘Save’
>Save
Delete
Press Select or C Entry saved
Press and hold C or do not touch the
keypad for 30 seconds to return to
standby
02 New Calls
Selected message has been saved.
It loses the New ‘!’ status. The
message remains in the call log
ANSWERPHONE
Page 39

38
Deleting Answerphone Messages
ACTIONS ON SCREEN DISPLAY
Press Select or Sor T
01 New Messages
02 New Calls
Use S and T to scroll through the
menu to select‘Messages’
> Messages
Font Size
Phonebook
Press Select
Message and call logs are held in
chronological order.
The most recent is at the top of the list.
! indicates a message is new.
Use Sor T keys to scroll through the
missed calls in the message inbox/call log
>!#01 Message
! #02 Missed Call
! #01 Missed Call
Press Select
The selected message is displayed
Use S to scroll up one line in the
message
Use Tto scroll down one line in the
message
Hi Lee, see you in
the bar tonight.
Remember the
book
Press Select or C
Use S and T to scroll through the
menu to select‘Delete’
Save
>Delete
Press Select or C
Entry deleted
Press and hold C or do not touch the
keypad for 30 seconds to return to
standby
02 New Calls
Selected message has been deleted
from the call log
NOTE: It is not possible to retrieve messages once they have been deleted.
ANSWERPHONE
Page 40

39
The features described in this section are only available if you
subscribe to a Caller Display service from your network provider.
Caller Display means you can see who is calling on your LCD
display (provided the number is not withheld, unavailable or is an
international call). When your telephone rings the following will
be displayed in the main area of the LCD Display.
LEE MOBILE
07771 123456
Every received call that is not answered is stored in the call log
and the new calls count displayed on the standby screen
increases by one. The LCD display will return to standby 10
seconds after the last ringing burst if the call is not answered.
This new call will also activate the new call indicator to blink. This
will continue to blink until the new calls are reviewed and
saved/deleted in the call log.
The call log can store 99 call log records. Each unanswered call
is stored as a record in arrival order with the following information:
If the telephone number
matches an entry in the
Phonebook or Quickdial
memory, the name will
be displayed (up to 20
characters)
Telephone Number
received (up to 24 digits)
CALLER DISPLAY
Page 41

40
#02 NEW R01 05/04 14:12
LEE MOBILE
07771 123456
When the call log memory is full, a new call will take the place of
the oldest call. You can display, save, delete and dial numbers in
the log.
If the caller has exercised the option to prevent his number from
being displayed, Private Number will be shown on the LCD
display. If someone is calling from an area where the service
provider is not offering the Caller display services or an area which
is not providing name and number delivery to your area via the
long distance network, Unavailable Number will be displayed on
the LCD display.
Record
number in
the call log
New Call
Log record
Date and Time
of last call from
this number
Number of
attempts from
the same caller
If the telephone number
matches an entry in the
Phonebook or Quickdial
memory, the name will
be displayed (up to 20
characters
)
Telephone Number received
(up
to 24 digits
)
CALLER DISPLAY
Page 42

41
Viewing the Call Log
ACTIONS ON SCREEN DISPLAY
Press Select or Sor T
03 New Calls
Use S and T to scroll through the
menu to select‘Messages’
> Messages
Font Size
Phonebook
Press Select
Message and call logs are held in
chronological order.
The most recent is at the top of the
list.
! indicates a message is new.
Use Sor T keys to scroll through the
missed calls in the message
inbox/call log
!#04 Missed Call
>!#03 Missed Call
!#02 Missed Call
#01 Missed Call
Press Select
The call log record details are
displayed
#02 05/04 14:12
LEE MOBILE
07771 123456
CALLER DISPLAY
Page 43

42
Saving a Call Log Record
ACTIONS
ON SCREEN DISPLAY
Press Select or Sor T
03 New Calls
Use S and T to scroll through the
menu to select‘Messages’
>Messages
Font Size
Phonebook
Press Select
Message and call logs are held in
chronological order.
The most recent is at the top of the
list.
! indicates a message is new.
Use Sor T keys to scroll through the
missed calls in the message
inbox/call log
!#04 Missed Call
>!#03 Missed Call
! #02 Missed Call
#01 Missed Call
Press Select
The call log record details are
displayed
#02 05/04 14:12
LEE MOBILE
07771 123456
Press Select or C
S and T to scroll through the menu
to select‘Save’
>Save
Delete
Store No.
Return Call
Press Select or C Entry saved
Press and hold C or do not touch the
keypad for 30 seconds to return to
standby
02 New Calls
CALLER DISPLAY
Page 44

43
Deleting a Call Log Record
ACTIONS
ON SCREEN DISPLAY
Press Select or Sor T
03 New Calls
Use S and T to scroll through the
menu to select‘Messages’
> Messages
Font Size
Phonebook
Press Select
Message and call logs are held in
chronological order.
The most recent is at the top of the list.
! indicates a message is new.
Use Sor T keys to scroll through the
missed calls in the message inbox/call
log
!#04 Missed Call
>!#03 Missed Call
!#02 Missed Call
#01 Missed Call
Press Select
The call log record details are displayed #02 05/04 4:12
LEE MOBILE
07771 123456
Press Select or C
S and T to scroll through the menu to
select
‘Delete’
Save
>Delete
Store No.
Return Call
Press Select or C
Entry deleted
Selected call log record has been
deleted from the call log
Press and hold C or do not touch the
keypad for 30 seconds to return to
standby
02 New Calls
CALLER DISPLAY
Page 45

44
Dial a Number from a Call Log Record
ACTIONS
ON SCREEN DISPLAY
Press Select or Sor T
03 New Calls
Use S and T to scroll through the
menu to select ‘Messages’
> Messages
Font Size
Phonebook
Press Select
Message and call logs are held in
chronological order.
The most recent is at the top of the list.
! indicates a message is new.
Use Sor T keys to scroll through the
missed calls in the message inbox/call
log
!#04 Missed Call
>!#03 Missed Call
!#02 Missed Call
#01 Missed Call
Press Select
The call log record details are
displayed
#02 05/04 14:12
LEE MOBILE
07771 123456
Press Select or C
S and T to scroll through the menu to
select ‘Return Call’
Save
Delete
Store No.
>Return Call
Press Select or C
CALLER DISPLAY
Page 46

45
S and T to scroll through the menu to
select
‘Voice/Text’
if you want 18001 inserted before the
telephone number. This will route
your call via the Text Relay operator.
Alternatively select
‘Voice only’
18001 will not be inserted before the
number and a standard voice call can
be made
Return as:
> Voice/Text
Voice only
Lift the handset, the telephone number
will be dialled automatically
1800107771123456
CALLER DISPLAY
Page 47

46
Store a Number from a Call Log Record
ACTIONS
ON SCREEN DISPLAY
Press Select or Sor T
03 New Calls
Use S and T to scroll through the
menu to select‘Messages’
> Messages
Font Size
Phonebook
Press Select
Message and call logs are held in
chronological order.
The most recent is at the top of the
list.
! indicates a message is new.
Use Sor T keys to scroll through
the missed calls in the message
inbox/call log
!#04 Missed Call
>!#03 Missed Call
!#02 Missed Call
#01 Missed Call
Press Select
The call log record details are
displayed
#02 05/04 14:12
LEE MOBILE
07771 123456
Press Select or C
S and T to scroll through the menu
to select ‘Store No.’
Save
Delete
>Store No.
Return Call
Press Select or C
CALLER DISPLAY
Page 48

47
S and T to scroll through the menu
to select
‘Yes’
the telephone number wil be saved
with 18001 inserted before the
number.
Alternatively select
‘No’
if you do not want the telephone
number to be saved with 18001
preceeding the number
Store with 18001?:
> Yes
No
The telephone provides the option to
edit(if provided) or add the name
before storing in memory
Select the desired letter by pressing
on the corresponding key on the
numerical keypad
Use the C key to delete an incorrect
character (See Phonebook Chapter
for more detail)
LEE MOBILE
Press Select
The telephone provides the option to
edit the number before storing in
memory
Use the C key to delete any incorrect
digits
1800107771123456
CALLER DISPLAY
Page 49

48
Use the numerical keypad to enter the
correct digits (See Phonebook
Chapter for more detail)
Press Select
To save in Quick dial
Save as:
>Quick Dial
Phonebook
EITHER
Using the keypad enter a quick dial
location between 0 and 9
The name and number has been
stored in the specified quick dial
location
Entry added
OR
Use S and T to scroll through the
menu to select ‘Quick Dial’
>Quick Dial
Phonebook
Press Select
Using the keypad enter a quick dial
location between 0 and 9
The name and number has been
stored in the specified quick dial
location
Entry added
Press and hold C or do not touch the
keypad for 30 seconds to return to
standby
CALLER DISPLAY
Page 50

49
To save in the Phonebook
Save as:
>Quick Dial
Phonebook
EITHER
Press Phonebook
The name and number has been
stored in the phonebook
Entry added
OR
Use S and T to scroll through the
menu to select ‘Phonebook’
Quick Dial
>Phonebook
The name and number has been
stored in the phonebook
Entry added
Press and hold C or do not touch the
keypad for 30 seconds to return to
standby
CALLER DISPLAY
Page 51

50
Names and phone numbers can be stored in the quick dial
memory or phone books available on the telephone.
If you have subscribed to a Caller Display service and if the caller
name and number have been stored in the phonebook, the name
of the caller will be displayed alongside the number during the
incoming call.
The Quick Dial memory can hold 10 telephone numbers. The
phone book can contain 50 entries. Each name can contain up to
20 characters and each phone number can contain up to 24 digits.
Create a Quick Dial Entry
ACTIONS
ON SCREEN DISPLAY
In standby, press and hold
Phonebook for 3 seconds
Use S and T to scroll through the
menu to select ‘Add entry’
>Add Entry
Edit Entry
Delete Entry
Press Select
Enter a name - select the desired
letter by pressing on the
corresponding key on the numerical
keypad You can use the table below
or the letters printed on the keypad to
help you.
Pause between each key entry. The
pause allows you to enter the next
character.
Use C to correct any incorrect
characters
PHONE BOOK
Page 52

51
Press Select
Enter the telephone number (and
code) you wish to store – up to 24
digits. Use C to correct any
incorrect digits
Press Select
EITHER
Using the keypad enter a quick dial
location between 0 and 9
The name and number has been
stored in the specified quick dial
location
Entry added
OR
Use S and T to scroll through the
menu to select ‘Quick Dial’
>Quick Dial
Phonebook
Press Select
Using the keypad enter a quick dial
location between 0 and 9
The name and number has been
stored in the specified quick dial
location
Entry added
Press and hold C or do not touch the
keypad for 20 seconds to return to
standby
If you select a quick dial location that already has an entry you will
get the following two options:
PHONE BOOK
Page 53

52
>Replace
Go back
If you replace the original quick dial information will be overwritten.
If you go back you will get the option to choose another quick dial
location between 0 an 9.
Lettering on the Numerical Keypad
Key Characters Key Characters
1 1 6 MNO6
2 ABC2 7 PQRS7
3 DEF3 8 TUV8
4 GHI4 9 XYZ9
5 JKL5 0 Space 0
Press each key the relevant number of times to get the letter you
need e..g. to get the letter J, press the 5 key once, to get the letter
S, press the 7 key four times in quick succession.
To move on to the next letter, wait a few seconds and the flashing
cursor will appear | after the last letter you entered. You may now
enter the next letter.
Pause Function
This function allows you to insert a pause within a telephone
number e.g. when you dial an international number, some
telephone systems will not identify the entire number entry without
a pause between the prefix digits and the number itself. When you
store a number e.g. 00-886-22-795-1234, you may have to dial 00,
then Redial, then 886 and Redial again, and then the remaining
digits. This allows adequate timing for the sequence of the phone
number to register with the telephone system and complete the
dialling successfully. When inserting a pause using Redial
“-“ will be displayed.
PHONE BOOK
Page 54

53
Create a Phonebook Entry
ACTIONS
ON SCREEN DISPLAY
In standby, press and hold Phonebook
for 3 seconds
Use S and T to scroll through the
menu to select ‘Add entry’
>Add Entry
Edit Entry
Delete Entry
Press Select
Enter a name - select the desired letter
by pressing on the corresponding key
on the numerical keypad You can use
the table below or the letters printed on
the keypad to help you.
Pause between each key entry. The
pause allows you to enter the next
character.
Use C to correct any incorrect
characters
Press Select
Enter the telephone number (and code)
you wish to store – up to 24 digits
Use C to correct any incorrect digits
Press Select
EITHER
Press Phonebook
53
PHONE BOOK
Page 55

54
The name and number has been stored
in the phonebook
Entry added
OR
Use S and T to scroll through the
menu to select ‘Phonebook’
Quick Dial
>Phonebook
The name and number has been stored
in the phonebook
Entry added
Press and hold C or do not touch the
keypad for 20 seconds to return to
standby
If the Phonebook is full (50 entries), you will be informed -
‘DIRECTORY FULL’ will be displayed on the LCD display. If you
wish to continue with adding this entry you will have to delete
another number in the phonebook to make space for the new entry
– see Deleting a Phonebook Entry section.
PHONE BOOK
Page 56

55
Edit a Quick Dial or Phonebook Entry
ACTIONS
ON SCREEN DISPLAY
In standby, press and hold Phonebook
for 2 seconds
Use S and T to scroll through the menu to
select ‘Edit entry’
Add Entry
>Edit Entry
Delete Entry
Press Select
Find the entry to be edited using one of the
following three methods:
-enter the quick dial location to be dialled
e.g. press 2 key
-useS and T to scroll through the quick dial
and phonebook list
-press and hold the digit corresponding to
the first character of the name of the entry.
e.g. Press and hold ‘6’ to go to Mum Home
(If there are no entries in quick dial or the
phonebook, Directory Empty will be
displayed)
>0 Lee Mobile
1 Andrew Gant
2 Rob Smith
Mum Home
Mum Mobile
Press Select if you have used S and T.
(If you have entered a quick dial location,
there is no need to for this step as the name
is presented on the screen immediately)
Use C to correct any incorrect characters.
Enter the correct characters using the
numerical keypad
Lee Mobile
Press Select
Use C to correct any incorrect digits. Enter
the correct digits using the numerical keypad
0770123456
Press Select. The entry has been saved
Entry saved
Press and hold C or do not touch the keypad
for 20 seconds to return to standby
PHONE BOOK
Page 57

56
Delete a Quick Dial or Phonebook Entry
In standby, press and hold Phonebook
for 3 seconds
Use S and T to scroll through the menu
to select ‘Delete entry’
Add Entry
Edit Entry
>Delete Entry
Press Select
Find the entry to be deleted using one of
the following three methods:
-enter the quick dial location to be dialled
e.g. press 2 key
-useS and T to scroll through the quick
dial and phonebook list
-press and hold the digit corresponding
to the first character of the name of the
entry. e.g. Press and hold ‘6’ to go to
Mum Home
(If there are no entries in quick dial or
the phonebook, Directory Empty
will be displayed)
>0 Lee Mobile
1 Andrew Gant
2 Rob Smith
Mum Home
Mum Mobile
Press Select to
Delete, C to Cancel
Entry deleted
Press and hold C or do not touch the
keypad for 20 seconds to return to
standby
PHONE BOOK
Page 58

57
Dial a Quick Dial or Phonebook Entry
Press Phonebook
Find the entry to be dialled using one of
the following three methods:
-enter the quick dial location to be
dialled e.g. press 2 key
-useS and T to scroll through the
quick dial and phonebook list
-press and hold the digit corresponding
to the first character of the name of the
entry. e.g. Press and hold ‘6’ to go to
Mum Home
(If there are no entries in quick dial or
the phonebook, Directory Empty
will be displayed
Add, Edit, Delete
>0 Lee Mobile
1 Andrew Gant
2 Rob Smith
Mum Home
Mum Mobile
Press Select
Lift the Handset
The selected telephone number will be
dialled automatically
PHONE BOOK
Page 59

58
Restore to Factory Default
Power on the telephone (unplug then plug in the mains power
lead to the mains power wall socket) whilst holding S
VXX will be displayed on the LCD display – this is the
software version number
Release S
Press * - to erase all answerphone messages
Press # - to erase the call log of missed calls
Press 0 – to erase all phonebook entries (including quick dial
entries)
Press C to exit
FACTORY DEFAULT
Page 60

59
Headset Option
You can also use this telephone in hands free mode with an
optional Geemarc headset.
This plugs into the headset socket found at the rear of the
telephone.
Keyboard
You can use this telephone as a textphone with an optional
Geemarc keyboard. This plugs into the keyboard socket at the rear
of the telephone.
NOTE: If you are making a text phone call without Text Relay you
will have to manually change the mode into ‘TEXT’ by pressing the
V/T button when the before or when the phone is dialling.
OPTIONAL ACCESSORIES
Page 61

60
No display
• Make sure that the power adaptor is plugg ed in correctly and is not
damaged
• Make sure the batteri es are i nserted correctly
• Make sure that the batteries are fully charged
SCREENPHONE does not ri ng
• Make sure that the telephone line cord is plugged in correctly and is not
damaged
• Connect another telephone to the telephone PTT socket or move your
telephone to another socket to track if the failure is coming from your
telephone or your PTT socket
• There may be too many communicat ion devices co nnected to a sing le
telephone line e.g. another telephone, modem or facsimile machine.
Contact your network provi der for help in calcul ating the limit for yo ur home
or business line
No dial tone
• Make sure that the telephone line cord is plugged in correctly and is not
damaged
• Connect another telephone to the telephone PTT socket or move your
telephone to another socket to track if the failure is coming from your
telephone or your PTT socket
• There may be too many communicat ion devices co nnected to a sing le
telephone line e.g. another telephone, modem or facsimile machine.
Contact your network provi der for help in calcul ating the limit for yo ur home
or business line
No number is displayed when the tele phone ri ngs:
• Please contact your telephone network provider to obtain the caller display
service or ensure that it has been activate d if you have subscribed alrea dy
• Even if you have subscribed to caller displ ay, if the caller does not wa nt to
show their number, the display will show Private numb er or if the call is
from an area not providing caller displa y, Unavailable number will be
displayed
• It could be a call from a PBX . Caller display may not work properly if the
telephone is connected to a PBX
No response on LCD display
• If you have experienced a power failure the batteries may become weak. If
the power is restored and the LCD displ ay still does not
respond the n
replace the batteries with new ones.
Flashing Light on the top right hand corner o f the Screen
• Go into the messages menu and open all your logged missed calls that
have a ! infront of them.
Light on the top right hand corner of the Screen
• Go into the messages menu and open all your logged messages that have
a ! infront of them.
Four red light s being di splay ed
• Switch underneath base unit needs to set on position 3.
TROUBLESHOOTING
Page 62

61
General
Only use the correct Geemarc authorised power supplies as listed
below with the product.
1. Sino-American model no. A30950BC
2. Ten Pao model no. G090050A31
3. Helms – Man model no. SEE0901000PB
Do not open the unit (except to replace the batteries). Contact the
helpline for all repairs.
Never dispose of batteries in a fire. There is a serious risk of
explosion and/ or the release of toxic chemicals.
Cleaning
Clean the telephone with a soft cloth. Keep the base and handset
charging contacts clean. Never use polishes or cleaning agents they could damage the finish or the electrics inside.
Environmental
Do not expose to direct sunlight.
Always ensure there is a free flow of air over the surfaces of the
telephone.
Do not place any part of your product in water and do not use it in
damp or humid conditions e.g. bathrooms.
Do not expose your product to fire or other hazardous conditions.
Unplug your phone from the telephone socket during
thunderstorms because it could damage your telephone. Your
guarantee does not cover thunderstorm damage.
The telephone is designed for working within a temperature range
of 5°C to 45°C.
SAFETY INFORMATION
Page 63

62
From the moment your Geemarc product is purchased, Geemarc
guarantee it for the period of one year. During this time, all repairs
or replacements (at our discretion) are free of charge. Should you
experience a problem then contact our help line or visit our
website at www.geemarc.com. The guarantee does not cover
accidents, negligence or breakages to any parts. The product
must not be tampered with or taken apart by anyone who is not an
authorized Geemarc representative. The Geemarc guarantee in
no way limits your legal rights.
IMPORTANT: YOUR RECEIPT IS PART OF YOUR GUARANTEE
AND MUST BE RETAINED AND PRODUCED IN THE EVENT OF
A WARRANTY CLAIM.
DECLARATION: Geemarc Telecom SA hereby declares that this
product is in compliance with the essential requirements and other
relevant provisions of the Radio and Telecommunications Terminal
Equipment Directive 1999/5/EEC and in particular article 3 section
1a, 1b and section 2. The telephone does not operate if the line
current is lower than 18 mA.
The declaration of conformity may be consulted at
www.geemarc.com
Electrical connection: The apparatus is designed to operate from a
230V 50Hz supply only. (Classified as ‘hazardous voltage’ according
to EN60950 standard). The apparatus does not incorporate an
integral power on/off switch. To disconnect the power, either switch
off supply at the mains power socket or unplug the AC adaptor. When
installing the apparatus , ensure that the mains power socket is readily
accessible.
Telephone connection: Voltages p resent on the telecommunication
network are classified TNV-3 (Telecommunication Network Voltage)
according to the EN60950 standard.
Please note: The guarantee applies to
the United Kingdom onl
y
GUARANTEE
Page 64

63
The WEEE (Waste Elec trical and Electronic Equipment) has been put
in place for the products at the end of their useful life are recycled in
the best way.
When this product is finished with, please do not put it in your
domestic waste bin.
Please use one of the following disposal options:
- Remove the batteries and deposit them in an appropriate WEEE
skip. Deposit the product in an appropriate WEEE skip.
- Or, hand the old product to the retailer. If you purchase a new one,
they should accept it.
Thus if you respect these instructions you ensure human he alth and
environmental protection.
Action on Hearing Loss
1 Haddonbrook Business Centre
Fallodan Road
Orton Southgate
Peterborough
PE2 6YX
Telephone 01733 361199
Textphone 01733 238020
www.actiononhearingloss.org.uk/shop
solutions@hearingloss.org.uk
RECYCLING DIRECTIVES
Page 65

64
Wall Mounting
Template 80mm
WALL MOUNTING TEMPLATE
Page 66

65
UGSTP_Ver: 3.0
 Loading...