

Page 1
Page 2

CONTENTS
DESCRIPTION P-Amp40 3-5
INSTALLATION 6-7
SETTINGS 8
Volume control 8
Tone control 8
Boost switch 8
Battery LED 8
TROUBLE SHOOTING 9
GUARANTEE 10
2
Page 3
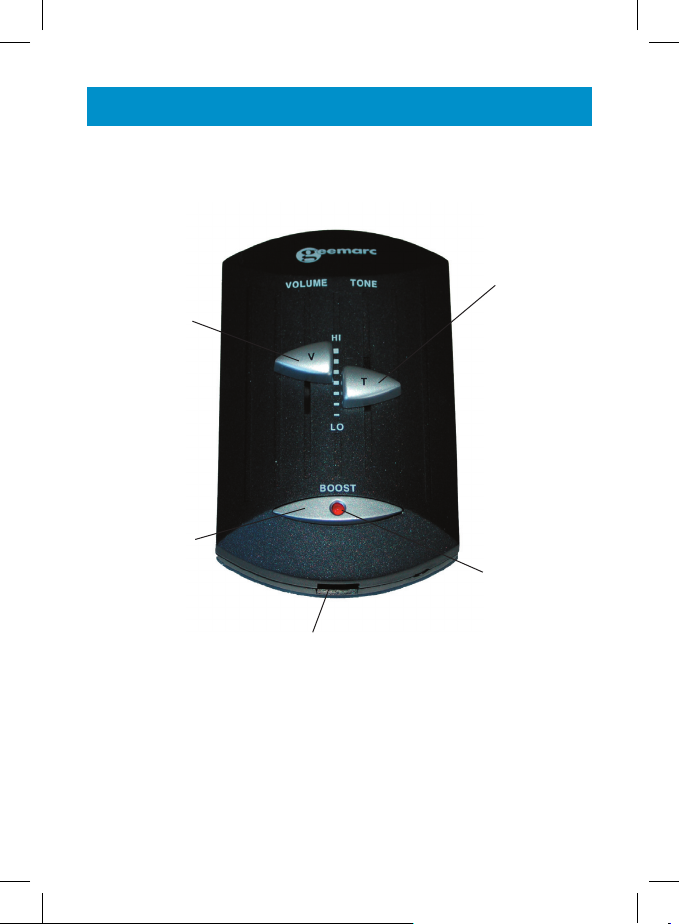
Volume
control
Boost switch
button
(*) Output socket connection (1)
DESCRIPTION
TOP
Tone control
Battery LED
(*) Classified TNV-3 according to EN60950 standard.
3
Page 4

Battery
compartment
12 Position rotary switch to match
the connections in your handset
DESCRIPTION
BOTTOM
Wall mount
holes
4
Page 5

DESCRIPTION
REAR
(*) Output socket connection (2)
(*) Classified TNV-3 according to EN60950 standard.
5
Page 6

INSTALLATION
1 - HOW TO SET THE BATTERY
The P-Amp40 amplifier needs with a 9V PP3 battery (not provided).
To insert the battery into the amplifier:
- Open the battery compartment located on the base by pressing
the small plastic lock.
- Insert the 9V battery with the correct polarity into the connector in
the battery compartment.
- Replace the battery cover.
- The amplifier is now ready to be connected to the phone.
2 - HOW TO CONNECT THE P-Amp40 TO THE PHONE
To connect your phone to the P-Amp40 amplifier:
- Unplug the handset from your telephone base socket.
- Connect the small lead supplied with the P-Amp40 to the telephone base socket and to the input socket (1) located at the top
of your P-Amp40 .
- Connect your handset curly cord to the output socket (2) located
at the front of your P-Amp40.
- After a few seconds the battery LED will light.
IMPORTANT: If you don’t have dial tone, you will have to use the
twelve position switch located on the bottom.This switch is used to
match the P-Amp40 to the connections in your handset because not
all telephone handset sockets have the same wiring. If you cannot
hear the dial tone or the microphone does not work properly, follow
the instructions below:
1. Replace the handset on the cradle and off hook again.
2.Turn the rotary switch position until get the dial tone in the earpiece.
6
Page 7

INSTALLATION
3. To test that the microphone is connected correctly, blow lightly
into the mouthpiece. If you hear the ‘blowing sound’ in the earpiece,
your P-Amp40 is now set. If you cannot hear the ‘blowing sound’,
repeat 2 and 3 until both the earpiece and microphone are working
correctly.
Note 1: The rotary switch is factory set in the most of common wiring position so always try this first before turning the switch.
Note 2: The rotary switch has deliberately been made rather stiff to
avoid misoperation or accidental change of setting. We apologise if
you find this inconvenient . But after first set-up, the switch will not
be to turned again unless you change your phone.
Note 3: The P-Amp40 cannot be used with one-piece telephones
which have a keypad on the handset. P-Amp40 is now ready to
use.
7
Page 8

SETTING
3 - VOLUME CONTROL
You can adjust the volume control level by using the “VOLUME”
control slide switch located on the top. Volume can be adjusted
from the standard level of your phone up to 30 dB or more.
4 - TONE CONTROL
You can adjust the tone by using the 5 position “TONE” switch
located on the top.The tone can be adjusted in 5 dB step from the
0dB mid point to the Hi or LO positions shown according to your
individual requirements
5 - BOOST SWITCH
If you wish you can increase the receiving up to 10 dB more by
pressing and holding the Boost switch button. During this operation
the microphone is muted to avoid feedback problems. To speak
release the button so that other party can hear you.
6 - BATTERY INDICATOR
The battery LED indicator should illuminate every time you use your
P-Amp40. If the LED start to fade or does not light when your PAmp40 is in use, you should change the battery to ensure optimum
sound quality and performance.
IMPORTANT: Always disconnect P-Amp40 from the phone before
replacing the battery.
8
Page 9

TROUBLESHOOTING
IF THE AMPLIFIER DOES NOT WORK
- Make sure all connections are plugged into the correct sockets
(phone line cord, amplifier connections) and try other position on
the rotary switch.
- Make sure battery is correctly inserted and is fully charged.
If you still have a problem when using your amplifier follow the
instructions below:
- Disconnect the amplifier from the telephone.
- Connect the handset to the telephone.
- If the problem ceases, the amplifier may be faulty or your telephone socket wiring may not be compatible with the P-Amp40. Call
our HELPLINE for advice.
- If you have a problem after disconnecting the amplifier, the problem may come from your telephone or your telephone line socket.
In this case you will have to inform your telephone company about
the problem or take your telephone to a repair centre.
IMPORTANT: The P-Amp40 can not be used with telephones which
include a keypad on the handset. The P-Amp40 can only be used
with standard phones without any amplification or tone adjustment.
9
Page 10

GUARANTEE
Sonic Alert warrants the device against any defect in materials or workmanship for the period of one year from the date of purchase. Should you
experience a problem, contact our customer service department . Be sure to
save your sales receipt as proof of purchase date should you need warranty
service.
Within a period of one year from purchase date, Sonic Alert will repair or
replace (our discretion) your device at no cost, if a defect in materials or
workmanship is found. If we elect to replace your device , we may replace
it with a new or reconditioned product of the same or similar design. Repair
or replacement will be warranted for a period of 90 days or the original time
on the original warranty, whichever is longer. The warranty does not cover
accidents, negligence or breakage to any parts. This includes shipping damage, failure to follow instructions, misuse, fire, floods, use of incompatible
accessories, Acts of God or failure in your device service carrier’s line service.
The product must not be tampered with or taken apart by anyone who is not
an authorized Sonic Alert representative. Tampering with the phone will void
antwritten or implied warranties
Sonic Alert shall not be responsible for loss of time, inconvenience , property
damage caused by your device or any other accidental or consequential
damages.
Simply send the
of purchase to:
Sonic Alert Inc., 1050 E. Maple Road, Troy MI 48083
IMPORTANT : Your receipt is part of your warranty and must be retained
and produced in the event of a warranty claim.
P-Amp40
(postpaid) and a copy of your sales s
lip as proof
UgP-Amp40_En _Ed02
10
1050 East Maple Rd.
Troy, MI 48083
Ph: 248577 5400
Fax: 248-577-5433
www.sonicalert.com
 Loading...